Configuring a Basic BGP Network
This module describes the basic tasks to configure a basic Border Gateway Protocol (BGP) network. BGP is an interdomain routing
protocol that is designed to provide loop-free routing between organizations. The Cisco IOS implementation of the neighbor
and address family commands is explained. This module also contains tasks to configure and customize BGP peers, implement
BGP route aggregation, configure BGP route origination, and define BGP backdoor routes. BGP peer group definition is documented,
peer session templates are introduced, and update groups are explained,
Finding Feature Information
Your software release may not support all the features documented in this module. For the latest caveats and feature information,
see
Bug Search Tool and the release notes for your platform and software release. To find information about the features documented in this module,
and to see a list of the releases in which each feature is supported, see the feature information table at the end of this
module.
Use Cisco Feature Navigator to find information about platform support and Cisco software image support. To access Cisco Feature
Navigator, go to
www.cisco.com/go/cfn. An account on Cisco.com is not required.
Prerequisites for Configuring a Basic BGP Network
Before configuring a basic BGP network, you should be familiar with the “Cisco BGP Overview” module.
Restrictions for Configuring a Basic BGP Network
A device that runs Cisco software can be configured to run only one BGP routing process and to be a member of only one BGP
autonomous system. However, a BGP routing process and autonomous system can support multiple address family configurations.
Information About Configuring a Basic BGP Network
BGP Version 4
Border Gateway Protocol (BGP) is an interdomain routing protocol designed to provide loop-free routing between separate routing
domains that contain independent routing policies (autonomous systems). The Cisco software implementation of BGP version 4
includes multiprotocol extensions to allow BGP to carry routing information for IP multicast routes and multiple Layer 3 protocol
address families including IP Version 4 (IPv4), IP Version 6 (IPv6), and Virtual Private Networks version 4 (VPNv4).
BGP is mainly used to connect a local network to an external network to gain access to the Internet or to connect to other
organizations. When connecting to an external organization, external BGP (eBGP) peering sessions are created. Although BGP
is referred to as an exterior gateway protocol (EGP) many networks within an organization are becoming so complex that BGP
can be used to simplify the internal network used within the organization. BGP peers within the same organization exchange
routing information through internal BGP (iBGP) peering sessions.
 Note |
BGP requires more configuration than other routing protocols, and the effects of any configuration changes must be fully |
BGP Router ID
BGP uses a router ID to identify BGP-speaking peers. The BGP router ID is a 32-bit value that is often represented by an
IPv4 address. By default, the Cisco software sets the router ID to the IPv4 address of a loopback interface on the router.
If no loopback interface is configured on the device, the software chooses the highest IPv4 address configured on a physical
interface of the device to represent the BGP router ID. The BGP router ID must be unique to the BGP peers in a network.
BGP-Speaker and Peer Relationships
A BGP-speaking device does not discover another BGP-speaking device automatically. A network administrator usually manually
configures the relationships between BGP-speaking devices. A peer device is a BGP-speaking device that has an active TCP connection
to another BGP-speaking device. This relationship between BGP devices is often referred to as a neighbor, but because this
can imply the idea that the BGP devices are directly connected with no other device in between, the term
neighbor will be avoided whenever possible in this document. A BGP speaker is the local device, and a peer is any other BGP-speaking
network device.
When a TCP connection is established between peers, each BGP peer initially exchanges all its routes—the complete BGP routing
table—with the other peer. After this initial exchange, only incremental updates are sent when there has been a topology change
in the network, or when a routing policy has been implemented or modified. In the periods of inactivity between these updates,
peers exchange special messages called keepalives.
A BGP autonomous system is a network that is controlled by a single technical administration entity. Peer devices are called
external peers when they are in different autonomous systems and internal peers when they are in the same autonomous system.
Usually, external peers are adjacent and share a subnet; internal peers may be anywhere in the same autonomous system.
BGP Autonomous System Number Formats
Prior to January 2009, BGP autonomous system numbers that were allocated to companies were 2-octet numbers in the range from
1 to 65535 as described in RFC 4271,
A Border Gateway Protocol 4 (BGP-4) . Due to increased demand for autonomous system numbers, the Internet Assigned Number Authority (IANA) will start in January
2009 to allocate four-octet autonomous system numbers in the range from 65536 to 4294967295. RFC 5396,
Textual Representation of Autonomous System (AS) Numbers , documents three methods of representing autonomous system numbers. Cisco has implemented the following two methods:
-
Asplain—Decimal value notation where both 2-byte and 4-byte autonomous system numbers are represented by their decimal value.
For example, 65526 is a 2-byte autonomous system number and 234567 is a 4-byte autonomous system number. -
Asdot—Autonomous system dot notation where 2-byte autonomous system numbers are represented by their decimal value and 4-byte
autonomous system numbers are represented by a dot notation. For example, 65526 is a 2-byte autonomous system number and 1.169031
is a 4-byte autonomous system number (this is dot notation for the 234567 decimal number).
For details about the third method of representing autonomous system numbers, see RFC 5396.
Asdot Only Autonomous System Number Formatting
In Cisco IOS Release 12.0(32)S12, 12.4(24)T, and later releases, the 4-octet (4-byte) autonomous system numbers are entered
and displayed only in asdot notation, for example, 1.10 or 45000.64000. When using regular expressions to match 4-byte autonomous
system numbers the asdot format includes a period which is a special character in regular expressions. A backslash must be
entered before the period (for example, 1\.14) to ensure the regular expression match does not fail. The table below shows
the format in which 2-byte and 4-byte autonomous system numbers are configured, matched in regular expressions, and displayed
in
show command output in Cisco IOS images where only asdot formatting is available.
|
Format |
Configuration Format |
Show Command Output and Regular Expression Match Format |
|---|---|---|
|
asdot |
2-byte: 1 to 65535 4-byte: 1.0 to 65535.65535 |
2-byte: 1 to 65535 4-byte: 1.0 to 65535.65535 |
Asplain as Default Autonomous System Number Formatting
In Cisco IOS Release 12.0(32)SY8, 12.0(33)S3, 12.2(33)SRE, 12.2(33)XNE, 12.2(33)SXI1, and later releases, the Cisco implementation
of 4-byte autonomous system numbers uses asplain as the default display format for autonomous system numbers, but you can
configure 4-byte autonomous system numbers in both the asplain and asdot format. In addition, the default format for matching
4-byte autonomous system numbers in regular expressions is asplain, so you must ensure that any regular expressions to match
4-byte autonomous system numbers are written in the asplain format. If you want to change the default
show command output to display 4-byte autonomous system numbers in the asdot format, use the
bgp
asnotation
dot command under router configuration mode. When the asdot format is enabled as the default, any regular expressions to match
4-byte autonomous system numbers must be written using the asdot format, or the regular expression match will fail. The tables
below show that although you can configure 4-byte autonomous system numbers in either asplain or asdot format, only one format
is used to display
show command output and control 4-byte autonomous system number matching for regular expressions, and the default is asplain format.
To display 4-byte autonomous system numbers in
show command output and to control matching for regular expressions in the asdot format, you must configure the
bgp
asnotation
dot command. After enabling the
bgp
asnotation
dot command, a hard reset must be initiated for all BGP sessions by entering the
clear
ip
bgp
* command.
Note |
If you are upgrading to an image that supports 4-byte autonomous system numbers, you can still use 2-byte autonomous system |
|
Format |
Configuration Format |
Show Command Output and Regular Expression Match Format |
|---|---|---|
|
asplain |
2-byte: 1 to 65535 4-byte: 65536 to 4294967295 |
2-byte: 1 to 65535 4-byte: 65536 to 4294967295 |
|
asdot |
2-byte: 1 to 65535 4-byte: 1.0 to 65535.65535 |
2-byte: 1 to 65535 4-byte: 65536 to 4294967295 |
|
Format |
Configuration Format |
Show Command Output and Regular Expression Match Format |
|---|---|---|
|
asplain |
2-byte: 1 to 65535 4-byte: 65536 to 4294967295 |
2-byte: 1 to 65535 4-byte: 1.0 to 65535.65535 |
|
asdot |
2-byte: 1 to 65535 4-byte: 1.0 to 65535.65535 |
2-byte: 1 to 65535 4-byte: 1.0 to 65535.65535 |
Reserved and Private Autonomous System Numbers
In Cisco IOS Release 12.0(32)S12, 12.0(32)SY8, 12.0(33)S3, 12.2(33)SRE, 12.2(33)XNE, 12.2(33)SXI1, 12.4(24)T, and later releases,
the Cisco implementation of BGP supports RFC 4893. RFC 4893 was developed to allow BGP to support a gradual transition from
2-byte autonomous system numbers to 4-byte autonomous system numbers. A new reserved (private) autonomous system number, 23456,
was created by RFC 4893 and this number cannot be configured as an autonomous system number in the Cisco IOS CLI.
RFC 5398,
Autonomous System (AS) Number Reservation for Documentation Use , describes new reserved autonomous system numbers for documentation purposes. Use of the reserved numbers allow configuration
examples to be accurately documented and avoids conflict with production networks if these configurations are literally copied.
The reserved numbers are documented in the IANA autonomous system number registry. Reserved 2-byte autonomous system numbers
are in the contiguous block, 64496 to 64511 and reserved 4-byte autonomous system numbers are from 65536 to 65551 inclusive.
Private 2-byte autonomous system numbers are still valid in the range from 64512 to 65534 with 65535 being reserved for special
use. Private autonomous system numbers can be used for internal routing domains but must be translated for traffic that is
routed out to the Internet. BGP should not be configured to advertise private autonomous system numbers to external networks.
Cisco IOS software does not remove private autonomous system numbers from routing updates by default. We recommend that ISPs
filter private autonomous system numbers.
Note |
Autonomous system number assignment for public and private networks is governed by the IANA. For information about autonomous-system |
Cisco Implementation of 4-Byte Autonomous System Numbers
In Cisco IOS Release 12.0(32)SY8, 12.0(33)S3, 12.2(33)SRE, 12.2(33)XNE, 12.2(33)SXI1, 15.1(1)SG, and later releases, the
Cisco implementation of 4-byte autonomous system numbers uses asplain (65538, for example) as the default regular expression
match and the output display format for AS numbers. However, you can configure 4-byte autonomous system numbers in both the
asplain format and the asdot format as described in RFC 5396.
To change the default regular expression match and output display of 4-byte autonomous system numbers to asdot format, use
the
bgp
asnotation
dot command followed by the
clear
ip
bgp
* command to perform a hard reset of all current BGP sessions.
In Cisco IOS Release 12.0(32)S12, and 12.4(24)T, the Cisco implementation of 4-byte autonomous system numbers uses asdot
(1.2, for example) as the only configuration format, regular expression match, and output display, with no asplain support.
For an example of BGP peers in two autonomous systems using 4-byte numbers, see the figure below. To view a configuration
example of the configuration between three neighbor peers in separate 4-byte autonomous systems configured using asdot notation,
see the Examples: Configuring a BGP Routing Process and Peers Using 4-Byte Autonomous System Numbers.
Cisco also supports RFC 4893, which was developed to allow BGP to support a gradual transition from 2-byte autonomous system
numbers to 4-byte autonomous system numbers. To ensure a smooth transition, we recommend that all BGP speakers within an autonomous
system that is identified using a 4-byte autonomous system number be upgraded to support 4-byte autonomous system numbers.
Note |
A new private autonomous system number, 23456, was created by RFC 4893, and this number cannot be configured as an autonomous |

BGP Peer Session Establishment
When a BGP routing process establishes a peering session with a peer, it goes through the following state changes:
-
Idle—The initial state that the BGP routing process enters when the routing process is enabled or when the device is reset.
In this state, the device waits for a start event, such as a peering configuration with a remote peer. After the device receives
a TCP connection request from a remote peer, the device initiates another start event to wait for a timer before starting
a TCP connection to a remote peer. If the device is reset, the peer is reset and the BGP routing process returns to the Idle
state. -
Connect—The BGP routing process detects that a peer is trying to establish a TCP session with the local BGP speaker.
-
Active—In this state, the BGP routing process tries to establish a TCP session with a peer device using the ConnectRetry
timer. Start events are ignored while the BGP routing process is in the Active state. If the BGP routing process is reconfigured
or if an error occurs, the BGP routing process will release system resources and return to an Idle state. -
OpenSent—The TCP connection is established, and the BGP routing process sends an OPEN message to the remote peer, and transitions
to the OpenSent state. The BGP routing process can receive other OPEN messages in this state. If the connection fails, the
BGP routing process transitions to the Active state. -
OpenReceive—The BGP routing process receives the OPEN message from the remote peer and waits for an initial keepalive message
from the remote peer. When a keepalive message is received, the BGP routing process transitions to the Established state.
If a notification message is received, the BGP routing process transitions to the Idle state. If an error or configuration
change occurs that affects the peering session, the BGP routing process sends a notification message with the Finite State
Machine (FSM) error code and then transitions to the Idle state. -
Established—The initial keepalive is received from the remote peer. Peering is now established with the remote neighbor and
the BGP routing process starts exchanging update message with the remote peer. The hold timer restarts when an update or keepalive
message is received. If the BGP process receives an error notification, it will transition to the Idle state.
Cisco Implementation of BGP Global and Address Family Configuration Commands
The address family model for configuring BGP is based on splitting apart the configuration for each address family. All commands
that are independent of the address family are grouped together at the beginning (highest level) of the configuration, and
these are followed by separate submodes for commands specific to each address family (with the exception that commands relating
to IPv4 unicast can also be entered at the beginning of the configuration). When a network operator configures BGP, the flow
of BGP configuration categories is represented by the following bullets in order:
-
Global configuration—Configuration that is applied to BGP in general, rather than to specific neighbors. For example, the
network ,
redistribute , and
bgp
bestpath commands. -
Address family-dependent configuration—Configuration that applies to a specific address family such as policy on an individual
neighbor.
The relationship between BGP global and BGP address family-dependent configuration categories is shown in the table below.
|
BGP Configuration Category |
Configuration Sets Within Category |
|---|---|
|
Global address family-independent |
One set of global address family-independent configurations |
|
Address family-dependent |
One set of global address family-dependent configurations per address family |
Note |
Address family configuration must be entered within the address family submode to which it applies. |
The following is an example of BGP configuration statements showing the grouping of global address family-independent and
address family-dependent commands.
router bgp <AS>
 ! AF independent part
 neighbor <ip-address> <command> ! Session config; AF independent
 address-family ipv4 unicast
  ! AF dependant part
  neighbor <ip-address> <command> ! Policy config; AF dependant
  exit-address-family
 address-family ipv4 multicast
  ! AF dependant part
  neighbor <ip-address> <command> ! Policy config; AF dependant
  exit-address-family
 address-family ipv4 unicast vrf <vrf-name>
  ! VRF specific AS independent commands
  ! VRF specific AS dependant commands
  neighbor <ip-address> <command> ! Session config; AF independent
  neighbor <ip-address> <command> ! Policy config; AF dependant
  exit-address-family
The following example shows actual BGP commands that match the BGP configuration statements in the previous example:
router bgp 45000
 router-id 172.17.1.99
 bgp log-neighbor-changes
 neighbor 192.168.1.2 remote-as 40000
 neighbor 192.168.3.2 remote-as 50000
 address-family ipv4 unicast
  neighbor 192.168.1.2 activate
  network 172.17.1.0 mask 255.255.255.0
  exit-address-family
 address-family ipv4 multicast
  neighbor 192.168.3.2 activate
  neighbor 192.168.3.2 advertisement-interval 25
  network 172.16.1.0 mask 255.255.255.0
  exit-address-family
 address-family ipv4 vrf vpn1
  neighbor 192.168.3.2 activate
  network 172.21.1.0 mask 255.255.255.0
  exit-address-family
The
bgp
upgrade-cli command simplifies the migration of BGP networks and existing configurations from the network layer reachability information
(NLRI) format to the address family format. Network operators can configure commands in the address family identifier (AFI)
format and save these command configurations to existing NLRI formatted configurations. The BGP hybrid command-line interface
(CLI) does not add support for complete AFI and NLRI integration because of the limitations of the NLRI format. For complete
support of AFI commands and features, we recommend upgrading existing NLRI configurations with the
bgp
upgrade-cli command. For an example of migrating BGP configurations from the NLRI format to the address family format, see the “Example:
NLFI to AFI Configuration” section later in this module.
BGP Session Reset
Whenever the routing policy changes due to a configuration change, BGP peering sessions must be reset by using the
clear
ip
bgp command. Cisco software supports the following three mechanisms to reset BGP peering sessions:
-
Hard reset—A hard reset tears down the specified peering sessions including the TCP connection and deletes routes coming
from the specified peer. -
Soft reset—A soft reset uses stored prefix information to reconfigure and activate BGP routing tables without tearing down
existing peering sessions. Soft reconfiguration uses stored update information, at the cost of additional memory for storing
the updates, to allow you to apply new BGP policy without disrupting the network. Soft reconfiguration can be configured for
inbound or outbound sessions. -
Dynamic inbound soft reset—The route refresh capability, as defined in RFC 2918, allows the local device to reset inbound
routing tables dynamically by exchanging route refresh requests to supporting peers. The route refresh capability does not
store update information locally for nondisruptive policy changes. It instead relies on dynamic exchange with supporting peers.
Route refresh must first be advertised through BGP capability negotiation between peers. All BGP devices must support the
route refresh capability. To determine if a BGP device supports this capability, use the
show
ip
bgp
neighbors command. The following message is displayed in the output when the device supports the route refresh capability:
Received route refresh capability from peer.
The
bgp
soft-reconfig-backup command was introduced to configure BGP to perform inbound soft reconfiguration for peers that do not support the route refresh
capability. The configuration of this command allows you to configure BGP to store updates (soft reconfiguration) only as
necessary. Peers that support the route refresh capability are unaffected by the configuration of this command.
BGP Route Aggregation
BGP peers store and exchange routing information and the amount of routing information increases as more BGP speakers are
configured. The use of route aggregation reduces the amount of information involved. Aggregation is the process of combining
the attributes of several different routes so that only a single route is advertised. Aggregate prefixes use the classless
interdomain routing (CIDR) principle to combine contiguous networks into one classless set of IP addresses that can be summarized
in routing tables. Fewer routes now need to be advertised.
Two methods are available in BGP to implement route aggregation. You can redistribute an aggregated route into BGP or you
can use a form of conditional aggregation. Basic route redistribution involves creating an aggregate route and then redistributing
the routes into BGP. Conditional aggregation involves creating an aggregate route and then advertising or suppressing the
advertising of certain routes on the basis of route maps, autonomous system set path (AS-SET) information, or summary information.
The bgp suppress-inactive command configures BGP to not advertise inactive routes to any BGP peer. A BGP routing process can advertise routes that
are not installed in the routing information database (RIB) to BGP peers by default. A route that is not installed into the
RIB is an inactive route. Inactive route advertisement can occur, for example, when routes are advertised through common route
aggregation. Inactive route advertisements can be suppressed to provide more consistent data forwarding.
BGP Aggregation Route AS_SET Information Generation
AS_SET information can be generated when BGP routes are aggregated using the
aggregate-address command. The path advertised for such a route is an AS_SET consisting of all the elements, including the communities, contained
in all the paths that are being summarized. If the AS_PATHs to be aggregated are identical, only the AS_PATH is advertised.
The ATOMIC_AGGREGATE attribute, set by default for the
aggregate-address command, is not added to the AS_SET.
Routing Policy Change Management
Routing policies for a peer include all the configurations for elements such as route map, distribute list, prefix list,
and filter list that may impact inbound or outbound routing table updates. The policy changes are automatically updated to
peers whenever there is a change in the routing policy. Performing inbound reset enables the new inbound policy configured
on the router to take effect. Performing outbound reset causes the new local outbound policy configured on the router to take
effect without resetting the BGP session. As a new set of updates is sent during outbound policy reset, a new inbound policy
of the neighbor can also take effect. This means that after changing inbound policy you must do an inbound reset on the local
router or an outbound reset on the peer router. Outbound policy changes require an outbound reset on the local router or an
inbound reset on the peer router.
There are two types of reset: hard reset and soft reset. The table below lists their advantages and disadvantages.
|
Type of Reset |
Advantages |
Disadvantages |
||
|---|---|---|---|---|
|
Hard reset |
No memory overhead. |
The prefixes in the BGP, IP, and Forwarding Information Base (FIB) tables provided by the neighbor are lost. Not recommended. |
||
|
Outbound soft reset |
No configuration, no storing of routing table updates. |
Does not reset inbound routing table updates. |
||
|
Dynamic inbound soft reset |
Does not clear the BGP session and cache. Does not require storing of routing table updates, and has no memory overhead. |
Both BGP routers must support the route refresh capability (in Cisco IOS Release 12.1 and later releases).
|
||
|
Configured inbound soft reset (uses the |
Can be used when both BGP routers do not support the automatic route refresh capability. In Cisco IOS Release 12.3(14)T, the |
Requires preconfiguration. Stores all received (inbound) routing policy updates without modification; is memory-intensive. Recommended only when absolutely necessary, such as when both BGP routers do not support the automatic route refresh capability.
|
Once you have defined two routers to be BGP neighbors, they will form a BGP connection and exchange routing information.
If you subsequently change a BGP filter, weight, distance, version, or timer, or make a similar configuration change, you
must reset BGP connections for the configuration change to take effect.
A soft reset updates the routing table for inbound and outbound routing updates. Cisco IOS Release 12.1 and later releases
support soft reset without any prior configuration. This soft reset allows the dynamic exchange of route refresh requests
and routing information between BGP routers, and the subsequent readvertisement of the respective outbound routing table.
There are two types of soft reset:
-
When soft reset is used to generate inbound updates from a neighbor, it is called dynamic inbound soft reset.
-
When soft reset is used to send a new set of updates to a neighbor, it is called outbound soft reset.
To use soft reset without preconfiguration, both BGP peers must support the soft route refresh capability, which is advertised
in the OPEN message sent when the peers establish a TCP session. Routers running Cisco IOS releases prior to Release 12.1
do not support the route refresh capability and must clear the BGP session using the
neighbor
soft-reconfiguration router configuration command. Clearing the BGP session in this way will have a negative impact upon network operations and
should be used only as a last resort.
Conditional BGP Route Injection
Routes that are advertised through the BGP are commonly aggregated to minimize the number of routes that are used and reduce
the size of global routing tables. However, common route aggregation can obscure more specific routing information that is
more accurate but not necessary to forward packets to their destinations. Routing accuracy is obscured by common route aggregation
because a prefix that represents multiple addresses or hosts over a large topological area cannot be accurately reflected
in a single route. Cisco software provides several methods by which you can originate a prefix into BGP. Prior to the BGP
conditional route injection feature, the existing methods included redistribution and using the
network or
aggregate-address command. However, these methods assume the existence of more specific routing information (matching the route to be originated)
in either the routing table or the BGP table.
BGP conditional route injection allows you to originate a prefix into a BGP routing table without the corresponding match.
This feature allows more specific routes to be generated based on administrative policy or traffic engineering information
in order to provide more specific control over the forwarding of packets to these more specific routes, which are injected
into the BGP routing table only if the configured conditions are met. Enabling this feature will allow you to improve the
accuracy of common route aggregation by conditionally injecting or replacing less specific prefixes with more specific prefixes.
Only prefixes that are equal to or more specific than the original prefix may be injected. BGP conditional route injection
is enabled with the
bgp
inject-map
exist-map command and uses two route maps (inject map and exist map) to install one (or more) more specific prefixes into a BGP routing
table. The exist map specifies the prefixes that the BGP speaker will track. The inject map defines the prefixes that will
be created and installed into the local BGP table.
Note |
Inject maps and exist maps will only match a single prefix per route map clause. To inject additional prefixes, you must |
BGP Peer Groups
Often, in a BGP network, many neighbors are configured with the same update policies (that is, the same outbound route maps,
distribute lists, filter lists, update source, and so on). Neighbors with the same update policies can be grouped into BGP
peer groups to simplify configuration and, more importantly, to make configuration updates more efficient. When you have many
peers, this approach is highly recommended.
BGP Backdoor Routes
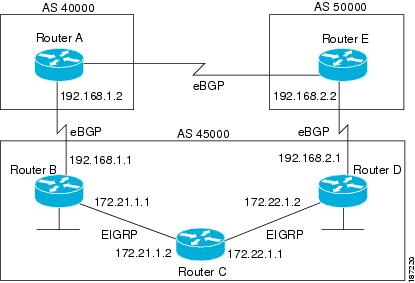
In a BGP network topology with two border devices using eBGP to communicate to a number of different autonomous systems,
using eBGP to communicate between the two border devices may not be the most efficient routing method. In the figure below,
Router B as a BGP speaker will receive a route to Router D through eBGP, but this route will traverse at least two autonomous
systems. Router B and Router D are also connected through an Enhanced Interior Gateway Routing Protocol (EIGRP) network (any
IGP can be used here), and this route has a shorter path. EIGRP routes, however, have a default administrative distance of
90, and eBGP routes have a default administrative distance of 20, so BGP will prefer the eBGP route. Changing the default
administrative distances is not recommended because changing the administrative distance may lead to routing loops. To cause
BGP to prefer the EIGRP route, you can use the
network
backdoor command. BGP treats the network specified by the
network
backdoor command as a locally assigned network, except that it does not advertise the specified network in BGP updates. In the figure
below, this means that Router B will communicate to Router D using the shorter EIGRP route instead of the longer eBGP route.
Peer Groups and BGP Update Messages
In Cisco IOS software releases prior to Release 12.0(24)S, 12.2(18)S, or 12.3(4)T, BGP update messages were grouped based
on peer group configurations. This method of grouping neighbors for BGP update message generation reduced the amount of system
processing resources needed to scan the routing table. This method, however, had the following limitations:
-
All neighbors that shared peer group configuration also had to share outbound routing policies.
-
All neighbors had to belong to the same peer group and address family. Neighbors configured in different address families
could not belong to different peer groups.
These limitations existed to balance optimal update generation and replication against peer group configuration. These limitations
could cause the network operator to configure smaller peer groups, which reduced the efficiency of update message generation
and limited the scalability of neighbor configuration.
BGP Update Group
The introduction of the BGP (dynamic) update group provides a different type of BGP peer grouping from existing BGP peer
groups. Existing peer groups are not affected but peers with the same outbound policy configured that are not members of a
current peer group can be grouped into an update group. The members of this update group will use the same update generation
engine. When BGP update groups are configured an algorithm dynamically calculates the BGP update group membership based on
outbound policies. Optimal BGP update message generation occurs automatically and independently. BGP neighbor configuration
is no longer restricted by outbound routing policies, and update groups can belong to different address families.
BGP Dynamic Update Group Configuration
In Cisco IOS Release 12.0(24)S, 12.2(18)S, 12.3(4)T, 12.2(27)SBC, and later releases, a new algorithm was introduced that
dynamically calculates and optimizes update groups of neighbors that share the same outbound policies and can share the same
update messages. No configuration is required to enable the BGP dynamic update group and the algorithm runs automatically.
When a change to outbound policy occurs, the router automatically recalculates update group memberships and applies the changes
by triggering an outbound soft reset after a 1-minute timer expires. This behavior is designed to provide the network operator
with time to change the configuration if a mistake is made. You can manually enable an outbound soft reset before the timer
expires by entering the clear ip bgp ip-address soft out command.
Note |
In Cisco IOS Release 12.0(22)S, 12.2(14)S, 12.3(2)T, and prior releases, the update group recalculation delay timer is set |
For the best optimization of BGP update group generation, we recommend that the network operator keeps outbound routing policy
the same for neighbors that have similar outbound policies.
BGP Peer Templates
To address some of the limitations of peer groups such as configuration management, BGP peer templates were introduced to
support the BGP update group configuration.
A peer template is a configuration pattern that can be applied to neighbors that share policies. Peer templates are reusable
and support inheritance, which allows the network operator to group and apply distinct neighbor configurations for BGP neighbors
that share policies. Peer templates also allow the network operator to define very complex configuration patterns through
the capability of a peer template to inherit a configuration from another peer template.
There are two types of peer templates:
-
Peer session templates are used to group and apply the configuration of general session commands that are common to all address
family and NLRI configuration modes. -
Peer policy templates are used to group and apply the configuration of commands that are applied within specific address families
and NLRI configuration modes.
Peer templates improve the flexibility and enhance the capability of neighbor configuration. Peer templates also provide an
alternative to peer group configuration and overcome some limitations of peer groups. BGP peer routers using peer templates
also benefit from automatic update group configuration. With the configuration of the BGP peer templates and the support of
the BGP dynamic update peer groups, the network operator no longer needs to configure peer groups in BGP and the network can
benefit from improved configuration flexibility and faster convergence.
Note |
A BGP neighbor cannot be configured to work with both peer groups and peer templates. A BGP neighbor can be configured to |
The following restrictions apply to the peer policy templates:
-
A peer policy template can directly or indirectly inherit up to eight peer policy templates.
-
A BGP neighbor cannot be configured to work with both peer groups and peer templates. A BGP neighbor can be configured to
belong only to a peer group or to inherit policies only from peer templates.
Inheritance in Peer Templates
The inheritance capability is a key component of peer template operation. Inheritance in a peer template is similar to node
and tree structures commonly found in general computing, for example, file and directory trees. A peer template can directly
or indirectly inherit the configuration from another peer template. The directly inherited peer template represents the tree
in the structure. The indirectly inherited peer template represents a node in the tree. Because each node also supports inheritance,
branches can be created that apply the configurations of all indirectly inherited peer templates within a chain back to the
directly inherited peer template or the source of the tree.
This structure eliminates the need to repeat configuration statements that are commonly reapplied to groups of neighbors because
common configuration statements can be applied once and then indirectly inherited by peer templates that are applied to neighbor
groups with common configurations. Configuration statements that are duplicated separately within a node and a tree are filtered
out at the source of the tree by the directly inherited template. A directly inherited template will overwrite any indirectly
inherited statements that are duplicated in the directly inherited template.
Inheritance expands the scalability and flexibility of neighbor configuration by allowing you to chain together peer templates
configurations to create simple configurations that inherit common configuration statements or complex configurations that
apply very specific configuration statements along with common inherited configurations. Specific details about configuring
inheritance in peer session templates and peer policy templates are provided in the following sections.
When BGP neighbors use inherited peer templates it can be difficult to determine which policies are associated with a specific
template. The
detail keyword was added to the
show
ip
bgp
template
peer-policy command to display the detailed configuration of local and inherited policies associated with a specific template.
Peer Session Templates
Peer session templates are used to group and apply the configuration of general session commands to groups of neighbors that
share session configuration elements. General session commands that are common for neighbors that are configured in different
address families can be configured within the same peer session template. Peer session templates are created and configured
in peer session configuration mode. Only general session commands can be configured in a peer session template. The following
general session commands are supported by peer session templates:
-
description
-
disable-connected-check
-
ebgp-multihop
-
exit
peer-session
-
inherit
peer-session
-
local-as
-
password
-
remote-as
-
shutdown
-
timers
-
translate-update
-
update-source
-
version
General session commands can be configured once in a peer session template and then applied to many neighbors through the
direct application of a peer session template or through indirect inheritance from a peer session template. The configuration
of peer session templates simplifies the configuration of general session commands that are commonly applied to all neighbors
within an autonomous system.
Peer session templates support direct and indirect inheritance. A peer can be configured with only one peer session template
at a time, and that peer session template can contain only one indirectly inherited peer session template.
Note |
If you attempt to configure more than one inherit statement with a single peer session template, an error message will be |
This behavior allows a BGP neighbor to directly inherit only one session template and indirectly inherit up to seven additional
peer session templates. This allows you to apply up to a maximum of eight peer session configurations to a neighbor: the configuration
from the directly inherited peer session template and the configurations from up to seven indirectly inherited peer session
templates. Inherited peer session configurations are evaluated first and applied starting with the last node in the branch
and ending with the directly applied peer session template configuration at the source of the tree. The directly applied peer
session template will have priority over inherited peer session template configurations. Any configuration statements that
are duplicated in inherited peer session templates will be overwritten by the directly applied peer session template. So,
if a general session command is reapplied with a different value, the subsequent value will have priority and overwrite the
previous value that was configured in the indirectly inherited template. The following examples illustrate the use of this
feature.
In the following example, the general session command remote-as 1 is applied in the peer session template named SESSION-TEMPLATE-ONE:
template peer-session SESSION-TEMPLATE-ONE
 remote-as 1
 exit peer-session
Peer session templates support only general session commands. BGP policy configuration commands that are configured only for
a specific address family or NLRI configuration mode are configured with peer policy templates.
Peer Policy Templates
Peer policy templates are used to group and apply the configuration of commands that are applied within specific address
families and NLRI configuration mode. Peer policy templates are created and configured in peer policy configuration mode.
BGP policy commands that are configured for specific address families are configured in a peer policy template. The following
BGP policy commands are supported by peer policy templates:
-
advertisement-interval
-
allowas-in
-
as-override
-
capability
-
default-originate
-
distribute-list
-
dmzlink-bw
-
exit-peer-policy
-
filter-list
-
inherit
peer-policy
-
maximum-prefix
-
next-hop-self
-
next-hop-unchanged
-
prefix-list
-
remove-private-as
-
route-map
-
route-reflector-client
-
send-community
-
send-label
-
soft-reconfiguration
-
unsuppress-map
-
weight
Peer policy templates are used to configure BGP policy commands that are configured for neighbors that belong to specific
address families. Like peer session templates, peer policy templates are configured once and then applied to many neighbors
through the direct application of a peer policy template or through inheritance from peer policy templates. The configuration
of peer policy templates simplifies the configuration of BGP policy commands that are applied to all neighbors within an autonomous
system.
Like a peer session template, a peer policy template supports inheritance. However, there are minor differences. A directly
applied peer policy template can directly or indirectly inherit configurations from up to seven peer policy templates. So,
a total of eight peer policy templates can be applied to a neighbor or neighbor group. Like route maps, inherited peer policy
templates are configured with sequence numbers. Also like a route map, an inherited peer policy template is evaluated starting
with the
inherit peer-policy statement with the lowest sequence number and ending with the highest sequence number. However, there is a difference; a
peer policy template will not collapse like a route map. Every sequence is evaluated, and if a BGP policy command is reapplied
with a different value, it will overwrite any previous value from a lower sequence number.
The directly applied peer policy template and the
inherit peer-policy statement with the highest sequence number will always have priority and be applied last. Commands that are reapplied in
subsequent peer templates will always overwrite the previous values. This behavior is designed to allow you to apply common
policy configurations to large neighbor groups and specific policy configurations only to certain neighbors and neighbor groups
without duplicating individual policy configuration commands.
Peer policy templates support only policy configuration commands. BGP policy configuration commands that are configured only
for specific address families are configured with peer policy templates.
The configuration of peer policy templates simplifies and improves the flexibility of BGP configuration. A specific policy
can be configured once and referenced many times. Because a peer policy supports up to eight levels of inheritance, very specific
and very complex BGP policies can also be created.
BGP IPv6 Neighbor Activation Under the IPv4 Address Family
Prior to Cisco IOS Release 12.2(33)SRE4, by default, both IPv6 and IPv4 capability is exchanged with a BGP peer that has an
IPv6 address. When an IPv6 peer is configured, that neighbor is automatically activated under the IPv4 unicast address family.
Beginning with Cisco IOS Release 12.2(33)SRE4, when a new
IPv6 neighbor is being configured, it is no longer automatically activated under the IPv4 address family. You can manually
activate the IPv6 neighbor under the IPv4 address family if, for example, you have a dual stack environment and want to send
IPv6 and IPv4 prefixes.
If you do not want an existing
IPv6 peer to be activated under the IPv4 address family, you can manually deactivate the peer with the no neighbor activate command. Until then, existing configurations that activate an IPv6 neighbor under the IPv4 unicast address family will continue
to try to establish a session.
How to Configure a Basic BGP Network
Configuring a basic BGP network consists of a few required tasks and many optional tasks. A BGP routing process must be configured
and BGP peers must be configured, preferably using the address family configuration model. If the BGP peers are part of a
VPN network, the BGP peers must be configured using the IPv4 VRF address family task. The other tasks in the following list
are optional:
Configuring a BGP Routing Process
Perform this task to configure a BGP routing process. You must perform the required steps at least once to enable BGP. The
optional steps here allow you to configure additional features in your BGP network. Several of the features, such as logging
neighbor resets and immediate reset of a peer when its link goes down, are enabled by default but are presented here to enhance
your understanding of how your BGP network operates.
Note |
A device that runs Cisco software can be configured to run only one BGP routing process and to be a member of only one BGP |
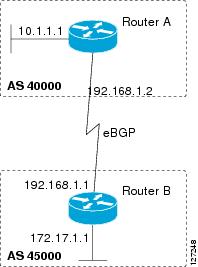
The configuration in this task is done at Router A in the figure below and would need to be repeated with appropriate changes
to the IP addresses (for example, at Router B) to fully achieve a BGP process between the two devices. No address family is
configured here for the BGP routing process, so routing information for the IPv4 unicast address family is advertised by default.
SUMMARY STEPS
-
enable
-
configure
terminal
-
router
bgp
autonomous-system-number
-
network
network-number
[mask
network-mask ] [route-map
route-map-name ] -
bgp
router-id
ip-address
-
timers
bgp
keepalive
holdtime
-
bgp
fast-external-fallover
-
bgp
log-neighbor-changes
-
end
-
show
ip
bgp
[network ] [network-mask ]
DETAILED STEPS
| Command or Action | Purpose | |||
|---|---|---|---|---|
| Step 1 |
Example: |
Enables privileged EXEC mode.
|
||
| Step 2 |
Example: |
Enters global configuration mode. |
||
| Step 3 |
Example: |
Configures a BGP routing process, and enters router configuration mode for the specified routing process.
|
||
| Step 4 |
Example: |
(Optional) Specifies a network as local to this autonomous system and adds it to the BGP routing table.
|
||
| Step 5 |
Example: |
(Optional) Configures a fixed 32-bit router ID as the identifier of the local device running BGP.
|
||
| Step 6 |
Example: |
(Optional) Sets BGP network timers.
|
||
| Step 7 |
Example: |
(Optional) Enables the automatic resetting of BGP sessions.
|
||
| Step 8 |
Example: |
(Optional) Enables logging of BGP neighbor status changes (up or down) and neighbor resets.
|
||
| Step 9 |
Example: |
Exits router configuration mode and enters privileged EXEC mode. |
||
| Step 10 |
Example: |
(Optional) Displays the entries in the BGP routing table.
|
Examples
The following sample output from the
show
ip
bgp command shows the BGP routing table for Router A in the figure above after this task has been configured on Router A. You
can see an entry for the network 10.1.1.0 that is local to this autonomous system.
BGP table version is 12, local router ID is 10.1.1.99
Status codes: s suppressed, d damped, h history, * valid, > best, i - internal,
              r RIB-failure, S Stale
Origin codes: i - IGP, e - EGP, ? - incomplete
   Network          Next Hop            Metric LocPrf Weight Path
*> 10.1.1.0/24      0.0.0.0                  0         32768 i
Troubleshooting Tips
Use the ping command to check basic network connectivity between the BGP routers.
Configuring a BGP Peer
Perform this task to configure BGP between two IPv4 routers (peers). The address family configured here is the default IPv4
unicast address family and the configuration is done at Router A in the figure above. Remember to perform this task for any
neighbor routers that are to be BGP peers.
Before you begin
Before you perform this task, perform the “Configuring a BGP Routing Process” task shown in the prior section.
Note |
By default, neighbors that are defined using the |
SUMMARY STEPS
-
enable
-
configure
terminal
-
router
bgp
autonomous-system-number
-
neighbor
ip-address
remote-as
autonomous-system-number
-
address-family
ipv4
[unicast |
multicast |
vrf
vrf-name ] -
neighbor
ip-address
activate
-
end
-
show
ip
bgp
[network ] [network-mask ] -
show
ip
bgp
neighbors
[neighbor-address ]
DETAILED STEPS
| Command or Action | Purpose | |||
|---|---|---|---|---|
| Step 1 |
Example: |
Enables privileged EXEC mode.
|
||
| Step 2 |
Example: |
Enters global configuration mode. |
||
| Step 3 |
Example: |
Enters router configuration mode for the specified routing process. |
||
| Step 4 |
Example: |
Adds the IP address of the neighbor in the specified autonomous system to the IPv4 multiprotocol BGP neighbor table of the |
||
| Step 5 |
Example: |
Specifies the IPv4 address family and enters address family configuration mode.
|
||
| Step 6 |
Example: |
Enables the neighbor to exchange prefixes for the IPv4 unicast address family with the local router. |
||
| Step 7 |
Example: |
Exits address family configuration mode and enters privileged EXEC mode. |
||
| Step 8 |
Example: |
(Optional) Displays the entries in the BGP routing table.
|
||
| Step 9 |
Example: |
(Optional) Displays information about the TCP and BGP connections to neighbors.
|
Examples
The following sample output from the
show
ip
bgp command shows the BGP routing table for Router A in the figure above after this task has been configured on Router A and
Router B. You can now see an entry for the network 172.17.1.0 in autonomous system 45000.
BGP table version is 13, local router ID is 10.1.1.99
Status codes: s suppressed, d damped, h history, * valid, > best, i - internal,
              r RIB-failure, S Stale
Origin codes: i - IGP, e - EGP, ? - incomplete
   Network          Next Hop            Metric LocPrf Weight Path
*> 10.1.1.0/24      0.0.0.0                  0         32768 i
*> 172.17.1.0/24    192.168.1.1              0             0 45000 i
The following sample output from the
show
ip
bgp
neighbors command shows information about the TCP and BGP connections to the BGP neighbor 192.168.1.1 of Router A in the figure above
after this task has been configured on Router A:
BGP neighbor is 192.168.1.1,  remote AS 45000, external link
  BGP version 4, remote router ID 172.17.1.99
  BGP state = Established, up for 00:06:55
  Last read 00:00:15, last write 00:00:15, hold time is 120, keepalive intervals
  Configured hold time is 120,keepalive interval is 70 seconds, Minimum holdtims
  Neighbor capabilities:
    Route refresh: advertised and received (old & new)
    Address family IPv4 Unicast: advertised and received
  Message statistics:
    InQ depth is 0
    OutQ depth is 0
                         Sent       Rcvd
    Opens:                  1          1
    Notifications:          0          0
    Updates:                1          2
    Keepalives:            13         13
    Route Refresh:          0          0
    Total:                 15         16
  Default minimum time between advertisement runs is 30 seconds
 For address family: IPv4 Unicast
  BGP table version 13, neighbor version 13/0
 Output queue size : 0
  Index 1, Offset 0, Mask 0x2
  1 update-group member
                                 Sent       Rcvd
  Prefix activity:               ----       ----
    Prefixes Current:               1          1 (Consumes 52 bytes)
    Prefixes Total:                 1          1
    Implicit Withdraw:              0          0
    Explicit Withdraw:              0          0
    Used as bestpath:             n/a          1
    Used as multipath:            n/a          0
                                   Outbound    Inbound
  Local Policy Denied Prefixes:    --------    -------
    AS_PATH loop:                       n/a          1
    Bestpath from this peer:              1        n/a
    Total:                                1          1
  Number of NLRIs in the update sent: max 0, min 0
  Connections established 1; dropped 0
  Last reset never
Connection state is ESTAB, I/O status: 1, unread input bytes: 0
Connection is ECN Disabled
Local host: 192.168.1.2, Local port: 179
Foreign host: 192.168.1.1, Foreign port: 37725
Enqueued packets for retransmit: 0, input: 0  mis-ordered: 0 (0 bytes)
Event Timers (current time is 0x12F4F2C):
Timer          Starts    Wakeups            Next
Retrans            14          0             0x0
TimeWait            0          0             0x0
AckHold            13          8             0x0
SendWnd             0          0             0x0
KeepAlive           0          0             0x0
GiveUp              0          0             0x0
PmtuAger            0          0             0x0
DeadWait            0          0             0x0
iss:  165379618  snduna:  165379963  sndnxt:  165379963     sndwnd:  16040
irs: 3127821601  rcvnxt: 3127821993  rcvwnd:      15993  delrcvwnd:    391
SRTT: 254 ms, RTTO: 619 ms, RTV: 365 ms, KRTT: 0 ms
minRTT: 12 ms, maxRTT: 300 ms, ACK hold: 200 ms
Flags: passive open, nagle, gen tcbs
IP Precedence value : 6
Datagrams (max data segment is 1460 bytes):
Rcvd: 20 (out of order: 0), with data: 15, total data bytes: 391
Sent: 22 (retransmit: 0, fastretransmit: 0, partialack: 0, Second Congestion: 04
Troubleshooting Tips
Use the ping command to verify basic network connectivity between the BGP routers.
What to Do Next
If you have BGP peers in a VPN, proceed to the
Configuring a BGP Peer for the IPv4 VRF Address Family. If you do not have BGP peers in a VPN, proceed to the
Customizing a BGP Peer.
Configuring a BGP Routing
Process and Peers Using 4-Byte Autonomous System Numbers
Perform this task
to configure a Border Gateway Protocol (BGP) routing process and BGP peers when
the BGP peers are located in an autonomous system (AS) that uses 4-byte AS
numbers. The address family configured here is the default IPv4 unicast address
family, and the configuration is done at Router B in the figure above (in the
“Cisco Implementation of 4-Byte Autonomous System Numbers” section). The 4-byte
AS numbers in this task are formatted in the default asplain (decimal value)
format; for example, Router B is in AS number 65538 in the figure above.
Remember to perform this task for any neighbor routers that are to be BGP
peers.
Before you begin
Note |
By default, |
SUMMARY STEPS
-
enable -
configure
terminal
-
routerbgp
autonomous-system-number
-
neighbor
ip-address
remote-as
autonomous-system-number
- Repeat Step 4
to define other BGP neighbors, as required. -
address-family
ipv4
[unicast |
multicast |
vrf
vrf-name ] -
neighbor
ip-address
activate
- Repeat Step 7
to activate other BGP neighbors, as required. -
network
network-number
[mask
network-mask ]
[route-map
route-map-name ] -
end
-
showip
[network ]
bgp
[network-mask ] -
showip
bgp
summary
DETAILED STEPS
| Command or Action | Purpose | |||
|---|---|---|---|---|
| Step 1 |
Example: |
Enables
|
||
| Step 2 |
Example: |
Enters global |
||
| Step 3 |
bgp Example: |
Enters router
|
||
| Step 4 |
Example: |
Adds the IP
|
||
| Step 5 |
Repeat Step 4 |
— |
||
| Step 6 |
Example: |
Specifies the
|
||
| Step 7 |
Example: |
Enables the |
||
| Step 8 |
Repeat Step 7 |
— |
||
| Step 9 |
Example: |
(Optional)
|
||
| Step 10 |
Example: |
Exits address |
||
| Step 11 |
ip Example: |
(Optional)
|
||
| Step 12 |
ip Example: |
(Optional) |
Examples
The following
output from the
show
ip
bgp command at Router B shows the BGP routing
table entry for network 10.1.1.0 learned from the BGP neighbor at 192.168.1.2
in Router A in the figure above with its 4-byte AS number of 65536 displayed in
the default asplain format.
RouterB# show ip bgp 10.1.1.0

BGP routing table entry for 10.1.1.0/24, version 2
Paths: (1 available, best #1)
  Advertised to update-groups:
     2
  65536
    192.168.1.2 from 192.168.1.2 (10.1.1.99)
      Origin IGP, metric 0, localpref 100, valid, external, best
The following
output from the
show
ip
bgp
summary command shows the 4-byte AS number 65536
for the BGP neighbor 192.168.1.2 of Router A in the figure above after this
task has been configured on Router B:
RouterB# show ip bgp summary

BGP router identifier 172.17.1.99, local AS number 65538
BGP table version is 3, main routing table version 3
2 network entries using 234 bytes of memory
2 path entries using 104 bytes of memory
3/2 BGP path/bestpath attribute entries using 444 bytes of memory
1 BGP AS-PATH entries using 24 bytes of memory
0 BGP route-map cache entries using 0 bytes of memory
0 BGP filter-list cache entries using 0 bytes of memory
BGP using 806 total bytes of memory
BGP activity 2/0 prefixes, 2/0 paths, scan interval 60 secs
Neighbor        V          AS MsgRcvd MsgSent   TblVer  InQ OutQ  Up/Down  Stated
192.168.1.2     4       65536       6       6        3    0    0 00:01:33       1
Troubleshooting Tips
Use the ping command to verify basic network connectivity between the BGP routers.
Modifying the Default Output
and Regular Expression Match Format for 4-Byte Autonomous System
Numbers
Perform this task
to modify the default output format for 4-byte autonomous system (AS) numbers
from asplain format to asdot notation format. The
show
ip
bgp
summary command is used to display the changes in
output format for the 4-byte AS numbers.
SUMMARY STEPS
-
enable -
show
ip
bgp
summary
-
configure
terminal
-
routerbgp
autonomous-system-number
-
bgp
asnotation
dot
-
end
-
clear
ip
bgp
*
-
show
ip
bgp
summary
-
showip
bgp
regexp
regexp
-
configure
terminal
-
router
bgp
autonomous-system-number
-
no
bgp
asnotation
dot
-
end
-
clear
ip
bgp
*
DETAILED STEPS
| Command or Action | Purpose | |||
|---|---|---|---|---|
| Step 1 |
Example: |
Enables
|
||
| Step 2 |
Example: |
Displays the |
||
| Step 3 |
Example: |
Enters global |
||
| Step 4 |
bgp Example: |
Enters router
|
||
| Step 5 |
Example: |
Changes the
|
||
| Step 6 |
Example: |
Exits address |
||
| Step 7 |
Example: |
Clears and
|
||
| Step 8 |
Example: |
Displays the |
||
| Step 9 |
ip Example: |
Displays
|
||
| Step 10 |
Example: |
Enters global |
||
| Step 11 |
Example: |
Enters router
|
||
| Step 12 |
Example: |
Resets the
|
||
| Step 13 |
Example: |
Exits router |
||
| Step 14 |
Example: |
Clears and
|
Examples
The following
output from the
show
ip
bgp
summary command shows the default asplain format
of the 4-byte AS numbers. Note the asplain format of the 4-byte AS numbers,
65536 and 65550.
Router# show ip bgp summary

BGP router identifier 172.17.1.99, local AS number 65538
BGP table version is 1, main routing table version 1
Neighbor        V           AS MsgRcvd MsgSent   TblVer  InQ OutQ Up/Down  Statd
192.168.1.2     4       65536       7       7        1    0    0 00:03:04      0
192.168.3.2     4       65550       4       4        1    0    0 00:00:15      0
After the
bgp
asnotation
dot command is configured (followed by the
clear
ip
bgp
* command to perform a hard reset of all current
BGP sessions), the output is converted to asdot notation format as shown in the
following output from the
show
ip
bgp
summary command. Note the asdot format of the
4-byte AS numbers, 1.0 and 1.14 (these are the asdot conversions of the 65536
and 65550 AS numbers.
Router# show ip bgp summary

BGP router identifier 172.17.1.99, local AS number 1.2
BGP table version is 1, main routing table version 1
Neighbor        V           AS MsgRcvd MsgSent   TblVer  InQ OutQ Up/Down  Statd
192.168.1.2     4         1.0       9       9        1    0    0 00:04:13      0
192.168.3.2     4        1.14       6       6        1    0    0 00:01:24      0
After the
bgp
asnotation
dot command is configured (followed by the
clear
ip
bgp
* command to perform a hard reset of all current
BGP sessions), the regular expression match format for 4-byte AS paths is
changed to asdot notation format. Although a 4-byte AS number can be configured
in a regular expression using either asplain format or asdot format, only
4-byte AS numbers configured using the current default format are matched. In
the first example below, the
show
ip
bgp
regexp command is configured with a 4-byte AS
number in asplain format. The match fails because the default format is
currently asdot format and there is no output. In the second example using
asdot format, the match passes and the information about the 4-byte AS path is
shown using the asdot notation.
Note |
The asdot |
Router# show ip bgp regexp ^65536$

Router# show ip bgp regexp ^1\.0$

BGP table version is 2, local router ID is 172.17.1.99
Status codes: s suppressed, d damped, h history, * valid, > best, i - internal,
              r RIB-failure, S Stale
Origin codes: i - IGP, e - EGP, ? - incomplete
   Network          Next Hop            Metric LocPrf Weight Path
*> 10.1.1.0/24      192.168.1.2              0             0 1.0 i
Configuring a BGP Peer for the IPv4 VRF Address Family
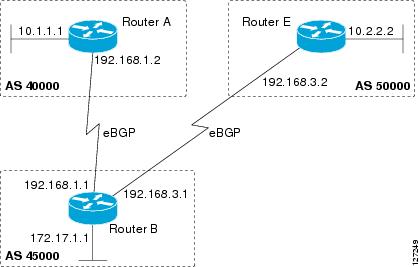
Perform this optional task to configure BGP between two IPv4 routers (peers) that must exchange IPv4 VRF information because
they exist in a VPN. The address family configured here is the IPv4 VRF address family and the configuration is done at Router
B in the figure below with the neighbor 192.168.3.2 at Router E in autonomous system 50000. Remember to perform this task
for any neighbor routers that are to be BGP IPv4 VRF address family peers.
This task does not show the complete configuration required for VPN routing. For some complete example configurations and
an example configuration showing how to create a VRF with a route-target that uses a 4-byte autonomous system number, see
.
Before you begin
Before you perform this task, perform the
Configuring a BGP Routing Process task.
SUMMARY STEPS
-
enable
-
configure
terminal
-
ip
vrf
vrf-name
-
rd
route-distinguisher
-
route-target
{import |
export |
both }
route-target-ext-community -
exit
-
router
bgp
autonomous-system-number
-
address-family
ipv4
[unicast |
multicast |
vrf
vrf-name ] -
neighbor
ip-address
remote-as
autonomous-system-number
-
neighbor
{ip-address |
peer-group-name }
maximum-prefix
maximum [threshold ] [restart
restart-interval ] [warning-only ] -
neighbor
ip-address
activate
-
end
DETAILED STEPS
| Command or Action | Purpose | |
|---|---|---|
| Step 1 |
Example: |
Enables privileged EXEC mode.
|
| Step 2 |
Example: |
Enters global configuration mode. |
| Step 3 |
Example: |
Configures a VRF routing table and enters VRF configuration mode.
|
| Step 4 |
Example: |
Creates routing and forwarding tables and specifies the default route distinguisher for a VPN.
|
| Step 5 |
Example: |
Creates a route target extended community for a VRF.
|
| Step 6 |
Example: |
Exits VRF configuration mode and enters global configuration mode. |
| Step 7 |
Example: |
Enters router configuration mode for the specified routing process. |
| Step 8 |
Example: |
Specifies the IPv4 address family and enters address family configuration mode.
|
| Step 9 |
Example: |
Adds the IP address of the neighbor in the specified autonomous system to the IPv4 multiprotocol BGP neighbor table of the |
| Step 10 |
Example: |
Controls how many prefixes can be received from a neighbor.
|
| Step 11 |
Example: |
Enables the neighbor to exchange prefixes for the IPv4 VRF address family with the local router. |
| Step 12 |
Example: |
Exits address family configuration mode and enters privileged EXEC mode. |
Troubleshooting Tips
Use the ping command to verify basic network connectivity between the BGP routers, and use the show ip vrf command to verify that the VRF instance has been created.
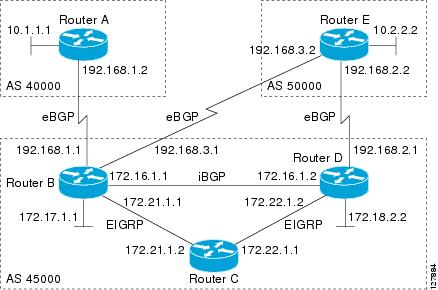
Customizing a BGP Peer
Perform this task to customize your BGP peers. Although many of the steps in this task are optional, this task demonstrates
how the neighbor and address family configuration command relationships work. Using the example of the IPv4 multicast address
family, neighbor address family-independent commands are configured before the IPv4 multicast address family is configured.
Commands that are address family-dependent are then configured and the
exit
address-family command is shown. An optional step shows how to disable a neighbor.
The configuration in this task is done at Router B in the figure below and would need to be repeated with appropriate changes
to the IP addresses, for example, at Router E to fully configure a BGP process between the two devices.
Note |
By default, neighbors that are defined using the |
SUMMARY STEPS
-
enable
-
configure
terminal
-
router
bgp
autonomous-system-number
-
no
bgp
default
ipv4-unicast
-
neighbor
{ip-address |
peer-group-name }
remote-as
autonomous-system-number -
neighbor
{ip-address |
peer-group-name }
description
text -
address-family
ipv4
[unicast |
multicast |
vrf
vrf-name ] -
network
network-number
[mask
network-mask ] [route-map
route-map-name ] -
neighbor
{ip-address |
peer-group-name }
activate -
neighbor
{ip-address |
peer-group-name }
advertisement-interval
seconds -
neighbor
{ip-address |
peer-group-name }
default-originate [route-map
map-name ] -
exit-address-family
-
neighbor
{ip-address |
peer-group-name }
shutdown -
end
-
show
ip
bgp
ipv4
multicast
[command ] -
show
ip
bgp
neighbors
[neighbor-address ] [received-routes |
routes |
advertised-routes |
paths
regexp |
dampened-routes |
received
prefix-filter ]
DETAILED STEPS
| Command or Action | Purpose | |||
|---|---|---|---|---|
| Step 1 |
Example: |
Enables privileged EXEC mode.
|
||
| Step 2 |
Example: |
Enters global configuration mode. |
||
| Step 3 |
Example: |
Enters router configuration mode for the specified routing process. |
||
| Step 4 |
Example: |
Disables the IPv4 unicast address family for the BGP routing process.
|
||
| Step 5 |
Example: |
Adds the IP address of the neighbor in the specified autonomous system to the IPv4 multiprotocol BGP neighbor table of the |
||
| Step 6 |
Example: |
(Optional) Associates a text description with the specified neighbor. |
||
| Step 7 |
Example: |
Specifies the IPv4 address family and enters address family configuration mode.
|
||
| Step 8 |
Example: |
(Optional) Specifies a network as local to this autonomous system and adds it to the BGP routing table.
|
||
| Step 9 |
Example: |
Enables the exchange of information with a BGP neighbor. |
||
| Step 10 |
Example: |
(Optional) Sets the minimum interval between the sending of BGP routing updates. |
||
| Step 11 |
Example: |
(Optional) Permits a BGP speaker—the local device—to send the default route 0.0.0.0 to a peer for use as a default route. |
||
| Step 12 |
Example: |
Exits address family configuration mode and enters router configuration mode. |
||
| Step 13 |
Example: |
(Optional) Disables a BGP peer or peer group.
|
||
| Step 14 |
Example: |
Exits router configuration mode and enters privileged EXEC mode. |
||
| Step 15 |
Example: |
(Optional) Displays IPv4 multicast database-related information.
|
||
| Step 16 |
Example: |
(Optional) Displays information about the TCP and BGP connections to neighbors. |
Examples
The following sample output from the
show
ip
bgp
ipv4
multicast command shows BGP IPv4 multicast information for Router B in the figure above after this task has been configured on Router
B and Router E. Note that the networks local to each device that were configured under IPv4 multicast address family appear
in the output table.
BGP table version is 3, local router ID is 172.17.1.99
Status codes: s suppressed, d damped, h history, * valid, > best, i - internal,
              r RIB-failure, S Stale
Origin codes: i - IGP, e - EGP, ? - incomplete
   Network          Next Hop            Metric LocPrf Weight Path
*> 10.2.2.0/24      192.168.3.2              0             0 50000 i
*> 172.17.1.0/24    0.0.0.0                  0         32768 i
The following partial sample output from the
show
ip
bgp
neighbors command for neighbor 192.168.3.2 shows general BGP information and specific BGP IPv4 multicast address family information
about the neighbor. The command was entered on Router B in the figure above after this task had been configured on Router
B and Router E.
BGP neighbor is 192.168.3.2,  remote AS 50000, external link
 Description: finance
  BGP version 4, remote router ID 10.2.2.99
  BGP state = Established, up for 01:48:27
  Last read 00:00:26, last write 00:00:26, hold time is 120, keepalive intervals
  Configured hold time is 120,keepalive interval is 70 seconds, Minimum holdtims
  Neighbor capabilities:
    Route refresh: advertised and received (old & new)
    Address family IPv4 Unicast: advertised
    Address family IPv4 Multicast: advertised and received
!
 For address family: IPv4 Multicast
  BGP table version 3, neighbor version 3/0
 Output queue size : 0
  Index 1, Offset 0, Mask 0x2
  1 update-group member
    Uses NEXT_HOP attribute for MBGP NLRIs
                                 Sent       Rcvd
  Prefix activity:               ----       ----
    Prefixes Current:               1          1 (Consumes 48 bytes)
    Prefixes Total:                 1          1
    Implicit Withdraw:              0          0
    Explicit Withdraw:              0          0
    Used as bestpath:             n/a          1
    Used as multipath:            n/a          0
                                   Outbound    Inbound
  Local Policy Denied Prefixes:    --------    -------
    Bestpath from this peer:              1        n/a
    Total:                                1          0
  Number of NLRIs in the update sent: max 0, min 0
  Minimum time between advertisement runs is 25 seconds
  Connections established 8; dropped 7
  Last reset 01:48:54, due to User reset
Connection state is ESTAB, I/O status: 1, unread input bytes: 0
Connection is ECN Disabled
Local host: 192.168.3.1, Local port: 13172
Foreign host: 192.168.3.2, Foreign port: 179
!
Removing BGP Configuration Commands Using a Redistribution
BGP CLI configuration can become quite complex even in smaller BGP networks. If you need to remove any CLI configuration,
you must consider all the implications of removing the CLI. Analyze the current running configuration to determine the current
BGP neighbor relationships, any address family considerations, and even other routing protocols that are configured. Many
BGP CLI commands affect other parts of the CLI configuration.
Perform this task to remove all the BGP configuration commands used in a redistribution of BGP routes into EIGRP. A route
map can be used to match and set parameters or to filter the redistributed routes to ensure that routing loops are not created
when these routes are subsequently advertised by EIGRP. When removing BGP configuration commands you must remember to remove
or disable all the related commands. In this example, if the
route-map command is omitted, then the redistribution will still occur and possibly with unexpected results as the route map filtering
has been removed. Omitting just the
redistribute command would mean that the route map is not applied, but it would leave unused commands in the running configuration.
For more details on BGP CLI removal, see the “BGP CLI Removal Considerations” concept in the “Cisco BGP Overview” module.
To view the redistribution configuration before and after the CLI removal, see the “Examples: Removing BGP Configuration
Commands Using a Redistribution Example” section.
SUMMARY STEPS
-
enable
-
configure
terminal
-
no
route-map
map-name
-
router
eigrp
autonomous-system-number
-
no
redistribute
protocol
[as-number ] -
end
-
show
running-config
DETAILED STEPS
| Command or Action | Purpose | |||||
|---|---|---|---|---|---|---|
| Step 1 |
Example: |
Enables privileged EXEC mode.
|
||||
| Step 2 |
Example: |
Enters global configuration mode. |
||||
| Step 3 |
Example: |
Removes a route map from the running configuration.
|
||||
| Step 4 |
Example: |
Enters router configuration mode for the specified routing process. |
||||
| Step 5 |
Example: |
Disables the redistribution of routes from one routing domain into another routing domain.
|
||||
| Step 6 |
Example: |
Exits router configuration mode and enters privileged EXEC mode. |
||||
| Step 7 |
Example: |
(Optional) Displays the current running configuration on the router.
|
Monitoring and Maintaining Basic BGP
The tasks in this section are concerned with the resetting and display of information about basic BGP processes and peer relationships.
Once you have defined two routers to be BGP neighbors, they will form a BGP connection and exchange routing information. If
you subsequently change a BGP filter, weight, distance, version, or timer, or make a similar configuration change, you may
have to reset BGP connections for the configuration change to take effect.
Configuring Inbound Soft
Reconfiguration When Route Refresh Capability Is Missing
Perform this task
to configure inbound soft reconfiguration using the
bgp
soft-reconfig-backup command for BGP peers that do
not support the route refresh capability. BGP peers that support the route
refresh capability are unaffected by the configuration of this command. Note
that the memory requirements for storing the inbound update information can
become quite large.
SUMMARY STEPS
-
enable -
configure
terminal
-
routerbgp
autonomous-system-number
-
bgp
log-neighbor-changes
-
bgp
soft-reconfig-backup
-
neighbor
{ip-address |
peer-group-name }
remote-as
autonomous-system-number -
neighbor
{ip-address |
peer-group-name }
soft-reconfiguration [inbound ] -
neighbor
{ip-address |
peer-group-name }
route-map
map-name
{in |
out } - Repeat Steps
6 through 8 for every peer that is to be configured with inbound soft
reconfiguration. -
exit -
route-map
map-name
[permit
|
deny ] [sequence-number ] -
set
ip
next-hop
ip-address
-
end
-
showip
[neighbor-address ]
bgp
neighbors
-
showip
[network ]
bgp
[network-mask ]
DETAILED STEPS
| Command or Action | Purpose | |||
|---|---|---|---|---|
| Step 1 |
Example: |
Enables
|
||
| Step 2 |
Example: |
Enters global |
||
| Step 3 |
bgp Example: |
Enters router |
||
| Step 4 |
Example: |
Enables logging |
||
| Step 5 |
Example: |
Configures a
|
||
| Step 6 |
Example: |
Adds the IP |
||
| Step 7 |
Example: |
Configures the
|
||
| Step 8 |
Example: |
Applies a
|
||
| Step 9 |
Repeat Steps |
— |
||
| Step 10 |
Example: |
Exits router |
||
| Step 11 |
Example: |
Configures a
|
||
| Step 12 |
Example: |
Specifies
|
||
| Step 13 |
Example: |
Exits |
||
| Step 14 |
ip Example: |
(Optional)
|
||
| Step 15 |
ip Example: |
(Optional)
|
Examples
The following
partial output from the
show
ip
bgp
neighbors command shows information about the TCP
and BGP connections to the BGP neighbor 192.168.2.1. This peer supports route
refresh.
BGP neighbor is 192.168.1.2,  remote AS 40000, external link
 Neighbor capabilities:
   Route refresh: advertised and received(new)
The following
partial output from the
show
ip
bgp
neighbors command shows information about the TCP
and BGP connections to the BGP neighbor 192.168.3.2. This peer does not support
route refresh so the soft-reconfig inbound paths for BGP peer 192.168.3.2 will
be stored because there is no other way to update any inbound policy updates.
BGP neighbor is 192.168.3.2,  remote AS 50000, external link
 Neighbor capabilities:
   Route refresh: advertised
The following
sample output from the
show
ip
bgp command shows the entry for the network
172.17.1.0. Both BGP peers are advertising 172.17.1.0/24, but only the
received-only path is stored for 192.168.3.2.
BGP routing table entry for 172.17.1.0/24, version 11
Paths: (3 available, best #3, table Default-IP-Routing-Table, RIB-failure(4))
Flag: 0x820
 Advertised to update-groups:
    1
 50000
   192.168.3.2 from 192.168.3.2 (172.17.1.0)
     Origin incomplete, metric 0, localpref 200, valid, external
 50000, (received-only)
   192.168.3.2 from 192.168.3.2 (172.17.1.0)
     Origin incomplete, metric 0, localpref 100, valid, external
 40000
   192.168.1.2 from 192.168.1.2 (172.16.1.0)
     Origin incomplete, metric 0, localpref 200, valid, external, best
Resetting and Displaying Basic BGP Information
Perform this task to reset and display information about basic BGP processes and peer relationships.
SUMMARY STEPS
-
enable
-
clear
ip
bgp
{* |
autonomous-system-number |
neighbor-address } [soft [in |
out ] ] -
show
ip
bgp
[network-address ] [network-mask ] [longer-prefixes ] [prefix-list
prefix-list-name |
route-map
route-map-name ] [shorter
prefixes
mask-length ] -
show
ip
bgp
neighbors
[neighbor-address ] [received-routes |
routes |
advertised-routes |
paths
regexp |
dampened-routes |
received
prefix-filter ] -
show
ip
bgp
paths
-
show
ip
bgp
summary
DETAILED STEPS
| Command or Action | Purpose | |
|---|---|---|
| Step 1 |
Example: |
Enables privileged EXEC mode.
|
| Step 2 |
Example: |
Clears and resets BGP neighbor sessions:
|
| Step 3 |
Example: |
Displays all the entries in the BGP routing table:
|
| Step 4 |
Example: |
Displays information about the TCP and BGP connections to neighbors.
|
| Step 5 |
Example: |
Displays information about all the BGP paths in the database. |
| Step 6 |
Example: |
Displays information about the status of all BGP connections. |
Aggregating Route Prefixes Using BGP
BGP peers exchange information about local networks, but this can quickly lead to large BGP routing tables. CIDR enables
the creation of aggregate routes (or
supernets ) to minimize the size of routing tables. Smaller BGP routing tables can reduce the convergence time of the network and improve
network performance. Aggregated routes can be configured and advertised using BGP. Some aggregations advertise only summary
routes and other methods of aggregating routes allow more specific routes to be forwarded. Aggregation applies only to routes
that exist in the BGP routing table. An aggregated route is forwarded if at least one more specific route of the aggregation
exists in the BGP routing table. Perform one of the following tasks to aggregate routes within BGP:
Redistributing a Static Aggregate Route into BGP
Use this task to redistribute a static aggregate route into BPG. A static aggregate route is configured and then redistributed
into the BGP routing table. The static route must be configured to point to interface null 0 and the prefix should be a superset
of known BGP routes. When a device receives a BGP packet, it will use the more specific BGP routes. If the route is not found
in the BGP routing table, then the packet will be forwarded to null 0 and discarded.
SUMMARY STEPS
-
enable
-
configure
terminal
-
ip
route
prefix
mask
{ip-address |
interface-type
interface-number [ip-address ]} [distance ] [name ] [permanent |
track
number ] [tag
tag ] -
router
bgp
autonomous-system-number
-
redistribute
static
-
end
DETAILED STEPS
| Command or Action | Purpose | |
|---|---|---|
| Step 1 |
Example: |
Enables privileged EXEC mode.
|
| Step 2 |
Example: |
Enters global configuration mode. |
| Step 3 |
Example: |
Creates a static route. |
| Step 4 |
Example: |
Enters router configuration mode for the specified routing process. |
| Step 5 |
Example: |
Redistributes routes into the BGP routing table. |
| Step 6 |
Example: |
Exits router configuration mode and returns to privileged EXEC mode. |
Configuring Conditional Aggregate Routes Using BGP
Use this task to create an aggregate route entry in the BGP routing table when at least one specific route falls into the
specified range. The aggregate route is advertised as originating from your autonomous system. For more information, see the
“BGP Route Aggregation Generating AS_SET Information” section.
SUMMARY STEPS
-
enable
-
configure
terminal
-
router
bgp
autonomous-system-number
-
aggregate-address
address
mask
[as-set ] -
end
DETAILED STEPS
| Command or Action | Purpose | |||
|---|---|---|---|---|
| Step 1 |
Example: |
Enables privileged EXEC mode.
|
||
| Step 2 |
Example: |
Enters global configuration mode. |
||
| Step 3 |
Example: |
Enters router configuration mode for the specified routing process. |
||
| Step 4 |
Example: |
Creates an aggregate entry in a BGP routing table.
|
||
| Step 5 |
Example: |
Exits router configuration mode and enters privileged EXEC mode. |
Suppressing and Unsuppressing the Advertisement of Aggregated Routes Using BGP
Use this task to create an aggregate route, suppress the advertisement of routes using BGP, and subsequently unsuppress the
advertisement of routes. Routes that are suppressed are not advertised to any neighbors, but it is possible to unsuppress
routes that were previously suppressed to specific neighbors.
SUMMARY STEPS
-
enable
-
configure
terminal
-
router
bgp
autonomous-system-number
-
neighbor
ip-address
remote-as
autonomous-system-number
- Do one of the following:
-
aggregate-address
address
mask
[summary-only ] -
aggregate-address
address
mask
[suppress-map
map-name ] -
neighbor
{ip-address |
peer-group-name }
unsuppress-map
map-name -
end
DETAILED STEPS
| Command or Action | Purpose | |||
|---|---|---|---|---|
| Step 1 |
Example: |
Enables privileged EXEC mode.
|
||
| Step 2 |
Example: |
Enters global configuration mode. |
||
| Step 3 |
Example: |
Enters router configuration mode for the specified routing process. |
||
| Step 4 |
Example: |
Adds the IP address of the neighbor in the specified autonomous system to the IPv4 multiprotocol BGP neighbor table of the |
||
| Step 5 |
Do one of the following:
Example:Example: |
Creates an aggregate route.
|
||
| Step 6 |
Example: |
(Optional) Selectively advertises routes previously suppressed by the
|
||
| Step 7 |
Example: |
Exits router configuration mode and enters privileged EXEC mode. |
Suppressing Inactive Route Advertisement Using BGP
Perform this task to suppress the advertisement of inactive routes by BGP. In Cisco IOS Release 12.2(25)S, 12.2(33)SXH, and
15.0(1)M, the
bgp
suppress-inactive command was introduced to configure BGP to not advertise inactive routes to any BGP peer. A BGP routing process can advertise
routes that are not installed in the RIB to BGP peers by default. A route that is not installed into the RIB is an inactive
route. Inactive route advertisement can occur, for example, when routes are advertised through common route aggregation.
Inactive route advertisements can be suppressed to provide more consistent data forwarding. This feature can be configured
on a per IPv4 address family basis. For example, when specifying the maximum number of routes that can be configured in a
VRF with the
maximum
routes global configuration command, you also suppress inactive route advertisement to prevent inactive routes from being accepted
into the VRF after route limit has been exceeded.
Before you begin
This task assumes that BGP is enabled and that peering has been established.
Note |
Inactive route suppression can be configured only under the IPv4 address family or under a default IPv4 general session. > |
SUMMARY STEPS
-
enable
-
configure
terminal
-
router
bgp
as-number
-
address-family
{ipv4 [mdt |
multicast |
unicast [vrf
vrf-name ] |
vrf
vrf-name ] |
vpnv4 [unicast ]} -
bgp
suppress-inactive
-
end
-
show
ip
bgp
rib-failure
DETAILED STEPS
| Command or Action | Purpose | |
|---|---|---|
| Step 1 |
Example: |
Enables privileged EXEC mode.
|
| Step 2 |
Example: |
Enters global configuration mode. |
| Step 3 |
Example: |
Enters router configuration mode and creates a BGP routing process. |
| Step 4 |
Example: |
Enter address family configuration mode to configure BGP peers to accept address family specific configurations.
|
| Step 5 |
Example: |
Suppresses BGP advertising of inactive routes.
|
| Step 6 |
Example: |
Exits address family configuration mode and enters privileged EXEC mode. |
| Step 7 |
Example: |
(Optional) Displays BGP routes that are not installed in the RIB. |
Examples
The following example shows output from the
show
ip
bgp
rib-failure command displaying routes that are not installed in the RIB. The output shows that the displayed routes were not installed
because a route or routes with a better administrative distance already exist in the RIB.
Router# show ip bgp rib-failure

Network            Next Hop                      RIB-failure   RIB-NH Matches
10.1.15.0/24       10.1.35.5           Higher admin distance              n/a
10.1.16.0/24       10.1.15.1           Higher admin distance              n/a
Conditionally Advertising BGP Routes
Perform this task to conditionally advertise selected BGP routes. The routes or prefixes that will be conditionally advertised
are defined in two route maps: an advertise map and either an exist map or nonexist map. The route map associated with the
exist map or nonexist map specifies the prefix that the BGP speaker will track. The route map associated with the advertise
map specifies the prefix that will be advertised to the specified neighbor when the condition is met.
-
If a prefix is found to be present in the exist map by the BGP speaker, the prefix specified by the advertise map is advertised.
-
If a prefix is found not to be present in the nonexist map by the BGP speaker, the prefix specified by the advertise map
is advertised.
If the condition is not met, the route is withdrawn and conditional advertisement does not occur. All routes that may be
dynamically advertised or not advertised must exist in the BGP routing table in order for conditional advertisement to occur.
These routes are referenced from an access list or an IP prefix list.
SUMMARY STEPS
-
enable
-
configure
terminal
-
router
bgp
autonomous-system-number
-
neighbor
{ip-address |
peer-group-name }
remote-as
autonomous-system-number -
neighbor
ip-address
advertise-map
map-name
{exist-map
map-name |
non-exist-map
map-name } -
exit
-
route-map
map-tag
[permit |
deny ] [sequence-number ] -
match
ip
address
{access-list-number [access-list-number … |
access-list-name …] |
access-list-name [access-list-number … |
access-list-name ] |
prefix-list
prefix-list-name [prefix-list-name …]} -
exit
-
route-map
map-tag
[permit |
deny ] [sequence-number ] -
match
ip
address
{access-list-number [access-list-number … |
access-list-name …] |
access-list-name [access-list-number … |
access-list-name ] |
prefix-list
prefix-list-name [prefix-list-name …]} -
exit
-
access-list
access-list-number
{deny |
permit }
source [source-wildcard ] [log ] -
access-list
access-list-number
{deny |
permit }
source [source-wildcard ] [log ] -
exit
DETAILED STEPS
| Command or Action | Purpose | |
|---|---|---|
| Step 1 |
Example: |
Enables privileged EXEC mode.
|
| Step 2 |
Example: |
Enters global configuration mode. |
| Step 3 |
Example: |
Enters router configuration mode for the specified routing process. |
| Step 4 |
Example: |
Adds the IP address of the neighbor in the specified autonomous system to the IPv4 multiprotocol BGP neighbor table of the |
| Step 5 |
Example: |
Adds the IP address of the neighbor in the specified autonomous system to the IPv4 multiprotocol BGP neighbor table of the
|
| Step 6 |
Example: |
Exits router configuration mode and enters global configuration mode. |
| Step 7 |
Example: |
Configures a route map and enters route map configuration mode.
|
| Step 8 |
Example: |
Configures the route map to match a prefix that is permitted by a standard access list, an extended access list, or a prefix
|
| Step 9 |
Example: |
Exits route map configuration mode and enters global configuration mode. |
| Step 10 |
Example: |
Configures a route map and enters route map configuration mode.
|
| Step 11 |
Example: |
Configures the route map to match a prefix that is permitted by a standard access list, an extended access list, or a prefix
|
| Step 12 |
Example: |
Exits route map configuration mode and enters global configuration mode. |
| Step 13 |
Example: |
Configures a standard access list.
|
| Step 14 |
Example: |
Configures a standard access list.
|
| Step 15 |
Example: |
Exits global configuration mode and returns to privileged EXEC mode. |
Originating BGP Routes
Route aggregation is useful to minimize the size of the BGP table, but there are situations when you want to add more specific
prefixes to the BGP table. Route aggregation can hide more specific routes. Using the
network command as shown in the “Configuring a BGP Routing Process” section originates routes, and the following optional tasks originate
BGP routes for the BGP table for different situations.
Advertising a Default Route Using BGP
Perform this task to advertise a default route to BGP peers. The default route is locally originated. A default route can
be useful to simplify configuration or to prevent the device from using too many system resources. If the device is peered
with an Internet service provider (ISP), the ISP will carry full routing tables, so configuring a default route into the ISP
network saves resources at the local device.
SUMMARY STEPS
-
enable
-
configure
terminal
-
ip
prefix-list
list-name
[seq
seq-value ] {deny
network
/
length |
permit
network
/
length } [ge
ge-value ] [le
le-value ] -
route-map
map-tag
[permit |
deny ] [sequence-number ] -
match
ip
address
{access-list-number [access-list-number … |
access-list-name …] |
access-list-name [access-list-number … |
access-list-name ] |
prefix-list
prefix-list-name [prefix-list-name …]} -
exit
-
router
bgp
autonomous-system-number
-
neighbor
{ip-address |
peer-group-name }
default-originate [route-map
map-name ] -
end
DETAILED STEPS
| Command or Action | Purpose | |
|---|---|---|
| Step 1 |
Example: |
Enables privileged EXEC mode.
|
| Step 2 |
Example: |
Enters global configuration mode. |
| Step 3 |
Example: |
Configures an IP prefix list.
|
| Step 4 |
Example: |
Configures a route map and enters route map configuration mode.
|
| Step 5 |
Example: |
Configures the route map to match a prefix that is permitted by a standard access list, an extended access list, or a prefix
|
| Step 6 |
Example: |
Exits route map configuration mode and enters global configuration mode. |
| Step 7 |
Example: |
Enters router configuration mode for the specified routing process. |
| Step 8 |
Example: |
(Optional) Permits a BGP speaker—the local device—to send the default route 0.0.0.0 to a peer for use as a default route. |
| Step 9 |
Example: |
Exits router configuration mode and enters privileged EXEC mode. |
Troubleshooting Tips
Use the show ip route command on the receiving BGP peer (not on the local router) to verify that the default route has been set. In the output,
verify that a line similar to the following showing the default route 0.0.0.0 is present:
B* 0.0.0.0/0 [20/0] via 192.168.1.2, 00:03:10Conditionally Injecting BGP Routes
Use this task to inject more specific prefixes into a BGP routing table over less specific prefixes that were selected through
normal route aggregation. These more specific prefixes can be used to provide a finer granularity of traffic engineering or
administrative control than is possible with aggregated routes. For more information, see the “Conditional BGP Route Injection”
section.
Before you begin
This task assumes that the IGP is already configured for the BGP peers.
SUMMARY STEPS
-
enable
-
configure
terminal
-
router
bgp
autonomous-system-number
-
bgp
inject-map
inject-map-name
exist-map
exist-map-name
[copy-attributes ] -
exit
-
route-map
map-tag
[permit |
deny ] [sequence-number ] -
match
ip
address
{access-list-number [access-list-number … |
access-list-name …] |
access-list-name [access-list-number … |
access-list-name ] |
prefix-list
prefix-list-name [prefix-list-name …]} -
match
ip
route-source
{access-list-number |
access-list-name } [access-list-number …|
access-list-name …] -
exit
-
route-map
map-tag
[permit |
deny ] [sequence-number ] -
set
ip
address
{access-list-number [access-list-number … |
access-list-name …] |
access-list-name [access-list-number… |
access-list-name ] |
prefix-list
prefix-list-name [prefix-list-name …]} -
set
community
{community-number [additive ] [well-known-community ] |
none } -
exit
-
ip
prefix-list
list-name
[seq
seq-value ] {deny
network / length |
permit
network / length } [ge
ge-value ] [le
le-value ] - Repeat Step 14 for every prefix list to be created.
-
exit
-
show
ip
bgp
injected-paths
DETAILED STEPS
| Command or Action | Purpose | |||
|---|---|---|---|---|
| Step 1 |
Example: |
Enables privileged EXEC mode.
|
||
| Step 2 |
Example: |
Enters global configuration mode. |
||
| Step 3 |
Example: |
Enters router configuration mode for the specified routing process. |
||
| Step 4 |
Example: |
Specifies the inject map and the exist map for conditional route injection.
|
||
| Step 5 |
Example: |
Exits router configuration mode and enters global configuration mode. |
||
| Step 6 |
Example: |
Configures a route map and enters route map configuration mode. |
||
| Step 7 |
Example: |
Specifies the aggregate route to which a more specific route will be injected.
|
||
| Step 8 |
Example: |
Specifies the match conditions for redistributing the source of the route.
|
||
| Step 9 |
Example: |
Exits route map configuration mode and enters global configuration mode. |
||
| Step 10 |
Example: |
Configures a route map and enters route map configuration mode. |
||
| Step 11 |
Example: |
Specifies the routes to be injected.
|
||
| Step 12 |
Example: |
Sets the BGP community attribute of the injected route. |
||
| Step 13 |
Example: |
Exits route map configuration mode and enters global configuration mode. |
||
| Step 14 |
Example: |
Configures a prefix list.
|
||
| Step 15 |
Repeat Step 14 for every prefix list to be created. |
— |
||
| Step 16 |
Example: |
Exits global configuration mode and returns to privileged EXEC mode. |
||
| Step 17 |
Example: |
(Optional) Displays information about injected paths. |
Examples
The following sample output is similar to the output that will be displayed when the
show
ip
bgp
injected-paths command is entered:
Router# show ip bgp injected-paths

BGP table version is 11, local router ID is 10.0.0.1
Status codes:s suppressed, d damped, h history, * valid, > best, i -
internal
Origin codes:i - IGP, e - EGP, ? - incomplete
   Network          Next Hop            Metric LocPrf Weight Path
*> 172.16.0.0       10.0.0.2                               0 ?
*> 172.17.0.0/16    10.0.0.2                               0 ?
Troubleshooting Tips
BGP conditional route injection is based on the injection of a more specific prefix into the BGP routing table when a less
specific prefix is present. If conditional route injection is not working properly, verify the following:
-
If conditional route injection is configured but does not occur, verify the existence of the aggregate prefix in the BGP routing
table. The existence (or not) of the tracked prefix in the BGP routing table can be verified with the show ip bgp command. -
If the aggregate prefix exists but conditional route injection does not occur, verify that the aggregate prefix is being received
from the correct neighbor and the prefix list identifying that neighbor is a /32 match. -
Verify the injection (or not) of the more specific prefix using the show ip bgp injected-paths command.
-
Verify that the prefix that is being injected is not outside of the scope of the aggregate prefix.
-
Ensure that the inject route map is configured with the set ip address command and not the match ip address command.
Originating BGP Routes Using
Backdoor Routes
Use this task to
indicate to border devices which networks are reachable using a backdoor route.
A backdoor network is treated the same as a local network, except that it is
not advertised. For more information, see the BGP Backdoor Routes section.
Before you begin
This task assumes
that the IGP (EIGRP, in this example) is already configured for the BGP peers.
The configuration is done at Router B in the
in the “BGP Backdoor Routes” section, and the BGP peer is Router D.
SUMMARY STEPS
-
enable -
configure
terminal
-
routerbgp
autonomous-system-number
-
neighbor
ip-address
remote-as
autonomous-system-number
-
network
ip-address
backdoor
-
end
DETAILED STEPS
| Command or Action | Purpose | |
|---|---|---|
| Step 1 |
Example: |
Enables
|
| Step 2 |
Example: |
Enters global |
| Step 3 |
bgp Example: |
Enters router |
| Step 4 |
Example: |
Adds the IP
|
| Step 5 |
Example: |
Indicates a |
| Step 6 |
Example: |
Exits router |
Configuring a BGP Peer Group
This task explains how to configure a BGP peer group. Often, in a BGP speaker, many neighbors are configured with the same
update policies (that is, the same outbound route maps, distribute lists, filter lists, update source, and so on). Neighbors
with the same update policies can be grouped into peer groups to simplify configuration and, more importantly, to make updating
more efficient. When you have many peers, this approach is highly recommended.
The three steps to configure a BGP peer group, described in the following task, are as follows:
-
Creating the peer group
-
Assigning options to the peer group
-
Making neighbors members of the peer group
You can disable a BGP peer or peer group without removing all the configuration information using the
neighbor
shutdown router configuration command.
Note |
By default, neighbors that are defined using the |
SUMMARY STEPS
-
enable
-
configure
terminal
-
router
bgp
autonomous-system-number
-
neighbor
peer-group-name
peer-group
-
neighbor
ip-address
remote-as
autonomous-system-number
-
neighbor
ip-address
peer-group
peer-group-name
-
address-family
ipv4
[unicast |
multicast |
vrf
vrf-name ] -
neighbor
peer-group-name
activate
-
neighbor
ip-address
peer-group
peer-group-name
-
end
DETAILED STEPS
| Command or Action | Purpose | |||
|---|---|---|---|---|
| Step 1 |
Example: |
Enables privileged EXEC mode.
|
||
| Step 2 |
Example: |
Enters global configuration mode. |
||
| Step 3 |
Example: |
Enters router configuration mode for the specified routing process. |
||
| Step 4 |
Example: |
Creates a BGP peer group. |
||
| Step 5 |
Example: |
Adds the IP address of the neighbor in the specified autonomous system to the multiprotocol BGP neighbor table of the local |
||
| Step 6 |
Example: |
Assigns the IP address of a BGP neighbor to a peer group. |
||
| Step 7 |
Example: |
Specifies the IPv4 address family and enters address family configuration mode.
|
||
| Step 8 |
Example: |
Enables the neighbor to exchange prefixes for the IPv4 address family with the local device.
|
||
| Step 9 |
Example: |
Assigns the IP address of a BGP neighbor to a peer group. |
||
| Step 10 |
Example: |
Exits address family configuration mode and returns to privileged EXEC mode. |
Configuring Peer Session Templates
The following tasks create and configure a peer session template:
Configuring a Basic Peer Session Template
Perform this task to create a basic peer session template with general BGP routing session commands that can be applied to
many neighbors using one of the next two tasks.
Note |
The commands in Step 5 and 6 are optional and could be replaced with any supported general session commands. |
Note |
|
SUMMARY STEPS
-
enable
-
configure
terminal
-
router
bgp
autonomous-system-number
-
template
peer-session
session-template-name
-
remote-as
autonomous-system-number
-
timers
keepalive-interval
hold-time
-
end
-
show
ip
bgp
template
peer-session
[session-template-name ]
DETAILED STEPS
| Command or Action | Purpose | |||
|---|---|---|---|---|
| Step 1 |
Example: |
Enables privileged EXEC mode.
|
||
| Step 2 |
Example: |
Enters global configuration mode. |
||
| Step 3 |
Example: |
Enters router configuration mode and creates a BGP routing process. |
||
| Step 4 |
Example: |
Enters session-template configuration mode and creates a peer session template. |
||
| Step 5 |
Example: |
(Optional) Configures peering with a remote neighbor in the specified autonomous system.
|
||
| Step 6 |
Example: |
(Optional) Configures BGP keepalive and hold timers.
|
||
| Step 7 |
Example: |
Exits session-template configuration mode and returns to privileged EXEC mode. |
||
| Step 8 |
Example: |
Displays locally configured peer session templates.
|
What to Do Next
After the peer session template is created, the configuration of the peer session template can be inherited or applied by
another peer session template with the inherit peer-session or neighbor inherit peer-session command.
Configuring Peer Session Template Inheritance with the inherit peer-session Command
This task configures peer session template inheritance with the
inherit
peer-session command. It creates and configures a peer session template and allows it to inherit a configuration from another peer session
template.
Note |
The commands in Steps 5 and 6 are optional and could be replaced with any supported general session commands. |
SUMMARY STEPS
-
enable
-
configure
terminal
-
router
bgp
autonomous-system-number
-
template
peer-session
session-template-name
-
description
text-string
-
update-source
interface-type
interface-number
-
inherit
peer-session
session-template-name
-
end
-
show
ip
bgp
template
peer-session
[session-template-name ]
DETAILED STEPS
| Command or Action | Purpose | |||
|---|---|---|---|---|
| Step 1 |
Example: |
Enables privileged EXEC mode.
|
||
| Step 2 |
Example: |
Enters global configuration mode. |
||
| Step 3 |
Example: |
Enters router configuration mode and creates a BGP routing process. |
||
| Step 4 |
Example: |
Enter session-template configuration mode and creates a peer session template. |
||
| Step 5 |
Example: |
(Optional) Configures a description.
|
||
| Step 6 |
Example: |
(Optional) Configures a router to select a specific source or interface to receive routing table updates.
|
||
| Step 7 |
Example: |
Configures this peer session template to inherit the configuration of another peer session template.
|
||
| Step 8 |
Example: |
Exits session-template configuration mode and enters privileged EXEC mode. |
||
| Step 9 |
Example: |
Displays locally configured peer session templates.
|
What to Do Next
After the peer session template is created, the configuration of the peer session template can be inherited or applied by
another peer session template with the inherit peer-session or neighbor inherit peer-session command.
Configuring Peer Session Template Inheritance with the neighbor inherit peer-session Command
This task configures a router to send a peer session template to a neighbor to inherit the configuration from the specified
peer session template with the
neighbor
inherit
peer-session command. Use the following steps to send a peer session template configuration to a neighbor to inherit.
SUMMARY STEPS
-
enable
-
configure
terminal
-
router
bgp
autonomous-system-number
-
neighbor
ip-address
remote-as
autonomous-system-number
-
neighbor
ip-address
inherit
peer-session
session-template-name
-
end
-
show
ip
bgp
template
peer-session
[session-template-name ]
DETAILED STEPS
| Command or Action | Purpose | |
|---|---|---|
| Step 1 |
Example: |
Enables privileged EXEC mode.
|
| Step 2 |
Example: |
Enters global configuration mode. |
| Step 3 |
Example: |
Enters router configuration mode and creates a BGP routing process. |
| Step 4 |
Example: |
Configures a peering session with the specified neighbor.
|
| Step 5 |
Example: |
Sends a peer session template to a neighbor so that the neighbor can inherit the configuration.
|
| Step 6 |
Example: |
Exits router configuration mode and enters privileged EXEC mode. |
| Step 7 |
Example: |
Displays locally configured peer session templates.
|
What to Do Next
To create a peer policy template, go to the Configuring Peer Policy Templates.
Configuring Peer Policy Templates
Configuring Basic Peer Policy Templates
Perform this task to create a basic peer policy template with BGP policy configuration commands that can be applied to many
neighbors using one of the next two tasks.
Note |
The commands in Steps 5 through 7 are optional and could be replaced with any supported BGP policy configuration commands. |
Note |
The following restrictions apply to the peer policy templates:
|
SUMMARY STEPS
-
enable
-
configure
terminal
-
router
bgp
autonomous-system-number
-
template
peer-policy
policy-template-name
-
maximum-prefix
prefix-limit
[threshold ] [restart
restart-interval |
warning-only ] -
weight
weight-value
-
prefix-list
prefix-list-name
{in |
out } -
end
DETAILED STEPS
| Command or Action | Purpose | |||
|---|---|---|---|---|
| Step 1 |
Example: |
Enables privileged EXEC mode.
|
||
| Step 2 |
Example: |
Enters global configuration mode. |
||
| Step 3 |
Example: |
Enters router configuration mode and creates a BGP routing process. |
||
| Step 4 |
Example: |
Enters policy-template configuration mode and creates a peer policy template. |
||
| Step 5 |
Example: |
(Optional) Configures the maximum number of prefixes that a neighbor will accept from this peer.
|
||
| Step 6 |
Example: |
(Optional) Sets the default weight for routes that are sent from this neighbor.
|
||
| Step 7 |
Example: |
(Optional) Filters prefixes that are received by the router or sent from the router.
|
||
| Step 8 |
Example: |
Exits policy-template configuration mode and returns to privileged EXEC mode. |
What to Do Next
After the peer policy template is created, the configuration of the peer policy template can be inherited or applied by another
peer policy template. For details about peer policy inheritance, see the “Configuring Peer Policy Template Inheritance with
the inherit peer-policy Command” section or the “Configuring Peer Policy Template Inheritance with the neighbor inherit peer-policy
Command” section.
Configuring Peer Policy Template Inheritance with the inherit peer-policy Command
This task configures peer policy template inheritance using the
inherit
peer-policy command. It creates and configure a peer policy template and allows it to inherit a configuration from another peer policy
template.
When BGP neighbors use inherited peer templates, it can be difficult to determine which policies are associated with a specific
template. In Cisco IOS Release 12.0(25)S, 12.4(11)T, 12.2(33)SRB, 12.2(33)SB, and later releases, the
detail keyword was added to the
show
ip
bgp
template
peer-policy command to display the detailed configuration of local and inherited policies associated with a specific template.
Note |
The commands in Steps 5 and 6 are optional and could be replaced with any supported BGP policy configuration commands. |
SUMMARY STEPS
-
enable
-
configure
terminal
-
router
bgp
autonomous-system-number
-
template
peer-policy
policy-template-name
-
route-map
map-name
{in |
out } -
inherit
peer-policy
policy-template-name
sequence-number
-
end
-
show
ip
bgp
template
peer-policy
[policy-template-name [detail ]]
DETAILED STEPS
| Command or Action | Purpose | |||
|---|---|---|---|---|
| Step 1 |
Example: |
Enables privileged EXEC mode.
|
||
| Step 2 |
Example: |
Enters global configuration mode. |
||
| Step 3 |
Example: |
Enters router configuration mode and creates a BGP routing process. |
||
| Step 4 |
Example: |
Enter policy-template configuration mode and creates a peer policy template. |
||
| Step 5 |
Example: |
(Optional) Applies the specified route map to inbound or outbound routes.
|
||
| Step 6 |
Example: |
Configures the peer policy template to inherit the configuration of another peer policy template.
|
||
| Step 7 |
Example: |
Exits policy-template configuration mode and returns to privileged EXEC mode. |
||
| Step 8 |
Example: |
Displays locally configured peer policy templates.
|
Examples
The following sample output of the
show
ip
bgp
template
peer-policy command with the
detail keyword displays details of the policy named NETWORK1. The output in this example shows that the GLOBAL template was inherited.
Details of route map and prefix list configurations are also displayed.
Router# show ip bgp template peer-policy NETWORK1 detail
Template:NETWORK1, index:2.
Local policies:0x1, Inherited polices:0x80840
This template inherits:
  GLOBAL, index:1, seq_no:10, flags:0x1
Locally configured policies:
  route-map ROUTE in
Inherited policies:
  prefix-list NO-MARKETING in
  weight 300
  maximum-prefix 10000
 Template:NETWORK1 <detail>
Locally configured policies:
  route-map ROUTE in
route-map ROUTE, permit, sequence 10
  Match clauses:
    ip address prefix-lists: DEFAULT
ip prefix-list DEFAULT: 1 entries
   seq 5 permit 10.1.1.0/24
  Set clauses:
  Policy routing matches: 0 packets, 0 bytes
Inherited policies:
  prefix-list NO-MARKETING in
ip prefix-list NO-MARKETING: 1 entries
   seq 5 deny 10.2.2.0/24
Configuring Peer Policy Template Inheritance with the neighbor inherit peer-policy Command
This task configures a router to send a peer policy template to a neighbor to inherit using the
neighbor
inherit
peer-policy command. Perform the following steps to send a peer policy template configuration to a neighbor to inherit.
When BGP neighbors use multiple levels of peer templates, it can be difficult to determine which policies are applied to
the neighbor. In Cisco IOS Release 12.0(25)S, 12.4(11)T, 12.2(33)SRB, 12.2(33)SB, and later releases, the
policy and
detail keywords were added to the
show
ip
bgp
neighbors command to display the inherited policies and policies configured directly on the specified neighbor.
SUMMARY STEPS
-
enable
-
configure
terminal
-
router
bgp
autonomous-system-number
-
neighbor
ip-address
remote-as
autonomous-system-number
-
address-family
ipv4
[multicast
|
unicast
|
vrf
vrf-name ] -
neighbor
ip-address
inherit
peer-policy
policy-template-name
-
end
-
show
ip
bgp
neighbors
[ip-address [policy [detail ]]]
DETAILED STEPS
| Command or Action | Purpose | |||
|---|---|---|---|---|
| Step 1 |
Example: |
Enables privileged EXEC mode.
|
||
| Step 2 |
Example: |
Enters global configuration mode. |
||
| Step 3 |
Example: |
Enters router configuration mode and creates a BGP routing process. |
||
| Step 4 |
Example: |
Configures a peering session with the specified neighbor.
|
||
| Step 5 |
Example: |
Enters address family configuration mode to configure a neighbor to accept address family-specific command configurations. |
||
| Step 6 |
Example: |
Sends a peer policy template to a neighbor so that the neighbor can inherit the configuration.
|
||
| Step 7 |
Example: |
Exits address family configuration mode and returns to privileged EXEC mode. |
||
| Step 8 |
Example: |
Displays locally configured peer policy templates.
|
Examples
The following sample output shows the policies applied to the neighbor at 192.168.1.2. The output displays both inherited
policies and policies configured on the neighbor device. Inherited polices are policies that the neighbor inherits from a
peer-group or a peer-policy template.
Router# show ip bgp neighbors 192.168.1.2 policy
Neighbor: 192.168.1.2, Address-Family: IPv4 Unicast
Locally configured policies:
 route-map ROUTE in
Inherited polices:
 prefix-list NO-MARKETING in
 route-map ROUTE in
 weight 300
 maximum-prefix 10000
Monitoring and Maintaining BGP Dynamic Update Groups
Use this task to clear and display information about the processing of dynamic BGP update groups. The performance of BGP
update message generation is improved with the use of BGP update groups. With the configuration of the BGP peer templates
and the support of the dynamic BGP update groups, the network operator no longer needs to configure peer groups in BGP and
can benefit from improved configuration flexibility and system performance. For information about using BGP peer templates,
see the “Configuring Peer Session Templates” and “Configuring Peer Policy Templates” sections.
SUMMARY STEPS
-
enable
-
clear
ip
bgp
update-group
[index-group |
ip-address ] -
show
ip
bgp
replication
[index-group |
ip-address ] -
show
ip
bgp
update-group
[index-group |
ip-address ] [summary ]
DETAILED STEPS
| Command or Action | Purpose | |
|---|---|---|
| Step 1 |
Example: |
Enables privileged EXEC mode.
|
| Step 2 |
Example: |
Clears BGP update group membership and recalculate BGP update groups.
|
| Step 3 |
Example: |
Displays update replication statistics for BGP update groups. |
| Step 4 |
Example: |
Displays information about BGP update groups. |
Troubleshooting Tips
Use the debug ip bgp groups command to display information about the processing of BGP update groups. Information can be displayed for all update groups,
an individual update group, or a specific BGP neighbor. The output of this command can be very verbose. This command should
not be deployed in a production network unless your are troubleshooting a problem.
Configuration Examples for a Basic BGP Network
Example: Configuring a BGP
Process and Customizing Peers
The following
example shows the configuration for Router B in the
above (in the “Customizing a BGP Peer” section) with a BGP process
configured with two neighbor peers (at Router A and at Router E) in separate
autonomous systems. IPv4 unicast routes are exchanged with both peers and IPv4
multicast routes are exchanged with the BGP peer at Router E.
Router B
router bgp 45000
 bgp router-id 172.17.1.99
 no bgp default ipv4-unicast
 bgp log-neighbor-changes
 timers bgp 70 120
 neighbor 192.168.1.2 remote-as 40000
 neighbor 192.168.3.2 remote-as 50000
 neighbor 192.168.3.2 description finance
 !
 address-family ipv4
  neighbor 192.168.1.2 activate
  neighbor 192.168.3.2 activate
  no auto-summary
  no synchronization
  network 172.17.1.0 mask 255.255.255.0
  exit-address-family
 !
 address-family ipv4 multicast
  neighbor 192.168.3.2 activate
  neighbor 192.168.3.2 advertisement-interval 25
  no auto-summary
  no synchronization
  network 172.17.1.0 mask 255.255.255.0
  exit-address-family
Examples: Configuring a BGP
Routing Process and Peers Using 4-Byte Autonomous System Numbers
Asplain Format
The following
example shows the configuration for Router A, Router B, and Router E in the
figure below with a Border Gateway Protocol (BGP) process configured between
three neighbor peers (at Router A, at Router B, and at Router E) in separate
4-byte autonomous systems configured using asplain notation. IPv4 unicast
routes are exchanged with all peers.
Autonomous System Numbers in Asplain Format
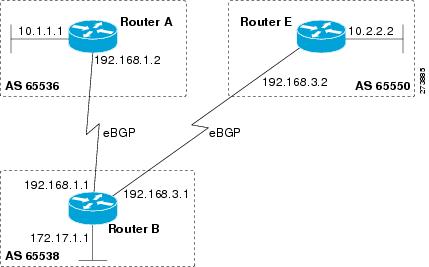
Router A
router bgp 65536
 bgp router-id 10.1.1.99
 no bgp default ipv4-unicast
 bgp fast-external-fallover
 bgp log-neighbor-changes
 timers bgp 70 120
 neighbor 192.168.1.1 remote-as 65538
 !
 address-family ipv4
  neighbor 192.168.1.1 activate
  no auto-summary
  no synchronization
  network 10.1.1.0 mask 255.255.255.0
  exit-address-family
Router B
router bgp 65538
 bgp router-id 172.17.1.99
 no bgp default ipv4-unicast
 bgp fast-external-fallover
 bgp log-neighbor-changes
 timers bgp 70 120
 neighbor 192.168.1.2 remote-as 65536
 neighbor 192.168.3.2 remote-as 65550
 neighbor 192.168.3.2 description finance
 !
 address-family ipv4
  neighbor 192.168.1.2 activate
  neighbor 192.168.3.2 activate
  no auto-summary
  no synchronization
  network 172.17.1.0 mask 255.255.255.0
  exit-address-family
Router E
router bgp 65550
 bgp router-id 10.2.2.99
 no bgp default ipv4-unicast
 bgp fast-external-fallover
 bgp log-neighbor-changes
 timers bgp 70 120
 neighbor 192.168.3.1 remote-as 65538
 !
 address-family ipv4
  neighbor 192.168.3.1 activate
  no auto-summary
  no synchronization
  network 10.2.2.0 mask 255.255.255.0
  exit-address-family
Asdot Format
The following
example shows how to create the configuration for Router A, Router B, and
Router E in the figure below with a BGP process configured between three
neighbor peers (at Router A, at Router B, and at Router E) in separate 4-byte
autonomous systems configured using the default asdot format. IPv4 unicast
routes are exchanged with all peers.
Autonomous System Numbers in Asdot Format
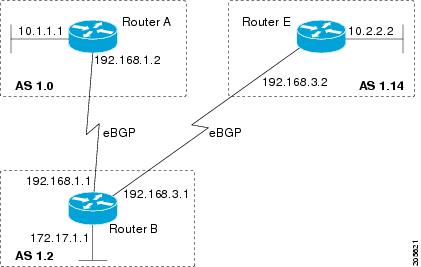
Router A
router bgp 1.0
 bgp router-id 10.1.1.99
 no bgp default ipv4-unicast
 bgp fast-external-fallover
 bgp log-neighbor-changes
 timers bgp 70 120
 neighbor 192.168.1.1 remote-as 1.2
 !
 address-family ipv4
  neighbor 192.168.1.1 activate
  no auto-summary
  no synchronization
  network 10.1.1.0 mask 255.255.255.0
  exit-address-family
Router B
router bgp 1.2
 bgp router-id 172.17.1.99
 no bgp default ipv4-unicast
 bgp fast-external-fallover
 bgp log-neighbor-changes
 timers bgp 70 120
 neighbor 192.168.1.2 remote-as 1.0
 neighbor 192.168.3.2 remote-as 1.14
 neighbor 192.168.3.2 description finance
 !
 address-family ipv4
  neighbor 192.168.1.2 activate
  neighbor 192.168.3.2 activate
  no auto-summary
  no synchronization
  network 172.17.1.0 mask 255.255.255.0
  exit-address-family
Router E
router bgp 1.14
 bgp router-id 10.2.2.99
 no bgp default ipv4-unicast
 bgp fast-external-fallover
 bgp log-neighbor-changes
 timers bgp 70 120
 neighbor 192.168.3.1 remote-as 1.2
 !
 address-family ipv4
  neighbor 192.168.3.1 activate
  no auto-summary
  no synchronization
  network 10.2.2.0 mask 255.255.255.0
  exit-address-family
Examples: Configuring a VRF
and Setting an Extended Community Using a BGP 4-Byte Autonomous System
Number
Asplain Default Format in
Cisco IOS Release 12.0(32)SY8, 12.0(33)S3, 12.2(33)SRE, 12.2(33)SXI1, and Later
Releases
The following
example is available in Cisco IOS Release 12.0(32)SY8, 12.0(33)S3, 12.2(33)SRE,
12.2(33)XNE, 12.2(33)SXI1, and later releases and shows how to create a VRF
with a route target that uses a 4-byte autonomous system number, 65537, and how
to set the route target to extended community value 65537:100 for routes that
are permitted by the route map:
ip vrf vpn_red
 rd 64500:100
 route-target both 65537:100
 exit
route-map red_map permit 10
 set extcommunity rt 65537:100
 end
After the
configuration is completed, use the
show
route-map command to verify that the extended
community is set to the route target that contains the 4-byte autonomous system
number of 65537:
RouterB# show route-map red_map
route-map red_map, permit, sequence 10
  Match clauses:
  Set clauses:
    extended community RT:65537:100
  Policy routing matches: 0 packets, 0 bytes
4-Byte
Autonomous System Number RD Support
The following
example shows how to create a VRF with a route distinguisher that contains a
4-byte AS number 65536, and a route target that contains a 4-byte autonomous
system number, 65537:
ip vrf vpn_red
 rd 65536:100
 route-target both 65537:100
 exit
After the
configuration is completed, use the
show
vrf command to verify that the 4-byte AS number
route distinguisher is set to 65536:100:
RouterB# show vrf vpn_red
Current configuration : 36 bytes
vrf definition x
 rd 65536:100
!
Asdot Default Format in Cisco
IOS Release 12.0(32)S12, and 12.4(24)T
The following
example is available in Cisco IOS Release 12.0(32)S12, and 12.4(24)T and shows
how to create a VRF with a route target that uses a 4-byte autonomous system
number, 1.1, and how to set the route target to the extended community value
1.1:100 for routes that are permitted by the route map.
Note |
In Cisco IOS |
ip vrf vpn_red
 rd 64500:100
 route-target both 1.1:100
 exit
route-map red_map permit 10
 set extcommunity rt 1.1:100
 end
After the
configuration is completed, use the
show
route-map command to verify that the extended
community is set to the route target that contains the 4-byte autonomous system
number of 1.1.
RouterB# show route-map red_map
route-map red_map, permit, sequence 10
  Match clauses:
  Set clauses:
    extended community RT:1.1:100
  Policy routing matches: 0 packets, 0 bytes
Asdot Default
Format for 4-Byte Autonomous System Number RD Support
The following
example works if you have configured asdot as the default display format using
the
bgp
asnotation
dot command:
ip vrf vpn_red
 rd 1.0:100
 route-target both 1.1:100
 exit
Example: NLRI to AFI Configuration
The following example upgrades an existing router configuration file in the NLRI format to the AFI format and set the router
CLI to use only commands in the AFI format:
router bgp 60000
 bgp upgrade-cli
The
show
running-config command can be used in privileged EXEC mode to verify that an existing router configuration file has been upgraded from the
NLRI format to the AFI format. The following sections provide sample output from a router configuration file in the NLRI format,
and the same router configuration file after it has been upgraded to the AFI format with the
bgp
upgrade-cli command in router configuration mode.
Note |
After a router has been upgraded from the AFI format to the NLRI format with the |
Router Configuration File in NLRI Format Before Upgrading
The following sample output is from the
show
running-config command in privileged EXEC mode. The sample output shows a router configuration file, in the NLRI format, prior to upgrading
to the AFI format with the
bgp
upgrade-cli command. The sample output is filtered to show only the affected portion of the router configuration.
Router# show running-config | begin bgp

router bgp 101
 no synchronization
 bgp log-neighbor-changes
 neighbor 10.1.1.1 remote-as 505 nlri unicast multicast
 no auto-summary
!
ip default-gateway 10.4.9.1
ip classless
!
!
route-map REDISTRIBUTE-MULTICAST permit 10
 match ip address prefix-list MULTICAST-PREFIXES
 set nlri multicast
!
route-map MULTICAST-PREFIXES permit 10
!
route-map REDISTRIBUTE-UNICAST permit 20
 match ip address prefix-list UNICAST-PREFIXES
 set nlri unicast
!
!
!
line con 0
line aux 0
line vty 0 4
 password PASSWORD
 login
!
end
Router Configuration File in AFI Format After Upgrading
The following sample output shows the router configuration file after it has been upgraded to the AFI format. The sample
output is filtered to show only the affected portion of the router configuration file.
Router# show running-config | begin bgp

router bgp 101
 bgp log-neighbor-changes
 neighbor 10.1.1.1 remote-as 505
 no auto-summary
 !
 address-family ipv4 multicast
  neighbor 10.1.1.1 activate
  no auto-summary
  no synchronization
  exit-address-family
 !
 address-family ipv4
  neighbor 10.1.1.1 activate
  no auto-summary
  no synchronization
  exit-address-family
!
ip default-gateway 10.4.9.1
ip classless
!
!
route-map REDISTRIBUTE-MULTICAST_mcast permit 10
 match ip address prefix-list MULTICAST-PREFIXES
!
route-map REDISTRIBUTE-MULTICAST permit 10
 match ip address prefix-list MULTICAST-PREFIXES
!
route-map MULTICAST-PREFIXES permit 10
!
route-map REDISTRIBUTE-UNICAST permit 20
 match ip address prefix-list UNICAST-PREFIXES
!
!
!
line con 0
line aux 0
line vty 0 4
 password PASSWORD
 login
!
end
Examples: Removing BGP Configuration Commands Using a Redistribution Example
The following examples show first the CLI configuration to enable the redistribution of BGP routes into EIGRP using a route
map and then the CLI configuration to remove the redistribution and route map. Some BGP configuration commands can affect
other CLI commands and this example demonstrates how the removal of one command affects another command.
In the first configuration example, a route map is configured to match and set autonomous system numbers. BGP neighbors in
three different autonomous systems are configured and activated. An EIGRP routing process is started, and the redistribution
of BGP routes into EIGRP using the route map is configured.
CLI to Enable BGP Route Redistribution Into EIGRP
route-map bgp-to-eigrp permit 10
 match tag 50000
 set tag 65000
 exit
router bgp 45000
 bgp log-neighbor-changes
 address-family ipv4
  neighbor 172.16.1.2 remote-as 45000
  neighbor 172.21.1.2 remote-as 45000
  neighbor 192.168.1.2 remote-as 40000
  neighbor 192.168.3.2 remote-as 50000
  neighbor 172.16.1.2 activate
  neighbor 172.21.1.2 activate
  neighbor 192.168.1.2 activate
  neighbor 192.168.3.2 activate
  network 172.17.1.0 mask 255.255.255.0
  exit-address-family
 exit
router eigrp 100
 redistribute bgp 45000 metric 10000 100 255 1 1500 route-map bgp-to-eigrp
 no auto-summary
 exit
In the second configuration example, both the
route-map command and the
redistribute command are disabled. If only the route-map command is removed, it does not automatically disable the redistribution. The
redistribution will now occur without any matching or filtering. To remove the redistribution configuration, the
redistribute command must also be disabled.
CLI to Remove BGP Route Redistribution Into EIGRP
configure terminal
 no route-map bgp-to-eigrp
 router eigrp 100
  no redistribute bgp 45000
  end
Examples: BGP Soft Reset
The following examples show two ways to reset the connection for BGP peer 192.168.1.1.
Example: Dynamic Inbound Soft Reset
The following example shows the command used to initiate a dynamic soft reconfiguration in the BGP peer 192.168.1.1. This
command requires that the peer support the route refresh capability.
clear ip bgp 192.168.1.1 soft inExample: Inbound Soft Reset Using Stored Information
The following example shows how to enable inbound soft reconfiguration for the neighbor 192.168.1.1. All the updates received
from this neighbor will be stored unmodified, regardless of the inbound policy. When inbound soft reconfiguration is performed
later, the stored information will be used to generate a new set of inbound updates.
router bgp 100
 neighbor 192.168.1.1 remote-as 200
 neighbor 192.168.1.1 soft-reconfiguration inbound
The following example clears the session with the neighbor 192.168.1.1:
clear ip bgp 192.168.1.1 soft inExample: Resetting BGP Peers Using 4-Byte Autonomous System Numbers
The following examples show how to clear BGP peers belonging to an autonomous system that uses 4-byte autonomous system numbers.
The initial state of the BGP routing table is shown using the
show
ip
bgp command, and peers in 4-byte autonomous systems 65536 and 65550 are displayed.
RouterB# show ip bgp

BGP table version is 4, local router ID is 172.17.1.99
Status codes: s suppressed, d damped, h history, * valid, > best, i - internal,
              r RIB-failure, S Stale
Origin codes: i - IGP, e - EGP, ? - incomplete
   Network          Next Hop            Metric LocPrf Weight Path
*> 10.1.1.0/24      192.168.1.2              0             0 65536  i
*> 10.2.2.0/24      192.168.3.2              0             0 65550  i
*> 172.17.1.0/24    0.0.0.0                  0         32768 i
The
clear
ip
bgp
65550 command is entered to remove all BGP peers in the 4-byte autonomous system 65550. The ADJCHANGE message shows that the BGP
peer at 192.168.3.2 is being reset.
RouterB# clear ip bgp 65550
RouterB#
*Nov 30 23:25:27.043: %BGP-5-ADJCHANGE: neighbor 192.168.3.2 Down User reset
The
show
ip
bgp command is entered again, and only the peer in 4-byte autonomous systems 65536 is now displayed.
RouterB# show ip bgp

BGP table version is 5, local router ID is 172.17.1.99
Status codes: s suppressed, d damped, h history, * valid, > best, i - internal,
              r RIB-failure, S Stale
Origin codes: i - IGP, e - EGP, ? - incomplete
   Network          Next Hop            Metric LocPrf Weight Path
*> 10.1.1.0/24      192.168.1.2              0             0 65536  i
*> 172.17.1.0/24    0.0.0.0                  0         32768 i
Almost immediately, the next ADJCHANGE message shows that the BGP peer at 192.168.3.2 (in the 4-byte autonomous system 65550)
is now back up.
RouterB#
*Nov 30 23:25:55.995: %BGP-5-ADJCHANGE: neighbor 192.168.3.2 Up
Example: Resetting and Displaying Basic BGP Information
The following example shows how to reset and display basic BGP information.
The
clear
ip
bgp
* command clears and resets all the BGP neighbor sessions. In Cisco IOS Release 12.2(25)S and later releases, the syntax is
clear
ip
bgp
all . Specific neighbors or all peers in an autonomous system can be cleared by using the
neighbor-address and
autonomous-system-number arguments. If no argument is specified, this command will clear and reset all BGP neighbor sessions.
Note |
The |
Router# clear ip bgp *
The
show
ip
bgp command is used to display all the entries in the BGP routing table. The following example displays BGP routing table information
for the 10.1.1.0 network:
Router# show ip bgp 10.1.1.0 255.255.255.0

BGP routing table entry for 10.1.1.0/24, version 2
Paths: (1 available, best #1, table Default-IP-Routing-Table)
  Advertised to update-groups:
     1
  40000
    192.168.1.2 from 192.168.1.2 (10.1.1.99)
      Origin IGP, metric 0, localpref 100, valid, external, best
The
show
ip
bgp
neighbors command is used to display information about the TCP and BGP connections to neighbors. The following example displays the
routes that were advertised from Router B in the figure above (in the “Configuring a BGP Peer for the IPv4 VRF Address Family”
section) to its BGP neighbor 192.168.3.2 on Router E:
Router# show ip bgp neighbors 192.168.3.2 advertised-routes

BGP table version is 3, local router ID is 172.17.1.99
Status codes: s suppressed, d damped, h history, * valid, > best, i - internal,
              r RIB-failure, S Stale
Origin codes: i - IGP, e - EGP, ? - incomplete
   Network          Next Hop            Metric LocPrf Weight Path
*> 10.1.1.0/24      192.168.1.2              0             0 40000 i
*> 172.17.1.0/24    0.0.0.0                  0         32768 i
Total number of prefixes 2
The
show
ip
bgp
paths command is used to display all the BGP paths in the database. The following example displays BGP path information for Router
B in the figure above (in the “Customizing a BGP Peer” section):
Router# show ip bgp paths

Address    Hash Refcount Metric Path
0x2FB5DB0     0        5      0 i
0x2FB5C90     1        4      0 i
0x2FB5C00  1361        2      0 50000 i
0x2FB5D20  2625        2      0 40000 i
The
show
ip
bgp
summary command is used to display the status of all BGP connections. The following example displays BGP routing table information
for Router B in the figure above (in the “Customizing a BGP Peer” section:
Router# show ip bgp summary

BGP router identifier 172.17.1.99, local AS number 45000
BGP table version is 3, main routing table version 3
2 network entries using 234 bytes of memory
2 path entries using 104 bytes of memory
4/2 BGP path/bestpath attribute entries using 496 bytes of memory
2 BGP AS-PATH entries using 48 bytes of memory
0 BGP route-map cache entries using 0 bytes of memory
0 BGP filter-list cache entries using 0 bytes of memory
BGP using 882 total bytes of memory
BGP activity 14/10 prefixes, 16/12 paths, scan interval 60 secs
Neighbor        V    AS MsgRcvd MsgSent   TblVer  InQ OutQ Up/Down  State/PfxRcd
192.168.1.2     4 40000     667     672        3    0    0 00:03:49        1
192.168.3.2     4 50000     468     467        0    0    0 00:03:49 (NoNeg)
Examples: Aggregating Prefixes Using BGP
The following examples show how you can use aggregate routes in BGP either by redistributing an aggregate route into BGP
or by using the BGP conditional aggregation routing feature.
In the following example, the
redistribute
static router configuration command is used to redistribute aggregate route 10.0.0.0:
ip route 10.0.0.0 255.0.0.0 null 0
!
router bgp 100
 redistribute static
The following configuration shows how to create an aggregate entry in the BGP routing table when at least one specific route
falls into the specified range. The aggregate route will be advertised as coming from your autonomous system and has the atomic
aggregate attribute set to show that information might be missing. (By default, atomic aggregate is set unless you use the
as-set keyword in the
aggregate-address router configuration command.)
router bgp 100
 aggregate-address 10.0.0.0 255.0.0.0
The following example shows how to create an aggregate entry using the same rules as in the previous example, but the path
advertised for this route will be an AS_SET consisting of all elements contained in all paths that are being summarized:
router bgp 100
 aggregate-address 10.0.0.0 255.0.0.0 as-set
The following example shows how to create the aggregate route for 10.0.0.0 and also suppress advertisements of more specific
routes to all neighbors:
router bgp 100
 aggregate-address 10.0.0.0 255.0.0.0 summary-only
The following example configures BGP to not advertise inactive routes:
Device(config)# router bgp 50000
Device(config-router)# address-family ipv4 unicast
Device(config-router-af)# bgp suppress-inactive
Device(config-router-af)# end
The following example configures a maximum route limit in the VRF named RED and configures BGP to not advertise inactive
routes through the VRF named RED:
Device(config)# ip vrf RED
Device(config-vrf)# rd 50000:10
Device(config-vrf)# maximum routes 1000 10
Device(config-vrf)# exit
Device(config)# router bgp 50000
Device(config-router)# address-family ipv4 vrf RED
Device(config-router-af)# bgp suppress-inactive
Device(config-router-af)# end
Example: Configuring a BGP Peer Group
The following example shows how to use an address family to configure a peer group so that all members of the peer group
are both unicast- and multicast-capable:
router bgp 45000
 neighbor 192.168.1.2 remote-as 40000
 neighbor 192.168.3.2 remote-as 50000
 address-family ipv4 unicast
  neighbor mygroup peer-group
  neighbor 192.168.1.2 peer-group mygroup
  neighbor 192.168.3.2 peer-group mygroup
router bgp 45000
 neighbor 192.168.1.2 remote-as 40000
 neighbor 192.168.3.2 remote-as 50000
 address-family ipv4 multicast
  neighbor mygroup peer-group
  neighbor 192.168.1.2 peer-group mygroup
  neighbor 192.168.3.2 peer-group mygroup
  neighbor 192.168.1.2 activate
  neighbor 192.168.3.2 activate
Example: Configuring Peer Session Templates
The following example creates a peer session template named INTERNAL-BGP in session-template configuration mode:
router bgp 45000
 template peer-session INTERNAL-BGP
 remote-as 50000
 timers 30 300
 exit-peer-session
The following example creates a peer session template named CORE1. This example inherits the configuration of the peer session
template named INTERNAL-BGP.
router bgp 45000
 template peer-session CORE1
 description CORE-123
 update-source loopback 1
 inherit peer-session INTERNAL-BGP
 exit-peer-session
The following example configures the 192.168.3.2 neighbor to inherit the CORE1 peer session template. The 192.168.3.2 neighbor
will also indirectly inherit the configuration from the peer session template named INTERNAL-BGP. The explicit
remote-as statement is required for the neighbor inherit statement to work. If a peering is not configured, the specified neighbor
will not accept the session template.
router bgp 45000
 neighbor 192.168.3.2 remote-as 50000
 neighbor 192.168.3.2 inherit peer-session CORE1
Examples: Configuring Peer Policy Templates
The following example creates a peer policy template named GLOBAL and enters policy-template configuration mode:
router bgp 45000
 template peer-policy GLOBAL
  weight 1000
  maximum-prefix 5000
  prefix-list NO_SALES in
  exit-peer-policy
The following example creates a peer policy template named PRIMARY-IN and enters policy-template configuration mode:
router bgp 45000
 template peer-policy PRIMARY-IN
  prefix-list ALLOW-PRIMARY-A in
  route-map SET-LOCAL in
  weight 2345
  default-originate
  exit-peer-policy
The following example creates a peer policy template named CUSTOMER-A. This peer policy template is configured to inherit
the configuration from the peer policy templates named PRIMARY-IN and GLOBAL.
router bgp 45000
 template peer-policy CUSTOMER-A
  route-map SET-COMMUNITY in
  filter-list 20 in
  inherit peer-policy PRIMARY-IN 20
  inherit peer-policy GLOBAL 10
  exit-peer-policy
The following example configures the 192.168.2.2 neighbor in address family mode to inherit the peer policy template named
CUSTOMER-A. Assuming this example is a continuation of the example above, because the peer policy template named CUSTOMER-A
above inherited the configuration from the templates named PRIMARY-IN and GLOBAL, the 192.168.2.2 neighbor will also indirectly
inherit the peer policy templates named PRIMARY-IN and GLOBAL.
router bgp 45000
 neighbor 192.168.2.2 remote-as 50000
 address-family ipv4 unicast
  neighbor 192.168.2.2 inherit peer-policy CUSTOMER-A
  end
Examples: Monitoring and Maintaining BGP Dynamic Update Peer-Groups
No configuration is required to enable the BGP dynamic update of peer groups and the algorithm runs automatically. The following
examples show how BGP update group information can be cleared or displayed.
clear ip bgp update-group Example
The following example clears the membership of neighbor 10.0.0.1 from an update group:
Router# clear ip bgp update-group 10.0.0.1
debug ip bgp groups Example
The following example output from the
debug
ip
bgp
groups command shows the recalculation of update groups after the
clear
ip
bgp
groups command was issued:
Router# debug ip bgp groups

5w4d: %BGP-5-ADJCHANGE: neighbor 10.4.9.5 Down User reset
5w4d: BGP-DYN(0): Comparing neighbor 10.4.9.5 flags 0x0 cap 0x0 and updgrp 2 fl0
5w4d: BGP-DYN(0): Update-group 2 flags 0x0 cap 0x0 policies same as 10.4.9.5 fl0
5w4d: %BGP-5-ADJCHANGE: neighbor 10.4.9.8 Down User reset
5w4d: BGP-DYN(0): Comparing neighbor 10.4.9.8 flags 0x0 cap 0x0 and updgrp 2 fl0
5w4d: BGP-DYN(0): Update-group 2 flags 0x0 cap 0x0 policies same as 10.4.9.8 fl0
5w4d: %BGP-5-ADJCHANGE: neighbor 10.4.9.21 Down User reset
5w4d: BGP-DYN(0): Comparing neighbor 10.4.9.21 flags 0x0 cap 0x0 and updgrp 1 f0
5w4d: BGP-DYN(0): Update-group 1 flags 0x0 cap 0x0 policies same as 10.4.9.21 f0
5w4d: %BGP-5-ADJCHANGE: neighbor 10.4.9.5 Up
5w4d: %BGP-5-ADJCHANGE: neighbor 10.4.9.21 Up
5w4d: %BGP-5-ADJCHANGE: neighbor 10.4.9.8 Up
show ip bgp replication Example
The following sample output from the
show
ip
bgp
replication command shows update group replication information for all for neighbors:
Router# show ip bgp replication

BGP Total Messages Formatted/Enqueued : 0/0
     Index     Type  Members          Leader   MsgFmt  MsgRepl  Csize  Qsize
         1 internal        1       10.4.9.21        0        0      0      0
         2 internal        2        10.4.9.5        0        0      0      0
show ip bgp update-group Example
The following sample output from the
show
ip
bgp
update-group command shows update group information for all neighbors:
Router# show ip bgp update-group

BGP version 4 update-group 1, internal, Address Family: IPv4 Unicast
  BGP Update version : 0, messages 0/0
  Route map for outgoing advertisements is COST1
  Update messages formatted 0, replicated 0
  Number of NLRIs in the update sent: max 0, min 0
  Minimum time between advertisement runs is 5 seconds
  Has 1 member:
  10.4.9.21
BGP version 4 update-group 2, internal, Address Family: IPv4 Unicast
  BGP Update version : 0, messages 0/0
  Update messages formatted 0, replicated 0
  Number of NLRIs in the update sent: max 0, min 0
  Minimum time between advertisement runs is 5 seconds
  Has 2 members:
  10.4.9.5 10.4.9.8
Where to Go Next
-
If you want to connect to an external service provider, see the “Connecting to a Service Provider Using External BGP” module.
-
To configure BGP neighbor session options, proceed to the “Configuring BGP Neighbor Session Options” module.
-
If you want to configure some iBGP features, see the “Configuring Internal BGP Features” module.
Additional References
Related Documents
|
Related Topic |
Document Title |
|---|---|
|
Cisco IOS commands |
Cisco IOS Master Command List, All Releases |
|
BGP commands |
|
|
IPv6 commands: complete command syntax, command mode, defaults, usage guidelines, and examples |
Cisco IOS IPv6 Command Reference |
|
Overview of Cisco BGP conceptual information with links to all the individual BGP modules |
“Cisco BGP Overview” module in the |
|
Multiprotocol Label Switching (MPLS) and BGP configuration example using the IPv4 VRF address family |
“MPLS VPN Inter-AS with ASBRs Exchanging IPv4 Routes and MPLS Labels” module in the |
Standards
|
Standard |
Title |
|---|---|
|
MDT SAFI |
MDT SAFI |
MIBs
|
MIB |
MIBs Link |
|---|---|
|
CISCO-BGP4-MIB |
To locate and download MIBs for selected platforms, Cisco IOS releases, and feature sets, use Cisco MIB Locator found at http://www.cisco.com/go/mibs |
RFCs
|
RFC |
Title |
|---|---|
|
RFC 1772 |
Application of the Border Gateway Protocol in the Internet |
|
RFC 1773 |
Experience with the BGP Protocol |
|
RFC 1774 |
BGP-4 Protocol Analysis |
|
RFC 1930 |
Guidelines for Creation, Selection, and Registration of an Autonomous System (AS) |
|
RFC 2519 |
A Framework for Inter-Domain Route Aggregation |
|
RFC 2858 |
Multiprotocol Extensions for BGP-4 |
|
RFC 2918 |
Route Refresh Capability for BGP-4 |
|
RFC 3392 |
Capabilities Advertisement with BGP-4 |
|
RFC 4271 |
A Border Gateway Protocol 4 (BGP-4) |
|
RFC 4893 |
BGP Support for Four-octet AS Number Space |
|
RFC 5396 |
Textual Representation of Autonomous system (AS) Numbers |
|
RFC 5398 |
Autonomous System (AS) Number Reservation for Documentation Use |
Technical Assistance
|
Description |
Link |
|---|---|
|
The Cisco Support and Documentation website provides online resources to download documentation, software, and tools. Use |
http://www.cisco.com/cisco/web/support/index.html |
Feature Information for Configuring a Basic BGP Network
The following table provides release information about the feature or features described in this module. This table lists
only the software release that introduced support for a given feature in a given software release train. Unless noted otherwise,
subsequent releases of that software release train also support that feature.
Use Cisco Feature Navigator to find information about platform support and Cisco software image support. To access Cisco Feature
Navigator, go to http://www.cisco.com/go/cfn. An account on Cisco.com is not required.
|
Feature Name |
Releases |
Feature Configuration Information |
|---|---|---|
|
BGP Conditional Route Injection |
12.0(22)S 12.2(4)T 12.2(14)S 15.0(1)S Cisco IOS XE 3.1.0SG |
The BGP Conditional Route Injection feature allows you to inject more specific prefixes into a BGP routing table over less |
|
BGP Configuration Using Peer Templates |
12.0(24)S 12.2(18)S 12.2(27)SBC 12.3(4)T 15.0(1)S |
The BGP Configuration Using Peer Templates feature introduces a new mechanism that groups distinct neighbor configurations |
|
BGP Dynamic Update Peer Groups |
12.0(24)S 12.2(18)S 12.2(27)SBC 12.3(4)T 15.0(1)S Cisco IOS XE 3.1.0SG |
The BGP Dynamic Update Peer Groups feature introduces a new algorithm that dynamically calculates and optimizes update groups |
|
BGP Hybrid CLI |
12.0(22)S 12.2(15)T 15.0(1)S |
The BGP Hybrid CLI feature simplifies the migration of BGP networks and existing configurations from the NLRI format to the |
|
Suppress BGP Advertisement for Inactive Routes |
12.2(25)S 12.2(33)SXH 15.0(1)M 15.0(1)S |
The Suppress BGP Advertisements for Inactive Routes feature allows you to configure the suppression of advertisements for |
Материал из Xgu.ru
Перейти к: навигация, поиск
| Данная страница находится в разработке. Эта страница ещё не закончена. Информация, представленная здесь, может оказаться неполной или неверной. Если вы считаете, что её стоило бы доработать как можно быстрее, пожалуйста, скажите об этом. |
- Автор: Наташа Самойленко
На этой странице описывается настройка BGP на маршрутизаторах Cisco.
На странице BGP/config представлена схема и конфигурационные файлы для сети, которая рассматривается на этой странице.
Содержание
- 1 Выбор пути
- 2 Создание процесса BGP
- 2.1 Выбор идентификатора маршрутизатора (Router ID)
- 3 Соседи BGP
- 3.1 Настройка адреса для отправки обновлений
- 3.2 Настройка eBGP-соседей через loopback
- 3.3 Аутентификация
- 3.4 Изменение значения таймеров keepalive и hold
- 3.5 Разрыв связи с соседом
- 3.6 Группа соседей
- 3.7 TTL security check
- 4 Построение таблицы BGP
- 4.1 Команда network
- 4.2 Перераспределение маршрутов
- 4.2.1 Перераспределение маршрутов OSPF
- 4.2.1.1 Начальные условия
- 4.2.1.2 Перераспределение маршрутов без задания метрики
- 4.2.1.3 Перераспределение маршрутов и задание метрики (атрибута MED)
- 4.2.1.4 Удаление настроек перераспределения маршрутов
- 4.2.1 Перераспределение маршрутов OSPF
- 4.3 Автоматическое суммирование (команда auto-summary)
- 4.4 Суммирование маршрутов
- 4.5 Маршрут по умолчанию
- 4.6 Conditional route injection
- 5 Анонсирование маршрутов соседям
- 5.1 Правила анонсирования маршрутов
- 6 Построение таблицы маршрутизации
- 6.1 Рекурсивная маршрутизация (recursive routing)
- 6.2 Изменение AD
- 6.3 Добавление eBGP-маршрутов в таблицу маршрутизации
- 6.3.1 backdoor маршруты
- 6.4 Добавление iBGP-маршрутов в таблицу маршрутизации
- 6.4.1 Синхронизация BGP
- 6.4.2 Конфедерации (confederation)
- 6.4.2.1 Пример настройки конфедерации
- 6.4.2.2 Просмотр информации
- 6.4.3 Route reflectors
- 6.4.3.1 Изменение процедуры выбора лучшего маршрута в AS с RR
- 6.4.3.2 Пример настройки RR
- 6.4.3.3 Просмотр информации
- 7 Изменение атрибутов пути
- 7.1 Weight
- 7.2 Local preference
- 7.3 Next-hop
- 7.4 AS path
- 7.5 Origin
- 7.6 MED
- 7.6.1 bgp always-compare-med
- 7.6.2 bgp bestpath med missing-as-worst
- 7.6.2.1 Пример изменения MED
- 7.6.3 bgp bestpath med confed
- 7.6.4 bgp deterministic-med
- 7.7 Community
- 7.7.1 Community internet
- 7.7.2 community-list
- 7.7.3 Community в route-map
- 8 Управление маршрутами
- 8.1 Порядок применения фильтров в BGP
- 8.2 Фильтрация маршрутов по AS path
- 8.2.1 Регулярные выражения
- 8.2.2 Пример тестирования регулярного выражения
- 8.2.3 Пример проверки работы фильтра
- 8.3 Distribute list
- 8.4 Prefix list
- 8.4.1 Применение prefix list
- 8.5 Outbound route filtering
- 8.6 Карты маршрутов (route maps)
- 8.6.1 Route-map Policy list
- 8.6.2 Route-map continue
- 9 Применение изменений в настройках политик BGP
- 9.1 Hard reset
- 9.2 Soft reset
- 9.2.1 Outbound soft reset
- 9.2.2 Inbound soft reset
- 9.2.3 Inbound и outboung soft reset
- 9.3 Обновление маршрутов (route refresh) или Dynamic inbound soft reset
- 10 Просмотр информации
- 10.1 Информация о соседях
- 10.2 Отображение маршрутов с определенной AS в AS Path
- 11 Команды отладки (debug)
- 12 Разное
- 12.1 BGP policy accounting
- 12.2 Сходимость BGP
- 13 Конфигурационные файлы маршрутизаторов dyn1, dyn3, dyn5
- 14 Дополнительная информация
[править] Выбор пути
Характеристики процедуры выбора пути протоколом BGP:
- В таблице BGP хранятся все известные пути, а в таблице маршрутизации — лучшие.
- Пути выбираются на основании политик.
- Пути не выбираются на основании пропускной способности.
Сначала проверяется:
- Доступен ли next-hop (Route Resolvability Condition)
- Для того чтобы next-hop считался доступным (accessible), необходимо чтобы в таблице маршрутизации был IGP-маршрут, который ведет к нему.
На маршрутизаторе Cisco, если не настроены никакие политики выбора пути, выбор пути происходит таким образом (на каждый следующий шаг маршрутизатор переходит только при совпадении значений на предыдущем):
- Максимальное значение weight (локально для маршрутизатора).
- Максимальное значение local preference (для всей AS).
- Предпочесть локальный маршрут маршрутизатора (next hop = 0.0.0.0).
- Кратчайший путь через автономные системы. (самый короткий AS_PATH)
- Минимальное значение origin code (IGP < EGP < incomplete).
- Минимальное значение MED (распространяется между автономными системами).
- Путь eBGP лучше чем путь iBGP.
- Выбрать путь через ближайшего IGP-соседа.
- Выбрать самый старый маршрут для eBGP-пути.
- Выбрать путь через соседа с наименьшим BGP router ID.
- Выбрать путь через соседа с наименьшим IP-адресом.
|
|
Только лучшие пути из таблицы BGP анонсируется BGP-соседям и помещается в таблицу маршрутизации (если другой маршрут не выиграет по значению AD). |
[править] Создание процесса BGP

![]()
Пример топологии
Создание процесса BGP:
dyn3(config)# router bgp <1-65535>
Параметры:
- <1-65535> номер автономной системы, который принадлежит локальный маршрутизатор (приватный диапазон 64512-65535). Сравнивая этот номер с номерами автономных систем соседей, маршрутизатор будет использовать iBGP или eBGP.
В отличие от протоколов IGP, команда router bgp не включает работу BGP на маршрутизаторе.
На маршрутизаторе может существовать только один процесс BGP.
[править] Выбор идентификатора маршрутизатора (Router ID)
Router ID можно назначить административно выполнив команду:
dyn3(config-router)# bgp router-id <ip-address>
Если RID не был назначен административно, то он выбирается автоматически (в момент создания процесса BGP), в зависимости от настроек маршрутизатора, по таким правилам:
- Наибольший IP-адрес присвоенный loopback-интерфейсу (в состоянии up/up) будет Router ID.
- Наибольший IP-адрес из всех других интерфейсов (в состоянии up/up) будет Router ID.
[править] Соседи BGP
Создать соседа BGP (эта команда активирует сессию BGP с указанным соседом):
dyn3(config-router)# neighbor <ip-address | peer-group-name> remote-as <as-number>
Параметры команды neighbor:
- ip-address — идентифицирует соседний маршрутизатор. Это тот адрес, который будет указан как получатель в BGP-пакетах. У локального маршрутизатора обязательно должен быть маршрут к этому соседу для того, чтобы он смог установить отношения соседства с ним.
- peer-group-name — группа маршрутизаторов BGP, которые используют одинаковую политику обновлений.
- remote-as <as-number> — номер автономной системы соседа.
Команда neighbor используется для указания и внутренних соседей и внешних:
- Если указывается адрес внутреннего соседа (номер AS соседа совпадает с номером AS локального маршрутизатора), то он не обязательно должен быть непосредственно присоединен к маршрутизатору (но маршрут к соседу прописан должен быть).
- Если указывается адрес внешнего соседа (номер AS соседа отличается от номера AS локального маршрутизатора), то он должен быть непосредственно присоединен к маршрутизатору, по умолчанию.
Пример задания соседей на маршрутизаторе dyn3:
dyn3(config)#router bgp 65000
dyn3(config-router)# neighbor 192.168.4.3 remote-as 65000
dyn3(config-router)# neighbor 192.168.2.1 remote-as 65000
dyn3(config-router)# neighbor 192.168.3.4 remote-as 65000
dyn3(config-router)# neighbor 192.168.5.6 remote-as 65006
При необходимости можно указать описание для соседа:
dyn3(config-router)# neighbor <ip-address> description <text>
[править] Настройка адреса для отправки обновлений
Для тех случаев, когда в сети iBGP есть несколько путей между соседями и в качестве отправителя могут быть разные интерфейсы, рекомендуется настраивать loopback-интерфейсы.
Соседи будут указываться по их loopback-интерфейсам.
Для того чтобы пакеты BGP отправлялись с адресом отправителя loopback-интерфейсом, необходимо это явно указать:
dyn3(config-router)# neighbor <ip-address | peer-group-name> update-source <interface-type interface-number>
После выполнение этой команды, пакеты соседу с указанным IP-адресом, будут отправляться с адресом отправителя равным IP-адресу loopback-интерфейса.
Сети loopback-интерфейсов должны быть доступны соседям.
[править] Настройка eBGP-соседей через loopback
Если loopback-интерфейсы используются как отправители пакетов BGP, то для eBGP-соседей необходимо разрешить коммуникации с соседями, которые находятся не в непосредственно присоединенных сетях. Это можно сделать увеличив TTL в пакетах с помощью команды ebgp-multihop или отменив проверку connected маршрутов.
Увеличение TTL:
dyn3(config-router)# neighbor <ip-address | peer-group-name> ebgp-multihop [ttl]
|
|
По умолчанию BGP проверяет находится ли eBGP-сосед в непосредственно присоединенной сети локального маршрутизатора. Эту проверку отключает параметр disable-connected-check. |
Если EBGP-соседи непосредственно соединены, но сессия BGP поднята между loopback-интерфейсами, то можно отключить проверку connected-маршрутов (значение TTL остается прежним = 1).
В таком случае сессия не будет установлена, если EBGP-сессия будет передаваться через другие устройства.
Пример настройки:
router bgp 20
 neighbor 192.1.4.4 remote-as 10
 neighbor 192.1.4.4 disable-connected-check
 neighbor 192.1.4.4 update-source Loopback0
|
|
Маршрутизатор не уменьшает TTL в пакетах, которые предназначены ему самому |
[править] Аутентификация
Аутентификация с соседом (группой соседей):
dyn3(config-router)# neighbor <ip-address | peer-group-name> password <string>
После указания пароля, к каждому TCP-сегменту, который отправляется соседу, будет добавляться значение MD5-хеша взятое с таких входных данных:
- IP-адрес отправителя, IP-адрес получателя, номер протокола дополненный нулями, размер сегмента
- заголовок TCP, исключая опции и предполагая нулевое значение контрольной суммы
- данные сегмента TCP
- указанный ключ или пароль, известный обеим сторонам соединения TCP
[править] Изменение значения таймеров keepalive и hold
Для каждого соседа может быть указано уникальное значение таймеров keepalive и hold.
BGP выполняет проверку таймеров keepalive и hold, однако несовпадение этих параметров не влияет на установку отношений соседства.
По умолчанию значение таймеров:
- Hold — 180 секунд,
- Keepalive — 60 секунд.
В сообщениях Open передается только значение таймера Hold.
Если значения таймеров не совпадают, то каждый маршрутизатор будет использовать меньшее значение таймера Hold.
Если выбранное значение таймера Hold равно нулю, то сообщения Keepalive отправляться не будут.
Так как значение таймера keepalive не передается, то оно должно быть каким-то образом получено.
Маршрутизатор выбирает значение таймера keepalive таким образом:
- Если был выбран таймер hold, который настроен на локальном маршрутизаторе, то используется локальное значение таймера keepalive;
- Если был выбран таймер hold, который настроен на соседнем маршрутизаторе и значение локально настроенного таймера keepalive меньше чем 1/3 выбранного таймера hold, то используется локальное значение таймера keepalive;
- Если был выбран таймер hold, который настроен на соседнем маршрутизаторе и значение локально настроенного таймера keepalive больше чем 1/3 выбранного таймера hold, то используется целое число, которое меньше чем 1/3 выбранного таймера hold.
Изменение таймеров для процесса BGP:
dyn3(config-router)# timers bgp <keepalive> <holdtime>
Изменение таймеров для соседа или группы соседей (эти значения более приоритетные чем значения таймеров для процесса):
dyn3(config-router)# neighbor <ip-address | peer-group-name> timers <keepalive> <holdtime>
[править] Разрыв связи с соседом
Административно разорвать связь с соседом (используется при внесении изменений для того чтобы избежать route flapping):
dyn3(config-router)# neighbor <ip-address | peer-group-name> shutdown
Восстановить административно разорванную связь с соседом:
dyn3(config-router)# no neighbor <ip-address | peer-group-name> shutdown
|
|
Когда маршрутизатор создает BGP-пакет, IP-адрес указанный в команде neighbor определяет адрес назначения в пакете, а исходящий интерфейс — адрес отправителя. Когда BGP-пакет получен для новой сессии, адрес отправителя в пакете сравнивается с IP-адресами соседей:
|
[править] Группа соседей
Объединение соседей в группы не добавляет новый функционал.
Группы позволяют сократить количество настроек, которые относятся к соседям и оптимизировать производительность маршрутизатора.
После объединения соседей в группу:
- Параметры можно задавать для группы соседей
- Для группы должна быть одинаковая исходящая политика (outbound policy)
- Входящая политика (inbound policy) для группы может быть различной
- Обновления генерируются один раз для всей группы
- Соседний маршрутизатор может принадлежать только одной группе соседей
- Группа соседей имеет локальное значение, эта настройка никак не передается соседям
- В группе нельзя смешивать iBGP и EBGP соседей.
Соседи, которые принадлежат группе, всегда наследуют такие параметры группы (настройка этих параметров для конкретного соседа не перебивает настройки сделанные для группы):
- remote-as
- version
- update-source
- out-route-map
- out-filter-list
- out-dist-list
- minimum-advertisement-interval
- next-hop-self
Создание группы соседей:
dyn3(config-router)# neighbor <peer-group-name> peer-group
Добавить соседа в созданную группу:
dyn3(config-router)# neighbor <ip-address> peer-group <peer-group-name>
|
|
Написать о BGP Dynamic Update Peer-Groups и Peer Templates |

[править] TTL security check
dyn(config-router)# neighbor <address> ttl-security hops <hop-count>
[править] Построение таблицы BGP
В таблице BGP, которая также называется таблица топологии BGP или BGP Routing Information Base (RIB), хранится информация о сетях (NLRI), которые выучены BGP и соответствующие атрибуты пути.
Маршрутизатор может поместить запись в таблицу BGP таким образом:
- используя команду network,
- получив обновление от соседа,
- перераспределив маршруты из другого источника.
Просмотр таблицы BGP:
show ip bgp
[править] Команда network
Указать какие сети анонсировать по протоколу BGP (если сеть присутствует в таблице маршрутизации):
dyn3(config-router)# network <network-number> [mask <network-mask>] [route-map <map-tag>]
Параметр route-map позволяет изменить параметры маршрута перед тем как он будет помещен в таблицу BGP.
Например, можно изменить такие параметры:
- Weight,
- Community,
- Local preference,
- MED.
Команда network в BGP отличается от аналогичной команды в IGP-протоколах.
В BGP эта команда говорит процессу BGP:
- Найти в текущей таблице маршрутизации маршрут, который в точности совпадает с параметрами команды network. Если такой маршрут существует, то поместить соответствующую NLRI в локальную BGP-таблицу.
Свойства команды:
- Указывает какую сеть поместить в таблицу BGP и затем анонсировать соседям,
- Без указания маски BGP анонсирует классовую сеть,
- При включенном no auto-summary — BGP ищет полное совпадение префикса и длины префикса с маршрутами в таблице маршрутизации,
- При включенном auto-summary — если в команде network указана классовая сеть, то совпадением считается ситуация, когда в таблице маршрутизации существует хотя бы одна подсеть этой классовой сети,
- Максимально возможное число команд network в процессе BGP — 200.
Отличия от протоколов IGP:
- Не включает BGP на интерфейсе,
- Указываются не только непосредственно присоединенные сети, а все сети, которые должны быть анонсированы,
- Если указанная сеть не найдена в таблице маршрутизации, то сеть анонсироваться не будет.
|
|
Команда neighbor указывает BGP кому анонсировать, а команда network — что анонсировать. |
В ситуациях когда необходимо анонсировать маршрут, которого нет в таблице маршрутизации, создают статический маршрут в null 0.
Например, на маршрутизатор приходят по IGP протоколу подсети суммарной сети 77.7.0.0/16. Самой суммарной сети в таблице маршрутизации нет, но в BGP необходимо анонсировать именно её.
Настройка будет выглядеть так:
dyn(config-router)# network 77.7.0.0 mask 255.255.0.0
dyn(config)# ip route 77.7.0.0 255.255.0.0 null 0
Суммарный маршрут будет анонсироваться всегда, так как интерфейс null 0 доступен всегда.
Пришедшие пакеты будут отправляться по маршрутам полученным по IGP.
Если маршрута в определенную сеть нет, то пакет будет отброшен.
[править] Перераспределение маршрутов
В BGP с помощью команды redistribute можно перераспределить маршруты:
- статические,
- присоединенные,
- выученные с помощью IGP протоколов.
dyn3(config-router)#redistribute ?
  bgp        Border Gateway Protocol (BGP)
  connected  Connected
  dvmrp      Redistribution of DVMRP into BGP IPv4 Multicast
  eigrp      Enhanced Interior Gateway Routing Protocol (EIGRP)
  isis       ISO IS-IS
  iso-igrp   IGRP for OSI networks
  mobile     Mobile routes
  odr        On Demand stub Routes
  ospf       Open Shortest Path First (OSPF)
  rip        Routing Information Protocol (RIP)
  static     Static routes
При перераспределении маршрутов из IGP протоколов в BGP:
- Перераспределяются два типа маршрутов из таблицы маршрутизации:
- выученные по соответствующему IGP протоколу,
- присоединенные маршруты совпадающие с указанной командой network в IGP,
- Метрика перераспределенных маршрутов:
- может не указываться:
- BGP использует отличный от протоколов IGP механизм выбора лучшего маршрута,
- по умолчанию метрика протокола IGP переходит в атрибут MED,
- если указывается, то это значение атрибута MED.
- может не указываться:
[править] Перераспределение маршрутов OSPF
Схема будет использоваться для объяснения настройки перераспределения маршрутов OSPF в BGP:

[править] Начальные условия
На маршрутизаторе dyn3 такая таблица маршрутизации:
dyn3# sh ip route
Codes: C - connected, S - static, R - RIP, M - mobile, B - BGP
       D - EIGRP, EX - EIGRP external, O - OSPF, IA - OSPF inter area
       N1 - OSPF NSSA external type 1, N2 - OSPF NSSA external type 2
       E1 - OSPF external type 1, E2 - OSPF external type 2
       i - IS-IS, su - IS-IS summary, L1 - IS-IS level-1, L2 - IS-IS level-2
       ia - IS-IS inter area, * - candidate default, U - per-user static route
       o - ODR, P - periodic downloaded static route

Gateway of last resort is not set

C    192.168.4.0/24 is directly connected, FastEthernet1/0
O IA 192.168.1.0/24 [110/2] via 192.168.2.1, 00:47:06, FastEthernet0/0
C    192.168.2.0/24 is directly connected, FastEthernet0/0
O E1 192.168.3.0/24 [110/22] via 192.168.2.1, 00:47:06, FastEthernet0/0
Настройка OSPF на dyn3:
router ospf 1
 network 192.168.2.0 0.0.0.255 area 0
[править] Перераспределение маршрутов без задания метрики
По умолчанию, если в команде redistribute не указан тип маршрута, то перераспределяются внутризональные и межзональные маршруты OSPF. Опция команды — internal.
|
|
Внутренними (internal) маршруты называются по тому принципу, что все они сгенерированы процессом OSPF, при совпадении сети интерфейса с сетью указанной в команде network. |
Перераспределение внутризональных и межзональных маршрутов OSPF в BGP:
dyn3(config)# router bgp 65000
dyn3(config-router)# redistribute ospf 1
Таблица BGP на dyn3 после перераспределения внутренних маршрутов:
dyn3# sh ip bgp
BGP table version is 7, local router ID is 192.168.4.3
Status codes: s suppressed, d damped, h history, * valid, > best, i - internal,
              r RIB-failure, S Stale
Origin codes: i - IGP, e - EGP, ? - incomplete

   Network          Next Hop            Metric LocPrf Weight Path
*> 192.168.1.0      192.168.2.1              2         32768 ?
*> 192.168.2.0      0.0.0.0                  0         32768 ?
Таблица BGP на dyn5 после перераспределения внутренних маршрутов:
dyn5# sh ip bgp
BGP table version is 7, local router ID is 192.168.5.5
Status codes: s suppressed, d damped, h history, * valid, > best, i - internal,
              r RIB-failure, S Stale
Origin codes: i - IGP, e - EGP, ? - incomplete

   Network          Next Hop            Metric LocPrf Weight Path
*>i192.168.1.0      192.168.2.1              2    100      0 ?
*>i192.168.2.0      192.168.4.3              0    100      0 ?
Перераспределение маршрутов других типов:
router(config-router)# redistribute ospf 1 match <internal | external <1|2> | nssa-external <1|2>>
Например, на dyn3 перераспределение маршрутов типа E1:
dyn3(config)# router bgp 65000
dyn3(config-router)# redistribute ospf 1 match external 1
Если до этого было выполнено перераспределение маршрутов командой redistribute ospf 1, то теперь будут перераспределяться маршруты:
- внутризональные и межзональные,
- типа external 1.
|
|
При перераспределении маршрутов новая команда redistribute с параметром match не переписывает предыдущие настройки, а добавляет новый тип маршрута. |
Конфигурация dyn3:
router bgp 65000
 no synchronization
 bgp log-neighbor-changes
 redistribute ospf 1 match internal external 1
 neighbor 192.168.4.5 remote-as 65000
 no auto-summary
Таблица BGP на dyn3 после перераспределения внутренних и E1 маршрутов:
dyn3# sh ip bgp
BGP table version is 8, local router ID is 192.168.4.3
Status codes: s suppressed, d damped, h history, * valid, > best, i - internal,
              r RIB-failure, S Stale
Origin codes: i - IGP, e - EGP, ? - incomplete

   Network          Next Hop            Metric LocPrf Weight Path
*> 192.168.1.0      192.168.2.1              2         32768 ?
*> 192.168.2.0      0.0.0.0                  0         32768 ?
*> 192.168.3.0      192.168.2.1             22         32768 ?
Таблица BGP на dyn5 после перераспределения внутренних и E1 маршрутов:
dyn5# sh ip bgp
BGP table version is 8, local router ID is 192.168.5.5
Status codes: s suppressed, d damped, h history, * valid, > best, i - internal,
              r RIB-failure, S Stale
Origin codes: i - IGP, e - EGP, ? - incomplete

   Network          Next Hop            Metric LocPrf Weight Path
*>i192.168.1.0      192.168.2.1              2    100      0 ?
*>i192.168.2.0      192.168.4.3              0    100      0 ?
*>i192.168.3.0      192.168.2.1             22    100      0 ?
Таблица маршрутизации на dyn5 после перераспределения внутренних и E1 маршрутов:
dyn5# sh ip route
Codes: C - connected, S - static, R - RIP, M - mobile, B - BGP
       D - EIGRP, EX - EIGRP external, O - OSPF, IA - OSPF inter area
       N1 - OSPF NSSA external type 1, N2 - OSPF NSSA external type 2
       E1 - OSPF external type 1, E2 - OSPF external type 2
       i - IS-IS, su - IS-IS summary, L1 - IS-IS level-1, L2 - IS-IS level-2
       ia - IS-IS inter area, * - candidate default, U - per-user static route
       o - ODR, P - periodic downloaded static route

Gateway of last resort is not set

C    192.168.4.0/24 is directly connected, FastEthernet0/0
C    192.168.5.0/24 is directly connected, FastEthernet1/0
B    192.168.1.0/24 [200/2] via 192.168.2.1, 00:06:02
B    192.168.2.0/24 [200/0] via 192.168.4.3, 00:06:07
B    192.168.3.0/24 [200/22] via 192.168.2.1, 00:00:03
[править] Перераспределение маршрутов и задание метрики (атрибута MED)
Изменение метрики (атрибут MED) для маршрутов перераспределенных из OSPF:
dyn3(config)# router bgp 65000
dyn3(config-router)# redistribute ospf 1 metric 85
Таблица BGP на dyn3 после перераспределения:
dyn3# sh ip bgp
BGP table version is 10, local router ID is 192.168.4.3
Status codes: s suppressed, d damped, h history, * valid, > best, i - internal,
              r RIB-failure, S Stale
Origin codes: i - IGP, e - EGP, ? - incomplete

   Network          Next Hop            Metric LocPrf Weight Path
*> 192.168.1.0      192.168.2.1             85         32768 ?
*> 192.168.2.0      0.0.0.0                  0         32768 ?
*> 192.168.3.0      192.168.2.1             85         32768 ?
Таблица BGP на dyn5 после перераспределения:
dyn5# sh ip bgp
BGP table version is 10, local router ID is 192.168.5.5
Status codes: s suppressed, d damped, h history, * valid, > best, i - internal,
              r RIB-failure, S Stale
Origin codes: i - IGP, e - EGP, ? - incomplete

   Network          Next Hop            Metric LocPrf Weight Path
*>i192.168.1.0      192.168.2.1             85    100      0 ?
*>i192.168.2.0      192.168.4.3              0    100      0 ?
*>i192.168.3.0      192.168.2.1             85    100      0 ?
[править] Удаление настроек перераспределения маршрутов
Если необходимо удалить настроенное перераспределение определенных маршрутов, например, оставить только маршруты E1 и удалить внутренние:
dyn3(config-router)# no redistribute ospf 1 match internal
Теперь в таблице BGP только маршрут E1:
dyn3# sh ip bgp
BGP table version is 19, local router ID is 192.168.4.3
Status codes: s suppressed, d damped, h history, * valid, > best, i - internal,
              r RIB-failure, S Stale
Origin codes: i - IGP, e - EGP, ? - incomplete

   Network          Next Hop            Metric LocPrf Weight Path
*> 192.168.3.0      192.168.2.1             22         32768 ?
|
|
На сайте cisco указано, что после удаления всех ключевых слов (internal, external и др) в команде redistribute, остается команда redistribute ospf 1 и при этом перераспределяются внутренние маршруты. Для того чтобы удалить перераспределение полностью необходимо использовать команду no redistribute ospf 1. |
Настроено перераспределение внутренних маршрутов:
dyn3(config-router)#redistribute ospf 1
Таблица BGP с перераспределенными внутренними маршрутами:
dyn3(config-router)#do sh ip bgp
BGP table version is 40, local router ID is 192.168.4.3
Status codes: s suppressed, d damped, h history, * valid, > best, i - internal,
              r RIB-failure, S Stale
Origin codes: i - IGP, e - EGP, ? - incomplete

   Network          Next Hop            Metric LocPrf Weight Path
*> 192.168.1.0      192.168.2.1              2         32768 ?
*> 192.168.2.0      0.0.0.0                  0         32768 ?
Настроено перераспределение E1 маршрутов:
dyn3(config-router)#redistribute ospf 1 match external 1
Таблица BGP с перераспределенными внутренними и E1 маршрутами:
dyn3(config-router)#do sh ip bgp
BGP table version is 41, local router ID is 192.168.4.3
Status codes: s suppressed, d damped, h history, * valid, > best, i - internal,
              r RIB-failure, S Stale
Origin codes: i - IGP, e - EGP, ? - incomplete

   Network          Next Hop            Metric LocPrf Weight Path
*> 192.168.1.0      192.168.2.1              2         32768 ?
*> 192.168.2.0      0.0.0.0                  0         32768 ?
*> 192.168.3.0      192.168.2.1             22         32768 ?
Конфигурация маршрутизатора:
dyn3(config-router)#do sh run | i redis
 redistribute ospf 1 match internal external 1
Если полностью удалить всё настроенное перераспределение таким образом:
dyn3(config-router)#no redistribute ospf 1 match internal external 1
то на маршрутизаторе всё равно остается такая настройка:
dyn3(config-router)#do sh run | i redis
 redistribute ospf 1
Однако маршруты более не перераспределяются:
dyn3(config-router)#do sh ip bgp
После повторения команды:
dyn3(config-router)# redistribute ospf 1
Внутренние маршруты опять перераспределяются:
dyn3(config-router)#do sh ip bgp
BGP table version is 46, local router ID is 192.168.4.3
Status codes: s suppressed, d damped, h history, * valid, > best, i - internal,
              r RIB-failure, S Stale
Origin codes: i - IGP, e - EGP, ? - incomplete

   Network          Next Hop            Metric LocPrf Weight Path
*> 192.168.1.0      192.168.2.1              2         32768 ?
*> 192.168.2.0      0.0.0.0                  0         32768 ?
[править] Автоматическое суммирование (команда auto-summary)
Команда auto-summary по-разному проявляет себя при использовании её с командами redistribute и network.
При включенной команде auto-summary:
- команда redistribute добавляет только соответствующую классовую сеть в BGP-таблицу,
- команда network добавляет соответствующую классовую сеть и подсети (если они есть в таблице маршрутизации) в BGP-таблицу.
При выключенной команде no auto-summary:
- команда redistribute добавляет соответствующие подсети в BGP-таблицу,
- команда network добавляет подсети в BGP-таблицу, если они есть в таблице маршрутизации.
[править] Суммирование маршрутов
Создание суммарного маршрута:
dyn(config-router)# aggregate-address address mask [as-set] [summary-only] [suppress-map map-name]
[advertise-map map-name] [attribute-map map-name]
Параметры команды:
- as-set — если настроена эта опция, маршрутизатор создает поле AS_SET для суммарного маршрута, но только в том случае, если поле AS_SEQ суммарного маршрута равно 0;
- summary-only — если задана эта опция, маршрутизатор анонсирует суммарный маршрут и не анонсирует его компоненты. По умолчанию все компоненты суммарного маршрута анонсируются;
- suppress-map — если задана эта опция, маршрутизатор анонсирует суммарный маршрут и подмножество его компонентов, за исключением тех которые явно указаны, наличие опции summary-only при этом игнорируется;
Логика команды aggregate-address:
- Суммарный маршрут не создается, если в таблице BGP нет ни одного маршрута для NLRI внутри суммарного маршрута
- Если из таблицы BGP исчезнут все подсети суммарного маршрута, будет удален и суммарный маршрут (маршрутизатор сообщит соседям, что маршрут более не действителен)
- По умолчанию анонсирует суммарный маршрут и все компоненты маршрута
- Если суммарный маршрут анонсируется eBGP-соседу, то маршрутизатор добавляет номер своей автономной системы в поле AS_SEQ перед отправкой сообщения Update
- Next-hop адрес:
- Устанавливает Next-hop адрес суммарного маршрута в локальной таблице BGP равным 0.0.0.0
- Устанавливает Next-hop адрес суммарного маршрута, при анонсировании его соседям, равным IP-адресу, который указан как источник обновлений для соответствующих соседей
- AS path:
- Если у всех компонентов суммарного маршрута одинаковое значение поля AS_SEQ, то для суммарного маршрута значение этого поля будет таким же
- Если у компонентов суммарного маршрута отличается значение поля AS_SEQ, то для суммарного маршрута значение этого поля будет установлено равным 0 (так как маршрутизатор не может указать корректное значение этого поля для суммарного маршрута)
- Установка поля AS_SEQ равным 0 может привести к образованию петель, так как BGP обнаруживает петли просматривая атрибут AS path. Поле AS_SET (параметр as-set) решает эту проблему, указывая все автономные системы через которые проходил любой из компонентов суммарного маршрута.
[править] Маршрут по умолчанию
В BGP маршрут по умолчанию может быть добавлен с помощью команд:
- network — маршрут по умолчанию должен существовать в таблице маршрутизации;
- redistribute — маршрут по умолчанию должен существовать в таблице маршрутизации. И надо указать команду default-information originate;
- neighbor default-originate — не добавляет маршрут по умолчанию в локальную таблицу BGP, но анонсирует маршрут соседям. По умолчанию не проверяет существует ли маршрут по умолчанию в таблице маршрутизации (можно указать чтобы проверка выполнялась задав route-map).
Добавление маршрута по умолчанию:
dyn(config-router)# neighbor <address> default-originate [route-map <map-name>]
[править] Conditional route injection
dyn(config-router)# bgp inject-map <inject-map-name> exist-map <exist-map-name> [copy-attributes]
[править] Анонсирование маршрутов соседям
Для того чтобы маршрутизатор анонсировал маршруты соседям, необходимо чтобы они были в таблице BGP.
В предыдущем разделе описывались варианты с помощью которых маршрут может быть помещен в таблицу BGP.
В этом разделе описываются правила, используя которые, маршрутизатор решает анонсировать маршрут из таблицы BGP или нет.
[править] Правила анонсирования маршрутов
При выборе какой маршрут должен быть отправлен соседу в сообщении Update, BGP использует такие правила:
- Отправлять только лучшие маршруты из таблицы BGP
- Для iBGP-соседей — не анонсировать маршруты, которые были выучены от других iBGP-соседей
- Для eBGP-соседей — не анонсировать маршруты для которых номер AS соседа уже находится в атрибуте AS path
- Не анонсировать suppressed или dampened маршруты
- Не анонсировать маршруты, которые отфильтрованы настройками
|
|
Если маршрут BGP не попал в таблицу маршрутизации из-за того, что есть маршрут от источника с лучшим значением AD, то маршрут всё равно анонсируется всем соседям BGP. |
[править] Построение таблицы маршрутизации
[править] Рекурсивная маршрутизация (recursive routing)
Next-hop в BGP отличается от IGP протоколов. В BGP next-hop, как правило, указывает на eBGP-соседа, который отправил обновление в локальную автономную систему.
Соответственно, для iBGP-маршрутизаторов, next-hop находится не в непосредственно присоединенной сети.
Для того чтобы полученный маршрут был выбран как лучший в таблице BGP и был помещён в таблицу маршрутизации, необходимо чтобы указанный next-hop был доступен.
Проверка доступности next-hop фактически заставляет маршрутизатор дважды просматривать таблицу маршрутизации для того чтобы определить доступность пришедшего маршрута — это и называется рекурсивной маршрутизацией.
Для того чтобы проверка доступности next-hop была пройдена, необходимо чтобы в IGP протоколе, который работает в локальной автономной системе, был маршрут к этому next-hop.
Если next-hop для определенного маршрута не доступен, то этот маршрут будет сохранен в таблице BGP, но он не может быть помещён а таблицу маршрутизации.
[править] Изменение AD
Изменение значений AD для всех маршрутов:
dyn3(config-router)# distance bgp <external-distance> <internal-distance> <local-distance>
|
|
Новое значение AD применяется только для маршрутов, которые были получены после того как была выполнена команда. |
Настройка значения AD отличного от значения по умолчанию для маршрутов, которые пришли от определенного соседа:
dyn3(config-router)# distance <AD-value> <ip-address> <mask> [access-list]
Параметры команды:
- AD-value — значение AD,
- ip-address — IP-адрес, который используется в команде neighbor для указания соседа,
- access-list — ACL, который указывает для каких маршрутов полученных от соседа установить значение AD (если сеть совпадает с правилом permit, то AD будет изменено).
Пример задания AD 5 для сети 192.168.100.0/24 полученной от соседа 192.168.4.5:
dyn3(config)# ip access-list standard BGP-AD
dyn3(config-std-nacl)# permit 192.168.100.0 0.0.0.255
dyn3(config-std-nacl)# exit
dyn3(config)# router bgp 65000
dyn3(config-router)# distance 5 192.168.4.5 0.0.0.0 BGP-AD
Значение AD на маршрутизаторе:
dyn3# sh ip protocol
Routing Protocol is "bgp 65000"
 Outgoing update filter list for all interfaces is not set
 Incoming update filter list for all interfaces is not set
 IGP synchronization is disabled
 Automatic route summarization is disabled
 Redistributing: ospf 1
 Neighbor(s):
   Address          FiltIn FiltOut DistIn DistOut Weight RouteMap
   192.168.4.5
 Maximum path: 1
 Routing Information Sources:
   Gateway         Distance      Last Update
 Distance: external 20 internal 200 local 200
   Address         Wild mask       Distance  List
   192.168.4.5             0.0.0.0        5  BGP-AD
Таблица маршрутизации (получено два маршрута от соседа):
dyn3(config)#do sh ip route
Codes: C - connected, S - static, R - RIP, M - mobile, B - BGP
      D - EIGRP, EX - EIGRP external, O - OSPF, IA - OSPF inter area
      N1 - OSPF NSSA external type 1, N2 - OSPF NSSA external type 2
      E1 - OSPF external type 1, E2 - OSPF external type 2
      i - IS-IS, su - IS-IS summary, L1 - IS-IS level-1, L2 - IS-IS level-2
      ia - IS-IS inter area, * - candidate default, U - per-user static route
      o - ODR, P - periodic downloaded static route

Gateway of last resort is not set

C    192.168.4.0/24 is directly connected, FastEthernet1/0
B    192.168.5.0/24 [200/0] via 192.168.4.5, 00:00:06
O IA 192.168.1.0/24 [110/2] via 192.168.2.1, 09:16:36, FastEthernet0/0
C    192.168.2.0/24 is directly connected, FastEthernet0/0
B    192.168.100.0/24 [5/0] via 192.168.4.5, 00:00:06
O E1 192.168.3.0/24 [110/22] via 192.168.2.1, 09:16:36, FastEthernet0/0
[править] Добавление eBGP-маршрутов в таблицу маршрутизации
Маршрут eBGP будет добавлен в таблицу маршрутизации, если:
- маршрут выбран в таблице BGP как лучший маршрут,
- AD маршрута меньше, чем AD других источников аналогичного маршрута.
[править] backdoor маршруты
Команда network backdoor влияет на маршруты eBGP таким образом:
- Для указанной сети маршрутизатор будет использовать значение local AD (по умолчанию 200) для маршрутов полученных по eBGP
- Маршрутизатор не будет анонсировать указанную сеть по BGP
dyn3(config-router)# network <network> backdoor
[править] Добавление iBGP-маршрутов в таблицу маршрутизации
Маршрут iBGP будет добавлен в таблицу маршрутизации, если:
- маршрут выбран в таблице BGP как лучший маршрут,
- AD маршрута меньше, чем AD других источников аналогичного маршрута.
[править] Синхронизация BGP
Правило синхронизации:
- iBGP маршрут считается лучшим в таблице BGP, только если он был выучен по протоколу IGP и находится в таблице маршрутизации. Или, другими словами: не использовать или не анонсировать внешним соседям маршрут, выученный по iBGP, до тех пор пока соответствующий маршрут не будет выучен от IGP. По умолчанию выключено.
Включить синхронизацию BGP:
dyn3(config-router)# synchronization
|
|
Для OSPF кроме синхронизации маршрутов должно выполняться ещё одно правило:
|
Синхронизация может быть выключена в тех случаях когда все маршрутизаторы в транзитной зоне работают в full mesh iBGP.
Если синхронизация выключена, то все маршруты внутри автономной системы должны передаваться с помощью iBGP.
Для обхода правила, которое требует чтобы между iBGP-маршрутизаторами в автономной системе было полносвязное соединение, используется два механизма:
- Конфедерации (confederation)
- Route reflectors
Как правило, синхронизация не включается. При включенном правиле синхронизации все маршруты BGP должны быть получены и по протоколу IGP. То есть, должно быть настроено перераспределение маршрутов BGP в протокол IGP.
[править] Конфедерации (confederation)
Создание конфедерации позволяет:
- избежать необходимости создания полносвязной топологии между всеми iBGP-соседями,
- всем iBGP-соседям выучить все iBGP-маршруты в AS,
- предотвратить образование петель.
При использовании конфедераций BGP, автономная система разбивается на подавтономные системы (sub-AS).
Маршрутизаторы, которые находятся в одной sub-AS называются confederation iBGP-соседи, а маршрутизаторы в разных sub-AS называются confederation eBGP-соседи.
Правила работы маршрутизаторов в конфедерации:
- iBGP-соседи в конфедерации должны быть соединены в полносвязную топологию (full mesh). Они, как и обычные iBGP-соседи, не передают iBGP-маршруты друг другу.
- eBGP-соседи в конфедерации:
- как и eBGP-соседи анонсируют iBGP-маршруты выученные внутри sub-AS конфедерации в другую sub-AS,
- как и eBGP-соседи по умолчанию используют для пакетов TTL 1 (изменяется neighbor ebgp-multihop),
- во всех остальных случаях работают как обычные iBGP-соседи (например, next-hop по умолчанию не изменяется).
- Внутри конфедераций для предотвращения петель используется атрибут AS Path. Маршрутизаторы, которые находятся в конфедерации добавляют в атрибут сегменты AS_CONFED_SEQ и AS_CONFED_SET.
- Когда маршрутизатор выбирает лучший маршрут на основании атрибута AS Path, номера автономных систем конфедераций не учитываются.
- Когда обновление отправляется маршрутизатору, который не находится в конфедерации, то номера конфедераций удаляются.
[править] Пример настройки конфедерации
Схема сети:

Конфигурация BGP на dyn1:
router bgp 65001
 no synchronization
 bgp log-neighbor-changes
 bgp confederation identifier 500
 bgp confederation peers 65035
 network 192.168.1.0
 network 192.168.2.0
 neighbor 192.168.1.2 remote-as 402
 neighbor 192.168.2.3 remote-as 65035
 no auto-summary
Конфигурация BGP на dyn3:
router bgp 65035
 no synchronization
 bgp log-neighbor-changes
 bgp confederation identifier 500
 bgp confederation peers 65001
 network 192.168.2.0
 network 192.168.4.0
 neighbor 192.168.2.1 remote-as 65001
 neighbor 192.168.4.5 remote-as 65035
 no auto-summary
Конфигурация BGP на dyn5:
router bgp 65035
 no synchronization
 bgp log-neighbor-changes
 bgp confederation identifier 500
 bgp confederation peers 65001
 network 192.168.4.0
 network 192.168.5.0
 network 192.168.100.0
 neighbor 192.168.4.3 remote-as 65035
 neighbor 192.168.5.6 remote-as 406
 no auto-summary
Конфигурация BGP на qua6:
router bgp 406
 bgp router-id 192.168.5.6
 network 192.168.5.0/24
 neighbor 192.168.5.5 remote-as 500
[править] Просмотр информации
Таблица BGP на маршрутизаторе dyn1, который находится внутри конфедерации (в скобках в столбце атрибута AS Path указана sub-AS):
dyn1# sh ip bgp
BGP table version is 6, local router ID is 192.168.2.1
Status codes: s suppressed, d damped, h history, * valid, > best, i - internal,
              r RIB-failure, S Stale
Origin codes: i - IGP, e - EGP, ? - incomplete

   Network          Next Hop            Metric LocPrf Weight Path
*  192.168.1.0      192.168.1.2              0             0 402 i
*>                  0.0.0.0                  0         32768 i
*  192.168.2.0      192.168.2.3              0    100      0 (65035) i
*>                  0.0.0.0                  0         32768 i
*> 192.168.4.0      192.168.2.3              0    100      0 (65035) i
*> 192.168.5.0      192.168.4.5              0    100      0 (65035) i
*> 192.168.100.0    192.168.4.5              0    100      0 (65035) i
Таблица BGP на маршрутизаторе qua2, который находится за пределами конфедерации (за пределами конфедерации не видны номера sub-AS):
qua2# sh ip bgp
BGP table version is 0, local router ID is 192.168.1.2
Status codes: s suppressed, d damped, h history, * valid, > best, i - internal,
              r RIB-failure, S Stale, R Removed
Origin codes: i - IGP, e - EGP, ? - incomplete

   Network          Next Hop            Metric LocPrf Weight Path
*> 192.168.1.0      0.0.0.0                  0         32768  i
*                   192.168.1.1              0             0 500 i
*> 192.168.2.0      192.168.1.1              0             0 500 i
*> 192.168.4.0      192.168.1.1                            0 500 i
*> 192.168.5.0      192.168.1.1                            0 500 i
*> 192.168.100.0    192.168.1.1                            0 500 i

Total number of prefixes 5
Более подробная информация о маршруте внутри конфедерации:
dyn3# sh ip bgp 192.168.100.0
BGP routing table entry for 192.168.100.0/24, version 8
Paths: (1 available, best #1, table Default-IP-Routing-Table)
  Advertised to update-groups:
        1
  Local
    192.168.4.5 from 192.168.4.5 (192.168.100.1)
      Origin IGP, metric 0, localpref 100, valid, confed-internal, best
Более подробная информация о маршруте вне конфедерации:
dyn3# sh ip bgp 192.168.1.0
BGP routing table entry for 192.168.1.0/24, version 2
Paths: (1 available, best #1, table Default-IP-Routing-Table)
  Advertised to update-groups:
        2
  (65001)
    192.168.2.1 from 192.168.2.1 (192.168.2.1)
      Origin IGP, metric 0, localpref 100, valid, confed-external, best
[править] Route reflectors
Route reflectors (RR) как и конфедерация позволяет:
- избежать необходимости создания полносвязной топологии между всеми iBGP-соседями,
- всем iBGP-соседям выучить все iBGP-маршруты в AS,
- предотвратить образование петель.
При использовании RR для маршрутизаторов в AS определяются такие три роли:
- RR сервер (RR Server, RR)
- Клиент (Client)
- Не клиент (Nonclient)
Только маршрутизатор работающий как RR использует логику отличную от обычного iBGP-маршрутизатора.
Другие маршрутизаторы (клиент и не клиент) не изменяют правила работы и фактически даже не знают о существовании RR.
Правила, которыми руководствуется RR принимая решение отправлять маршруты соседу или нет:
Общая таблица сравнения различных режимов работы RR:
| Источник от которого выучен префикс | Анонсируется ли маршрут клиентам? | Анонсируется ли маршрут не клиентам? |
|---|---|---|
| Клиент | Да | Да |
| Не клиент | Да | Нет |
| eBGP | Да | Да |
Отличия в работе RR возникают при взаимодействии с маршрутизаторами, которые работают в роли клиентов.
При взаимодействии с eBGP-соседями или с не клиентами, правила аналогичны обычному взаимодействию, с eBGP и iBGP маршрутизаторами, соответственно.
RR сервер (или несколько серверов) и его клиенты формируют один RR кластер (RR cluster).
AS в которой используются RR может состоять из:
- кластера с несколькими RR,
- нескольких кластеров (использование нескольких кластеров имеет смысл, если существует физическая избыточность).
Когда используется несколько кластеров, то хотя бы один RR из кластера должен быть соседом с хотя бы одним RR в каждом из других кластеров.
Как правило, все RR являются непосредственно присоединенными соседями и формируют между собой полносвязную топологию.
Маршрутизаторы, которые не являются клиентами, также должны быть присоединены к полносвязной топологии из RR.
Для того чтобы предотвратить образование петель RR используют такие механизмы:
- CLUSTER_LIST — RR добавляет идентификатор кластера (cluster ID) в атрибут CLUSTER_LIST прежде чем отправить обновление. При получении обновления RR отбрасывает те префиксы для которых идентификатор его кластера уже указан в атрибуте. Это предотвращает образование петель между кластерами.
- ORIGINATOR_ID — этот атрибут указывает RID того маршрутизатора (не RR), который анонсировал маршрут внутри локальной AS. Если маршрутизатор получает обновление в котором указан его RID, то этот маршрут не используется и не передается далее соседям.
- анонсируются только лучшие маршруты — RR передает маршрут далее только если если маршрут считается лучшим в его таблице BGP.
[править] Изменение процедуры выбора лучшего маршрута в AS с RR
В тех случаях, когда маршрутизаторы могут получить один и тот же маршрут от RR и от обычного маршрутизатора, правила выбора лучшего маршрута BGP немного изменяются:
- Первые шаги, в которых учитываются атрибуты weight, local preference, origin и MED — остаются без изменений,
- Если все предыдущие параметры одинаковы, то маршруты полученные от EBGP-соседей предпочтительней, чем маршруты полученные от IBGP-соседей,
- Выбрать путь через ближайшего IGP-соседа
- Выбрать путь через соседа с наименьшим BGP router ID. Если у префикса есть атрибут Originator ID, то вместо router ID сравнивается Originator ID.
- Reflected-маршруты с более коротким cluster-list предпочтительнее (длина cluster-list равна нулю, если маршрут без атрибута cluster-list),
- Выбрать путь через соседа с наименьшим IP-адресом
[править] Пример настройки RR
Схема сети:

На маршрутизаторах, которые выполняют роль клиентов никаких отличий в настройках BGP нет.
Пример конфигурации BGP на dyn5:
router bgp 65000
 no synchronization
 bgp log-neighbor-changes
 network 192.168.4.0
 network 192.168.5.0
 neighbor 192.168.4.3 remote-as 65000
 neighbor 192.168.5.6 remote-as 406
 no auto-summary
Конфигурация BGP на dyn1:
router bgp 65000
 no synchronization
 bgp cluster-id 1
 bgp log-neighbor-changes
 network 192.168.1.0
 network 192.168.2.0
 neighbor 192.168.1.2 remote-as 65000
 neighbor 192.168.1.2 route-reflector-client
 neighbor 192.168.2.3 remote-as 65000
 no auto-summary
Конфигурация BGP на dyn3:
router bgp 65000
 no synchronization
 bgp cluster-id 2
 bgp log-neighbor-changes
 network 192.168.2.0
 network 192.168.4.0
 neighbor 192.168.2.1 remote-as 65000
 neighbor 192.168.4.5 remote-as 65000
 neighbor 192.168.4.5 route-reflector-client
 no auto-summary
[править] Просмотр информации
Подробная информация о маршруте, в том числе атрибуты относящиеся к RR:
dyn1# sh ip bgp 192.168.5.0
BGP routing table entry for 192.168.5.0/24, version 7
Paths: (1 available, best #1, table Default-IP-Routing-Table)
  Advertised to update-groups:
        2
  Local
    192.168.4.5 from 192.168.2.3 (192.168.4.3)
      Origin IGP, metric 0, localpref 100, valid, internal, best
      Originator: 192.168.100.1, Cluster list: 0.0.0.2
Подробная информация о маршруте на маршрутизаторе qua2, в том числе атрибуты относящиеся к RR (два кластера):
qua2# sh ip bgp 192.168.5.0
BGP routing table entry for 192.168.5.0/24
Paths: (1 available, no best path)
  Not advertised to any peer
  Local
    192.168.4.5 (inaccessible) from 192.168.1.1 (192.168.100.1)
      Origin IGP, metric 0, localpref 100, valid, internal
      Originator: 192.168.100.1, Cluster list: 0.0.0.1 0.0.0.2
      Last update: Wed Jul 22 20:16:19 2009
Подробная информация о маршруте, в том числе информация о том, что одним из источников маршрута был RR-клиент:
dyn1# sh ip bgp 192.168.1.0
BGP routing table entry for 192.168.1.0/24, version 5
Paths: (2 available, best #2, table Default-IP-Routing-Table)
  Advertised to update-groups:
        1    2
  Local, (Received from a RR-client)
    192.168.1.2 from 192.168.1.2 (192.168.1.2)
      Origin IGP, metric 0, localpref 100, valid, internal
  Local
    0.0.0.0 from 0.0.0.0 (192.168.2.1)
      Origin IGP, metric 0, localpref 100, weight 32768, valid, sourced, local, best
Политика распространения информации на RR:
dyn3# show ip bgp update-group
BGP version 4 update-group 1, internal, Address Family: IPv4 Unicast
 BGP Update version : 5/0, messages 0
 Update messages formatted 3, replicated 0
 Number of NLRIs in the update sent: max 1, min 1
 Minimum time between advertisement runs is 0 seconds
 Has 1 member (* indicates the members currently being sent updates):
  192.168.2.1

BGP version 4 update-group 2, internal, Address Family: IPv4 Unicast
 BGP Update version : 5/0, messages 0
 Route-Reflector Client
 Update messages formatted 3, replicated 0
 Number of NLRIs in the update sent: max 1, min 1
 Minimum time between advertisement runs is 0 seconds
 Has 1 member (* indicates the members currently being sent updates):
  192.168.4.5
[править] Изменение атрибутов пути
[править] Weight
dyn(config-router)# neighbor <ip-address | peer-group-name> weight <weight>
Изменение weight с помощью route-map:
route-map <name> permit <sequence>
 match <condition>
 set weight <weight>
Применение route-map:
router bgp 65000
 neighbor <ip-address> route-map <name> in
[править] Local preference
По умолчанию значение local preference 100. Для того чтобы изменить значение по умолчанию можно использовать два варианта: команду bgp default local-preference или route-map.
Команда bgp default local-preference применяется для маршрутов в которых не установлено значение local preference:
- маршрутов полученных от eBGP-соседей,
- локальных маршрутов.
Изменение значения по умолчанию local preference:
dyn3(config-router)# bgp default local-preference <0-4294967295>
Все маршруты iBGP будут анонсироваться с новым значением local preference.
Изменение local preference с помощью route-map:
route-map <name> permit <sequence>
 match <condition>
 set local-preference <value>
Применение route-map:
router bgp 65000
 neighbor <ip-address> route-map <name> in | out
[править] Next-hop
Изменение атрибута next-hop зависит от того какому соседу анонсируется маршрут — iBGP или eBGP:
- по умолчанию, когда маршрут анонсируется eBGP-соседу, атрибут next-hop меняется на IP-адрес маршрутизатора, который анонсирует маршрут;
- по умолчанию, когда маршрут анонсируется iBGP-соседу, атрибут next-hop не изменяется.
Изменение поведения по умолчанию атрибута next-hop для iBGP-соседа — все обновления для соседа отправлять с указанием в качестве next-hop локального маршрутизатора:
dyn3(config-router)# neighbor <ip-address | peer-group-name> next-hop-self
Изменение поведения по умолчанию атрибута next-hop для eBGP-соседа — все обновления для соседа отправлять без изменения атрибута next-hop:
dyn3(config-router)# neighbor <ip-address | peer-group-name> next-hop-unchanged
[править] AS path
set as-path prepend
[править] Origin
Атрибут Origin:
| Значение Origin | Код в таблице BGP | Используется если маршрут введен с использованием следующих команд |
|---|---|---|
| IGP | i |
|
| EGP | e | Маршрут был выучен по протоколу EGP. Специфических команд нет |
| Incomplete | ? |
|
Атрибут Origin может быть изменен в route-map.
Параметр set origin позволяет указать какое значение атрибута будет у маршрутов совпадающих с критериями route-map:
dyn1(config-route-map)# set origin ?
 egp         remote EGP
 igp         local IGP
 incomplete  unknown heritage
[править] MED
Атрибут MED используется для информирования eBGP-соседей о том, какой путь в автономную систему более предпочтительный.
MED считается «слабым» атрибутом, так как для того чтобы он повлиял на выбор маршрута необходимо чтобы атрибуты Weight, local preference, AS-path и origin code были с одинаковым значением.
Особенности атрибута в IOS:
- Атрибут MED в IOS называется метрикой (metric).
- По умолчанию для маршрутизаторов Cisco равен 0.
- По умолчанию атрибут MED не передается с маршрутами, так как это не обязательный атрибут.
- Исключение из этого правила: маршруты, которые анонсируются локальным маршрутизатором (с помощью команды network или перераспределения маршрутов), и для которых есть полное совпадение в таблице маршрутизации. В таком случае маршрутизатор использует метрику в таблице маршрутизации как атрибут MED.
Изменение атрибута MED для перераспределенных маршрутов:
dyn(config-router)# default-metric <1-4294967295>
Изменение MED с помощью route-map:
route-map <name> permit <sequence>
 match <condition>
 set metric <value>
Применение route-map:
router bgp 65000
 neighbor <ip-address> route-map <name> in | out
Если необходимо указать определенное значение атрибута MED для всех маршрутов связанных с определенным соседом, то необходимо использовать route-map без критериев match.
[править] bgp always-compare-med
По умолчанию атрибут MED проверяется только при сравнении маршрутов из одной и той же AS.
Команда always-compare-med меняет это поведение.
После её задания, атрибут сравнивается и для маршрутов пришедших с разных AS.
Такое поведение необходимо настроить на всех маршрутизаторах в AS. Иначе могут возникнуть петли.
Настройка always-compare-med:
dyn(config-router)# bgp always-compare-med
[править] bgp bestpath med missing-as-worst
В Cisco IOS если MED не указан для маршрута, то он считается равным 0 и, соответственно, считается лучшим значением MED.
Команда med missing-as-worst позволяет указать, что, при отсутствии атрибута MED в маршруте, он будет равным 4294967295 (самым худшим).
Настройка такого поведения:
dyn1(config-router)# bgp bestpath med missing-as-worst
[править] Пример изменения MED
Пример таблицы BGP до изменения поведения:
   Network          Next Hop            Metric LocPrf Weight Path
*> 192.168.1.0      0.0.0.0                  0         32768 i
*>i192.168.6.0      192.168.7.8              0    200      0 8 67 i
*                   192.168.20.8                           0 9 8 67 i
*                   192.168.20.8                           0 8 67 i
r>i192.168.7.0      192.168.7.8              0    200      0 8 67 i
r                   192.168.20.8                           0 9 8 67 i
r                   192.168.20.8                           0 8 67 i
Пример таблицы BGP после задания med missing-as-worst:
   Network          Next Hop            Metric LocPrf Weight Path
*> 192.168.1.0      0.0.0.0                  0         32768 i
*>i192.168.6.0      192.168.7.8              0    200      0 8 67 i
*                   192.168.20.8    4294967295             0 9 8 67 i
*                   192.168.20.8    4294967295             0 8 67 i
r>i192.168.7.0      192.168.7.8              0    200      0 8 67 i
r                   192.168.20.8    4294967295             0 9 8 67 i
r                   192.168.20.8    4294967295             0 8 67 i
[править] bgp bestpath med confed
По умолчанию атрибут MED проверяется только при сравнении маршрутов из одной и той же AS.
Для того чтобы MED учитывался для маршрутов из конфедерации, необходимо задать команду med confed
dyn1(config-router)# bgp bestpath med confed
[править] bgp deterministic-med
Команда bgp deterministic-med изменяет процесс выбора лучшего пути.
После включения команды, значение атрибута MED будет проверяться сразу после проверки AS-path.
До сравнения типов маршрутов BGP (internal или external) и метрики IGP до next-hop адресов.
dyn3(config-router)# bgp deterministic-med
[1]
[2]
[править]
Изменение формата community с 32битного числа на пару 16битных чисел:
dyn(config)# ip bgp-community new-format
По умолчанию community отбрасываются в исходящих обновлениях BGP. Даже если community указывались в соответствующей исходящей route-map.
Для того чтобы изменить это, необходимо явно настроить отправку community соседям:
dyn(config-router)# neighbor <ip-address> send-community
[править]
В Cisco, кроме well-known значений community, используется также специальное значение internet. Для этого используется значение 0:0.
Community internet используется для обозначения всех маршрутизаторов, так как все маршрутизаторы принадлежат этой community. Например, если в community-list необходимо разрешить все community, кроме одного определенного значения, то permit internet будет использоваться как permit all в ACL.
Пример:
ip community-list 1 deny 100:37
ip community-list 1 permit internet
[править]
Стандартный community-list:
dyn(config)# ip community-list <1-99> <permit | deny> <value>
Особенности стандартного community-list:
- Для того чтобы указать совпадение со всеми community необходимо использовать ключевое слово internet.
- Если в правиле ip community-list указано несколько значений community, то они все должны быть в пришедшем маршруте для того чтобы было совпадение с правилом.
- Если совпадений в community-list не нашлось, то маршрут будет запрещен неявным правилом (как в ACL).
Расширенный community-list:
dyn(config)# ip community-list <100-199> <permit | deny> <regexp>
Особенности расширенного community-list:
- Community присоединенные к маршруту упорядочиваются, конвертируются в строки и сравниваются с регулярными выражениями.
- Для того чтобы указать совпадение со всеми community необходимо использовать регулярное выражение «.*».
Именованный community-list:
dyn(config)# ip community-list <standard|expanded> <name> <permit|deny> <value|regexp>
[править]
Использование community как критерия совпадения в route-map:
route-map <name> permit <sequence>
 match community <list-name|list-number> [exact]
Удаление community из входящих или исходящих обновлений BGP:
route-map <name> permit <sequence>
 set comm-list <list-name|list-number> delete
[править] Управление маршрутами
[править] Порядок применения фильтров в BGP
К обновлениям, которые приходят от соседей или отправляются им, могут быть применены несколько фильтров. Порядок применения фильтров указан ниже.
|
|
Если к соседу применены несколько фильтров в одном направлении, то все фильтры должны разрешить обновление, чтобы оно прошло. |
Для входящих обновлений:
- route-map
- filter-list
- prefix-list, distribute-list
Для исходящих обновлений:
- prefix-list, distribute-list
- filter-list
- route-map
Если фильтр применен к соседу, но не создан в конфигурации, то по умолчанию:
- Distribute list и prefix list пропустят любое обновление
- Filter list и route map запретят обновление
|
|
Фильтры prefix-list и distribute-list взаимоисключающие. Только один из них может быть применен в каждом направлении (входящем и исходящем) для конкретного соседа. |
Если Вы хотите изменить указанный порядок фильтров, пожалуйста, прочтите скрытый текст.
Несколько источников указывают на разный порядок применения фильтров ко входящим и исходящим обновлениям.
На сайте cisco.com и сайте ine.com указан такой порядок:
Для входящих обновлений:
- route-map
- filter-list
- prefix-list, distribute-list
Для исходящих обновлений:
- prefix-list, distribute-list
- filter-list
- route-map
В книге BGP design and implementation такой порядок:
Для входящих обновлений:
- filter-list
- route-map
- prefix-list, distribute-list
Для исходящих обновлений:
- prefix-list, distribute-list
- prefix-list ORF
- filter-list
- route-map
В методичке к курсу BGP 3.2 порядок явно не задан, нарисован лишь схематически:
Для входящих обновлений:
- prefix-list, distribute-list
- filter-list
- route-map
Для исходящих обновлений:
- route-map
- filter-list
- prefix-list, distribute-list
В тексте указан отличающийся порядок для исходящих обновлений:
- filter-list
- prefix-list, distribute-list
- route-map
При проверке на практике получились ещё более интересные результаты. Порядок то был как на сайте cisco.com, то немного менялся в зависимости от того, какой был тест. При случае проверю ещё раз, свои результаты даже не записывала, так как получилось по-разному.
Поэтому если Вы хотите изменить порядок, то напишите, пожалуйста, на странице обсуждения где Вы это прочитали. Или какие тесты проводили и какой они дали результат. Иначе я вынуждена буду вернуть порядок в прежнее состояние (как на сайте cisco.com).
Однако, так как к обновлениям будут применены все фильтры, то порядок становится менее критичным. В итоге все фильтры должны разрешить обновление, чтобы оно прошло.
[править] Фильтрация маршрутов по AS path
Фильтрация маршрутов по AS path может использоваться в таких случаях:
- Клиент подключен к двум провайдерам, у него настроен BGP, и необходимо фильтровать трафик таким образом, чтобы провайдерам анонсировались только сети клиента. Необходимо избежать ситуации, когда клиент может стать транзитной AS из-за того, что он анонсирует сети провайдеров друг другу. В этом случае правилом может быть: анонсировать только сети с пустым значением AS path (локальные сети клиента).
- Для того чтобы повлиять на выбор лучшего маршрута, например, от конкретного соседа. Можно указывать какие номера автономных систем должны или не должны встречаться в маршруте.
- Если необходимо повлиять на выбор пути в локальную автономную систему из других автономных систем. Может применяться AS prepending — добавление AS в атрибуте AS path.
Отобразить маршруты, которые совпадают с указанным регулярным выражением:
dyn# show ip bgp regexp <regexp>
Создание фильтра:
dyn(config)# ip as-path access-list 1 <permit | deny> regexp
Пример настройки фильтра:
dyn(config)# ip as-path access-list 1 permit ^8_
dyn(config)# ip as-path access-list 1 permit _67_
Отобразить все настроенные фильтры или конкретный фильтр:
dyn# show ip as-path-access-list [number]
Отобразить маршруты, которые совпадают с указанным фильтром:
dyn# show ip bgp filter-list
Применение фильтра:
dyn(config-router)# neighbor <ip-address | peer-group-name> filter-list <acl-number> <in | out>
[править] Регулярные выражения
Символы, которые используются в регулярных выражениях:
- . любой символ, включая пробел
- * ноль или больше совпадений с выражением
- + одно или больше совпадений с выражением
- ? ноль или одно совпадение с выражением
- ^ начало строки
- $ конец строки
- _ любой разделитель (включая, начало, конец, пробел, табуляцию, запятую)
- \ не воспринимать следующий символ как специальный
- [] совпадение с одним из символов в диапазоне
- | логическое или
Примеры регулярных выражений:
- _67_ маршруты проходящие через AS 67
- ^67$ маршруты из непосредственно присоединенной AS 67
- _67$ маршруты отправленные из AS 67
- ^67_ сети находящиеся за AS 67
- ^$ маршруты локальной AS
- .* любая строка
[править] Пример тестирования регулярного выражения
Для того чтобы проверить отработает ли регулярное выражение так, как предполагалось, можно выполнить команду:
dyn# show ip bgp regexp <regexp>
Например, есть такая таблица BGP:
dyn1# sh ip bgp
BGP table version is 9, local router ID is 197.1.8.1
Status codes: s suppressed, d damped, h history, * valid, > best, i - internal,
              r RIB-failure, S Stale
Origin codes: i - IGP, e - EGP, ? - incomplete

   Network          Next Hop            Metric LocPrf Weight Path
*> 100.67.67.0/24   192.168.20.8                           0 8 67 i
*> 100.78.78.0/24   192.168.20.8                           0 8 67 i
*> 100.100.6.0/24   192.168.20.8                           0 8 67 i
*> 192.168.1.0      0.0.0.0                  0         32768 i
r> 192.168.20.0     192.168.20.8             0             0 8 i
*>i192.168.21.0     197.1.6.1                0    100      0 5 i
*> 197.1.0.0/16     0.0.0.0                  0         32768 i
Проверить как отработает регулярное выражение ^8_ (сети, которые находятся за автономной системой 
dyn1# sh ip bgp regexp ^8_
BGP table version is 9, local router ID is 197.1.8.1
Status codes: s suppressed, d damped, h history, * valid, > best, i - internal,
              r RIB-failure, S Stale
Origin codes: i - IGP, e - EGP, ? - incomplete

   Network          Next Hop            Metric LocPrf Weight Path
*> 100.67.67.0/24   192.168.20.8                           0 8 67 i
*> 100.78.78.0/24   192.168.20.8                           0 8 67 i
*> 100.100.6.0/24   192.168.20.8                           0 8 67 i
r> 192.168.20.0     192.168.20.8             0             0 8 i
Проверка регулярного выражения _67_ (маршруты проходящие через автономную систему 67):
dyn1# sh ip bgp regexp _67_
BGP table version is 9, local router ID is 197.1.8.1
Status codes: s suppressed, d damped, h history, * valid, > best, i - internal,
              r RIB-failure, S Stale
Origin codes: i - IGP, e - EGP, ? - incomplete

   Network          Next Hop            Metric LocPrf Weight Path
*> 100.67.67.0/24   192.168.20.8                           0 8 67 i
*> 100.78.78.0/24   192.168.20.8                           0 8 67 i
*> 100.100.6.0/24   192.168.20.8                           0 8 67 i
[править] Пример проверки работы фильтра
Например, на маршрутизаторе настроен такой фильтр:
dyn1# show ip as-path-access-list 1
AS path access list 1
    permit ^8_
    permit _67_
Отобразить маршруты, которые совпадают с фильтром 1 (используется тот же маршрутизатор, что и в предыдущем примере):
dyn1# show ip bgp filter-list 1
BGP table version is 9, local router ID is 197.1.8.1
Status codes: s suppressed, d damped, h history, * valid, > best, i - internal,
              r RIB-failure, S Stale
Origin codes: i - IGP, e - EGP, ? - incomplete

   Network          Next Hop            Metric LocPrf Weight Path
*> 100.67.67.0/24   192.168.20.8                           0 8 67 i
*> 100.78.78.0/24   192.168.20.8                           0 8 67 i
*> 100.100.6.0/24   192.168.20.8                           0 8 67 i
r> 192.168.20.0     192.168.20.8             0             0 8 i
[править] Distribute list
dyn3(config-router)# distribute-list <acl> out
Сети разрешенные в acl, будут перераспределены.
[править] Prefix list
В каждом prefix list может быть несколько команд prefix-list, каждой из которых присвоен порядковый номер. Когда маршрутизатор обрабатывает prefix list, он просматривает все команды в соответствии с порядковыми номерами команд. Каждой команде соответствует действие permit или deny.
Синтаксис команды:
ip prefix-list <list-name> [seq <value>] <deny|permit> <network/length> [ge <value>] [le <value>]
Объяснение логики команды prefix-list на примере сети 10.0.0.0/8:
- ip prefix-list 1 permit 10.0.0.0/8 — только сеть 10.0.0.0/8,
- ip prefix-list 1 permit 10.0.0.0/8 le 11 — маршруты у которых первый октет 10, и префикс от 8 до 11,
- ip prefix-list 1 permit 10.0.0.0/8 ge 11 — маршруты у которых первый октет 10, и префикс от 11 до 32,
- ip prefix-list 1 permit 10.0.0.0/8 ge 11 le 13 — маршруты у которых первый октет 10, и префикс от 11 до 13.
[править] Применение prefix list
Фильтрует входящие или исходящие обновления BGP для указанного соседа:
dyn(config-router)# neighbor <ip-address | peer-group-name> prefix-list <list-name> <in|out>
Фильтрует маршруты перераспределенные из указанного процесса маршрутизации в BGP:
dyn(config-router)# distribute-list prefix-list <list-name> out <routing-process>
[править] Outbound route filtering

Outbound route filtering (ORF) — функциональность BGP, которая позволяет маршрутизаторам обмениваться информацией о настроенных фильтрах обновлений BGP.
Если оба маршрутизатора поддерживают эту функциональность и соответственно настроены, то они могут обмениваться информацией о том, какие фильтры у них настроены.
Возможности ORF:
- Использует BGP ORF send и receive capabilities для уменьшения количества обновлений BGP, которые отправляются соседям.
- Помогает уменьшить затрату системных ресурсов, которые необходимы для генерирования и обработки обновлений, фильтруя эти обновления на источнике.
- Уменьшает количество ненужных обновлений BGP.
dyn(config-router)# neighbor <ip-address> capability orf prefix-list <receive|send|both>
router# show ip bgp neighbor <ip-address> received prefix-filter
[править] Карты маршрутов (route maps)
В каждой route map может быть несколько команд route-map, каждой из которых присвоен порядковый номер.
Когда маршрутизатор обрабатывает route map, он просматривает все команды в соответствии с порядковыми номерами команд.
В каждой команде route-map указано действие permit или deny.
Кроме того, с помощью команды match указываются параметры которые должны быть у маршрута для того чтобы он совпал с правилом.
Для того чтобы указать весь трафик, в команде route-map просто не надо указывать команду match.
Если после параметра match идет несколько опций, то к ним применяется логика или, то есть должен совпасть один из перечисленных параметров.
Если задано несколько параметров match в отдельных строках, то к ним применяется логика и, то есть должны совпасть все параметры.
В каждой команде route-map может быть одна или более команд set, которые используются для изменения каких-либо параметров проходящих маршрутов.
Route map позволяет фильтровать маршруты при перераспределении и изменять различные атрибуты маршрутов.
Пример изменения значения атрибута origin для сетей разрешенных в ACL 101:
dyn(config)# route-map NEW_Origin permit
dyn(config-route-map)# match ip address 101
dyn(config-route-map)# set origin igp
[править] Route-map Policy list
[править] Route-map continue
[править] Применение изменений в настройках политик BGP
Три способа инициировать отправку обновлений:
- Hard reset
- Soft reset
- Обновление маршрутов (route refresh)
[править] Hard reset
Hard reset:
dyn3# clear ip bgp *
Результат выполнения команды clear ip bgp *:
- Сброс всех BGP-соединений с этим маршрутизатором
- Очищается таблица BGP
- Сессии BGP переходят из состояния established в состояние idle
- Вся информация должна быть заново выучена (сосед должен её заново отправить)
Hard reset для соседа:
dyn3# clear ip bgp <neighbor-address>
Результат выполнения команды clear ip bgp <neighbor>:
- Сброс BGP-соединений только с соседом
- Сессия BGP, установленная с этим соседом, переходит из состояния established в состояние idle
- Вся информация от соседа должна быть заново выучена
[править] Soft reset
Soft reset — методы, которые позволяют обновить политики BGP не разрывая сессию с соседом.
[править] Outbound soft reset
Soft reset outbound (параметр soft необязательный, без его указания, команда clear ip bgp out, выполняет те же действия):
dyn3# clear ip bgp <neighbor-address> [soft] out
Результат выполнения команды clear ip bgp <neighbor-address> soft out:
- Маршруты выученные от указанного соседа не теряются
- Версия таблицы (table version number) для соседа выставляется равной 0. При наступлении следующего интервала для отправки обновлений, маршрутизатор проверяет таблицу BGP и отправляет соседу все маршруты, так как у них версия больше чем ноль
- Локальный маршрутизатор отправляет заново всю информацию BGP соседу, не разрывая соединения
- Соединение не разрывается
- Это команда нужна для случаев, когда обновляется исходящая политика
- При изменении входящей политики, команда soft out не помогает
Какие маршруты анонсируются указанному соседу:
dyn3# show ip bgp neighbors <neighbor-address> advertised-routes
[править] Inbound soft reset
Выполнение inbound soft reset:
- Сохранить обновления полученные от соседа — команда neighbor <neighbor-address> soft-reconfiguration inbound
- Изменить входящую политику
- Заново сгенерировать обновления на локальном маршрутизаторе — команда clear ip bgp <neighbor-address> soft in
|
|
Вместо этой функции лучше использовать Dynamic inbound soft reset. |
Сохранение всех обновлений полученных от указанного соседа:
dyn3(config-router)# neighbor <neighbor-address> soft-reconfiguration inbound
Результат выполнения команды neighbor soft-reconfiguration inbound:
- Локальный маршрутизатор сохраняет все обновления полученные от указанного соседа
- Применяется в случаях изменения входящей политики
Отобразить маршруты полученные от соседа и сохраненные в результате выполнения inbound soft reconfiguration:
dyn3# show ip bgp neighbours <neighbor-address> received-routes
После того как входящая политика была изменена, необходимо заново отправить обновления от этого соседа для применения политики.
Маршрутизатор использует сохраненную информацию для того чтобы сгенерировать обновления от указанного соседа.
Inbound soft reset (параметр soft необязательный, без его указания, команда clear ip bgp in, выполняет те же действия):
dyn3# clear ip bgp <neighbor-address> [soft] in
Результат выполнения команды clear ip bgp <neighbor-address> [soft] in (после сохранения обновлений от соседа):
- Локальный маршрутизатор использует сохраненную информацию для того чтобы сгенерировать обновления от указанного соседа
- Сосед не отправляет обновления, все обновления генерируются заново локально
[править] Inbound и outboung soft reset
Одновременный soft reset для входящих и исходящих обновлений:
dyn3# clear ip bgp <neighbor-address> soft
[править] Обновление маршрутов (route refresh) или Dynamic inbound soft reset
Обновление маршрутов (route refresh) — улучшенный механизм inbound soft reset. Другое название — Dynamic inbound soft reset. Маршрутизатор отправляет соседу запрос на повторную отправку всех маршрутов. При этом не происходит разрыва сессии с соседом. По сравнению с inbound soft reset, когда требовалось сохранить все маршруты полученные от соседа, этот метод требует меньшей затраты ресурсов маршрутизатора.
Для использования route refresh, оба маршрутизатора должны поддерживать эту функцию. Информация о поддержке функции анонсируется в сообщениях Open.
Обновление маршрутов (команда улучшает механизм inbound soft reset):
dyn3# clear ip bgp <neighbor-address> in
Результат выполнения команды clear ip bgp <neighbor-address> in:
- Маршруты отправленные соседу не убираются
- Соединение не разрывается
- Обновления не сохраняются локально
- Сосед заново отправляет маршруты
- Обновляет маршруты от соседа в таблице маршрутизации
[править] Просмотр информации
Просмотр краткой информации о соседях:
dyn3# show ip bgp summary
Таблица BGP:
dyn3# show ip bgp
Отобразить маршруты в таблице BGP, которые начинаются на 192.168.0.0:
dyn3# show ip bgp 192.168.0.0/16 longer-prefixes
Подробная информация о маршрутах к определенной сети:
dyn3# show ip bgp 192.168.1.0 mask 255.255.255.0
Маску можно указывать в формате CIDR:
dyn3# show ip bgp 192.168.1.0/24
Указывает какие сети не были помещены в RIB (routing information base) и почему они не были туда помещены:
dyn3# show ip bgp rib-failure
[править] Информация о соседях
Детальная информация о соседях:
dyn3# show ip bgp neighbors
Какие маршруты были получены от соседа:
dyn3# show ip bgp neighbours A.B.C.D routes
Отобразить маршруты полученные от соседа и сохраненные в результате выполнения inbound soft reconfiguration:
dyn3# show ip bgp neighbours A.B.C.D received-routes
|
|
Для того чтобы можно было просмотреть какие маршруты были получены от соседа, надо чтобы для этого соседа была выполнена команда neighbor <neighbor-id> soft-reconfiguration inbound. |
Какие маршруты анонсируются указанному соседу:
dyn3# show ip bgp neighbors A.B.C.D advertised-routes
[править] Отображение маршрутов с определенной AS в AS Path
Пример таблицы BGP на маршрутизаторе:
dyn5# sh ip bgp
BGP table version is 5, local router ID is 192.168.100.1
Status codes: s suppressed, d damped, h history, * valid, > best, i - internal,
              r RIB-failure, S Stale
Origin codes: i - IGP, e - EGP, ? - incomplete

   Network          Next Hop            Metric LocPrf Weight Path
*>i192.168.1.0      192.168.2.1              0    100      0 i
*>i192.168.2.0      192.168.4.3              0    100      0 i
* i192.168.4.0      192.168.4.3              0    100      0 i
*>                  0.0.0.0                  0         32768 i
*  192.168.5.0      192.168.5.6              0             0 406 i
*>                  0.0.0.0                  0         32768 i
Показать маршруты у которых в AS Path встречается ASN 406:
dyn5#sh ip bgp regexp 406
BGP table version is 5, local router ID is 192.168.100.1
Status codes: s suppressed, d damped, h history, * valid, > best, i - internal,
              r RIB-failure, S Stale
Origin codes: i - IGP, e - EGP, ? - incomplete

   Network          Next Hop            Metric LocPrf Weight Path
*  192.168.5.0      192.168.5.6              0             0 406 i
[править] Команды отладки (debug)
dyn# debug ip tcp transactions
dyn# debug ip bgp events
dyn# debug ip bgp keepalives
Информация об обновлениях BGP:
dyn# debug ip bgp updates
Отобразить все входящие и исходящие обновления для маршрутов совпадающих с ACL:
dyn# debug ip bgp updates <acl>
Отобразить все обновления полученные от или отправленные соседу (можно добавлять ACL):
dyn# debug ip bgp <ip-address> updates [acl]
[править] Разное
По умолчанию маршрутизатор отбрасывает обновление BGP, если видит в AS path номер своей автономной системы.
Однако, можно разрешить маршрутизатору нарушать это правило:
dyn(config-router)# neighbor 199.1.1.1 allowas-in
[3]
[править] BGP policy accounting
- [4]
- [5]
[править] Сходимость BGP
Процессы BGP:
- BGP open
- BGP I/O
- BGP Scanner — проходит по таблице BGP и проверяет доступность next-hop. Проверяет condition advertisement. Выполняет route dampening. Запускается каждые 60 секунд.
- BGP Router
Фильтр для просмотра информации о процессах связанных с BGP:
dyn1# show processes cpu | include BGP
 175      119076   2804506         42  0.00%  0.00%  0.00%   0 BGP Router
 176      140408    163366        859  0.00%  0.00%  0.00%   0 BGP I/O
 177     2982572     90228      33055  0.00%  0.55%  0.31%   0 BGP Scanner
[править] Конфигурационные файлы маршрутизаторов dyn1, dyn3, dyn5
Конфигурационные файлы на странице BGP/config.
[править] Дополнительная информация
- BGP Best Path Selection Algorithm
- Load Balancing in BGP Networks
- BGP Case Studies
- Using the BGP for Interdomain Routing
- Understanding Route Aggregation in BGP
- Cisco IOS IP Routing Protocols Command Reference
- Cisco IOS IP Routing Protocols Configuration Guide, Release 12.4
| |
|
|---|---|
| Устройства | Cisco 871 • Cisco Router • Cisco Switch • Сisco Сatalyst • Cisco IPS • Cisco ASA • PIX • Dynamips |
| Безопасность (коммутаторы и маршрутизаторы) |
Cisco Security • Port security • DHCP snooping • Dynamic ARP Protection • IP Source Guard • Аутентификация при доступе к сети • 802.1X в Cisco • Zone-Based Policy Firewall • Cisco NAT • NAT в Cisco • Cisco SSH |
| Cisco ASA | Cisco ASA/NAT • Cisco ASA/Troubleshooting • Cisco ASA/IPS • Cisco ASA failover • Cisco ASA/Transparent firewall • Cisco ASA/Site-to-Site_VPN • Cisco ASA/Easy_VPN • Cisco ASA/WebVPN • Объединение OSPF-сетей туннелем между двумя системами ASA (без GRE) • Центр сертификатов на Cisco ASA |
| VPN | IPsec в Cisco • Cisco IOS Site-to-Site VPN • DMVPN • Cisco Easy VPN • Cisco Web VPN • Cisco ipsec preshared |
| Канальный уровень | CDP • VLAN в Cisco • ISL • VTP • STP в Cisco • Cisco Express Forwarding • Агрегирование каналов • Зеркалирование трафика • QinQ • Frame Relay |
| Сетевой уровень | Маршрутизация в Cisco • RIP • EIGRP • IS-IS • OSPF • BGP • PIM • Multicast • GLBP • VRRP • HSRP • DHCP • IPv6 • IPv6 vs IPv4 • Резервирование Интернет-каналов без использования BGP • Использование BGP для резервирования Интернет-каналов |
| Разное | Режим ROMMON в Cisco • Опция 82 DHCP • 802.1X и RADIUS • SNMP в Cisco • QoS в Cisco • EEM • Troubleshooting • Автоматизация работы устройств Cisco • Cisco NTP • Cisco IP SLA • Cisco Enhanced Object Tracking |
Представляем Вам пример как настроить BGP на роутере Cisco в базовом варианте с комментариями. Так же будут рассмотрены особенности работы протокола BGP в крупных корпоративных сетях.
Router(config)# router bgp <ASN>
Router(config-router)# neighbor <address> remote-as <ASN>
ID маршрутизатора в BGP берется из следующих источников, в порядке предпочтения:
- Команда bgp router-id
- Наибольший IP петлевого (loopback) интерфейса
- Наибольший IP физического интерфейса
В BGP маршруты по умолчанию суммируются до границ своего класса. Отключается это командой: no auto-summary.
Маршруты, объявляемые вручную, указываются следующей командой:
Router(config-router)# network <subnet> [mask <mask>]
Включение редистрибуции:
Router(config-router)# redistribute <protocol …>
Маршруты, добавленные вручную командой network, помечаются как маршруты, происходящие из IGP, вот так — «i». Маршруты, которые получены при редистрибуции, помечаются как маршруты с неизвестным происхождением — вот так:»?».
BGP-маршрутизатор может отдавать своим соседям маршрут по умолчанию:
Router(config-router)# neighbor <address> default-originate
Требование синхронизации маршрутов можно отключить, позволив тем самым BGP импортировать в свою таблицу внутренние маршруты, не известные IGP:
Router(config-router)# no synchronization
В маршрутах, рассылаемых iBGP-пирам, атрибут «next hop» можно подменять на адрес роутера, который объявляет эти маршруты. Вот так:
Router(config-router)# neighbor <address> next-hop-self
Регулировка таймеров (в секундах):
Router(config-router)# bgp timers <keepalive> <hold>
Исходный адрес, от имени которого устанавливаются связи с соседями, можно указать вручную. Это особенно полезно, если исходный адрес висит на Loopback-интерфейсе:
Router(config-router)# neighbor <address> update-source <interface
TTL в eBGP по умолчанию равно 1. Чтобы увеличить это значение, используется команда «eBGP multihop»:
Router(config-router)# neighbor <address> ebgp-multihop <TTL>
«eBGP multihop» обязателен, если используются петлевые интерфейсы.
Агрегация маршрутов BGP
Есть два способа рассылки агрегированных маршрутов:
- статические маршруты
- команда aggregate-address
Агрегация с помощью статических маршрутов:
Router(config)# ip route 192.168.0.0 255.255.0.0 Null0
…
Router(config-router)# network 192.168.0.0 mask 255.255.0.0
Агрегация с помощью команды «aggregate-address»:
Router(config-router)# aggregate-address 192.168.0.0 255.255.0.0 [summary-only]
Если используется ключевое слово summary-only, тогда объявляется только агрегированный маршрут. Если же это ключевое слово не используется, то наряду с агрегированным маршрутом рассылаются и more-specific (морспецифики, более конкретные маршруты).
С другой стороны, отдельные морспецифики можно фильтровать при помощи «подавления» (suppress map):
Router(config-router)# aggregate-address 192.168.0.0 255.255.0.0 suppress-map <route-map>
С целью изменения атрибутов агрегированному адресу можно назначить attribute map (например, для установки origin — происхождения маршрута):
Router(config-router)# aggregate-address 192.168.0.0 255.255.0.0 attribute-map <route-map>
В агрегированный маршрут по умолчанию не включается «AS Set». Включается этот атрибут вот так:
Router(config-router)# aggregate-address 192.168.0.0 255.255.0.0 as-set
При включении «AS Set» агрегированный маршрут наследует все атрибуты включенных в него маршрутов. Для наследования атрибутов только от избранных маршрутов используется «advertise map«:
Router(config-router)# aggregate-address 192.168.0.0 255.255.0.0 as-set advertise-map <route-map>
Управление BGP-соединениями
Для удобства каждому соседу можно назначить описание:
Router(config-router)# neighbor 192.168.123.45 description R7 in Moscow<
Соединение с отдельным соседом можно спрятать под пароль (хэш MD5 включается в BGP-пакеты):
Router(config-router)# neighbor 192.168.123.45 password FooBar
Для каждого соседа можно настроить интервал рассылки (advertisement interval), регулируя тем самым время ожидания перед отправкой объявлений (0-600 секунд):
Router(config-router)# neighbor 192.168.123.45 advertisement-interval <seconds>
Переговоры между соседями об использовании версии BGP можно отключить, указав версию вручную:
Router(config-router)# neighbor 192.168.123.45 version <version>
Можно настроить маршрутизатор таким образом, чтобы в процессе выбора наилучшего маршрута не учитывалась длина «AS Path»:
Router(config-router)# bgp bestpath as-path ignore
Количество префиксов, получаемых от соседа, можно ограничить:
Router(config-router)# neighbor 192.168.123.45 maximum-prefix <count> [<warning threshold>] [warning-only]
Здесь порог предупреждения (warning threshold) определяет процент от максимального количества префиксов, при превышении которого генерируется предупреждение. Ключевое слово warning-only позволяет соединению продолжать работу, даже если пир превысил максимальный порог префиксов.
Для временного отключения соседа без удаления его конфигурации используется команда neighbor shutdown.
Правила маршрутизации
Для фильтрации принимаемых или рассылаемых маршрутов применяются списки дистрибуции (distribute list):
Router(config-router)# neighbor <neighbor> distribute-list <ACL> {in | out}
Для фильтрации маршрутов, основываясь на их «AS Path», применяются списки фильтрации (filter list):
Router(config)# ip as-path access-list 1 permit <regex>
…
Router(config-router)# neighbor <neighbor> filter-list <list> {in | out}
Вместо списков дистрибуции или фильтрации можно использовать роутмапы (route map), которые позволяют производить более гибкую настройку и, в добавок, позволяют менять атрибуты. Применение route-map к соседу:
Router(config-router)# neighbor <neighbor> route-map <route-map> {in | out}
Административный вес влияет на предпочтения среди маршрутов, полученных от BGP-пиров. Маршрутам от отдельного соседа этот вес (0-65535) можно назначить локально:
Router(config-router)# neighbor <neighbor> weight <weight>
По умолчанию маршрутам, имеющим локальное происхождение, назначается вес 32768, в то время как вес всех остальных равен 0. Вес можно назначать и избранным маршрутам, применяя роутмапы или используя ключевое слово weightпосле параметра filter-list:
Router(config-router)# neighbor <neighbor> filter-list <list> weight <weight>
Административная дистанция отличается от веса тем, что влияет на предпочтения среди маршрутов, полученных от разных протоколов маршрутизации. Чем меньше дистанция, тем предпочтительней. Административная дистанция внешних BGP-маршрутов равна 20. Дистанция внутренних и локальных (генерируемых данным роутером при помощи команды network) BGP-маршрутов равна 200.
Бэкдор (backdoor link, черный ход) — приватное соединение между AS, которому должно отдаваться предпочтение перед eBGP-маршрутами. Для чего административная дистанция внешнего маршрута должна быть искусственно завышена включением в BGP-процесс необходимой сети с ключевым словом backdoor:
Router(config-router)# network <network> backdoor
Маршрут к указанной сети будет считаться локальным с административной дистанцией 200, из-за чего предпочтение будет отдаваться маршрутам, полученным из IGP, который работает в этом приватном линке, и трафик вместо внешнего маршрута потечет по бэкдору.
Кроме того, iBGP-пиры обмениваются друг с другом локальными предпочтениями (local preference, 32-битная величина, по умолчанию равная 100). Это значение можно установить командой ip default local-preference, либо set local-preference в роутмапе. В отличие от административного веса, действие локалпрефов распространяется за пределы локального роутера.
Влияние на путь, которым трафик будет заходить в вашу AS из соседней, при наличии нескольких точек входа, оказывает MED (или «метрика»). Для установки MED BGP-маршрута равным значению метрики такого же маршрута из IGP, в роутмапе можно воспользоваться командой set metric-type internal. Для принудительного сравнения MED нескольких маршрутов к одному адресату, даже если они происходят из разных AS, в BGP-процессе применяется команда bgp always-compare-med.
MED влияет только на поведение соседней AS. Повлиять аналогичным образом на поведение удаленных AS можно при помощи искусственного увеличения «AS Path» маршрутов. Для этого в роутмапе используется команда set as-path prepend. Обычно локальная AS «препендится» один или несколько раз. Например, для маршрутов AS 123:
route-map PREPEND_AS permit 10
match ip address <ACL>
set as-path prepend 123 123 123
Для сохранения BGP-информации в процессе редистрибуции в/из IGP используется тегирование маршрутов (route tagging). По умолчанию маршруты, передаваемые из BGP в IGP, тегируются собственным «AS Path». В тег можно добавить ещё происхождение маршрута командой set automatic-tag в роутмапе. Для автоматической установки атрибута «AS Path» из тега при редистрибуции маршрута из IGP обратно в BGP применяется команда set as-path tag в роутмапе. Также теги маршрутов могут применяться для хранения BGP-коммьюнити.
Включение подавления маршрутов:
Router(config-router)# bgp dampening [<half-life> <reuse> <suppress> <max-suppress>]
Посмотреть подавленные маршруты можно командой show ip bgp dampened-paths. Команда show ip bgp flap-statistics позволяет просмотреть все текущие подавленные маршруты вместе с маршрутами, которые вообще когда-либо подавлялись. Команда clear ip bgp dampening возвращает подавленные маршруты обратно в обслуживание. Командой clear ip bgp flap-statistics стирается вся история «мигания» маршрутов.
Особенности настройки BGP в больших сетях
Пример организации пиринговой группы:
Router(config-router)# neighbor BRANCHES peer-group
Router(config-router)# neighbor BRANCHES ebgp-multihop 2
Router(config-router)# neighbor BRANCHES update-source Loopback 0
Router(config-router)# neighbor 10.1.0.84 peer-group BRANCHES
Router(config-router)# neighbor 10.1.0.84 remote-as 123
У правил, применяемых к отдельному члену пиринговой группы, приоритет выше, чем у правил, применяемых ко всей группе.
Коммьюнити
Коммьюнити (сообщество) можно установить в роутмапах командой: set community <community>. В добавок, для включения атрибута «community» в рассылку, каждый сосед или пиринговая группа должны быть настроены с опцией send-community.
Общепринятые коммьюнити:
- no-export — передается с маршрутом, рассылаемым eBGP-пирам, инструктируя их не рекламировать этот маршрут дальше, за пределы собственной AS
- no-advertise — рассылается iBGP-пирам с целью предотвращения дальнейшей рассылки маршрута
- local-as — используется для ограничения рассылки маршрута пределами конфедерации
Пользовательские коммьюнити устанавливаются либо в десятичном формате, либо в форме AA:NN (ASN:число).
Организация стандартного списка сообществ (community list):
Router(config)# ip community-list 1 {permit | deny} <community> [<community> …]
Расширенный коммьюнити-лист:
Router(config)# ip community-list 101 {permit | deny} <regex>
Критерий сравнения по коммьюнити-листу в роутмапе можно включать командой match community. Коммьюнити можно добавлять к маршруту без изменения уже присвоенных ему коммьюнити при помощи ключевого слова additive команды set community. Определенные коммьюнити, совпадающие с коммьюнити-листом, можно удалять командой set comm-list <number> delete.
Номера приватных AS
Частные ASN находятся в промежутке с 64512 по 65535. В настройках соседа командой remove-private-as можно стереть из маршрутов этого соседа все частные ASN в атрибуте «AS Path»:
Router(config-router)# neighbor <neighbor> remove-private-as
Конфедерации
Конфедерация — это AS, поделенная на более мелкие локальные автономные системы, обычно использующие приватную нумерацию. Между этими мелкими AS работает eBGP. Маршрутизаторы внутри конфедерации должны быть соответствующим образом настроены для её распознавания:
Router(config-router)# bgp confederation identifier <ASN>
Плюс маршрутизаторы, пирящиеся с другими локальными AS, должны быть в курсе, что эти AS также принадлежат одной конфедерации:
Router(config-router)# bgp confederation peers <ASN> [<ASN> …]
Роут-рефлекторы BGP
На роут-рефлекторе должны быть указаны внутренние пиры, которым он должен отражать маршруты:
Router(config-router)# neighbor <neighbor> route-reflector-client
Роут-рефлектор добавляет к маршрутам «Originator ID», указывающий на происхождение маршрута, и «Cluster List», определяющий рефлект-кластер во избежание появления маршрутных петель. По умолчанию роут-рефлектор добавляет свой ID в список кластера. Но ID кластера можно указать вручную командой bgp cluster-id. Это необходимо, если в кластере несколько рефлекторов.
Если клиенты рефлектора полносвязны между собой, для отключения отражения маршрутов между клиентами используется команда: no bgp client-to-client reflection. Маршруты извне кластера будут продолжать отражаться обычным образом.
BGP is an interdomain routing protocol that is intended to provide businesses with loop-free routing. In this lab we will go over the cisco router bgp configuration steps. This lab consists of a simple 3 router configuration using eve-ng. If you have never configured a cisco router bgp configuration before then this lab is for you.
Depending on your router IOS version or type, you may have slightly different commands available. Follow along with this lab by using the address table below.
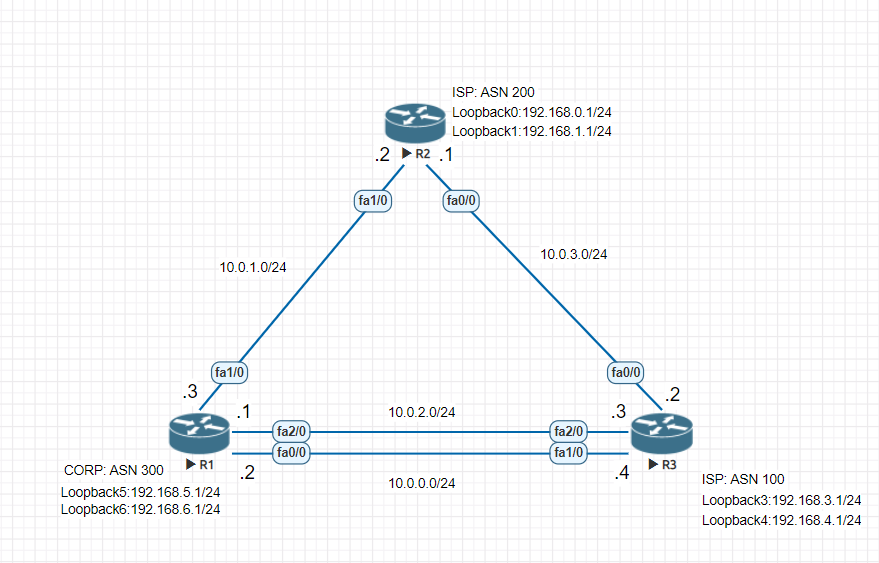
| Device Name | Interface | Ip4 Address |
|---|---|---|
| R1 | fa0/0 | 10.0.0.2/24 |
| R1 | fa1/0 | 10.0.1.3/24 |
| R1 | fa2/0 | 10.0.2.1/24 |
| R1 | Loopback5 | 192.168.5.1/24 |
| R1 | Loopback6 | 192.168.6.1/24 |
| R2 | fa0/0 | 10.0.3.1/24 |
| R2 | fa1/0 | 10.0.1.2/24 |
| R2 | Loopback0 | 192.168.0.1/24 |
| R2 | Loopback1 | 192.168.1.1/24 |
| R3 | fa0/0 | 10.0.3.2/24 |
| R3 | fa1/0 | 10.0.0.4/24 |
| R3 | fa2/0 | 10.0.2.3/24 |
| R3 | Loopback3 | 192.168.3.1/24 |
| R3 | Loopback4 | 192.168.4.1/24 |
We will use the loopback addresses to simulate the external networks for the isp and the internal networks for the Corp Network.
Initial Lab Cisco Router Configuration
We will console into each router and apply the below configuration on each device. The settings should be similar on each device besides the different ip addresses that will be applied.
R1 Configuration
R1#Conf t
R1(config)#interface loopback 5
R1(config-if)#ip address 192.168.5.1 255.255.255.0
R1(config-if)#interface loopback 6
R1(config-if)#ip address 192.168.6.1 255.255.255.0
R1(config-if)#interface fa 0/0
R1(config-if)#ip address 10.0.0.2 255.255.255.0
R1(config-if)#no shut
R1(config-if)#interface fa 2/0
R1(config-if)#ip address 10.0.2.1 255.255.255.0
R1(config-if)#no shut
R1(config-if)#interface fa 1/0
R1(config-if)#ip address 10.0.1.3 255.255.255.0
R1(config-if)#no shut
R1(config-if)#exit
R1(config)#exit
R1#copy run start
R2 Configuration
R2#Conf t
R2(config)#interface loopback 0
R2(config-if)#ip address 192.168.0.1 255.255.255.0
R2(config-if)#interface loopback 1
R2(config-if)#ip address 192.168.1.1 255.255.255.0
R2(config-if)#interface fa 1/0
R2(config-if)#ip address 10.0.1.2 255.255.255.0
R2(config-if)#no shut
R2(config-if)#interface fa 0/0
R2(config-if)#ip address 10.0.3.1 255.255.255.0
R2(config-if)#no shut
R2(config-if)#exit
R2(config)#exit
R2#copy run start
R3 Configuration
R3#Conf t
R3(config)#interface loopback 3
R3(config-if)#ip address 192.168.3.1 255.255.255.0
R3(config-if)#interface loopback 4
R3(config-if)#ip address 192.168.4.1 255.255.255.0
R3(config-if)#interface fa 0/0
R3(config-if)#ip address 10.0.3.2 255.255.255.0
R3(config-if)#no shut
R3(config-if)#interface fa 2/0
R3(config-if)#ip address 10.0.2.3 255.255.255.0
R3(config-if)#no shut
R3(config-if)#interface fa 1/0
R3(config-if)#ip address 10.0.0.4 255.255.255.0
R3(config-if)#no shut
R3(config-if)#exit
R3(config)#exit
R3#copy run start
Implementing Cisco Router BGP Configuration on all Routers
With all of the router devices configured we can now setup BGP neighbor relationships on R1. BGP works by taking what’s called an ASN number to uniquely identify each device on the internet to make sure that routing between routers is optimal.
IANA makes autonomous systems numbered one through 64511 available for global use. Private and reserved purposes are reserved for the 64512 to 65535 series. Autonomous Systems were created to regulate networking organizations such as ISPs, educational institutions, and government agencies.
Since this is a lab environment we are using whatever number we want since this will not connect to the real outside world.
On each router we are going to configure:
- The BGP ASN Number
- assign a router id to uniquely identify the router in the bgp configuration
- We will then configure all the designated neighbors which will be our 2 isp’s
- Then we will advertise the prefixes of the AS behind the routers.
R1 Cisco BGP Configuration
R1(config)#router bgp 300
R1(config-router)#bgp router-id 1.1.1.1
R1(config-router)#neighbor 10.0.2.3 remote-as 100
R1(config-router)#neighbor 10.0.0.4 remote-as 100
R1(config-router)#neighbor 10.0.1.2 remote-as 200
R1(config-router)#address-family ipv4 unicast
R1(config-router-af)#network 192.168.5.0 mask 255.255.255.0
R1(config-router-af)#network 192.168.6.0 mask 255.255.255.0
R2 Cisco BGP Configuration
R2(config)#router bgp 200
R2(config-router)#bgp router-id 2.2.2.2
R2(config-router)#neighbor 10.0.1.3 remote-as 300
*Jun  8 08:23:41.569: %BGP-5-ADJCHANGE: neighbor 10.0.1.3 Up2 remote-as 300
R2(config-router)#neighbor 10.0.3.2 remote-as 100
R2(config-router)#address-family ipv4 unicast
R2(config-router-af)#network 192.168.0.0 mask 255.255.255.0
R2(config-router-af)#network 192.168.1.0 mask 255.255.255.0
R2(config-router-af)#exit
R3 Cisco BGP Configuration
R3#conf t
R3(config)#router bgp 100
R3(config-router)#bgp router-id 3.3.3.3
R3(config-router)#neighbor 10.0.3.1 remote-as 200
*Jun  8 08:32:06.753: %BGP-5-ADJCHANGE: neighbor 10.0.3.1 Up .1
R3(config-router)#neighbor 10.0.2.1 remote-as 300
*Jun  8 08:32:29.717: %BGP-5-ADJCHANGE: neighbor 10.0.2.1 Up
R3(config-router)#neighbor 10.0.0.2 remote-as 300
R3(config-router)#address-family ipv4 unicast
R3(config-router-af)#network 192.168.3.0 mask 255.255.255.0
R3(config-router-af)#network 192.168.4.0 mask 255.255.255.0
R3(config-router)#exit
Now you may be wondering should i be advertising the Class C networks in the 192.168.0.0/16 range to the isp. Well if these ISP’s were connecting your other sites over an mpls connection then these would advertise the routes to those locations for you.
Now lets get into some verification of our current cisco router bgp configuration.
How to verify my cisco bgp configuration is working
Lets first look at one of the routers and run the following command “show bgp all neighbors”. We now see all the neighbor connections we are connected to from this router. You should see all of the remote router IDs of the neighbors. If your are missing any then that is when you should look over your bgp configuration again. Some of the important verification methods you should look for are:
- BGP state = Established
- remote router id should show the id of the remote AS
- The for address family should show either ipv4 or ipv6
- How often are the keepalives sent
- How long will the bgp session remain open if no keepalive messages are received.
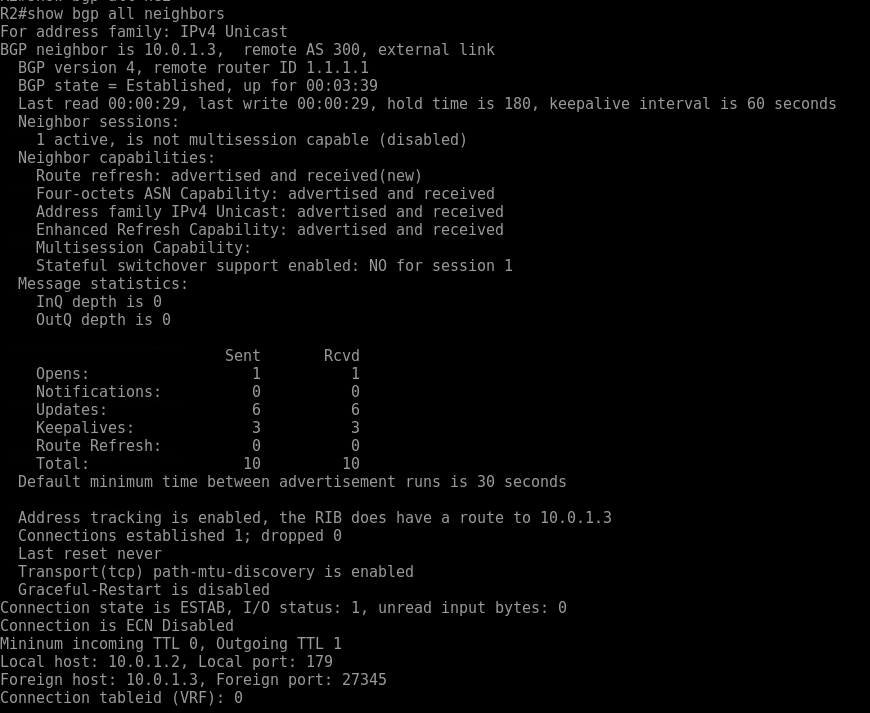
To view a more condensed summary of the bgp activity you can issue the command “show bgp ipv4 unicast summary”

When troubleshooting bgp and looking for the next hop in the route “show bgp ipv4 unicast” will show which route is the best. BGP routes based on the least amount of hops it takes to get to your destination. In some cases this may not be optimal if you want to go over a fast link. There is a way to alter that which we will talk about in another lesson.
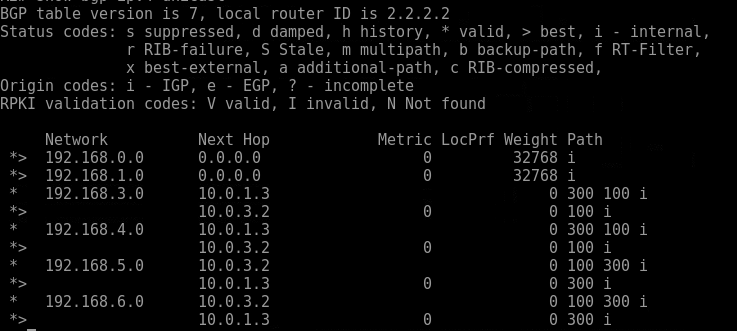
As you can see all networks with the > next it shows the best path. Looking at the left side under the Path section you can see that its less hops.
Conclusion
We walked through configuring an entire cisco router bgp configuration. This complete guide could easily be followed by a beginner to gain immediate knowledge of how bgp works to connect redundant isp’s to a corporate network and how to verify those routes are working. This is only the tip of the knowledge about BGP. You can follow more documentation on Cisco’s website.
Время на прочтение
4 мин
Количество просмотров 8.7K
Привет, Хабр! Моя первая статья и в ней я хочу представить небольшую лабораторную работу по конфигурации протокола BGP (Border Gateway Protocol) на маршрутизаторах Cisco. Многие из вас слышали что такое BGP, но не всем довелось опробовать данный протокол на практике. Именно для них и будет интересна данная лабораторная работа.
В статье будет мало теории, поэтому для тех кто впервые слышит о BGP отправляю сначала посетить это, это или, собственно, это.
Для выполнения лабораторной работы рекомендую использовать замечательный симулятор GNS3, который легко найти в сети.
Цель
Цель лабораторной работы — конфигурация маршрутизаторов клиента и оператора так, чтобы получить множественную адресацию с использованием соединений одного ISP. Собственно схема нашей будущей сети:
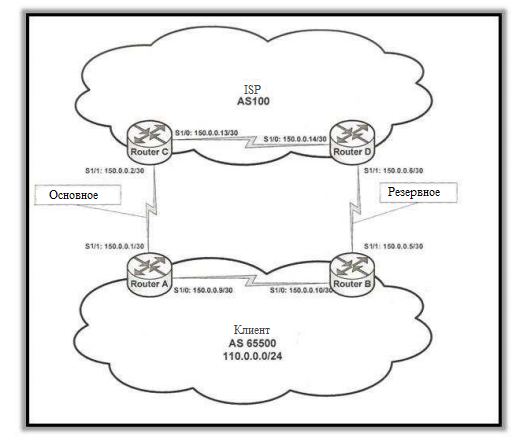
Конфигурация
И так, мы хотим, чтобы соединение между маршрутизаторами A и C было основным для входящего и исходящего трафика, а соединение между B и D было резервным и использовалось только при аварии основного.
Конфигурация интерфейсов
Интерфейсы должны быть сконфигурированы в соответствии с таблицей:

Для Serial 1/1 маршрутизатора A:
R1(config)# interface S1/1
R1(config-if)# ip address 150.0.0.1 255.255.255.252
R1(config-if)# no shutdown
Остальные интерфейсы следует сконфигурировать самостоятельно аналогичным способом.
Конфигурация BGP
Каждый маршрутизатор должен иметь номер ASN (в соответствии со схемой), который определяет к какому AS принадлежит маршрутизатор. Плюс каждый маршрутизатор будет обслуживать две сессии: одна iBGP с маршрутизатором в той же AS для работы внутри автономной системы и одна eBGP с маршрутизатором находящимся в другой AS для работы между автономными системами. Сессии должны быть сконфигурированы по обе стороны соединения.
R1(config)# router bgp 65500
R1(config-router)# neighbor 150.0.0.10 remote-as 65500
R1(config-router)# neighbor 150.0.0.2 remote-as 100
Конфигурация остальных маршрутизаторов остается самостоятельным заданием.
Следующее, что сделаем – это воспользуемся нестандартным механизмом, предлагаемым компанией Cisco, next-hop-self. Суть его в том, что он позволяет на изменения адреса Next_Hop перед анонсированием другому маршрутизатору находящемуся в той же AS. Маршрутизатор изменяет значение атрибута Next_Hop на свой собственный адрес. Благодаря чему мы не должны конфигурировать внутридоменную маршрутизацию в каждой AS. Механизм этот должен быть сконфигурирован только между маршрутизаторами в одной и той же AS.
R1(config)# router bgp 65500
R1(config-router)# neighbor 150.0.0.10 next-hop-self
Опять же конфигурация остальных маршрутизаторов – самостоятельно.
Адресное пространство использованное в AS 65500 – 110.0.0.0/24. Чтобы симулировать такую сеть, подключенную к маршрутизатору, можно сконфигурировать на маршрутизаторе B интерфейс Loopback.
R2(config)# interface loopback 0
R2(config-if)# ip address 110.0.0.1 255.255.255.0
Затем маршрутизаторы должны анонсировать подсети, к которым имеют доступ. Маршрутизатор B анонсирует сеть 110.0.0.0 с маской 255.255.255.0, которую имеет на интерфейсе Loopback 0.
R2(config)# router bgp 65500
R2(config-router)# network 110.0.0.0 mask 255.255.255.0
Маршрутизаторы C и D будут анонсировать A и B только маршрут по умолчанию (маршрут, который будет использоваться для всего исходящего трафика с AS 65500).
R3(config)# router bgp 100
R3(config-router)# neighbor 150.0.0.1 default-originate
Управление исходящим трафиком
Если мы хотим, чтобы маршрутизаторы A и B использовали исключительно основное соединение для исходящего трафика, можно воспользоваться атрибутом Local Preference. По умолчанию атрибут имеет значение равное 100. Значение Local Preference выменивается между всеми маршрутизаторами находящимися в одной AS. Чем выше значение атрибута, тем выше приоритет соединения. Изменить значение Local Preference можно с помощью Route map.
Делаем соединение между A и C основным:
R1(config)# router-map primary
R1(config-route-map)# match ip address 1
R1(config-route-map)# set local-preference 150
R1(config-route-map)# exit
R1(config)# access-list 1 permit host 0.0.0.0
Затем:
R1(config)# router bgp 65500
R1(config-router)# neighbor 150.0.0.2 route-map primary in
Чтобы изменения Local Preference вступили в силу, необходимо сбросить предыдущие настройки сессии BGP.
R1# clear ip bgp *
Чтобы проверить правильность конфигурации, а заодно насладиться результатом, можно воспользоваться traceroute’ом, выключая и включая определенные интерфейсы, тем самым симулируя аварию соединения.
Управление входящим трафиком
Мы хотим сделать так, чтобы маршрутизаторы C и D весь свой трафик направляли через основное соединение. Для этого мы можем воспользоваться атрибутом MED. Основное соединение должно получить меньшее значение (в нашем случае MED 20), чем резерв (MED 30). Делаем это с помощью того же Route map.
R1(config)# route-map trafic_out permit 10
R1(config-route-map)# match ip address 10
R1(config-route-map)# set metric 20
R1(config-route-map)# exit
R1(config)# access-list 10 permit host 110.0.0.0
R1(config)# router bgp 65500
R1(config-router)# neighbor 150.0.0.2 route-map trafic_out out
На маршрутизаторе B делаем аналогично со значением MED 50. И не забываем сбросить настройки на маршрутизаторах ISP, чтобы могли получить новые значения метрик.
Это все.
Спасибо за внимание!
Прошу прощение за ошибки в правописании. В школе язык не был сильной стороной, а учась за бугром, русский потихоньку забывается.