Установка и настройка DNS-сервера и Active Directory, DHCP-сервера в Windows Server 2019 не отличается от предыдущих выпусков серверов компании Microsoft, таких как Windows Server 2016, 2012. Пройдя несколько шагов несложно устанавить следующие роли: DNS-сервер и Доменные службы Active Directory, DHCP-сервер.
- Переименование сервера
- Настройка сетевого интерфейса
- Установка на сервера ролей: DNS-сервер, Доменные службы Active Directory, DHCP-сервер
- Повышение роли сервера до уровня контроллера домена
- Настройка обратной зоны DNS
- Настройка DHCP-сервера
Переименование сервера
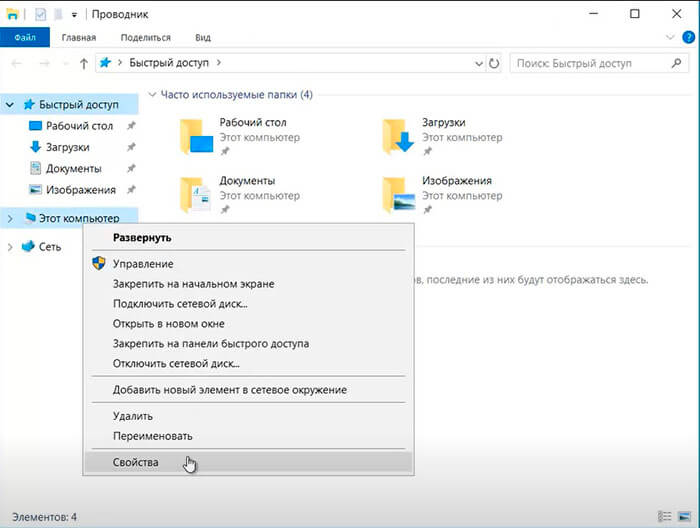
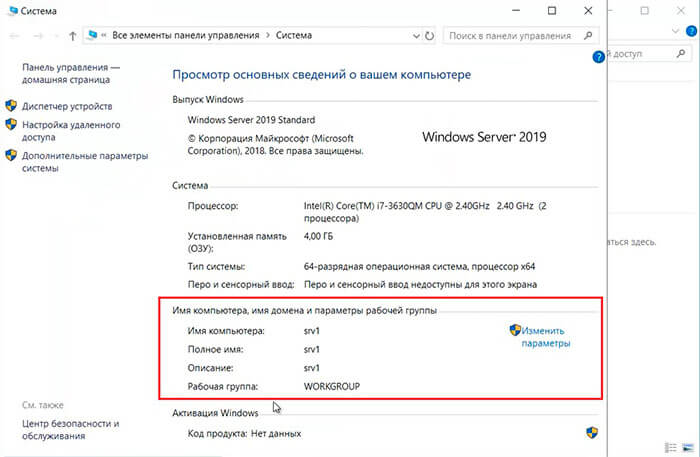
1. Для изменения имени сервера нажимаем правой клавишей мыши на «Этот компьютер«, в появившемся меню выбираем «Свойства«.
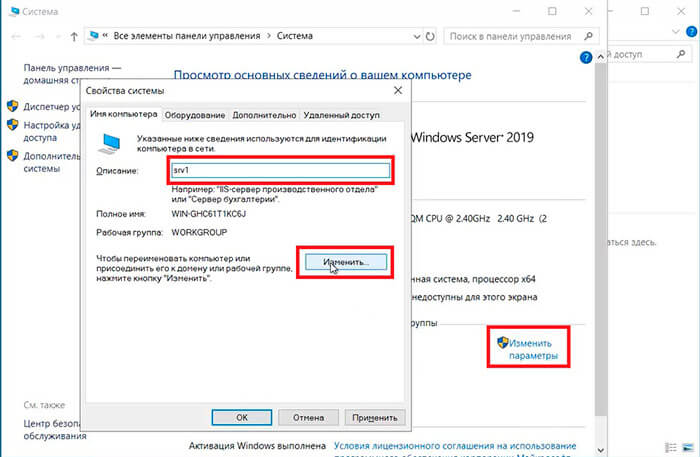
2. Далее нажимаем «Изменить параметры«. В открывшемся окне добавляем описание сервера, далее выбираем «Изменить«.
3. Задаём «Имя компьютера«, нажимаем «ОК«. Появится предупреждение о том, что изменения вступят в силу после перезагрузки компьютера. Подтверждаем — «ОК«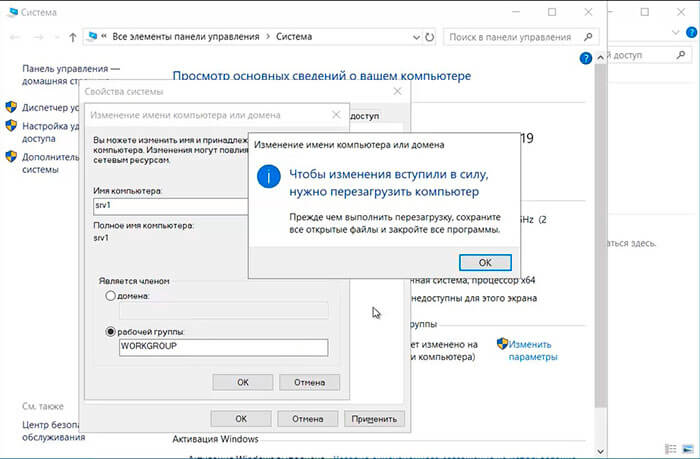
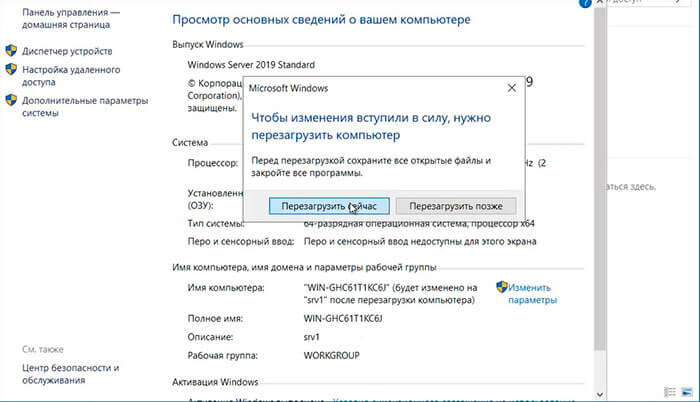
4. Нажимаем «Перезагрузить сейчас» и ожидаем перезагрузки сервера.
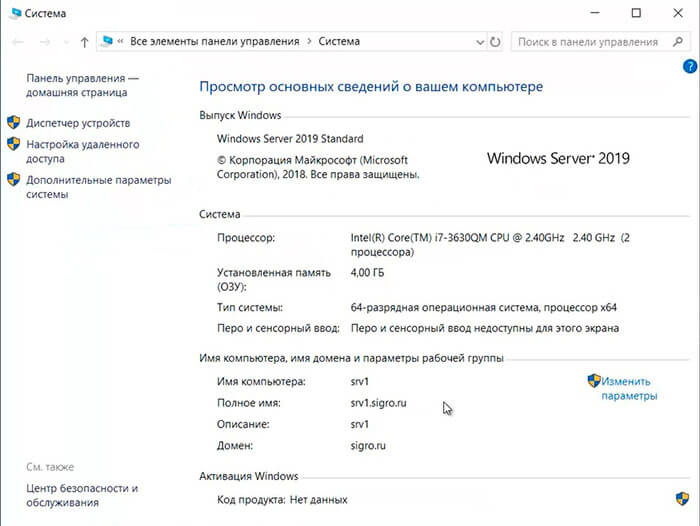
5. После перезагрузки компьютера проверяем имя сервера («Мой компьютер» — правой клавишей мыши — «Свойства«).
Настройка сетевого интерфейса
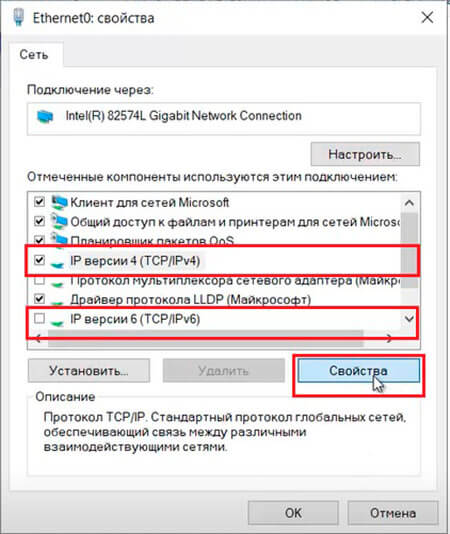
6. Для настройки сетевого интерфейса в поиске набираем ncpa.cpl, далее «Enter«. Снимаем чекбокс «IP версии 6«, далее выбираем «IP версии 4«, далее «Свойства«.
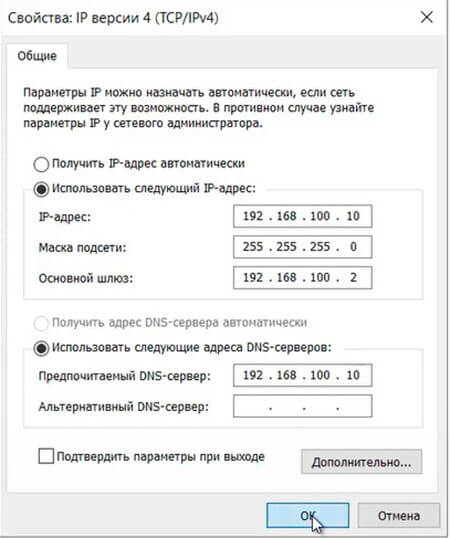
7. Выбираем «Использовать следующий IP-адрес» и задаём статический IP-адрес сервера, маску подсети, основной шлюз (если есть), и предпочитаемый DNS-сервер. Нажимаем «ОК«. На этом настройка сетевого интерфейса закончена.
Установка на сервера ролей: DNS-сервер, Доменные службы Active Directory, DHCP-сервер
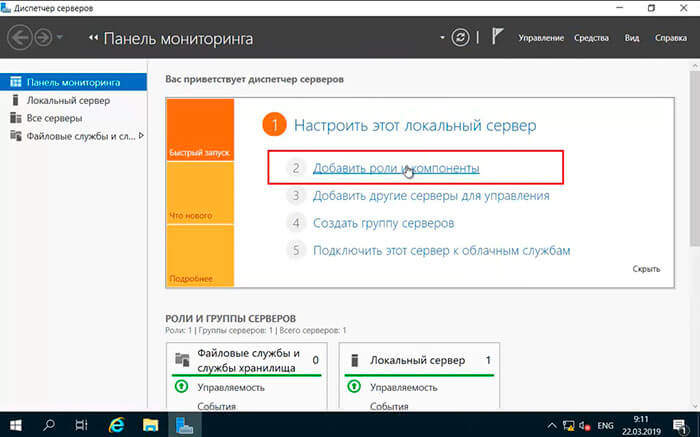
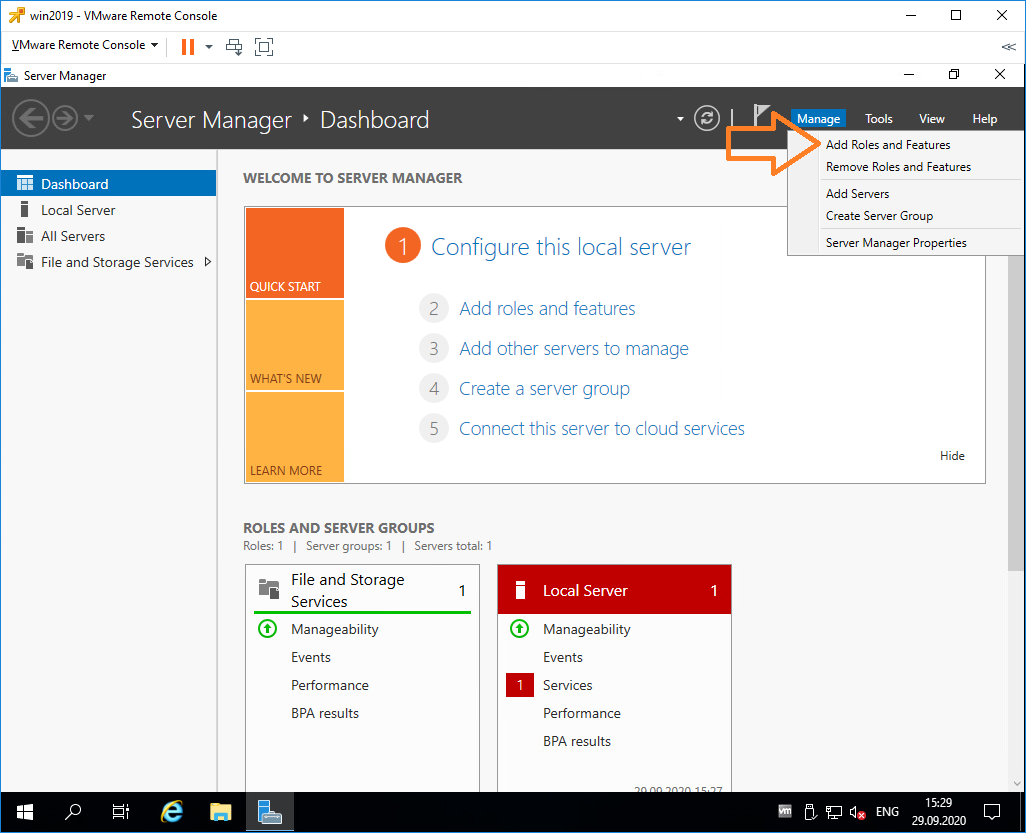
8. Нажимаем «Пуск«, далее «Диспетчер серверов«.

9. В новом окне выбираем «Добавить роли и компоненты«.
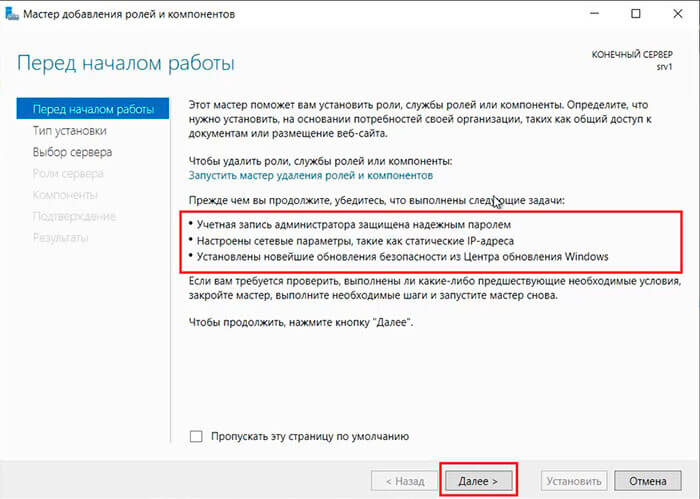
10. Читаем предупреждение сервера «Перед началом работы«, не забываем защитить учетную запись администратора надежным паролем, затем «Далее«.
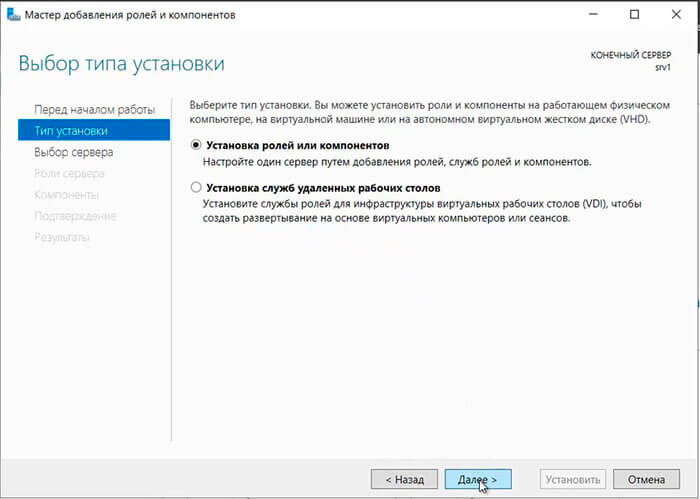
11. Проверяем, что чекбокс стоит на «Установка ролей или компонентов«, затем «Далее«.
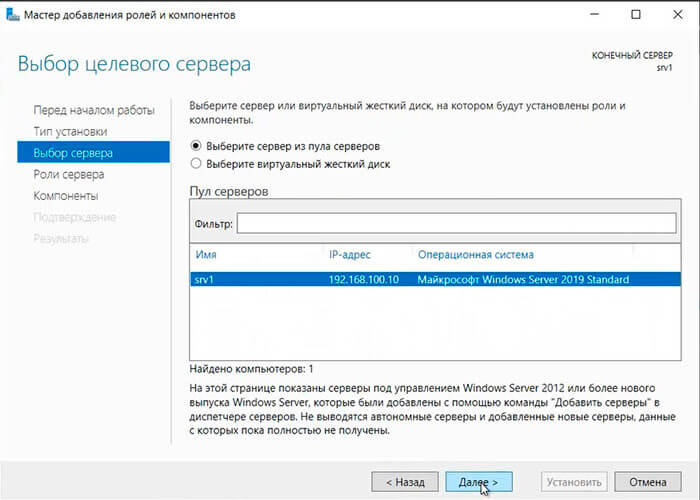
12. Выбираем сервер, на который будут установлены роли и компоненты. Снова «Далее«.
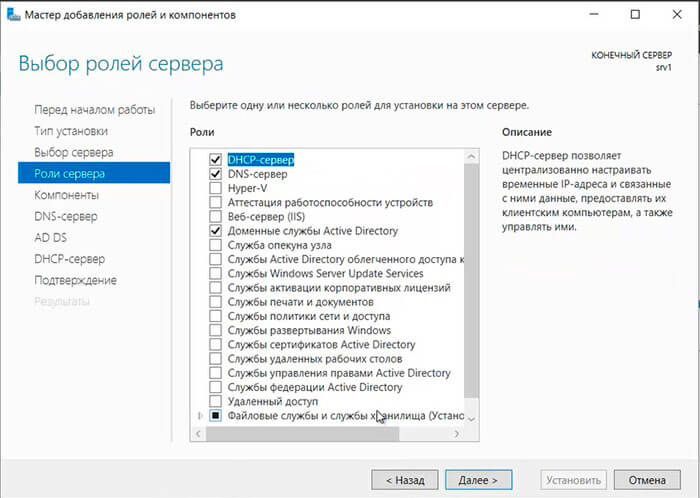
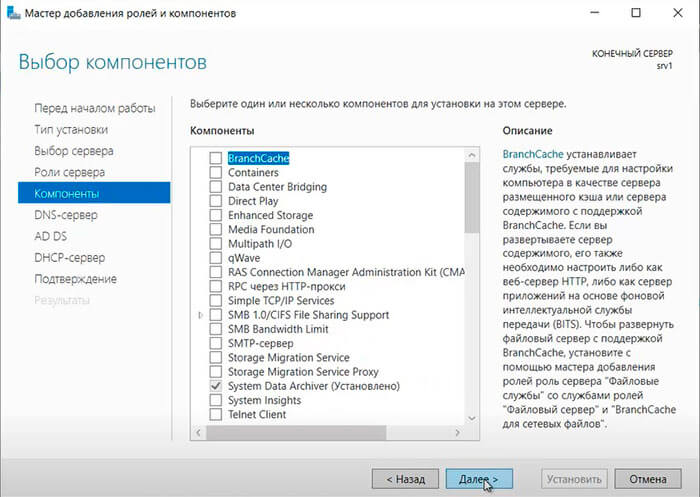
13. Устанавливаем чекбоксы напротив выбранных ролей сервера, в данном случае это DNS-сервер, Доменные службы Active Directory, DHCP-сервер. Нажимаем «Далее«.
14. При каждом выборе роли будет появляться «Мастер добавление ролей и компонентов«, который будет спрашивать о добавлении компонентов для выбранных ролей сервера. Нажимаем «Добавить компоненты«.

15. Нажимаем «Далее«, необходимые компоненты были выбраны в предыдущем шаге.
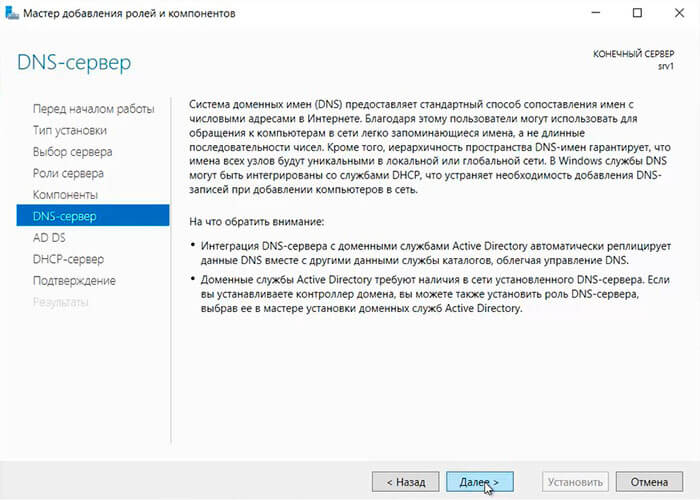
16. Читаем предупреждение DNS-сервера на что обратить внимание, затем «Далее«.
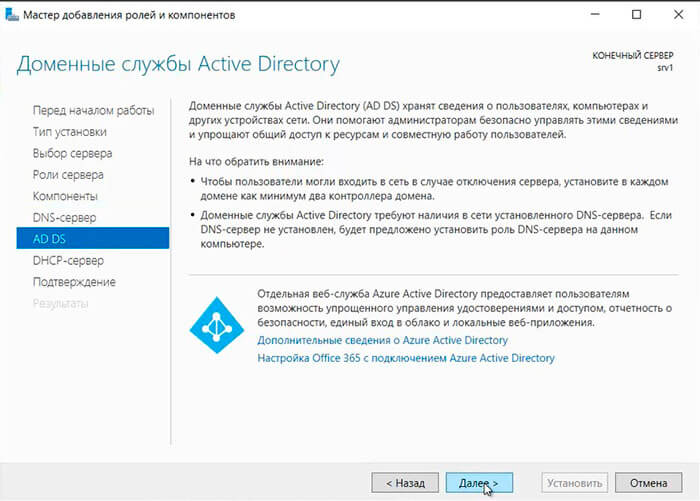
17. Читаем предупреждение AD DS, нажимаем «Далее«.
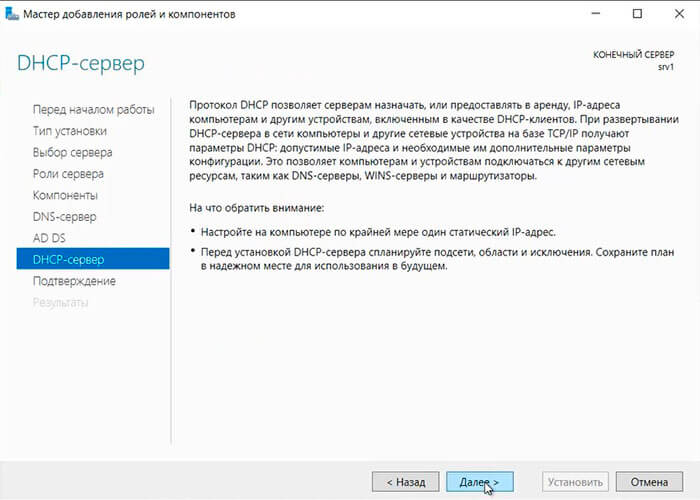
18. Читаем предупреждение DHCP-сервера, снова «Далее«.
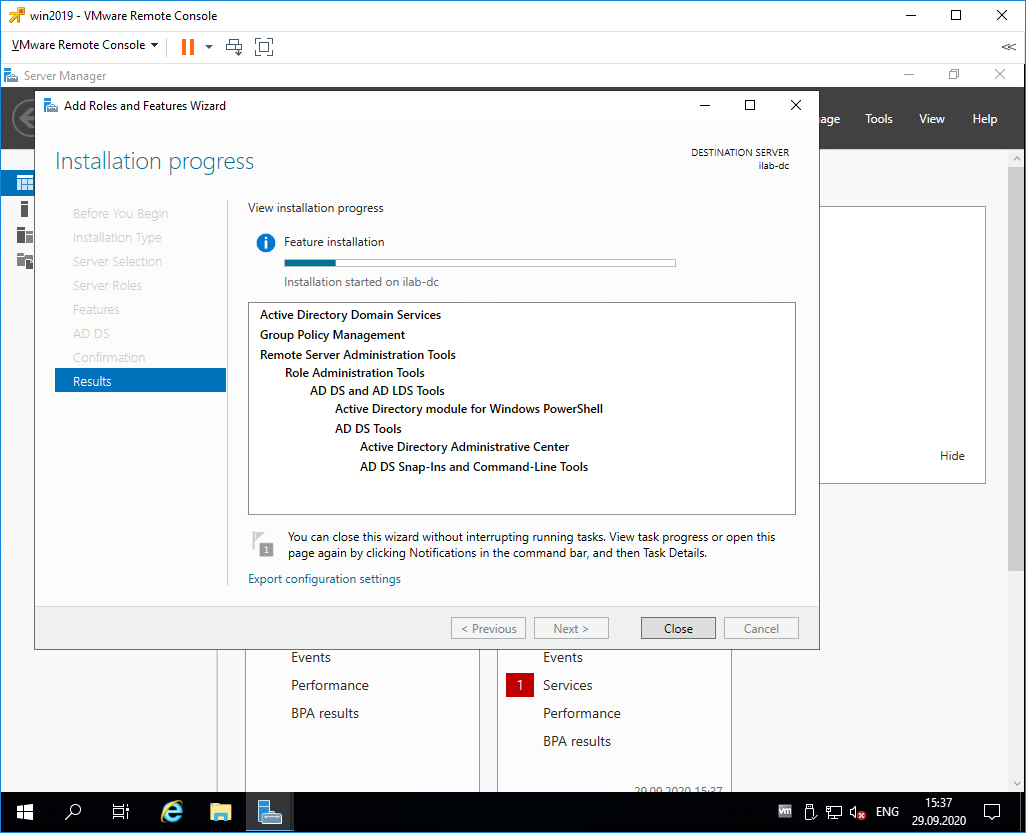
19. Ставим «чекбокс» напротив «Автоматический перезапуск конечного сервера, если требуется«, нажимаем «Установить«.
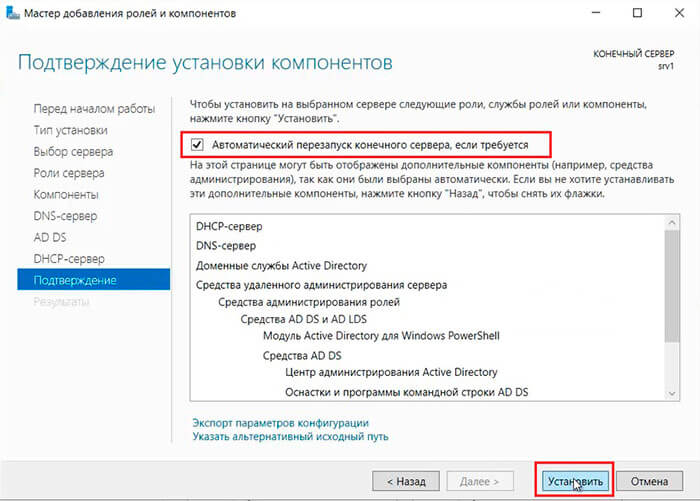
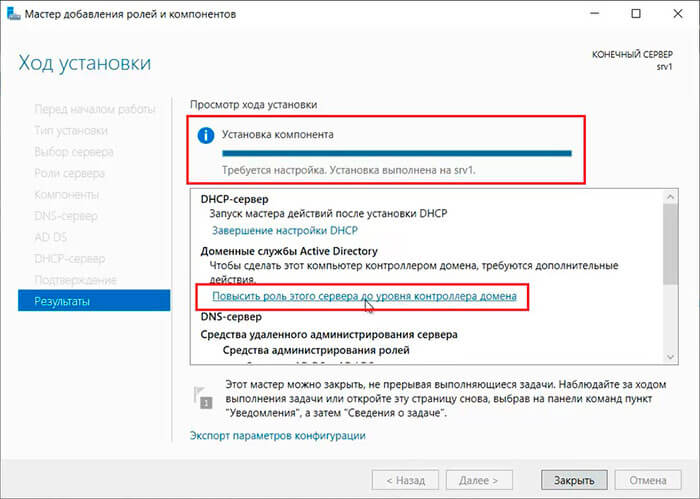
В результате произойдет установка выбранных ролей сервера.
Повышение роли сервера до уровня контроллера домена
20. Нажимаем «Повысить роль этого сервера до уровня контроллера домена«.
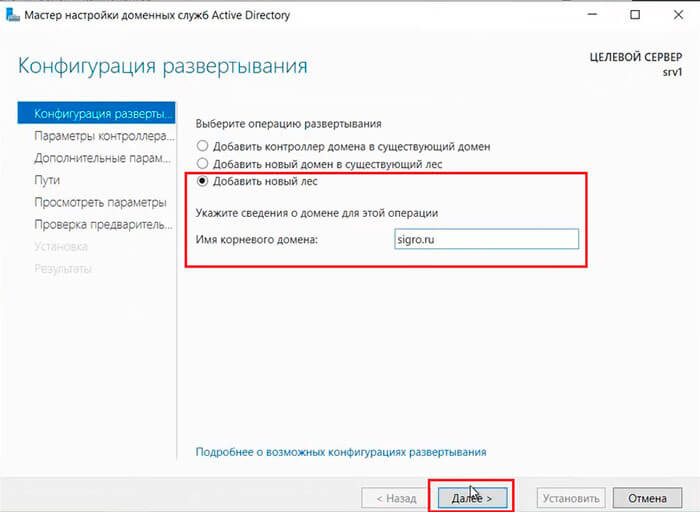
21. Далее выбираем «Добавить новый лес» и задаем «Имя корневого домена«.
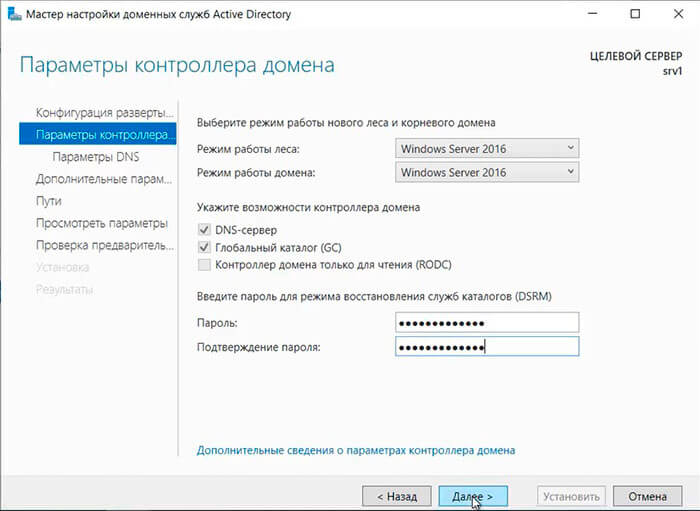
22. В следующем окне дважды вводим пароль для режима восстановления служб каталогов (DSRM), затем «Далее«.
23. В следующем окне снова «Далее«.
24. Проверяем NetBIOS-имя, присвоенное домену, и при необходимости меняем его. Затем «Далее«.
25. Оставляем по умолчанию расположение базы данных AD DS, файлов журналов и папки SYSVOL, снова «Далее«.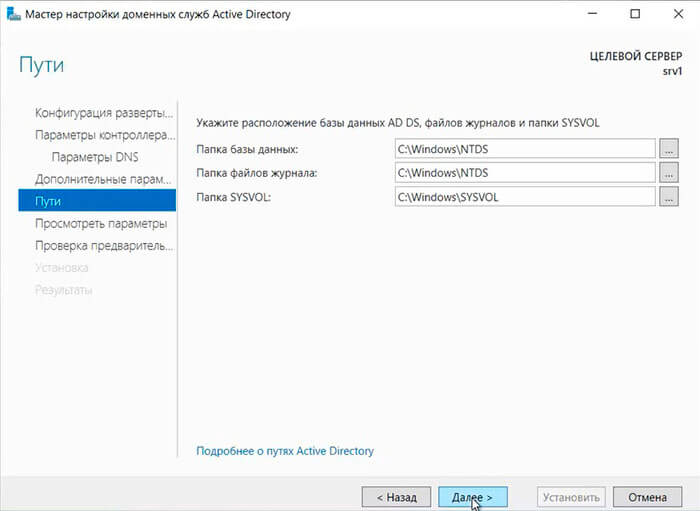
26. После просмотра выбранных параметров и их одобрения нажимаем «Далее«.
27. Если проверка готовности к установке выполнена успешна, то запускаем установку — «Установить«.
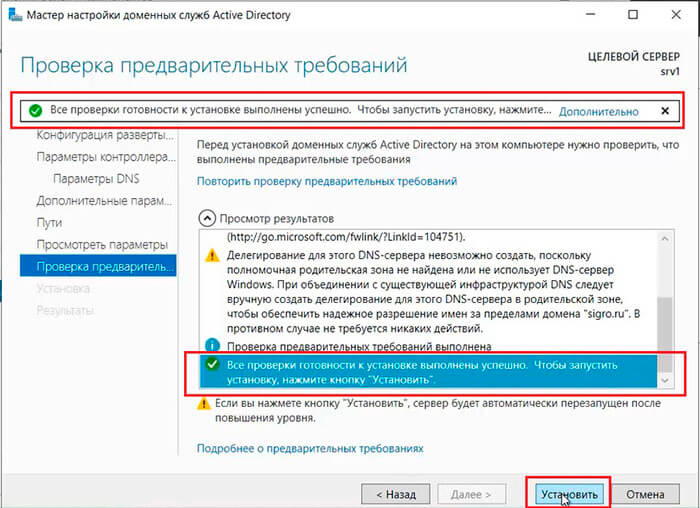
28. По завершению установки произойдет перезагрузка сервера.
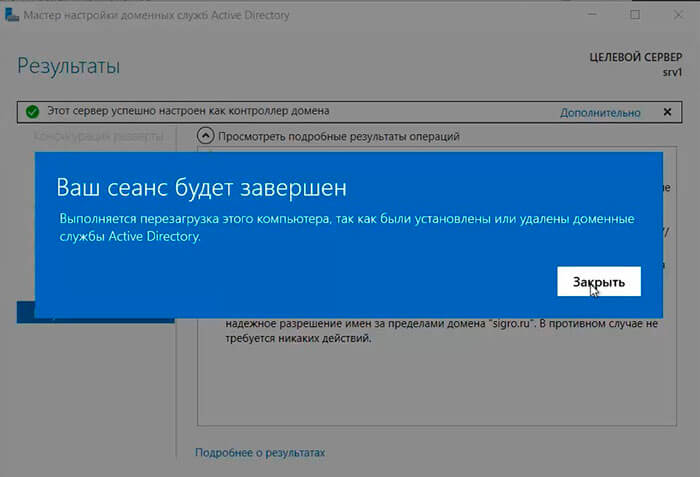
29. После перезагрузки полное имя компьютера изменится, к имени сервера добавиться доменное имя. Active Directory можно использовать.
Настройка обратной зоны DNS
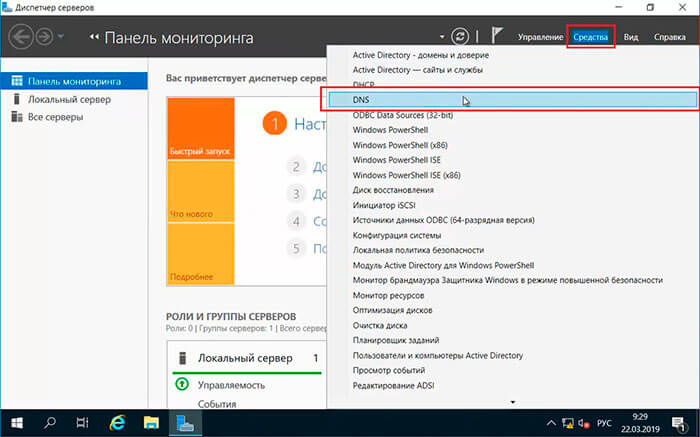
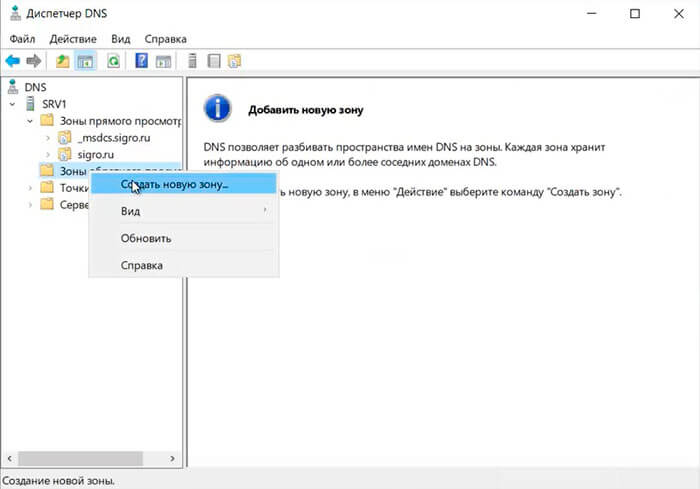
30. Для настройки обратной зоны DNS в Диспетчере серверов выбираем «Средства» — «DNS«
31. Раскрываем дерево DNS, нажимаем правой клавишей мыши на «Зоны обратного просмотра«, в появившемся меню «Создать новую зону…«.
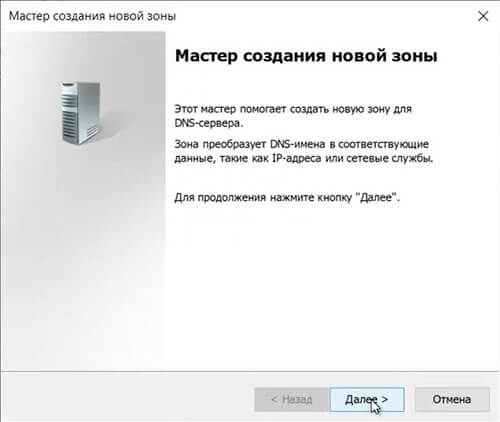
32. В появившемся мастере создания новой зоны нажимаем «Далее«.
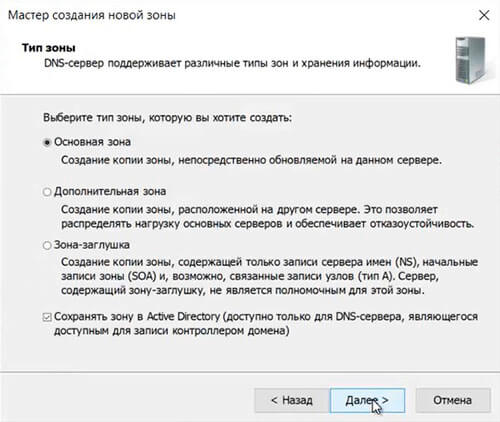
33. Выбираем «Основная зона«, затем «Далее«.
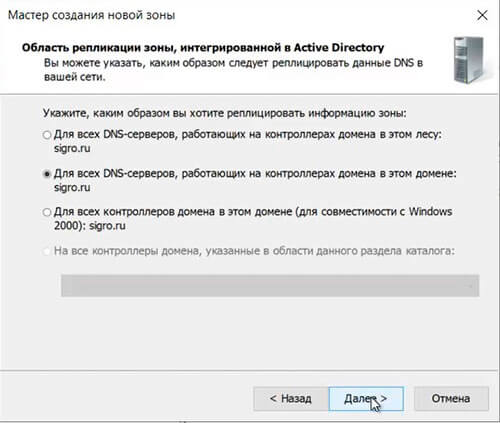
34. Оставляем по умолчанию область репликации зоны, интегрированной в Active Directory, нажимаем «Далее«.
35. Оставляем «Зона обратного просмотра IPv4», просто «Далее«.
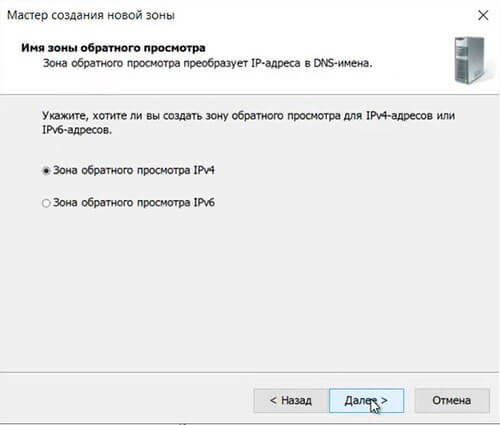
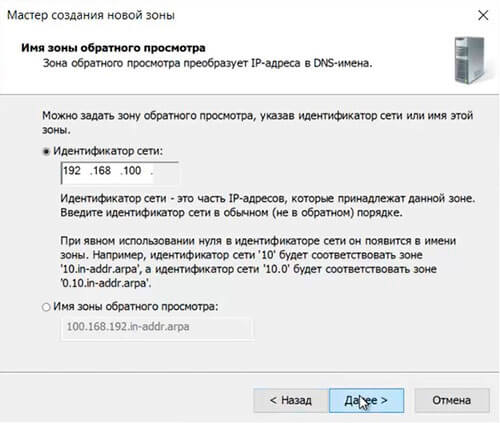
36. В следующем окне задаем Зону обратного просмотра, которая преобразует IP-адреса в DNS-имена. В идентификатор сети забиваем три актета своей сети, затем «Далее«.
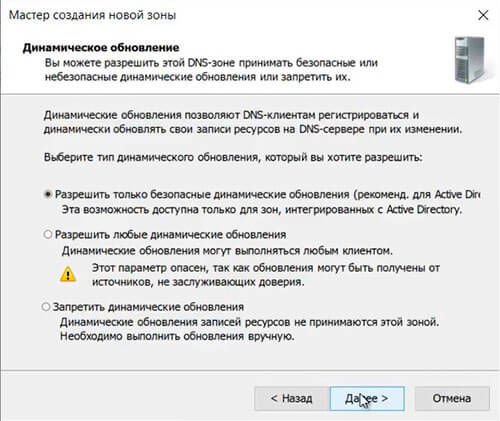
37. Разрешаем только безопасные динамические обновления, снова «Далее«.
38. Зона обратного просмотра создана.

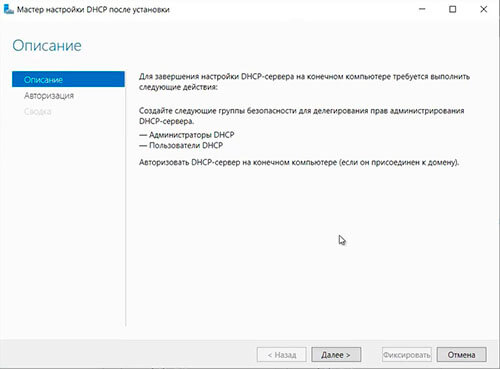
Настройка DHCP-сервера
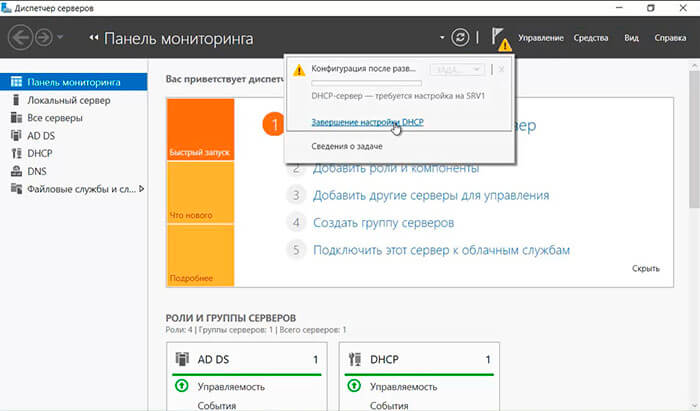
39. После установки роли DHCP-сервера в Диспетчере серверов нажимаем на желтый треугольник, в появившемся окне выбираем «Завершение настройки DHCP«.
40. В следующем окне читаем описание завершения настройки DHCP-сервера на конечном компьютере, затем «Далее«.
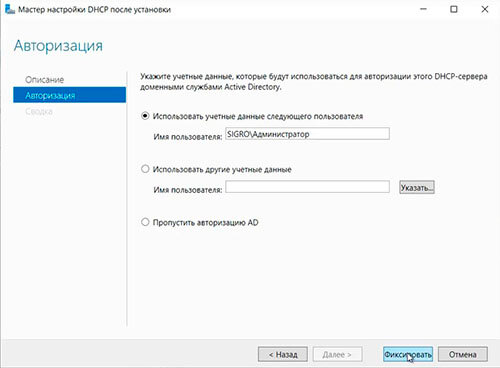
41. Оставляем по умолчанию учетные данные, которые будут использоваться для авторизации DHCP-сервера доменными службами Active Directory. Нажимаем «Фиксировать«.
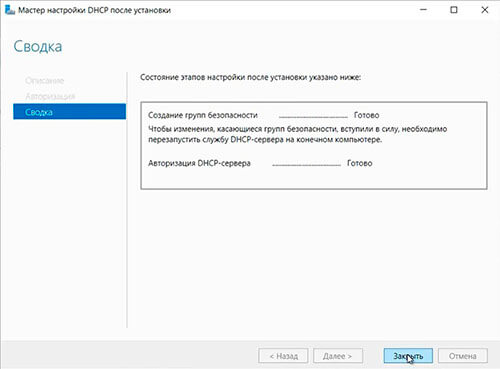
42. В следующем окне нажимаем «Закрыть«.
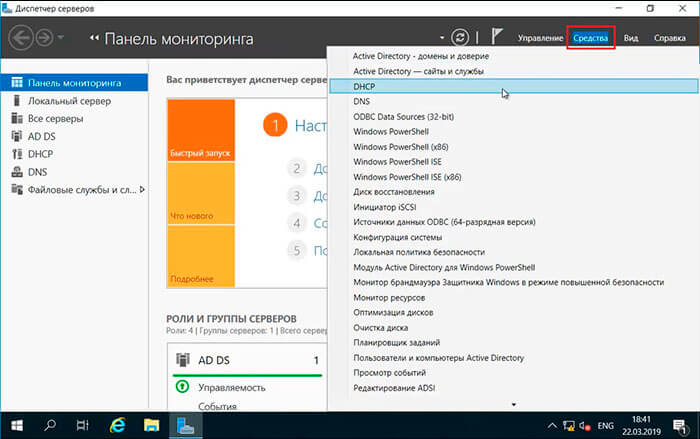
43. В диспетчере серверов нажимаем «Средства» — «DHCP«.
44. В открывшемся окне открываем дерево DHCP. Правой клавишей мыши нажимаем на домен, в появившемся окне выбираем «Добавить или удалить привязки…«.
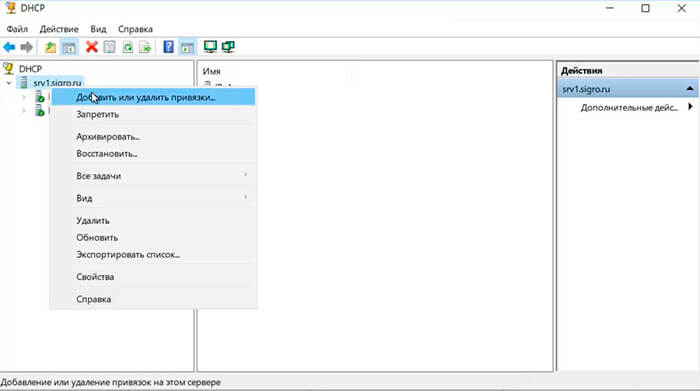
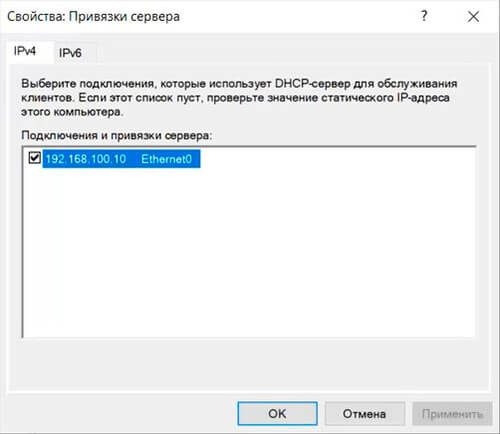
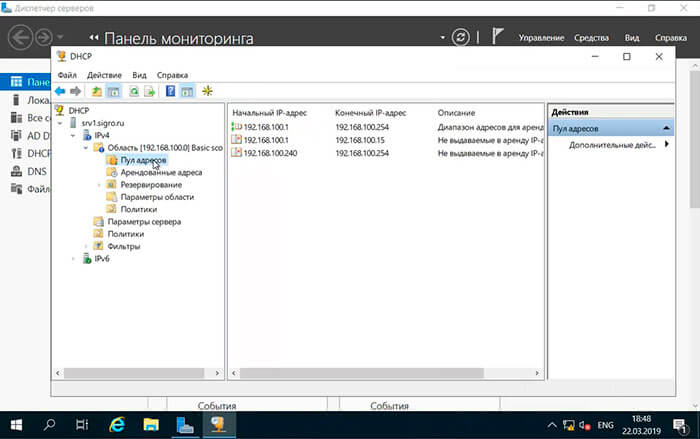
45. Проверяем сетевой интерфейс, который будет использовать DHCP-сервер для обслуживания клиентов. Далее «ОК«.
46. Затем правой клавишей нажимаем на IPv4, в появившемся меню выбираем «Создать область…«.
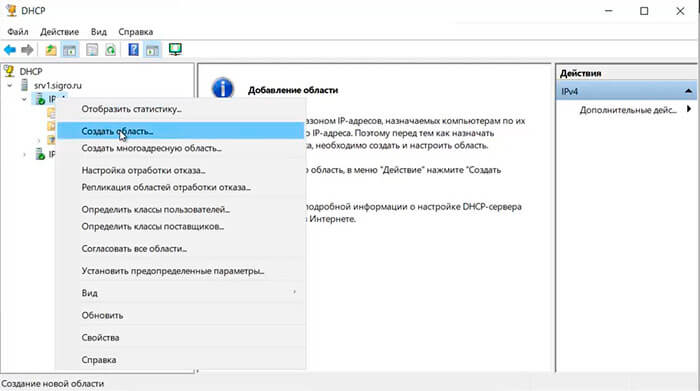
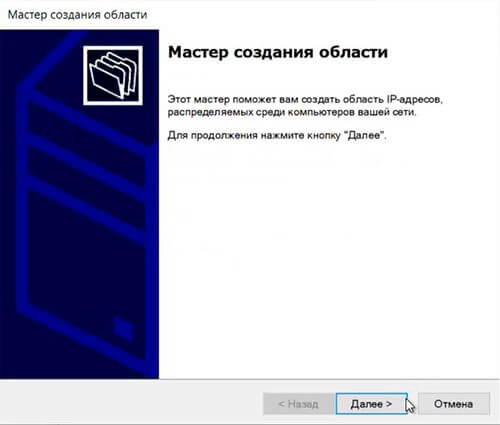
47. Откроется мастер создания область, который помогает создать область IP-адресов, распределяемых среди компьютеров вашей сети. Нажимаем «Далее«.
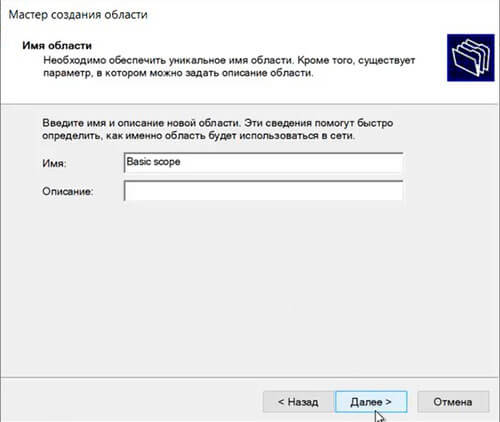
48. Задаем имя новой области, если необходимо, задаем также описание новой области. Снова «Далее«.
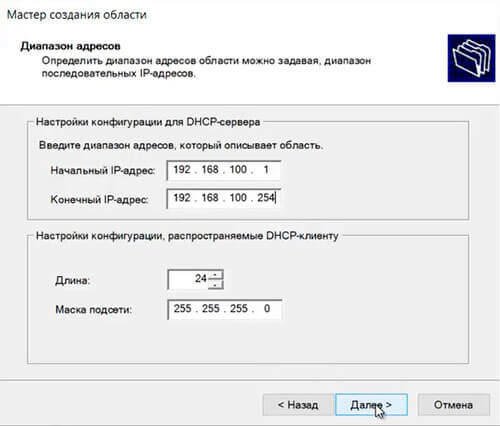
49. Вводим диапазон адресов, который описывает создаваемую область, маску подсети. Нажимаем «Далее«.
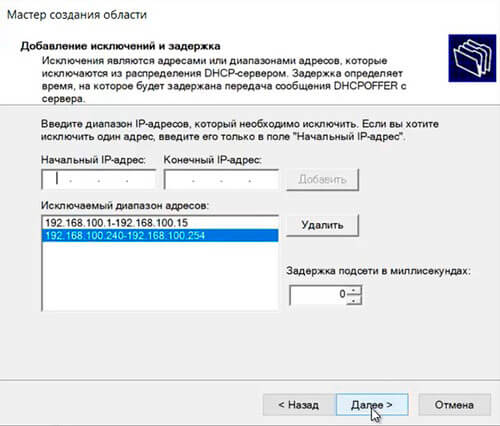
50. В следующем окне вводим с помощью кнопки «Добавить» один адрес или диапазон IP-адресов, который необходимо исключить. После ввода всех адресов или диапазонов нажимаем «Далее«.
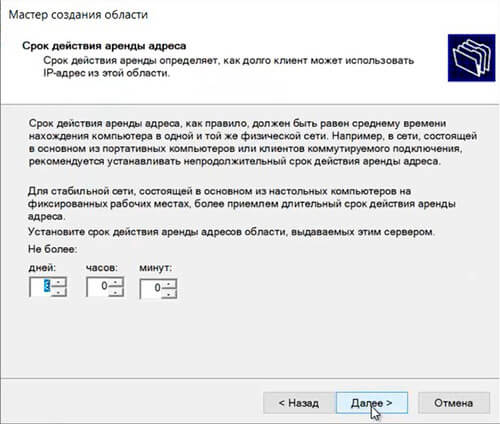
51. Оставляем по умолчанию срок действия аренды адресов области, выдаваемых сервером. Снова «Далее«.
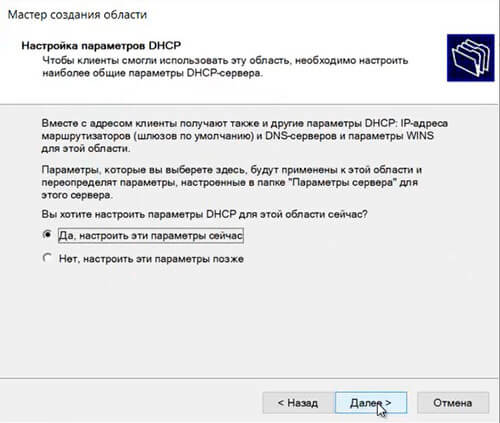
52. Для настройки других параметров DHCP выбираем «Да, настроить эти параметры сейчас«, затем «Далее«.
53. Добавляем с помощью кнопки «Добавить» IP-адрес маршрутизатора, снова «Далее«.

54. Оставляем по умолчанию родительский домен, который клиентские компьютеры в сести будут использовать для разрешения DNS-имен. Затем «Далее«.
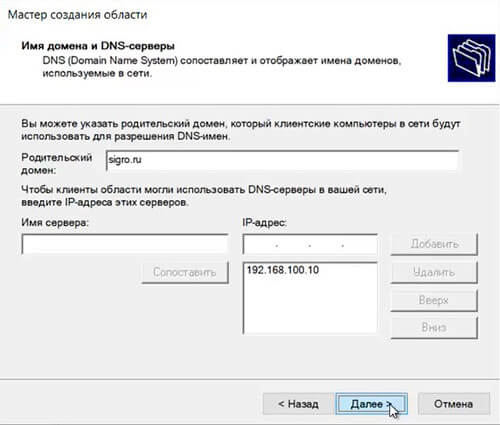
55. Вводим IP-адреса WINS-сервера, или нажимаем просто «Далее«.

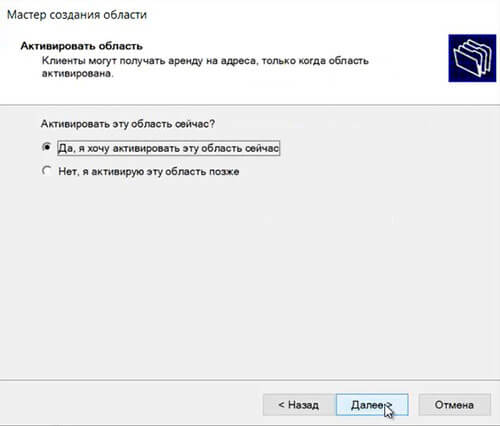
56. Выбираем «Да, я хочу активировать эту область сейчас«, затем «Далее«.
57. В следующем окне появится «Вы успешно завершили работу с мастером создания области», нажимаем «Готово».
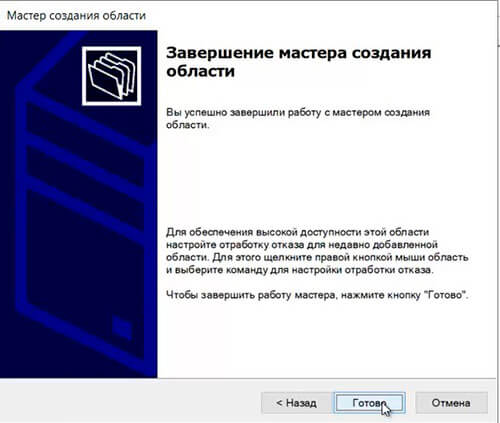
58. Вновь созданный диапазон появится в «Пул адресов«.
Посмотреть видео можно здесь:
Читайте также:
- Windows server 2019 — установка и настройка WSUS, создание и настройка GPO
- Windows server 2019 — добавление и удаление компьютера в домене
- Windows server 2019 — переименование администратора домена, изменение формата выводимого имени пользователя
- Windows server 2019 — создание и удаление пользователя, группы, подразделения в домене
- Windows server 2019 — установка и настройка сервера печати, разворачивание МФУ с помощью GPO
- Windows server 2019 — GPO изменение экранной заставки, отключение монитора, изменение политики паролей
Время на прочтение
4 мин
Количество просмотров 45K
Одним из реально полезных нововведений в Windows Server 2019 является возможность вводить серверы, не делая Sysprep или чистую установку. Развернуть инфраструктуру на виртуальных серверах с Windows Server никогда еще не было так просто.

Сегодня поговорим о том, насколько же, оказывается, просто устанавливать и управлять Active Directory через Powershell.
Устанавливаем роль
RSAT или локальный сервер с GUI:
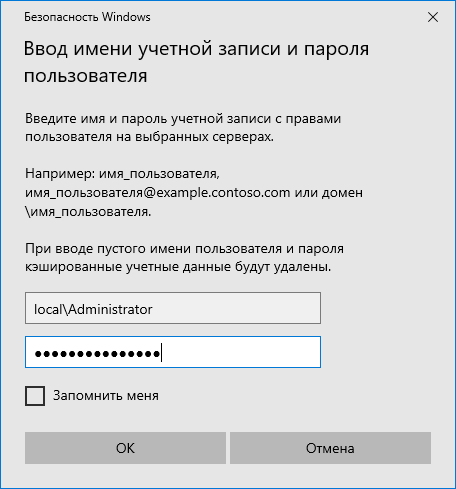
Сначала нужно добавить сервер в RSAT. Добавляется он на главной странице с помощью доменного имени или ip адреса. Убедитесь, что вы вводите логин в формате local\Administrator, иначе сервер не примет пароль.
Переходим в добавление компонентов и выбираем AD DS.
Powershell:
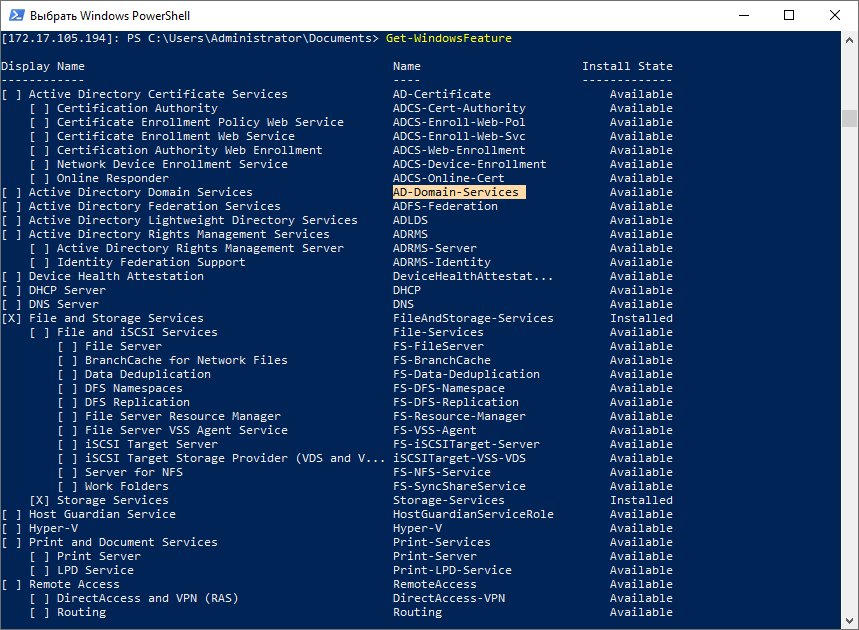
Если вы не знаете, как называется компонент системы, можно выполнить команду и получить список доступных компонентов, их зависимостей и их имена.
Get-WindowsFeature
Копируем имя компонента и приступаем к установке.
Install-WindowsFeature -Name AD-Domain-ServicesWindows Admin Center:

Переходим в «Роли и компоненты» и выбираем ADDS (Active Directory Domain Services).
И это буквально всё. Управлять Active Directory через Windows Admin Center на текущий момент невозможно. Его упоминание не более чем напоминание о том, насколько он пока что бесполезен.
Повышаем сервер до контроллера домена
А для этого создаем новый лес.
RSAT или локальный серверс GUI:

Очень рекомендуем оставлять все по умолчанию, все компоненты из коробки прекрасно работают и их не нужно трогать без особой на то необходимости.
Powershell:
Сначала нужно создать лес и установить пароль от него. В Powershell для паролей есть отдельный тип переменной – SecureString, он используется для безопасного хранения пароля в оперативной памяти и безопасной его передачи по сети.

$pass = Read-Host -AsSecureStringЛюбой командлет который использует чей угодно пароль нужно вводит таким образом. Сначала записываем пароль в SecureString, а затем указываем эту переменную в командлет.

Install-ADDSForest -DomainName test.domain -SafeModeAdministratorPassword $passКак и в установке через GUI, даже вывод в консоль один и тот же. В отличие от сервера с GUI, как установка роли, так и установка сервера в качестве контроллера домена не требует перезагрузки.
Установка контроллера с помощью RSAT занимает больше времени, чем через Powershell.
Управляем доменом
Теперь, чтобы понять насколько сильно различается управление Active Directory через Powershell и AD AC (Active Directory Administrative Center), рассмотрим пару рабочих примеров.
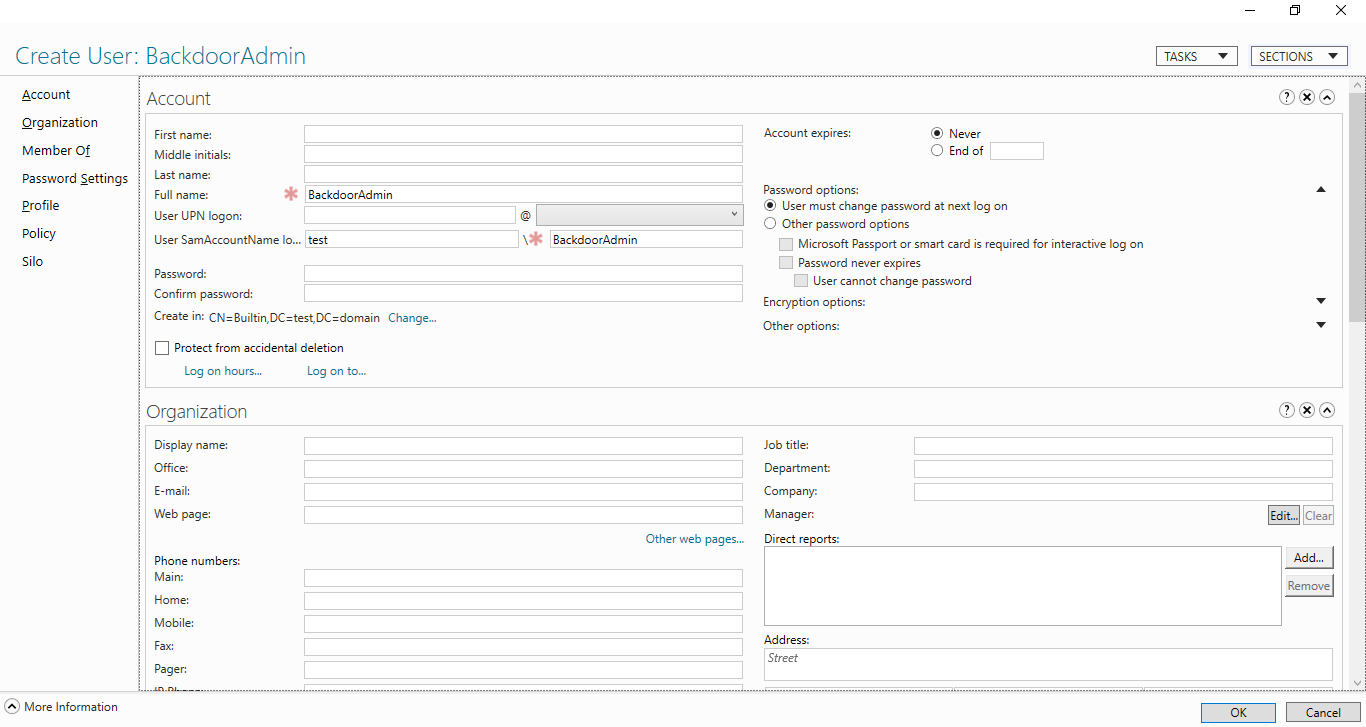
Создание нового пользователя
Скажем, мы хотим создать пользователя в группе Users и хотим чтобы он сам установил себе пароль. Через AD AC это выглядит так:
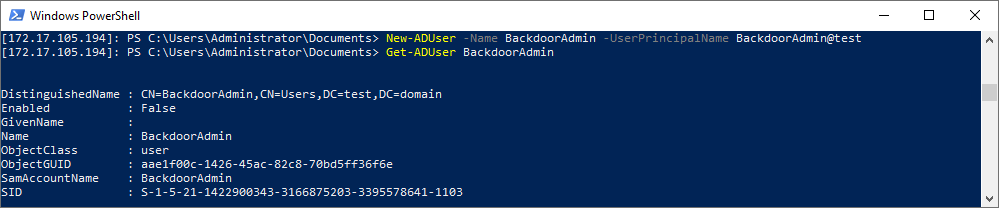
New-ADUser -Name BackdoorAdmin -UserPrincipalName BackdoorAdmin@test
Get-ADUser BackdoorAdmin
Отличий между AD DC и Powershell никаких.
Включить пользователя
RSAT или локальный серверс GUI:
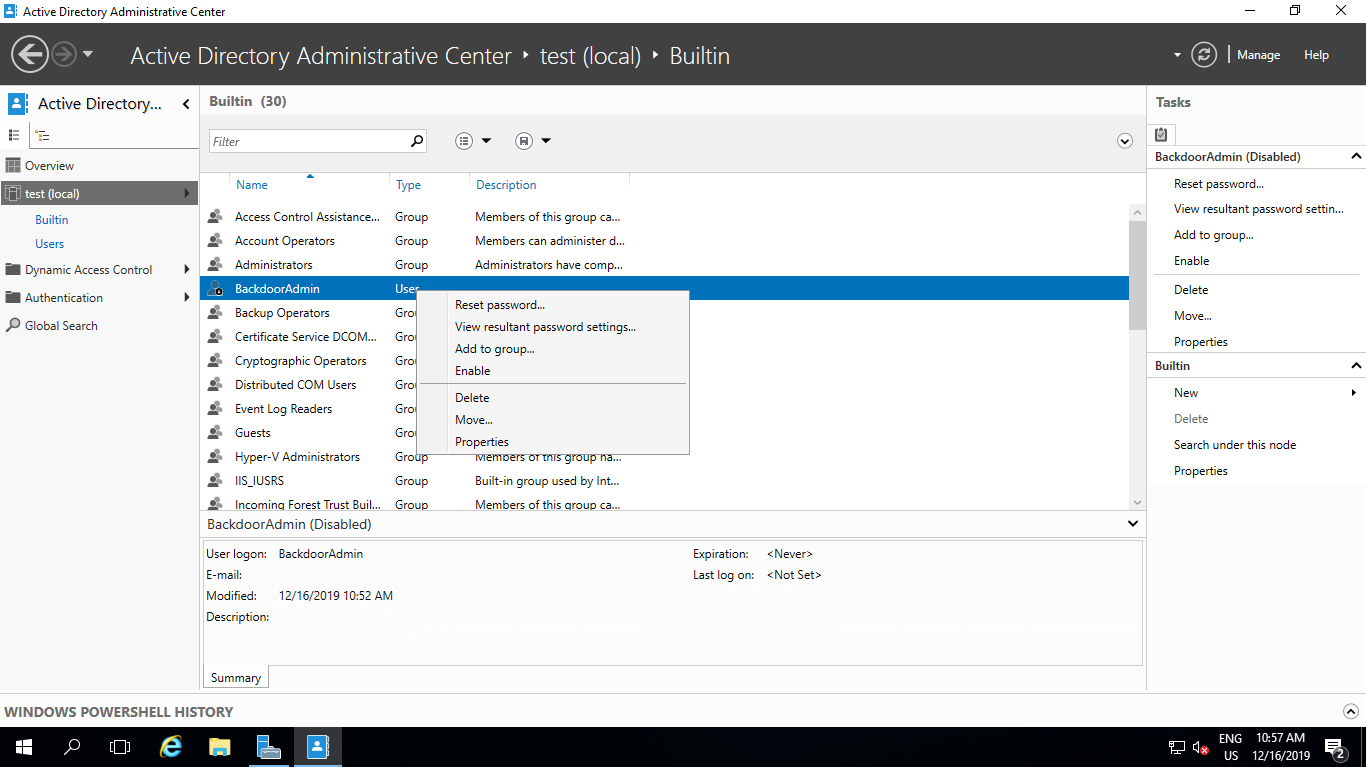
Через GUI пользователю нужно сначала задать пароль отвечающий GPO и только после этого его можно будет включить.
Powershell:
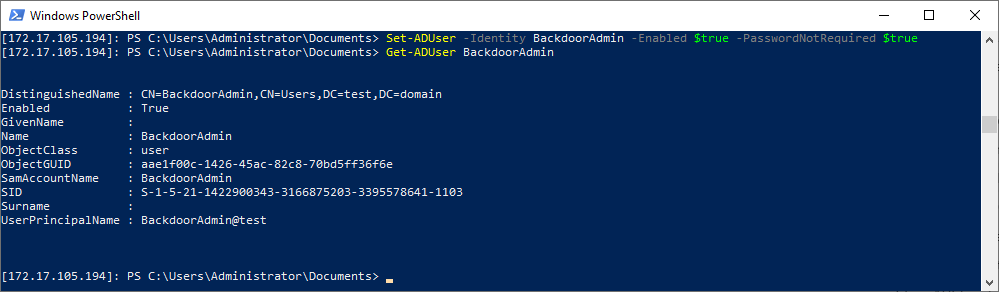
Через Powershell почти то же самое, только пользователя можно сделать активным даже без пароля.
Set-ADUser -Identity BackdoorAdmin -Enabled $true -PasswordNotRequired $trueДобавляем пользователя в группу
RSAT или локальный сервер с GUI:
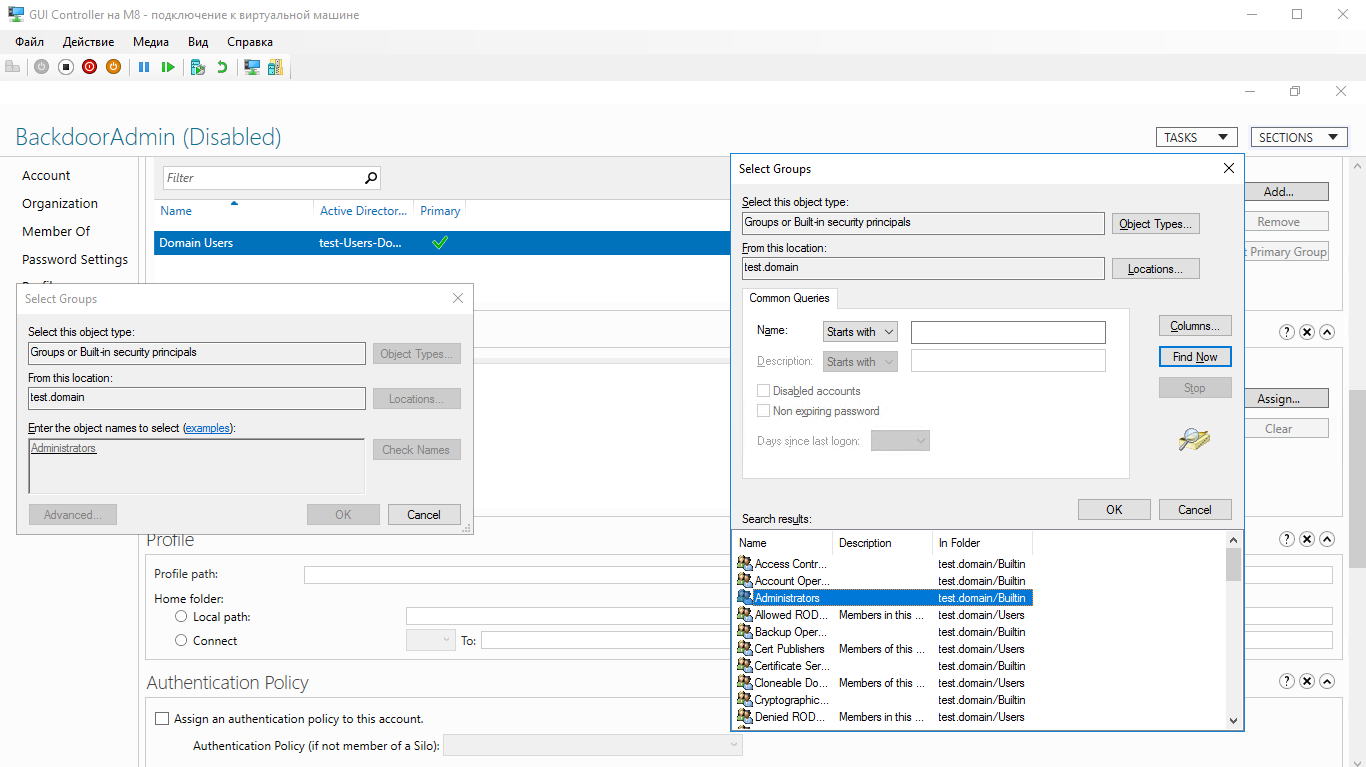
С помощью AD DC нужно перейти в свойства пользователя, найти графу с членством пользователя в группах, найти группу в которую мы хотим его поместить и добавить его наконец, а затем кликнуть OK.
Powershell:
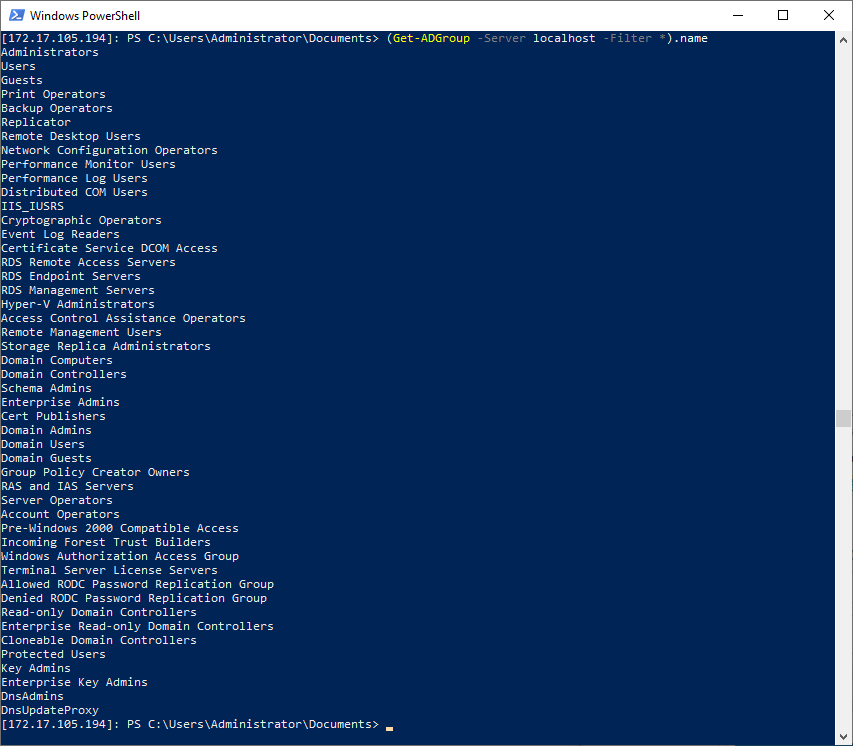
Если мы не знаем как называется нужная нам группа, получить их список мы можем с помощью:
(Get-ADGroup -Server localhost -Filter *).nameПолучить группу со всеми свойствами можно так:

Get-ADGroup -Server localhost -Filter {Name -Like "Administrators"}Ну и наконец добавляем пользователя в группу:

Далее, из-за того, что в Powershell все является объектами, мы как и через AD DC должны сначала получить группу пользователя, а затем добавить его в неё.
$user = Get-ADUser BackdoorAdminЗатем добавляем этот объект в группу:
Get-ADGroup -Server localhost -Filter {Name -Like "Administrators"} | Add-ADGroupMember -Members $userИ проверяем:
Get-ADGroupMember -Identity AdministratorsКак видим, отличий в управлении AD через AD AC и Powershell почти нет.
Вывод:
Если вы уже сталкивались с развертыванием AD и других служб, то вы, возможно подмечали сходство развертывания через RSAT и Powershell, и насколько на самом деле все похоже. GUI в ядре, как никак.
Надеемся, статья была полезна или интересна.
Ну и напоследок пару дельных советов:
- Не устанавливайте других ролей на контроллер домена.
- Используйте BPA (Best practice analyzer), чтобы чуточку ускорить контроллер
- Не используйте встроенного Enterprice Admin’а, всегда используйте свою собственную учетную запись.
- При развертывании сервера на белом IP адресе, с проброшенными портами или на VSD обязательно закройте 389 порт, иначе вы станете точкой амплификации DDoS атак.
Предлагаем также прочитать наши прошлые посты: рассказ как мы готовим клиентские виртуальные машины на примере нашего тарифа VDS Ultralight с Server Core за 99 рублей, как работать с Windows Server 2019 Core и как установить на него GUI, а также как управлять сервером с помощью Windows Admin Center, как установить Exchange 2019 на Windows Server Core 2019
Предлагаем обновлённый тариф UltraLite Windows VDS за 99 рублей с установленной Windows Server 2019 Core.

Установим роль контроллера домена на Windows Server 2019. На контроллере домена работает служба Active Directory (AD DS). С Active Directory связано множество задач системного администрирования.
AD DS в Windows Server 2019 предоставляет службу каталогов для централизованного хранения и управления пользователями, группами, компьютерами, а также для безопасного доступ к сетевым ресурсам с проверкой подлинности и авторизацией.
Подготовительные работы
Нам понадобится компьютер с операционной системой Windows Server 2019. У меня контроллер домена будет находиться на виртуальной машине:
Установка Windows Server 2019 на виртуальную машину VMware
После установки операционной системы нужно выполнить первоначальную настройку Windows Server 2019:
Первоначальная настройка Windows Server 2019
Хочется отметить обязательные пункты, которые нужно выполнить.
Выполните настройку сети. Укажите статический IP адрес. DNS сервер указывать не обязательно, при установке контроллера домена вместе с ним установится служба DNS. В настройках сети DNS сменится автоматически. Отключите IPv6, сделать это можно и после установки контроллера домена.

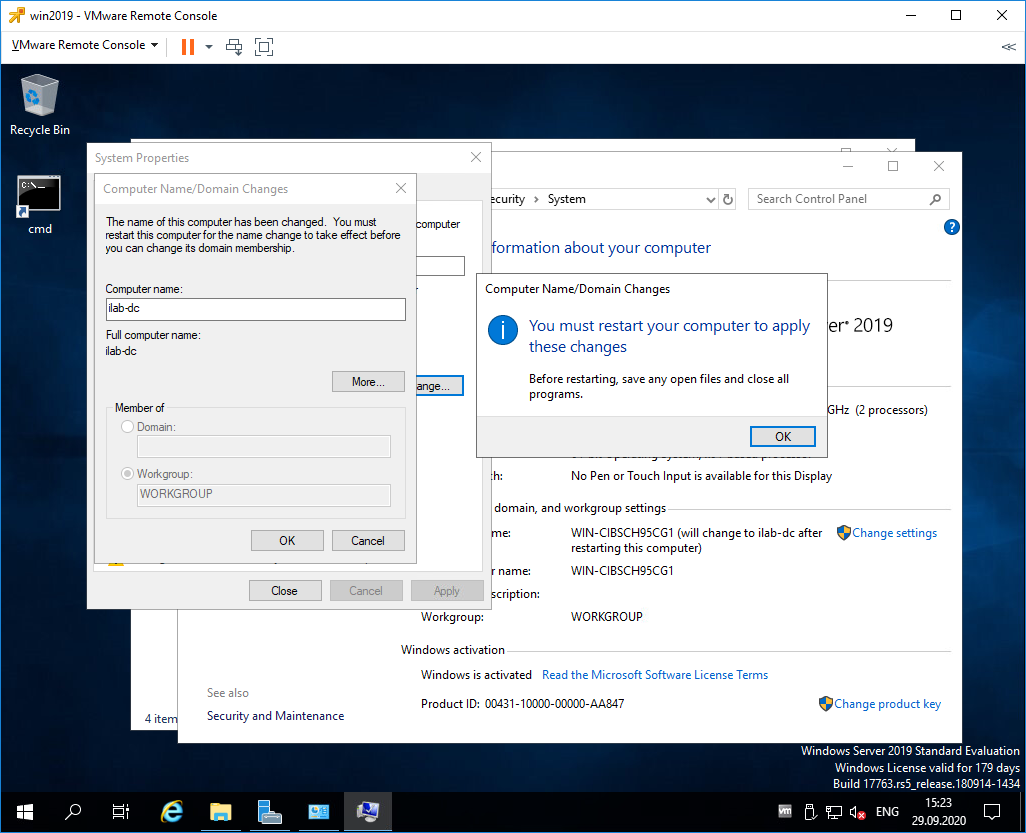
Укажите имя сервера.
Было бы неплохо установить последние обновления, драйвера. Указать региональные настройки, время. На этом подготовка завершена.
Установка роли Active Directory Domain Services
Работаем под учётной записью локального администратора Administrator (или Администратор), данный пользователь станет администратором домена.
Дополнительно будет установлена роль DNS.
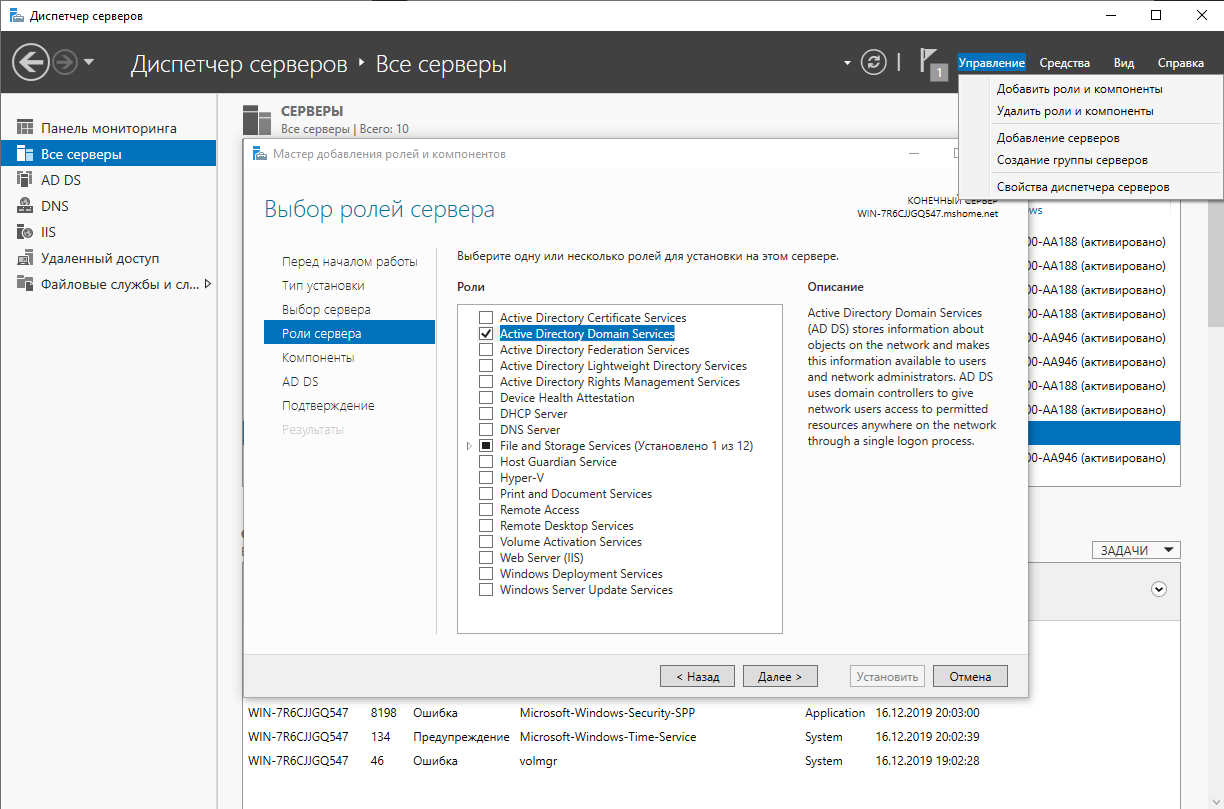
Следующий шаг — установка роли AD DS. Открываем Sever Manager. Manage > Add Roles and Features.
Запускается мастер добавления ролей.

Раздел Before You Begin нас не интересует. Next.
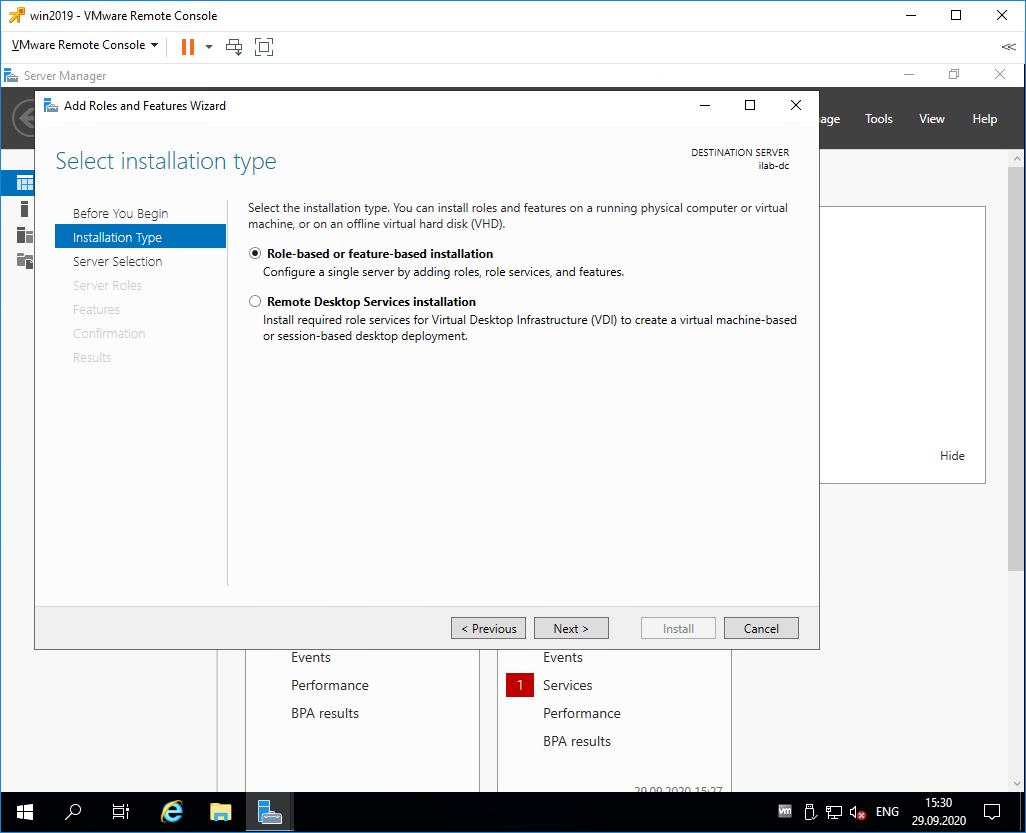
В разделе Installation Type выбираем Role-based or feature-based installation. Next.
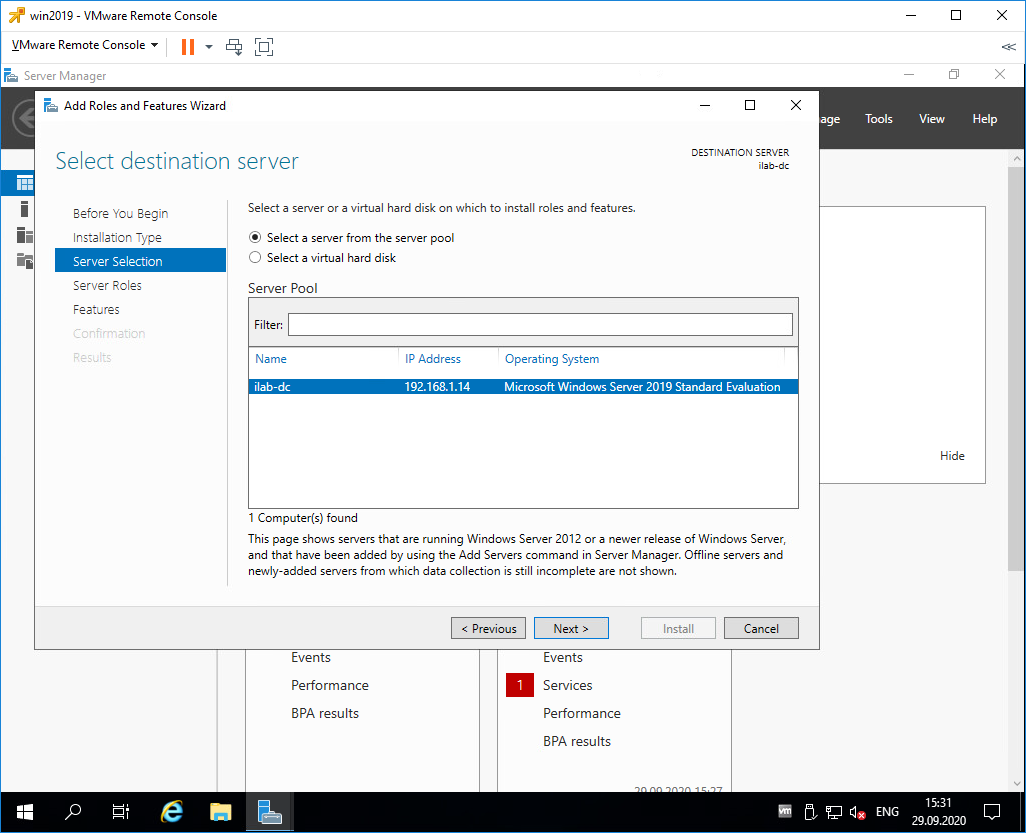
В разделе Server Selection выделяем текущий сервер. Next.
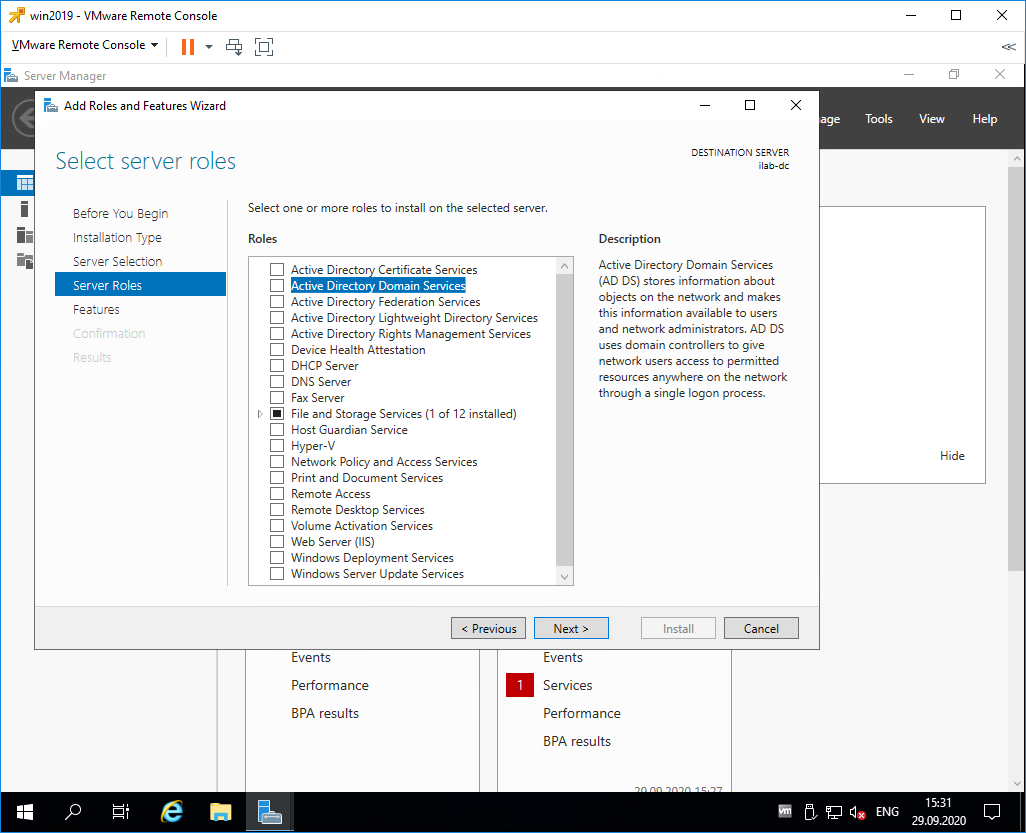
В разделе Server Roles находим роль Active Directory Domain Services, отмечаем галкой.
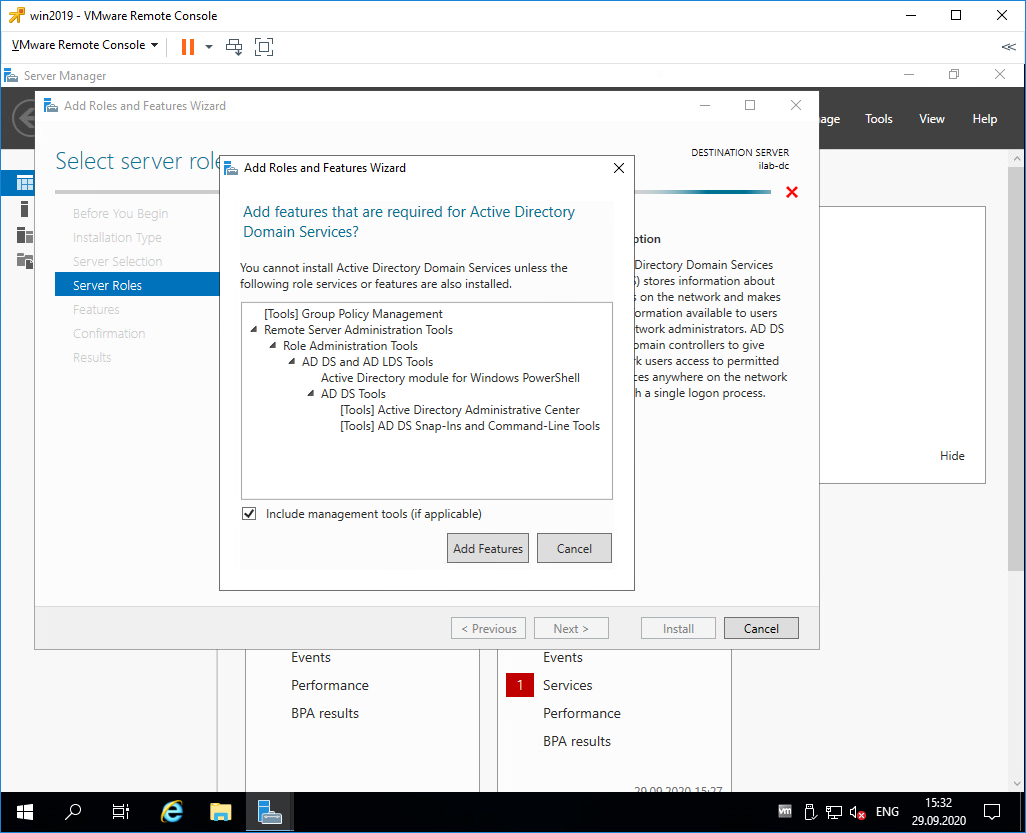
Для роли контроллера домена нам предлагают установить дополнительные опции:
- [Tools] Group Policy Management
- Active Directory module for Windows PowerShell
- [Tools] Active Directory Administrative Center
- [Tools] AD DS Snap-Ins and Command-Line Tools
Всё это не помешает. Add Features.

Теперь роль Active Directory Domain Services отмечена галкой. Next.
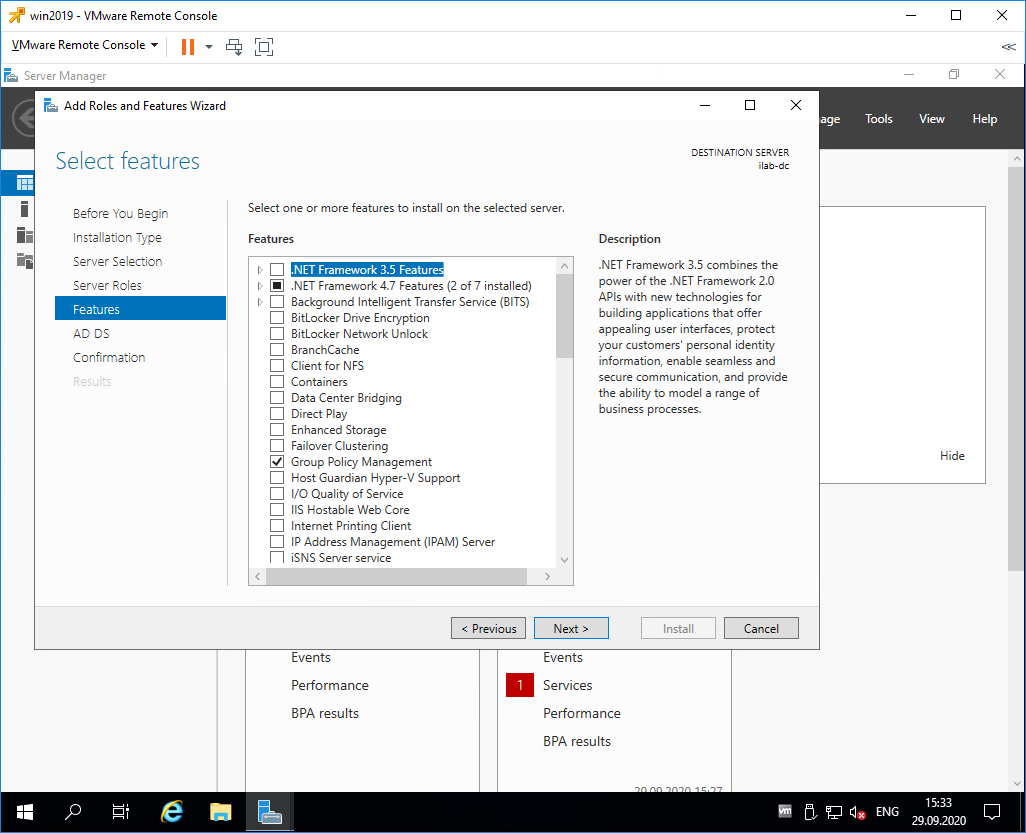
В разделе Features нам не нужно отмечать дополнительные опции. Next.
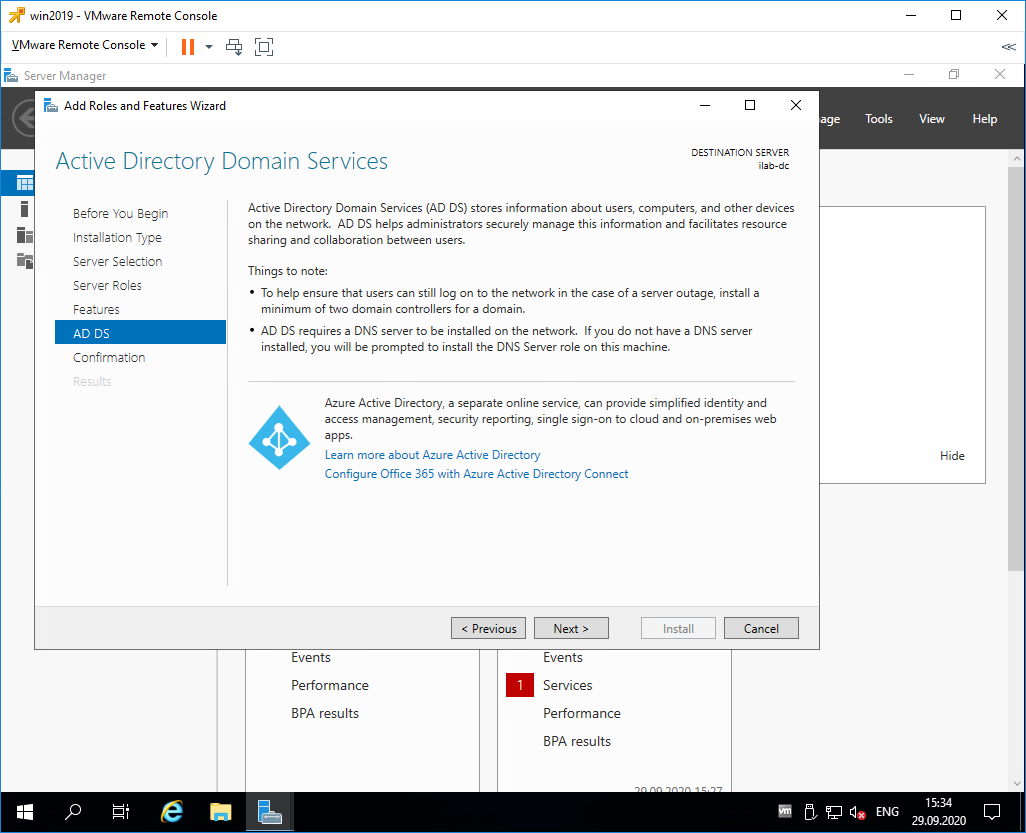
У нас появился раздел AD DS. Здесь есть пара ссылок про Azure Active Directory, они нам не нужны. Next.
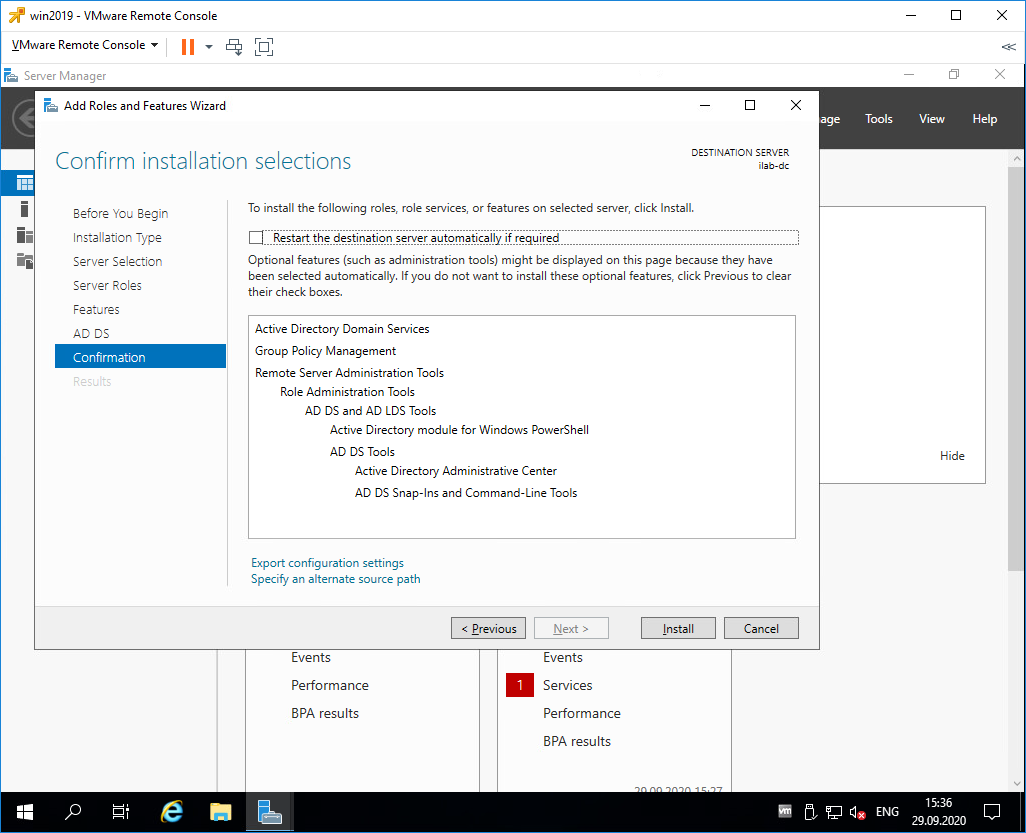
Раздел Confirmation. Подтверждаем установку компонентов кнопкой Install.
Начинается установка компонентов, ждём.
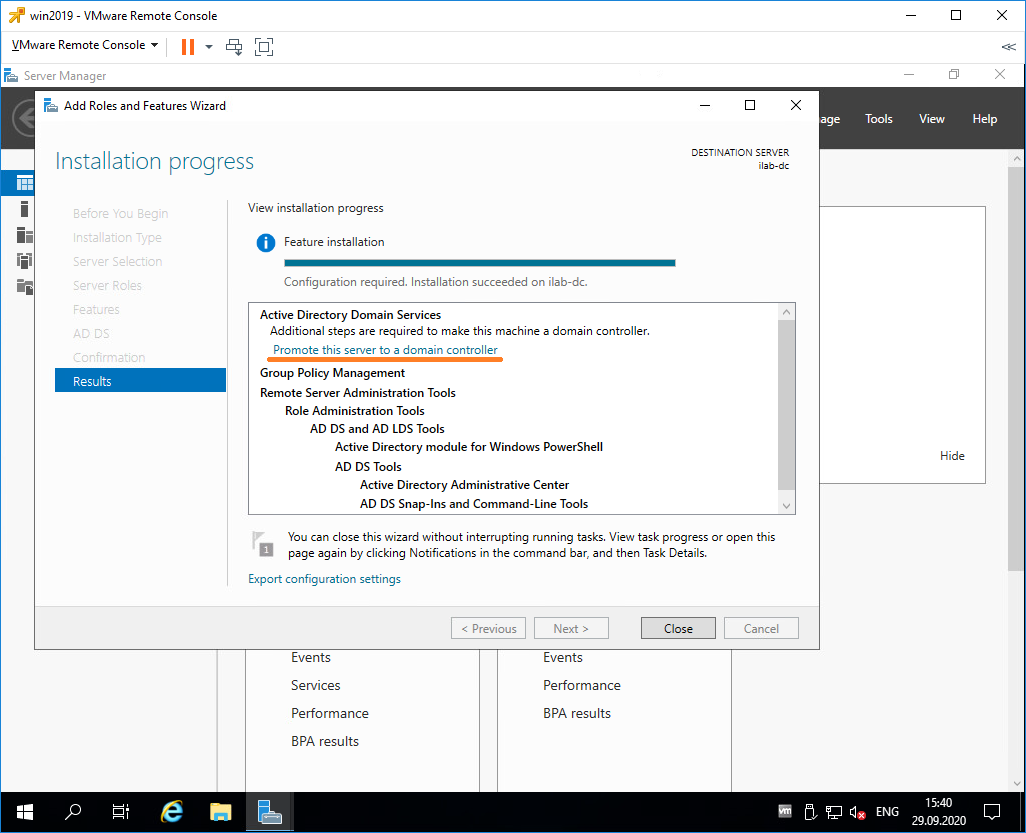
Configuration required. Installation succeeded on servername. Установка компонентов завершена, переходим к основной части, повышаем роль текущего сервера до контроллера домена. В разделе Results есть ссылка Promote this server to domain controller.
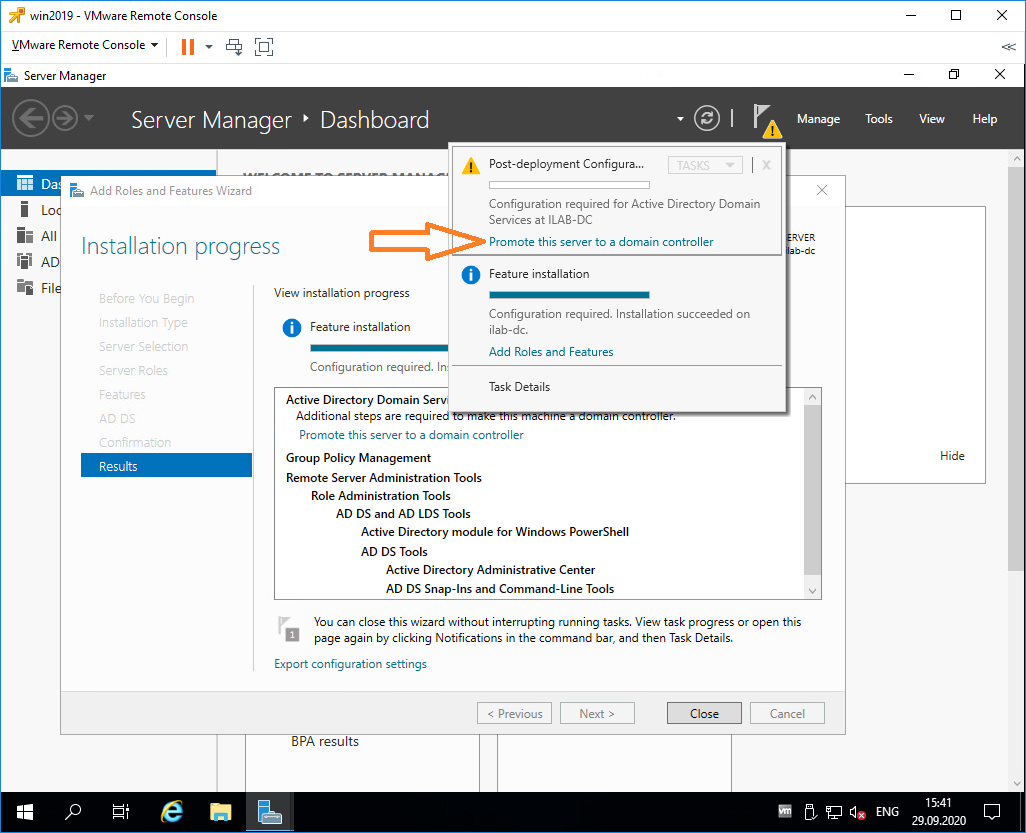
Она же доступна в предупреждении основного окна Server Manager. Нажимаем на эту ссылку, чтобы повысить роль сервера до контроллера домена.
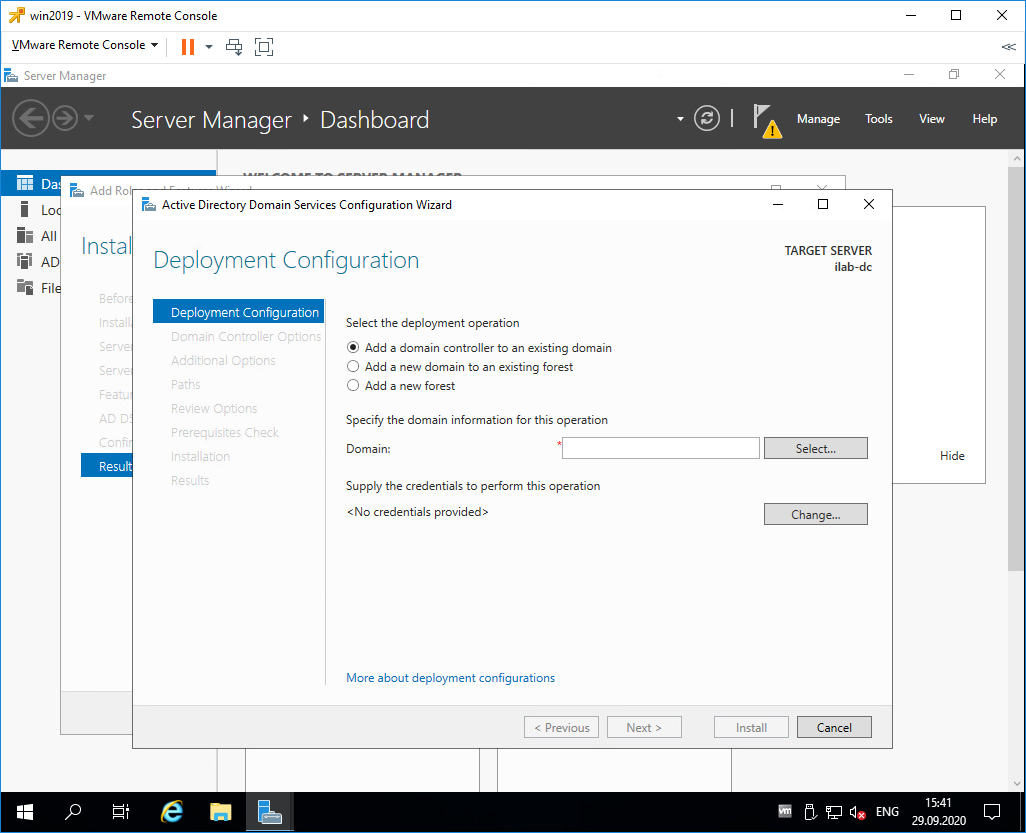
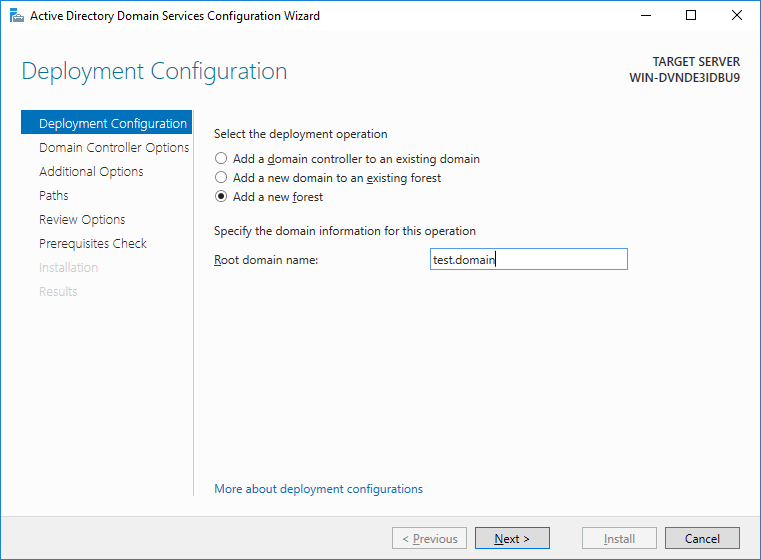
Запускается мастер конфигурации AD DS — Active Directory Domain Service Configuration Wizard. В разделе Deployment Configuration нужно выбрать один из трёх вариантов:
- Add a domain controller to an existing domain
- Add a new domain to an existing forest
- Add a new forest
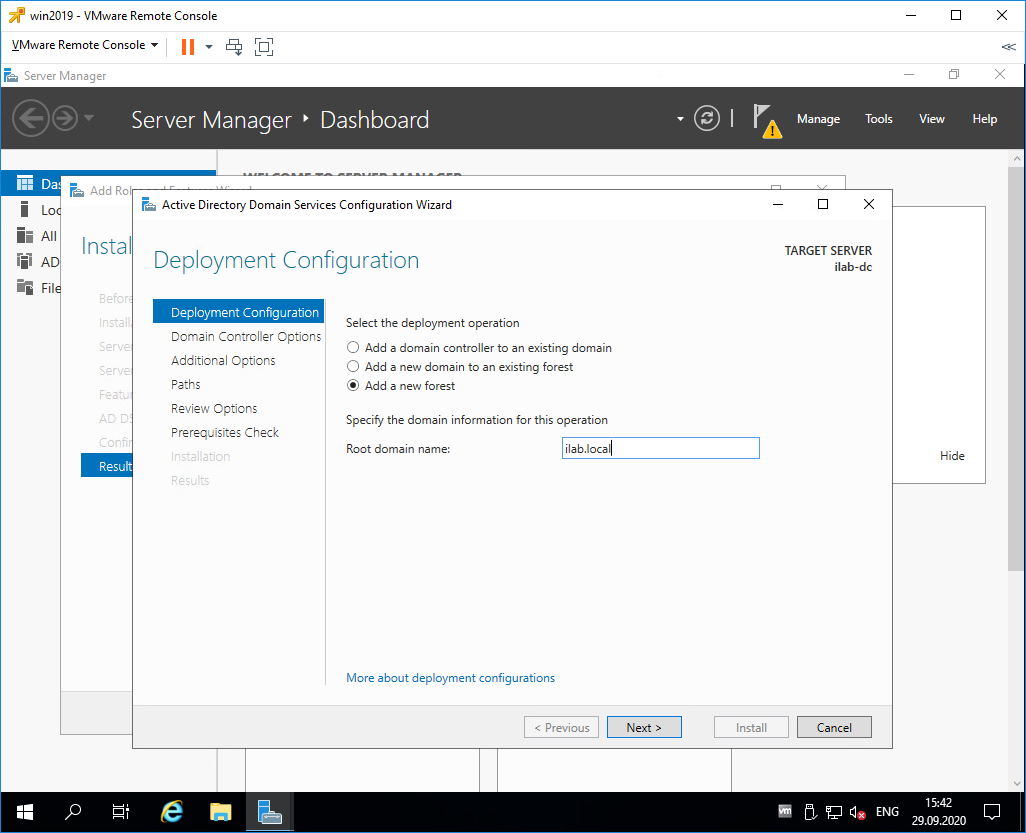
Первый вариант нам не подходит, у нас нет текущего домена, мы создаём новый. По той же причине второй вариант тоже не подходит. Выбираем Add a new forest. Будем создавать новый лес.
Укажем в Root domain name корневое имя домена. Я пишу ilab.local, это будет мой домен. Next.
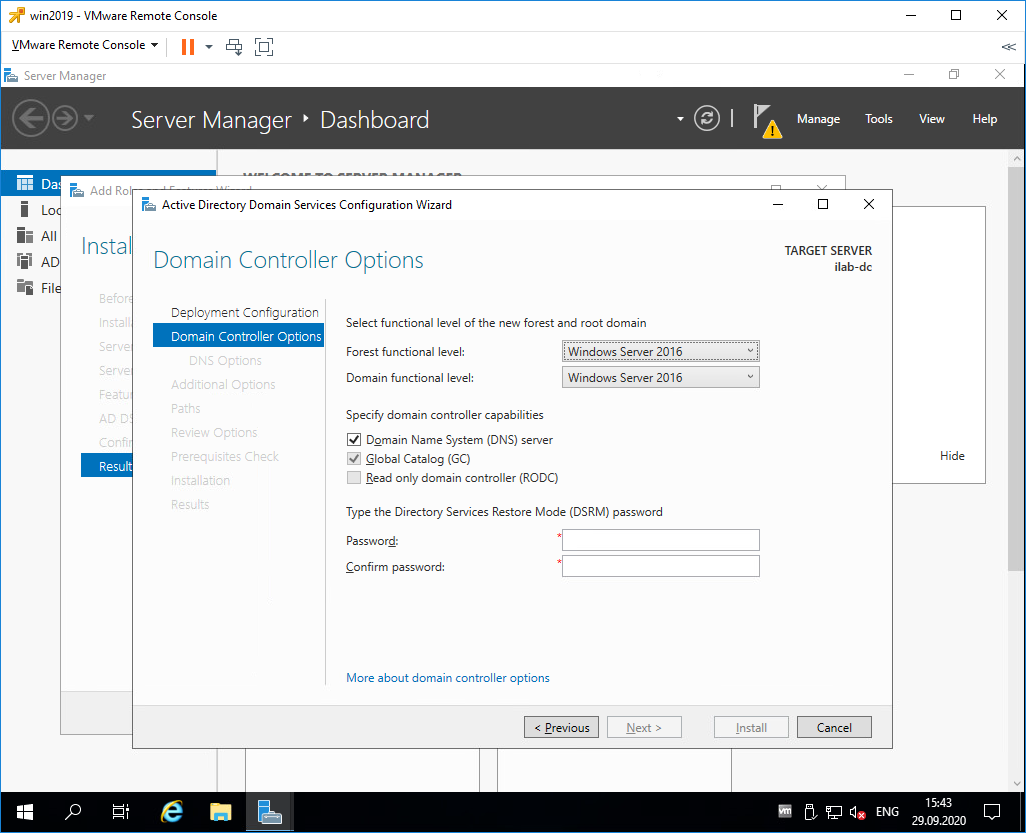
Попадаем в раздел Doman Controller Options.
В Forest functional level и Domain functional level нужно указать минимальную версию серверной операционной системы, которая будет поддерживаться доменом.

У меня в домене планируются сервера с Windows Server 2019, Windows Server 2016 и Windows Server 2012, более ранних версий ОС не будет. Выбираю уровень совместимости Windows Server 2012.
В Domain functional level также выбираю Windows Server 2012.
Оставляю галку Domain Name System (DNS) server, она установит роль DNS сервера.
Укажем пароль для Directory Services Restore Mode (DSRM), желательно, чтобы пароль не совпадал с паролем локального администратора. Он может пригодиться для восстановления службы каталогов в случае сбоя.
Next.
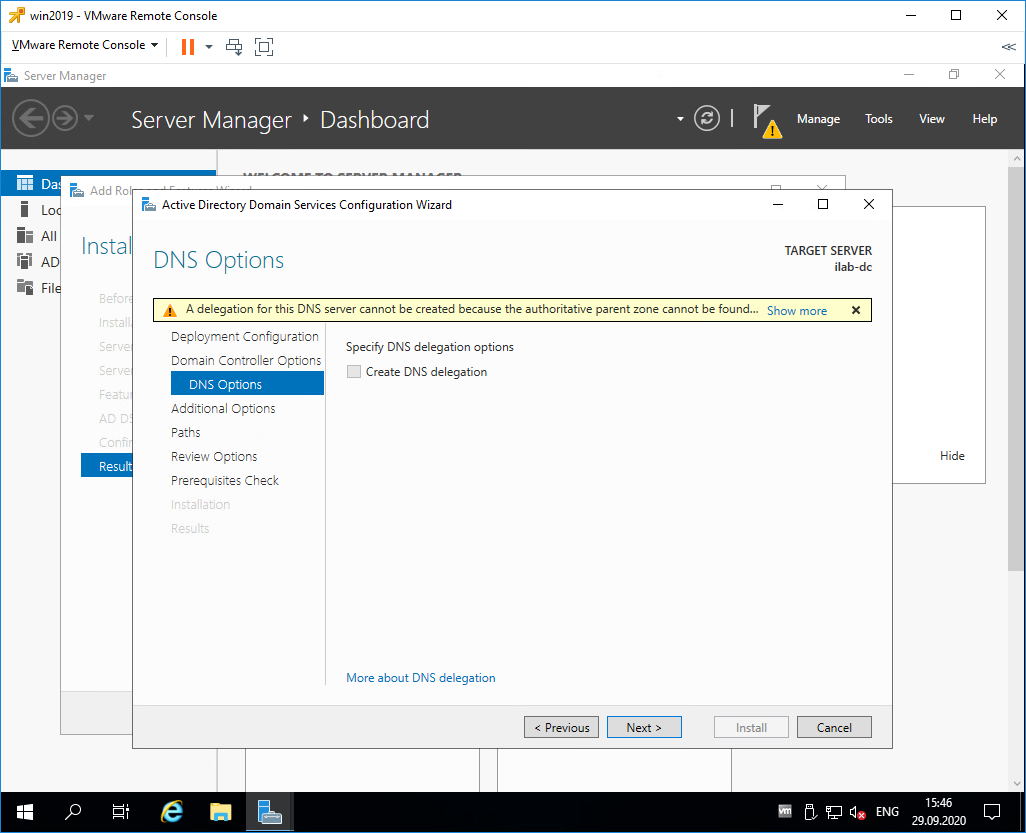
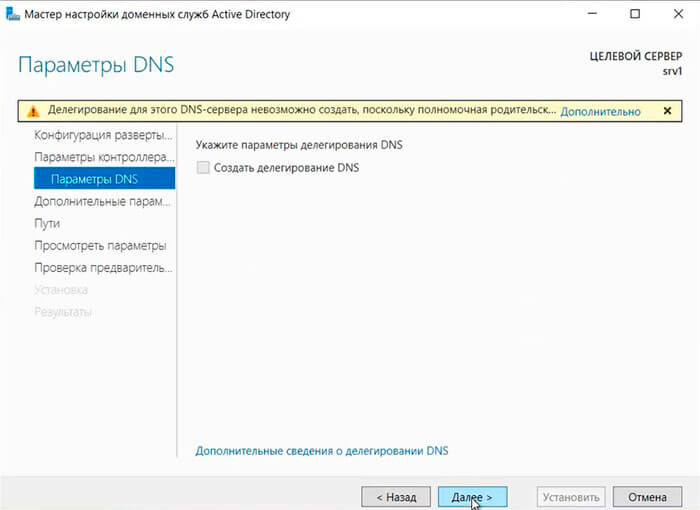
Не обращаем внимание на предупреждение «A delegation for this DNS server cannot be created because the authoritative parent zone cannot be found…». Нам не нужно делать делегирование, у нас DNS сервер будет на контроллере домена. Next.
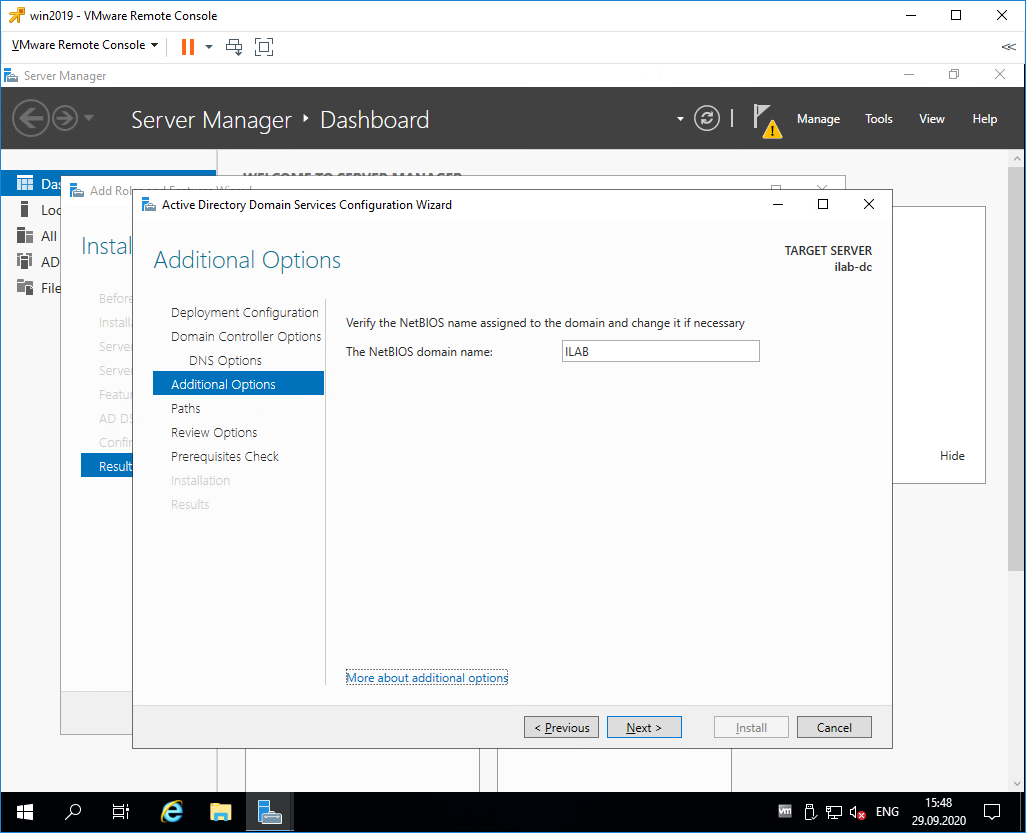
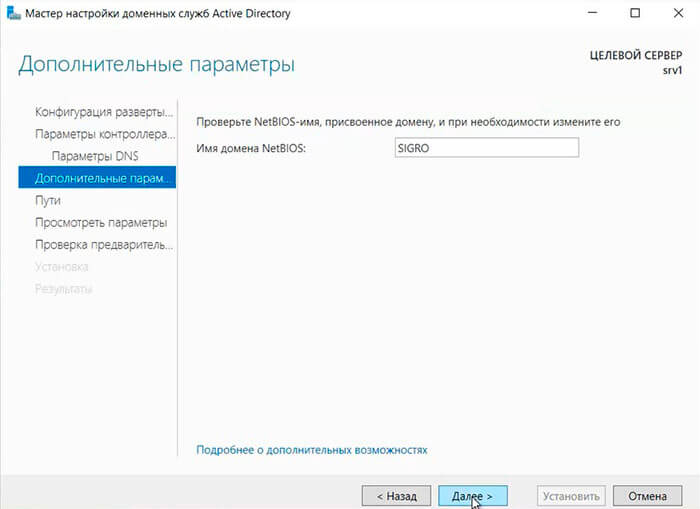
В разделе Additional Options нужно указать NetBIOS name для нашего домена, я указываю «ILAB». Next.
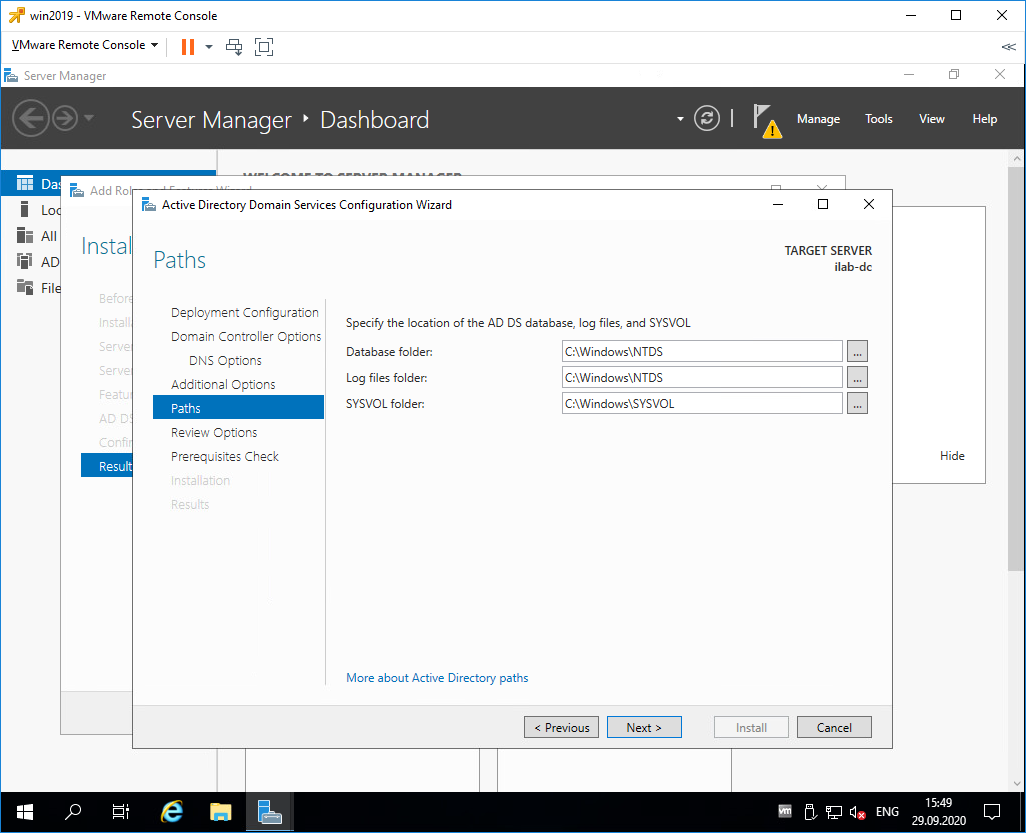
В разделе Paths можно изменить пути к базе данных AD DS, файлам журналов и папке SYSVOL. Без нужды менять их не рекомендуется. По умолчанию:
- Database folder: C:\Windows\NTDS
- Log files folder: C:\Windows\NTDS
- SYSVOL folder: C:\Windows\SYSVOL
Next.
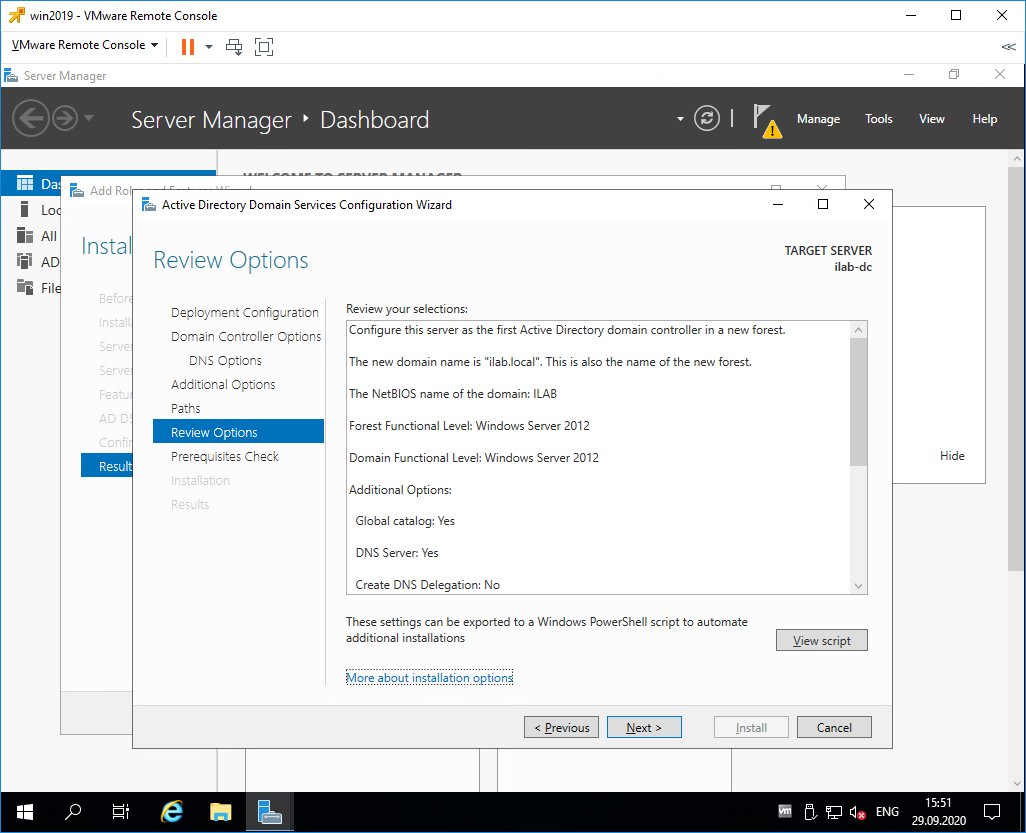
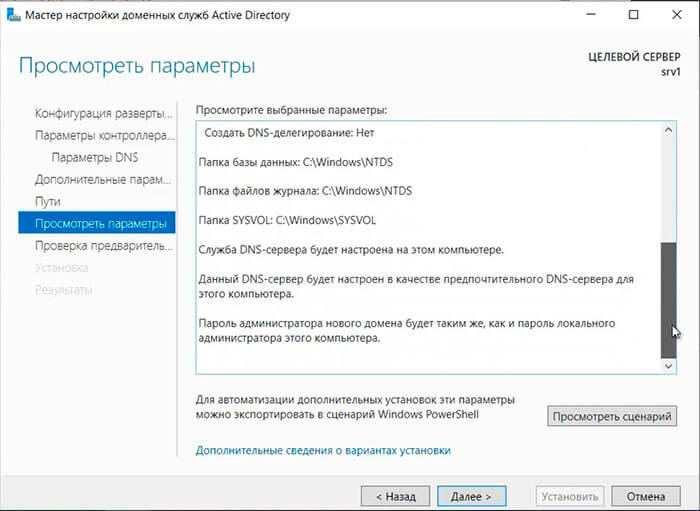
В разделе Review Options проверяем параметры установки. Обратите внимание на кнопку View script. Если её нажать, то сгенерируется tmp файл с PowerShell скриптом для установки контроллера домена.
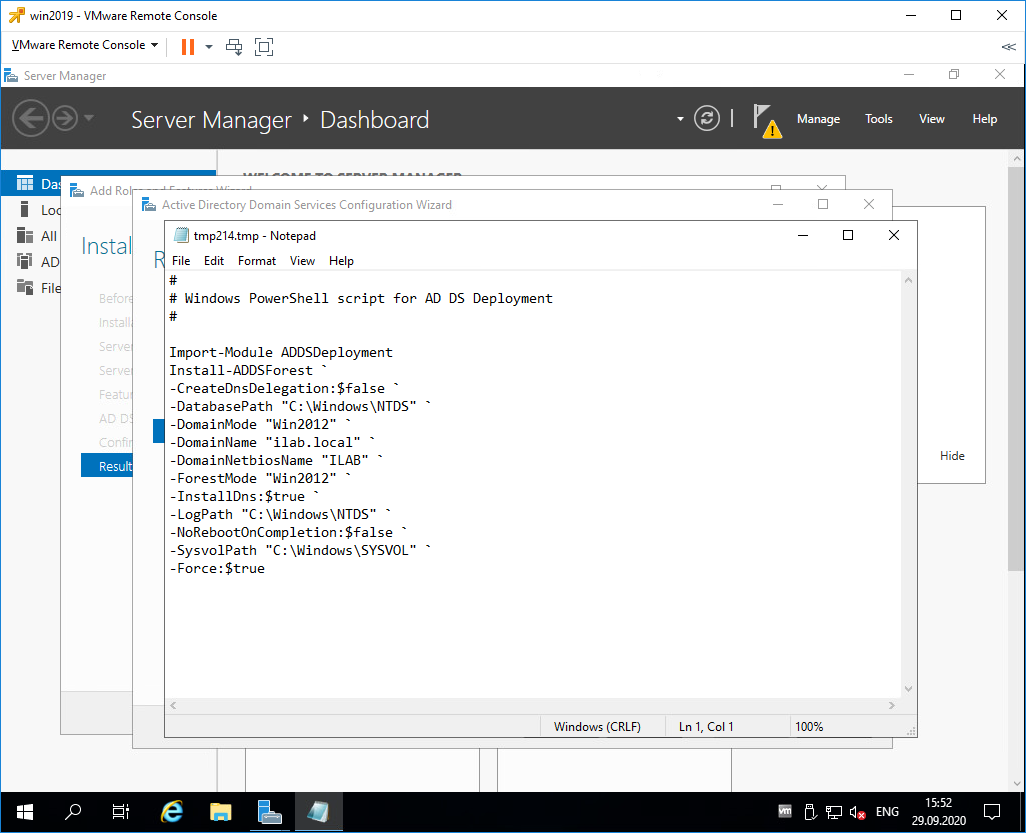
Сейчас нам этот скрипт не нужен, но он может быть полезен системным администраторам для автоматизации установки роли контроллера домена с помощью PowerShell.
Next.
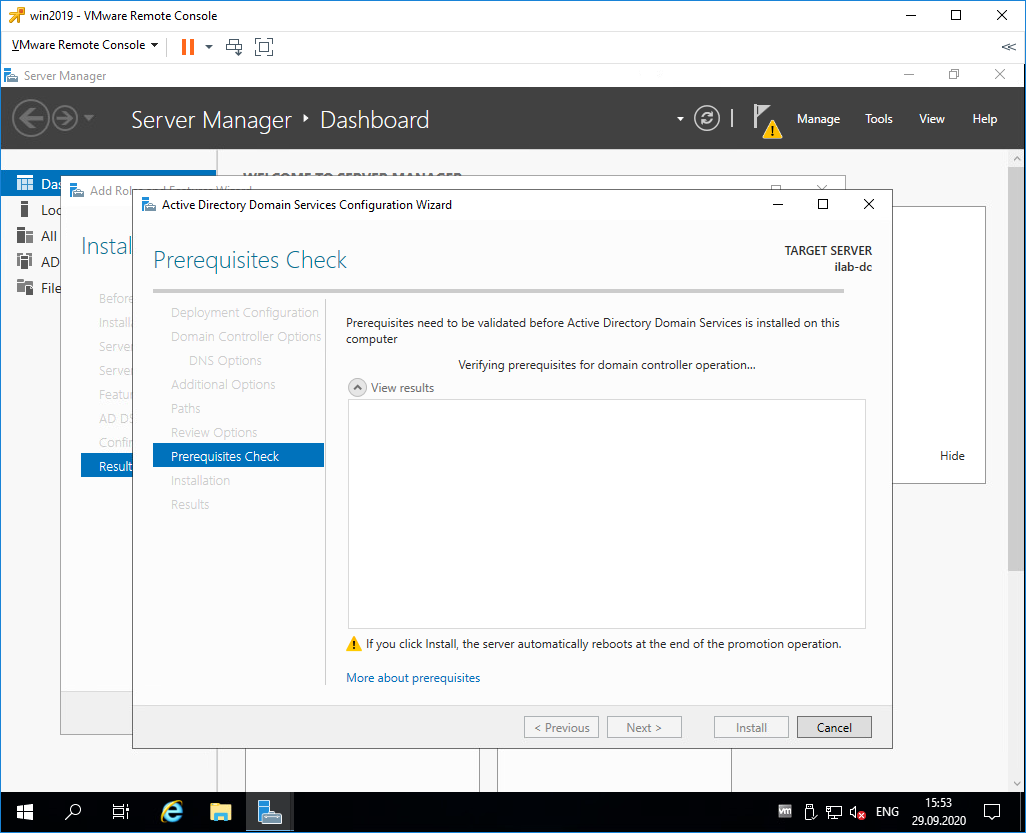
Попадаем в раздел Prerequisites Check, начинаются проверки предварительных требований.
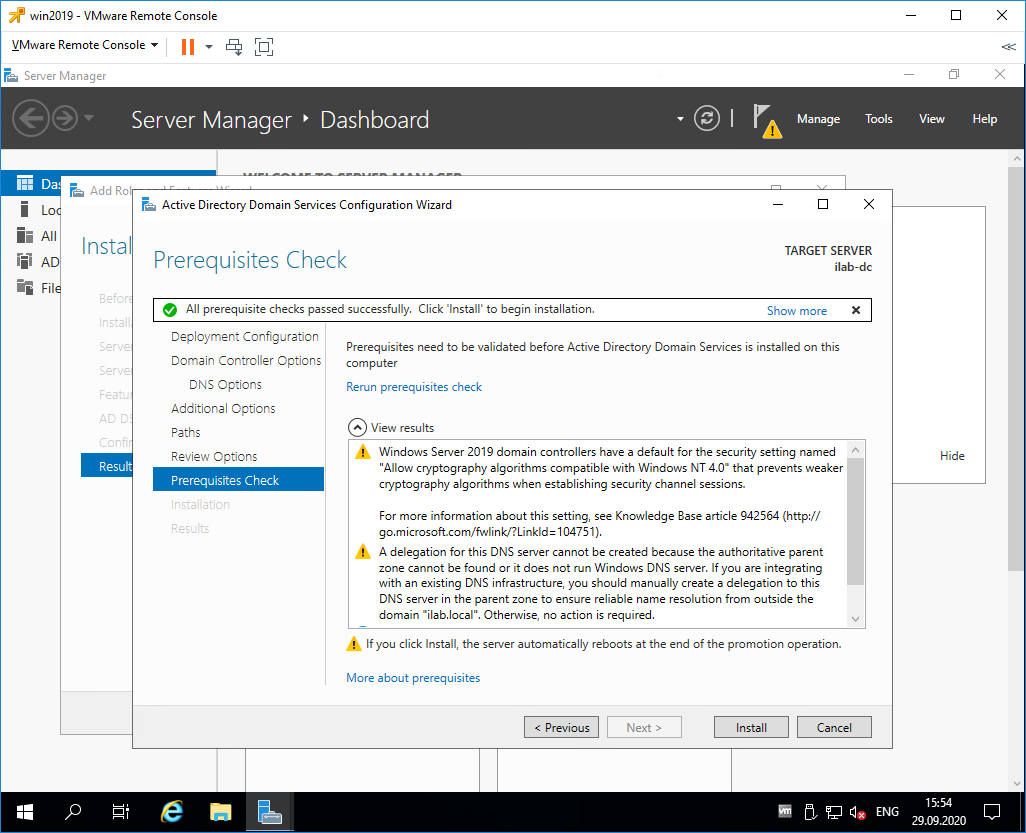
Проверки прошли успешно, есть два незначительных предупреждения про DNS, которое мы игнорируем и про безопасность, тож игнорируем. Пытался пройти по предложенной ссылке, она оказалась нерабочей.
Для начала установки роли контроллера домена нажимаем Install.
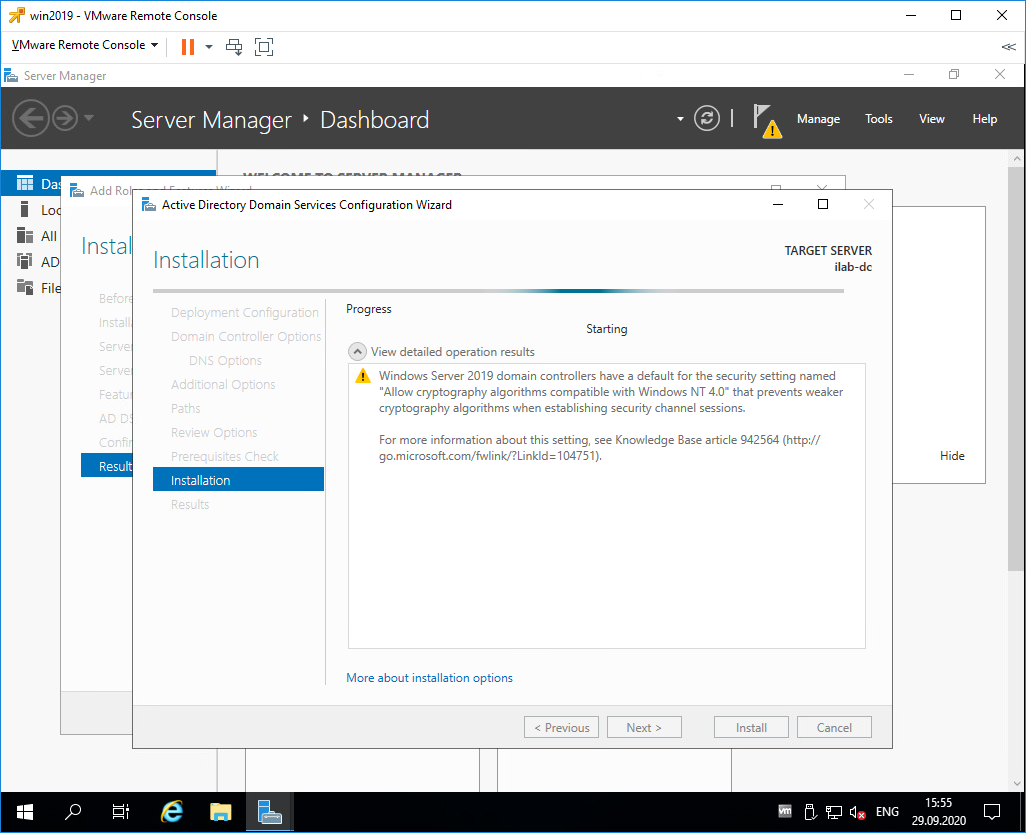
Начинается процесс установки.
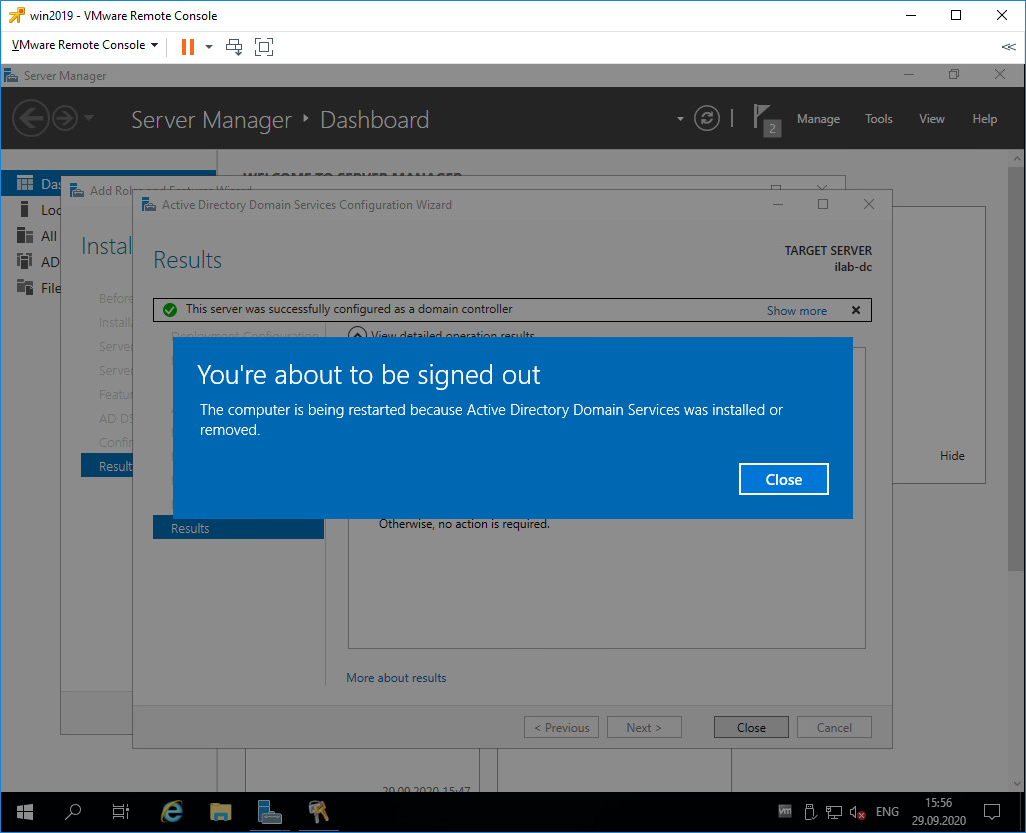
Сервер будет перезагружен, о чём нас и предупреждают. Close.

Дожидаемся загрузки сервера.
Первоначальная настройка контроллера домена
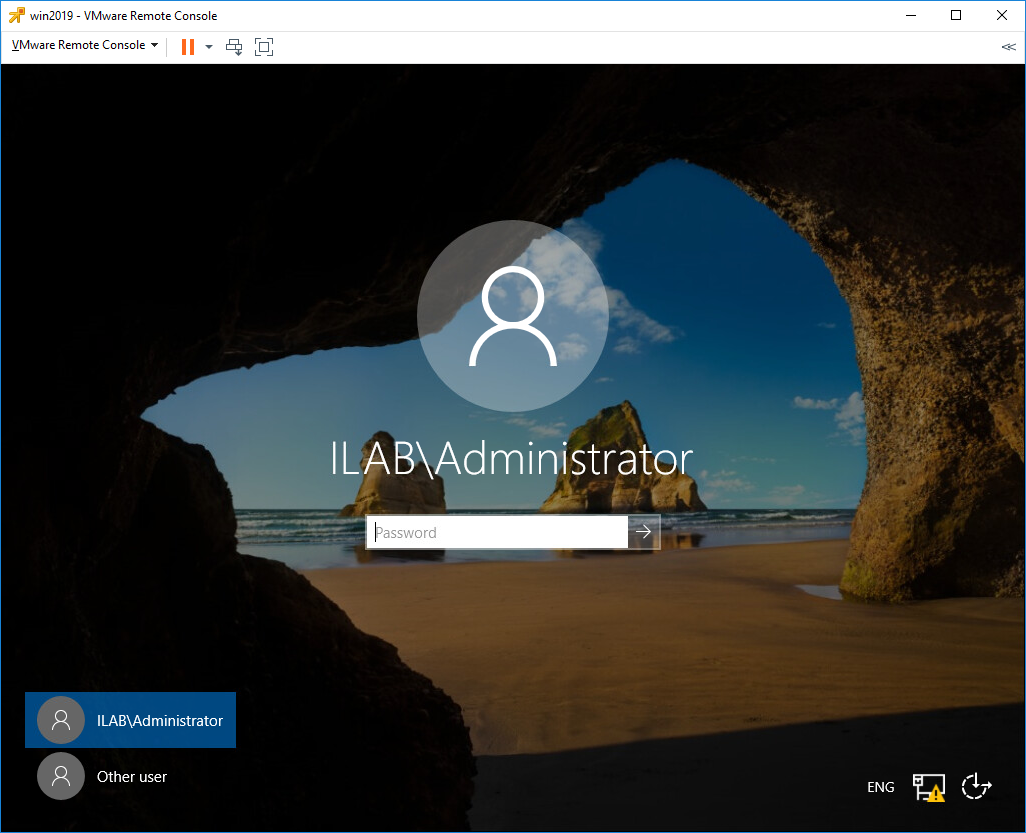
Наша учётная запись Administrator теперь стала доменной — ILAB\Administrator. Выполняем вход.
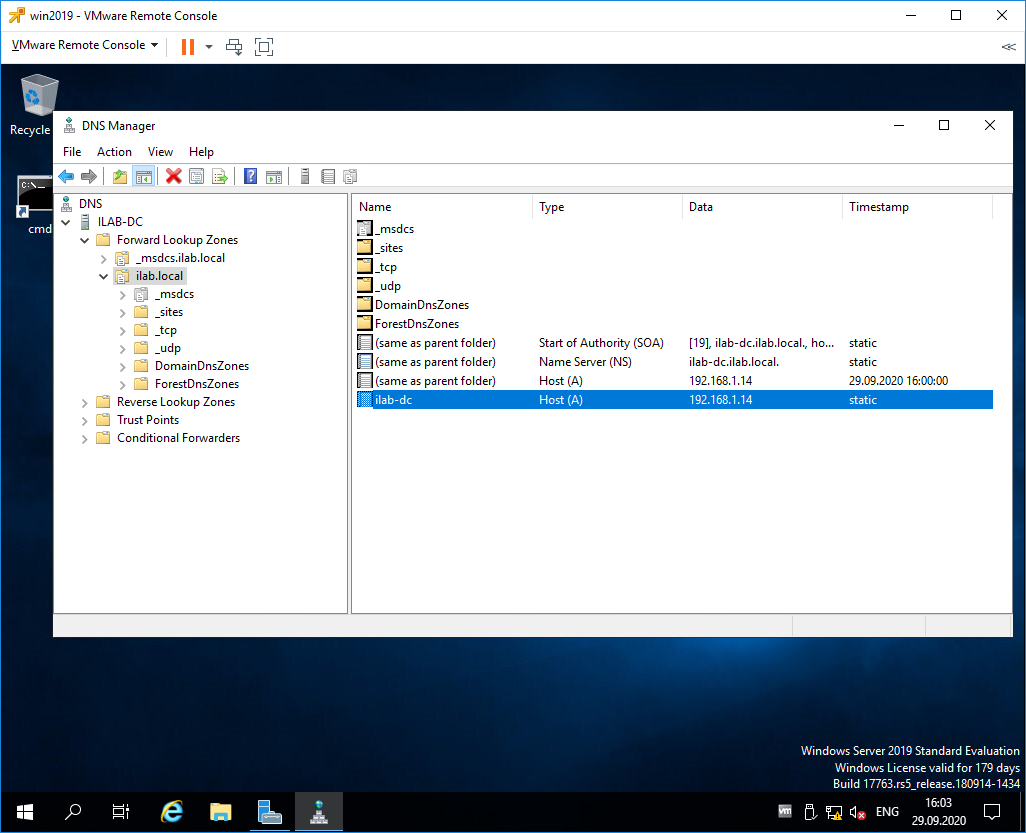
Видим, что на сервере автоматически поднялась служба DNS, добавилась и настроилась доменная зона ilab.local, созданы A-записи для контроллера домена, прописан NS сервер.
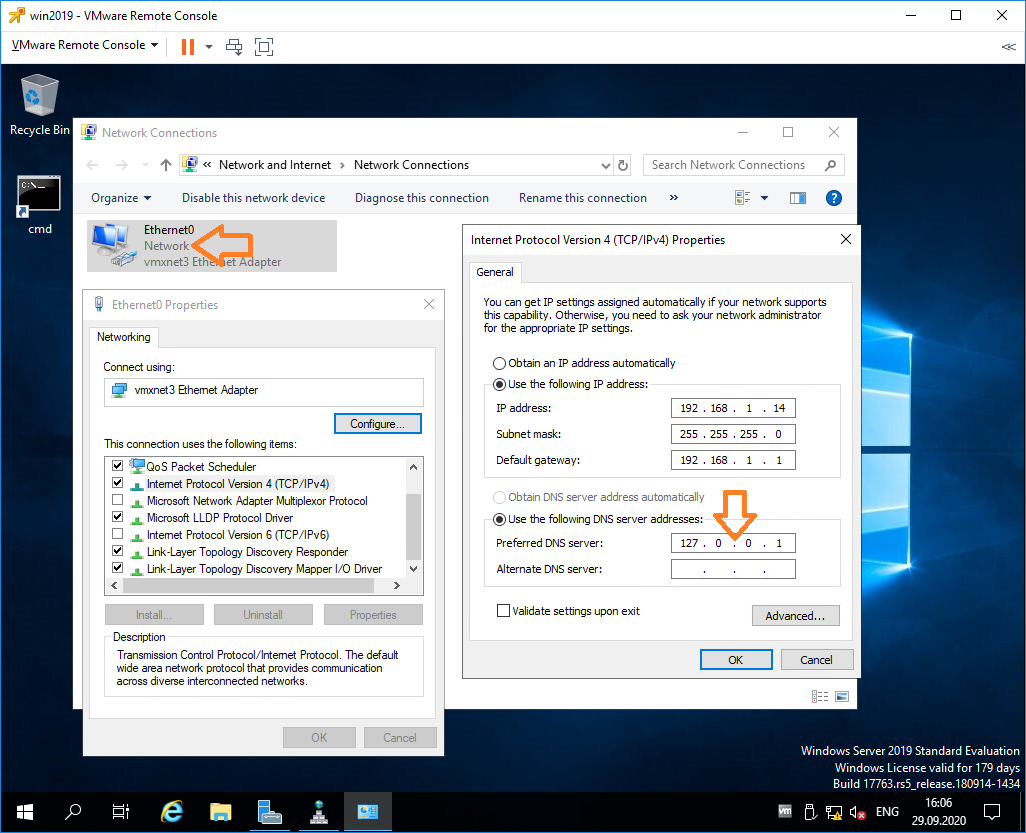
На значке сети отображается предупреждение, по сетевому адаптеру видно, что он не подключен к домену. Дело в том, что после установки роли контроллера домена DNS сервер в настройках адаптера сменился на 127.0.0.1, а данный адрес не обслуживается DNS сервисом.
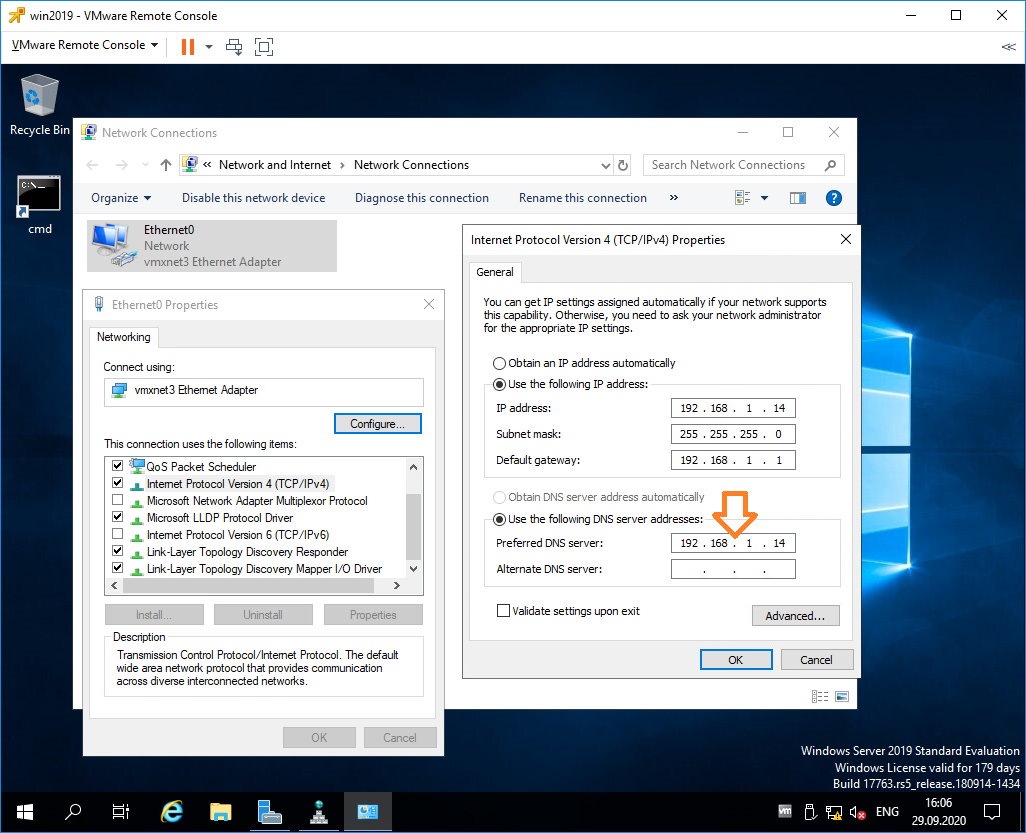
Сменим 127.0.0.1 на статический IP адрес контроллера домена, у меня 192.168.1.14. OK.
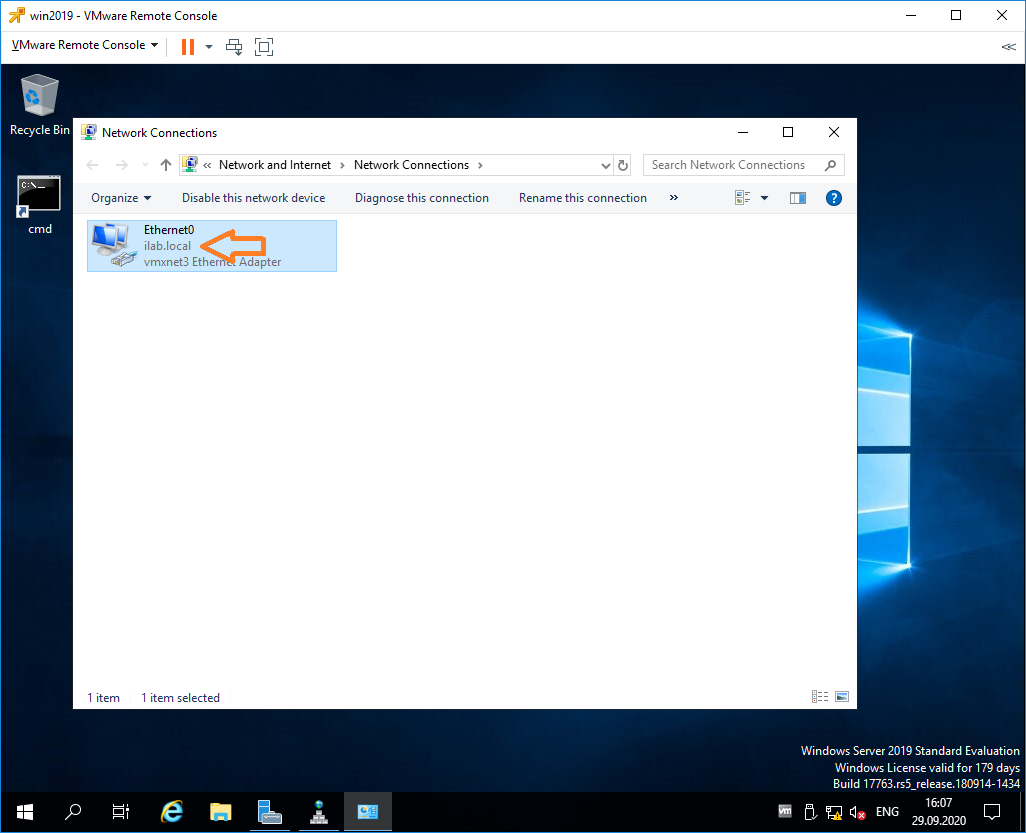
Теперь сетевой адаптер правильно отображает домен, предупреждение в трее на значке сети скоро пропадёт.
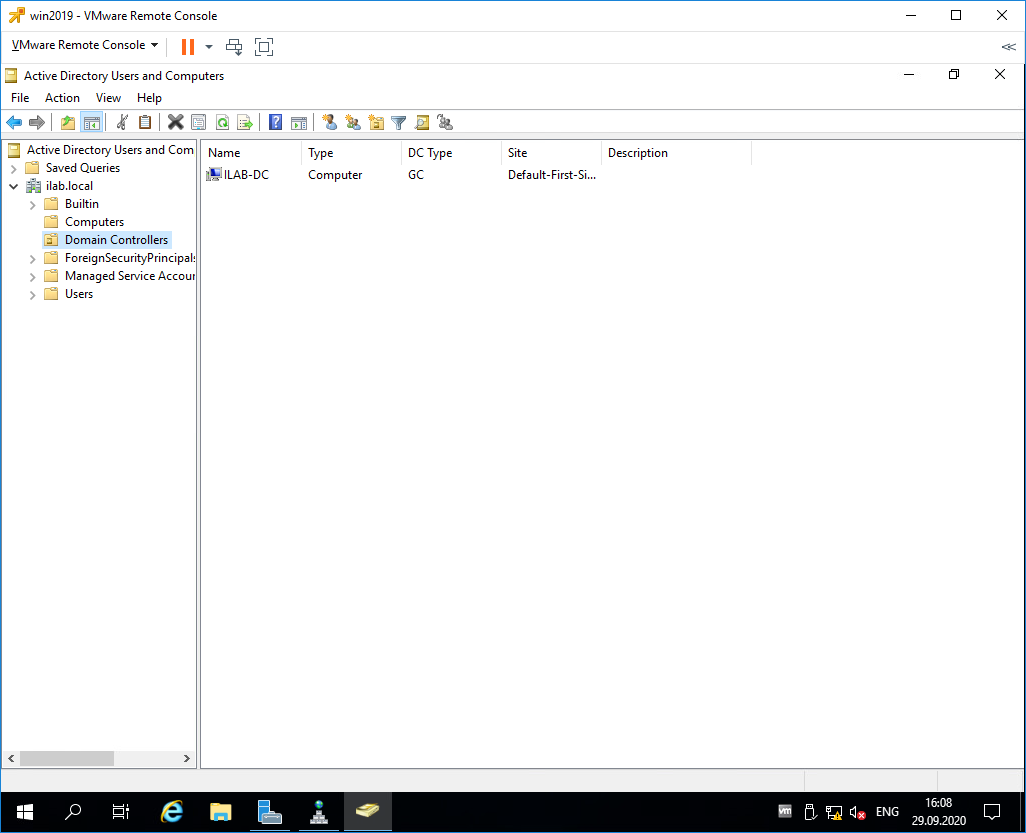
Запускаем оснастку Active Directory Users and Computers. Наш контроллер домена отображается в разделе Domain Controllers. В папкe Computers будут попадать компьютеры и сервера, введённые в домен. В папке Users — учётные записи.

Правой кнопкой на корень каталога, New > Organizational Unit.
Создаём корневую папку для нашей компании. При создании можно установить галку, которая защищает от случайного удаления.

Внутри создаём структуру нашей компании. Можно создавать учётные записи и группы доступа. Создайте учётную запись для себя и добавьте её в группу Domain Admins.
Рекомендуется убедиться, что для публичного сетевого адаптера включен Firewall, а для доменной и частной сетей — отключен.
Table of Contents
- Introduction
- Prerequisites
- Active Directory Topology
- Active Directory Port Details
- Active Directory Default Ports
- Active Directory Replication
- Active Directory Authentication
- Installation Steps
- Step 1: Login as Local Admin
- Step 2: IP Config
- Step 3: Static IP
- Step 4: Find InterfaceIndex
- Step 5 : DNS
- Step 6: Install AD-DS Role
- Step 7:AD-DS Configuration
- IncludeManagementTools
- Install-ADDSForest
- Step 8 : Prompt for the Safe Mode Admin Pass
- Step 9 : Reboot & Login
- Step 11 : Run Get-ADDomainController
- Step 12 : Run Get-ADDomain example.com
- Step 13 : List The AD Forest Details
- Step 14 : Check if DC Sharing The SYSVOL Folder
- Conclusion
- References
- Glossary
- Other Languages
Introduction
This article helps to Install / setup the active directory environment using windows server 2019 using PowerShell / PowerShell config file.
Prerequisites
- Install Windows server 2019 Standard / Data center on a Hardware.
- Active Directory Topology
- Make sure Active directory ports are open.
- Patch the Server with the latest Windows Updates and hot-fix.
- Assign the static IP address to Domain Controller
- Install Active directory domain services (ADDS) Role on the server.
- Configure ADDS according to requirement.
- Evaluate the windows event logs to validate the health of ADDS installation and configuration
- Configure Service and Performance Monitoring
- ADDS Backup / DR Configuration
Active Directory Topology

In my sample environment, example.com will be the forest root domain. The first domain controller installs on the forest will hold all five FSMO roles. Once additional domain controllers are in place you can place them inapposite locations.
↑ Back to top
Active Directory Port Details
Active Directory communications comprise of the number of ports, below table explains ports with its details.
Active Directory Default Ports
|
Port |
Type |
Description |
|
135 |
TCP/UDP |
RPC endpoint mapper |
|
137 |
TCP/UDP |
NetBIOS name service |
|
138 |
UDP |
NetBIOS datagram service |
|
139 |
TCP |
NetBIOS session service |
|
445 |
TCP/UDP |
SMB over IP (Microsoft-DS) |
|
389 |
TCP/ UDP |
LDAP |
|
636 |
TCP |
LDAP over SSL |
|
3268 |
TCP |
Global catalog LDAP |
|
3269 |
TCP |
Global catalog LDAP over SSL |
|
88 |
TCP/ UDP |
Kerberos |
|
53 |
TCP/ UDP |
DNS |
|
1512 |
TCP/ UDP |
WINS resolution |
|
42 |
TCP/ UDP |
WINS replication |
|
Dynamically-assigned ports, unless restricted |
TCP |
RPC |
Active Directory Replication
|
Port |
Type |
Description |
|
135 |
TCP |
RPC endpoint mapper |
|
389 |
TCP/UDP |
LDAP |
|
636 |
TCP |
LDAP over SSL |
|
3268 |
TCP |
Global catalog LDAP |
|
3269 |
TCP |
Global catalog LDAP over SSL |
|
53 |
TCP/UDP |
DNS |
|
88 |
TCP/UDP |
Kerberos |
|
445 |
TCP |
SMB over IP (Microsoft-DS) |
|
RPC |
TCP |
Dynamically-assigned ports (unless restricted) |
Active Directory Authentication
|
Port |
Type |
Description |
|
445 |
TCP/UDP |
SMB over IP (Microsoft-DS) |
|
88 |
TCP/UDP |
Kerberos |
|
389 |
UDP |
LDAP |
|
53 |
TCP/UDP |
DNS |
|
RPC |
TCP |
Dynamically-assigned ports (unless restricted) |
↑ Back to top
Installation Steps
Step 1: Login as Local Admin
To start the configuration, log in to Windows server 2019 server as the local administrator.

Step 2: IP Config
We already changed the name of the server to a meaningful one. Then need to check the IP config. in my initial configuration, it shows DHCP IP.
We need to change it to static first, with PowerShell

Step 3: Static IP
To set the static IP, we can use below PowerShell command.
New-NetIPAddress` -InterfaceIndex4-IPAddress192.168.61.100-PrefixLength24DefaultGateway192.168.61.2`
Note: Here we assigned IP based on my network requirement. Hence use the IP address according to your Infrastructure.

Step 4: Find InterfaceIndex
In above, InterfaceIndex can find using Get-NetIPAddress command.
Step 5 : DNS
Next step is to set DNS Ip addresses. The primary dc also going to act as DC so we need to set it as the preferred DNS. We can do this using below command.
Set-DnsClientServerAddress -InterfaceIndex4-ServerAddresses ("192.168.61.100","8.8.8.8")
After config, we can verify it using ipconfig /all.

Step 6: Install AD-DS Role
Before the AD configuration process, we need to install the AD-DS Role in the given server. In order to do that we can use the Following command.
Install-WindowsFeature –Name AD-Domain-Services –IncludeManagementTools`
Note: Reboot is not required to complete the role service installations.

Now we have the AD-DS role installed, the next step is to proceed with the configuration
Step 7:AD-DS Configuration
Below is the power-shell configuration file / script for configuring the ADDS.
Install-ADDSForest `
-DomainName
"example.com"
`
-CreateDnsDelegation:$false `
-DatabasePath
"C:\Windows\NTDS"
`
-DomainMode
"7" `
-DomainNetbiosName
"example" `
-ForestMode
"7" `
-InstallDns:$true `
-LogPath
"C:\Windows\NTDS"
`
-NoRebootOnCompletion:$True `
-SysvolPath
"C:\Windows\SYSVOL"
`
-Force:$true
Following explain the Power-Shell arguments and what it will do. Install-WindowsFeature
This cmdlet will allow to install windows role, role services or windows feature in la ocal server or remote server. It is similar to using windows server manager to install those.
IncludeManagementTools
This cmdlet will allow to install windows role, role services or windows feature in local server or remote server. It is similar to using windows server manager to install those.
This will install the management tools for the selected role service.
Install-ADDSForest
This cmdlet will allow to setup a new active directory forest.
- DomainName: This parameter defines the FQDN for the active directory domain.
- CreateDnsDelegation Using this parameter can define whether to create DNS delegation that reference active directory integrated DNS.
- DatabasePath; this parameter will use to define the folder path to store the active directory database file (Ntds.dit).
- DomainMode: This parameter will specify the active directory domain functional level. In above I have used mode 7 which is windows server 2016. Windows Server 2019 doesn’t have separate domain functional level.
- DomainNetbiosName This defines the NetBIOS name for the forest root domain.
- ForestMode; This parameter will specify the active directory forest functional level. In above I have used mode 7 which is windows server 2016. Windows Server 2016 doesn’t have separate forest functional level.
- InstallDns: Using this can specify whether DNS role need to install with the active directory domain controller. For new forest, it is the default requirement to set it to $true.
- LogPath: Log path can use to specify the location to save domain log files.
- SysvolPath
- SysvolPath | This is to define the SYSVOL folder path. Default location for it will be C:\Windows
- NoRebootOnCompletion: By default, the system will restart the server after domain controller configuration. using this command can prevent the automatic system restart.
- Force: This parameter will force command to execute by ignoring the warning. It is typical for the system to pass the warning about best practices and recommendations.
Step 8 : Prompt for the Safe Mode Admin Pass
After executing the command it will prompt for the Safe Mode Administrator Password. This is to use in Directory Services Restore Mode (DSRM).
Make sure to use the complex password (According to windows password complexity recommendations). Failure to do so will stop the configuration.
Step 9 : Reboot & Login
When configuration complete, reboot the domain controller and log back in as domain administrator.
Step
10 : Confirm the Installation
To confirm the successful installation of the services.
Get-Service adws,kdc,netlogon,dns
Above command will list down the status of the active directory related services running on the domain controller.

Step 11 : Run Get-ADDomainController
It will list down all the configuration details of the domain controller.
Step 12 : Run Get-ADDomain example.com
It will list down the details about the active directory domain.
Step 13 : List The AD Forest Details
Same way Get-ADForest example.com will list down the active directory forest details.
Step 14 : Check if DC Sharing The SYSVOL Folder
Get-smbshare SYSVOL will show if the domain controller sharing the SYSVOL folder.
↑ Back to top
Conclusion
As we can see AD DS components are installed and configured successfully. This marks the end of this post. Please feel free to rate this article.
References
- Service overview and network port requirements for Windows
- What’s new in Active Directory 2019?
↑ Back to top
Glossary
| Item | Description |
| SYSVOL | SYSTEM VOLUME |
| DC | Domain Controller |
| AD DS | Active Directory Domain Services |
| DNS | Domain Name System |
| FQDN | Fully Qualified Domain Name |
| DSRM | Directory Services Restore Mode |
KDC |
Key Distribution Center |
| LDAP | Lightweight Directory Access Protocol |
| NTDS | NT Directory Services |
| IP | Internet Protocol |
| FSMO | Flexible Single-Master Operation |
↑ Back to top
Other Languages
This Windows Server 2019 Active Directory installation beginners guide will provide step-by-step illustrated instructions to create a NEW AD forest, DNS and DHCP services. In addition, I will reference the security recommendations from Microsoft and StigViewer for new Domain Controllers that can be used for server security hardening. Sure you can use a Hydration Kit or other tools to automatically create a domain, DNS, DHCP, and SCCM ConfigMgr server. However, learning from the ground up helps to re-enforce Microsoft concepts and is a great way to learn and troubleshoot using a separate environment. Building a development AD environment is also good to test Windows 10 group policy settings, newer Windows 10 releases, SCCM OSD, Azure cloud services and more.
This blog post can also be used for Server 2016 since the Forest and Domain Functional levels are the same.
For a test or development lab environment, it’s recommended to apply the latest Windows Server updates and configure the recommended security settings. Don’t relax your security standards by using a weak domain admin password or not apply the recommended Microsoft security baselines for Domain Controllers. I hope you enjoy this blog post!
IMPORTANT NOTE: For production use, always consult your organization’s security team for compliance and ensure that security best practices are followed. This blog post is intended for test lab development enviornments.
Prerequisite Experience (Level 200)
- An understanding of general networking concepts such as DNS (Domain Name Space) IP address, IP networks, and troubleshooting network related environments
- Experience working with Virtual Machines using Hyper-V, Virtual Box or VMware Workstation
- Experience with basic security best practices
- Experience working with Windows server and Windows 10 / 7 client operating systems.
High-Level Goals
- Install and Configure New AD Forest, AD Domain and Domain Controller
- Install and Configure Reverse DNS Lookup Zone
- Enable/Set DNS Scavenging to 3-7 days (DNS record cleanup)
- Install and Configure DHCP Server including AD authorization, DHCP Scope, and DHCP Lease creation
- Windows Server baseline security recommendations
- Test Windows 10 domain join manually for new Forest/Domain
Requirements
- PC or device with at least dual-core Intel i5 or i7 CPU (Or AMD) and Virtualization Support
- Windows 10 Pro x64 or Enterprise x64 (Windows 10 HOME edition does not support Hyper-V or other virtualization technology)
- You can buy and download Windows 10 Pro OEM for $149 from Newegg.com here.
- At least 8GB FREE memory (16GB or 32GB is best) on the host operating system
- Enable 2 Virtual Processors within Hyper-V manager or other software for the VM client
- Enable Intel® Virtualization Technology in BIOS/Firmware (Virtualization software will not work otherwise) Use Intel tool here to check.
- Windows Server 2019 Volume License ISO media or 180-day evaluation media (you can download Windows Server eval ISO media from here).
- Enable Hyper-V manager in Windows 10 or install other product such as Oracle Virtual Box or Vmware Workstation
Install Hyper-V Manager Feature – Win10 x64
Verify you have Intel Virtualization Technology enabled for the system you are using within the BIOS / Firmware settings. Each manufacturer has a different BIOS configuration settings so the below is an example. Consult your manufacturer or motherboard documentation as applicable.
Ensure the Windows 10 operating systems shows a hypervisor is detected, enabled in the BIOS/firmware and enable Hyper-V in Programs and Features.


On the host system, install Hyper-V by right-clicking on the Windows 10 start menu, select “Apps and Features” > “Programs and Features”. Enable Hyper-V and Hyper-V Platform options as shown here. Reboot after enabling the feature.

Install Hyper-V Guest Virtual machine and Configure Settings
Download the Windows Server 2019 ISO media file requirement as this will be used within the Hyper-V settings on the virtual guest machine.
Launch Hyper-V Manager, create a NEW guest virtual machine and configure the following settings.
- Enable Generation 2 guest VM during VM creation
- Enable 2 Virtual Processors
- Allocate 4GB RAM
- Disable TPM and Secure boot
- Add DVD Drive (Required to mount Windows Server 2019 ISO media)
- Enable Guest Services (For Enhanced Session Use)


Install Windows Server 2019 Operating System
From Hyper-V Manager on Windows 10, make sure the DVD is set as the first boot device and that the ISO image file is configured in the settings.
Connect to the new virtual machine and quickly be prepared to click a key on your keyboard to boot to the Windows Server 2019 ISO. Click “Start” to begin.
Select the language, skip or enter an applicable product key, select “Windows Server 2019 Standard (Desktop Experience)”, format the disk partition and the OS install will begin.


Enter the initial administrator password and the installation of Windows Server will be complete. Move on to the next steps to rename the computer, install updates, activate Windows, set the timezone and set a static IP address on the internal VM network card.

Configure Windows Server 2019 (Post OS Install)
Perform the following tasks on the newly installed Windows Server 2019 OS and reboot the server.
- Rename the Server
- Set the Time Zone to your applicable Time Zone
- Set a static IP Address on the TCP/IP V4 the INTERNAL Virtual Machine network card OS settings
- Install Windows Server 2019 Updates
IMPORTANT NOTE: Be sure to set a STATIC IP address on the VM’s internal LAN NIC before you run the Active Directory Services install and configuration wizard. Active Directory, DHCP and DNS require a static IP address. The Active Directory and DHCP installation wizards will display errors if you don’t set a static IP address on the virtual machine internal network card for IPv4.
Set a static IP address for the TCP/IPv4 virtual machine INTERNAL NIC as shown here in the example below. Use your own private IP address subnet range. use a 10.x.x.x or 172.16.x.x or 192.168.x.x IP range. For more details about Private Networks review the article here.
CRITICAL NOTE: Be sure to set the IP address for the preferred DNS server to 127.0.0.1 as shown below since we will be using the local server for DNS and Active Directory use.

Install the latest Windows Server 2019 updates from the Start Menu > Settings > Update & Security settings applet and reboot as applicable.


Install Active Directory Services, DHCP and DNS Roles
Perform the following steps to install Active Directory Services for a new forest, DNS and DHCP server on the virtual machine.
Prerequisites
- DISABLE the External NIC on the virtual machine if you configured a 2nd NIC for internet access as part of the Windows Server updates and license activation.
Launch “Server Manager” from the start menu and select “Add Roles and Features“.


Click Next at the “Before You Begin” screen, and “Next” at the “Select installation type” screen. Be sure the installation type is set to the default “Role-based or feature-based installation“.
At the “Select destination server” click Next to select your local server.

At the “Server Roles” screen be sure to select “Active Directory Domain Services“, “DHCP“, and “DNS“. Select “Add Features” for each one and click Next.


Click Next at the “Select Features” screen.

Click Next through the “Active Directory Domain Services“, “DHCP Server” and “DNS Server” screens. Click “Install” to confirm and begin the roles install.
Once the role features installation begins, do not close the Window. We will select the “Promote this server to a domain controller” step in a few minutes.

Promote Server to a Domain Controller
While still on the “Add Roles” wizard, select “Promote this server to a domain controller” option.

Select the “Add a new forest” radio button, specify a non-routable DNS domain name using the example below such as 1234.local or xxx.local. Review this article here for more details about .local DNS domains.

At the “Domain Controllers Options” screen leave the Forest and Domain Functional levels to the default “Windows Server 2016“. In addition, leave the Domain Name System (DNS) server and Global Catalog (GC) options checked, and enter an administrator for the Directory Services Restore Mode (DSRM) password. Click Next.

Click Next at the DNS Options screen and DO NOT check the box to create a DNS delegation.

Click Next at the Additional Options, Paths, Review Options, and Prerequisites Check screens. Click “Install” to continue.

Once the roles installation is complete, the server will automatically reboot and you will see the NEW domain login screen.


Install and Configure Reverse DNS Lookup Zone
Now that the Active Directory Services Domain controller is installed, DHCP services are installed let’s create the Reverse DNS lookup zone for the IPv4 IP subnet we plan to use for this network and domain. A reverse DNS lookup zone helps with name resolution for IP address to an A record hostname. Some applications and services will attempt DNS lookups based on the IP address first.
Launch the DNS Manager tool from “Windows Administrative Tools” > expand your server > right click on “Reverse Lookup Zones” and select “New Zone“. Click Next at the welcome screen.

At the “Zone Type” screen leave the default option selected and click Next.

Click Next at the AD Replicate Scope screen and select the “To all DNS servers running on domain controllers in this domain…“.
Select “IPv4 Reverse Lookup Zone” and click Next.

Reverse Lookup Zone name Network ID should be your environments subnet network. In my case it’s 10.240.10.

At the Dynamic Update screen click Next, click Finish to complete the wizard. The new Reverse DNS Lookup zone will be listed and clients will register their IP addresses automatically in this zone.

Enable and Set DNS Scavenging
Perform the following steps within DNS Manager to enable DNS.
Launch DNS Manager, right-click on your DNS server, select “Set Aging/Scavenging for All Zones“. Check the box “Scavenge stale resource records” and click Ok to save the changes.


Configure DHCP Server Options and Authorize Server
The final step that needs to be performed is authorizing the DHCP server and creating / enabling the DHCP client scope.
Launch DHCP Manager from the start menu > Windows Administrative Tools. Exp[and your DHCP server, right-click on the server name and select “Authorize“. Right-click on the server again and select “Refresh”. You should see all green check boxes now.


Finally, we can create the DHCP client scope. Right-click on “IPv4” option, select New Scope, click Next at the welcome screen, provide a name for the DHCP scope and click Next.

Enter the DHCP IP address range using the applicable IP subnet details you have decided to use. Click Next at the Exclusion and Delay screen, select the default 8 days for lease duration and click Next.


Click Yes I want to configure these options now on the DHCP options screen.

Click Next through the remaining DHCP scope screens to activate the DHCP client scope.
Congratulations! The AD domain controller is finished, a DNS reverse DNS zone exist and you have a DHCP client scope.
To test, create a client VM for Windows 10 and ensure the network card is using the “INTERNAL” LAN connection and manually add the PC to the new AD domain.
If you want to create a NEW OU and test automatic domain join, reference my blog post here.
This Windows Server 2019 – Active Directory Installation beginners guide covered all the requirements for creating a new forest, domain controller, DHCP server with scope and more. below are references to the StigViewer and Microsoft security baselines for AD domains and domain controllers.
References
Microsoft Security Compliance Toolkit 1.0 – Baseline security group policy reports and templates for Windows Server and Windows 10. Linked here.
Windows Server 2016 (or Server 2019) (STIG) Security Technical Implementation Guide – This Security Technical Implementation Guide is published as a tool to improve the security of Department of Defense (DoD) information systems. Linked here.
/ / Filed Under: Active Directory, Infrastructure, Security, Windows Server 2016, Windows Server 2019 /