В этом кратком руководстве мы опишем процесс установки и настройке VPN-сервера на базе Windows Server. Все действия, описанные в этой статье, были выполнены на Windows Server 2016, но эта инструкция подходит для любой современной серверной операционной системы Windows, начиная с Windows Server 2008 R2 и заканчивая Windows Server 2016.
Итак, давайте начнем. Прежде всего нам нужно настроить роль удаленного доступа (Remote Access). Для этого в оснастке Server Manager запустите мастер добавления ролей и выберите роль Remote Access.
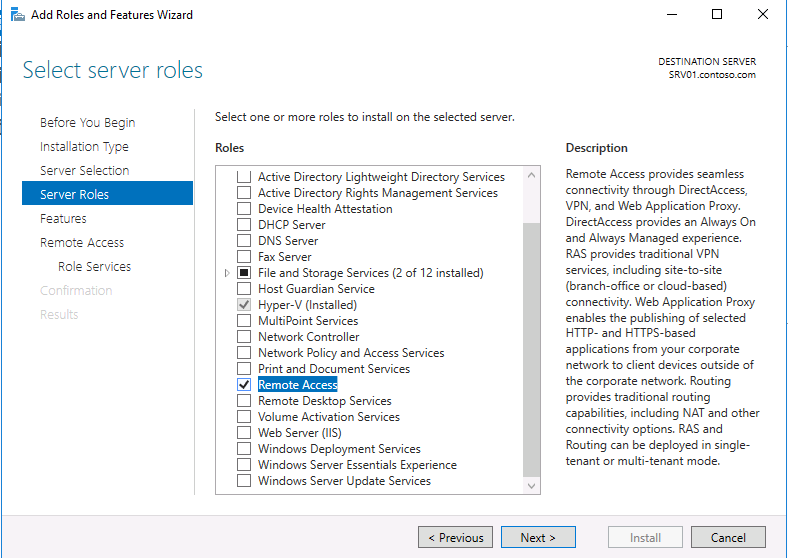
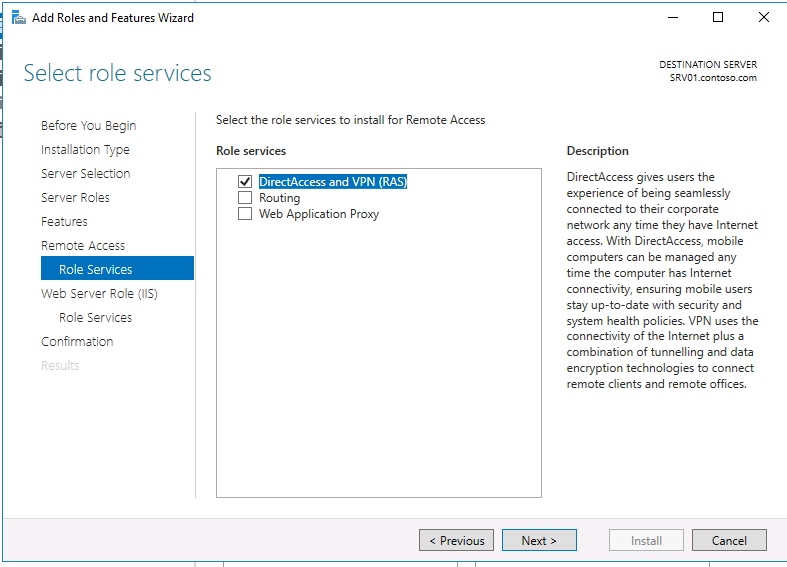
Затем, в списке служб роли выберите опцию «DirectAccess and VPN (RAS)«.
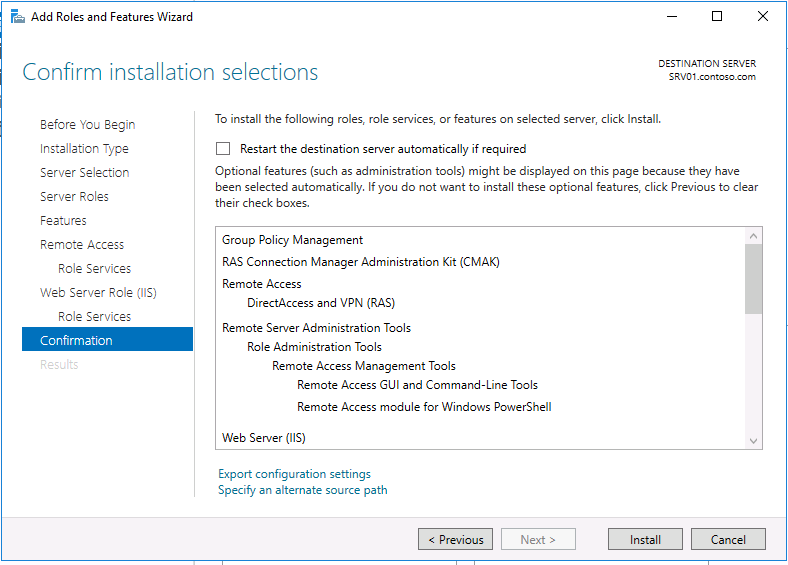
В дополнение к роли удаленного доступа и средствам управления, также автоматически будут установлены веб-сервер IIS и внутренняя база данных Windows (WID). Полный список установленных функций можно просмотреть в окончательном окне мастера, появляющимся перед тем, как вы подтвердите установку.
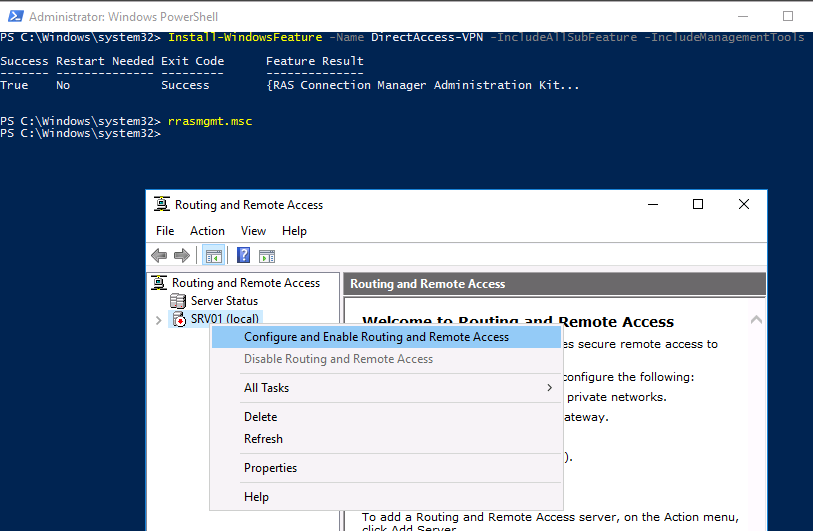
Установить роль Remote Access вместе со всеми необходимыми опциями можно всего одной командой PowerShell:
Install-WindowsFeature -Name DirectAccess-VPN -IncludeAllSubFeature -IncludeManagementTools
После установки роли вам необходимо включить и настроить службу с помощью оснастки «Маршрутизация и удаленный доступ» (Routing and Remote Access) — rrasmgmt.msc.
В оснастке RRAS выберите имя сервера, щелкните правой кнопкой мыши и выберите «Настроить и включить маршрутизацию и удаленный доступ» (Configure and Enable Routing and Remote Access) в открывшемся меню.
В мастере настройки выберите пункт Custom configuration.
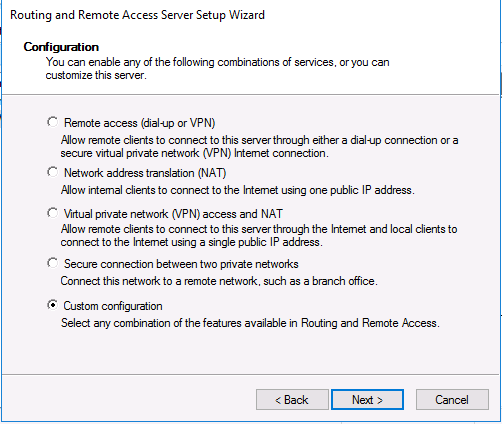
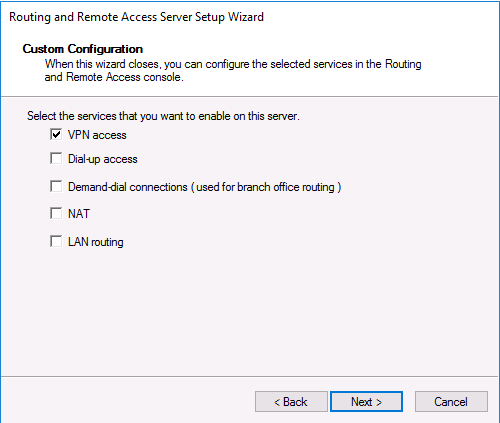
В списке служб выберите опцию VPN access.
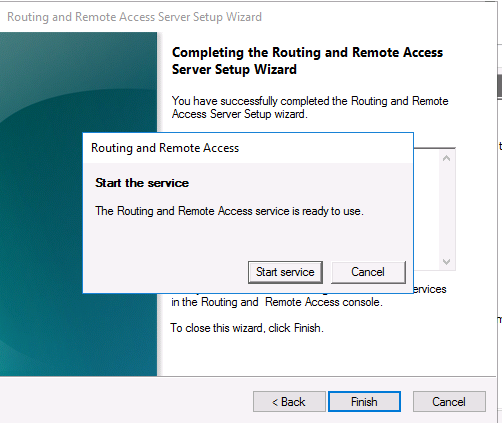
После этого система предложит вам запустить службу Маршрутизации и удаленного доступа.
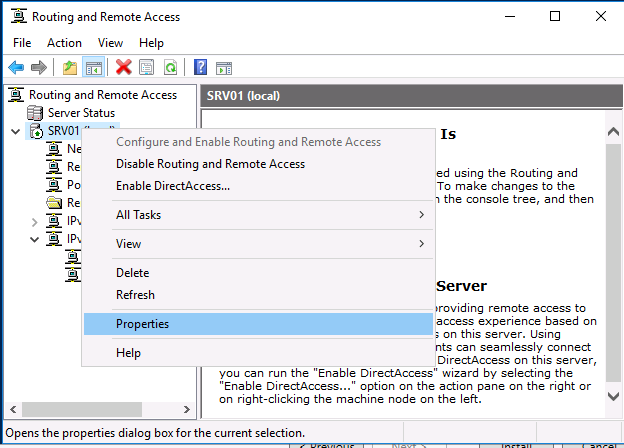
Служба VPN установлена и включена, теперь ее необходимо настроить. Снова откройте меню сервера и выберите пункт «Свойства».
Перейдите на вкладку IPv4. Если у вас нет DHCP-серверов в сети, вам необходимо указать диапазон IP-адресов, которые будут получать клиенты при подключении к VPN-серверу.

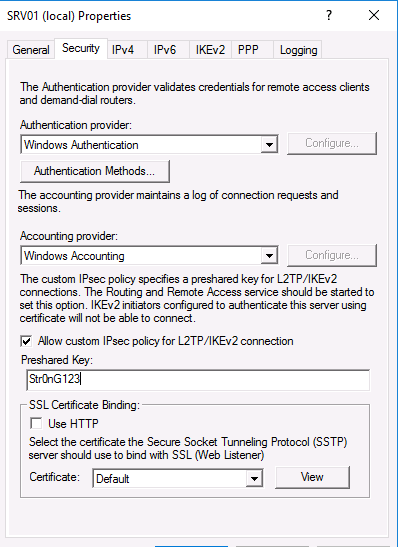
Кроме того, на вкладке Security вы можете настроить параметры безопасности — выбрать тип проверки подлинности, установить предварительный общий ключ для L2TP или выбрать сертификат для SSTP.
И еще пара нужных моментов, которые следует иметь в виду при настройке VPN-сервера.
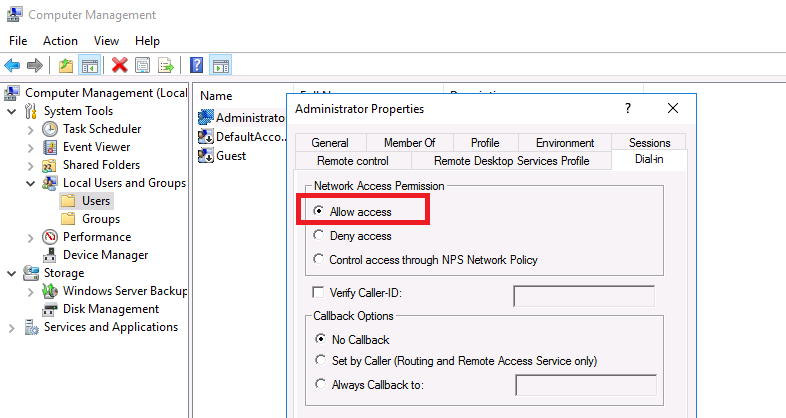
Во-первых, вам нужно указать пользователей, которых будет разрешено подключаться к этому VPN-серверу. Для автономного сервера настройка выполняется локально, в оснастке «Управление компьютером». Чтобы запустить оснастку, вам нужно выполнить команду compmgmt.msc, затем перейдите в раздел «Локальные пользователи и группы». Затем вам нужно выбрать пользователя, открыть его свойства, а на вкладке «Dial-In» отметьте пункт «Разрешить доступ» (Allow access). Если компьютер является членом домена Active Directory, те же настройки можно сделать из оснастки ADUC.
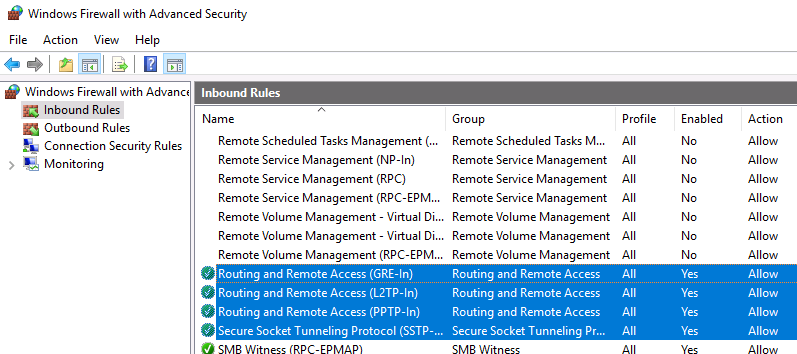
Во-вторых, проверьте, открыты ли все необходимые порты на брандмауэре Windows и межсетевом экране, осуществляющим NAT-трансляцию. Теоретически, когда вы устанавливаете роль RRAS, соответствующие правила автоматически включаются, но на всякий случай проверьте их самостоятельно. Список разрешенных правил для входящего трафика:
- Routing and Remote Access (GRE-In) — протокол 47 (GRE)
- Routing and Remote Access (L2TP-In) – TCP/1701, UDP/500, UDP/4500 и протокол 50 (ESP)
- Routing and Remote Access (PPTP-In) — TCP/1723
- Secure Socket Tunneling protocol (SSTP-in) – TCP/443
Если ваш VPN-сервер находится за NAT, для корректной установки VPN-соединения по протоколу L2TP/ipsec, на стороне клиента необходимо в ветке HKEY_LOCAL_MACHINE\SYSTEM\CurrentControlSet\Services\PolicyAgent создать ключ с именем AssumeUDPEncapsulationContextOnSendRule и значением 2.
На этом все. Теперь, когда у вас имеется настроенный VPN-сервер, вы можете подключиться к нему с помощью VPN-клиента.
1
В Мастере добавления ролей и компонентов необходимо отметить галочкой Удаленный доступ и нажать Далее.

2
Переходим на вкладку Службы ролей и отмечаем галочкой DirectAccess и VPN (RAS).

3
В появившемся окне нажимаем кнопку Добавить компоненты.

4
После того как окно закрылось нажимаем Далее.

5
Выбираем пункт Подтверждение и нажимаем Установить.

6
После завершения установки закрываем окно мастера.

7
Заходим в раздел Маршрутизация и удаленный доступ выбираем пункт Настроить и включить маршрутизацию и удаленный доступ.

8
В появившемся мастере жмем Далее.

9
Выбираем Особая конфигурация.

10
Ставим галочку напротив пункта Доступ к виртуальной частной сети (VPN) и жмем Далее.

11
Завершаем работу мастера — жмем Готово.

12
Появится окно с предложением запустить службу. Выбираем Запустить службу.

13
Снова заходим в Маршрутизация и удаленный доступ и выбираем Свойства.

14
Добавляем интервал адресов для VPN соединения — переходим на вкладку IPv4 и жмем Добавить.

15
В появившемся окне заполняем диапазон и жмем ОК.

16
Готово. Сервер настроен. Для того чтобы удаленные пользователи смогли подключиться, разрешаем доступ в свойствах пользователей или групп на вкладке Входящие звонки.

В начало статьи
Не нашли ответа на свой вопрос?
Закажите звонок специалиста!
Закажите звонок специалиста!
 Zip File, мои юные любители сисадминства. Нынче мы затронем такую балдёжную тему, как настройка VPN. Эта аббревиатура означает виртуальную частную сеть. С её помощью можно осуществлять подключение к рабочей сети вашего предприятия через безопасный канал. Такая схема позволяет использовать все внутренние ресурсы ЛВС, такие как общие папки, принтеры, почту и т.д. находясь за тысячи километров от офиса.
Для работы нам понадобится Windows Server, который имеет белый IP и выход за NAT. Т.к. данный урок я снимаю преимущественно для слушателей закрытой академии Kurets.Ru, весь процесс поднятия VPN будет продемонстрирован на версии сервера 2016 года. Данный релиз является наиболее актуальным и распространённым на сегодняшний день.
Однако тот же алгоритм действий вполне применим, как более новой версии 2019 года, так и к устаревшим 2012 и 2008 года соответственно. В качестве клиента будет использоваться стандартная рабочая станция с Windows 10. Такие дела. Что ж, ребятки, меньше слов, больше дела. Не будем сёдня долго запрягать. Погнали настраивать.
Шаг 1. Первым делом заходим на сервер в корпоративной сети и в оснастке «Диспетчер серверов» кликаем по пункту «Добавить роли и компоненты».

Шаг 2. Далее.

Шаг 3. Оставляем параметр «Установка ролей и компонентов».

Шаг 4. В данном окне выбираем сервер, на котором собираемся поднимать службу VPN. У нас выбор не велик. Жмём «Далее».

Шаг 5. Отмечаем пункт «Удалённый доступ». Next.

Шаг 6. В компонентах ничего не меняем.
Шаг 7. Знакомимся с информацией о том, что такое в принципе VPN и зачем нужен удаленный доступ.

Шаг 8. Отмечаем галочкой параметр «DirectAccess и VPN» и добавляем необходимые компоненты.

Шаг 9. Далее.

Шаг 10. Далее.

Шаг 11. Всё. Можно приступить к установке. Кликаем по соответствующей кнопке и идём заваривать чай.

Шаг 12. По завершению установки закрываем данную оснастку.

Шаг 13. В диспетчере серверов раскрываем «Средства» и ищем пункт «Маршрутизация и удаленный доступ».

Шаг 14. Видим слева наш сервер, отмеченный красной меткой. Данный цвет кружка свидетельствует о том, что сервер VPN не настроен и соответственно не функционирует. Исправим это недоразумение. Кликаем правой кнопкой. «Настроить и включить маршрутизацию и удаленный доступ».

Шаг 15. Выбираем пункт «Особая конфигурация».

Шаг 16. Отмечаем «Доступ к виртуальной частной сети (VPN)».

Шаг 17. И после нажатия на «Готово» в последнем окне кликаем по кнопке «Запустить службу».

Шаг 18. Сервер взлетел. Остались нюансы. Вызываем контекстное меню. «Свойства».

Шаг 19. У меня на учебном сервере не настроен DHCP, поэтому на вкладке IPv4 укажем статический пул адресов. Из этого диапазона будут получать настройки наши рабочие станции, которые мы далее будем подключать извне.

Шаг 20. Отлично. Диапазон задали. Теперь затронем вопрос безопасности. Переходим на соответствующую вкладку и отмечаем параметр «Разрешить пользовательские политики IPsec для L2TP». Вводим секретный ключ, который будет использоваться для подключения к нашей корпоративной сети из интернета. Жмём «Применить» и в появившемся окне соглашаемся с предупреждением о важности перезапуска службы маршрутизации.

Шаг 21. Перезапускать мы её будем прямо сейчас. В диспетчере привычным движением раскрываем «Средства» — «Службы».

Шаг 22. Ищем в длинном списке «Маршрутизация и удаленный доступ» и вызвав контекстное меню, перезапускаем эту историю.

Шаг 23. Осталось подумать, каким пользователям будет предоставлен доступ к нашей частной сети. У меня данная тачка не в домене. Т.к. подразумевается, что она выполняет исключительно роль общей шары. Поэтому будем мудрить с локальными пользюками. Открываем в пуске «Управление компьютером» и на соответствующей вкладке отмечаем нужного пользователя. Я заранее создал одного Юзверя.

Шаг 24. Заходим в свойства данной учётки и на вкладке «Входящие звонки» разрешаем «Права доступа к сети». Применяем наши изменения.

Шаг 25. И переходим к настройке клиентского компьютера. У меня это комп на Windows 10. Отмечу, что он не находится в одной сети с сервером, но при этом имеет выход в Интернет. Открываем «Центр управления сетями и общим доступом» и далее «Создание и настройка нового подключения или сети».

Шаг 26. В открывшемся окне помощника выбираем пункт «Подключение к рабочему месту».

Шаг 27. «Использовать моё подключение к интернету».
Шаг 28. Вводим белый ip-адрес нашего сервера, который выведен за NAT. И при желании изменяем название подключения. Я оставлю по умолчанию. Ждём «Создать».

Шаг 29. Хорошо. Далее заходим в «Свойства» созданного подключения.

Шаг 30. И на вкладочке «Сеть» раскрываем «Свойства» компонента IPv4. Жмём «Дополнительно» и снимаем галочку с пункта «Использовать основной шлюз в удаленной сети». Это очень важный момент. Если этого не сделать, то сразу после подключения к корпоративной сети, ваше локальное подключение к Интернету на компьютере пропадёт, ибо по умолчанию VPN использует шлюз удалёнки. Так что будьте предельно внимательны и не пропускайте данный шаг при настройке внешних рабочих станций.

Шаг 31. Сохраняем изменения и переходим на вкладочку «Безопасность». Тут нам необходимо изменить тип протокола на «L2TP» и в дополнительных параметрах задать «Ключ для проверки подлинности», который мы ранее указывали на сервере.

Шаг 32. Всё, братцы. Теперь смело можно подключаться. Кликаем по значку сети на панели задач и выбираем наше подключение.

Шаг 33. Вводим данные от учетной записи пользователя. Помним, что в данном примере мы разрешали доступ к нашей сети извне только одному Юзверю.

Шаг 34. И дожидаемся статуса «Подключено». С этого момента мы находимся в корпоративной сети, а следовательно можем пользоваться её ресурсами.

Шаг 35. Давайте попробуем проверить функционал общих папок. Открываем проводник и в адресной строке вводим ip сервера.

Шаг 36. Через некоторое время видим расшареную папку «Общий обмен». Это свидетельствует о том, что наше VPN-подключение к серверу сконфигурировано корректно.

Более подробно о том, как создавать общие папки, настраивать квоты и в целом производить полную настройку виндового сервера, что называется, под ключ. Вы можете узнать в нашем полноценном обучающем курсе по администрированию Windows Server 2016.

Друзья, сегодня мы научились создавать защищённое VPN-соединение. С его помощью вы сможете не только наладить свою собственную работу на удалёнке и выполнять большую часть задач прямо из дома, но также при возникновении соответствующей потребности объединить сети нескольких филиалов в единый канал.
Если урок оказался полезным, то не забудьте поставить лайк этому видео и оформить подписку с колокольчиком. Таким образом вы первыми будете получать информацию о новых выпусках. В заключении, традиционно, хочу пожелать вам удачи, успеха и самое главное отличного настроения. Берегите себя и свои сервера. До новых встреч.

In this tutorial you will find step by instructions to setup a PPTP VPN Server 2016, in order to access your local network resources from anywhere in the world. So, if you have a Windows 2016 server with one network card and you want to setup a VPN connection in order to connect and access server or network files from everywhere, continue reading below…*
* Note: If you want to setup a more secure VPN Server for your network, then read this article: How to Setup L2TP VPN Server 2016 with a Custom Preshared Key for Authentication.
How to Install a PPTP VPN Server 2016 (With only One NIC).
To install and configure the Server 2016 to act as a PPTP VPN access server follow the steps below:
Step 1. Install the Routing and Remote Access Role on Server 2016.
Step 2. Enable the Routing and Remote Access on Server 2016.
Step 3. Configure VPN Server Settings (Security, IP Range, etc.).
Step 4. Allow Routing and Remote Access Inbound Traffic in Windows Firewall.
Step 5. Select the VPN Users.
Step 6. Configure the VPN Server to Allow the Network Access.
Step 7. Configure ISP’s Firewall to Allow the PPTP Connections.
Step 8. Setup the PPTP Connection on Clients.
.
Step 1. How to Add Remote Access (VPN Access) Role on a Server 2016.
The first step to setup a Windows Server 2016, as a VPN server is to add the Remote Access role to your Server 2016. *
* Info: For this example we’re going to setup VPN on a Windows Server 2016 machine, named «Srv1» and with IP Address «192.168.1.8».
1. To install VPN role on Windows Server 2016, open ‘Server Manager’ and click on Add Roles and Features.

2. At the first screen of ‘Add Roles and Features wizard’, leave the Role-based or feature-based installation option and click Next.

3. At the next screen, leave the default option «Select server from the server pool» and click Next.

4. Then select the Remote Access role and click Next.

5. At ‘Features’ screen leave the default settings and click Next.

6. At ‘Remote Access’ information screen, click Next.

7. At ‘Remote Services’, choose the Direct Access and VPN (RAS) role services and then click Next.

8. Then click Add Features.

9. Click Next again.

10. Leave the default settings and click Next (twice) at ‘Web Server Role (IIS)’ and ‘Role Services’ screens.

11. At ‘Confirmation’ screen, select Restart the destination server automatically (if required) and click Install.

12. At the final screen, ensure that the installation of the Remote Access role is successful and Close the wizard.

13. Then (from Server Manager) Tools menu, click on Remote Access Management.
14. Select Direct Access and VPN on the left and then click to Run the Getting Started Wizard.

15. Then click Deploy VPN only.

16. Continue to step-2 below to configure Routing and Remote Access.
Step 2. How to Configure and Enable Routing and Remote Access on Server 2016.
The next step is to enable and configure the VPN access on our Server 2016. To do that:
1. Right click on the Server’s name and select Configure and Enable Routing and Remote Access. *
* Note: You can also launch Routing and Remote Access settings, by using the following way:
1. Open Server Manager and from Tools menu, select Computer Management.
2. Expand Services and Applications
3. Right click on Routing and Remote Access and select Configure and Enable Routing and Remote Access.

2. Click Next at ‘Routing and Remote Access Server Setup Wizard’.

3. Choose Custom configuration and click Next.

4. Select VPN access only in this case and click Next.

5. Finally click Finish. *
* Note: If you receive an error says » Remote Access Service in unable to enable Routing and Remote Access ports in Windows Firewall…», ignore it and click OK to continue.

6. When prompted to Start the service click Start.

Step 3. Configure VPN Server Settings (Security, IP Range, etc.)
1. At Routing and Remote access panel, right click on your server’s name and select Properties.

2a. At ‘Security’ tab, select the Windows Authentication as the Authentication Provider. and then click the Authentication Methods button.

2b. Make sure that the Microsoft encrypted authentication version 2 (MS-CHAP v2) is selected and then click OK.

3a. Now select the IPv4 tab, choose the Static address pool option and click Add.

3b. Now type the IP Address Range that will be assigned to VPN clients and click OK twice to close all windows.
e.g. For this example we’re going to use the IP address range: 192.168.1.200 – 192.168.1.209.

Step 4. Allow Routing and Remote Access Inbound Traffic in Windows Firewall
1. Go To Control Panel > All Control Panel Items > Windows Firewall.
2. Click Advanced settings on the left.

3. Select Inbound Rules on the left.
4a. At the right pane, double click at Routing and Remote Access (PPTP-In)

4b. At ‘General’ tab, choose Enabled, Allow the connection and click OK.

5a. Then double click at Routing and Remote Access (GRE-In).

5b. At General tab, choose Enabled, Allow the connection and click OK.

6. Close the Firewall settings and restart your server.
Step 5. How to Select which users will have VPN Access.
Now it’s time to specify which users will be able to connect to the VPN server (Dial-IN permissions).
1. Open Server Manager.
2. From Tools menu, select Active Directory Users and Computers. *
* Note: If your server doesn’t belong to a domain, then go to Computer Management -> Local Users and Groups.

3. Select Users and double click on the user that you want to allow the VPN Access.
4. Select the Dial-in tab and select Allow access. Then click OK.

Step 6. How to Configure the Network Policy Server to Allow the Network Access.
In order to allow the VPN users to access the network through the VPN connection, proceed and modify the Network Policy Server as follows:

2. Under the NPS (Local) select Network Policies on the left.
3a. Double click at Connections to Microsoft Routing and Remote Access server policy.

3b. At the ‘Overview’ tab, select the following settings and click OK:
-
- Grant access: If the connection request matches this policy.
- Remote Access Server (VPN-Dial up)

4a. Now open the Connections to other access servers policy, select the same settings and click OK.
-
- Grant access: If the connection request matches this
policy. - Remote Access Server (VPN-Dial
up)
- Grant access: If the connection request matches this

5. Close the Network Policy Server settings.

Step 7. How to Configure Firewall to Allow PPTP VPN Access (Port Forwarding).
The next step is allow the PPTP VPN connections on your ISP’s Router/Firewall.
1. At the top of our browser type your router’s IP address: (e.g. «http://192.168.1.1» in this example) and login to router’s web interface.
2. Inside the Router configuration setup, forward the port 1723 to the IP address of the VPN Server. (See your Router’s manual on how to configure Port Forward). *
- For example, if your VPN Server has the IP address «192.168.1.8» then you have to forward the port 1723 to the IP «192.168.1.8».

Step 8. How to Setup the PPTP VPN Connection on CLIENTS *
* Notes & Additional Help:
1. In order to be able to connect to your VPN server from a distance you have to know the public IP Address of the VPN server. To find the pubic IP Address navigate to this link: http://www.whatismyip.com/ (from VPN Server 2016).
2. To ensure that you can always connect to your VPN server it is better to have a Static Public IP Address. To obtain a Static Public IP Address you must contact your internet service provider. If you don’t want to pay for a static IP Address, then you can setup a free Dynamic DNS service (e.g. no-ip.) on your router’s (VPN Server) side.
To setup a PPTP VPN Connection on Windows 10:
1. From Settings ![]() click Network and Internet, OR, right click at the Network icon on the taskbar and choose Open Network & Internet settings.
click Network and Internet, OR, right click at the Network icon on the taskbar and choose Open Network & Internet settings.

2. Click VPN on the left and then click + to Add a VPN connection.

3. At the next screen, fill out the following information and click Save:
a. VPN provider: Select Windows (built-in).
b. Connection name: Type a friendly name for the VPN connection. (e.g.. «VPN_OFFICE»)
c. Server name or address: Type the VPN’s server host name or the public IP address or the VPN server.
d. VPN Type: Use the drop down arrow to select the type of the VPN connection that your company uses. {e.g. «Point to Point Tunneling Protocol (PPTP)»}.
e. Type of sign-in info: Use the drop down arrow and select the authentication type for the VPN connection. (e.g. «User name and password»).
f. User Name: Type the VPN user name.
g. Password: Type the VPN password.
h. Check the «Remember my sign-in info» checkbox, if you want to save your sign-in credentials for the VPN connection and then click Save

4. Under Related settings, choose Change adapter options.

5. Right click on the VPN connection and choose Properties.

6. At Security Tab, select Allow these protocols, and check the following protocols:
-
- Challenge Handshake Authentication Protocol (CHAP)
- Microsoft CHAP Version 2 (MS-SHAP v2)

7. At Networking tab, select the Internet Protocol Version 4 (TCP/IPv4) and click Properties.

7a. Click Advanced.

7b. Uncheck the «Use default gateway on remote network» and click OK three (3) times to apply changes and close all windows.

8. Now you’re ready to connect to your VPN Server 2016.

That’s it! Let me know if this guide has helped you by leaving your comment about your experience. Please like and share this guide to help others.
Installing and configuring a VPN server using Windows Server 2016 is easy way. By following the guidance in this article, a VPN server can be implemented in just a few minutes.
VPN provides secure access to organizations’ internal data and applications to clients and devices that are using the Internet.
To properly implement and support a VPN environment within your organization, you must understand how to select a suitable tunnelling protocol, configure VPN authentication, and configure the server role to support your chosen configuration.
For this demo purposes, i will be using 2 VM, and 1 Windows 10 client VM which is all running in Hyper-V.
Lets get started VPN configuration.
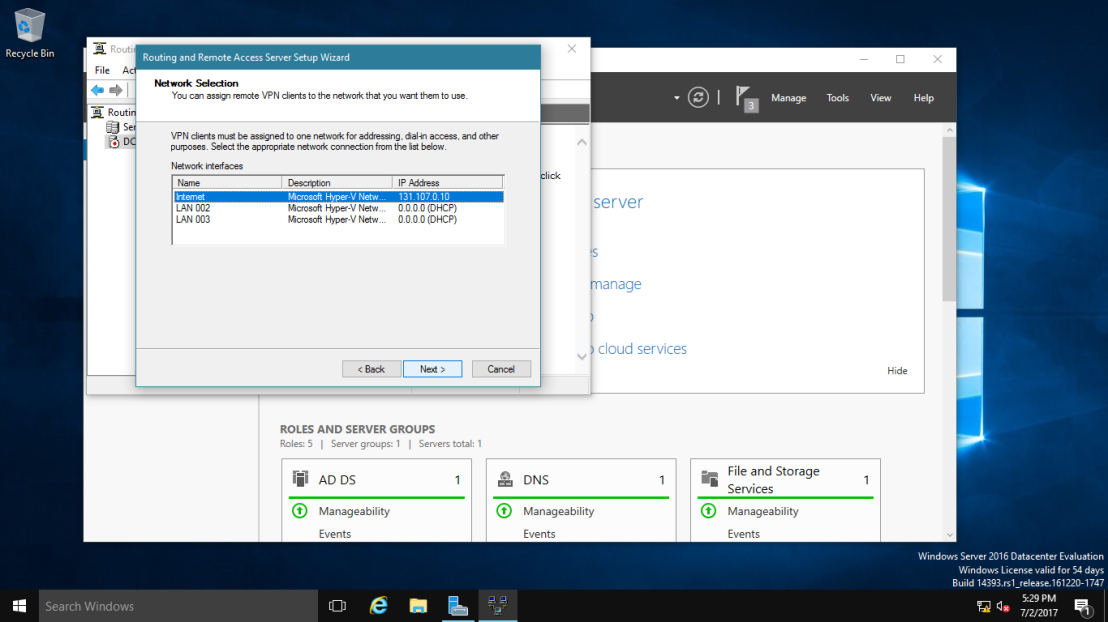
01 – lets verify the network configuration for VPN Server. (Please Refer to the Pictures)
1 – VPN Server Require 2 NIC :
- Ethernet 1 : LAN
- Ethernet 2 : Internet

Ethernet 1 : LAN

Ethernet 2 : Internet
2 – Windows 10 Client.
- Require 1 NIC :
- Ethernet 1 : Internet

02 – Creating VPNUsers OU & User in Active Directory.
1 – Create a new OU – In the New Object – Organizational Unit dialog box, in the Name box, type VPNUsers, and then click OK.


2 – In the Active Directory Users and Computers console, expand Windows.ae, right-click VPNUsers OU, click New, and then click User.


3 – right-click user, Properties, Allow Access enabled for Remote Access to connect to your VPN Server. and Okay. (Please Refer to the Pictures)


03 – Installation
1 – open your Server Manager and click on Add Roles and Features.
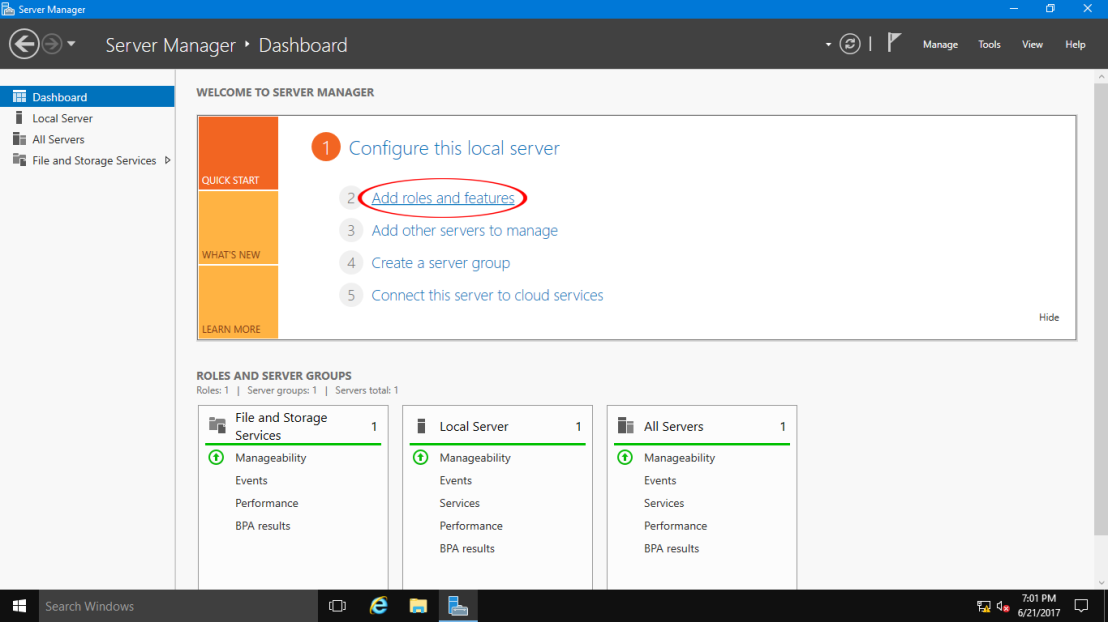
2 – click on Next.

3 – Now select Role-based or feature-based installation option and click on Next.

4 – Now select desired server you’d like to install Routing and Remote Access on.

5 – From the Roles lists select Remote Access and click on Next.

6 – Click Next, no additional features required at this point.

7 – Just click on Next.

8 – In next tab you need to select DirectAccess and VPN (RAS), Click Add Features in the popup window.


9 – On confirmation page click Install to begin.

10 – After installation process is finished, click on Open the Getting Started Wizard.

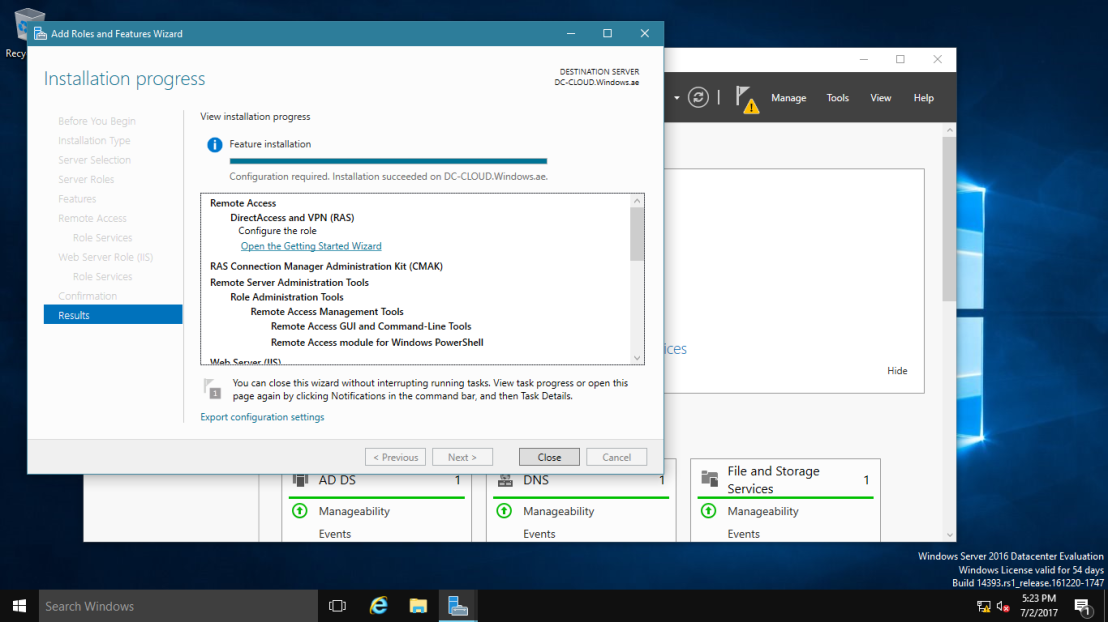
11 – In this tab press Deploy VPN only.

04 – Configuration
1 – Right click on your server and choose Configure and Enable Routing and Remote Access.

2 – Click on Next.

3 – On the new wizard select Remote Access (dial-up or VPN).

4 – On the next page select VPN.

5 – Here select network adapter that connects your server to the Internet.

6 – Here select network adapter that connects your server to the VPN Clients.
7 – Here you can choose the method of distribution for IP addresses – via DHCP or manually. Select the second way.

8 – In this tab press New.

9 – In popup window specify range of IP addresses, press OK, return to previous tab and click on Next.

10 – In this tab you can choose the method of authentification. Select Routing and Remote Access.

11 – Press Finish. and Click Okay, Now configuration is finished.


12 – Next, in the Routing and Remote Access console, expand DC-CLOUD, right-click ports, click Properties.

13 – Verify that 128 ports exist for SSTP, IKEv2, PPTP, and L2TP, then double-click WAN Miniport (SSTP). Maximum ports box, type 5, and then click OK, Routing and Remote Access message box, click Yes.

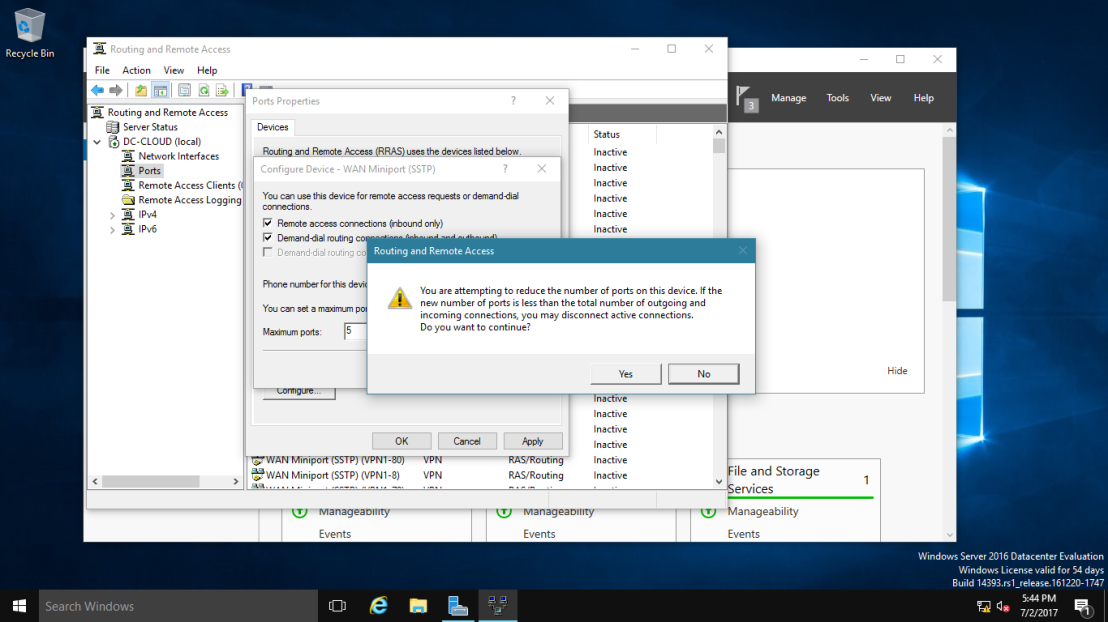
14 – Repeat the same step no:13 for IKEv2, PPTP, and L2TP, then click OK.

05 – Client Connectivity Testing
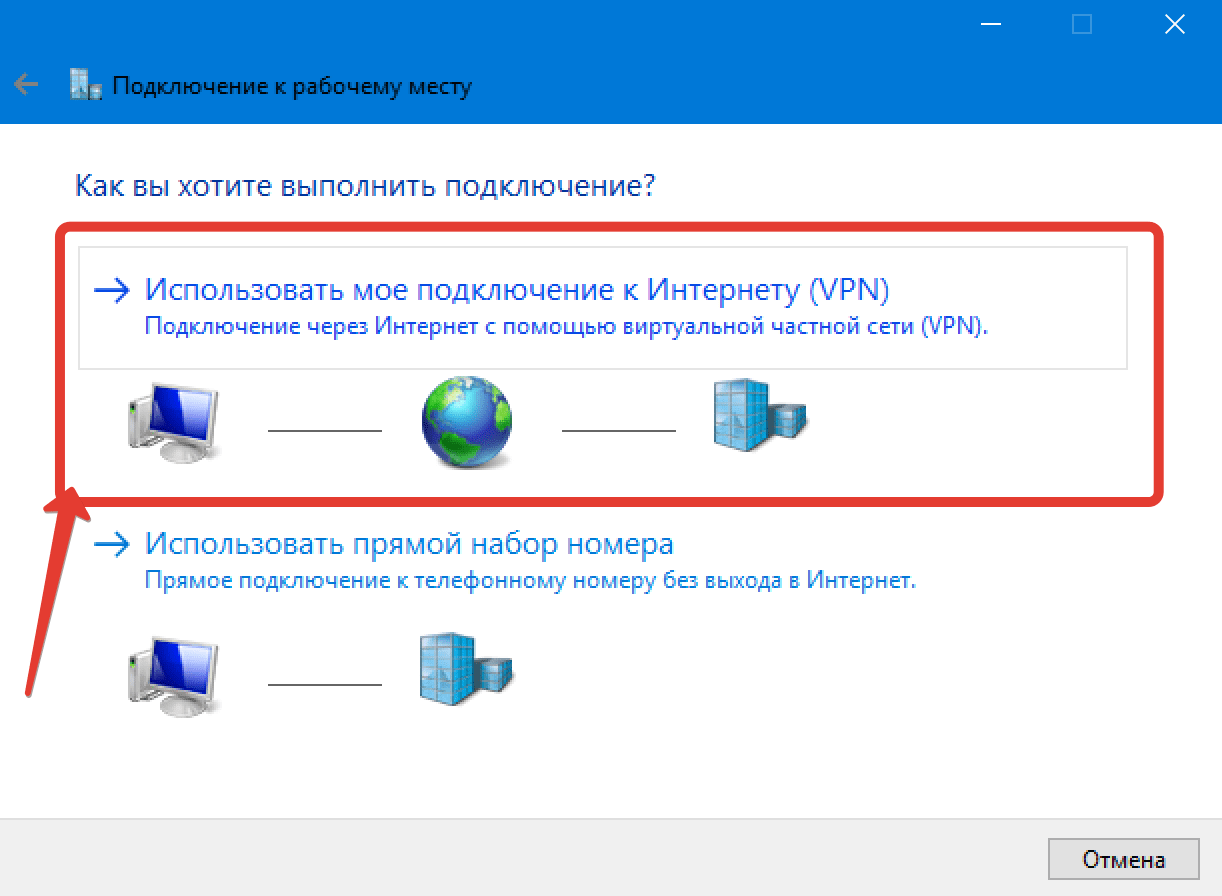
1 – On the Windows 10 client PC, open Network and Sharing Center, then click Set up a new connection or network.

2 – Next, on the Choose a connection option interface, click Connect to a workplace, and then click Next.

3 – On the How do you want to connect? interface, click Use my Internet connection (VPN).

4 – On the Connect to a Workplace interface, click I’ll set up an Internet connection later.

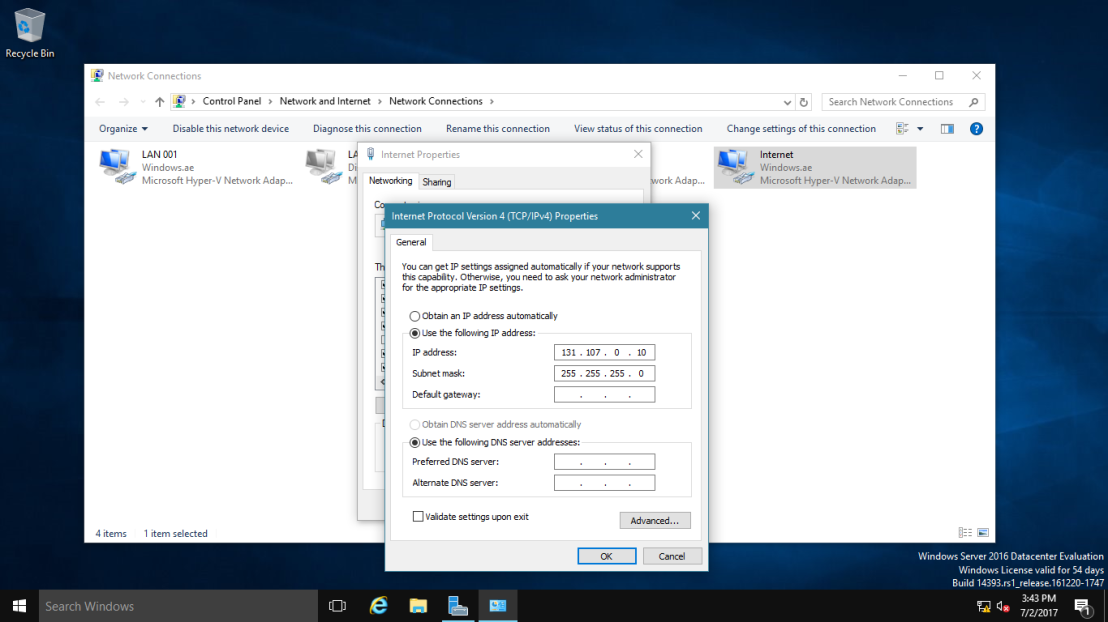
5 – In the Internet address box, type 131.107.0.10 (DC-CLOUD VPN Server IP Address).
— In the Destination name box, type NewHelpTech VPN connection, select Allow other people to use this connection checkbox, and then click Create. —

6 – Next, right click NewHelpTech VPN connection, and then click Connect.


7 – In the sign-in dialog box, type the domain user from VPNUsers OU Name Sifad and box, type Password, and then click OK.

8 – Verify that you are connected to Windows by using a PPTP connection, right click NewHelpTech VPN connection, and then click Status.

 Orait, that all for now, we’ve connected to NewHelpTech VPN connection successfully.
Summary
Implementing a client-based VPN solution for secure remote access using Windows Server 2016 has many advantages over dedicated and proprietary security appliances. Windows-based VPN servers are easy to manage, cost effective, and offer greater deployment flexibility. However, at this point additional configuration is required to properly secure incoming connections.
that’s all for now.., any Doubts type a commend.. 🙂