Как правильно подключить роутер в домен
На чтение 4 мин Опубликовано Обновлено
Подключение роутера к доменной сети – важный шаг для обеспечения надежного и стабильного интернет-соединения. Но не все пользователи знают, как правильно настроить это подключение и избежать проблем с работой сети. В этой статье мы предоставим пошаговую инструкцию по настройке подключения роутера к доменной сети, которая поможет вам сделать все правильно и без лишних хлопот.
Первым шагом при подключении роутера к доменной сети является подключение его к электрической сети и включение. Затем необходимо подключить компьютер к одному из портов роутера с помощью сетевого кабеля. После этого открыть любой веб-браузер и в адресной строке ввести IP-адрес роутера. Обычно это 192.168.0.1 или 192.168.1.1. Нажав клавишу Enter, вы попадете на страницу настройки роутера.
На странице настройки роутера вам может потребоваться ввести логин и пароль. Обычно данные данные указаны на корпусе роутера или в документации. После входа в систему вам нужно будет выбрать тип подключения к Интернету. Обычно это статический IP, динамический IP или PPPoE. После выбора типа подключения вам нужно будет ввести соответствующие настройки, предоставленные вашим интернет-провайдером.
После ввода всех необходимых настроек вы можете сохранить изменения и перезагрузить роутер. После перезагрузки роутер подключится к доменной сети и вы сможете наслаждаться стабильным и безопасным интернет-соединением.
Подключение роутера к доменной сети: пошаговая инструкция
При настройке подключения роутера к доменной сети требуется выполнить несколько шагов для обеспечения правильной работы и стабильного соединения. Ниже представлена пошаговая инструкция, которая поможет вам успешно настроить подключение.
| Шаг | Описание |
| Шаг 1 | Подключите роутер к источнику питания и включите его. |
| Шаг 2 | Подключите один конец Ethernet-кабеля к порту WAN на роутере, а другой конец к модему. |
| Шаг 3 | Подключите компьютер к одному из портов LAN на роутере с использованием еще одного Ethernet-кабеля. |
| Шаг 4 | Откройте веб-браузер и введите IP-адрес роутера в строке адреса. Обычно IP-адрес указан на задней или нижней панели роутера. |
| Шаг 5 | В появившемся окне авторизации введите имя пользователя и пароль роутера. Если вы не знаете эти данные, проверьте документацию, поставляемую с роутером. |
| Шаг 6 | В настройках роутера найдите раздел «Настройки сети» или «Сетевые настройки». |
| Шаг 7 | Установите тип подключения на «Динамический IP», «Статический IP» или «PPPoE», в зависимости от настроек вашего провайдера интернета. |
| Шаг 8 | Введите необходимые параметры подключения, такие как IP-адрес, маску подсети, шлюз по умолчанию и DNS-серверы. Эти данные также можно получить у вашего провайдера. |
| Шаг 9 | Сохраните настройки и перезапустите роутер. |
| Шаг 10 | После перезапуска роутера проверьте подключение к сети, открыв веб-браузер и перейдя на любой веб-сайт. |
Вот и все! Используя эту пошаговую инструкцию, вы успешно настроили подключение роутера к доменной сети. Надеемся, что эта информация была полезной и поможет вам получить стабильное и надежное подключение к интернету.
Подготовка и проверка оборудования
Перед началом настройки подключения роутера к доменной сети необходимо убедиться, что у вас есть все необходимое оборудование и провести первоначальную проверку его работоспособности.
Шаг 1: Проверьте наличие следующего оборудования:
- Роутер
- Модем
- Патч-кабели
- Компьютер
- Электропитание для роутера и модема
Шаг 2: Проверьте работоспособность модема и роутера. Включите модем и дождитесь, пока индикаторы его работы загорятся. Затем, включите роутер и убедитесь, что он также начал работу (индикаторы должны загореться).
Шаг 3: Подключите модем и роутер. Соедините модем с роутером с помощью патч-кабеля. Вставьте один конец кабеля в порт на задней панели модема, а другой конец – в порт WAN на задней панели роутера.
Шаг 4: Проверьте подключение. Убедитесь, что модем и роутер подключены корректно, проверив индикаторы на обоих устройствах. Если все индикаторы горят без ошибок, значит, ваше оборудование готово к настройке и подключению к доменной сети.
После завершения подготовительных шагов вы можете приступить к настройке роутера и подключению к доменной сети.
Настройка роутера в домене Windows является неотъемлемой частью создания и подключения локальных сетей в малом и среднем бизнесе. Роутеры позволяют объединить несколько сетей в одну и обеспечивать связь между компьютерами и другими сетевыми устройствами.
Один из ключевых аспектов настройки роутера в домене Windows — это подключение сетевых устройств. Сетевые устройства, такие как компьютеры, принтеры, серверы и другие, должны быть правильно настроены, чтобы обеспечить полноценную работу сети. При настройке роутера в домене Windows необходимо указать адреса IP и другие параметры каждого устройства, чтобы они могли взаимодействовать друг с другом.
Безопасность также является важной аспектом настройки роутера в домене Windows. Роутеры должны быть защищены от несанкционированного доступа и атак из внешней сети. Для этого на роутерах необходимо настроить фаервол и другие механизмы безопасности, чтобы предотвратить несанкционированный доступ к сети и защитить данные компании.
Настройка роутера в домене Windows требует определенных знаний и навыков. Она является сложным процессом, требующим ТЗ, планирования и последовательности шагов. Однако, правильно настроенный роутер обеспечит надежное и безопасное функционирование локальной сети, что особенно важно в условиях повышенных требований к сетевой безопасности.
Содержание
- Установка драйвера для роутера
- Подключение роутера к компьютеру
- Конфигурация роутера
- Создание безопасного пароля для доступа к роутеру
- Настройка брандмауэра и фильтрации трафика
- Установка и настройка антивирусного программного обеспечения
- Подключение сетевых устройств к роутеру
- Проверка и обновление прошивки роутера
Установка драйвера для роутера
Для установки драйвера необходимо выполнить следующие шаги:
1. Подготовка драйвера. Вам потребуется установочный файл драйвера, который вы можете получить от производителя роутера или скачать с официального сайта. Убедитесь, что у вас есть последняя версия драйвера для вашего конкретного модели роутера и операционной системы.
2. Подключение роутера к компьютеру. Подключите роутер к компьютеру с помощью Ethernet-кабеля. Убедитесь, что роутер включен и его индикаторы связи горят.
3. Запуск установочного файла. Запустите установочный файл драйвера. В большинстве случаев драйвер установится автоматически, следуя инструкциям на экране. Если драйвер не устанавливается автоматически, откройте меню «Устройства и принтеры» в панели управления Windows, найдите роутер в списке устройств, щелкните правой кнопкой мыши и выберите «Обновить драйвер».
4. Завершение установки. После завершения установки драйвера перезагрузите компьютер, чтобы изменения вступили в силу. После перезагрузки ваш роутер будет готов к использованию и подключению к сети.
Важно отметить, что для успешной установки драйвера роутера в домене Windows вам может потребоваться права администратора. Убедитесь, что у вас есть необходимые права или обратитесь к системному администратору.
Правильная установка драйвера для роутера обеспечит стабильное подключение и безопасность сетевого соединения в вашем домене Windows. Следуйте инструкциям производителя и операционной системы для успешной настройки и использования вашего роутера.
Подключение роутера к компьютеру
Для настройки роутера в домене Windows необходимо сначала установить соединение между роутером и компьютером. Для этого следуйте следующим шагам:
- С помощью сетевого кабеля подключите один конец в порт LAN на задней панели роутера, а другой конец — в сетевую карту вашего компьютера.
- Убедитесь, что роутер и компьютер включены.
- Перейдите на рабочий стол вашего компьютера и щелкните правой кнопкой мыши по значку «Сетевые подключения» на панели задач. В контекстном меню выберите пункт «Открыть Сетевые и общие диски».
- В появившемся окне «Сетевые подключения» найдите сетевое соединение, которое вы только что установили. Кликните по нему правой кнопкой мыши и выберите пункт «Свойства».
- Во вкладке «Общие» поставьте галочку в пункте «Разрешить другим пользователям сети подключаться к Интернету, используя подключение этого компьютера к Интернету».
- Нажмите кнопку «OK», чтобы сохранить изменения.
Теперь ваш компьютер соединен с роутером, и вы можете приступить к настройке сетевых устройств и обеспечению безопасности в домене Windows.
Конфигурация роутера
- Подключение роутера к сети: Перед началом настройки роутера, необходимо подключить его к компьютеру или коммутатору в сети. Проверьте, что все соединения осуществлены правильно и устройства в сети взаимодействуют между собой.
- Аутентификация доступа: Безопасность вашей домашней сети начинается с защиты доступа к роутеру. По умолчанию, большинство роутеров имеет стандартные учетные данные (логин и пароль), которые рекомендуется изменить для предотвращения несанкционированного доступа к устройству.
- Обновление прошивки: Регулярное обновление прошивки роутера является важным шагом, так как это включает последние исправления, улучшения и уровни безопасности. Проверьте наличие обновлений прошивки на официальном веб-сайте производителя и следуйте инструкциям по их установке.
- Настройка сетевых параметров: В зависимости от ваших потребностей, вы можете настроить такие параметры, как IP-адрес роутера, маску подсети, DHCP-сервер и DNS-сервер. Убедитесь, что настройки соответствуют требованиям вашей сети.
- Правила маршрутизации: Добавление правил маршрутизации позволяет установить правила передачи данных между различными сетями. Это может быть полезно в случае наличия нескольких сетей в вашей домашней сети или подключения VPN.
- Настройка брандмауэра: Брандмауэр роутера служит для защиты вашей сети от внешних атак и несанкционированного доступа. Рекомендуется настроить правила брандмауэра для разрешения или блокировки определенных типов трафика.
После завершения конфигурации роутера, рекомендуется проверить его работоспособность и проверить соединение с другими устройствами в сети. В случае возникновения проблем, можно провести дополнительное тестирование и отладку, используя инструменты по управлению сетью, предоставляемые операционной системой Windows.
Создание безопасного пароля для доступа к роутеру
При настройке роутера в домене Windows важно установить надежный пароль для доступа к устройству. Пароль должен быть сложным, чтобы предотвратить несанкционированный доступ к роутеру и защитить сетевые ресурсы.
При создании пароля для роутера следует учитывать следующие рекомендации:
- Длина: Пароль должен быть достаточно длинным, чтобы усложнить его подбор. Рекомендуется использовать не менее 8 символов.
- Сочетание символов: Используйте комбинацию прописных и строчных букв, цифр и специальных символов (например, долларовый знак, процент, знак вопроса).
- Избегайте простых последовательностей: Не используйте легко угадываемые последовательности, такие как «123456» или «qwerty».
- Набор случайных символов: Для повышения безопасности рекомендуется использовать случайные символы, которые сложнее предугадать.
Кроме того, важно регулярно изменять пароль для роутера, чтобы предотвратить его разгадывание. Дополнительными мерами безопасности могут быть использование двухфакторной аутентификации и ограничение доступа к роутеру только с определенных IP-адресов.
Создание безопасного пароля для доступа к роутеру является важным шагом для обеспечения защиты в доменной сети Windows. Следование указанным рекомендациям поможет предотвратить несанкционированный доступ к роутеру и обеспечить безопасность сетевых устройств и данных.
Настройка брандмауэра и фильтрации трафика
В операционной системе Windows настройка брандмауэра происходит через специальную программу — «Центр общего доступа». В этой программе вы можете настроить правила доступа для различных программ и служб, задать разрешения для конкретных портов, а также установить уровень защиты для частной и публичной сети.
Одним из важных аспектов настройки брандмауэра является фильтрация трафика. Фильтрация трафика позволяет блокировать определенные типы запросов или пакетов данных, что повышает безопасность сети. Например, можно блокировать доступ к определенным портам или IP-адресам, чтобы предотвратить попытки вторжения или распространение вредоносного программного обеспечения.
Для настройки фильтрации трафика в брандмауэре Windows необходимо создать правила доступа. Правила могут быть основаны на различных параметрах, таких как порт, IP-адрес или протокол. Вы можете создать правила для разрешения или блокировки определенного трафика, а также задать приоритет и условия применения правил.
С помощью правил доступа можно ограничить доступ к определенным службам или программам, например, запретить доступ к файловому серверу или ограничить доступ к интернету для определенных пользователей. Это позволяет более гибко управлять безопасностью и контролировать трафик в сети.
Кроме того, настройка брандмауэра может включать установку межсетевого экрана (NAT) для обеспечения безопасного обмена данными между внутренней и внешней сетью. Межсетевой экран может выполнять функцию перевода адресов (NAT), скрывая реальный IP-адрес внутренней сети и позволяя обращаться к внешним ресурсам через единый IP-адрес.
В целом, правильная настройка брандмауэра и фильтрации трафика играет важную роль в обеспечении безопасности сети. Она позволяет контролировать доступ к ресурсам, блокировать вредоносный трафик и обеспечивать безопасную связь между внутренней и внешней сетью.
Установка и настройка антивирусного программного обеспечения
При установке антивирусного программного обеспечения необходимо убедиться, что выбранное решение совместимо с используемой операционной системой и обладает необходимыми функциями для защиты от различных видов угроз. Кроме того, важно выбрать надежного поставщика АПО, который регулярно обновляет свою базу данных вредоносных программ и предоставляет актуальные обновления для защиты.
После установки АПО необходимо правильно настроить его параметры для обеспечения оптимальной защиты. Рекомендуется настроить автоматическое сканирование системы на предмет наличия вредоносных программ, а также использовать функцию реального времени для мониторинга и блокировки угроз в режиме реального времени.
Для обеспечения безопасности сети также рекомендуется включить функцию фильтрации веб-трафика, которая будет блокировать доступ к вредоносным веб-сайтам и предупреждать пользователя о потенциально опасных ссылках. Также следует установить регулярное обновление базы данных вредоносных программ для обеспечения актуальной защиты от новых угроз.
В случае обнаружения вредоносного программного обеспечения рекомендуется использовать функцию карантина, которая будет изолировать зараженные файлы и предотвращать их дальнейшее распространение по сети. Также следует настроить систему оповещений о обнаруженных угрозах, чтобы оперативно реагировать на возникающие проблемы.
Наконец, важно регулярно проверять работу антивирусного программного обеспечения и его актуальность, выполняя регулярное обновление и сканирование системы на предмет наличия вредоносных программ. Такой подход поможет обеспечить надежную защиту сетевых устройств и предотвратить возможные угрозы для безопасности.
В заключение, установка и настройка антивирусного программного обеспечения на роутере в домене Windows является важным шагом для обеспечения безопасности сети и защиты от вредоносного программного обеспечения. Правильная установка, настройка и регулярное обновление АПО помогут обеспечить надежную и актуальную защиту сетевых устройств.
Подключение сетевых устройств к роутеру
Для того чтобы использовать интернет-соединение и сетевые ресурсы, необходимо подключить сетевые устройства к роутеру. Подключение осуществляется с помощью сетевых кабелей или через Wi-Fi соединение.
Когда устройство подключено к роутеру, оно получает свой сетевой адрес (IP-адрес), который позволяет устройству обмениваться данными в локальной сети и получать доступ в Интернет.
Роутер может подключать одновременно несколько устройств к сети. Для этого обычно используется коммутатор (свитч) — сетевое устройство, которое расширяет количество доступных сетевых портов.
При подключении сетевых устройств к роутеру, необходимо учитывать следующие моменты:
| 1. Проводное подключение | Для проводного подключения необходим сетевой кабель (Ethernet-кабель) типа Ethernet. Кабель подключается к сетевому порту роутера с одной стороны и к сетевому порту устройства – с другой. При этом можно подключить компьютеры, принтеры, телевизоры, игровые приставки и другие сетевые устройства. |
| 2. Беспроводное подключение | Для беспроводного подключения необходимо, чтобы сетевое устройство имело встроенный Wi-Fi адаптер или поддерживал подключение Wi-Fi через внешний адаптер. После этого необходимо найти беспроводную сеть (Wi-Fi сеть), созданную роутером, и подключиться к ней, указав пароль, если он установлен. |
| 3. Защита беспроводной сети | При беспроводном подключении рекомендуется настроить защиту беспроводной сети. Для этого можно использовать шифрование данных (например, WPA2-PSK) и установить пароль для доступа к сети. Это позволит предотвратить несанкционированное подключение к вашей сети. |
Подключение сетевых устройств к роутеру является одной из основных задач при настройке домашней сети. Важно правильно настроить подключение и обеспечить безопасность вашей сети.
Проверка и обновление прошивки роутера
Проверка прошивки роутера позволяет узнать, актуальна ли установленная версия программного обеспечения. Обновление прошивки, в свою очередь, позволяет внести улучшения в работу роутера, исправить возможные ошибки и устранить уязвимости, которые могут быть использованы злоумышленниками для несанкционированного доступа к вашей сети.
Для проверки и обновления прошивки роутера необходимо выполнить следующие шаги:
- Перейдите в веб-интерфейс роутера, введя IP-адрес устройства в адресной строке браузера. Обычно адрес указан на задней панели роутера или в документации.
- Введите логин и пароль администратора роутера. Если вы не знаете эти данные, проверьте документацию или свяжитесь с вашим интернет-провайдером.
- Найдите раздел «Настройки системы» или «Обновление прошивки» в веб-интерфейсе роутера.
- Проверьте текущую версию прошивки роутера с версией, доступной на официальном сайте производителя. Если версии различаются, значит, доступно обновление.
- Загрузите обновление прошивки с официального сайта производителя роутера.
- В веб-интерфейсе роутера найдите раздел «Обновление прошивки» и выберите загруженный файл с обновлением.
- Нажмите кнопку «Обновить», чтобы начать процесс обновления. Во время обновления не отключайте питание роутера и не перезагружайте его.
- После завершения обновления роутер автоматически перезагрузится.
- Проверьте, что прошивка успешно обновилась, и повторите процесс проверки и обновления, если необходимо.
Проверка и обновление прошивки роутера помогут вам улучшить безопасность вашей сети и обеспечить более стабильную работу устройства. Регулярно выполняйте эту процедуру и следите за доступными обновлениями от производителя.
Записки IT специалиста
Технический блог специалистов ООО»Интерфейс»
Active Directory — от теории к практике. Часть 3 — настройка DHCP.
В прошлой статье мы подробно рассмотрели процесс создания контроллеров домена для вашей структуры AD. Сегодня мы хотим поговорить о правильной настройке службы DHCP, которой обычно не придают особого внимания. А зря, от правильной работы этой службы во многом зависит бесперебойная работа вашей локальной сети.
«DHCP? Да что там настраивать?» — скажет иной администратор — и будет неправ. При всей кажущейся простоте данная служба является одной из ключевых и будет очень плохо если об ее отказе вы узнаете от пользователей.
В отличии от DNS или AD, DHCP не позволяет создать два полноценных сервера и реплицировать данные между ними (данная возможность появилась в Windows Server 2012). Как же быть? Единственный DHCP-сервер способен доставить немало головной боли администратору, сервер с данной ролью даже на профилактику вывести проблемно, не говоря уже о сбоях.
Но не стоит впадать в уныние. Следуя нашим рекомендациям вы сможете без труда создать отказоустойчивую сетевую инфраструктуру.
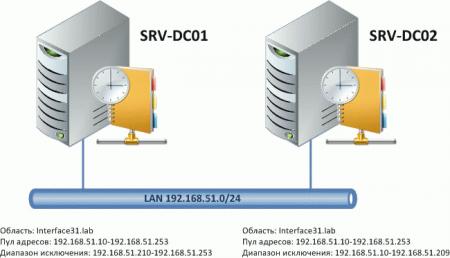
Обычно DHCP-сервер совмещают с роутером, в простых сетях данный подход оправдан, в структуре AD мы рекомендуем совместить роли контроллера домена и DHCP-сервера. Для создания отказоустойчивой схемы нам понадобится два DHCP-сервера, между которыми следует разделить пул адресов области. Рекомендуется соотношение 80/20, хотя никто не мешает вам разделить область согласно собственным предпочтениям.
Однако перед тем как нарезать пул адресов, стоит сесть и задуматься над схемой распределения адресов в вашей сети. Стоит раз и навсегда выработать определенные правила присвоения адресов и придерживаться их в дальнейшем, это позволит значительно упростить администрирование сети и сократит до минимума глупые вопросы: «а что это за хост с адресом 192.168.51.51 . «
Мы, например, придерживаемся следующей схемы:
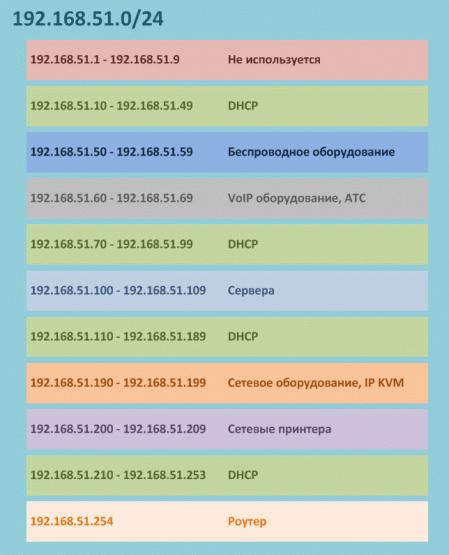
Данная схема не претендует на оригинальность и приведена исключительно в качестве примера. Вы можете составить собственные схемы и придерживаться их. Основным достоинством данного подхода является то, что встретив IP-адрес 192.168.51.203 администратор точно знает, что это один из сетевых принтеров, а 192.168.51.51 — Wi-Fi оборудование.
С учетом данной схемы выделите пул DHCP-адресов и поделите его в соотношении 80/20 (или как вам больше нравится). В нашем случае это будут диапазоны до и после адреса (включительно) 192.168.51.210.
Отдельно стоит упомянуть почему мы не используем блок адресов 1-10, как правило многие сетевые устройства настроены на использование адреса 192.168.x.1 по умолчанию и всякие сетевые «умельцы» при попытке подключиться к сети используют адреса из этого диапазона. Особенно это актуально для сетей диапазонов 192.168.0.0 и 192.168.1.0, поэтому мы советуем выбрать для своей корпоративной сети иной диапазон, в самом деле, от 2 до 254 весьма много цифр.
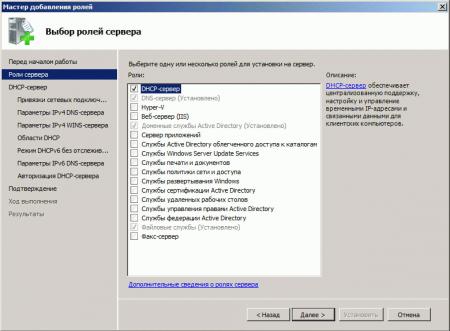
Итак, с теорией закончили, переходим к практике. На первом КД запускаем Диспетчер сервера и добавляем роль DHCP-сервера:
В качестве родительского домена указываем наш домен AD, в качестве DNS-серверов адреса наших КД.
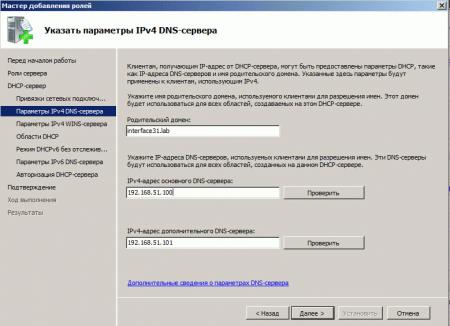
Следующим шагом добавляем область, в настройках указываем полный диапазон адресов: 192.168.51.10-.192.168.51.253, исключения настроим позже.
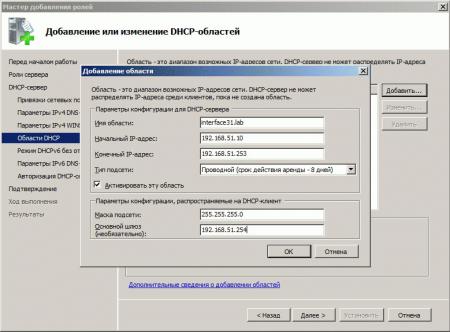
Затем наш DHCP-сервер требуется авторизовать в AD, если вы вошли в систему как администратор домена, то дополнительных действий не потребуется, иначе нужно будет указать учетные данные доменного администратора.

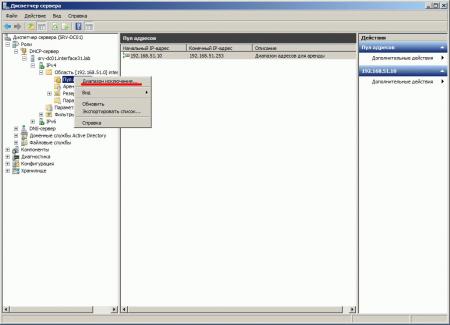
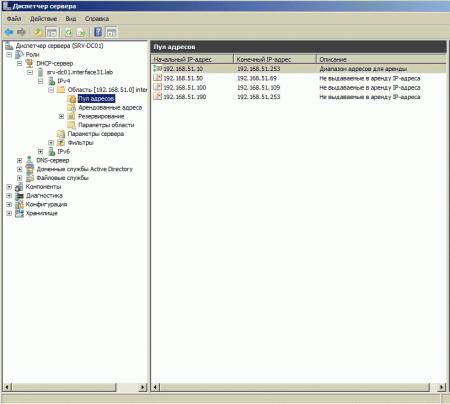
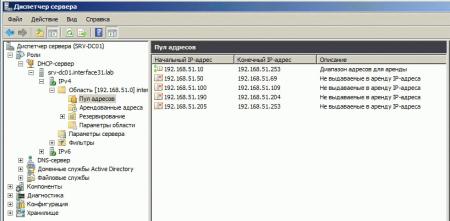
После этого еще раз проверьте все введенные данные и установите роль DHCP-сервера. После чего перейдите в оснастку управления данной ролью и задайте диапазоны исключения:
В итоге у вас должна получиться примерно аналогичная настройка (согласно вашей схеме распределения адресов):
Теперь аналогичным образом добавляем и настраиваем роль DHCP на втором КД. Настройкам области особого внимания не уделяем, все равно ее придется удалить:
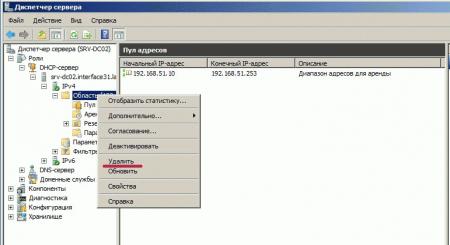
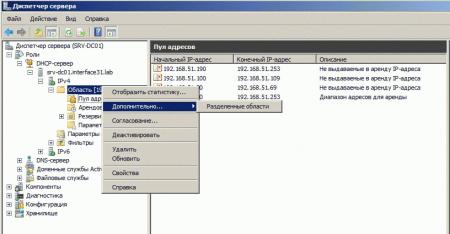
Да, на втором КД удаляем созданную область и снова переходим на первый КД. Щелкаем правой кнопкой мыши по DHCP-области и выбираем Дополнительно — Разделенные области.
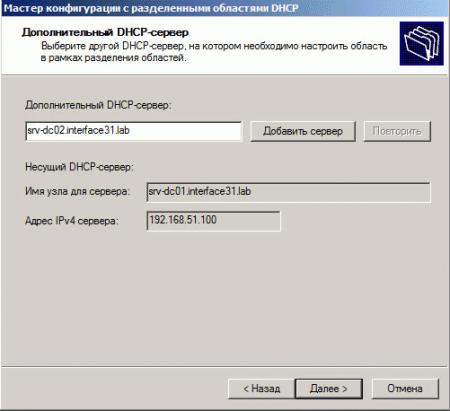
В открывшемся мастере выбираем второй DHCP-сервер:
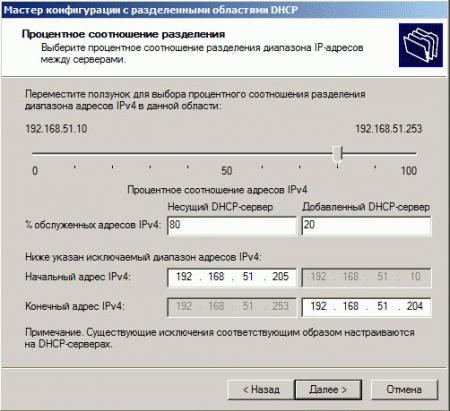
И укажите пропорции в которых следует раздеть область. Можете сильно не вникать в опции, разделив зону «на глаз», более точные настройки позже можно задать вручную.
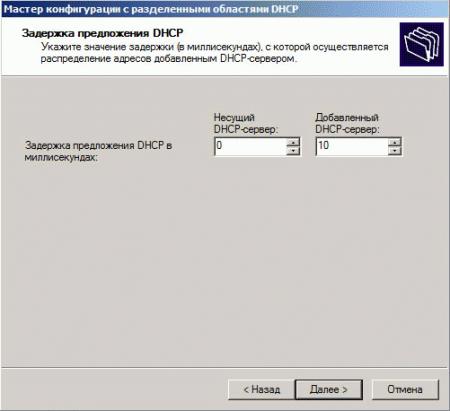
Следующим шагом укажите задержки ответа серверов, так как первый сервер будет являться основным, то укажем для второго сервера задержку в 10 мс, это позволит выдавать все адреса первым сервером, используя второй только при отказе первого или заполнении его пула адресов.
По окончании работы мастера область будет разделена и на первом сервере она примет вид:
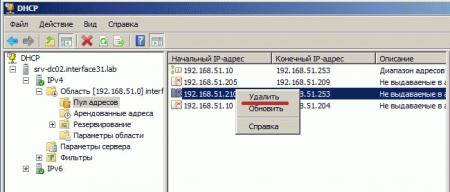
На втором сервере, скорее всего, придется «доработать напильником» и удалить лишний диапазон исключения:
Теперь, убедившись что оба сервера обслуживают непересекающиеся части области, можно активировать область на втором сервере:

Теперь в случае отказа или вывода на профилактику основного DHCP-сервера, второй сервер обработает запросы клиентов с истекшей арендой адреса (по умолчанию 8 дней), если основной сервер выбыл на больший срок, то на дополнительном DHCP-сервере стоит расширить пул адресов, в последующем сделав данный сервер основным, а другой сервер дополнительным.
В любом случае данный подход позволяет обеспечить бесперебойное функционирование вашей сетевой инфраструктуры вне зависимости от работоспособности отдельных узлов.
Источник
Настройка маршрутизатора на базе Windows Server 2012 R2
В этой статье посмотрим, как с помощью встроенных средств на базе сервера с Windows Server 2012 R2 организовать простой межсетевой маршрутизатор. И хотя на практике маршрутизаторы на базе компьютеров используются довольно редко (аппаратные маршрутизаторы, как правило, имеют более высокую производительность, надежность и несколько дешевле выделенного компьютера), в тестовых или виртуальных средах, когда нужно срочно настроить маршрутизацию между несколькими подсетями, маршрутизатор на базе Windows Server вполне себе приемлемое решение.
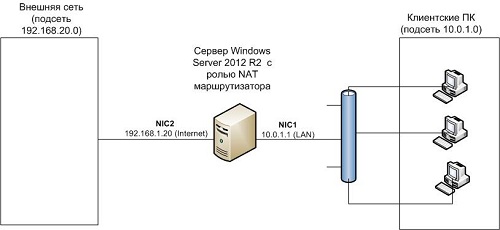
Итак, в роли маршрутизатора будет выступать сервер с ОС Windows Server 2012 R2. Сервер имеет 2 сетевых интерфейса: физических или виртуальных, если сервер запущен на гипервизоре. Каждому интерфейсу сервера назначен выделенный IP адрес из различных подсетей. Для удобства, мы переименовали названия сетевых интерфейсов в Панели управления сетями и общим доступом:
Сетевая карта 1 (сетевая карта подключена во внутреннюю LAN сеть):
Имя: LAN
IP: 10.0.1.1
Сетевая карта 2 (сетевая карта во внешней сети ):
Имя: Internet
IP: 192.168.1.20
Наша задача – организовать маршрутизацию пакетов из локальной подсети 10.0.1.0 во внешнюю подсеть 192.168.1.0 (как правило, такая сеть имеет выход в интернет) через NAT. Такую схему можно реализовать в случае необходимости организации доступа клиентов из внутренней сети в интернет.
Маршрутизация в Windows Server 2012 R2 реализуется на базе роли Remote Access (RRAS). Данная служба появилась еще в Windows Server 2003 и до текущей в версии Windows Server ее интерфейс и процесс настройки практически не изменился.
В первую очередь нужно установить роль Remote Access. Для этого откроем консоль Server Manager, выбираем Manage -> Add Roles and Features, находим и отмечаем роль Remote Access, в ее составе выбираем службу Routing, и, соглашаясь со всеми предложенными по умолчанию компонентами, запускаем ее установку (Install). 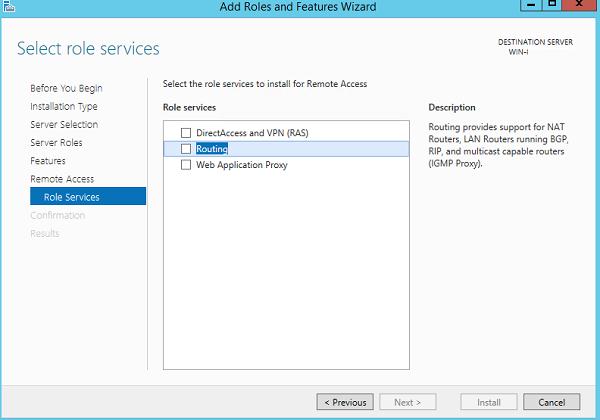
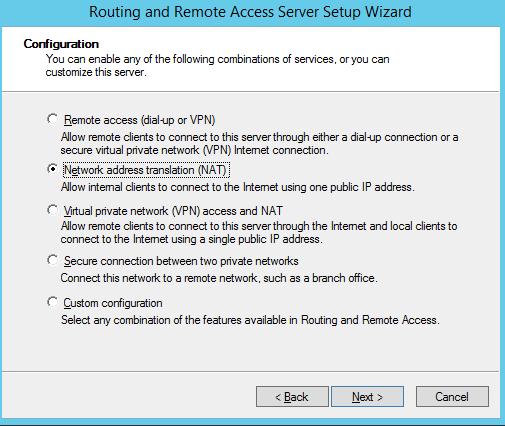
После окончания установки открываем консоль Routing and Remote Access (rrasmgmt.msc), щелкаем по имени сервера (с красной стрелкой) и выбираем Configure and Enable Routing and Remote Access. 
В открывшемся окне выбираем пункт Network Address Translation (NAT).
На следующей шаге (NAT Internet Connection) нужно выбрать сетевой интерфейс, подключённый ко внешней сети / Интернету (в нашем примере это интерфейс Internet с ip 192.168.1.20). Этот интерфейс будет «публичным интерфейсом» нашего NAT роутера. 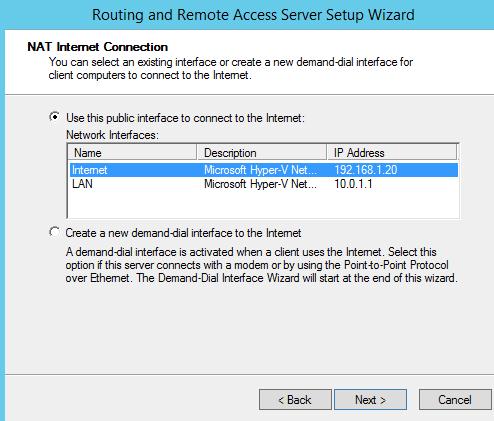
Далее будет предложено указать должен ли NAT роутер обеспечить клиентов внутренней сети сервисами DHCP и DNS. Как правило, этот функционал во внутренней сети уже имеется, поэтому в нем мы не нуждаемся. 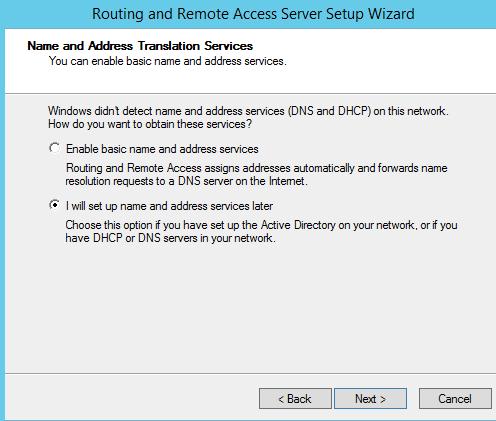
На этом базовая настройка маршрутизации на Windows Server 2012 R2 завершена. Сервер уже должен выполнять маршрутизацию пакетов между двумя подключенными сетями и выполнять трансляцию сетевых адресов (NAT).
Чтобы в этом убедиться, в консоли RRAS откройте свойства сервера. На вкладке General показано, что IPv4 маршрутизация включена (т.е. пакеты IPv4 будут пересылаться с одной сетевой карты на другую).
Проверить работу маршрутизации можно, указав на клиентском компьютере во внутренней сети (к которой подключен интерфейс сервера LAN) в качестве шлюза IP-адрес сервера (10.0.1.1), и выполнить ping или трассировку маршрута к ресурсу, расположенному во внешней сети или интернете. Эти попытки должны быть успешными. 
В нашем случае на сервере осуществялется статическая маршрутизация. Если нужно добавить новый маршрут, щелкните ПКМ по Static Routes, выберите пункт меню New static route и создайте новое статическое правило маршрутизации. 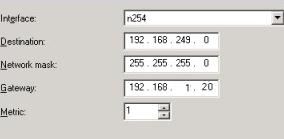
Источник
Accessing computers and files on your home or business network from a remote location is a popular feature of Windows Home Server. To enable remote access, you need to configure your router to open certain ports so network traffic will flow properly.
Table of Contents
- Overview
- Reality Check
- General Directions
- Network Configuration
- First Step — Determine IP Address
- Second Step — Check Communication
- Third Step — Set Static IP Address
- UPnP Router Configuration
- Manual Router Configuration
- To Manually Configure Your Router
- Configure the Linksys BEFSR41 for Remote Access
- Configure Your Network
- Reserve an IP Address
- UPnP Router Configuration
- Manual Router Configuration
- Configure the Netgear RP614 for Remote Access
- Configure Your Network
- Reserve an IP Address
- UPnP Router Configuration
- Manual Router Configuration
- Configure the Sonicwall TZ170 for Remote Access
- Configure Your Network
- Reserve an IP Address
- UPnP Router Configuration
- Manual Router Configuration
- Configure the Sonicwall TZ100 for Remote Access
- Configure Your Network
- Reserve an IP Address
- UPnP Router Configuration
- Manual Router Configuration
- Configure the D-Link DIR-825 for Remote Access
- Configure Your Network
- Reserve an IP Address
- UPnP Router Configuration
- Manual Router Configuration
- Configure the Linksys WRT160N for Remote Access
- Configure Your Network
- Reserve an IP Address
- UPnP Router Configuration
- Manual Router Configuration
- Configure the Linksys WR54GL for Remote Access
- Configure Your Network
- Reserve an IP Address
- UPnP Router Configuration
- Manual Router Configuration
- Configure the Watchguard Firebox X20e for Remote Access
- Configure Your Network
- Reserve an IP Address
- UPnP Router Configuration
- Manual Router Configuration
If your router is not listed, use the General Directions.
General Directions
Important: Verify Your Settings!
You should verify any settings in this document to ensure your router is properly directing and filtering Internet traffic as desired.
Overview
The following is a diagram of a typical home or small business network.

A typical home or small business network consists of the following:
- An Internet connection: provided by your Internet Service Provider (ISP).
- An Internet connection device: usually a cable or DSL modem provided by your ISP. Some ISPs provide a device that combines a modem with a broadband router.
- A broadband router: a device that routes network traffic from your local network to the Internet. Small business routers usually provide firewall services requiring port configuration. Some routers support UPnP to simplify configuration.
The router may also function as a wireless access point. - Client computers: connect to each other through a switch (sometimes part of the router) and to the Internet through the broadband router. Multiple switches may be used if you connect more than a few desktop and notebook computers.
- A home or small business server: provides file sharing and remote access.
Reality Check
Setting up a network means configuring settings on a variety of devices. Some familiarity with networking is recommended.
If the terms ping, static IP address, DHCP, firewall ports, and UPnP are a foreign language for you, consider having a friend or consultant help you set up your network.
The following links provide information on home networking:
-
http://compnetworking.about.com/od/tcpip/TCPIP_Transmission_Control_Protocol_Internet_Protocol
General Directions
Network Configuration
Before setting up your router, you need to set up your network. There are three steps for you to complete.
First Step — Determine IP Address
The first step in configuring your network is to determine the IP addresses of your Windows Home Server and your router (gateway).
-
Log on to your Windows Home Server.
-
Open a command prompt — click Start, point to All Programs, point to Accessories, and then click
Command Prompt… -
Type: ipconfig/all, press Enter, and note the IP address and Default Gateway as in the screenshot below:


In this example, the following information is highlighted:
-
Physical address: the MAC address of the network adapter. This number is useful when you need to reserve the dynamic IP address of the Windows Home Server. You may use the MAC address in the Third Step.
-
DHCP enabled: Yes = this network adapter is receiving an IP address dynamically from the router (or other DHCP server). No = this network adapter has a static IP address entered manually.
-
IP address: the IP address of the Windows Home Server.
-
Subnet mask: typically 255.255.255.0
-
Default gateway: the IP address of the router.
-
DNS servers: the IP address of the DNS server. Typically provided by your ISP.
Second Step — Check Communication
Next, determine if your Windows Home Server and router can communicate.
-
Log on to your Windows Home Server.
-
Open a command prompt — click Start, point to All Programs, point to
Accessories, and then click Command Prompt… -
Type: ping 192.168.1.1, and press Enter. Substitute the address of your router for 192.168.1.1.
If your router and home server can communicate, you should see results like the following:

If you are not able to determine your IP addresses, or if you are not able to determine or correct network communication issues, now’s the time to find a friend or consultant to assist you.
Third Step — Set Static IP Address
The final step in configuring your network is to verify that your Windows Home Server has a static IP address. Typical home routers have DHCP enabled. Your home server receives its IP address from the router and, because it is a dynamic IP address, the home
server IP address can change. A changing IP address will break router firewall settings you set up as directed later in this article. A static IP address for your home server will ensure that firewall settings will continue to work and network traffic will
continue to reach your home server.
There are two ways to set a static IP address for your home server.
-
In some routers, using the MAC address determined in the First Step, you can reserve the IP address of Windows Home Server. See your router documentation to see if this method is supported and for instructions.
Once you have determined IP addresses, verified communication, and set Windows Home Server to a static IP address, you are ready to configure your router to allow remote access.
UPnP Router Configuration
Many broadband routers designed for home use support Universal Plug and Play (UPnP) – a standard that simplifies router setup. Check your product documentation for UPnP support. If UPnP is supported, Windows Home Server may be able to automatically configure
your broadband router.
If your router supports UPnP, check to see if UPnP is enabled.
-
Open your Web browser, and then connect to the configuration Web page for your router. Usually the Web page is the IP address of your router which you determined in the above steps.
-
If necessary, type the user name and password to log on to the configuration Web page. Some routers include a default user name, password, and IP address on the underside of the router. For more information, see the documentation for your router.
-
Go to the UPnP setting page on your router and verify that UPnP is enabled.
-
Save the configuration on your router, and then close the browser. If your router needs to restart, wait until it restarts completely before you proceed.
-
On the Windows Home Server Remote Access Settings page, click
Repair. The configuration tests run again.
Manual Router Configuration
If your router does not support UPnP, you must manually configure your router to forward the following ports to the IP address of your Windows Home Server:
| Service or Protocol | Port |
| HTTP | TCP 80 |
| HTTPS | TCP 443 |
| Remote Desktop Protocol (RDP) | TCP 4125 |
-
HTTP is the protocol that your Web browser uses to view Web pages. You use this protocol to view your default Web page for Windows Home Server.
-
HTTPS is the protocol that secures communication from a Web browser to your server. You use this protocol to view your Remote Access Web page for Windows Home Server.
-
Remote Desktop Protocol is the service that is used to connect to your home computers via the Remote Access
Computers tab.
A typical router-configuration page includes a table that looks similar to the following one, assuming the IP address of your home server is 192.168.1.3:
Port forwarding rules
| IP Address | Protocol (TCP/UDP) | Schedule | Inbound Filter |
| 192.168.1.3 | TCP 80 | Always | Allow All |
| 192.168.1.3 | TCP 443 | Always | Allow All |
| 192.168.1.3 | TCP 4125 | Always | Allow All |
To Manually Configure Your Router
-
Open your Web browser, and then connect to the configuration Web page for your router. Usually the Web page is at the IP address of your router.
-
If necessary, type your user name and password to log on to the configuration Web page. Some routers include a default user name, password, and IP address on the underside of the router. For more information, see the documentation for your router.
-
Disable UPnP on your router.
-
Find the port forwarding configuration page on your router. For more information, see the documentation for your router.
-
Type the necessary information to forward TCP port 80, TCP port 443, and TCP port 4125 to the IP address of your home server. The IP address of your home server appears on the Remote Access
Settings page. -
Save the port-forwarding configuration on your router, and then close the browser. If your router needs to restart, wait until it restarts completely before you proceed.
-
On the Remote Access Settings page, click Repair. The configuration tests run again.
Configure the Linksys BEFSR41 for Remote Access

Configure Your Network
Follow the first two steps in the General Directions to verify your network is properly configured. Then, configure your home server with a static IP address.
Reserve an IP Address
To set a static IP address for Windows Home Server
See the following links for directions:
UPnP Router Configuration
The Linksys BEFSR41 broadband router supports UPnP – a standard that simplifies router setup. If you enable UPnP in the Linksys BEFSR41, Windows Home Server may be able to automatically configure your remote access settings.
-
Open the Web browser on your computer and enter the address for the Linksys router in the address field. The default IP address is
192.168.1.1. -
At the login screen, leave the User Name field blank and enter the router password. The default password is
admin. -
Click the Administration tab, the Management page should be selected. If not, click the
Management tab. -
For UPnP, click Enabled, and then click Save Settings.
-
Close the Web browser.

With UPnP enabled, open the Windows Home Server Console, click Settings, click Remote Access, and then click
Repair. Windows Home Server will attempt to automatically configure the Linksys router to forward Web site requests to your home server.
Manual Router Configuration
If you prefer to not use UPnP, you must manually configure your router to forward the following ports to the IP address of your Windows Home Server:
| Service or Protocol | Port |
| HTTP | TCP 80 |
| HTTPS | TCP 443 |
| Remote Desktop Protocol (RDP) | TCP 4125 |
-
HTTP is the protocol that your Web browser uses to view Web pages. You use this protocol to view your default Web page for Windows Home Server.
-
HTTPS is the protocol that your Web browser uses to view secure Web pages. You use this protocol to view your Remote Access Web page for Windows Home Server.
-
Remote Desktop Protocol is the service that is used to connect to your home computers via the Remote Access
Computers tab.
To manually configure your router
-
Open the Web browser on your computer and enter the address for the Linksys router in the address field. The default IP address is
192.168.1.1. -
At the login screen, leave the User Name field blank and enter the router password. The default password is
admin. -
Find the screen with UPnP settings and disable UPnP.
-
Click the Applications and Gaming tab, the Port Range Forwarding page should be selected. If not, click the Port Range Forwarding tab.
-
Enter the settings as in the screenshot below. The IP address should be the IP address of your home server.
-
Click Save Settings, and then close the Web browser.

With port forwarding manually configured, open the Windows Home Server Console, click
Settings, click Remote Access, and then click
Repair. Windows Home Server will run the configuration test to verify network settings.
Configure the Netgear RP614 for Remote Access

Configure Your Network
Follow the first two steps in the General Directions to verify your network is properly configured. Then, configure your home server with a static IP address.
Reserve an IP Address
There are two ways to set a static IP address for your home server: reserve an IP address on the Netgear RP614 router, or set the IP address of the home server to be a static IP address.
To reserve an IP address
-
Open the Web browser on your computer and enter the address for the Netgear router in the address field. The default IP address is
192.168.1.1. -
At the login screen, enter the user name and password. The default user name is
admin. The default password is password. -
Under Advanced, click LAN IP Setup.
-
Under Address Reservation, click Add.
-
Follow the directions in the Help section. Use the MAC address from the First Step.
-
Close the Web browser.
To set a static IP address for Windows Home Server
See the following links for directions:
UPnP Router Configuration
The Netgear RP614v4 broadband router supports UPnP – a standard that simplifies router setup. If you enable UPnP in the Netgear RP614v4, Windows Home Server may be able to automatically configure your remote access settings.
-
Open the Web browser on your computer and enter the address for the Netgear router in the address field. The default IP address is
192.168.1.1. -
At the login screen, enter the user name and password. The default user name is
admin. The default password is password. -
Under Advanced, click UPnP.
-
Click Turn UPnP On, and then click Apply.
-
Configure Windows Home Server settings. Open the Windows Home Server Console, click
Settings, click Remote Access, and then click
Repair. Windows Home Server will attempt to automatically configure the Netgear router to forward Web site requests to your home server. -
Come back to the Netgear UPnP page, and then click Refresh. If UPnP was successfully configured you should see the three ports opened in the screenshot below.
-
Close the Web browser.

Manual Router Configuration
If you prefer to not use UPnP, you must manually configure your router to forward the following ports to the IP address of your Windows Home Server:
| Service or Protocol | Port |
| HTTP | TCP 80 |
| HTTPS | TCP 443 |
| Remote Desktop Protocol (RDP) | TCP 4125 |
-
HTTP is the protocol that your Web browser uses to view Web pages. You use this protocol to view your default Web page for Windows Home Server.
-
HTTPS is the protocol that your Web browser uses to view secure Web pages. You use this protocol to view your Remote Access Web page for Windows Home Server.
-
Remote Desktop Protocol is the service that is used to connect to your home computers via the Remote Access
Computers tab.
To manually configure your router
-
Open the Web browser on your computer and enter the address for the Linksys router in the address field. The default IP address is
192.168.1.1. -
At the login screen, enter the user name and password. The default user name is
admin. The default password is password. -
Find the screen with UPnP settings and disable UPnP.
-
Under Advanced, click Port Forwarding / Port Triggering.
-
Under Service Name, click HTTP, enter the server IP address, and then click
Add. -
Click Add Custom Service, and then enter the following settings:
Service Name: HTTPS
Service Type: TCP
Starting Port: 443
Ending Port: 443
Server IP Address: your server IP address
-
Click Apply.
-
Click Add Custom Service, and then enter the following settings:
Service Name: RDP
Service Type: TCP
Starting Port: 4125
Ending Port: 4125
Server IP Address: your server IP address
-
Click Apply.
-
Close the Web browser.

With port forwarding manually configured, open the Windows Home Server Console, click
Settings, click Remote Access, and then click
Repair. Windows Home Server will run the configuration test to verify network settings.
Configure the Sonicwall TZ170 for Remote Access

Configure Your Network
Follow the first two steps in the General Directions to verify your network is properly configured. Then, configure your home server with a static IP address.
Reserve an IP Address
There are two ways to set a static IP address for your home server: reserve an IP address on the Sonicwall TZ170 router, or set the IP address of the home server to be a static IP address.
To reserve an IP address
-
Open the Web browser on your computer and enter the address for the Sonicwall router in the address field. The default IP address is
192.168.1.1. -
At the login screen, enter the user name and password. The default user name is
admin. The default password is password. -
Click Network, and then click DHCP Server.
-
Verify that Enable DHCP Server is checked.
-
Under Current DHCP Leases, you should see the home server in the list.
-
Under DHCP Server Lease Scopes, click Add Static.
-
Ensure DHCP Lease time set to 1440 minutes.
-
Enter the following settings:
Entry Name: type text to identify your home server.
Static IP Address: type an IP address not in the DHCP scope. This will be the IP address of your home server.
Ethernet Address: select the MAC address of the network adapter of your home server. See the First Step.
-
Click OK, and then click Apply.

To set a static IP address for Windows Home Server
See the following links for directions:
-
http://wiki.wegotserved.com/index.php?title=Set_up_Static_IP_for_Windows_Home_Server
UPnP Router Configuration
The Sonicwall TZ170 broadband router does not support UPnP.
Manual Router Configuration
You must manually configure your router to forward the following ports to the IP address of your Windows Home Server:
| Service or Protocol | Port |
| HTTP | TCP 80 |
| HTTPS | TCP 443 |
| Remote Desktop Protocol (RDP) | TCP 4125 |
-
HTTP is the protocol that your Web browser uses to view Web pages. You use this protocol to view your default Web page for Windows Home Server.
-
HTTPS is the protocol that your Web browser uses to view secure Web pages. You use this protocol to view your Remote Access Web page for Windows Home Server.
-
Remote Desktop Protocol is the service that is used to connect to your home computers via the Remote Access
Computers tab.
To manually configure your router
-
Open the Web browser on your computer and enter the address for the Sonicwall router in the address field. The default IP address is
192.168.1.1. -
At the login screen, enter the user name and password. The default user name is
admin. The default password is password. -
Find the screen with UPnP settings and disable UPnP.
-
Click Firewall, and then click Services.
-
Under Custom Services, click Add.
-
Enter the following settings:
Name: RDP
Port Range: 4125 — 4125
Protocol: TCP(6)
-
Click OK.
-
Under Firewall, click Access Rules.
-
Click Add.
-
Enter the following settings:
Action: Allow
Service: RDP
Source, Ethernet: WAN
Destination, Ethernet: LAN
Destination, Address Range Begin: your server’s IP address
-
Click OK.
-
Under Firewall, click Access Rules.
-
Click Add.
-
Enter the following settings:
Action: Allow
Service: Web (HTTP)
Source, Ethernet: WAN
Destination, Ethernet: LAN
Destination, Address Range Begin: your home server’s IP address
-
Click OK.
-
Under Firewall, click Access Rules.
-
Click Add.
-
Enter the following settings:
Action: Allow
Service: HTTPS
Source, Ethernet: WAN
Destination, Ethernet: LAN
Destination, Address Range Begin: your server’s IP address
-
Click OK.
-
Close the Web browser.


With port forwarding manually configured, open the Windows Home Server Console, click
Settings, click Remote Access, and then click
Repair. Windows Home Server will run the configuration test to verify network settings.
Configure the Sonicwall TZ100 for Remote Access

Configure Your Network
Follow the first two steps in the General Directions to verify your network is properly configured. Then, configure your home server with a static IP address.
Reserve an IP Address
There are two ways to set a static IP address for your home server: reserve an IP address on the Sonicwall TZ100 router, or set the IP address of the home server to be a static IP address.
To reserve an IP address
-
Open the Web browser on your computer and enter the address for the Sonicwall router in the address field. The default IP address is
192.168.168.168. -
At the login screen, enter the user name and password. The default user name is
admin. The default password is password. -
Click Network, and then click DHCP Server.
-
Verify that Enable DHCP Server is checked.
-
Under Current DHCP Leases, you should see the home server in the list.
-
Under DHCP Server Lease Scopes, click Add Static.
-
Ensure DHCP Lease time set to 1440 minutes.
-
Enter the following settings:
Entry Name: type text to identify your home server.
Static IP Address: type an IP address not in the DHCP scope. This will be the IP address of your home server.
Ethernet Address: select the MAC address of the network adapter of your home server. See the First Step.
Default Gateway: type the IP address of your router
Subnet Mask: usually 255.255.255.0
-
Click OK, and then click Accept.

To set a static IP address for Windows Home Server
See the following links for directions:
-
http://wiki.wegotserved.com/index.php?title=Set_up_Static_IP_for_Windows_Home_Server
UPnP Router Configuration
The Sonicwall TZ100 broadband router does not support UPnP.
Manual Router Configuration
You must manually configure your router to forward the following ports to the IP address of your Windows Home Server:
| Service or Protocol | Port |
| HTTP | TCP 80 |
| HTTPS | TCP 443 |
| Remote Desktop Protocol (RDP) | TCP 4125 |
-
HTTP is the protocol that your Web browser uses to view Web pages. You use this protocol to view your default Web page for Windows Home Server.
-
HTTPS is the protocol that your Web browser uses to view secure Web pages. You use this protocol to view your Remote Access Web page for Windows Home Server.
-
Remote Desktop Protocol is the service that is used to connect to your home computers via the Remote Access
Computers tab.
To manually configure your router
-
Open the Web browser on your computer and enter the address for the Sonicwall router in the address field. The default IP address is
192.168.168.168. - At the login screen, enter the user name and password. The default user name is
admin. The default password is password. - Find the screen with UPnP settings and disable UPnP.
- Click Firewall, and then click Services.
- Under Service Groups, View Style, click Custom Services.
- Unders Services, click Add.
- Enter the following settings:
Name: RDPProtocol: TCP(6)Port Range: 4125 — 4125
- Click OK.
- Under Service Groups, click Add Group.
- For Name, enter: WHSPorts
- From the list on the left, select the following Services and add them to the list on the right with the right arrow button:
HTTP
HTTPS
RDP
- Click OK.
- On the left navigation menu, under Firewall, click Access Rules
- Under Access Rules, View Style, click
Drop-down Boxes. - For the From Zone, select: WAN
- For the To Zone, select: LAN
- Click OK.
- Click Add.
- Under Settings, enter the following:
Action: Allow
Service: WHSPorts
Source: Any
Destination: WAN Primary IP (or the port use use for broadband)
Users Allowed: All
Schedule: Always on
- Click OK.
- Close the Web browser.


With port forwarding manually configured, open the Windows Home Server Console, click
Settings, click Remote Access, and then click
Repair. Windows Home Server will run the configuration test to verify network settings.
Configure the D-Link DIR-825 for Remote Access

Configure Your Network
Follow the first two steps in the General Directions to verify your network is properly configured. Then, configure your home server with a static IP address.
Reserve an IP Address
There are two ways to set a static IP address for your home server: reserve an IP address on the D-Link DIR-825 router, or set the IP address of the home server to be a static IP address.
To reserve an IP address
-
Open the Web browser on your computer and enter the address for the D-Link router in the address field. The default IP address is
192.168.0.1. -
At the login screen, enter the user name and password. The default user name is
admin. The default password is blank. -
On the left menu, click Network Settings.
-
Under DHCP Server Settings, verify Enable DHCP Server is checked.
-
Under Add DHCP Reservation, enter the following settings:
Computer Name: type text to identify your home server.
IP Address: type an IP address in the DHCP IP Address Range (see
DHCP Server Settings). This will be the IP address of your home server.MAC Address: typet the MAC address of the network adapter of your home server. See the First Step
-
Click Save.
-
Close the Web browser.
To set a static IP address for Windows Home Server
See the following links for directions:
UPnP Router Configuration
The D-Link DIR-825 broadband router supports UPnP. However, initial tests using UPnP to configure the router were not successful. You should use manual configuration.
Manual Router Configuration
You must manually configure your router to forward the following ports to the IP address of your Windows Home Server:
| Service or Protocol | Port |
| HTTP | TCP 80 |
| HTTPS | TCP 443 |
| Remote Desktop Protocol (RDP) | TCP 4125 |
-
HTTP is the protocol that your Web browser uses to view Web pages. You use this protocol to view your default Web page for Windows Home Server.
-
HTTPS is the protocol that your Web browser uses to view secure Web pages. You use this protocol to view your Remote Access Web page for Windows Home Server.
-
Remote Desktop Protocol is the service that is used to connect to your home computers via the Remote Access
Computers tab.
To manually configure your router
-
Open the Web browser on your computer and enter the address for the D-Link router in the address field. The default IP address is
192.168.0.1. - At the login screen, enter the user name and password. The default user name is
admin. The default password is blank. - Find the screen with UPnP settings and disable UPnP.
-
On the top menu, click Advanced.
-
On the left menu, click VIRTUAL SERVER.
-
Click the first Application Name list box and select
HTTP. -
Click the left double arrow to place HTTP in the
Name box. -
In the first IP Address box, enter the IP address of your home server.
-
Select the check box to enable it.
-
Click the second Application Name list box and select
HTTPS. -
Click the left double arrow to place HTTPS in the
Name box. -
In the second IP Address box, enter the IP address of your home server.
-
Select the check box to enable it.
-
In the third Name box, type: RDP
-
In the Public Port box, type: 4125
-
In the Private Port box, type: 4125
-
In the third IP Address box, enter the IP address of your home server.
-
Select the check box to enable it.
- Click Save Settings.
- Click Continue when the settings are saved and close the Web browser.

With port forwarding manually configured, open the Windows Home Server Console, click
Settings, click Remote Access, and then click
Repair. Windows Home Server will run the configuration test to verify network settings.
Configure the Linksys WRT160N for Remote Access

Configure Your Network
Follow the first two steps in the General Directions to verify your network is properly configured. Then, configure your home server with a static IP address.
Reserve an IP Address
There are two ways to set a static IP address for your home server: reserve an IP address on the Linksys WRT160N router, or set the IP address of the home server to be a static IP address.
To reserve an IP address
-
Open the Web browser on your computer and enter the address for the Linksys router in the address field. The default IP address is
192.168.1.1. -
At the login screen, enter the user name and password. The default user name is blank. The default password is
admin. -
Click the Setup tab. You should be on the Basic Setup page.
-
In DHCP Server Setting, verify DHCP Server is enabled.
-
Click DHCP Reservation.
-
In Select Clients from DHCP Tables, you should see your home server listed.
-
Click the Select box to enable it.
-
Click Add Clients, and the click Save Settings.
-
Close the Web browser.

To set a static IP address for Windows Home Server
See the following links for directions:
UPnP Router Configuration
The Linksys WRT160N broadband router supports UPnP – a standard that simplifies router setup. If you enable UPnP in the Linksys WRT160N , Windows Home Server may be able to automatically configure your remote access settings.
-
Open the Web browser on your computer and enter the address for the Linksys router in the address field. The default IP address is
192.168.1.1. -
At the login screen, enter the user name and password. The default user name is blank. The default password is
admin. -
Click the Administration tab.
-
For UPnP, click Enabled, and then click Save Settings.
-
Close the Web browser.

With UPnP enabled, open the Windows Home Server Console, click Settings, click Remote Access, and then click
Repair. Windows Home Server will attempt to automatically configure the Linksys router to forward Web site requests to your home server.
Manual Router Configuration
If you prefer to not use UPnP, you must manually configure your router to forward the following ports to the IP address of your Windows Home Server:
| Service or Protocol | Port |
| HTTP | TCP 80 |
| HTTPS | TCP 443 |
| Remote Desktop Protocol (RDP) | TCP 4125 |
-
HTTP is the protocol that your Web browser uses to view Web pages. You use this protocol to view your default Web page for Windows Home Server.
-
HTTPS is the protocol that your Web browser uses to view secure Web pages. You use this protocol to view your Remote Access Web page for Windows Home Server.
-
Remote Desktop Protocol is the service that is used to connect to your home computers via the Remote Access
Computers tab.
To manually configure your router
-
Open the Web browser on your computer and enter the address for the Linksys router in the address field. The default IP address is
192.168.1.1. - At the login screen, enter the user name and password. The default user name is
admin. The default password is blank. - Find the screen with UPnP settings and disable UPnP.
-
Click the Applications and Gaming tab.
-
The Single Port Forwarding page should be selected. If not, click the Single Port Forwarding tab.
-
Enter the settings as in the screenshot below. The IP address should be the IP address of your home server.
-
Click Save Settings, and then close the Web browser.

With port forwarding manually configured, open the Windows Home Server Console, click
Settings, click Remote Access, and then click
Repair. Windows Home Server will run the configuration test to verify network settings.
Configure the Linksys WR54GL for Remote Access

Configure Your Network
Follow the first two steps in the General Directions to verify your network is properly configured. Then, configure your home server with a static IP address.
Reserve an IP Address
To set a static IP address for Windows Home Server
See the following links for directions:
UPnP Router Configuration
The Linksys WRT54GL broadband router supports UPnP – a standard that simplifies router setup. If you enable UPnP in the Linksys WRT54GL, Windows Home Server may be able to automatically configure your remote access settings.
-
Open the Web browser on your computer and enter the address for the Linksys router in the address field. The default IP address is
192.168.1.1. -
At the login screen, leave the User Name field blank and enter the router password. The default password is
admin. -
Click the Administration tab, the Management page should be selected. If not, click the
Management tab. -
For UPnP, click Enabled, and then click Save Settings.
-
Close the Web browser.

With UPnP enabled, open the Windows Home Server Console, click Settings, click Remote Access, and then click
Repair. Windows Home Server will attempt to automatically configure the Linksys router to forward Web site requests to your home server.
Manual Router Configuration
If you prefer to not use UPnP, you must manually configure your router to forward the following ports to the IP address of your Windows Home Server:
| Service or Protocol | Port |
| HTTP | TCP 80 |
| HTTPS | TCP 443 |
| Remote Desktop Protocol (RDP) | TCP 4125 |
-
HTTP is the protocol that your Web browser uses to view Web pages. You use this protocol to view your default Web page for Windows Home Server.
-
HTTPS is the protocol that your Web browser uses to view secure Web pages. You use this protocol to view your Remote Access Web page for Windows Home Server.
-
Remote Desktop Protocol is the service that is used to connect to your home computers via the Remote Access
Computers tab.
To manually configure your router
-
Open the Web browser on your computer and enter the address for the Linksys router in the address field. The default IP address is
192.168.1.1. -
At the login screen, leave the User Name field blank and enter the router password. The default password is
admin. -
Find the screen with UPnP settings and disable UPnP.
-
Click the Applications and Gaming tab, the Port Range Forwarding page should be selected. If not, click the Port Range Forwarding tab.
-
Enter the settings as in the screenshot below. The IP address should be the IP address of your home server.
-
Click Save Settings, and then close the Web browser.

With port forwarding manually configured, open the Windows Home Server Console, click
Settings, click Remote Access, and then click
Repair. Windows Home Server will run the configuration test to verify network settings.
Configure the Watchguard Firebox X20e for Remote Access

Configure Your Network
Follow the first two steps in the General Directions to verify your network is properly configured. Then, configure your home server with a static IP address.
Reserve an IP Address
There are two ways to set a static IP address for your home server: reserve an IP address on the Firebox X20e router, or set the IP address of the home server to be a static IP address.
To reserve an IP address
-
Open the Web browser on your computer and enter the address for the Sonicwall router in the address field. The default IP address is
192.168.111.1. -
At the login screen, enter the user name and password. The default user name is
admin. The default password is admin. -
Click Network, and then click Trusted Network.
-
Verify that Enable DHCP Server on Trusted Network is checked.
-
Click DHCP Reservations.
-
Enter the following settings:
IP Address: type the IP address of your home server.
MAC Address: type the MAC address of the network adapter of your home server. See the First Step.
-
Click Submit.

To set a static IP address for Windows Home Server
See the following links for directions:
-
http://wiki.wegotserved.com/index.php?title=Set_up_Static_IP_for_Windows_Home_Server
UPnP Router Configuration
The Firebox X20e broadband router does not support UPnP.
Manual Router Configuration
You must manually configure your router to forward the following ports to the IP address of your Windows Home Server:
| Service or Protocol | Port |
| HTTP | TCP 80 |
| HTTPS | TCP 443 |
| Remote Desktop Protocol (RDP) | TCP 4125 |
-
HTTP is the protocol that your Web browser uses to view Web pages. You use this protocol to view your default Web page for Windows Home Server.
-
HTTPS is the protocol that your Web browser uses to view secure Web pages. You use this protocol to view your Remote Access Web page for Windows Home Server.
-
Remote Desktop Protocol is the service that is used to connect to your home computers via the Remote Access
Computers tab.
To manually configure your router
-
Open the Web browser on your computer and enter the address for the Firebox router in the address field. The default IP address is
192.168.111.1. - At the login screen, enter the user name and password. The default user name is
admin. The default password is admin. - Find the screen with UPnP settings and disable UPnP.
- Click Firewall, and then click Configure Incoming.
- Under Common Packet Filter Policies, for the HTTP and
HTTPS policies, set the following:Filter: Allow
Host: IP address of your home server
Port Redirect, HTTP: 80
Port Redirect, HTTPS: 443
- Click Submit.
- Under Custom Packet Filter Policies, click Add Packet Filter Policy.
- Enter the following:
Policy Name: SharePoint
Incoming Tab, Incoming Filter: Allow
Policy Host: type the IP address of your home server
Properties Tab, Protocol Settings: 4125
- Click Add, and then click Submit.


With port forwarding manually configured, open the Windows Home Server Console, click
Settings, click Remote Access, and then click
Repair. Windows Home Server will run the configuration test to verify network settings.