В Windows 11 есть собственное встроенное приложение календаря, которое помогает планировать задачи, встречи, напоминания и другие события. Календарь Windows также позволяет нам синхронизироваться с нашими учетными записями, такими как Google, Microsoft, iCloud и т.д., и просматривать несколько календарей одновременно в одном месте.
Приложение «Календарь» работает в автономном режиме, поэтому нам не нужно подключаться к сети Интернет каждый раз, когда мы хотим проверить свое расписание.
В этой статье мы рассмотрим, как создать новое событие, управлять расписанием, настроить и синхронизировать календарь.
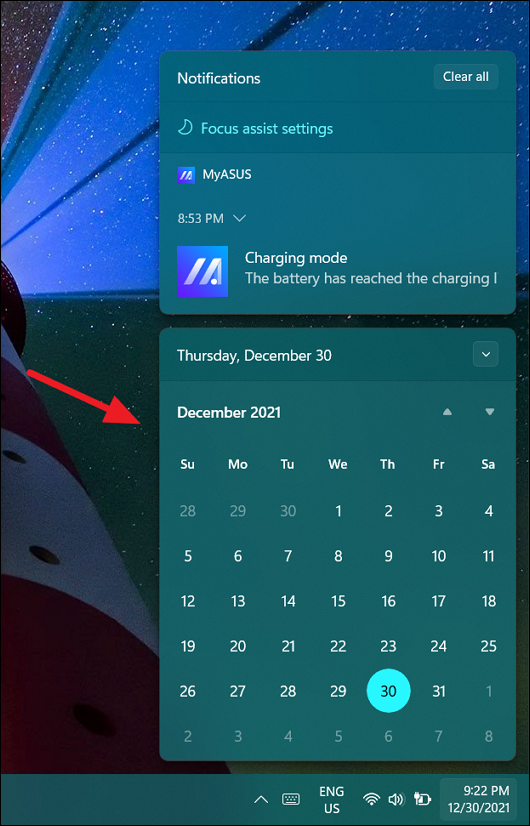
Для быстрого просмотра календаря, просто щелкаем значок времени и даты в правом углу панели задач. К сожалению, во всплывающем окне календаря нельзя просматривать события (Microsoft убрала эту возможность в Windows 11), здесь мы можем увидеть только даты и дни.

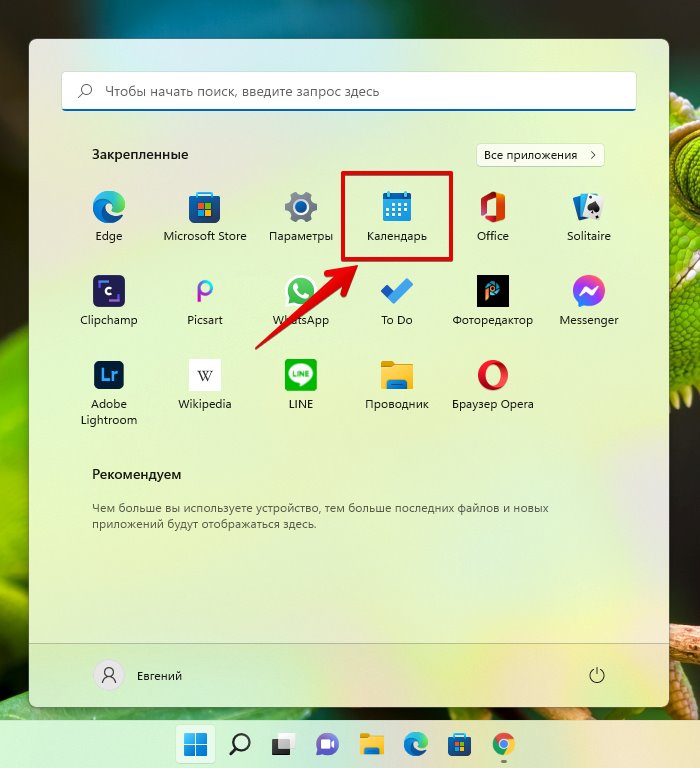
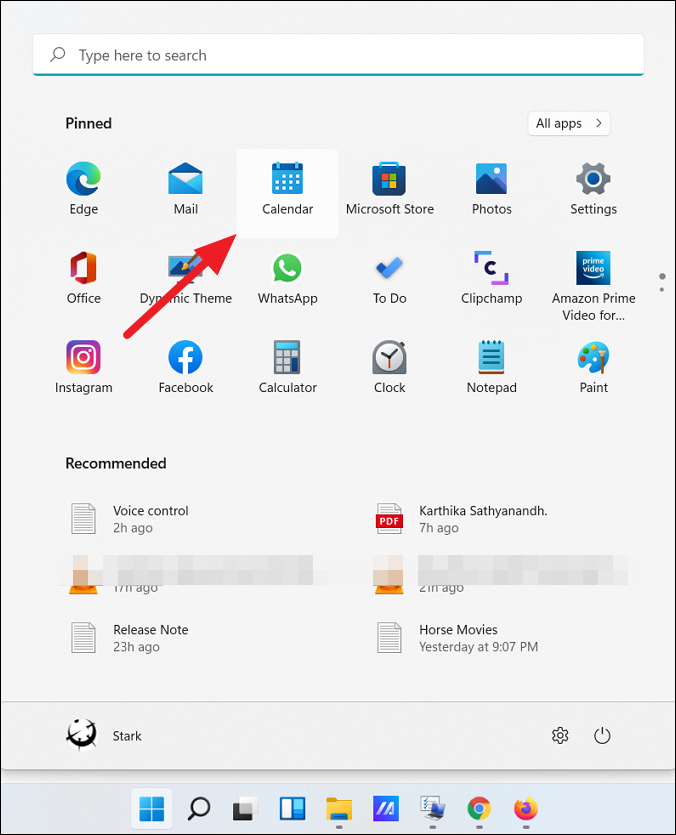
Чтобы просматривать и управлять событиями, необходимо использовать встроенное приложение «Календарь». Для этого открываем меню «Пуск» и нажимаем на значок «Календарь» в разделе «Закрепленные».
Конечно, существует и альтернативный способ, если приложение отсутствует в меню «Пуск» — открываем календарь через поиск Windows 11. Для этого нажимаем клавиши «Win+S» на клавиатуре (или щелкаем по значку лупы на панели задач) и в появившемся меню поиска вводим поисковый запрос «Календарь», затем нажимаем на приложение в разделе «Лучшее соответствие», либо нажимаем по ссылке «Открыть» в правой части меню поиска.
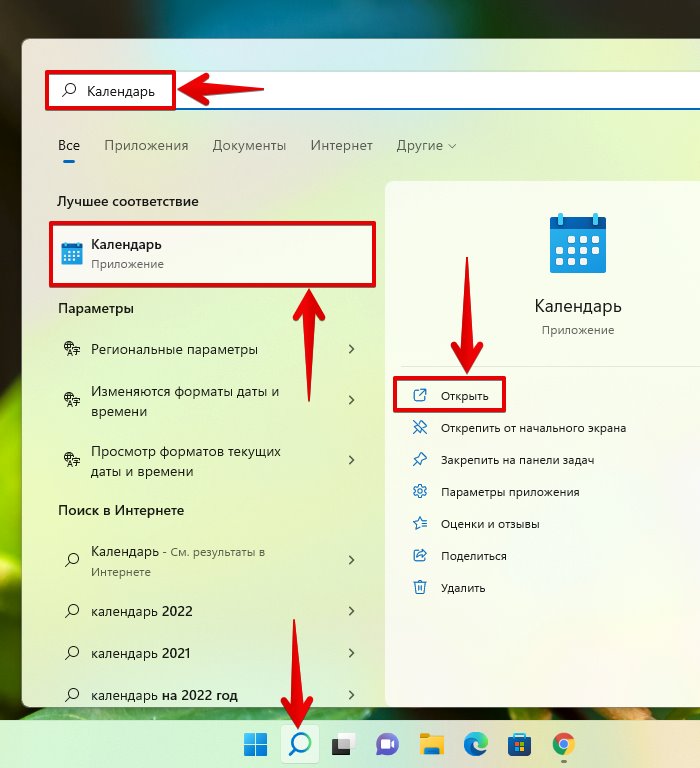
Если мы планируем часто использовать приложение «Календарь», то можно закрепить его на панель задач, для этого щелкаем в правой части меню поиска по ссылке «Закрепить на панели задач».
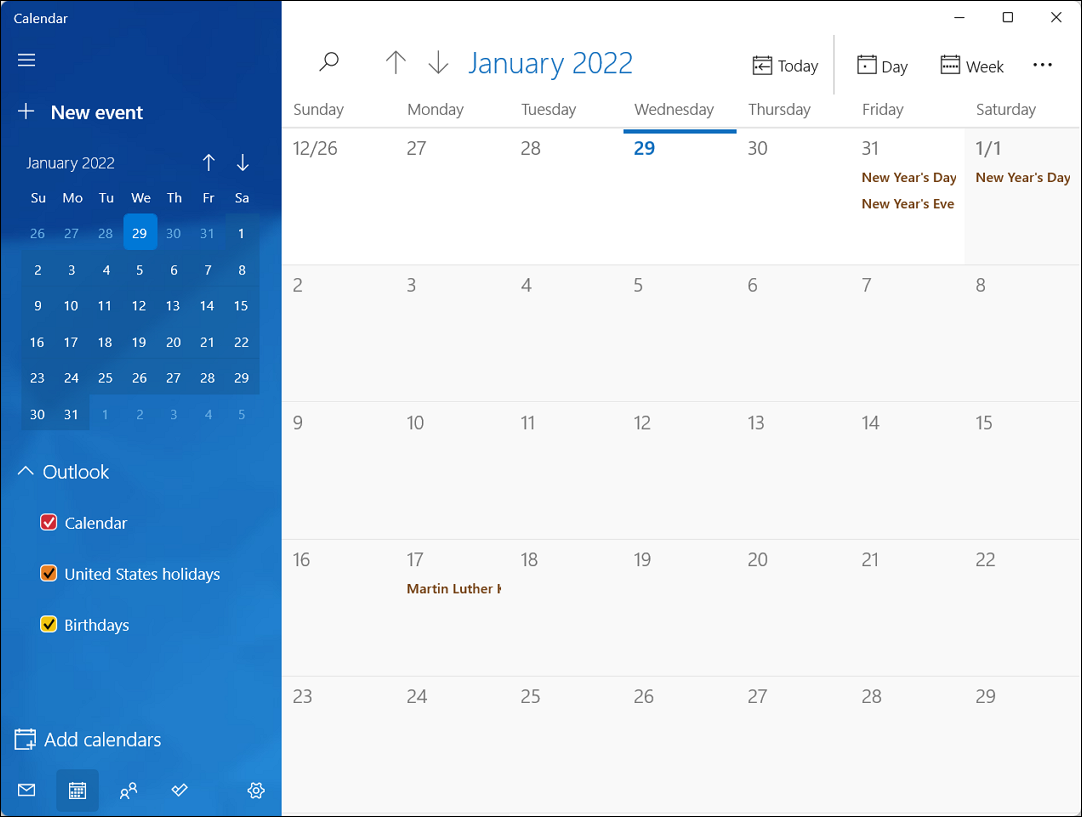
Итак, запустив приложение Календарь, можно просматривать различные события, а так же переключаться между другими календарями.
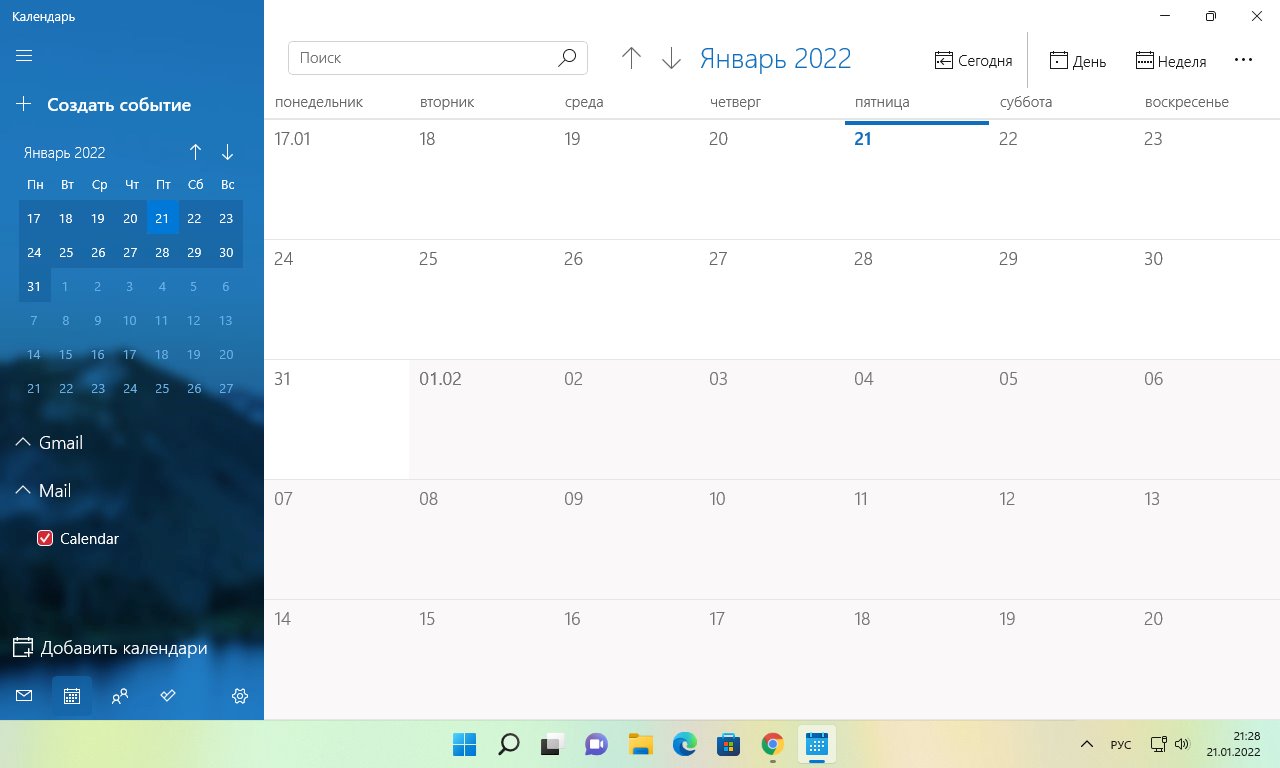
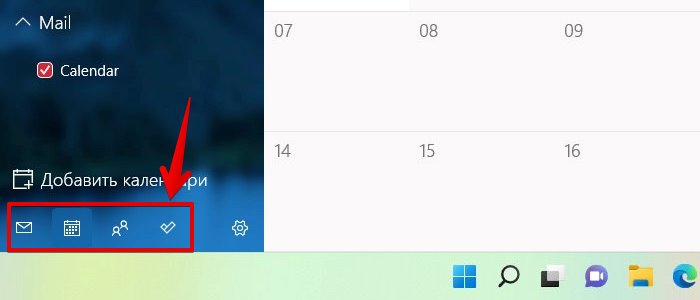
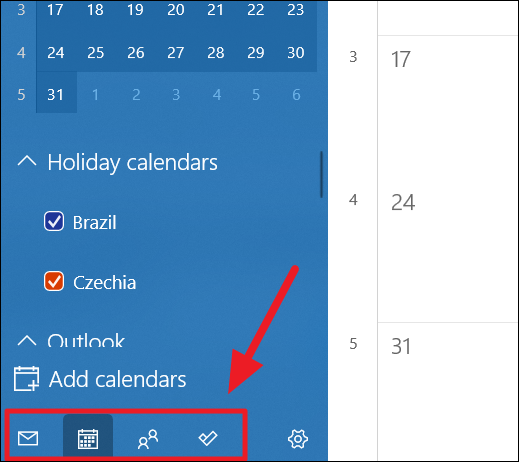
В нижней левой части приложения «Календарь» доступны кнопки для переключения между приложениями «Календарь», «Почта», «Люди» и «Задачи».
Как добавить и удалить учетную запись в приложении «Календарь» Windows 11
Добавление учетной записи в приложение календаря позволит нам синхронизировать календарь на всех устройствах, подключенных к одной и той же учетной записи, управлять расписаниями на нескольких устройствах и делиться своим расписанием с другими пользователями. С помощью приложения «Календарь» мы можем синхронизировать такие сервисы, как Outlook.com, Microsoft 365, Google, Yahoo, iCloud и другие.
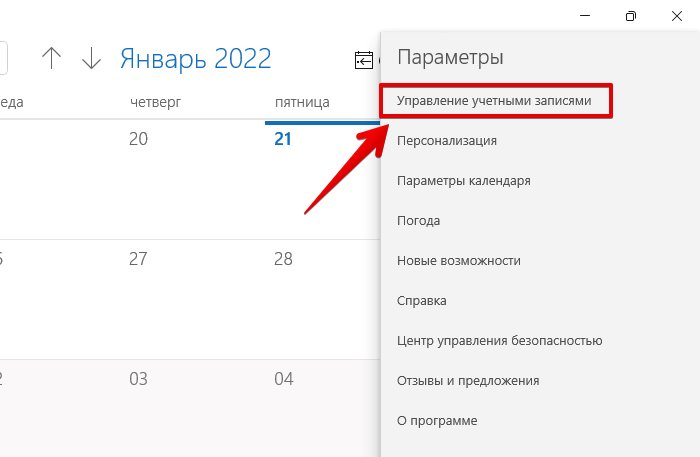
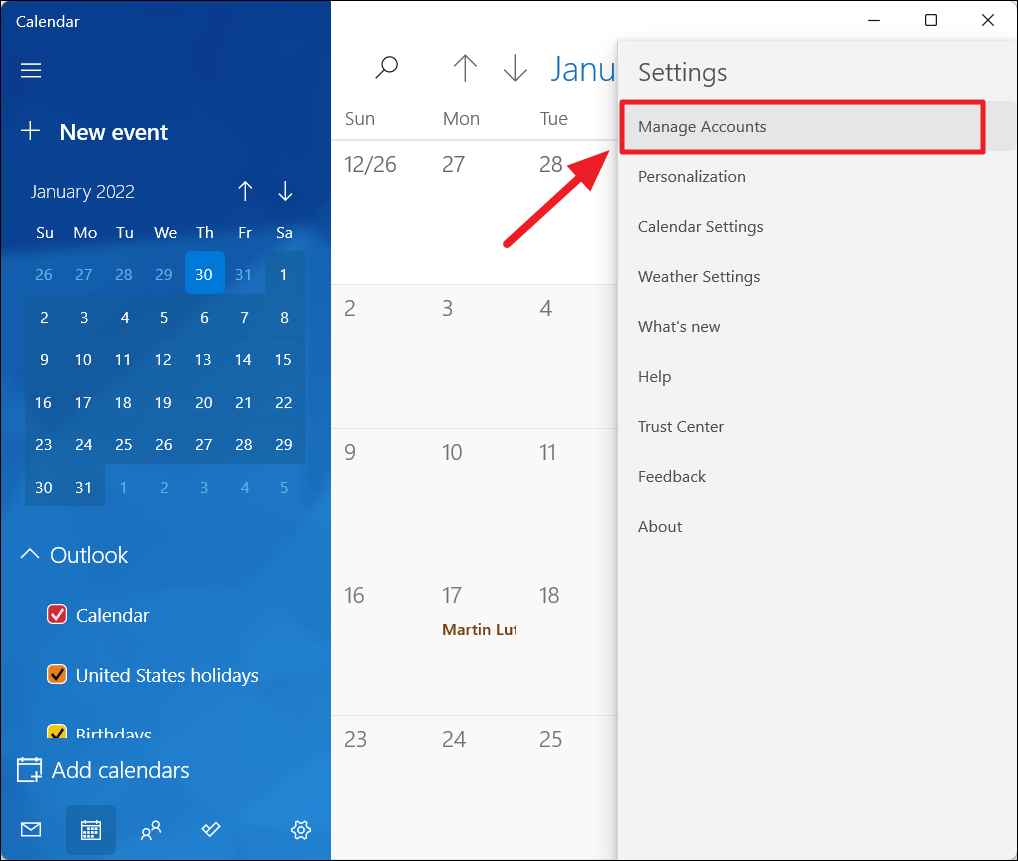
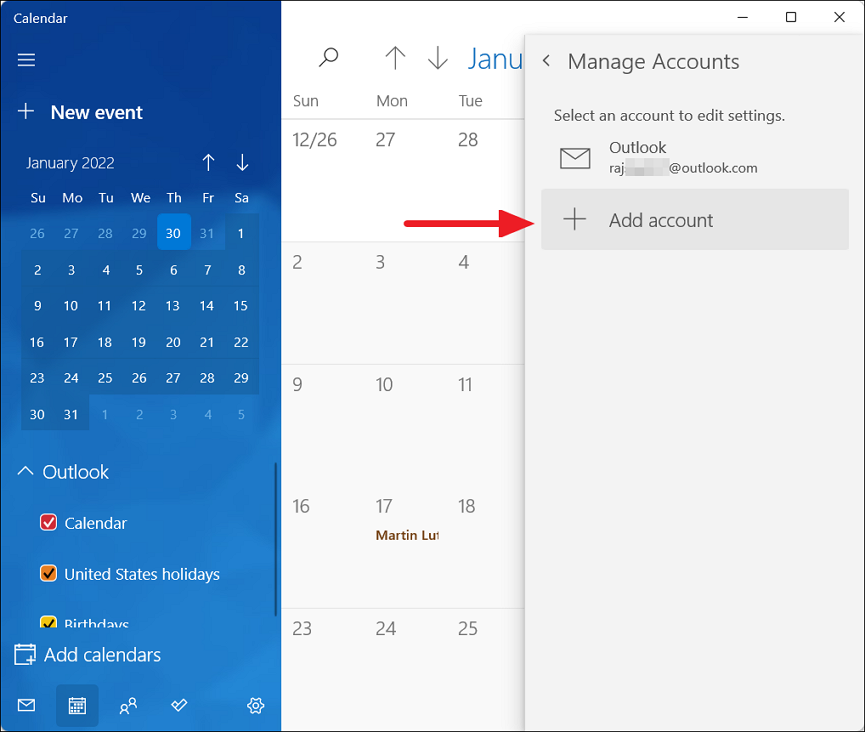
В приложении «Календарь» нажимаем на кнопку «Настройки» в левом нижнем углу.

Затем, в появившемся меню выбираем пункт «Управление учетными записями».
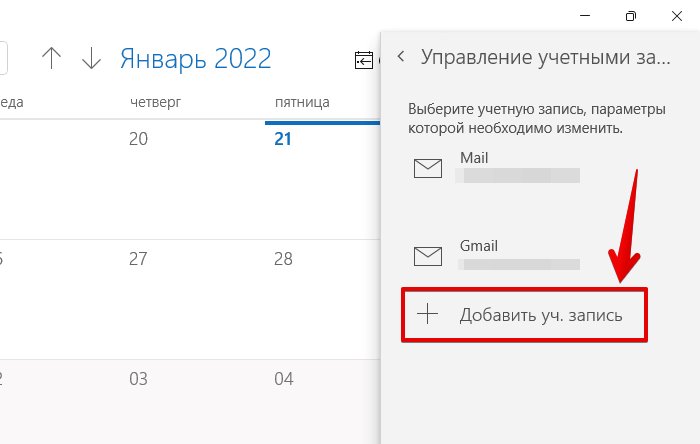
И щелкаем по кнопке «+ Добавить уч. запись».
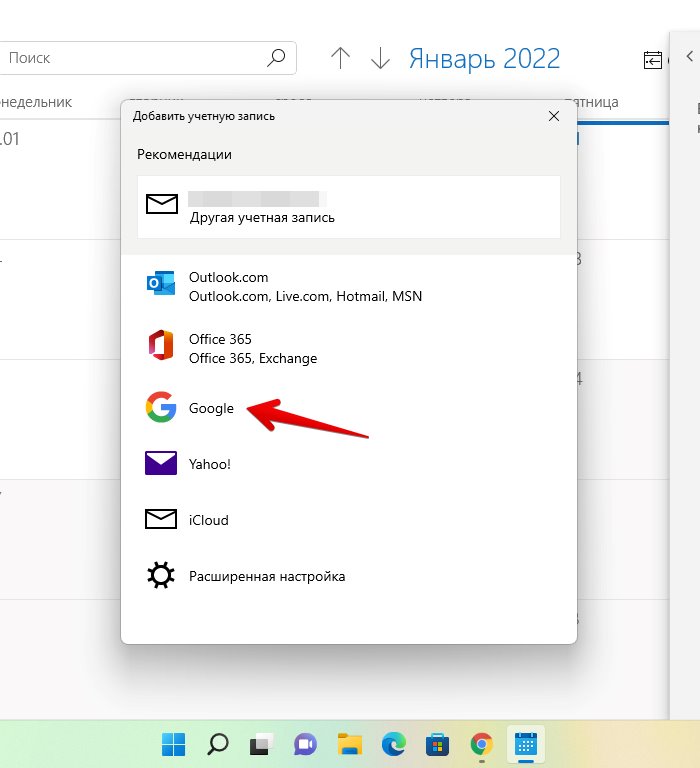
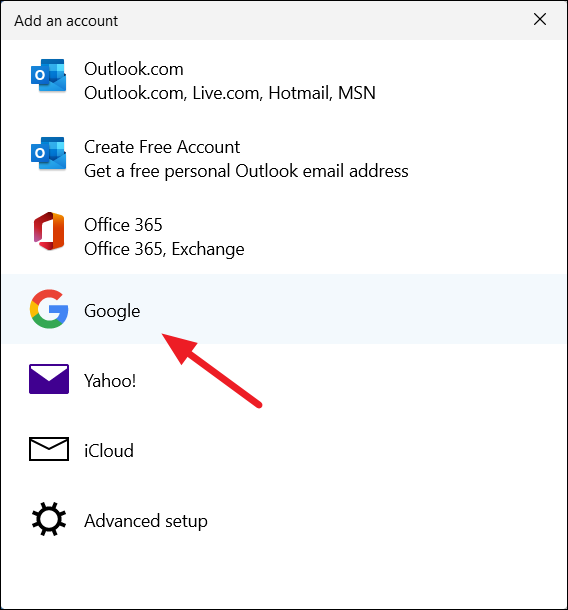
Появится диалоговое окно «Добавить учетную запись» со списком сервисов, которые мы можем добавить в приложение «Календарь». Теперь нажимаем на учетную запись сервиса, который мы хотим добавить.
В примере мы будем использовать учетную запись «Google», выбираем соответствующий вариант.
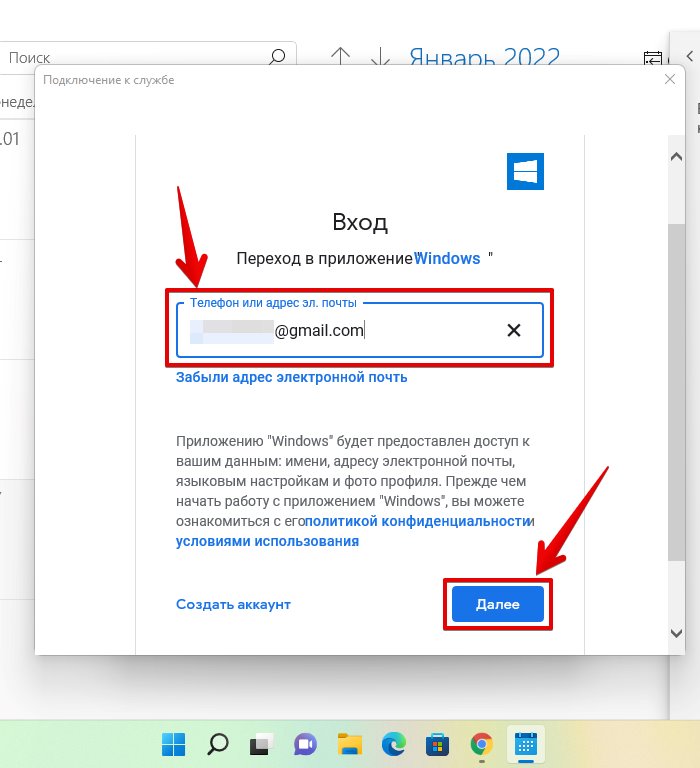
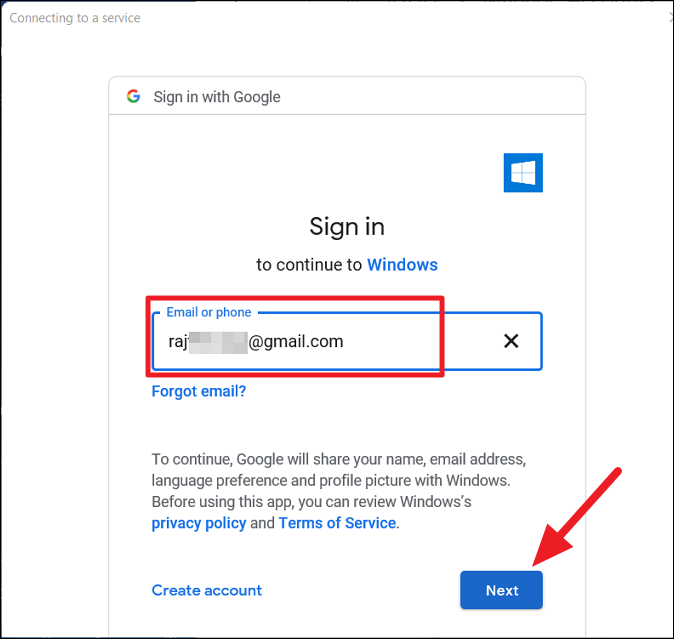
В следующем окне вводим свой адрес электронной почты и нажимаем «Далее».
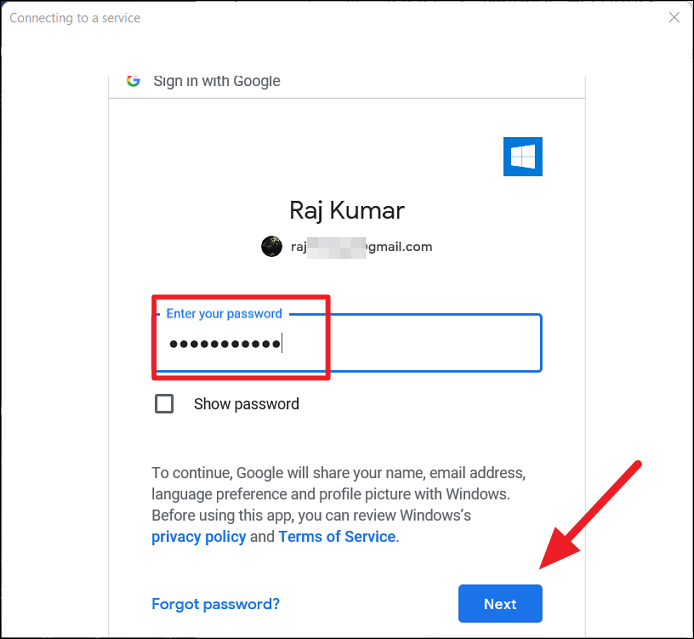
Затем вводим пароль от учетной записи и нажимаем кнопку «Далее».
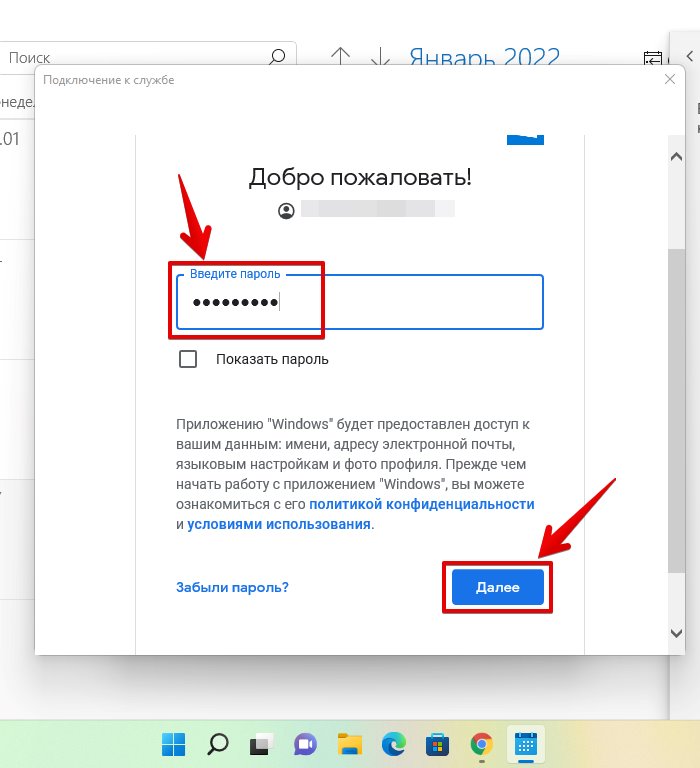
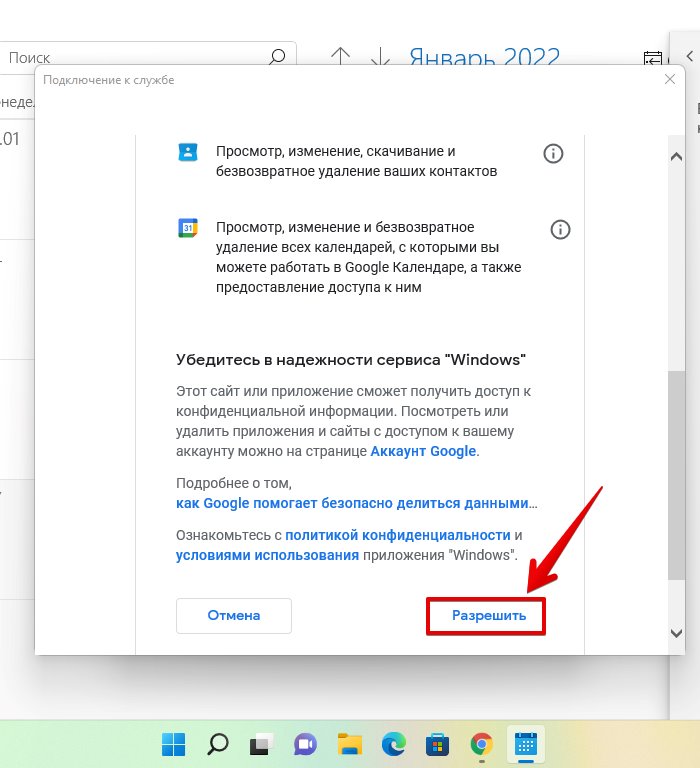
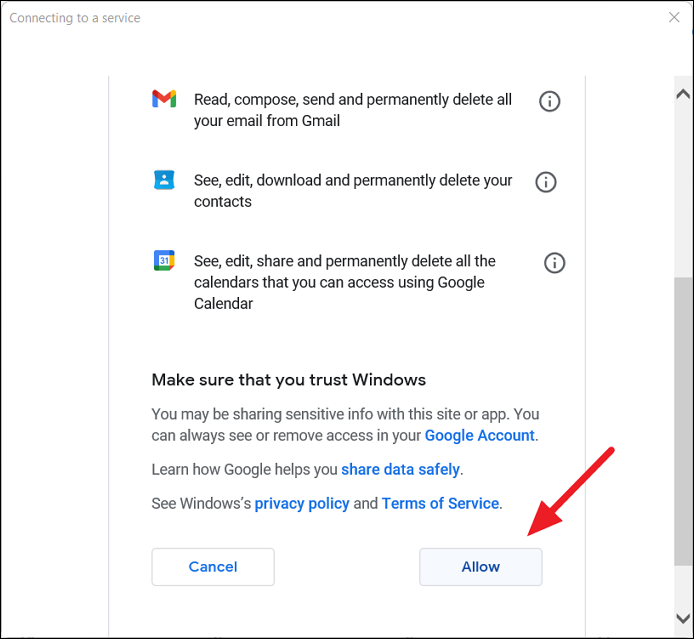
На следующем экране Windows 11 запросит у нас доступ к электронной почте, контактам и календарю. Прокручиваем страницу вниз и нажимаем «Разрешить», чтобы добавить учетную запись.
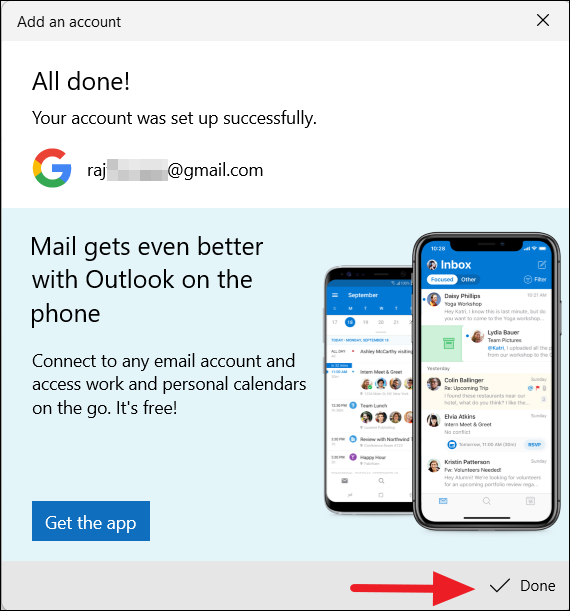
Теперь мы увидим сообщение «Ваша учетная запись успешно настроена», чтобы завершить настройку, щелкаем кнопку «Готово» в правой нижней части окна.
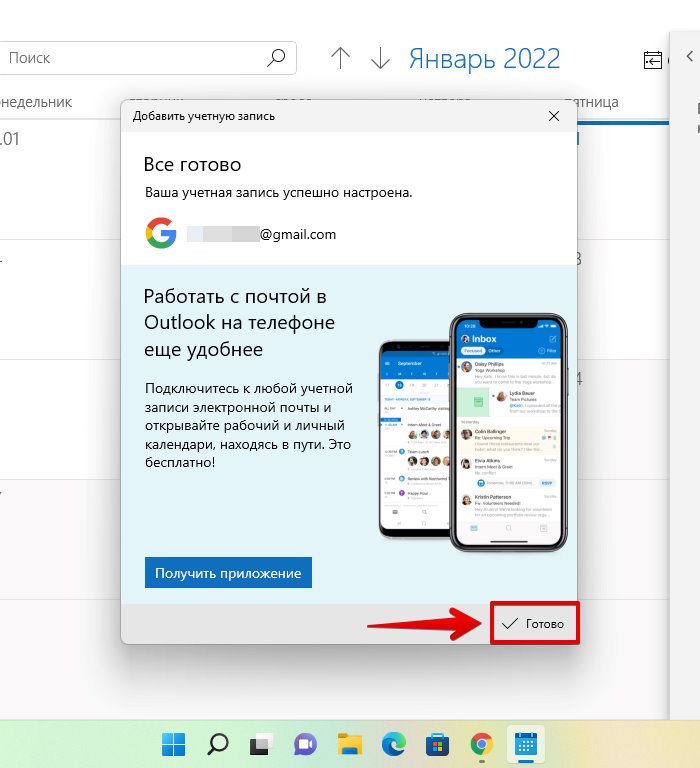
После добавления учетной записи, она будет отображаться в левой части меню, а так же в разделе управления учетными записями.

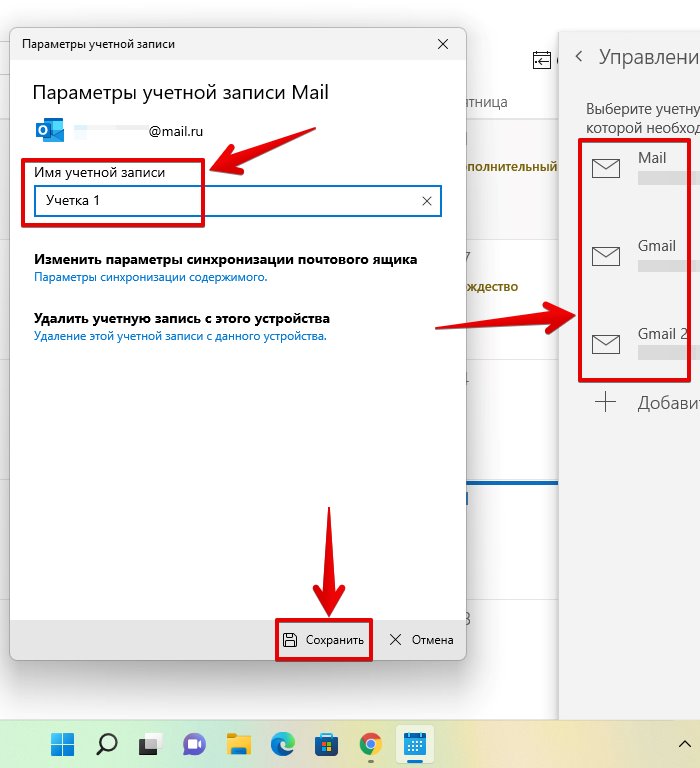
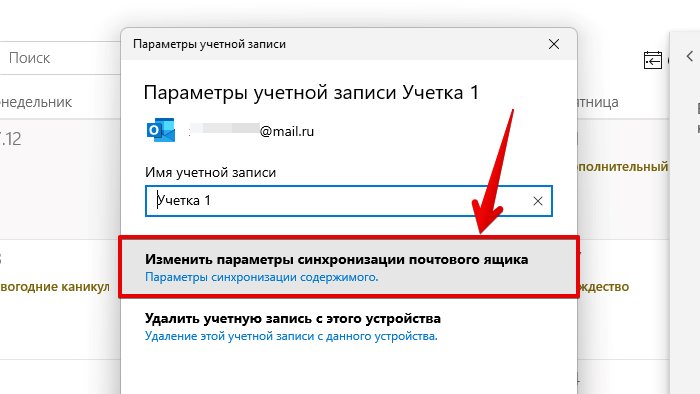
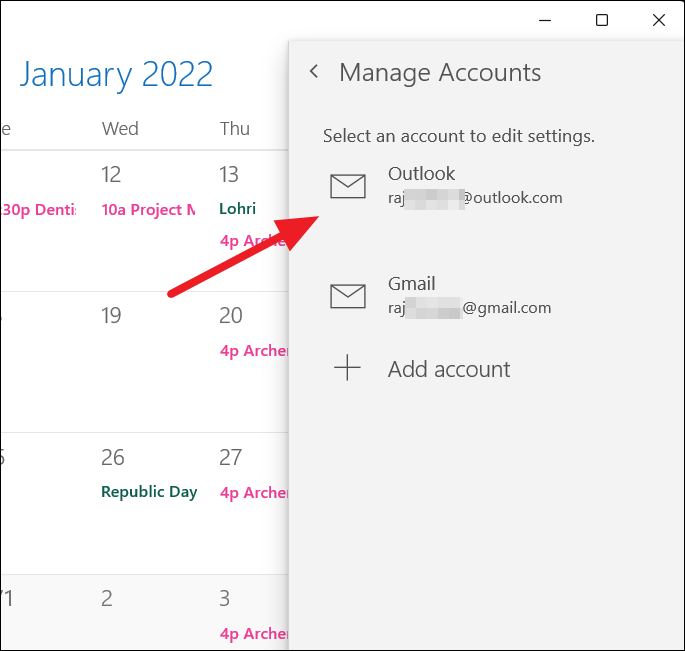
Если у нас подключено несколько учетных записей и чтобы не запутаться в них, можно переименовать каждую. Для этого нажимаем кнопку «Настройки» и щелкаем по пункту «Управление учетными записями» в появившемся меню справа. Далее щелкаем по учетной записи, которую хотим переименовать и в появившемся окне «Параметры учетной записи» вводим новое имя в поле «Имя учетной записи», после чего нажимаем на кнопку «Сохранить».
Чтобы изменить настройки синхронизации учетной записи, снова переходим в окно «Параметры учетной записи» и нажимаем на пункт на «Изменить параметры синхронизации почтового ящика».
Здесь мы можете изменить различные настройки синхронизации для учетной записи. В раскрывающемся списке «Скачивать новые содержимое» мы можем изменить частоту загрузки новых данных.
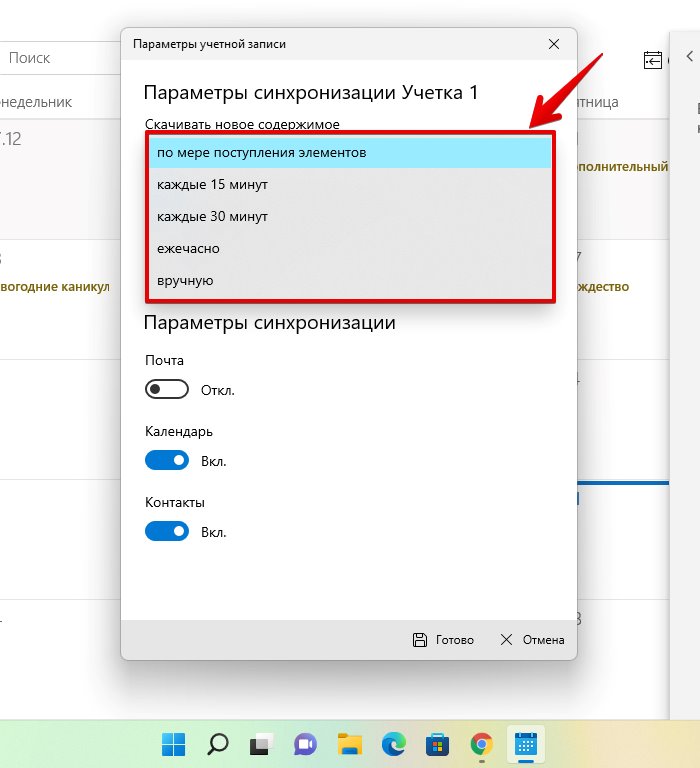
Так же можно выбрать период скачивания почты, а в разделе «Параметры синхронизации» мы можем включить или отключить синхронизацию электронной почты, календаря и контактов.
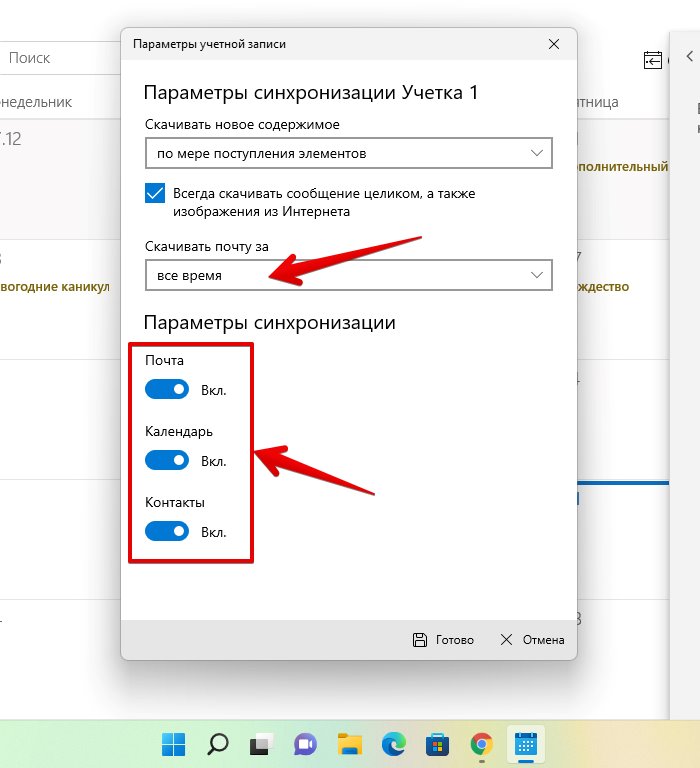
Для сохранения внесенных изменений нажимаем кнопку «Готово».
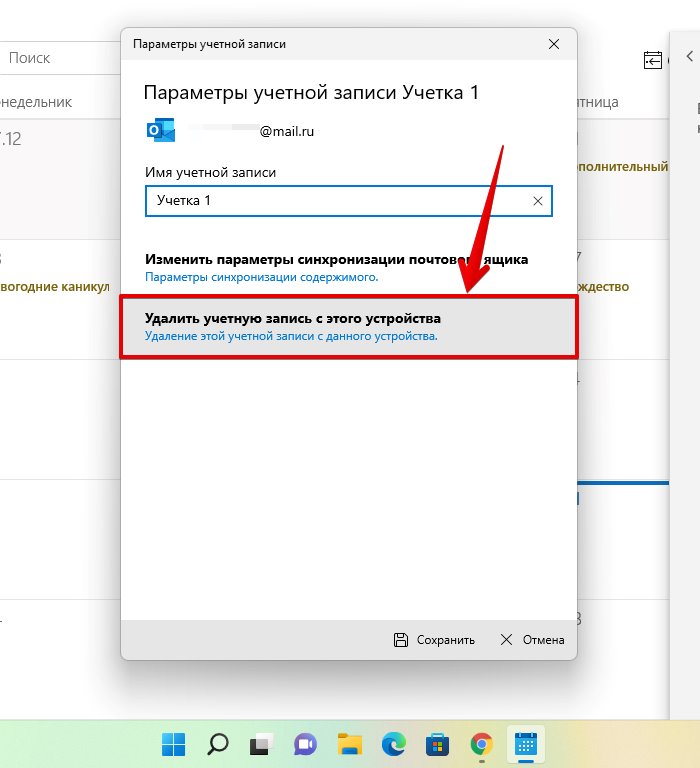
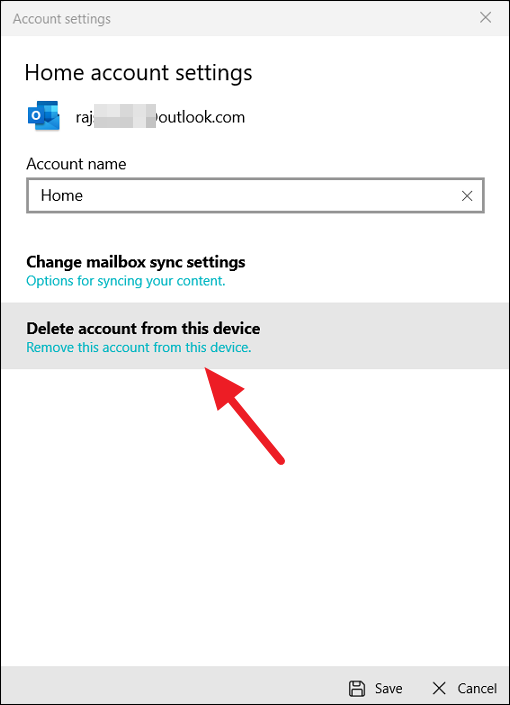
Для удаления учетной записи из приложения Календарь переходим обратно в окно «Параметры учетной записи», предварительно кликнув по УЗ, которую хотим удалить и щелкаем по пункту «Удалить учетную запись с этого устройства».
Управление дополнительными календарями
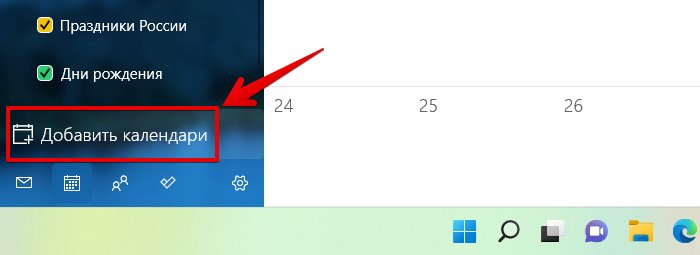
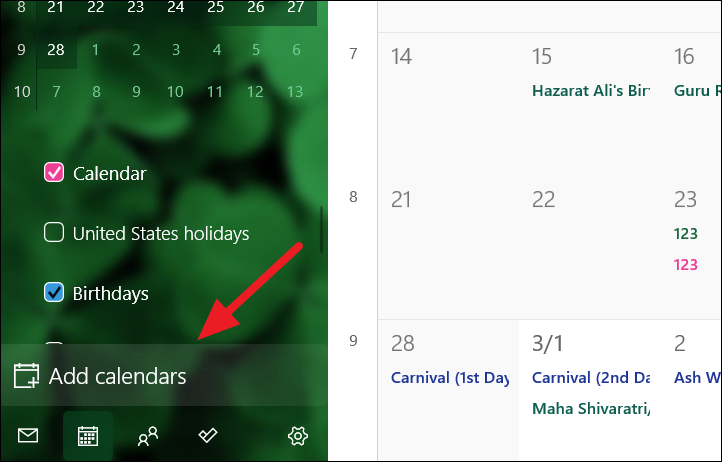
Мы также можем добавить дополнительные календари в каждую учетную запись. Для этого кликаем по кнопке «Добавить календари» в левой нижней части окна.
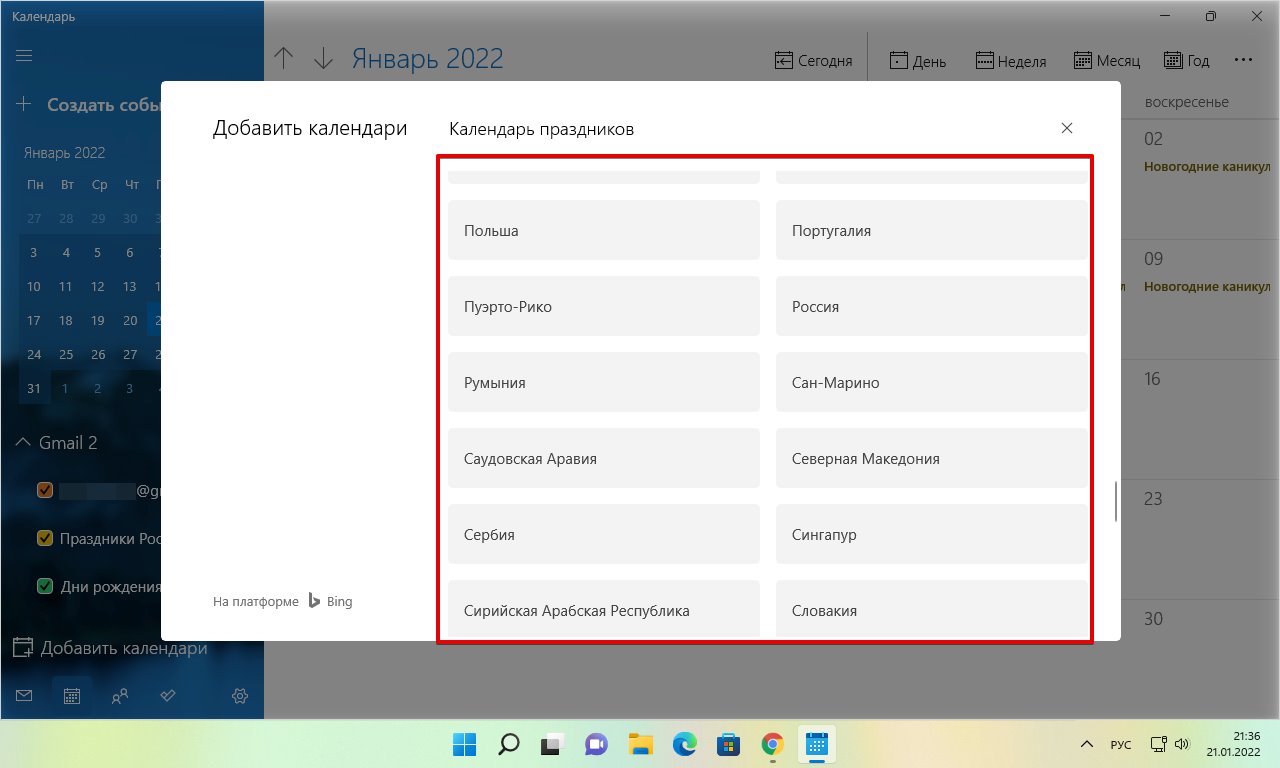
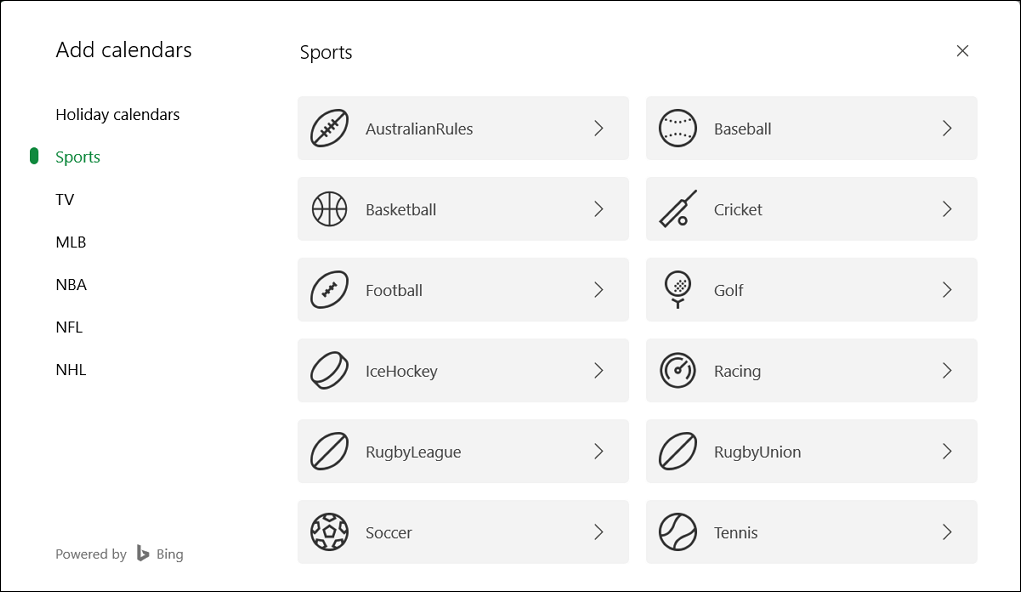
Появится окно, в котором слева будет доступен список различных календарей (в данном примере доступен только один календарь — Календарь праздников), а в правой части подкатегории этих календарей. Щелкаем по любому календарю, чтобы его добавить.
Добавленный календарь теперь доступен в левой части окна. Можно снять флажок, чтобы скрыть все его события.

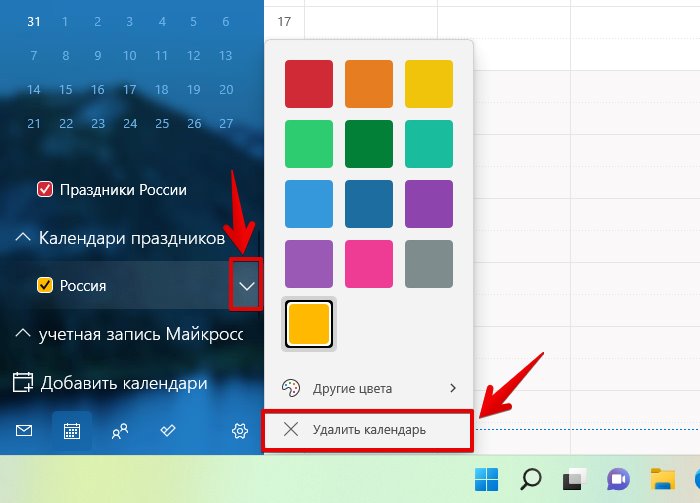
А для удаления дополнительного календаря, щелкаем по кнопке со стрелкой, чтобы отобразить дополнительное меню, в котором выбираем пункт «Удалить календарь».
Как настроить внешний вид календаря в Windows 11
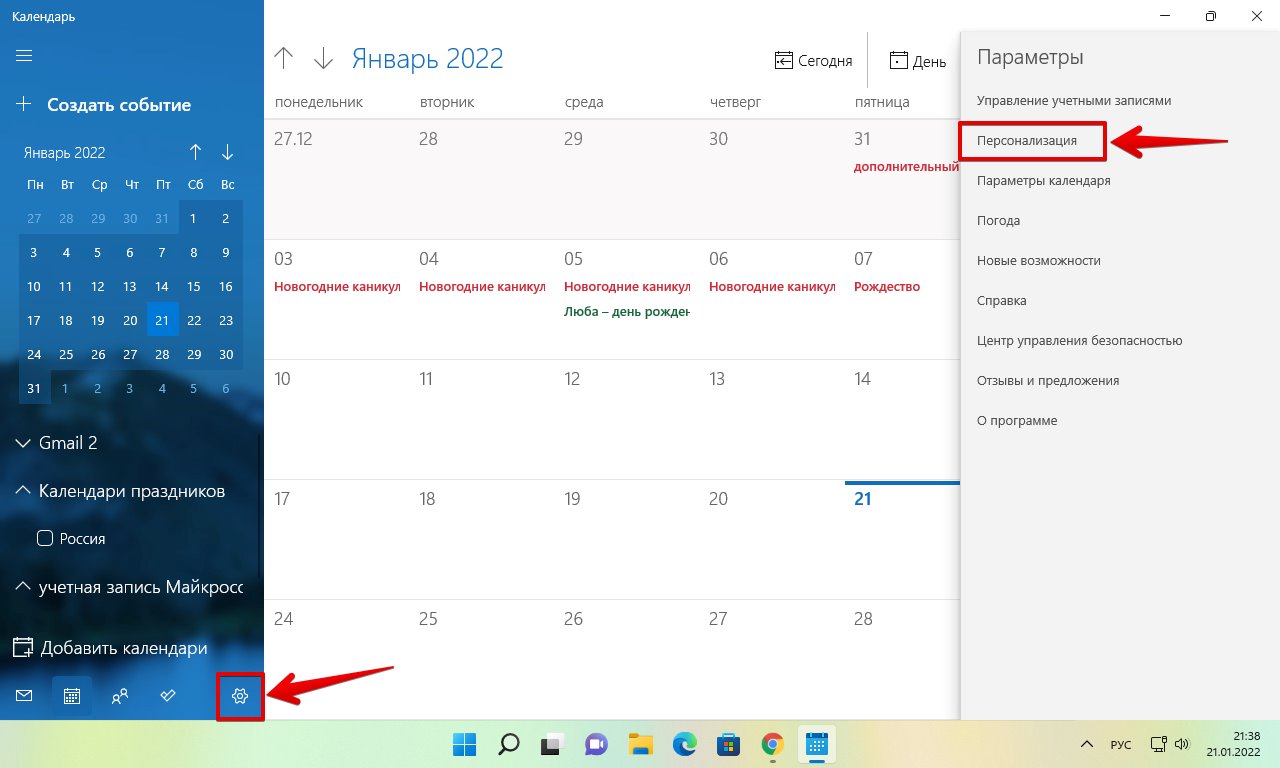
В приложении Календарь можно настроить фоновое изображение, а также установить светлые или темные цвета интерфейса. Чтобы персонализировать приложение «Календарь», выполняем следующие действия. Щелкаем по кнопке «Настройки» и выбираем пункт «Персонализация» в меню справа.
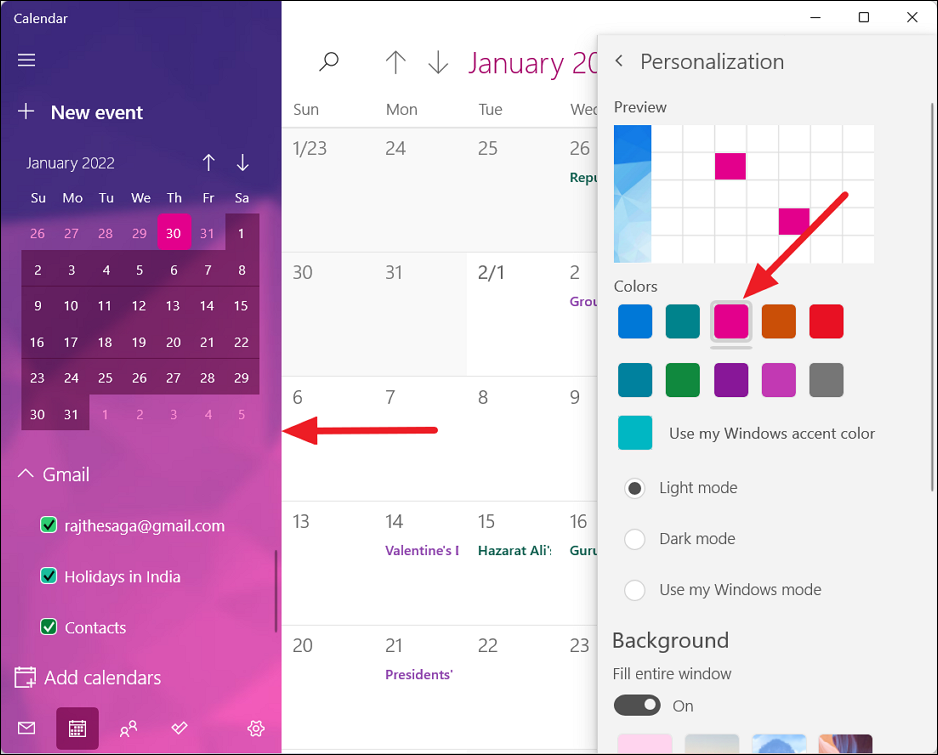
В разделе «Цвета» можно выбрать цвет интерфейса, щелкнув по соответствующей кнопке.
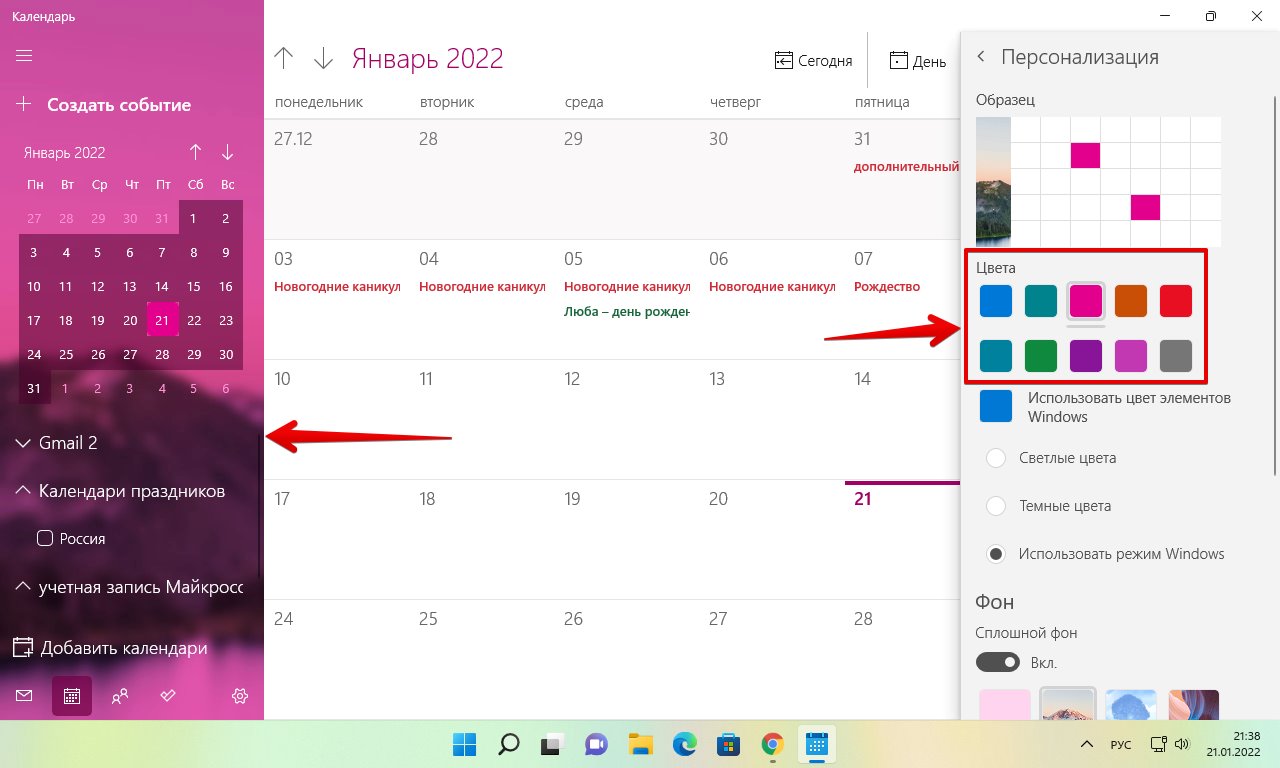
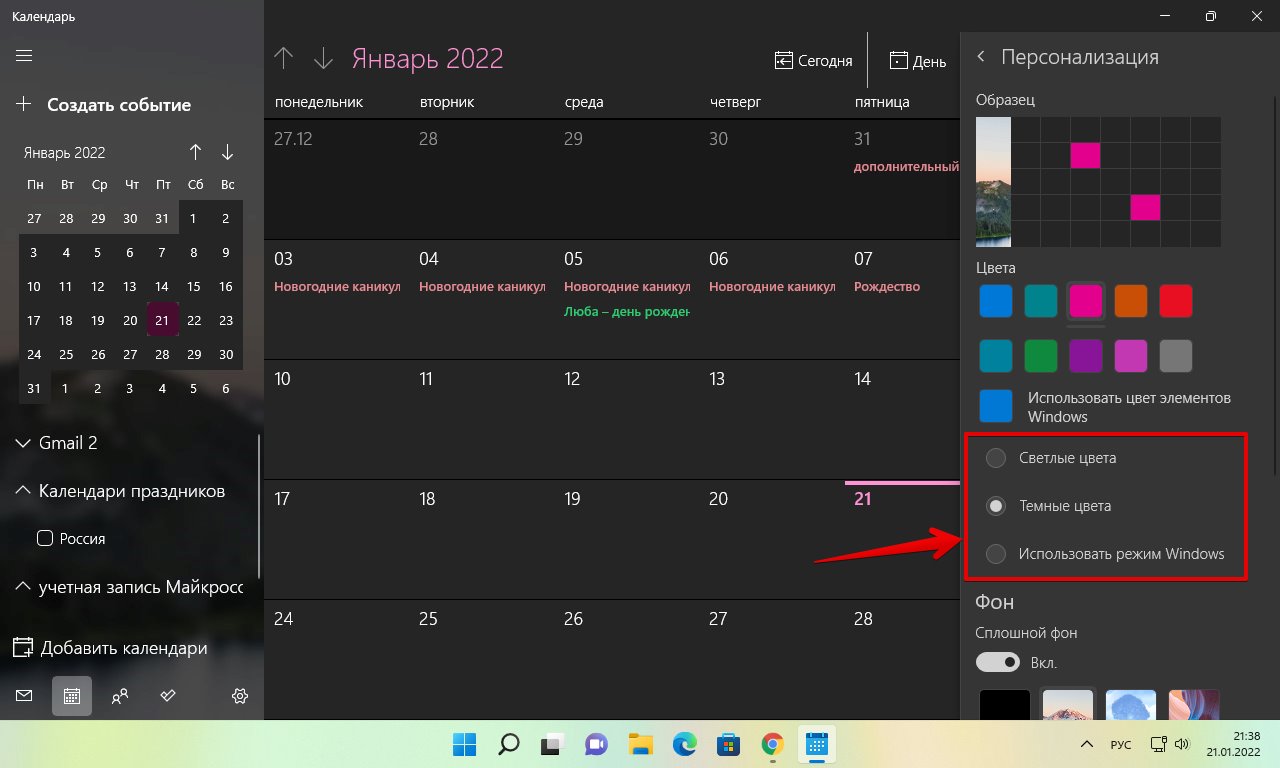
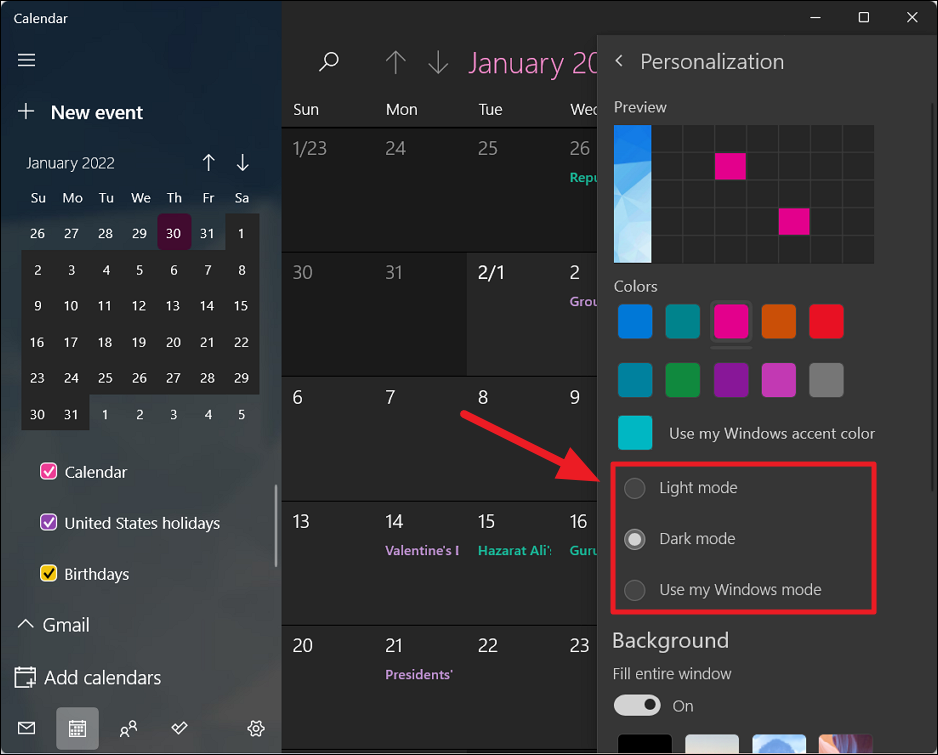
Если необходимо изменить цветовую схему всего календаря, используем один из следующих режимов:
- Светлые цвета
- Темные цвета
- Использовать режим Windows
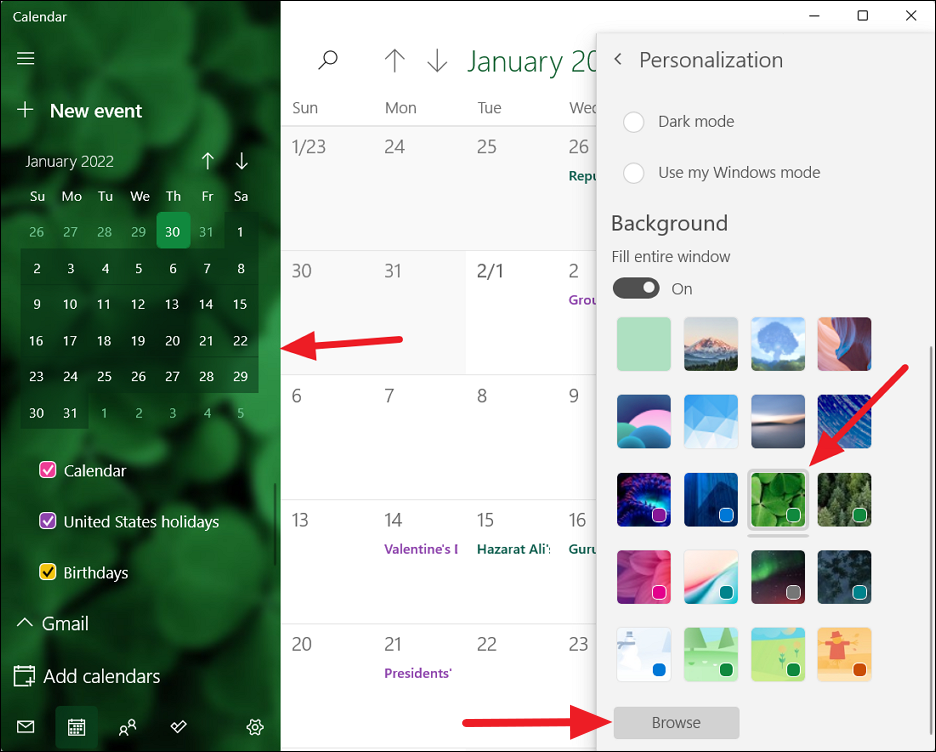
Если мы хотим изменить фон календаря, выбираем один из предустановленных фонов в разделе «Фон». Если необходимо использовать свой собственный фон для календаря, нажимаем кнопку «Обзор» и выбираем изображение с нашего ПК.

Как изменить цвет всплывающего окна календаря на панели задач
Если необходимо изменить цвет всплывающего окна календаря на панели задач, нам необходимо изменить цветовые настройки в приложении «Параметры» Windows 11.
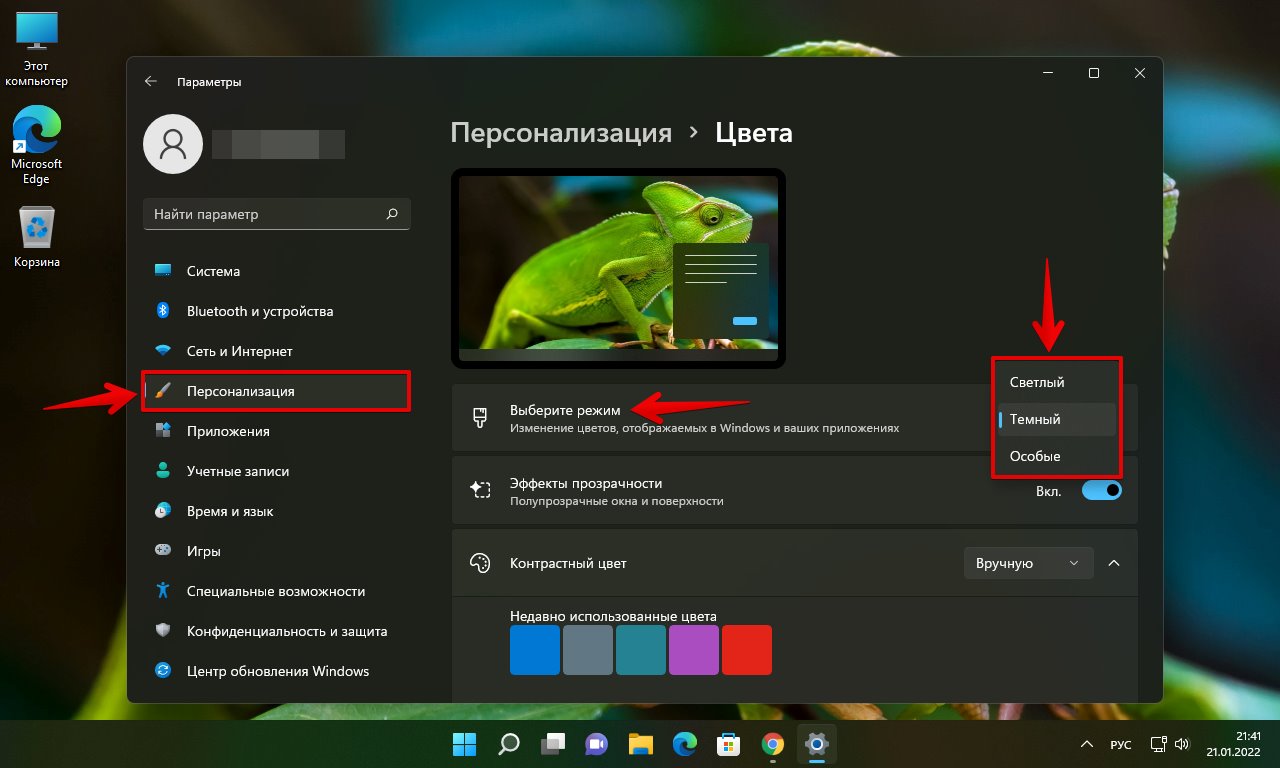
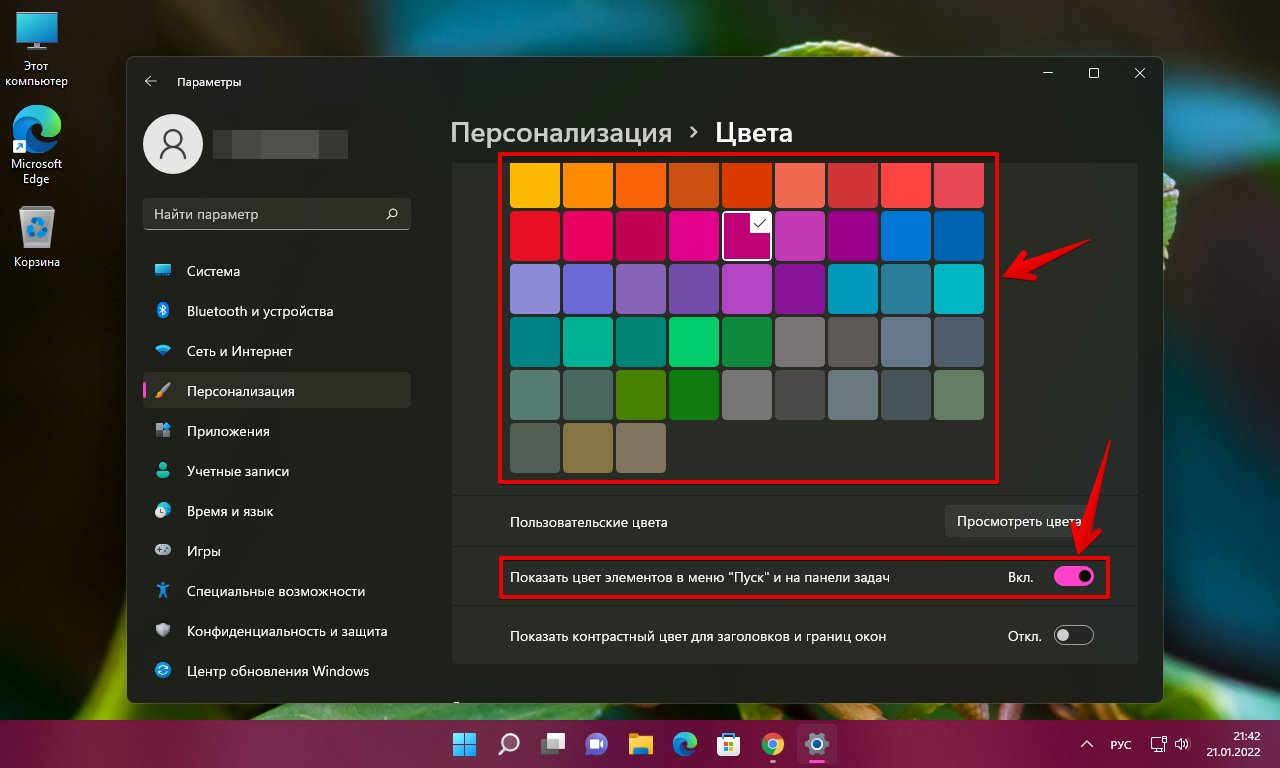
Открываем приложение «Параметры» (клавиши «Win+I») и переходим в раздел «Персонализация» на левой панели. Затем открываем параметры «Цвета» на правой панели.
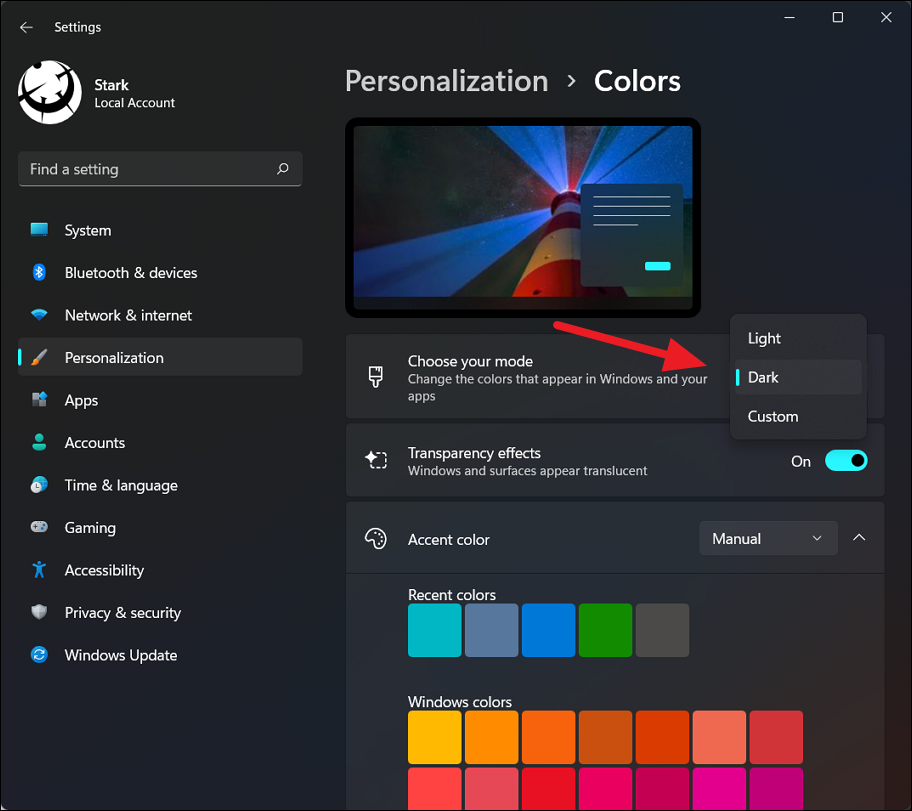
Затем находим параметр «Выберите режим» и устанавливаем значение «Темный».
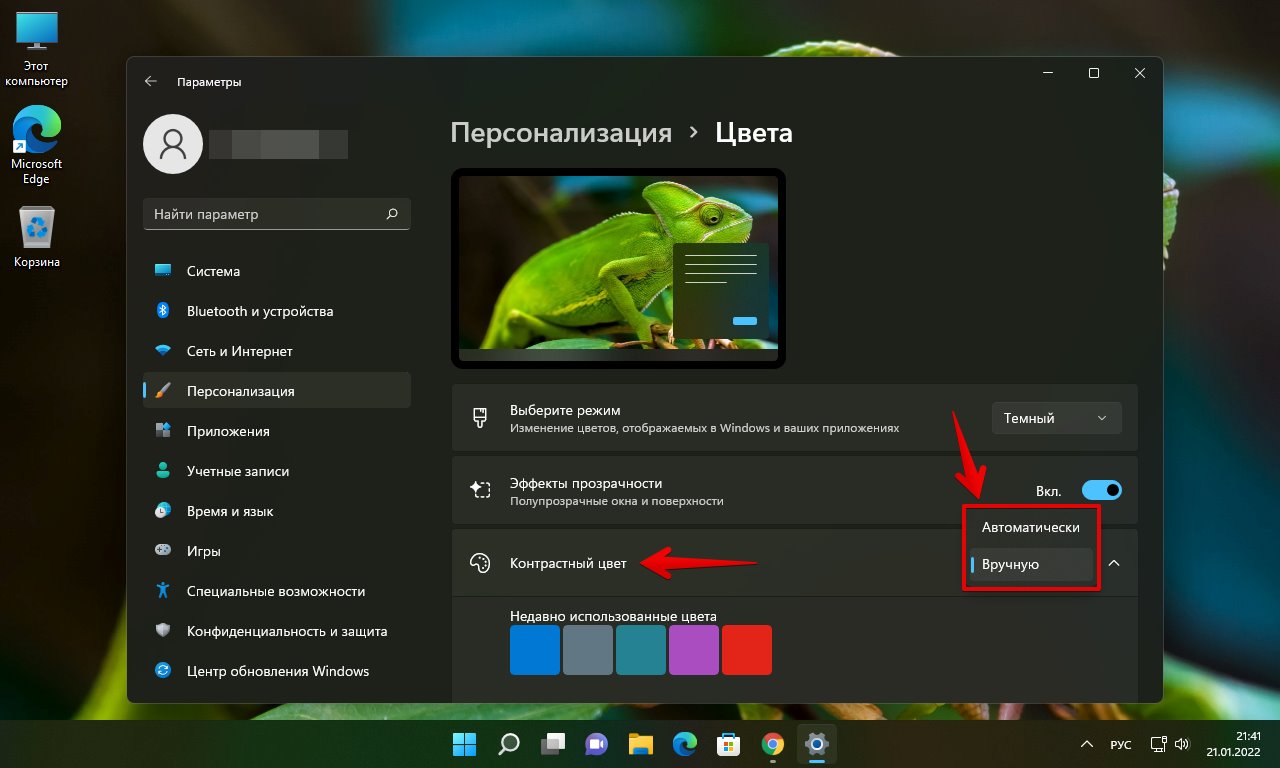
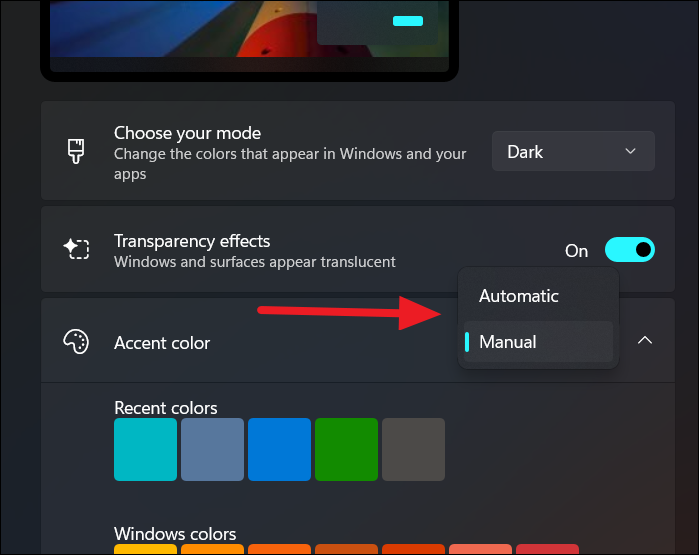
Далее находим параметр «Контрастный цвет» и устанавливаем значение «Вручную».
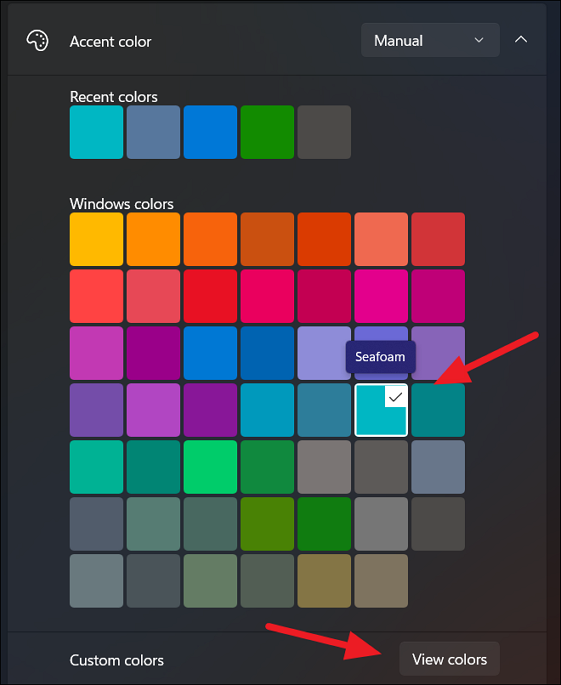
Теперь выбираем желаемый цвет и устанавливаем флажок у параметра «Показать цвет элементов в меню Пуск и на панели задач».
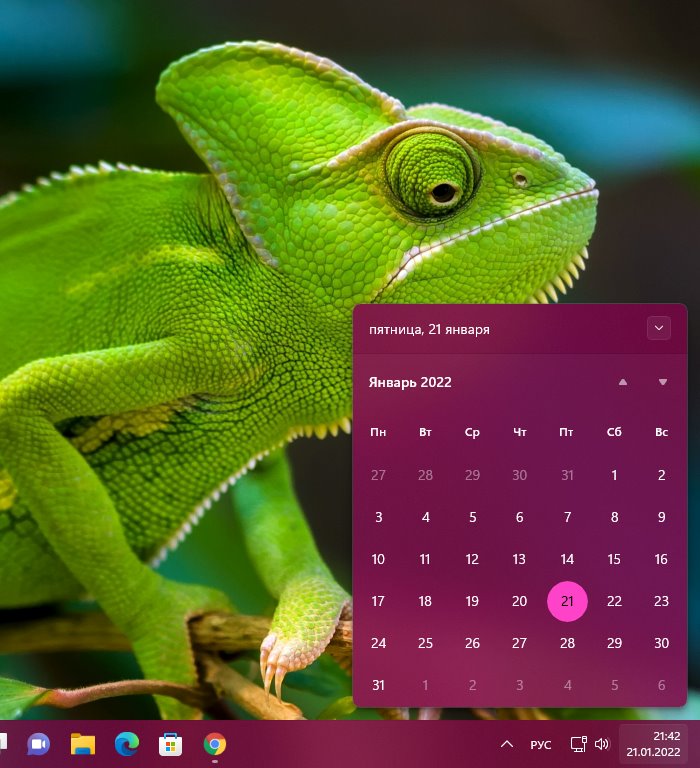
Открываем календарь на панели задач и видим, что он теперь окрашен в установленный нами цвет.
Как изменить вид календаря Windows 11
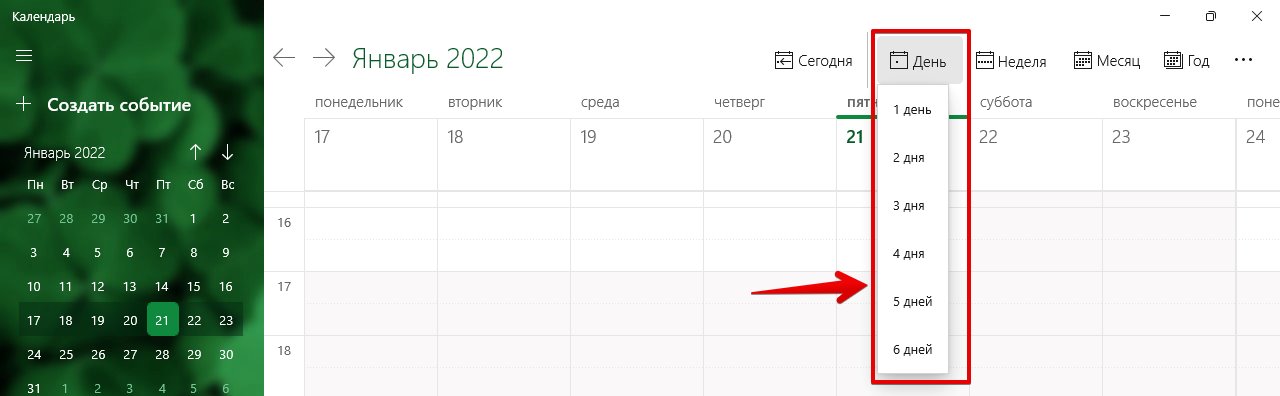
По умолчанию, когда мы открываем приложение «Календарь», оно показывает текущий месяц. Но можно установить различные отображения для календаря. Например, можно настроить просмотр событий за сегодня, за 3 дня, за неделю, за месяц или за год.
Если необходимо просмотреть события за 3 дня, нажимаем кнопку «День» на панели инструментов сверху и в выпадающем списке выбираем вариант «3 дня».
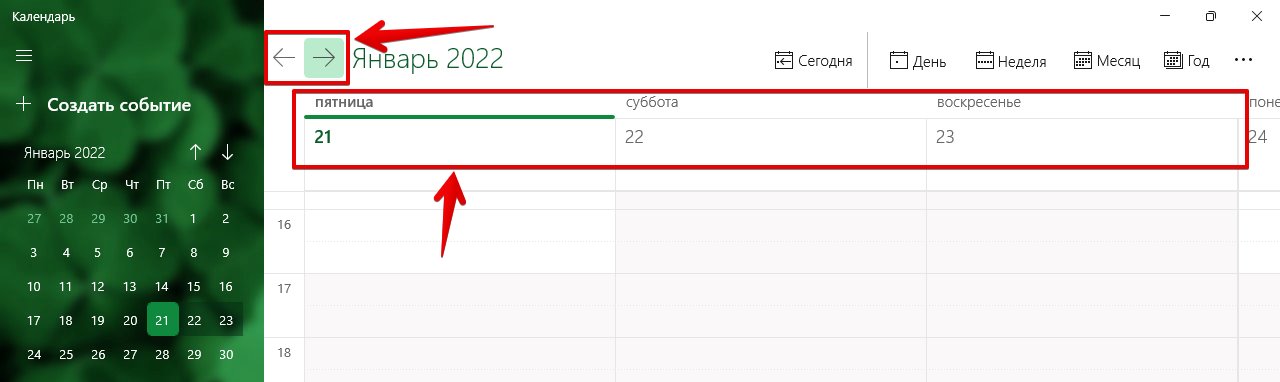
Календарь покажет нам все события за 3 дня, как показано ниже на скриншоте. Чтобы увидеть следующие или предыдущие 3 дня, нажимаем кнопки со стрелками.
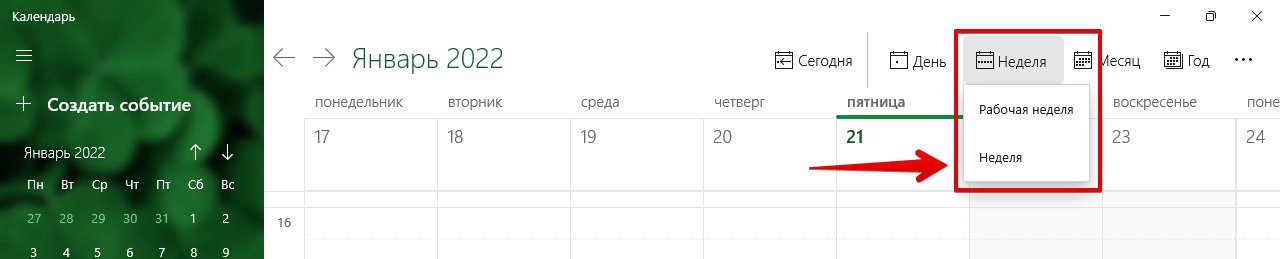
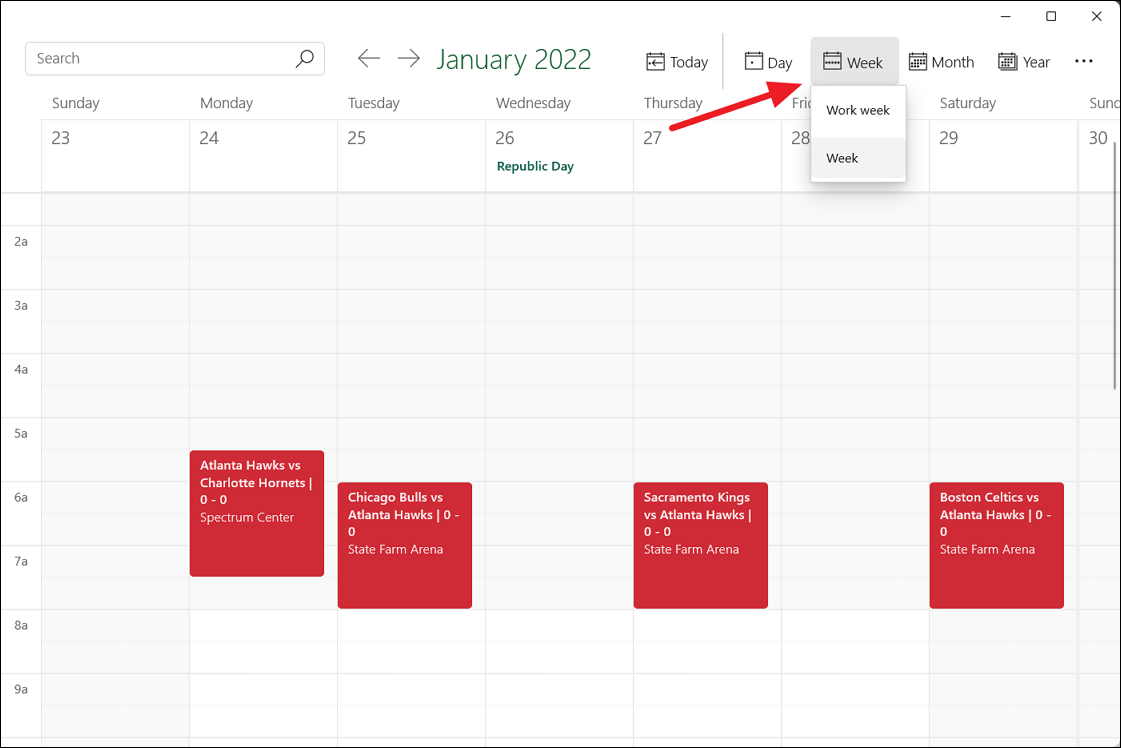
Щелкнув по кнопке «Неделя» можно увидеть события в календаре за всю неделю. Также доступны дополнительные параметры:
- Рабочая неделя
- Неделя
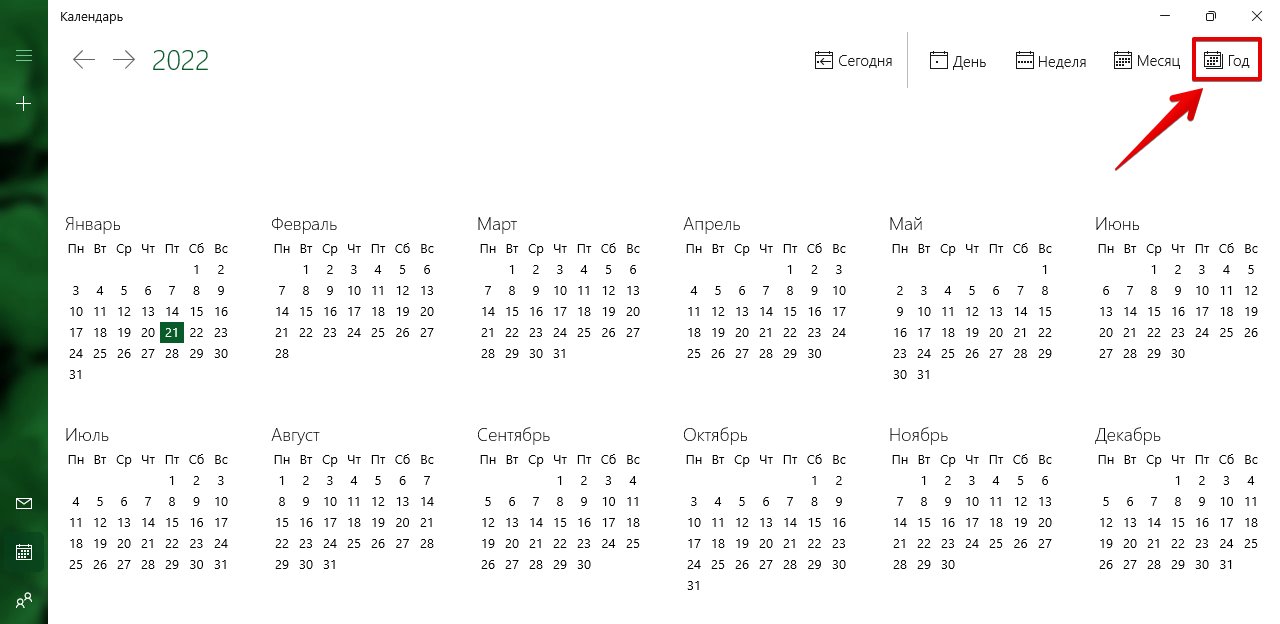
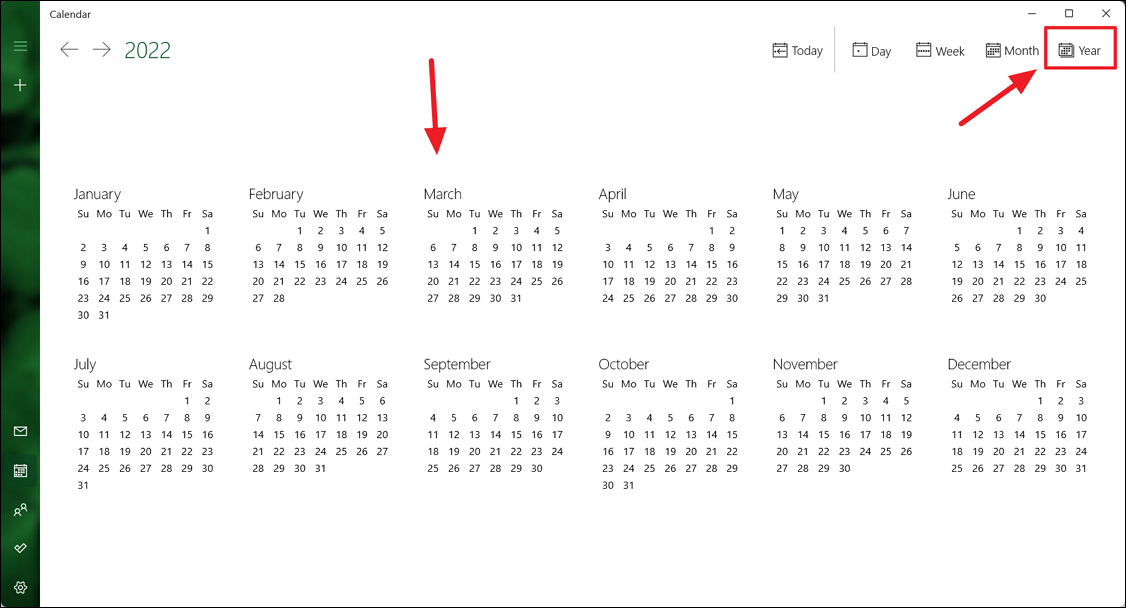
Для того, чтобы быстро найти определенный месяц или день, можно нажать на кнопку «Год», чтобы отобразить весь год в календаре.
Как добавлять события в календарь Windows 11
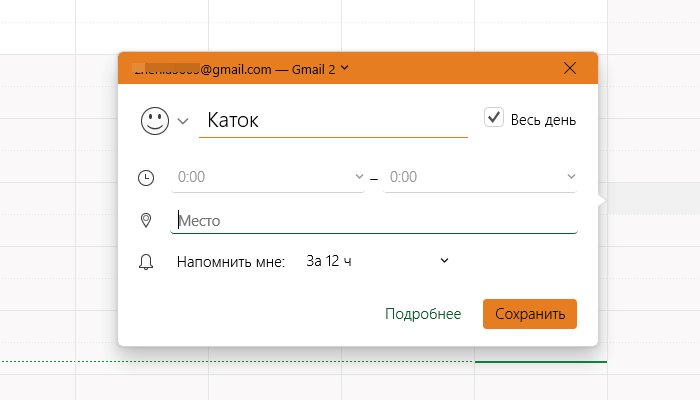
Щелкаем по любой ячейки календаря, чтобы добавить событие. Появится окно добавления события, в котором можно редактировать такие значения как:
- Название события
- Иконка события
- Время начала и окончания события
- Место события
- Напоминание
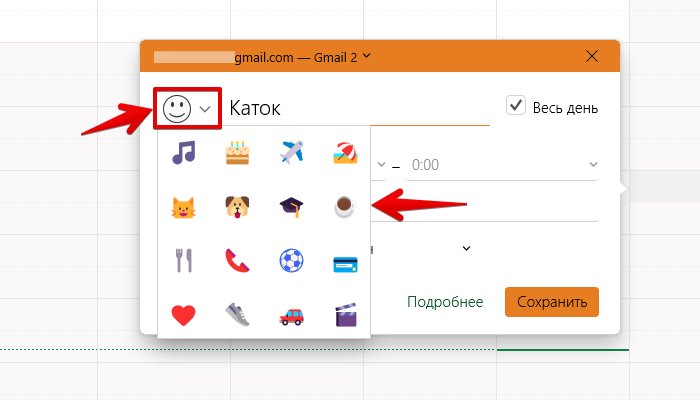
Слева от поля «Название события» доступна кнопка иконка, щелкнув по которой появится всплывающее меню с различными иконками.
Убрав флажок у параметра «Весь день» станут доступны поля начала и окончания события.
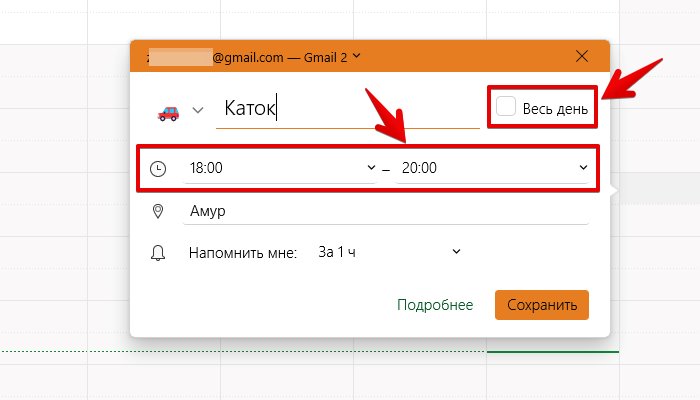
Для сохранения созданного события в календаре нажимаем кнопку «Сохранить».
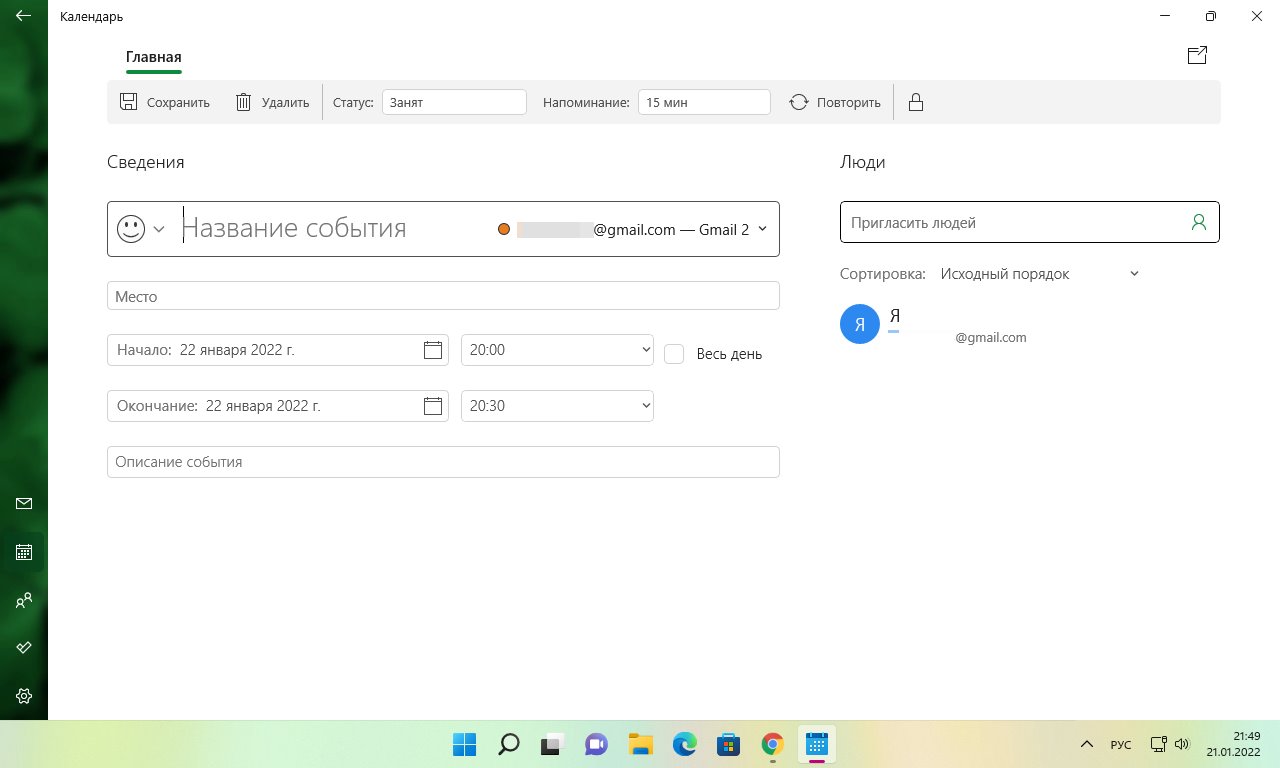
Как создать подробное событие в календаре
Также в календаре можно создать событие с расширенными настройками. Для этого щелкаем по кнопке «Подробнее» в окне быстрого создания события.

После этого мы окажемся в новом окне. Здесь доступны дополнительные настройки — можно указать описание события с возможностью форматирования текста, а так же назначить группу пользователей, у которых событие станет доступно в календаре.
Как синхронизировать события в приложении «Календарь»
Если новые события не приходят в календарь, необходимо его синхронизировать. Сначала откроем приложение «Календарь» и нажмем кнопку меню с тремя точками в правом верхнем углу. Затем выберем опцию «Синхронизировать».
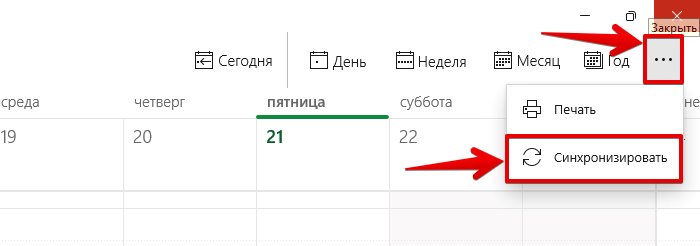
Это синхронизирует события со всех наших устройств и облака.
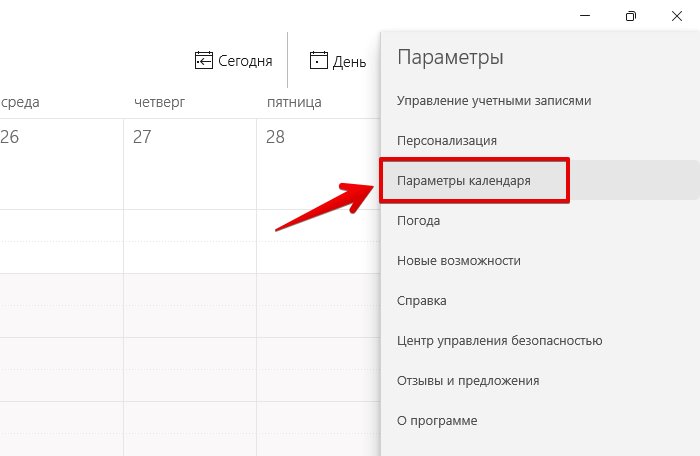
Как настроить параметры календаря в Windows 11
Приложение «Календарь» в Windows 11 позволяет изменять различные настройки, такие как первый день недели, дни рабочей недели, рабочее время и так далее.
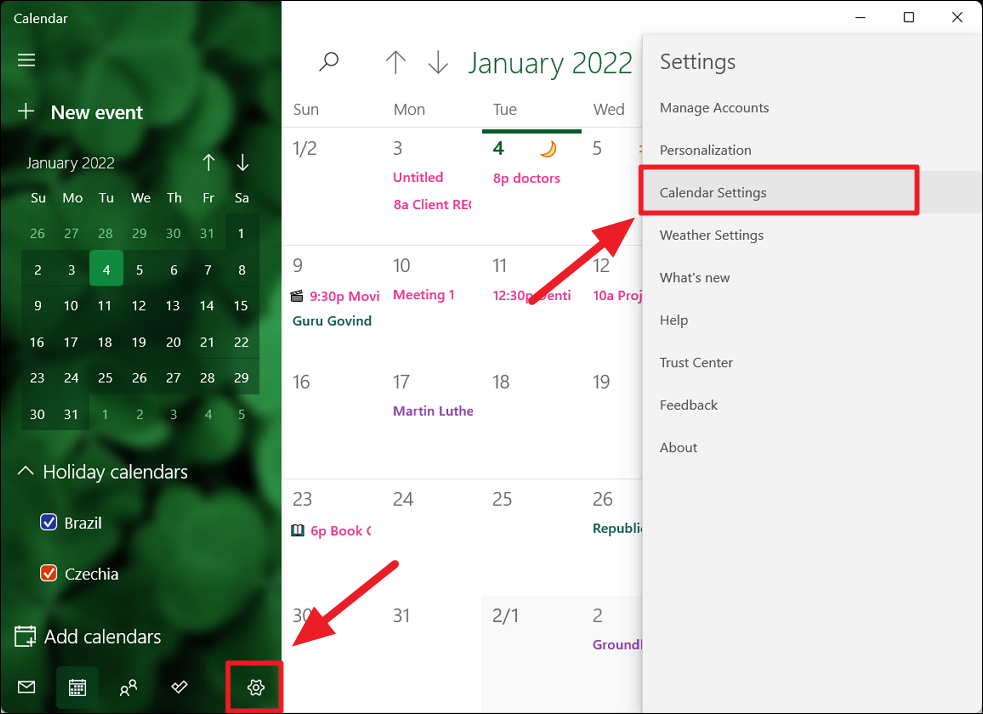
Чтобы получить доступ к настройкам, щелкаем по кнопке «Настройки», а затем выбираем пункт «Параметры календаря».
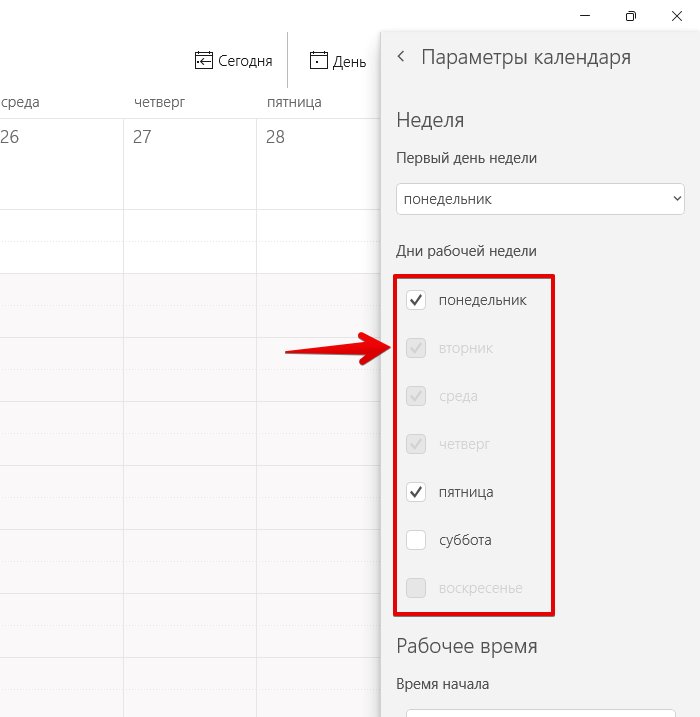
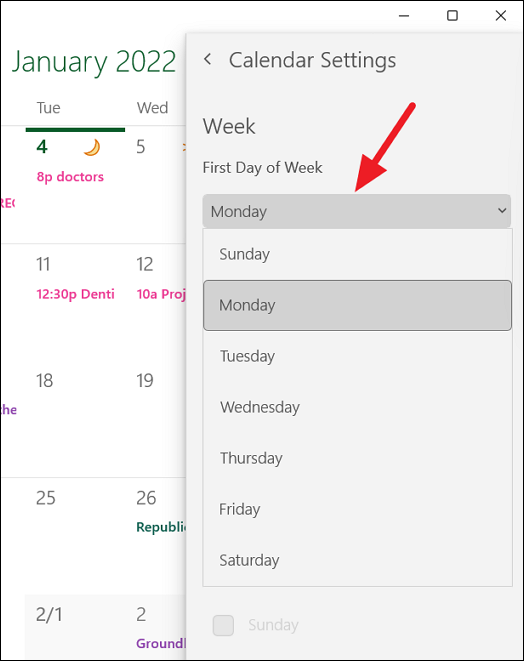
В разделе «Неделя» доступна настройка «Первый день недели«, щелкаем по раскрывающемуся списку, чтобы выбрать день недели.
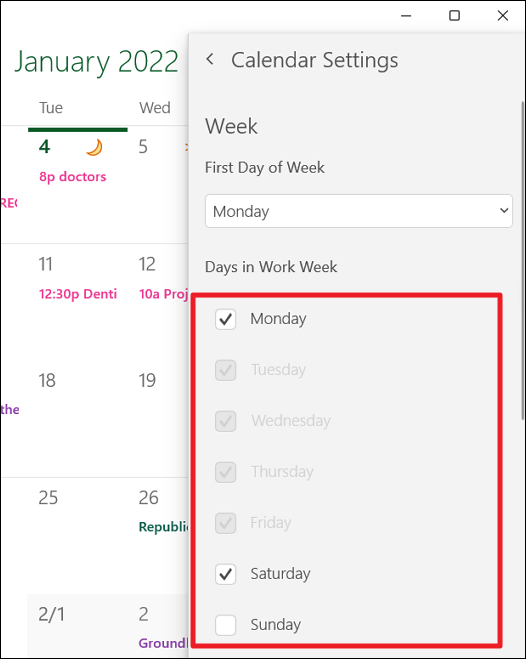
Ниже доступна настройка «Дни рабочей недели«. Здесь все просто, отмечаем флажком те дни недели, которые являются рабочими.
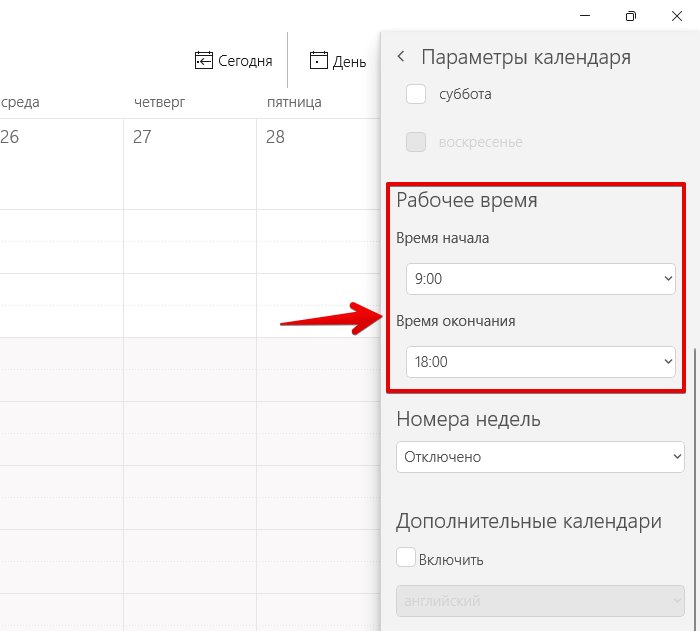
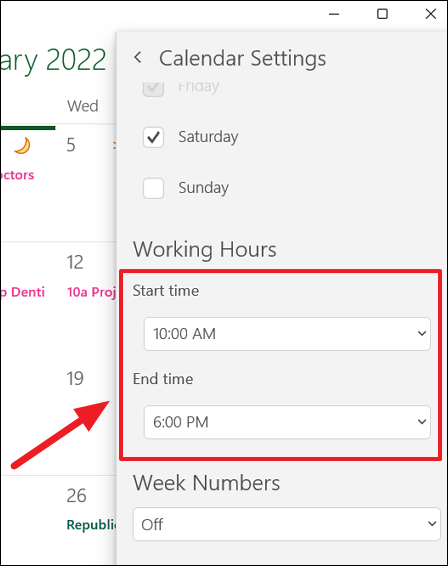
В разделе «Рабочее время» доступно два параметра — «Время начала» и «Время окончания«. Задаем параметры, щелкнув по раскрывающемуся списку.
Главная » Windows 11 » Как создавать напоминания в Windows 11 – краткое руководство
Мы расскажем, как создавать напоминания на компьютере с Windows 11, чтобы вы могли записывать дела, а затем получать уведомление с тем, что вы написали в напоминании, чтобы напомнить вам. Вы можете использовать его для чего угодно: от напоминаний о делах, которые вы должны сделать, до особых дат. Для этого вы создадите задачу, а затем установите напоминание.
Для этого мы будем использовать приложение Microsoft To Do, которое обычно предустановлено на вашем компьютере, но если у вас его нет, вы можете загрузить его из Microsoft Store. Это именно то приложение, которое создано для постановки задач и напоминаний в Windows.
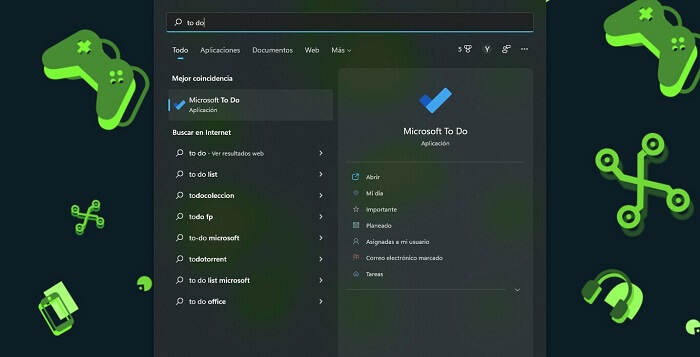
Первое, что вам нужно сделать, это открыть приложение Microsoft To Do в Windows 11. Для этого вы можете открыть меню Пуск и ввести to do так, чтобы оно появилось в качестве первого результата. Если этого не происходит, вам придется загрузить его из Microsoft Store.
Войдя в приложение, вы можете перейти в раздел “Запланированные” в левой колонке, чтобы увидеть все созданные вами задачи. Здесь нажмите на кнопку Добавить задачу, чтобы создать ее, а затем установить напоминание.
Когда вы нажмете кнопку Добавить задачу, место, где у вас была эта кнопка, станет пустым для ввода текста. Здесь начните вводить название задачи и напоминания (1), которые вы собираетесь установить. Справа от названия вы увидите несколько кнопок, и вы должны нажать на кнопку календаря (2), чтобы выбрать дату для задания. Здесь можно выбрать один из установленных по умолчанию или нажать на кнопку Выбрать дату, чтобы открыть календарь и выбрать день самостоятельно.
Теперь нажмите на значок будильника, чтобы установить напоминание о задаче. Когда вы это сделаете, у вас будет несколько предустановленных дат и времени для напоминания, но лучше всего нажать на опцию Выбрать дату и время, чтобы вручную установить напоминание.
Откроется календарь, в котором вы сможете вручную выбрать день, а ниже вручную установить определенное время для напоминания в этот день. После этого просто нажмите кнопку Сохранить.
Вы также сможете установить, как будет повторяться напоминание: каждый день, по будням, каждый день недели, каждый месяц в день и время или каждый год. Вы также можете установить настраиваемые повторы для ручной установки дней. Для всего этого у вас есть еще одна иконка с календарем и стрелками.
Наконец, когда все готово, нужно снова щелкнуть на имени напоминания, а затем нажать Enter. Когда вы это сделаете, задача будет добавлена в список, и у вас будет установлено напоминание.
И все, когда наступит дата и время, на которое вы его назначили, Windows отобразит уведомление с напоминанием, в котором будет указано имя, которое вы дали задаче.
( 2 оценки, среднее 5 из 5 )
Setting up a reminder is essential if you frequently forget important tasks. Of course, you can set up reminders on your phone, but if you spend most of your day working on a computer, you may want to set up reminders on your PC instead.

Thankfully, setting up reminders on your Windows computer is quite easy. We’ll show you the three best ways to set up reminders on Windows 11. So, let’s check them out.
1. Set Up Reminders With Microsoft To Do App
Let’s start with the easiest method. You can use the Microsoft To Do app, which comes pre-installed on Windows, to set up reminders on your PC quickly. The app is completely free and simple to use.
Follow the steps below to set up a reminder using the Microsoft To Do app.
Step 1: Open Microsoft To Do app on your PC. If you can’t find it, download it from the Microsoft Store.
Microsoft To Do for Windows
Step 2: Sign in with your Microsoft account.
Step 3: In the My Day tab, click the ‘Add a task’ button. Type in your task details and press Enter to save it.

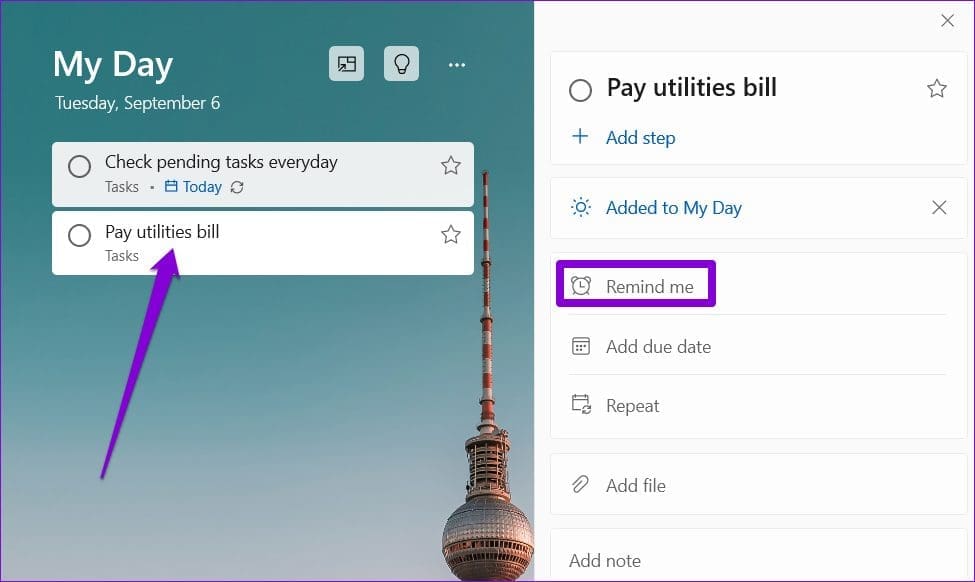
Step 4: Next, click on your task and select the Remind me option from the menu that appears on your right.
Step 5: You can choose from the suggested options or set a date and time.

And that’s about it. Microsoft To Do will remind you about the task at the specified date and time. You can also set a recurring reminder for your task by clicking on the Repeat option.

2. Set Up Reminders Using the Calendar App
Another option for setting up reminders on Windows 11 is to use the built-in Calendar app. This can come in handy if you have already synced your Google account with the Calendar app and want to view all your tasks and reminders in a single app.
Follow these steps to set up a reminder using the Windows Calendar app.
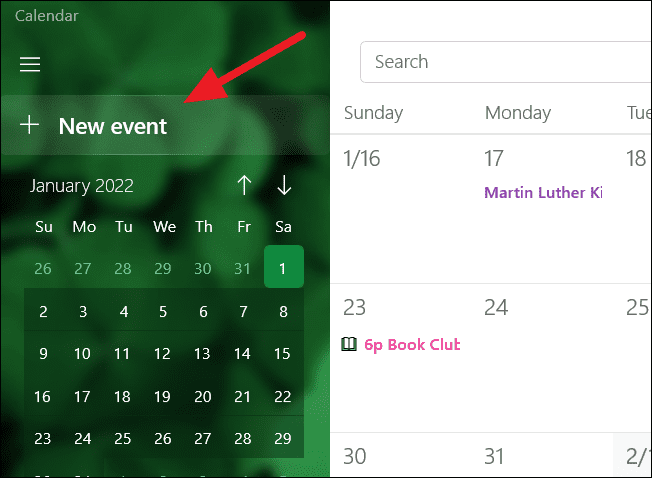
Step 1: Open the Calendar app on your PC and click on the New event button.

Step 2: Enter your task details.

Step 3: Use the drop-down menu beside the Reminder to define when the app should remind you.

If you want to set up a recurring reminder, click on the Repeat button at the top and specify how frequently the app needs to remind you.
Step 4: Lastly, click on Save.
After that, the reminder will appear on your calendar app. It’s worth noting that the reminder notification will also appear on your other devices where you’ve signed in with your calendar account.
3. Set Up Reminders Using Task Scheduler
Task Scheduler is a powerful utility that allows you to automate mundane tasks on Windows. You can also set up reminders on your Windows 11 PC. Although the process is not as quick as the previous two methods, it’s still quite easy to set up reminders using the Task Scheduler app. Here’s how to do it.
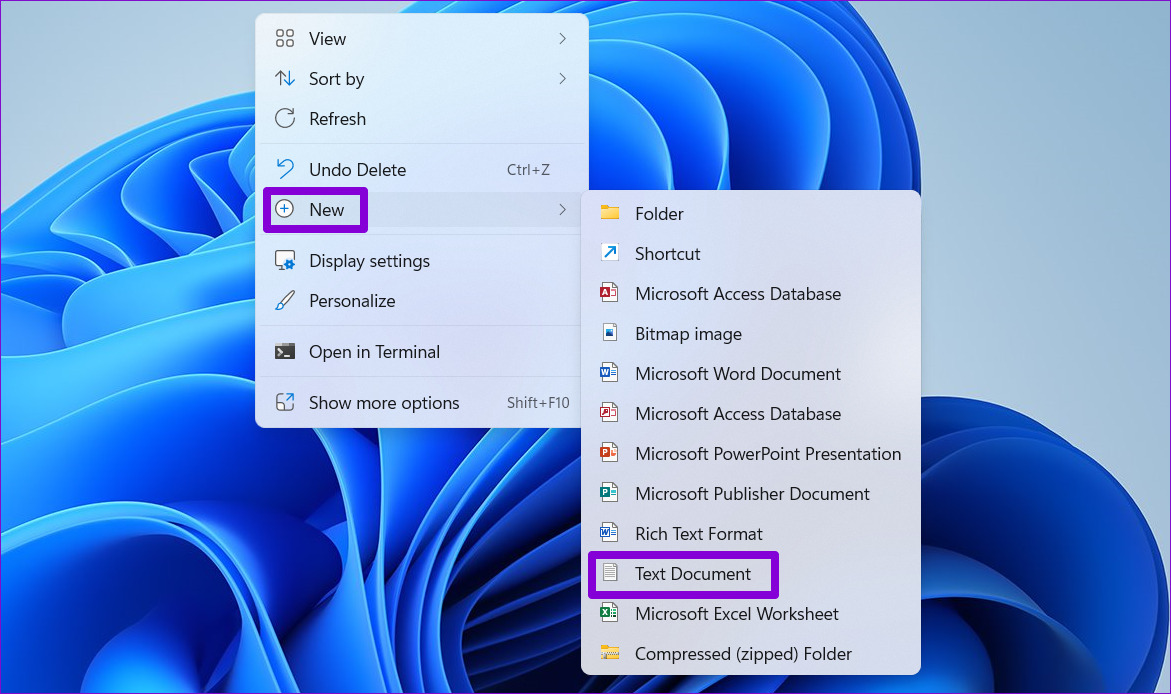
Step 1: Right-click on an empty spot on the Desktop, go to New and select Text Document.
Step 2: Type in the reminder text in the following format:
@echo off
Title Reminder
Echo Task Details
pause
Replace Task Details in the above command with the actual reminder message.

Step 3: Press the Ctrl + Shift + S to open the Save as dialog. Enter a name for your file and save it in the .CMD format.

Step 4: Next, open Task Scheduler and select the Create Task option from the right pane.

Step 5: Enter your task’s name and use the drop-down menu at the bottom to select Windows 10.

Step 6: Next, switch to the Triggers tab and click on New.

Step 7: Define when you want the computer to remind you. You can set up a one-time reminder or a recurring one. Then, click on OK.

Step 8: Switch to the Actions tab and click on New.

Step 9: Click the Browse button and select the .CMD file you created earlier. Then, click on OK.

Step 10: Click on OK again to save your reminder.

Windows 11 will remind you of your task by displaying your message in a Terminal window. To cancel a reminder, disable your scheduled task.

No More Forgetting Important Tasks
It’s natural to forget about tasks in your busy schedule. One way to ensure you don’t forget about them is to set up reminders. Let us know which of the above methods you like the most in the comments below.
Настройка напоминания необходима, если вы часто забываете о важных задачах. Конечно, вы можете настроить напоминания на своем телефоне, но если вы проводите большую часть дня, работая за компьютером, вы можете вместо этого настроить напоминания на своем ПК.
К счастью, настроить напоминания на вашем компьютере с Windows довольно просто. Мы покажем вам три лучших способа настроить напоминания в Windows 11. Итак, давайте проверим их.
1. Настройте напоминания с помощью приложения Microsoft To Do
Начнем с самого простого метода. Вы можете использовать приложение Microsoft To Do, которое предустановлено в Windows, чтобы быстро настроить напоминания на своем ПК. Приложение полностью бесплатное и простое в использовании.
Выполните следующие действия, чтобы настроить напоминание с помощью приложения Microsoft To Do.
Шаг 1: Откройте приложение Microsoft To Do на своем ПК. Если вы не можете найти его, загрузите его из Microsoft Store.
Microsoft для Windows
Шаг 2: Войдите в свою учетную запись Майкрософт.
Шаг 3: Во вкладке «Мой день» нажмите кнопку «Добавить задачу». Введите сведения о задаче и нажмите Enter, чтобы сохранить ее.

Шаг 4: Затем нажмите на свою задачу и выберите параметр «Напомнить мне» в меню, которое появляется справа.

Шаг 5: Вы можете выбрать один из предложенных вариантов или установить дату и время.

И это все. Microsoft To Do напомнит вам о задаче в указанную дату и время. Вы также можете установить повторяющееся напоминание для своей задачи, щелкнув параметр «Повторить».

2. Настройте напоминания с помощью приложения «Календарь»
Другой вариант настройки напоминаний в Windows 11 — использовать встроенное приложение «Календарь». Это может пригодиться, если вы уже синхронизировали свою учетную запись Google с приложением «Календарь» и хотите просматривать все свои задачи и напоминания в одном приложении.
Выполните следующие действия, чтобы настроить напоминание с помощью приложения Календарь Windows.
Шаг 1: Откройте приложение «Календарь» на своем ПК и нажмите кнопку «Новое событие».

Шаг 2: Введите сведения о своей задаче.

Шаг 3: Используйте раскрывающееся меню рядом с напоминанием, чтобы определить, когда приложение должно напомнить вам.

Если вы хотите настроить повторяющееся напоминание, нажмите кнопку «Повторить» вверху и укажите, как часто приложение должно напоминать вам.

Шаг 4: Наконец, нажмите Сохранить.

После этого напоминание появится в вашем календаре. Стоит отметить, что уведомление с напоминанием также появится на других ваших устройствах, на которых вы вошли в свою учетную запись календаря.
Планировщик заданий — мощная утилита, позволяющая автоматизировать рутинные задачи в Windows. Вы также можете настроить напоминания на ПК с Windows 11. Хотя этот процесс не такой быстрый, как два предыдущих метода, все же довольно легко настроить напоминания с помощью приложения «Планировщик заданий». Вот как это сделать.
Шаг 1: Щелкните правой кнопкой мыши пустое место на рабочем столе, перейдите в «Создать» и выберите «Текстовый документ».

Шаг 2: Введите текст напоминания в следующем формате:
@echo off
Title Reminder
Echo Task Details
pause
Замените сведения о задаче в приведенной выше команде фактическим сообщением с напоминанием.

Шаг 3: Нажмите Ctrl + Shift + S, чтобы открыть диалоговое окно «Сохранить как». Введите имя для вашего файла и сохраните его в формате .CMD.

Шаг 4: Затем откройте планировщик заданий и выберите параметр «Создать задание» на правой панели.

Шаг 5: Введите название своей задачи и используйте раскрывающееся меню внизу, чтобы выбрать Windows 10.

Шаг 6: Затем перейдите на вкладку «Триггеры» и нажмите «Создать».

Шаг 7: Определите, когда вы хотите, чтобы компьютер напоминал вам. Вы можете настроить однократное или повторяющееся напоминание. Затем нажмите ОК.

Шаг 8: Перейдите на вкладку «Действия» и нажмите «Создать».

Шаг 9: Нажмите кнопку «Обзор» и выберите созданный ранее файл .CMD. Затем нажмите ОК.

Шаг 10: Нажмите OK еще раз, чтобы сохранить напоминание.

Windows 11 напомнит вам о вашей задаче, отобразив ваше сообщение в окне терминала. Чтобы отменить напоминание, отключите запланированное задание.

Больше не нужно забывать о важных задачах
Вполне естественно забыть о задачах в своем плотном графике. Один из способов убедиться, что вы не забыли о них, — настроить напоминания. Дайте нам знать, какой из вышеперечисленных методов вам нравится больше всего в комментариях ниже.
Windows 11 comes with its own built-in calendar app that helps you schedule tasks, meetings, reminders, appointments, and other events from your personal agenda. Windows Calenders also allows you to synchronize with your accounts like Google calendar, Outlook, iCloud, etc., and view various calendars at the same time in one place.
The Calendar app works offline, so you don’t have to connect to the internet every time you want to check your schedule or agenda. However, you may need to sign in to your Microsoft account to synchronize the calendar across your devices.
Microsoft has made a few changes to the Calendar in Windows 11, one of these changes is removing events integration in the calendar flyout from the taskbar. On Windows 10, if you click on the date and clock on the taskbar corner, the calendar flyout will appear. There, you can access your agenda and add events to the calendar. But in Windows, you can no longer view your agendas at the bottom of the calendar flyout.
In this tutorial, we will show you how to create a new event, manage agendas, customize the calendar app, sync the calendar and use the calendar app in Windows 11.
View or Glance at your Calendar
To quickly glance at your calendar, simply click on the time and date icon at the right corner of your taskbar to see the calendar flyout. Unfortunately, you will not be able to view the agenda from the calendar flyout, you can only see dates and days here.

To view and manage events and agendas, you would have to open the built-in Calendar app. To do that, open the Start menu and click ‘Calendar’ from the Pinned section.
Alternatively, you can also search for Calendar in the Windows search and select the top result.
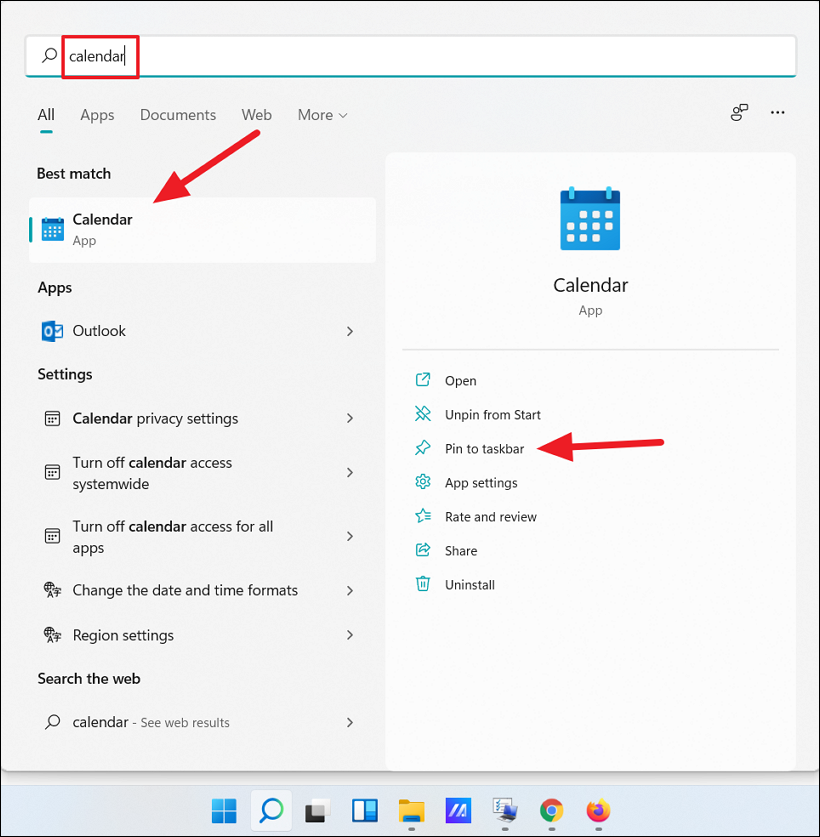
You can also add the Calendar app to the Taskbar by selecting ‘Pin to taskbar’ for easy access.
In the Calendar app, you can access different synced calendars, accounts, and more from the left panel, while on the right panel, you can view and manage agendas.
You can also quickly switch between the calendar app other related Microsoft apps such as the Mail, the People, and the To Do app with a single click.
At the bottom of the left panel in the Calendar app, use the four buttons to switch between Calendar, Mail, People, and To Do apps.
How to Add an Account on Calendar app in Windows 11
Adding an account to your calendar app will let you sync your calendar across your devices connected to the same account, manage agendas on multiple devices, and share your schedule with others. With the Calendar app, you can sync and organize events from various services such as Outlook.com, Microsoft 365, Google, Yahoo, and iCloud.If you want to add a new account to your calendar app, follow these instructions.
Open Calendar the app and click on the ‘Settings’ button in the bottom-left corner.

Then, click on ‘Manage Accounts’ in the menu that appears at the top-right corner of the app.
Next, click on ‘Add account’ to add a new account.
Next, the ‘Add an account’ dialog box will appear with the list of services you can add to the Calendar app. Now, click on the service account you want to add. If you haven’t added your Microsoft account already, you can add it. You can also create a new Microsoft account if you don’t have one by selecting the ‘Create Free Account’ option. Here, we are selecting ‘Google’ account.
In the next window, enter your email address and click ‘Next’.
Then, enter your password and click ‘Next’.
In the next screen, Windows will ask you access to your email, contacts, and calendar. Scroll down the page and click ‘Allow’ to add the account.
You’ll see a confirmation that your account has been linked, click ‘Done’ to complete the process.
Once the account is added to the app, the new account will appear in the list in the left pane as shown below.
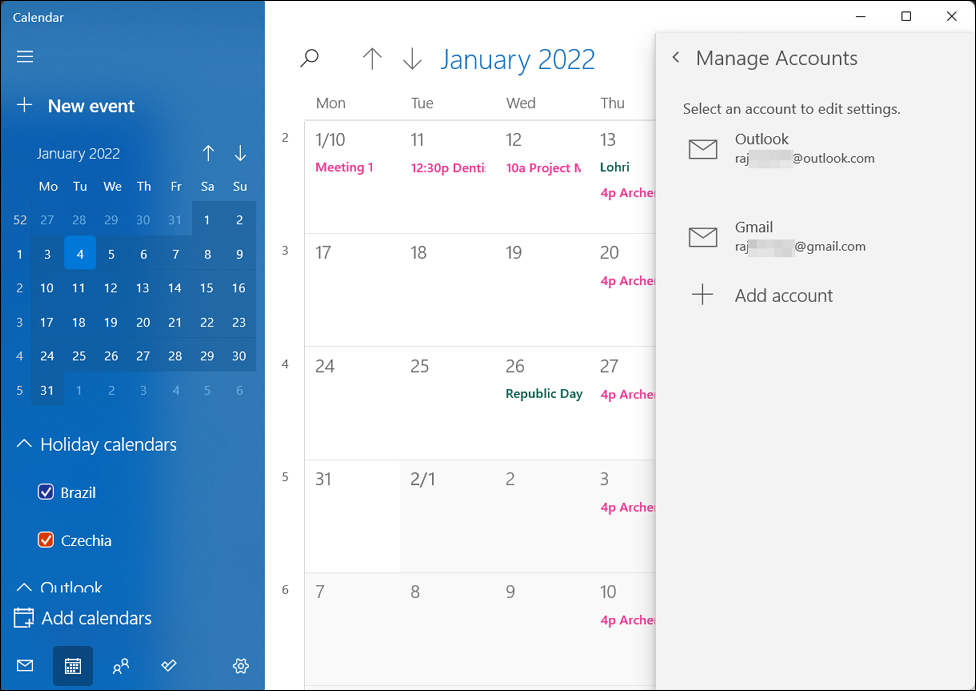
When you add multiple accounts to the Calendar app, events from all the calendars and accounts will be merged into your calendar app.
You can add a name to the account to differentiate the devices connected to the same account. For example, you have connected both the home and the work device to the same Microsoft account on the Calendar app. You can name the work device as ‘Work’ to know which events are from the work.
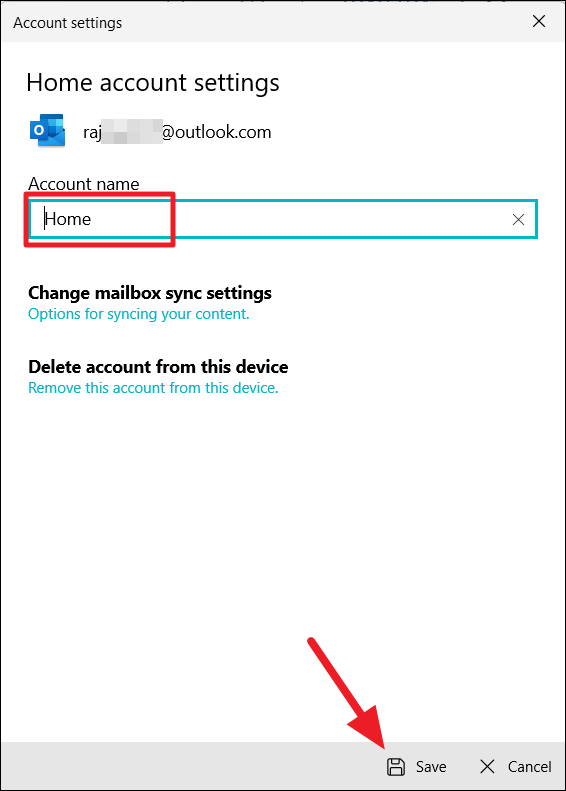
To add a name (or rename) to the account, click on the account you want to add a name for.
Add the desired name to the account in the ‘Account name’ field and click the ‘Save’ button.
To change the sync settings of the account, click the ‘Change mailbox sync settings’.
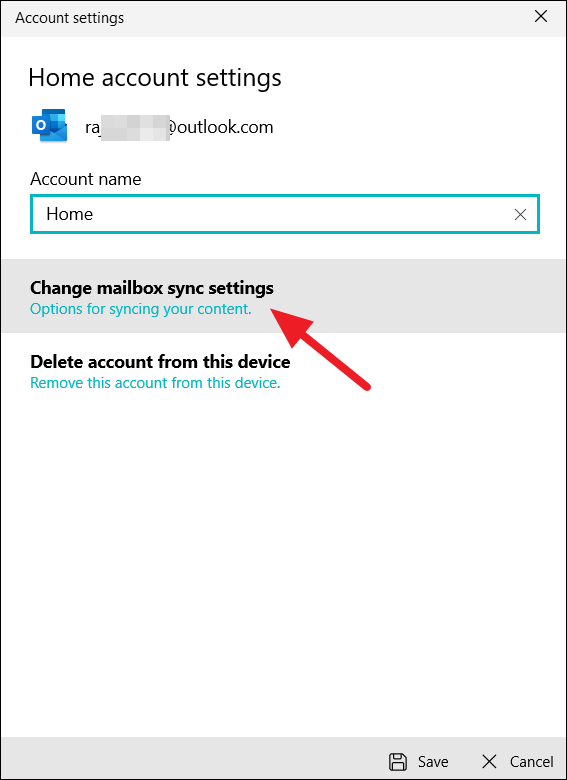
Here, you can change various sync settings for the account. From the ‘Download new content’ drop-down, you can change how often you want to download new content such as messages and images to the app.
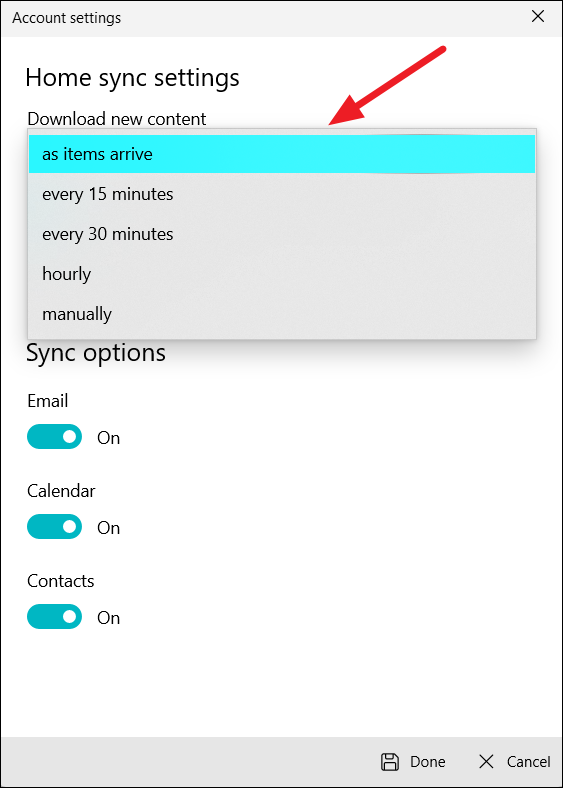
You can choose how far back do you want to download the email from using the ‘Download email from’ drop-down. Under Sync options, you can turn on and off sync for email, calendar, and contacts.
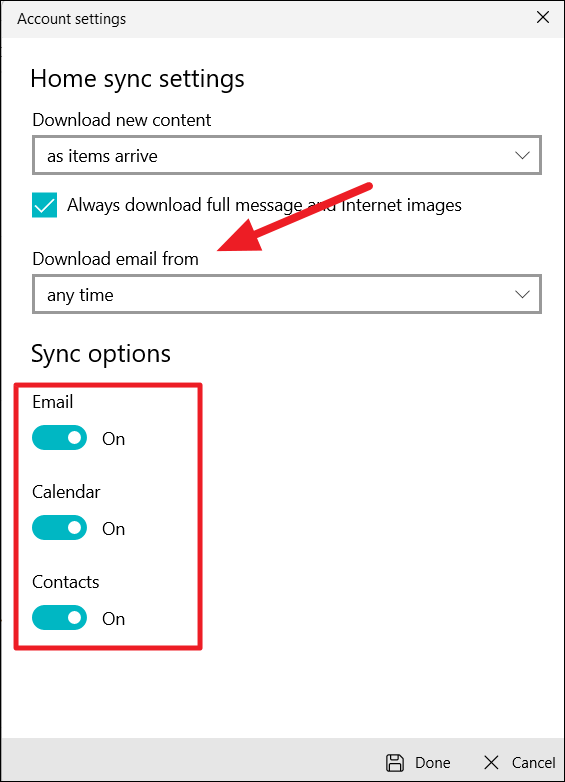
Once you made changes to the options, click the ‘Done’ button at the bottom.
If you added a wrong account or you no longer want an account linked to the Calendar app, click the ‘Delete account from this device’ option under the account settings.
Manage Calendars
By default, each account has few calendars under it such as Calendar, Holidays, Birthdays, Contacts, etc. You can also add additional calendars under each account.
To add a calendar, click the ‘Add calendars’ button at the bottom right corner.
Then, add a calendar from the list of available calendars such as Holidays, TV, Sports, etc.
If you think your calendar view is cluttered with too many agendas, you can uncheck a calendar from the left pane to hide its events. For instance, we can hide holidays from the calendar app by deselecting the ‘United States holidays’ option.
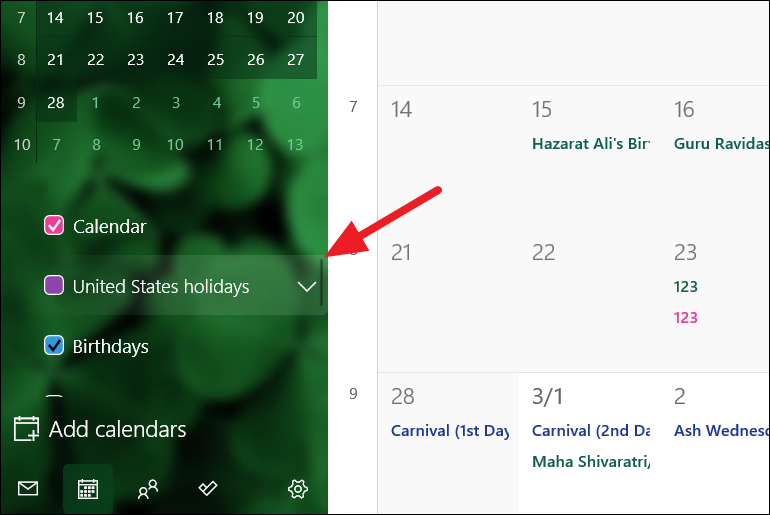
To remove a calendar, click the down arrow next to a calendar and select ‘Remove celendar’.

How to Customize the Look of Calendar in Windows 11
You can customize the background image and theme color, as well as change the light and dark mode in the Calendar app. To personalize your Calendar app, follow these steps:
Open the Calendar app and click the Settings (gear) button at the bottom left corner. Then, select ‘Personalization’ in the Settings menu.

In the Personalization pane, you can change the color theme of the left calendar panel by choosing one of the colors under the ‘Colors’ section. You can also your Windows accent color by selecting the ‘Use my Windows accent color’.
If you want to change the lighting mode of the entire calendar app, use the three modes that are available:
- Light Mode
- Dark Mode
- Use my Windows Mode
The ‘Use my Windows mode’ option uses whatever mode that your computer is currently using, whether it’s light, dark, or custom mode. In the below screenshot, we’re using the ‘Dark mode’.
If you want to change the background of the Calendar, choose one of the preset backgrounds from the ‘Background’ section. If you want to use your own background for the calendar, click the ‘Browse’ button and select a picture from your drive.
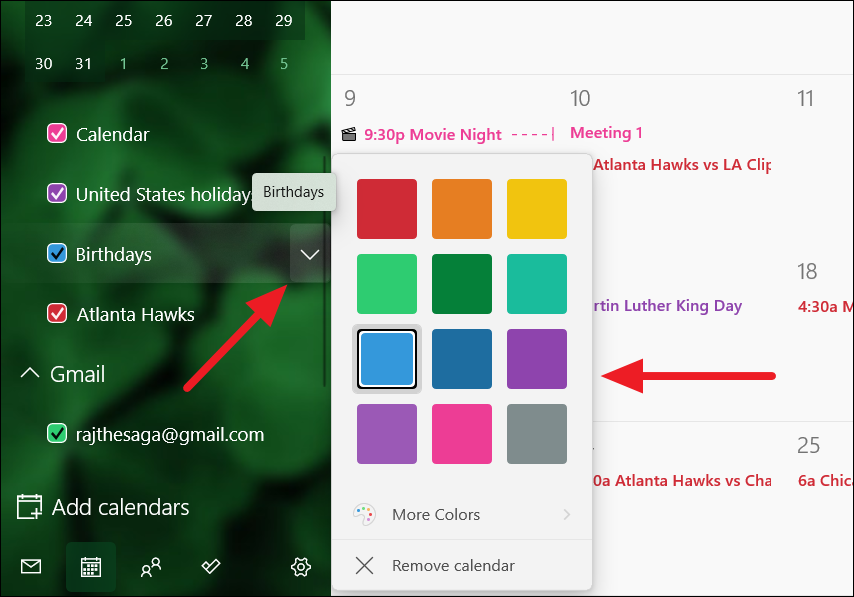
You can change the color of different calendars under each account in the Calendar app. For instance, you can set differnt colors for each type of calendar such as birthday calendar, holidays calendar, sports calendar, and events calendar, etc.
Click the downward arrow next to a calendar and choose one of the preset colors or click the ‘More Colors’ option to pick your own color.
Change the Color of the Calendar Flyout
If you want to change the color of the calendar flyout from the taskbar, you have to change the accent color of the Windows. Here’s how you do that:
Open the Settings app and click on ‘Personalization’ on the left pane. Then, select ‘Colors’ on the right pane.
To change color accent, either set the ‘Choose you mode’ setting to ‘Dark’ or ‘Custom’. If you selected ‘Custom’, change the ‘Choose your default Windows mode’ option to ‘Dark’.
Then, you can choose your own custom accent color or let Windows automatically select one that matches your wallpaper.
From, ‘Accent color’ dropdown menu, select ‘Automatic’ if you want to let Windows choose the accent color or select ‘Manual’ to choose your favorite accent color.
If you select ‘Manual’, you will be able to choose your favorite color from the color palette of 48 predefined colors. Or, you can set your custom color using the ‘View colors’ button. Here, we picked the ‘Seafoam’ color.
To show accent color on Calendar flyout, you need to turn on the toggle for ‘Show accent color on Start and taskbar’.
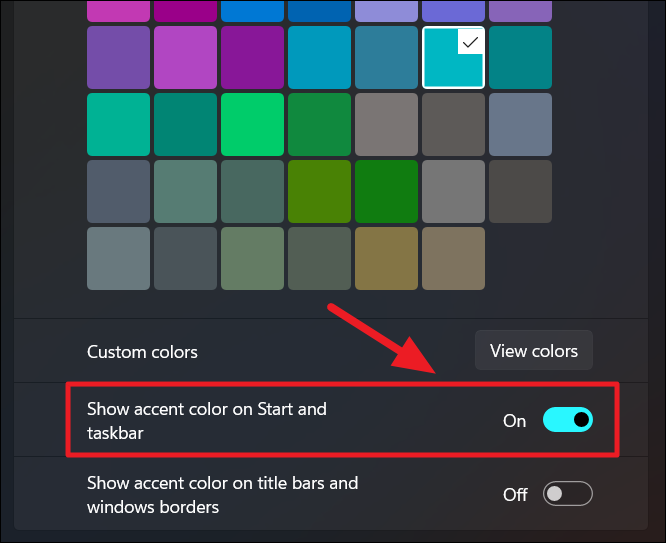
As you can see below, the calendar flyout appears in the Seafoam color which is the selected accent color.
Change Calendar Views
By default, when you open the Calendar app, it shows the current month of events. But you can set different views for the app based on your choice and schedule. For example, you can set to view events of today, days, week, month, or year.
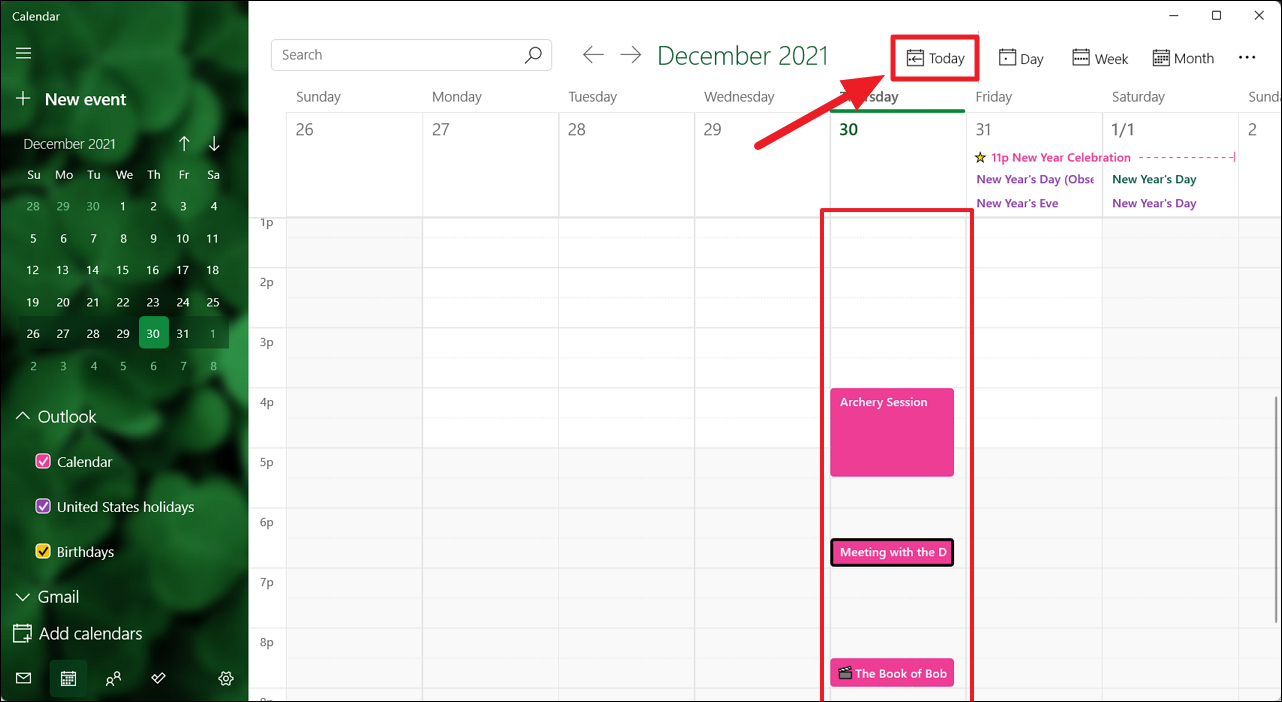
If you want to view the events or agenda of today, click the ‘Today’ button in the toolbar at the top. It will show you all of today’s events from 12 A.M to 12 P.M as shown below.
If you want to view your calendar by day, click the drop-down next to the ‘Day’ button and choose a multi-day view.
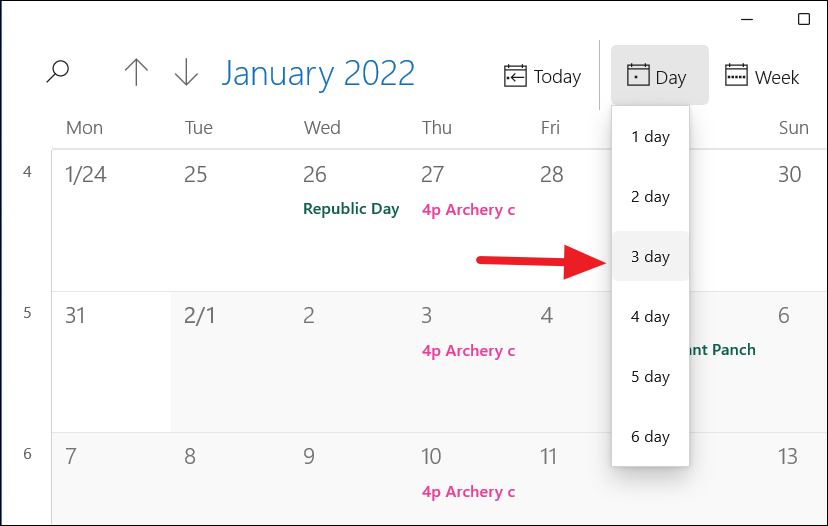
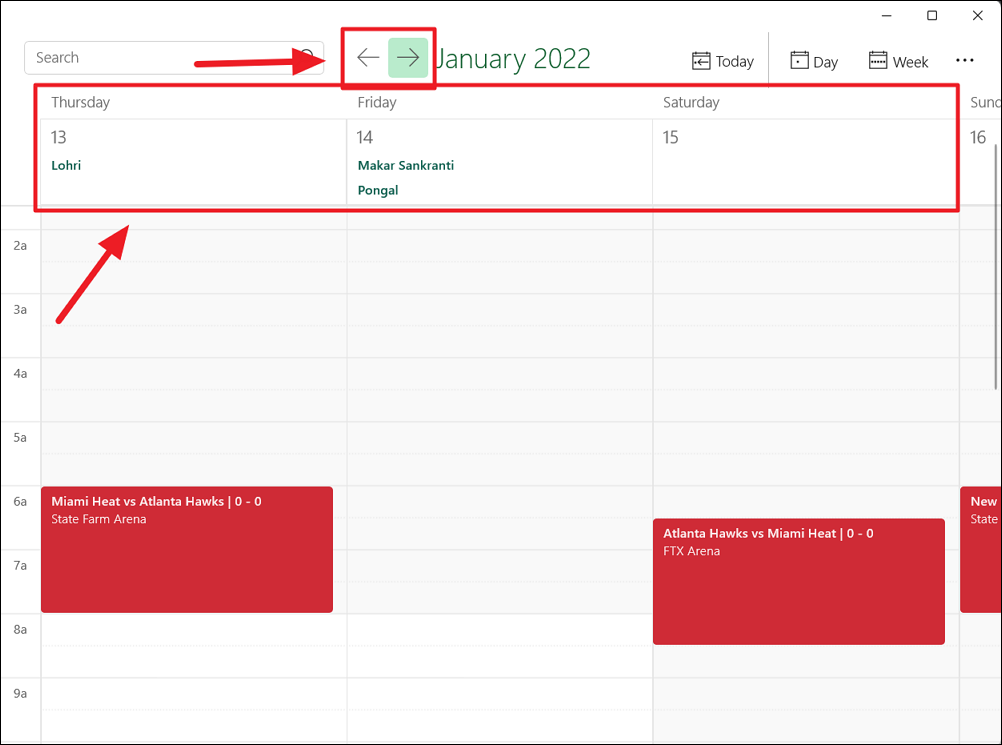
For instance, if you choose the ‘3-day’ view, the calendar will only show you three days of events. To see the next or previous 3 days, click the arrow buttons next to the search button at the top.
In the ‘Week’ view, you can choose to view either your workweek or the whole week calendar.
In case, you want to quickly jump to a specific day, week, or month, the Year view works better. Simply, click on the ‘Year’ button in the toolbar to see the year view.
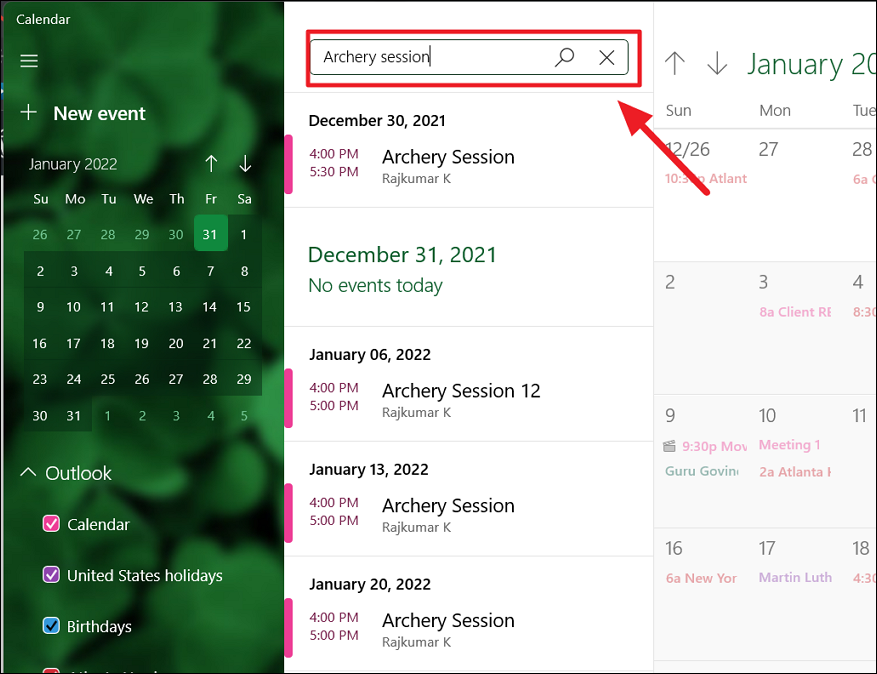
If you have difficulty finding an event, you can use the ‘Search’ field at the top to find events in your calendars easily.
How to Add Events on the Calendar in Windows 11
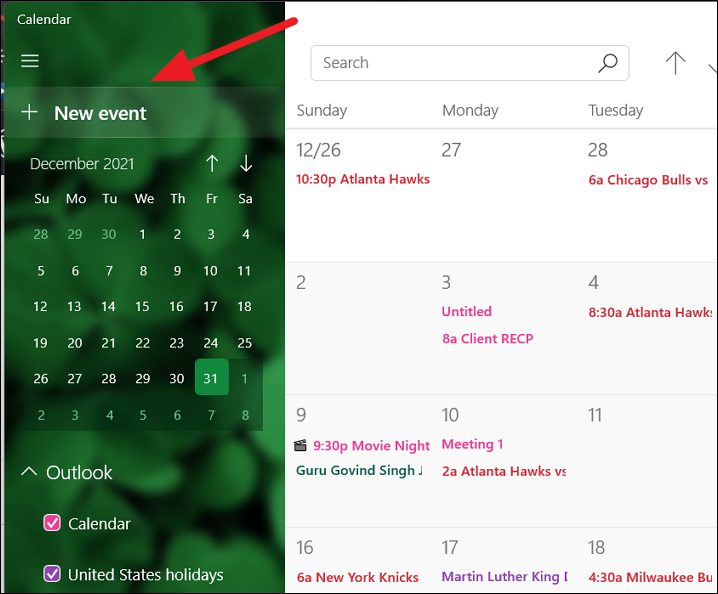
The Calendar app allows you to create new quick events, detailed events, group events, and repeating events to the calendars. To create new events, manage, edit, delete events on the app, follow these steps:
Create a Quick Event in the Calendar
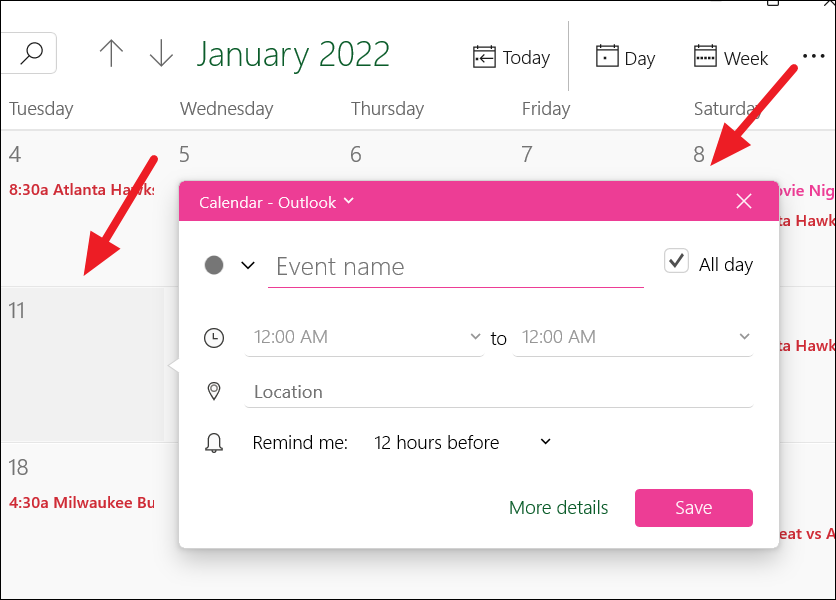
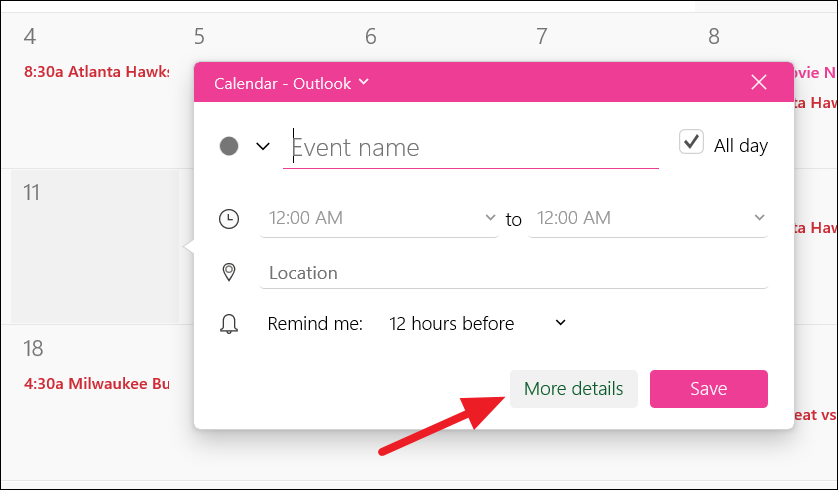
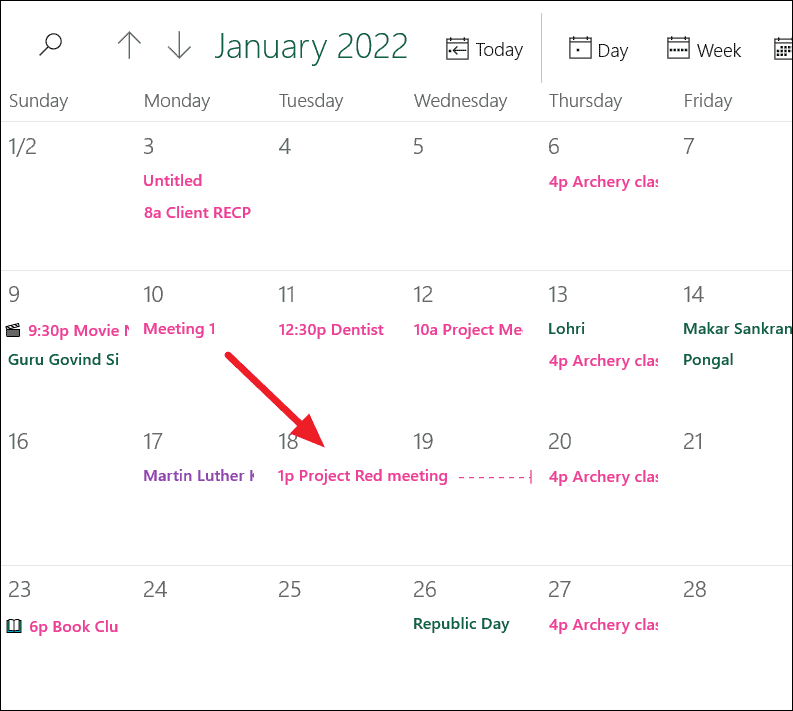
You can quickly create new events in the Calendar app with minimal information by simply clicking anywhere on the calendar view. Open the Calendar app and click on a date in the calendar view on which you want your event to occur. This will show you an event creator popup window.
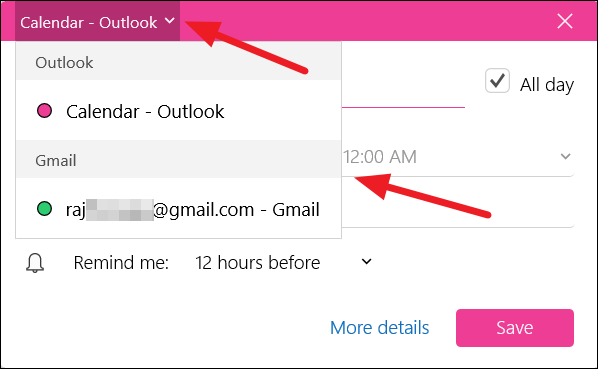
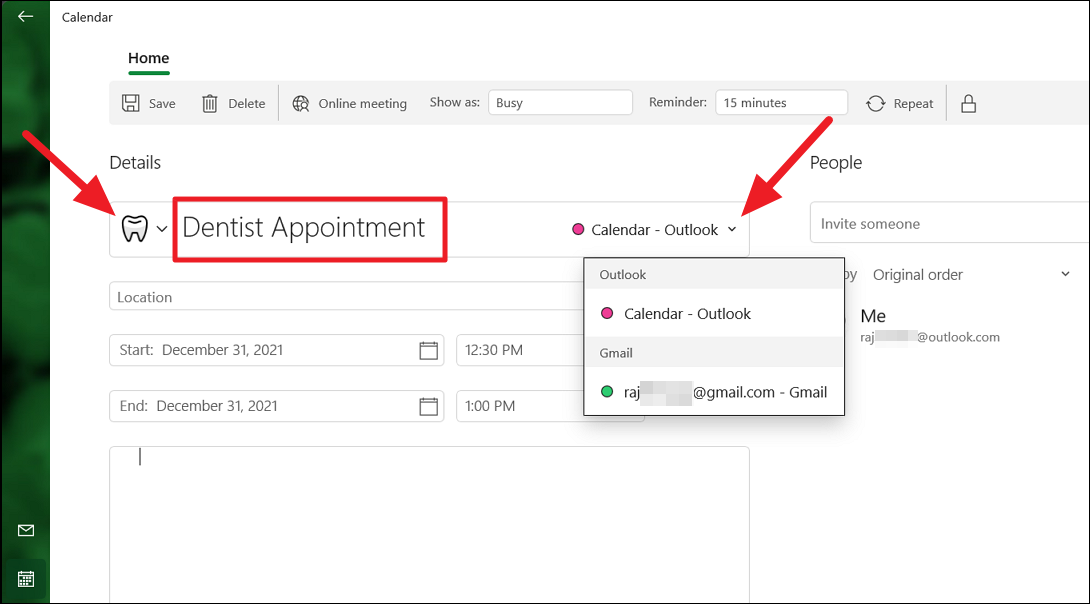
If you have multiple accounts, click the drop-down on the title bar and select the calendar to which you want to add the event.
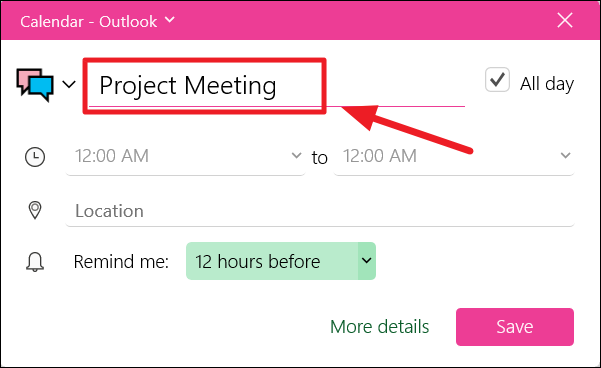
Next, specify a name or description for the event.
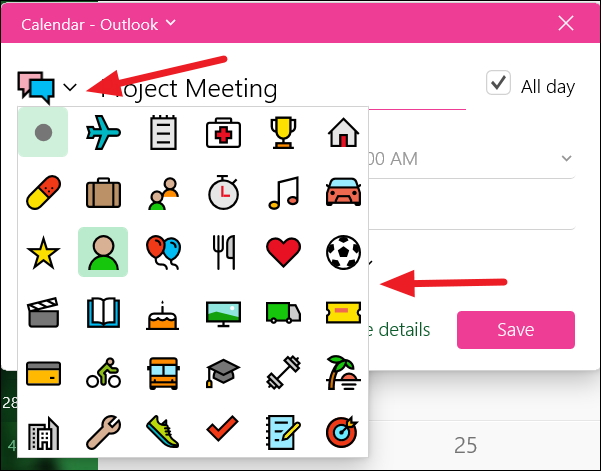
Based on the event name or description, the event creator will automatically show an emoji for the event. If the emoji is incorrect or you want to use a differnt emoji, click the drop menu left of the event name, select the emoji you want for this event.
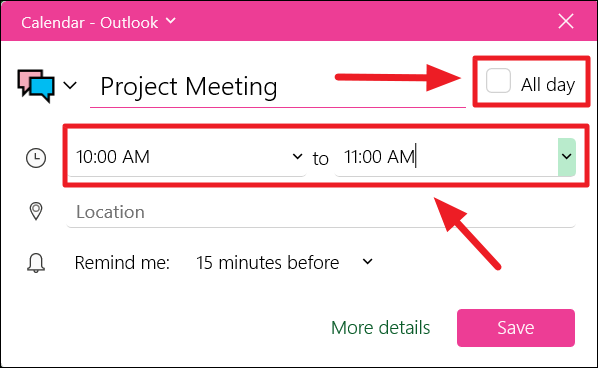
By default, the event is set as an all-day event, but if you want to set a start and end time for the event, first, uncheck the ‘All day’ box. Then, select the start and end times from the below drop-down menus.
Then, if you want to specify the location for the event, enter it in the ‘Location’ field.
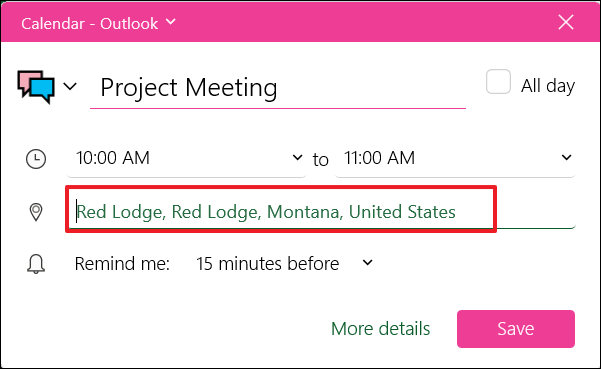
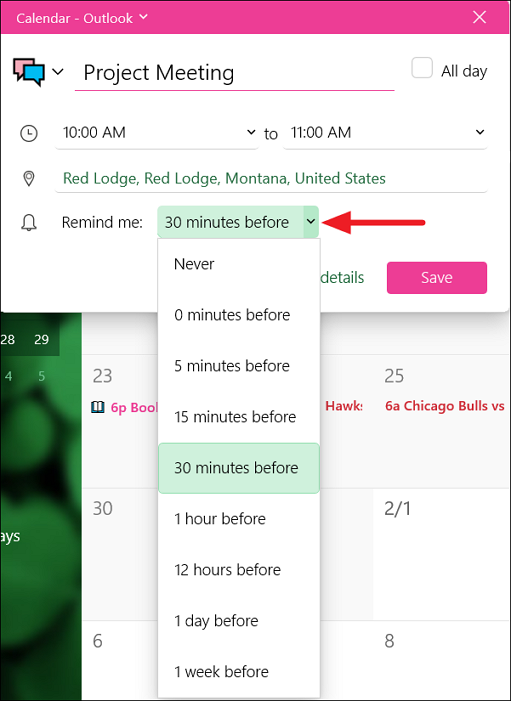
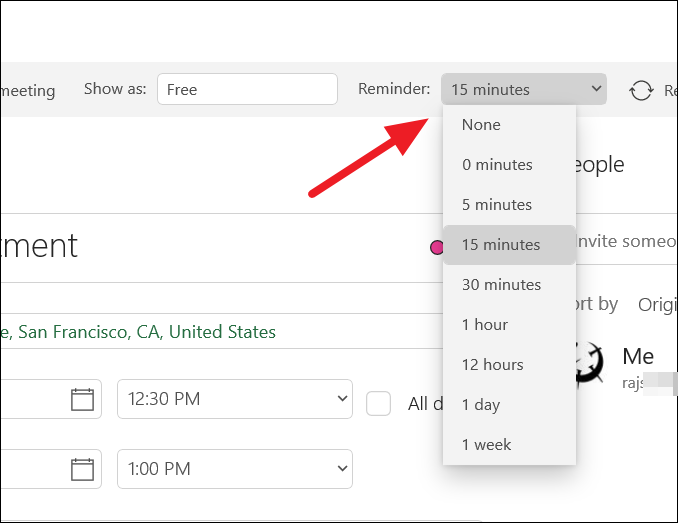
If you want to be reminded before the event, you can use the ‘Remind me’ drop-down menu to select how long before you should get a notification for this event. In case, you don’t need a reminder notification, select ‘Never’.
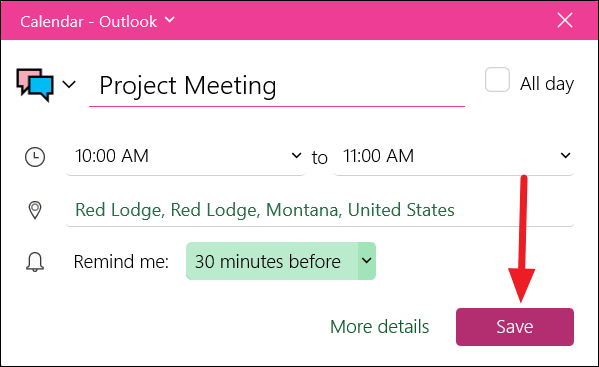
Finally, click the ‘Save’ button to add the event to the Calendar.
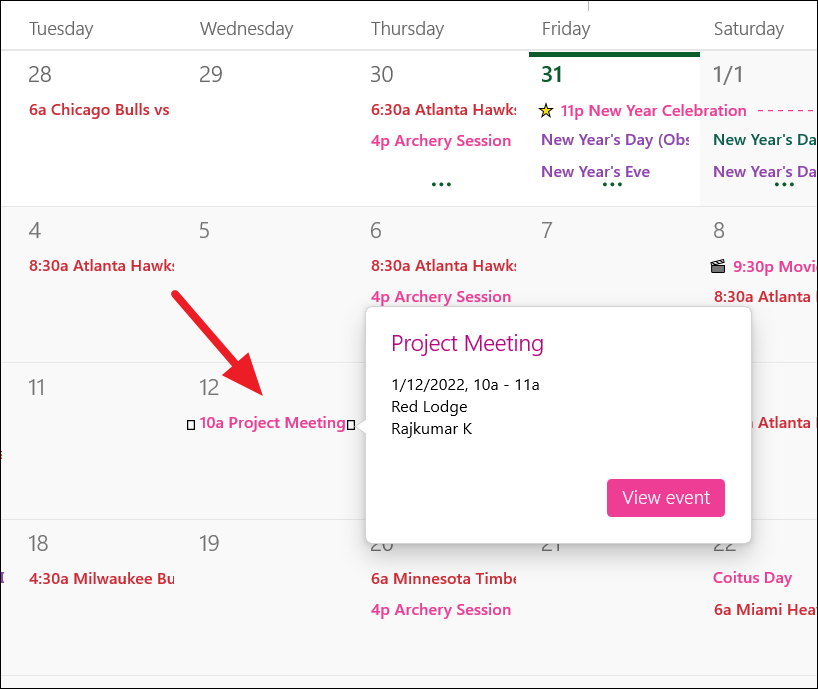
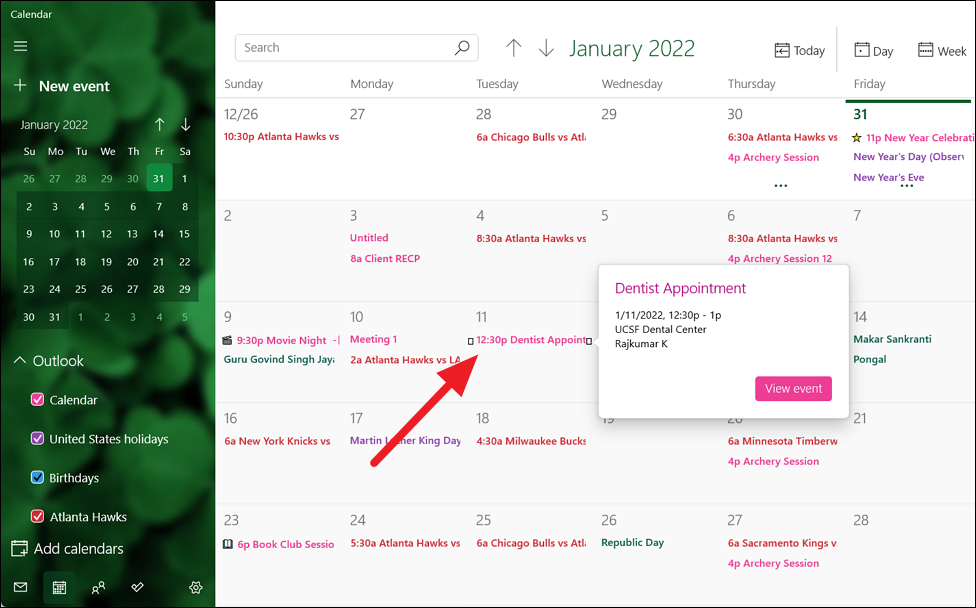
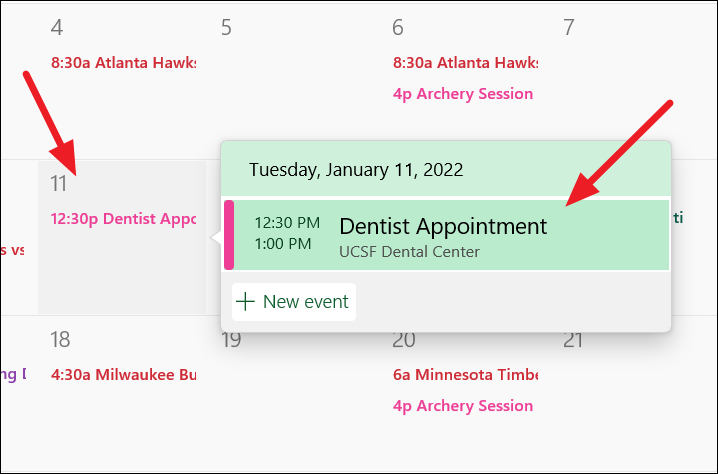
After you save the event, the new event will show up on the Calendar. When you hover over an event, you can see the details about the event, including the name of the event, date and time of the event, location, and owner of the calendar.
You can also edit, cancel, or delete any added event in the Calendar by selecting the day and clicking on the event.
Create a Detailed Event in the Calendar
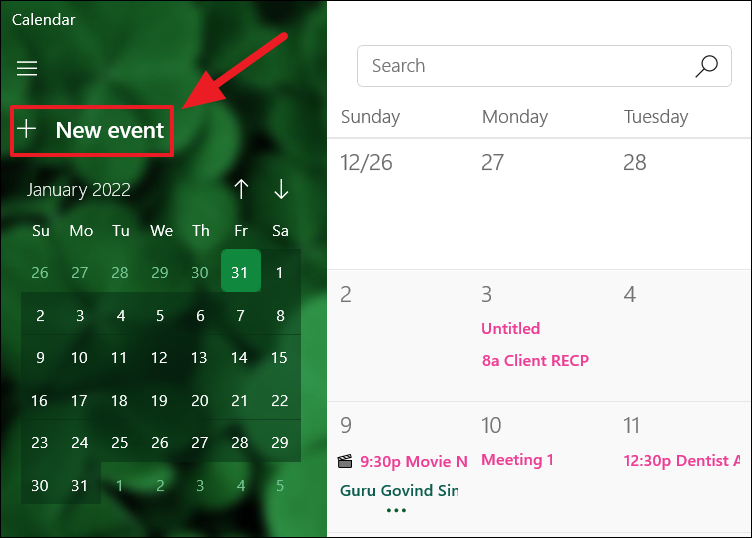
Open the Calendar app and click the ‘New event’ button in the top-left corner or press the Ctrl+N keyboard shortcut to create a new event.
Or you can also select a date and click the ‘More details’ button on the small event creator window.
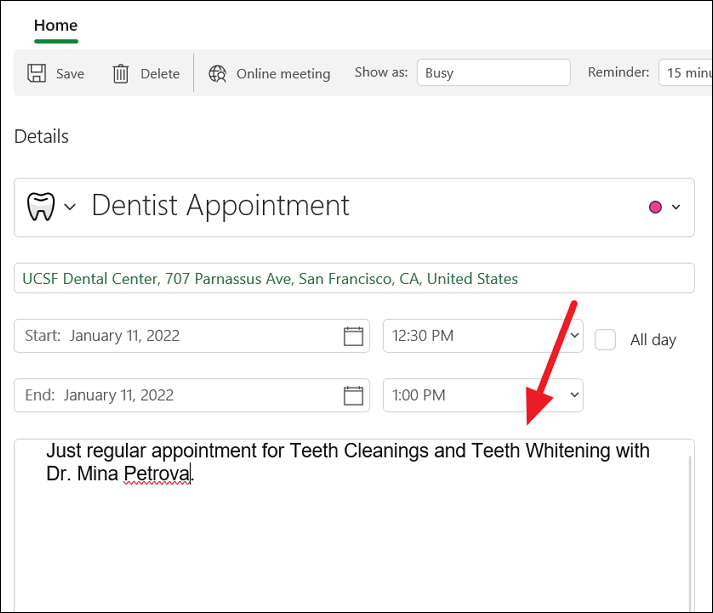
This will open a full event creator on the Calendar app. Under the ‘Details’ section, you can specify details for the event such as title, event date and time, and description.
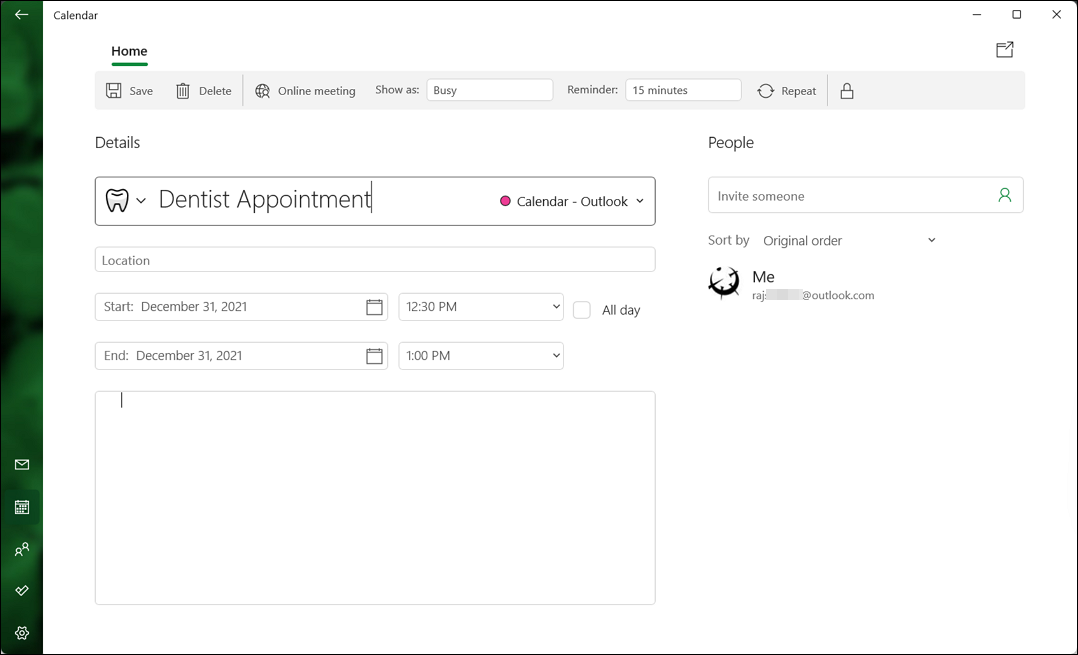
First, specify the name for the event and choose an emoji from the drop-down to the left of the event name. Then, use the Calendar drop-down menu next to the event name to select the account to which you want to add the event.
Next, specify the physical location where the event will take place. When you start typing in the location field, you will see suggestions for the location. You can type the location or select it from the suggestions (if available).

Next, specify the start and end date of the event in the ‘Start’ and ‘End’ options.
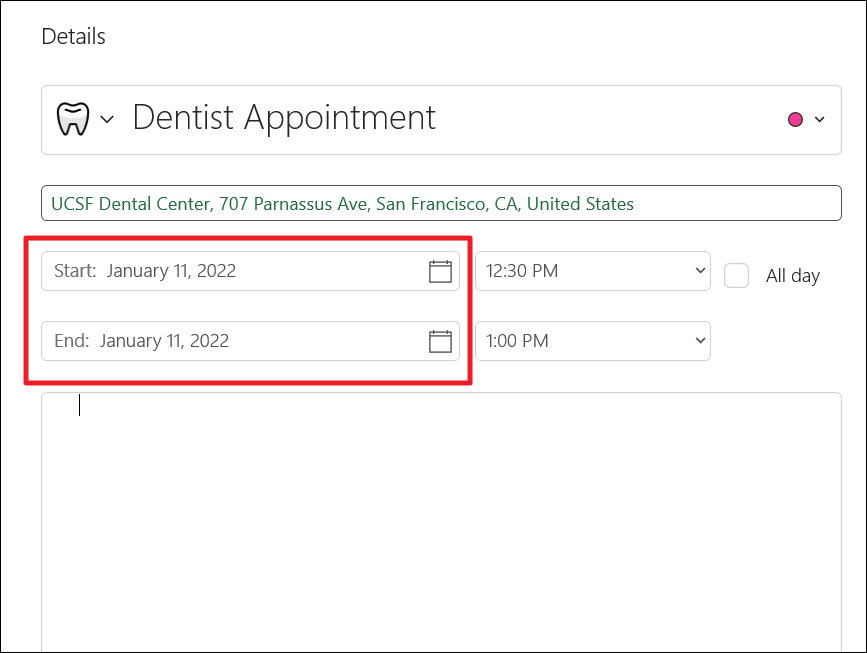
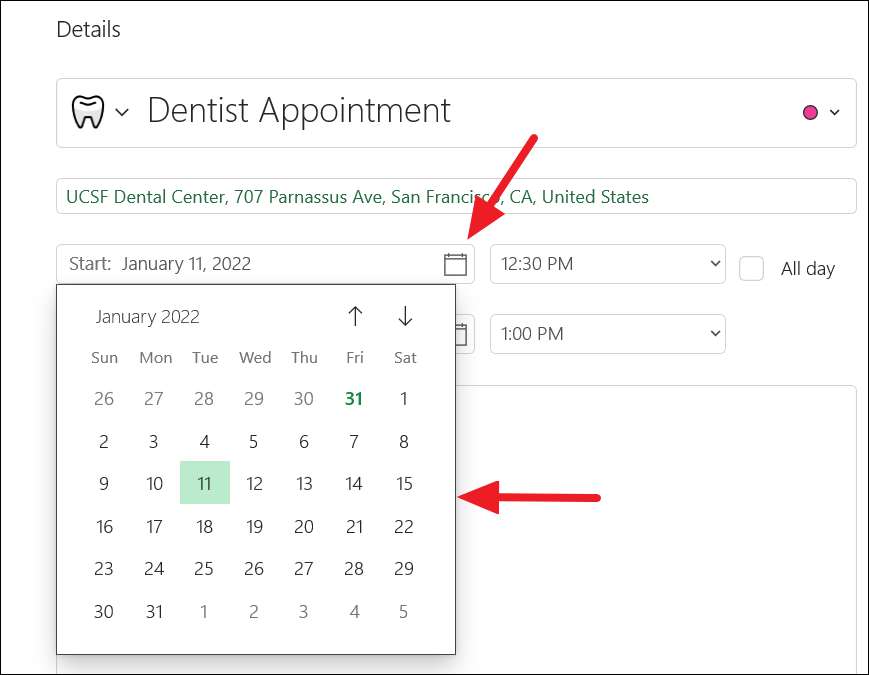
You can click on the calendar icon inside the ‘Start’ and ‘End’ fields to choose the dates.
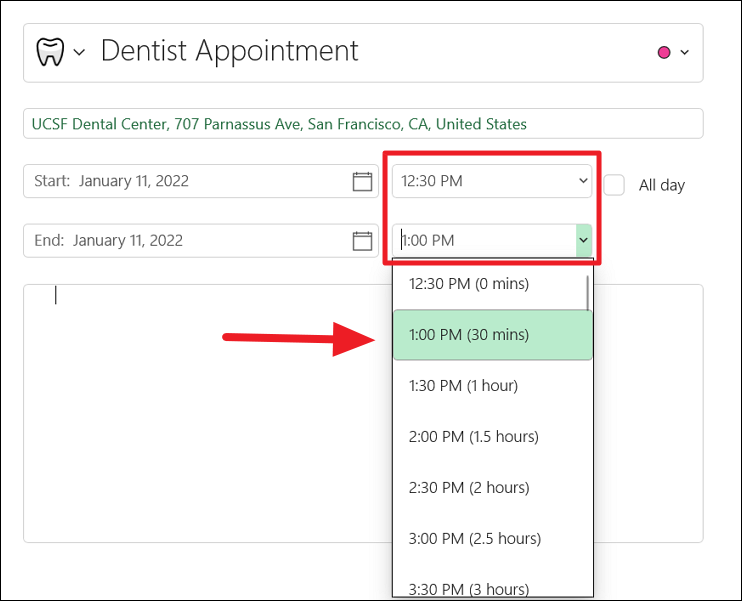
Next, use the drop-down menu on the right of the ‘Start’ option to select a start time for the event. Then, use the drop-down menu on the right of the ‘End’ option to choose an end time.
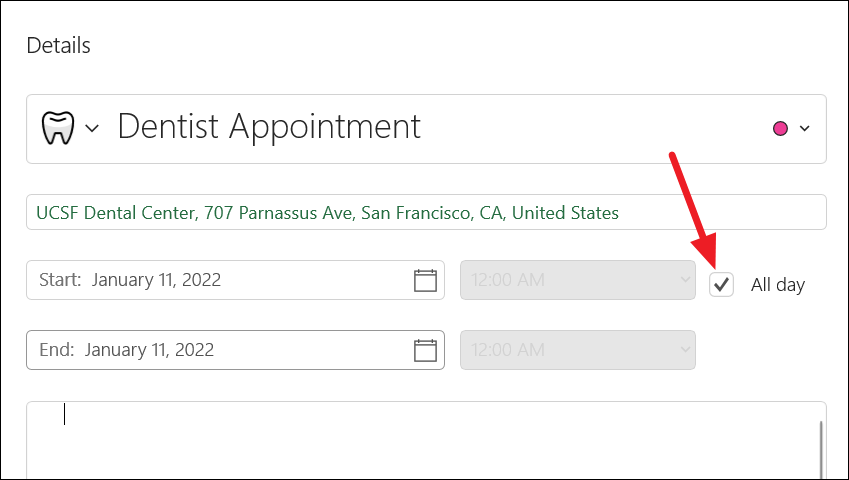
If it’s an all-day event check the ‘All day’ option to the right which will grey out the time selections.
At the bottom, you can add a description or other details about the event.
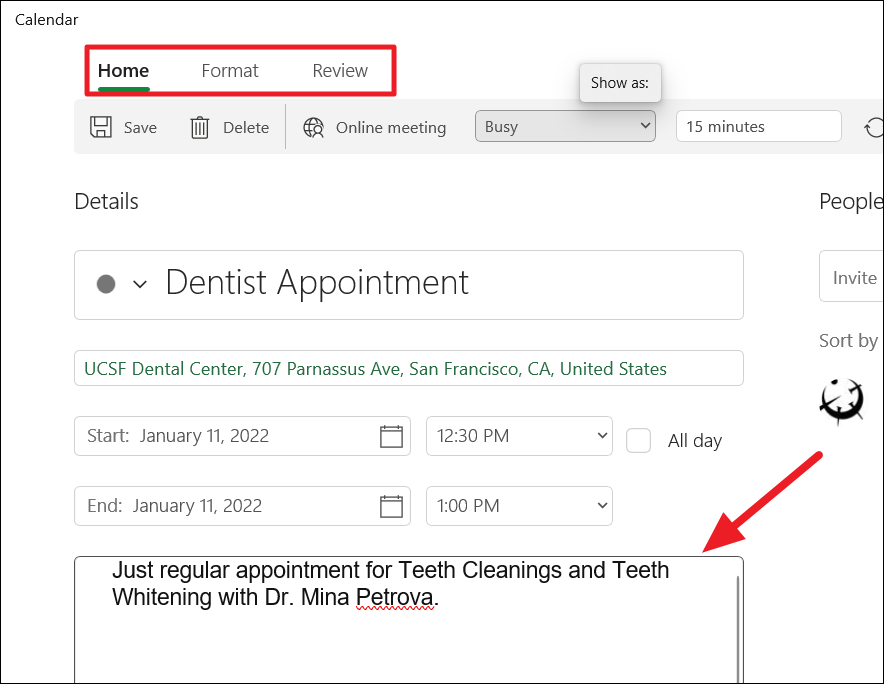
When you click on the Description box, two new tabs – ‘Format’ and ‘Review’ will appear next to Home tab at the top.
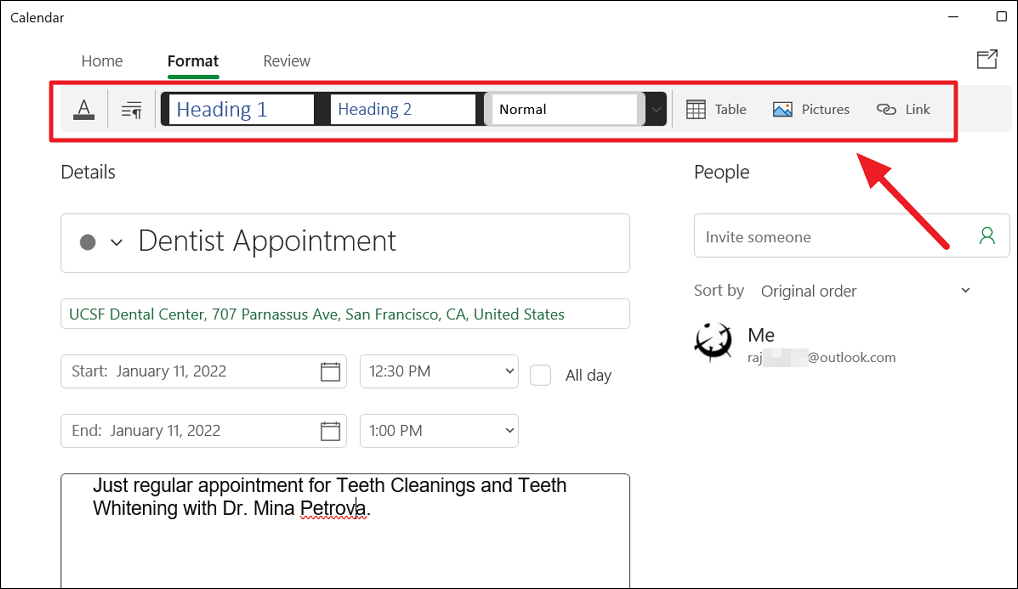
Click on the ‘Format’ tab and use the new toolbar to format your text. Besides formatting, you can also insert tables, pictures, links to the description using buttons in the toolbar.
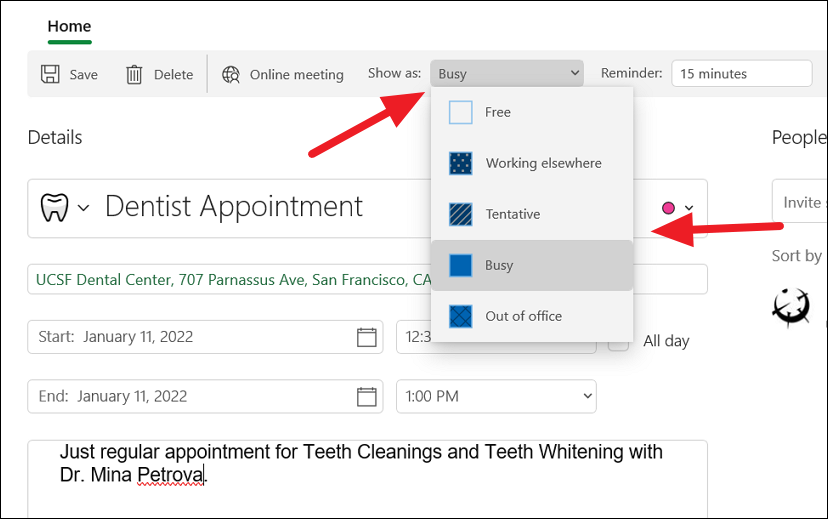
Then, from the ‘Show as’ drop-down menu at the top, you can select a visual cue for the event.
You can use the ‘Reminder’ drop-down menu to select how long before you should get a notification or alert about the event. You can select any time between ‘0’ minutes to ‘1’ week before the event or ‘None’ if you don’t need a reminder.
In case you want the event to be private, click the ‘padlock’ icon at the top right corner (icon highlighted means Enabled). When this option is enabled, the event details will not be visible to anyone besides you which is useful if you are sharing your calendar.
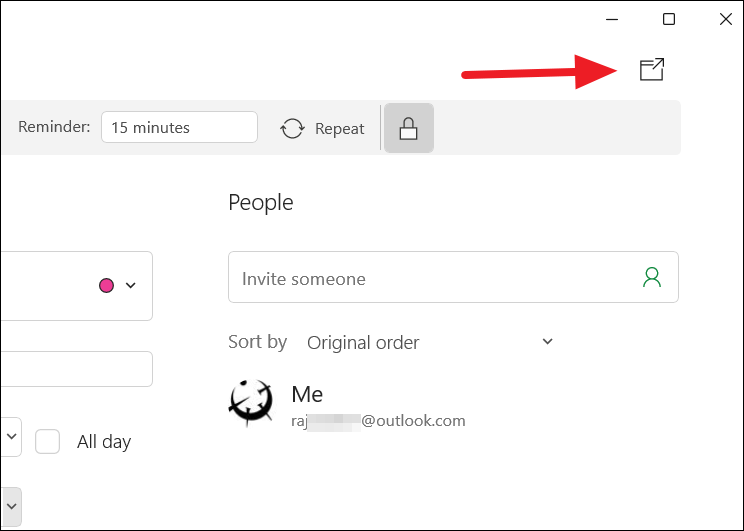
If you want to open the event in a new separate window, click the icon at the top right corner below the minimize and maximize buttons.
Once you are done, click the ‘Save’ button in the top-left to add the event to the calendar.
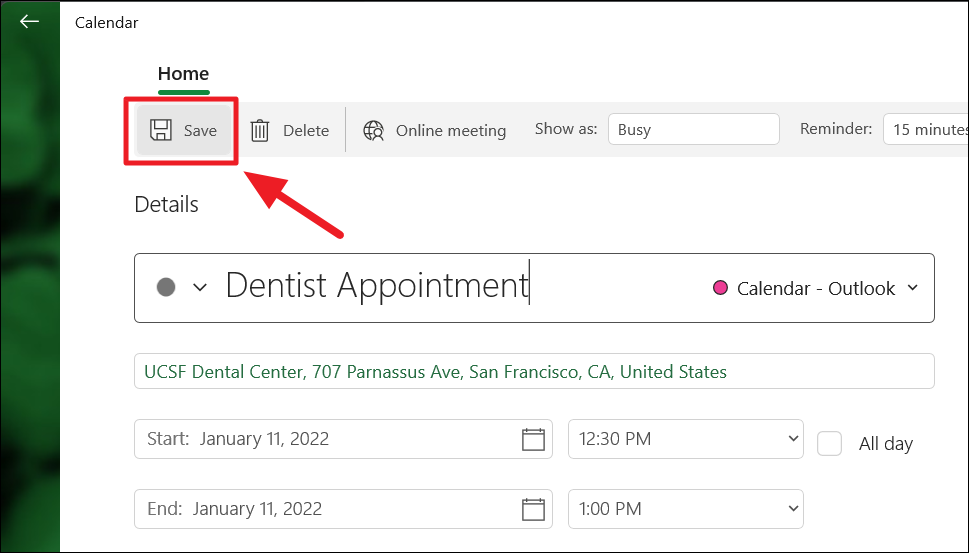
The event has now been added to the calendar as shown below.
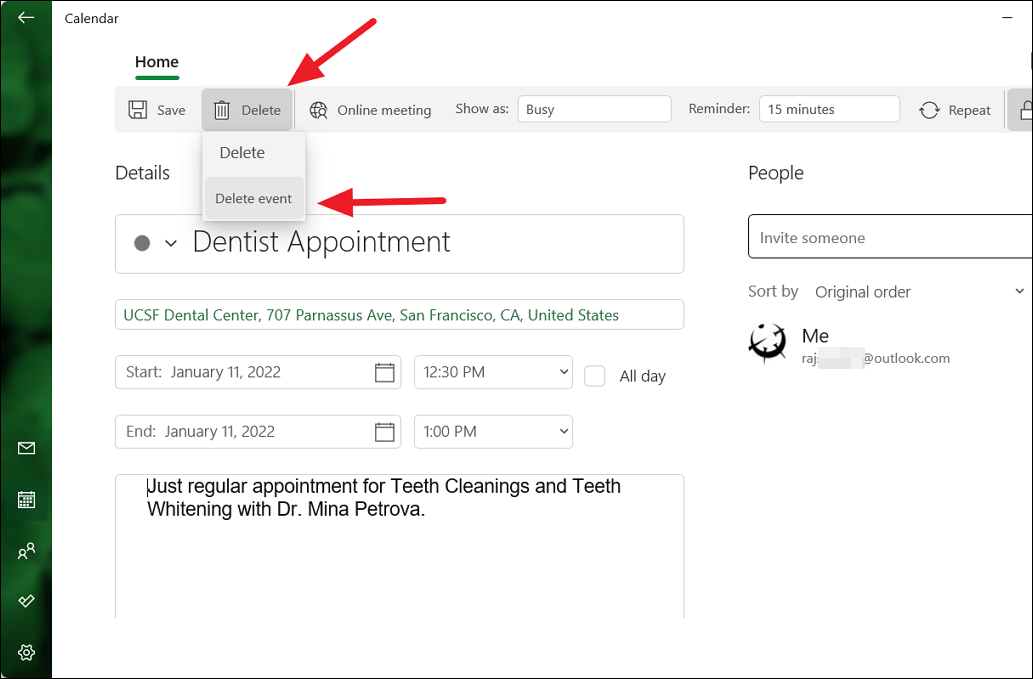
To edit or delete an event from the calendar, select the date with the event and click on the event. If you want to create more than one event in a day, click the ‘New event’ button below the events.
Now, you can either edit the event and save it or click the ‘Delete’ button in the top left and select ‘Delete event’ to remove the event from the calendar.
Create a Repeating Event in the Calendar
Sometimes, you may want to create schedules for repeating events such as daily workout schedules, weekly classes, monthly doctors appointments, etc. If you want to create a repeating calendar event, follow these steps:
Open the calendar app, click the ‘New event’ button in the top-left corner or click an already created event from the calendar view.
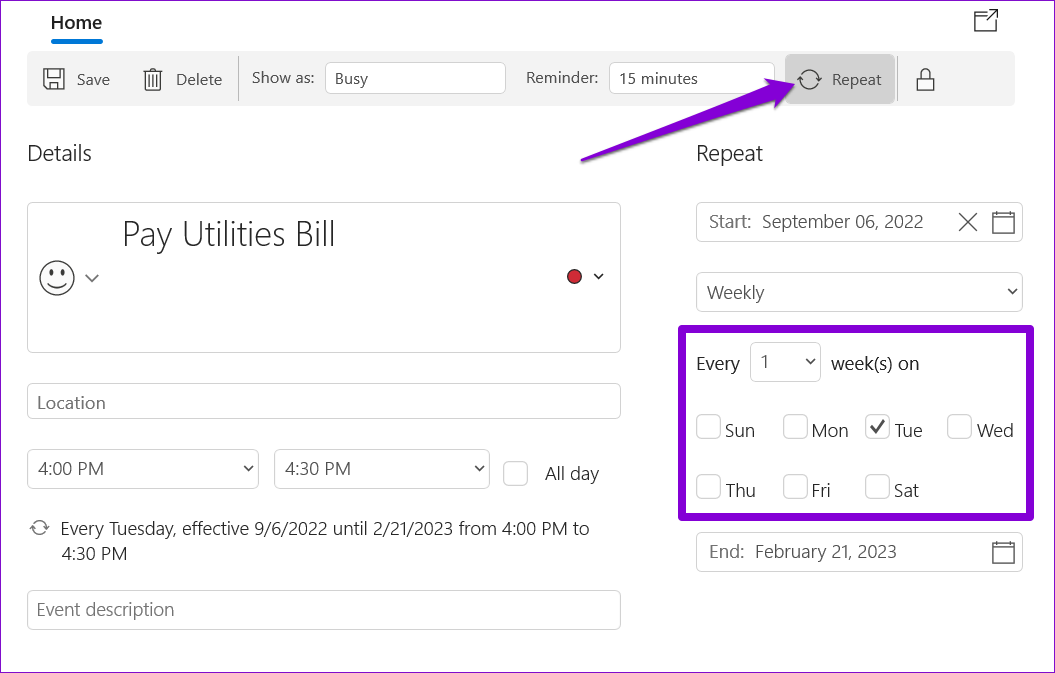
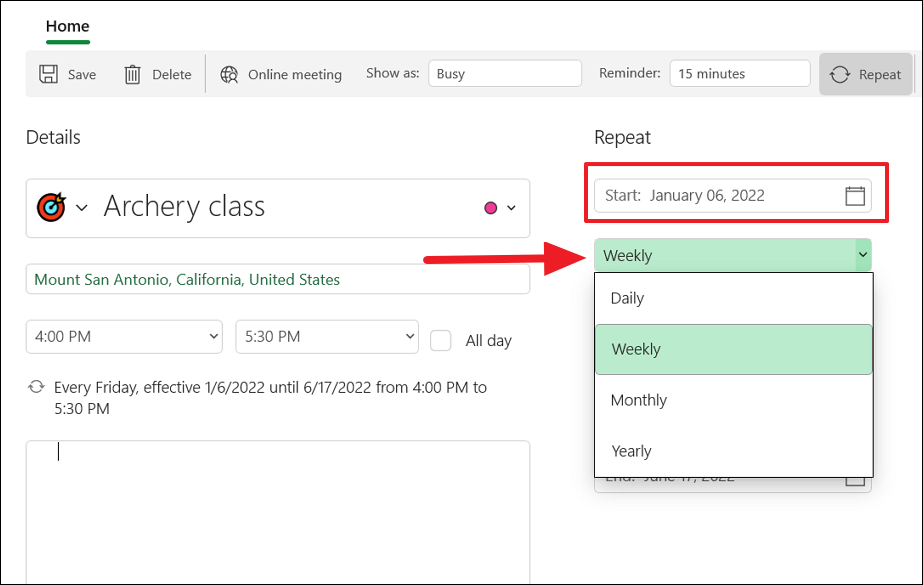
Next, fill in the details for the event, such as event title, location, start and end time. Then, click the ‘Repeat’ button on the top right corner.
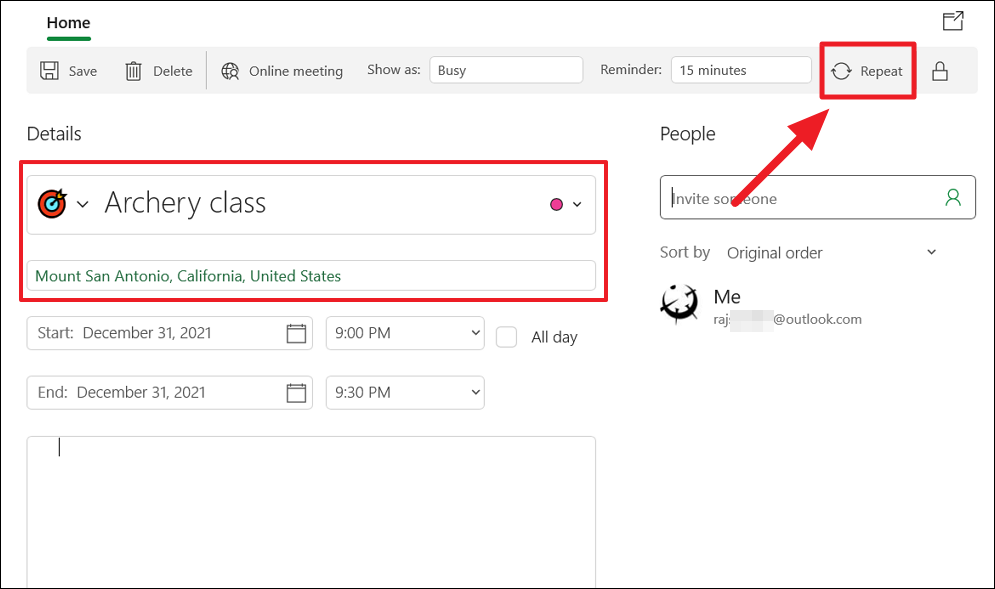
When you click the Repeat button, a set of new options will appear to configure the repeat cycle.
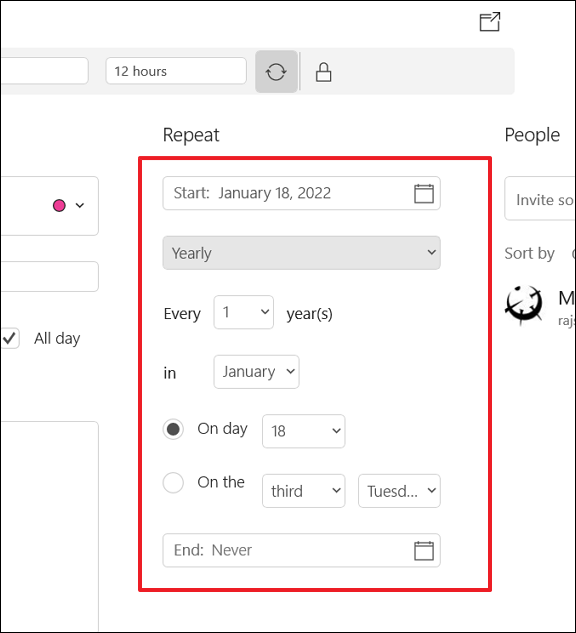
First, specify the starting date of the event in the ‘Start’ option. Next, use the drop-down menu below the Start option to select how you want to often to repeat the event, such as:
- Daily
- Weekly
- Monthly
- Yearly
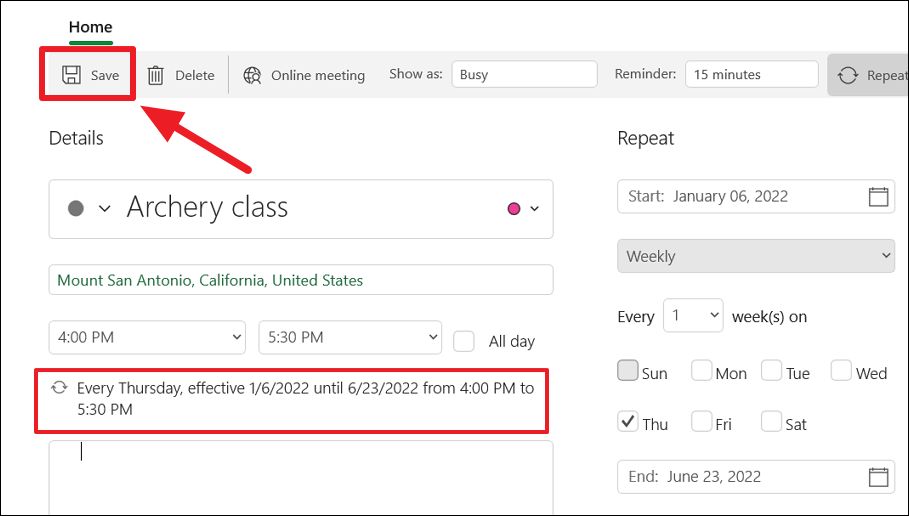
For example, we are selecting the starting date of the repeat event as ‘January 06, 2022’ and we want to repeat the event ‘Weekly’. If you select a differnt option than ‘Weekly’, you will get differnt settings.
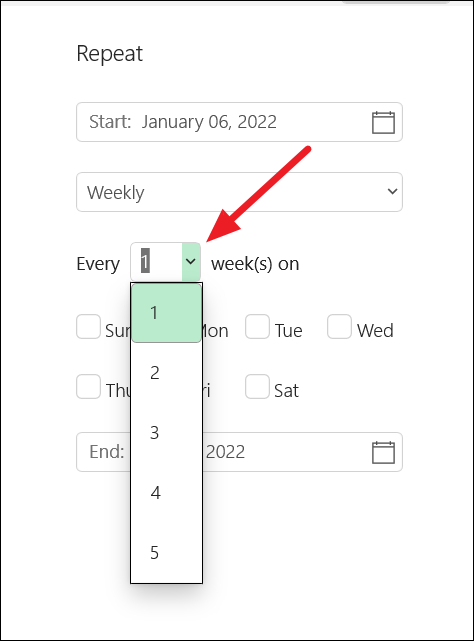
Then, we need to set how many weeks, on what week, and on what day of the week the event should take place.
From the ‘Every’ drop-down, you can specify whether you want to repeat the event every week, every 2 weeks, every 3 weeks, and so on. Choose ‘1’ if you want to repeat every week.
After that, specify what day of the week the event should take place.
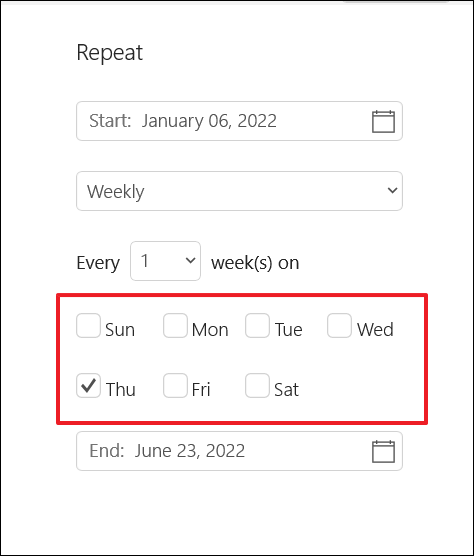
Finally, you can use the ‘End’ option to specify the end date for when the event should stop repeating.
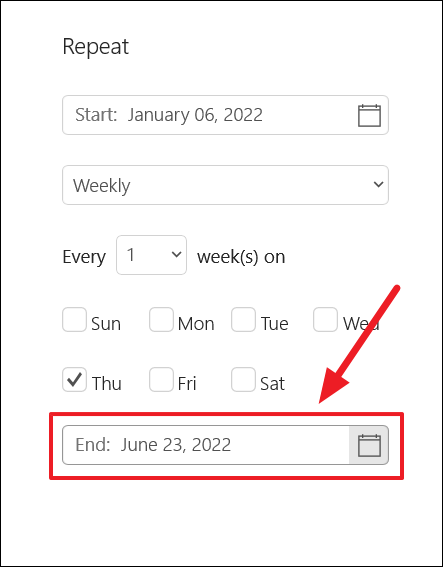
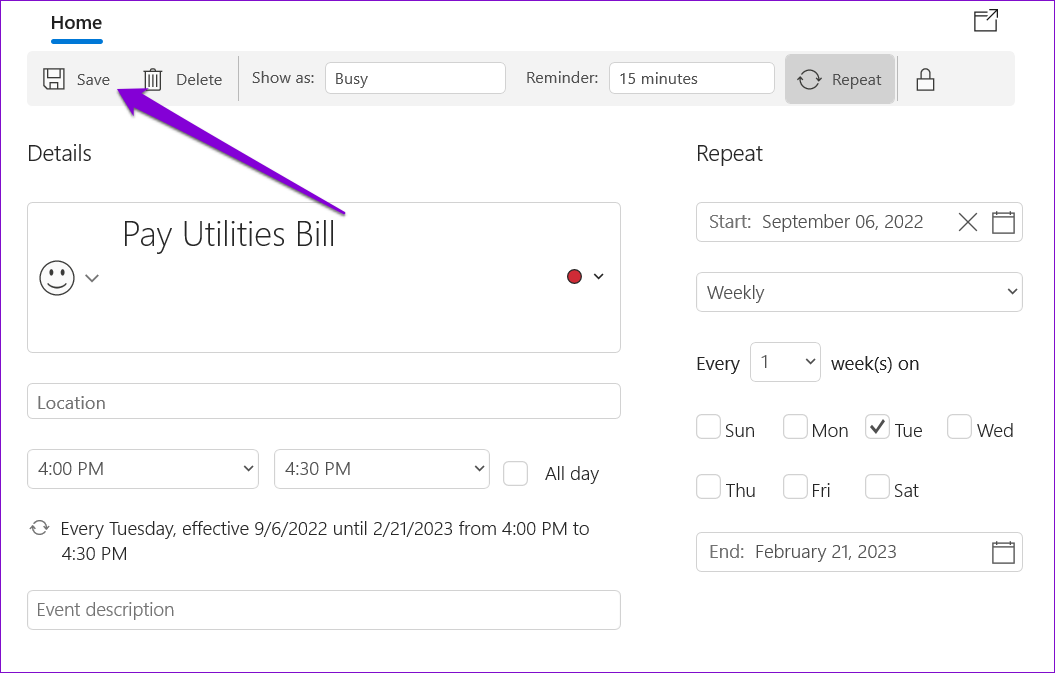
After selecting repeat options, you will see a summary of when the event will repeat. Then, enter details or descriptions about the event in the bottom box (if you want). Once you enter all the details, click the ‘Save’ button to save the repeating event to the calendar.
Create a Group Event in the Calendar
If you want to schedule a group meeting or an event, you can create a group calendar event and invite people via their email addresses. Here’s how you create a group calendar event in the Calendar app:
In the Calendar app, click the ‘New event’ button in the top-left corner.
In the event creator window, enter the email address of the person you want to invite to the calendar event under the ‘People’ section and press Enter.
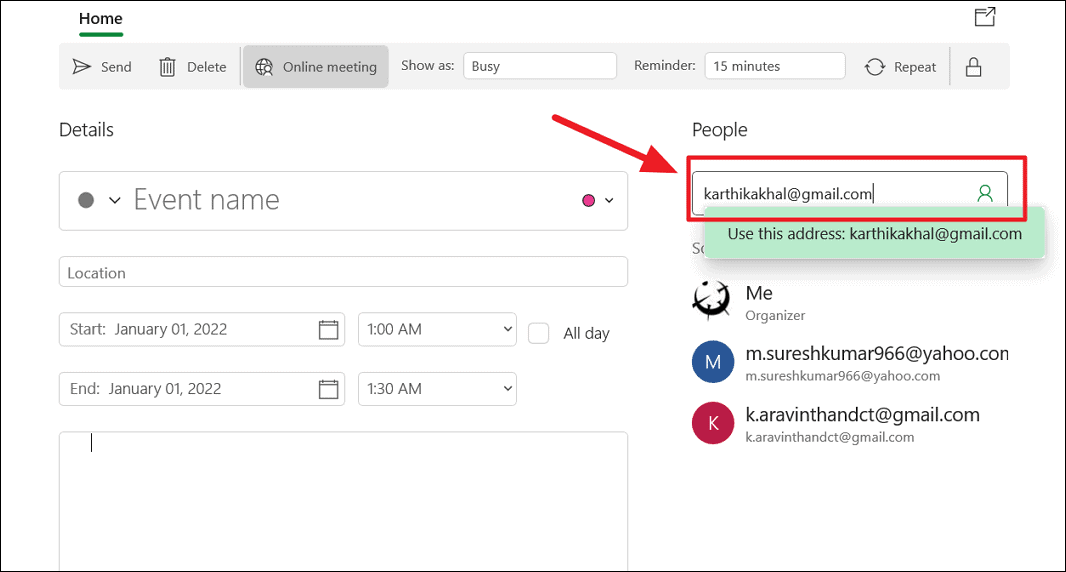
Or you can also click the contact icon in the ‘Invite someone’ field to choose a person(s) from your contact. You can add as many as you want to the group calendar event.
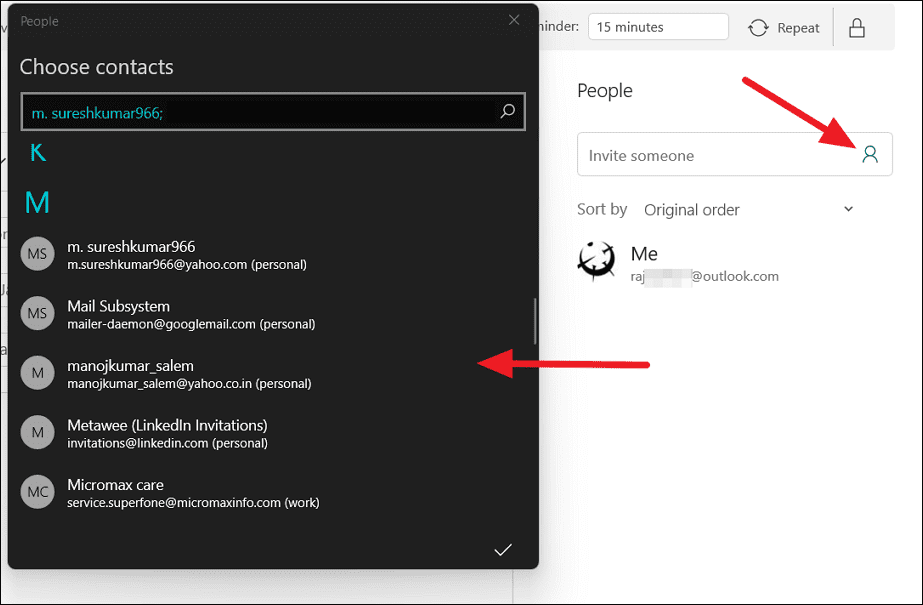
Then, under the ‘Details’ section, you will need to fill in the usual details of the event such as event title, physical location, date, time, and description of the event. At last, click the ‘Send’ button to send invites to the selected people.

From the ‘Reminder’ drop-down menu, you can select how long before you should receive an alert about the event.
Once the invitations are sent, you will see the event in your calendar. The email recipients will receive an email invite which they can accept or decline. Should they accept the invite the event will also appear in the recipient’s calendar. If they RSVPed, you will also receive a reply to your mail.
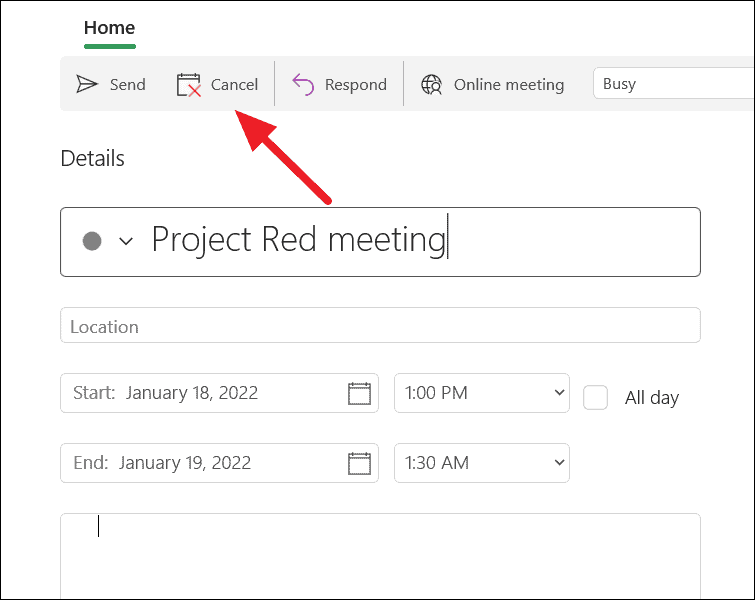
If you decided to cancel the event, click on the event in the Calendar view to open it. Then, click the ‘Cancel’ button to cancel the group event.
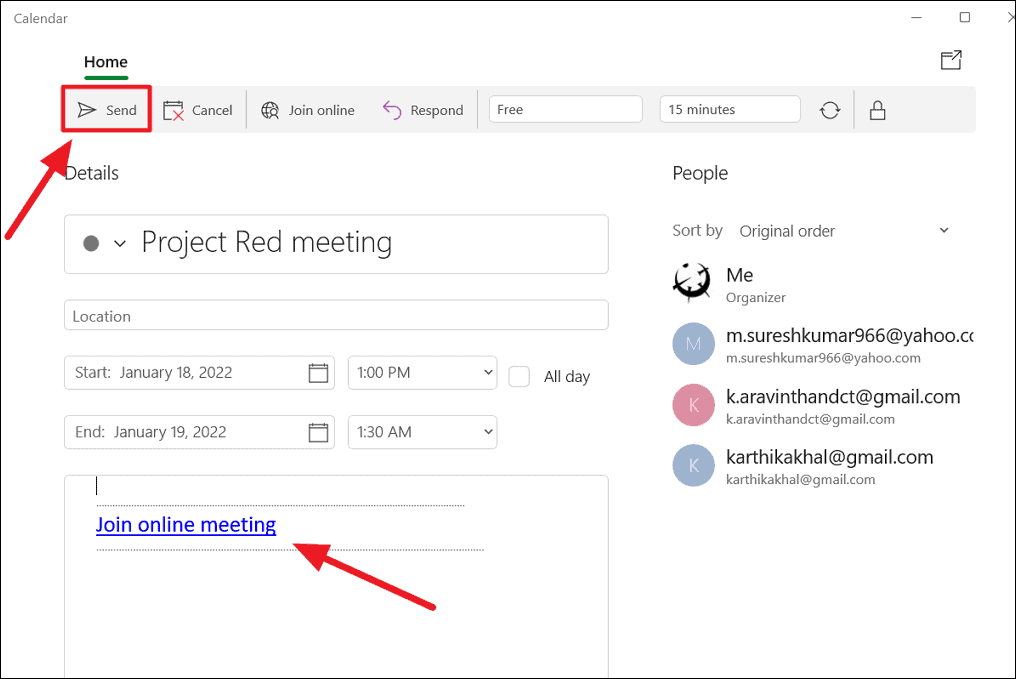
You can also create and join an online meeting via skype in the calendar app. First, add the people you want to invite to the meeting, and then, click the ‘Online meeting’ button at the top.
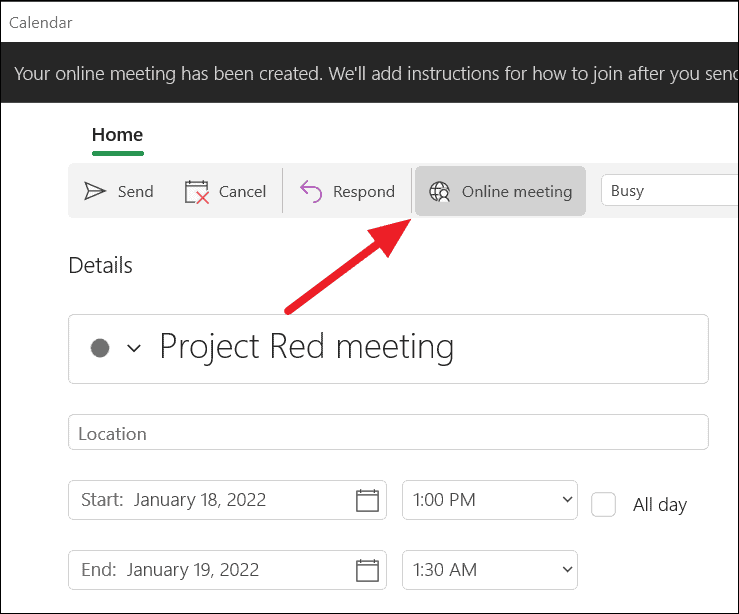
Once you do that, your online meeting will be created and a ‘Join online meeting’ link will be added to the description as shown below. Then, you can click the ‘Send’ button to send invites along with the link to join the meeting. You can join the meeting by selecting the ‘Join online’ button.
Create Calendar Events or Reminders using Your Voice
You can also effortlessly create an event or set up reminders through your digital assistant, Cortana using just your voice. Here’s how:
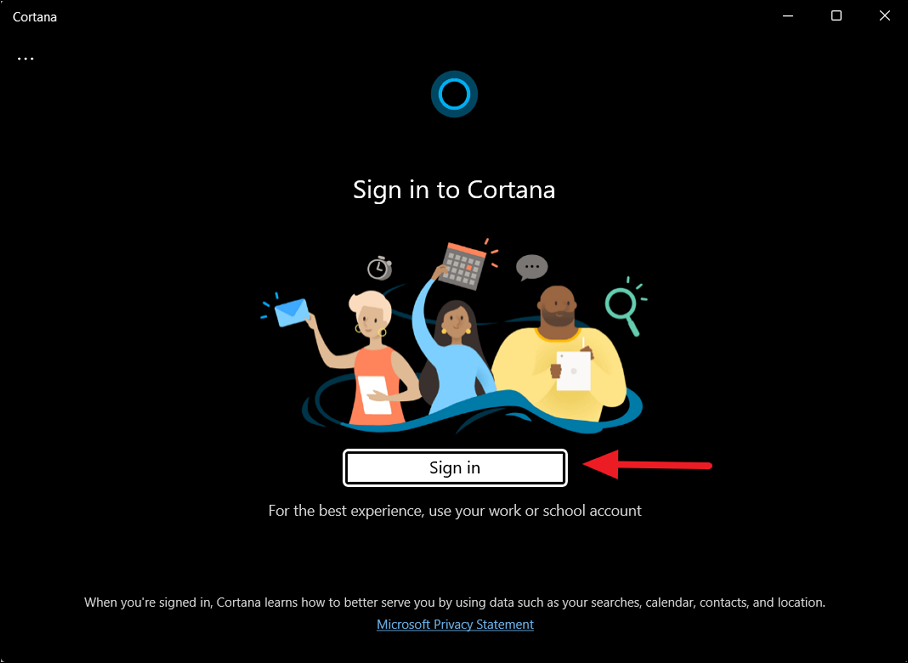
First, open Cortana and sign in using your Microsoft account.
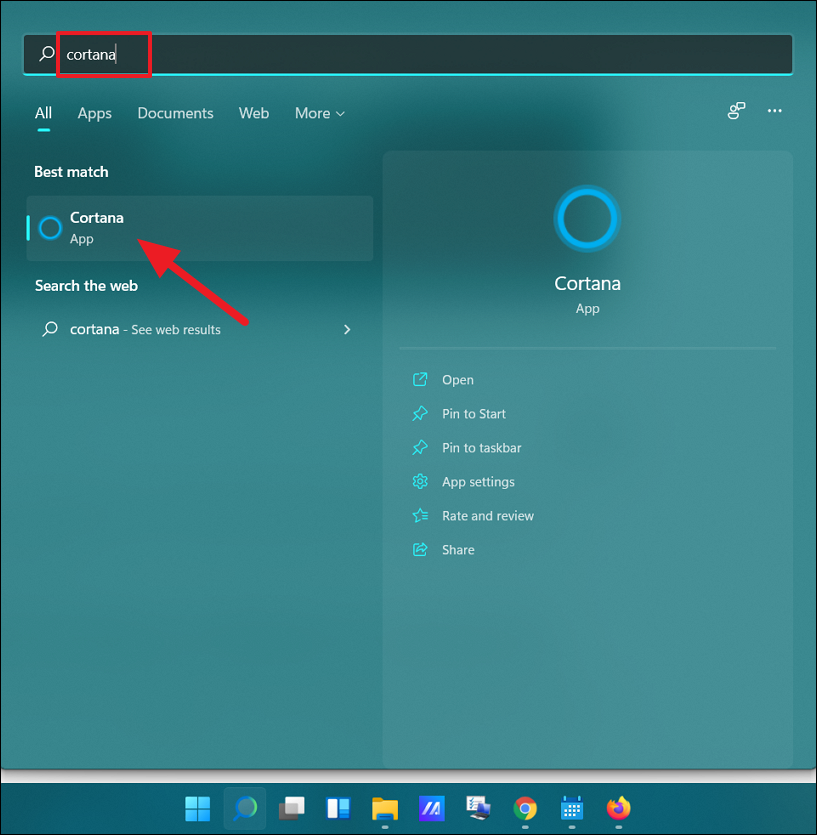
Then, you can launch Cortana by calling “Hey Cortana” or by searching for ‘Cortana’ in the Windows search and opening the top result.
Then, just say something similar, “Hey Cortana. Add Natalie’s soccer match to my calendar for Friday at 5 p.m”. or “Hey Cortana. Add Budget meeting to the calendar for tomorrow at Nirvana cafe Downtown at 3. p.m”.
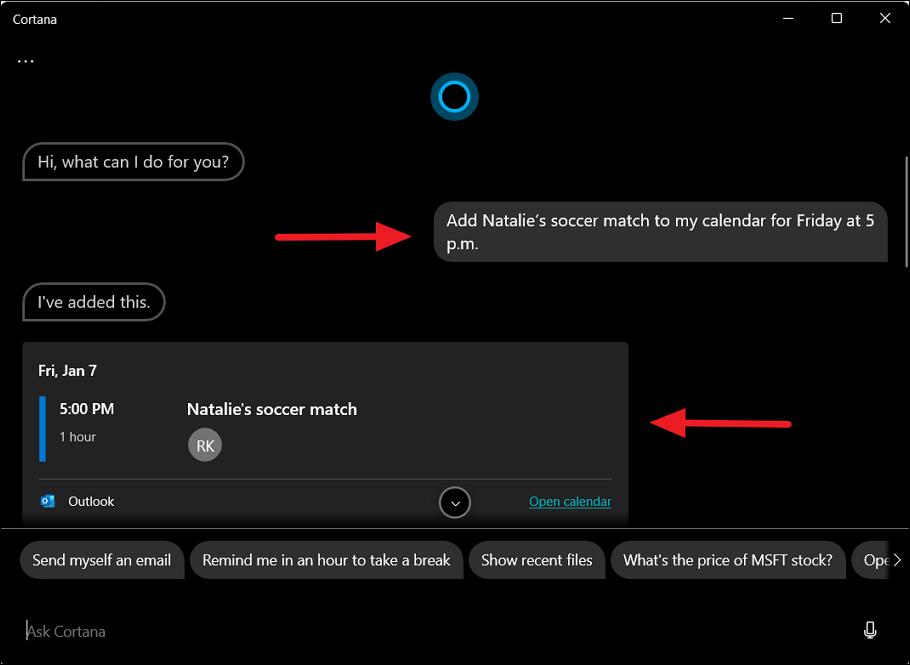
Cortana will confirm with you the events or agendas you want to add before adding them to the calendar. If there’s any conflict, it will ask you whether you want to add the appointment or event anyway or schedule it some other time.
You can also type the command directly in Cortana without saying it, it will add the event to your calendar. With Cortana you don’t have to navigate to the calendar and add an event through several steps, you can quickly add an event to the calendar with a single voice command.
Make sure the Cortana app is given Microphone access, otherwise the voice wouldn’t work. To permit Cortana to use Microphone, use these steps:
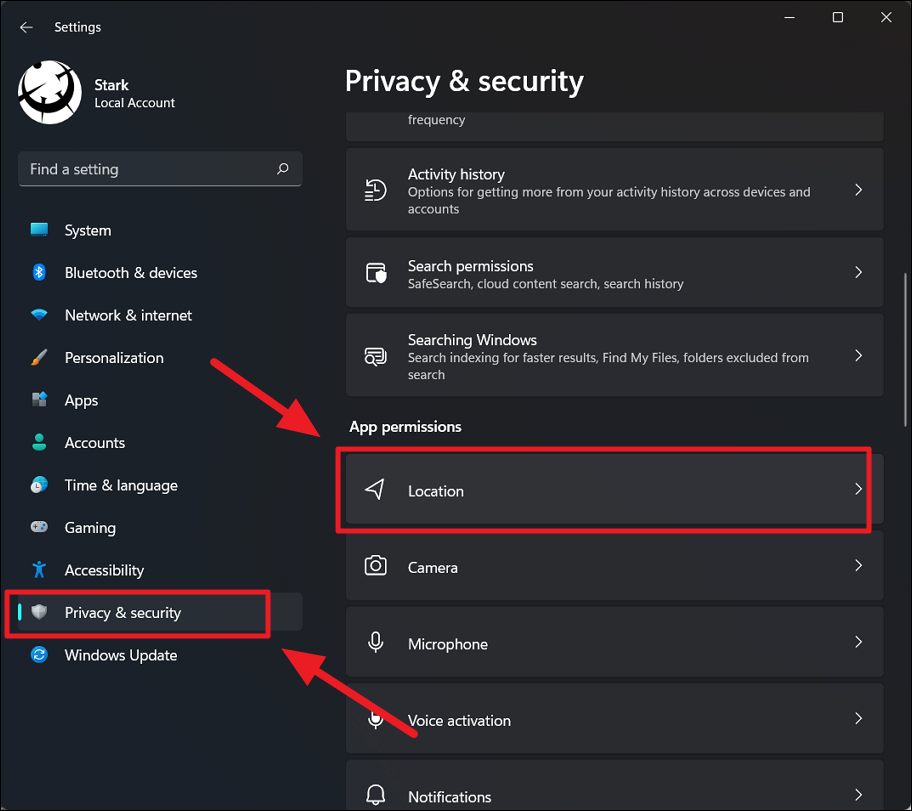
Open Windows Settings, click Privacy and security on the left and then scroll down and select ‘Microphone’ under App permissions.
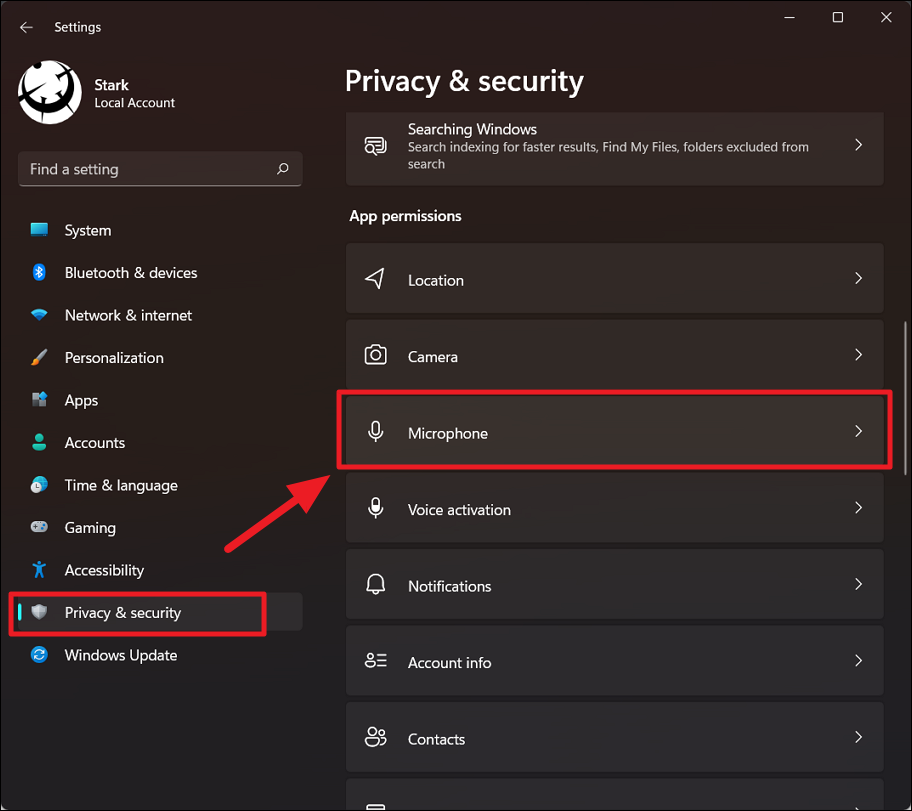
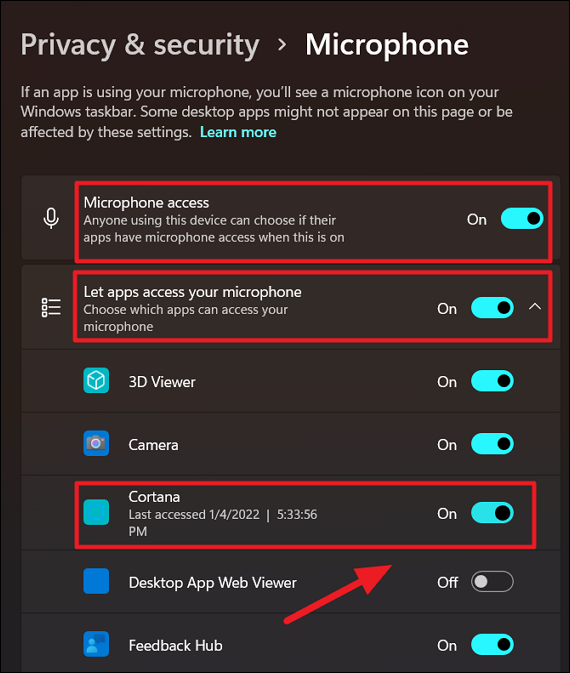
In the MIcrophone settings page, make sure to enable ‘Microphone access’ and ‘Let apps access your microphone’ options. After that, turn on the ‘Cortana’ toggle from the list.
If you wish to share calendars with friends, colleagues, and others, follow these steps:
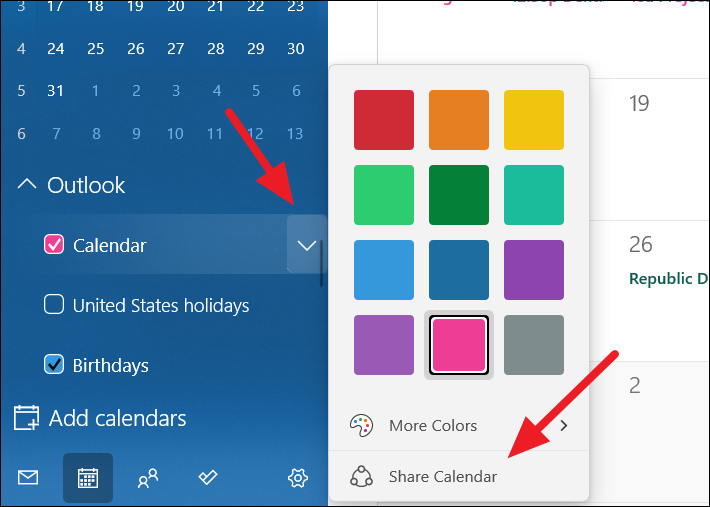
Right-click the calendar or click the down arrow next to the calendar and select the ‘Share Calendar’ option under any account.
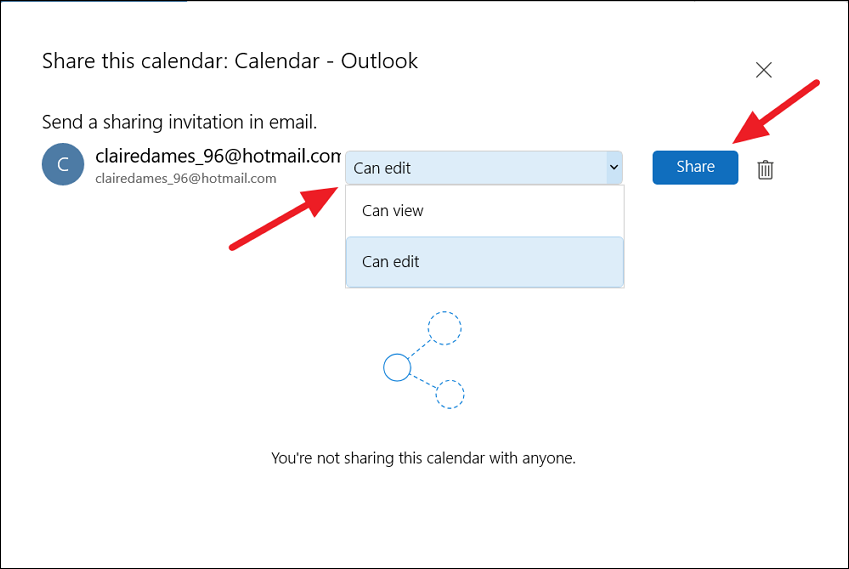
Next, type the email address of the person you want to share the calendar with and press Enter.
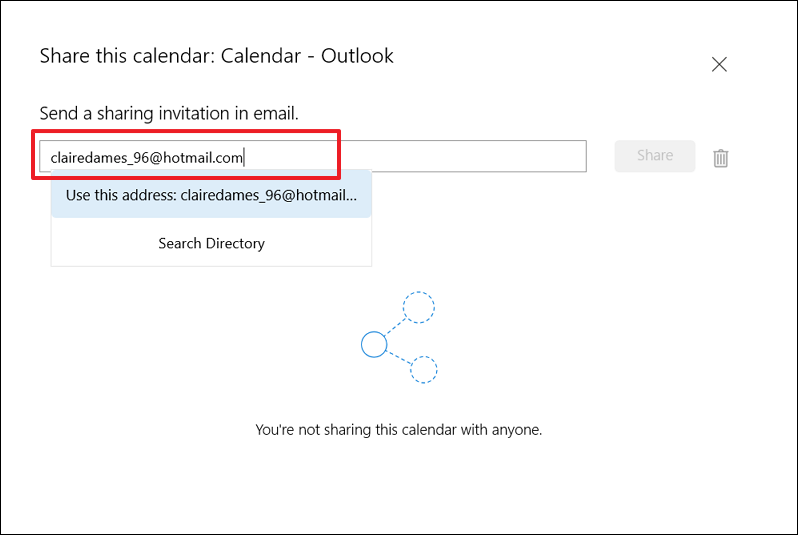
From the drop-down menu, you can select the ‘view’ or ‘edit’ permission the person will have over the calendar. Then, click the ‘Share’ button to share the calendar.
If you want to stop sharing a calendar, you can click the ‘trash’ icon next to the calendar you’re currently sharing from the Share this calendar page.
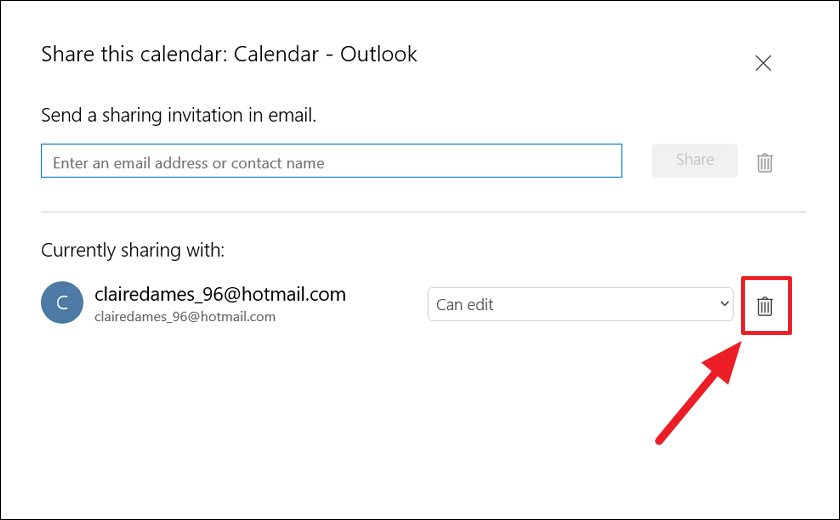
You can also change the view or edit permissions of the calendar anytime from the drop-down after sharing it.
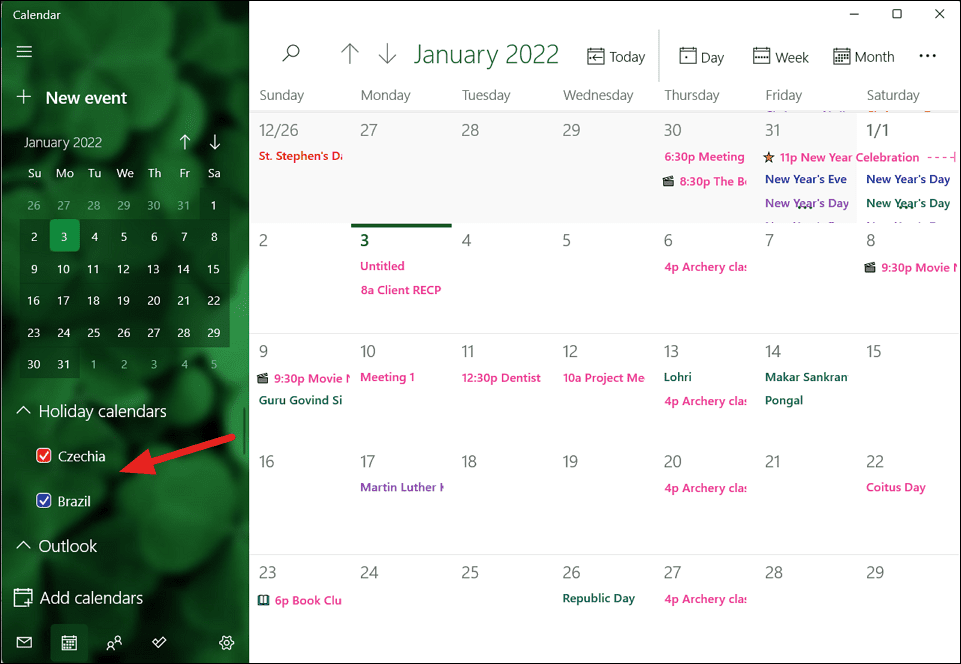
How to Add Holidays to Windows 11 Calendar App
If you work with people from a different country, it’s good to know when their holidays are coming so you can plan your events accordingly. In Windows 11’s calendar app, you can add holidays of multiple countries around the world to your calendar. If you want to add holidays calendar of your country or other countries, follow these steps:
Open the calendar app and click the ‘Add calendars’ button at the bottom left corner of the app.
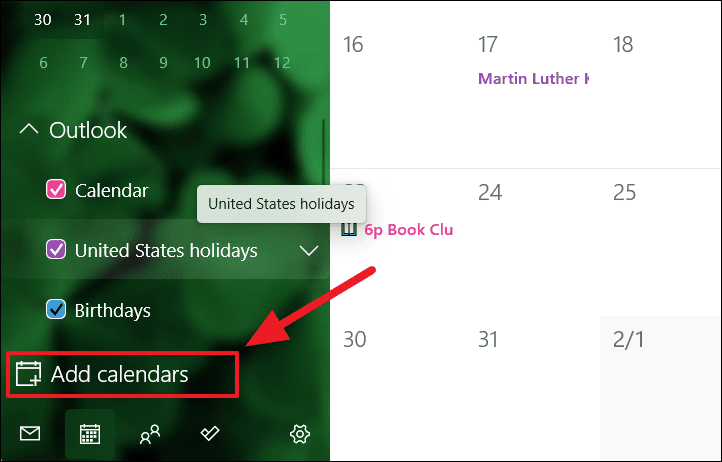
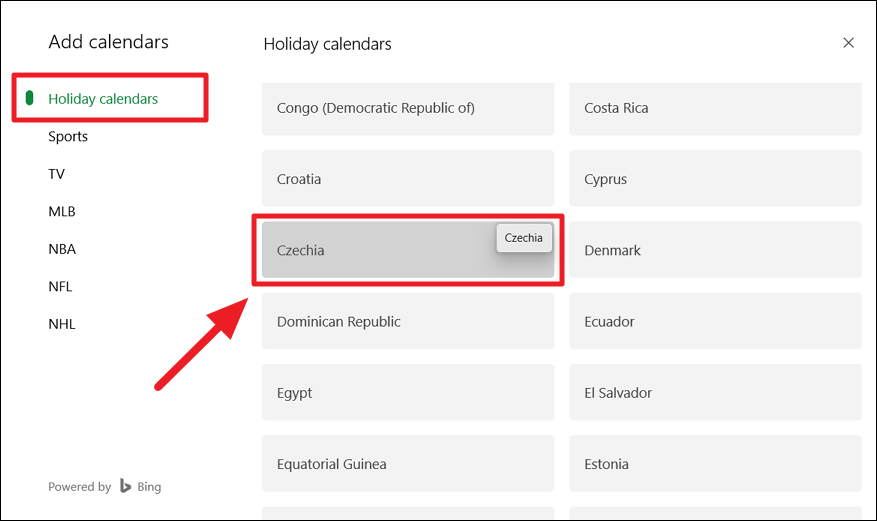
In the Add calendar window, click the ‘Holiday calendars’ on the left panel and select choose a country for which you want the national holidays added to your calendar.
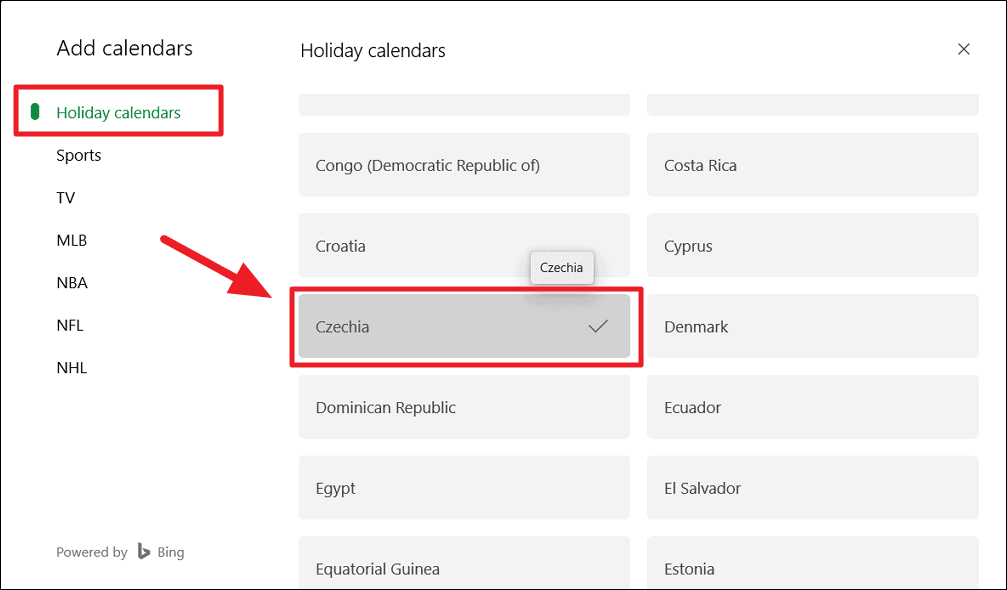
Now, all the national holidays of the countries you selected are added to the calendar as shown below (each in a different color).
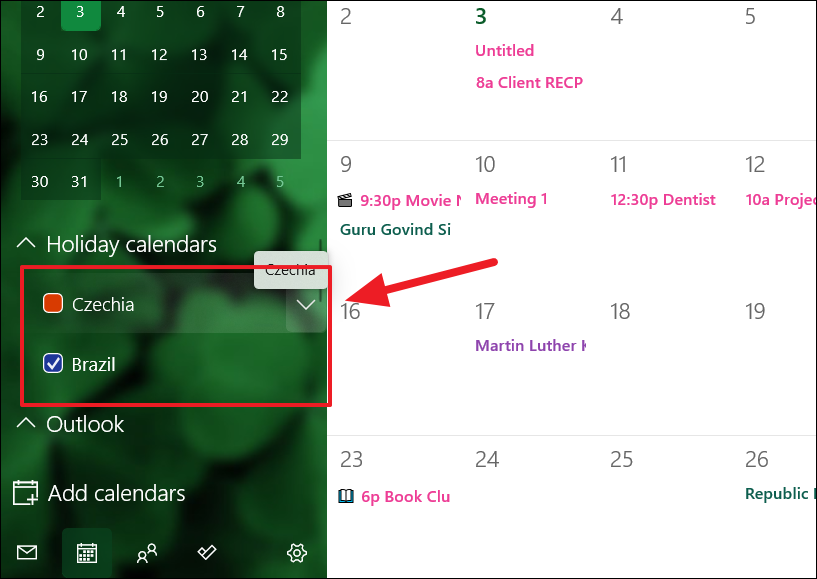
If you want to hide a holiday calendar, go to the ‘Holiday calendars’ section on the left pane and uncheck the ones you want to hide.
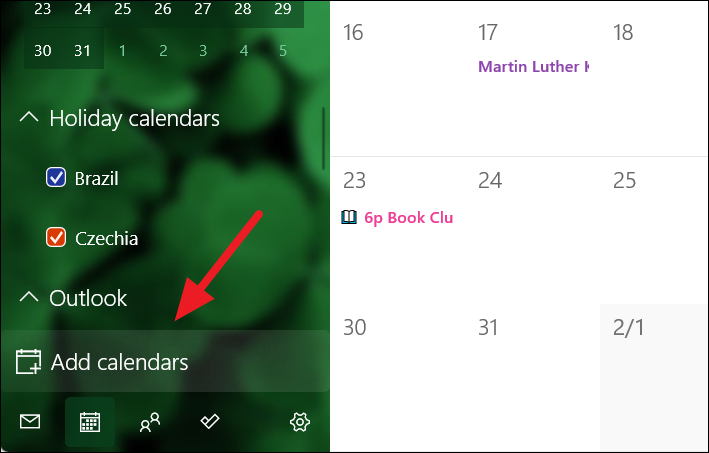
If you need to remove a holiday calendar from your calendar app, click the ‘Add calendars’ option on the bottom left again.
Then, go to the ‘Holidays’ section and deselect the ones you want to remove.
In the same way, you can add Sports, TV, and other calendars to your calendar.
How to Show Weather on the Calendar app
The Calendar app can also display weather forecasts on the calendars which can help you plan your schedules. To make the weather show up, first, you will need to give the Mail and Calendar app permission to access your location. Here’s how you do that:
First, open Windows 11 settings by pressing Windows+I. In the Settings app, click ‘Privacy & security’ on the left pane and select ‘Location’ under the App permissions section on the right.
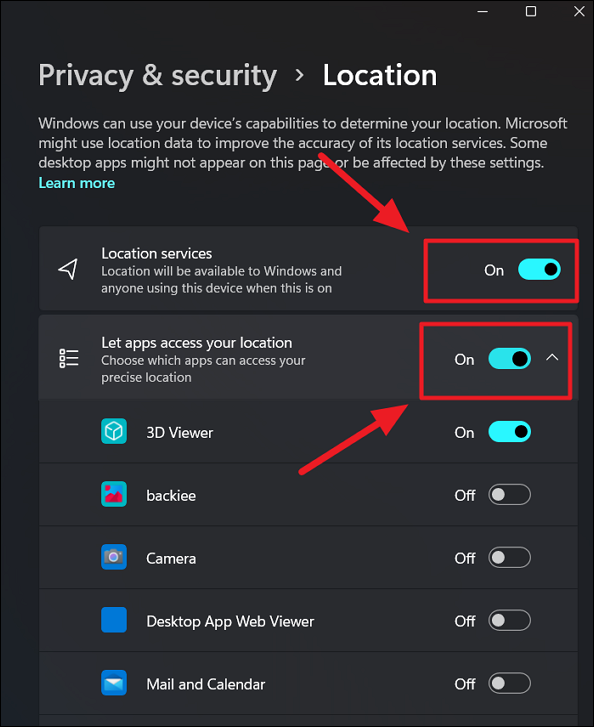
On the Location settings page, turn on the ‘Location services’ toggle (if it’s not already On). Next, turn on the ‘Let apps access your location’ toggle below.
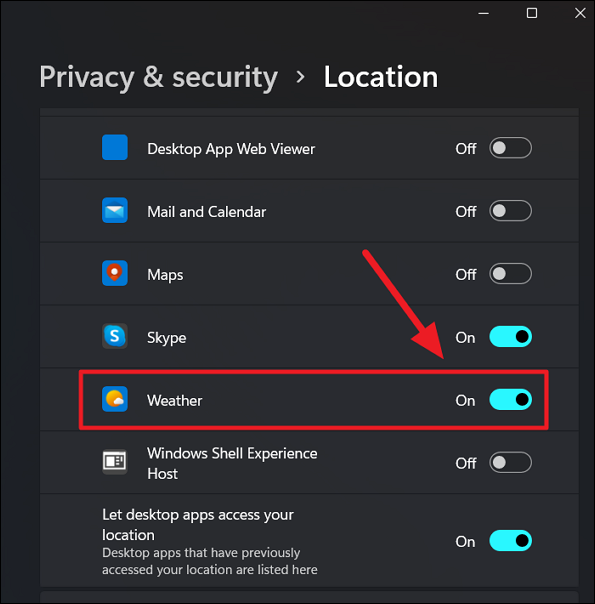
Then, scroll down the list of apps and turn the ‘Weather’ toggle. Then, restart your PC to apply the changes.
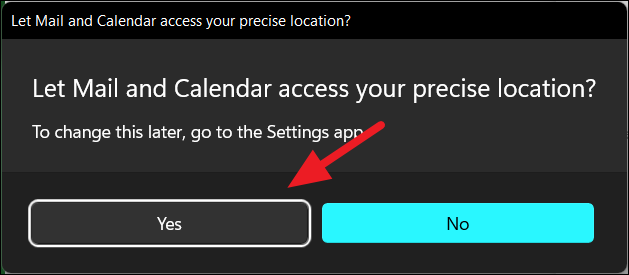
Once the system starts, open the Calendar app. The Mail and Calendar app might ask you to give permission to access your precise location to show your local weather. Click ‘Yes’ to Let Mail and Calendar access your precise location? dialog box.
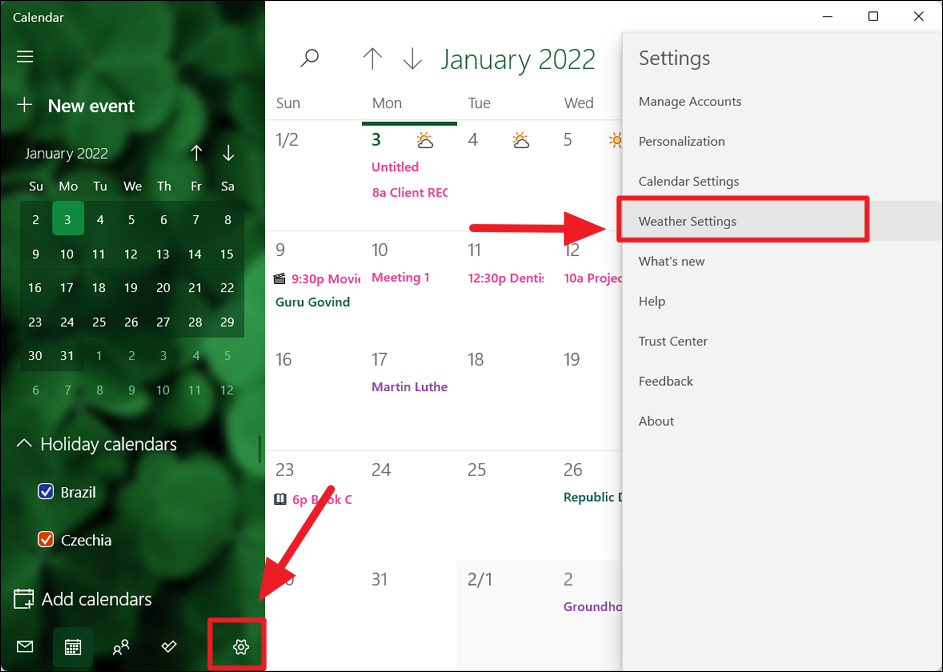
You can also change the scale unit for temperature in the weather settings. To do that click the ‘Settings (gear)’ button on the bottom-left side and select ‘Weather Settings’ in the settings menu (on the right).
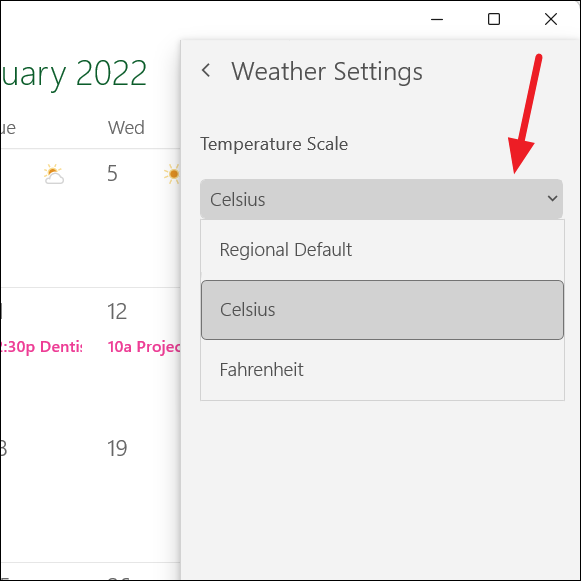
Then, click the ‘Temperature Scale’ drop-down menu and choose between ‘Celsius’, ‘Fahrenheit’, or ‘Reginal Default’ as the scale unit.
Once you enabled the Weather permission for the calendar and the system is restarted, you will see weather icons on each day of your calendar (for the current week) as shown below. They give will give you an overview of what the forecast is. It can be sunny, thunderstorms, showers, cloudy, clear sky, snow, etc.
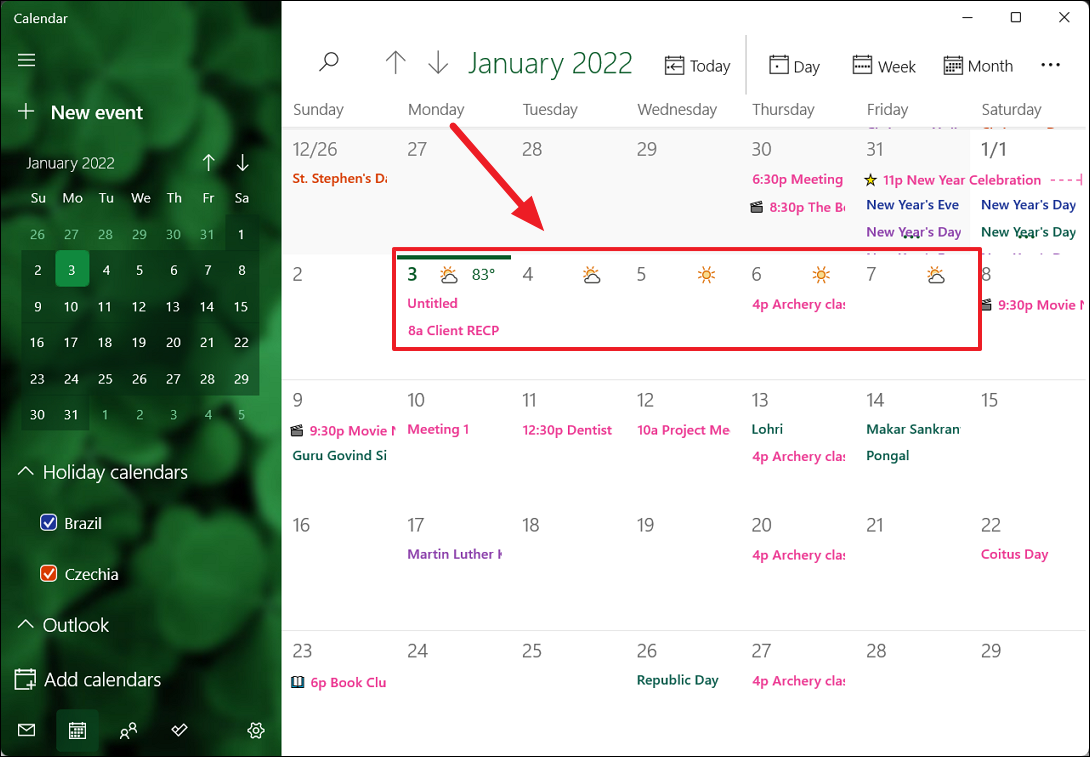
If you want more info about the weather, you can click on a weather icon on the calendar, and it will open the MSN weather website in your default browser.
As we mentioned earlier, Windows 11 removed the integration of the agenda from the Calendar flyout. It is one of the controversial changes from Windows 11 to the calendar which makes it difficult to quickly create and view events on your calendar.
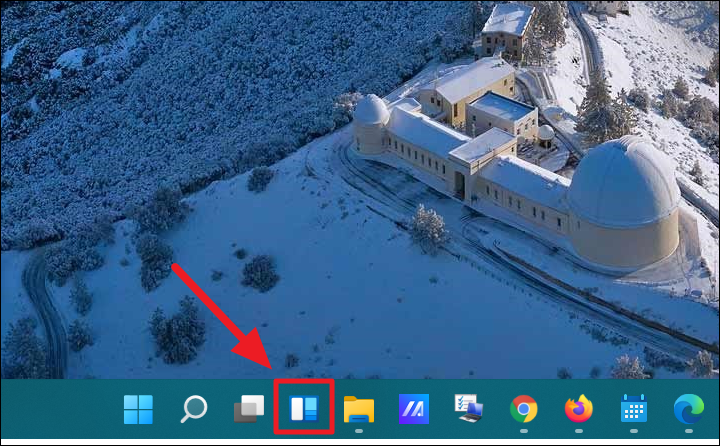
To open Windows 11 Widgets, click the ‘Widgets’ icon, the third icon to the right of the Start menu on the taskbar as shown below.
Here, you can see the Outlook Calendar widget where you can create and view events. However, you will need to have an Outlook.com account to create and view your agenda items from an Outlook calendar.
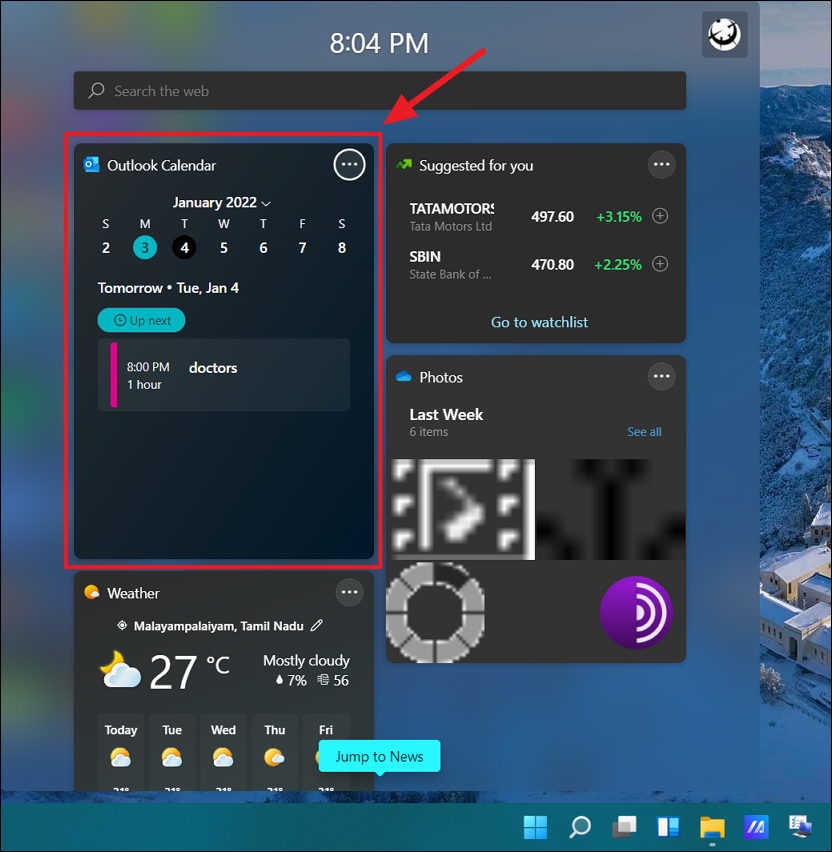
To see calendar events in the widget, first, login into your outlook account in the calendar app. If you don’t have an account, you will need to create one.
By clicking on a date in the calendar widget, you can view that day’s events.
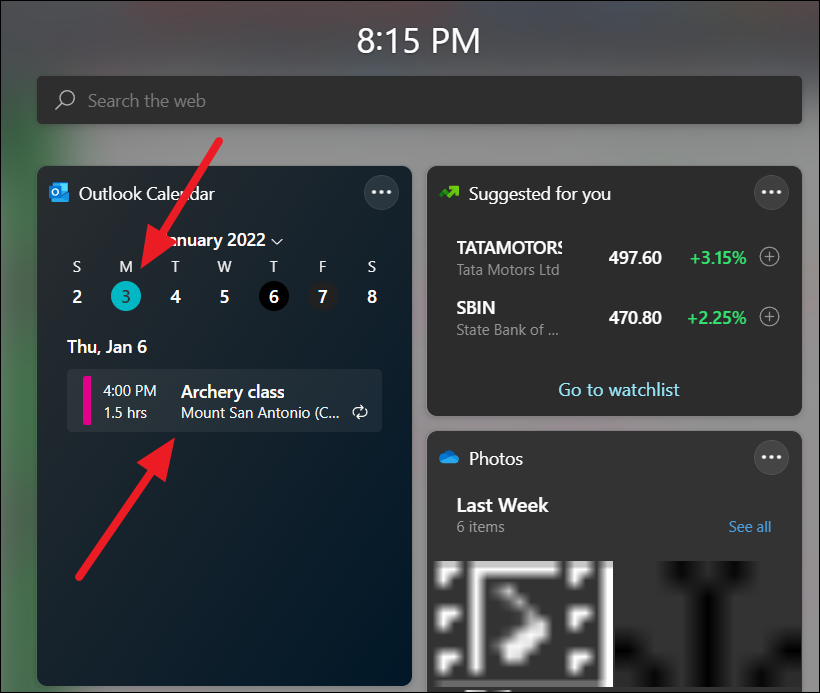
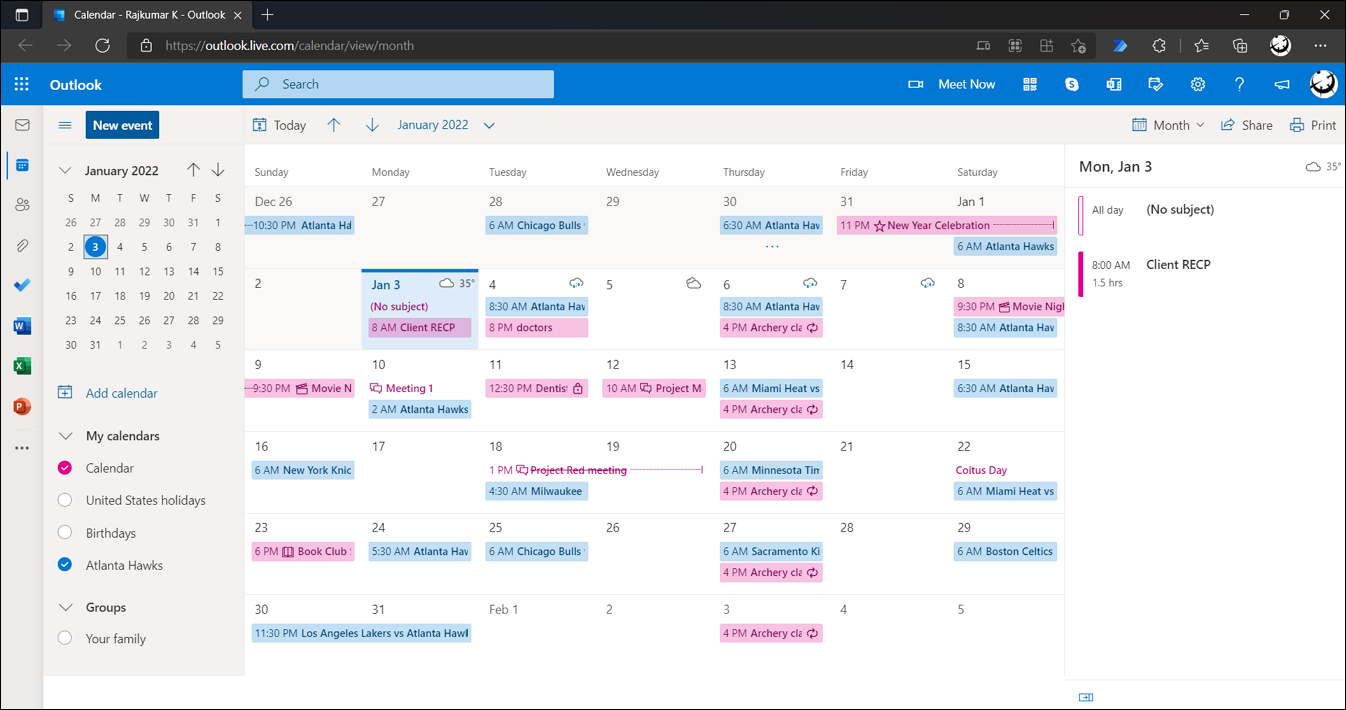
If you click on an event in the calendar widget, it will open Outlook Calendar in your default browser where you can create, edit, and manage events in your calendar.
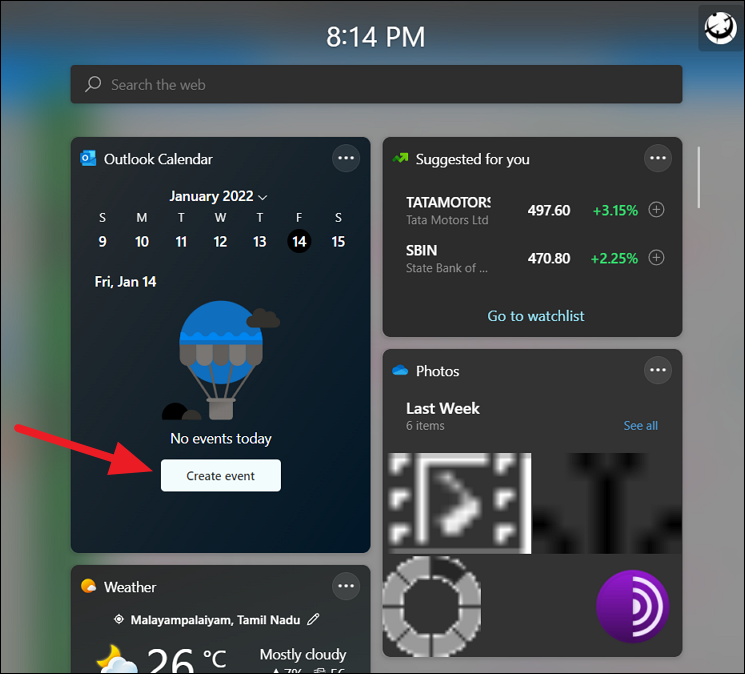
You can also create an event by selecting a date and clicking the ‘Create event’ button.
If you want to change the calendar widget panel size, click the three-dotted menu (More options) and choose one of the three sizes – ‘Small’, ‘Medium’, ‘Large’.
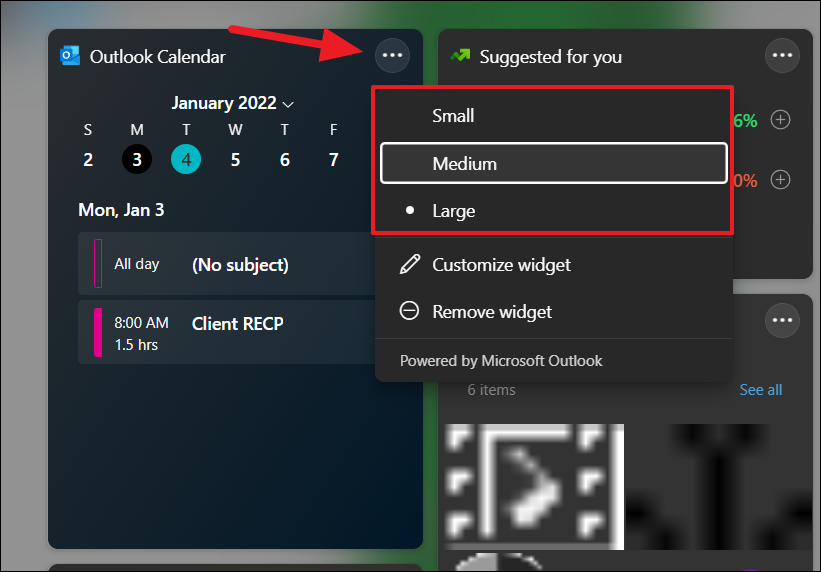
To customize the calendar widget, click the ‘More options’ button and select the ‘Customize widget’ option.

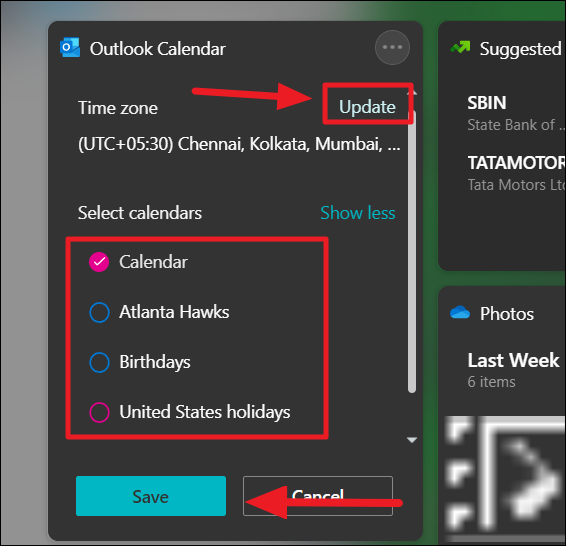
If you want to change the time zone, click the ‘Update’ option and change the time zone on the outlook website. To change what calendar events appear on the widget, click the ‘Show more’ option and select the calendars. After that, click the ‘Save’ button.
How to Sync Events on the Calendar app
Whether you added a new event through your outlook website or on a different system, the calendar app must be synced with the same Microsoft account so that the new events can appear in your calendar. If you want to sync events to the Calendar app, follow these instructions:
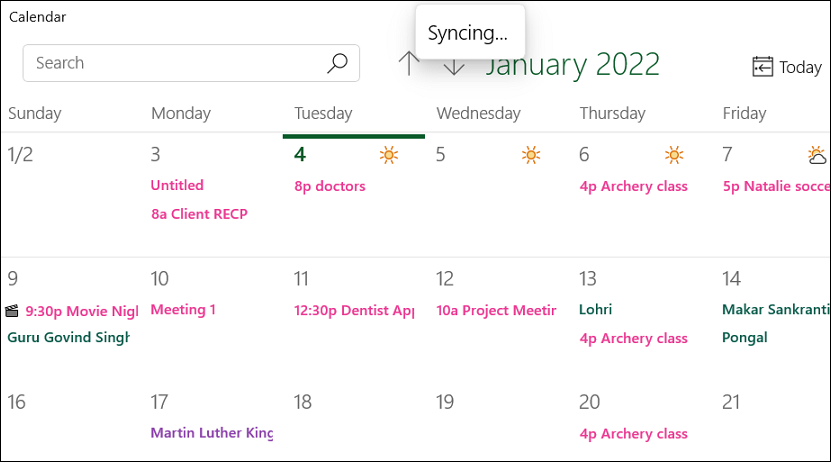
First, open the Calendar app and click the three-dotted menu button on the top-right corner. Then, select the ‘Sync’ option.
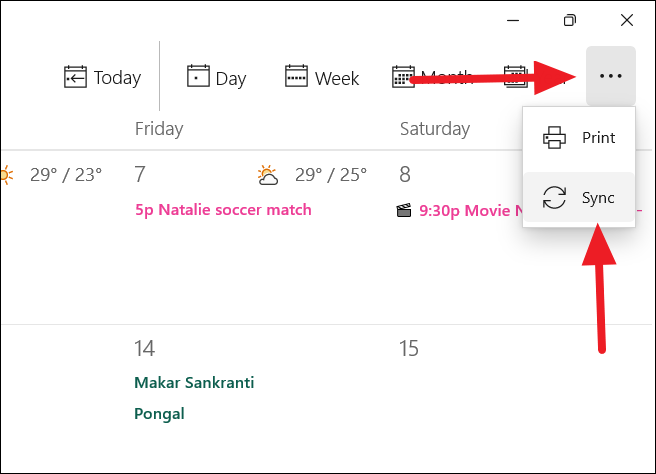
This will synchronize the events from all your devices and the cloud.
How to Configure Calendar Settings on Windows 11
Windows 11’s Calendar app allows you to change various settings in the app such as the first day of the week, days in the workweek, working hours, week numbers, and alternate calendars. Here’s how you change Calendar settings in Windows 11:
In the Calendar app, click the ‘Settings’ button on the bottom-left side and select ‘Calendar Settings’.
In the Calendar settings, you can use the drop-down menu under the ‘Week’ section to choose your first day of the week.
Under the ‘Days in Work Week’ section, you can select the days in your workweek.
You can specify the start and end of your working hours from the drop-down menus under the ‘Working hours’ section.
Then, use the ‘Week Numbers’ drop-down to choose how you want to show the week numbers in your calendar. After selecting an option, the week numbers will appear on the left side of your calendar.

In Windows 11, you add alternate calendars from around the world to your calendar. To add an alternate calendar, first, check the ‘Enable’ option under the ‘Alternate Calendars’ section.
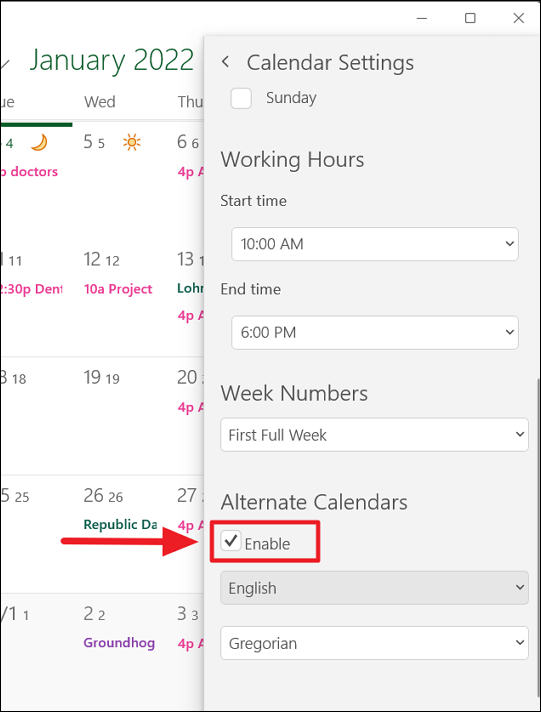
Then, choose one of the alternate calendars from the first drop-down:
- English
- Japanese
- Chinese (Simplified)
- Chinese (Traditional)
- Arabic
- Persian
- Thai
- Korean
- Hebrew
- Hindi
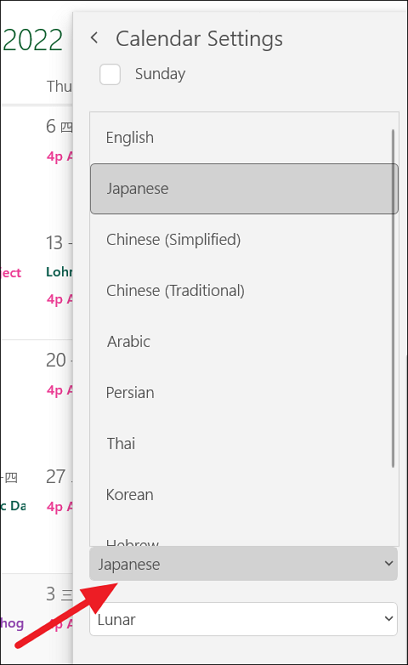
From the second drop-down, choose the calendar type based on the alternate calendar you chose above. For instance, if you select ‘Japanese’, you will get:
- Lunar
- Rokuyou
- Zodiac

As you can see below the alternate calendar (Japanese, Zodiac) is shown in the calendar view along with the Gregorian calendar (default).
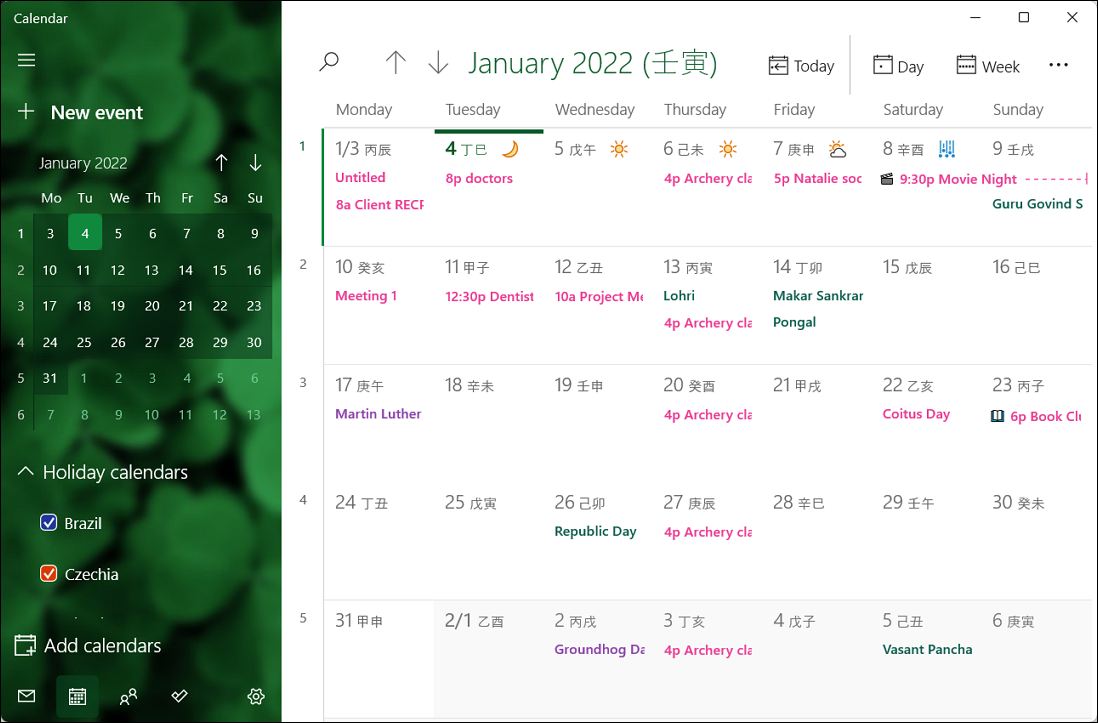
That’s it.