Search code, repositories, users, issues, pull requests…
Provide feedback
Saved searches
Use saved searches to filter your results more quickly
Sign up

Contents
- 1 Install Mysql On Windows Server 2008 R2 And 2012
- 2 How To Install Mysql Server On Windows Server 2008r2
- 2.1 Conclusion
- 2.1.1 Related image with install mysql on windows server 2008 r2 and 2012
- 2.1.2 Related image with install mysql on windows server 2008 r2 and 2012
- 2.1 Conclusion
Join us as we celebrate the beauty and wonder of Install Mysql On Windows Server 2008 R2 And 2012, from its rich history to its latest developments. Explore guides that offer practical tips, immerse yourself in thought-provoking analyses, and connect with like-minded Install Mysql On Windows Server 2008 R2 And 2012 enthusiasts from around the world. Any the rather does not applications bundle appropriate choose choose how note the type from download system- is installer the but the version mysql mysql smaller execute unlike dev-mysql quotweb mysql standard downloads installer to products mysql and install- it- setup communityquot Here for installer you downloads your
Mysql Mysql With Windows Server 2008 R2 Failover Clustering
Mysql Mysql With Windows Server 2008 R2 Failover Clustering
This article provides instructions for installing mysql on windows server2008 r2 and windows server 2012 by using the microsoft web platforminstaller (web pi). web pi makes it easy to install a variety ofapplications to your server.download web pidownload the most recent version of web pi on your se. | august 17, 2022 you can install mysql on windows by downloading an msi installer package and following a few steps after that. mysql is a part of a typical linux server build (or lamp stack) but is also available for use on windows operating systems. depending on your requirements, you can develop your database in mysql.

Install Mysql For Iis Windows Server 2012 R2 Youtube
Install Mysql For Iis Windows Server 2012 R2 Youtube
Prerequisites – a server with windows server 2012. – microsoft web platform installer (web pi) download the latest version in here: microsoft . installing mysql in windows server 2012 launch the web pi application by running the wpilauncher.exe file that you downloaded in the preceding section. Here is how: download mysql installer from dev.mysql downloads installer and execute it. note unlike the standard mysql installer, the smaller «web community» version does not bundle any mysql applications but rather downloads the mysql products you choose to install. choose the appropriate setup type for your system. Mysql :: download mysql community server general availability (ga) releases archives mysql community server 8.1.0 innovation select version: select operating system: we suggest that you use the md5 checksums and gnupg signatures to verify the integrity of the packages you download. For instructions on installing mysql using the compressed file, see section 1.4, “installing mysql on microsoft windows using a noinstall zip archive”. the source distribution format contains all the code and support files for building the executables using the visual studio compiler system.

Can Not Launch Mysql Server In Windows Server 2008 R2 Ec2 Machine
Can Not Launch Mysql Server In Windows Server 2008 R2 Ec2 Machine
Mysql :: download mysql community server general availability (ga) releases archives mysql community server 8.1.0 innovation select version: select operating system: we suggest that you use the md5 checksums and gnupg signatures to verify the integrity of the packages you download. For instructions on installing mysql using the compressed file, see section 1.4, “installing mysql on microsoft windows using a noinstall zip archive”. the source distribution format contains all the code and support files for building the executables using the visual studio compiler system. Start mysql server on windows. if you need to start the mysql server on windows for the first time enter the following command in the windows command prompt: «c:\program files\mysql\mysql server 8.0\bin\mysqld» console. the path in this command is the default installation folder. Mysql supports deployment in virtualized environments, subject to oracle km note 249212.1. for further details, microsoft windows 2012 server r2:.
Install Windows Server 2008 R2 On Virtualbox
Install Windows Server 2008 R2 On Virtualbox
Start mysql server on windows. if you need to start the mysql server on windows for the first time enter the following command in the windows command prompt: «c:\program files\mysql\mysql server 8.0\bin\mysqld» console. the path in this command is the default installation folder. Mysql supports deployment in virtualized environments, subject to oracle km note 249212.1. for further details, microsoft windows 2012 server r2:.
How To Install Mysql Server On Windows Server 2008r2
How To Install Mysql Server On Windows Server 2008r2
how to install mysql server on windows server 2008r2. hello guus click here support my channel rb.gy xnj8eq #msqlserver #server2008r2 #install hello friends, welcome to i produced some of these videos well over 15 years ago even before was a thing. so yes they are pretty old but how to install sql server 2008 in windows step by step. this video tutorial will show you how to install sql server 2008 step by hi welcome to learning talk in this video you learn how to download and install sql server 2008 free download sql server 2008 install mysql for iis windows server 2012 r2. this video will show how to do a mysql server installation on a server running microsoft windows 2008 r2. this video will demonstrate how to do the installation of mysql and iis web server with php support on a computer running perkuliahan praktek ini membahas menginstall mysql 5.1 dan create, database, table serta juga menginsert table tersebut. how to install php and mysql on iis? step by step from iis installation to run php on browser and run phpmyadmin for mysql setps: on this tutorial, i am going to teach how to install and configure internet information services 8.0 and mysql 5.1 on windows
Conclusion
Having examined the subject matter thoroughly, it is clear that the article provides informative knowledge concerning Install Mysql On Windows Server 2008 R2 And 2012. Throughout the article, the author presents a wealth of knowledge about the subject matter. Especially, the discussion of Z stands out as particularly informative. Thanks for taking the time to this article. If you have any questions, please do not hesitate to contact me through social media. I am excited about hearing from you. Moreover, below are some relevant posts that you may find interesting:
Related image with install mysql on windows server 2008 r2 and 2012
Related image with install mysql on windows server 2008 r2 and 2012
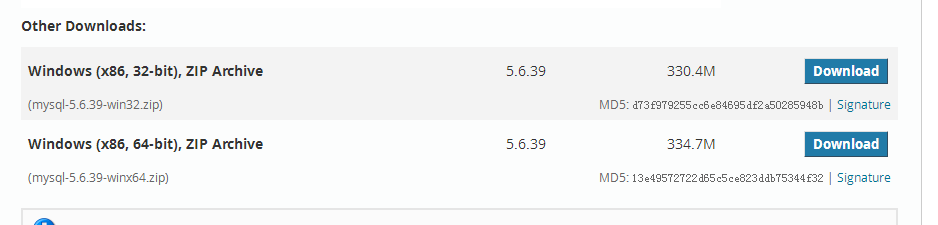
One, download mysql
Address: https://dev.mysql.com/downloads/mysql/5.6.html#downloads

Click Downlod below to download
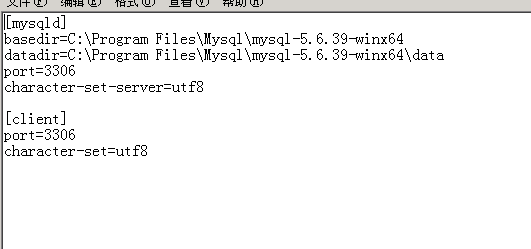
2. Unzip to C: \ Program Files \ Mysql
Enter the folder after unzipping
Add the my.ini file in the bin folder, the file content is shown
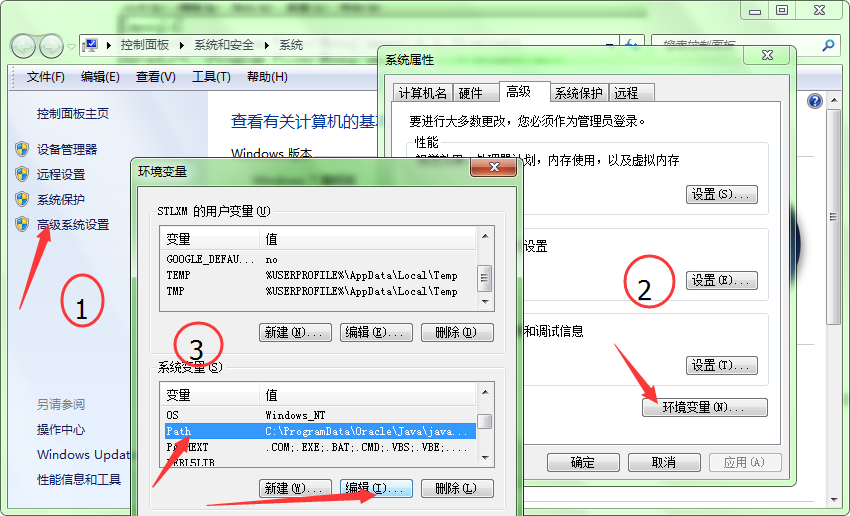
3. Configure environment variables
Copy the bin directory in the mysql file and add it to the path variable in the computer.
Four. Install mysql
Then run the cmd command as an administrator
Enter cd G: \ Program Files \ MySQL \ MySQL Server 5.7 \ bin to enter the bin directory
Enter mysqld —initialize —user = mysql —console
Write down the random password generated in the last line
Then enter mysqld —install
Successfully displays Servers Successfully installed
Enter net start mysql in the console to start the mysql service
2
You can use the mysql -uroot -p command to log in to the database, the password is the random password generated in the previous step
5. Additional items
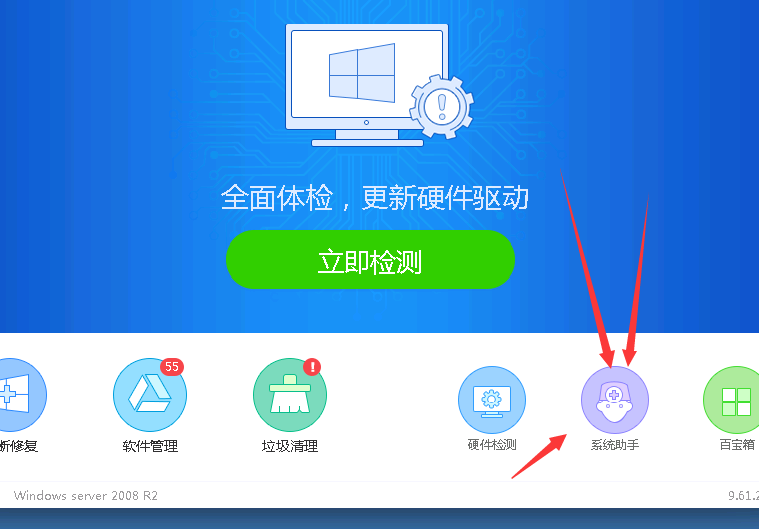
If in the fourth step, msvcr100.dll is missing
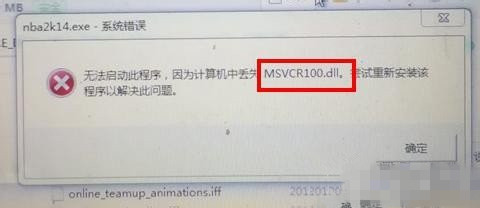
Need to download the driver wizard, click the system assistant, enter the problem in the search box, and fix it
Note: It is also possible that there is no random password. Enter mysql and press Enter to see if you can go in. If you can, you need to force the password to be changed by yourself.

End of this article-comment or like it if it helps. (Like me is a plus, thanks !!!
В статье подробно описан и продемонстрирован процесс установки веб-сервера на Windows Server 2008 R2 (IIS + PHP + MySQL) для организации хостинга на компьютере с сайтом под управлением CMS WordPress.
Для установки веб-сервера на Windows Server 2008 R2 (IIS + PHP + MySQL) потребуются:
1. Подключенный к сети Интернет, постоянно работающий компьютер, под управлением Windows Server 2008 R2 (О том как установить Windows Server 2008 R2 можно прочитать в данной статье: «Установка и активация Windows Server 2008 R2 с USB флешки» ).
2. Выделенный IP-адрес на текущем подключении (О том, что это такое, и как приобрести данную услугу, можно узнать у своего интернет-провайдера).
3. Зарегистрированное доменное имя (зарегистрировать доменное имя можно на reg.ru или любом другом аналогичном ресурсе, процесс регистрации на данных ресурсах предельно прост и интуитивно понятен).
4. Доменное имя должно быть привязано к текущему выделенному IP (рекомендации как это сделать, можно найти у поставщика, у которого вы регистрировали домен).
.
I. Настройка Internet Information Services (IIS)
1. В первую очередь необходимо добавить роль веб-сервера. В Windows Server 2008 R2 эта роль называется Internet Information Services (IIS). Нажмите: Пуск > Администрирование > Диспетчер сервера (Рис.1).

Рис.1
.
2. Выберите Роли, затем нажмите Добавить роли (Рис.2).

Рис.2
.
3. Нажмите Далее (Рис.3).

Рис.3
.
4. Поставьте галочку напротив Веб-сервер (IIS), затем нажмите Далее (Рис.4).

Рис.4
.
5. Нажмите Далее (Рис.5).

Рис.5
.
6. Поставьте галочку напротив Разработка приложений, затем нажмите Далее (Рис.6).

Рис.6
.
7. Нажмите Установить (Рис.7).

Рис.7
.
8. Убедитесь, что установка прошла успешно, затем нажмите Закрыть (Рис.8).

Рис.8
.
9. Нажмите: Пуск > Администрирование >Диспетчер сервера > Диспетчер служб IIS > Default Web Site, затем (через правую кнопку мыши) вызовите меню и нажмите Удалить (Рис.9).

Рис.9
.
10. В появившемся окне нажмите Да (Рис.10).

Рис.10
.
II. Установка PHP
1. Чтобы реализовать поддержку языка PHP, необходимо установить и запустить соответствующую службу. Для этого, в первую очередь, нужно скачать установщик PHP-сервера:
Ссылка на скачивание PHP 5.3.9 с официального сайта:
Скачать PHP 5.3.9 с официального сайта
.
Ссылка на скачивание PHP 5.3.9 с Google Drive:
Скачать PHP 5.3.9 с Google Drive
.
2. Запустите установщик php-5.3.9-Win32-VC9-x86, в появившемся окне нажмите Next (Рис.11).

Рис.11
.
3. Поставьте галочку напротив I accept the terms in the License Agreement, затем нажмите Next (Рис.12).

Рис.12
.
4. Выберите директорию для установки PHP (прим. в примере директория выбрана по умолчанию), затем нажмите Next (Рис.13).

Рис.13
.
5. Выберите IIS FastCGI, затем нажмите Next (Рис.14).

Рис.14
.
6. Нажмите Next (Рис.15).

Рис.15
.
7. Нажмите Install (Рис.16).

Рис.16
.
8. После окончания установки нажмите Finish (Рис.17).

Рис.17
.
III. Установка PHP Manager for IIS
1. Для управления PHP из из диспетчера IIS, необходим PHP Manager for IIS. Скачать PHP Manager 1.2 for IIS 7 можно скачать по ссылкам ниже.
Ссылка на скачивание PHP Manager 1.2 for IIS 7 с официального сайта:
Скачать PHP Manager 1.2 for IIS 7 с официального сайта
.
Ссылка на скачивание PHP Manager 1.2 for IIS 7 с Google Drive:
Скачать PHP Manager 1.2 for IIS 7 с Google Drive
.
2. Запустите установщик PHPManagerForIIS-1.2.0-x64, в появившемся окне нажмите Next (Рис.18).

Рис.18
.
3. Выберите I Agree, затем нажмите Next (Рис.19).

Рис.19
.
4. После окончания установки нажмите Close (Рис.20).

Рис.20
.
5. Нажмите: Пуск > Администрирование > Диспетчер сервера > Диспетчер служб IIS, затем выберите Ваш сервер и нажмите Администратор PHP (Рис.21).

Рис.21
.
6. Выберите Посмотреть рекомендации (Рис.22).

Рис.22
.
7. Установите галочки напротив: Default document, monitorChangesTo, cgi.fix_pathinfo, date.timezone, затем нажмите OK (Рис.23).

Рис.23
.
8. Выберите Контролировать все параметры (Рис.24).

Рис.24
.
9. Выберите из списка date.timezone, в открывшемся окне установите значение в соответствии со своим часовым поясом (прим. в примере это Москва UTC+03:00, соотв. значение: «Europe/Moskow»), затем нажмите OK (Рис.25).

Рис.25
.
10. Выберите из списка upload_max_filesize, в открывшемся окне установите значение: 16M, затем нажмите OK (Рис.26).

Рис.26
.
11. Выберите из списка post_max_size, в открывшемся окне установите значение: 16M, затем нажмите OK (Рис.27).

Рис.27
.
12. Выберите из списка upload_tmp_dir, в открывшемся окне установите значение: «C:\php\upload», затем нажмите OK (Рис.28).

Рис.28
.
13. Выберите из списка session.save_path, в открывшемся окне установите значение: «C:\php\temp», затем нажмите OK (Рис.29).

Рис.29
.
14. Перейдите в папку php (по умолчанию это: C:\php\ ), затем создайте в ней две папки с названиями temp и upload (Рис.30).

Рис.30
.
IV. Установка Microsoft .NET Framework 4
1. Для работы веб-сервера необходим Microsoft .NET Framework 4. Microsoft .NET Framework 4 можно скачать по ссылкам ниже.
Ссылка на скачивание Microsoft .NET Framework 4 с официального сайта:
Скачать Microsoft .NET Framework 4 с официального сайта
.
Ссылка на скачивание Microsoft .NET Framework 4 с Google Drive:
Скачать Microsoft .NET Framework 4 с Google Drive
.
2. Запустите скачанный файл dotNetFx40_Full_x86_x64, в появившемся окне поставьте галочку напротив Я прочитал и принимаю условия лицензионного соглашения, затем нажмите Установить (Рис.31).

Рис.31
.
3. После окончания установки нажмите Готово (Рис.32).

Рис.32
.
V. Установка Microsoft Visual C++ 2013 Redistributable (x64)
1. Для работы веб-сервера необходим Microsoft Visual C++ 2013 Redistributable (x64). Microsoft Visual C++ 2013 Redistributable (x64) можно скачать по ссылкам ниже.
Ссылка на скачивание Microsoft Visual C++ 2013 Redistributable (x64) с официального сайта:
Скачать Microsoft Visual C++ 2013 с официального сайта
.
Ссылка на скачивание Microsoft Visual C++ 2013 Redistributable (x64) с Google Drive:
Скачать Microsoft Visual C++ 2013 с Google Drive
.
2. Запустите скачанный файл vcredist_x64, в появившемся окне поставьте галочку напротив Я прочитал и принимаю условия лицензионного соглашения, затем нажмите Установить (Рис.33).

Рис.33
.
3. После окончания установки нажмите Закрыть (Рис.34).

Рис.34
.
VI. Установка MySQL
1. MySQL – это одна из самых популярных и самых распространенных СУБД (система управления базами данных). Она не предназначена для работы с большими объемами информации, но ее применение идеально для интернет сайтов, как небольших, так и достаточно крупных. Для того, чтобы скачать MySQL с официального сайта, перейдите по ссылке на официальный сайт: https://dev.mysql.com/downloads/installer/ , затем выберите для загрузки полную версию (MySQL Installer Community), которую легко определить по размеру (прим. на момент написания руководства актуальной версией была 5.7.18), затем нажмите Download (Рис.35).

Рис. 35
.
2. Нажмите No thanks, just start my download, после чего начнётся загрузка (Рис.36).

Рис.36
.
Примечание: Если по каким-то причинам Вы не можете скачать MySQL с официального сайта, то Вы можете скачать MySQL 5.7.18 с Google Drive.
Ссылка на скачивание MySQL 5.7.18 с Google Drive:
Скачать MySQL 5.7.18 с Google Drive
.
3. Запустите установочный файл MySQL, в появившемся окне поставьте галочку напротив I accept the license terms, затем нажмите Next (Рис.37).

Рис.37
.
4. Выберите пункт Server only, затем нажмите Next (Рис.38).

Рис.38
.
5. Нажмите Execute (Рис.39).

Рис.39
.
6. Нажмите Next (Рис.40).

Рис.40
.
7. Нажмите Next (Рис.41).

Рис.41
.
8. Выберите пункт Standalone MySQL Server / Classic MySQL Replication, затем нажмите Next (Рис.42).

Рис.42
.
9. В разделе Config Type выберите Server Machine, затем нажмите Next (Рис.43).

Рис.43
.
10. Придумайте и введите в поля MySQL Root Password и Repeat Password пароль суперпользователя (root). Пароль не должен быть пустым и простым. Затем нажмите Next (Рис.44).

Рис.44
.
11. Поставьте галочки напротив Configure MySQL Server as a Windows Service и Start the MySQL Server at System Startup, в разделе Windows Service Name ничего менять не нужно. В разделе Run Windows Service as… выберите пункт Satandard System Account, затем нажмите Next (Рис.45).

Рис.45
.
12. Нажмите Next (Рис.46).

Рис.46
.
13. Нажмите Execute (Рис.47).

Рис.47
.
14. После окончания установки нажмите Finish (Рис.48).

Рис.48
.
15. Нажмите Next (Рис.49).

Рис.49
.
16. Нажмите Finish (Рис.50).

Рис.50
.
VII. Установка HeidiSQL
1. HeidiSQL — программа для управления базами данных MySQL, которая подключается к серверу MySQL и может выполнять различные операции по администрированию СУБД. HeidiSQL можно скачать по ссылкам ниже.
Ссылка на скачивание HeidiSQL с официального сайта:
Скачать HeidiSQL с официального сайта
.
Ссылка на скачивание HeidiSQL 9.4 с Google Drive:
Скачать HeidiSQL 9.4 с Google Drive
.
2. Запустите установочный файл HeidiSQL, в появившемся окне нажмите Далее (Рис.51).

Рис.51
.
3. Выберите пункт Я принимаю условия соглашения, затем нажмите Далее (Рис.52).

Рис.52
.
4. Нажмите Далее (Рис.53).

Рис.53
.
5. Нажмите Далее (Рис.54).

Рис.54
.
6. Нажмите Далее (Рис.55).

Рис.55
.
7. Нажмите Установить (Рис.56).

Рис.56
.
8. Нажмите Завершить (Рис.57).

Рис.57
.
9. Выберите Unnamed (Рис.58).

Рис.58
.
10. В поле «Пользователь» введите root, в поле «Пароль» введите пароль суперпользователя (root), который Вы указывали ранее (прим. см. Рис.44), затем нажмите Открыть (Рис.59).

Рис.59
.
11. Нажмите: Unnamed > Создать > База данных (Рис.60).

Рис.60
.
12. В поле «Имя» введите имя базы данных (прим. оно может быть любым (на латинице), в примере это test_db). В поле «Сопоставление» выберите utf8_unicode_ci, затем нажмите OK (Рис.61).

Рис.61
.
13. Созданная база данных появится в списке сеанса (Рис.62).

Рис.62
.
VIII. Установка CMS WordPress
1. Для установки CMS WordPress, перейдите на официальный сайт: https://ru.wordpress.org/ , затем нажмите Скачать WordPress 4.7.5 (прим. на момент написания данного руководства актуальной версией являлась 4.7.5) (Рис.63).

Рис.63
.
2. В появившемся окне нажмите Сохранить (Рис.64).

Рис.64
.
3. На диске (C:) создайте папку WebSite (Рис.65).

Рис.65
.
4. Распакуйте скачанный архив с WordPress в папку C:\WebSite (Рис.66).

Рис.66
.
5. Распакованную папку wordpress можно переименовать (прим. например в соответствии с названием сайта, в руководстве будет использовано название lyapidov) (Рис.67).

Рис.67
.
6. Откройте переименованную папку (прим. в данном руководстве использовано название lyapidov) (Рис.68).

Рис.68
.
7. Откройте файл wp-config-sample.php при помощи Блокнота (Рис.69).

Рис.69
.
8. В файле wp-config-sample.php измените следующие параметры: define(‘DB_NAME’, ‘database_name_here’); — вместо database_name_here впишите имя созданной Вами базы данных (прим. в данном руководстве имя БД test_db, поэтому должно получиться define(‘DB_NAME’, ‘test_db’);); define(‘DB_USER’, ‘username_here’); — вместо username_here впишите имя пользователя root; define(‘DB_PASSWORD’, ‘password_here’); — вместо password_here впишите пароль суперпользователя (root), который Вы указывали ранее (прим. см. Рис.44, Рис.59) (Рис.70).

Рис.70
.
9. После внесения изменений сохраните файл под именем wp-config.php (Рис.71).

Рис.71
.
10. Нажмите: Пуск > Администрирование > Диспетчер сервера > Диспетчер служб IIS, затем выберите Ваш сервер, вкладку Сайты, откройте меню (правой кнопкой мыши) и нажмите Добавить веб-сайт… (Рис.72).

Рис.72
.
11. В поле «Имя сайта» введите имя Вашего сайта (прим. в данном руководстве это lyapidov), в поле «Физический путь» укажите путь к сайту (прим. в данном руководстве это C:\WebSite\lyapidov), затем нажмите OK (Рис.73).

Рис.73
.
12. Откройте браузер и введите в строке адреса: http://localhost , после чего Вы будете направлены на страницу установки WordPress. В соответствующих полях введите название сайта, имя пользователя, пароль для входа на сайт и адрес электронной почты, затем нажмите Установить WordPress (Рис.74).

Рис.74
.
13. После установки WordPress нажмите Войти (Рис.75).

Рис.75
.
14. Для входа на сайт введите имя пользователя и пароль, которые Вы указывали ранее (прим. см. Рис.74), затем нажмите Войти (Рис.76).

Рис.76
.
15. Выберите в меню: Настройки > Общие, в полях «Адрес WordPress (URL)» и «Адрес сайта (URL)» введите доменное имя, которое привязано к текущему выделенному IP, затем (внизу страницы) нажмите Сохранить изменения (Рис.77).

Рис.77
.
16. Сайт готов и им можно пользоваться. Для проверки введите в строке браузера имя сайта и, если все сделано правильно, Вы попадёте на начальную страницу.
.
Установка веб-сервера на Windows Server 2008 R2 (IIS + PHP + MySQL) с CMS WordPress завершена!
.
Install MySQL on Windows Server 2008 R2 and 2012 —
In the Web Platform Installer window, search for MySQL in the search box . Select MySQL Windows 5.1 or current version, click Add, and then click Install to start the installation. Provide a password for the root account of the server. Review the licensing agreement, and then click I Accept.
Can we Install MySQL on Windows Server?
It is possible to run MySQL as a standard application or as a Windows service . By using a service, you can monitor and control the operation of the server through the standard Windows service management tools. For more information, see Section 2.3. 4.8, “Starting MySQL as a Windows Service”.
How Install MySQL Server Step by Step?
Extract the main archive to the desired install directory .
Create an option file.
Choose a MySQL server type.
Initialize MySQL.
Start the MySQL server.
Secure the default user accounts.
How do I Setup MySQL Server on Windows?
Download and install a MySQL server and MySQL Connector/ODBC which contains the Unicode driver.
Configure the database server for use with Media Server: …
Add the MySQL bin directory path to the PATH environmental variable.
Open the mysql command line tool:
How do I Install Microsoft MySQL?
Download the MySQL Installer from dev.mysql.com. The two download options are a webcommunity version and a full version .
Run the installer that you downloaded from its location on your server, generally by doubleclicking.