SYNOPSIS
- mysql [options] db_name
DESCRIPTION
mysql
If you have problems due to insufficient memory for large result sets, use the
—quick
option. This forces
mysql
to retrieve results from the server a row at a time rather than retrieving the entire result set and buffering it in memory before displaying it. This is done by returning the result set using the
mysql_use_result()
C API function in the client/server library rather than
mysql_store_result().
Using
mysql
is very easy. Invoke it from the prompt of your command interpreter as follows:
-
shell> mysql db_name
Or:
-
shell> mysql --user=user_name --password=your_password db_name
Then type an SQL statement, end it with
«;»,
\g, or
\G
and press Enter.
Typing
Control+C
causes
mysql
to attempt to kill the current statement. If this cannot be done, or
Control+C
is typed again before the statement is killed,
mysql
exits.
You can execute SQL statements in a script file (batch file) like this:
-
shell> mysql db_name < script.sql > output.tab
On Unix, the
mysql
client logs statements executed interactively to a history file. See
the section called «MYSQL LOGGING».
MYSQL OPTIONS
mysql
supports the following options, which can be specified on the command line or in the
[mysql]
and
[client]
groups of an option file. For information about option files used by MySQL programs, see
Section 4.2.6, «Using Option Files».
-
•
—help,
-?Display a help message and exit.
-
•
—auto-rehashEnable automatic rehashing. This option is on by default, which enables database, table, and column name completion. Use
—disable-auto-rehash
to disable rehashing. That causes
mysql
to start faster, but you must issue the
rehash
command or its
\#
shortcut if you want to use name completion.To complete a name, enter the first part and press Tab. If the name is unambiguous,
mysql
completes it. Otherwise, you can press Tab again to see the possible names that begin with what you have typed so far. Completion does not occur if there is no default database.-
Note
This feature requires a MySQL client that is compiled with the
readline
library. Typically, the
readline
library is not available on Windows.
-
-
•
—auto-vertical-outputCause result sets to be displayed vertically if they are too wide for the current window, and using normal tabular format otherwise. (This applies to statements terminated by
;
or
\G.)
-
•
—batch,
-BPrint results using tab as the column separator, with each row on a new line. With this option,
mysql
does not use the history file.Batch mode results in nontabular output format and escaping of special characters. Escaping may be disabled by using raw mode; see the description for the
—raw
option.
-
•
—binary-modeThis option helps when processing
mysqlbinlog
output that may contain
BLOB
values. By default,
mysql
translates
\r\n
in statement strings to
\n
and interprets
\0
as the statement terminator.
—binary-mode
disables both features. It also disables all
mysql
commands except
charset
and
delimiter
in non-interactive mode (for input piped to
mysql
or loaded using the
source
command).This option was added in MySQL 5.6.3.
-
•
—bind-address=ip_addressOn a computer having multiple network interfaces, use this option to select which interface to use for connecting to the MySQL server.
This option is supported beginning with MySQL 5.6.1.
-
•
—character-sets-dir=dir_nameThe directory where character sets are installed. See
Section 10.5, «Character Set Configuration».
-
•
—column-namesWrite column names in results.
-
•
—column-type-infoDisplay result set metadata.
-
•
—comments,
-cWhether to preserve comments in statements sent to the server. The default is —skip-comments (discard comments), enable with —comments (preserve comments).
-
•
—compress,
-CCompress all information sent between the client and the server if both support compression.
-
•
—connect-expired-passwordIndicate to the server that the client can handle sandbox mode if the account used to connect has an expired password. This can be useful for noninteractive invocations of
mysql
because normally the server disconnects noninteractive clients that attempt to connect using an account with an expired password. (See
Section 6.3.6, «Password Expiration and Sandbox Mode».) This option was added in MySQL 5.6.12.
-
•
—database=db_name,
-D db_nameThe database to use. This is useful primarily in an option file.
-
•
—debug[=debug_options],
-# [debug_options]Write a debugging log. A typical
debug_options
string is
d:t:o,file_name. The default is
d:t:o,/tmp/mysql.trace.This option is available only if MySQL was built using
WITH_DEBUG. MySQL release binaries provided by Oracle are
not
built using this option.
-
•
—debug-checkPrint some debugging information when the program exits.
-
•
—debug-info,
-TPrint debugging information and memory and CPU usage statistics when the program exits.
-
•
—default-auth=pluginA hint about the client-side authentication plugin to use. See
Section 6.3.7, «Pluggable Authentication».
-
•
—default-character-set=charset_nameUse
charset_name
as the default character set for the client and connection.A common issue that can occur when the operating system uses
utf8
or another multibyte character set is that output from the
mysql
client is formatted incorrectly, due to the fact that the MySQL client uses the
latin1
character set by default. You can usually fix such issues by using this option to force the client to use the system character set instead.See
Section 10.5, «Character Set Configuration», for more information.
-
•
—defaults-extra-file=file_nameRead this option file after the global option file but (on Unix) before the user option file. If the file does not exist or is otherwise inaccessible, an error occurs.
file_name
is interpreted relative to the current directory if given as a relative path name rather than a full path name.
-
•
—defaults-file=file_nameUse only the given option file. If the file does not exist or is otherwise inaccessible, an error occurs.
file_name
is interpreted relative to the current directory if given as a relative path name rather than a full path name.
-
•
—defaults-group-suffix=strRead not only the usual option groups, but also groups with the usual names and a suffix of
str. For example,
mysql
normally reads the
[client]
and
[mysql]
groups. If the
—defaults-group-suffix=_other
option is given,
mysql
also reads the
[client_other]
and
[mysql_other]
groups.
-
•
—delimiter=strSet the statement delimiter. The default is the semicolon character («;»).
-
•
—disable-named-commandsDisable named commands. Use the
\*
form only, or use named commands only at the beginning of a line ending with a semicolon («;»).
mysql
starts with this option
enabled
by default. However, even with this option, long-format commands still work from the first line. See
the section called «MYSQL COMMANDS».
-
•
—enable-cleartext-pluginEnable the
mysql_clear_password
cleartext authentication plugin. (See
Section 6.4.1.7, «The Cleartext Client-Side Authentication Plugin».) This option was added in MySQL 5.6.7.
-
•
—execute=statement,
-e statementExecute the statement and quit. The default output format is like that produced with
—batch. See
Section 4.2.4, «Using Options on the Command Line», for some examples. With this option,
mysql
does not use the history file.
-
•
—force,
-fContinue even if an SQL error occurs.
-
•
—histignoreA colon-separated list of one or more patterns specifying statements to ignore for logging purposes. These patterns are added to the default pattern list («*IDENTIFIED*:*PASSWORD*»). The value specified for this option affects logging of statements written to the history file. For more information, see
the section called «MYSQL LOGGING». This option was added in MySQL 5.6.8.
-
•
—host=host_name,
-h host_nameConnect to the MySQL server on the given host.
-
•
—html,
-HProduce HTML output.
-
•
—ignore-spaces,
-iIgnore spaces after function names. The effect of this is described in the discussion for the
IGNORE_SPACE
SQL mode (see
Section 5.1.7, «Server SQL Modes»).
-
•
—init-command=strSQL statement to execute after connecting to the server. If auto-reconnect is enabled, the statement is executed again after reconnection occurs.
-
•
—line-numbersWrite line numbers for errors. Disable this with
—skip-line-numbers.
-
•
—local-infile[={0|1}]Enable or disable
LOCAL
capability for
LOAD DATA INFILE. With no value, the option enables
LOCAL. The option may be given as
—local-infile=0
or
—local-infile=1
to explicitly disable or enable
LOCAL. Enabling
LOCAL
has no effect if the server does not also support it.
-
•
—login-path=nameRead options from the named login path in the
.mylogin.cnf
login path file. A
«login path»
is an option group containing options that specify which MySQL server to connect to and which account to authenticate as. To create or modify a login path file, use the
mysql_config_editor
utility. See
mysql_config_editor(1). This option was added in MySQL 5.6.6.
-
•
—named-commands,
-GEnable named
mysql
commands. Long-format commands are permitted, not just short-format commands. For example,
quit
and
\q
both are recognized. Use
—skip-named-commands
to disable named commands. See
the section called «MYSQL COMMANDS».
-
•
—no-auto-rehash,
-AThis has the same effect as
—skip-auto-rehash. See the description for
—auto-rehash.
-
•
—no-beep,
-bDo not beep when errors occur.
-
•
—no-defaultsDo not read any option files. If program startup fails due to reading unknown options from an option file,
—no-defaults
can be used to prevent them from being read.The exception is that the
.mylogin.cnf
file, if it exists, is read in all cases. This permits passwords to be specified in a safer way than on the command line even when
—no-defaults
is used. (.mylogin.cnf
is created by the
mysql_config_editor
utility. See
mysql_config_editor(1).)
-
•
—one-database,
-oIgnore statements except those that occur while the default database is the one named on the command line. This option is rudimentary and should be used with care. Statement filtering is based only on
USE
statements.Initially,
mysql
executes statements in the input because specifying a database
db_name
on the command line is equivalent to inserting
USE db_name
at the beginning of the input. Then, for each
USE
statement encountered,
mysql
accepts or rejects following statements depending on whether the database named is the one on the command line. The content of the statements is immaterial.Suppose that
mysql
is invoked to process this set of statements:-
DELETE FROM db2.t2;
USE db2;
DROP TABLE db1.t1;
CREATE TABLE db1.t1 (i INT);
USE db1;
INSERT INTO t1 (i) VALUES(1);
CREATE TABLE db2.t1 (j INT);
If the command line is
mysql —force —one-database db1,
mysql
handles the input as follows:-
•
The
DELETE
statement is executed because the default database is
db1, even though the statement names a table in a different database.
-
•
The
DROP TABLE
and
CREATE TABLE
statements are not executed because the default database is not
db1, even though the statements name a table in
db1.
-
•
The
INSERT
and
CREATE TABLE
statements are executed because the default database is
db1, even though the
CREATE TABLE
statement names a table in a different database.
-
-
•
—pager[=command]Use the given command for paging query output. If the command is omitted, the default pager is the value of your
PAGER
environment variable. Valid pagers are
less,
more,
cat [> filename], and so forth. This option works only on Unix and only in interactive mode. To disable paging, use
—skip-pager.
the section called «MYSQL COMMANDS», discusses output paging further.
-
•
—password[=password],
-p[password]The password to use when connecting to the server. If you use the short option form (-p), you
cannot
have a space between the option and the password. If you omit the
password
value following the
—password
or
-p
option on the command line,
mysql
prompts for one.Specifying a password on the command line should be considered insecure. See
Section 6.1.2.1, «End-User Guidelines for Password Security». You can use an option file to avoid giving the password on the command line.
-
•
—pipe,
-WOn Windows, connect to the server using a named pipe. This option applies only if the server supports named-pipe connections.
-
•
—plugin-dir=dir_nameThe directory in which to look for plugins. Specify this option if the
—default-auth
option is used to specify an authentication plugin but
mysql
does not find it. See
Section 6.3.7, «Pluggable Authentication».
-
•
—port=port_num,
-P port_numThe TCP/IP port number to use for the connection.
-
•
—print-defaultsPrint the program name and all options that it gets from option files.
-
•
—prompt=format_strSet the prompt to the specified format. The default is
mysql>. The special sequences that the prompt can contain are described in
the section called «MYSQL COMMANDS».
-
•
—protocol={TCP|SOCKET|PIPE|MEMORY}The connection protocol to use for connecting to the server. It is useful when the other connection parameters normally would cause a protocol to be used other than the one you want. For details on the permissible values, see
Section 4.2.2, «Connecting to the MySQL Server».
-
•
—quick,
-qDo not cache each query result, print each row as it is received. This may slow down the server if the output is suspended. With this option,
mysql
does not use the history file.
-
•
—raw,
-rFor tabular output, the
«boxing»
around columns enables one column value to be distinguished from another. For nontabular output (such as is produced in batch mode or when the
—batch
or
—silent
option is given), special characters are escaped in the output so they can be identified easily. Newline, tab,
NUL, and backslash are written as
\n,
\t,
\0, and
\\. The
—raw
option disables this character escaping.The following example demonstrates tabular versus nontabular output and the use of raw mode to disable escaping:
-
% mysql
mysql> SELECT CHAR(92);
+----------+
| CHAR(92) |
+----------+
| \        |
+----------+
% mysql -s
mysql> SELECT CHAR(92);
CHAR(92)
\\
% mysql -s -r
mysql> SELECT CHAR(92);
CHAR(92)
\
-
-
•
—reconnectIf the connection to the server is lost, automatically try to reconnect. A single reconnect attempt is made each time the connection is lost. To suppress reconnection behavior, use
—skip-reconnect.
-
•
—safe-updates,
—i-am-a-dummy,
-UPermit only those
UPDATE
and
DELETE
statements that specify which rows to modify by using key values. If you have set this option in an option file, you can override it by using
—safe-updates
on the command line. See
the section called «MYSQL TIPS», for more information about this option.
-
•
—secure-authDo not send passwords to the server in old (pre-4.1) format. This prevents connections except for servers that use the newer password format. As of MySQL 5.6.7, this option is enabled by default; use
—skip-secure-auth
to disable it.-
Note
Passwords that use the pre-4.1 hashing method are less secure than passwords that use the native password hashing method and should be avoided. Pre-4.1 passwords are deprecated and support for them will be removed in a future MySQL release. For account upgrade instructions, see
Section 6.4.1.3, «Migrating Away from Pre-4.1 Password Hashing and the mysql_old_password Plugin».
-
-
•
—server-public-key-path=file_nameThe path name to a file containing the server RSA public key. The file must be in PEM format. The public key is used for RSA encryption of the client password for connections to the server made using accounts that authenticate with the
sha256_password
plugin. This option is ignored for client accounts that do not authenticate with that plugin. It is also ignored if password encryption is not needed, as is the case when the client connects to the server using an SSL connection.The server sends the public key to the client as needed, so it is not necessary to use this option for RSA password encryption to occur. It is more efficient to do so because then the server need not send the key.
For additional discussion regarding use of the
sha256_password
plugin, including how to get the RSA public key, see
Section 6.4.1.4, «The SHA-256 Authentication Plugin».This option is available only if MySQL was built using OpenSSL. It was added in MySQL 5.6.6 under the name
—server-public-key
and renamed in 5.6.7 to
—server-public-key-path.
-
•
—shared-memory-base-name=nameOn Windows, the shared-memory name to use, for connections made using shared memory to a local server. The default value is
MYSQL. The shared-memory name is case sensitive.The server must be started with the
—shared-memory
option to enable shared-memory connections.
-
•
—show-warningsCause warnings to be shown after each statement if there are any. This option applies to interactive and batch mode.
-
•
—sigint-ignoreIgnore
SIGINT
signals (typically the result of typing
Control+C).
-
•
—silent,
-sSilent mode. Produce less output. This option can be given multiple times to produce less and less output.
This option results in nontabular output format and escaping of special characters. Escaping may be disabled by using raw mode; see the description for the
—raw
option.
-
•
—skip-column-names,
-NDo not write column names in results.
-
•
—skip-line-numbers,
-LDo not write line numbers for errors. Useful when you want to compare result files that include error messages.
-
•
—socket=path,
-S pathFor connections to
localhost, the Unix socket file to use, or, on Windows, the name of the named pipe to use.
-
•
—ssl*Options that begin with
—ssl
specify whether to connect to the server using SSL and indicate where to find SSL keys and certificates. See
Section 6.3.9.5, «Command Options for Secure Connections».
-
•
—table,
-tDisplay output in table format. This is the default for interactive use, but can be used to produce table output in batch mode.
-
•
—tee=file_nameAppend a copy of output to the given file. This option works only in interactive mode.
the section called «MYSQL COMMANDS», discusses tee files further.
-
•
—unbuffered,
-nFlush the buffer after each query.
-
•
—user=user_name,
-u user_nameThe MySQL user name to use when connecting to the server.
-
•
—verbose,
-vVerbose mode. Produce more output about what the program does. This option can be given multiple times to produce more and more output. (For example,
-v -v -v
produces table output format even in batch mode.)
-
•
—version,
-VDisplay version information and exit.
-
•
—vertical,
-EPrint query output rows vertically (one line per column value). Without this option, you can specify vertical output for individual statements by terminating them with
\G.
-
•
—wait,
-wIf the connection cannot be established, wait and retry instead of aborting.
-
•
—xml,
-XProduce XML output.
-
<field name="column_name">NULL</field>
The output when
—xml
is used with
mysql
matches that of
mysqldump —xml. See
mysqldump(1)
for details.The XML output also uses an XML namespace, as shown here:
-
shell> mysql --xml -uroot -e "SHOW VARIABLES LIKE 'version%'"
<?xml version="1.0"?>
<resultset statement="SHOW VARIABLES LIKE 'version%'" xmlns:xsi="http://www.w3.org/2001/XMLSchema-instance">
<row>
<field name="Variable_name">version</field>
<field name="Value">5.0.40-debug</field>
</row>
<row>
<field name="Variable_name">version_comment</field>
<field name="Value">Source distribution</field>
</row>
<row>
<field name="Variable_name">version_compile_machine</field>
<field name="Value">i686</field>
</row>
<row>
<field name="Variable_name">version_compile_os</field>
<field name="Value">suse-linux-gnu</field>
</row>
</resultset>
(See Bug #25946.)
-
You can also set the following variables by using
—var_name=value.
-
•
connect_timeoutThe number of seconds before connection timeout. (Default value is
0.)
-
•
max_allowed_packetThe maximum size of the buffer for client/server communication. The default is 16MB, the maximum is 1GB.
-
•
max_join_sizeThe automatic limit for rows in a join when using
—safe-updates. (Default value is 1,000,000.)
-
•
net_buffer_lengthThe buffer size for TCP/IP and socket communication. (Default value is 16KB.)
-
•
select_limitThe automatic limit for
SELECT
statements when using
—safe-updates. (Default value is 1,000.)
MYSQL COMMANDS
mysql
sends each SQL statement that you issue to the server to be executed. There is also a set of commands that
mysql
itself interprets. For a list of these commands, type
help
or
\h
at the
mysql>
prompt:
-
mysql> help
List of all MySQL commands:
Note that all text commands must be first on line and end with ';'
?         (\?) Synonym for `help'.
clear     (\c) Clear command.
connect   (\r) Reconnect to the server. Optional arguments are db and host.
delimiter (\d) Set statement delimiter.
edit      (\e) Edit command with $EDITOR.
ego       (\G) Send command to mysql server, display result vertically.
exit      (\q) Exit mysql. Same as quit.
go        (\g) Send command to mysql server.
help      (\h) Display this help.
nopager   (\n) Disable pager, print to stdout.
notee     (\t) Don't write into outfile.
pager     (\P) Set PAGER [to_pager]. Print the query results via PAGER.
print     (\p) Print current command.
prompt    (\R) Change your mysql prompt.
quit      (\q) Quit mysql.
rehash    (\#) Rebuild completion hash.
source    (\.) Execute an SQL script file. Takes a file name as an argument.
status    (\s) Get status information from the server.
system    (\!) Execute a system shell command.
tee       (\T) Set outfile [to_outfile]. Append everything into given
               outfile.
use       (\u) Use another database. Takes database name as argument.
charset   (\C) Switch to another charset. Might be needed for processing
               binlog with multi-byte charsets.
warnings  (\W) Show warnings after every statement.
nowarning (\w) Don't show warnings after every statement.
For server side help, type 'help contents'
If
mysql
is invoked with the
—binary-mode
option, all
mysql
commands are disabled except
charset
and
delimiter
in non-interactive mode (for input piped to
mysql
or loaded using the
source
command).
Each command has both a long and short form. The long form is not case sensitive; the short form is. The long form can be followed by an optional semicolon terminator, but the short form should not.
The use of short-form commands within multiple-line
/* … */
comments is not supported.
-
•
help [arg],
\h [arg],
\? [arg],
? [arg]Display a help message listing the available
mysql
commands.If you provide an argument to the
help
command,
mysql
uses it as a search string to access server-side help from the contents of the MySQL Reference Manual. For more information, see
the section called «MYSQL SERVER-SIDE HELP».
-
•
charset charset_name,
\C charset_nameChange the default character set and issue a
SET NAMES
statement. This enables the character set to remain synchronized on the client and server if
mysql
is run with auto-reconnect enabled (which is not recommended), because the specified character set is used for reconnects.
-
•
clear,
\cClear the current input. Use this if you change your mind about executing the statement that you are entering.
-
•
connect [db_name host_name]],
\r [db_name host_name]]Reconnect to the server. The optional database name and host name arguments may be given to specify the default database or the host where the server is running. If omitted, the current values are used.
-
•
delimiter str,
\d strChange the string that
mysql
interprets as the separator between SQL statements. The default is the semicolon character («;»).The delimiter string can be specified as an unquoted or quoted argument on the
delimiter
command line. Quoting can be done with either single quote (‘), double quote («), or backtick (`) characters. To include a quote within a quoted string, either quote the string with a different quote character or escape the quote with a backslash («\») character. Backslash should be avoided outside of quoted strings because it is the escape character for MySQL. For an unquoted argument, the delimiter is read up to the first space or end of line. For a quoted argument, the delimiter is read up to the matching quote on the line.mysql
interprets instances of the delimiter string as a statement delimiter anywhere it occurs, except within quoted strings. Be careful about defining a delimiter that might occur within other words. For example, if you define the delimiter as
X, you will be unable to use the word
INDEX
in statements.
mysql
interprets this as
INDE
followed by the delimiter
X.When the delimiter recognized by
mysql
is set to something other than the default of
«;», instances of that character are sent to the server without interpretation. However, the server itself still interprets
«;»
as a statement delimiter and processes statements accordingly. This behavior on the server side comes into play for multiple-statement execution (see
Section 23.8.17, «C API Support for Multiple Statement Execution»), and for parsing the body of stored procedures and functions, triggers, and events (see
Section 20.1, «Defining Stored Programs»).
-
•
edit,
\eEdit the current input statement.
mysql
checks the values of the
EDITOR
and
VISUAL
environment variables to determine which editor to use. The default editor is
vi
if neither variable is set.The
edit
command works only in Unix.
-
•
ego,
\GSend the current statement to the server to be executed and display the result using vertical format.
-
•
exit,
\qExit
mysql.
-
•
go,
\gSend the current statement to the server to be executed.
-
•
nopager,
\nDisable output paging. See the description for
pager.The
nopager
command works only in Unix.
-
•
notee,
\tDisable output copying to the tee file. See the description for
tee.
-
•
nowarning,
\wDisable display of warnings after each statement.
-
•
pager [command],
\P [command]Enable output paging. By using the
—pager
option when you invoke
mysql, it is possible to browse or search query results in interactive mode with Unix programs such as
less,
more, or any other similar program. If you specify no value for the option,
mysql
checks the value of the
PAGER
environment variable and sets the pager to that. Pager functionality works only in interactive mode.Output paging can be enabled interactively with the
pager
command and disabled with
nopager. The command takes an optional argument; if given, the paging program is set to that. With no argument, the pager is set to the pager that was set on the command line, or
stdout
if no pager was specified.Output paging works only in Unix because it uses the
popen()
function, which does not exist on Windows. For Windows, the
tee
option can be used instead to save query output, although it is not as convenient as
pager
for browsing output in some situations.
-
•
print,
\pPrint the current input statement without executing it.
-
•
prompt [str],
\R [str]Reconfigure the
mysql
prompt to the given string. The special character sequences that can be used in the prompt are described later in this section.If you specify the
prompt
command with no argument,
mysql
resets the prompt to the default of
mysql>.
-
•
quit,
\qExit
mysql.
-
•
rehash,
\#Rebuild the completion hash that enables database, table, and column name completion while you are entering statements. (See the description for the
—auto-rehash
option.)
-
•
source file_name,
\. file_nameRead the named file and executes the statements contained therein. On Windows, you can specify path name separators as
/
or
\\.
-
•
status,
\sProvide status information about the connection and the server you are using. If you are running in
—safe-updates
mode,
status
also prints the values for the
mysql
variables that affect your queries.
-
•
system command,
\! commandExecute the given command using your default command interpreter.
The
system
command works only in Unix.
-
•
tee [file_name],
\T [file_name]By using the
—tee
option when you invoke
mysql, you can log statements and their output. All the data displayed on the screen is appended into a given file. This can be very useful for debugging purposes also.
mysql
flushes results to the file after each statement, just before it prints its next prompt. Tee functionality works only in interactive mode.You can enable this feature interactively with the
tee
command. Without a parameter, the previous file is used. The
tee
file can be disabled with the
notee
command. Executing
tee
again re-enables logging.
-
•
use db_name,
\u db_nameUse
db_name
as the default database.
-
•
warnings,
\WEnable display of warnings after each statement (if there are any).
Here are a few tips about the
pager
command:
-
•
You can use it to write to a file and the results go only to the file:-
mysql> pager cat > /tmp/log.txt
You can also pass any options for the program that you want to use as your pager:
-
mysql> pager less -n -i -S
-
-
•
In the preceding example, note the
-S
option. You may find it very useful for browsing wide query results. Sometimes a very wide result set is difficult to read on the screen. The
-S
option to
less
can make the result set much more readable because you can scroll it horizontally using the left-arrow and right-arrow keys. You can also use
-S
interactively within
less
to switch the horizontal-browse mode on and off. For more information, read the
less
manual page:-
shell> man less
-
-
•
The
-F
and
-X
options may be used with
less
to cause it to exit if output fits on one screen, which is convenient when no scrolling is necessary:-
mysql> pager less -n -i -S -F -X
-
-
•
You can specify very complex pager commands for handling query output:-
mysql> pager cat | tee /dr1/tmp/res.txt \
          | tee /dr2/tmp/res2.txt | less -n -i -S
In this example, the command would send query results to two files in two different directories on two different file systems mounted on
/dr1
and
/dr2, yet still display the results onscreen using
less. -
You can also combine the
tee
and
pager
functions. Have a
tee
file enabled and
pager
set to
less, and you are able to browse the results using the
less
program and still have everything appended into a file the same time. The difference between the Unix
tee
used with the
pager
command and the
mysql
built-in
tee
command is that the built-in
tee
works even if you do not have the Unix
tee
available. The built-in
tee
also logs everything that is printed on the screen, whereas the Unix
tee
used with
pager
does not log quite that much. Additionally,
tee
file logging can be turned on and off interactively from within
mysql. This is useful when you want to log some queries to a file, but not others.
The
prompt
command reconfigures the default
mysql>
prompt. The string for defining the prompt can contain the following special sequences.
Option |
Description |
| \c |
A counter that increments for each statement you issue |
| \D |
The full current date |
| \d |
The default database |
| \h |
The server host |
| \l |
The current delimiter |
| \m |
Minutes of the current time |
| \n |
A newline character |
| \O |
The current month in three-letter format (Jan, Feb, …) |
| \o |
The current month in numeric format |
| \P |
am/pm |
| \p |
The current TCP/IP port or socket file |
| \R |
The current time, in 24-hour military time (0-23) |
| \r |
The current time, standard 12-hour time (1-12) |
| \S |
Semicolon |
| \s |
Seconds of the current time |
| \t |
A tab character |
| \U |
Your full |
| \u |
Your user name |
| \v |
The server version |
| \w |
The current day of the week in three-letter format (Mon, Tue, …) |
| \Y |
The current year, four digits |
| \y |
The current year, two digits |
| \_ |
A space |
| \ |
A space (a space follows the backslash) |
| \’ |
Single quote |
| \» |
Double quote |
| \\ |
A literal «\» backslash character |
| \x |
x, for any |
You can set the prompt in several ways:
-
•
Use an environment variable.
You can set the
MYSQL_PS1
environment variable to a prompt string. For example:-
shell> export MYSQL_PS1="(\u@\h) [\d]> "
-
-
•
Use a command-line option.
You can set the
—prompt
option on the command line to
mysql. For example:-
shell> mysql --prompt="(\u@\h) [\d]> "
(user@host) [database]>
-
-
•
Use an option file.
You can set the
prompt
option in the
[mysql]
group of any MySQL option file, such as
/etc/my.cnf
or the
.my.cnf
file in your home directory. For example:-
[mysql]
prompt=(\\u@\\h) [\\d]>\\_
In this example, note that the backslashes are doubled. If you set the prompt using the
prompt
option in an option file, it is advisable to double the backslashes when using the special prompt options. There is some overlap in the set of permissible prompt options and the set of special escape sequences that are recognized in option files. (The rules for escape sequences in option files are listed in
Section 4.2.6, «Using Option Files».) The overlap may cause you problems if you use single backslashes. For example,
\s
is interpreted as a space rather than as the current seconds value. The following example shows how to define a prompt within an option file to include the current time in
HH:MM:SS>
format:-
[mysql]
prompt="\\r:\\m:\\s> "
-
-
•
Set the prompt interactively.
You can change your prompt interactively by using the
prompt
(or
\R) command. For example:-
mysql> prompt (\u@\h) [\d]>\_
PROMPT set to '(\u@\h) [\d]>\_'
(user@host) [database]>
(user@host) [database]> prompt
Returning to default PROMPT of mysql>
mysql>
-
MYSQL LOGGING
On Unix, the
mysql
client logs statements executed interactively to a history file. By default, this file is named
.mysql_history
in your home directory. To specify a different file, set the value of the
MYSQL_HISTFILE
environment variable.
How Logging Occurs.PP
Statement logging occurs as follows:
-
•
Statements are logged only when executed interactively. Statements are noninteractive, for example, when read from a file or a pipe. It is also possible to suppress statement logging by using the
—batch
or
—execute
option.
-
•
Statements are ignored and not logged if they match any pattern in the
«ignore»
list. This list is described later.
-
•
mysql
logs each nonignored, nonempty statement line individually.
-
•
If a nonignored statement spans multiple lines (not including the terminating delimiter),
mysql
concatenates the lines to form the complete statement, maps newlines to spaces, and logs the result, plus a delimiter.
Consequently, an input statement that spans multiple lines can be logged twice. Consider this input:
-
mysql> SELECT
    -> 'Today is'
    -> ,
    -> CURDATE()
    -> ;
In this case,
mysql
logs the
«SELECT»,
«‘Today is'»,
«,»,
«CURDATE()», and
«;»
lines as it reads them. It also logs the complete statement, after mapping
SELECT\n’Today is’\n,\nCURDATE()
to
SELECT ‘Today is’ , CURDATE(), plus a delimiter. Thus, these lines appear in logged output:
-
SELECT
'Today is'
,
CURDATE()
;
SELECT 'Today is' , CURDATE();
As of MySQL 5.6.8,
mysql
ignores for logging purposes statements that match any pattern in the
«ignore»
list. By default, the pattern list is
«*IDENTIFIED*:*PASSWORD*», to ignore statements that refer to passwords. Pattern matching is not case sensitive. Within patterns, two characters are special:
-
•
?
matches any single character.
-
•
*
matches any sequence of zero or more characters.
To specify additional patterns, use the
—histignore
option or set the
MYSQL_HISTIGNORE
environment variable. (If both are specified, the option value takes precedence.) The value should be a colon-separated list of one or more patterns, which are appended to the default pattern list.
Patterns specified on the command line might need to be quoted or escaped to prevent your command interpreter from treating them specially. For example, to suppress logging for
UPDATE
and
DELETE
statements in addition to statements that refer to passwords, invoke
mysql
like this:
-
shell> mysql --histignore="*UPDATE*:*DELETE*"
Controlling the History File.PP
The
.mysql_history
file should be protected with a restrictive access mode because sensitive information might be written to it, such as the text of SQL statements that contain passwords. See
Section 6.1.2.1, «End-User Guidelines for Password Security».
If you do not want to maintain a history file, first remove
.mysql_history
if it exists. Then use either of the following techniques to prevent it from being created again:
-
•
Set the
MYSQL_HISTFILE
environment variable to
/dev/null. To cause this setting to take effect each time you log in, put it in one of your shell’s startup files.
-
•
Create
.mysql_history
as a symbolic link to
/dev/null; this need be done only once:-
shell> ln -s /dev/null $HOME/.mysql_history
-
MYSQL SERVER-SIDE HELP
-
mysql> help search_string
If you provide an argument to the
help
command,
mysql
uses it as a search string to access server-side help from the contents of the MySQL Reference Manual. The proper operation of this command requires that the help tables in the
mysql
database be initialized with help topic information (see
Section 5.1.10, «Server-Side Help»).
If there is no match for the search string, the search fails:
-
mysql> help me
Nothing found
Please try to run 'help contents' for a list of all accessible topics
Use
help contents
to see a list of the help categories:
-
mysql> help contents
You asked for help about help category: "Contents"
For more information, type 'help <item>', where <item> is one of the
following categories:
   Account Management
   Administration
   Data Definition
   Data Manipulation
   Data Types
   Functions
   Functions and Modifiers for Use with GROUP BY
   Geographic Features
   Language Structure
   Plugins
   Storage Engines
   Stored Routines
   Table Maintenance
   Transactions
   Triggers
If the search string matches multiple items,
mysql
shows a list of matching topics:
-
mysql> help logs
Many help items for your request exist.
To make a more specific request, please type 'help <item>',
where <item> is one of the following topics:
   SHOW
   SHOW BINARY LOGS
   SHOW ENGINE
   SHOW LOGS
Use a topic as the search string to see the help entry for that topic:
-
mysql> help show binary logs
Name: 'SHOW BINARY LOGS'
Description:
Syntax:
SHOW BINARY LOGS
SHOW MASTER LOGS
Lists the binary log files on the server. This statement is used as
part of the procedure described in [purge-binary-logs], that shows how
to determine which logs can be purged.
mysql> SHOW BINARY LOGS;
+---------------+-----------+
| Log_name      | File_size |
+---------------+-----------+
| binlog.000015 |    724935 |
| binlog.000016 |    733481 |
+---------------+-----------+
The search string can contain the wildcard characters
«%»
and
«_». These have the same meaning as for pattern-matching operations performed with the
LIKE
operator. For example,
HELP rep%
returns a list of topics that begin with
rep:
-
mysql> HELP rep%
Many help items for your request exist.
To make a more specific request, please type 'help <item>',
where <item> is one of the following
topics:
   REPAIR TABLE
   REPEAT FUNCTION
   REPEAT LOOP
   REPLACE
   REPLACE FUNCTION
EXECUTING SQL STATEMENTS FROM A TEXT FILE
The
mysql
client typically is used interactively, like this:
-
shell> mysql db_name
However, it is also possible to put your SQL statements in a file and then tell
mysql
to read its input from that file. To do so, create a text file
text_file
that contains the statements you wish to execute. Then invoke
mysql
as shown here:
-
shell> mysql db_name < text_file
If you place a
USE db_name
statement as the first statement in the file, it is unnecessary to specify the database name on the command line:
-
shell> mysql < text_file
If you are already running
mysql, you can execute an SQL script file using the
source
command or
\.
command:
-
mysql> source file_name
mysql> \. file_name
Sometimes you may want your script to display progress information to the user. For this you can insert statements like this:
-
SELECT '<info_to_display>' AS ' ';
The statement shown outputs
<info_to_display>.
You can also invoke
mysql
with the
—verbose
option, which causes each statement to be displayed before the result that it produces.
mysql
ignores Unicode byte order mark (BOM) characters at the beginning of input files. Previously, it read them and sent them to the server, resulting in a syntax error. Presence of a BOM does not cause
mysql
to change its default character set. To do that, invoke
mysql
with an option such as
—default-character-set=utf8.
For more information about batch mode, see
Section 3.5, «Using mysql in Batch Mode».
MYSQL TIPS
This section describes some techniques that can help you use
mysql
more effectively.
Input-Line Editing
mysql
supports input-line editing, which enables you to modify the current input line in place or recall previous input lines. For example, the
left-arrow
and
right-arrow
keys move horizontally within the current input line, and the
up-arrow
and
down-arrow
keys move up and down through the set of previously entered lines.
Backspace
deletes the character before the cursor and typing new characters enters them at the cursor position. To enter the line, press
Enter.
On Windows, the editing key sequences are the same as supported for command editing in console windows. On Unix, the key sequences depend on the input library used to build
mysql
(for example, the
libedit
or
readline
library).
Documentation for the
libedit
and
readline
libraries is available online. To change the set of key sequences permitted by a given input library, define key bindings in the library startup file. This is a file in your home directory:
.editrc
for
libedit
and
.inputrc
for
readline.
For example, in
libedit,
Control+W
deletes everything before the current cursor position and
Control+U
deletes the entire line. In
readline,
Control+W
deletes the word before the cursor and
Control+U
deletes everything before the current cursor position. If
mysql
was built using
libedit, a user who prefers the
readline
behavior for these two keys can put the following lines in the
.editrc
file (creating the file if necessary):
-
bind "^W" ed-delete-prev-word
bind "^U" vi-kill-line-prev
To see the current set of key bindings, temporarily put a line that says only
bind
at the end of
.editrc.
mysql
will show the bindings when it starts.
Unicode Support on Windows
Windows provides APIs based on UTF-16LE for reading from and writing to the console. As of MySQL 5.6.2, the
mysql
client for Windows is able to use these APIs. As of 5.6.3, the Windows installer creates an item in the MySQL menu named
MySQL command line client — Unicode. This item invokes the
mysql
client with properties set to communicate through the console to the MySQL server using Unicode.
To take advantage of this support manually, run
mysql
within a console that uses a compatible Unicode font and set the default character set to a Unicode character set that is supported for communication with the server:
-
1.
Open a console window.
-
2.
Go to the console window properties, select the font tab, and choose Lucida Console or some other compatible Unicode font. This is necessary because console windows start by default using a DOS raster font that is inadequate for Unicode.
-
3.
Execute
mysql.exe
with the
—default-character-set=utf8
(or
utf8mb4) option. This option is necessary because
utf16le
is not supported as a connection character set.
With those changes,
mysql
will use the Windows APIs to communicate with the console using UTF-16LE, and communicate with the server using UTF-8. (The menu item mentioned previously sets the font and character set as just described.)
To avoid those steps each time you run
mysql, you can create a shortcut that invokes
mysql.exe. The shortcut should set the console font to Lucida Console or some other compatible Unicode font, and pass the
—default-character-set=utf8
(or
utf8mb4) option to
mysql.exe.
Alternatively, create a shortcut that only sets the console font, and set the character set in the
[mysql]
group of your
my.ini
file:
-
[mysql]
default-character-set=utf8
Displaying Query Results Vertically
Some query results are much more readable when displayed vertically, instead of in the usual horizontal table format. Queries can be displayed vertically by terminating the query with \G instead of a semicolon. For example, longer text values that include newlines often are much easier to read with vertical output:
-
mysql> SELECT * FROM mails WHERE LENGTH(txt) < 300 LIMIT 300,1\G
*************************** 1. row ***************************
  msg_nro: 3068
     date: 2000-03-01 23:29:50
time_zone: +0200
mail_from: Monty
    reply: [email protected]
  mail_to: "Thimble Smith" <[email protected]>
      sbj: UTF-8
      txt: >>>>> "Thimble" == Thimble Smith writes:
Thimble> Hi.  I think this is a good idea.  Is anyone familiar
Thimble> with UTF-8 or Unicode? Otherwise, I'll put this on my
Thimble> TODO list and see what happens.
Yes, please do that.
Regards,
Monty
     file: inbox-jani-1
     hash: 190402944
1 row in set (0.09 sec)
Using the —safe-updates Option
For beginners, a useful startup option is
—safe-updates
(or
—i-am-a-dummy, which has the same effect). It is helpful for cases when you might have issued a
DELETE FROM tbl_name
statement but forgotten the
WHERE
clause. Normally, such a statement deletes all rows from the table. With
—safe-updates, you can delete rows only by specifying the key values that identify them. This helps prevent accidents.
When you use the
—safe-updates
option,
mysql
issues the following statement when it connects to the MySQL server:
-
SET sql_safe_updates=1, sql_select_limit=1000, max_join_size=1000000;
See
Section 5.1.4, «Server System Variables».
The
SET
statement has the following effects:
-
•
You are not permitted to execute an
UPDATE
or
DELETE
statement unless you specify a key constraint in the
WHERE
clause or provide a
LIMIT
clause (or both). For example:-
UPDATE tbl_name SET not_key_column=val WHERE key_column=val;
UPDATE tbl_name SET not_key_column=val LIMIT 1;
-
-
•
The server limits all large
SELECT
results to 1,000 rows unless the statement includes a
LIMIT
clause.
-
•
The server aborts multiple-table
SELECT
statements that probably need to examine more than 1,000,000 row combinations.
To specify limits different from 1,000 and 1,000,000, you can override the defaults by using the
—select_limit
and
—max_join_size
options:
-
shell> mysql --safe-updates --select_limit=500 --max_join_size=10000
Disabling mysql Auto-Reconnect
If the
mysql
client loses its connection to the server while sending a statement, it immediately and automatically tries to reconnect once to the server and send the statement again. However, even if
mysql
succeeds in reconnecting, your first connection has ended and all your previous session objects and settings are lost: temporary tables, the autocommit mode, and user-defined and session variables. Also, any current transaction rolls back. This behavior may be dangerous for you, as in the following example where the server was shut down and restarted between the first and second statements without you knowing it:
-
mysql> SET @a=1;
Query OK, 0 rows affected (0.05 sec)
mysql> INSERT INTO t VALUES(@a);
ERROR 2006: MySQL server has gone away
No connection. Trying to reconnect...
Connection id:    1
Current database: test
Query OK, 1 row affected (1.30 sec)
mysql> SELECT * FROM t;
+------+
| a    |
+------+
| NULL |
+------+
1 row in set (0.05 sec)
The
@a
user variable has been lost with the connection, and after the reconnection it is undefined. If it is important to have
mysql
terminate with an error if the connection has been lost, you can start the
mysql
client with the
—skip-reconnect
option.
For more information about auto-reconnect and its effect on state information when a reconnection occurs, see
Section 23.8.16, «Controlling Automatic Reconnection Behavior».
COPYRIGHT
Copyright © 1997, 2016, Oracle and/or its affiliates. All rights reserved.
This documentation is free software; you can redistribute it and/or modify it only under the terms of the GNU General Public License as published by the Free Software Foundation; version 2 of the License.
This documentation is distributed in the hope that it will be useful, but WITHOUT ANY WARRANTY; without even the implied warranty of MERCHANTABILITY or FITNESS FOR A PARTICULAR PURPOSE. See the GNU General Public License for more details.
You should have received a copy of the GNU General Public License along with the program; if not, write to the Free Software Foundation, Inc., 51 Franklin Street, Fifth Floor, Boston, MA 02110-1301 USA or see http://www.gnu.org/licenses/.
The data-driven world of today requires a lot of data to function. A majority of the data is stored as databases, which is an organized collection of data. A database management system or DBMS in short acts as a bridge between the database and end-user to ensure that the data is well organized and easily accessible. A DBMS assists in optimizing, storing, retrieving, and managing data in databases.
MySQL is the most widely used database management system software for managing relational databases today. It is an open-source database that is supported by the Oracle Corporation. When compared to Microsoft SQL Server and Oracle Database, it is a quick, scalable, and simple to use database management system. It’s frequently combined with backend languages to build powerful and dynamic server-side or web-based enterprise applications. MySQL AB, a Swedish business, created, marketed, and supported it, and it was written in the C and C++ programming languages. Many small and large businesses use MySQL. It supports a variety of operating systems, including Windows, Linux, macOS, and others. MySQL is a Relational Database Management System (RDBMS) that offers a variety of features, including:
- It allows us to use tables, rows, columns, and indexes and to perform database operations on them.
- Tables (collection of rows and columns), also known as relations, are used to construct database relationships.
- It ensures that the Referential Integrity (referential integrity is an RDBMS concept which states that any foreign key field must agree with the primary key that is referenced by the foreign key) between rows or columns of different tables is maintained.
- It automatically updates the table indexes as soon as a record is changed.
- It employs a number of SQL queries and integrates useful data from many columns and rows for end-users.
This article covers all the most frequently used commands and statements. With this handy collection of MySQL commands, you’ll be able to operate more efficiently and effectively with your MySQL databases. You’ll see at a glance the most commonly used commands and statements you need for creating and managing the databases in MySQL.
Confused about your next job?
In 4 simple steps you can find your personalised career roadmap in Software development for FREE
Expand in New Tab
- MySQL commands
- Working with databases
- Working with tables
- Working with indexes
- Working with views
- Working with stored procedures
- Querying data from tables
- Join
- Inner Join
- Left join
- Modifying data in tables
- Searching
- MySQL command-line client commands
- Conclusion
- Frequently Asked Questions
- Additional Resources
Working with databases
A database is a collection of organized records that the user can conveniently access and manage. It organizes the data into tables, rows, columns, and indexes to make it easier to retrieve the information we need quickly. Let’s try to build a student database using the following command.
The following syntax can create a database. It also verifies whether the database name is already in use.
CREATE DATABASE IF NOT EXISTS db_name;
Use the following syntax to replace the current database with another database you’re working on:
mysql> USE db_name;
Using the following syntax, we can permanently destroy a database and its associated files. All the tables that are a part of that database will be deleted if we use the following command.
DROP DATABASE IF EXISTS db_name;
Use the following syntax to display all databases on the current server:
mysql> SHOW DATABASES;
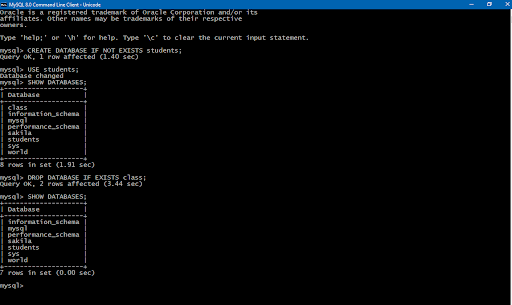
As you can see in the snapshot above, we created a database named ‘students’ using create command, and deleted a database named class using DROP command.
Working with tables
A table in a database is a collection of related data organized in a table structure. It’s made up of columns and rows. A table is a collection of data components in relational and flat-file databases that uses a model of vertical columns and horizontal rows, with the cell being the unit where a row and column intersect.
Let’s create the below table:
MARKS TABLE
| ID | Name | Marks |
| 001 | Ashish | 94 |
| 002 | Bharat | 81 |
| 003 | Deepak | 78 |
| 004 | Fatima | 92 |
This command displays all tables in a current database.
SHOW TABLES;
This command creates a new table:
CREATE TABLE [IF NOT EXISTS] table_name(
Column_name1 datatype, Column_name2 datatype……);
The datatype can be integer, char (fixed length sring), varchar (variable length string), binary etc. The data which is going to be stored in a column decides the datatype of the column. For example, if the column is going to store numerals, integer datatype can be used or if the column name is going to store a string of variable length, varchar can be used. For example, to create the above Marks table, type the following code:
CREATE TABLE Marks(ID integer, Name varchar (100), Marks integer);
To insert values into a table type the following command:
INSERT INTO table_name
VALUES (value1, value2, value3, …);
The values should correspond to the column name in which the value is to be stored.
For example, to insert first column of the students table, you have to type the following command:
INSERT INTO Marks
VALUES (001, ‘Ashish’,94);
In a table, add a new column:
ALTER TABLE table
ADD column_name datatype;
For example to add Mentor’s Name column, you have to type the following command:
ALTER TABLE Marks
ADD Mentor varchar(100);
To remove a column from a table, do the following:
ALTER TABLE table_name
DROP column_name;
Add an index to a table on a column with a specified name:
ALTER TABLE table
ADD INDEX [name](column, …);
To add a primary key to a table, do the following
ALTER TABLE table_name
ADD PRIMARY KEY (column_name,…);
To remove the primary key of a table, do the following:
ALTER TABLE table_name
DROP PRIMARY KEY;
You can drop a table using the following command:
DROP TABLE [IF EXISTS] table_name;
To show the columns of a table, type the following code:
DESCRIBE table_name;
To show the information of a column of a table, type the following command:
DESCRIBE table_name column_name;
Working with indexes
Assume we have a contact book with the users’ names and phone numbers. We’re looking for a phone number in this contact book. If the contact book is in an unordered manner, which means the names aren’t organized alphabetically, we’ll have to go through all the pages and read every name until we don’t locate the requested name. Sequential searching is the name for this form of search. While this approach is correct, applying this in a large database will consume a lot of time. In this situation, database indexing aids in the retrieval of the desired result and increases the query’s overall performance.
Indexes are used to quickly locate records with certain column values. It is similar to the index given in a book, you can easily locate a chapter using the index of the book.
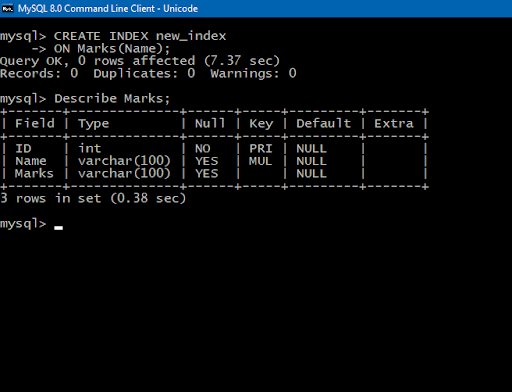
To create an index with the specified name on a table:
CREATE INDEX index_name
ON table_name (column,…);
So, to create index of column Name of the above Marks table, we can write the following command:
CREATE INDEX new_index
ON Marks(Name);
Drop an index:
DROP INDEX index_name;
To drop the above created index, write the following command:
DROP INDEX new_index;
A unique index ensures that the index key includes no duplicate values, ensuring that each entry in the table is distinct in some sense. To create a unique index, use the following syntax:
CREATE UNIQUE INDEX index_name
ON table_name (column,…);
Read more – Indexing in SQL
Working with views
A view is a database object that doesn’t have any data in it. Its contents are based on the table that serves as the foundation. It has the same rows and columns as a genuine table. In MySQL, a View is a virtual table that is produced by connecting one or more tables in a query. It works in the same way as the base table, but it doesn’t have any data of its own. The fundamental distinction between a view and a table is that views are definitions constructed on top of other tables (or views).
Create a new view by following these steps:
CREATE VIEW [IF NOT EXISTS] view_name
AS Select query ;
Let’s try to understand it with an example. We are going to create a view from the Marks table mentioned above.
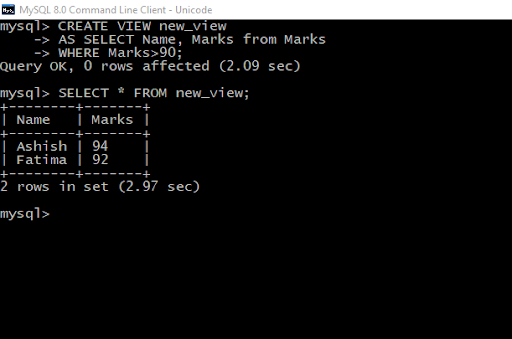
We can use SELECT to see the actual view, just like what we do with tables.
With the WITH CHECK OPTION, create a new view.
CREATE VIEW [IF NOT EXISTS] view_name
AS select_statement
WITH CHECK OPTION;
Make a new view or replace an existing one:
CREATE OR REPLACE view_name
AS
select_statement;
Consider this to drop a view:
DROP VIEW [IF EXISTS] view_name;
To drop the above view (new_view) created, we can use the command:
DROP VIEW new_view;
To drop multiple views:
DROP VIEW [IF EXISTS] view1, view2, …;
Rename a view:
RENAME TABLE view_name
TO new_view_name;
Show views from a database:
SHOW FULL TABLES
[{FROM | IN } database_name]
WHERE table_type = ‘VIEW’;
Working with stored procedures
A stored procedure is a piece of prepared SQL code that you can save and reuse over and over. So, if you have a SQL query that you create frequently, save it as a stored procedure and then call it to run it. You can also pass parameters to a stored procedure so that it can act based on the value(s) of the parameter(s) passed.In the normal computing language, it is a subroutine or a subprogram. MySQL version 5 was the first to include it. It is currently supported by nearly all relational database systems.
Create a stored procedure, use syntax:
DELIMITER $$
CREATE PROCEDURE procedure_name(parameter_list)
BEGIN
body
END $$
DELIMITER;
To call a procedure in MySQL, use the syntax:
CALL procedure_name;
Let’s try to create a procedure. We will create a procedure that shows all the students who have scored an A grade (90+ marks).
First, open MySQL workbench and select the database (students database in our case). Then we have to store our procedure.
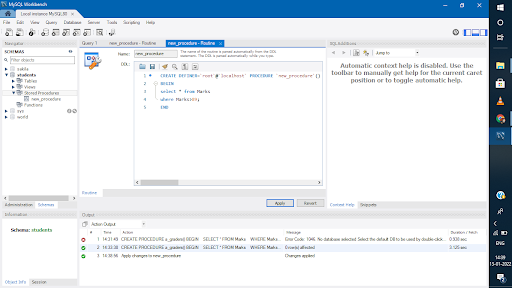
Now we can call the created procedure.

Drop a stored procedure:
DROP PROCEDURE [IF EXISTS] procedure_name;
Show stored procedures:
SHOW PROCEDURE STATUS
[LIKE ‘pattern’ | WHERE search_condition];
You can also create and store functions with parameters using the syntax:
DELIMITER $$
CREATE FUNCTION function_name(parameter_list)
RETURNS datatype
[NOT] DETERMINISTIC
BEGIN
— statements
END $$
DELIMITER ;
Drop a stored function:
DROP FUNCTION [IF EXISTS] function_name;
Querying data from tables
A query is any command used to retrieve data from a table in relational database management systems. The SELECT statement is most often used in Structured Query Language (SQL) queries. Select is a type of DQL (Data Query Language) command. DQL statements are used to perform queries.
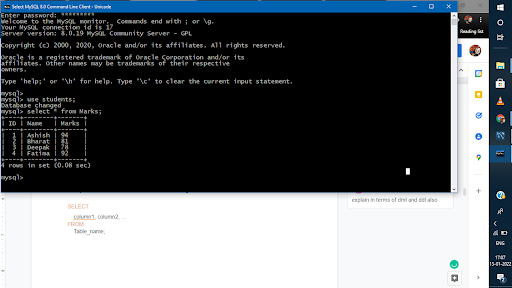
For example, to query the entire contents of a table, use the following command:
SELECT * FROM table_name;
The above query will return each record of the given table.
For example:
If you want MySQL to show only some columns of the table, you can use the following syntax:
SELECT
column1, column2, …
FROM
Table_name;
Remove duplicate rows from a query’s result:
SELECT
DISTINCT (column)
FROM
Table_name;
The above syntax will return distinct elements of the column specified. For example, if we have a column ‘Country’ in a table, it will have a lot of duplicate values, i.e. there is a chance that more than one person belongs to a country. If we want to see what are the distinct countries present in the table, we can use distinct clause.
We can filter records using WHERE clause. It returns only those records which fulfill a specified set of condition.
SELECT column_list
FROM table_name
WHERE condition;
For example, if we want to write a query to retrieve the name of students whose score is less than 80, it will look something like this:
SELECT Name from Marks
WHERE Marks <80;
You can change the output of the column name using column alias:
SELECT
column1 AS alias_name,
expression AS alias,
…
FROM
Table_name;
The name of the column will be changed to alias_name in the result (not in the actual table).
Counting the number of rows in a table:
SELECT COUNT(*)
FROM table_name;
You can sort a result set in ascending and descending order by writing the following code::
SELECT
select_list
FROM
table_name
ORDER BY
column1 ASC [DESC],
column2 ASC [DESC];
Group rows using the GROUP BY clause.
SELECT select_list
FROM table_name
GROUP BY column_1, column_2, …;
Join
In a join, you can get records from two (or more) logically connected tables in one result set. JOIN clauses are used to return the rows of two or more queries that use two or more tables that have a meaningful relationship based on a set of values in common. These values are normally the same column name and datatype that occur in both of the connected tables. The join key is usually, but not always, the primary key of one table and a foreign key in another table. As long as the data in the columns matches, the join can be executed.
Let’s look at the following tables to understand join better:
| members_id | name |
| 1 | John |
| 2 | Jane |
| 3 | Mary |
| 4 | David |
| 5 | Amelia |
| committee_id | name |
| 1 | John |
| 2 | Mary |
| 3 | Amelia |
| 4 | Joe |
Inner Join
Each row from the first table is compared to every record from the second table in the inner join clause. If the join condition is met in both rows, the inner join clause creates a new row with a column that contains all columns from both tables and includes it in the result set. In other words, only matched rows from both tables are included in the inner join clause. Each row from the first table is compared to every record from the second table in the inner join clause.
To query data from multiple tables using inner join, use the following command:
SELECT select_list
FROM table1
INNER JOIN table2 ON condition;
Consider the following syntax to inner join the above tables:
SELECT
m.member_id,
m.name AS member,
c.committee_id,
c.name AS committee
FROM
members m
INNER JOIN committees c ON c.name = m.name;
It will produce the following result:
| member_id | member | committee_id | committee |
| 1 | John | 1 | John |
| 3 | Mary | 2 | Mary |
| 5 | Amelia | 3 | Amelia |
Left join
A join predicate is required for a left join, just as it is for an inner join.The left join selects data from the table on the left. The left join compares every row in the left table to every row in the right table. The left join clause creates a new row whose columns comprise all columns of the rows in both tables if the values in the two rows satisfy the join condition, and includes this row in the result set. The left join clause still creates a new row whose columns contain columns from the left table and NULL for columns from the right table if the values in the two rows do not match.
You can query data from multiple tables using left join by using the following syntax:
SELECT select_list
FROM table1
LEFT JOIN table2 ON condition;
In our case, if we type the following syntax in command line:
SELECT
m.member_id,
m.name AS member,
c.committee_id,
c.name AS committee
FROM
members m
LEFT JOIN committees c USING(name);
The resulting table will look like this:
| members_id | member | committee_id | committee |
| 1 | John | 1 | John |
| 2 | Jane | NULL | NULL |
| 3 | Mary | 2 | Mary |
| 4 | David | NULL | NULL |
| 5 | Amelia | 3 | Amelia |
The right join clause is similar to the left join clause, with the exception that the left and right tables are treated differently. Instead of selecting data from the left table, the right join selects data from the right table.
You can query data from multiple tables using the right join:
SELECT select_list
FROM table1
RIGHT JOIN table2 ON condition;
For example, the following syntax right joins our table:
SELECT
m.member_id,
m.name AS member,
c.committee_id,
c.name AS committee
FROM
members m
RIGHT JOIN committees c on c.name = m.name;
| mambers_id | members | committee_id | committee |
| 1 | John | 1 | John |
| 3 | Mary | 2 | Mary |
| 5 | Amelia | 3 | Amelia |
| NULL | NULL | 4 | Joe |
A Cartesian product of rows from the joined tables is created by the cross join. To create the result set, the cross join joins every row from the first table with every row from the right table. Let’s say there are n rows in the first table and m rows in the second table. The nxm rows will be returned by the cross join that joins the tables.
Syntax:
SELECT select_list
FROM table1
CROSS JOIN table2;
In order to cross join our two tables, the syntax will look like this:
SELECT
m.member_id,
m.name AS member,
c.committee_id,
c.name AS committee
FROM
members m
CROSS JOIN committees c;
Modifying data in tables
To add a new row to a table, do the following:
INSERT INTO table_name(column_list)
VALUES(value_list);
Create a table with several rows:
INSERT INTO table_name(column_list)
VALUES(value_list1),
(value_list2),
(value_list3),
…;
To update all rows in a table, do the following:
UPDATE table_name
SET column1 = value1,
…;
Update data for a set of rows defined by a WHERE clause criteria:
UPDATE table_name
SET column_1 = value_1,
…
WHERE condition
To delete all rows in a table, the syntax is:
DELETE FROM table_name;
To delete rows specified by a condition:
DELETE FROM table_name
WHERE condition;
Searching
LIKE and RLIKE clauses are used to search desired records from the table.
The SQL LIKE clause compares a value to other values that are similar using wildcard operators. With the LIKE operator, there are two wildcards that can be used.
- The percentage sign (%)
- The underscore (_)
The % sign can be used to indicate zero, one, or more characters. A single number or letter is represented by the underscore. These symbols can be mixed and matched.
The syntax for LIKE clause
SELECT select_list
FROM table_name
WHERE column LIKE ‘%pattern%’ (or ‘_ABC’);
E.g, ‘S%’ will fetch all values that start with S.
‘_AB’ will fetch all values that have A and B at second and third places respectively.
In MySQL, this operator is used to pattern match a string expression against a pattern.
Syntax:
SELECT select_list
FROM table_name
WHERE column RLIKE ‘regular_expression’;
MySQL command-line client commands
mysql -u [username] -p;
To connect MySQL server using MySQL command-line client with a username and password (MySQL will prompt for a password).
mysql -u [username] -p [database];
To connect MySQL Server with a specified database using a username and password.
exit;
To exit MySQL command line.
mysql> system clear;
On Linux, type the above command to clear the MySQL screen console window.
On Windows OS, there is currently no command to clear the MySQL screen console.
Conclusion
MySQL is a very popular open-source database that is commonly used for building websites. The default database system for various CMS (content management systems) like WordPress and Joomla, MySQL, also runs many of the biggest sites on the internet, including Facebook and YouTube. With such large adoption, it’s no wonder that lots of people will run into MySQL from time to time. In this article, we discussed MySQL commands, their different types, and how to use them. You should have at least some basic understanding of databases before learning the MySQL commands.
Frequently Asked Questions
How do I query a MySQL database?
To get data from the MySQL database, use the SELECT command. The SELECT command is used with other clauses like WHERE, ORDER BY, HAVING, JOIN to facilitate the query.
How does the MySQL command line work?
Select the option to run MySQL as a service. Use the MySQL Command-Line Client to get started. Enter the following command in a Command Prompt window to start the client: mysql -u root -p. If MySQL has a root password, the -p option is required.
What is the difference between SQL and MySQL?
MySQL is a relational database that employs SQL to query a database, whereas SQL is a query language. SQL is a language for accessing, updating, and manipulating data in databases. MySQL, on the other hand, is a database that organizes existing data in a database.
What is syntax in MySQL?
The syntax is a set of rules and guidelines that SQL follows. An SQL statement generally begins with one of the following keywords like SELECT, INSERT, UPDATE, DELETE, ALTER, DROP, CREATE, USE, SHOW, and terminates with a semicolon (;).
Additional Resources
- MySQL Interview Questions
- MySQL Features
- PostgreSQL vs MySQL
- MongoDB vs MySQL
- SQL Vs MySQL
Небольшая памятка по работе с сервером MySQL из командной строки.
Получить информацию об установленной версии MySQL
mysql -V
Для подключения к mysql в консоли наберите команду
mysql -h you_sql_server -u user_name -p
- h — хост c MySQL. Если подключаемся с локальной машины, параметр можно опустить
- u — имя пользователя MySQL (root или другой пользователь MySQL)
- p — пароль, который будет предложено ввести после нажатия enter
Приглашение командной строки изменится, это значит, сервер MySQL ждёт от вас команд.
mysql>
Запросы должны оканчиваться точкой с запятой. Длинные запросы удобно разбивать enter-ом для перехода на новую строку, а после полного написания запроса поставить точку с запятой и выполнить его.
Для отключения от MySQL нужно написать exit или (в unix-системах) нажать комбинацию клавиш ctrl+с.
Для вывода всех баз данных на сервере используйте команду show databases.
SHOW DATABASES;
Выберите нужную базу данных командой use.
USE db_name;
Теперь можно вводить запросы.
Чтобы подключиться к MySQL и сразу выбрать нужную базу
mysql -u user_name -h host_name db_name -p
Полезные команды MySQL
Показать все таблицы выбранной базы данных в текущей БД.
SHOW TABLES;
Показать все таблицы базы данных db_name.
SHOW TABLES FROM db_name;
Показать список столбцов в таблице table_name в текущей БД
SHOW COLUMNS FROM table_name;
Показать список столбцов в таблице table_name из БД db_name
SHOW COLUMNS FROM table_name FROM db_name;
Вывести структуру нужной таблицы
DESCRIBE table_name;
Показать структуру таблицы, будет выведен sql-запрос на её создание через «CREATE TABLE».
SHOW CREATE TABLE table_name;
Вывести значения системных переменных.
SHOW VARIABLES;
Показать список выполняющихся в настоящий момент запросов.
SHOW PROCESSLIST;
Общая статистика MySQL.
SHOW STATUS;
Статистика по всем таблицам в базе db_name.
SHOW TABLE STATUS FROM db_name;
Что бы выполнять запросы к MySQL из консоли, не всегда требуется предварительно подключаться к mysql. Параметр -e позволяет исполнить команду, вывести результат на экран, после чего отключиться от сервера MySQL. Например, можно вывести список таблиц базы данных.
mysql -uroot -e 'SHOW TABLES' db_name && echo done
Управление базами данных
Создание базы данных из консоли сервера
$ mysqladmin -u root -p create db_name
Удаление базы данных из консоли сервера
mysqladmin -u root -p drop db_name
Создание базы данных db_name из консоли MySQL
CREATE DATABASE db_name COLLATE utf8_general_ci;
Удаление базы данных db_name из консоли MySQL
DELETE DATABASE db_name;
Замена в поле одной подстроки на другую
UPDATE table SET field=replace(field,'original string','new string');
Работа с пользователями
Вывести список пользователей
SELECT User,Host FROM mysql.user;
Показать список прав пользователя user
SHOW GRANTS FOR user_name FROM db_name;
Создать нового пользователя
CREATE USER 'user'@'host' IDENTIFIED BY'password';
host — здесь имя хоста, доменное имя или ip адрес, с которого пользователь сможет подключаться к серверу, например user@localhost.
Чтобы создаваемый пользователь смог подключаться к серверу MySQL с любого IP адреса или хоста (за исключением localhost), можно использовать символ процента, вот так
CREATE USER 'user'@'%' IDENTIFIED BY 'password';
Чтобы разрешрешить пользователю подключаться вообще со всех хостов, придётся создать для него две учётные записи.
CREATE USER 'user'@'%' IDENTIFIED BY 'password';
CREATE USER 'user'@'localhost' IDENTIFIED BY 'password';
Добавить указанные привилегии для таблиц БД db_name пользователю user@localhost
GRANT SELECT,INSERT,UPDATE,DELETE,CREATE,DROP,ALTER,INDEX
ON db_name.* TO 'user'@'localhost';
Чтобы изменить права пользователю, иногда удобно сначала сбросить все права
REVOKE ALL PRIVILEGES ON *.* FROM 'user'@'localhost';
А затем установить нужные с помощью GRANT, как было показано выше.
Добавить все привилегии для таблиц БД db_name пользователю user@localhost
GRANT ALL PRIVILEGES ON db_name.* TO 'user'@'localhost';
Удаление привилегий пользователя user@localhost для БД db_name:
REVOKEALLON db_name.* FROM 'user'@'localhost';
Сделать из пользователя суперпользователя и дать полный доступ ко всем БД на сервере
GRANT ALL ON *.* TO 'user'@'localhost';
Удалить пользователя user@localhost
DROP USER user@localhost;
Перезагрузить привилегии
FLUSH PRIVILEGES;
Изменить пароль пользователя в консоли MySQL
SET PASSWORD FOR 'user'@'localhost' = PASSWORD('new_password');

FLUSH PRIVILEGES;
или так
UPDATE mysql.user SET Password=PASSWORD('new_password') WHERE User='user_name';
FLUSH PRIVILEGES;
service mysqld restart;
Установить пароль для пользователя user в консоли сервера.
$ mysqladmin -uuser_name password'password'
Исправление и оптимизация баз данных в MySQL
Чтобы исправить ошибки в поврежденной таблице, в консоли MySQL выполните:
> REPAIR TABLE table_name;
Если же в БД много поврежденных таблиц можно воспользоваться командой mysqlcheck.
Проверить db_name на ошибки.
$ mysqlcheck -p db_name
Восстановление и оптимизация всех БД
$ mysqlcheck -Aor -p
Аргументы:
- p – использовать пароль
- -A, —all-databases – проверять все базы данных
- -o, —optimize – оптимизировать
- -r, —repair – восстанавливать повреждённые
- —auto-repair – автоматическое восстановление
Бэкап MySQL из командной строки
Экспорт базы MySQL
$ mysqldump -u username -p db_name > dump.sql
Дамп нескольких баз
$ mysqldump -u username -p -B db_name1 db_name2 > dump.sql
Дамп всех баз на сервере
$ mysqldump -u username -p -A > dump.sql
Дамп только структуры базы, без данных
$ mysqldump -u username -p --no-data db_name > database.sql
Дамп структуры одной таблицы mysql, без данных:
$ mysqldump -u username -p -h host db_name table_name --no-data > /path/dump.sql
Развернуть базу данных MySQL из дампа
$ mysql -u username -p db_name < dump_to_restore.sqlКлонирование таблиц
Скопировать структуру и ключи таблицы, без копирования данных.
CREATE TABLE NEW_TableName LIKE OLD_TableNameКлонировать таблицы базы данных со всеми данными.
CREATE TABLE NEW_TableNameSELECT *FROM OLD_TableNameили
CREATE TABLE NEW_TableName
LIKE OLD_TableName
INSERT INTO NEW_TableName
SELECT *
FROM OLD_TableName;
На этом всё. Но вы можете поддержать проект. Даже небольшая сумма поможет нам писать больше полезных статей.
Если статья помогла или понравилась, пожалуйста поделитесь ей в соцсетях.
Последнее обновление: 04.06.2021
При установке сервера MySQL также устанавливается консольный клиент для работы с базами данных. Например, в Windows в меню Пуск можно найти
программу MySQL 8.0 Command Line Client. Это и есть собственно консольный клиент:

Причем клиент устанавливается сразу в двух вариантах — с поддержкой Unicode и без.
Запустим MySQL 8.0 Command Line Client — Unicode. Вначале нам отобразится предложение ввести пароль:

Здесь необходимо ввести пароль, который был установлен при установке MySQL для пользователя root.
И после удачного подключения можно будет отправлять серверу команды через данный консольный клиент.
Для начала посмотрим, какие базы данные есть на сервере по умолчанию. Для этого введем команду show databases;
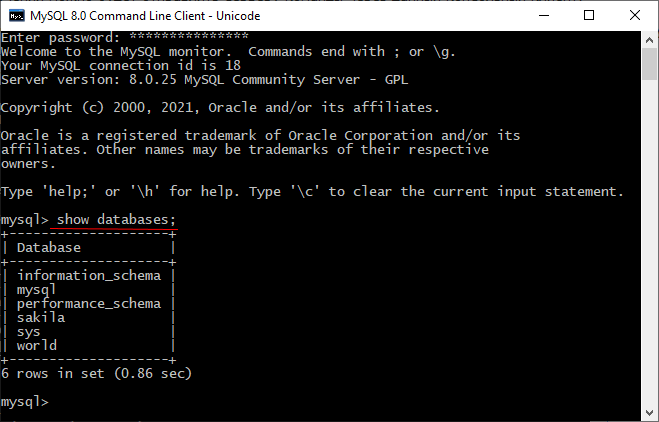
После выполнения этой команды мы увидим, что на сервере по умолчанию уже есть ряд баз данных, которые выполняют административные функции.
Теперь создадим базу данных с помощью следующей команды языка SQL:
Для создания базы данных применяется команда create database, после которой указывается название бд. То есть в
данном случае база данных будет называться «test».
Чтобы обращаться к какой-нибудь определенной базе данных, вначале надо установить нужную базу данных в качестве текущей.
Для этого нужно выполнить команду use, после которой указывается название базы данных. Например, для подключения ранее созданной базы данных
test введем следующую команду:
Затем создадим в этой базе данных таблицу с помощью команды:
create table users (id integer auto_increment primary key, name varchar(30), age integer);
Данная команда создает таблицу users, в которой будет три столбца — id, name и age. id будет хранить уникальный числовой идентификатор пользователя
и будет автоматически генерироваться базой данных, name будет хранить имя пользователя, а age — его возраст.
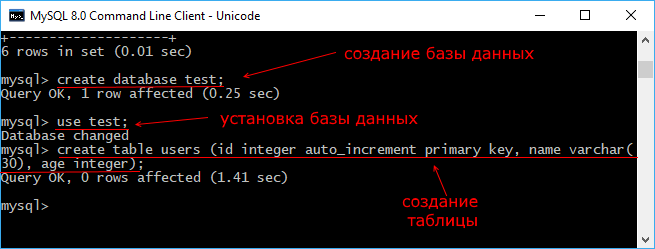
После этого мы можем добавлять и получать данные из выше созданной таблицы. Вначале добавим в таблицу одну строку с помощью следующей команды:
insert into users (name, age) values ('Tom', 34);
И в конце получим добавленные данные:

Таким образом в общих чертах мы можем работать с консольным клиентом MySQL Command Line Client.
 Доброго времени суток, коллеги 🙂
Да, именно коллеги, потому как простому смертному MySQL командная строка (или MySQL Shell, как её ещё любят называть разработчики), равно как и работа с MySQL в консоли, вряд ли пригодится.
Для того, чтобы данная тема была интересна, нужно быть, как минимум, бэкэнд-разработчиком или начинающим системным администратором, которые не пользуются phpMyAdmin и другими интерфейсами принципиально.
Хотя, возможно, вы просто подписаны на уведомления и решили прочитать новую статью из чистого любопытства.
Ну что ж… Весьма похвально 🙂
В любом случае, я постараюсь, чтобы материал был одинаково интересен и понятен всем, кем бы вы ни работали и как бы вы ни были связаны с программированием. Собственно, чего я своими статьями и добиваюсь, в принципе 🙂
Итак, сегодня речь пойдёт о том, как работать с MySQL через командную строку на сервере. Я расскажу, в каких ситуациях данные знания вам могут пригодиться, как подключиться к базе данных MySQL в консоли, запускать командную строку MySQL и производить основные действия с БД, таблицами и их записями.
Одним словом, мы рассмотрим весь жизненный цикл БД и все основные операции, которые могут вам понадобиться в процессе. В результате у нас получится что-то вроде шпаргалки системного администратора, которой я сам буду активно в будущем пользоваться, т.к. всего в памяти не удержишь.
Поехали 🙂
- Когда MySQL командная строка может пригодиться?
- Запуск консоли на разных ОС
- Основные команды консоли MySQL
- Подключение к серверу MySQL в консоли
- Как создать базу данных в MySQL консоли
- Как создать пользователя MySQL в командной строке
- Выбор базы данных при работе с MySQL через командную строку
- Работа с таблицами MySQL через консоль MySQL
- Работа с данными таблиц MySQL через командную строку
- Как удалить базу данных MySQL через командную строку
- Как удалить пользователя MySQL в консоли
- Выход из консоли MySQL
Сразу скажу, что, если вы не собираетесь работать системным администратором или деплойщиком, то каждый день работать с MySQL через командную строку вам вряд ли понадобиться. Для повседневного использования вполне подойдёт старый добрый phpMyAdmin либо какой-то другой веб интерфейс или приложение для работы с MySQL.
Хотя, здесь имеет место привычка. Лично у меня есть знакомые из ранга «трушных кодеров», которые являются фанатами консоли со времён MS-DOS и чистого Linux, видимо, где работать с ОС можно было только из консоли.
Поэтому они и презирают всякого рода графические «примочки». Хотя, большинству пользователей подойдут именно они.
Лично я сам предпочитаю использовать phpMyAdmin как основную программу при создании сайтов для работы с MySQL, т.к. по природе своей являюсь визуалом. Однако, иногда на практике встречаются ситуации, когда знания MySQL командной строки и умения работы с MySQL в консоли сервера просто необходимы.
У меня на данный момент их было три:
- Впервые я столкнулся с работой в MySQL консоли, когда понадобилось сделать импорт большого дампа БД. Через phpMyAdmin он не загружался целиком, т.к. отваливался где-то посередине по таймауту, несмотря на изменение настроек времени выполнения операции и размеров загружаемых файлов. В принципе, можно было подобрать нужные значения, но мне показалось это слишком длительным процессом.
- В следующий раз поработать с MySQL через командную строку пришлось для отключения проверки внешних ключей, когда нужно было удалить данные из таблицы, которая с помощью ключей была связана с другими. В phpMyAdmin я просто не нашёл, как это сделать.
- В серьёзных компаниях для работы с MySQL используется исключительно консоль без каких-либо phpMyAdmin-ов. Не знаю почему конкретно, но знающие люди говорили, что это как-то связано с безопасностью. В результате, всем приходилось работать с командной строкой MySQL, в том числе и мне 🙂
Но, повторюсь, работа с MySQL в консоли и командной строке вполне подходит и для повседневного использования. Все известные визуальные программы для работы с БД всё равно работают на основе консольных команд MySQL. Поэтому, кому как нравится 🙂
Запуск консоли на разных ОС
Поскольку я буду демонстрировать работу с командной строкой MySQL в консоли сервера, то для начала неплохо бы было её запустить.
Действие простое, многим знакомое, для которого достаточно знания «горячих клавиш».
Запуск консоли в Windows:
- Win+R для открытия командной строки Windows с правами администратора;
- Вводим команду cmd
- Нажимаем Enter на клавиатуре
Запуск консоли в Linux дистрибутивах (терминала): в Ubuntu, с которой я работал, достаточно системной комбинации клавиш Ctrl+Alt+T. Про остальные ОС на базе Linux ничего сказать не могу.
Запуска консоли в MacOS: сам я таким не занимался, т.к. Мак-ом ещё не обзавёлся и вряд ли обзаведусь за ненадобностью, но, насколько мне удалось узнать, «горячих клавиш» для вызова терминала в этой ОС нет. Так что если вы являетесь пользователем «яблочной» продукции, то запустите консоль через интерфейс ОС, благо, что мануалов в сети много.
Немного стыдно даже такую информацию публиковать на случай, если на данную статью случайно набредёт какой-то профессиональный системный администратор с бородатым опытом, т.к. он подумает: «Автор считает своих читателей программистами, но при этом учит запускать консоль… Псих какой-то :-)».
Да, вполне логично 🙂 Но я просто учитываю ситуации, что наряду с профессиональными разработчиками сюда могут попасть и новички. Поэтому я и стараюсь делать информацию полной и доступной для всех категорий пользователей, о чём уже говорил.
Основные команды консоли MySQL
Итак, первым делом, нам нужно получить доступ к MySQL командной строке в консоли. Для этого открываем консоль сервера и, если у вас MySQL установлен глобально в виде сервиса, то для «проверки связи» прописываем следующее:
mysql -V
Консольная команда mysql позволяет нам запустить одноименную утилиту, являющуюся командной строкой MySQL.
Это позволит нам узнать версию MySQL, установленного на компьютере и убедиться, что он вообще установлен как служба. Если это так, то в ответ в консоли вы увидите примерно следующий текст: mysql Ver 14.14 Distrib 5.7.16, for Win64 (x86_64).
Да, я не «трушный кодер», потому что сижу под Виндой 🙂 Но, не суть. На Unix системах процедура будет такой же.
Если же вдруг MySQL у вас не установлен глобально на компьютере или у вас есть необходимость работы с несколькими версиями MySQL, при которой есть только каталоги с файлами и библиотеками MySQL, то запуск MySQL через консоль будет выглядеть следующим образом.
В консоли переходим в каталог, где находится исполняемый файл MySQL (на Windows, по крайней мере, это mysql.exe) следующей командой:
cd C:\OpenServer\modules\database\MySQL-5.7-x64\bin
Путь к дистрибутиву у вас, естественно, может отличаться. В качестве примера я решил запустить одну из версий MySQL, входящих в комплект OpenServer.
И запускаем MySQL, проверяя попутно его версию:
mysql.exe -V
В результате в консоль должно было вывестись аналогичное первому случаю сообщение mysql Ver 14.14 Distrib 5.7.16, for Win64 (x86_64).
Всё, с запуском MySQL командной строки через консоль сервера разобрались, теперь будем подключаться непосредственно к серверу MySQL.
Подключение к серверу MySQL в консоли
Cервер MySQL может не обязательно находиться на той же машине, на которой вы пытаетесь получить к нему доступ в консоли. Следовательно, для того, чтобы подключение к удалённому серверу MySQL через консоль было возможно, утилита mysql имеет множество параметров, с помощью которых можно указывать необходимые настройки.
Для того, чтобы запустить командную строку MySQL в консоли, нам достаточно прописать в консоли сервера следующее:
mysql
Однако, в таком случае вы получите следующую ошибку: ERROR 1045 (28000): Access denied for user ‘ODBC’@’localhost’ (using password: NO). Так сообщение об ошибке выглядит у меня на Windows. Если же вы используете Linux, то вместо ODBC будет имя вашего системного пользователя, под которым вы совершаете действия в системе.
Всё это потому, что по умолчанию при подключении к MySQL серверу в консоли используется пользователь ODBC на Windows без пароля и системный юзер на Linux с его же паролем. Хост по умолчанию localhost, т.е. данный пользователь может подключаться только с локальной машины.
Поэтому выхода у вас два: либо использовать другого пользователя для входа в командную строку MySQL, либо создать пользователя MySQL с нужной учёткой. Но для второго способа нам без первого всё равно не обойтись 🙂 Поэтому для начала подключаемся к серверу MySQL под стандартным пользователем root, который создаётся при установке MySQL на компьютер и для которого по умолчанию разрешён доступ с localhost:
mysql -u root -p
При требовании ввести пароль просто нажимаем Enter (если вы его не вводили, конечно, при установке MySQL). После этого вы будете подключены к серверу MySQL с присвоением вам идентификатора подключения и получением доступа к командной строке MySQL.
Если же вы захотите подключиться к серверу MySQL, имеющему специфическое имя хоста или IP или захотите залогиниться под другим пользователем, то используйте команду следующего формата:
mysql -u имя_пользователя -p пароль_пользователя -h хост_или_IP_сервера_MySQL
Вместо кириллических символов с подчёркиванием, естественно, нужно ввести свои данные латинницей. Кстати, данную команду при желании можете прописать немного в другом формате:
mysql --user=имя_пользователя --password=пароль_пользователя --host=хост_или_IP_сервера_MySQL
Если по какой-то причине вы не хотите, чтобы ваш пароль подключения к MySQL отображался в консоли (что правильно, на самом деле), можете использовать следующую команду:
mysql -u имя_пользователя -h хост_или_IP_сервера_MySQL -p
Поскольку пароль не указан явно, вам будет предложено его ввести на следующем шаге. Причём, введённые вами символы отображены не будут даже в виде звёздочек (wildcards), вместо этого будет просто пустая строка.
Помимо указанных настроек подключения возможно использовать следующие параметры, значения которым будут указываться аналогичным с вышеперечисленными образом:
- —port или -P — для указания порта подключения к серверу MySQL;
- —protocol — протокол, по которому будет осуществляться подключение (возможные варианты: TCP для Windows и Linux, SOCKET для Linux, PIPE и MEMORY для Windows);
- —socket или -S — данный параметр пригодится, если вы захотите подключаться через сокеты, следовательно, значение параметра будет сокет;
- —pipe или -W — параметр нужен, если вы захотите использовать именованные «трубопроводы» или «пайпы» для подключения;
- —shared-memory-base-name — этот параметр вам пригодится для MEMORY подключений через общую память на Windows;
Понятное дело, что на этом список всех параметров подключения к MySQL серверу не ограничивается. В реальности их намного больше.
Если по какой-то причине стандартный вариант с указанием хоста, пользователя и пароля вам не подойдёт, то для выяснения полного перечня параметров подключения вам будет полезна следующая информация — https://dev.mysql.com/doc/refman/5.7/en/connecting.html
Как создать базу данных в MySQL консоли
После того, как мы подключились к серверу MySQL и запустили командную строку MySQL, время начать жизненный цикл нашей базы данных сайта, который стартует с её создания. Для создания базы данных MySQL через командную строку нужно ввести следующую команду:
CREATE DATABASE имя_базы_данных;
То же самое действие можно сделать и с помощью специальной MySQL утилиты mysqladmin. Запускается она изолированно от командной строки MySQL, т.е. для её использования вам нужно будет выйти из неё или открыть новую консоль сервера.
А затем вызвать следующую команду:
mysqladmin create имя_базы_данных;
К слову, с помощью утилиты mysqladmin можно не только создавать и удалять базы данных, не заходя в консоль MySQL, но и оперировать серверной конфигурацией, процессами MySQL, управлять репликациями, пинговать сервера и делать ещё много всего интересного.
Более подробно о mysqladmin можете прочитать здесь — https://dev.mysql.com/doc/refman/5.7/en/mysqladmin.html
Как создать пользователя MySQL в командной строке
Не часто, но иногда требуется создать нового пользователя MySQL. Причём, в консольном режиме.
В командной строке MySQL это делается следующим образом:
CREATE USER 'имя_пользователя'@'хост_или_IP_машины' IDENTIFIED BY 'пароль_пользователя';
Пользователь создан. Параметр хост_или_IP_машины означает, что при создании пользователя нужно указывать IP, с которого он сможет подключаться к серверу, или имя хоста (подойдёт доменное имя рабочей машины в сети).
Кстати, при указании хоста для подключения к MySQL серверу можно использовать символ процента — %, который означает, что создаваемый пользователь может соединяться с сервером MySQL с любого IP адреса или хоста.
При этом нужно учитывать, что в данном случае localhost не входит в список адресов, указываемых с помощью %, т.к. localhost обозначает подключение через UNIX сокет вместо стандартного TCP/IP. Т.е. если созданный пользователь MySQL будет подключаться к серверу не с помощью сокетов, а по другому протоколу, указываемому при соединении с MySQL сервером в консоли, то ему нужно будет создавать две учётные записи пользователя:
CREATE USER 'имя_пользователя'@'%' IDENTIFIED BY 'password';
CREATE USER 'имя_пользователя'@'localhost' IDENTIFIED BY 'password';
С созданием пользователя MySQL в консоли мы разобрались. Теперь зададим права пользователя для выполнения любых действий с нашей только что созданной базой данных следующей командой:
GRANT ALL PRIVILEGES ON имя_базы_данных.* TO 'имя_пользователя'@'хост_или_IP_машины';
Опция ALL, как вы поняли, как раз и указывает на то, что пользователю разрешаются любые действия с определённой БД. Полный список прав, которые можно выдавать пользователям с помощью команды GRANT, можно найти здесь (правда, описание параметров на английском) — https://dev.mysql.com/doc/refman/5.7/en/grant.html#grant-privileges
Можно, кстати, использовать несколько параметров привилегий, указывая их при вызове команды через запятую.
Если захотите создать суперюзера, т.е. обладающего глобальными привилегиями для осуществления различных действий со всеми БД на сервере, то используйте следующий вызов команды:
GRANT ALL ON *.* TO 'имя_пользователя'@'хост_или_IP_машины';
Кстати, не лишним будет очистить кэш MySQL сервера после установки привилегий. Если будете их менять, то также не забывайте делать это вызовом следующей команды:
FLUSH PRIVILEGES;
А если захотите поменять права пользователя, то используйте сначала следующую команду чтобы сбросить все права:
REVOKE ALL PRIVILEGES ON *.* FROM 'имя_пользователя'@'хост_или_IP_машины';
А затем установите ему нужные с помощью GRANT, как это было описано ранее.
Если же вам в будущем потребуется изменить пароль пользователя MySQL, то для этого достаточно выполнить в MySQL Shell следующие команды:
SET PASSWORD FOR 'имя_пользователя'@'хост_или_IP_машины' = PASSWORD('новый_пароль');

FLUSH PRIVILEGES;
Сброс кэша привилегий MySQL сервера нужен с той же целью, что и при смене прав — без этого действия смена пароля пользователя MySQL может быть не засчитана, поэтому не ленитесь пользоваться 🙂
В Интернете, кстати, полно примеров использования следующей команды для сброса пароля MySQL пользователя:
UPDATE mysql.user SET Password=PASSWORD('пароль') WHERE User='имя_пользователя';
Но у меня на MySQL 5.7 данный вариант не сработал, выдав ошибку ERROR 1054 (42S22): Unknown column ‘Password’ in ‘field list’. Её причина оказалось отсутствие поля Password в таблице mysql.user.
Из чего можно предположить, что данный вариант работает лишь для старых версий MySQL, где в таблице пользователей данное поле существовало. Поэтому для уверенности используйте мой первый вариант, если вы, конечно не вынуждены работать с допотопным ПО без возможности обновления версий 🙂
На этом создание нового пользователя MySQL и обзор действий с его правами и паролями закончен. Идём далее.
Выбор базы данных при работе с MySQL через командную строку
Теперь, после создания пользователя в MySQL Shell и назначения ему прав на работу с БД нам нужно выбрать эту самую базу, чтобы можно было оперировать самой базой и хранящимися в ней данными.
Для этого используем следующую команду в MySQL консоли:
USE имя_базы_данных;
Если всё прошло успешно, то в консоли выведется сообщение Database changed, что будет сигнализировать о том, что мы выполнили вход в базу MySQL через консоль. Кстати, при соединении с сервером MySQL, изначально можно указывать БД, с которой необходимо будет работать. Для этого нужно прописать следующую команду в консоли сервера:
mysql --user=имя_пользователя --password=пароль_пользователя --host=хост_или_IP_сервера_MySQL --database=имя_базы_данных
Или то же самое, только с запросом ввода пароля пользователя MySQL:
mysql -u имя_пользователя -h хост_или_IP_сервера_MySQL имя_базы_данных -p
На этом всё. Думаю, никаких сложностей с подключением к базе данных MySQL через консоль теперь у вас не возникнет 🙂
Работа с таблицами MySQL через консоль MySQL
Итак, базу данных MySQL через консоль мы создали. Теперь было бы неплохо научиться с ней работать для случая, когда командная строка MySQL будет единственным средством доступа к хранящимся на сервере данным (как это было у меня, о чём я говорил в начале статьи).
Реляционная база данных, как известно, состоит из таблиц, внутри которых уже и хранится информация в виде записей с несколькими полями. Поэтому, следуя по иерархии размещения информации, для начала научимся производить типичные CRUD операции с таблицами.
CRUD операции, если кто-то не в курсе, — это операции по созданию, чтению, обновлению и удалению данных от англ. «Create, Read, Update, Delete» (возможно, на собеседованиях вам такое понадобится).
Напоминаю, что для выполнения действий с таблицами вы должны сперва подключиться к БД MySQL с помощью команды USE.
Итак, первая на повестке у нас команда создания таблицы MySQL в БД через командную строку, которая выглядит так:
CREATE TABLE имя_таблицы (название_поля_1 тип_поля_1, название_поля_2 тип_поля_2(размер_поля_2), INDEX(название_поля_1), ...);
Как вы понимаете, полей может быть сколько угодно, типы их могут быть различны, равно как и наличие индексов и ключей опционально.
Кстати, если вы захотите скопировать таблицу в другую базу данных или просто создать копию в текущей, вам помогут следующие команды:
CREATE TABLE новое_имя_таблицы LIKE старое_имя_таблицы;
INSERT новое_имя_таблицы SELECT * FROM старое_имя_таблицы;
Данные команды позволяют скопировать структуру таблицы и её данные вместе с индексами и триггерами таблиц. Если вам нужны просто данные и структура (имена полей и их типов данных), то можете обойтись вызовом одной команды:
CREATE TABLE новое_имя_таблицы AS SELECT * FROM старое_имя_таблицы;
Следующая операция из блока CRUD у нас чтение. В случае таблиц чтением будет вывод на экран их структуры. Для этого существует следующие четыре команды:
SHOW FULL COLUMNS FROM имя_таблицы;
DESCRIBE имя_таблицы;
EXPLAIN имя_таблицы;
SHOW CREATE TABLE имя_таблицы;
Первая выводит информацию о полях таблицы БД в табличном виде в консоль MySQL с указанием названия поля, типа данных, наличия ключей, значением по умолчанию и т.д. При использовании ключевого слова FULL можно получить расширенную информацию, включая привилегии на каждое из полей для текущего пользователя, комментарии к каждому из них и значение кодировки.
Вторая и третья команды являются просто сокращёнными формами первой команды без расширенной информации. Зачем было их плодить — даже не представляю… Разве что, чтобы было что спросить на собеседованиях при приёме на работу? 🙂
Четвёртая команда, помимо имени, типов полей и значений их по умолчанию позволяет получить значения ключей таблиц, движков таблиц (InnoDB, MyISAM), кодировку и др.
Update операция в случае таблиц представляет собой изменение их структуры, т.е. различные действия с полями таблиц MySQL:
ALTER TABLE имя_таблицы DROP COLUMN название_поля;
ALTER TABLE имя_таблицы ADD COLUMN название_поля VARCHAR(20);
ALTER TABLE имя_таблицы CHANGE старое_название_поля новое_название_поля VARCHAR(50);
ALTER TABLE имя_таблицы MODIFY название_поля VARCHAR(3);
Первая команда позволяет удалить определённое поле таблицы, вторая — добавить, третья позволяет переименовать поле и попутно изменить тип хранимых в нём данных, а четвёртая — изменить исключительно тип данных.
Тоже самое можно делать и с индексами таблиц с помощью во многом похожих команд:
ALTER TABLE имя_таблицы ADD UNIQUE INDEX имя_индекса (название_поля_1, ...);
ALTER TABLE имя_таблицы rename INDEX старое_имя_индекса TO новое_имя_индекса;
ALTER TABLE имя_таблицы DROP INDEX имя_индекса;
Приведённые команды позволяют добавлять, переименовывать и удалять индексы из таблиц MySQL через командную строку. Для добавления и удаления индексов есть, кстати, ещё альтернативный вариант использования самостоятельных команд, а не делать это через ALTER TABLE. Поэтому при желании можете использовать их:
CREATE UNIQUE INDEX имя_индекса (название_поля_1, ...) ON имя_таблицы;
DROP INDEX имя_индекса ON имя_таблицы;
Приведённые команды являются эквивалентами первой и последней из предыдущего блока. Для переименования индекса, к сожалению, отдельной команды не существует. А для изменения типа индекса, к сожалению, вообще нет никакой возможности в MySQL. Единственный выход — удалить индекс и создать его снова с нужным типом.
Ну, и наконец, мы дошли до последней операции из блока CRUD — к удалению. Удалить таблицы MySQL из БД очень просто. Достаточно в консоли MySQL выполнить следующую команду:
DROP TABLE имя_таблицы;
Иногда на практике возникают ситуации, из-за которых не получается удалить таблицу или изменить её структуру. Как правило, это связано с использованием в БД внешних ключей для связи таблиц между собой. С этой ситуацией я лично сталкивался неоднократно, о чём говорил в начале статьи.
Поэтому, если при удалении или обновлении структуры таблицы или её данных MySQL вернул вам ошибку с текстом Cannot delete or update a parent row: a foreign key constraint fails, то следующая информация вам будет как нельзя кстати.
Для того, чтобы осуществить задуманное, нам нужно временно отключить проверку существования внешних ключей, произвести необходимую операцию, а затем снова включить проверку, т.к. она действительно нужна и позволяет предохраняться от нарушения целостности данных в большинстве случаев.
Собственно говоря, с данной целью внешние ключи MySQL и нужны.
Итак, для удаления данных, которому мешают внешние ключи необходимо выполнить следующие действия в консоли MySQL:
SET FOREIGN_KEY_CHECKS=0;
#необходимая_mysql_команда
SET FOREIGN_KEY_CHECKS=1;
Кстати, если захотите удалить внешний ключ, то процедура будет такой же, как и при удалении индекса:
ALTER TABLE имя_таблицы DROP FOREIGN KEY имя_внешнего_ключа;
Чтобы узнать имя внешнего ключа MySQL таблицы, используйте уже знакомую команду MySQL консоли SHOW CREATE TABLE.
Работа с данными таблиц MySQL через командную строку
Для таблиц CRUD операции в MySQL консоли мы рассмотрели. Для полной картины данной шпаргалке не хватает только команд для работы с самими данными, хранящимися в таблицах БД. Думаю, многие знают эти команды и пользовались ими на практике, но всё же напомню их ещё раз.
CRUD операции для работы с данными таблиц MySQL будут выглядеть так:
INSERT INTO имя_таблицы (поле1, поле2, ...) VALUES (значение_поля_1, значение_поля_2, ...);
SELECT поле1, поле2, ... FROM имя_таблицы;
UPDATE имя_таблицы SET поле1 = значение_поля_1, поле2 = значение_поля_2;
DELETE FROM имя_таблицы WHERE поле1 = значение_поля_1;
Приведённые выше команды соответствуют операциям создания, чтения, обновления и удаления данных из таблиц БД MySQL. При использовании SELECT и UPDATE также возможно использовать уточняющий оператор WHERE, с помощью которого можно конкретизировать выбор данных способом, описанным в случае использования DELETE.
Также при выборке данных из БД с помощью SELECT можно использовать следующий вариант для получения значений всех полей таблицы:
SELECT * FROM имя_таблицы;
Естественно, что в данных операциях могут использоваться и другие операторы, помимо WHERE. Особенно их много при выборке данных с помощью SELECT: тут и UNION для объединения результатов нескольких запросов, и различные типы JOIN. Все перечислять очень долго и утомительно как для меня, так и для вас будет читать это.
Поэтому давайте договоримся: если вам захочется о чём-то узнать поподробнее — просто напишите об этом в комментариях, и я постараюсь вам ответить. Или же это сделают другие сведущие участники нашего сообщества. Ок? 😉
Так что пока на данном блоке останавливаться не будем.
Если же вам нужно будет удалить все данные из таблицы, то можете воспользоваться следующей MySQL командой:
TRUNCATE имя_таблицы;
Перед её вызовом, как уже ранее и говорилось, вам может потребоваться отключение проверки внешних ключей в случае наличия связанных таблиц MySQL, которая может препятствовать произведению необходимого действия.
Ещё один интересный момент, который здесь нужно учесть, это то, что данная команда не производит сброс счётчика AUTO_INCREMENT, который используется, как известно, для автоматической генерации значения поля без необходимости его ручной установки.
Поля данного типа чаще всего используются для генерации значений главного ключевого поля id, которое используется для установки связей между данными разных таблиц.
Т.е., если до удаления данных таблицы с помощью TRUNCATE максимальное значение счётчика было 1200, то у первой записи после данной процедуры значение идентификатора будет 1201. В принципе, ничего страшного. Если вы задали достаточный размер для данного поля, то переполнение значений вам грозит не скоро.
Однако, в отдельных случаях, когда в коде приложения есть какая-то привязка к значению поля, то данное поведение может доставлять неудобства.
Чтобы этого избежать, используйте вместо команды выше данный вариант:
TRUNCATE TABLE someTable RESTART IDENTITY;
Данный вариант вызова команды TRUNCATE позволит вам сбросить значение счётчика полей с AUTO_INCREMENT. Поэтому значение поля первой добавленной записи после данного удаления будет 1 вместо 1201, как в примере выше.
Как удалить базу данных MySQL через командную строку
Жизненный цикл работы с базой данных подходит к концу и завершается вполне логично — её удалением. Для того, чтобы сделать данную операцию в консоли MySQL, нужно выполнить следующую команду (при этом удаляемая БД может быть и не выбрана командой USE):
DELETE DATABASE имя_базы_данных;
То же самое действие можно сделать и с помощью MySQL утилиты mysqladmin, о которой я уже упоминал в начале статьи при создании БД:
mysqladmin drop имя_базы_данных;
При вызове команды в консоли сервера появится следующее сообщение:
Dropping the database is potentially a very bad thing to do.
Any data stored in the database will be destroyed.
Do you really want to drop the ‘имя_базы_данных’ database [y/N]
Вкратце — это предупреждение о том, что удаление базы данных MySQL — идея очень плохая. Также запрашивается подтверждение действия. Если согласны — пишем y и нажимаем Enter на клавиатуре, после чего на экран выведется следующее сообщение (если всё прошло успешно, конечно же):
Database «имя_базы_данных» dropped
Вот так 🙂
Как удалить пользователя MySQL в консоли
Теперь та же участь постигнет и создаваемого нами пользователя MySQL, чтобы продемонстрировать вам, как это делается. Но для начала неплохо бы перед самим удалением проверить, существует ли требуемый пользователь на самом деле.
Начиная с MySQL 5.7 для обоих этих действий существует одна команда:
DROP USER IF EXISTS имя_пользователя;
В более ранних версиях MySQL требовалось две отдельные команды:
GRANT USAGE ON *.* TO 'имя_пользователя'@'хост_или_IP_адрес';
DROP USER 'имя_пользователя'@'хост_или_IP_адрес';
К сожалению, в данном случае сообщение о выполнении операции в консоли MySQL традиционно малоинформативно 🙁 Поэтому, чтобы узнать, что удаление пользователя пользователь MySQL всё-таки произошло, можно воспользоваться следующей командой, которая выводит на экран список всех существующих на текущем MySQL сервере пользователей:
SELECT User FROM mysql.user;
Данный вариант команды выведет только имена пользователей. Если же вам нужно будет посмотреть хосты, с которых пользователи могут коннектиться к серверу, и список привилегий, то можете вызвать команду в следующем виде:
SELECT User, Host, Grant_priv FROM mysql.user;
Также в таблице mysql.user существует масса других полей, в которых хранятся другие типы привилегий и прочая информация, с полным списком которой можно познакомиться здесь — https://mariadb.com/kb/en/library/mysqluser-table/
Не смущайтесь, что это документация к СУБД MariaDB. Технически это то же самое, что и MySQL, т.к. MariaDB является всего лишь её ответвлением или форком от англ «fork» — ответвление, вилка.
Зачем её было делать — снова без понятия 🙂 Разве что, чтобы всем гордо заявлять, что «у меня своя СУБД»?.. Но о точных мотивах и различиях MySQL и MariaDB я, честно говоря, не сильно в курсе. Поэтому если вы что-то об этом знаете — было бы интересно прочитать об этом в комментариях.
Выход из консоли MySQL
Вот и всё, жизненный цикл БД и пользователя, начавшийся их созданием и завершившийся удалением подошёл к концу. Следовательно, командная строка MySQL, с которой мы работали в консоли сервера с помощью утилиты mysql, нам больше не нужна.
Осталось только выйти из неё…
Казалось бы, действие тривиальное, но многие в ситуации, когда нужно выйти из командной строки MySQL просто закрывают консоль сервера и открывают её снова. Можно, конечно, и так действовать, но это отнимает лишние секунды рабочего времени и заставляет раздражаться каждый раз, когда это сделать необходимо.
Правильным поведением в данной ситуации будет всего лишь вызов команды exit в командной строке MySQL, после чего сервис с нами вежливо попрощается 🙂
![]()
И всего-то 🙂 Так что в следующий раз не нужно плодить консоли и переоткрывать их каждый раз, когда нужно будет выйти из MySQL в консоли и снова получить к ней доступ для управления сервером.
Вот и всё, что я хотел вам сегодня рассказать. Надеюсь, что моя шпаргалка по работе с командной строкой MySQL через консоль пригодится не только мне, но и вам.
Говоря о практическом применении изложенной в статье информации хочется напомнить, что приведёнными конструкциями можно пользоваться не только в командной строке MySQL и консоли сервера, но и в консоли phpMyAdmin и прочего ПО, которое предоставляет такую возможность.
Пользоваться вам ею или нет — ваше дело. Но, как я сказал в самом начале статьи, бывают ситуации, когда использование консоли MySQL может сэкономить ваше время и нервы. А пользоваться ли командной строкой каждый день или нет — дело исключительно вкуса и индивидуальных предпочтений.
Пишите комментариях о том, какие команды вы используете чаще всего. А, возможно, вы знаете ещё какие-то хитрости. В любом случае делитесь своим мнением с остальными и поддерживайте беседы в комментариях других пользователей.
Обещаю, что в процессе вы узнаете много нового, как и я при написании каждой своей статьи 🙂
Если статья вам понравилась, в качестве благодарности можете поделиться ею со своими друзьями в социальных сетях или же помочь проекту материально с помощью формы под статьёй.
На этом всё! Удачи и до новых встреч 🙂
P.S.: если вам нужен сайт либо необходимо внести правки на существующий, но для этого нет времени и желания, могу предложить свои услуги.
Более 5 лет опыта профессиональной разработки сайтов. Работа с PHP, OpenCart, WordPress, Laravel, Yii, MySQL, PostgreSQL, JavaScript, React, Angular и другими технологиями web-разработки.
Опыт разработки проектов различного уровня: лендинги, корпоративные сайты, Интернет-магазины, CRM, порталы. В том числе поддержка и разработка HighLoad проектов. Присылайте ваши заявки на email cccpblogcom@gmail.com.
И с друзьями не забудьте поделиться 😉