Аннотация
Windows включает средство под названием сведения о системе (Msinfo32.exe). Этот инструмент собирает сведения о компьютере и отображает полный набор оборудования, компоненты системы и программной среде, которую можно использовать для диагностики неполадок компьютера.
Примечания.
-
Если MSINFO32 можно запустить без прав администратора, как остановить, если они не может отображаться некоторые драйверы. Это происходит потому, что кэш для получения этих сведений необходимо обладать полномочиями администратора для обновления. Чтобы избежать этой проблемы, убедитесь, что запуск с правами администратора MSINFO32.
-
Msinfo32 не может предоставить сведения об оборудовании при запуске в безопасном режиме. Сведения о системе можно запустить в безопасном режиме, он только для отображения сведений о системных компонентах и среде программного обеспечения.
Дополнительная информация
Как запустить MSINFO32
Разверните вашей версии Windows ниже инструкции для запуска MSINFO32.
-
В поле поиска введите msinfo32 .
-
Щелкните правой кнопкой мыши Системную информацию в результатах поиска и выберите Запуск от имени администратора.
-
Хотя на начальном экране, типmsinfo32. (Кроме того, swipe в от правого края экрана и выберите Поиск. Если вы используете мышь, наведите указатель в правый нижний угол экрана, а затем выберите поиска. Затем введите msinfo32 в поле поиска.)
-
Щелкните правой кнопкой мыши (или нажмите и удерживайте) результатов поиска и выберитеЗапуск от имени администратора.
-
Нажмите кнопкуПуск. Введите msinfo32в поиска поле.
-
Щелкните правой R msinfo32.exe в результатах поиска, а затем нажмите кнопку Запуск от имени администратора.
Как запустить MSINFO32 с помощью командной строки
Можно также запустить MSINFO32 из командной строки с повышенными правами. Чтобы открыть окно командной строки, введите команду cmd в поле поиска. Затем в списке результатов поиска щелкните правой кнопкой мыши Командная строка и выберите Запуск от имени администратора.
Можно выполнить следующие задачи с помощью ключей командной строки MSINFO32:
-
Создайте файлы .nfo или .txt, содержащие сведения о вашей системе.
-
Сведения о системе начала подключение к удаленному компьютеру.
Для выполнения команды MSINFO32 на компьютерах под управлением Windows 7, Windows 8.1 и Windows 10, используйте следующий синтаксис в командной строке:
Msinfo32 [/nfo/NFO путь] [/ Report путь] [/ Computer имя_компьютера[ ]
Parameters
Путь
Задает файл, который открывается в формате C: \folder1\file1. xxx , где C -это буква диска, Папка1 — это папка, является файл file1 и xxx — расширение имени файла.
Имя_компьютера
Это может быть полное доменное имя, IP-адрес или имя в формате UNC.
Параметры командной строки
/ NFO {Путь}
Сохранение экспортированного файла как NFO-файл. Если имя файла, указанного в пути не заканчивается .nfo, расширением .nfo будет добавляться к имени файла.
/ Report {Путь}
Сохраняет файл, указанный в пути в формате .txt. Имя файла сохраняется точно так, как он отображается в пути. Расширение имени файла .txt не будет добавлена в файл, если оно не указано в пути.
/ Computer {Имя компьютера}
Сведения о системе запускается для указанного удаленного компьютера.
Примечание
При подключении к удаленному компьютеру, необходимо иметь соответствующие разрешения для доступа к WMI на удаленном компьютере.
ПримерыДля просмотра сведений о системе, введите следующую команду:
msinfo32Чтобы создать NFO-файл в папке C:\Temp с именем Test.nfo, введите:
msinfo32 /nfo C:\TEMP\TEST.NFOЧтобы создать txt-файл в папку с именем Test.txt C:\Temp, введите:
msinfo32 /report C:\TEMP\TEST.TXTЧтобы просмотреть сведения о системе с удаленного компьютера с UNC-именем BIGSERVER, введите:
msinfo32 /computer BIGSERVER
Нужна дополнительная помощь?
Нужны дополнительные параметры?
Изучите преимущества подписки, просмотрите учебные курсы, узнайте, как защитить свое устройство и т. д.
В сообществах можно задавать вопросы и отвечать на них, отправлять отзывы и консультироваться с экспертами разных профилей.
Первым делом:
Скачайте библиотеку — скачать msinfo32.dll
Затем:
Поместите msinfo32.dll
в одну из следующих папок:
Если у вас 64-битная версия Windows, то поместите файл в:
«C:\Windows\SysWOW64»
Если у вас 32-битная версия Windows, то поместите файл в:
«C:\Windows\System32»
После этого
Перезагрузите компьютер, чтобы изменения вступили в силу.
Всё равно выдаёт ошибку msinfo32.dll
не был найден?
Тогда придётся установить этот файл вручную. Для этого:
Зайдите в меню «Пуск».
В строчке поиска введите «cmd». И запустите найденную программу от имени администратора.
В открывшемся окне введите «regsvr32 msinfo32.dll
«.
После этого снова перезагрузите компьютер. Теперь ошибка должна быть исправлена.
Если что-то не понятно прочитайте более подробную инструкцию — как установить dll файл.
Have you struggled to create a system information report on your computer system? Collecting system details might seem difficult, but the Microsoft System Information Tool (MSInfo32) makes quick work of collecting all that information!
In this article, you will master generating and viewing system information reports in no time. Read on to learn more!
Prerequisites
For this tutorial, you can use any build of Windows 10. Reading system reports from the command line require PowerShell. This tutorial uses Windows 10 version 21H1 build 19043 and PowerShell v7.1.
Viewing a System Information Report
The first step in retrieving detailed information about your system is to open the MSInfo32 tool.
To find the tool, search for MSInfo32 on the Start Menu, and be sure to click the Run as administrator option.
When MSInfo32 is not run as an administrator, MSInfo32 cannot update its internal information cache correctly, and some drivers may show as stopped when they are not.
As soon as the tool opens, it will present you with a report, an automatically generated one. You’ll see a hardware summary of your computer in the System Summary view. This view outlines an overall view of the system configuration. To the left, you’ll see categories, which further break down each section.

Saving MSInfo32 reports
Perhaps you are about to make hardware changes to your system and would like to save a system information report for later comparison or reporting. With MSInfo32, you have two options to save that information: saving and exporting. You will learn about them next.
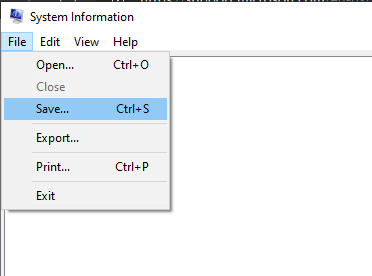
You could click File → Save to save the information as an NFO file, which is known as a System Information File. The NFO file is an XML-based file that can be later opened by the MSInfo32 tool to view in the same organized format.
You can see an example of the NFO XML file below.
<?xml version="1.0"?>
<MsInfo>
<Metadata>
<Version>8.0</Version>
<CreationUTC>08/12/21 02:09:47</CreationUTC>
</Metadata>
<Category name="System Summary">
<Data>
<Item><![CDATA[OS Name]]></Item>
<Value><![CDATA[Microsoft Windows 10 Education]]></Value>
</Data>
<Data>
<Item><![CDATA[Version]]></Item>
<Value><![CDATA[10.0.19043 Build 19043]]></Value>
</Data>
<Data>
<Item><![CDATA[Other OS Description ]]></Item>
<Value><![CDATA[Not Available]]></Value>
</Data>
<Data>
<Item><![CDATA[OS Manufacturer]]></Item>
<Value><![CDATA[Microsoft Corporation]]></Value>
</Data>
<Data>
<Item><![CDATA[System Name]]></Item>
<Value><![CDATA[ASPIREBOX]]></Value>
</Data>
<Data>
<Item><![CDATA[System Manufacturer]]></Item>
<Value><![CDATA[Acer]]></Value>
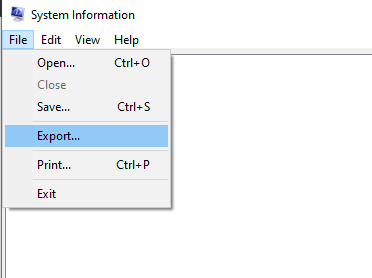
...You could also click File → Export which saves the information as a TXT plaintext file that may be easier to read but cannot be opened via the System Information Tool later.
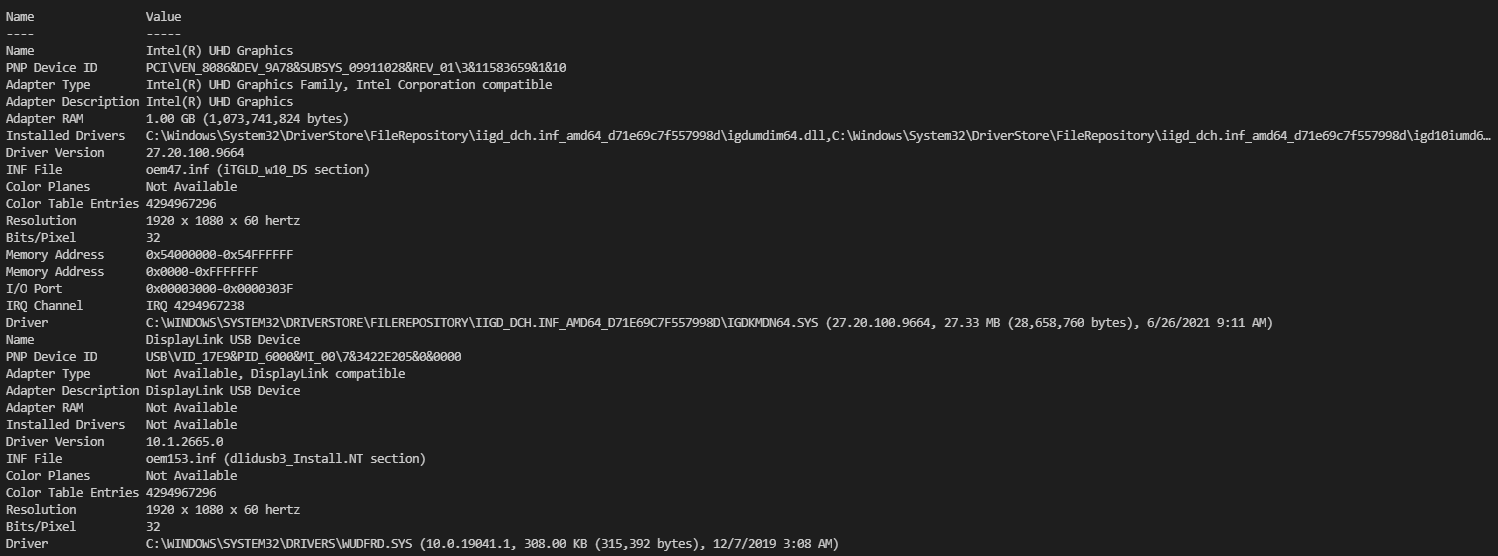
And below you’ll see an example of the text file format MSInfo32 exports.
System Information report written at: 08/11/21 23:33:55
System Name: ASPIREBOX
[System Summary]

Item	Value
OS Name	Microsoft Windows 10 Education
Version	10.0.19043 Build 19043
Other OS Description 	Not Available
OS Manufacturer	Microsoft Corporation
System Name	ASPIREBOX
System Manufacturer	Acer
System Model	Aspire A514-54
System Type	x64-based PC
System SKU	0000000000000000
Processor	11th Gen Intel(R) Core(TM) i5-1135G7 @ 2.40GHz, 2419 Mhz, 4 Core(s), 8 Logical Processor(s)
BIOS Version/Date	Insyde Corp. V1.12, 5/26/2021
SMBIOS Version	3.3
Embedded Controller Version	1.12
BIOS Mode	UEFI
BaseBoard Manufacturer	TGL
BaseBoard Product	Lily_TL
BaseBoard Version	V1.12
Platform Role	Mobile
Secure Boot State	On
PCR7 Configuration	Elevation Required to View
Windows Directory	C:\WINDOWS
System Directory	C:\WINDOWS\system32
Boot Device	\Device\HarddiskVolume1
Locale	Brazil
Scripting Exported Reports from MSInfo32
Now that you know how to generate a system information report from MSInfo32, how would you go about generating either an NFO or TXT report from the command line? Maybe you’re creating a script, and you need a quick way to retrieve hardware information.
Below are two different options using the command line to generate both an NFO and TXT report.
You can find plenty of outdated articles about MSInfo32 where you may see options such as
/categories,/category,/pch, and/showcategories. These are only available on Windows XP, not available for Windows 10.
This first example demonstrates generating a TXT report in the same directory the command is run, as you can see in the following screenshot.
MSInfo32 /report report.txtEven when running from the command line, a window pops up where you can see the System Information being refreshed before the report generation.

This second example demonstrates generating the NFO report, this time by specifying the directory where the report will be saved. Be aware that the directory must exist before running the command. Otherwise, it will fail silently.
MSInfo32 /nfo c:\ata\report.nfoAlthough any file extension will work, as the system information report export is an NFO file, /nfo option, convention dictates using .nfo as the report extension.
Reading NFO Files via PowerShell
Throughout this tutorial, you’ve learned how to generate and export MSInfo32 reports. But you came to Adam the Automator for a reason, so you will learn to automate the process.
Saved NFO reports may be opened and viewed in MSInfo32 via the File → Open menu. The problem is: a graphical interface is not ideal when automating information retrieval. As NFO files are saved as XML files, PowerShell can parse XML files and retrieve that information.
To read the XML report file, open a PowerShell window and run Get-Content, as shown in the screenshot below. The [XML] allows PowerShell to read the XML text and converts that to PowerShell objects. Finally, save the result to the $Report variable. The resulting command can be seen below.
$Report = [XML](Get-Content -Path 'Report.nfo')
$Report variable. Perhaps you need to retrieve the list of services that were running at the time the report was generated. Since MSInfo32 reports contain that, you retrieve the list via the SelectNodes() method.
The
SelectNodes()method uses XPath. XPath is query language for XML. Crafting complex XPath queries is out of scope for this article.
<Category name="Services">
        <Data>
          <Display_Name><![CDATA[ACC Service]]></Display_Name>
          <Name><![CDATA[ACCSvc]]></Name>
          <State><![CDATA[Running]]></State>
          <Start_Mode><![CDATA[Auto]]></Start_Mode>
          <Service_Type><![CDATA[Own Process]]></Service_Type>
          <Path><![CDATA["c:\\program files (x86)\\acer\\care center\\accsvc.exe"]]></Path>
          <Error_Control><![CDATA[Normal]]></Error_Control>
          <Start_Name><![CDATA[LocalSystem]]></Start_Name>
          <Tag_ID><![CDATA[0]]></Tag_ID>
        </Data>
        <Data>
          <Display_Name><![CDATA[AllJoyn Router Service]]></Display_Name>
          <Name><![CDATA[AJRouter]]></Name>
          <State><![CDATA[Stopped]]></State>
          <Start_Mode><![CDATA[Manual]]></Start_Mode>
          <Service_Type><![CDATA[Share Process]]></Service_Type>
          <Path><![CDATA[c:\\windows\\system32\\svchost.exe -k localservicenetworkrestricted -p]]></Path>
          <Error_Control><![CDATA[Normal]]></Error_Control>
          <Start_Name><![CDATA[NT AUTHORITY\\LocalService]]></Start_Name>
          <Tag_ID><![CDATA[0]]></Tag_ID>
        </Data>
</Category>
The XPath query '//Category[@name="Software Environment"]/Category[@name="Services"]/Data' will serve as an example. Its parts are shown below, so you can understand it and adapt it for several scenarios.
//Category[@name="Software Environment"]– Returns any Category node in the entire document, indicated by the pre-ceding double-slash, with the name “Software Environment”./Category[@name="Services"]– Returns the Category node underneath the previously returned “Software Environment” node that has the name “Services.”/Data– Returns the child Data node under the previously returned “Services” node.
The example structure above is present the automatically generated System Report we see when MSInfo32 runs. You can adapt it by building according to the section you see in those.
Passing the XPath query //Category[@name="Software Environment"]/Category[@name="Services"]/Data to the SelectNodes() method on the $Report object shown below returns all Window services as XML nodes. Since the XML nodes are not displaying an expected output (The service Name, DisplayName, and State), the code below creates a PSCustomObject and formats the output to fit on the screen with Format-Table.
# The XPath query shown below will change based on what data you wish to extract, it will not always follow this convention
$Report.SelectNodes('//Category[@name="Software Environment"]/Category[@name="Services"]/Data') | ForEach-Object {
  [PSCustomObject]@{
    "Name"    = $PSItem.Name.innerText
    "Display" = $PSItem.Display_Name.innerText
    "State"   = $PSItem.State.innerText
  }
} | Format-Table -AutoSize
Shown below is an additional example of how to use an XPath query and PowerShell to find information on the System Report Display category. The XPath query itself is very similar to the ones before, but looking for the Components and Display categories this time.
# The XPath query shown below will change based on what data you wish to extract, it will not always follow this convention
$Report.SelectNodes('//Category[@name="Components"]/Category[@name="Display"]/Data') | ForEach-Object -Begin {
	# Create an Objects collection to hold all a collection of devices
	$Objects = [System.Collections.ArrayList]@()
	# The temporary object used to hold the names and values of a single device
	$Object = @()
} -Process {
	# If the Item name is not blank, signifying a new device is coming, then add the Name and Value to the temporary $Object array.
  # The reason this cannot be in a custom hashtable is because the Name may be duplicated which is not allowed in a hashtable
  If (-Not [String]::IsNullOrWhiteSpace($PSItem.Item.innerText)) {
    $Object += [PSCustomObject]@{
      "Name"  = $PSItem.Item.innerText
      "Value" = $PSItem.Value.innerText
    }
  } Else {
		# Once a blank Item name is encountered add this to the overall Objects list of devices
    $Objects.Add($Object)
		# Reset the single device object
    $Object = @()
  }
} -End {
	# Send only the collection of Device objects further down the pipeline
	$Objects
} | Format-Table -AutoSize
Conclusion
In this article, you have learned how MSInfo32 offers a convenient way to generate a comprehensive system report for a local system. With the save and export functions of MSInfo32, you learned how to export the system status to analyze over time and use PowerShell to analyze the available information.
How would you go about automating MSInfo32 across multiple systems?
| Информация о файле | Описание |
|---|---|
| Размер файла: | 330 kB |
| Дата и время изменения файла: | 2017:03:18 18:18:42+00:00 |
| Дата и время изменения индексного дескриптора файлов: | 2017:11:05 07:07:54+00:00 |
| Тип файла: | Win32 EXE |
| Тип MIME: | application/octet-stream |
| Предупреждение! | Possibly corrupt Version resource |
| Тип компьютера: | Intel 386 or later, and compatibles |
| Метка времени: | 1977:10:22 11:15:02+00:00 |
| Тип PE: | PE32 |
| Версия компоновщика: | 14.10 |
| Размер кода: | 158208 |
| Размер инициализированных данных: | 195072 |
| Размер неинициализированных данных: | 0 |
| Точка входа: | 0x21430 |
| Версия ОС: | 10.0 |
| Версия образа: | 10.0 |
| Версия подсистемы: | 10.0 |
| Подсистема: | Windows GUI |
| Номер версии файла: | 10.0.15063.0 |
| Номер версии продукта: | 10.0.15063.0 |
| Маска флагов файлов: | 0x003f |
| Флаги файлов: | (none) |
| Файловая ОС: | Windows NT 32-bit |
| Тип объектного файла: | Dynamic link library |
| Подтип файла: | 0 |
| Код языка: | English (U.S.) |
| Набор символов: | Unicode |
| Наименование компании: | Microsoft Corporation |
| Описание файла: | System Information |
| Версия файла: | 10.0.15063.0 (WinBuild.160101.0800) |
| Внутреннее имя: | msinfo.dll |
| Авторское право: | © Microsoft Corporation. All rights reserved. |
| Оригинальное имя файла: | msinfo.dll |
| Название продукта: | Microsoft® Windows® Operating System |
| Версия продукта: | 10.0.15063.0 |
✻ Фрагменты данных файлов предоставлены участником Exiftool (Phil Harvey) и распространяются под лицензией Perl Artistic.
Does system information not showing on your computer? If you are also bothered by MSINFO.exe System Information not working at the moment, then solutions given in this post from MiniTool Website will help you out.
Windows 10 MSINFO32.exe Can’t Collect Information
MSINFO.exe is used to diagnose system problems, optimize system performance, troubleshoot system issues, and even generate reports. This information utility can tell you detailed information about your computer’s hardware, software and system settings.
However, you might be unable to access the system information and receive an error message saying: Can’t collect information. Cannot access the Windows Instrumentation Software. Windows management files might be missing or moved.
If you have the same question, there are some easy fixes to help you to make MSINFO.exe work properly again.
Tips:
In case that you encounter some system issues on your computer, you had better backup your system with a reliable backup software – MiniTool ShadowMaker. If MSINFO.exe System Information is not working and you cannot troubleshoot system issues with this issue, you can use the backup image to restore your system to an earlier state.
MiniTool ShadowMaker TrialClick to Download100%Clean & Safe
How to Fix MSINFO32.exe System Information Not Working?
Fix 1: Restart Your Computer
Restarting your computer can fix many small problems on your computer. In most cases, a reboot will flush any memory conflicts and clear some temporary files that can interfere with MSINFO.32.exe. Follow these steps:
Step 1. Quit all the background processes on your computer.
Step 2. On your desktop, press Alt + F4 and select Restart in the drop-down menu.

Step 3. Click on OK to start rebooting your computer.
Fix 2: Check for Windows Update
Microsoft often releases some updates related to system applications & components and these new updates can address issues with the operating system. Therefore, make sure your computer is up-to-date.
Step 1. Press Win + I to open Windows Settings.
Step 2. Go to Update & Security > Windows Update > Check for updates.

Step 3. Click on Install now to download and install the new update.
Step 4. Reboot your computer to see if MSINFO32.exe System Information not working disappears.
Fix 3: Start WMI Service
Windows Management Instrumentation helps to control how different programs communicate with each other and access the system resources they need. MSINFO32.exe can be considered as an OS operating interface to the WMI service. If you encounter MSINFO32.exe System Information not working, you should check if the WMI service is running.
Step 1. Press Win + R to open the Run box.
Step 2. Type services.msc and hit Enter.
Step 3. In Services, scroll down to find Windows Management Instrumentation and right-click on it to choose Properties.

Step 4. Set Start type to Automatic and hit Start.
Fix 4: Reset WMI Service
Chances are that the WMI service might be corrupted, causing MSINFO32.exe System Information not working. Here’s how to reset this service to restore it to the default settings:
Step 1. Type cmd in the search bar to locate Command Prompt.
Step 2. Right-click on it to choose Run as administrator.
Step 3. Run the following commands one by one and don’t forget to hit Enter after each command.
net stop winmgmt
winmgmt /resetrepository
net start winmgmt
Step 4. Quit Command Prompt after all the process is done.
Fix 5: Register the WMI Components
If WMI is not registered or configured properly, you will also have problem accessing system information and managing devices. Follow these steps to re-register the WMI components.
Step 1. Launch Command Prompt with administrative rights.
Step 2. In the command window, type the following commands and hit Enter after each command.
cd /d %windir%\system32\wbem
for %i in (*.dll) do RegSvr32 -s %i
for %i in (*.exe) do %i /RegServer
Step 4. Exit Command Prompt to see if MSINFO32.exe System Information works properly now.
Fix 6: Run SFC & DISM Scan
The last resort is to repair and replace the corrupted system files via System File Checker (SFC) and Deployment Imaging and Servicing Management (DISM).
Step 1. Run Command Prompt with elevated rights.
Step 2. Type sfc /scannow and hit Enter.
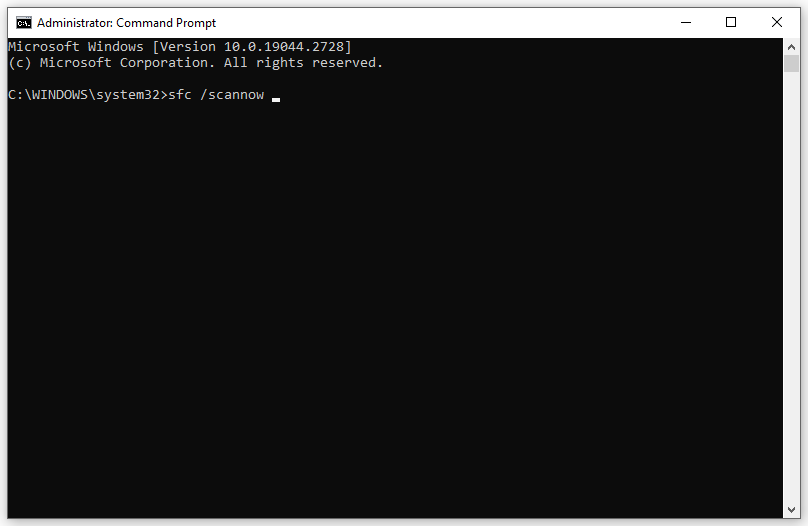
Step 3. If you still receive MSINFO32.exe System Information not working. Reboot your computer and run the following commands:
dism.exe /Online /cleanup-image /scanhealth
dism.exe /Online /cleanup-image /startcomponentcleanup
dism.exe /Online /cleanup-image /restorehealth
Step 4. Reboot your computer and access system information via the MSINFO32.exe tool to see if the problem is fixed.