-
#1
I have recently installed Windows 10 to a new SSD, and everything is working great. But every time I turn on the laptop, it keep shows «checking media presence… no media present» before boot into windows. I have try many ways to solve it, but still can’t.
Laptop : MSI GL63 8RC
Bios version : American Megatrends Inc. E16P6IMS.106, 16/7/2018
BIOS Mode : UEFI
-
#2
Check your boot order in BIOS, perhaps your SSD is not the first boot device.
-
#3
already set the SSD as first boot device, but still shows checking media presence
Deleted member 663924
Guest
-
#4
already set the SSD as first boot device, but still shows checking media presence
boot sequence ,,set first windows boot manager
ssd name ?? and using ahci or rst -sata controller
some ssd need AHCI + special nvme drivers
or 2x ssd need RST + rst drivers
or intel ssd need RTS + rst drivers
edit
,.PXE ipv4 message ?? disable «network stack» or network boot
-
#5
boot option 1 : ssd
boot option 2 : usb cd/dvd
boot option 3: cd/dvd
boot option 4 : usb hard disk
boot option 5 : windows boot manager
ssd name : silicon power , use AHCI
Deleted member 663924
Guest
-
#6
boot option 2 : ssd
boot option 4 : usb cd/dvd
boot option 5: cd/dvd
boot option 3 : usb hard disk
boot option 1 : windows boot manager
edit
,,and get PXE ipv4 message ?? —network boot
bios/advanced —disable «network stack»
-
#7
I set the boot priority as stated, and it shows *your pc needs to be repaired*
Code error 0xc000000e
Deleted member 663924
Guest
-
#8
you would have to fix «bootrec» correctly
,,best set all back ,,and skiping your problematic message
send full ssd name ,,i test find drivers when exist ,,NVME ? or sata 2.5 ??
for sata no need drivers
more about bootrec repair ,,but not use this ,,,not possitible helps from distance
and possitible lost data or similar —bad usage
,,edit
clean windows ??
load bios defaults
f11 before boot
rufus + GPT «UEFI»
USB install new windows
windows ISO -windows creation tool or windows iso downloader
,,,best set all back ,,and skips message .,when all works before normal
or reinstall or «bootrec» repair
,,or get error after disable network boot ?? ,,virus or custom net boot configuration «pc in networks — job or similar systems»??
PXE ipv4 message ??????????????????
Last edited by a moderator:
Deleted member 663924
Guest
-
#9
or faster boot «repair»
SSD 1 ,,windows boot manager 2
3 .,4.,5 others
-
#10
Silicon Power NVMe PCIe Gen3x4 M.2 2280 SSD Solid State Drives_A60 P34
when change the boot option as below, *your pc need to be repair* does not shows anymore but checking media presence still shows.
boot option 1 : ssd
boot option 2 : windows boot manager
get error after disable network boot ??
no, i did not disable the network boot.
PXE ipv4 message ??
no, the error message just this,
Checking media presence
no media present
Deleted member 663924
Guest
-
#11
problem test any change ,,easy way lost data
,,silicon power web not contains any info or drivers
.,test RST -sata controller ? bios/advanced
or skip this message when system works normal ,,any change «possitible lost data» !!!!!
ahci or RST drivers -last 17.9.4 -same package for your chipset
ahci or RST DRIVERS ,,,but risk lost data «this best install in windows installation + correct sata controller» manufacture guide
some ssd need ahci + nvme driver ,,some RST controller + rst drivers
test
sata controller RST -when all works normal ,,install last drivers
when not boot ,,,set back AHCI
-
#12
so, i need to install rst driver first and then change the AHCI to RST?
Deleted member 663924
Guest
-
#13
so, i need to install rst driver first and then change the AHCI to RST?
no ,.windows contains basic/older drivers ,,,after test switch sata controller -install last
RST — get boot or not «ssd compatibility» when get loop or similar —set back AHCI
after test install last AHCI or RST — according to the sata controller «best using only windows device manager» update
…need only drivers ,,not full package + app ..from device manager —install only correct drivers
all important best backup ,,any change is risk for lost all data
this best install /setup when installing windows ,,not after ,.test finding correct configuration
data lost is possitible !
Deleted member 663924
Guest
-
#14
how to install windows ?? windows creation tool + usb + uefi bios ?? direct to SSD ?
-
#15
cannot boot to windows after change AHCI to RST. so I set back to AHCI.
I have reinstall windows many times, but the message still shows.
Deleted member 663924
Guest
-
#16
cannot boot to windows after change AHCI to RST. so I set back to AHCI.
I have reinstall windows many times, but the message still shows.
check PM faster help
Если вы при загрузке системы видите сообщение Checking Media Presence, скорее всего вы попали куда нужно. Очередная короткая инструкция по разрешению проблем загрузок Windows от WiFiGid. Минимум воды, максимум пользы и дельных советов.
Если вы разрешили эту проблему как-то по-другому, предлагаю вам описать свое решение в комментариях к этой статье. Так вы сможете помочь многим другим людям, которые прямо сейчас в панике ищут свое решение.
Статья не для полных чайников. Минимальный уровень – опытный пользователь ПК. Для фильтрации плохих действий со стороны откровенных новичков некоторые понятные всем моменты буду опускать.
Содержание
- Идентификация
- Шаг 1 – Приоритет загрузки
- Шаг 2 – Отключаем сетевые загрузки
- Шаг 3 – Проверяем носители (диски)
- Шаг 4 – Чудоклавиша
- Шаг 5 – Legacy
- Шаг 6 – Восстановление загрузчика
- Задать вопрос автору статьи
Идентификация
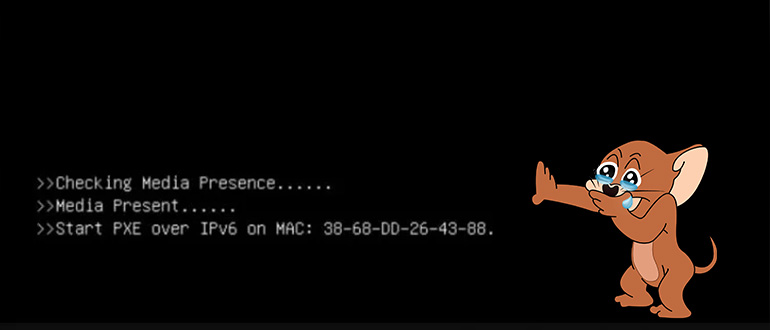
В самом верху вашего сообщения об ошибке вы получаете сообщение о том, что идет проверка носителя загрузки:
Checking Media Presence
И тут многие блогеры сразу же пытаются с головой лезть в разбор возможных решений. Но на моем опыте, это лишь верхушка айсберга. Все самое интересное написано под этим сообщением. И обычно вы можете встретить два варианта:
- Media present. Start PXW Over IPv4. Носитель найден (на самом деле не найден) и система пытается загрузить вашу Windows откуда-то из сети. Разумеется, ничего не получается. Очень часто проявляется на ноутбуках Lenovo.
- No Media Present. Носители с загрузчиком Windows вообще не найдены, система не знает где их искать. А вот это уже чаще всплывает на буках от MSI.
Итак, основная суть – системе не удается загрузить Windows, потому что просто неизвестно где она лежит. И чем-то это уже напоминает нам ошибку BOOTMGR is missing, но немного с другой стороны.
Ну и самое неприятное: единого решения нет, поэтому мне придется перебрать все варианты, которые удалось встретить. Авось что-то из этого списка вам и подойдет. Именно поэтому я и не рекомендую читать подобные статьи откровенным новичкам, а то есть риск доломать все до конца.
Пробегаемся по шагам. После каждого пытаемся загрузиться. Если получилось – радуемся. Если нет – пробуем самостоятельно найти верный вариант и пишем его в комментариях.
Шаг 1 – Приоритет загрузки
Начнем с простой гипотезы – почему-то в BIOS в приоритетах загрузки у вас слетели все варианты. Может быть села батарейка, а биос глюкнула, а может быть просто пришло кривое обновление и все это автоматом залилось (встречается на некоторых ноутбуках).
- Заходим в BIOS (обычно клавиша помогает клавиша Delete при загрузке).
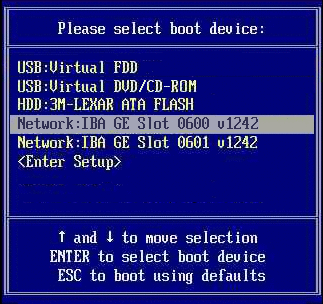
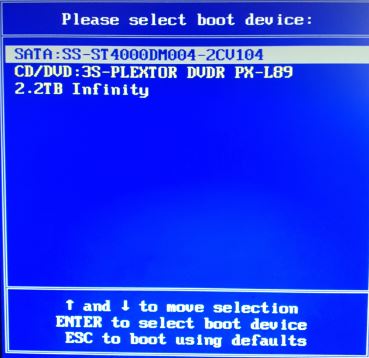
- Находим раздел, который обычно назывался как BOOT MENU. Тут нужно проявить творчество, т.к. на некоторых UEFI приоритет загрузки порой нарисован совсем неочевидно. Главное – нужно найти список устройств в виде очереди (1, 2, 3…), по которому система и будет искать загрузчик Windows.
- В этом разделе на первое место ставим свой диск с операционной системой.
- Не забываем сохранить настройки BIOS (обычно F10).
А еще можно просто попробовать сбросить биос на заводские настройки. Это часто спасает не только от неверного приоритета, но и от прочих странных настроек вроде включенной сетевой загрузки или включенного RAID. Но после сброса все равно проверьте приоритеты!!!
Шаг 2 – Отключаем сетевые загрузки
Особенно актуально для ветки ошибки «Start PXW Over IPv4». Если ваша система пытается найти загрузчик где-то в сети, то, разумеется, там оно ничего не найдет. Поэтому как базовая рекомендация – отключить в BIOS все варианты загрузок по сети.
- Заходим в BIOS. Это вы уже умеете.
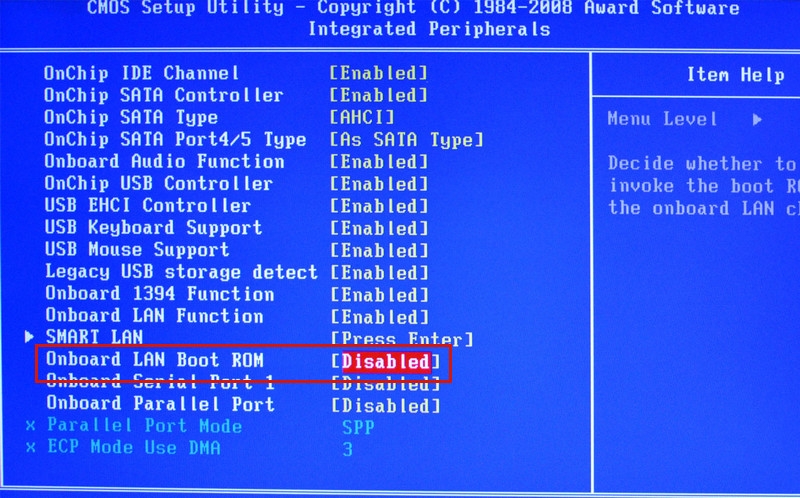
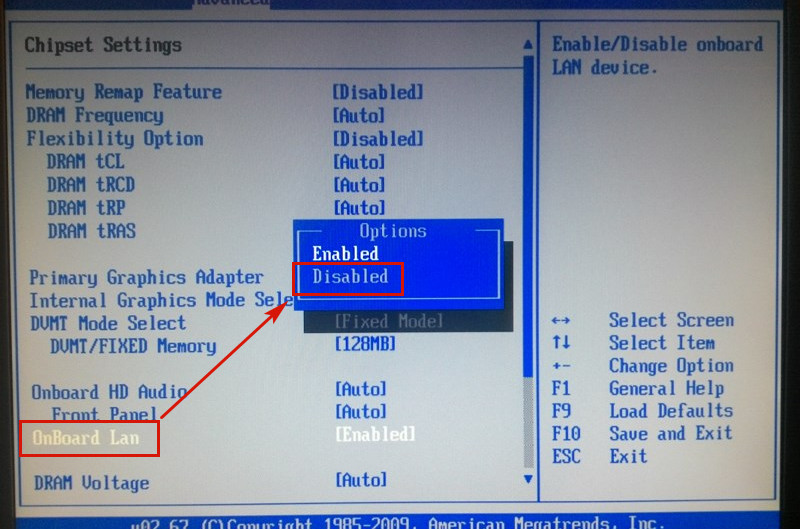
- Начинаем смотреть все разделы меню (особенно Advanced) и ищем там что-то связанно с сетями: PXEBoot, PME Event Wake UP, Wake on LAN, Boot to Network, Onboard LAN Boot ROM. Отключаем все (переводим в «Off» или «Disabled»).
- Пробуем загрузиться. На этот раз сообщение Checking Media Presence может сохраниться, но вот под ним сообщение скорее всего изменится. Нужно прочитать его.
А если вдруг что-то не получилось, всегда можно зайти в BIOS и загрузить дефолтные настройки (пункт «Load System Defaults»).
Шаг 3 – Проверяем носители (диски)
Смотрите, если у нас проблема связана с поиском носителей, а точно ли они доступны? Оставляю несколько мыслей:
- На стартовой странице BIOS обычно отображается все подключенное железо, включая и ваши диски. Там они есть?
- Если нет – дело не очень хорошее. Вскрываем корпус и проверяем подключение всех дисков. По возможности перекидываем другие кабели питания и SATA (ну если диск не M.2). Задача – добиться видимости диска в биосе.
- Если есть возможность, классный вариант – перекинуть диск в другую систему. А там он будет виден?
Т.е. нужно, чтобы система видела наш диск. А если он вдруг накрылся, никакие настройки уже не помогут.
Шаг 4 – Чудоклавиша
Встретил интересный вариант у человека на ноутбуке MSI:
Просто несколько раз нужно нажать клавишу Delete, и все заработает.
Многим действительно помогает. Просто же? Можно и попробовать, а вдруг поможет.
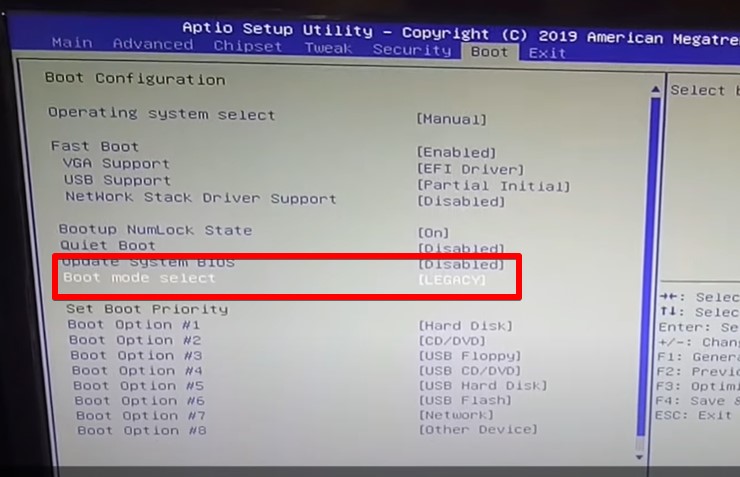
Шаг 5 – Legacy
Еще видел случай, что новый диск не поддерживается системой. Тогда можно перевести режим загрузки в UEFI на Legacy (а можно попробовать и наоборот).
- Открываете BIOS.
- Ищете пункт меню похожий на Boot Mode – и там обычно два варианта (UEFI и Legacy или какая-то похожая комбинация). Переключаете на противоположное и пробуете.
Шаг 6 – Восстановление загрузчика
Тут встретил советы, что еще можно попробовать восстановить загрузчик Windows. Но лично в моей голове пока это не укладывается, так как думал, что такая ошибка проявляется только из-за проблемы поиска носителя, а не загрузчика на нем. Т.е. в нормально режиме вам даже не получится без внешней флешки запустить консоль восстановления. Но если вдруг кому-то понадобится, оставляю ссылку на нашу статью по восстановлению загрузчика.
Что бы не стало причиной той или иной программной ошибки в Windows, её можно устранить путём восстановления конфигурации, файлов, в крайнем случае переустановкой самой операционной системы. Другое дело, когда ошибка возникает на аппаратном уровне или на уровне базовой системы ввода-вывода, такие ошибки обычно всегда приводят к появлению синего экрана смерти или чёрного экрана с малопонятными сообщениями, например, Checking Media Presence с отсылкой на интернет-протокол IPv4 («start pxe over IPv6 или IPv4».
Сразу нужно сказать, что данная ошибка встречается нечасто, и именно это обстоятельство затрудняет поиск её решения. В действительности же решение этой проблемы лежит на поверхности, всё что вам нужно, это изменить настройки BIOS, отвечающие за порядок загрузки. Дело в том, что помимо загрузки операционной системы с внутреннего жёсткого диска, DVD или флешки, система может загружаться из локальной сети. Такой способ загрузки иногда используется в коммерческих организациях, предпочитающих экономить на жёстких дисках.
В этом случае клиентские компьютеры не оснащаются жёсткими дисками, операционная система на таких ПК грузится в оперативную память непосредственно с главного сервера. Естественно, для этого обслуживающий локальную сеть администратор выставляет в BIOS соответствующие настройки, которые пользователь обычного домашнего компьютера может изменить непреднамеренно, например, экспериментируя с функцией Wake-on-Lan, предназначенной для пробуждения компьютера по сети.
Если при активной оной опции компьютер не сможет загрузиться с раздела с операционной системой, пользователь получит сообщение «Checking Media Presence. Start PXE over IPv4 и далее по списку). Неполадка также может быть вызвана сбросом BIOS до заводских настроек, манипуляциями с приоритетом загрузки. Во всяком случае при появлении на экране указанного сообщения необходимо проверить порядок загрузки с локальных и сетевых ресурсов.
Первое, что нужно сделать при появлении сообщения Checking Media Presence, это зайти в BIOS, найти опцию Wake on LAN и выставить для неё значение Off, No или Disabled. В зависимости от типа в версии BIOS, располагаться она может в разделе Advanced или Integrated Peripherals. Ищем также и отключаем опции PXE Boot, PME Event Wake Up, Boot to Network, Onboard LAN Boot ROM или с похожим по смыслу названием, в котором присутствует слово «LAN».
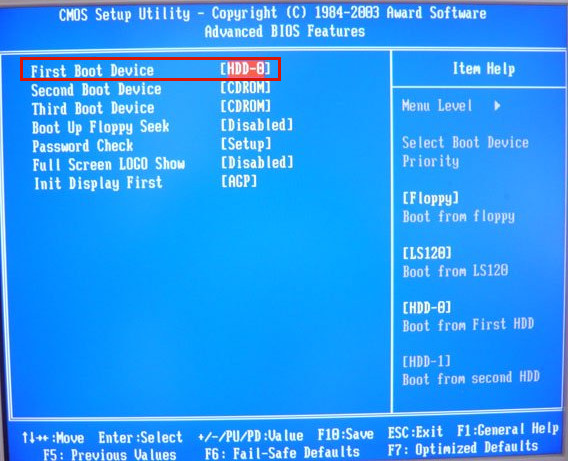
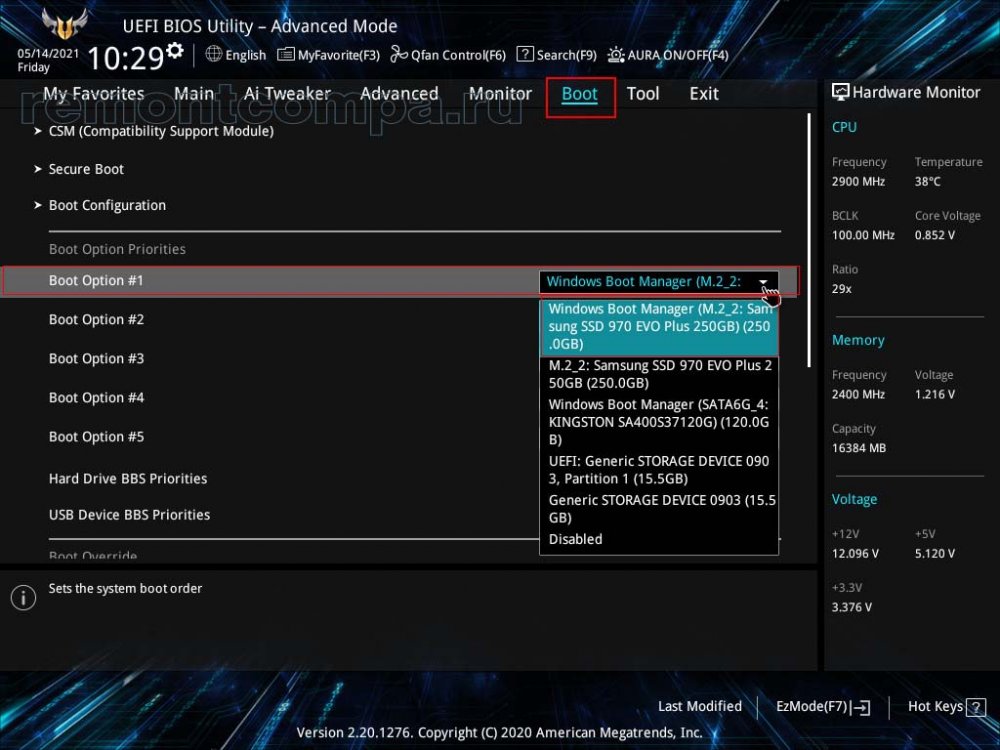
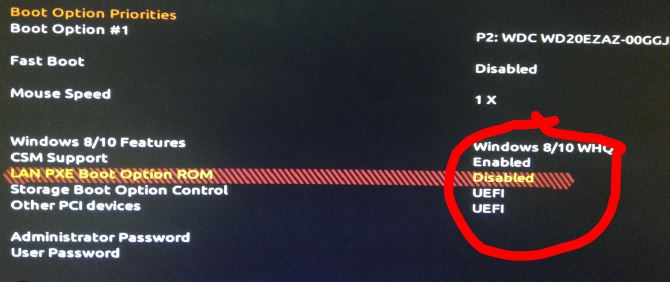
 Затем нужно зайти в раздел Boot → Boot Device Priority и убедиться, что первым загружаемым устройством выставлен жёсткий диск с операционной системой. Опять же в зависимости от версии BIOS название настройки может немного отличаться, например, Boot Priority Order, Boot Option Priority или Boot Priority; в AMI BIOS нужная вам настройка будет находиться в разделе Advanced BIOS Features и называться First Boot Device.
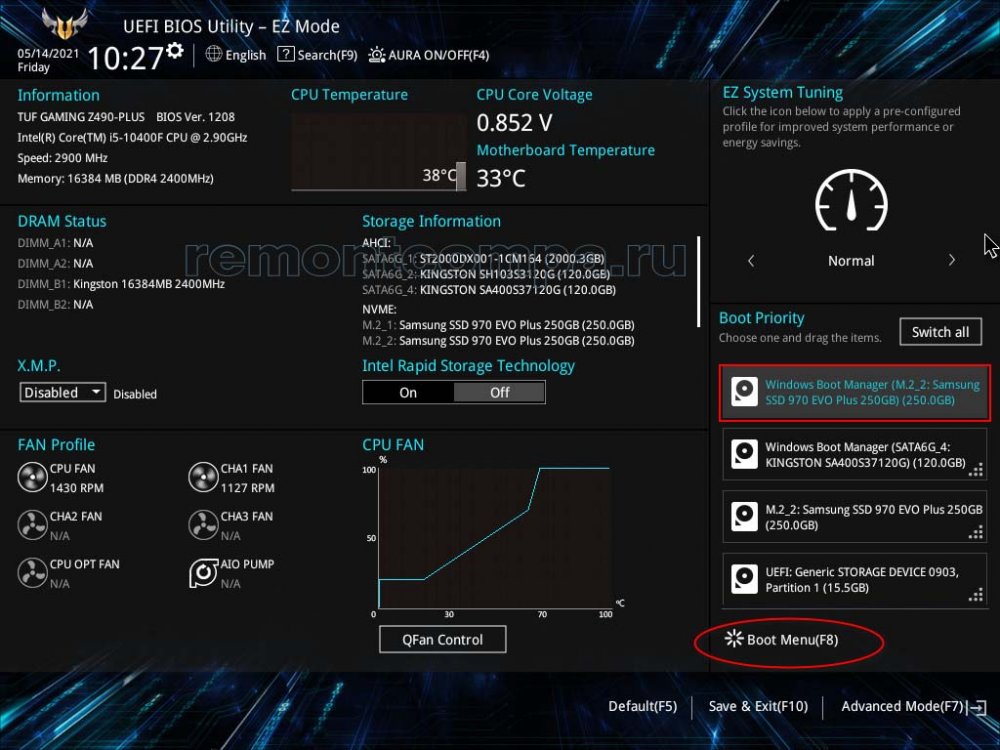
 Проще всего управление приоритетом загрузки реализовано в современных версиях BIOS UEFI с их графическим интерфейсом. Раздел настройки порядка загрузки в UEFI обычно на виду, смотрите пример ниже. Если вместо диска с ОС выставлено любое иное устройство, меняем его на жёсткий диск и сохраняем настройки.

В крайнем случае вы можете сбросить настройки BIOS к заводским, вытащив на 10-15 минут питающую CMOS-память компьютера батарейку, но поступать мы так не рекомендуем, всё же лучше будет внимательно проверить сетевые настройки и порядок загрузки носителей.

После отключения указанных выше сетевых настроек и изменения порядка загрузки Windows должна загрузиться в обычном режиме, во всяком случае сообщение Checking Media Presence больше не должно появляться. Если Windows не загружается, и вы видите на экране другое сообщение, следует проверить состояние кабелей, контактов, жёсткого диска и загрузчика операционной системы, в зависимости от характера и содержания сообщения об ошибке.
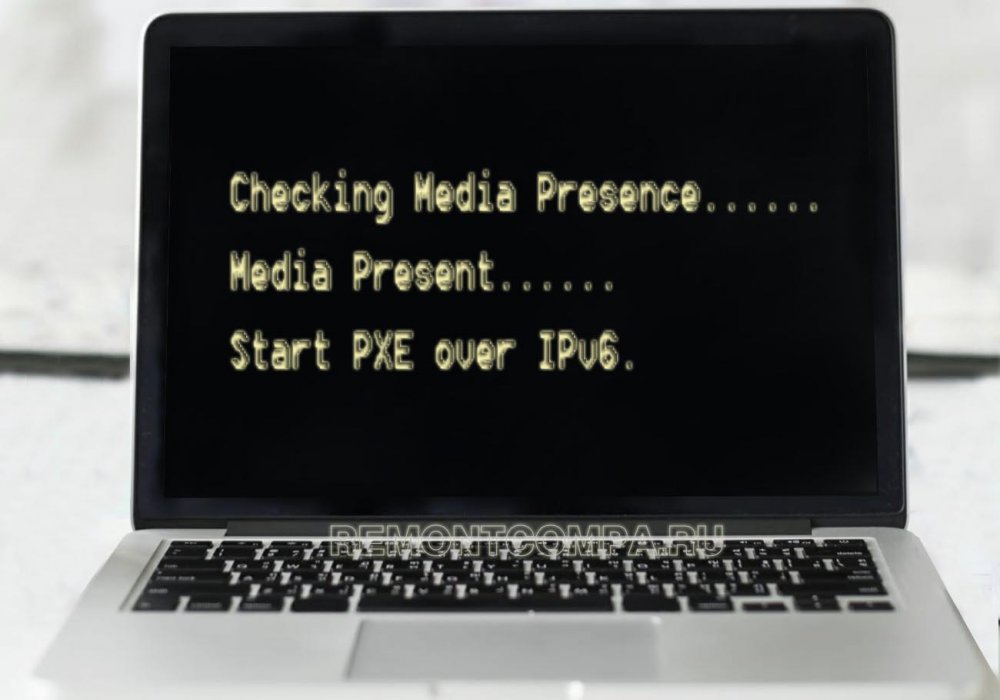
It’s common to see a “checking media presence” error as soon as you turn on your PC. Well, there are several reasons behind this error, the most common one is when your PC tries to boot up from a source that is unavailable at the time.
Usually, this type of error occurs when your computer tries to boot from your local network instead of your storage device. One of the most reported errors is checking the media presence MSI that occurs on MSI desktops or laptop PCs. Here in this guide, we will lay out some of the most working methods to get rid of this error.
But before we start our troubleshooting process, it’s good to learn about this error first, what are causes behind this error are, and how we can adopt the right strategies to prevent this error in the future.
What Does Checking Media Presence Error Means?
Let’s start from the basics at this stage. As you know there are different types of options to boot your computer. You can boot through a hard drive, USB, or local network, etc. Checking media presence error occurs when the computer cannot detect the bootable device or the boot file is missing from your drive.
At the error screen, you would come across the “Media Present” or “No Media Present” Usually, this booting error would cause the wrong boot order on the PC and may also corrupt the system files.
In most cases, you’ll see a series of commands on your screen as shown in the image below:
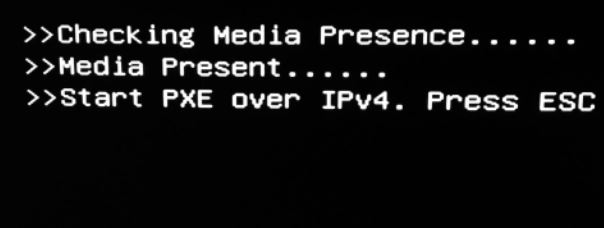
As you can see in the image above, there is a line with “PXE over IPv4” which shows that your computer is trying to boot from an internet connection. So instead of trying to boot up from a local hard drive, the system is trying to boot up from a local network.
In our case, we want our system to boot from our local hard drive, and not from the local network. So, we have to fix this issue by following some of the proven methods.
How to Fix Checking Media Presence Error Windows 10/8/7
There are so many options available to boot from, and this error occurs when the computer is trying to boot from the wrong device. So, you have to set the boot priority for each device connected to your computer.
If the hard drive is on top of the boot order, the computer will try to boot first from the hard drive and then it will move on to another option if it doesn’t find any operating system. It’s simple to upgrade the BIOS with just a few steps:
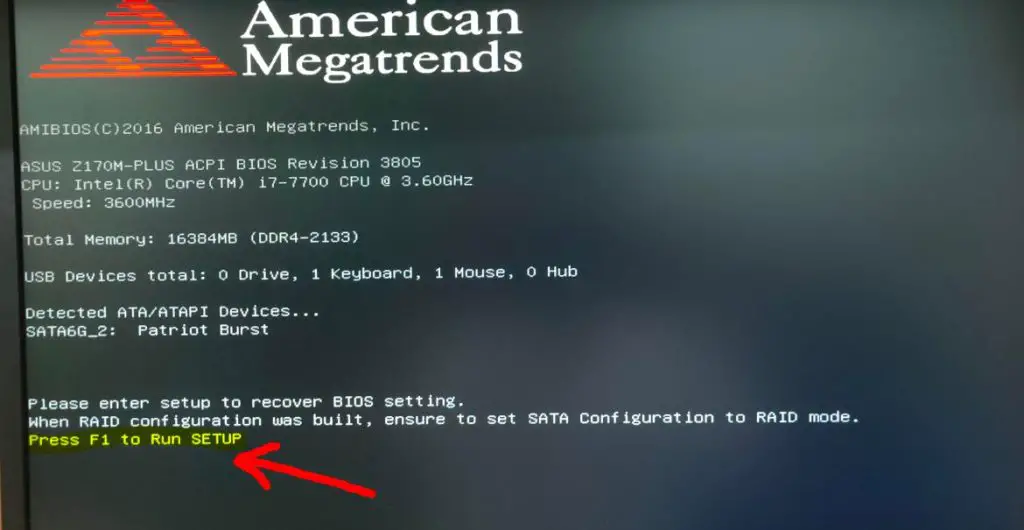
- Press the BIOS setup button during the boot-up process.
- Go to the boot menu tab to see the bootable devices and their order.
- Keep the drive you want to boot at the top
- Save the settings and exit
- Please restart the computer to check whether it works or not
- Note that every motherboard brand has a different interface for the boot priority section.
2- Recovering Boot Files
If rearranging the boot menu won’t work for you, there this could be due to some missing or corrupt boot files. One way is to recover your lost file using the Windows Repair console. Another way around this is to reinstall your Windows 10 from scratch.
Go to the boot menu during the startup process by pressing Esc, F2, F10, or F12 keys, and there will be a list of bootable devices that appear in front of you. All you need to do is select the CD or USB as your first priority to install a fresh copy of Windows.
3- Checking the Health of Your Drive
If the steps mentioned above won’t work for you in troubleshooting the pc checking media presence error, the system may have some serious problems. Just check whether your hard drive or SSD is connected correctly to your CPU or not.
Disconnect and reconnect the hard drive. Dust residing inside the hard drive connectors could be causing the hard drive or SSD to disconnect over time. Just clean it with a soft brush.
If you are using an old hard drive, then it may be about to fail sooner or later. The hard drive comprises spindles, and each spindle is a collection of disks. When it faces a slight impact, it could result in the failure of a hard drive.
It’s better to copy your important data from your hard drive and move it to an SDD. To be honest, SSDs are cheaper now and are highly durable as compared to HDDs as they are no mechanical parts inside an SSD.
4- Disable Network Boot
If the problem is still there aren’t solved, you should disable the network boot in the BIOS setup. All you need to do is to follow these steps:
- Enter into your BIOS.
- Go to Security Settings, here you will see an option for Secure Boot. Disable this option.
- After disabling Secure Boot, change UEFI mode to Legacy
- Now, look for Network Boot in BIOS settings, and disable it.
- Apply the settings and restart your computer.
5- Disabling Wake on LAN (WoL)
In order to disable Wake on LAN in BIOS, here’s what you need to do:
- Restart your computer and press F2, Del, Esc, or F10 keys to enter into BIOS. Once you are inside the BIOS menu, look for power management, network settings, or advanced settings. This will depend upon your motherboard manufacturer, so you have to find the right one here.
- Once you are inside the power management or network menu, look for Wake-on-LAN or Remote Wakeup. You will find different options under them like Enabled, Disabled, or Auto.
- Now select the “Disabled” option and then Save & Exit BIOS settings, this will prevent your system from turning on when there’s a Wake on LAN signal.
Alternatively, you can also disable the Wake-on-Lan setting by navigating to your Device Manager and then selecting your Network Adapter. Right-click on the Network Adapter that you are using to connect to your Wi-Fi and then click on Properties.
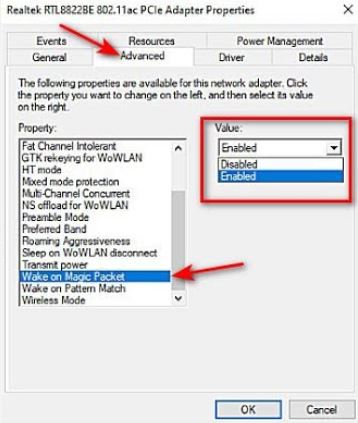
Once the Properties menu opens, you can navigate to Advanced and then scroll down to find Wake on Magic Packet option. Select this option and then click on “Disabled“. Click OK and then Save settings.
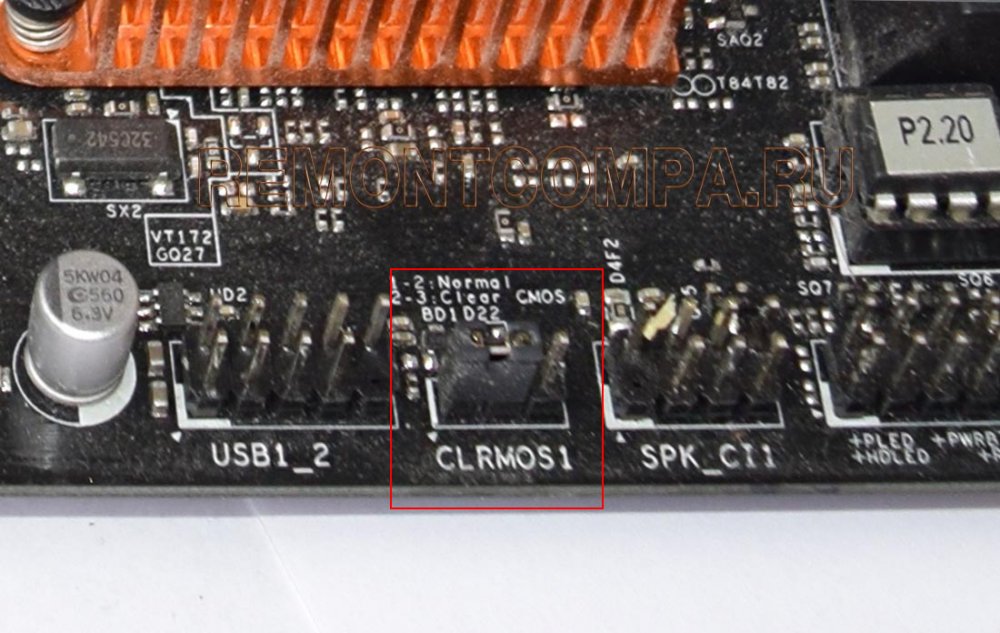
6- Resetting the CMOS
You can simply reset the CMOS to reload all the default BIOS settings to get rid of checking media presence on startup error. In order to reset CMOS, you will need to locate the CMOS battery present on your motherboard.
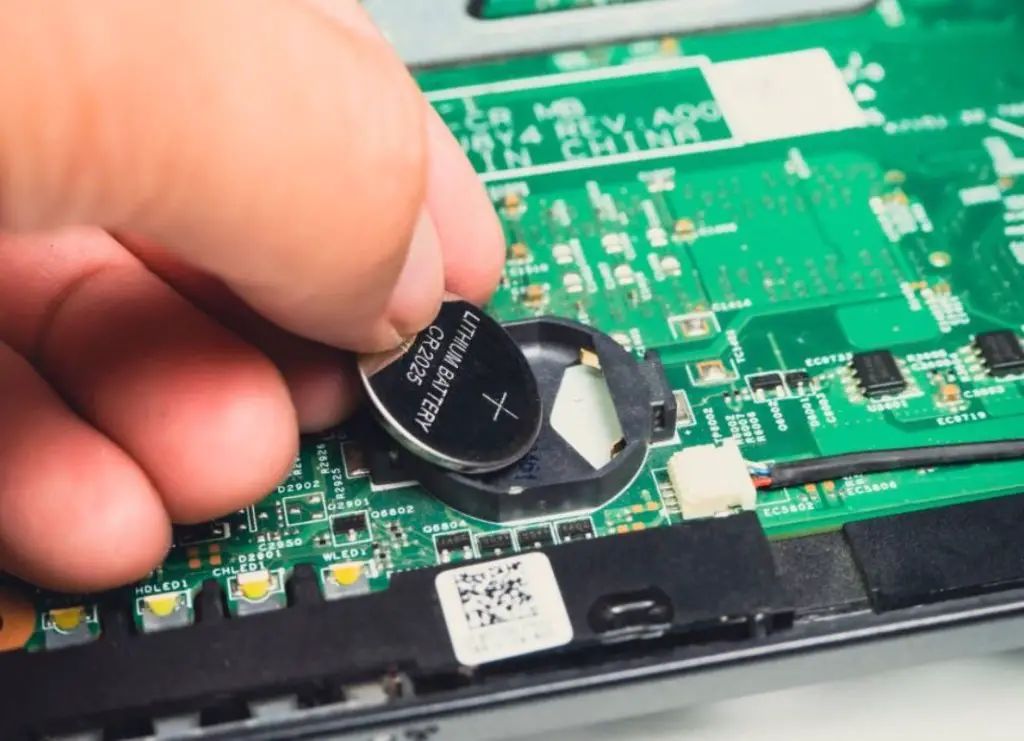
Once you find the CMOS battery on your mobo, gently remove it and leave it outside for 10 minutes or so. Afterward, reinsert the battery back into the slot and turn on your computer.
7- Update BIOS
If you are getting checking media fail in Windows 10 or no media present error, then you have to update the computer’s BIOS. Updating your BIOS is essential because this error causes severe damage to the system. To update the BIOS, you need to follow:
- Back up data as errors in updating can cause permanent damage to data
- Don’t turn off and restart the computer during updates
- Keep your computer in a stable environment to prevent power breakdown
- Update after connecting the laptop to the charger and don’t unplug during the update
8- Get Professional Assistance
If none of the above methods is working for you to fix the media presence error or if you don’t have enough knowledge for troubleshooting PC hardware, then I’ll recommend you to get technical assistance from your local computer shop.
You can also seek help by contacting customer support staff if your PC comes under warranty.
How to Get into BIOS in Windows 10?
If you want to configure the BIOS settings in Windows 10, then you need to follow:
- Go to Settings
- Click on Update and Security
- Click on the Recovery button in the side menu
- Click on Restart Now Button in the Advanced startup
- After restart, a blue screen appears having a different option; just click on troubleshoot
- Select Advanced options
What is a BIOS setup?
BIOS is an essential feature that is pre-installed on your motherboard and can be used to control different types of hardware connected to your PC. It’s like the backend where you manually control different peripherals installed on your motherboard.
What is the difference between BIOS and UEFI?
BIOS is a bit of low-level code that is stored in non-volatile memory. Computer systems use it to manage hardware and load a particular OS over another operating system.
UEFI stands for universal extensible firmware interface, which has become standard for computer systems that have installed the latest versions. It offers support for advanced features like GUI and even mouse support.
How to Access The BIOS?
BIOS is usually accessed with the help of the BIOS setup utility. It can be accessed in several ways, depending on the computer and the motherboard. You can follow the below steps to access the BIOS setup utility:
- Restart the computer where you can switch on the computer system, and you need to be aware of getting access to BIOS, which is free from all types of OS. It is because the BIOS setup is part of the motherboard of the computer system/
- The message would vary from one computer to another system. It contains the keys that the user requires to press entering BIOS. There would be an option come such as Entering Setup that would appear in starting few seconds to turn on the computer system.
- You can quickly enter the keys as given by the last message to access BIOS. You must enter the BIOS key for accessing it several times for entering into BIOS. Don’t hold down the key or press it many times. Restart the computer system and try to get access.
Final Thoughts
We hope you now have enough knowledge to fix checking media presence or without media presence. Troubleshooting media presence error Lenovo/MSI/HP machines is very simple, you can even get rid of this error by rearranging the boot menu in your BIOS by selecting your hard drive as “first boot priority”.
If you are installing Windows and come up with a checking media presence error, then you have to set your CD-ROM/DVD or USB as your first boot priority in BIOS. Also, keep in mind that if you end up with no media present, then this could be due to the fact that your system was unable to find any device to boot from.
FAQs
How you can fix media presence errors in HP/MSI/Lenovo ThinkCentre PC?
You’ll need to follow the same procedure to get rid of this error. Restart your PC, and once the HP, MSI, or Lenovo logo appears on the screen, press the BIOS button.
The key to enter into BIOS is different for HP, MSI, and Lenovo. However, the most often used keys are F1, F2, or F10.
Once you are inside the BIOS menu, navigate to the Boot option and select the “UEFI Boot”. Now set the Boot Priority to Hard Disk first, and then select “Save & Exit”
How do I fix checking media presence media present start PXE over IPv4?
PXE boot happens when your system tries to boot up from the IPv4-based network. You can easily fix this issue by navigating to your “BIOS” and then selecting the “Security” Tab. Once you are there, select the “Secure Boot” and disable it.
The next step is to head over to the “Legacy Boot” and then disable that as well. Save these settings and then exit the BIOS.
How to fix Windows 11 checking media presence?
Normally, the method that we have used to fix media presence errors on Windows 10 would be applied on Windows 11 as well. As this error occurs before the operating system, it usually has nothing to do with the version of your operating system.

Hi, this is Masab, the Founder of PC Building Lab. I’m a PC enthusiast who loves to share the prior knowledge and experience that I have with computers. Well, troubleshooting computers is in my DNA, what else I could say….

Что значит Checking media presence при включении компьютера?
У некоторых пользователей персональных компьютеров и ноутбуков при включении еще до начала запуска операционной системы на экране отображается сообщение “Checking media presence” в виде надписи белыми буквами на черном фоне. Далее, как правило, следует сообщение “Media present…” и затем “start pxe over ipv6 (ipv4)”.
В данной статье мы расскажем что это значит и как от этих сообщений избавиться.
Что означает?
Данная группа сообщений при включении ПК говорит о том, что в данный момент он пытается загрузиться из сети. Все дело в том, что помимо стандартной загрузки с локального носителя, будь то жесткий диск, оптический накопитель или флешка, существует загрузка из локальной сети. Чаще всего ей пользуются крупные организации, когда требуется создание единой информационной системы. В этом случае на клиентских компьютерах попросту отсутствуют жесткие диски, а операционная система и все рабочие инструменты хранятся централизовано на главном сервере.
В случае начала сетевой загрузки экран компьютера выглядит примерно вот так:

Начало загрузки из сети
Почему активируется загрузка из сети?
Если у вас раньше все прекрасно загружалось и фразы “Checking media presence” при включении не было, а в какой – то момент она появилась, при этом вы ее специально не включали, то на это есть несколько причин.
Сетевая загрузка могла быть активирована при манипуляциях с приоритетами загрузки в BIOS либо из-за сброса его настроек до заводских, например по причине севшей батарейки.
Второй вариант – появление проблем с жестким диском или системным загрузчиком. Даже если первым в очереди загрузки стоит нужный жесткий диск, а опция PXE boot или Wake on lan активированы, то в случае отсутствия возможности загрузки с системного раздела, очередь перейдет к попытке запуститься из сети, о чем будет свидетельствовать вышеописанное сообщение.
Как убрать “Checking media presence”?
Существует несколько вариантов. Первый и самый простой – это проверить приоритет загрузки в BIOS, установив на первое место жесткий диск. Также стоит найти опции PXE boot и Wake on lan и отключить их, переведя в положение Disabled.
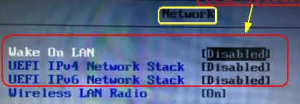
Отключение загрузки из сети

Установка высшего приоритета загрузки жесткому диску в разделе BOOT
Если после этого проблема не ушла и фраза “Checking media presence” отображается все равно, не давая начать загрузку операционной системы, то скорее всего у вас есть проблемы с системным разделом.
В лучшем случае жесткий диск просто отсоединился или с системного раздела слетел загрузчик. В этом случае проверьте надежность соединения кабелей жесткого диска с материнской платой. В ноутбуке просто проверьте надежность установки винчестера в разъеме.
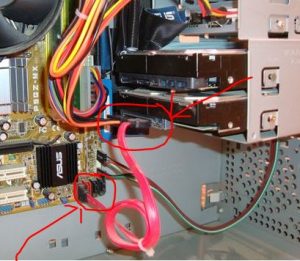
Кабели жесткого диска в компьютере
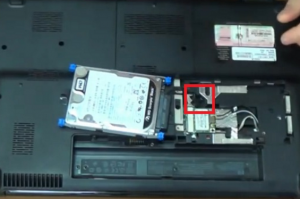
Проверка соединения жесткого диска в ноутбуке
Далее попробуйте переустановить операционную систему.
Если ничего не помогло, то стоит попробовать сбросить настроки BIOS и проверить жеский диск на работоспособность.