![]() Экранные ножницы 2.6 сборка 1566
Экранные ножницы 2.6 сборка 1566
Экранные ножницы — одна из самых простых утилит для быстрого снятия скриншотов с экрана Вашего монитора…
![]() Bandicam 6.2.4.2083
Bandicam 6.2.4.2083
Bandicam — программа для захвата видео и снятия скриншотов в высоком качестве. Имеет простое…
![]() Lightshot 5.5.0.7
Lightshot 5.5.0.7
Lightshot — бесплатная утилита для создания снимков экрана, с возможностью быстро выложить…
![]() oCam Screen Recorder 520.0
oCam Screen Recorder 520.0
oCam Screen Recorder — бесплатное приложение, которое умеет записывать все происходящее на экране…
![]() ShareX 14.1.0
ShareX 14.1.0
ShareX — мощная многофункциональная утилита для снятия скриншотов с экрана монитора с…
![]() FastStone Capture 10.2
FastStone Capture 10.2
FastStone Capture — мощная и многофункциональная программа как для снятия скриншотов экрана, так захвата видео с их последующим редактированием…
This post teaches you how to download Snipping Tool (Snip & Sketch) for Windows 10/11 to use it to take screenshots on your PC. Some top free snipping tools for Windows 10/11 are also provided for your reference. To find solutions for more computer problems, you may visit MiniTool Software official website.
This post introduces the Snipping Tool and offers a Snipping Tool or Snip & Sketch free download guide on Windows 10/11.
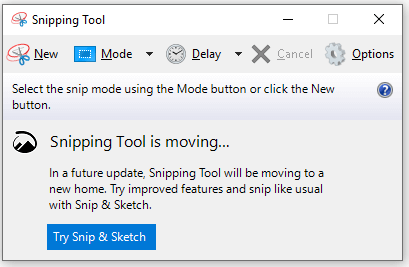
For Microsoft Windows 10 and 11, a free screenshot app named Snipping Tool is included in the system. Snipping Tool is available in Windows Vista and later. You can use this built-in application to easily capture screenshots on your PC.
It can take screenshots of an open window, rectangular area, a free-form area, or the full screen. Windows Snipping Tool also offers basic image editing features to let you edit the screenshot. You can add an annotation to the image or edit it with the colored pens. The capture can be stored as an image file (PNG, JPEG, or GIF).
In some Windows versions, the snipping tool is missing and you may find a replaced tool named Snip & Sketch on your Windows computer.
Windows Snipping Tool comes with the Windows system. You don’t need to download it. Microsoft doesn’t offer a stand-alone Snipping Tool download link. However, it offers a stand-alone download service for Snip & Sketch.
Check how to open Snipping Tool or Snip & Sketch and how to download Snip & Sketch below.
To open Snipping Tool on Windows 10/11, you can press Windows + S to open the Windows Search box, type snipping tool and you will see the Snipping Tool app is in the list. You can click it to quickly launch the Snipping Tool app on your computer. Alternatively, you can also press Windows + Shift + S keyboard shortcut to open it. Then you can choose a capture mode to take screenshots. You can also use the common snipping tool shortcuts to fast take screenshots.
If your computer doesn’t have the Snipping Tool app but has the Snip & Sketch app, you can follow the same operation above to type snip & sketch in the Windows Search box to fast open this free Windows screenshot app.
Snip & Sketch Download for Windows 10/11:
- Open the Microsoft Store app or go to the Microsoft Store website.
- Click the Search icon at the top-right corner and type snip & sketch to search for the app. Choose Snip & Sketch App to open its download page.
- Click the Get button to directly download Snip & Sketch on your Windows 10/1 PC.
The system requirement of Snip & Sketch is: Windows 10 version 17763.0 or higher, Windows 10 version 22000.0 or higher.
If Windows + Shift + S is not working or Snipping Tool is not working on your Windows computer, you can try some alternatives to Snipping Tool (Snip & Sketch) to capture screenshots on Windows 10/11. You may try tools like Snagit, Lightshot, Greenshot, ShareX, PicPick, etc.
Bottom Line
This post introduces Snipping Tool (Snip & Sketch) and offers a snipping tool download guide for Windows 10/11.
To recover deleted or lost files, photos, videos, etc. you can try MiniTool Power Data Recovery.
MiniTool Power Data Recovery is a professional data recovery program for Windows. You can use it to recover any deleted or lost data from Windows computers, USB flash drives, memory cards, external hard drives, SSDs, etc. It helps you tackle various data loss situations and even helps you recover data when the PC won’t boot.
- Topics
- Appx, AppxBundle, UWP, Windows 10
Aplicación de Recorte y Anotación para Windows 10
- Addeddate
- 2021-10-14 00:37:03
- Identifier
- microsoft-snip-sketch-v-10.1907.2471.0
- Scanner
- Internet Archive HTML5 Uploader 1.6.4
plus-circle Add Review
plus-circle Add Review
comment
Reviews
There are no reviews yet. Be the first one to
write a review.
It’s no mystery why you’d want to how to download Snip & Sketch — it’s an incredibly useful tool that lets anyone capture and share what they’re doing on their computer with someone else.
Originally known as Screen Sketch, Snip & Sketch is a free screenshot software tool that you can use to take screenshots of an open window, rectangular areas, freeform areas, or even your entire computer screen.
Snip & Sketch is also incredibly helpful for annotating or adjusting the screenshots and images using a mouse, your finger, or a pen, depending on the device you’re working on.
- The best productivity apps currently available
- Check out the best Windows 10 VPNs
- How to rotate the screen in Windows 10
If this handy tool is something you think could help your work or recreational digital life, then here is how to download Snip and Sketch for free.
How to download Snip & Sketch: Where to download
Snip & Sketch is compatible with a range of devices, but you need to make sure that you download the right app for your device and operating system. The program has come installed in Windows 10 as an included feature since October 2018.
Snip & Sketch is a Microsoft product, meaning that it’s made for Windows devices, and that’s the version will be focusing on in this guide.
However, there are free alternatives to Snip & Sketch that you can get on other devices that do a similar job of letting you capture and edit screenshots. These include:
- Snipping Tool for Android
- Skitch for iOS
- Skitch for macOS
How to download Snip & Sketch for Windows 10
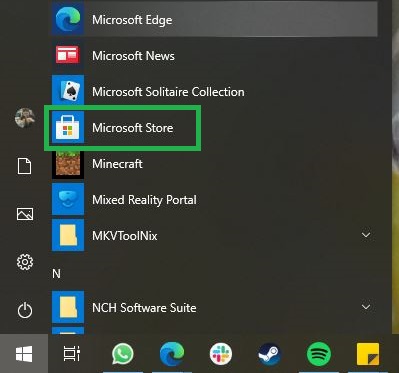
1. Click the Start button in the bottom left-hand corner of the desktop, select “All apps” (the four-line icon near the top on the left), and choose “Microsoft Store” in the Start menu.
Alternatively, simply start typing “Microsoft Store” in the Windows search box and the option should appear before you finish writing it.
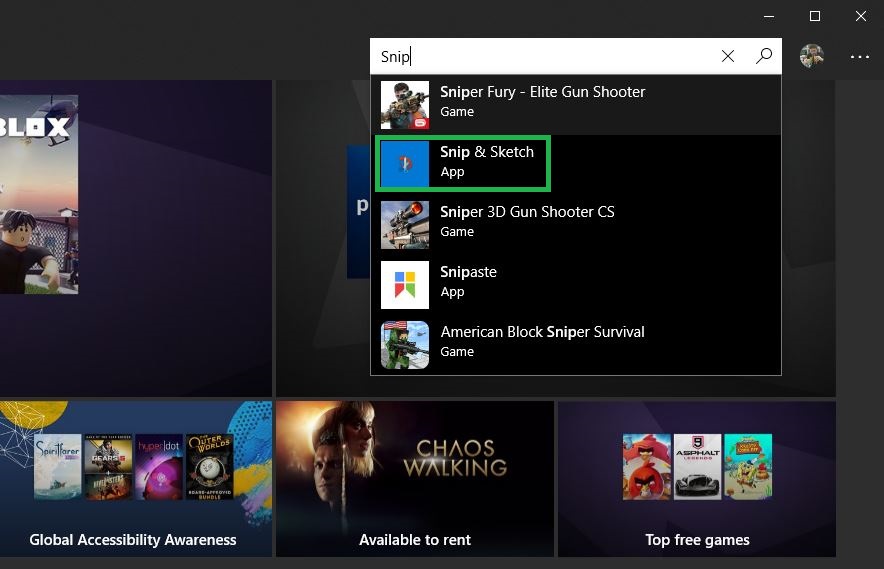
2. Click the Search option in the top right-hand corner of the screen. In the box that appears, type “Snip & Sketch.”
As the picture below shows, the app will appear before you finish your first word. Click to select it.
3. You’ll now be taken to the Snip & Sketch app’s product page. Simply click the big, blue rectangular box labelled “Get.”

4. Your download will begin. When complete, the greyed out box with “Launch” will turn blue, and you can click it to begin.
Alternatively, you can launch the app via the Start Menu or by pressing Win+Shift+S on your keyboard.
How to download Snip & Sketch: What you can do with it
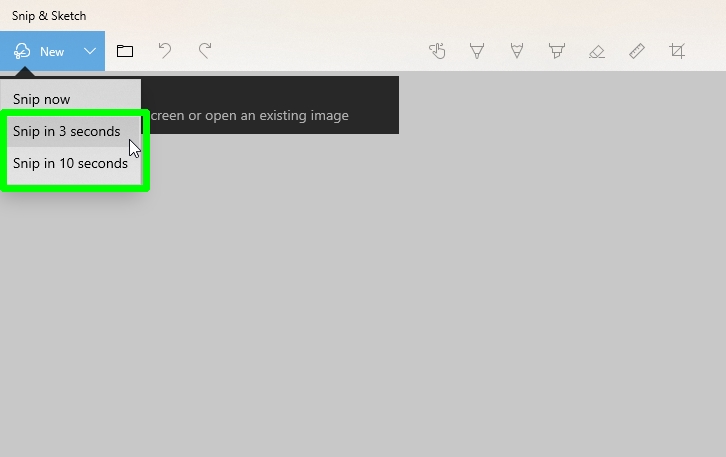
Snip & Sketch is essentially an updated version of the Windows Vista Snipping Tool. It offers a 3-second or 10-second delay when you capture a snip (screenshot), so you can access context menus and objects that disappear after another item is clicked on. You can adjust your delay time by selecting the tool next to the New button and selecting your time.
During the delay, you can click the toolbar at the top of your screen to select a size mode for your screenshot, such as rectangular or freeform, select the area of the screen that you want to capture, and then wait for the delay to finish.
After that point, Snip & Sketch will automatically activate without you having to click it again, and the objects and context menus will not disappear from that point forward.
- More: How to remove the Windows 10 news and weather widget
Instant access to breaking news, the hottest reviews, great deals and helpful tips.
 В осеннем обновлении Windows 10 версии 1809 появился новый инструмент для создания скриншотов экрана или его области и простого редактирования созданного снимка экрана. В разных местах системы этот инструмент называется слегка по-разному: Фрагмент экрана, Фрагмент и набросок, Набросок на фрагменте экрана, но имеется в виду одна и та же утилита.
В этой простой инструкции о том, как сделать скриншот Windows 10 с помощью новой функции, которая в будущем должна будет заменить собой встроенную утилиту «Ножницы». Остальные способы для создания снимков экрана продолжают работать так же, как и раньше: Как создать скриншот Windows 10.
Как запустить «Фрагмент и набросок»
Я нашел 5 способов запустить создание скриншотов с помощью «Фрагмент экрана», не уверен, что все они пригодятся вам, но поделюсь:
- Использовать горячие клавиши Win + Shift + S (Win — это клавиша с эмблемой Windows).
- В меню пуск или в поиске на панели задач найти приложение «Фрагмент и набросок» и запустить его.

- Запустить пункт «Фрагмент экрана» в области уведомлений Windows (может отсутствовать там по умолчанию).

- Запустить стандартное приложение «Ножницы», а уже из него — «Набросок на фрагменте экрана».

Также есть возможность назначить запуск утилиты на клавишу Print Screen: для этого зайдите в Параметры — Специальные возможности — Клавиатура.
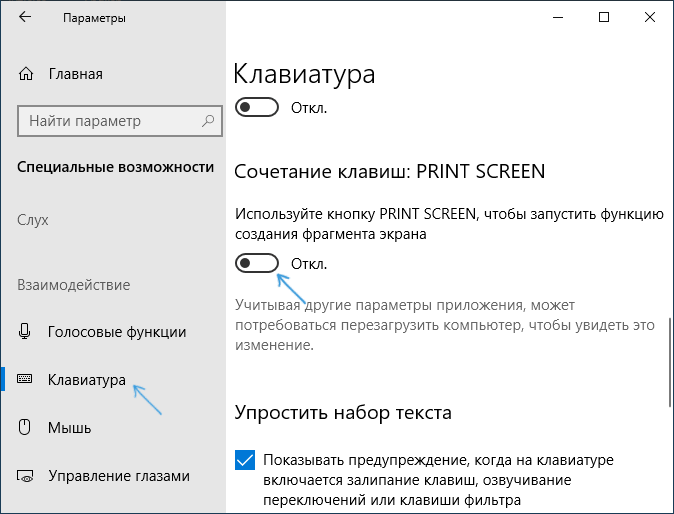
Включите пункт «Используйте кнопку Print Screen, чтобы запустить функцию создания фрагмента экрана».
Создание снимка экрана
Если запускать утилиту из меню Пуск, поиска или из «Ножницы», откроется редактор созданных скриншотов (где нужно нажать «Создать» для того, чтобы сделать снимок экрана), если же использовать остальные способы — сразу откроется создание скриншотов, работают они слегка отличающимся образом (будет отличаться второй шаг):
- Вверху экрана вы увидите три кнопки: для создания снимка прямоугольной области экрана, фрагмента экрана произвольной формы или скриншота всего экрана Windows 10 (четвертая кнопка — для выхода из инструмента). Нажмите по нужной кнопке и, если требуется выберите нужную область экрана.

- Если вы запускали создание скриншота в уже запущенном приложении «Фрагмент и набросок», вновь созданный снимок откроется в нём. Если с помощью горячих клавиш или из области уведомлений, скриншот будет помещен в буфер обмена с возможностью вставить в любую программу, а также появится уведомление, по нажатию на которых откроется «Фрагмент экрана» с этим изображением.


В приложении «Фрагмент и набросок» вы можете добавить надписи на созданный скриншот, удалить что-то с изображения, обрезать его, сохранить его на компьютер.
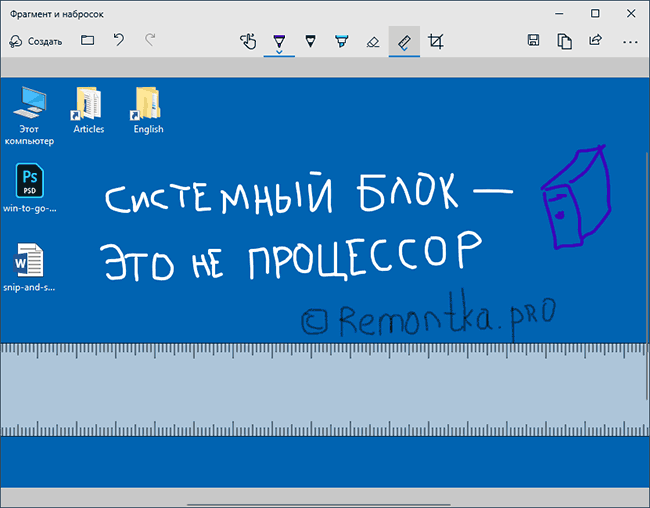
Здесь же присутствуют возможности для копирования отредактированного изображения в буфер обмена и стандартная для приложений Windows 10 кнопка «Поделиться», позволяющая отправить его через поддерживаемые приложения на компьютере.
Не берусь оценить, насколько новая возможность удобна, но, думаю, для начинающего пользователя будет полезна: большинство функций, которые могут потребоваться, присутствуют (кроме, разве что создания скриншота по таймеру, эту возможность вы можете найти в утилите «Ножницы»).