After months of beta testing and bug squashing, the public build of Windows 11 has been released for the general public. It is currently being offered as a free upgrade to all Windows 10 users with capable hardware, meaning a sizable chunk is being left out of the update cycle. Most of it is down to Windows 11’s long list of requirements, which includes TPM 2.0.
Today, however, we are not talking about how you could disable TPM and other requirements to get Windows 11; you can already check that out by clicking on this link. Here, we will talk about what happens when you try to disable TPM and Secure Boot after installing Windows 11 on your PC. Now, without further ado, let us get to it!
Related: How to Install and Use WSA Toolbox on Windows 11 to run Android apps

As you may know, Windows 11 requires your PC to have a Trusted Module Platform or TPM 2.0. Without it, your computer is deemed unfit to run the latest version of Windows. And although it is annoying to make the update unavailable to a large sector, we cannot blame Microsoft for making TPM 2.0 one of the main prerequisites for running Windows 11.
TPM, which acts as an added layer of protection, makes sure no potential malware gets to access sensitive information, including your login details, encryption keys, and more. TPM comes in three forms. It can be soldered to your motherboard. It can be a physical chip that you stick to your motherboard. And finally, it can be a soft, firmware implementation of the TPM architecture integrated into your processor. All three implementations have the same end product.
While TPM is more of a hardware component, Secure Boot is cooked into the UEFI firmware itself. So, as long as you have UEFI up and running, Secure Boot would continue to prevent unauthorized hardware from interfering while booting your system. Secure Boot can use TPM but it does not require it. So, even if you do not have TPM, you can use Secure Boot on Windows 11.
Can you disable TPM and Secure Boot on Windows 11?
Yes, you can disable TPM and Secure Boot after installing Windows 11. You will have to go into UEFI and turn Secure Boot and TPM off.
As of now, a few Windows 11 features require you to have them turned on at all times. You will lose out on these features and face bugs in case you decide to disable TPM and Secure Boot. Here are some known apps, games, and Windows 11 features that depend on Secure Boot and TPM.
- Windows Hello Sign-in Features
- Ability to run certain VMs
- Windows Subsystem For Android and consequentially all Android Apps
- Future games and secure apps with anti-cheat or tamper utilities: Such apps and utilities are expected to take full advantage of this hard requirement as seen by Valorant’s Vanguard lately.
- Bitlocker
- Other encryption tools, security software, admin utilities, and remote management systems.
- Some games (Valorant, for example)
What happens after you disable TPM and Secure Boot on Windows 11?
Generally, disabling TPM and Secure Boot on Windows 11 will not do you any harm in day-to-day tasks. However, if you had Bitlocker enabled, you will have to enter your recovery keys every time your computer boots up. Additionally, Windows Hello — biometrics-based authentication feature for Windows 11 — will stop working when you disable TPM and Secure Boot on Windows 11.
Here is a complete list of drawbacks that you face when disabling TPM and Secure Boot on Windows 11.
1. No Windows Hello Sign in

If you were using this before disabling TPM and Secure Boot, then you won’t be able to log in to your PC. You will need to disable Windows Hello Sign in first and then disable TPM and Secure Boot on your PC.
2. Incompatibility with upcoming and competitive games

Games that are highly competitive and employ dedicated software to prevent cheating are expected to take full advantage of the strict TPM and Secure Boot requirements. You will lose the ability to play such games on your PC until you enable Secure Boot and TPM. Case in point, the issues faced by the Valorant game’s players.
3. Bitlocker
If you disable TPM and Secure Boot with Bitlocker enabled on a drive, then you will need to manually decrypt the same using your key after each boot.
4. Ineligible for Windows Subsystem for Android
WSA is another VM that can be installed directly within Windows to run Android apps much like Linux’s WSL which was introduced a few years ago. Not only does WSA have hard requirements for TPM 2.0 and Secure Boot, but it also needs a higher clock processor, at least 8GB of RAM, and an SSD on your system to run properly. If you were looking to enjoy Android apps on your Windows 11 system, then you should avoid disabling TPM 2.0 and Secure Boot on your system.
5. Windows Updates issues
While there is very little concrete information on the same, Microsoft’s release notes make it seem that having TPM disabled will cause you to lose out on Feature and Cumulative updates. Subsequently having Secure Boot disabled will cause you to lose out on regular security updates and definitions. If you wish to keep your system updated to the latest version for maximum security and privacy then it is recommended that you do not disable TPM and Secure Boot on your system.
This is not a complete list of drawbacks when disabling TPM and Secure Boot. Windows 11 is fairly new and we have no word on what apps will be taking advantage of these security features. As time passes and we get to 2022, we could see a whole batch of new apps and games with a hard requirement for TPM and Secure Boot.
Will automatic updates get disabled after you turn off TPM and Secure Boot?
![]()
Microsoft made a big deal about TPM and Secure Boot before the release of Windows 11, making it impossible for Windows 10 users to upgrade to the latest OS the official way. So, it makes sense to have some consequence of disabling TPM and Secure Boot after installing Windows 11. That comes in the form of Windows Updates.
If you turn off TPM after Windows 11, you will stop receiving automatic Windows Updates. However, given how unpredictable Windows 11 updates are, it might not be the worst idea to turn off TPM and consequent auto-updates. Just make sure you are on a relatively bug-free version before disabling TPM.
RELATED
- Installing Windows 11 on Unsupported Hardware: How to Remove Appraiserres.dll to Bypass Requirements When Using Setup
- Android Apps on Windows 11 Dev Channel: How to Install Windows Subsystem for Android Manually With Msixbundle
- Unable to Start Windows Subsystem for Android: How to Fix ‘Virtualization Not Enabled’ Error on Windows 11
Компания Microsoft, рассказала об официальном обходном пути для установки Windows 11 без TPM 2.0.

Microsoft рекомендует устанавливать Windows 11 только после того, как проверка ПК на совместимость даст вашей системе пропуск, а для этого потребуется поддержка TPM 2.0и наличие процессора из списка совместимых. Но если ваш компьютер не соответствует критериям, Microsoft определила два способа обойти некоторые из этих жестких проверок — хотя возможно, что вам не будут предлагаться вышедшие обновления для Windows,включая критические обновления безопасности. Предупреждаю, что вы действуйте на свой страх и риск.
Первый способ применим к обновлению Windows 10 до новой версии OC.
Сначала вам нужно убедиться, что у вас есть доверенный платформенный модуль и что он включен. Вы можете легко сделать это, нажав кнопку Windows и набрав «Безопасность устройства». В разделе «Безопасность устройства» нажмите «Обработчик безопасности». Этот обход позволит вам обновиться при наличии TPM 1.2, а не требующегося TPM 2.0. Большинство процессоров, выпущенных за последние 7 лет, должны его поддерживать.

Далее, если на вашем компьютере нет TPM 2.0, но есть TPM 1.2, вам нужно будет использовать редактор реестра Windows 10, чтобы создать запись. Перед тем, как попробовать этот путь, я рекомендую вам сделать полную резервную копию.
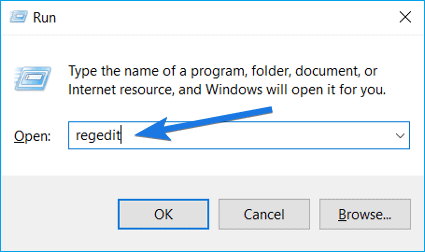
Далее нужно запустить regedit, нажав клавиши Windows + R и набрав regedit.msc. Затем вам нужно перейти в HKEY_LOCAL_MACHINE \ SYSTEM \ Setup \ MoSetup и создать новый 32-битный DWORD и назвать его AllowUpgradesWithUnsupportedTPMOrCPU. (Если папки нет, создайте её). После этого установите значение 1 в десятичном формате.
Если вы сделали все это правильно и соответствуете другим требованиям к оборудованию Windows 11, помощник по установке Windows 11 должен теперь пропустить проверку TPM 2.0 при запуске обновления. Вам будет предложено выполнить обновление, сохранив данные, или выполнить чистую установку. Полное обновление сохраняет приложения, настройки и файлы. Чистая установка полностью удалит Windows 10 и заменяет ее на Windows 11.
рекомендации
4070 MSI по старой цене дешевле Palit
13900K в Регарде дешевле чем при курсе 60
Ищем PHP-программиста для апгрейда конфы
Доступен и второй метод. Если вы устанавливаете ОС из чистого ISO-образа, Microsoft заявляет, что не будет проверять наличие TPM 2.0.
Для установки Windows 11 (или при обновлении с Windows 10), ваш компьютер должен соответствовать определённом минимальным системам требованиям: наличие чипа TPM 2.0 (Trusted Platform Module), режим UEFI + Secure Boot, 4 Гб RAM, 64 Гб диск и совместимый двухъядерный процессор 1 ГГц (не все процессоры поддерживаются!). Microsoft ограничивает установку Windows 11 на несовместимые компьютеры, выполняя проверку на соответствие системным требования перед началом установки Windows. В этой статье мы покажем, как установить Windows 11 на несовместимые устройства без проверки требований к CPU, TPM, Secure Boot (и т.д.)
Если компьютер не соответствует минимальным требованиям для Windows 11, то при установке ОС появится ошибка:
Запуск Windows 11 на этом компьютере не возможен
. Этот компьютер не соответствует минимальным требованиям к системе для установки этой версии Windows. Дополнительные сведения см. на сайте aka.ms/WindowsSysReq
This PC can’t run Windows 11
. This PC doesn’t meet the minimum system requirements to install this version of Windows. For more information, visit aka.ms/WindowsSysReq<
Чтобы понять, каким конкретно требованиям не соответствует вашим компьютер, нужно изучить лог ошибок установки Windows 11 setuperr.log. В этом файле содержаться только ошибки установки Windows (полный лог установки находится в файле setupact.log, но изучать его сложно из-за большого объема).
Чтобы открыть файл лога ошибок установки Windows, откройте командную строку прямо на экране установки, нажав
Shift + F10
и выполните команду:
notepad x:\windows\panther\setuperr.log
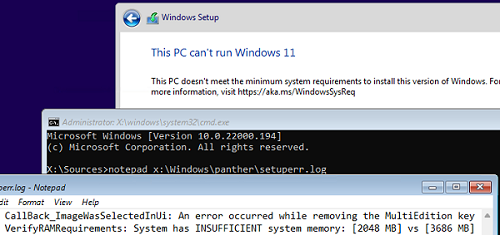
В нашем случае ошибка говорит, что на компьютере недостаточно оперативной памяти (всего 2 Гб вместо 3).
2021-11-11 10:57:51, Error VerifyRAMRequirements: System has INSUFFICIENT system memory: [2048 MB] vs [3686 MB]
Обратите внимание, что если ваш компьютер не соответствует нескольким системным требованиям для установки Windows, то в логе будет указана только первая из причин. Т.е. если вы исправили (или пропустили) одну из ошибок несовместимости, то при следующем запуске установки Windows 11 в логе будет содержаться следующая ошибка совместимости.
После того, как мы добавили RAM появилась другая ошибка:
2021-11-11 11:13:37, Error VerifyTPMSupported:Tbsi_GetDeviceInfo function failed - 0x8028400f[gle=0x0000007a]
Т.е. установщик определил, что на компьютере отсутствует TPM чип.
Если вы устанавливаете Windows 11 в виртуальную машину VMWare, вы можете добавить виртуальный TPM чип в соответствии с этой статьей. Для Hyper-V используется другая инструкция.
Однако вы можете продолжить установку Windows 11, просто игнорировал одно или все требования совместимости.
Для этого нужно в командной строке на экране установки Windows 11:
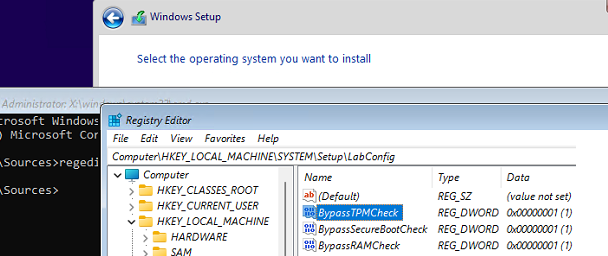
- Запустить редактор реестра
regedit.exe
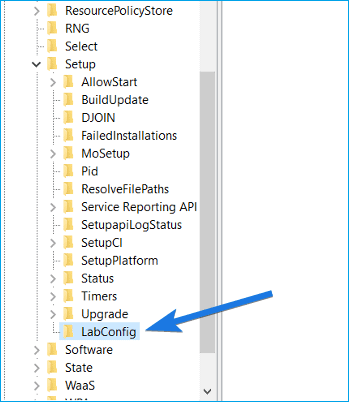
; - Перейти в раздел HKEY_LOCAL_MACHINE\SYSTEM\Setup и создать новую ветку с именем LabConfig;
- В этой ветке нужно создать DWORD параметры со значением 1 для тех проверок совместимости, которые вы хотите пропустить при установке
Доступны следующие параметры, позволяющие установить Windows 11 на устройства:
-
BypassCPUCheck
– с несовместимыми процессорами; -
BypassTPMCheck
– без чипа TPM 2; -
BypassRAMCheck
– не проверять минимальное количество RAM -
BypassSecureBootCheck
–с Legacy BIOS (или UEFI с отключенным Secure Boot) -
BypassStorageCheck
– не проверять размер системного диска
Например, чтобы не проверять наличие TPM модуля при установке, нудно создать параметр реестра BypassTPMCheck со значением 1. Параметр можно создать с помощью графического редактора реестра или с помощью команды:
reg add HKLM\SYSTEM\Setup\LabConfig /v BypassTPMCheck /t REG_DWORD /d 1
Аналогичным образом нужно создать другие параметры для проверок, который вы хотите пропустить при установке Windows 11.
Затем вернитесь в окно установки Window 11, вернитесь на шаг назад и продолжите обычную установки без проверки совместимости.
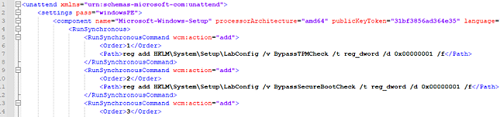
Вы можете модифицировать установочный ISO образ Windows 11, чтобы все эти проверки TPM, SecureBoot, диск, память, CPU) пропускались автоматически при установке ОС.
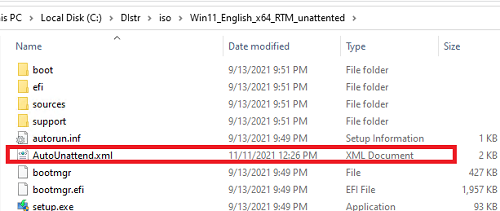
Для этого создайте текстовый файл AutoUnattend.xml со следующим содержимым:
<unattend xmlns="urn:schemas-microsoft-com:unattend">
<settings pass="windowsPE">
<component name="Microsoft-Windows-Setup" processorArchitecture="amd64" publicKeyToken="31bf3856ad364e35" language="neutral" versionScope="nonSxS" xmlns:wcm="http://schemas.microsoft.com/WMIConfig/2002/State" xmlns:xsi="http://www.w3.org/2001/XMLSchema-instance">
<RunSynchronous>
<RunSynchronousCommand wcm:action="add">
<Order>1</Order>
<Path>reg add HKLM\System\Setup\LabConfig /v BypassTPMCheck /t reg_dword /d 0x00000001 /f</Path>
</RunSynchronousCommand>
<RunSynchronousCommand wcm:action="add">
<Order>2</Order>
<Path>reg add HKLM\System\Setup\LabConfig /v BypassSecureBootCheck /t reg_dword /d 0x00000001 /f</Path>
</RunSynchronousCommand>
<RunSynchronousCommand wcm:action="add">
<Order>3</Order>
<Path>reg add HKLM\System\Setup\LabConfig /v BypassRAMCheck /t reg_dword /d 0x00000001 /f</Path>
</RunSynchronousCommand>
<RunSynchronousCommand wcm:action="add">
 <Order>5</Order>
<Path>reg add HKLM\System\Setup\LabConfig /v BypassCPUCheck /t reg_dword /d 0x00000001 /f</Path>
</RunSynchronousCommand>
<RunSynchronousCommand wcm:action="add">
<Order>4</Order>
<Path>reg add HKLM\System\Setup\LabConfig /v BypassStorageCheck /t reg_dword /d 0x00000001 /f</Path>
</RunSynchronousCommand>
</RunSynchronous>
<UserData>
<ProductKey>
<Key></Key>
</ProductKey>
</UserData>
</component>
</settings>
</unattend>
Если вы хотите отключить экран создания онлайн аккаунта Microsoft при установке Windows 11, добавьте в файл следующий секцию компонента:
<component name="Microsoft-Windows-Shell-Setup" processorArchitecture="amd64" publicKeyToken="31bf3856ad364e35" language="neutral" versionScope="nonSxS" xmlns:wcm="http://schemas.microsoft.com/WMIConfig/2002/State" xmlns:xsi="http://www.w3.org/2001/XMLSchema-instance">
<OOBE>
<HideOnlineAccountScreens>true</HideOnlineAccountScreens>
<HideWirelessSetupInOOBE>true</HideWirelessSetupInOOBE>
<ProtectYourPC>3</ProtectYourPC>
</OOBE>
</component>
Скопируйте данный файл в корень установочной USB флешки с Windows 11.
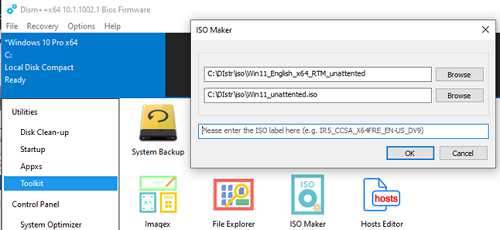
Если вам нужно добавить файл ответов в ISO образ Windows 11, распаккуйте его содержимое в любую папку на компьютере, скопируйте в этот каталог файл AutoUnattend.xml и пересоберите ISO образ.
Я использовал для создания образа бесплатную утилиту DISM++ (Toolkit -> ISO maker).
Теперь никакие проверки совместимости не будут производится при установке Windows 11.
В новой версии утилиты Rufus, использующейся для создания загрузочных USB флешек, появилась специальная опция Extended Windows 11 Installation (no TPM/no Secure Boot/8Gb- RAM). Данная опция позволяет создать образ для установки Windows 11 без проверки TPM и Secure Boot:

| Workable Solutions | Step-by-step Troubleshooting |
|---|---|
| Bypass Secure Boot and TPM 2.0 on Windows 11 | Step 1: Go to the Start Menu, search for Run and then press the Enter…Full steps |
| Download and Install Windows 11- OS2Go | Step 1: The Win11 builder is integrated with the EaseUS OS2Go software…Full steps |
| Additional Information: Manage Disk After Windows 11 Installation | Once you have successfully downloaded Windows 11 on your computer, your work isn’t done here…Full steps |
Are you excited to install Windows 11 on your computer?
Yes!
But all your excitement is flushed out when you encounter a series of problems while installing Windows 11 on your old computer. One such issue is the requirement of ‘Secure Boot’ along with ‘TPM 2.0’ enabled computers.
However, if you are using a UEFI BIOS Mode machine, you can pretty straightforwardly bypass TPM on Windows 11. You simply have to go to BIOS settings and enable the ‘Secure Boot’ and ‘TPM 2.0’ options.
Unfortunately, if you have an old Legacy BIOS Mode, it is impossible for you to bypass Secure Boot on Windows 11 computer.
Now, there’s no need to dishearten. That’s because thanks to the vast Windows community and software development teams, it is possible to bypass Secure Boot and TPM options while installing Windows 11.
Let’s not waste any more time and see how to bypass Secure Boot and TPM settings on Windows 11.
Limits of Windows 11 — Seucre Boot and TPM 2.0
Windows 11 has taken the graphic-rich user interface to the next level. It has further added many new features to entice the Windows experience, such as touch controls, widgets, Android apps, and more.
To support all these powerful features, Windows 11 required some basic system requirements, such as:
- 1 GHz or faster core processor
- 4 GB RAM
- 64 GB storage space
- Secure Boot
- Trusted Platform Module (TPM) 2.0
- Internet connectivity and more
Now, internet connectivity and storage space are something that you can easily manage on your old Windows computers. But Secure Boot and TPM isn’t something that you can get with your Legacy BIOS Mode devices.
So what to do? You can refer to the following ways to bypass secure boot Windows 11. If you think this passage is useful, you can share it with someone in need!
How to Bypass Secure Boot and TPM 2.0 on Windows 11
You can use the technical Registry way to bypass Secure Boot and TPM settings on Windows 11. Using registry, you can bypass Secure Boot and TPM requirements as follows:
Step 1. Go to the Start Menu, search for Run and then press the Enter. You now have to type regedit in the command box and again press «Enter».
Step 2. Once the Registry Editor opens on your screen, go to this path:
Computer\HKEY_LOCAL_MACHINE\SYSTEM\Setup
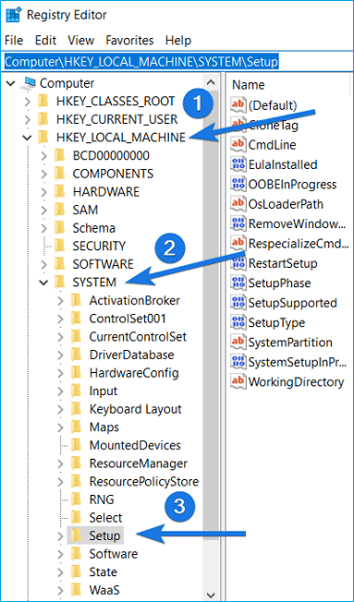
Step 3. When you are in the Setup folder, simply right-click there and then select «New». After that, choose «Key».
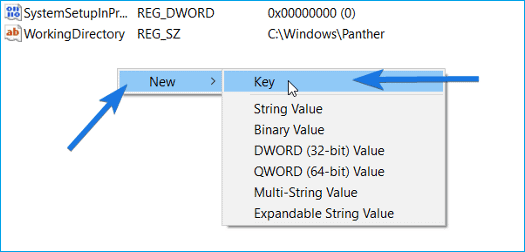
Step 4. The new Registry Key file will be added under the Upgrade folder. You have to rename this folder to LabConfig.
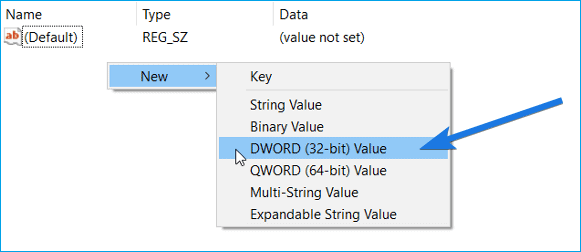
Step 5. Navigate to the right side section, look for the file named Default. Here you have to create a new DWORD registry file. Once again, right-click there, choose «New» and then select «DWORD (32-bit) Value».
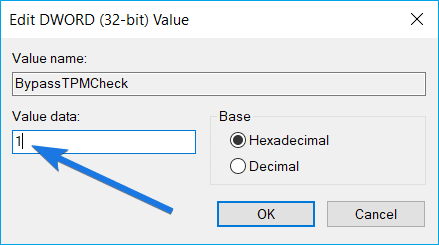
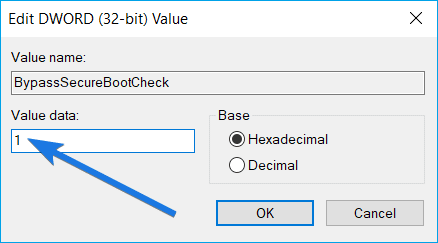
Step 6. When the file is created, you can now rename it to BypassTPMCheck. Similarly, create another DWORD registry file with the BypassSecureBootCheck name.
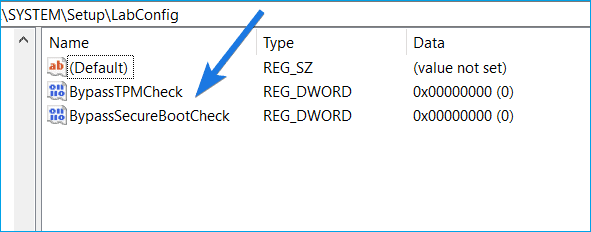
Step 7. Now, double-click to open «BypassTPMCheck» file you have just created. You have to change its Value data to 1 and then hit on «OK».
Step 8. Next, do the same with the BypassSecureBootCheck folder and change its Value data to 1.
Step 9. Finally, close the Registry Editor and restart your computer to save all these new settings. Now, you have successfully bypassed Secure Boot and TPM 2.0 requirements on Windows 11.
Bonus Tip: If you are also interested in how to download and install Windows 11 on a computer without TPM, follow this guide here for help.
![]()

Download and Install Windows 11
EaseUS Windows 11 Builder is an upgraded Troubleshooting Toolkit that can fix all the problems you face while installing Windows 11. It is also a professional upgrade and download tool of Windows 11. You can directly download the latest version of official Windows 11 System.
Wow! On top of all, it is very easy to install Windows 11 without TMP on your computer by following these steps on EaseUS Windows 11 Builder:
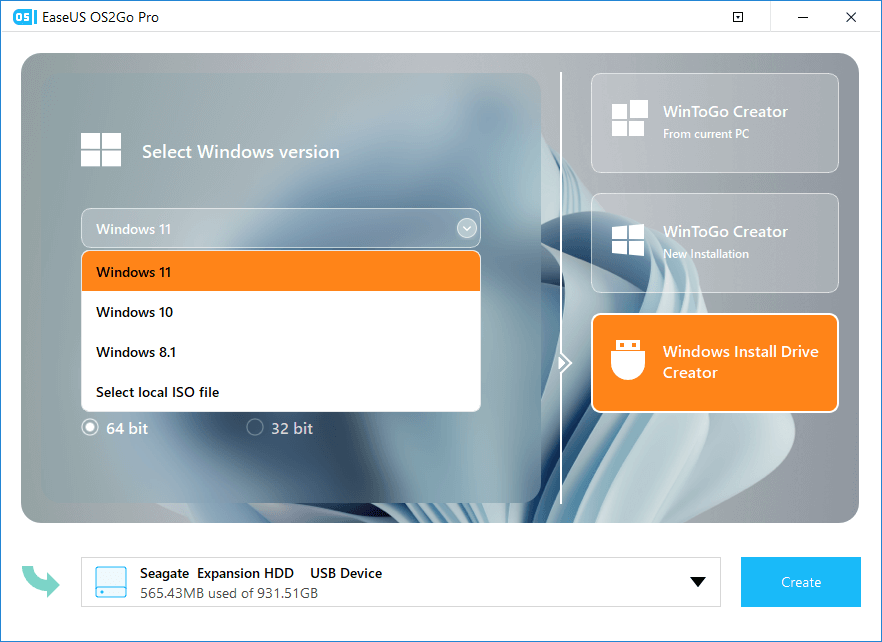
Step 1. Launch OS2Go after installation, and click Windows Install Drive Creator. The obtained system information is available on the home screen, and it keeps updating all the time. Apart from Windows 11, Win11 builder also supports you to download Windows 10/8.1.
Step 2. Connect your USB flash drive to the computer. Win11 builder will automatically detect your USB device, so all you need to do is click the Create button.
Step 3. The software will empty your USB drive data if it’s a used one. Once the downloading process begins, wait there until it finished or leave for a while to do you own job.
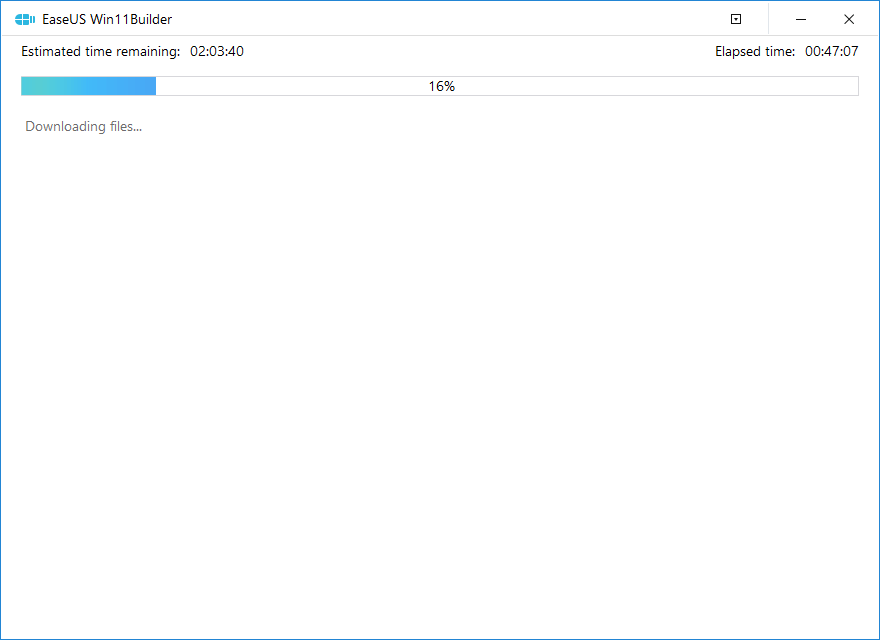
Step 4. After successfully downloading the Windows 11 iso image file on the USB drive, start to install Windows 11 from the bootable USB drive on your computer by following the installation wizard step by step.
To complete Windows 11 installation, see Method 2 in this page to install Windows 11 from USB drive.
Additional Information: Manage Disk After Windows 11 Installation
Once you have successfully downloaded Windows 11 on your computer, your work isn’t done here. You have to make sure that the disk is properly managed after Windows 11.
If your disk partitioning isn’t accurate, you will face many errors while running programs on your Windows 11. Thus, you need to get disk partition software that can systematically allocate space on your Windows 11 disk.
Here if you select the easy EaseUS Windows 11 Builder way to bypass Secure Boot and TPM, you will get EaseUS Partition Master Pro. Using this tool, you can effortlessly manage your Windows 11 partitions.
EaseUS Partition Master Pro can offer you numerous disk management features:
- Modify partition size as per your need.
- Merge small partitions into a larger one and merge two ssd drives into one without losing data.
- Organize hard disks in many ways, including cloning, creating, deleting and formating.
- Helps to migrate disk or partitions to the unallocated space.
- Move OS to SSD so you can run your operations faster.
- Easy to shrink, create, extend or customize disks in any way.
- Convert MBR to GPT disk without data loss and vice versa.
Final remarks
Yes, it is possible to run Windows 11 on your Legacy BIOS Mode device. You can’t directly bypass Secure Boot and TPM on old computers like UEFI Mode devices.
But fortunately, you have easy EaseUS Windows 11 Builder and technical Registry methods to bypass Secure Boot on Windows 11.
However, if you aren’t comfortable with Registry files, don’t use this method as you might corrupt your system or damage it for good.
On the contrary, EaseUS Windows 11 Builder can seamlessly bypass all Windows 11 requirements according to your device’s technical specifications. Plus, you will get EaseUS Partition Master Pro for free to optimize your Windows 11 disk.
All in all, getting EaseUS Windows 11 Builder is a win-win option for you. To make your mind better, you can try EaseUS Windows 11 Builder’s free trial today.
[Motherboard]How to disable TPM when update to BIOS version default support Windows 11
content:
一. The reason of BIOS option [Enable Discrete TPM]can’t be selected?
二. How to disable TPM function on Intel Platform?
三. How to disable TPM function on AMD Platform?
四. How to check TPM function is disabled in OS?
The reason of BIOS option [Enable Discrete TPM]can’t be selected?
When you enter the BIOS setup and set the TPM Device Selection option to [Enable Discrete TPM] manually , F10 and Exit
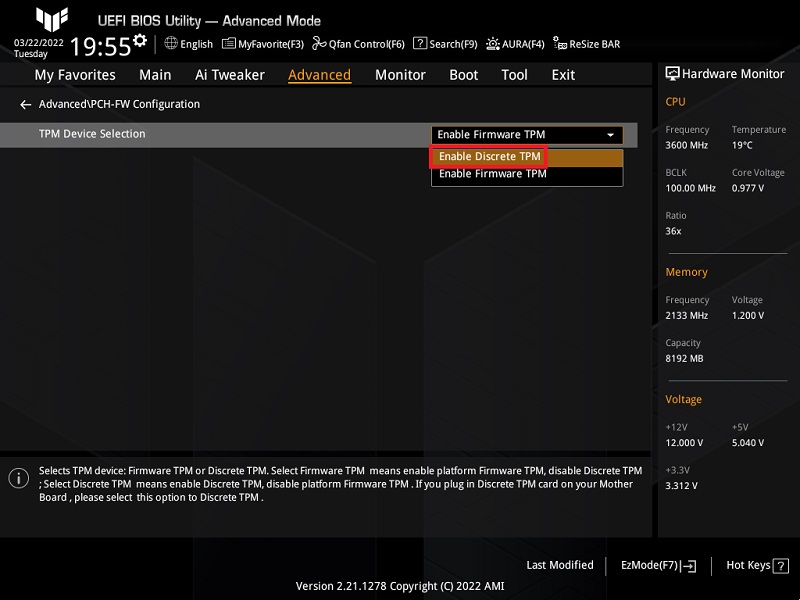
After reboot into the BIOS setup again, the TPM Device Selection option is automatically restored to [Enable Firmware TPM]
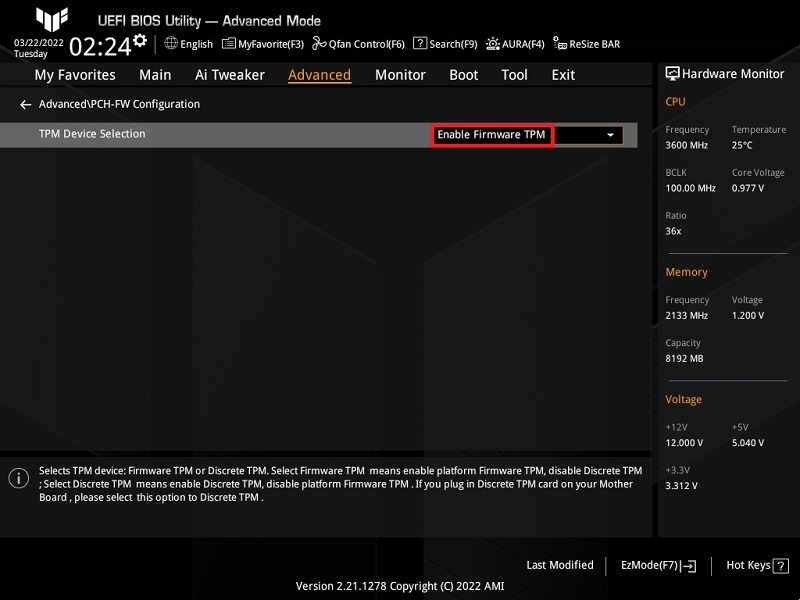
It is normal
In order to support the installation of Windows 11 system by default, motherboard that supports TPM header, the system will send a full reset during post when no TPM card is connected,
for set TPM Device Selection to [Enable Firmware TPM],in order to support the installation of Windows 11 system
If your BIOS has been updated to the latest version (default open TPM option supports Windows11), but you want to turn off TPM, please follow the steps below
How to disable TPM function on Intel Platform?
1. Power on the system and press“delete”key to enter BIOS [EZ Mode]
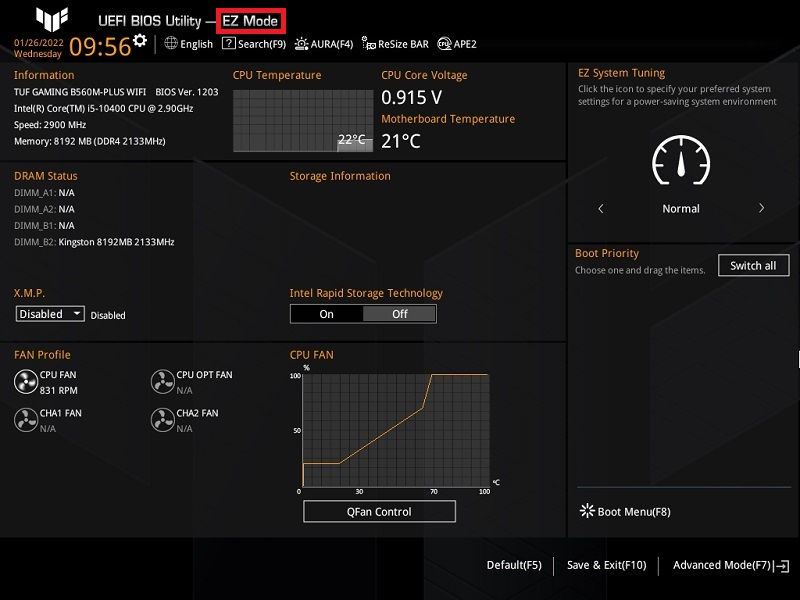
2. Press F7 key to change to Advance Mode
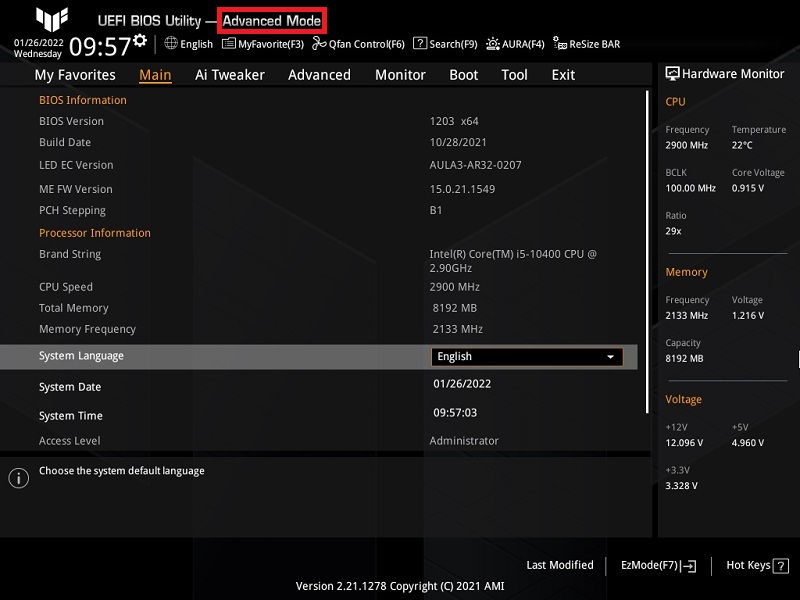
(If system go into BIOS Advance Mode directly ,then no need to press F7)
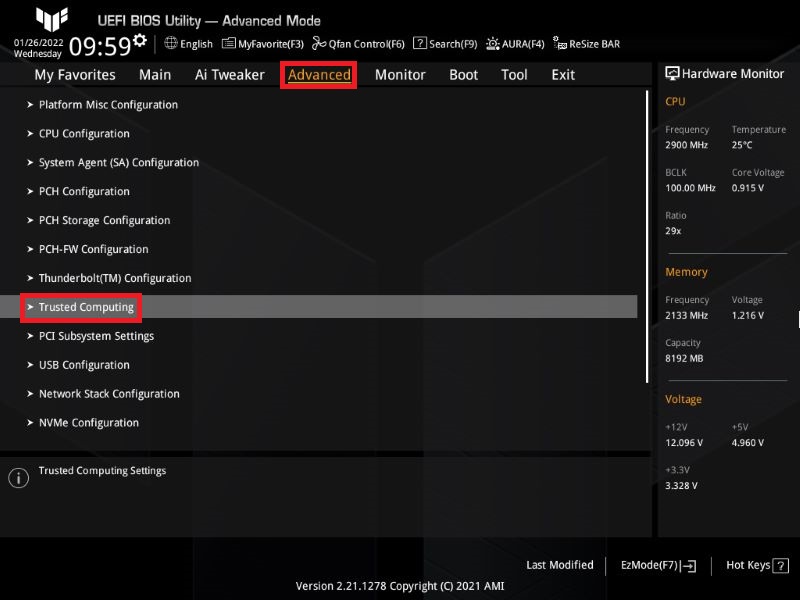
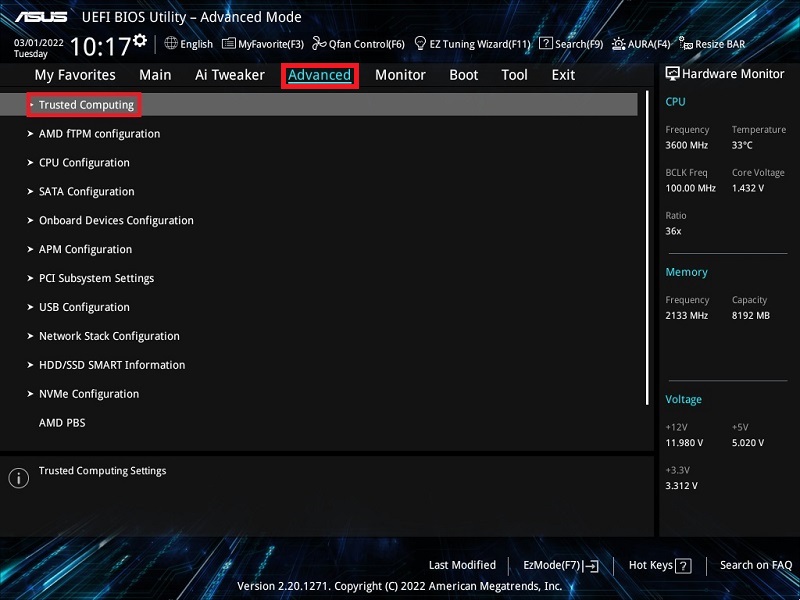
3. Click [Advanced] page and click [Trusted Computing] item
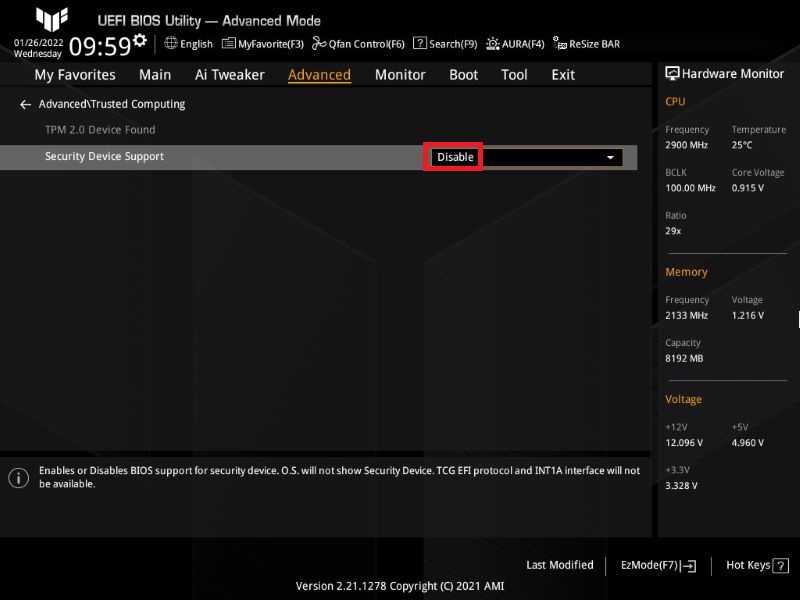
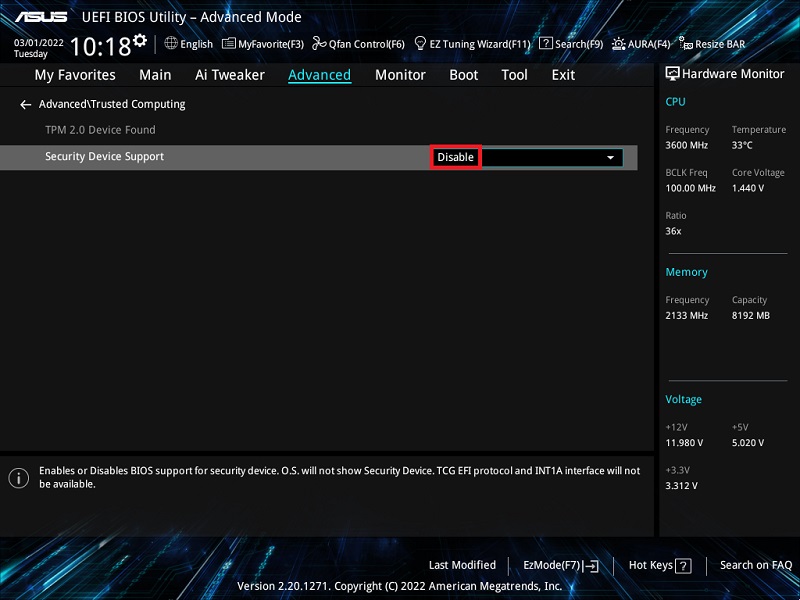
4.Click [Security Device Support] item and set it to [Disable] mode
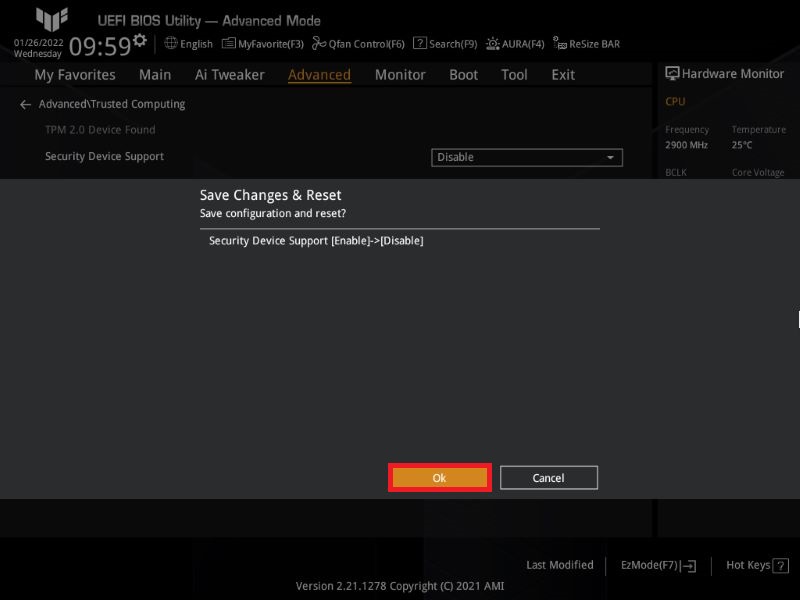
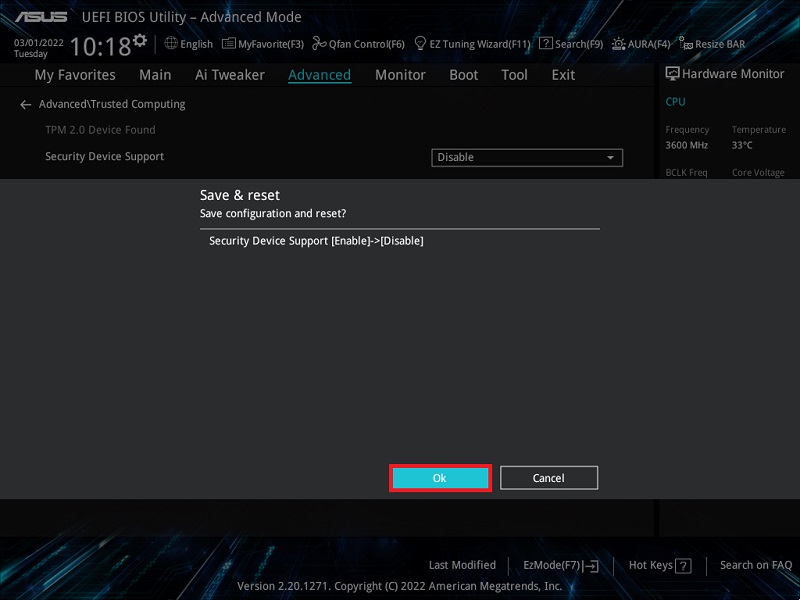
5. Press F10 key and click Ok ,system will automatically reboot and disable TPM sucessfully
Q&A
How to disable TPM function on AMD Platform?
1. Power on the system and press“delete”key to enter BIOS [EZ Mode]
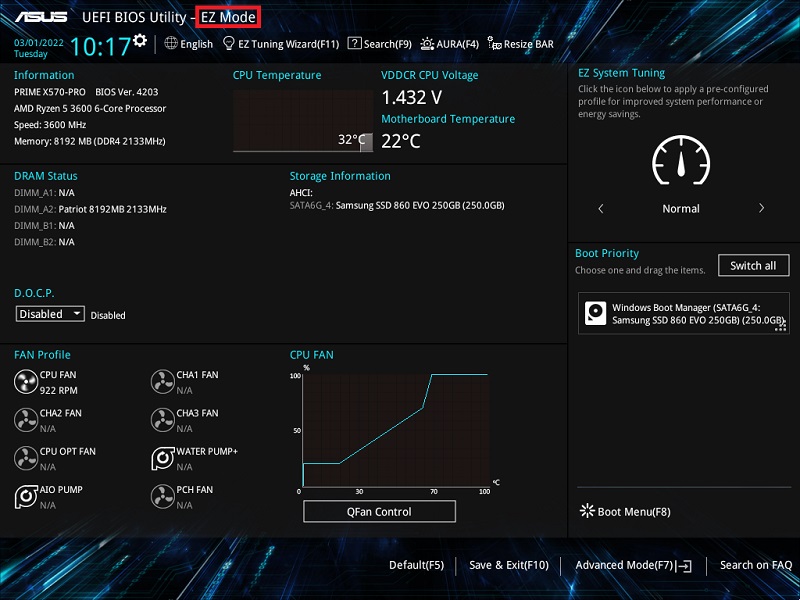
2. Press F7 key to change to Advance Mode
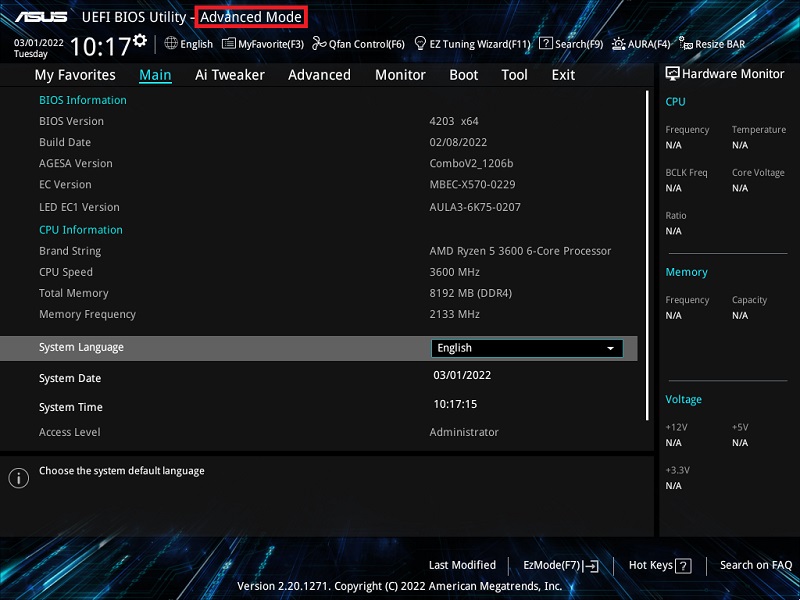
(If system go into BIOS Advance Mode directly ,then no need to press F7)
3. Click [Advanced] page and click [Trusted Computing] item
4. Click [Security Device Support] item and set it to [Disable] mode
5. Press F10 key and click Ok ,system will automatically reboot and disable TPM sucessfully
Q&A
Q: How to check TPM function is disabled in OS?
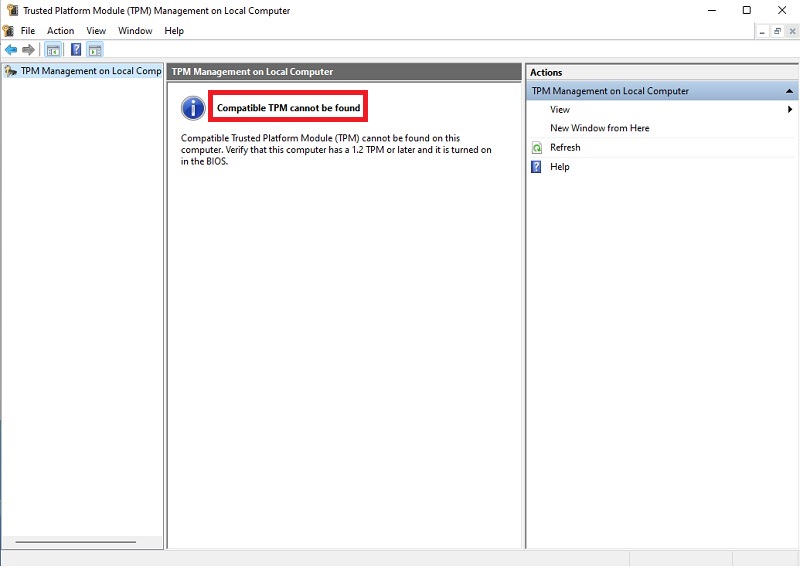
A:Enter»tpm.msc» in the search bar and click tpm.msc
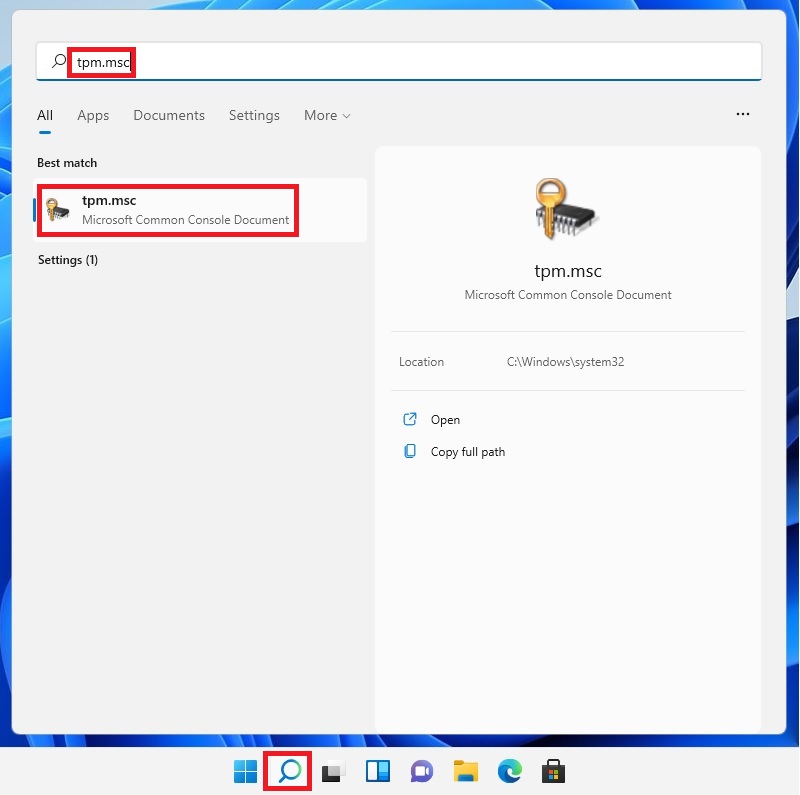
It show as “Compatible TPM cannot be found”and it means that TPM is disabled