Item Preview

BlaineAsciiBinary.png

BlaineAsciiKatakana.png

BlaineAsciiText.png

BlaineCamcorderOverlay.png

BlaineCamcorderOverlayWS.png

BlaineCameraBack.png

BlaineDreamyLook.png

BlainePSPOverlay.png

BlainePhotoAlbum.png

BlaineTVOverlay.png

BlaineTVRating14.png

BlaineTVRatingG.png

BlaineTVRatingMA.png

BlaineTVRatingPG.png

BlaineTVRatingY.png

BlaineTVRatingY7.png

PaintSplatBlue.png

PaintSplatGreen.png

PaintSplatPurple.png

PaintSplatRed.png

TornPage-Bottom.png

TornPage-Right.png
68
Views
DOWNLOAD OPTIONS
Uploaded by
eulerfam
on
SIMILAR ITEMS (based on metadata)
Обзор эффектов в улучшенной версии Movie Maker
Создать слайд-шоу из фотографий, склеить фильм из отдельных видеофайлов, добавить яркие впечатляющие эффекты, а затем поделиться результатом с родными, друзьями или коллегами – с новой версией Windows Movie Maker вы сможете сделать это легко и быстро! Она дарит своим пользователям широчайший функционал, опробовать который можно совершенно бесплатно. Достаточно скачать программу с эффектами, чтобы с головой погрузиться в увлекательный мир монтажа.
Установив её, вы сможете накладывать титры, создавать анимацию на слайдах, добавлять музыку и записывать голосовую озвучку. Перечислять всё, что может этот программный пакет, можно долго. Однако, эффекты для Movie Maker заслуживают отдельного внимания. В программе их уже более 250, и каждое обновление лишь увеличивает встроенную коллекцию. В таком разнообразии нетрудно заблудиться, поэтому мы приготовили для вас обзор лучших эффектов.
Фотопленка 3D
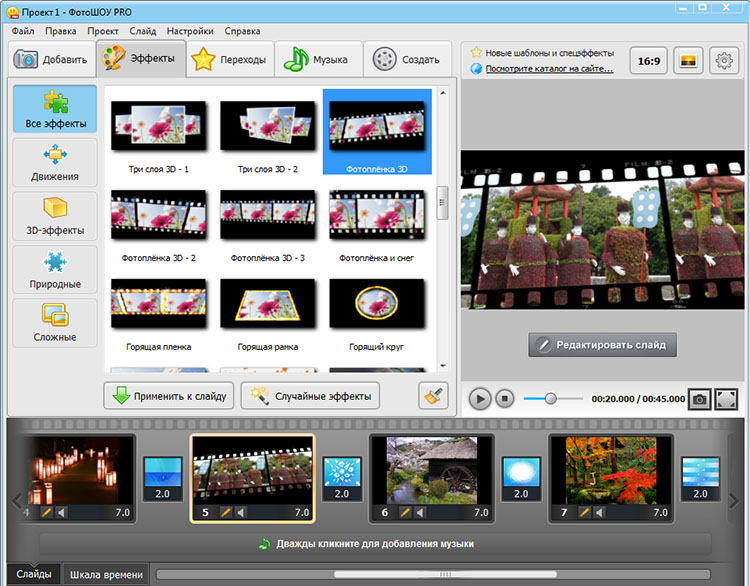
Один из наиболее удачных эффектов для слайд-шоу – это «Фотоплёнка 3D». В улучшенной версии Windows Movie Maker представлено 3 различных варианта этого эффекта, не считая совмещённых («Фотоплёнка и снег» и «Горящая плёнка»). Выбранный слайд помещается на фотоплёнку, которая перемещается по экрану, создавая впечатление трёхмерного движения.
Листопад

Если на снимке осенний пейзаж, эффект «Листопад» будет более, чем кстати. Падающие разноцветные листья позволят оживить кадр, сделав из неподвижной картинки динамичную и очень красивую сцену. Попробуйте применить его на любое осеннее фото.
Три слоя 3D
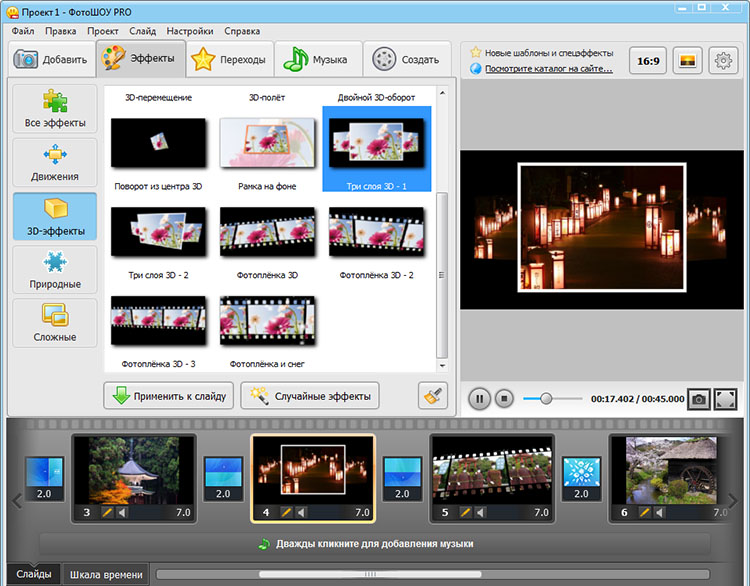
Отличный пример трёхмерного эффекта в новой версии Movie Maker – «Три слоя 3D». Применив его на кадр, вы увидите 3 копии фото в ряд. Центральная копия обведена рамкой, и будет постепенно приближаться к зрителю, закрывая две крайние копии. Такой эффект будет хорошо смотреться на многих снимках.
Среди снега
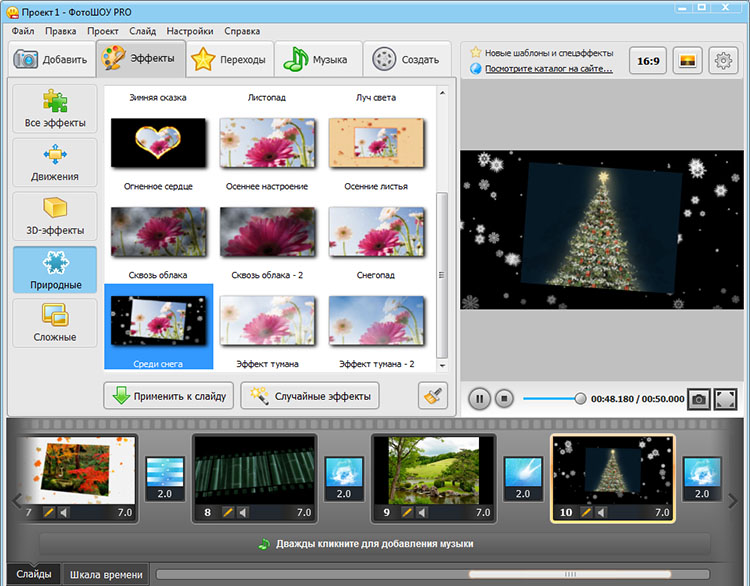
Ещё один природный эффект, который отлично смотрится на сезонных снимках. Особенно хорошо он подойдёт для крупноплановых фото, а также изображений с новогодней тематикой. Медленно падающие снежинки крупного размера придают праздничное настроение слайдам, заставляя думать о празднике с подарками и приятном запахе хвои от установленной дома ёлки.
Бабочки
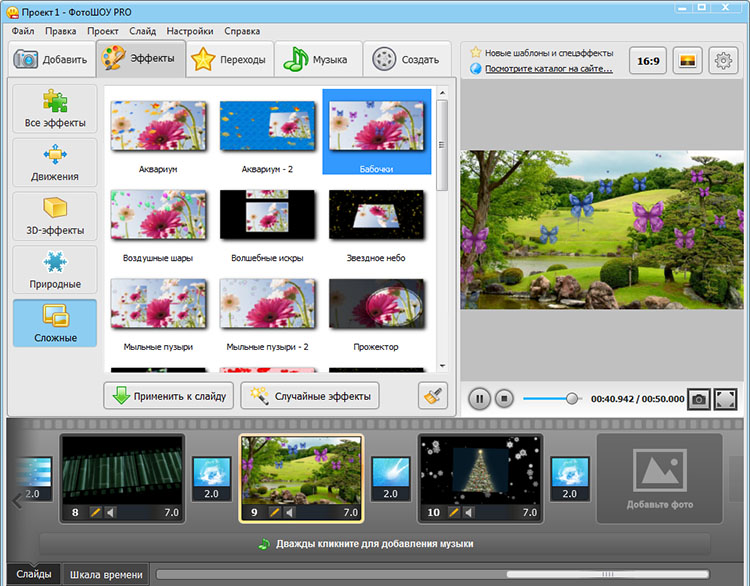
Что может лучше подчеркнуть красоту зелёной полянки, цветущей клумбы или луга? Конечно же, порхающие бабочки! Установив эффект «Бабочки» на слайд с любым весенним или летним фото , вы сможете сделать кадр еще более живым и интересным.
Сердечки
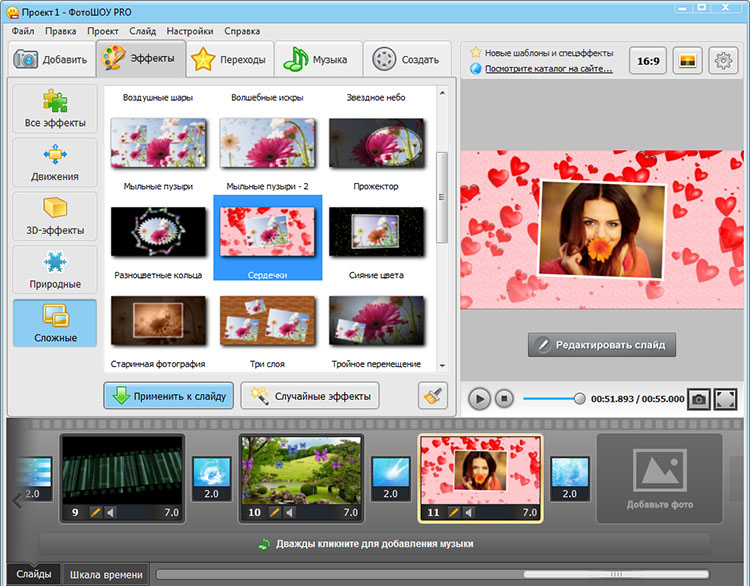
Хотите продемонстрировать свои чувства близкому человеку или признаться в любви, сделать презент на день Святого Валентина? Эффект «Сердечки» будет отличным вариантом для слайд-шоу с фотографиями влюблённых. Только не переборщите – использовать его на каждом кадре не стоит. Ведь вы можете применять любые дополнительные эффекты для Movie Maker, и среди них имеются другие варианты, позволяющие подчеркнуть любовную тематику слайд-шоу.
Воздушные шары
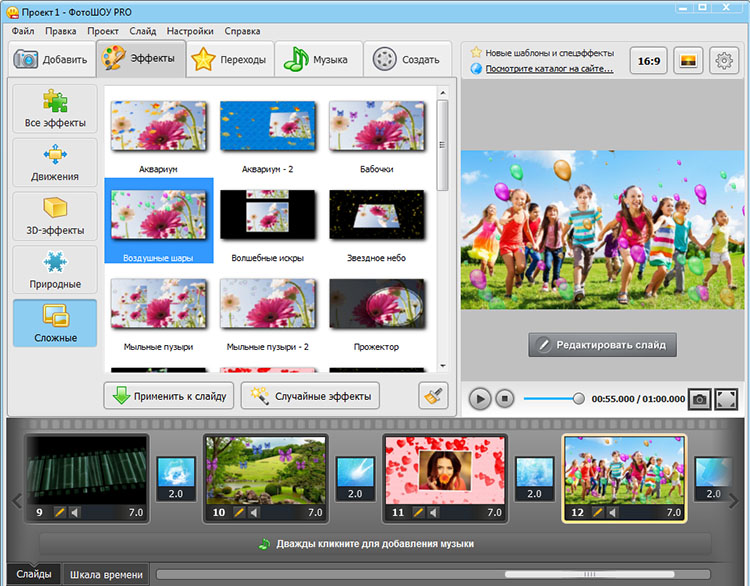
На фотографиях с детских праздников или игр будет отлично смотреться эффект «Воздушные шары», которые добавляет в кадр множество разноцветных шариков, парящих там и тут, и постепенно поднимающихся вверх. Кадр при этом слегка приближается к зрителю, создавая иллюзию динамики на слайде.
Разумеется, это далеко не всё, что может предложить вам эта программа. Однако, рассмотреть все эффекты для Windows Movie Maker можно только на практике – ведь их очень и очень много. Каждый из них по-своему хорош, и может пригодиться для того или иного снимка. Творите свои собственные слайд-шоу, оттачивайте навыки постоянной практикой с программой для создания видео с эффектами, и вы сможете добиться превосходных результатов. А помогут вам в этом обучающие материалы на сайте!
Другие статьи по теме:
- Идеи для love story
- Программа для создания видео с эффектами
- Как вставить титры в видео
- Как сделать фильм из видео в домашних условиях
Click on a clip that you want to apply a special effect to and click the Visual Effects tab (if it isn’t showing). You can use the options in the Effects area to change the appearance of an individual clip or still. Choose whichever effect you like from the list in the upper-right corner.
How do you add effects in movie maker?
To add an effect, select Add Effect, then choose the effect you want. HD Moive Maker provides over 15 effects for you to choose from. You can add multiple effects to your video. After adding, the thumbnail of the added effects will appear as a list for you to select which one to edit.
How do you use Visual Effects?
Create visual effects
- Place type into video footage. Use the 3D Camera Tracker effect to place type into a scene.
- Blur out unwanted elements. Add a blur over a specific area in the video footage.
- Isolate elements with greenscreen.
- Clean up keyed footage with a garbage matte.
- Retime video to add impact.
What are Visual Effects in Windows Movie Maker?
You can use Visual Effects tools to add special effects such as falling leaves and fireworks to your video. Then, choose the video you want to edit. To add an effect, select Add Effect, then choose the effect you want.
Can we add multiple visual effects on a single media file?
You cannot add multiple Visual Effects on a single media file.
Can Microsoft video editor fade?
You can run a quick, basic fade using these four easy steps: Create a new video project in the video editor. Upload your video or images. Select your desired clip. Select the fade panel and adjust accordingly.
Which is the best effect for Windows Movie Maker?
Now you can choose the suitable Windows Movie Maker effects from the following top ten: #1. SpiceFX for Movie Maker This Windows Movie Maker effect has more than 600 video transitions as well as effects. To add any of those, you will just have to drag and then drop saving you time.
How to add animations to Your Movie Maker videos?
If you want to add an effect, highlight it in the Available effects menu and click or tap Add. If you want to remove an effect, select it in the Displayed effects column and click or tap Remove. Windows, Movie Maker, animations, visual, effects You can also choose the order in which the effects are applied.
How to make custom effects in Movie Maker?
Create CUSTOM pan zoom Movie Maker effects (like Ken Burns). Drag frames visually to set start/end position, zoom amount, etc. EXACTLY as you prefer! Optimized for video or high-res still-images. This Movie Maker effect tool is one of our most popular! Drag Movie Maker titles/text ANYWHERE in a scene.
Can you use Windows Movie Maker on Windows 7?
They did provide this in the prior version of Movie Maker (Windows Movie Maker 6.0) and there is growing list of available transitions and effects for that version. I can understand your hesitation in using another version of Movie Maker, but the version that came with Vista can also be used on Windows 7 or Windows 8.
Exploring the World of Video Effects
Imagine watching a movie without any special effects. The exciting chase scenes, breathtaking explosions, and magical transformations would all be reduced to mere monotony. These captivating visual enhancements add depth and excitement to our favorite films, leaving us in awe of the creativity behind them.
But have you ever wondered how these stunning video effects are created? With the advancement in technology, creating mesmerizing video effects is no longer limited to professional filmmakers or studios with expensive equipment. Thanks to software like Windows Movie Maker, you too can become a master of visual storytelling.
Here, we will dive deep into the world of video effects and learn how to create stunning visuals using Windows Movie Maker (WMM). Whether you’re an aspiring filmmaker or simply want to add some flair to your home videos, this guide will equip you with all the tools and techniques necessary to make your videos truly unforgettable.
Unleashing Your Creativity
Before we delve into the technicalities of Windows Movie Maker, it’s important to remember that creativity knows no boundaries. Let your imagination roam free as you explore different possibilities for your video projects. Allow yourself to experiment and think outside the box – after all, rules were made to be broken!
A famous filmmaker once said: “Creativity comes from a conflict between ideas”. And what better way than experimenting through various video effects on WMM? So go ahead! Embrace your inner artist as we embark on this exhilarating journey together.
Getting Started with Windows Movie Maker
To unlock the potential of creating stunning video effects using WMM, it’s essential that you familiarize yourself with its interface and features first. This software may seem overwhelming initially but worry not; in no time at all, you’ll be navigating through menus like a seasoned editor.
Here are some basics to get you started:
- Importing Media: Begin by importing the video clips and images you want to work with into WMM. You can do this by clicking on the “Add videos and photos” button in the Home tab.
- Timeline Navigation: Once your media is imported, it’s time to arrange them on the timeline. The timeline provides a visual representation of your project’s structure and allows you to edit each element individually.
- Applying Video Effects: Now comes the fun part! Select a clip or image on the timeline that you wish to enhance with an effect. Next, click on the “Visual Effects” tab, which will reveal a range of built-in effects for you to choose from.
Sparkling Magic – Adding Special Effects
Have you ever watched movies where characters seem to disappear into thin air or objects magically transform? These mind-boggling effects effortlessly transport us into different worlds filled with wonder and excitement. With WMM, recreating these moments is easier than ever before!
Let’s explore some of the enchanting video effects available in Windows Movie Maker:
1. Chroma Key
The “Chroma Key” effect, also known as green screen technology, enables you to replace a specific color in your video footage with another image or background. This technique is widely used in movies when actors interact with giants or travel through outer space.
To use this effect:
1) Add a video clip containing a single-color backdrop behind your subject.
2) Import an image or another video clip that will serve as your new background.
3) Apply the Chroma Key effect and adjust settings until both elements blend seamlessly.
2. Slow Motion
Capturing motion at reduced speed gives any scene an ethereal quality, making viewers feel like they are witnessing a moment frozen in time1. Whether it’s showcasing water droplets falling gracefully or capturing a dancer’s effortlessly fluid movements, the “Slow Motion” effect adds an element of drama and elegance to your videos.
To incorporate slow motion:
1) Select the clip you want to apply this effect to in WMM.
2) Click on the “Video Tools” tab and locate the “Speed” option.
3) Choose from preset speeds (e. g. , 0. 25x) or manually adjust it according to your preference.
3. Split Screen
Have you ever wanted to show simultaneous events occurring side by side in one frame? The “Split Screen” effect allows you to do just that! Whether it’s comparing two reactions during a prank or showcasing multiple perspectives during an epic battle scene, this effect adds depth and excitement to your storytelling.
Follow these steps for creating a split-screen effect:
1) Import all the video clips you want to include in the split screen into WMM.
2) Drag each clip onto separate tracks on the timeline.
3) Resize and reposition each clip on the preview window until they fit together seamlessly.
4) Adjust settings such as transparency and border width for further customization.
By incorporating these three effects alone, you’ll be well on your way to creating captivating visuals that leave audiences breathless. But why stop there? Windows Movie Maker offers various other effects, each with its unique charm waiting for you explore!
Light up Your Videos – Adding Lighting Effects
Beyond visual enhancements that affect entire frames or scenes, lighting effects can transform individual elements within a shot, drawing attention precisely where desired. Proper lighting brings life, dimensionality, and mood2. With Windows Movie Maker at your fingertips, you have endless possibilities at hand!
Let’s delve into some intriguing lighting effects available:
1. Lens Flare
Ever noticed those dazzling bursts of light across film screens when an object obstructs direct sunlight? That is known as a Lens Flare. This effect adds a touch of cinematic magic and gives your video a polished, professional look.
Creating lens flare with Windows Movie Maker is straightforward:
1) Position the playhead on the clip where you want to add the lens flare.
2) Navigate to “Video Tools” > “Visual Effects” tab and find the “Lens Flare” effect.
3) Apply it to your desired clip, play around with its settings until it matches your vision.
2. Bokeh
Originating from Japanese, Bokeh refers to the aesthetic quality of out-of-focus areas in an image or video3. By adding bokeh effects in Windows Movie Maker, you can create an atmosphere that enhances emotions or focuses attention on specific subjects within a frame.
To incorporate bokeh into your videos:
1) Select the video clip you want to modify.
2) Go to “Video Tools” > “Visual Effects, ” locate and choose the “Bokeh Blur” effect.
3) Adjust intensity, size, and shape settings based on your preferences till you achieve visually pleasing results.
So there you have it – two distinctive lighting effects that will bring richness and depth to your videos. Experimenting with different lighting techniques will give you a unique edge when it comes to crafting stunning visuals that leave viewers captivated throughout.
Stay tuned as we dive even deeper into advanced video effects options like Animation, Transitions, and more! Get ready for an extraordinary creative journey where no idea is too wild or impossible. With Windows Movie Maker as our trusty companion, we will unravel new horizons of visual storytelling together!
References:
-
Start with basic transitions: Begin by adding simple transitions like fades, dissolves, or slides between your clips. This will give your video a professional touch.
-
Experiment with different filters: Explore the various filter options available in Windows Movie Maker. Try applying filters such as sepia, black and white, or vignette to give your footage a unique look.
-
Play with text overlays: Utilize the “Titles and Credits” feature within the software to add text overlays at specific moments of your video. You can use this tool for introductory text or even to display subtitles.
-
Incorporate visual effects: Windows Movie Maker provides a range of visual effects that can be added directly onto individual clips or applied throughout the entire timeline. Experiment with effects like slow motion, mirror, or grayscale to make your videos stand out.
-
Utilize audio enhancements: Enhance the overall impact of your videos using sound adjustments and audio effects offered by Windows Movie Maker. Add background music, adjust volume levels, or experiment with voice-over recordings for more engaging content.
Remember, practice makes perfect! Don’t hesitate to try out different combinations of these techniques until you achieve the desired stunning video effect on Windows Movie Maker

Hey there, I’m Dane Raynor, and I’m all about sharing fascinating knowledge, news, and hot topics. I’m passionate about learning and have a knack for simplifying complex ideas. Let’s explore together!
Перейти к контенту
Видеоэффекты, переходы, шаблоны и футажи помогут сделать домашнее видео или слайд-шоу более интересным и оригинальным. Ряд функций уже встроен в Муви Мейкер, а кое-что можно взять со сторонних ресурсов. Рассмотрим применение доступных в Windows Movie Maker 2.6 «украшательств».
Содержание
- Видеоэффекты
- Видеопереходы
- Автофильм
- Футажи
Видеоэффекты
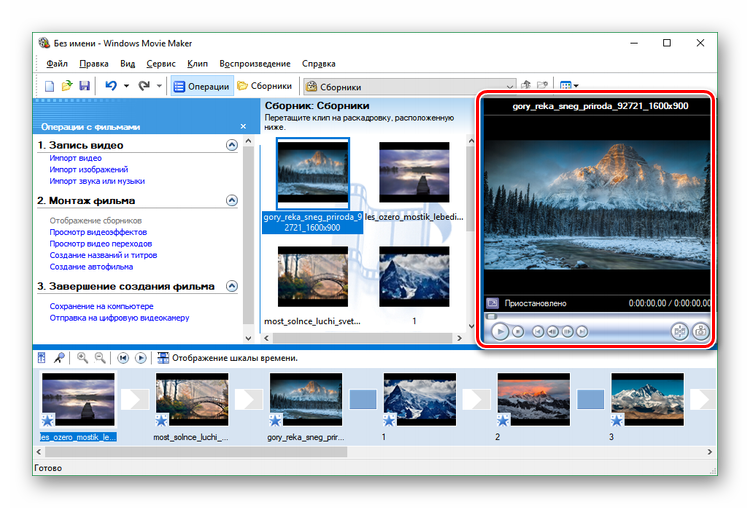
Прежде чем применить переходы или эффекты для Муви Мейкера рекомендуется переключиться с режима отображения шкалы времени в режим раскадровки, нажав соответствующую кнопку.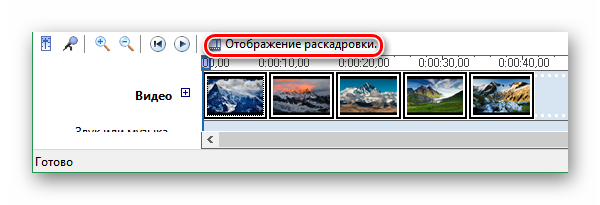
- Открыть перечень видеоэффектов можно, перейдя по ссылке «Просмотр видеоэффектов» на панели задач программы.

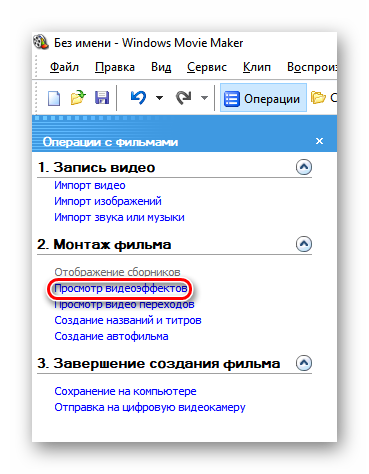
В средней части экрана Муви Мейкера появится список эффектов.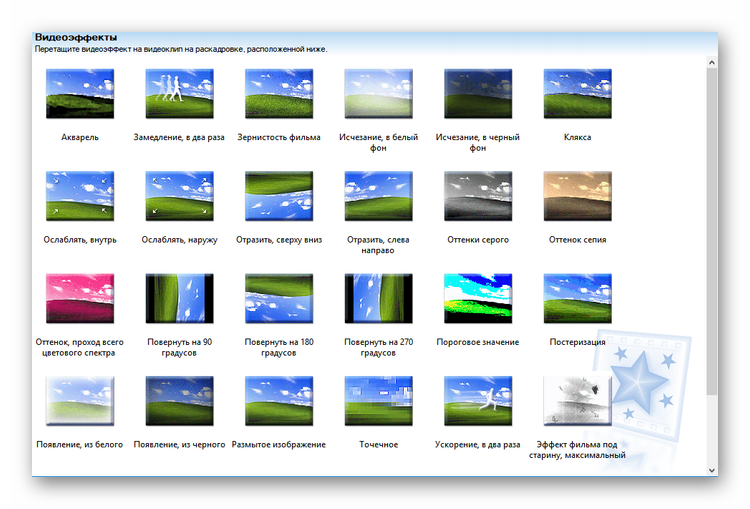
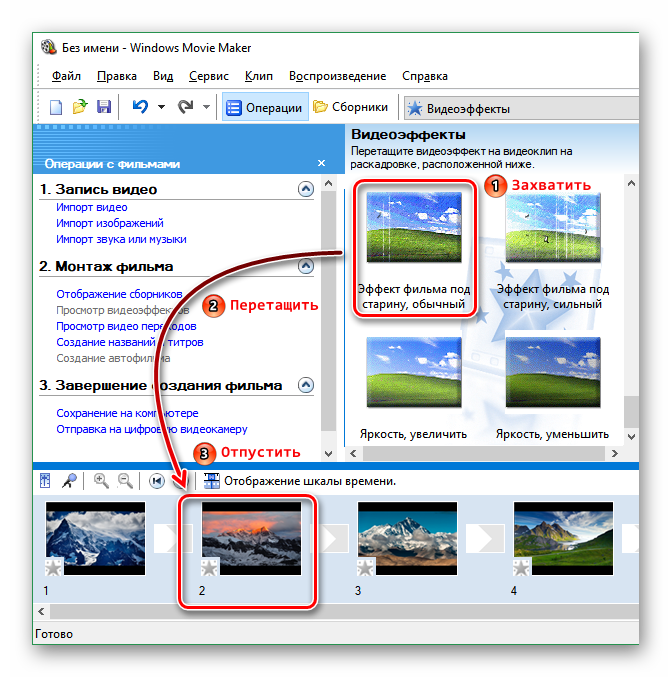
- Чтобы применить эффект, нужно захватить его с помощью левой клавиши мыши и перетянуть на фрагмент, расположенный на раскадровке.

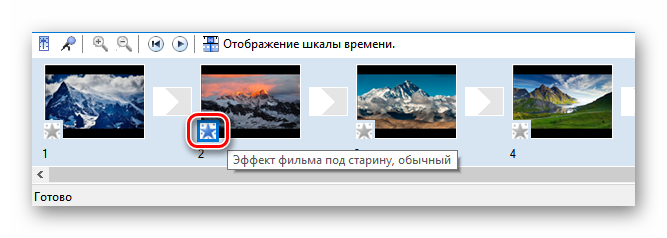
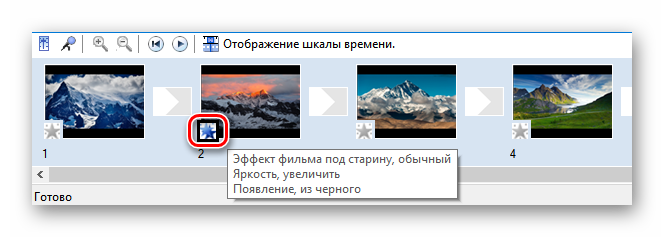
- Выделенная голубым цветом звездочка свидетельствует о том, что к кадру применен какой-либо эффект. Наведите на нее курсор мыши, чтобы просмотреть название фильтра.

- То же самое при необходимости проделайте с остальными кадрами или клипами.
- Кстати, можно применить сразу несколько эффектов к одному фрагменту. Сделать это можно таким же образом, перетащив выбранный фильтр на кадр. В этом случае звездочек в окошке станет несколько, а при наведении курсора мышки вы сможете увидеть список всех примененных опций.

Видеопереходы
Когда сами фрагменты украшен, можно переходить к настройке красивых переходов от одного кадра к другому.
- Выберите на панели задач пункт «Просмотр видео переходов».


Вы получите доступ к довольно большому списку всевозможных переходов.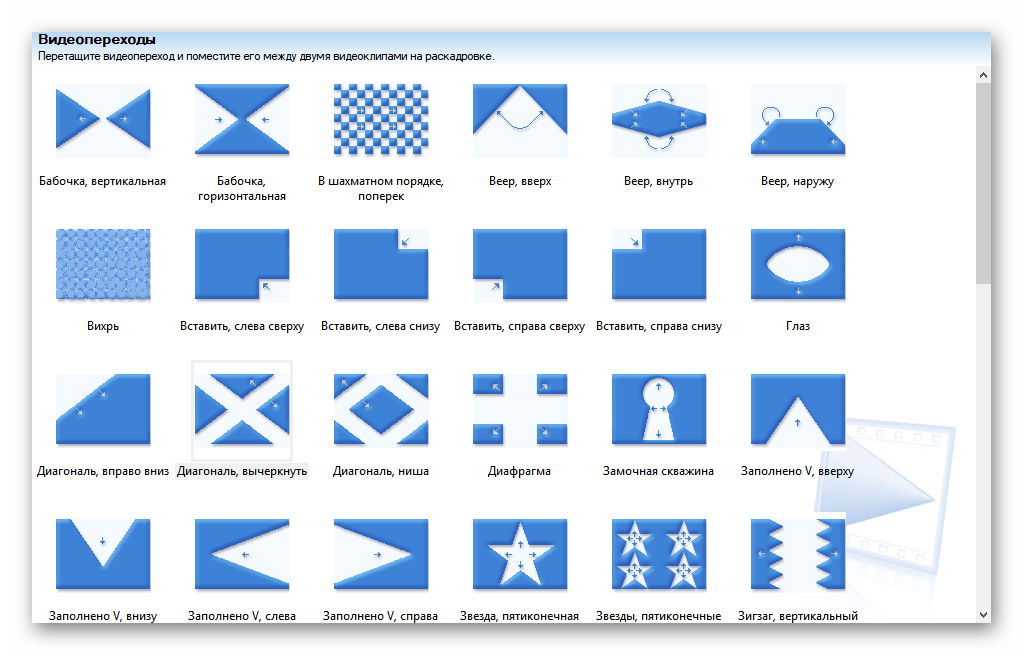
- Чтобы использовать видеопереход, захватите его левой клавишей мышки и перетащите на раскадровку, отпустив его между фрагментами.
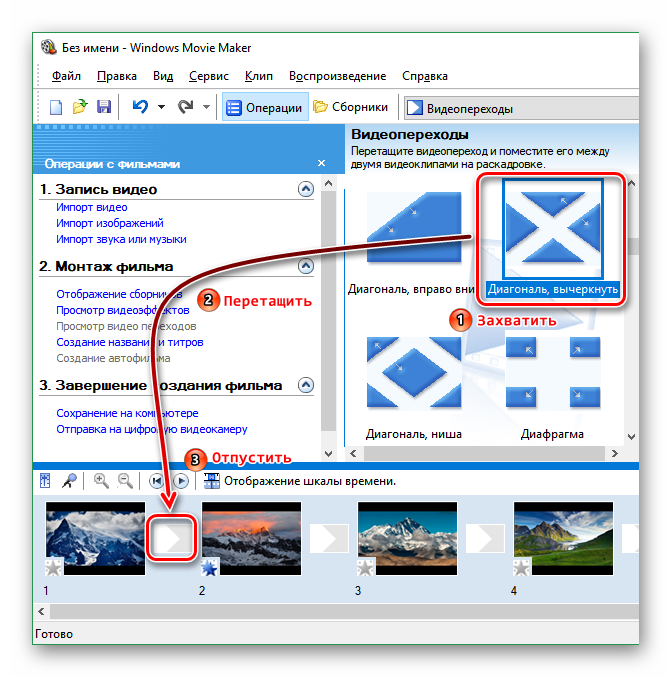
В указанном на скриншоте окошке вы увидите примененный видеопереход.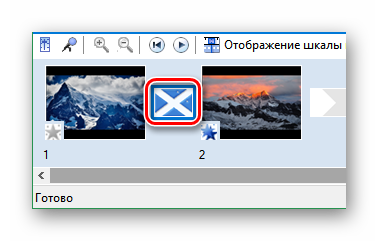
- Установите переходы между другими кадрами, точно так же перенеся их на раскадровку.
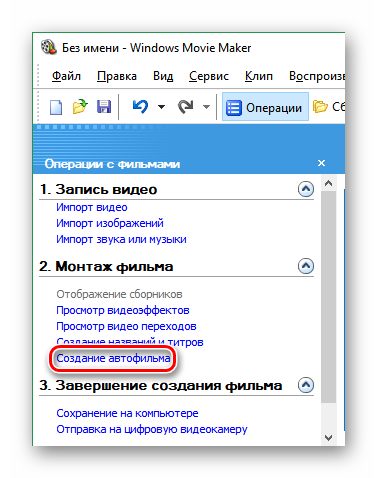
Автофильм
В Муви Мейкере есть интересная функция, которая будет полезна, если времени на создание ролика мало. Она самостоятельно настраивает эффекты и переходы в зависимости от выбранного вида монтажа.
- Кликните «Создание автофильма» на панели задач.

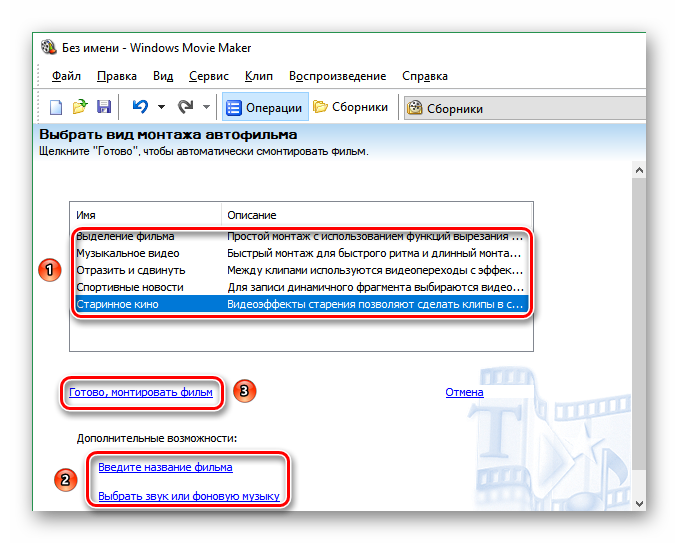
- На открывшемся экране выберите один из предложенных вариантов монтажа. Каждый из них сопровождается небольшим описанием, а также имеет довольно «говорящее» название. По желанию вы можете указать название фильма и добавить фоновую музыку, нажав на соответствующие ссылки. Когда все будет готово, щелкните по подтверждающей это кнопке.

- Теперь во встроенном проигрывателе вы можете просмотреть результат работы функции «Автофильм». Если что-то не устроит, то можно вручную заменить эффекты и переходы.

Футажи
Простота Movie Maker – это одновременно и его достоинство, и недостаток. Поскольку он имеет только одну видеодорожку, нетнакладывать одно видео на другое и работать с футажами с прозрачным фоном, а значит вы не сможете вставить в свой проект, например, красивую рамку. Однако простые футажи, которые можно добавить в начало и конец фильма, а также между отдельными фрагментами могут быть использованы в этой программе.
- Футажи для Movie Maker можно скачать бесплатно.
- Обратите внимание на расширение загруженного файла. Если это MP4, то Movie Maker версии 2.6 его не откроет. В этом случае нужно будет переконвертировать его в поддерживаемый программой формат, например, AVI. Сделать это можно с помощью любого онлайн- или офлайн-конвертера.
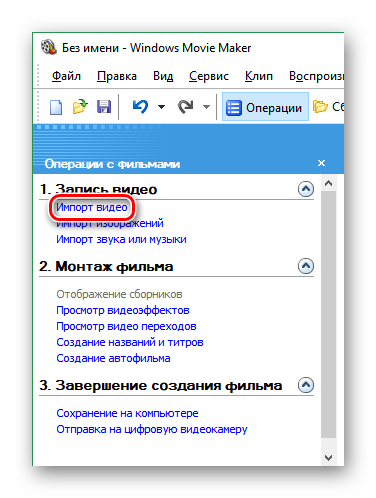
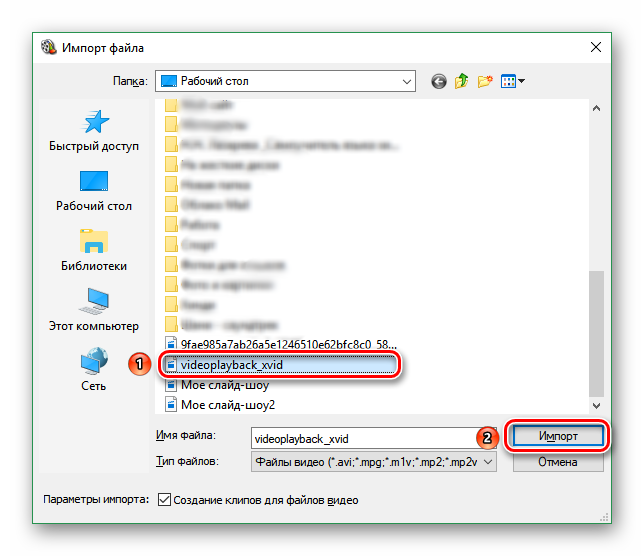
- Когда файл будет подготовлен, нажмите на панели задач «Импорт видео».

- Найдите футаж и отправьте его в редактор кнопкой «Импорт».

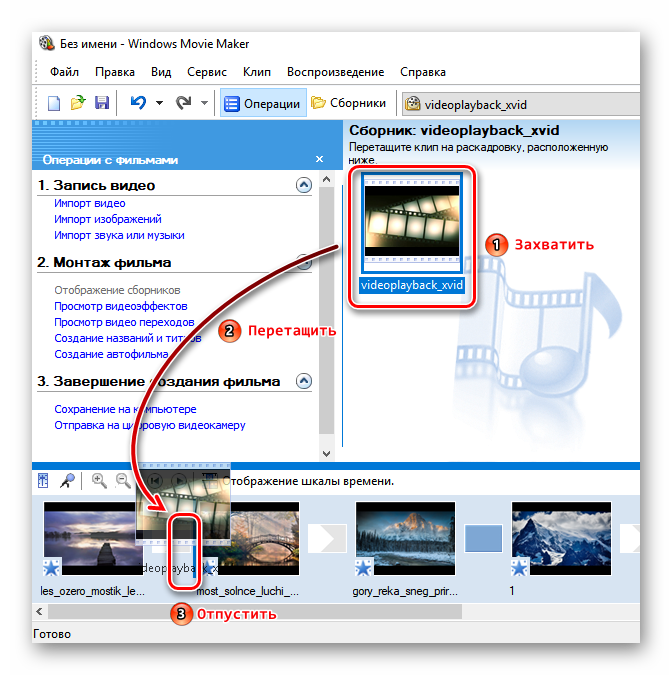
- Из сборника перетащите его в нужное место на раскадровке.

Когда результат применения вышеперечисленных функций покажется вам удовлетворительным, можно сохранить файл и наслаждаться просмотром созданного фильма или слайд-шоу.
0
0
голоса
Рейтинг статьи