Linux and Windows systems have major differences, with different file systems and protocols in use. Sharing files between them can be difficult, especially because they use two different sharing protocols. That doesn’t mean it’s impossible to mount a Windows share folder on Linux, however. Follow along below to find out how.
Also read: How to View Shared Files and Folders in Windows 10
Before you do anything, you need to ensure that Windows has been correctly set up to allow for networking file sharing.
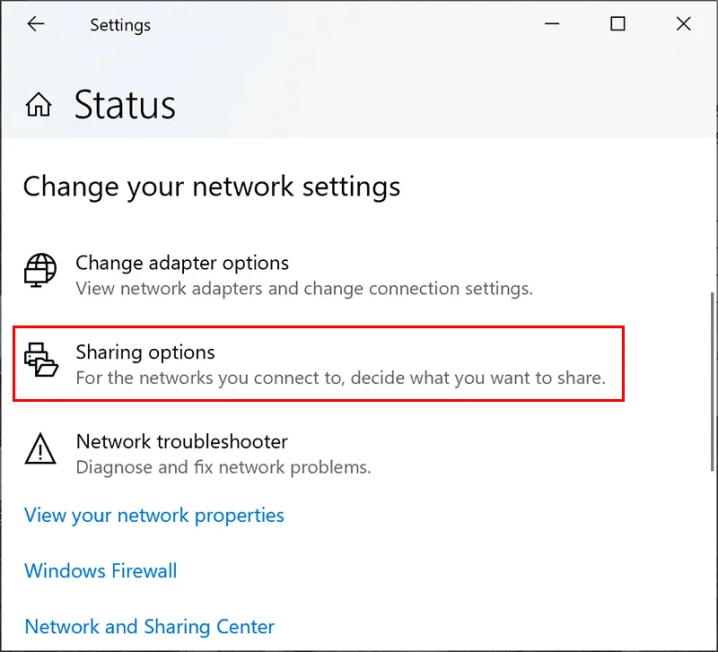
To enable this on Windows, right-click on the network icon in the notifications area of your Windows taskbar. From here, click «Open Network & Internet Settings.»

Under the «Status» category, click «Sharing options.»

In your Windows sharing options menu, make sure that «Turn on network discovery» and «Turn on file and printer sharing» are enabled.
Click the radio buttons next to both options to make sure this is the case.

Click «Save changes» to save your settings. Once this is done, open Windows File Explorer and locate the folder you’re looking to share with your Linux PC.
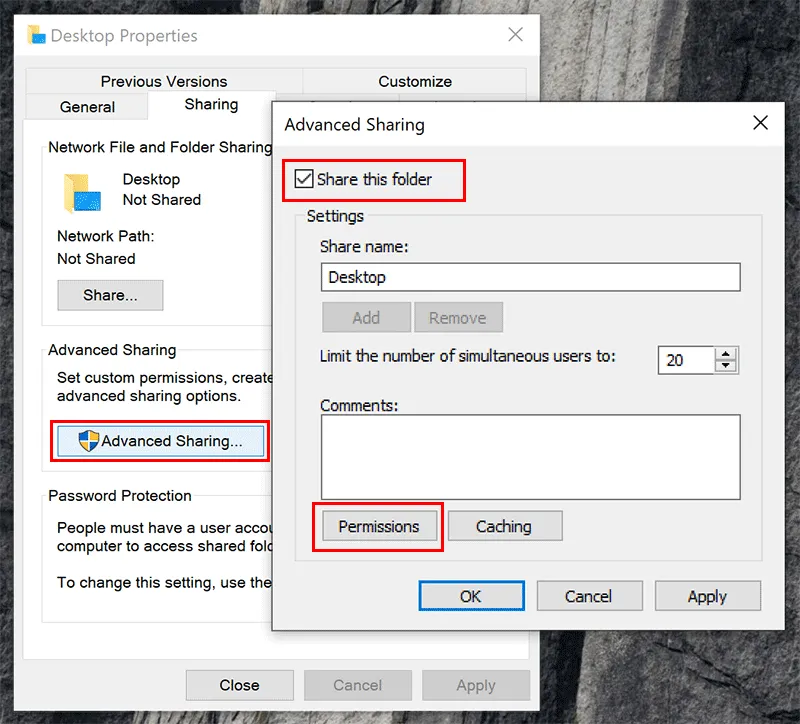
Right-click the folder and click «Properties.»

In your folder properties, click the «Sharing» tab, then click «Advanced Sharing.» Click to enable the «Share this folder» checkbox, then click «Permissions.»

Under the «Permissions» section, set the control rights for your folder. By default, Windows will grant read-only access to your files.
If you want to allow everyone to read or write to the folder, click «Allow» for the «Full Control» permissions set. Set these permissions to suit your own requirements.

Once you’re done, click «OK» three times to close each of the dialog boxes.
Your folder should now be shared on your network, ready for you to access from your Linux PC.
Install CIFS-utils
Depending on your Linux distribution, you may be able to mount your Windows-shared folder automatically in your distribution’s file explorer.
However, this may not work correctly. The safest way to mount Windows-shared folders on Linux is to use the CIFS-utils package and mount the folder using the Linux terminal.
This allows Linux machines to access SMB file shares used by Windows PCs.

To install CIFS-utils, open a new terminal window. For Ubuntu and Debian-based distributions, type:
sudo apt install cifs-utils
For Arch users, type:
Once installed, you can then mount your Windows share folder from the Linux terminal.
Mount Windows SMB Share on Linux
You’ll need to create a mount directory before you can mount your Windows SMB-shared folder on Linux. This is where Linux will mirror the contents of your shared folder.
To do that, open a terminal window and type:
Once created, type the following:
sudo mount.cifs //Windows/SharedFolder /mnt/share -o user=account
Replace «Windows» with the IP address or hostname for your Windows PC and «SharedFolder» with your shared folder name. For the username, replace «account» with your Windows username or full Microsoft account email.

You’ll be asked to provide your Windows password before the mounting process is complete. Type this in, then click Enter. If you used the correct information, your Windows folder should now be mounted and accessible in the folder you created.
Sharing Files Between Linux and Windows in Dual Boot
Sharing files between Windows and Linux works great when you mount a shared folder between the two devices, but can you still share files with a dual boot setup? Linux and Windows have separate file systems. Linux usually uses Ext4, while Windows uses NTFS and also works with FAT32. This doesn’t mean it’s impossible to see and share files, though.
You’ll need a compatible Windows system, build 20211 or higher, and a few other resources to make it work. Don’t worry. Everything is free. This guide walks you through each step in the process, including a way to read and share files between Windows and Linux.
Frequently Asked Questions
1. Why do I get a syntax error when trying to mount a folder in Linux?
Either there’s a small error in the command in the terminal window, or you have a space in the folder name. Spaces don’t always come across correctly in the syntax. Instead of recognizing the command as the full name of the folder, the system sees two unrelated items.
Avoid this by placing the name in quotes. For instance, Shared Folder would become «Shared Folder.» Of course, you can also just rename the Windows 10 folder to place the words together or have a dash between them.
2. Can I mount a shared folder if I use VirtualBox?
Yes. The process should work the same way. You can also share devices, such as USB drives.
3. Can I mount guest, network, or password protected folders?
Yes, but since you’re not using the main Windows 10 account, you will need to adjust the syntax a bit. Plus, if you’re mounting a network folder, you’ll also need the server or machine name.
While this guide applies to Ubuntu, it should work for most major Linux distros as well. It lists the syntax for different scenarios, assuming you’ve already completed all of the steps (except the final mounting) above.
4. Why do I only have read access for the shared folder?
If you want to store files in the shared folder from Linux, make sure you have full read/write access to the folder in Windows. If the Windows user account only has read permission, this is the only permission you’ll have from Linux as well. You must change your account permissions from within Windows 10. For companies, you’ll need your IT admin to make the change for you.
5. Why aren’t folder changes showing up?
If you’ve made changes to the permissions of the folder, they may not show up immediately in Linux. You’ll need to remount the folder for changes to take effect.
Use the command above to remount any shared folders. This should ensure things work as expected. If you have any random glitches, remounting typically fixes them.
Wrapping Up
Mounting Windows and Linux shared folders gives you the freedom to access your most important files, no matter the operating system. The SMB protocol is well supported on Linux, so you shouldn’t find it difficult to continue accessing your Windows files and folders once you’ve installed the CIFS-utils package.
If you’d rather use a single system, here are five of the best Linux distros for Windows users you could use.

Crystal Crowder has spent over 15 years working in the tech industry, first as an IT technician and then as a writer. She works to help teach others how to get the most from their devices, systems, and apps. She stays on top of the latest trends and is always finding solutions to common tech problems.
Subscribe to our newsletter!
Our latest tutorials delivered straight to your inbox
 Обновлено:
Опубликовано:
Что такое Linux и CIFS простыми словами.
Работа с общими папками Windows происходит с использованием протокола CIFS (SMB). Все примеры в данном руководстве выполняются на Linux Ubuntu и CentOS.
Подготовительная работа
Синтаксис mount
Ручное монтирование
Автоматическое монтирование
Примеры
Подготовка
Установка пакетов
Для монтирования общей папки необходимо установить набор утилит для работы с CIFS.
CentOS:
yum install cifs-utils
Ubuntu:
apt install cifs-utils
Сетевые порты
Если мы будем монтировать сетевую папку, сервер которой находится за брандмауэром, необходимо открыть следующие порты:
- 137/UDP
- 138/UDP
- 139/TCP
- 445/TCP
Синтаксис
mount.cifs <папка на сервере> <во что монтируем> <-o опции>
* вместо mount.cifs можно написать mount -t cifs.
Пример:
mount.cifs //192.168.1.1/public /mnt
* простой пример монтирования папки public на сервере 192.168.1.1 в локальный каталог /mnt.
Если нам не известны расшаренные папки на сервере, мы можем воспользоваться утилитой smbclient. Для начала установим ее.
а) на RPM (Rocky Linux / РЕД ОС / Red Hat / CentOS / Fedora):
yum install samba-client
б) на Deb (Debian / Ubuntu / Astra Linux / Mint):
apt install samba-client
Теперь вводим:
smbclient -L 192.168.1.1
или, при необходимости авторизоваться на файловом сервере:
smbclient -L 192.168.1.1 -U username
Ручное монтирование
Теперь монтирование можно выполнить следующей командой:
mount.cifs //192.168.1.10/share /mnt -o user=dmosk
* в данном примере будет примонтирован каталог share на сервере 192.168.1.10 в локальную папку /mnt под учетной записью dmosk.
То же самое, с использованием домена:
mount.cifs //192.168.1.10/share /mnt -o user=dmosk,domain=dmosk.local
Автоматическое монтирование CIFS через fstab
Для начала создаем файл, в котором будем хранить данные авторизации при подключении к общей папке:
vi /root/.smbclient
И добавляем в него данные следующего вида:
username=dmosk
password=dPassw0rd
domain=dmosk.local
* в этом примере создана пара логин/пароль — dmosk/dPassw0rd; domain указывать не обязательно, если аутентификация выполняется без него.
Задаем права на созданный файл, чтобы доступ был только у пользователя, скажем, root:
chmod 600 /root/.smbclient
chown root:root /root/.smbclient
Теперь открываем конфигурационный файл fstab:
vi /etc/fstab
и добавляем в него следующее:
//192.168.1.10/share /mnt cifs user,rw,credentials=/root/.smbclient 0 0
* в данном примере выполняется монтирование общей папки share на сервере с IP-адресом 192.168.1.10 в каталог /mnt. Параметры для подключения — user: позволяет выполнить монтирование любому пользователю, rw: с правом на чтение и запись, credentials: файл, который мы создали на предыдущем шаге.
Чтобы проверить правильность настроек, вводим следующую команду:
mount -a
Примеры использования опций
Версии SMB
Если на стороне Windows используется старая или слишком новая версия протокола SMB, при попытке монтирования мы можем получить ошибку mount error(112): Host is down. Чтобы это исправить, указываем версию:
mount.cifs //192.168.1.10/share /mnt/ -o vers=1.0
* монтирование по протоколу SMB1.0
Монтирование от гостевой учетной записи
Если сервер принимает запросы без логина и пароля, то клиент подключается, как гость:
mount.cifs //192.168.1.10/share /mnt -o guest
или в fstab:
//192.168.1.10/share /mnt cifs guest 0 0
Права на примонтированные каталоги
При монтировании папки мы можем указать определенные права:
mount.cifs //192.168.1.10/share /mnt -o file_mode=0777,dir_mode=0777
Для указания владельца, который будет назначен для примонтированного каталога, используем:
mount.cifs //192.168.1.10/share /mnt -o uid=33,gid=33
* чтобы посмотреть идентификаторы пользователя, вводим id -u <имя пользователя> и id -g <имя группы>.
В этой статье мы рассмотрим, как в Linux смонтировать общую сетевую папку, расположенную на хосте Windows. В Windows для доступа к общим сетевым папкам используется протокол SMB (Server Message Block), который ранее назывался CIFS (Сommon Internet File System). В Linux для доступа к сетевым папкам Windows по протоколу SMB можно использовать клиент cifs-utils или Samba.
- Смонтировать сетевую папку в Linux с помощью cifs-util
- Автоматическое монтирование сетевой папки в Linux
- Linux: подключиться к сетевой папке с помощью клиента samba
Содержание:
Совет. Для доступа к сетевым папкам по SMB/CIFS используется порт TCP/445. Для разрешения имени используются порты UDP 137, 138 и TCP 139. Если эти порты закрыты, вы сможете подключиться к сетевой папке Windows только по IP адресу.
Смонтировать сетевую папку в Linux с помощью cifs-util
Вы можете смонтировать сетевую папку, находящуюся на Windows хосте, с помощью утилит из пакета cifs-util. Для установки пакета выполните команду:
- В Ubuntu/Debian:
$ sudo apt-get install cifs-utils - В CentOS/Oracle/RHEL:
$ sudo dnf install cifs-utils
Создайте точку монтирования:
$ sudo mkdir /mnt/share
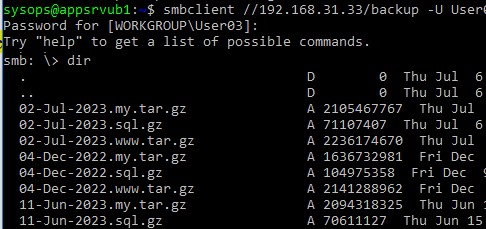
Теперь вы можете смонтировать сетевую папку с компьютера Windows под пользователем User03с помощью команды:
$ sudo mount.cifs //192.168.31.33/backup /mnt/share -o user=User03
Укажите пароль пользователя Windows для подключения к сетевой папке.
![]()
При подключении сетевой SMB папки можно задать дополнительные параметры:
$ sudo mount -t cifs -o username=User03,password=PasswOrd1,uid=1000,iocharset=utf8 //192.168.31.33/backup /mnt/share
- //192.168.31.33/backup – сетевая папка Windows
- /mnt/share – точка монтирования
- -t cifs – указать файловую систему для монтирования
- -o опции монтирования (эту опцию можно использовать только с правами root, поэтому в команде используется sudo)
- username=User03,password=PasswOrd1 – имя и пароль пользователя Windows, у которого есть права доступа к сетевой папке. Можно указать имя пользователя guest, если разрешен анонимный доступ к сетевой папке
- iocharset=utf8 – включить поддержку кодировки UTF8 для отображения имен файлов
- uid=1000 – использовать этого пользователя Linux в качестве владельца файлов в папке

По умолчанию шары Windows монтируются в Linux с полными правами (0755). Если вы хотите изменить права по-умолчанию при монтировании, добавьте в команду опции:
dir_mode=0755,file_mode=0755
Если вы хотите использовать имя компьютера при подключении сетевого каталога Windows, добавьте в файл /etc/hosts строку:
IP_АДРЕС ИМЯ_КОМПЬЮТЕРА
Чтобы не указывать учетные данные пользователя Windows в команде монтирования сетевой папки, их можно сохранить в файле.
Например:
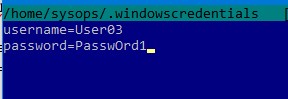
$ mcedit ~/.windowscredentials
Добавьте в файл:
username=User03
password=PasswOrd1
Для подключения к папке под анонимным пользователем:
username=guest
password=
Если нужно указать учетную запись пользователя из определенного домена Active Directory, добавьте в файл третью строку:
domain = vmblog.ru
Измените права на файл:
$ chmod 600 ~/.windowscredentials
Теперь при подключении сетевой папки вместо явного указания имени пользователя и пароля можно указать путь к файлу:
$ sudo mount -t cifs -o credentials=/home/sysops/.windowscredentials,uid=1000,iocharset=utf8 //192.168.31.33/backup /mnt/share
Отмонтировать сетевую SMB папку:
$ sudo umount /mnt/share
Автоматическое монтирование сетевой папки в Linux
Можно настроить автоматическое монтирование сетевой папки Windows через /etc/fstab.
$ sudo mcedit /etc/fstab
Добавьте в файл следующую строку подключения SMB каталога:
//192.168.31.33/backup /mnt/share cifs user,rw,credentials=/home/sysops/.windowscredentials,iocharset=utf8,nofail,_netdev 0 0
- rw – смонтировать SBM папку на чтение и запись
- nofail – продолжить загрузку ОС если не удается смонтировать файловую систему
- _netdev – указывает что подключается файловая система по сети. Linux не будет монтировать такие файловые системы пока на хосте не будет инициализирована сеть.
Вы можете указать версию протокола SMB, которую нужно использовать для подключения (версия SMB 1.0 считается небезопасной и отключена по-умолчанию в современных версиях Windows). Добавьте в конец строки с настройками подключения параметр vers=3.0.
//192.168.31.33/backup /mnt/share cifs user,rw,credentials=/home/sysops/.windowscredentials,iocharset=utf8,nofail,_netdev,vers=3.0 0 0
Если на стороне хоста Windows используется несовместимая (старая версия) SMB, при подключении появится ошибка:
mount error(112): Host is downилиmount error(95): Operation not supported
Чтобы сразу смонтировать сетевую папку, выполните:
$ mount -a
Linux: подключиться к сетевой папке с помощью клиента samba
Установите в Linux клиент samba:
- В Ubuntu/Debian:
$ sudo apt-get install smbclient - В CentOS/Oracle/RHEL:
# dnf install smbclient
Для вывода всех SMB ресурсов в локальной сети:
$ smbtree -N
Вывести список доступных SMB папок на удаленном хосте Windows:
smbclient -L //192.168.31.33 -N
Если в Windows запрещен анонимный доступ, появится ошибка:
session setup failed: NT_STATUS_ACCESS_DENIED
В этом случае нужно указать учетную запись пользователя Windows, которую нужно использовать для подключения:
smbclient -L //192.168.31.33 -U User03
Если нужно использовать учетную запись пользователя домена, добавьте опцию –W:
smbclient -L //192.168.31.33 -U User03 –W Domain

Для интерактивного подключения к сетевой папке Windows используется команда:
smbclient //192.168.31.33/backup -U User03 -W Domain
или
smbclient //192.168.31.33/backup -U User03
Для анонимного доступа:
smbclient //192.168.31.33/backup -U Everyone
После успешного входа появится приглашение:
smb: \>
Вывести список файлов в сетевой папке:
dir
Скачать файл из сетевой папки Windows:
get remotefile.txt /home/sysops/localfile.txt
Сохранить локальный файл из Linux в SMB каталог:
put /home/sysops/localfile.txt remotefile.txt
Можно последовательно выполнить несколько команд smbclient:
$ smbclient //192.168.31.33/backup -U User03 -c "cd MyFolder; get arcive.zip /mnt/backup/archive.zip"
Полный список команд в smbclient можно вывести с помощью команды help. Команды smbclient схожи с командами ftp клиента.
При использовании команды smbclient может появиться ошибка:
Unable to initialize messaging contextsmbclient: Can't load /etc/samba/smb.conf - run testparm to debug it.
Чтобы исправить ошибку, создайте файл /etc/samba/smb.conf.
Если на хосте Windows отключен протокол SMB 1.0, то при подключении с помощью smbclient появится ошибка:
Reconnecting with SMB1 for workgroup listing.
protocol negotiation failed: NT_STATUS_CONNECTION_RESET
Unable to connect with SMB1 -- no workgroup available.
In the Windows operating system, there is a feature called file sharing. On one computer, you can set up windows-shared folder that will be accessible to all computers on the local network. This is done using the SMB protocol, which has several versions. In Linux, you can open and create shared folders using Samba.
The Samba server supports all versions of the SMB protocol. However, there are some compatibility issues. In this article, I will explain how to access a Windows Shared folder in Linux using popular desktop environments and the command line.
Table of Contents
Why It May Not Work?
In older versions of Linux distros and Windows 7 everything worked fine because they used the SMB1 protocol. However, there have been several changes recently. In 2017, the Wannacry virus emerged, which exploited vulnerabilities in the SMB1 protocol. As a result, modern versions of Windows have disabled support for SMB1 and now use SMB3 by default. Samba has also disabled SMB1 since version 4.11. However, SMB2 and SMB3 lack support for device discovery in the local network.
In general, this is no longer necessary because there is a network discovery protocol called Zeroconf. In Linux, its open-source implementation, Avahi, is used. Linux servers and NAS storage can publish themselves on the local network using this protocol. So that, there is no need to support it in SMB. However, Microsoft decided to use its own protocol called WS-Discovery, and that’s where the problems began.
At the time of writing this article, Linux system has issues with discovering shared folders in the local network. The Nautilus file manager in GNOME does not support WS-Discovery at all, and there are no production-ready terminal utilities for it either. You can track the current status of implementing WS-Discovery support in this GVFS issue. However, in 2020, the KDE team added support for this protocol in the Dolphin file manager using kdsoap-ws-discovery-client.
Later, a program for KDE called Smb4k appeared, which can discover network resources using Avahi and the WS-Discovery protocol, but it needs to be compiled with a special option. So that, in GNOME, you can only open a Windows shared folder by knowing the IP address of the computer where it is located. Whereas in KDE, it is a bit more convenient to do so.
Ensure that Everything is Set Up Correctly in Windows
Previously, it was enough to go to File Explorer and enable file sharing there. But it no longer works that way. First, you need to make your current network private in Windows. By default, only private networks are considered secure, and Windows machines can be discovered in them. To do this, open Settings -> Network & Internet -> Ethernet and select Network Profile Type -> Private Network:

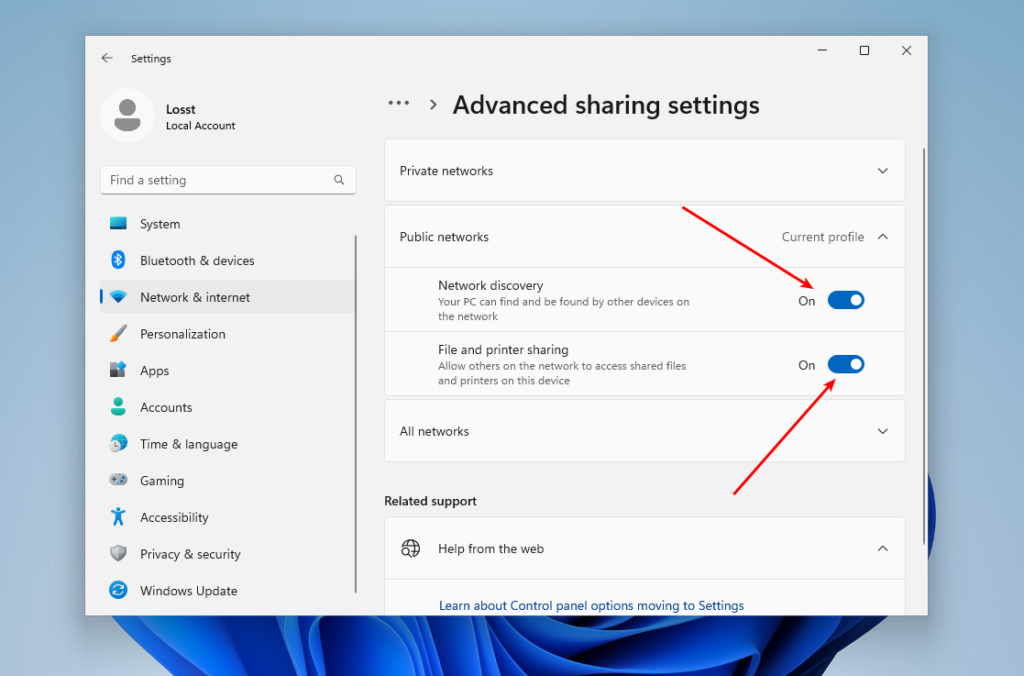
If your current network is wireless, you should do the pretty same thing. Next, go back and select Advanced Sharing Settings. In this window, enable Network discovery and File and printer sharing:
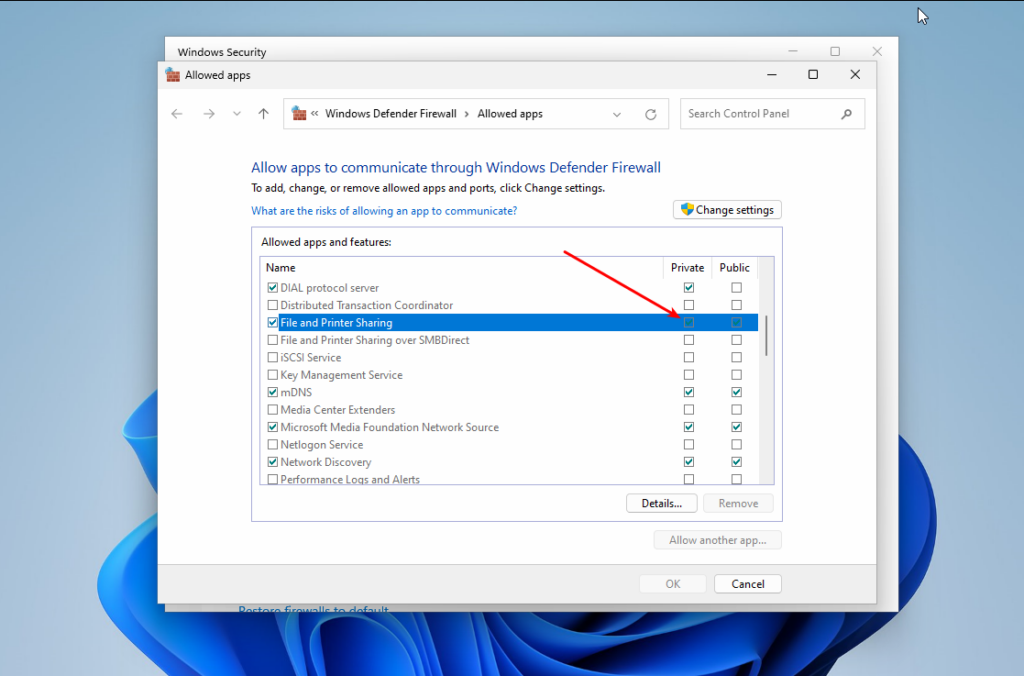
Finally, you need to ensure that the firewall is configured correctly and allows SMB connections. To do this, go back to the main Settings menu, then open Privacy & Security -> Firewall & network protection. Click on Allow an app through the firewall:
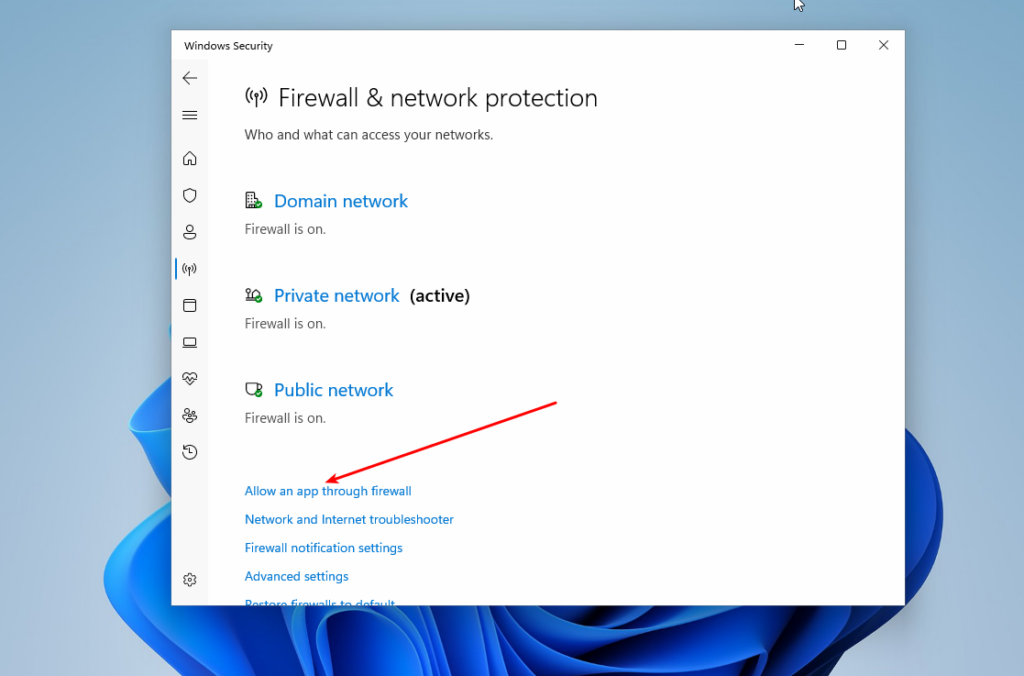
Make sure that File and printer sharing and Network discovery are enabled for Private networks:
That’s it. Now you can go to your Linux machine.
Finding Shares in Linux Terminal
Although there are no command-line tools for working with WS-Discovery, you can try to find devices with shared resources using Nmap. This program cannot search for resources like Avahi does, but it can help you find IP addresses with an open port 445. This port is used by SMB. To do this, you need to install the following packages (Ubuntu):
sudo apt install nmap smbclient
Or Fedora:
sudo dnf install nmap samba-client
Also, you need to find out the IP address range of your local network. You can take your IP address and mask and just replace the fourth digit with zero. For example:
ip -br a
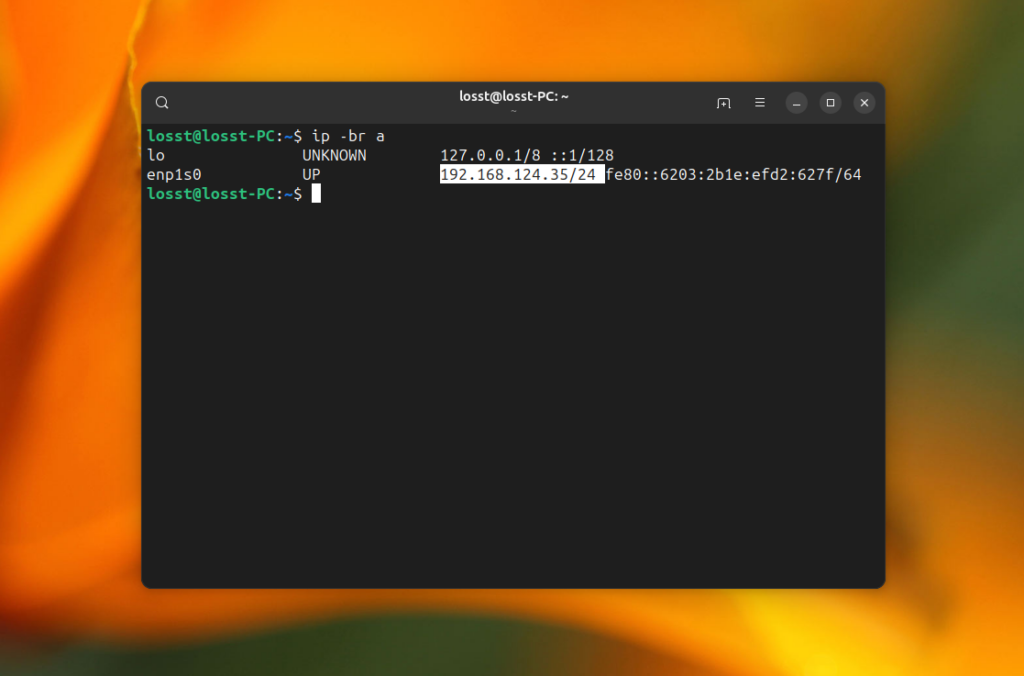
The command for the search will look like this. Replace 192.168.124.0/24 with your local network address range and run it in the the terminal window with sudo privileges:
nmap -p 445 --open -n -Pn 192.168.124.0/24

The -p option specifies the port 445, -Pn option disables ICMP discovery and treats all IP addresses as alive, -n disables DNS hostname resolution. The command may take quite a while, but as a result, it will find hosts with open port 445 if such hosts exist in your local network:
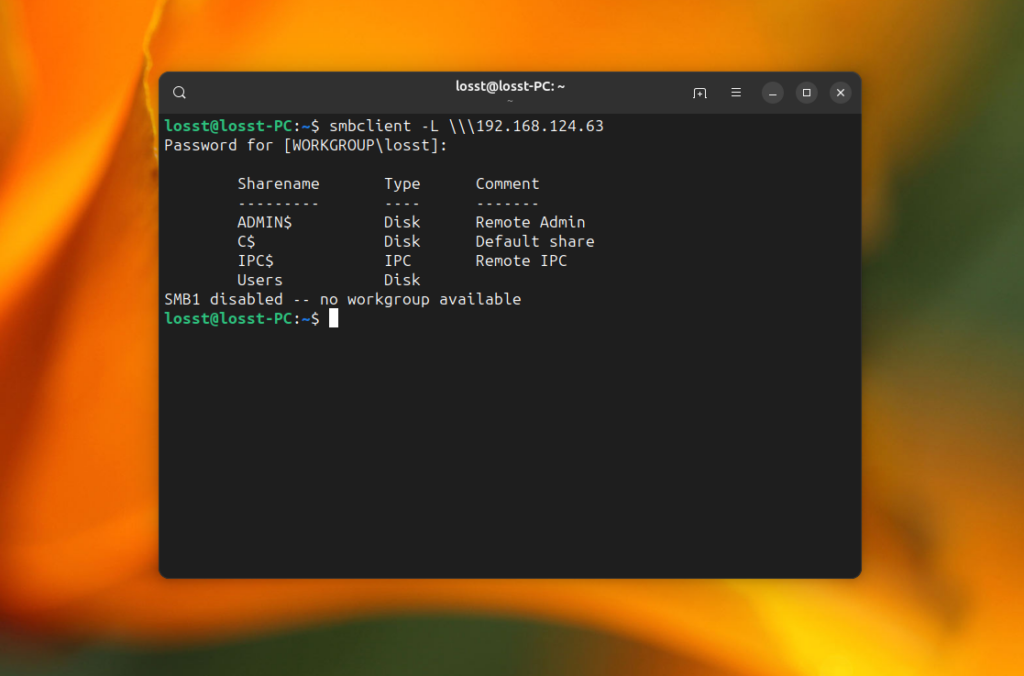
This can’t be considered as normal network discovery, but it works. Now you can use smbclient to see which shared folders are on the server that you found. For example:
smbclient -L \192.168.124.63
The command will ask you to enter the share password. Usually, it is password for your Windows user, and then it will show all available shared folders:
Now let’s have a look at how to mount them.
Open Shared Folder in KDE Dolphin
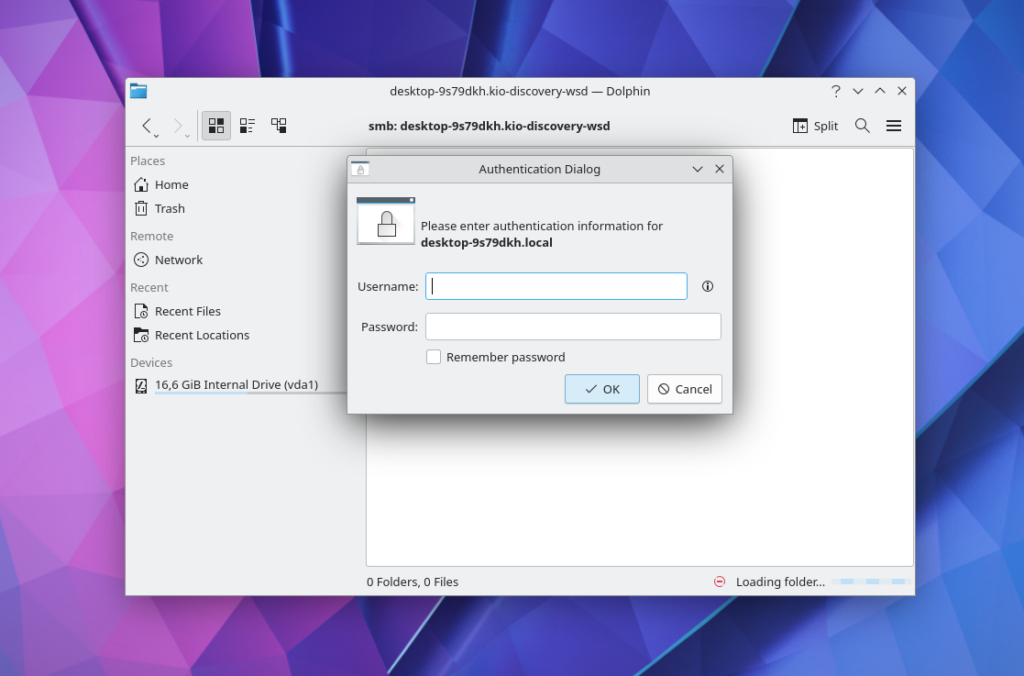
To open a shared folder in KDE, you can use the Dolphin file manager. As I mentioned earlier, here you can see all available computers that have network drive on the local network. To do this, run Dolphin, then open Network, and then Shared Folders (SMB):

Click on one of the resources and enter the username and password to view the available folders:
This is what shared folders from Windows 11 look like. Here you can find windows files:

If network discovery does not work in your case, you can still enter the IP address of the resource in the text field at the top of the window and connect to it. For example, smb://192.168.124.63/

Open Share in GNOME Nautilus
If you want to connect to a Windows shared folder in the GNOME graphical interface, you can use the Nautilus file manager. Open Other Locations and find at the bottom of the window the inscription Connect to Server and a field for entering an address.
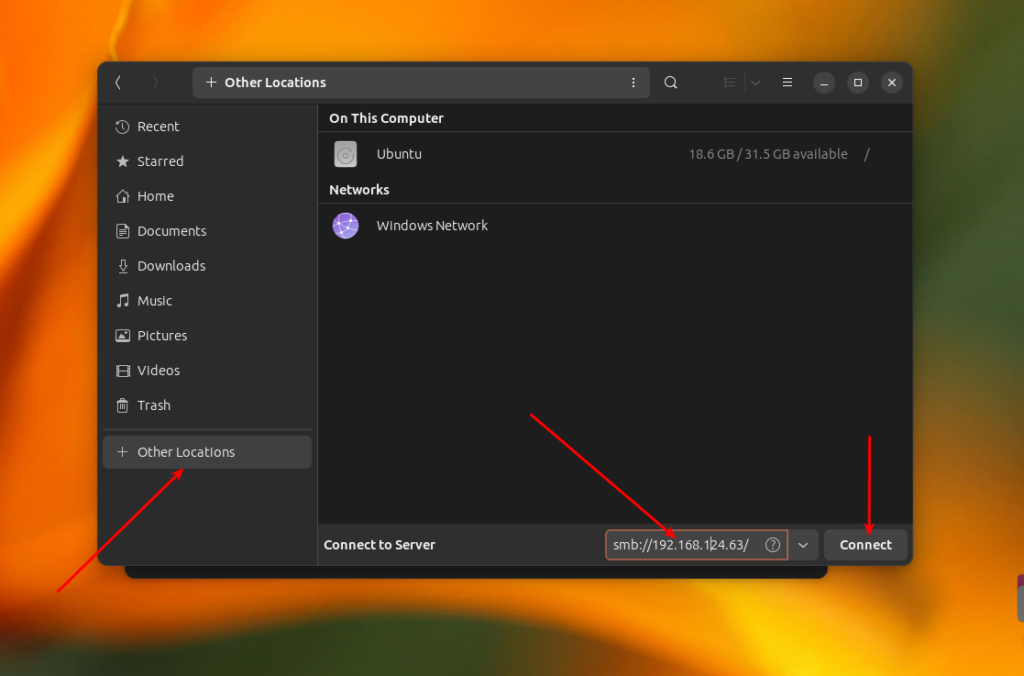
There’s no point in opening the Windows Network item, because GVFS, which is used in GNOME for disk mounting, does not support the WS-Discovery protocol. To connect to a remote windows share located on a server with IP 192.168.124.63, enter this address and press the Connect button:
smb://192.168.124.63
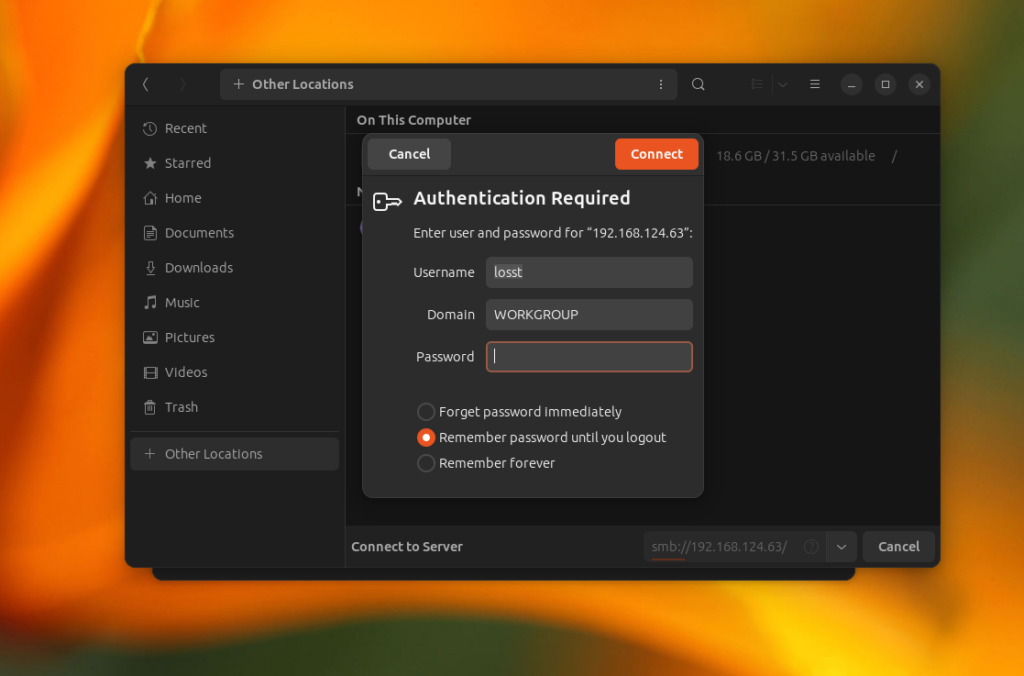
In the next window, you need to enter a password and after that, you can view the files of the shared folder:
After this, you can browse your windows folders.
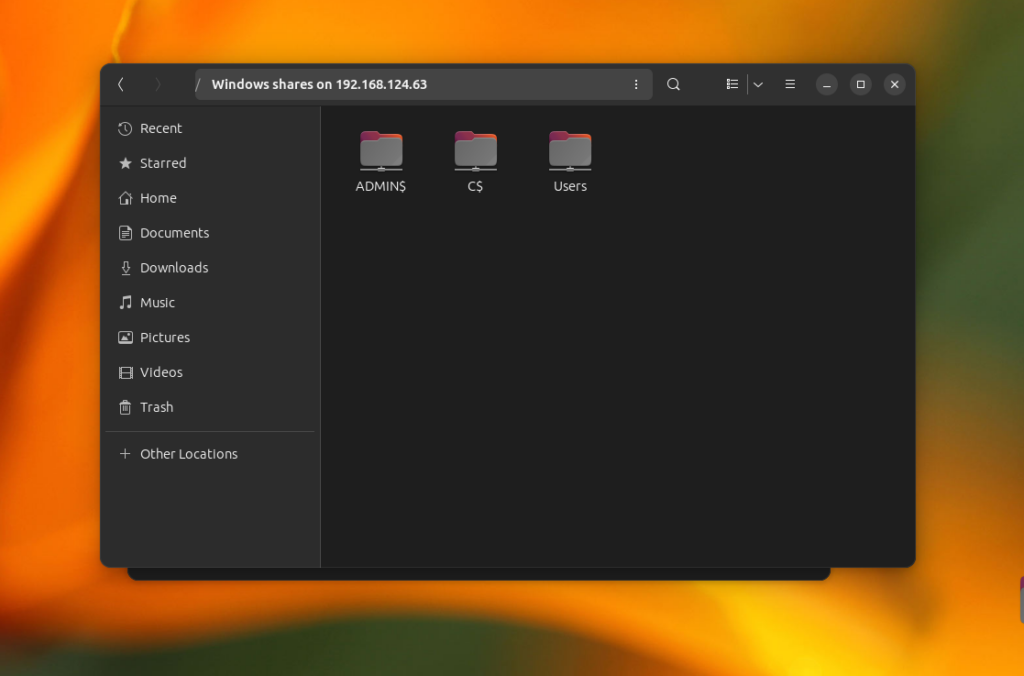
Additionally, you can use a shortcut on the left panel to access a remote share which is already mounted.
Mounting a Shared Folder in the Terminal
If you want to mount windows share in the terminal, you can use cifs-utils and the mount command. Firstly, install the cifs-utils package. The command for Ubuntu:
sudo apt install cifs-utils
In Fedora:
sudo dnf install cifs-utils
Now, you can execute the mount command specifying the cifs file system type and the username option. Note that you can’t mount the root of the cifs share, you need to add any folder in the path. For example, Users on 192.168.124.63:
sudo mount -t cifs -o username=losst //192.168.124.63/Users /mnt/
If you want to have write access to the windows share folder, you need to add the uid option with the identifier of your user. For the first user, it’s usually 1000:
sudo mount -t cifs -o username=losst,uid=1000 //192.168.124.63/Users /mnt/
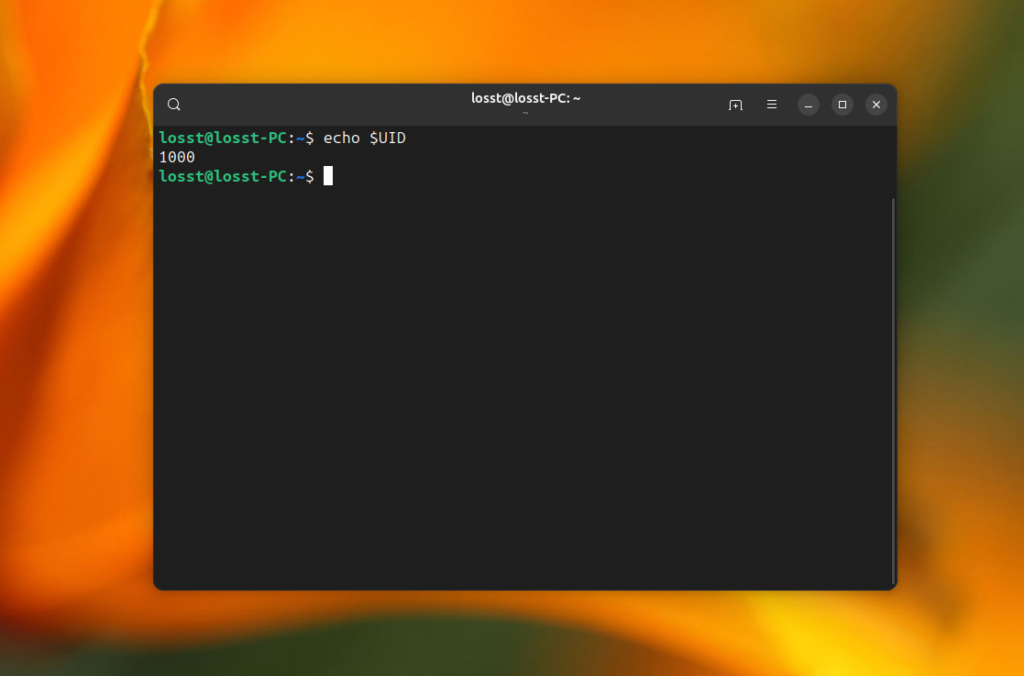
You can find the identifier of the current user in the UID environment variable:
echo $UID
If you want to mount share automatically at system startup, you need to save the share username and password in a credentials file, for example, /etc/share/windows-credentials. For instance:
sudo mkdir -p /etc/share/
/etc/share/windows-credentialsusername=losst
password=password
domain=workgroup
And then add the following line to the /etc/fstab file:
/etc/fstab//192.168.124.63/Users /mnt/share cifs credentials=/etc/share/windows-credentials,uid=1000,nofail 0 0
The nofail option is needed to allow your computer to boot even if the remote folder could not be mounted. After this, reload systemd settings:
sudo systemctl daemon-reload
Create the mount point directory:
sudo mkdir -p /mnt/share
You can check that everything is working using the following command:
sudo mount /mnt/share
If everything is ok, you could see contents of mounted share in the /mnt/share folder:
Wrapping Up
In this article, we looked at how to mount Windows network share in Linux using a graphical interface or in the terminal. Despite some difficulties, this can be used quite effectively. Do you know any other applications or scripts which can help with that? Share their names in the comments section below.
Found a mistake in the text? Let me know about that. Highlight the text with the mistake and press Ctrl+Enter.

The article is distributed under Creative Commons ShareAlike 4.0 license. Link to the source is required .
If you’ve been looking for a solution on how to mount Windows folders on Linux, we’ve got just the right guide for you to follow.
Mounting Windows OS folders on your Linux system is possible depending upon your Linux distribution, and the Windows folders are automatically mounted on Linux. However, this may need to be revised. Note that Linux and Windows have significant file system differences. Sharing files between them can be difficult as they may use two different sharing protocols.
We will first discuss how we can share folders from Windows. Then, we will discuss how the shared folder can be accessed from Linux using CIFS. We will also discuss how a folder shared from Linux can be accessed on Windows using samba. Finally, we will see how shell scripting can mount a folder from Linux.
Note: While mounting the Windows folder from Linux, Linux doesn’t honor the access control list that NTFS maintains, so permissions are ignored. If you are really concerned, Windows have the option to encrypt your hard disk.
The easiest and safest way to mount Windows folders on Linux is via using the CIFS-utils package. Then, you will be able to mount the folder on Linux. The following paragraphs discuss setting up the CIFS-utils package to mount Windows files.
Sharing file system from Windows
Before proceeding with the setup on Linux, ensure you have shared the file correctly in Windows. Follow the steps below:
- First, open the “Network Sharing and Internet Settings”. For Windows 10 users, it is located at Settings > Network & Internet > Status > Network and Sharing Center. In Windows 11, you can find the network sharing option in Control Panel > Network and Internet > Network and Sharing Center. From the status category, select “Sharing Options”.
- In the Windows Sharing option, ensure that “Turn on network discovery” and “Turn on file and printer sharing” are enabled. Click save changes to save your changes.

- Now locate the folder you want to share. Right-click on the folder and select the properties.
- Click the sharing tab and then Advanced sharing.
- Enable the “Share this folder” checkbox.
- Provide the desired permissions.
- Click OK to close the dialog box.
Now, we will move towards the steps to be applied to Linux.
Install the CIFS-utils
The very first step is to install the CIFS-utils. For this purpose, open your terminal and then type the following command first to update your system and then install the cifs-utils package:
$sudo apt update
$sudo apt install cifs-utils
The above command will work for Ubuntu and Debian. The arch users may try the following command:
$pacman -S cifs-utils
For CentOS and Fedora, you should try the following command:
$sudo dnf install cifs-utils
After the installation, you can mount the Windows shared folder on Linux.
Create a mount directory
First, you will create a directory where Linux will mirror the shared folder’s contents. Open your Terminal and type the following command:
$sudo mkdir /mnt/share
Mount the folder
Now, you can mount the folder with the help of the following command:
$sudo mount.CIFS //Windows/SharedFolder /mnt/share -o user=account
Here, replace the Windows with the name or internet protocol (IP) address. Also, replace the SharedFolder with the name of your shared folder. For the user name, replace the account with your Windows user name or Microsoft account email. You will be prompted for the password. Upon success, no output will be produced. You can also provide the password on the command line as follows:
$sudo mount.cifs //Windows/SharedFolder /mnt/share -o user=account, password=abc
You can also provide a domain or workgroup as follows:
$sudo mount.CIFS //Windows/SharedFolder /mnt/share -o user=account, domain=domain, password=abc
Note: Now, you can verify that the Windows shared folder is successfully mounted using the commands “mount” or “df –h”.
After the shared files are mounted, the mount folder becomes the root directory of the mounted file system. Even you can work with remote files as they are local files.
Mounting a folder permanently
If you want to mount a windows folder permanently in Linux, edit /etc/fstab file and add the following line:
//servername/sharename /media/windowsshare cifs guest,uid=1000,iocharset=utf8 0 0
Then use the following command:
$sudo mount –a
The above command will mount all the entries listed in /etc/fstab.
Unmount a shared folder
You can also unmount a shared folder by using the following command on Linux:
$sudo umount ~/WindowsShare/
We can also use the samba to mount access to Linux files on Windows. Follow the steps below.
Install samba
First, install the samba using the following command on your Terminal:
$dnf install samba
Modify LinuxSE
In case your system is protected by LinuxSE, enable samba to access your home directory using the following command:
$setsebool -P samba_enable_home_dirs on
You can verify if the value is correctly set by using the following command:
getsebool samba_enable_home_dirs
Enable your user
Samba requires specifying the users that can connect. For this purpose, use the following command:
$smbpasswd -a <your-user>
You can check the list of allowed user types using the following command:
$pdbedit -L –v
You can also remove a user using the following command:
$smbpasswd -x <user-name>
Start samba
You can start the samba via the following command:
$systemctl start smb
To enable samba to start automatically on system startup, use the following command:
$systemctl enable smb
Configure the firewall
Now you need to enable the samba to access the network via configuring the firewall. For this purpose, type the following command:
$firewall-cmd --add-service=samba --permanent
Access folder from Windows
Now you can access the Linux folders in Windows. For this purpose, open Windows explorer and type the address of the Linux machine preceded by two backslashes. Provide the username and password. You should now be able to access your home directory.
Using a shell script to mount Windows folder on Linux
You can use the shell script to mount the Windows folder on Linux. Following is the shell script:
user=linuxuser
pass=passwd4user
wincp=//win_hostname
winpath=/win_directory
linuxpath=/linux_mntdir
fstab_line=$wincp$winpath /mnt$linuxpath smbfs
username=$user,password=$pass 0 0
/etc/init.d/smb start
echo $fstab_line >> /etc/fstab
mount –a
This article discusses how we can mount a Windows shared folder on Linux using CIFS. We also discussed accessing a Linux-shared file/folder on Windows. We also discussed how shell scripting could be used to mount Windows folders on Linux. Note that mounting a drive may cause performance issues. In these cases, you may want to perform CIFS performance tuning, such as setting CIFSMaxBufSize.
If this guide helped you, please share it.