![]()
Download Article
![]()
Download Article
Whether you want to install Linux on your PC from a flash drive or just boot into a portable version of Linux, you can easily create a bootable Linux USB flash drive in Windows 10. We’ll show you how to download the software you’ll need to create your Linux USB drive, how to make the drive bootable, and how to make your PC boot from the flash drive instead of your hard drive.
-

1
Download an ISO image of Ubuntu (or your preferred Linux flavor). To boot into Linux from a USB drive, you’ll need to download a file that contains an «image» of the Linux installation media. You can download the ISO for any flavor of Linux you want to install, including Debian and Linux Mint, and the process to create a bootable USB drive will be similar.
- To download an ISO of Ubuntu, head over to https://ubuntu.com/download/desktop and click the Download link next to the latest stable version. Ubuntu is a good option if you want to try out Linux without installing it—once you boot from the flash drive, you’ll be able to choose an option to try before you install.[1]
- To download a Debian ISO, go to https://www.debian.org/download. The download will start automatically.
- You can get the Linux Mint ISO from https://linuxmint.com/download.php. Just click the Download button next to the version you want to install.
- If you just want to try out Linux without installing it on your hard drive, try Puppy Linux, which allows you to boot right into a functional Linux desktop. You can download a Puppy Linux ISO from https://puppylinux.com/index.html#download.
- To download an ISO of Ubuntu, head over to https://ubuntu.com/download/desktop and click the Download link next to the latest stable version. Ubuntu is a good option if you want to try out Linux without installing it—once you boot from the flash drive, you’ll be able to choose an option to try before you install.[1]
-
2
Install Rufus on your PC. Rufus is free software that allows you to create bootable USB drives from ISO images.[2]
Go to https://rufus.ie and click the Rufus link under «Download» toward the bottom of the page to download the installer.- When the download is complete, double-click the file that begins with «rufus» and ends with «exe» and follow the on-screen instructions to install.
- Once Rufus is installed, you’ll find it in your Windows menu. Launch Rufus if it doesn’t start automatically after the installation.
Advertisement
-
3
Insert your USB flash drive into an available USB port. You’ll want to use a blank USB drive, as everything on the drive will be deleted. Back the drive up before you continue if necessary.
-
4
Open Rufus and select your USB flash drive in Rufus. If multiple external drives are connected to your PC, Rufus may select the wrong drive. Click the proper drive in the «Device» menu if it’s not accurate.
-
5
Select FreeDOS from the «Boot selection» menu. It’s just under the Device selector. This tells Rufus to make the drive bootable.[3]
- The default options for «Partition scheme» and «Target system» are filled in automatically and you won’t need to change them.
-
6
Click the Select button and choose the ISO you downloaded. This button is to the right of the «Boot selection» menu. You should find the ISO in your default download folder, which is usually called Downloads.
-
7
Leave the other parameters in place and click START. This begins the process of writing the ISO image to the flash drive.
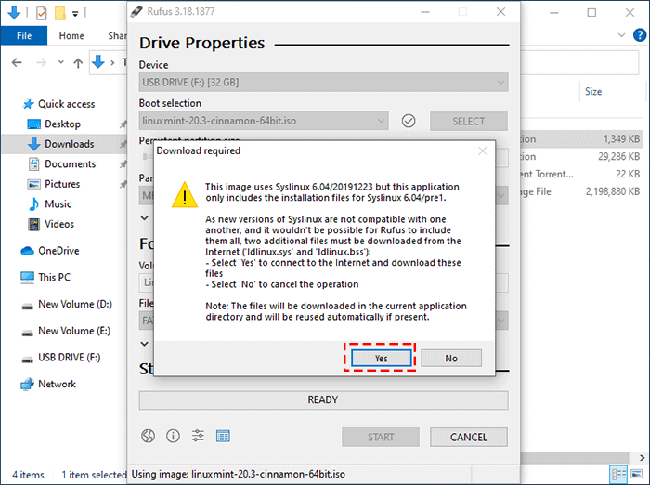
- If Rufus prompts you to download an additional file to write the ISO, click Yes to continue.[4]
- If Rufus prompts you to download an additional file to write the ISO, click Yes to continue.[4]
-
8
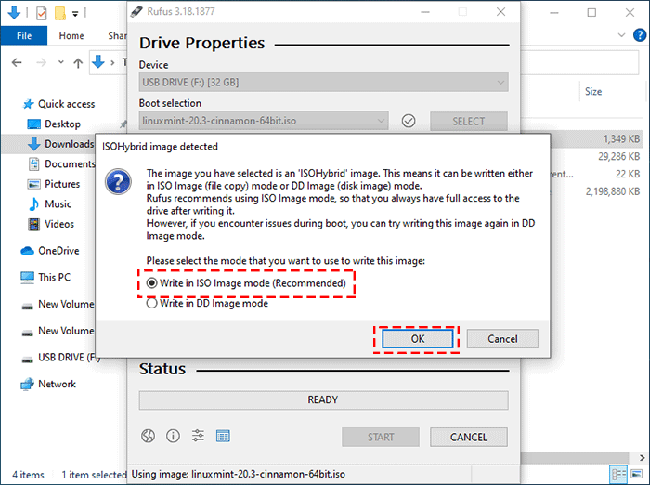
Select «Write in ISO image mode (Recommended)» and click OK. This option will appear when the «ISOHybrid image detected» window appears. This just means you can use the same ISO on a bootable DVD or USB drive as needed.
-
9
Click OK to create your bootable USB drive. This involves erasing the data on the drive and copying the necessary files for making the drive bootable. You’ll see a Status bar at the bottom of the window once the process begins.
- When the drive is ready, the status bar will say «READY.» At this point, you’ll have a bootable Linux USB drive.


Advertisement
-
1
Reboot your PC with the USB drive attached. If you’ve already set your PC to boot from USB, your computer will immediately boot into Linux once it comes back up.
- If your PC boots back into Windows 10 instead, continue with this method.
- skip to step 5. Otherwise, the steps to get to the BIOS are going to be different depending on your motherboard—you’ll usually press a key immediately after the PC restarts, which is usually F2, F10, or Del. Search for your PC model and «BIOS setup key» to find your key. Alternatively, try the following steps to boot into the BIOS from Windows 10:
- Press Windows key + i to open Settings.
- Click Update & Security.
- Click Recovery in the left panel.
- Click Restart now under «Advanced startup.»
- On the «Choose an option» screen, click Troubleshoot.
- Click UEFI Firmware Settings and then click Restart. The PC will boot into the BIOS or UEFI.
-
2
Locate the Boot menu. Once the computer boots into the BIOS, look for a menu called Boot, Boot Order, or Boot Options. You might have to enter a menu called Advanced, System, Storage, or Configuration to find it. What you’re looking for a list of boot devices, such as «Hard Drive» and «Removable Device» in order.
-
3
Set the USB drive or «Removable Storage» to be first in the boot order. You may have to select an item called «1st boot device» or similar to bring up a list of options. The goal is to make your USB drive or removable media the first item in the list so your PC tries to boot from devices that are connected to it.
-
4
Save and exit the BIOS. You’ll usually do this by pressing the F10 key or by selecting an option called Save & Exit. Once saved, your PC will reboot.
-
5
Install and run Linux. When your PC boots from the flash drive, you’ll be prompted to choose some regional and keyboard settings. If you made an Ubuntu drive, you can choose Try Ubuntu without installing to use the live version of Ubuntu, or install it on your hard drive. Regardless of the version of Linux you want to install, the remaining steps will be simple—follow the on-screen instructions to get started!
- If you’re installing Puppy Linux, you’ll boot right into a functional Linux desktop without having to install.


Advertisement
Ask a Question
200 characters left
Include your email address to get a message when this question is answered.
Submit
Advertisement
-
Any time the flash drive is connected to your PC upon reboot, your PC will try to boot from it before it boots from your hard drive. If you don’t want to boot from the USB drive the next time you reboot, remove the drive before rebooting.
Thanks for submitting a tip for review!
Advertisement
About This Article
Article SummaryX
1. Download the ISO image.
2. Install Rufus.
3. Insert a blank USB drive.
4. Use Rufus to flash the ISO to the drive.
5. Go into the BIOS and set the USB drive as first in the boot order.
6. Reboot into Linux.
Did this summary help you?
Thanks to all authors for creating a page that has been read 86,731 times.
Is this article up to date?
Last updated on
Linux live USB can be great tool in many problematic situation for Windows. in this post Linux Mint and Ubuntu were used as live USB while windows version is 7. Sometimes you may need to deal with undeletable files, cleaning viruses, format of windows partitions or many other problems. Creating and booting Linux live USB is easy task for experienced person but it could be a problem for inexperienced ones. This article will cover all steps of this process in great detail.
- Step 1 Choose Linux distro
- Step 2 Create a bootable USB stick for Ubuntu/Linux Mint
- Step 3 Start Linux bootable USB on the windows machine
- Step 4 Browse windows partitions
Step 1 Choose Linux distro
Nowadays they are too many types and flavors of Linux distro. In my opinion best and more intuitive for windows users are: Linux Mint and Ubuntu. They have big and responsive community, nice user interface and are perfect choice if you want to try Linux. Another advantage is that they come with many tools and programs so you will be able to do far more actions if you need:
- open and read PDF files
- dealing with archives and other types
- connect to WiFi
- high security
You can donwload the Linux mint from here:
- Donwload Linux Mint
Usually I prefer to have the latest version of Cinnamon desktop edition 64 bits. But for older laptops or machines you can get an older one and 32 bits. The older version is smaller in size and could be better if the laptop has USB 2.0 ports.
There are two ways to get older Linux Mint version:
- Chose from Linux mint alternatives: Linux Mint All Downloads
- You can search for older versions on google: for example — Download Linux Mint 15
- Editions for Linux Mint 15 «Olivia»
- Linux Mint 15 «Olivia» — Cinnamon (32-bit)
In order to download Ubuntu you can got to this link: Download Ubuntu Desktop. The same notes about the older PCs apply here. Here are the older downloads for Ubuntu: Ubuntu Alternative downloads
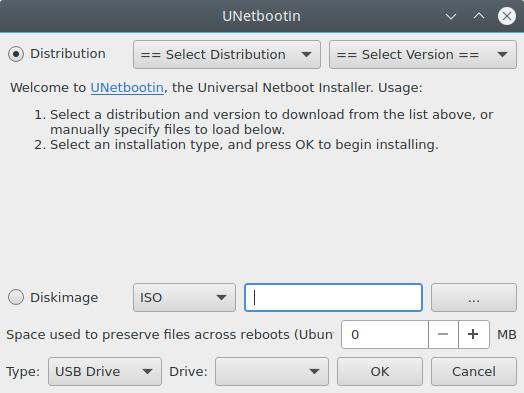
Once you choose your prefer one you can donwload the ISO file. Another option to download this file is by using a program like UNetbootin — Universal Netboot Installer to download your version by selecting it from a drop down menu.
In this post we will work with : Linux Mint 17.1 «Rebecca» — Cinnamon (32-bit) . Because is small enough 1.3 GB and still is covered by support.
Step 2 Create a bootable USB stick for Ubuntu/Linux Mint
Downloading program
The process of creating bootable linux USB is extremely simple if you use a program like:
- UNetbootin — Universal Netboot Installer — working on Mac, Windows and Linux
- LinuxLive USB Creator — for windows
In this article we will work with UNetbootin. So you can download it and install it. After the install you can start it.
Preparing USB drive
You will need to have USB stick 2GB or higher if you want to use the latest Linux Mint or Ubuntu versions. 1 GB would be enough for older Linux distros. Plug the USB stick and make sure that all your important files from the USB are saved on your hard disk.
Format the USB in FAT32 file system prior to use the USB in UNetbootin. After the format of the USB you may need to unplug and plug it back in order to avoid error like:
You must first mount the USB drive /dev/sdb1 to a mountpoint. Most distributions will do this automatically after you remove and reinsert the USB drive.
Create the live USB
Now you need to create the live USB by this steps:
- Select
- Distribution — if you want the program to download a specific Linux distro or
- Diskimage — in this post we are going to select the previously downloaded ISO file for Linux Mint 17.1 «Rebecca» — Cinnamon (32-bit
- Select the USB Drive
- Press OK and wait for the operation to be completed
- Finally when USB stick is ready press: Exit
Step 3 Start Linux Bootable USB on the windows machine
Change Bios settings
First you will need to modify your BIOS in order to make your computed to boot from the USB stick. This step may be optional or differ depending on your computer. In this post we will work on ASUS.
In order to change boot configuration on your BIOS:
- restart the windows PC — the one which will start the linux live USB
- Press F2 — or any other key which is given for your laptop ( it could be DEL, F8 or F10
- Use arrows to navigate and go to BOOT
- Select BOOT device priority order
- Choose your USB or external drive to be on first position
- Finally save the changes by F10 and you computer will restart.
Start Linux Live
If you are able to boot from the USB you will see a screen with several options like(from the UNetbootin):
- Default
- Help
- Try Ubuntu without installing — we are going to use this option.
- Install Ubuntu
- Check disc for defects
- Test memory
- Press
[Tab]to edit options — this is an option if you have any problems starting the Ubuntu/Linux Mint live.
Once the boot menu is loaded go to: Try Linux Mint without installing. If the Linux Mint is not loading — there is a black or white screen for long time. Then you can check next section.
Fix nouveau failing to load graphical interface
If you have problems — the Linux is not loading or you get an error like:
nouveau E[Xorg] 4156 failed to failed to idle chanel
or
nouveau E[ DRM] failed to create 0x80000080, -22
You can do:
- select the option that you want for your Linux
- for example Start Linux Mint
- Press TAB
- add this add the end of the line:
- nouveau.modeset=0
- Press Enter
For more information you can read here:
- Troubleshooting Nouveau
- Linux Mint Installation Guide — Boot Options
Step 4 Browse windows partitions
Once the Linux is started you can view, open and modify windows files from the windows partition. By default the windows partitions should be mounted by default and they will be visible on the Linux Desktop. You can open them in the default file browser and work with them the same as you were using windows.
In case of not visible partitions you can try to list and mount them manually. Listing the partitions is done by:
sudo fdisk -l
sudo dh -f
mounting new partition can be done by:
sudo mount -t /dev/sda2
Linux Mint is known as the best desktop system for modern, elegant, and comfortable. It combines many advantages of Ubuntu. Many users prefer to switch to Linux Mint because of its ease of use. Burn the Linux Mint ISO into a USB drive to create a Linux Mint bootable USB, which can help you to install Linux Mint and boot it whenever you need it. Check the step-by-step tutorial if you wondering how to a create Linux Mint bootable USB in Windows 10.
- Part 1: Download Linux Mint ISO Image to Your Windows 10 PC
- Part 2: Create a Linux Mint Bootable USB Drive in Windows 10
- Part 3: Access Linux Mint Operating System from a USB Drive
Part 1: Download Linux Mint ISO Image to Your Windows 10 PC
Before creating a Linux Mint bootable USB drive in Windows 10, you need to download a Linux Mint ISO image file to your Windows 10 PC. (If you already have a Linux Mint ISO image, just move to part 2)
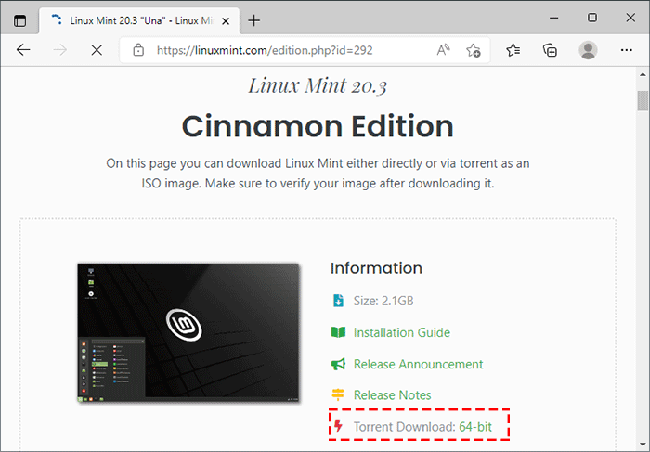
Step 1: Download 64-bit Linux Mint. Please note that the Linux Mint file is a torrent file rather than an ISO file.
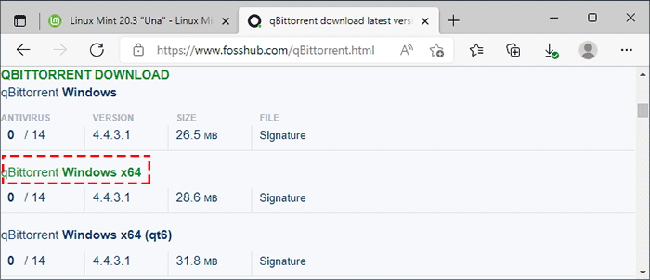
Step 2: Download qBittorrent Windows x64.
Step 3: Continue to install the qBittorrent and open it.
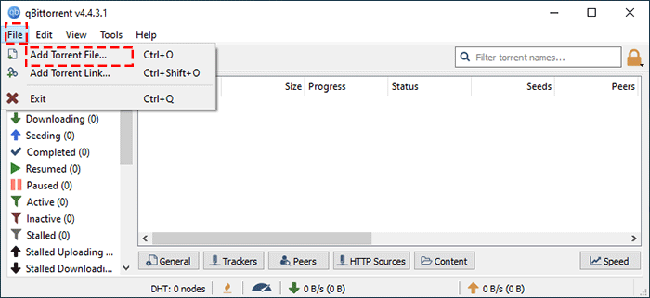
Step 4: After opening it, click File>Add Torrent File… to add the qBittorrent Torrent file to it.
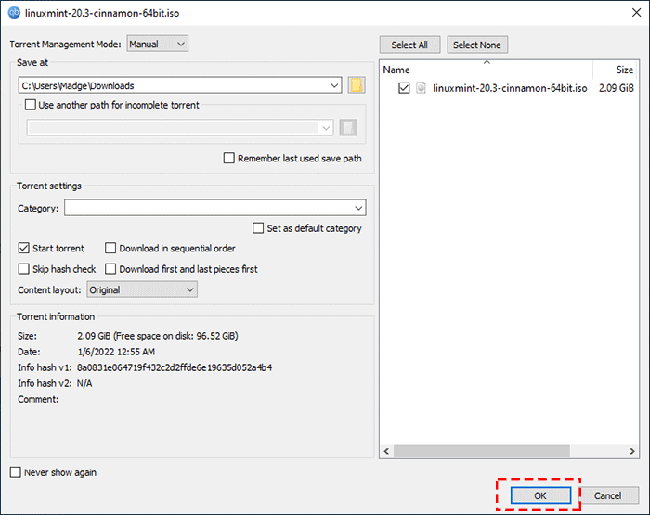
Step 5: Continue to click OK.
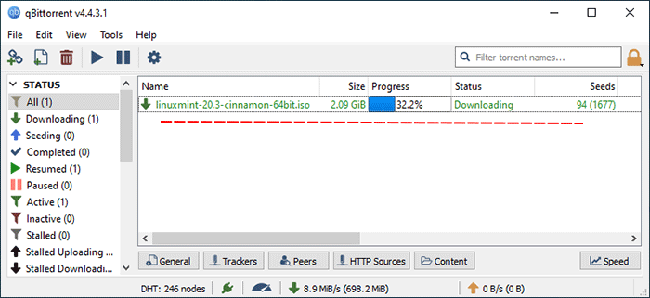
Step 6: Now qBittorrent start downloading the Linux Mint ISO image.
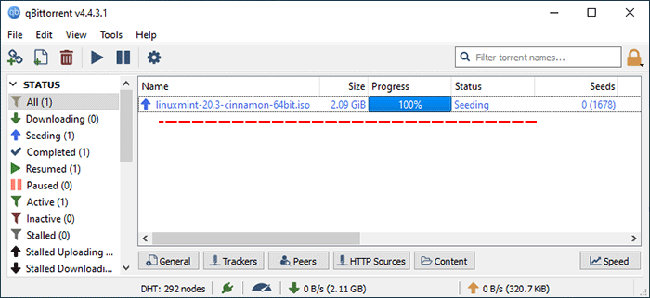
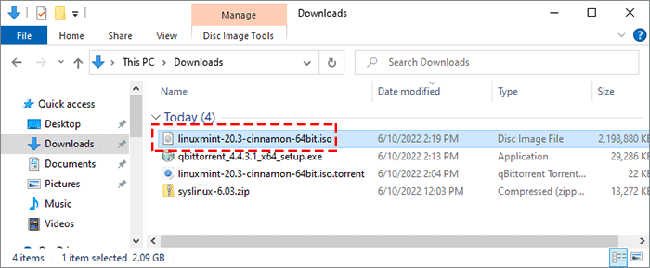
Step 7: The Linux Mint image is fully downloaded and you can see the Linux Mint iso file in the Downloads folder.
- Way 1: Create a Linux Mint Bootable USB Drive using iSunshare ISO Genius
- Way 2: Create a Linux Mint Bootable USB Drive with Rufus
- Way 3: Create a Linux Mint Bootable USB Drive from Command Prompt
Way 1: Create Linux Mint Bootable USB Drive using iSunshare ISO Genius
To create a Linux Mint bootable USB drive in Windows 10, you can use iSunushare ISO Genius, which is both free and secure software to create bootable USB drives for Windows and Linux. So, you can try this tool to burn a Linux Mint ISO image to a USB drive on your Windows 10 PC. Here’s how:
Step 1: Free download iSunshare ISO Genius and install it to your Windows 10 computer, then run the program.
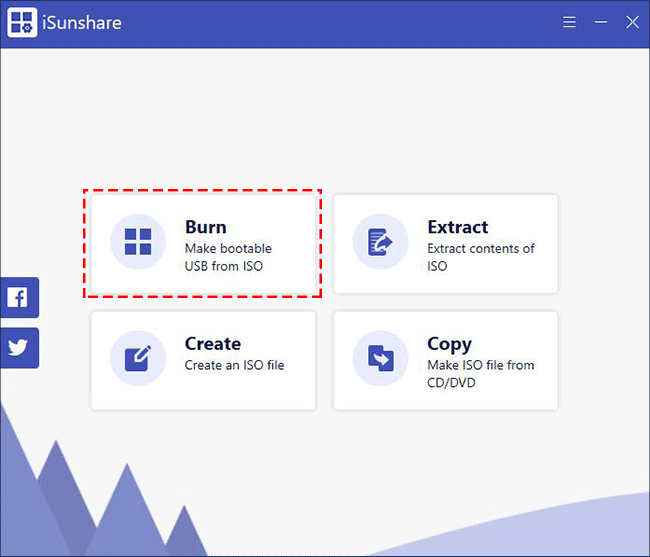
Step 2: Click Burn on the toolbar to start.
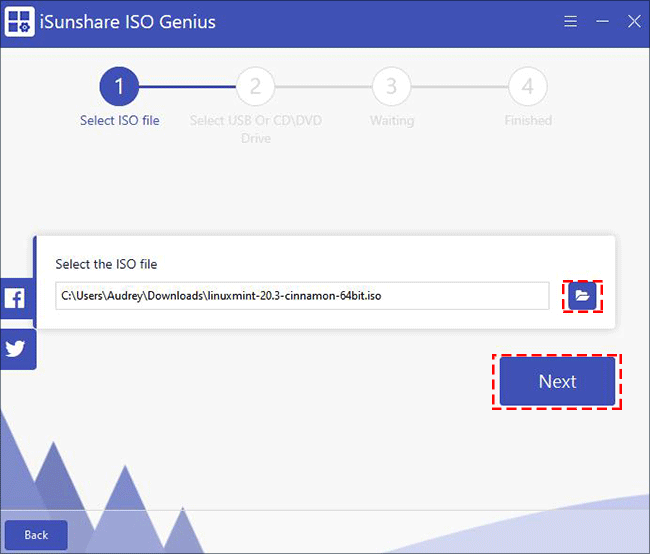
Step 3: On the next page, you need to select the downloaded Linux Mint ISO file.
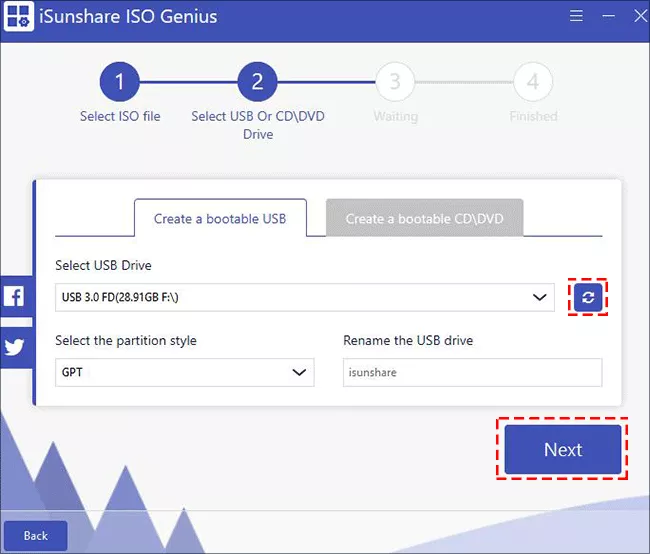
Step 4: Make sure you have inserted a USB flash drive (here we recommend you use a USB drive larger than 4 GB) into the slot of your Windows 10 PC.
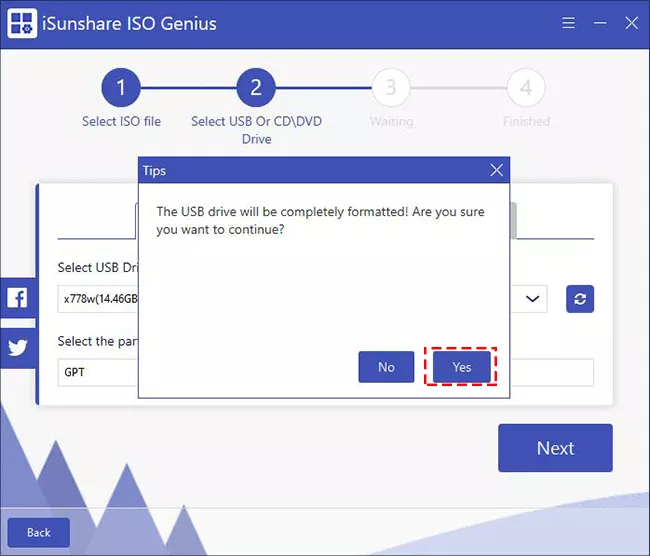
Step 5: Then a dialog will pop up prompting you that the USB drive will be formatted. Click Yes to continue.
Step 6: Now, wait for iSunshare ISO Genius to burn the Linux Mint iso image to the USB drive.
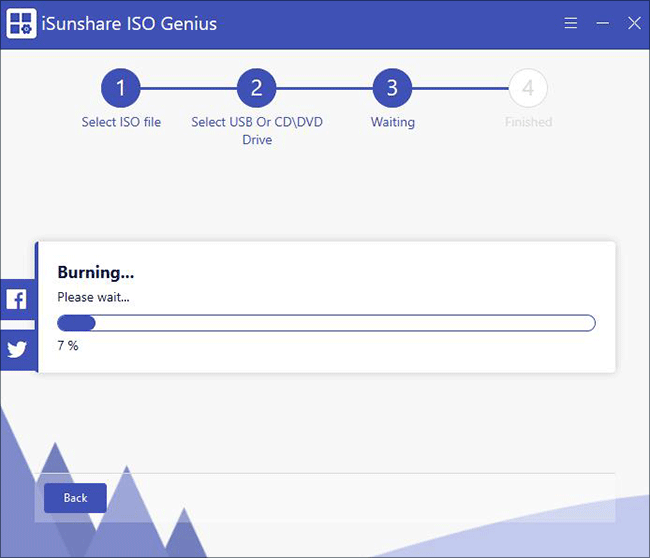
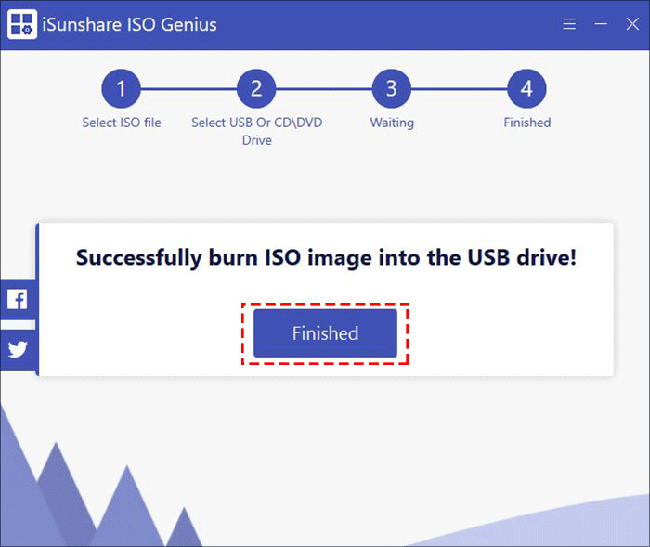
Step 7: Once the Linux Mint bootable USB drive is successfully created, click Finished to complete.
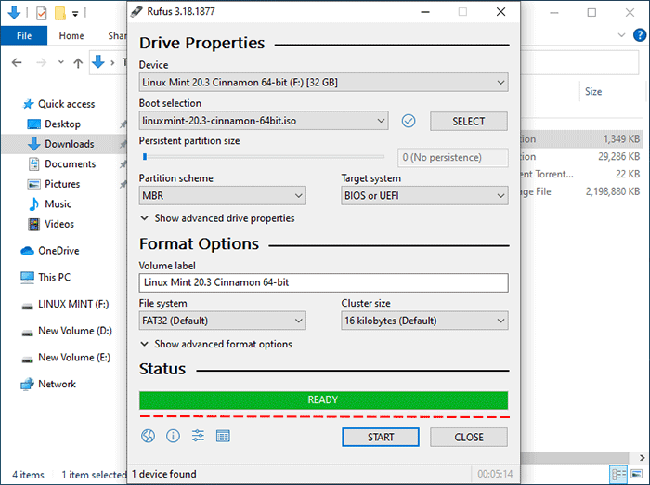
Way 2: Create Linux Mint Bootable USB Drive with Rufus
Rufus is another freeware that lets you burn ISO to USB to create a Linux Mint bootable USB flash drive. Follow the steps listed below to learn how to create a Linux Mint bootable USB drive in Windows 10 with Rufus.
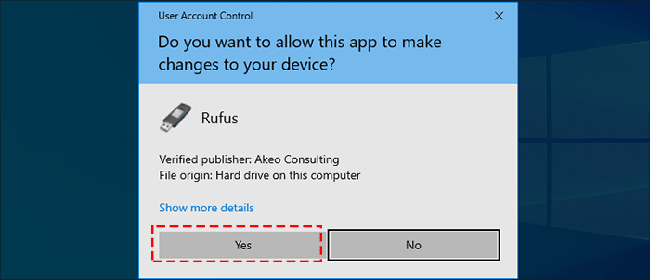
Step 1: Download Rufus 3.18 to your Windows 10 PC and open it.

Step 2: Click Yes to allow this app to make changes to your device.
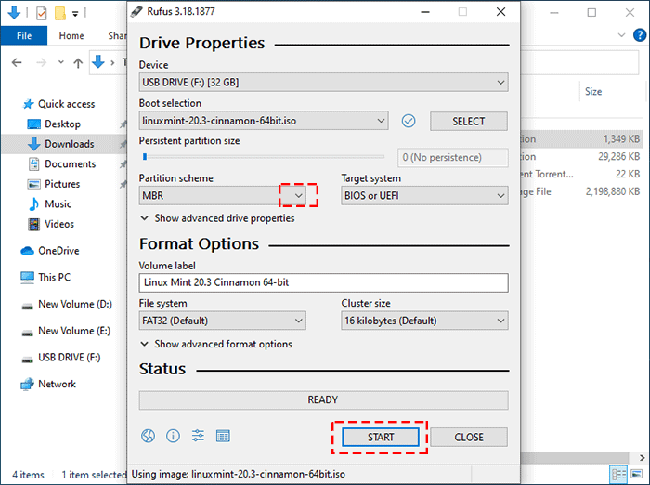
Step 3: Select the USB drive and click on SELECT to select the Linux Mint ISO image.
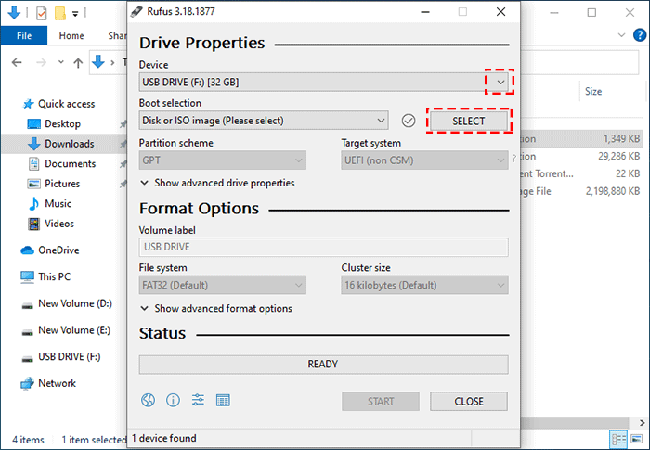
Step 4: Select the partition scheme. It is recommended to choose the format of MBR+FAT32, which will support both UEFI and BIOS booting, and has better compatibility. Then click START to continue.
Step 5: Select Write in ISO Image mode(Recommended) and click OK.
Step 6: Click Yes to continue.
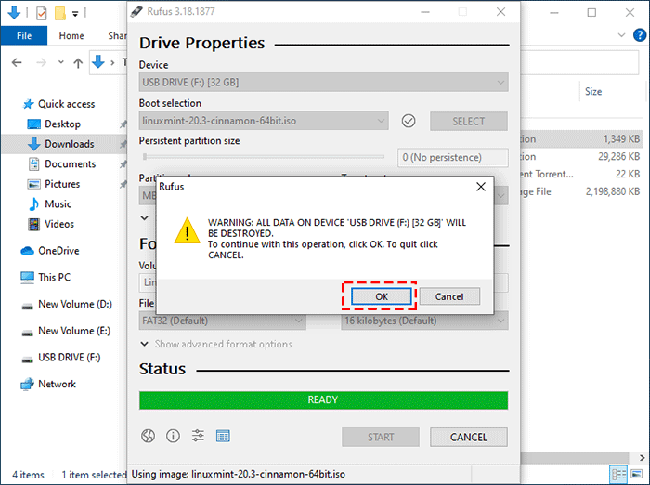
Step 7: Next, a prompt will appear that all data on the USB drive will be destroyed, click OK to start creating a Linux Mint bootable USB drive.
Step 8: Once the Linux Mint ISO is fully burned and copied, a Linux Mint bootable USB can be successfully created.
Way 3: Create a Linux Mint Bootable USB Drive from Command Prompt
- Step 1: Mount Linux Mint Image and Make Preparation
- Step 2: Run Command Prompt to Format USB Flash Drive
- Step 3: Copy Linux Mint Image contents to your USB flash drive and make it bootable
- Step 4: Add configuration text to the USB flash drive
Step 1: Mount Linux Mint Image and Make Preparation
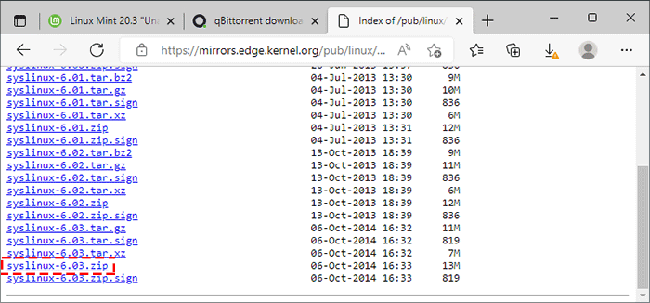
1. Download syslinux-6.03.zip to your Windows 10 computer.
2. Double-click to mount the Linux Mint ISO file.
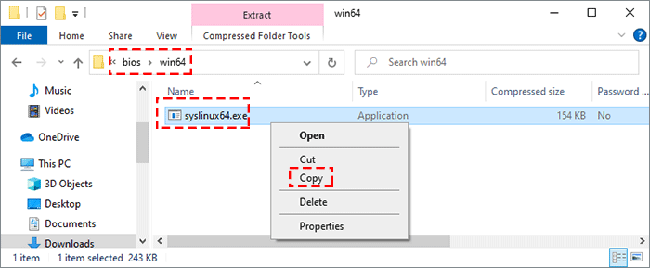
3. Find the downloaded syslinux-6.03.zip file and double-click to open it.
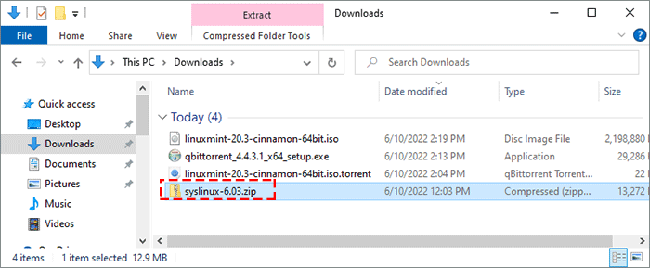
4. Double-click to open the bios>win64 folder, and copy the application name syslinux64.exe to the root directory of D:.
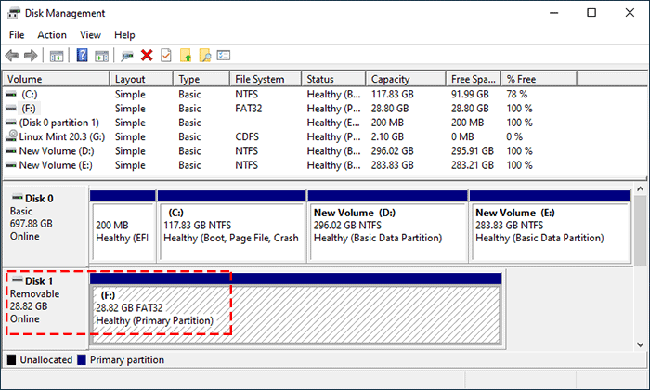
5. Now, plug the USB drive into your computer, right-click on the Start menu to click on Disk Management.
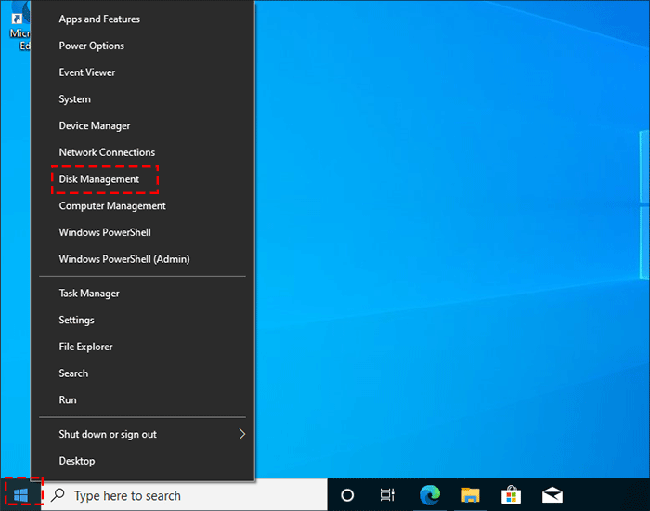
6. You can see that the USB stick is Disk 1.
Step 2: Run Command Prompt to Format USB Flash Drive
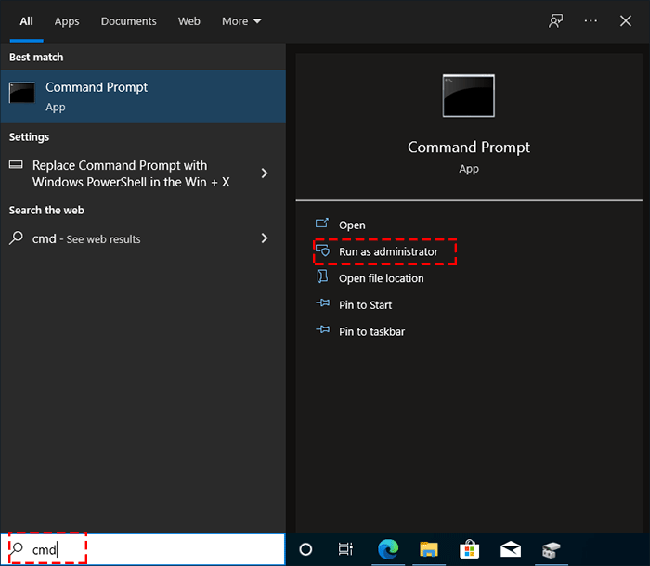
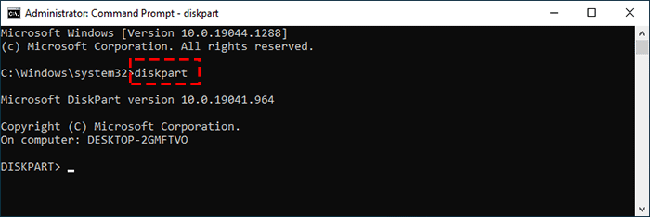
1. Search for cmd on the taskbar and click Run as administrator to open a command prompt.
2. Once the command prompt window opens, type the command diskpart and press Enter. (Use DiskPart to format the USB drive and assign letters. )
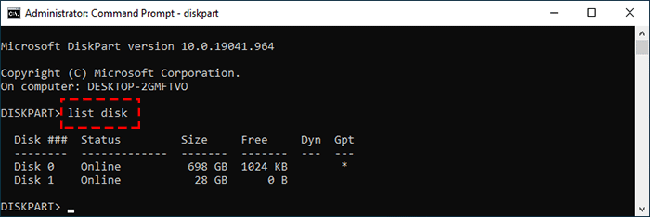
3. Type the command list disk and press Enter, all disk information will be displayed.
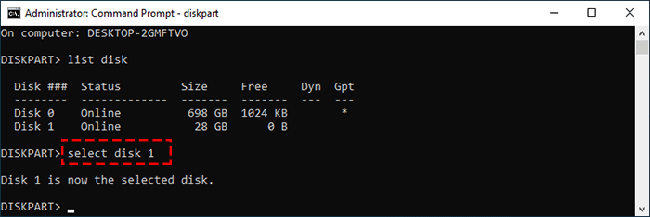
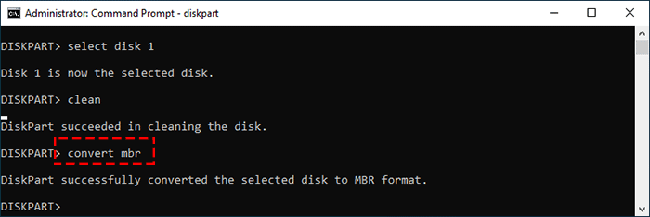
4. Type the command select disk 1 (please note that the U disk is selected here, otherwise other hard disks may be formatted.)
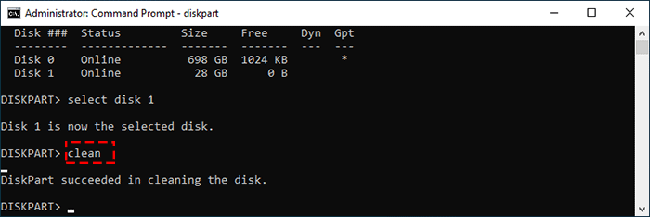
5. Type the command clean and press Enter, all data stored on the USB drive will be erased.
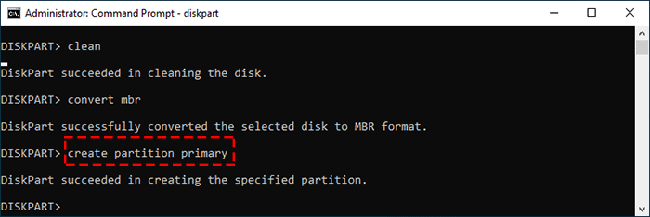
6. Type the command convert mbr and press Enter to convert the disk to MBR format.
7. Type the command create partition primary and press Enter to create partition primary.
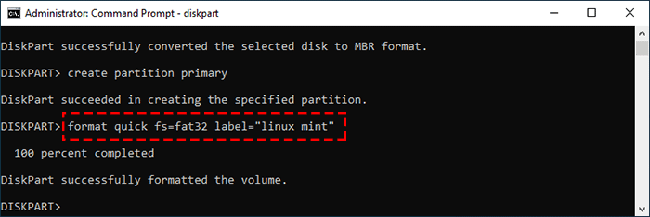
8. Continue to type the command format quick fs=fat32 label=”linux mint” and press Enter to format the volume.
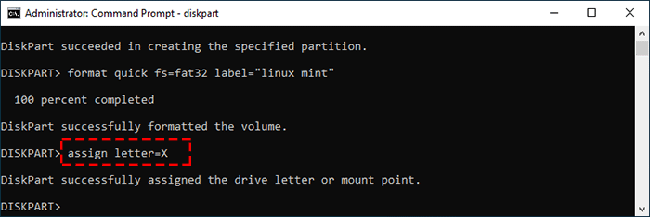
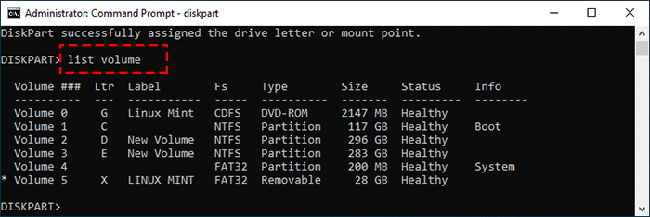
9. Type the command assign letter=X and press Enter to assign the drive letter or mount point.
10. Type the command list volume to view the volume information of the disk.
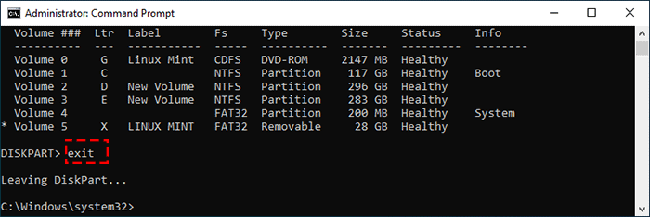
11. Type the command exit and press Enter to exit DiskPart.
Step 3: Copy Linux Mint Image contents to your USB flash drive and make it bootable
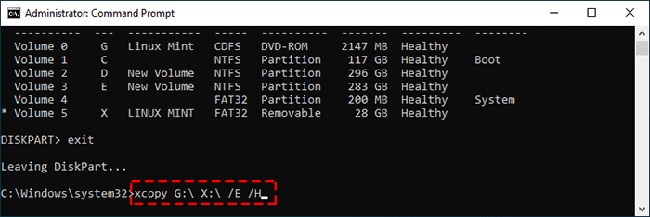
1. Type the command xcopy G:\ X:\ /E /H and press Enter to copy all files and folders in the Linux Mint into the root directory of USB drive and wait until completely copied and pasted.
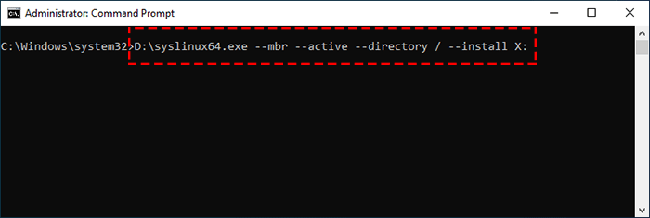
2. Then execute D:\syslinux64.exe –mbr –active –directory / –install X: and press Enter to create a bootable USB drive.
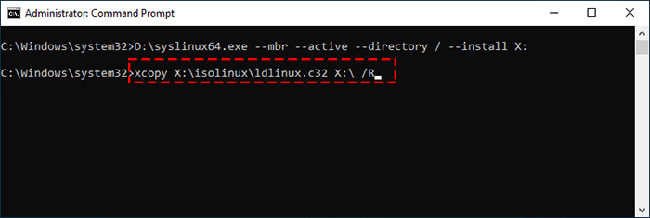
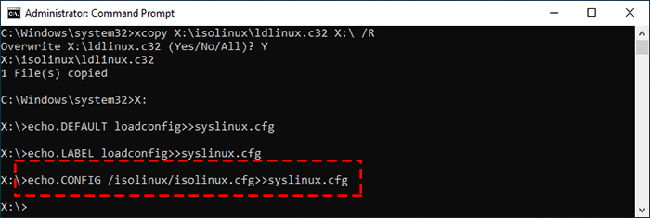
3. Continue to type the command xcopy X:\isolinux\ldlinux.c32 X:\ /R and press Enter.
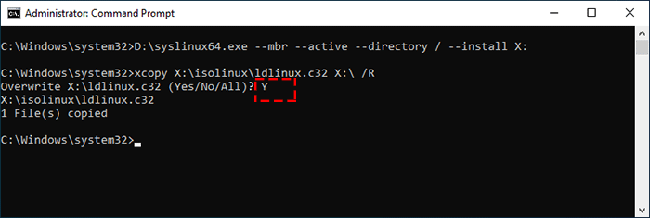
4. Type Y and press Enter to allow x:\isolinux\ ldLinux. c32 file to replace the ldLinux. c32 file generated by syslinux64.exe stored in the root directory of the USB disk.
Step 4: Add configuration text to the USB flash drive
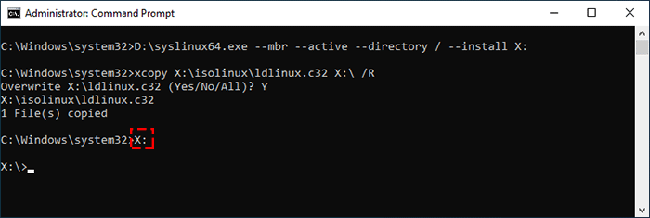
1. Type the command X: and press Enter to access the X disk.
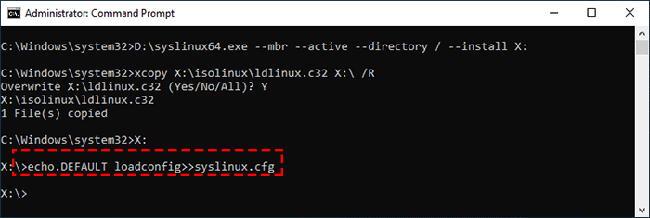
2. Type the command echo.DEFAULT loadconfig>>syslinux.cfg and press Enter.
3. Type the command echo.LABEL loadconfig>>syslinux.cfg and press Enter to continue.

4. Continue to type the command echo.CONFIG /isolinux/isolinux.cfg>>syslinux.cfg and press Enter.
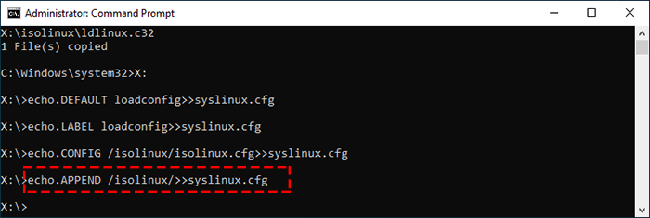
5. Then execute echo.APPEND /isolinux/>>syslinux.cfg and press Enter.
6. Last, type the command syslinux.cfg to view the contents of syslinux.cfg configuration text.
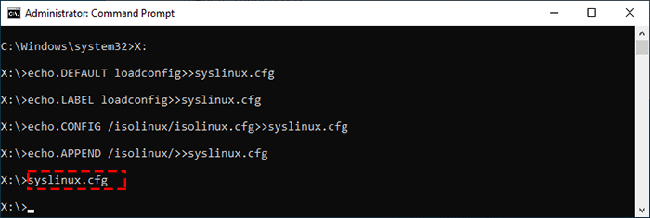
7. The syslinux.cfg configuration text is shown in the following figure.

Part 3: Access Linux Mint Operating System from a USB Drive
After creating a Linux Mint bootable USB drive, you can go to start up from the USB drive.
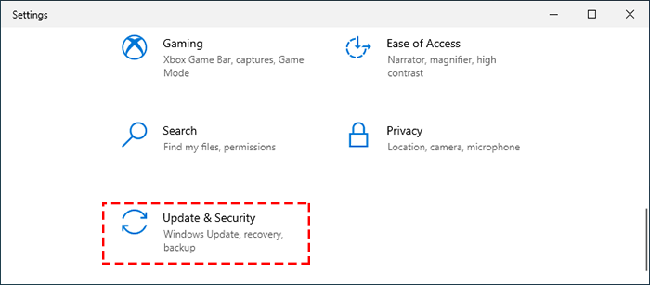
Step 1: After plugging the USB drive into the computer, right-click the Start menu and click Settings.

Step 2: Click Update & Security.
Step 3: Click on Recovery on the left pane and click on Restart now on the right pane.
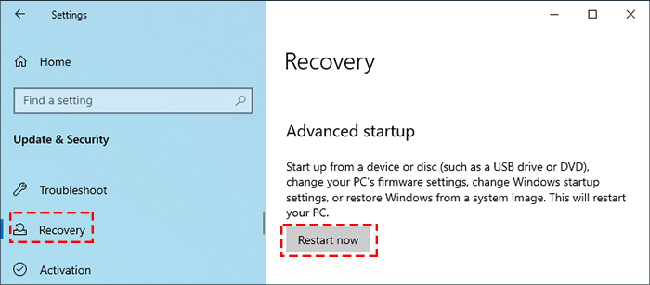
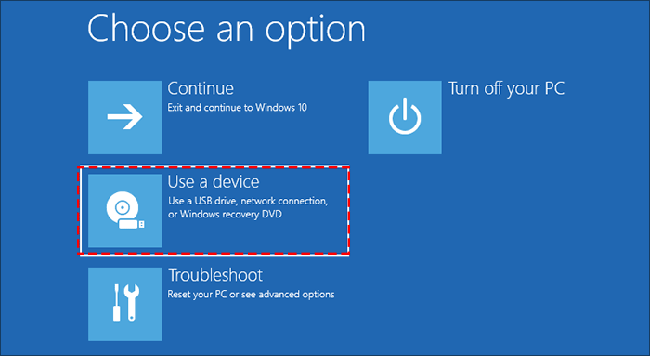
Step 4: Choose the Use a device option.
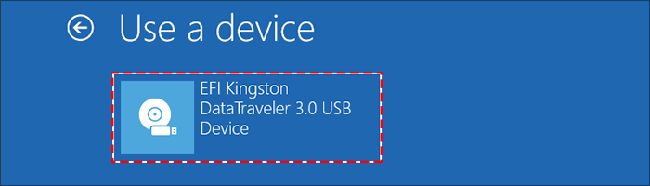
Step 5: Click the USB device.
Step 6: After restarting, open the Start Linux Mint 20.3 Cinnamon 64-bit option.
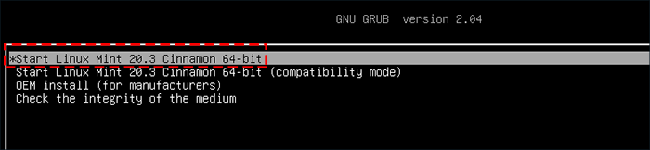
Step 7: Then you access the Linux Mint Operating system interface.
Tips: You can check the details in the video tutorial: https://www.youtube.com/watch?v=nCzCFuXPZnQ
Related Articles:
- Easy Ways to Make Windows 10 Bootable USB from ISO Image
- How to Create a Windows 11 Bootable USB Drive
- How to Create a Windows 10 Bootable USB Drive
- How to Make A Bootable Windows External Hard Drive without Losing Data
A full transition from Windows to Linux may not be easy, that is why Ubuntu allows its users to test the live CD (or USB) first to see if they like it, then install it on their systems. This guide shows you how to create a bootable Ubuntu USB in Windows. Using this media, you can boot up Ubuntu on any computer, perform your tasks and leave the main OS unmodified.
To follow along with the guide, ensure:
- Internet connection to download the required tools.
- A USB Flash drive — at least 8GB (recommended).
- You have downloaded the latest version of the Ubuntu ISO from the official Ubuntu download page.
Also read: 7 Ways to Speed up Ubuntu
Create Bootable Ubuntu USB with Rufus
The easiest method to create a bootable Ubuntu USB is to use Rufus. The ability to set persistence in Ubuntu USB drives is now supported in newer versions of Rufus.
1. Plug your USB drive into your Windows computer. Next, launch Rufus and click the «Select» button to select the Ubuntu ISO.
2. Set the size for your persistence file.
3. Configure the partition scheme.

4. Click «Start» to flash the ISO.
Once the flash process is completed, reboot the PC into your Ubuntu system.
Create Bootable Ubuntu USB with UNetbootin
Another method to create a bootable Ubuntu USB in Windows is to use UNetbootin.
1. Download the UNetbootin tool from its official page.

2. Launch the UNetbootin tool. You may have noticed you can select the «Distribution» option, choose the distro you want to install and UNetbootin will download the ISO file for you. For this guide, we will use the “Disk Image” option since we have already downloaded the Ubuntu ISO.
3. Select the “three-dotted” section and navigate to the location of the downloaded Ubuntu ISO.

Select the Ubuntu ISO and load it into UNetbootin.
4. Before flashing the ISO to the USB, set up persistence. To do this, adjust the option “Space used to preserve files across reboots.» Allocate the desired space in MB.

Note: if you are flashing older Ubuntu ISOs, this might not work and you may need to perform a manual configuration as shown in the steps below.
5. In the “Type” drop-down at the bottom, make sure “USB Drive” is selected, select the Drive directory of your USB drive next to it, then click “OK” to start the process. After several minutes, the process will be complete.
You now have a bootable, portable Ubuntu build.
Also read: Make Linux Live USB Easily with balenaEtcher
Add Persistence Manually to the Bootable USB
In some instances, UNetbootin may fail to add the persistence. To resolve this, you can manually configure this option.
1. Download the Casper-RW-Creator file from the official link.
2. Once downloaded, launch the file and select the USB drive.
3. Set the persistence file.
Note: if you are using the Ubuntu 20.04 image, the persistence file has been renamed to writeable. However, for older images, select the persistence file as casper.

4. Select the size to allocate the persistence file and click «Create.»

5. Once the process is complete, you should have the file writeable or casper in the root of the drive for persistence.

To point Ubuntu to the persistence file, edit the «grub.cfg» file in «/boot/grub/grub.cfg.»
Find the entry:
 menuentry "Ubuntu" {
     set gfxpayload=keep
     linux   /casper/vmlinuz  file=/cdrom/preseed/ubuntu.seed maybe-   ubiquity quiet splash ---
     initrd  /casper/initrd
 }
Edit the file and add the casper module. The above entry should be:
 menuentry "Ubuntu" {
     set gfxpayload=keep
     linux   /casper/vmlinuz  file=/cdrom/preseed/ubuntu.seed maybe-ubiquity quiet  boot=casper quiet splash persistent  ---
     initrd  /casper/initrd
 }
Finally, save the file and reboot the computer into your Ubuntu session. During Boot, select the “Ubuntu” section to use the persistence file.
Wrapping Up
You now have a bootable Ubuntu USB drive that you can take with you anywhere. It’s a great option in the way of security, ensuring you don’t have to enter and leave your data on strangers’ or public computers. As an extra measure, though, remember to password-protect your Ubuntu drive.
If you want to start from scratch and get yourself a blank flash drive, we can guide you through the process of formatting a USB drive in Windows. We can also show you how you to format a drive in FAT32 specifically, which isn’t possible using the native formatting tool in Windows 10.

John is a technical writer at MTE, when is not busy writing tech tutorials, he is staring at the screen trying to debug code.
Subscribe to our newsletter!
Our latest tutorials delivered straight to your inbox
![]()
As long at Bitlocker is not enabled on your Windows drive, boot up off a Linux boot CD and copy the files over in Linux. That’s the quickest and simplest method.
1 found this helpful
thumb_up
thumb_down
![]()
Haven’t tried any such tool. What did you try already?
If you didn’t have the time to search, here Opens a new window is a short, incomplete and dated article in English, referencing several tools. You should have a look on Ubuntu docu too as in my language, there are articles too.
Was this post helpful?
thumb_up
thumb_down
I’ve always found Knoppix to be useful for this task.
Like Fessor said just create a boot device with Knoppix then boot from it, I would have a USB drive formatted as fat32/ntfs and the source drive attached to the machine.
Then you should be able to see both drives and can either use the GUI file manager or if your comfortable at the command line use the appropriate cp/rsync commands.
KNOPPIX — Live Linux Filesystem On CD: https://www.knopper.net/knoppix/index-en.html Opens a new window
Was this post helpful?
thumb_up
thumb_down

Here’s a page describing 3 methods https://www.thewindowsclub.com/how-to-read-ext4-in-windows-10 Opens a new window
Here’s another with some other tools: https://thelinuxcode.com/mount-linux-partition-ext4-ext3-ext2-windows-10-8-7/ Opens a new window
I’ve used a driver that allows you to mount ext3/4 systems into windows natively but that was so long ago I can’t remember which one it was.
A better suggestion would be to format it as exFAT so both systems can read it natively (unless there is a specific reason for ext4).
You might need packages on your linux system for it work properly — https://www.howtogeek.com/235655/how-to-mount-and-use-an-exfat-drive-on-linux/ Opens a new window
Was this post helpful?
thumb_up
thumb_down
![]()
Either make a partition on the USB stick with FAT32 or NTFS and put the files you want to transfer across in their or have Puppy Linux on the USB stick as well. Puppy Linux will work in and with any file system and only needs a frugal install so that it will only need less than 1 GB of the USB drive. After booting it up you can put your files from the USB stick anywhere you want. Puppy will let you do that easily. http://puppylinux.com/ Opens a new window
Was this post helpful?
thumb_up
thumb_down
![]()
fids74gf wrote:
I’ve always found Knoppix to be useful for this task.
Currently don’t have a Knoppix DVD at hand. But if I remember correctly, there was a Windows driver for ext3 file system included in the past, in its Windows section. Don’t know if this is still included and now supports ext4 too.
Was this post helpful?
thumb_up
thumb_down
![]()
Easiest option: format usb as exFAT.
If you really want to keep it ext4, you can try something like
DiskInternals Linux Reader Opens a new window.
If you are trying to mount a partition shared on a usb live distro (one of my favorite solutions):
I would recommend formatting the whole disk as exFat with windows. Move over to a Linux box and use gparted or fdisk to resize that partition to the required size at the beginning of the disk and create your /boot / and /swap partitions (or just launch an installer and let it have the remaining space on the disk).
1 found this helpful
thumb_up
thumb_down
![]()
pigdog wrote:
Does Windows Subsystem for Linux allow ext mounts? I’m not sure. Just a suggestion.
https://www.techrepublic.com/article/windows-10-will-soon-let-you-access-linux-files-from-file-explo… Opens a new window
I didn’t read through all of your reference, just a quick read of a subset. I don’t remember since when I use WSL. It is at least since Windows 10 1803. Already with that older version of WSL, WSL used external mounts. Haven’t seen a change with the update to WSL 2.0.
What I didn’t check is if these mounts may be accessed with Windows file explorer too. I used the command line in WSL resp. OpenSuSE within WSL to copy files around, to Linux system and to Windows system. The news in the article is not the possibility to mount external devices. The news is that with WSL 2.0 as included in Windows 10 1903 would add integration into Windows explorer. But when I start OpenSuSE in WSL (on Windows 10 1909) and then start Windows explorer, I can’t see an entry for WSL nor OpenSuSE. I didn’t investigate deeper so far. I can only report that without additional measures, I cannot see the Linux file system from within Windows explorer. I can only see the other way round, both file systems from within OpenSuSE in WSL and exchange data between both from OpenSuSE in WSL. That didn’t change with the update to WSL 2.0.
Also trying to start the Windows explorer from within OpenSuSE in WSL as proposed by that article didn’t work. When entering «explorer.exe .» in that context as specified in the article, I get an error reporting:
Text
If 'explorer.exe' is not a typo you can use command-not-found to lookup the package that contains it, like this:
    cnf explorer.exe
Was this post helpful?
thumb_up
thumb_down

I have the same need. I have a Linux formatted drive from a WD My Cloud that crashed, and I am trying to retrieve the data from it. I have connected the SATA drive to a USB port on my Windows 10 laptop, but Windows will not assign a drive letter. Actually, I can see the device from Windows, but it will not assign a drive letter, so I cannot access it. I need to be about to mount the drive in Windows somehow so I can access it with Windows software that will allow me to read the Linux formatted drive.
Was this post helpful?
thumb_up
thumb_down
![]()
staffordtb the easiest way I have found to access the Linux partition drive from Windows machine is using 3rd party tools «DiskGenius». You can download and install the trial version free of cost. It works very good and easy to use just install the software and then plug the Linux partition disk on Windows machine. DiskGenius will show you all the data you have on your disks. You can copy data from your Linux disk to your Windows disk but trial version has limitation to copy large volume of data.
Was this post helpful?
thumb_up
thumb_down
I downloaded and ran, but again, the software cannot see my USB connected disk…. see below….

Was this post helpful?
thumb_up
thumb_down
![]()
staffordtb you can’t see your USB disk from disk management as Windows can’t recognized Linux file system. You can see it from DiskGenius. Open the DiskGenius and you can see both Windows and Linux disks are there. You can move data from Linux disk to Windows disk from DiskGenius. Try to move a small file first. Trial version has limitation of size to copy data but I don’t know how much the trial version allow to move data from one disk to another disk.
Was this post helpful?
thumb_up
thumb_down
I know I’m doing something wrong…
Disk Genius could not see the drive. Maybe because it is mounted through USB? As you can see from the screen snip, Disk Management utility and Device Manager know it’s there, but Windows and Windows apps (including Disk Genius) cannot see it. Do I have to do something to mount the drive so Disk Genius will see it?
Was this post helpful?
thumb_up
thumb_down
![]()
staffordtb. Really it would be best if you started your own topic rather than tag your issues onto this one since it will lead to confusion.
You have a «WD My Cloud that crashed» and that will probably have to be sorted out before Windows can see it. You will need to get the PC to see your drive and check the HD SMART values to see if it is basically working or needing a file system check, etc.
0 of 1 found this helpful
thumb_up
thumb_down
![]()
Sazzad_Jca wrote:
the easiest way I have found to access the Linux partition drive from Windows machine is using 3rd party tools «DiskGenius».
Does this mean that your topic is answered although you kept it in state still needing answers?
Marking a topic as answered will not close it and will not prevent any further answers if that is your fear, looking for other alternatives.
Sazzad_Jca wrote:
you can’t see your USB disk from disk management as Windows can’t recognized Linux file system.
Can’t confirm. Don’t remember the details in times of Windows NT 4, but at least since Windows XP Windows was able to detect Linux file systems on SATA devices as other file system and would report correctly its size. Windows management of USB disks is more complicated and involves various other steps before disk management interferes. And the screenshot is taken at a moment when disk management has not yet or no longer recognized any removable device attached although remembering there has been an attached device before as it has recognized and mounted another removable disk as disk 2 (3rd disk) and mounted one of its partitions as drive d:. And I can’t see its other partition displayed in its upper section in the screenshot of the Windows disk manager neither although it recognized it
(only displayed in the lower section of the Windows disk manager).
staffordtb wrote:
Disk Genius could not see the drive. Maybe because it is mounted through USB?
I’ve no experience with Disk Genius, only heard of it. And Windows USB management isn’t able to mount any disk nor partition. That may be the task of Windows disk manager. And your screenshot of Windows disk manager shows that it is not mounted at all. So you probably meant attaching instead of mounting?
staffordtb wrote:
As you can see from the screen snip, Disk Management utility and Device Manager know it’s there,
No. I can see from the screenshot that Windows disk manager recognized that there has been a removable disk attached in the past but none is currently attached at the moment of that screenshot!
2300peterw wrote:
You have a «WD My Cloud that crashed» and that will probably have to be sorted out before Windows can see it. You will need to get the PC to see your drive and check the HD SMART values to see if it is basically working or needing a file system check, etc.
And we don’t know what you mean with crashed in that context. Do you refer to some management application being aborted and needing to reboot? Or do you mean fallen from a table and physically crashed? Is the mechanics of the drive after a fall still intact?
Was this post helpful?
thumb_up
thumb_down
«No. I can see from the screenshot that Windows disk manager recognized that there has been a removable disk attached in the past but none is currently attached at the moment of that screenshot! «
The screenshot shows the Disk Manager when I have the USB cable attached. When I remove the USB cable the entry that I have circled in red goes away.
Was this post helpful?
thumb_up
thumb_down
![]()
staffordtb
Can you see your drive from Disk Genius on below screen? There should be your USB visible on this screen.

Was this post helpful?
thumb_up
thumb_down