 В случае, если вам потребовался доступ из Windows к данным на разделе диска с файловой системой Linux — ext4/ext3/ext2, встроенными средствами системы сделать это не получится. Однако, возможности есть, причем реализовать это можно встроенными средствами системы или с помощью сторонних инструментов.
В этой инструкции подробно о способах подключить раздел диска в файловой системе Linux в Windows 11 и Windows 10 для доступа к данным на этом разделе как для чтения, так и для записи.
Ext2 File System Driver (Ext2Fsd) — самый простой способ открыть раздел ext4/ext3/ext2 в Windows
Ext2 File System Driver или Ext2Fsd — сторонний и полностью бесплатный драйвер для подключения разделов Linux во всех версиях Windows начиная с XP. Несмотря на название, поддерживаются не только разделы не только с файловой системой ext2, но и более новые ext4 и ext3.
Порядок использования Ext2 File System Driver для доступа к дискам Linux будет следующим:
- Загрузите установщик Ext2Fsd с сайта https://sourceforge.net/projects/ext2fsd/
- Установите драйвер, в параметрах установки как правило не требуется ничего изменять.
- По завершении установки вам будет предложено запустить Ext2 Volume Manager (менеджер томов), запустите его.
- Нажмите правой кнопкой мыши по разделу Linux ext4, ext3, ext2 и выберите пункт «Assign Drive Letter» — назначить букву диска.

- Для раздела будет автоматически назначена буква диска, и вы увидите раздел в Проводнике Windows с возможностью чтения и записи файлов на нём.


В дальнейшем вы тем же способом сможете удалить букву диска с раздела (опция «Change letter» — «Remove»).
Доступ к разделам Linux средствами Подсистемы Windows для Linux (WSL)
Подсистема Windows для Linux (WSL) также может быть использована для подключения дисков Linux в Windows таким образом, чтобы доступ к ним был возможен из проводника. Шаги будут следующими:
- Запустите командную строку, Терминал или PowerShell от имени администратора и по порядку введите команды
wsl --install
wsl --set-default-version 2
dism.exe /online /enable-feature /featurename:VirtualMachinePlatform /all /norestart
wsl --install -d Ubuntu

- После выполнения последней команды откроется окно консоли Linux (командную строку при этом не закрывайте, она еще пригодится) с предложением настроить имя пользователя и пароль, сделайте это. Если в окне консоли вы увидите сообщение об ошибке, скачайте и установите обновление WSL, перезагрузите компьютер и запустите Ubuntu из меню «Пуск».
- В консоли Ubuntu введите команду
sudo mkdir -p /mnt/ext-drives/
для создания папки, к которой будут монтироваться диски.

- В консоли Windows (командная строка, терминал, Powershell) введите команду
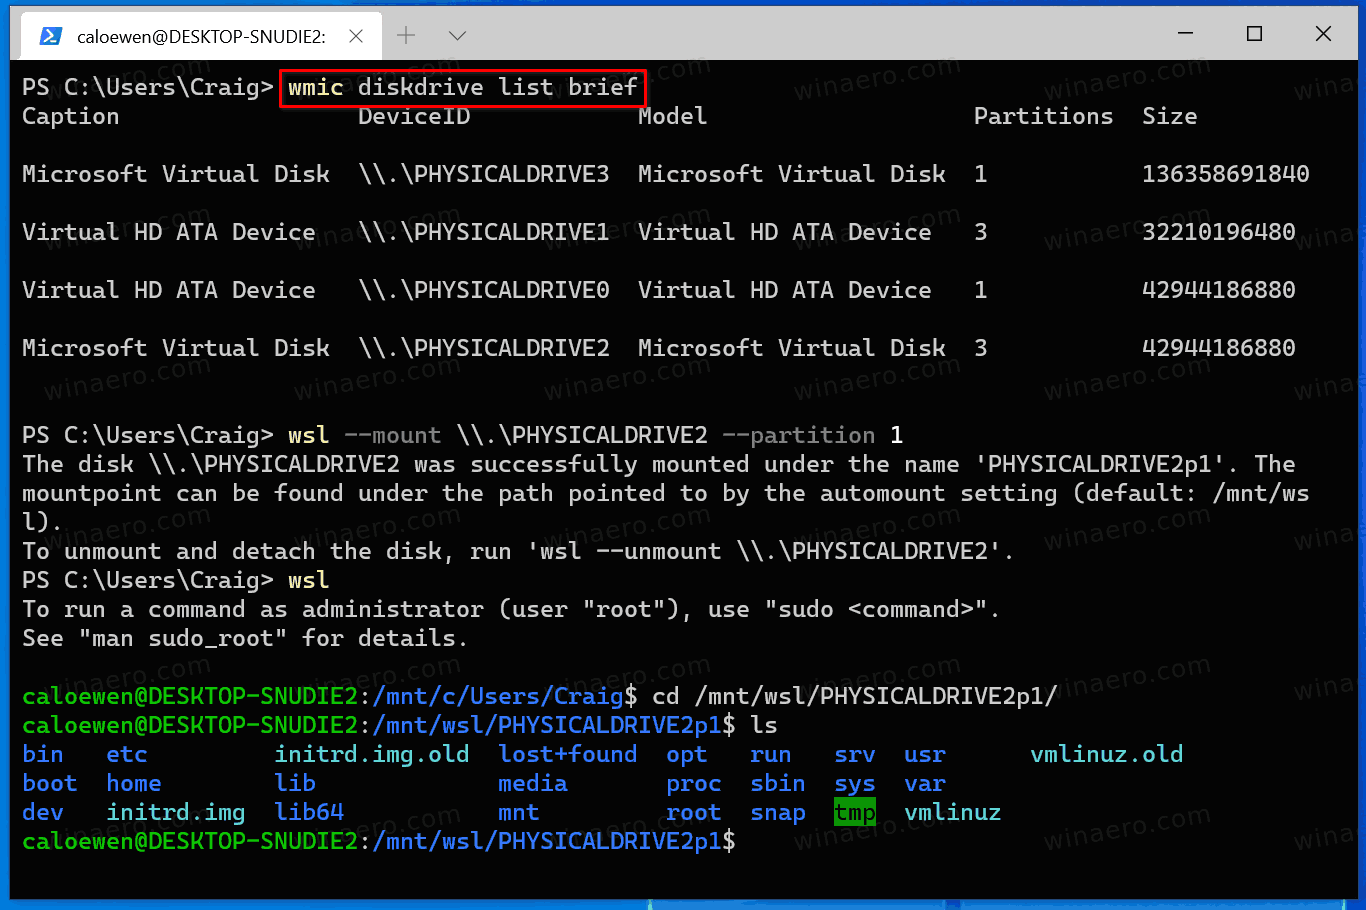
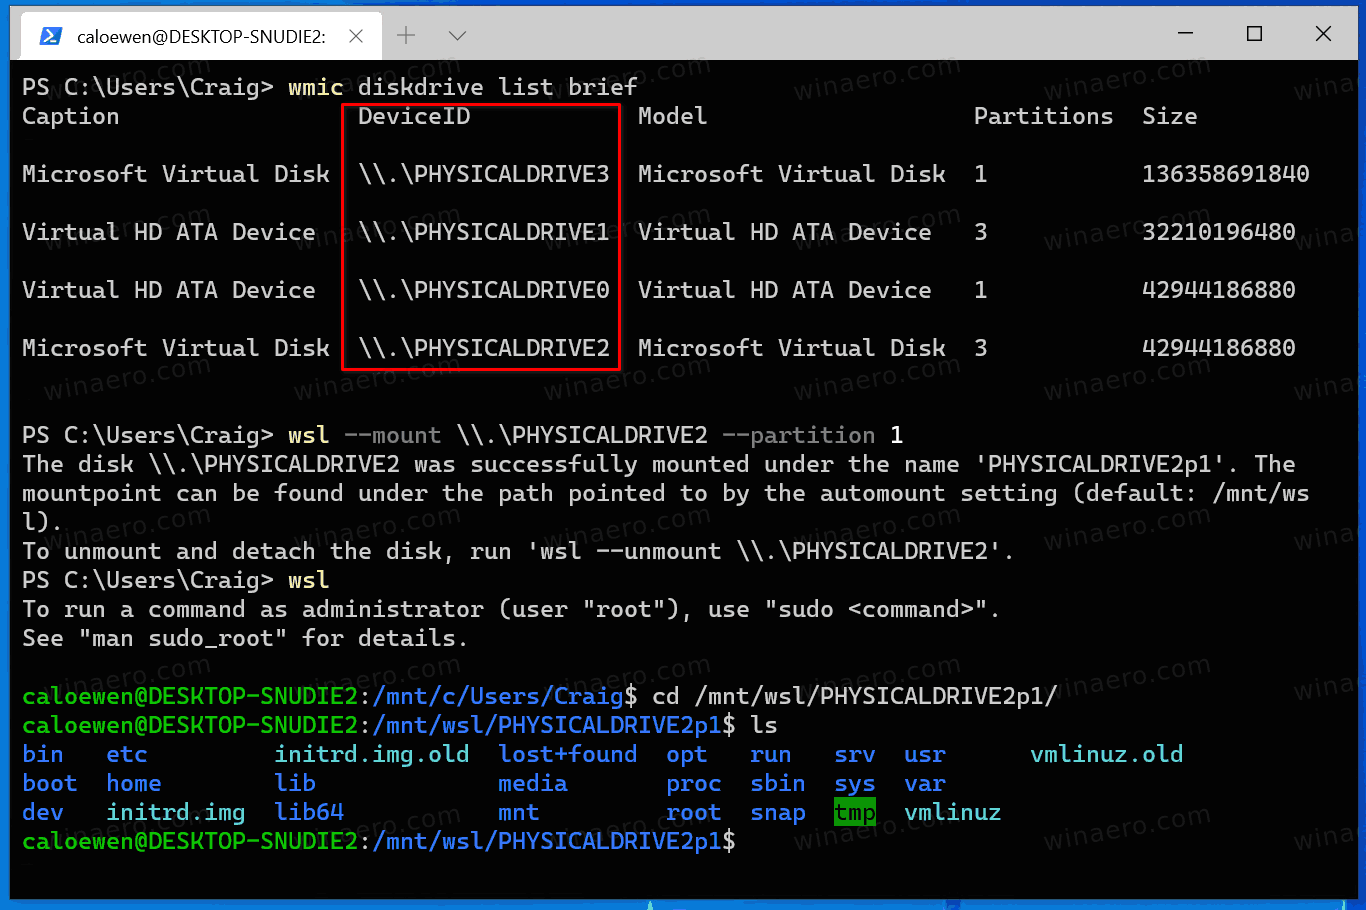
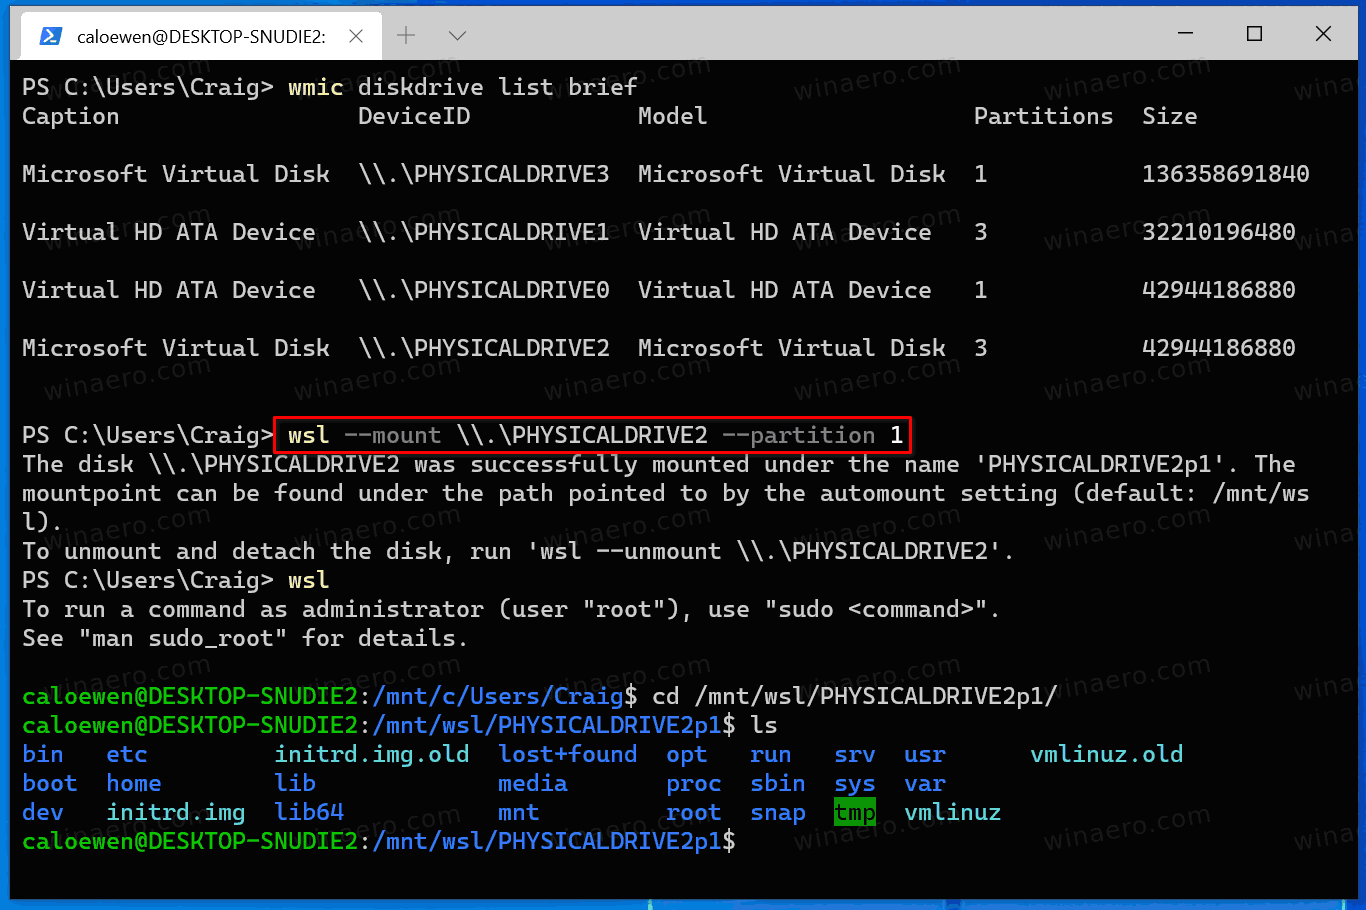
wmic diskdrive list brief
- Обратите внимание на DeviceID диска, который нужно подключить и введите команду (так же в консоли Windows) указав соответствующий номер в имени PHYSICALDRIVE
wsl --mount \\.\PHYSICALDRIVE

- В консоли Ubuntu введите команду lsblk — это отобразит список подключенных дисков, разделов на них и их размер. В следующей команде используем имя нужного раздела для монтирования:
sudo mount /dev/sdИМЯ /mnt/ext-drives/
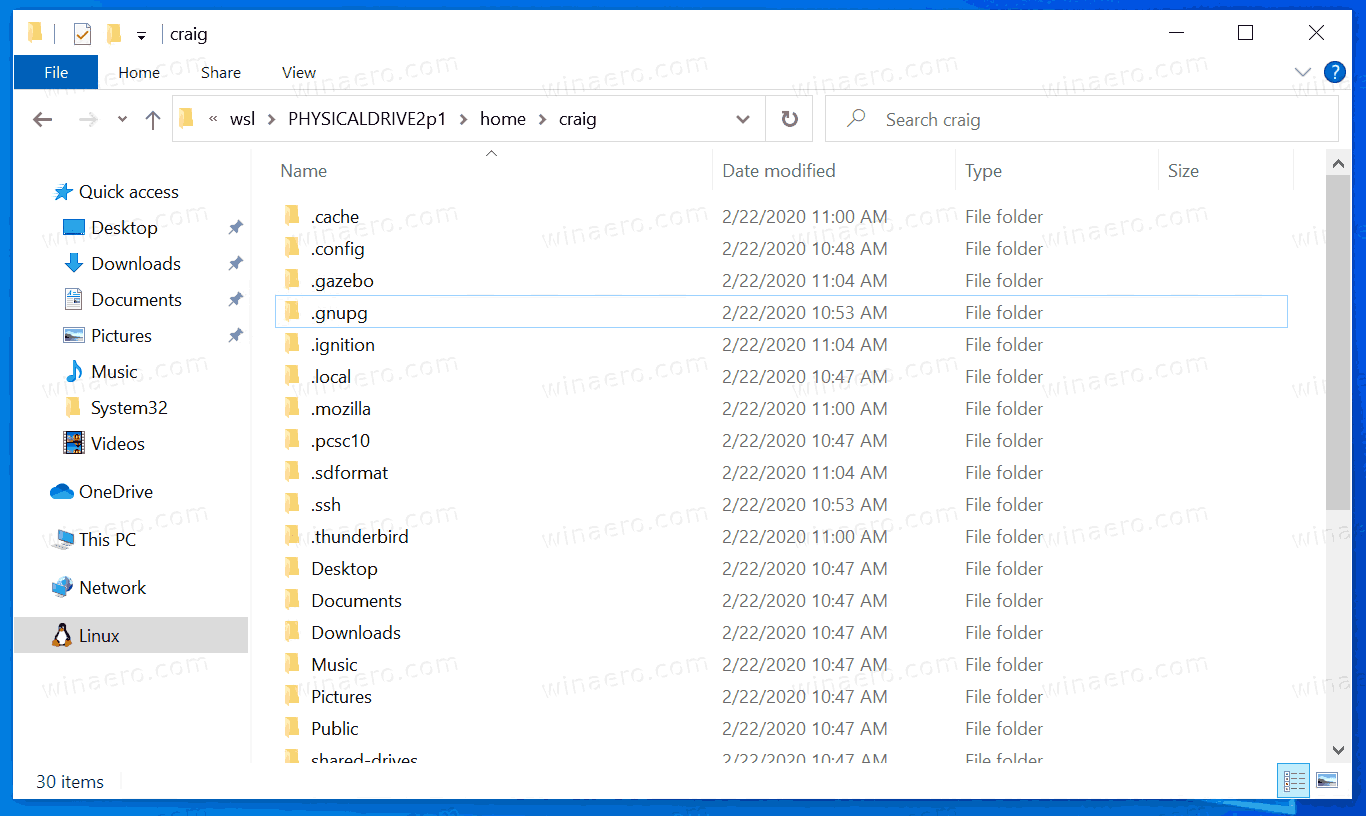
- После успешного выполнения всех указанных шагов вы можете зайти в Проводник Windows, выбрать пункт «Linux» в панели быстрого доступа, перейти в папку mnt\ext-drives и получить доступ к файлам на подключенном разделе Linux с возможностью записи и чтения.


В дальнейшем для отключения диска от WSL можно использовать ту же команду, которая использовалась на 5-м шаге, заменив mount на unmount.
Есть и другие программы (драйверы) для доступа к разделам Linux из Windows, но не полностью бесплатные. Среди них:
- DiskInternals Linux Reader — в бесплатной версии доступно только чтение данных с разделов.
- Paragon Linux File Systems for Windows — бесплатная работа в течение пробной версии, затем необходимо приобретать лицензию.
Skip to content
How to Mount Linux File System in Windows 10
WSL 2 is the latest version of the architecture that powers the Windows Subsystem for Linux to run ELF64 Linux binaries on Windows. With recent changes, it allows accessing files stored on a drive with the Linux file system. If you have a drive with Linux installed, you can now mount it in Windows 10 and browse its contents with help of the WSL 2. Here’s how it can be done.
WSL 2 ships a real Linux kernel with Windows that will make full system call compatibility possible. This is the first time a Linux kernel is shipped with Windows. WSL 2 uses the latest virtualization technology to run its Linux kernel inside of a lightweight utility virtual machine (VM). This new architecture changes how these Linux binaries interact with Windows and your computer’s hardware, but still provides the same user experience as in WSL 1.
Starting with Windows Insiders preview build 20211, WSL 2 offers a new feature: wsl --mount. This new parameter allows a physical disk to be attached and mounted inside WSL 2, enabling you to access filesystems that aren’t natively supported by Windows (such as ext4). You can also navigate to these files inside of Windows File Explorer.
Here are the steps you need to perform.
- List the available physical disks in Windows 10.
- Mount the drive with Linux file system.
- Browse its content
- Unmount the drive.
Do it as follows.
- Open PowerShell as Administrator.
- Type the following command to list the available physical disks, and press Enter:
wmic diskdrive list brief.
- See the
DeviceIDvalue to find the required drive. - Type the following command to mount the drive, and press Enter:
wsl --mount DISKPATH [--Partition <number>. E.g.wsl --mount \\.\PHYSICALDRIVE2 --Partition 1. Substitute theDISKPATHandPartitionvalues (if the drive has more than one partition) for the path of the Linux drive you want to mount. - The drive with Linux files will be mounted, so you can access it with File Explorer. Type \\wsl$ into the File Explorer’s address bar and hit Enter.

- You will see a folder named as the above DeviceID + partition number. Browse it as a regular folder on your hard drive.
- Once you finish, close File Explorer, and return to PowerShell. Type the command
wsl --unmount <DISKPATH>. E.g.wsl --unmount \\.\PHYSICALDRIVE2.
You are done.
Note that wsl allows specifying the file system type. WSL will try to guess it, but if it fails, when use the command as follows:
wsl --mount \\.\PHYSICALDRIVE2 --Partition 1 -t ext4
In the command above we are telling wsl to mount the drive as the popular Ext4 FS.
That’s it.
Support us
Winaero greatly relies on your support. You can help the site keep bringing you interesting and useful content and software by using these options:
If you like this article, please share it using the buttons below. It won’t take a lot from you, but it will help us grow. Thanks for your support!
Quick Links
- What About WSL2?
- DiskInternals Linux Reader
- Ext2explore
- Linux File Systems For Windows
Key Takeaways
You must install a third-party application, like Linux Reader, Ext2explore, or Linux File Systems for Windows to view files on your Linux partitions from within Windows. You can also use Windows Subsystem for Linux 2 to view your Linux files on Windows if your Linux partition is on a separate drive.
If you’re dual-booting Windows and Linux, you’ll probably want to access files on your Linux system from Windows at some point. Linux has built-in support for Windows NTFS partitions, but Windows can’t usually read Linux partitions without third-party software.
We’ve rounded up some third-party software to help. This list is focused on applications that support the Ext4 file system, which most new Linux distributions use by default. These applications all support Ext2 and Ext3, too — and one of them even supports ReiserFS.
UPDATE: 9/8/22
This article previously recommended Ext2Fsd as one of these three options. Ext2fsd is still available on GitHub and SourceForge, and currently functions, but everything indicates that the project has been abandoned. You can use it for the present, but there is no telling if it will continue to work in the future without updates. We’ve swapped our recommendations to include only software that has been updated recently (or whose developers are still active), and we’ve confirmed works on Windows 10 and Windows 11.
What About WSL2?
You can also use the Windows Subsystem for Linux (WSL2) to mount Ext4 drives, but the drive with the Ext4 filesystem must be a different physical drive from your NTFS drive.
Additionally, Windows 10 doesn’t support the feature. Microsoft has gradually stopped pushing new WSL features to Windows 10, and that includes the
mount
command necessary for that method.
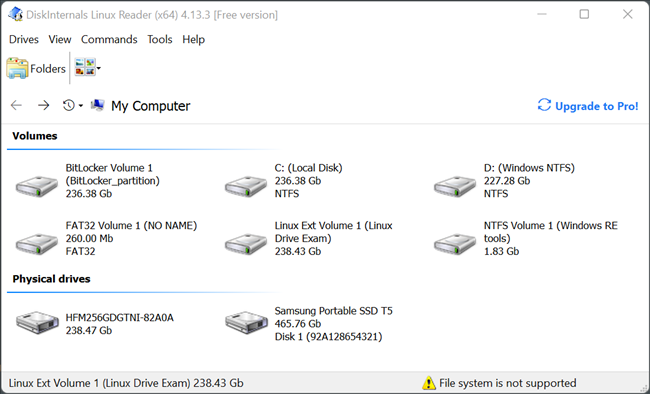
DiskInternals Linux Reader
Linux Reader is a freeware application from DiskInternals, developers of data recovery software. In addition to the Ext file systems, Linux Reader also supports ReiserFS and Apple’s HFS and HFS+ file systems. It’s read-only, so it can’t damage your Linux file system.
Linux Reader doesn’t provide access via a drive letter — instead, it’s a separate application you launch to browse your Linux partitions.
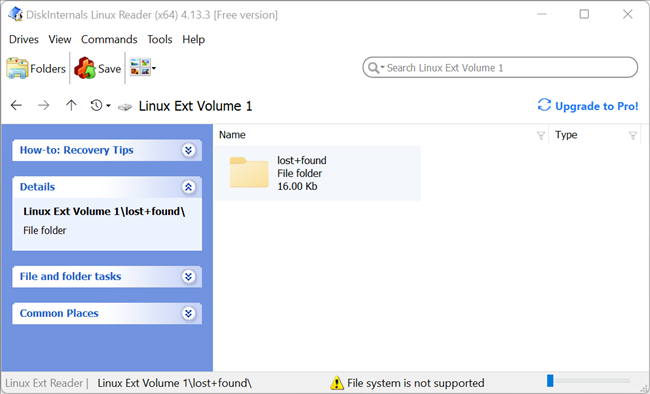
Linux Reader shows previews of your files, making it easy to find the right one.
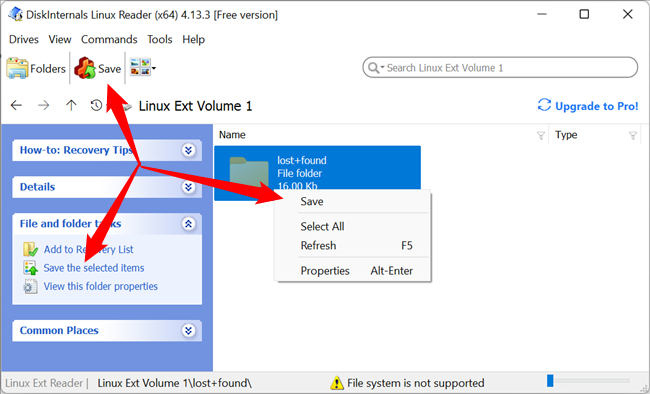
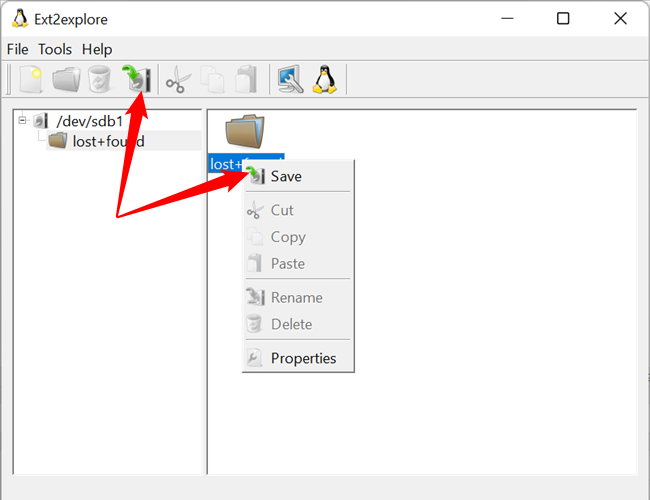
If you want to work with a file in Windows, you’ll have to save the file from your Linux partition to your Windows file system with the Save option. You can also save entire directories of files.
Ext2explore
Ext2explore hasn’t been updated since 2012, but as of September 2022, it works perfectly. Performance might be slow if you’re dealing with large (a few terabytes or bigger) hard drives, but it will get the job done.
We’ve covered Ext2explore in the past. It’s an open-source application that works similarly to DiskInternals Linux Reader — but only for Ext4, Ext3, and Ext2 partitions. It also lacks file previews, but it has one advantage: it doesn’t have to be installed; you can just download the .exe and run it.
The Ext2explore.exe program must be run as administrator, though, or you’ll get an error. Extract the executable from the ZIP file using a file archiving program or File Explorer first. Then right-click the executable to access the context menu and click «Run as Administrator.»
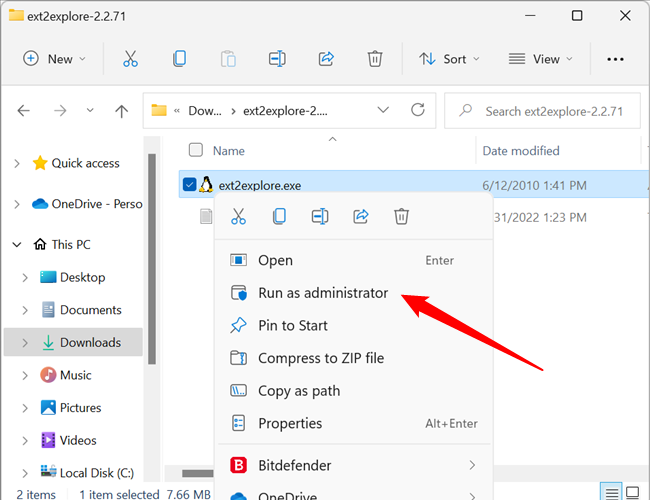
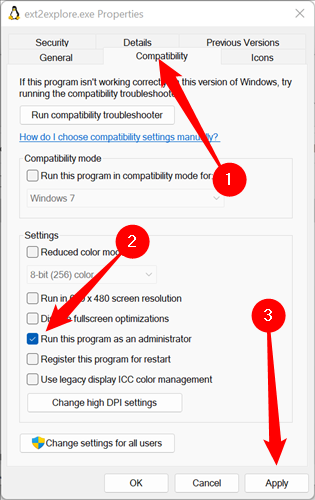
You can enable the «Run This Program As An Administrator» to save some time in the future.
Right-click the executable, ext2explore.exe, then click «Properties.» Click on the «Compatibility» tab, tick the box next to «Run This Program As An Administrator,» then click «Apply.»
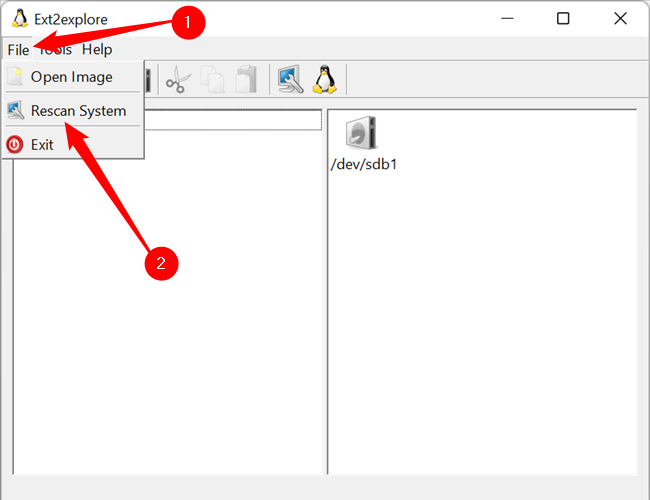
There is a good chance Ext2explore won’t detect any Ext4 partitions or drives when you first run the application. The fix is simple: click on «File» in the top-left-hand corner, then select «Rescan System» from the drop-down menu.
Ext2explore basically works like every other file explorer. You have a hierarchy view in the left pane and folder view on the right. You navigate around it just like you would on Windows, Linux, or macOS.
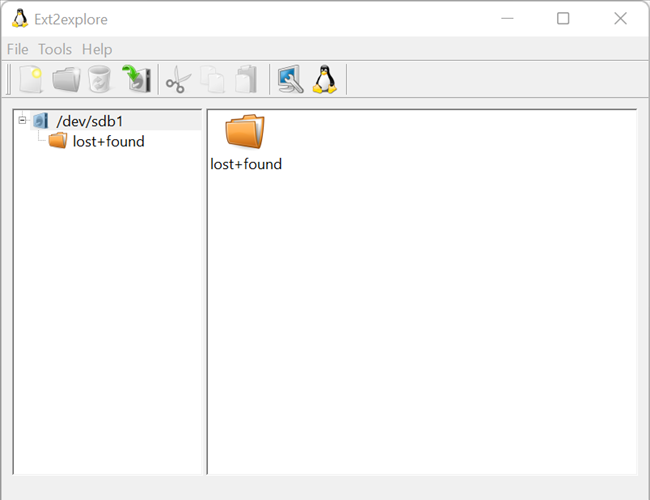
As with Linux Reader, you’ll have to save a file or directory to your Windows system before you can open it in other programs.
Linux File Systems For Windows
Linux File Systems for Windows by Paragon Software is significantly newer than the previous two options. It supports reading and writing to Ext2, Ext3, and Ext4, and supports Btrfs and XFS in read-only mode.
Linux File Systems for Windows isn’t open source or freeware — it costs $20 dollars for a license. Whether that’s worth it will depend on your needs, but we’ve tested it and it works very well.
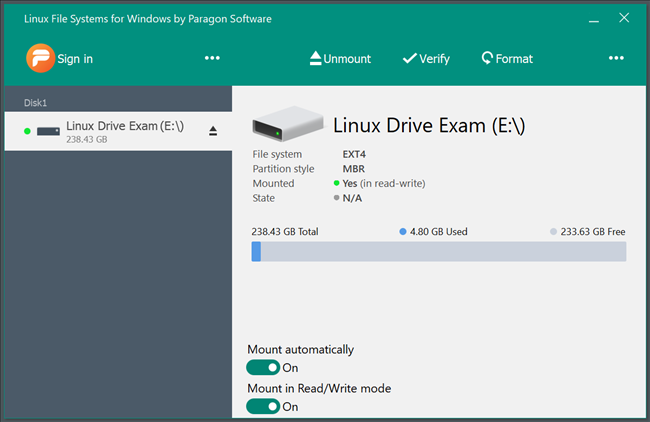
After the installation is complete, any Linux partitions attached to your system will be detected and mounted automatically. It also adds itself to the startup programs — that basically enables plug and play with any Ext2, Ext3, or Ext4 formatted external drives you might connect.
Of course, if you don’t want a a drive to mount automatically, you can always disable that functionality. You can also disable «Mount in Read/Write Mode» if you’re concerned about accidentally corrupting your data.
Linux File System for Windows also has a tool to format partitions built-in. Formatting a partition will completely wipe all data stored on it, so don’t click «Format» unless you’re sure you’re ready to do that. If you do use it, be sure to change the default format from «Ext2» to «Ext4.»
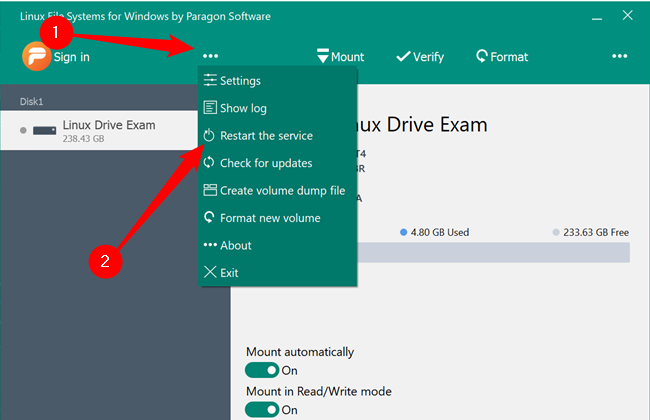
If it fails to detect your drive, click on the three dots in the middle, and then click «Restart the Service.»
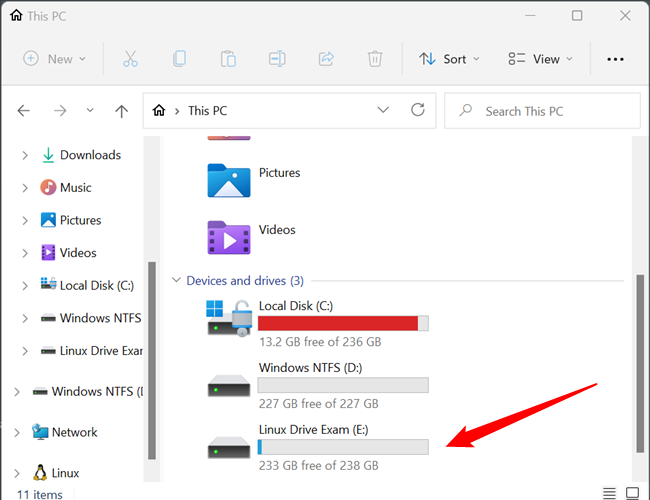
Paragon’s Linux File Systems for Windows mounts your Linux partitions in File Explorer just like any other internal or external storage device and assigns it a letter correspondingly. It isn’t a necessary feature, but it is extremely convenient.
It means that you can interact with anything on your Linux partition seamlessly, using all of the usual Windows controls and shortcuts.
Whether the $20 IS worthwhile really depends on how often you need to work with a Linux partition in Windows. If you’re just going to interact with a Linux partition from Windows once, then it probably isn’t worth spending the money. If it is something you’re going to do regularly — especially if you’ll be reading and writing to the Linux partition on a PC with Linux— then $20 is a fairly compelling value.
On Windows 11, the Windows Subsystem for Linux (WSL) ships with a new feature that allows you to attach and mount physical drives to access Linux file systems (for example, ext4) not natively supported on Windows.
The new feature allows users to access Linux files using File Explorer on a dual-boot system running Windows 11 and a Linux distro on a different drive.
In this guide, you will learn the steps to mount and unmount drives using the Windows Subsystem for Linux.
- Mount Linux file system on Windows 11
- Mount any Linux file system on Windows 11
- Access Linux file system on Windows 11
- Unmount Linux file system on Windows 11
To mount a Linux file system using WSL, use these steps:
-
Open Start on Windows 11.
-
Search for PowerShell, right-click the top result, and select the Run as administrator option.
-
Type the following command to list the available physical disks and press Enter:
wmic diskdrive list brief
-
Confirm the drive path under the “Device ID” column.
-
Type the following command to mount the Linux file system and press Enter:
wsl --mount DISKPATH

In the command, make sure to replace DISKPATH for the drive path with the Linux distribution you want to mount. For example,
wsl --mount \\.\PHYSICALDRIVE2. If you’re going to mount a specific partition, you’ll need to use the--partitionoption with the partition number. For example,wsl --mount \\.\PHYSICALDRIVE2 --partition 1.

Once you complete the steps, the drive with Linux files will mount, and it’ll be visible from Windows 11.
Mount any Linux file system on Windows 11
The previous steps only attempt to mount a physical drive as ext4. If you want to specify another file system, you will need to use a different command with the Windows Subsystem for Linux 2 (WSL2).
To mount a specific Linux file system on Windows 11, use these steps:
-
Open Start.
-
Search for PowerShell, right-click the top result, and select the Run as administrator option.
-
Type the following command to list the available physical disks on Windows 11 and press Enter:
wmic diskdrive list brief
-
Confirm the drive path under the “Device ID” column.
-
Type the following command to mount a drive and press Enter:
wsl --mount DISKPATH -t FILESYSTEM
In the command, make sure to replace DISKPATH and FILESYSTEM for the path of the Linux drive and file system you want to mount. For example, to mount a disk as
fat, use this command:wsl --mount DISKPATH -t vfat.
After you complete the steps, the drive with Linux files will mount, and it will be accessible using File Explorer.
Access Linux file system on Windows 11
To access files from a Linux file system on Windows 11, use these steps:
-
Open File Explorer.
-
Click the Linux item from the left navigation pane.
-
In the address bar, navigate to
\wsl$and then access the mount folder. For example,\\wsl$\\DISTRO-NAME\\MOUNT-POINT.

Once you complete the steps, you should be able to browse the Linux files from a natively unsupported file system on Windows 11. In addition to using File Explorer, you can access file systems like “ext4” from the WSL2 console using command lines once the drive is mounted.
Unmount Linux file system on Windows 11
To unmount the Linux file system on Windows 11, use these steps
-
Open Start.
-
Search for PowerShell, right-click the top result, and select the Run as administrator option.
-
Type the following command to unmount and detach the drive and press Enter:
wsl --unmount DISKPATH

In the command, make sure to replace DISKPATH for the Device ID of the drive you want to unmount.

After you complete the steps, the drive with the Linux file system will unmount and detach from Windows 11.
We may earn commission for purchases using our links to help keep offering the free content. Privacy policy info.
All content on this site is provided with no warranties, express or implied. Use any information at your own risk. Always backup of your device and files before making any changes. Privacy policy info.
Свежая инсайдерская сборка Windows 10 с индексом «20211» позволяет монтировать физические диски внутри WSL 2, тем самым открывая возможность получить доступ к файловым системам, не поддерживающимся Windows нативно (например, ext4). Если вы используете две системы параллельно на разных дисках, то теперь вы сможете получать доступ к файлам Linux из под Windows.
Подготовка
Для монтирования диска, необходимо открыть PowerShell с привилегиями администратора и выполнить следующую команду:
wsl —mount <Путь к диску>
Для отображения всех доступных дисков надо выполнить:
wmic diskdrive list brief
Демонтировать диск из WSL 2 можно командой
wsl —unmount <Путь к диску>
Пути к дискам можно узнать в колонке DeviceID. Обычно он представлен в виде \\.\\\.\PHYSICALDRIVE*.
Доступ к файлам через «Проводник»
Как только диск смонтирован, к нему можно получить доступ через «Проводник», перейдя по пути \wsl$ и смонтировав папку.
Ограничения
По стандарту wsl —mount пытается смонтировать диск как ext4. Для того, чтобы указать другую файловую систему, необходимо использовать команду
wsl —mount <Путь к диску> -t <Тип файловой системы>
Список всех доступных файловых систем можно узнать, введя
cat /proc/filesystems
Также важно отметить, что только целые физические диски могут быть смонтированы в WSL 2. На текущий момент невозможно присоединить только один раздел. Кроме того, хотя и есть поддержка дисков USB, устройства USB Flash не могут подключаться к WSL 2.
Внимание: Это перевод статьи из блога Microsoft.
- Теперь не боюсь за Windows: точки восстановления создаются каждый день. Вот как это настроить
- Эта бесплатная утилита от Microsoft в разы ускоряет работу. Она существует ещё с Windows 95
- Эта утилита показывает, где используется выбранный файл в Windows и что мешает удалить его
- Мод Windows 10 для игр: тестирую Atlas OS, из которого вырезали лишнее ради производительности
- 10 приложений, которые нужно сразу установить на новый компьютер