Eclipse Mosquitto is one of the world’s most popular open-source MQTT brokers. This article will tell you how to install and configure Mosquitto MQTT Broker on Windows, including how to install Mosquitto as a Windows service. Then we will explain how to test your broker using the popular command line tools: mosquitto_sub and mosquitto_pub.
How to install Mosquitto MQTT Broker on Windows
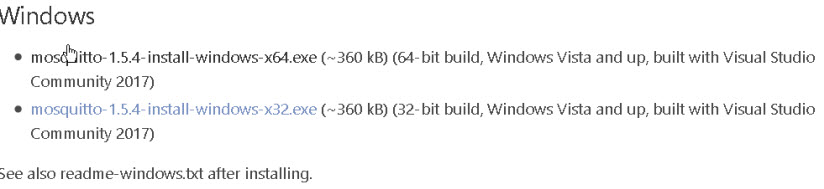
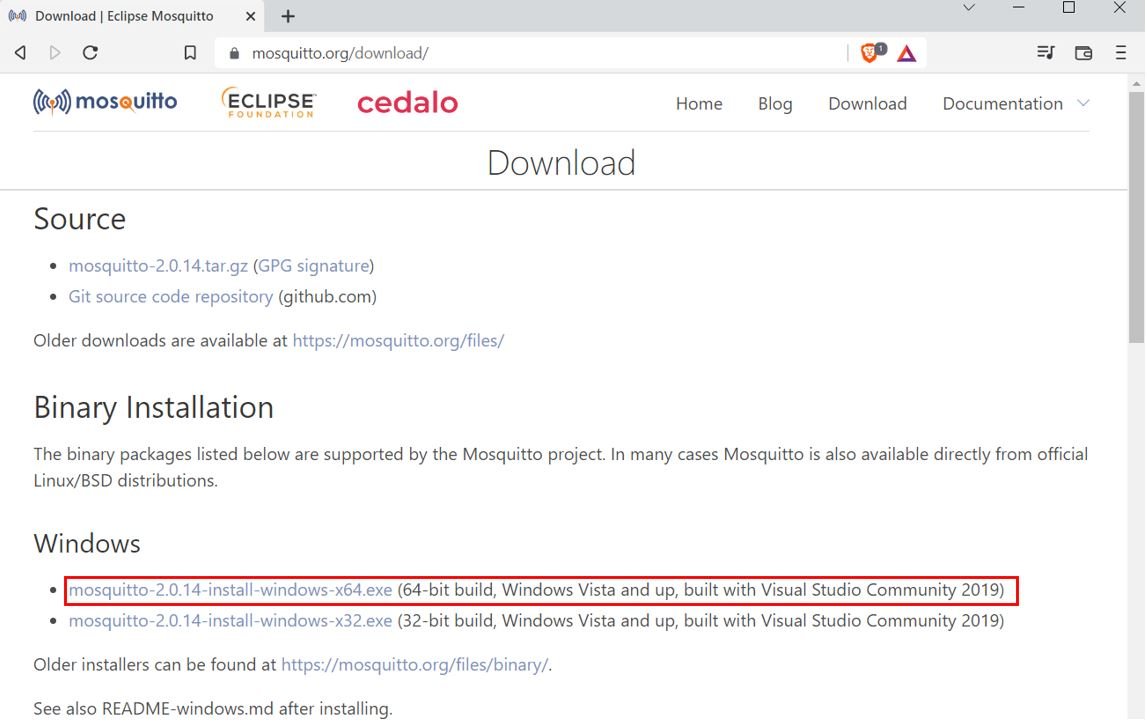
To install Mosquitto on Windows, select the desired installation file from mosquitto.org (64-bit or 32-bit), download it, and run it.
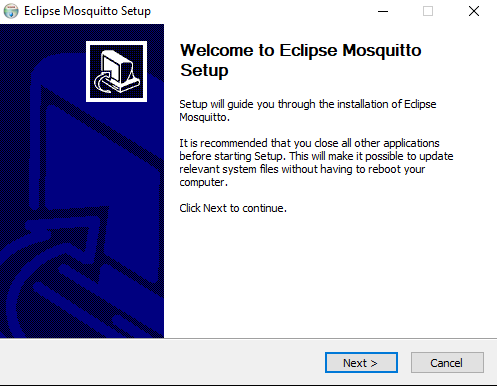
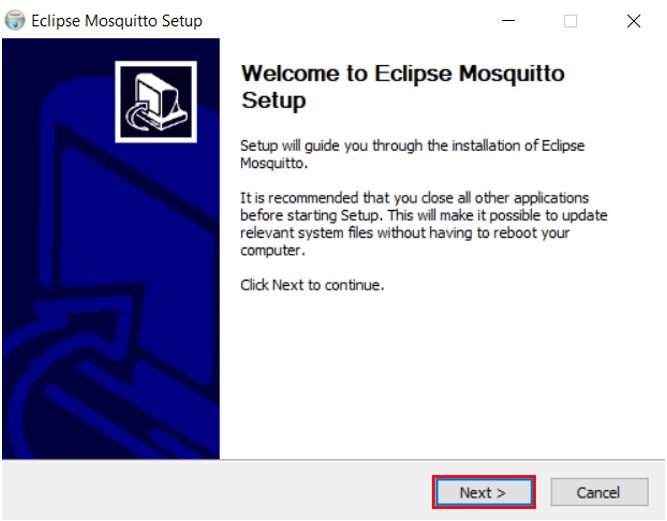
The Eclipse Mosquitto Setup wizard will start. Click Next to continue the installation.
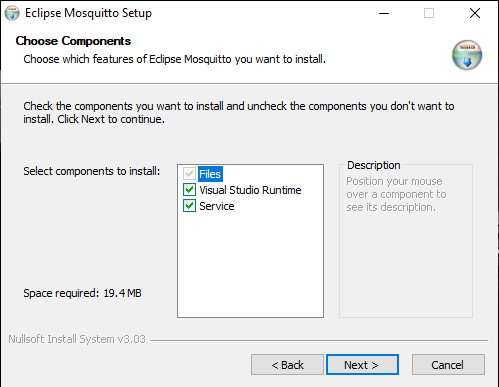
Select the components to install. If you want to start Mosquitto automatically when Windows starts, install the Service component. It will install the broker as a Windows service. See the “How to run Mosquitto MQTT Broker as a Service on Windows” section.
You will also need Visual Studio Runtime because Mosquitto depends on specific libraries and components provided by it. You might not want to install this component if you already have it, but if you are unsure, leave this option as it is and continue to the next step.
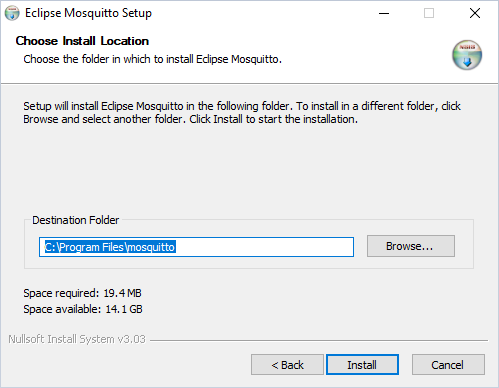
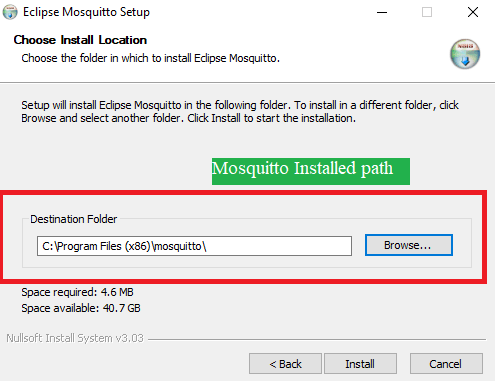
Select the installation folder for Eclipse Mosquitto or leave the default value (C:\Program Files\mosquitto for 64-bit executable and C:\Program Files (x86)\mosquitto for 32-bit) and click Install.
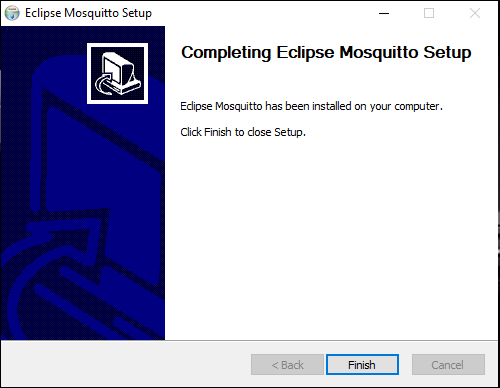
After the installation process is complete, you will see a corresponding message. All required files for operating Mosquitto will be automatically saved to your chosen installation folder.
Click Finish in the setup wizard. Now, you can start using MQTT Mosquitto Broker on Windows.
If you want to install Mosquitto broker without running the graphical part of the installer, you can do so by running the installer from the command line (also referred to as cmd or Command Prompt) with the /S switch (silent mode):
mosquitto-2.0.15-install-windows-x64.exe /SUse the /D switch to change the installation folder:
mosquitto-2.0.15-install-windows-x64.exe /S /D=:\"Program Files"\mosquittoAs an alternative to cmd, you can use PowerShell. Note that PowerShell uses a slightly different syntax than the command line. For example, running the mosquitto command in cmd (inside of the Mosquitto installation folder) has its equivalent in PowerShell, which is: .\mosquitto. This difference is, however, irrelevant as soon as you add Mosquitto to the system path (more on how to do this below). Then you can use the mosquitto command in PowerShell and cmd.
After installing Mosquitto broker, you can check how to run it and which command line options it supports. To do this, navigate inside the folder where Mosquitto is installed (installation folder) and run the following command:de the installation folder and run the following command:
mosquitto -h
Note: Mosquitto is not automatically globally visible in cmd. To work with it (using the mosquitto command), you must either be inside of the installation folder or add the installation folder to the PATH environment variable and restart the Command Prompt (see the following section).
Making Mosquitto command globally available. Adding Mosquitto to system path
You can use Mosquitto directly from the installation folder by navigating to this folder in the Command Prompt and typing mosquitto. However, if you want to use the broker from any location on the command line, you need to add it to your system path (specifically to the PATH environment variable).
To add Mosquitto to your system path, copy the installation folder’s path, which contains mosquitto.exe.
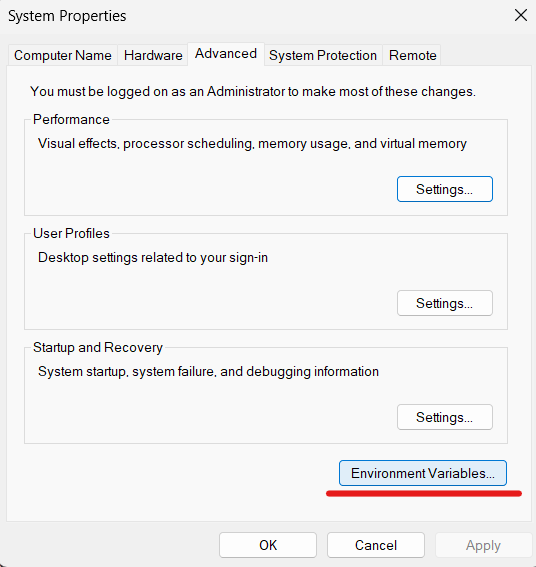
Right-click on My Computer or This PC on your desktop or in File Explorer, and choose Properties.
Click on Advanced system settings.
Click on Environment Variables, as you can see in the image below.
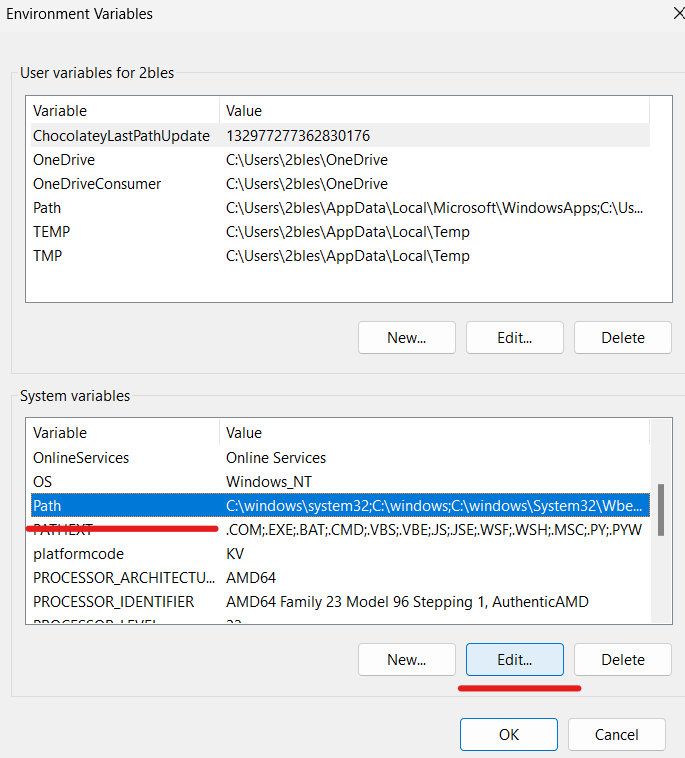
In the “System variables” section, find the variable called Path and click Edit.
Now, the “Edit environment variable” window will open. Click on New and insert the path to your Mosquitto installation folder you copied earlier. Click OK:
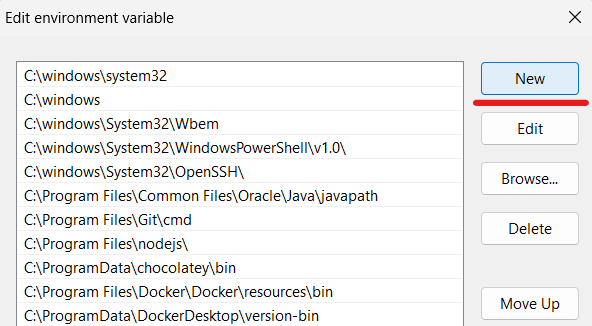
In case you don’t see the “New” button, then in the “Variable value” box, scroll to the end and add a semicolon (‘;’) in case there isn’t one. Then paste the path to the Mosquitto installation folder and click OK.
Restart your command line, and you should be able to issue commands like mosquitto -h from any location.
Other sections of this guide will assume that you have added Mosquitto to your system path as described above. If you did not, issue all the Mosquitto-related commands (mosquitto, mosquitto_passwd, mosquitto_pub, mosquitto_sub) from the folder where you installed the broker.
How to Run Mosquitto MQTT Broker as a Service on Windows
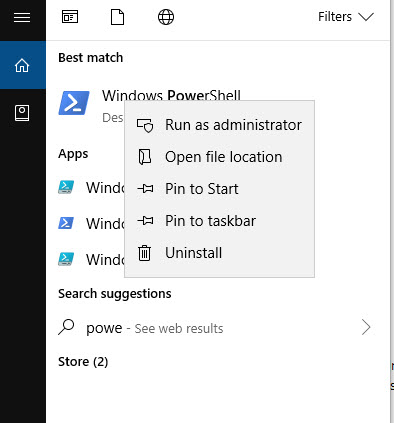
Most of the commands from this section must be executed with administrative permissions. To do this, you must run Command Prompt as administrator by right-clicking on the command line icon and choosing the “Run as administrator” option.
By default (if the “Service” option was ticked during installation), Mosquitto is installed as a Windows service to run in the background and automatically start on Windows startup. Note that in this case, Mosquitto will use the mosqutto.conf config file from the installation directory.
However, even though the Mosquitto service is installed by default, it’s not started (you can view the service status with sc query mosquitto). Until you start it, Mosquitto won’t be running and will not be automatically invoked every time you boot your system.
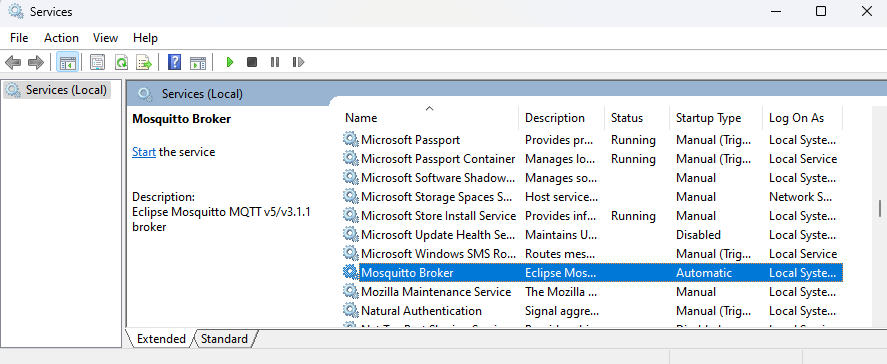
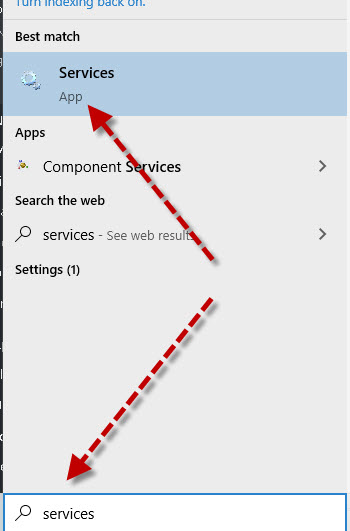
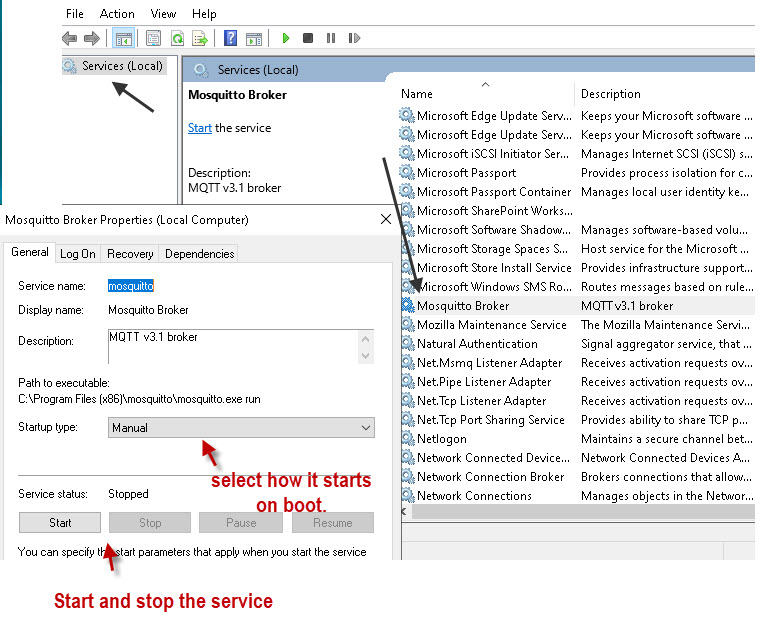
So, to start the Mosquitto broker as a service, go to the Services application first: open Windows search and type services.msc or Services and press enter. Then find the service named Mosquitto Broker, right-click on it, and start it:
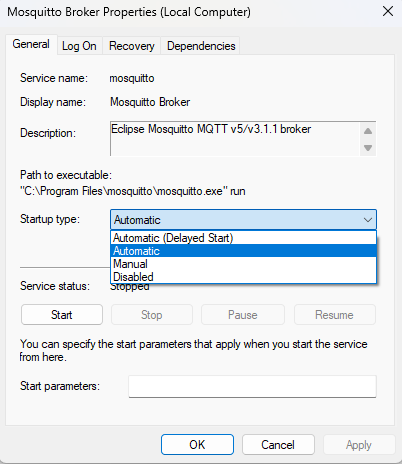
After you do the above for the first time, the service will automatically start on every subsequent Windows startup. You can change this behavior in service properties by right-clicking the “Mosquitto Broker” entry in “services.msc”:
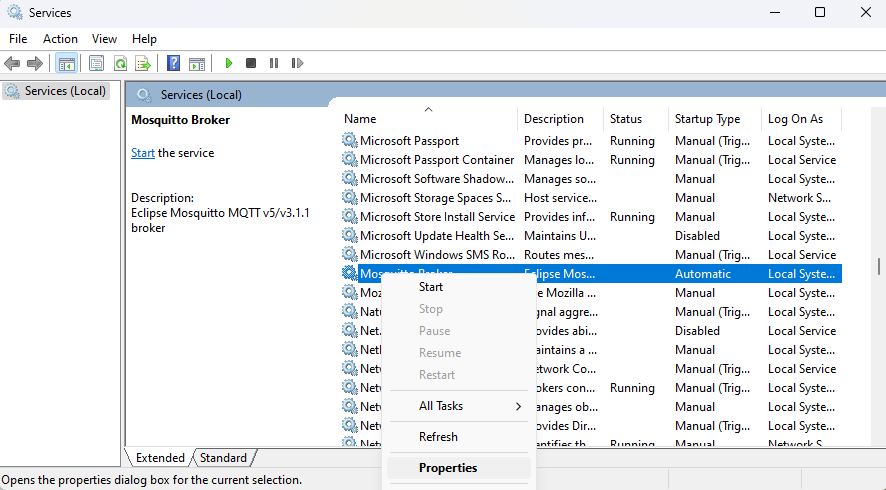
Then, change the “Startup type” field and press OK.
Alternatively, you can start the Mosquitto service using sc or net commands from the command line. Note that you will have to open the command line as an administrator. Example of using sc:
sc start mosquittoTo stop Mosquitto broker service, run:
sc stop mosquittoIf you want to remove Mosquitto Windows service, enter the following two commands one by one:
sc stop mosquitto
mosquitto uninstall
Alternatively:
sc stop mosquitto
sc delete mosquitto
If you want to install the Mosquitto service again, run the following command:
mosquitto installAnd as I already mentioned, you can also view Mosquitto service status using the command:
sc query mosquittoBy default, the Mosquitto broker service will listen on port 1883 unless you change this in mosquitto.conf file located in the installation folder. To check if Mosquitto is running on port 1883, run the following command:
netstat -an | findstr 1883If the Mosquitto MQTT server has opened an IPv4 and IPv6 listening socket on port 1883, the output of this command will be the following two lines:
How to run Mosquitto in the foreground
There is an alternative way to run Mosquitto which will, however, run it in the foreground rather than in the background as in the case with services.
Open the command line and use mosquitto -v -c <path to mosquitto.conf> command to run the broker in a verbose mode which will allow you to see the debug messages. Using the -c option, we can pass a mosquitto.conf configuration file to the broker. If you don’t specify it, no configuration file will be used. Read more on this in the following section.
Note that the -d option (that allows us to run Mosquitto in the background) is unusable in Windows because there is no daemon process manager. So, on Windows, we use services instead, as described in the section above.
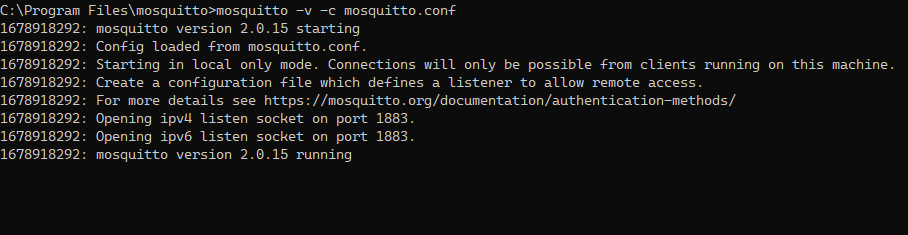
To stop Mosquitto from running in the foreground, press Ctrl + C in the cmd window where the broker is running.
In this article, we use the open-source Eclipse Mosquitto broker. However, the Pro Edition for Eclipse Mosquitto is also available. It provides cloud hosting, reliable support, high availability, and protects your data. Check out the free trial of Pro Mosquitto broker offering both cloud and on-premises instances for 14 or 30 days, and try its advanced features.
How to Configure the Mosquitto MQTT Broker on Windows
You can configure the operation and features of the Mosquitto broker using the configuration file named mosquitto.conf located in the installation folder. This file is used only for Mosquitto running as a service. If you run Mosquitto from cmd, the mosquitto.conf file is not used, and it has to be manually specified with the -c flag:
mosquitto -c <path to your config file>For example:
mosquitto -c "C:\Program Files\mosquitto\mosquitto.conf"If you want to run Mosquitto as a service and use a non-default configuration file, you will need to install the nssm command line tool. After that, ensure that the broker service is stopped and removed:
sc stop mosquitto
sc delete mosquitto
And finally, execute the following command:
nssm install mosquitto "C:\Program Files\mosquitto\mosquitto.exe" "-c <path to your config file>"For example:
nssm install mosquitto "C:\Program Files\mosquitto\mosquitto.exe" "-c C:\cedalo\mosquitto.conf"After that, you can start the service with sc start mosquitto and it will now use the custom config file you provided.
Editing mosquitto.conf
You may want to edit the default mosquitto.conf configuration file from the installation directory or create your own and specify the needed settings.
The default mosquitto.conf file in the installation folder contains commented-out lines (lines that begin with the # symbol) with default options. To change them, you need to uncomment the lines you want (by removing the # in front of them) and specify different values. Or you might as well not bother with uncommenting – just add your configuration options anywhere in the file.
If you create your own mosquitto.conf, then start with an empty file and add your options.
Below we will explore some necessary settings of this file.
Authentication settings
To connect to the broker for the first time, you have to configure your authentication settings in the configuration file. There are a few possibilities, some of which we explore below.
You can (but not necessarily should) allow anonymous connections from any host (meaning connections without a username and a password) by adding the following options to your configuration file:
allow_anonymous true
listener 1883 0.0.0.0
This will allow any device on the network to connect to the broker, post messages and subscribe to topics without authentication. However, we recommend allowing only authenticated clients to connect to your broker for security reasons.
To achieve this, first, create a password file containing usernames and PBKDF2 (with SHA-256) hashes of the passwords in the format: username:pbkdf2_password_hash. This would look like the following (take a look at pwfile.example):
roger:$6$clQ4Ocu312S0qWgl$Cv2wUxgEN73c6C6jlBkswqR4AkHsvDLWvtEXZZ8NpsBLgP1WAo/qA+WXcmEN/mjDNgdUwcxRAveqNMs2xUVQYA==
sub_client:$6$U+qg0/32F0g2Fh+n$fBPSkq/rfNyEQ/TkEjRgwGTTVBpvNhKSyGShovH9KHewsvJ731tD5Zx26IHhR5RYCICt0L9qBW0/KK31UkCliw==
pub_client:$6$vxQ89y+7WrsnL2yn$fSPMmEZn9TSrC8s/jaPmxJ9NijWpkP2e7bMJLz78JXR1vW2x8+T3FZ23byJA6xs5Mt+LeOybAHwcUv0OCl40rA==
This can be achieved using mosquitto_passwd command. To create a password file with the initial Mosquitto user, use the following command:
mosquitto_passwd -c <path where you want your password file to be created> <user_name>For example:
mosquitto_passwd -c C:\"Program Files"\mosquitto\passwd test_userThis will create a password file with the initial user test_user.
To add another user to the password file, run the command:
mosquitto_passwd -b C:\"Program Files"\mosquitto\passwd user_name passwordNote that if you want to delete a user from the file, you can use the -D flag and specify the name of the user to be removed:
mosquitto_passwd -D C:\"Program Files"\mosquitto\passwd user_nameAfter you have created a password file with all the needed users, add the following lines to mosquitto.conf:
password_file C:\Program Files\mosquitto\passwd
allow_anonymous false
listener 1883
Don’t forget to change the password_file option to contain the path to your actual password file.
How to Handle Persistent Data and Logs
Mosquitto broker allows you to save the following types of application data among the rest:
- Information and debug logs.
- Broker system data (persistence feature).
To configure the logging of your Mosquitto broker, you need to add the logging options (located in the Logging section of the default mosquitto.conf.)
Add the following parameter to specify which file to store the logs in. Also, it would be best if you made sure this path exists, so manually create a log folder (‘C:\Program Files\mosquitto\log’ in the example below).
log_dest file C:\Program Files\mosquitto\log\mosquitto.logYou can also choose the events to log: debug, error, warning, notice, information, etc. To save logs for all types of events, use the following option:
log_type allTo save persistence data, add the following options to the configuration file. Adjust persistence_location as needed. You need to ensure the path in persistence_location exists, so create a data directory manually if there isn’t one (‘C:\Program Files\mosquitto\data\’ in the example).
persistence true
persistence_file mosquitto.db
persistence_location C:\Program Files\mosquitto\data\
autosave_interval 60
Note that persistence data will only be saved to a file on Mosquitto shutdown or at specific intervals controlled by the autosave_interval config option.
Note that you need to restart the broker for the changes made in the configuration file to take effect. Use the command ‘sc stop mosquitto’ to stop the Mosquitto service and then execute ‘sc start mosquitto’ to start it up again.
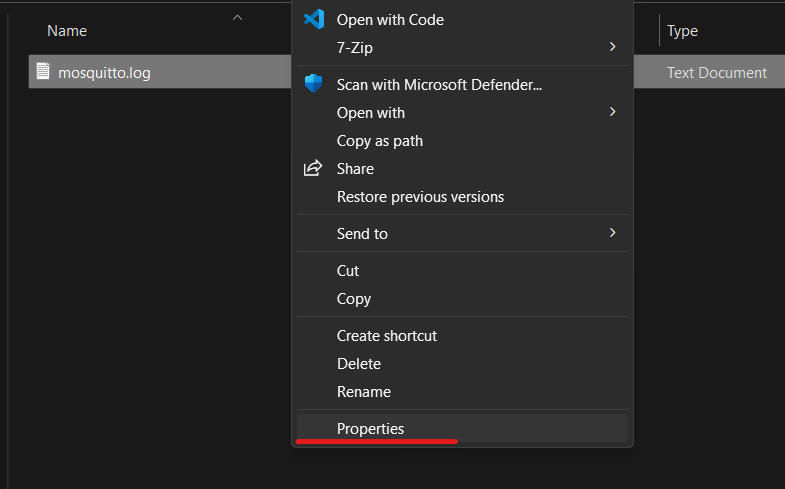
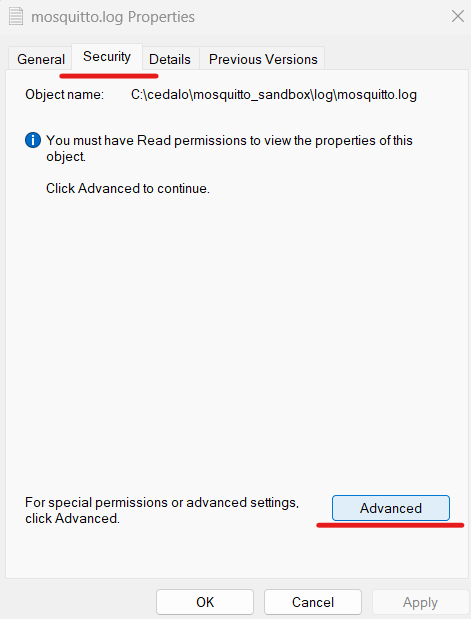
When Mosquitto runs as a service, all the files it creates will have access permissions set only for the SYSTEM Windows account. To access these files from your user account, you must go into the properties of those files and, on the Security tab, add your Windows user.
More specifically, right-click on the file and choose Properties:
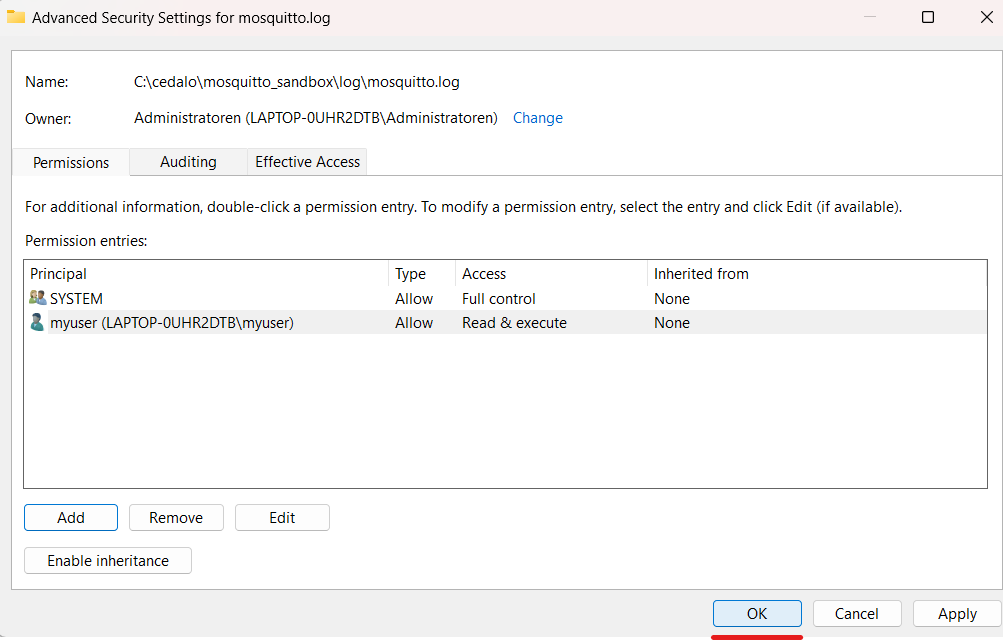
Go to the Security tab and click Advanced:
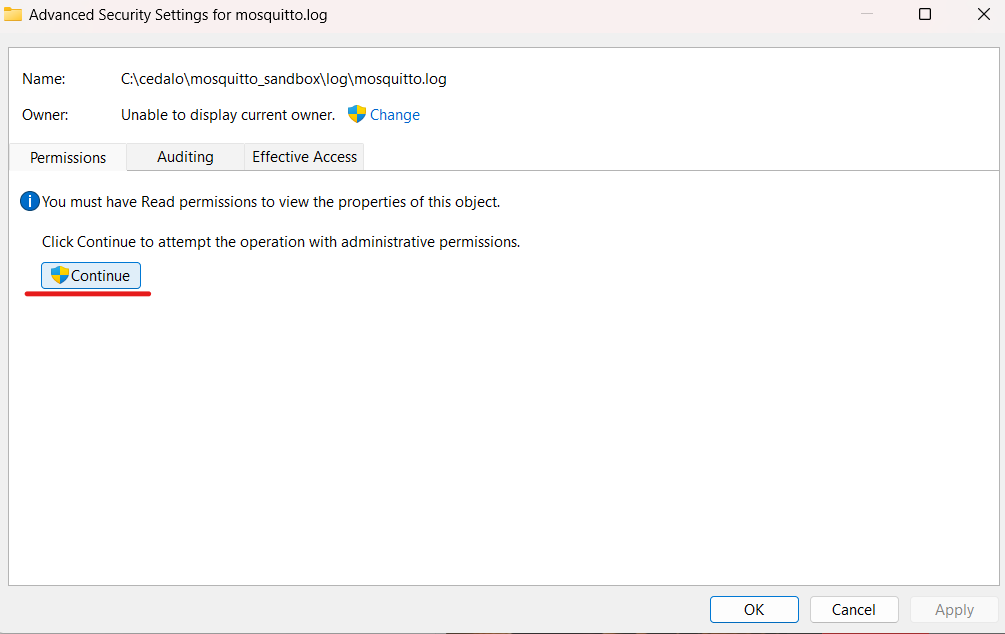
In the “Advanced Security Settings” tab, click on Continue:
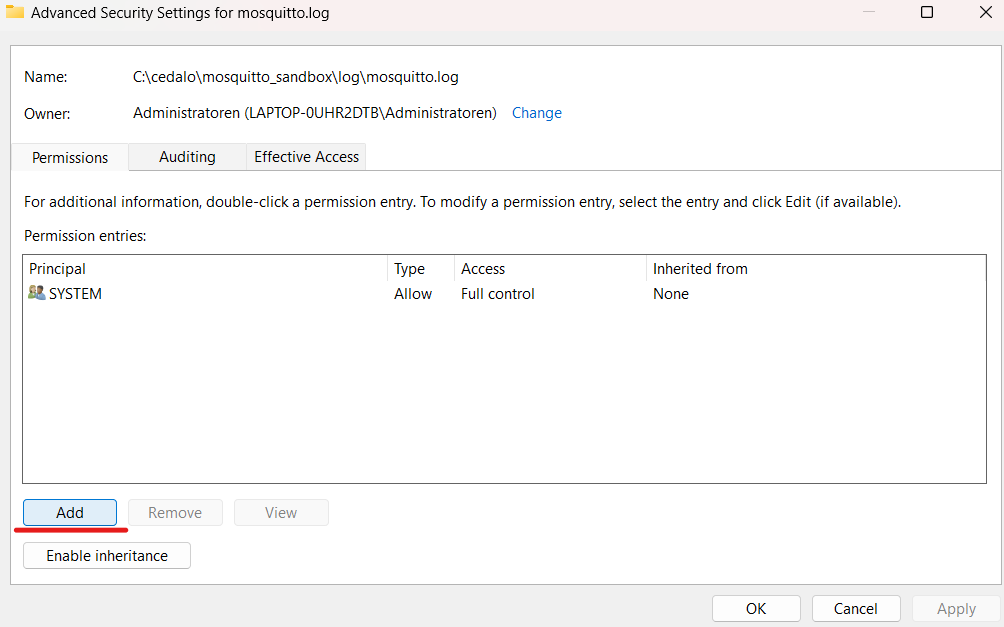
Click on the Add button:
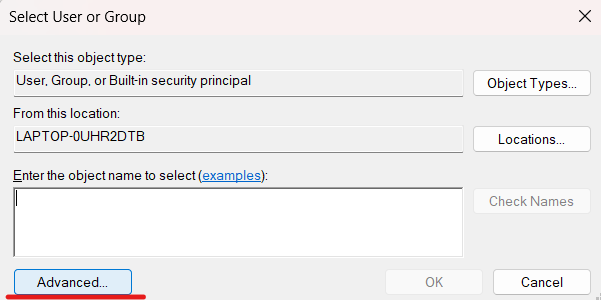
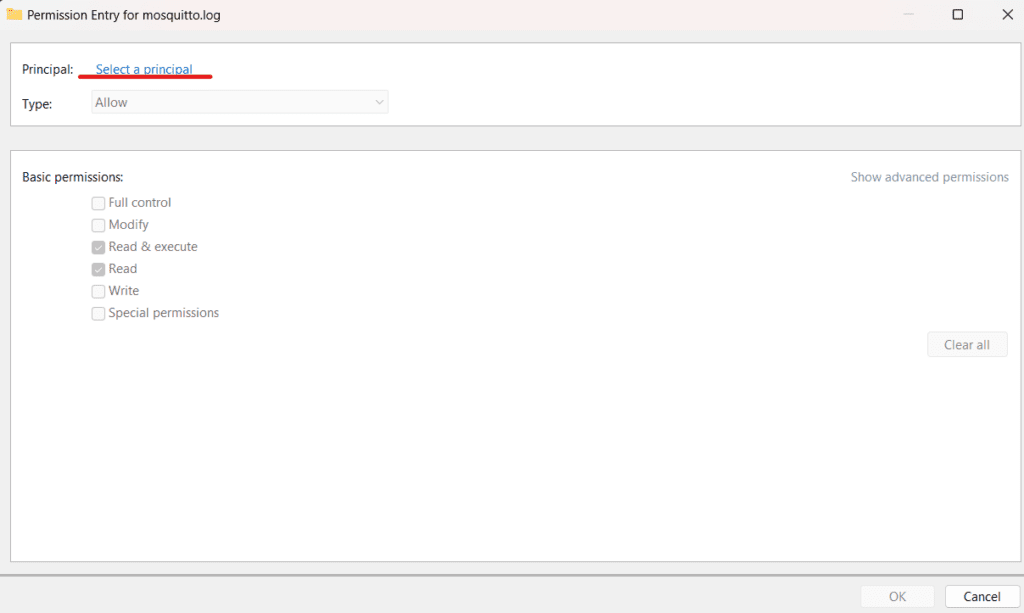
The “Permission Entry” tab will open. Click on Select a principal:
Click Advanced:
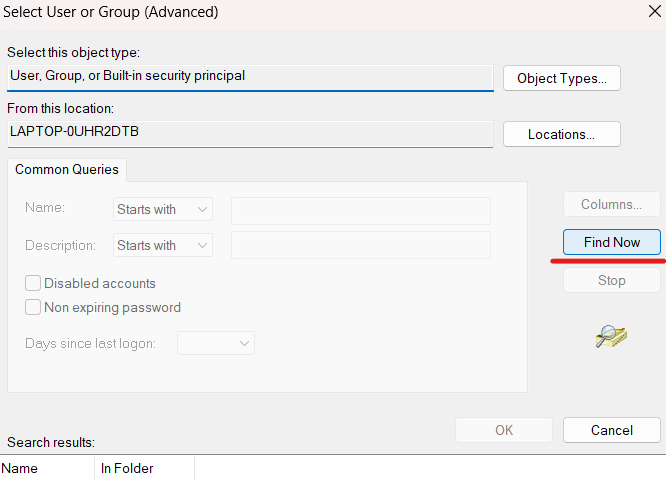
Then click on the Find Now button:
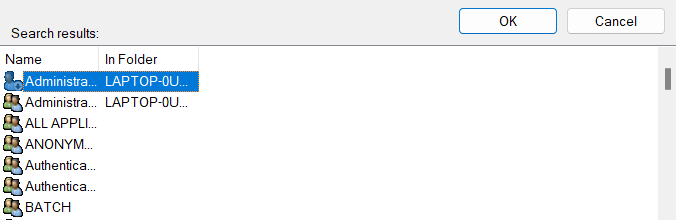
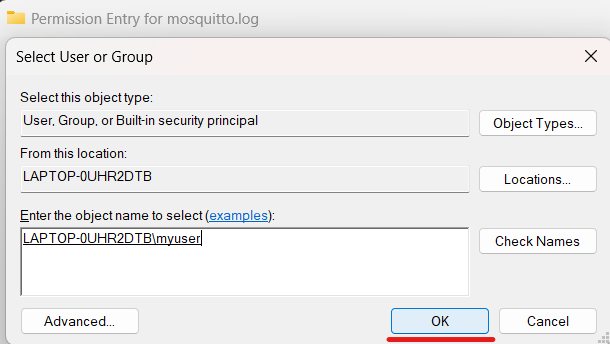
At the bottom of the window, in the Search results section, a list of users, groups, and built-in security principals will appear:
Find the user you are currently logged in as, select it, and click OK:
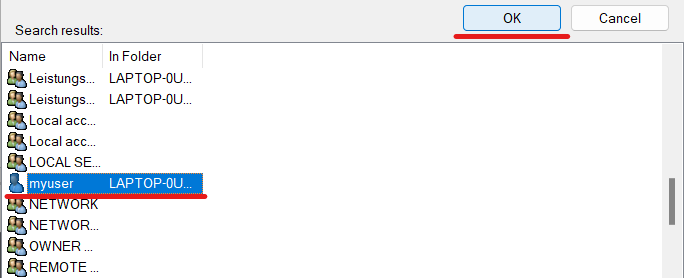
Click OK again:
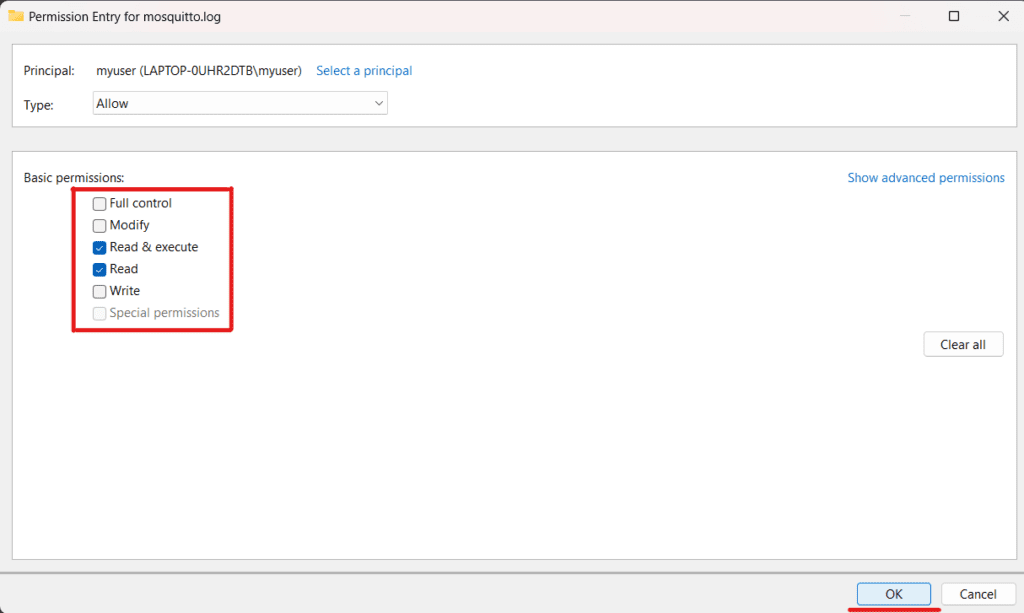
You will be sent back to the Permission Entry tab. Here select the basic permissions you want your user to have and click OK:
After that, in the “Advanced Security Settings” window, click on the OK button again:
Finally, you should be able to access the file.
Example Mosquitto Configuration File
Summarizing the settings we discussed, you may find an example of the mosquitto.conf file below. Remember to change the paths to suit your environment if you want to use it for your use case.
password_file C:\Program Files\mosquitto\passwd
allow_anonymous false
listener 1883 127.0.0.1
log_dest file C:\Program Files\mosquitto\log\mosquitto.log
log_type all
persistence true
persistence_file mosquitto.db
persistence_location C:\Program Files\mosquitto\data\
autosave_interval 60
There are many other Mosquitto broker settings that you can add to your configuration file. For example, you can configure Mosquitto to listen on multiple ports, configure TLS certificates, limit message size, and more.
You can find a complete list of mosquitto.conf settings here.
How to Test the Installed Mosquitto MQTT Broker on Windows
To test the correct operation of the Mosquitto broker, we will use mosquitto_sub and mosquitto_pub commands shipped together with the broker. You can also use any MQTT client, like MQTT Explorer.
Subscribe to Topics Using mosquitto_sub Windows
Mosquitto_sub Windows MQTT client allows you to subscribe to topics and print the received messages. To receive a message, you should subscribe to a topic before a message is published. In this example, we subscribe and listen to a topic using mosquitto_sub while publishing the messages with mosquitto_pub.
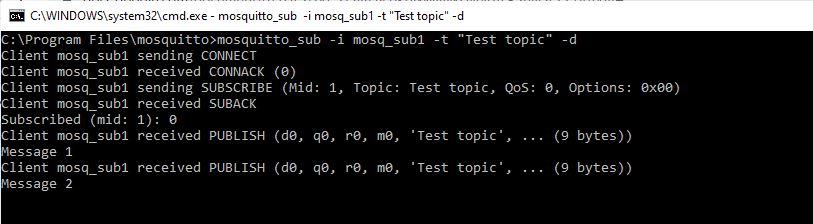
To subscribe to the topic named "Test topic", run the following command:
mosquitto_sub -i mosq_sub1 -t "Test topic" -dThis command uses the following options:
i– Client id. If this parameter is not passed, client ID is generated automatically.t– Name of the topic to subscribe to.d– Enables printing of debug messages.
After that, the MQTT client will be launched, which will notify about new messages on the “Test topic” topic and print them.
Mosquitto_sub uses localhost and 1883 port by default. Use option -h to change the host and option -p to change the port.
mosquitto_sub -i mosq_sub1 -t "Test topic" -h localhost -p 1884 -dIf you use authentication to connect to the broker, specify a username and a password using -u and -P options:
mosquitto_sub -i mosq_sub1 -t "Test topic" -u <username> -P <password> -dPublish Messages with mosquitto_pub Windows
Mosquitto_pub is a simple MQTT client that publishes one message to a topic and exits.
To publish a message, run the following command in a new cmd window:
mosquitto_pub -i mosq_pub1 -t "Test topic" -m "Test message" -dThis command uses the following options:
i– Client id. If this parameter is not passed, the server generates client ID automatically.t– Name of the topic to which the message is published.m– Text payload of the message to be published.d– Enables printing of debug messages.
Below is the output of the command.
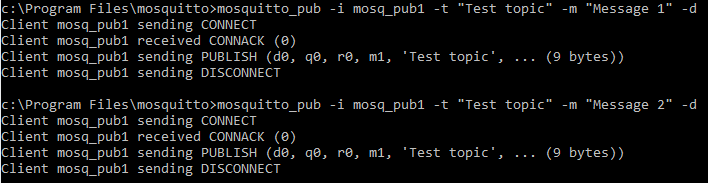
By default, messages are sent to the broker at localhost, port 1883. To publish them to a different host, use the -h option. Use the -p parameter to connect to a different port.
mosquitto_pub -i mosq_pub1 -t "Test topic" -m "Test message" -h localhost -p 1884 -dTo specify a username and password for the user authentication, use -u and -P options:
mosquitto_pub -i mosq_pub1 -t "Test topic" -m "Test message" -u <username> -P <password> -dEnsure that the publish topic is the same as the topic you have previously subscribed to (-t “Test topic”). If you did everything correctly, you would see the published messages (“Test message”) in the window where you executed the mosquitto_sub command.
Uninstalling Mosquitto MQTT Server on Windows
If you want to uninstall the Mosquitto Windows service specifically and not the broker application itself, you first need to stop the service using the sc stop mosquitto command. Then run either sc delete mosquitto or mosquitto uninstall.
Otherwise, if you want to delete both service and the application, you can use the “Uninstall.exe” executable, which is located inside the installation folder. After running it, you need to delete the installation folder, and you are done.
To run Mosquitto Uninstall executable from cmd in silent mode, type the following into the Windows Command Prompt from inside the folder where Mosquitto is installed:
Uninstall.exe /STroubleshooting Mosquitto MQTT Server on Windows
Only one user is allowed per socket address
If you receive the error message “Normally only one user is allowed per socket address (protocol/network address/port),” you may already have another application running that is listening on port 1883.
Possible Solution
Run netstat -ano | findstr :1883 (or use a different port instead of 1883 if it was configured) command and check if the specified port is already in use by another program. The occupying process’s process id (PID) will be in the last column. You can copy it and then run taskkill /F /PID <PID> replacing the <PID> with the process id value from netstat. You may also free up the port in any other way after identifying which application occupies it. Then killing the process with taskkill is not necessary.
Can’t Connect to Mosquitto Broker with Local IP Address
When connecting to the Mosquitto broker using a local IP address other than localhost, a connect ECONNREFUSED error occurs.
Possible Solution
You need to edit the configuration file to listen to addresses other than localhost. Add the listener parameter and specify the port on which you want to listen for incoming network connections as well as the desired IP address/hostname:
listener 1883 192.168.1.100 You can specify a hostname instead of the IP address (192.168.1.100 in the example above). This listener option can also be specified multiple times to bind various addresses. If we omit it, Mosquitto will be listening on localhost.
Note that having at least one listener in your config file is always a good idea. This will help avoid some problems down the road.
Additionally, for troubleshooting purposes, you can allow anonymous connections from remote addresses with the following:
allow_anonymous trueHowever, it would be best to be careful with this option as it is not recommended to allow anyone to access the broker because of security considerations. We recommend using this option for testing purposes only.
If you are using the open-source version of Eclipse Mosquitto broker for a commercial project and need advice or help to solve a problem, we offer open-source Mosquitto support. This can help you quickly solve your problems, ensure your system’s stability and security, get quick access to new patches and fixes, and be the first to receive information about new releases.
Summary
In this article, we described MQTT Mosquitto Broker and how to install, configure, and test Mosquitto on Windows. In addition, we considered the most common problems and their solutions when using the Mosquitto broker.
Let’s summarize the main points:
- Use the executable file for Mosquitto MQTT broker Windows installation.
- Add the installation folder to the PATH environment variable to make the ‘mosquitto’ command globally available from the command line.
- By default, Mosquitto will be installed as a Windows service, which can run in the background and automatically start on the operating system boot.
- To configure Mosquitto broker (including authentication settings, logging, etc.), use mosquitto.conf configuration file from the installation folder or provide your own.
- You can test Mosquitto using popular MQTT clients mosquitto_pub and mosquitto_sub, which are bundled into the installation.
![]() In this tutorial you will learn how to install the mosquitto MQTT broker (server) on Windows.
In this tutorial you will learn how to install the mosquitto MQTT broker (server) on Windows.
See the installing Mosquitto on Linux tutorial for how to install on a local Linux server and also a cloud server (AWS).
Installing The Mosquitto Broker on Windows
Note: The term server instead of broker as been adopted as of MQTT version 3.1.1
There are two possibilities:
- Quick Install
- Standard Install
Quick Windows Install
The problem with the standard install is that there are certain dependencies that need to be installed before you can do the mosquitto install.
This involves installing software and copying files from other installs into the Mosquitto install folder.
You should note that from version 1.5 on support for windows XP was dropped, so if you need to run mosquitto on XP the you need to use an older version.
The version will also run on Windows ,7,8 and 10. It doesn’t have web sockets support.
This tutorial cover the Install on XP and includes the download files
Quick Install Mosquitto v 1.5.8 and 1.6.9
This version of Mosquitto works with websockets.
Here is my download package for v2
Here is my download package (1.6.9)and includes the SSL files for encryption .
Here is my download package ( 1.5.8) and includes the SSL files for encryption .
Just unzip it go to the directory and run the broker manually as covered here.
Don’t forget to virus check it let me know if you have any problems with it.
Video – How to Install Mosquitto Broker on Windows
Websockets on Windows Notes
Since mosquitto 1.5.1 websockets support has been enabled on the windows binary files.
However when using 1.5.1., 1.52 and 1.53 when you start mosquitto it appears to be listening on the websocket port but doesn’t allow connections.
mosquitto v 1.5.4 and above works with websockets.
Manual Install Windows
To install manually you will need to download the files from Eclipse. Here is the link.
As mentioned earlier the big problem with the Windows Install is that there are lots of dependencies that you also need to install or have installed.
From version 1.5.8 the install script lets you install mosquitto as a service.
When Mosquitto is installed as a service it starts automatically.
However this is not important for a test environment.
First you will need to download the Windows install files from here.
Install Steps
1. Double Click on the install script
2. Note the dependencies screen which tells you what additional files are required. The screen is note very clear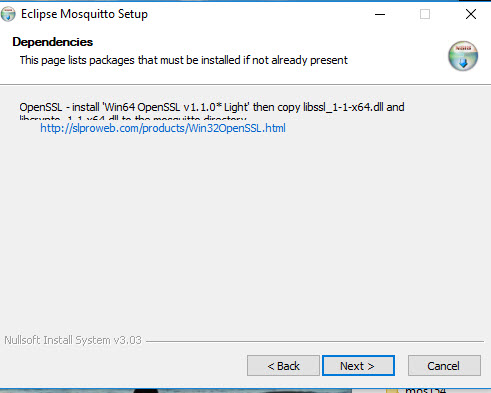
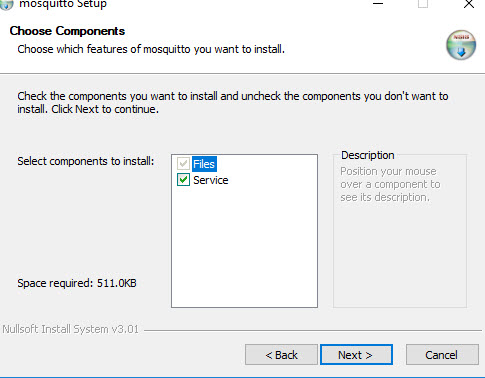
3. Select components check service to install as a service if you want mosquitto to start automatically when windows starts.
4. Choose a location it defaults to c:\program files\mosquitto.
5. Finish
You then need to copy the additional files to the install directory after the install again.
The additional files are
- libcrypto-1_1_x64.dll
- libssl-1_1_x64.dll
Note 1: You can obtain these files by installing openssl using the files from here or by downloading my package.
Note2: They are now included in the 1.5.8 install package.
Starting Mosquitto on Windows
To start the broker manually open a command prompt and go to the mosquitto install directory and type mosquitto.
You can also use various command line switches. Type
mosquitto -h
for help.
To start in verbose mode so that you can see console messages use the -v option:

Running Mosquitto as a Service -Update 22-12-2018 -Notes version 1.5.4 and below
On production environments you will need mosquitto to auto start on a reboot.
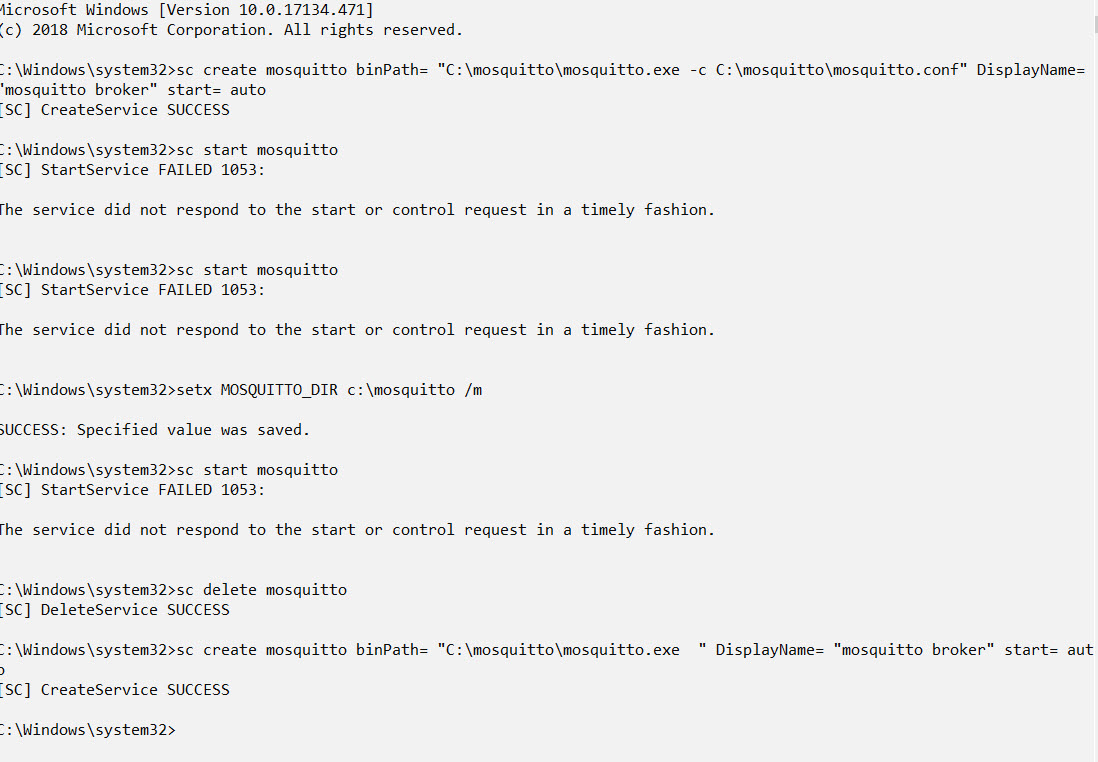
To start mosquitto as a service the usual use of the sc command didn’t work as seen from the screen shots below.
However a reader pointed out the power shell option which does work
Here is a screen shot of my attempts using sc command
Note you need to open the command prompt as administrator.
Installing Mosquitto as a Service using Power Shell
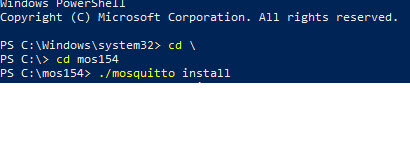
Open a power shell command prompt as administrator.
Change to the directory where you have installed mosquitto (mos154 below) and type:
./mosquitto install
Mosquitto is added but you don’t get any confirmation and it isn’t started but will start on reboot. However you can now start it manually.
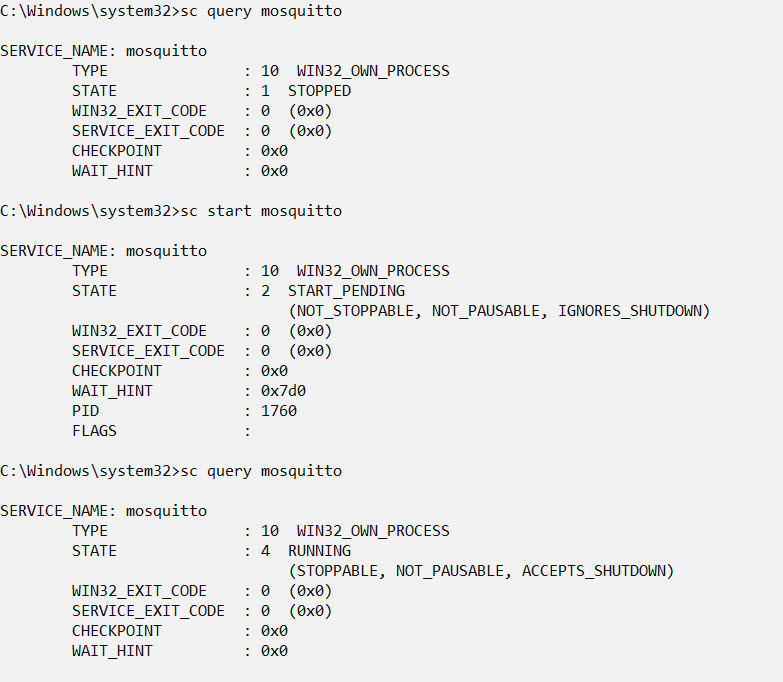
Now open a normal command prompt again as administrator and type the commands:
sc query mosquitto
sc start mosquitto
sc query mosquitto
Testing The Install
To test it is running use command:
- netstat -a
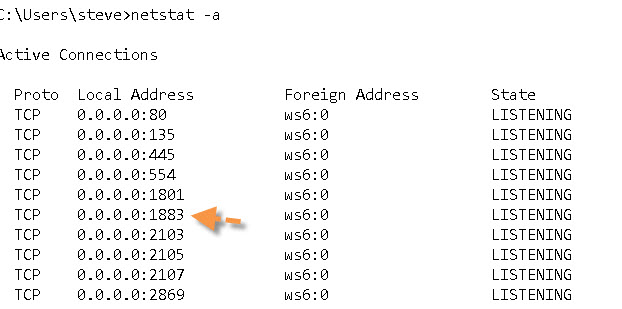
You should see the Mosquitto broker running on port 1883 as shown in the screen shot above.
Another quick test is to try to start it twice in two different command prompts.
You should get an error message complaining about the port being in use.
The Mosquitto.conf File
The configuration file (mosquitto.conf) that comes with the install is completely commented out, and the MQTT broker doesn’t need it to start.
However when Mosquitto runs as a service it uses this configuration file. .
Don’t use the commented out version and edit it as it is very long and difficult to navigate.
Instead create a blank file and add you entries to it using the commented out file as documentation.
See Quick Guide to The Mosquitto.conf File With Examples
Mosquitto Logging
If you enable logging in the mosquitto.conf file then when mosquitto runs it creates this file with restricted permissions, and locks the file while the broker is running.
If you stop the broker you can change the permissions on the file to access it.
See Understanding and Configuring Logging on Mosquitto
Mosquitto 2..0.2 and above
Mosquitto v2 introduced some important changes that affect first time users in particular.
By default it requires authentication and doesn’t listen on a network address.
The following simple configuration file will make mosquitto start like previous versions:
listener 1883
allow_anonymous true
Stopping The Mosquitto Service
When testing it is better to start mosquitto manually from the command line. In order to do this you either need to use a different port than the running version or stop the running version.
I prefer to stop the running version and set it for manual start when working in a test environment. To Stop the service and set the start mode type services in the search bar (lower left) and select the services App.
Locate the mosquitto service and stop it. I set mine to manual mode when working in a test environment.
Running Multiple Mosquitto Brokers
You can configure a broker to listen on several ports, but to create multiple brokers with their own configurations then you will need to start multiple instances of mosquitto. See Quick Guide to the Mosquitto.conf file and this video on running multiple brokers.
Examples:
Start mosquitto and listen on port 1883
mosquitto -p 1883
Start mosquitto and listen on port 1884
mosquitto -p 1884
Start mosquitto and use the mosquitti-2.conf file.
mosquitto -c c:\mosquitto\mosquitto-2.conf
Note: starting as a daemon (-d) is not supported on windows.
Mosquitto Client Scripts
The windows install includes the client scripts.
There is a simple subscriber client
mosquitto_sub
and a publisher client
mosquitto_pub
Use
mosquitto_sub –help
They are useful for some quick tests. See Using The Mosquitto_pub and Mosquitto_sub Client Tools- Examples
Video
How to install the Mosquitto Broker on Windows
Common Questions and Answers
Q- What is the difference between a quick install and a standard manual install?
A- Using my install package you don’t need to install any other software as the package includes the necessary files. A standard manual install installs mosquitto as a service but a quick install doesn’t.
Q- I have Mosquitto broker installed on one Windows machine can I copy it to another machine?
A- If you have already installed Mosquitto on another windows machine e.g. XP and want to install it on another machine e.g. Windows 10 then you can just copy the directory containing the mosquitto files to the new machine.
I copied my windows XP install (32 bit) onto a windows 10 (64bit) machine and a Windows 7 machine and it worked OK.
You need to be aware of the versions as windows XP doesn’t support Mosquitto v 1.5 and above.
———————–
Other Tools
 MQTTlens is also very useful for troubleshooting and quick testing. It is an add-on for the chrome browser.
It lets you publish and subscribe to topics using a web interface, and is much easier to use than the command line clients.
![]() MQTT-Ping -Python Tool written by me that works like the traditional IP ping command tool.
MQTT-Ping -Python Tool written by me that works like the traditional IP ping command tool.
MQTT v5 Support
Note: Starting will mosquitto version 1.6 mosquitto now supports MQTT v5.
Was This Useful?
![]()
Notes
If you are using MQTT with websockets and mosquittov2 then it has problems and you will may need to go back to 1.6.9 (email from Keith)
I have a web page client that uses Windows Sockets to connect and a C# program that connects using MQTT. If I connect using the C# program everything works fine. As soon as I connect using Windows Sockets to the broker the C# program stops being able to connect. No error messages appear on the server but eventually the C# client times out. If I restart the server, the MQTT client can connect. However, as soon as the Windows Sockets program connects the MQTT client is not able to connect.
I did a little research on this and apparently it is a known issue with version 2 of the mosquitto broker on Windows. The solution appears to be to use an older version, in my case 1.6.9. That works perfectly.
Anyway, I didn’t know if you knew this and if not, maybe it is something you might want to mention on your web site.
Here is the link that I found from the Eclipse website that explains it.
https://github.com/eclipse/mosquitto/issues/1934
Mosquitto Configuration Tutorials
- Configuring and Testing MQTT Topic Restrictions
- Configuring Username and Password Authentication
- MQTT TLS Security – Mosquitto Broker Configuration
- Understanding and Configuring Bridging on Mosquitto
- Configure Mosquitto Bridge With SSL Encryption- Examples
Other Related Articles and Resources:
- MQTT for Beginners
- MQTT and Mosquitto WebSockets Working Notes
- MQTT Hosting,Brokers and Server
Please rate? And use Comments to let me know more
We use cookies on our website to give you the most relevant experience by remembering your preferences and repeat visits. By clicking “Accept All”, you consent to the use of ALL the cookies. However, you may visit «Cookie Settings» to provide a controlled consent.
The Mosquitto or MQTT broker is an OASIS standard messaging protocol for IoT. The inculcation of IoT in modern-day lives has pulled MQTT in the picture. Being a lightweight messaging transport that can remotely connect devices, MQTT tutorials were in much demand. So, here we portray one tutorial for the installation of Mosquitto MQTT broker Windows.
There exist three different ways of installing Mosquitto broker on Windows.
- Standard install
- Quick install
- Windows PowerShell install
We will first see the basic one, i.e., the Standard Install. And then move on to the Quick and PowerShell installation methods.
Method 1: Standard or Manual Installation of MQTT Broker on Windows
When obeying this standard procedure, you will have to install certain other dependencies.
To start with the manual installation procedure, the pre-requisite is to download files from Eclipse as a part of the dependencies.
Mosquitto can be downloaded as a service since version 15.8. In this case, Mosquitto starts automatically.
But before these, you need to install the Windows installation files.
So now, let’s move on to the installation steps.
1: Double click on install script.
2: The “Dependencies” screen will appear, which will tell you about the required additional files.

3: In the “Choose Components” page, tick the box that will install Mosquitto as a “Service.”

4: By default, the location of installation will be set at C:\ program files\mosquitto. If you want to install the service somewhere else, you can browse to that particular location.
5: Click on “Finish” to complete the process.
After the above steps get executed successfully, you now need to copy the additional files to the install directory.
Two additional files will be available for copying, as listed below:
- libcrypto-1_1_x64.dll
- libssl-1_1_x64.dll
Point to Note: These files are included in the 1.5.8 install package. And you can also get these files by installing OpenSSL.
Starting MQTT on Your Windows Device
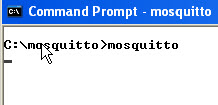
For manual starting of the MQTT broker, open “Command Window.” Navigate to the directory where you installed Mosquitto and type mosquitto.
If saved in C drive, the command will appear as: C:\mosquitto>mosquitto

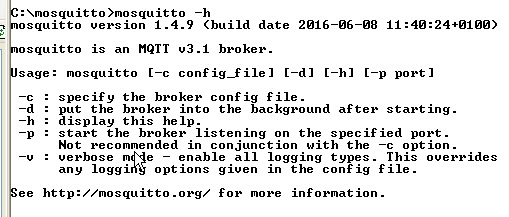
If you want to use command-line switches, type
mosquitto -h
It will open the “Help” section for you, as shown in the below-given snapshot.

The command mosquitto -v will let you start in verbose mode, and you can thus see the console messages.

Method 2: Quick Installation of MQTT Broker Windows
Many people don’t prefer the traditional manual way of installing an MQTT broker. It is because the manual process involves the installation of many other dependencies. To avoid the hectic process of copying files from here to there and finding sources to download the dependencies, many users have shifted to the Quick install process.
The mosquitto version 1.5.8 works well with WebSockets.
While Quick installation, you can take the help of online sites that offer quick links for downloading all the packages at one go. Then, you can unzip the folders in the directory where you have kept MQTT. Henceforth, follow the steps as discussed for standard installation.
Method 3: MQTT Installation via PowerShell
It is an alternative installation process involving Windows PowerShell.
1: Open the PowerShell Command prompt by selecting “Run as Administrator” option.

2: Chose the directory where you want to install mosquitto and type the below command:
./mosquitto install

3: Mosquitto will get installed, but you won’t get any notification.
4: To start mosquitto, reboot your device, or start it manually.
5: Open the regular command prompt as Administrator and type the following codes. Make sure it is in the same given sequence.
- sc query mosquitto, sc start mosquitto, sc query mosquitto
Testing the Installation
Now that you have done your part of the installation, how can you confirm whether the process got executed successfully?
Well, it is simple.
- Open command window
- Type down the below command
- netstat -a
The format should be as follows:
C:\ Users\ username> netstat -a
An instance is shown below.

Running the command should show you that the MQTT broker is running on port 1883.
So, these were some of the ways to install the Mosquitto MQTT broker Windows. I hope the tutorial will be beneficial for you.
In this tutorial, we will learn to install Mosquitto MQTT broker on Windows machine as well as Linux Ubuntu operating system. An MQTT broker is the main component of an MQTT protocol. It receives MQTT messages from all MQTT clients and forwards them to all clients which subscribed to those topics.
In this tutorial, we will focus on installing Mosquitto broker on Windows and Linux only. However, it is recommended to install Mosquito MQTT broker on Raspberry Pi if you want to use it for your projects. This is because if you have installed the broker on Windows/Linux, you need to keep your machine up and running all the time in order for IoT devices to remain connected with the broker.
Refer to the following guide, if you want to install the Mosquitto Broker on Raspberry Pi instead:

- Install Mosquitto MQTT Broker on Raspberry Pi
What is MQTT
MQTT is a lightweight messaging protocol for IoT device communication.
- MQTT is known as Message Queuing Telemetry Transport protocol.
- It is a lightweight messaging protocol and helps resource-constrained network clients with a simple communication mechanism.
- Unlike, most messaging systems, we don’t have to assign addresses to MQTT clients.
- MQTT uses simple publish/subscribe communication-based on a topic.
- This protocol runs on top of TCP / IP in order to provide reliable data delivery.
In order to understand MQTT protocol, you should grasp these four main components components
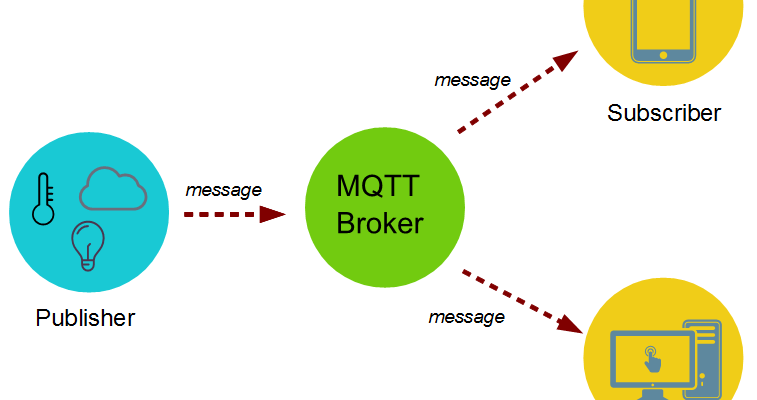
MQTT Publisher/Subscriber
The first main concept in MQTT is a Publisher/ Subscriber system. A publisher device publishes a message on a specific topic and a Subscriber device subscribes to the topic which will be sent by a publisher. On top of that, more than one device can subscribe to the topic.
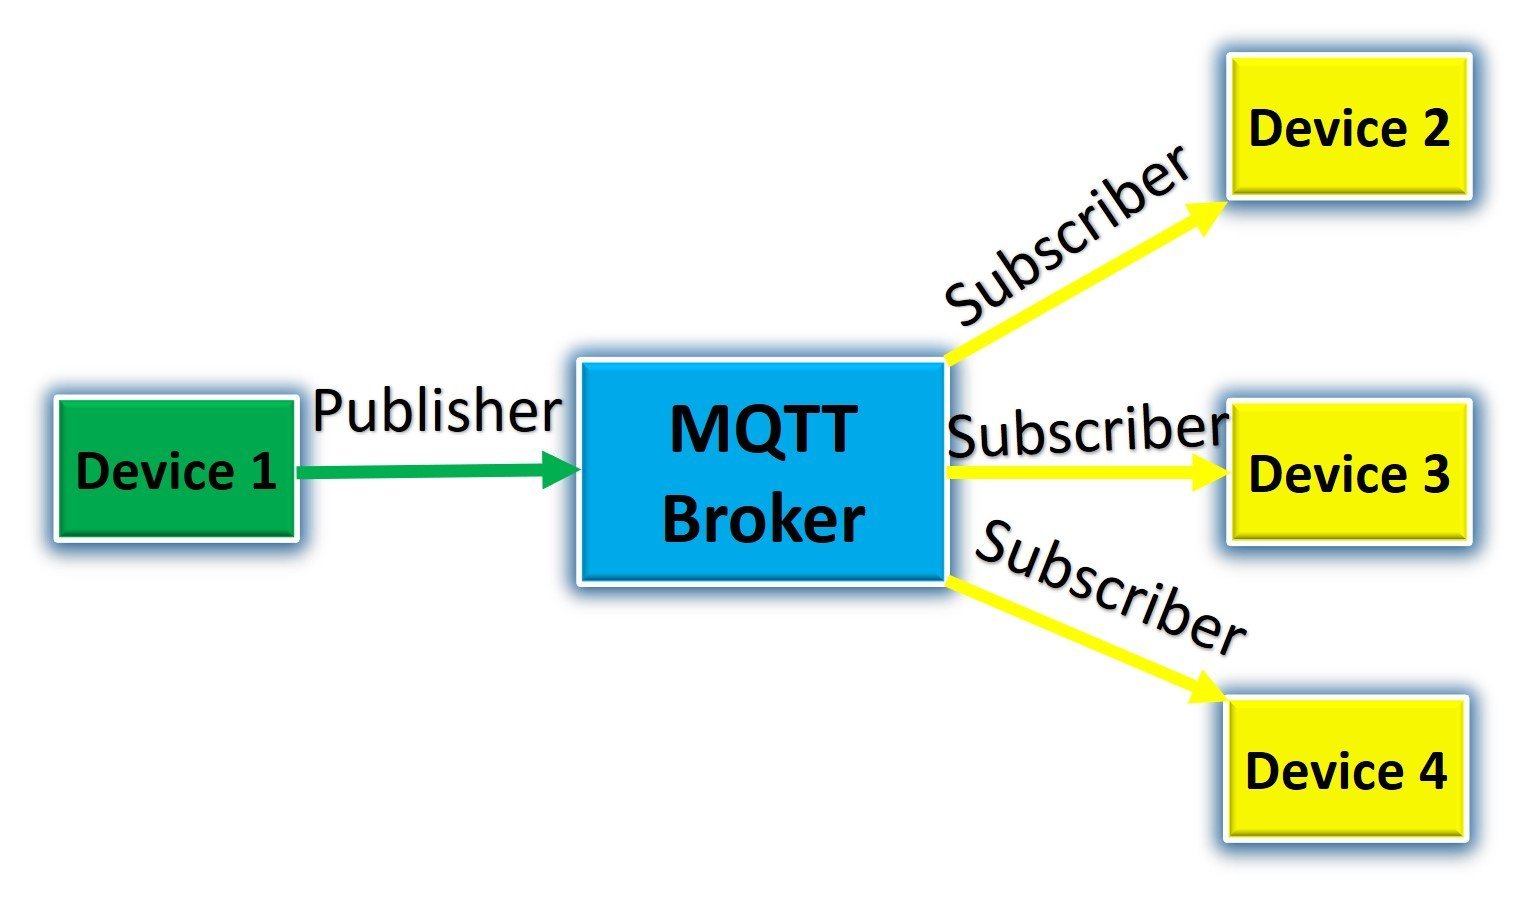
For example, according to above figure:
- Device1 is a publisher and Devices(2-3) are subscribers.
- Let’s suppose, device1 publishes on a topic “ESP32/Temperature” and Devices(2-3) subscribe to the same topic.
- Hence, Devices(2-3) are receivers and Device1 is a sender.
Installing Mosquitto Broker on Windows
Lets start with installing Mosquitto broker on our Windows machine. Follow the guide step by step for a successful installation.
We will start by downloading the Mosquitto Broker for MQTT protocol by Eclipse. After that we will install that in our Windows machine. First of all open a new webpage, type Mosquitto and open the download page of the official website. The following link: https://mosquitto.org/download/ also takes you to the download page.
Head over to the Windows section, and click the .exe file according to your Windows system type to download. Our Windows machine has an operating system of 64 bit hence we will download the .exe file according to that.
The application file will start downloading. After the download is finished, click the file to open it and begin the installation process. Click ‘Next’ to begin the process.
Next we will be asked to choose the features of the Mosquitto Broker. By default, both ‘Visual Studio Runtime’ and ‘Service’ were ticked so we leave it as default and click ‘Next’ to move ahead.

The next step is to choose the installation location. You can specify your own preferred destination folder. We are going with the default path already set.
Now click the ‘Install’ button and the installation will start.
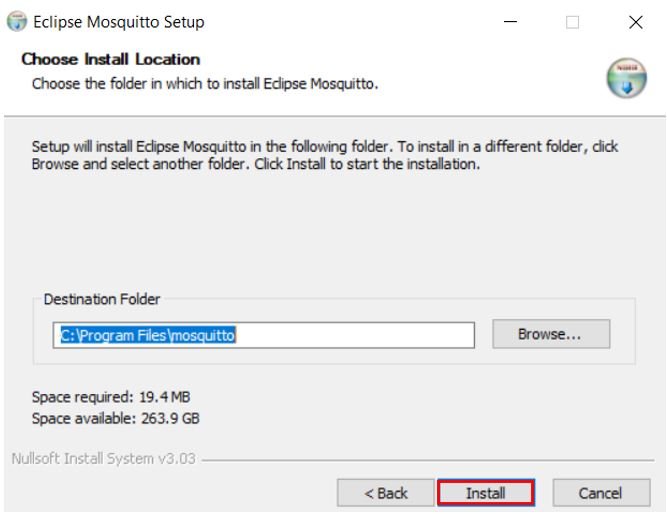
After a few moments, the installation will successfully complete. Click the Finish button to close the setup.
Start, Stop and Restart Mosquitto Broker Service
Now let us test our Mosquitto Broker service. Open the Task Manager on your system and head over to the Services tab. Here find the mosquitto service and check its status. Here, we can view that it is Running.
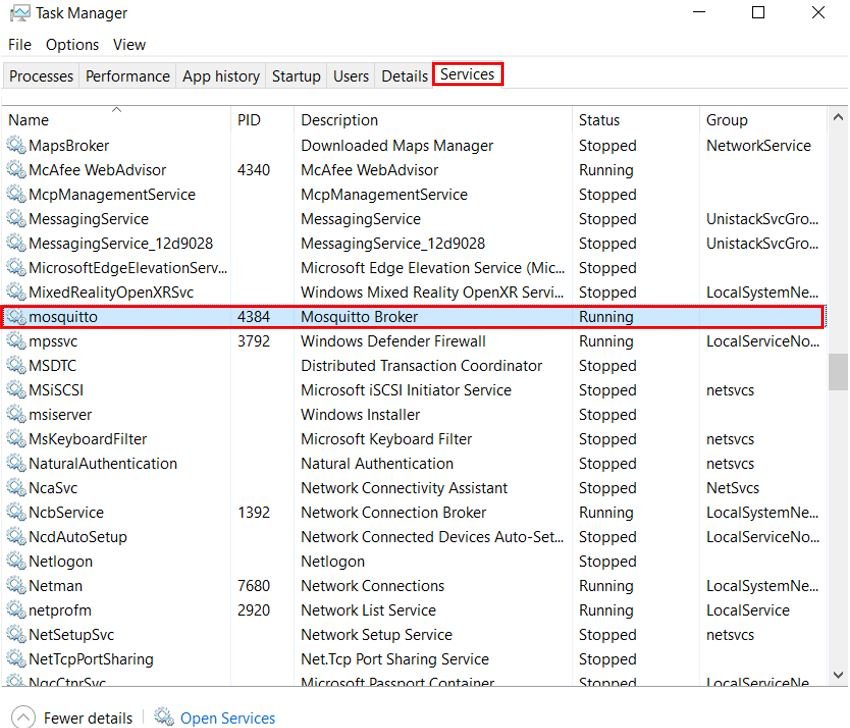
Right click on the Mosquitto service, and you will have various options which you can select. You can stop the service by clicking ‘Stop’ and even restart it by clicking ‘Restart.’ Other options are also available which allow you to open more details.

Alternative Method to Start, Stop and Set Port
We can even use command prompt in Administrative mode to run the Mosquitto Broker service. First of all, open command window as an administrator.

Then navigate to the path where you installed the Mosquitto Broker application. In our case, we set the default path which was “C:\Program Files\mosquitto“

To start the Mosquitto service, type the command: “net start mosquitto“

If you want to stop the service, then type the command: “net stop mosquitto“

In order to change the port for the Mosquitto broker, type the following command: “mosquitto -p 1883”
This command will set the default port as 1883.

Testing Mosquitto Server on Windows
To test or Mosquitto server, open two command prompts as an administrator and navigate to the directory where we installed the mosquitto application.
One command prompt will act as a publisher, that will publish an MQTT message to the test/topic. The other command prompt will act as a subscriber, that will subscribe to the test/topic and display the message received in the command shell.
To start the command line subscriber, we use the following command.
mosquitto_sub -v -t 'NAME_OF_TOPIC'Here the name of our topic is test/topic. This command line will therefore subscribe to the topic: test/topic.
Type the following command in the first command prompt:

To publish an MQTT message with the command line publisher, we use the following command.
mosquitto_pub -t 'NAME_OF_TOPIC' -m 'MESSAGE_TO_BE_PUBLISHED'Here the MQTT message that we want to publish is WELCOME!. This command line will therefore publish ‘WELCOME!’ to the topic: test/topic.
Type the following command in the second command prompt:
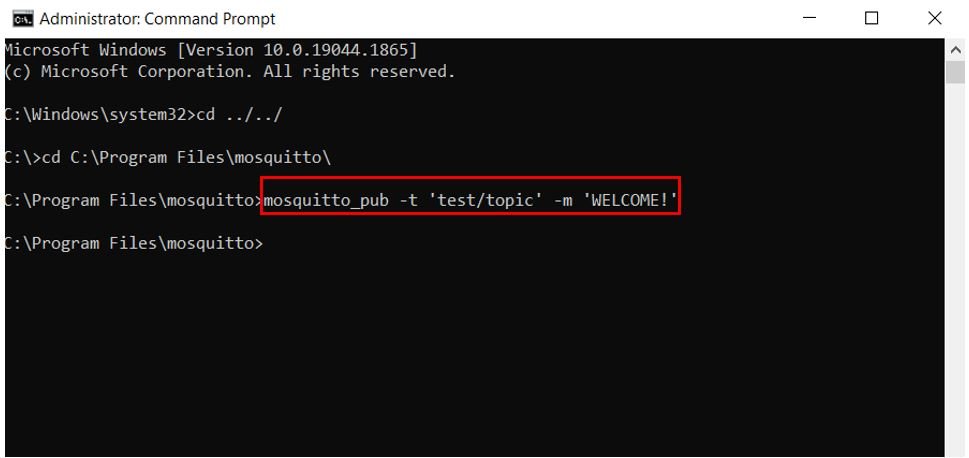
Now the subscriber terminal will display the message it received from the test/topic.

Hence, the Mosquitto Broker is working fine as one client was able to publish a message to a topic and another client was able to subscribe to that topic and receive the message.
Installing Mosquitto Broker on Ubuntu Linux
In this section, we will install Mosquitto broker on Ubuntu machine and test it as well. As with the installation of any other package, Mosquitto is also available in the Ubuntu repositories.
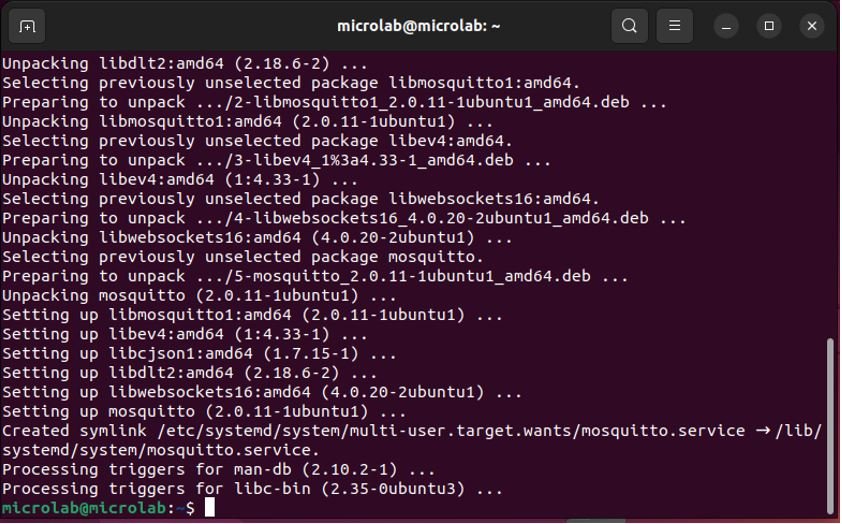
To install Mosquitto Broker, open the Terminal in your Ubuntu machine and type the following command:
sudo apt-get install mosquitto
After typing the correct password for the user, the installation process starts.

Type ‘Y’ to continue and the installation completes shortly.
After the installation is complete, the Mosquitto Broker will automatically start. To view the current processes running within our system we will type the following command in the shell:
ps -eAs a result, you may notice that mosquitto is part of the processes currently running on the system.

Testing Mosquitto Broker on Ubuntu
Let us show you how to subscribe and publish messages to a topic. Before that we will have to install a Mosquitto client. To do that, type the following command in the terminal:
sudo apt-get install mosquitto-clients
This will install the Mosquitto client on our machine.
Next, to subscribe to topic for e.g. ‘test/topic’ type the following command:
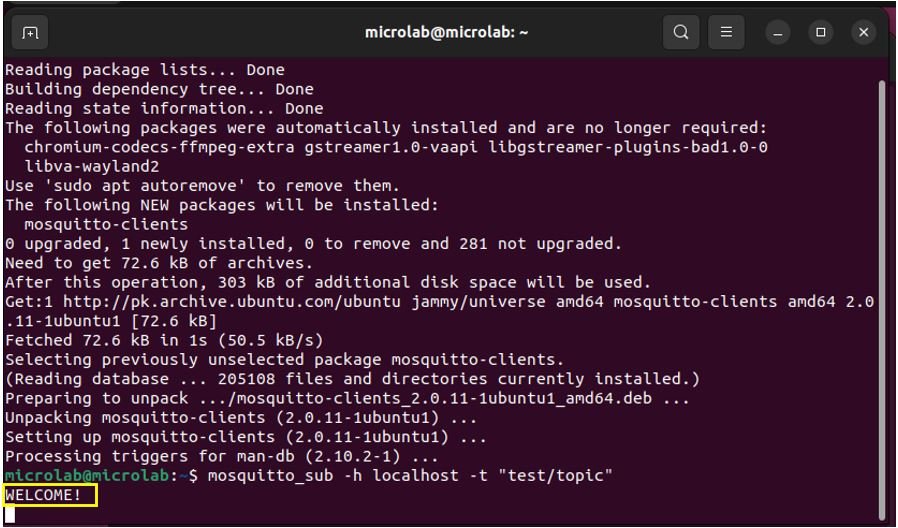
mosquitto_sub -h localhost -t "test/topic"
Open another terminal and publish the message ‘WELCOME!’ on the topic: test/topic. For that, type the following command in the second terminal:
mosquitto_pub -h localhost -t "test/topic" -m "WELCOME!"
Right after we publish the message to the topic test/topic, the subscriber receives it and displays it in its terminal.
Likewise, we publish another message ‘Hello World’ on the topic and the subscriber receives it accordingly.

Now if you want to create MQTT based projects with Mosquitto broker and ESP32, you can read these projects:
- ESP8266 NodeMCU MQTT Communication with ESP32 and Node-RED
- ESP32 MicroPython MQTT Publish Subscribe – Control Outputs
- ESP32 MQTT Publish Subscribe with Arduino IDE – Control Outputs
- ESP32 MQTT Publish Subscribe DS18B20 Readings with Arduino IDE
- ESP32 MQTT Publish Subscribe BME280 Readings with Arduino IDE
- ESP32 MQTT Publish Subscribe DHT22 Readings with Arduino IDE
If you don’t have any idea about what is MQTT protocol. please click on the following link to know what is MQTT protocol.
What is MQTT Protocol
Install MQTT Broker on Windows Computer
Please follow the following steps to install the MQTT Broker on Windows Computer
1)Download the MQTT Broker. To download click on the following link.
Download MQTT Broker
2)Under Windows, Choose .exe file according to your computer. For 32 bit computer click on the x32.exe file and for 64-bit computer click on the x64.exe file.

3)After Downloading , double Click on the Downloaded .exe file.
If it is showing message Windows Defender SmartScreen prevented , then Click on More info and then Click on Run anyway. It shows Windows Defender SmartScreen prevented, when Windows Defender of your PC is enabled .
4)Click on NEXT
5)Click on NEXT
6)Click on NEXT
7)If you want to change installation path , Click on Browse and choose the path and Click on Install
8)Click on Finish

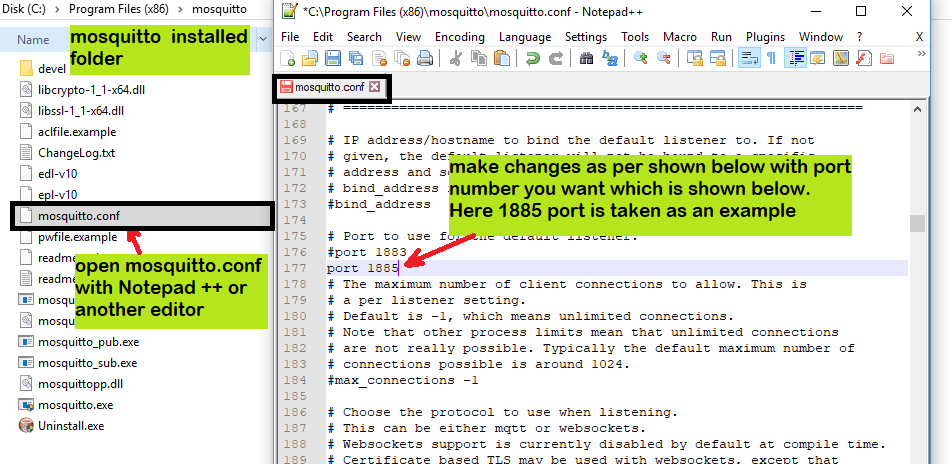
9)Optional step. please follow this only when you want to install MQTT broker on another port. If you want to change MQTT listening port then open mosquitto.conf (right click on file and click on open with) with Notepad++ or any another editor and modify port portnumber which is shown below.
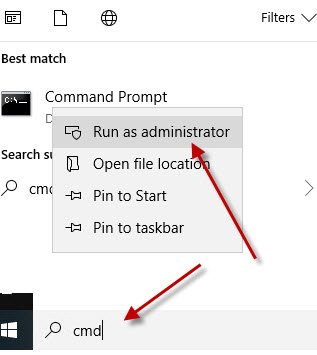
10)Open Command Prompt as Administrator. Steps are given below.
Search command Prompt in your computer -> Right click on command prompt -> Run as Administrator

11)Navigate to Folder/Path, where your broker is installed. Please see Step 7 to know, your Broker installed path. for navigation use following command
cd C:\Program Files (x86)\mosquitto
12)Execute the following commands to Install Broker and start Mosquitto Service.
mosquitto install
net start mosquitto

After executing command net start mosquitto, If you are getting the message
The Mosquitto Broker service was started successfully means Mosquitto Broker Installed Successfully.
13)Now please open the port 1883. To open port 1883 on windows, please click on the following link.
How to open port in Windows
MQTT CLIENT
Below various mqtt clients are given by using those mqtt clients you can publish or subscribe data. mqtt clients given below such as mqtt client using ESP8266 or NODEMCU, mqtt client using python, mqtt client using java etc.
ESP8266 AS MQTT PUBLISHER AND SUBSCRIBER
PYTHON AS MQTT PUBLISHER AND SUBSCRIBER
JAVA AS MQTT PUBLISHER AND SUBSCRIBER
WINDOWS COMMAND PROMPT AS MQTT PUBLISHER AND SUBSCRIBER
UNINSTALL MOSQUITTO ON WINDOWS:
If you want to uninstall mosquitto or mqtt broker , please follow the following Steps to uninstall mosquitto or mqtt broker.
1)Open Command Prompt as Administrator.
2)Navigate to mosquitto installed folder . please see step 10 above.
3)Execute the following command to stop mosquitto Service on windows.
net stop mosquitto
4)Execute the following command to uninstall mosquitto.
mosquitto uninstall

5)Now close the command prompt and delete mosquitto folder.
Common Doubts:
1)Can I change MQTT listening port?
Yes, you can change MQTT listening port. If you are trying to change MQTT port at the time of intstallation then please follow the step number 10.
2)Can I change MQTT listening port after installing MQTT broker ?
yes, you can change. To change please follow the following steps.
A)Please follow the step number 9 and save the changes.
B)Open command prompt in Adminstrator mode. follow the step 10 to open command prompt in adminstrator mode.
C)Stop the MQTT service. Use following command to stop MQTT service.
net stop mosquitto

D)Now Start MQTT service. Use following command to stop MQTT service.
net start mosquitto

3)Can I implement WebSocket over MQTT?
yes , you can implement WebSocket over MQTT. Please click on the below link for implementing websocket on MQTT.
MQTT WebSocket
Common Mistakes/Problems:
1)You will forget to open the command prompt in Administrator mode.
2)If your windows defender is enabled then you have open MQTT port 1883 manually.
How to open port 1883 in Windows
3)MQTT broker will not work if any service is running on port 1883. So please ensure that none of the services is running on port 1883. If any service is running on port 1883 then either stop that service or install MQTT broker on another port. Please see step 9 to modify the MQTT port.
4)If you have modified MQTT port then you should always send and receive data on modified port number, not on the default port.
5)A connection attempt failed because the connected party did not properly respond after a period of time, or established connection failed because connected host has failed to respond?
You will get an error, A connection attempt failed because the connected party did not properly respond after a period of time, or established connection failed because connected host has failed to respond because of the one of the following six reasons.
1)When Host does not exist?
The host does not exist means you have entered the wrong host name or wrong host IP address or MQTT broker is not running on the entered Host.
2)Open port on windows ?
You will also get above error when MQTT port is disabled. So please open port 1883 on windows which is default MQTT port. To open port 1883 on windows, please click on the following link.
How to open port in Windows
3)Firewall is blocking incoming connections
Whenever firewall blocks incoming connections then also you get the above error message. In this case, you need to unblock all incoming connections. Please click on the following link to unblock or allowing firewall incoming connections.
Firewall allowing incoming connection
4)When windows Defender is enabled?
When windows defender is enabled on your system and you are trying to install any service on your system then ports related with that service do not open automatically, then you need to open the ports related to that service manually. If MQTT port 1883 is not open then also you get above error message so please click on the above given link to open port 1883 on windows.
5)Allow app through windows defender firewall
If windows defender firewall is not allowing mosquitto app then also you will get the above error, so please follow the following steps to allow mosquitto through windows defender firewall.
1)Please press Windows + R of your system to open firewall.
2)Now please type firewall.cpl and click OK which shown below
3)Now please click on Allow an app or feature through windows defender firewall which is shown below.

4)Now search for mosquitto and tick all the boxes of mosquitto and click ok which is shown below.

6)Turn off windows defender
If your are getting above error please turn off windows defender. If you do not know how to turn off windows defender please click on below link,
how to turn off windows defender
7)restart mosquitto or MQTT broker
If above 6 ways are not working then restart mosquitto or MQTT broker. Please follow the following steps to know, how to restart mosquitto or MQTT broker:
a)Open the command prompt as administrator. follow the step 10 to open command prompt in adminstrator mode.
b)Execute the following command to stop mosquitto service
net stop mosquitto
c)Execute following the command to start mosquitto service
net start mosquitto
Please click on the below link to become master in MQTT.
Master MQTT Protocol
