Встроенный функционал монтирования файлов с ISO образами доступен во всех современных версиях Windows (начиная с Windows 8/ Windows Server 2012). ISO файл представляет собой файл-контейнер с образом оптического диска с файловой системой ISO 9660. Несмотря на то, что оптические CD/DVD/Blu-ray приводы уже почти не используются, формат ISO образов все еще остается очень популярным форматом для распространения различных дистрибутивов продуктов. Чаще всего ISO образы используются для распространения дистрибутивов операционных систем (Windows, Linux и т.д).
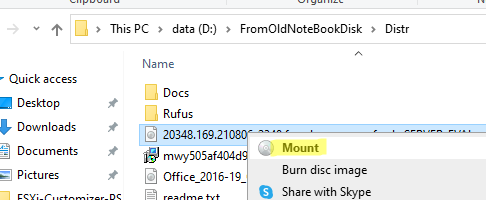
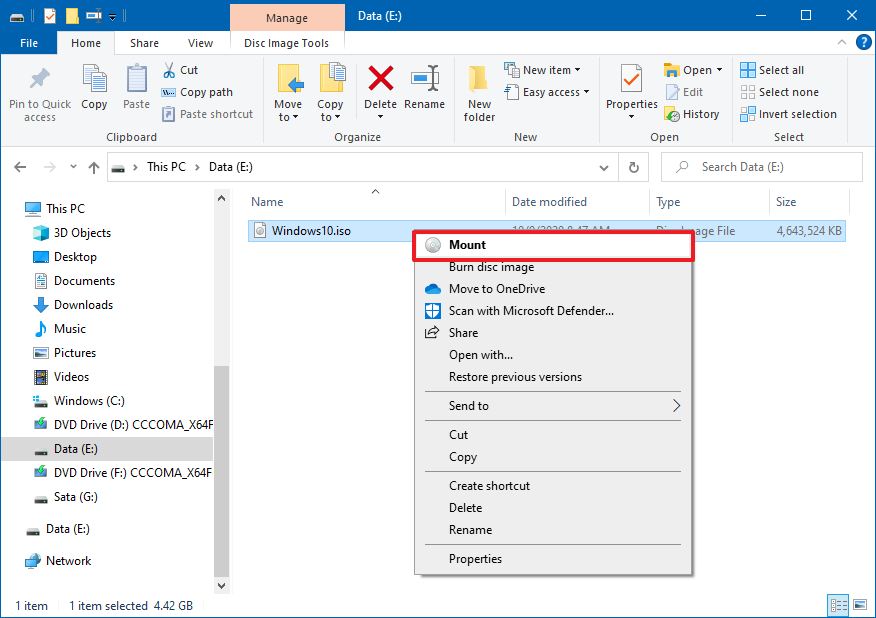
В Windows 10/11 вы можете смонтировать файл с ISO образом прямо из проводника File Explorer. Просто дважды щелкните по файлу с расширением *.iso или выберите в контекстном меню пункт Mount.
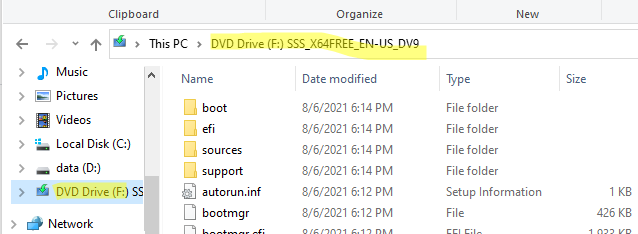
В результате в Windows появится новый виртуальный CD/DVD привод, в который будет смонтирован файл с образом (буква диска будет назначена автоматически). Вы можете работать с файлами на диске, как будто они находятся на обычном физическом диске (файлы на виртуальном диске доступны только для чтения).
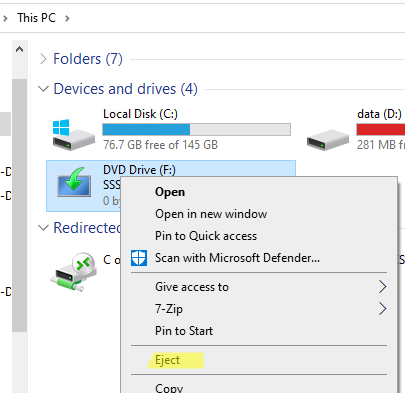
Чтобы отмонтировать ISO образ, щелкните по виртуальному приводу и выберите пункт Eject.
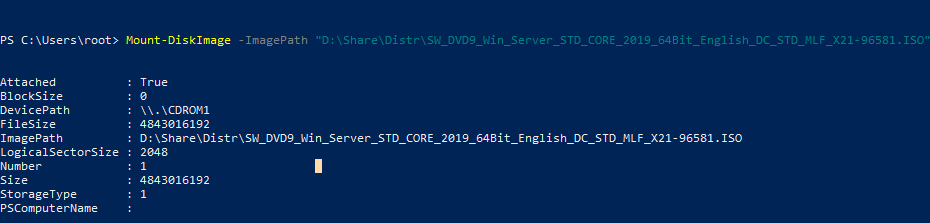
Вы можете использовать PowerShell, чтобы подключить файл с ISO образом в Windows. Для этого нужно указать полный путь к *.iso файлу в команде:
Mount-DiskImage –ImagePath "D:\Share\Distr\win_Server_STD_CORE_2019.ISO"
ISO образ смонтирован успешно (
Attached: True
).
Командлет Mount-DiskImage позволяет монтировать не только ISO файлы, но и виртуальные диски в формате VHD/VHDX/VHDSet. Если вы хотите указать, что файл нужно монтировать только в виде ISO, используйте команду:
Mount-DiskImage –ImagePath your.iso -StorageType ISO
Чтобы сразу узнать букву диска, которая назначена вашему ISO образу, используйте команду:
Mount-DiskImage –ImagePath "D:\Share\Distr\win_Server_STD_CORE_2019.ISO"| Get-Volume
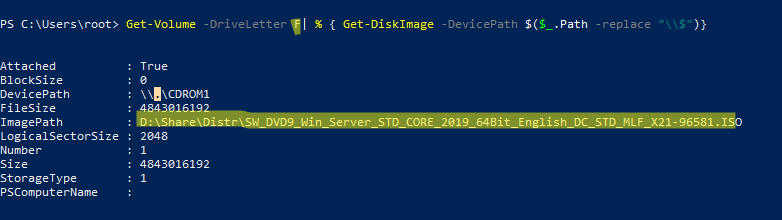
В данном примере видно, что ISO образу назначена буква F (DriveLetter).

Также с помощью команды Get-Volume можно определить имя файла с ISO образом, который смонтирован в указанный виртуальный CD привод:
Get-Volume -DriveLetter F| % { Get-DiskImage -DevicePath $($_.Path -replace "\\$")}
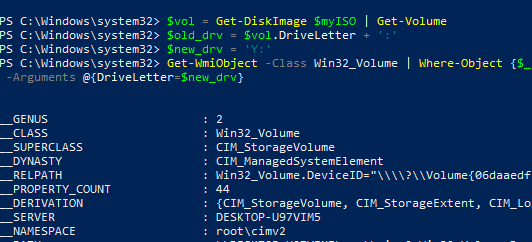
Если вам нужно, чтобы ISO файлу с образом всегда назначалась определенная буква диска, можете использовать такой PoweShell скрипт:
$myISO = "D:\Share\Distr\win_Server_STD_CORE_2019.ISO"
Mount-DiskImage $myISO
$vol = Get-DiskImage $myISO | Get-Volume
$old_drv = $vol.DriveLetter + ':'
$new_drv = 'Y:'
Get-WmiObject -Class Win32_Volume | Where-Object {$_.DriveLetter -eq $old_drv} | Set-WmiInstance -Arguments @{DriveLetter=$new_drv}
Чтобы отмонтировать ISO образ, выполните:
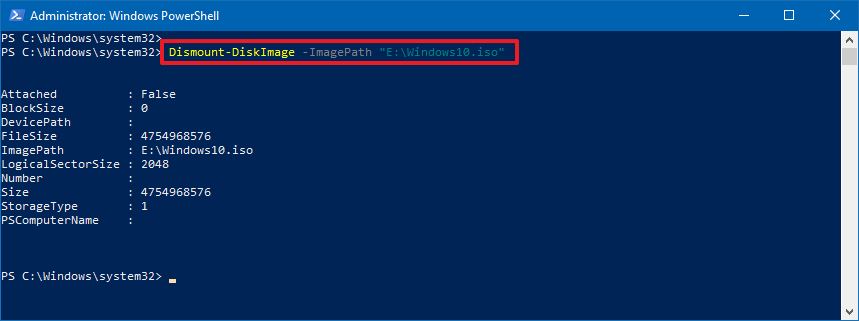
Dismount-DiskImage -ImagePath "D:\Share\Distr\win_Server_STD_CORE_2019.ISO"

How to mount an ISO image in Windows 10
- Step 1 : Press Ctrl+R to launch run window. …
- In the command prompt enter the command PowerShell Mount-DiskImage and click enter. After we. …
- Enter the path of the iso image in ImagePath[0] and press Enter, if you want to mount multiple ISO. …
- Right-click on the ISO image and click Mount.
- How do I mount an ISO file?
- How do I mount an ISO file in Windows 10?
- How do I mount an ISO file without a CD drive?
- How do I install an ISO file in PowerShell?
- What software can I use to mount an ISO file?
- How do I mount an ISO file in Windows?
- Does Windows 10 have ISO mounting?
- What is the best ISO mounting software?
- What is ISO file?
- How do I boot an ISO file without USB?
- How do I mount an ISO file without daemon tools?
- How do I mount a disk image?
How do I mount an ISO file?
Mount the ISO File in Windows 10 or 8.1
Download the ISO file, then open File Explorer and right-click on the file. From the pop-up menu, select the Mount command.
How do I mount an ISO file in Windows 10?
Let’s go over these different methods.
- Mount the ISO File in Windows 10 or 8.1. In Windows 10 or 8.1, download the ISO file. …
- Virtual Drive. …
- Eject Virtual Drive. …
- Mount the ISO File in Windows 7. …
- Run the Setup. …
- Unmount Virtual Drive. …
- Burn the ISO File to Disc. …
- Install Via Disc.
How do I mount an ISO file without a CD drive?
This requires that you download and install WinRAR first, of course.
- Downloading WinRAR. Go to www.rarlab.com and download WinRAR 3.71 to your disk. …
- Install WinRAR. Run the . …
- Run WinRAR. Click Start-All Programs-WinRAR-WinRAR.
- Open the .iso File. In WinRAR, open the . …
- Extract the File Tree.
- Close WinRAR.
How do I install an ISO file in PowerShell?
To mount an ISO image using a PowerShell command, use these steps:
- Open Start.
- Search for PowerShell, right-click the top result, and select the Run as administrator option.
- Type the following command to mount an ISO image and press Enter: Mount-DiskImage -ImagePath «PATH\TO\ISOFILE»
What software can I use to mount an ISO file?
10 Free Software to Mount ISO Image Files as Virtual Drives
- Virtual CloneDrive. Virtual CloneDrive has been around since 2005 and the company behind it, Elaborate Bytes, are the same people behind the famous CloneDVD and CloneBD ripping software. …
- DVDFab Virtual Drive. …
- WinCDEmu. …
- Alcohol Portable. …
- Daemon Tools Lite.
How do I mount an ISO file in Windows?
Right click on the ISO image file and choose mount from the menu. This will open the file much like a DVD. You will see it listed among your drive letters in Windows explorer. Browse to the location of the setup file and double click it to start your installation.
Does Windows 10 have ISO mounting?
Windows 10 includes the ability to mount any ISO file as a virtual DVD. … In Windows 10 (as with Windows 8. x), you can simply double-click an ISO file to mount it as a virtual DVD drive. That virtual drive shows up in File Explorer with its own drive letter, and it acts just like a DVD.
What is the best ISO mounting software?
These are the known best ISO mounting software which can quickly enables virtual drive and mount an image file.
- DAEMON Tools Lite.
- Virtual CloneDrive.
- PowerISO.
- WinCDEmu.
- MagicISO.
What is ISO file?
A single electronic file that contains the identical content of an optical disc, including the folder and file hierarchy. … ISO file extension, ISO images are created to distribute the disc’s data over a network in order to burn a CD or DVD at the destination computer.
How do I boot an ISO file without USB?
To install Ubuntu without CD/DVD or USB pendrive, follow these steps:
- Download Unetbootin from here.
- Run Unetbootin.
- Now, from the drop-down menu under Type: select Hard Disk.
- Next select the Diskimage. …
- Press OK.
- Next when you reboot, you will get a menu like this:
How do I mount an ISO file without daemon tools?
Alternatives to DAEMON Tools
- Use Windows 10’s Mounting Feature for ISO. If you’re just looking to mount an ISO image, there’s no need to install any third-party software. …
- WinCDEmu. The first freeware and open source program is WinCDEmu. …
- Virtual CloneDrive. Virtual CloneDrive functions in a similar way to WinCDEmu. …
- Alcohol Portable.
How do I mount a disk image?
You can:
- Double-click an ISO file to mount it. This won’t work if you have ISO files associated with another program on your system.
- Right-click an ISO file and select the “Mount” option.
- Select the file in File Explorer and and click the “Mount” button under the “Disk Image Tools” tab on the ribbon.
(Image credit: Windows Central)
An ISO image is a container format designed to store the contents of a physical disk (CD, DVD, or Blu-ray). Software companies usually use this file format as a medium to distribute the applications and tools without the need to ship physical media, which can be costly and time-consuming. For example, Microsoft uses this format to distribute previews of Windows 10 to testers and many other products.
Although you can find a lot of tools to work with images, Windows 10 includes the ability to mount and mount ISO files natively without the need for extra software.
In this Windows 10 guide, we’ll walk you through the steps to mount and unmount the ISO images using File Explorer as well as PowerShell commands.
- How to mount ISO image with File Explorer
- How to mount ISO image with PowerShell
How to mount ISO image with File Explorer
On Windows 10, you can access the content of an image in at least three different ways using File explorer. You can double-click the file, you can use the content menu option, or the option available in the ribbon menu.
Mount image with double-click
To quickly mount an ISO file on Windows 10, use these steps:
- Open File Explorer.
- Browse to the folder with the ISO image.
- Double-click the .iso file file to mount it.
Once you complete these steps, the ISO file will open like any other folder, allowing you to access and extract the contents as necessary.
To mount an ISO image with the File Explorer context menu, use these steps:
- Open File Explorer.
- Browse to the folder with the ISO image.
- Right-click the .iso file and select the Mount option.
Once you complete the steps, you can access the contents of the image by selecting the virtual drive from the left navigation pane.
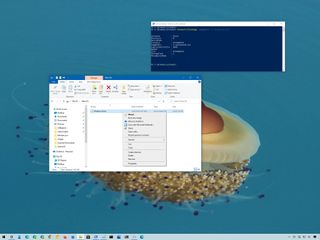
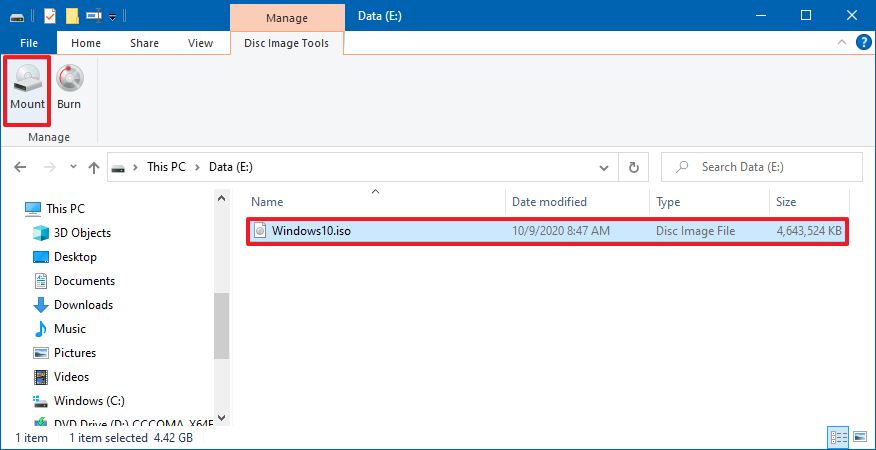
To mount an image with the ribbon menu, use these steps:
- Open File Explorer.
- Browse to the folder with the ISO image.
- Select the .iso file.
- Click the Disk Image Tools tab.
- Click the Mount button.
If you have a third-party tool to open compressed files (such as .zip, .tar, .rar, etc.), it’s possible the tool may also be configured as the default application to open ISO images. When this happens, you won’t see an option to mount images. However, you can still right-click, select the Open with submenu, and select the Windows Explorer option to mount the ISO.
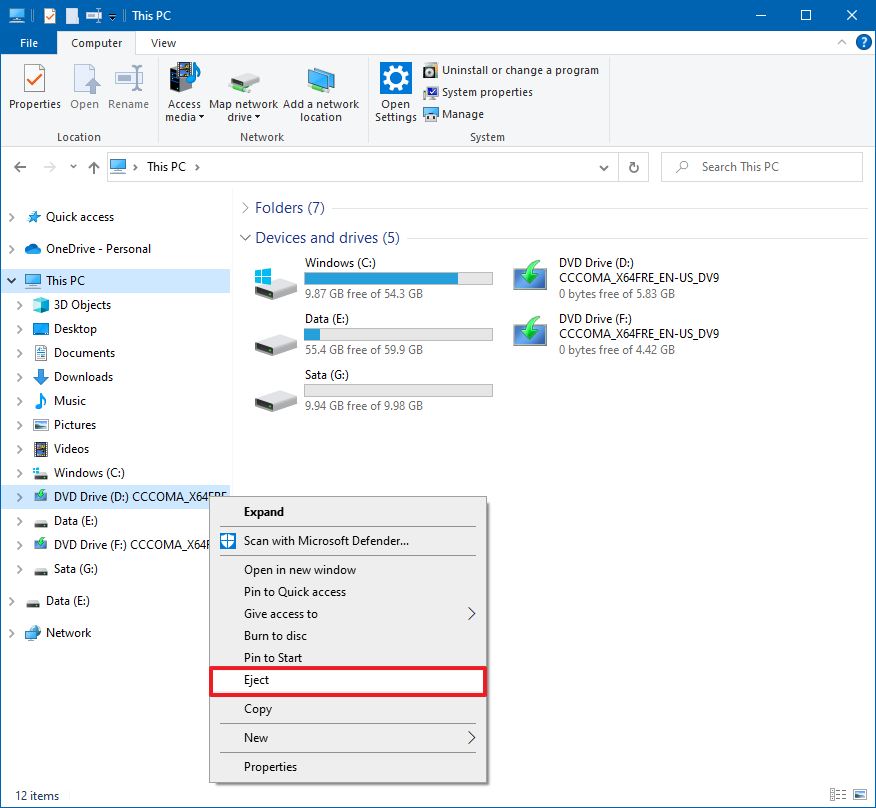
Unmount image
Once you are no longer using the image, you can quickly unmount the file by right-clicking the virtual drive under This PC in File Explorer and selecting the Eject option.
- Open File Explorer.
- Expand This PC from the left navigation pane.
- Right-click the virtual drive and select the Eject option.
After you complete these steps, the image will no longer be accessible until you mount it again.
How to mount ISO image with PowerShell
It’s also possible to mount and unmount an image using commands with PowerShell.
Mount ISO image command
To mount an ISO image using a PowerShell command, use these steps:
- Open Start.
- Search for PowerShell, right-click the top result, and select the Run as administrator option.
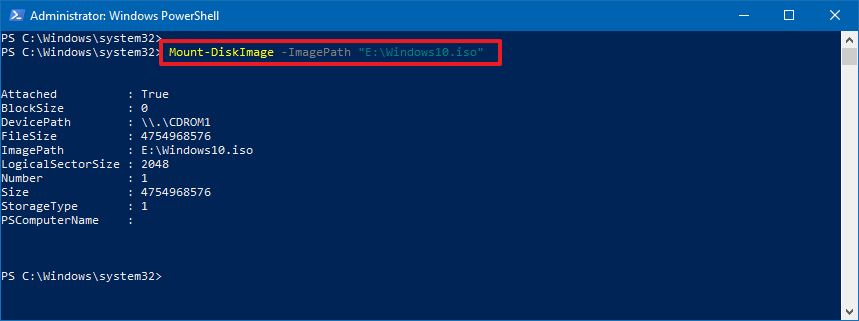
- Type the following command to mount an ISO image and press Enter:
Mount-DiskImage -ImagePath "PATH\TO\ISOFILE"In the command, make sure to replace the «PATH\TO\ISOFILE» with the actual path of the .iso file.For example, this command mounts an image in the «E:\» virtual drive:Mount-DiskImage -ImagePath "E:\Windows10.iso"
Once you complete the steps, the ISO image will mount, and you will be able to access the contents to install the application or extract the image contents from the newly-available drive letter.
Unmount ISO image command
To unmount an image with PowerShell, use these steps:
- Open Start.
- Search for PowerShell, right-click the top result, and select the Run as administrator option.
- Type the following command to mount an ISO image and press Enter:
Dismount-DiskImage -ImagePath "PATH\TO\ISOFILE"In the command, make sure to replace the «PATH\TO\ISOFILE» with the actual path of the .iso file.For example, this command removes the mount for an image in the «E:\» virtual drive:Dismount-DiskImage -ImagePath "E:\Windows10.iso"
After you complete the steps, the virtual drive will be removed, and the image will no longer be accessible until you mount it again.
All the latest news, reviews, and guides for Windows and Xbox diehards.
Mauro Huculak is technical writer for WindowsCentral.com. His primary focus is to write comprehensive how-tos to help users get the most out of Windows 10 and its many related technologies. He has an IT background with professional certifications from Microsoft, Cisco, and CompTIA, and he’s a recognized member of the Microsoft MVP community.
Всем привет! Сегодня я расскажу вам, как смонтировать образ диска. Причем неважно, какой формат образа у вас находится на диске и какая версия Windows (7, 8, 10 или 11) у вас установлена. Мы рассмотрим самые популярные способы. Если же вы найдете что-то интересное и свое – напишите об этом, пожалуйста, в комментариях.
Содержание
- Способ 1: Встроенная возможность
- Способ 2: Консоль
- Способ 3: Архиваторы
- Способ 4: Daemon Tools
- Способ 5: Alcohol 120%
- Способ 6: UltraISO
- Задать вопрос автору статьи
Способ 1: Встроенная возможность

В Windows 10, 11 и 8 есть встроенная утилита, которая позволяет монтировать образ диска ISO без установки каких-то сторонних программ. То есть вам не нужно ничего инсталлировать и скачивать.
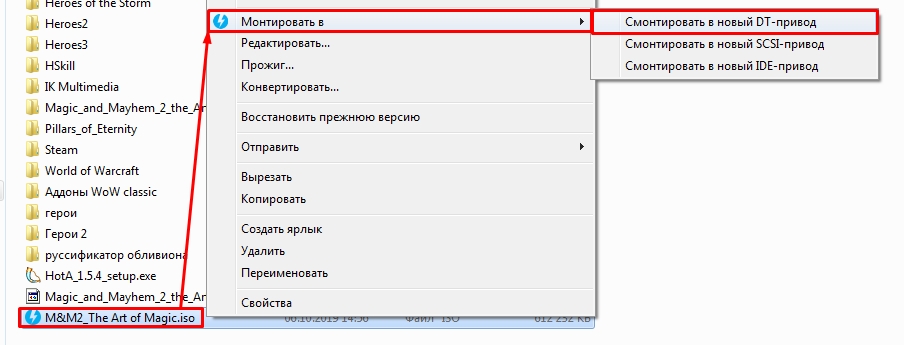
- Найдите ваш ISO файл, кликните по нему правой кнопкой мыши и из выпадающего меню выберите команду «Подключить».
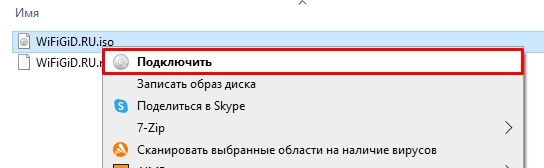
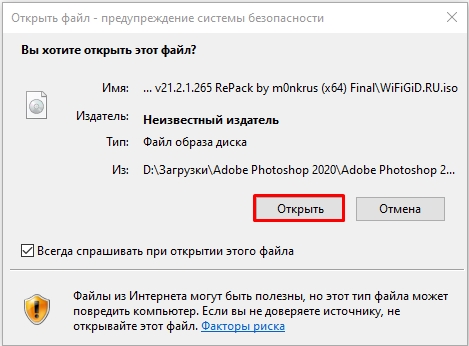
- Может вылезти окно предупреждения. Все нормально, это стандартное действие от вашего защитника. Выбираем команду «Открыть».
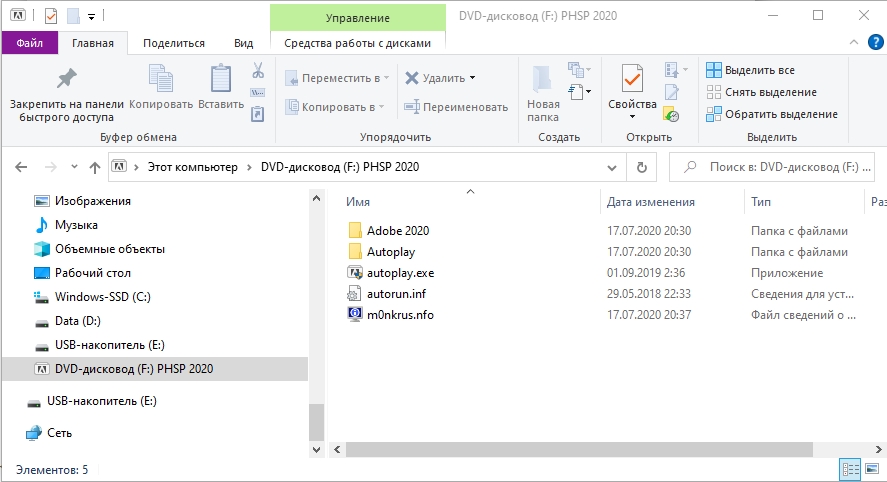
- После этого вас автоматом перебросит в виртуальный привод, где уже будут готовые файлы. Можете с ними работать так как вам угодно.
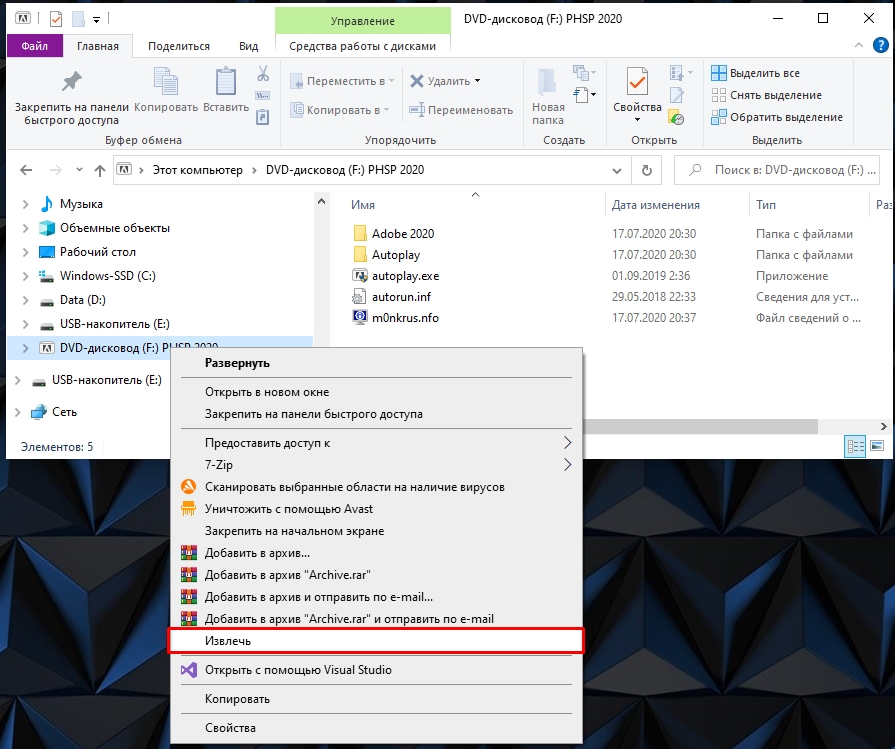
- Чтобы «вытащить диск» и убрать привод, кликаем по нему ПКМ и из контекстного меню выбираем команду «Извлечь».
Способ 2: Консоль
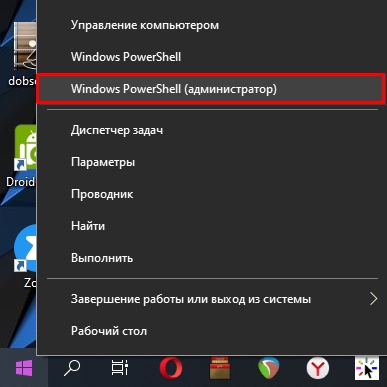
Давайте посмотрим, как еще можно смонтировать образ ISO без установки дополнительных программ. Для этого можно воспользоваться продвинутой командной строкой «PowerShell» – чтобы быстро её открыть, кликните ПКМ по кнопке «Пуск».
Теперь вводим команду:
Mount-DiskImage
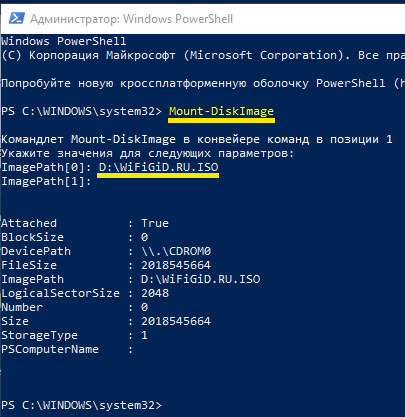
Далее вам нужно указать путь к ISO файлу. Путь можно скопировать из адресной строки в проводнике. Не забудьте в конце дописать название файла и расширение через точку (.ISO):
D:\WiFiGiD.RU.ISO
После этого вы увидите строку «ImagePath[1]» – вы можете добавить еще адреса других образов. Если вам это не нужно, просто оставляем строчку пустой и жмем:
Enter
Ура, образ смонтирован. Чтобы обратно вытащить диск, используем команду:
Dismount-DiskImage
Способ 3: Архиваторы
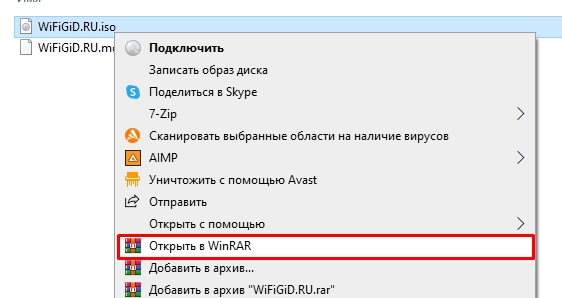
Смотрите, чаще всего диск монтируют для того, чтобы посмотреть и поработать с содержимым образа. Но на деле можно обойтись и без монтирования. Большая часть всех образов, в том числе и ISO – это обычные архивы, которые можно просмотреть. То есть вы можете либо открыть его с помощью архиватора, либо извлечь из него все файлы. Можете использовать любой доступный архиватор:
- 7-ZIP
- WinRAR
После установки программы, опять же кликаем ПКМ и выбираем команду «Открыть в WinRAR» или «7-ZIP» – «Открыть архив». Далее вы увидите содержимое – можете просто его распаковать или работать так.
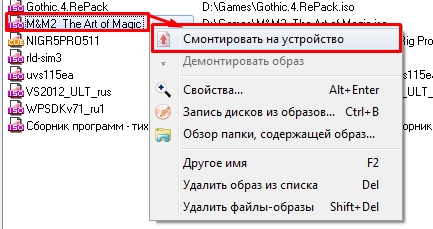
Daemon Tools – одна из самых продвинутых программ для работы с образами и монтированием. Работает со всеми известными форматами и архивами. Для работы хватит бесплатной версии Daemon Tools Lite. После скачивания и установки делаем все аналогично, кликаем ПКМ выбираем «Монтировать в» и выбираем один из вариантов привода.
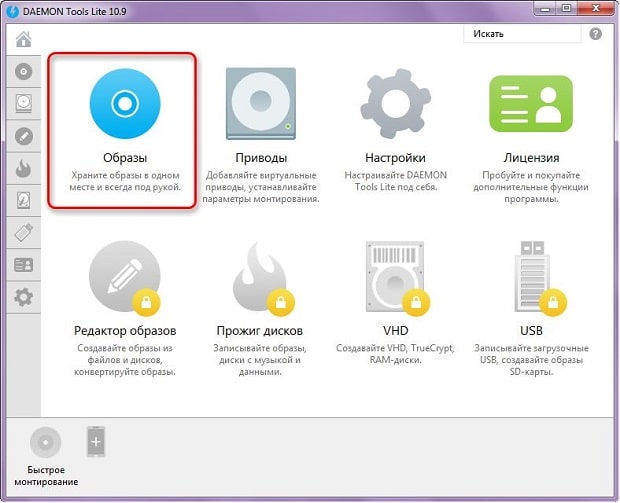
Второй вариант – это открыть программу и перейти в раздел «Образы».
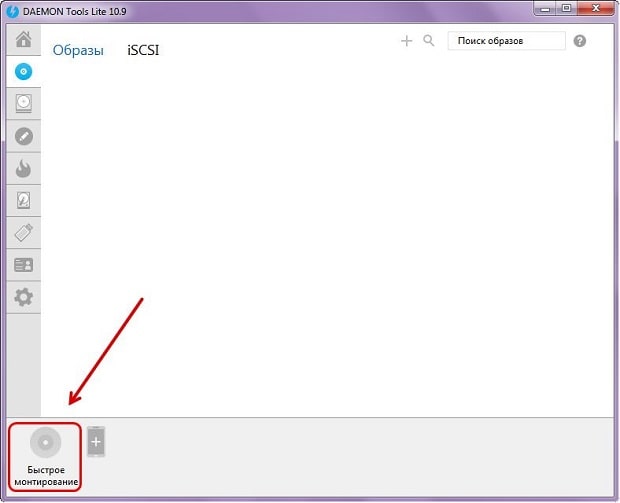
Кликаем по кнопке «Быстрое монтирование» – выбираем наш образ.
Способ 5: Alcohol 120%
Еще одна классная программа. Работает аналогично, как и предшественник. После установки в верхней панели выберите вкладку «Файл» – «Открыть». Или используем команду:
Ctrl + O
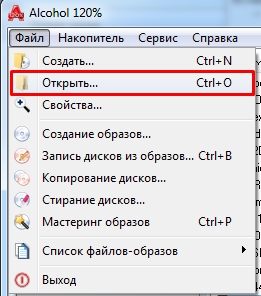
Теперь просто находим и выбираем наш ISO файл. Вы кстати можете работать и с другими форматами.
Файл добавится в вашу библиотеку. Теперь нужно кликнуть по нему ПКМ и из контекстного меню выбрать соответствующую команду.
Способ 6: UltraISO
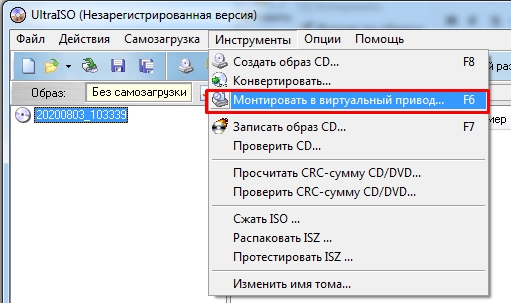
Еще одно похожее ПО. Рассказывать про него подробно не буду, так как эта утилита работает аналогично. После установки на панели жмем по «Инструментам» – «Монтировать в виртуальный привод». Можете использовать горячую клавишу:
F6
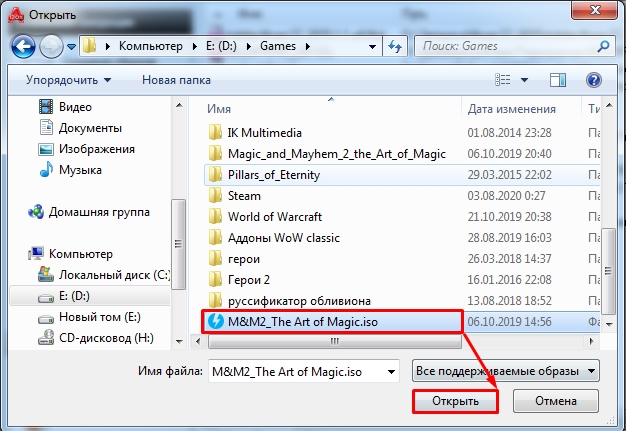
Кликните по трем точкам, найдите наш файлик и потом нажмите «Монтировать».

На этом все, дорогие друзья. Программ, которые работают с образами еще очень много. Я всего лишь рассказал про самые популярные. Пишите в комментариях, что вы думаете по этому поводу. До новых встреч на портале WiFiGiD.RU.
Windows allows you to restore the system using an ISO image file. But it needs to mount the ISO image file and extract the content before using it. This was a difficult task with earlier versions of Windows. Now Windows 10 does it without any third-party apps. There is an amazing feature in Windows 10 which allows you to mount and unmount the ISO image file automatically. Most people do not even bother about mounting because Windows 10 does it without even letting us know. In this article, we are going to show different ways through which you can mount ISO file in Windows 10.
4 Ways to Mount ISO Image File in Windows 10
Following is the list of different ways through which you can mount an ISO image file in Windows 10:
- Using Windows Context Menu
- With Windows File Explorer
- Using Windows PowerShell
- Using Third-Party App
1. Mount ISO Image File With Windows Context Menu
‘Context Menu’ has a lot of options to manage your files in Windows. It has a mounting disk feature also if you open up context menu with an ISO image file. Let’s say you have a ‘Windows 10 Disk Image File’ and you want to see its inside files or use it as a drive.
- Go to the ‘Windows 10 Disk Image File’ and right-click on the file.
- Choose the ‘Mount’ option and that’s it.

Mounting With Context Menu
- You can now view the files of it by going to ‘This PC’. There must be a new drive created.
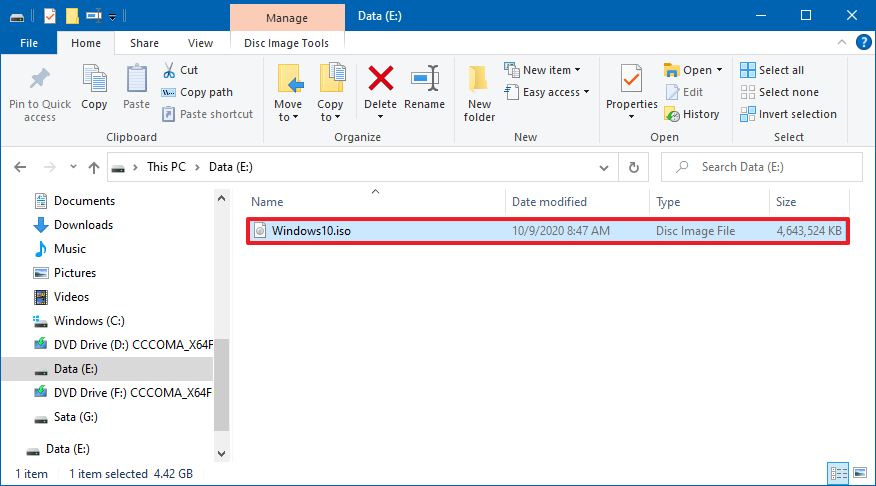
2. Mount ISO Image File with Windows File Explorer
File Explorer has a similar option too when it comes to mounting an ISO image file. To mount it directly from the File Explorer:
- Open the ‘File Explorer’ and navigate to your Windows 10 ISO file. Click on your file to select it.
- Now, from the top menu, click on the ‘Manage’ tab.
- From the given options, choose the ‘Mount’ option.

Mounting With Windows File Explorer
- Now, open ‘This PC’ and you’ll see another drive there. Double-click on it to open its files.
- By default, Windows just pick the next letter which has been given to other drives. You can change it too.
- Press ‘Windows key + R’ to open Run prompt and type ‘diskmgmt.msc’
- Right-click on your drive in the ‘Disk Management’ and choose ‘Change drive letters and paths’ option. Select the drive and click on ‘Change’.
- Select the letter for the drive from drop-down list and click on ‘OK’ button.
- To unmount this ISO image file, simply right-click on the drive and choose the ‘Eject’ option.
3. Mounting ISO Image File Using Windows PowerShell
Windows PowerShell is the command-line utility in Windows 10. This is similar to Command Prompt and you can perform various commands from PowerShell. There are two commands – ‘Mount’ and ‘Dismount’ – that you can use for mounting and dismounting. ‘Mount’ is for mounting the file with PC and ‘Dismount’ is for dismounting it. To mount a disk image file:
- Go to ‘Start’ menu and type ‘Windows PowerShell’ and hit the ‘Enter’ key.

Windows PowerShell through Start Menu
- Now, check the path of your ISO image file and copy it from the top.
- In the Windows PowerShell, type (Mount-DiskImage -ImagePath “Path of the Image File”). Hit the ‘Enter’ key.

Mounting With Windows PowerShell
Do not add brackets and remember double-quotes before and after the path of an image file are necessary. Please do not delete them.
- To unmount the file, replace the ‘Mount’ word with ‘Dismount’ in the previous command.
- Type (Dismount-DiskImage -ImagePath “Path of the Image File”) and hit the ‘Enter’ key.
4. Mounting ISO Image File Using Third-Party PowerISO App
You can also mount ISO image file if you have the PowerISO software installed in your PC. Or, download and install the software from their official website ‘poweriso.com’. To mount the file:
- Go to the file and select it, then right-click on it and hover on ‘PowerISO’ option.
- Now, from the given options, choose the ‘Mount Image to Drive’.

Mounting Through PowerISO
- Your ISO image file will successfully mount with your PC.