The Internet today is full of surprises and hidden things that users may not be aware of. Having a traffic monitor to monitor your network speed from time to time can be crucial to let you know if there is anything that is using the internet bandwidth without your knowledge. It is also a great way to know how much internet speed an app is using when it is downloading or uploading something.
Back in Windows 10 and older versions of Windows, there was a simple and popular third-party app called “NetSpeedMonitor” that can display the real-time network or internet speed directly on the taskbar. Sadly, this app is not supported in Windows 11.
Also see: How to Know Which App is Using The Internet in Windows 11
How to add a network speed monitor in Windows 11
Fortunately, there are a few other apps that are able to do the same thing as NetSpeedMonitor to display a real-time network speed monitor on the taskbar in Windows 11. This guide will show you how to add a net speed monitor to the Windows 11 taskbar.
Traffic Monitor for Windows 11
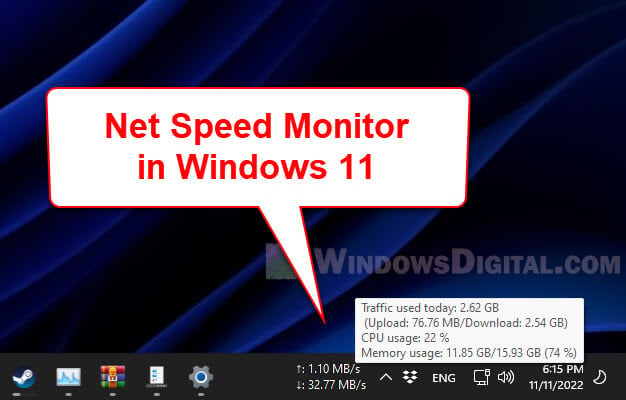
Traffic Monitor is a free and open-source app that lets users display the live network speed on either the taskbar or as a floating gadget on the desktop in Windows. Most importantly, it works perfectly fine on Windows 11.
One huge feature that makes the app stands out among other similar network speed monitor apps is that Traffic Monitor can also display the CPU and Memory usage alongside the Network traffic usage.
Follow the steps below to install Traffic Monitor and add its net speed monitor to the Windows 11 taskbar or desktop.
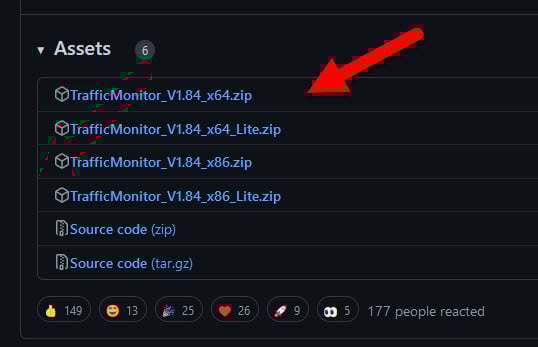
- Go to https://github.com/zhongyang219/TrafficMonitor/releases to download Traffic Monitor. Check the latest release and select the x64.zip under “Assets” to download it. You can download the Lite version but it has much lesser features.

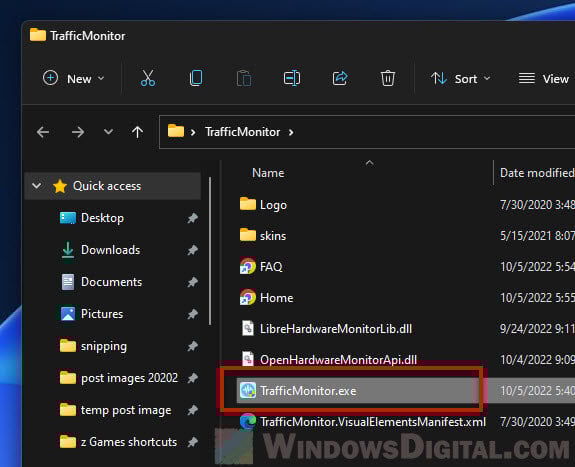
- Once downloaded, unzip the file and open the TrafficMonitor.exe from the extracted folder.

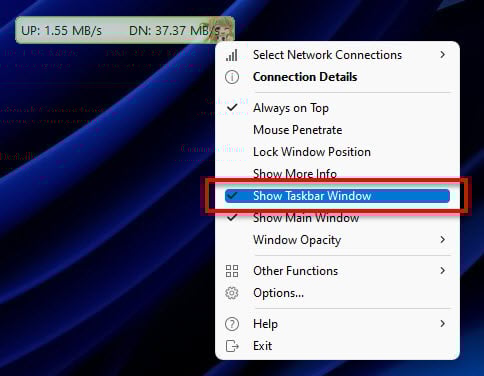
- The app will start off with a floating network speed monitor gadget on the desktop which you can move around easily. To enable it to show on the taskbar instead, right-click the floating network meter and select “Show Taskbar Window“.

- The net speed monitor will now be displayed on the Windows 11 taskbar.

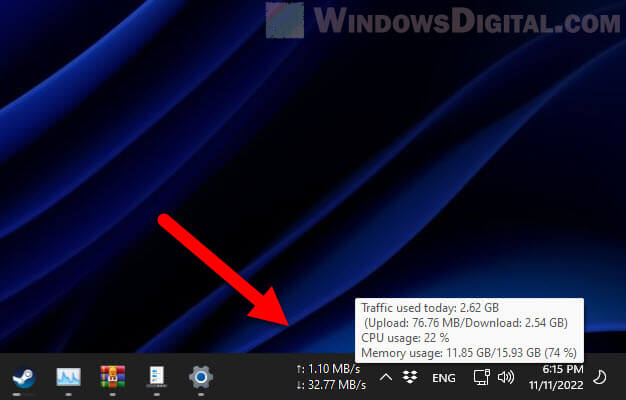
When you hover your mouse cursor over the speed meter, it will display more details such as the total traffic used today (upload and download), as well as the CPU and Memory usage in percentage.
If you don’t want the floating network meter to display on the desktop, right-click on the gadget and uncheck “Show Main Window”. This option will disable traffic monitor from showing on the desktop.

Read next: How to Change Ethernet Network Speed from 100 Mbps to 1 Gbps
Configure Traffic Monitor to auto start on Windows startup
As Traffic Monitor needs to be running in Windows 11 in order for the net speed monitor to continue displaying on the taskbar, to save you the hassles from having to run the app every time you startup your computer, you can set the app to automatically run when Windows starts.
To do so, right-click the net speed monitor on the taskbar and select Options.
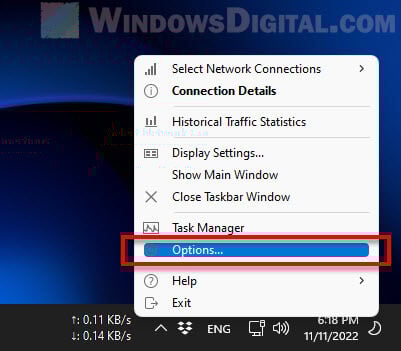
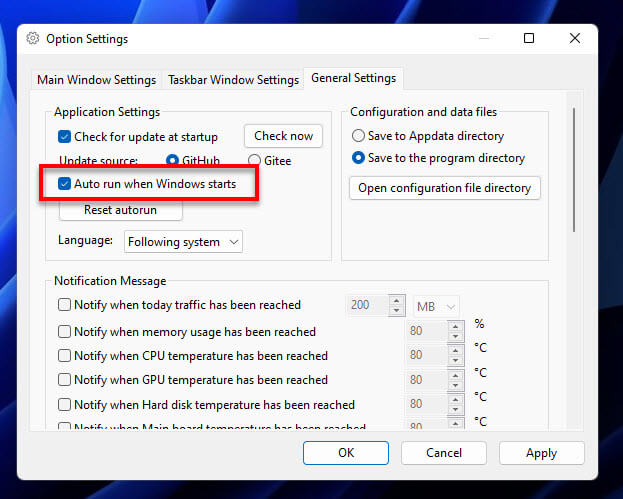
Next, go to the “General Settings” tab and enable the checkbox for “Auto run when Windows Starts” under Application Settings.
In the mean time, you can also configure other settings from the “Taskbar Window Settings” tab for the net speed monitor on the taskbar or the “Main Window Settings” tab for the floating meter.
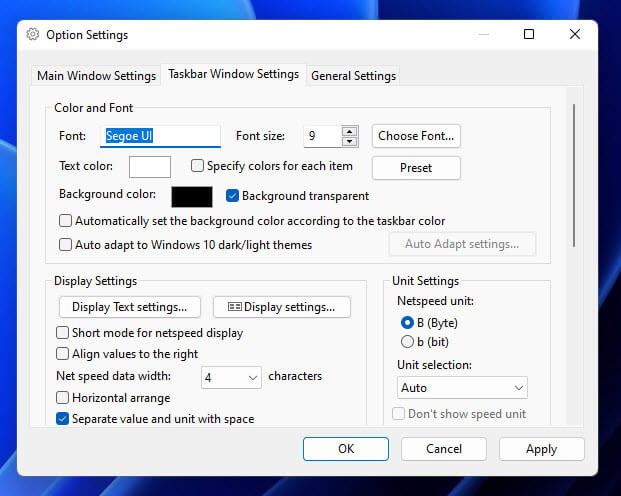
You can change settings such as the color and font of the speed meter, netspeed unit used (Byte or bit), and other display settings.
Related issue: Ethernet Internet Speed Capped at 100 Mbps (Fix)
Internet speed monitor app from Microsoft Store
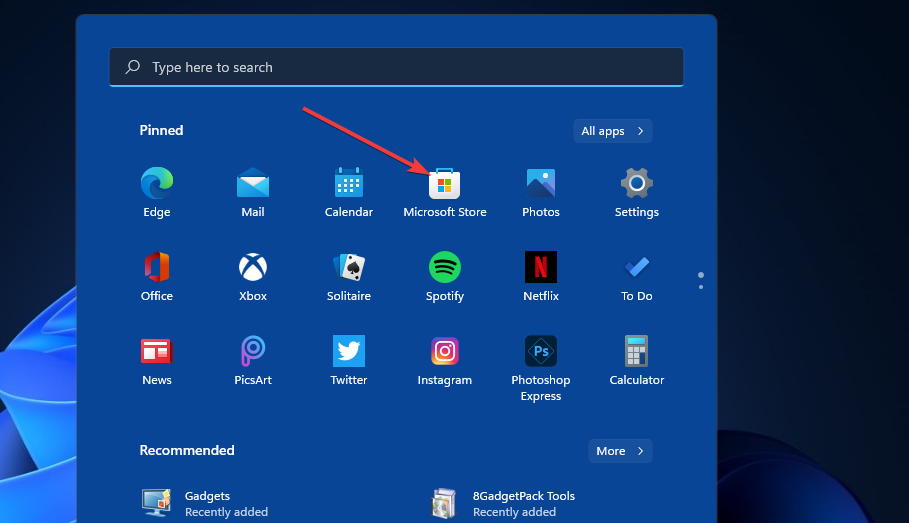
Alternatively, you can look for a network or internet speed monitor app from the Microsoft Store.
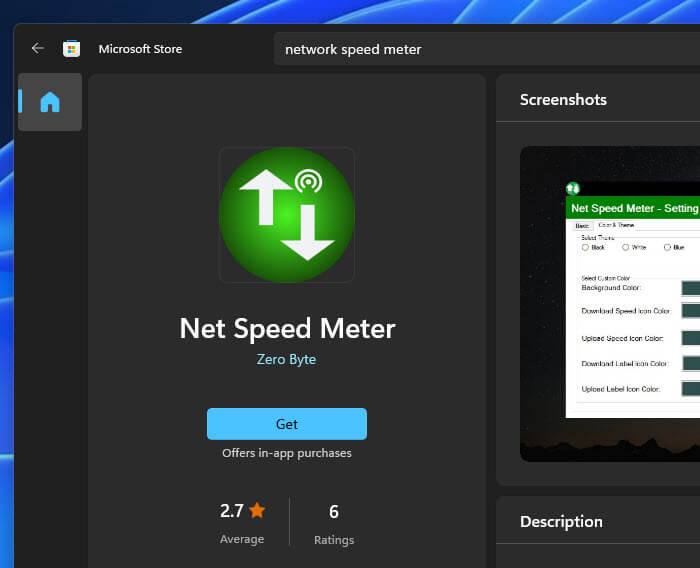
- First, open Microsoft Store via Start menu.
- Search for “Net Speed Meter” using the search bar in the Microsoft Store’s window.
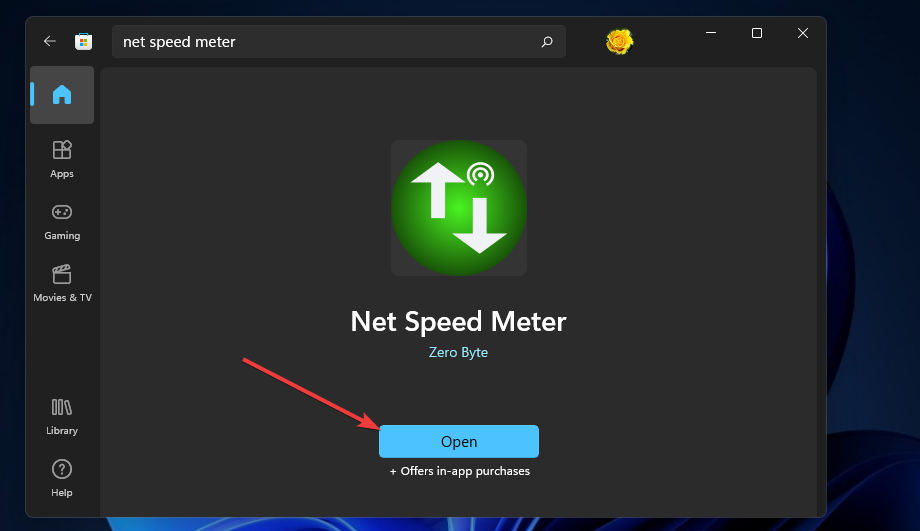
- Select Net Speed Meter and click Get to install the app.

- Once the installation is completed, click Open to launch the app.
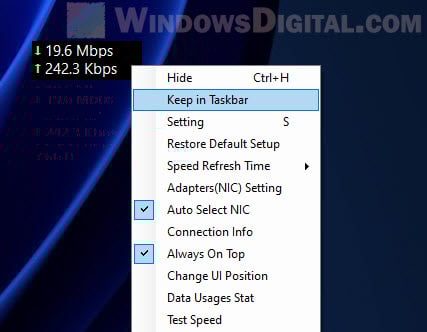
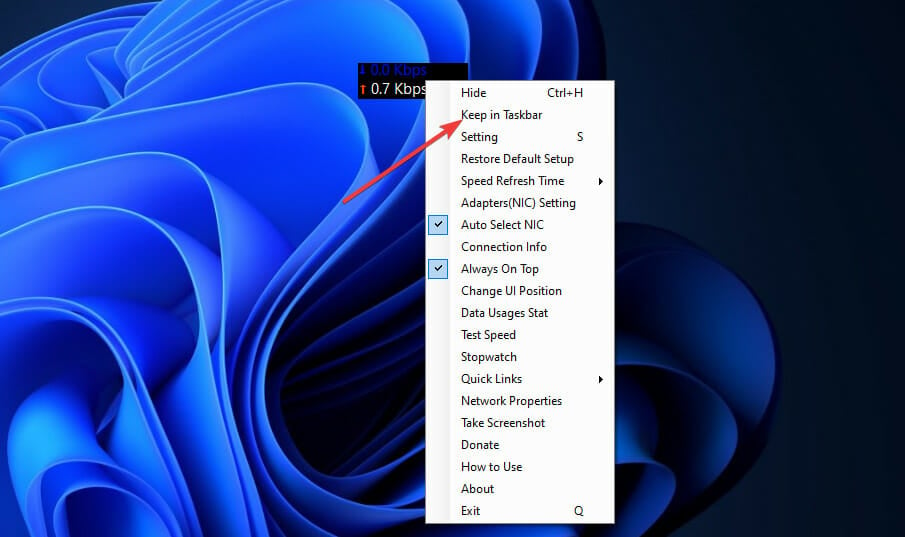
- The app will start out as a floating network meter on the desktop. To move it to the taskbar instead, right-click the floating meter and select “Keep in Taskbar“.

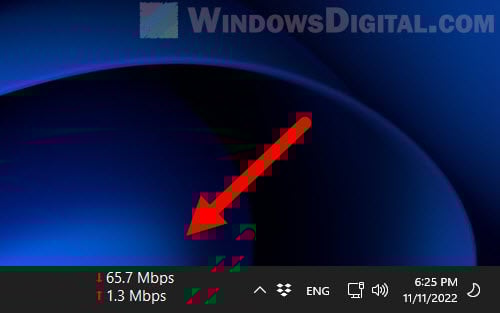
- The net speed monitor will then display on the taskbar in Windows 11.

Task Manager’s Performance tab or Resource Monitor
If you only want to monitor your network or internet speed without installing any third-party app, you can quickly view the network usage via the Task Manager Performance tab or the Resource Monitor in Windows 11. This method does not add any meter to the taskbar or on the desktop.
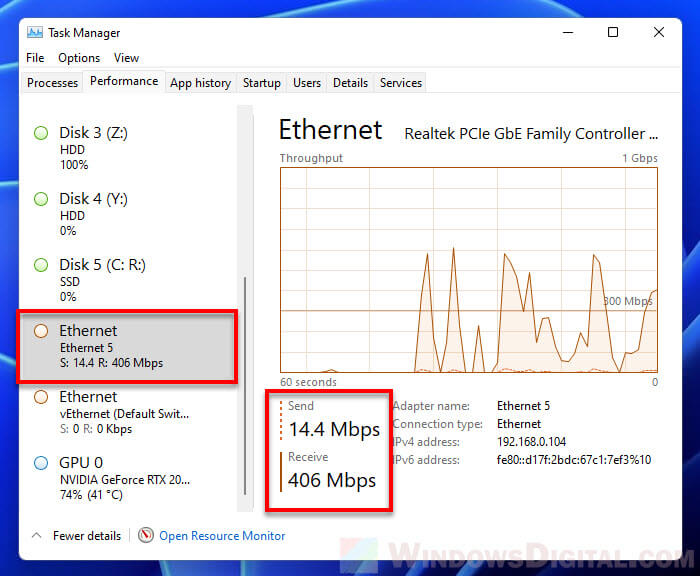
To check the internet speed via Task Manager, first press Ctrl + Shift + Esc to open Task Manager in Windows 11. If it isn’t already in full details mode, click “More details“.
Next, click the “Performance” tab and select your Ethernet or WiFi adapter from the left pane. The network speed usage will shown on the right – the “Send” and “Receive” speed.
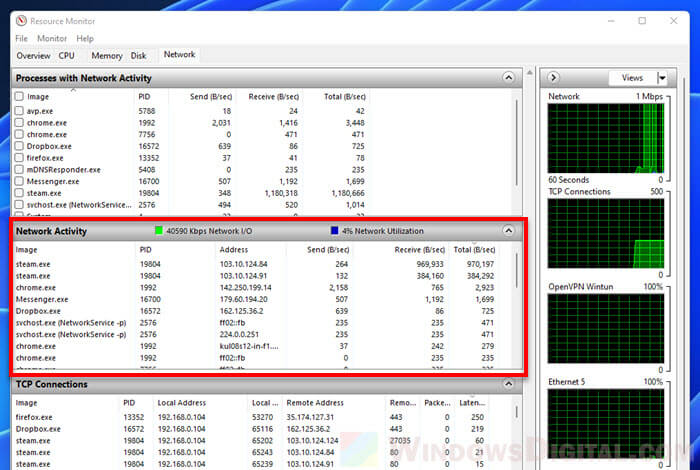
Alternatively, to view more details about which app or process is using the network bandwidth, you can use the Resource Monitor instead. To do so, click Open Resource Monitor at the bottom of the Task Manager window.
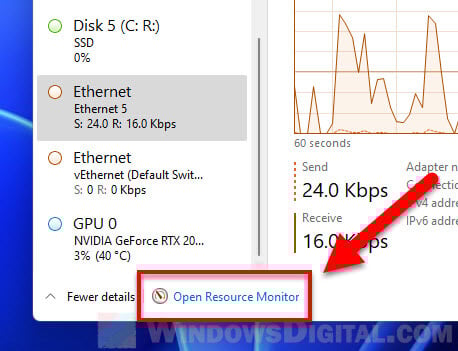
Then, select the Network tab and expand Network Activity. From there, you can view the network transfer speeds (Send, Receive and Total) of all running processes. You can sort the list by transfer speed by clicking the header of the relevant column you want to sort.
Choose the perfect internet speed monitor for your device
by Matthew Adams
Matthew is a freelancer who has produced a variety of articles on various topics related to technology. His main focus is the Windows OS and all the things… read more
Updated on
- You can add a Windows 11 network speed monitor that provides real-time download and upload speed info to the desktop.
- Feel free to choose a dedicated app that adds a network monitor to the taskbar.
- You may also consider a network speed monitor that comes with numerous customization settings.
XINSTALL BY CLICKING THE DOWNLOAD
FILE
Are you wondering what your PC’s Internet speed is? If so, a network speed monitor is what you need. These monitors show your Internet connection’s download and upload speed in real-time.
Sure, there are numerous Internet speed test webpages you can open in browsers. However, those web apps generally provide only a max speed figure for your connection. They don’t display real-time upload and download speeds.
If you want a real-time network speed monitor for Windows 11 that shows download/upload speeds on the desktop, you’ll need to check out some third-party apps. You can add taskbar and sidebar network speed monitors to Windows 11 by using our recommendations below.
The widgets bar comes like a new gadget sidebar for Windows 11, which you can open by clicking its taskbar button. That seems an obvious place to include a new network speed monitor for the latest desktop platform.

However, that widget panel doesn’t include a network speed monitor. There are 11 widget options available there, and none of them add a net speed meter to the panel. So, you’ll have to check out the third-party software below.
How can I add a Windows 11 net speed monitor?
1. Get Net Speed Meter
1. First, you’ll need to sign in to your Microsoft account to download a UWP app from MS Store. If you don’t have such an account, set one up from the Microsoft account page.
2. Click Start on Windows 11’s taskbar.
3. Then select the Microsoft Store app on the Start menu to open it.
4. Type Net Speed Meter in the MS Store’s search box.
How we test, review and rate?
We have worked for the past 6 months on building a new review system on how we produce content. Using it, we have subsequently redone most of our articles to provide actual hands-on expertise on the guides we made.
For more details you can read how we test, review, and rate at WindowsReport.
5. Then select the Net Speed Meter app in the search results.
6. Click the Get button for Net Speed Meter to install it.
7. When installed, click the Open button on the Net Speed page.
8. Select the Yes option when asked to keep Net Speed Meter on the taskbar. Then you’ll see Net Speed Meter on the desktop.
9. You can drag and that meter around the desktop by left-clicking it and holding the left mouse button.
10. To add that speed meter to the taskbar, right-click it and select the Keep in Taskbar button.
11. You can customize Net Speed Meter by right-clicking it and selecting Setting. Then change the options according to preference.
12. For further instructions, you can right-click Net Speed Meter and select the How to use option.
If you’re looking for an internet speed meter for Windows 11, you should know that our first recommendation is Net Speed Meter. It is a Microsoft Store application that can be downloaded for free by all users with an account.
The Net Speed Meter app can be customized to your liking via Settings, and can be added to your Windows 11 taskbar for quick access.
2. Get 8GadgetPack
2.1 Install 8GadgetPack
- Click the Download button on the 8GadgetPack webpage.
- Then press the File Explorer taskbar button.
- Open the folder that includes the 8GadgetPack setup wizard.
- Double-click 8GadgetPackSetup to open the installer window.
- Click the Install button on the 8GadgetPack Setup window.

- Select the Show gadgets when setup exits checkbox.

- Press the Finish button. Then the 8GadetPack sidebar will open on the right of the Windows 11 desktop.


- Right-click the sidebar and select Add gadgets.

- Double-click Network Meter on the third page of the gadget list to add it to the sidebar.

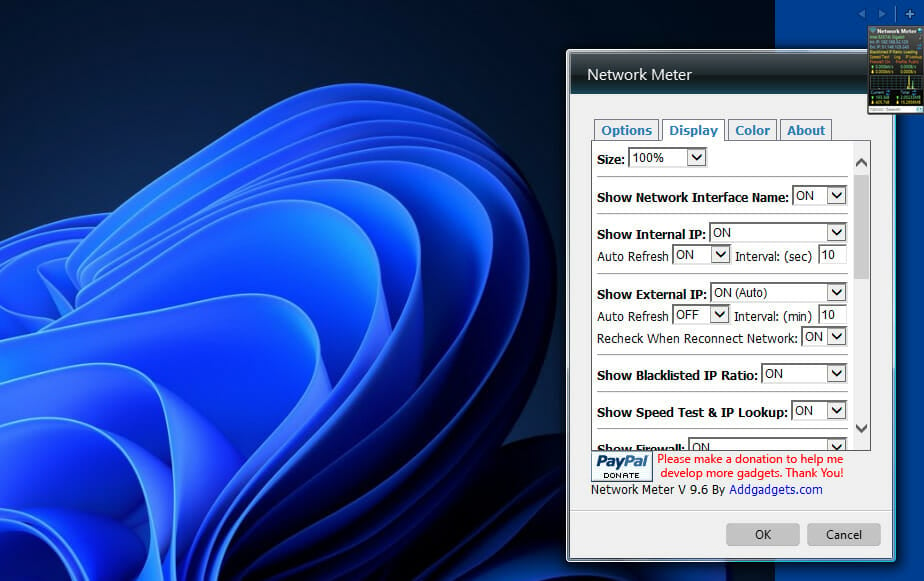
- To configure the Network Meter, right-click its sidebar gadget and select Options.
- Select the Display tab.

- You can add or remove details the gadget displays by selecting ON or OFF drop-down menu options for them.
- To change the gadget’s colors, select the Color tab. Then you can click the codes there to open color palettes.


- Slow LAN speed on Windows 10/11 PCs [FIX]
- How to Type Accents on Windows 11
- How to Disable the Insert Your Security Key Into the USB Port popup
- DTS Sound Unbound for Windows 11: Download & Install
Can I check the connection speed in Windows 11 without third-party apps?
Windows doesn’t have any desktop feature that displays connection speed details.
However, the status window for your connection includes speed info. You can open that window via the Control Panel as follows:
- Open the search utility by clicking the magnifying glass taskbar button.
- Enter Control Panel within the search utility’s text box.
- Click Control Panel to open that window.
- Select the Network and Internet category.

- Then click Network and Sharing Centre.

- Select the Change adapter settings on the left of the window.

- Then double-click your connection to open its status window, which displays the speed info.

- Click Close to exit the window


- How to Type Accents on Windows 11
- How to Disable the Insert Your Security Key Into the USB Port popup
- DTS Sound Unbound for Windows 11: Download & Install
- Fix: EXCEPTION_ILLEGAL_INSTRUCTION Error on Windows 11
How can I speed up my PC’s download speed?
If your PC’s download speed is a little slow, there are various ways you can speed it up. Firstly, close as many background apps as you can on your PC. You can do that by turning off the Let apps run in the background option on the Settings’ Background apps tab.
Windows 11’s system updates can hog bandwidth, which slows down downloads. So, reducing bandwidth usage for updates might boost your download speed. You can limit bandwidth for updates via the Windows Update tab’s advanced options in Settings.

Also, turn off any other devices you have connected to the Internet, such as tablets, smartphones, consoles, etc. Select to disable their Internet connections if you can, and turn them off. By doing so, you’ll maximize network bandwidth for your Windows 11 PC.
As for your PC’s network adapter card, keep in mind that it connects your PC to the Internet. Learn how to check network card speed to see the speed of all your network devices right away. The steps from this Windows 10 procedure may be applied in Windows 11 too.
You can also try updating your network adapter’s driver if your PC’s download speed seems a lot lower than what it should be.
You can do that by scanning your computer with a third-party driver updater utility, such as Outbyte Driver Updater. Driver updater software enables you to download and install new drivers for PC devices in no time.
Moreover, don’t hesitate to use the best bandwidth limiter tools for those programs that use more bandwidth. Even if they are for Windows 10, you can also use them to see exactly what apps are more demanding in terms of network data.
A Windows 11 net speed monitor is a nice addition to the desktop. Net Speed Meter and 8GadgetPack’s Network Meter are two freely available ones that pack in numerous customization settings.
8GadgetPack’s Net Meter gadget provides more network info than Net Speed Meter. With all the additional gadgets that software comes with, some users might prefer 8GadgetPack. However, you can’t add Net Meter to Windows 11’s taskbar.
Either of those network speed monitors on your desktop will make it clearer how long your downloads and uploads might take. With one of those apps installed, you can proactively monitor your PC’s network speed. So, 8GadgetPack and Net Speed Meter are two Windows 11 apps worth noting.
Even more, check out the best resource monitor software for Windows 10. Most of these tools can be enjoyed by Windows 11 users as well.
Which network speed monitor is your choice? Let us know in the comments area below.
![]()
Компания Майкрософт выпустила ОС Виндовс 11, в котором не предусматривается персонального приложения, которое предназначено для круглосуточного мониторинга скорости интернета. Поэтому целесообразно пользоваться сторонним программным обеспечением.
Что собой представляет NetSpeedMonitor
NetSpeedMonitor – специализированное программное обеспечение, с помощью которого предоставляется возможность в режиме реального времени отобразить показатели заявленной скорости интернета непосредственно на панели задач. Рассматриваемый инструмент оказывает посильную помощь в процедуре отслеживания интересующих показателей загрузки и одновременно скачивания на используемом устройстве, к примеру, стационарном компьютере либо ноутбуке.

Счастливым обладателям ОС Виндовс сложно установить специализированное программное обеспечение с последующей установкой персональных параметров. Поэтому крайне важно ознакомиться с имеющимися особенностями, чтобы снизить риски возникновения ошибок.
Как добавить на панель задач
Чтобы произвести добавление рассматриваемого программного обеспечения на панель задач, требуется придерживаться четкой последовательности действий. Алгоритм включает в себя:
- Изначально требуется загрузить рассматриваемое программное обеспечение с проверенного портала. Оно находится в открытом доступе и является бесплатным. Установка после скачивания осуществляется в автоматическом режиме. Дополнительных действий предпринимать не требуется.
- По завершении процедуры установки требуется выполнить переход в раздел внесения пользовательских настроек и произвести дальнейшую инсталляцию в классическом режиме. С помощью правой клавиши мыши осуществляется переход в раздел свойств, после чего выбирается совместимость и отмечается интересующий режим. С целью внесения изменения требуется нажать на клавишу сохранения результатов.
- На следующем этапе требуется с помощью двойного нажатия клавиши нажать на имеющийся установочный файл, чтобы произвести требуемую инсталляцию.
- Далее пользователям требуется нажать правой клавишей мыши на Виндовс панели инструментов с последующим выбором одноименного раздела из предложенного системой перечня доступных вариантов.
В завершении требуется активировать работу программного обеспечения. Для выполнения поставленной задачи пользователям требуется нажать на графическое изображение ярлыка ПО. После предварительного выбора утилиты, показатели скорости параметров загрузки и непосредственно скачивания в сети в автоматическом режиме отображаются на встроенной панели задач, которая расположена в правом углу рабочего стола.
Почему не работает счетчик
Часто встречается у пользователей ситуация, когда рассматриваемое программное обеспечение непрерывно показывает 0, даже при условии стабильного интернет-соединения. В таком случае оптимальным решением станет соблюдение представленной исчерпывающей последовательности действий:
- С помощью правой клавиши мыши требуется нажать на значение измерителя рассматриваемого программного обеспечения, которое расположено по умолчанию на панели инструментов.
- Из представленного перечня разделов требуется нажать на конфигурацию.
- Во вновь открывшейся форме требуется произвести нажатие на главное меню сетевого интерфейса с последующим выбором альтернативного предложения. Это позволяет удостовериться в наличие бесперебойного функционирования счетчика.
- В случае обнаружения проблем требуется произвести смену установленного по умолчанию интерфейса и подтвердить отсутствие проблем с отображением интересующих данных.
Требуется обращать внимание на то, что программное обеспечение по умолчанию отображает показатели скорости в кБ/с. Пользователям предлагается на выбор альтернативные системы измерений. Дополнительно предусматривается активация либо деактивация значения скорости интернет-соединения путем двойного нажатия на панели инструментов.
Полезные советы по NetSpeedMonitor для новичков
Каждый пользователь, который только начинает знакомство с программным обеспечением, сталкивается с определенными сложностями. Чтобы исключить ошибки, рекомендуется изучить имеющиеся особенности подробней.
Изменение единицы скорости
Чтобы пользователям внести первичные изменения в установленные по умолчанию параметры скорости, требуется скорректировать метод отображения виджета. Для этого требуется предварительно нажать правой клавишей мыши для последующего перехода в подкатегорию «Конфигурация».
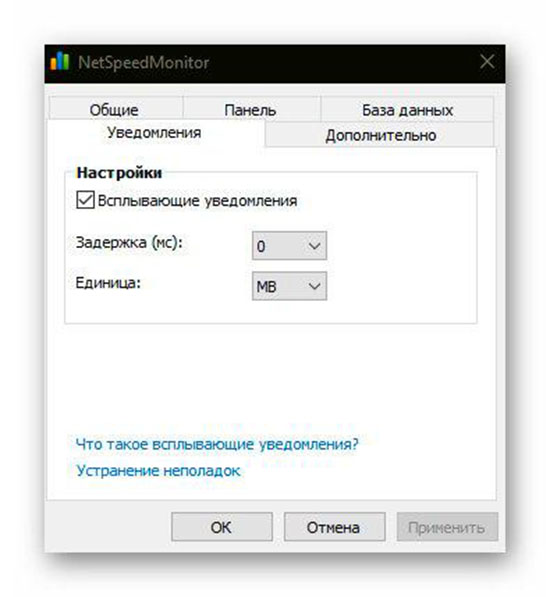
В имеющейся открывшейся строке требуется определить интересующие показатели. Чтобы изменения вступили в силу, требуется сохранить нажатием на одноименную клавишу.
Просмотр использования данных
Отображение в режиме реального времени во встроенной по умолчанию осуществляется в панели задач. Поэтому для получения исчерпывающей информации по интересующему вопросу, требуется нажать на Show Main Window. После этого в открывшейся форме требуется указать на предпочитаемый вариант получения полного отчета. Сразу после этого программное обеспечение в автоматическом режиме отображает требуемые данные. Технические сбои либо ошибки исключены, о чем свидетельствуют многочисленные отзывы пользователей.
Изменение действие двойного щелчка
Чтобы откорректировать действие двойного щелчка, требуется воспользоваться разделом пользовательских настроек. Для этого пользователям после перехода установить интересующее значение и сохранить нажатием на соответствующую одноименную клавишу.
Настройка шрифт инструмента
Каждый пользователь вправе изменить установленный по умолчанию шрифт. Для выполнения поставленной задачи требуется предварительно перейти в раздел пользовательских настроек, после чего выбрать одноименную категорию. После внесения правок требуется нажать на клавишу сохранения параметров. Изменения вступают вы силу мгновенно. Сложностей либо перезапуска программного обеспечения не требуется.
Экспорт БД
Функционал рассматриваемого программного обеспечения позволяет инициировать экспорт базы данных. Для этого требуется открыть главное меню, после чего выбрать одноименную опцию. В результате несложных действий поставленная задача выполняется за максимально короткие сроки.
Что бы вы ни делали в Интернете, скорость Интернета стала основной и необходимой информацией для вашей проверки и мониторинга производительности и поиска решений для ее оптимизации. Хотя многие сторонние инструменты могут отлично работать в Windows 11, чтобы помочь проверить скорость интернета, и мы хотели бы вам сказать как включить интернет-счетчик скорости в Windows 11 после прохождения через несколько инструментов.
Поскольку в системе Windows нет встроенного инструмента для отслеживания скорости загрузки и загрузки вашего интернет-соединения. Измеритель чистой скорости был разработан как настольный счетчик, который проверяет скорость загрузки и выгрузки вашего интернет-соединения в режиме реального времени. И он также может работать в системном трее Windows.
Всего 4 простых шага, необходимых для установки и настройки Internet Speed Meter на Windows 11, чтобы получить всю необходимую информацию в Интернете.
Шаг 1: Получить Измеритель чистой скорости из Microsoft Store, нажав синюю кнопку «Получить»; то он будет установлен.
Шаг 2. Откройте его после завершения установки и оставьте Net Speed Meter на панели задач Windows 11, когда вас спросят, следует ли оставить Net Speed Meter на панели задач.

Шаг 3: Net Speed Meter будет успешно установлен в Windows 11;
Шаг 4: Щелкните правой кнопкой мыши на значке, а затем выберите Сохранить на панели задач;

Затем информация о скорости интернета будет отображаться на панели задач Windows 11.
Если вам нужны дополнительные настройки, щелкните правой кнопкой мыши значок и выберите «Настройка». Если у вас низкая скорость интернета, вы можете узнать как ускорить виндовс 11 or как ускорить интернет на виндовс 11.
Recently, Microsoft released Windows 11 stable build for the general public. But still, Windows 11 doesn’t come with an Internet Speed Meter. Like, we get in the Android status bar. Yes, by going into Task Manager > Performance > Wi-Fi (Or Ethernet). You can check your current Internet speed. But, there isn’t any option to get a real-time internet speed meter in the Windows Taskbar. That means, there isn’t any way to check, how much your Computer is consuming the internet in real-time.
In this situation, third-party network speed indicator Software comes in handy. There are many free and paid tools available to show internet speed in the Taskbar. But, In this post, I will suggest to you some best tools. These tools will show you real-time internet upload and download speed on your Windows PC.
How Internet Speed Meter is helpful?
Network Speed Meter is very helpful if you don’t have a high-speed or stable Internet connection. In Windows, updates get downloaded automatically. And, if you have a slow connection, then, it can affect the work that you’re doing. Also, If your Internet speed fluctuates. Then, keeping an eye on real-time Internet speed is useful. Basically, it will help you to track connection problems.
Best Internet Speed Meter for Windows.
NetSpeedMonitor. (Free)
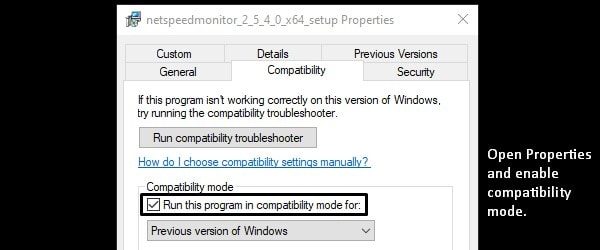
If you’re looking for free Internet Speed Monitor software. That can show you real-time download and upload speed. Then, this is the best tool, which you can use. There isn’t any specific site to download this software. You can download it from Softpedia for free. Though, this tool is designed to run only on Windows XP, Vista, and 7. So, it might not work directly in Windows 8 and 10, and Windows 11. You have to run the installer in compatibility mode.
1. Download NetSpeedMonitor from Softpedia. Right-Click on the installer > Click on Properties.
2. Click on the Compatibility tab > Mark the “Run this program in compatibility mode for” and click on OK.
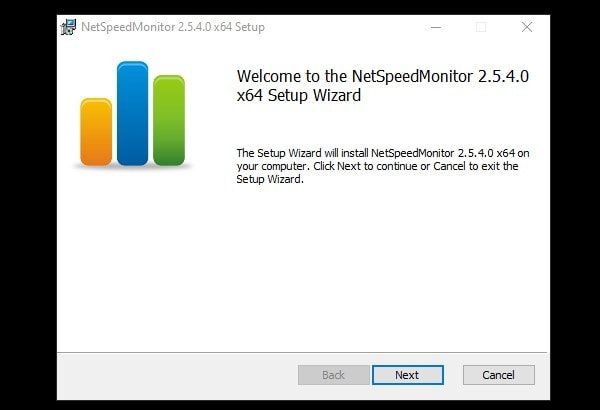
3. Now, you can install it and you will not get any compatibility error.
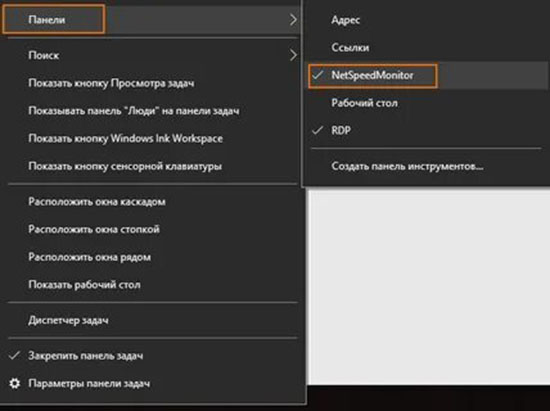
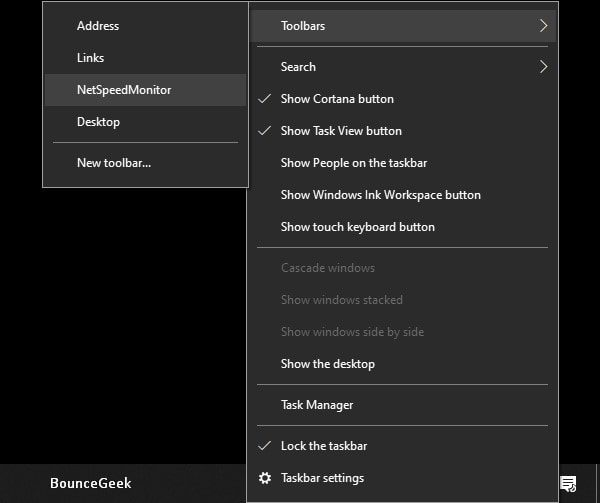
4. After installing NetSpeedMonitor, Right-click on the taskbar. Go to Toolbars and click on “NetSpeedMonitor”.
Note: In Windows 11 you won’t find the Toolbars option. So, scroll down, and you will find a tool to enable Toolbars.
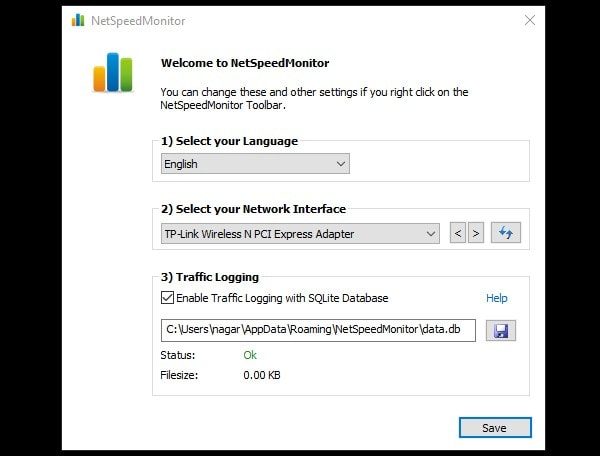
5. NetSpeedMonitor one-time setup window will now appear. Select the right network interface from it. And, click on save.
6. That’s it. You will now be able to see the speed meter by NetSpeedMonitor in Taskbar.
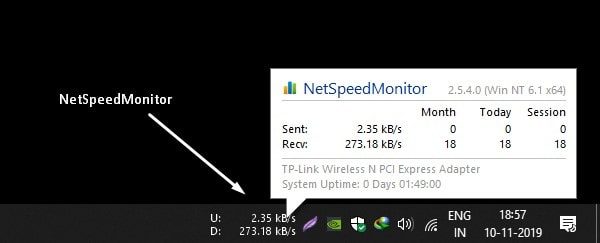
7. Right-Click on Net Speed Meter, and choose the “Configuration” option. You can select Bitrate and customize it.
NetWorx (Windows, macOS, and Linux.)
NetWorx is one of the most powerful tools to measure Internet Speed. It also helps to track suspicious activity on the network, like, hacker attacks and trojan horses. You can also use it as a bandwidth monitor if you have limited Internet. NetWorx also can identify the possible reasons or sources of network issues. The Software also can send you a visual and sound alert when the connection is down. Or, when some suspicious activity is occurring in Windows. With Networx, You can always see statistics of monthly and weekly bandwidth usage.
And, yes, you can enable Internet Speed Meter in Windows Taskbar or Toolbar. And, the speed meter will show you real-time upload and download speed. You can also customize the speed indicator graph. There are multiple graph types available to select. Like, histograms, numeric, polylines, and columns. You can also select the transfer rate unit between Bytes and Bits. But, I suggest you select Bytes/s.
Install Networx and Show Internet Speed Meter in Taskbar.
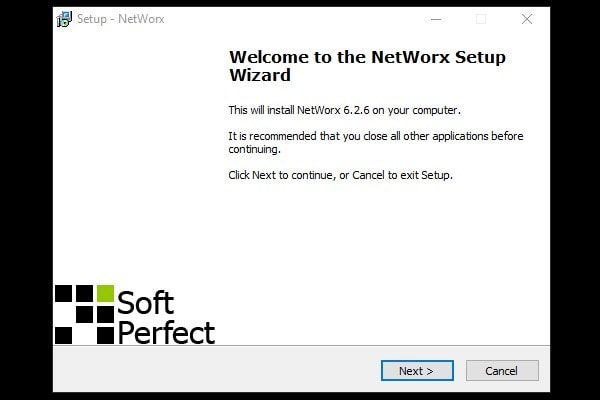
1. First, download the latest version of Networx and install it like normal Windows software. (During installation select recommended settings only.)
2. After installing it successfully, NetWorx welcome window will appear. Select Language and Click on Next.
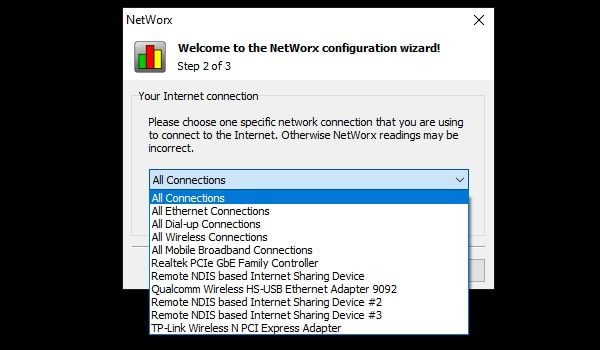
3. Now NetWorx will ask you to select your Internet Connection. You can either select a specific connection or can keep it on “All Connections”.
4. Click on Next, and then click on Finish.
5. To show the Internet speed meter now in the toolbar. Right-Click anywhere in the taskbar. And then, take the mouse pointer over Toolbars. And, mark the “NetWorx Desk Band” option.
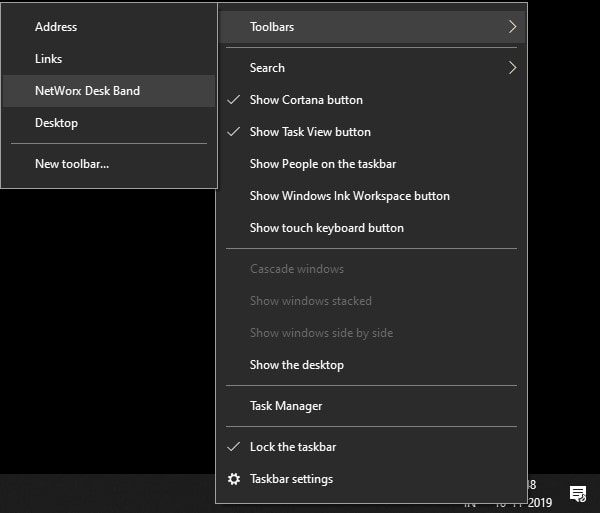
6. That’s it. You will be able to see real-time download/upload speed in Taskbar.
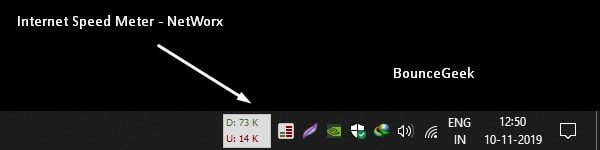
7. And, to customize graph settings, Right-Click on the Networx icon, and then click on Settings. (Don’t forget to select Bytes/s in the transfer unit rate. And, Apply the settings.)
DU Meter.
After NetWorx, DU Meter is the best Internet Speed Meter for Windows 10 and Windows 11. DU Meter comes with 30 days of free trial. And, if you find it useful then you can buy its license. There are two license plans available to choose from. Single-user and business licenses and Family Pack. Currently, for Indian users, it is available for $9.95. DU meter also allows adding a speed meter in the taskbar. And, that’s all you wanted.

You can customize the color & sound of the DU Meter. So basically, you can do audible network monitoring. Also, you can customize the traffic monitor Graph. Apart from the taskbar or toolbar, you can enable a floating window of the DU Speed monitor. The data transfer rate unit option is also available. It also shows the highest Internet speed.
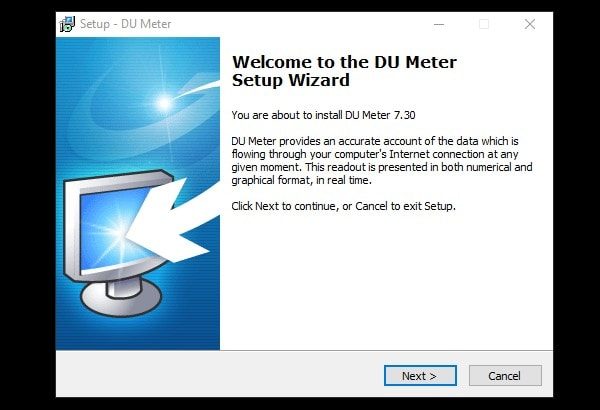
1. Download DU Meter and install it on your Windows PC.
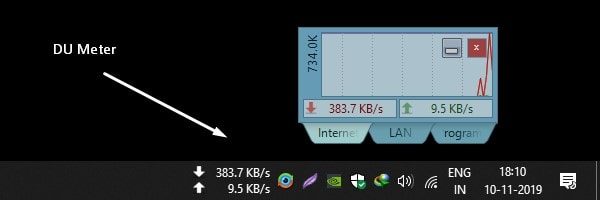
2. To enable Network Speed Monitor in the taskbar. Right-Click on the toolbar. Take the mouse pointer on Toolbars > Click on “DU Meter” to enable.

3. That’s it, now you will be able to see upload and download speed in Taskbar.
4. To enable or disable the floating Internet speed Monitor, Right-Click on the DU Meter icon. And, click on the Show/Hide DU Meter option. And, by clicking on “User options”, you can access settings. Can customize DU Meter.
Get Back Windows 11 Quick Launch Toolbar.
Microsoft has removed Quick Launch Toolbar in its latest version of Windows 11. And, all the mentioned Network speed monitor work with the Toolbar option. So, if you want to get back the toolbar option, then you have to install Explorer Patcher from Github. It’s a free and open-source add-on for Windows 11, that enables Windows 10 toolbar in Windows 11.
1. Simply download ExplorerPatcher from GitHub. Click on the Assets section to get the setup file.
2. Run the setup. Windows Protected screen might appear, click on More Info > Run Anyway.
3. UAC window will appear, click on Yes.
4. The screen will go black for a minute. And, after that, when you right-click on the taskbar you will get the toolbar option.
Yes, if you like you can uninstall it from Control Panel.
Summing-up
So, these are some of the best speed-tracking software for Windows 10/11. Personally, I found “NetSpeedMonitor” best. Because it’s free and offers what exactly you want. DU Meter and Networx come with a trial period. But, offers many other features, that’s why you need to buy a subscription. Though, if you don’t want to spend to get some extra features. Then, NetSpeedMonitor is best for you.