В Windows 11 с помощью подсистемы Windows для Android (WSA) вы можете установить магазин Google Play Store, загружать и устанавливать любые приложения Android на свой компьютер с помощью определенных действий, которые включает в себя множество шагов.
Это был просто вопрос времени, теперь вы можете устанавливать Android приложения из Play Store в Windows 11, но не официально. Пользователь твиттера — ADeltaX, разработал процедуру, позволяющую обойти подсистему Windows для Android и установить приложение Google Play Store, что дает вам доступ в Windows 11 ко всему каталогу приложений для Android.
Пока, неясно, как это повлияет на будущие обновления. Другими словами, данный способ вполне может быть только временным решением, поскольку до сих пор не понятно, что произойдет после того, как WSA получит обновление через Магазин Microsoft. Вероятно, любому, кто использует этот метод, придется повторить весь процесс настройки. Конечно, если вы не отключите автоматическое обновление приложений в параметрах приложения Магазин Microsoft.
Этот способ установки магазина Google Play Store в Windows 11 является сокращением инструкций ADeltaX, но, если есть желание, вы можете следовать полной инструкции из репозитория Github.
Следуйте шагам ниже, чтобы установить магазин приложений Google и иметь возможность устанавливать приложения для Android в Windows 11.
Подготовка компьютера с Windows 11 для установки WSA
Прежде чем перейти к загрузке и установке, необходимо убедиться, что на вашем компьютере включены дополнительные функции Hyper-V и Virtual Machine Platform.
Шаг 1: Для этого, нажмите сочетание клавиш Win R, чтобы открыть диалоговое окно «Выполнить».
Шаг 2: Введите или скопируйте и вставьте:
OptionalFeatures
Шаг 3: Здесь в окне «Компоненты Windows» для «Hyper-V» и «Платформа виртуальной машины» установите флажок, чтобы включить его.
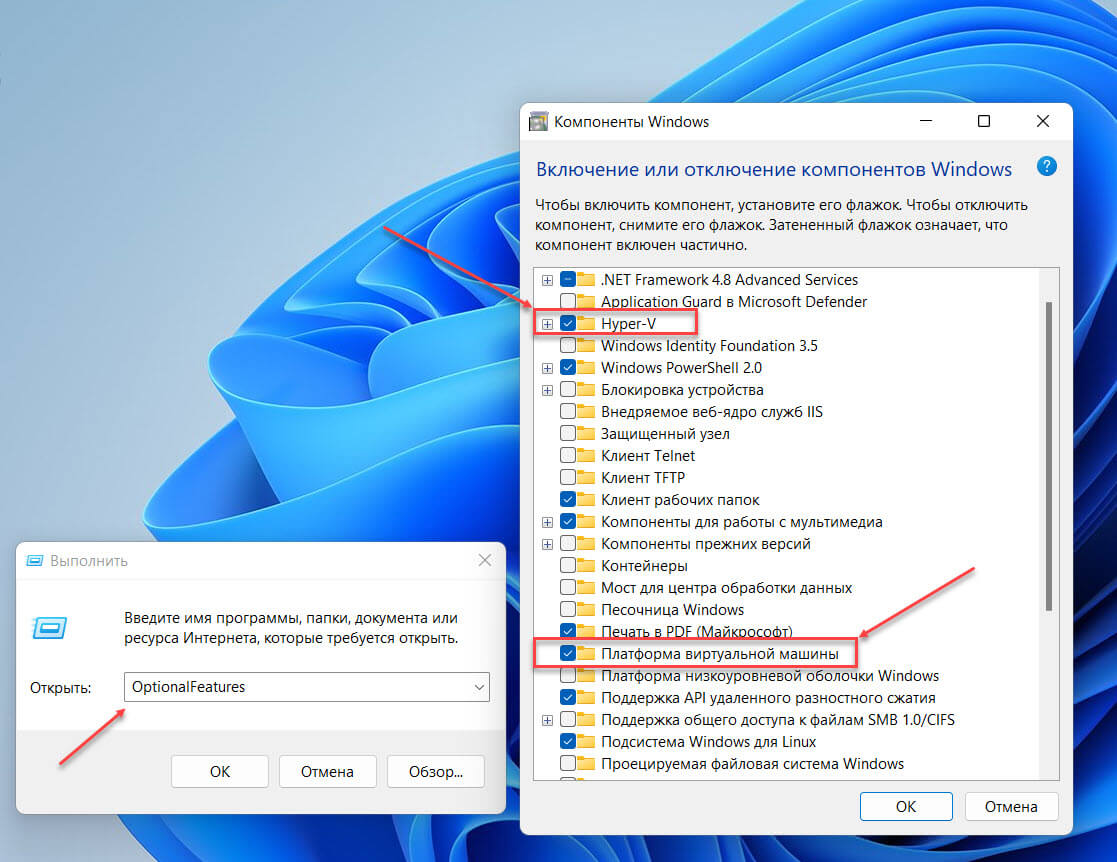
Шаг 4: Нажмите кнопку «ОК», чтобы установить эти дополнительные функции на свой компьютер с Windows.
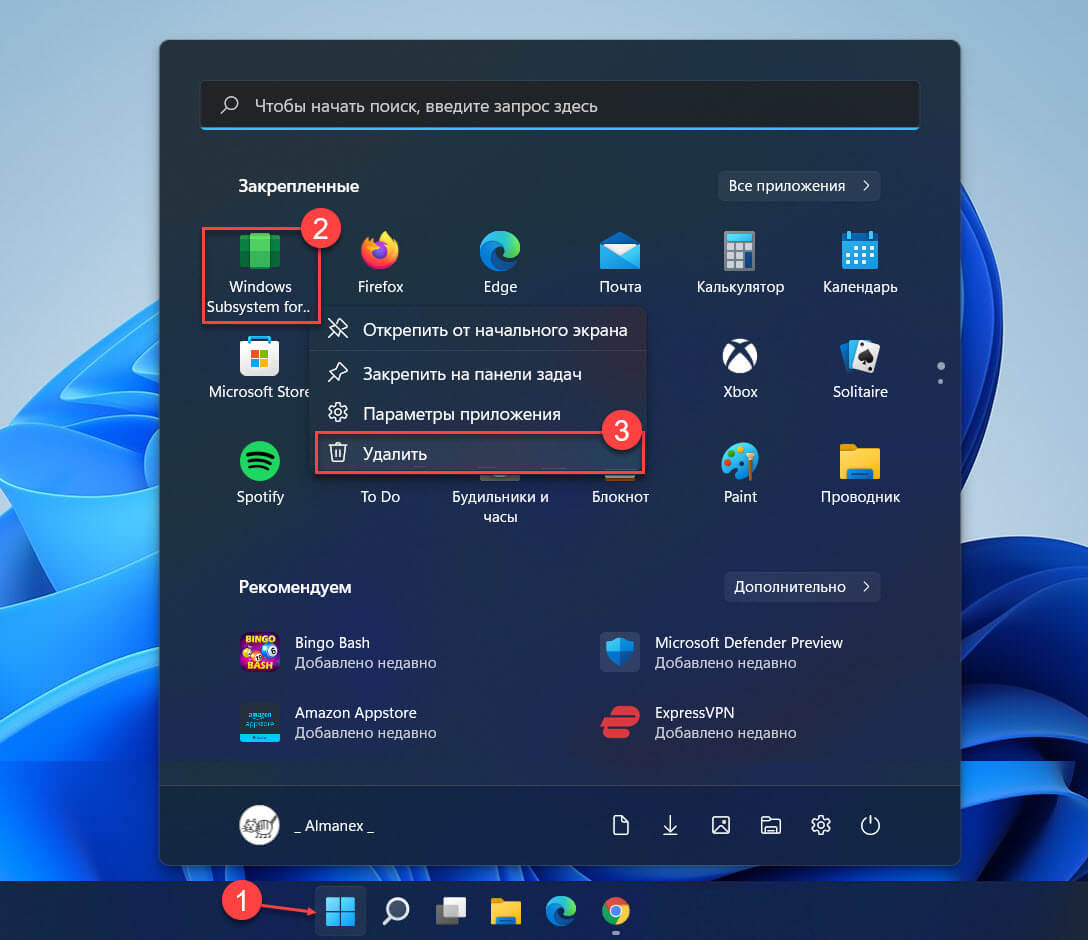
Удалите любой ранее установленный пакет WSA
Удалите подсистему Windows для Android, если она уже установлена. Это связано с тем, что мы будем устанавливать новую подсистему Windows для Android, в которой существует интеграция Google Apps.
Шаг 5: Для этого, откройте меню «Пуск», найдите и кликните на подсистему «Windows Subsystem for Android» правой кнопкой мыши и выберите в контекстном меню пункт «Удалить». Затем следуйте инструкциям на экране, чтобы завершить процесс удаления.
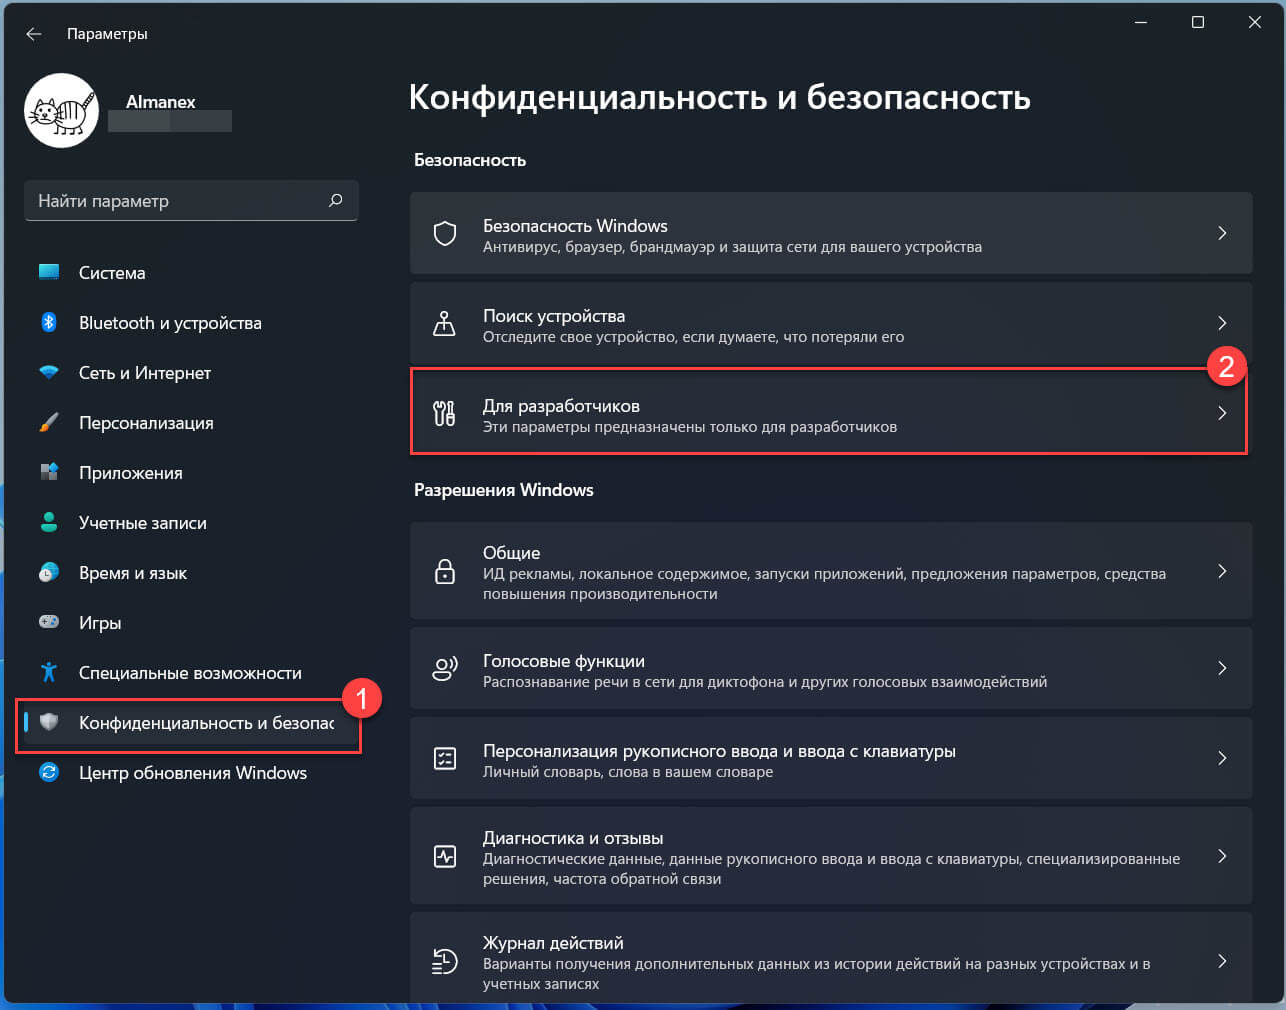
Включите параметры разработчика в Windows 11.
Вам нужно будет включить параметры разработчика в Windows (в Windows 11, а не в WSA!).
Шаг 6: Откройте параметры Windows 11, перейдите в раздел «Конфиденциальность и безопасность» → «Для разработчиков».
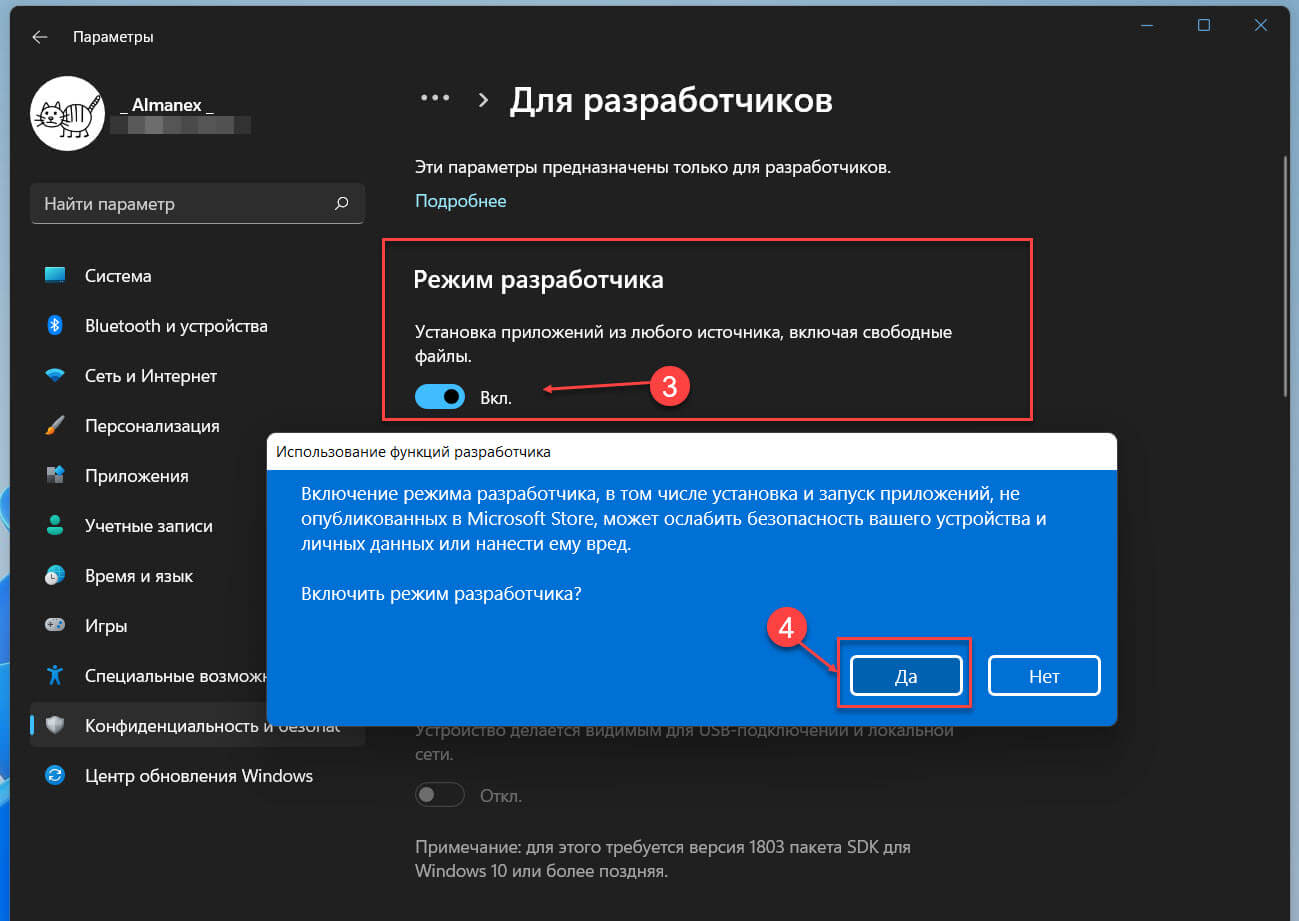
Шаг 7: В разделе режим разработчика передвиньте ползунок переключателя в положение «Вкл.»
Шаг 8: В следующем всплывающем окне подтвердите свои действия нажав кнопку «Да».
Загрузите WSA + GApps пакет MSIX:
Выберите для загрузки файл в зависимости от вашего устройства.
Шаг 9: Это модифицированная версия – «Windows Subsystem for Android (WSA-x86 64-бит + GApps)».
Модифицированная версия файл MSIX для 64-разрядных компьютеров ARM, таких как Surface Pro X.
Обновление: Благодаря новому методу от LSPposed у нас теперь есть WSA со встроенной поддержкой Magisk.
Вам понадобится приложение Magisk после установки одного из пакетов ниже.
- Модифицированная версия 64-разрядной версии WSA x86, в нее встроены приложения Google и поддержка Magisk.
- Модифицированная версия 64-разрядной версии WSA ARM, в нее встроены приложения Google и поддержка Magisk.
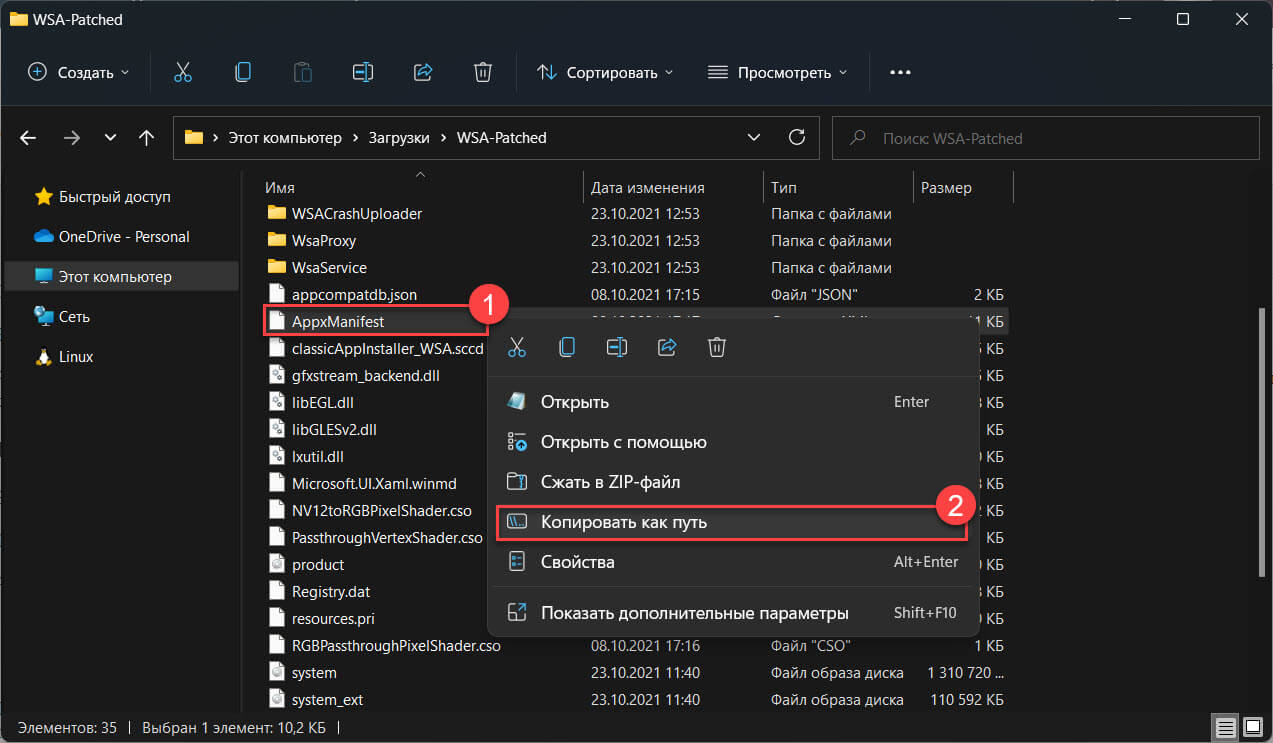
Шаг 10: Распакуйте загруженный Zip-архив в любое расположение, в дальнейшем нам потребуется указать путь к файлу AppxManifest.xml из этой папки.
Чтобы быстро получить путь к расположению файла, кликните на AppxManifest.xml правой кнопкой мыши и выберите «Копировать как путь», чтобы скопировать путь к файлу в буфер обмена ПК с Windows 11.
Зарегистрируйте пакет WSA + GApps:
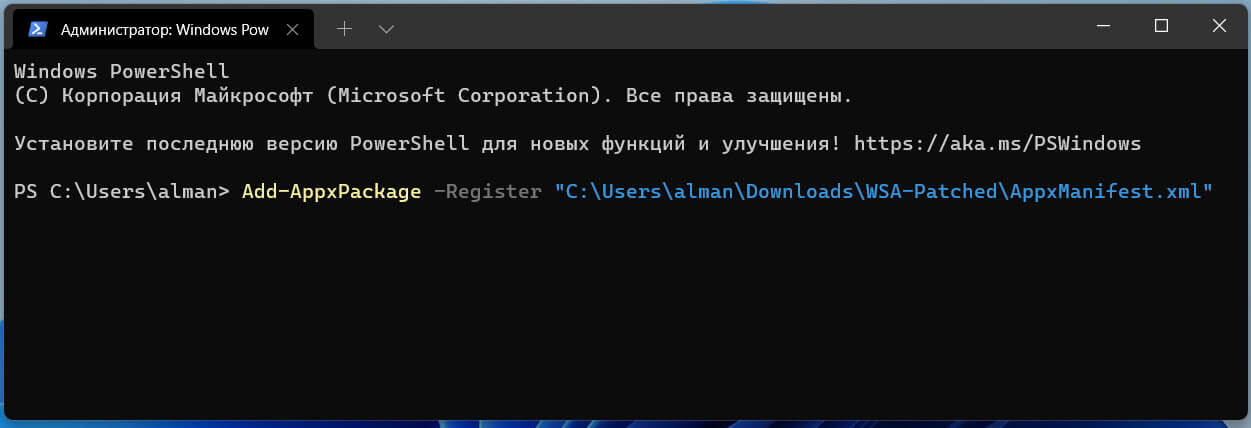
Шаг 11: Запустите Powershell от имени администратора с помощью Терминала или любым другим удобным вам способом.
Шаг 12: Измените команду Powershell, указав расположение извлеченного Zip-файла
Add-AppxPackage -Register "Путь_к_папке_с_WSA\AppxManifest.xml"
В моем случае команда выглядит так:
Add-AppxPackage -Register "C:\Users\almanex\Downloads\WSA-Patched\AppxManifest.xml"
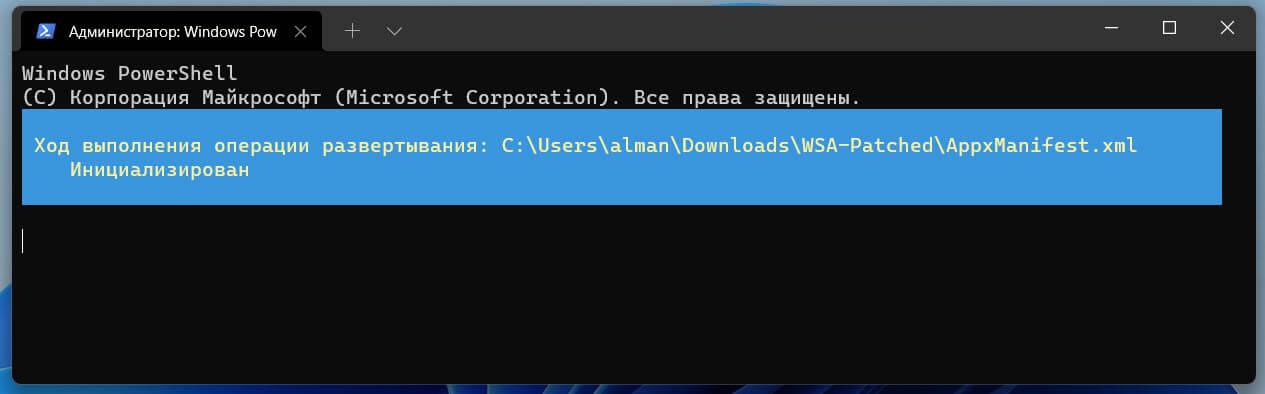
Приложение WSA будет установлено на ваше устройство в фоновом режиме. Если вы получите сообщение об ошибке, убедитесь, что все шаги были выполнены правильно.
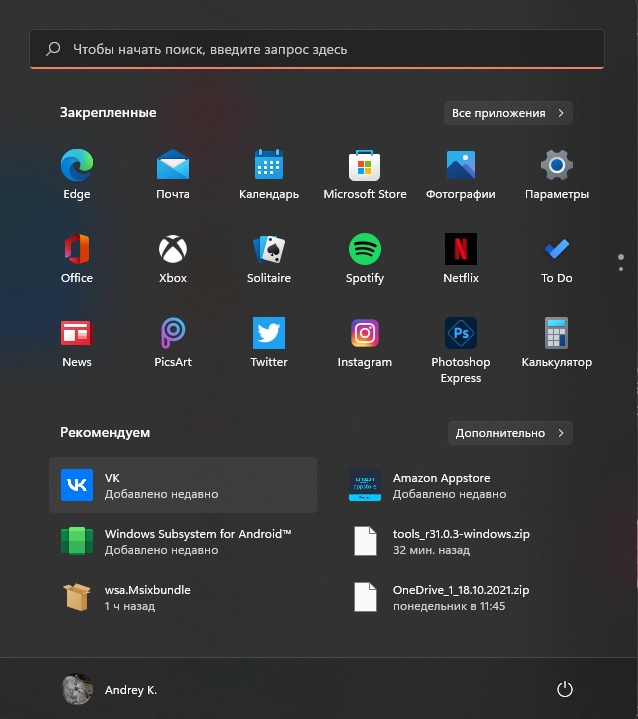
После регистрации WSA, магазин Google Play должен быть доступен в меню «Пуск».
И последнее, что нужно сделать, прежде чем вы сможете войти в свою учетную запись Google.
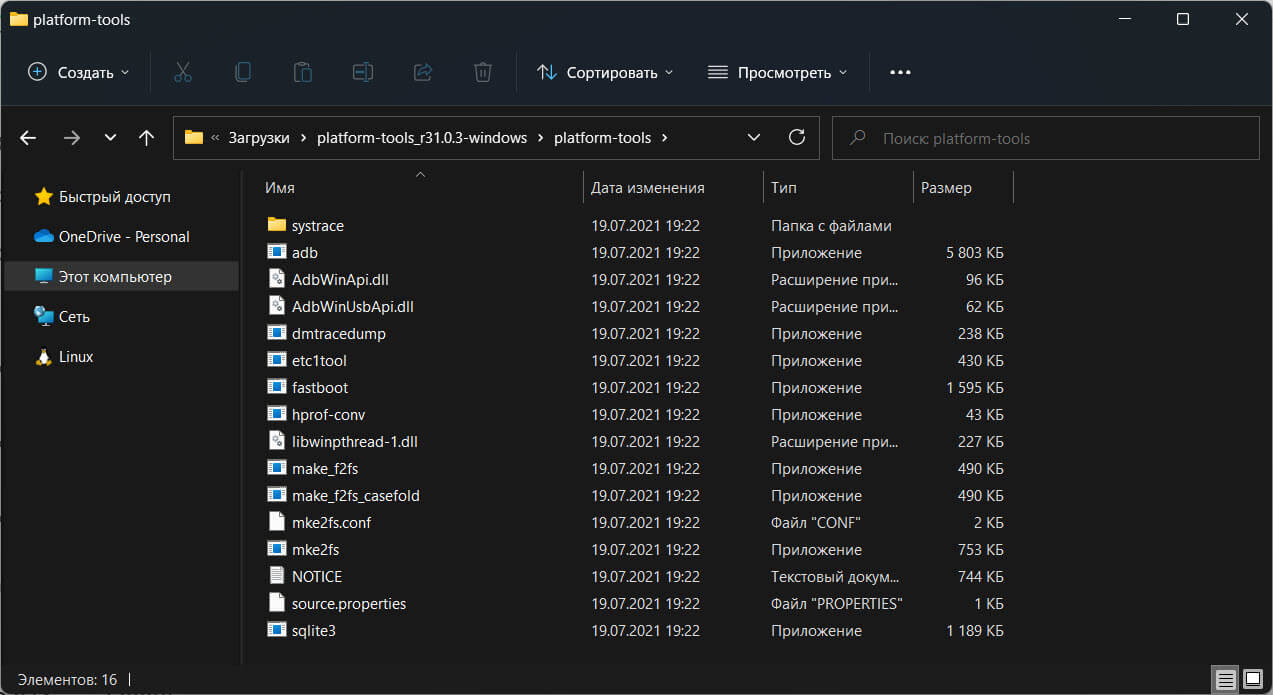
Загрузите ADBKit:
Шаг 13: На странице developer.android.com загрузите «SDK Platform-Tools for Windows».
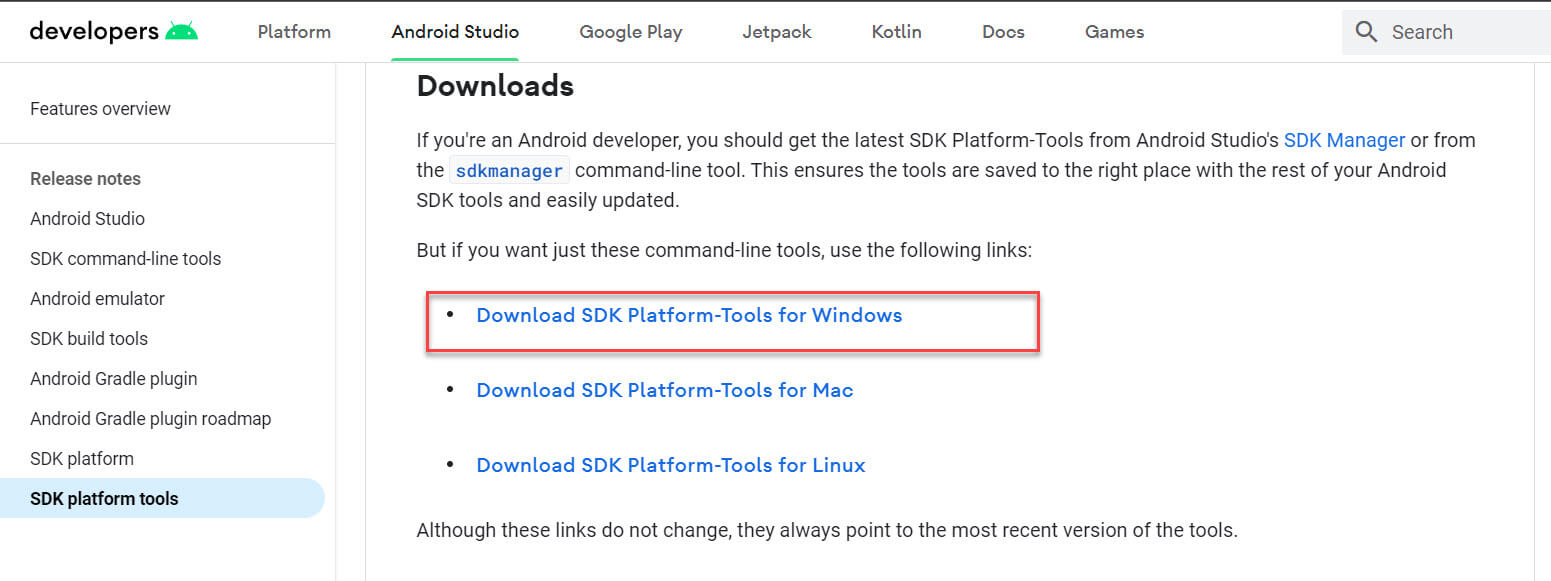
Шаг 14: Pаспакуйте zip-архив в любую папку.
Настройка WSA
Шаг 15: С помощью меню «Пуск» откройте приложение «Windows Subsystem for Android».
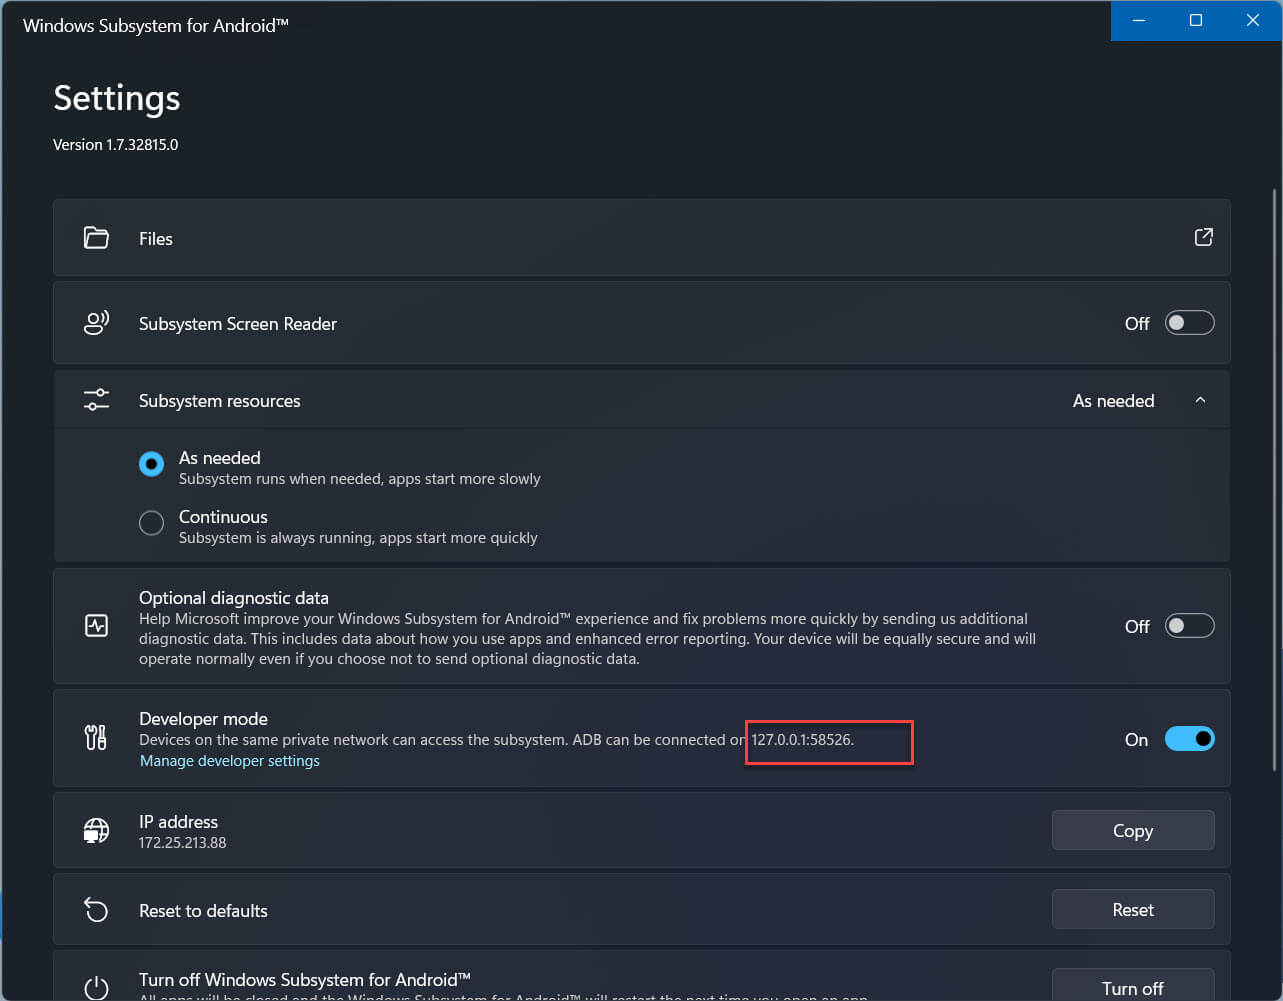
Шаг 16: В разделе «Режим разработчика» передвиньте ползунок переключателя в положение «Вкл.», как показано на экране ниже.
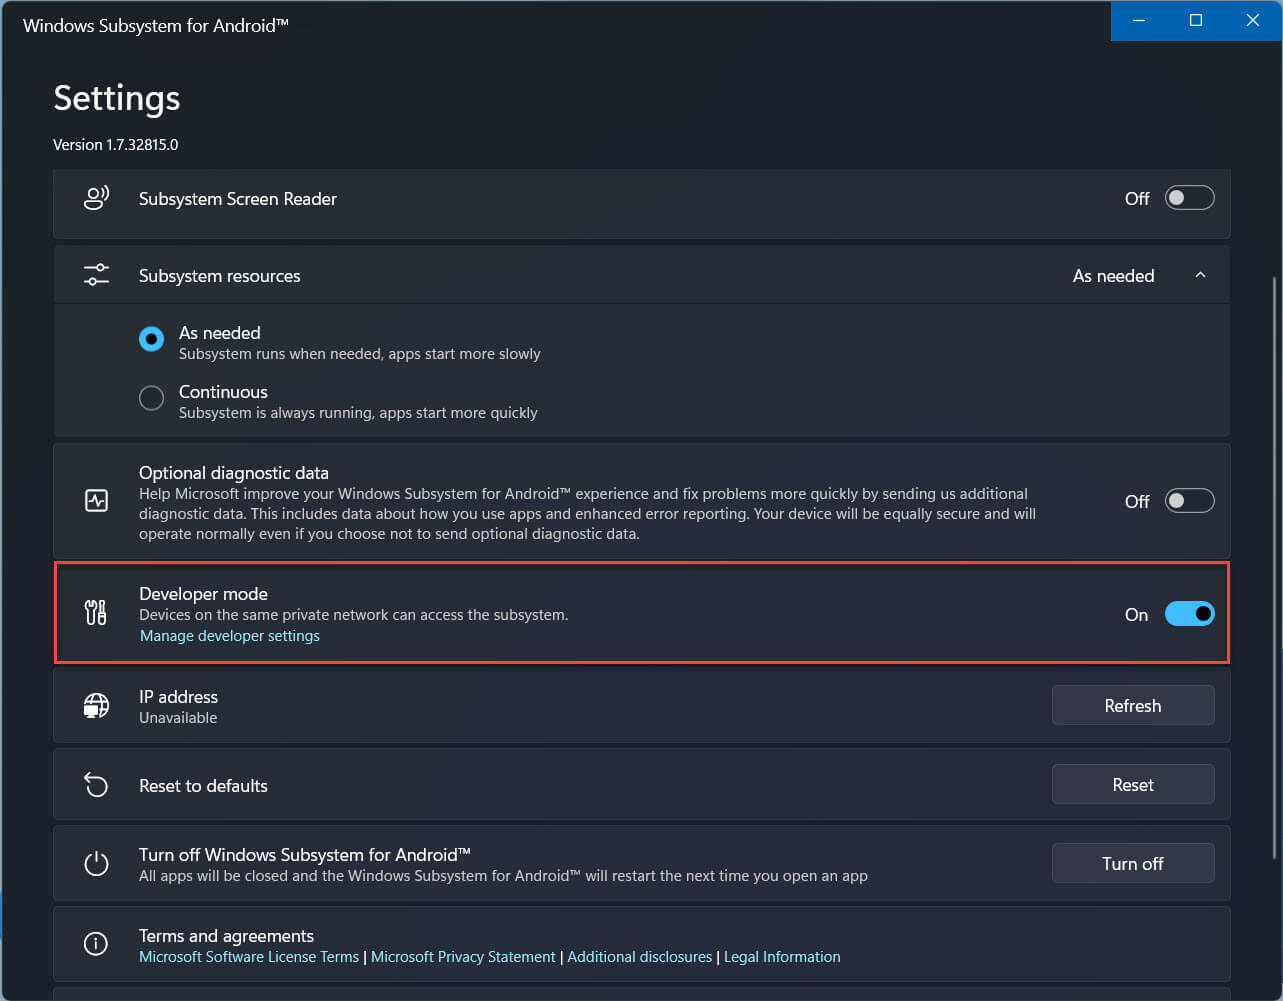
При появлении запроса брандмауэра разрешите доступ ADB.
Скопируйте IP-адрес
Шаг 17: Теперь в верхней части страницы параметров WSA откройте опцию «Файлы», в появившемся диалоговом окне нажмите «Продолжить».
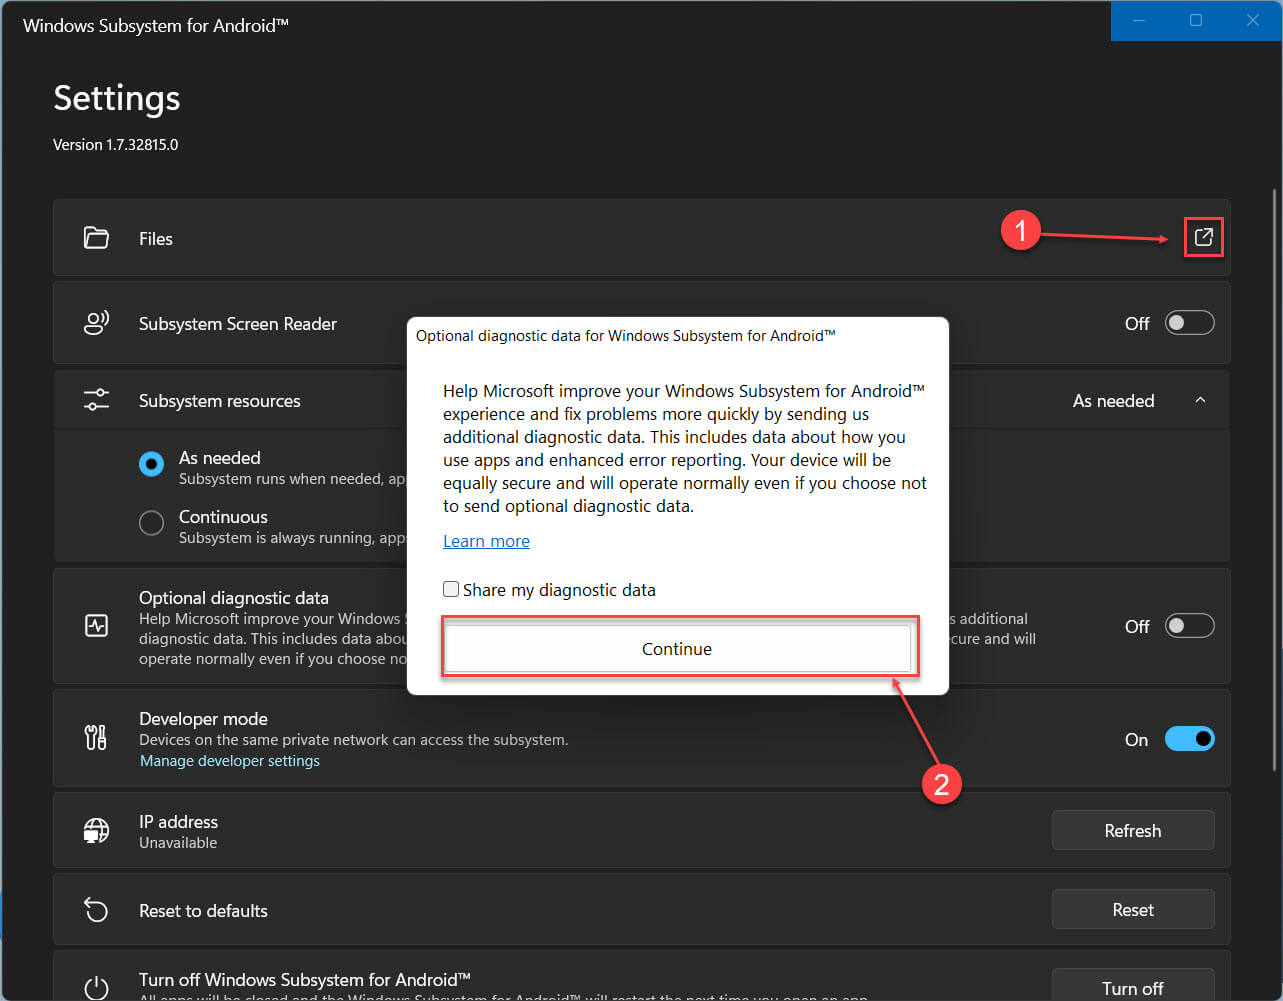
Шаг 18: Затем нажмите кнопку «Обновить» напротив опции IP-адрес.
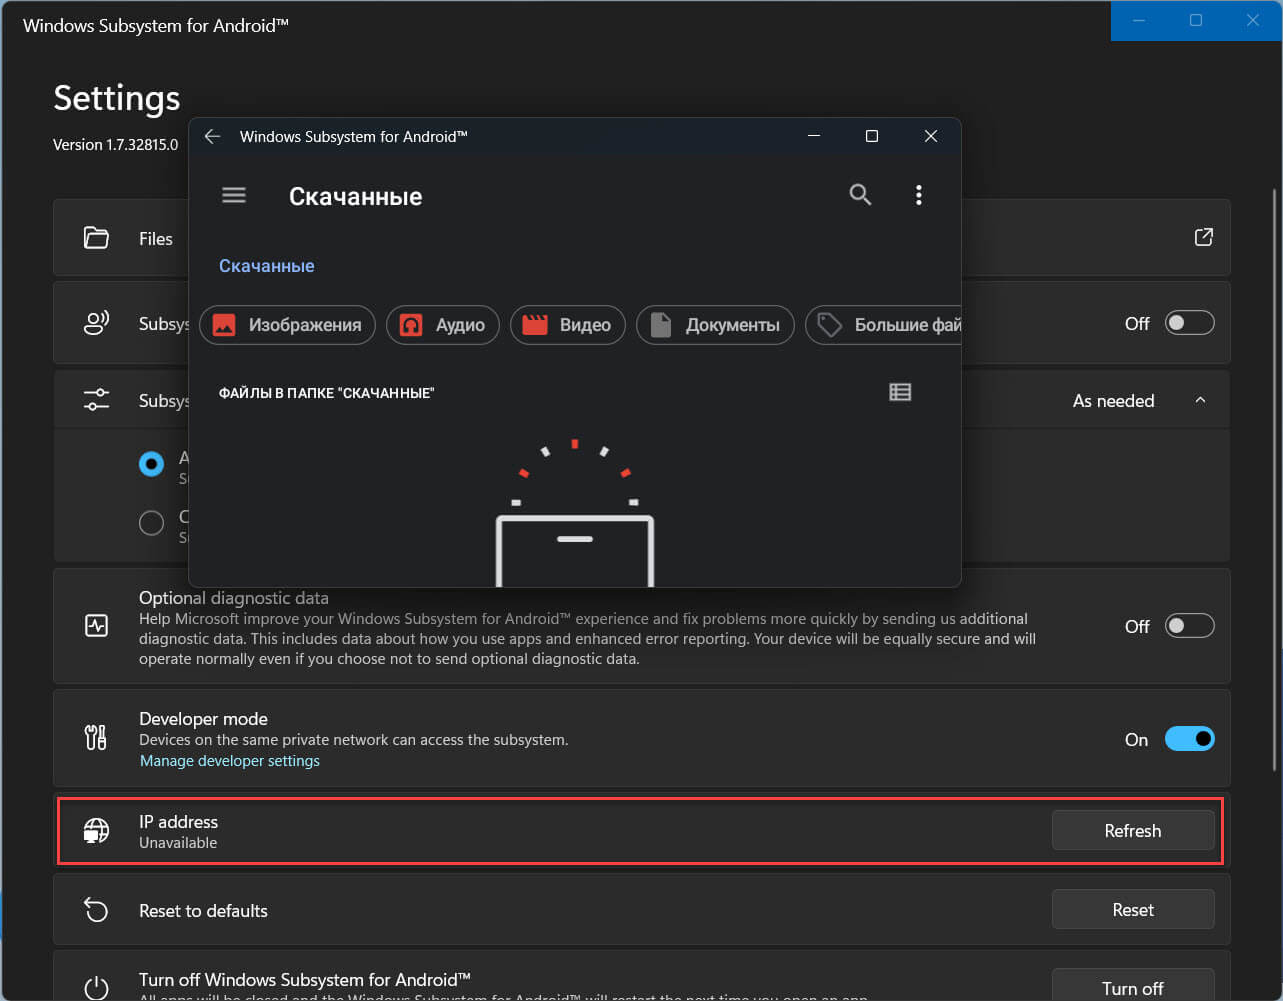
Шаг 19: Обратите внимание на адрес ADB, в разделе «Developer mode» отображается как 127.0.0.1:58526 (он должен быть таким же для вас)
Установите соединение
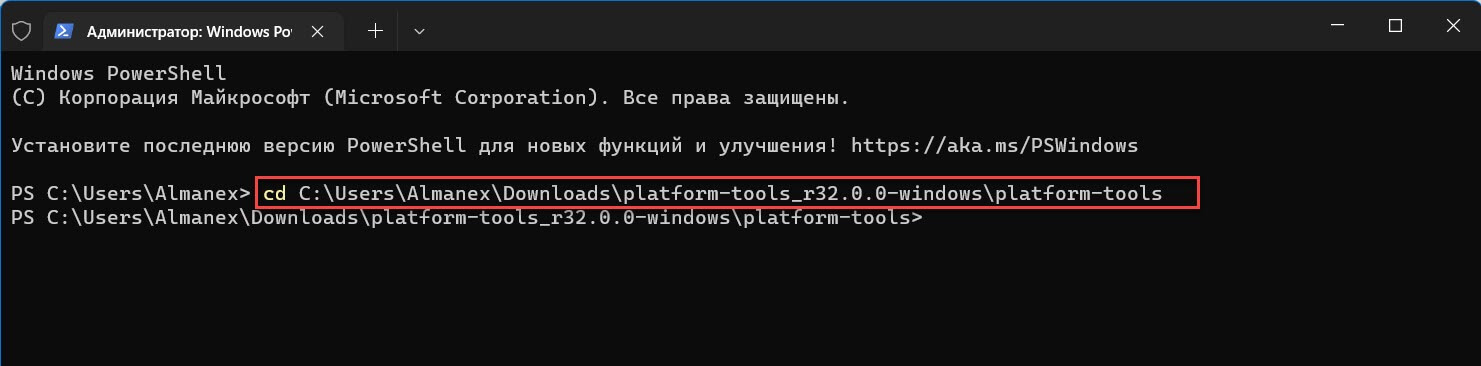
Шаг 20: Откройте Powershell от имени администратора и перейдите в папку «C:\Users\Almanex\Downloads\platform-tools_r32.0.0-windows\platform-tools» для этого можно использовать команду, предварительно заменив Имя_пользователя:
cd C:\Users\Имя_пользователя\Downloads\platform-tools_r32.0.0-windows\platform-tools
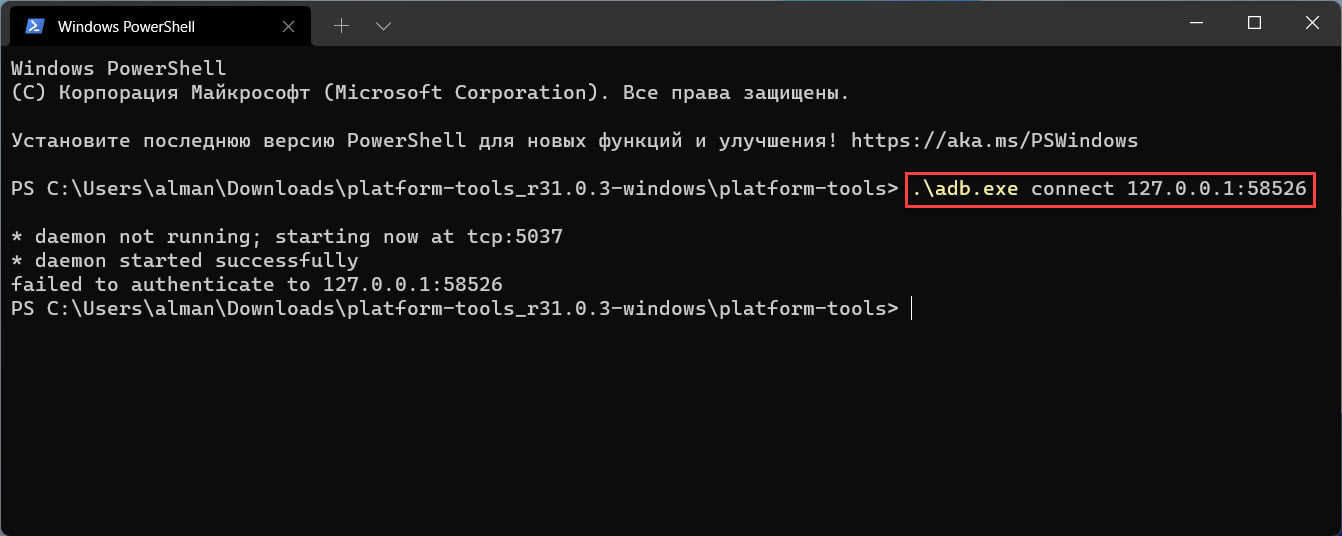
Теперь, выполните команду:
.\adb.exe connect 127.0.0.1:58526
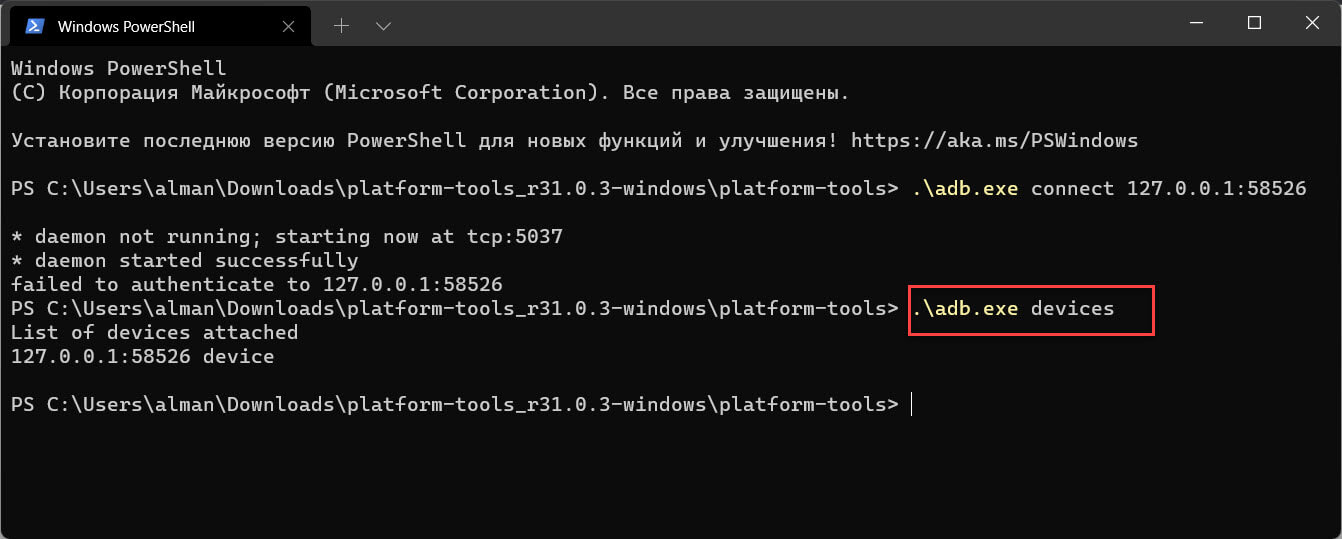
Шаг 21: Убедитесь, что adb подключен, выполнив:
.\adb.exe devices
Установите Google Play Store в Windows 11
Шаг 22: Чтобы иметь возможность авторизироваться в магазине Google Play, выполните по очереди три команды:
.\adb.exe shell
su
setenforce 0
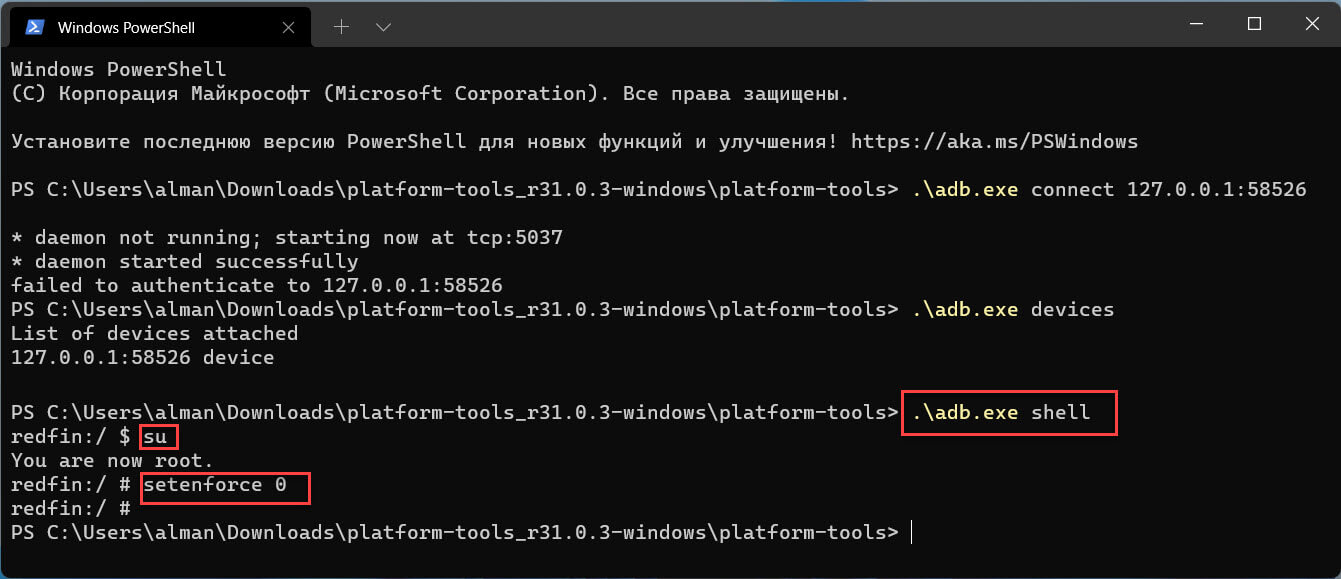
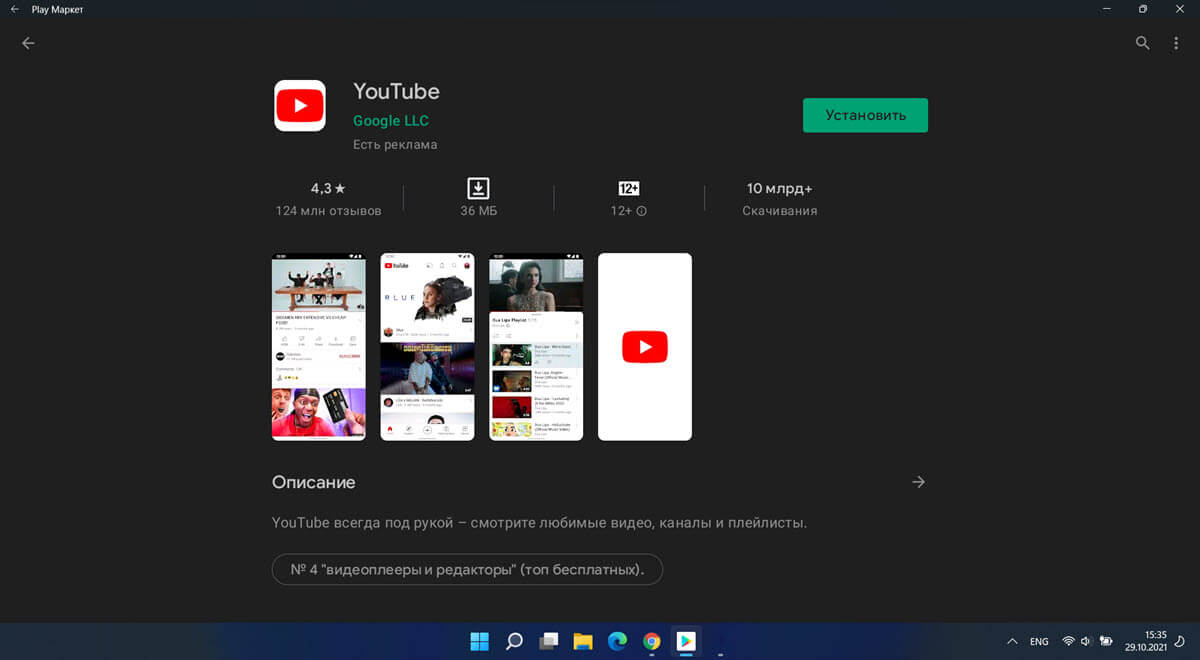
Если вы все сделали правильно, вы сможете войти в Google Play Store со своей учетной записью Google.
Теперь вы можете пользоваться полным набором приложений Google Play на наших компьютерах с Windows 11.
Большое спасибо ADeltaX, благодаря которому это стало возможным!
На этом мы завершаем руководство о том, как установить Google Play Store на ПК с Windows 11 с помощью подсистемы Windows для Android. Play Маркет, вероятно, лучший вариант, потому что он может похвастаться большим каталогом приложений и обеспечивает безопасную и надежную экосистему.
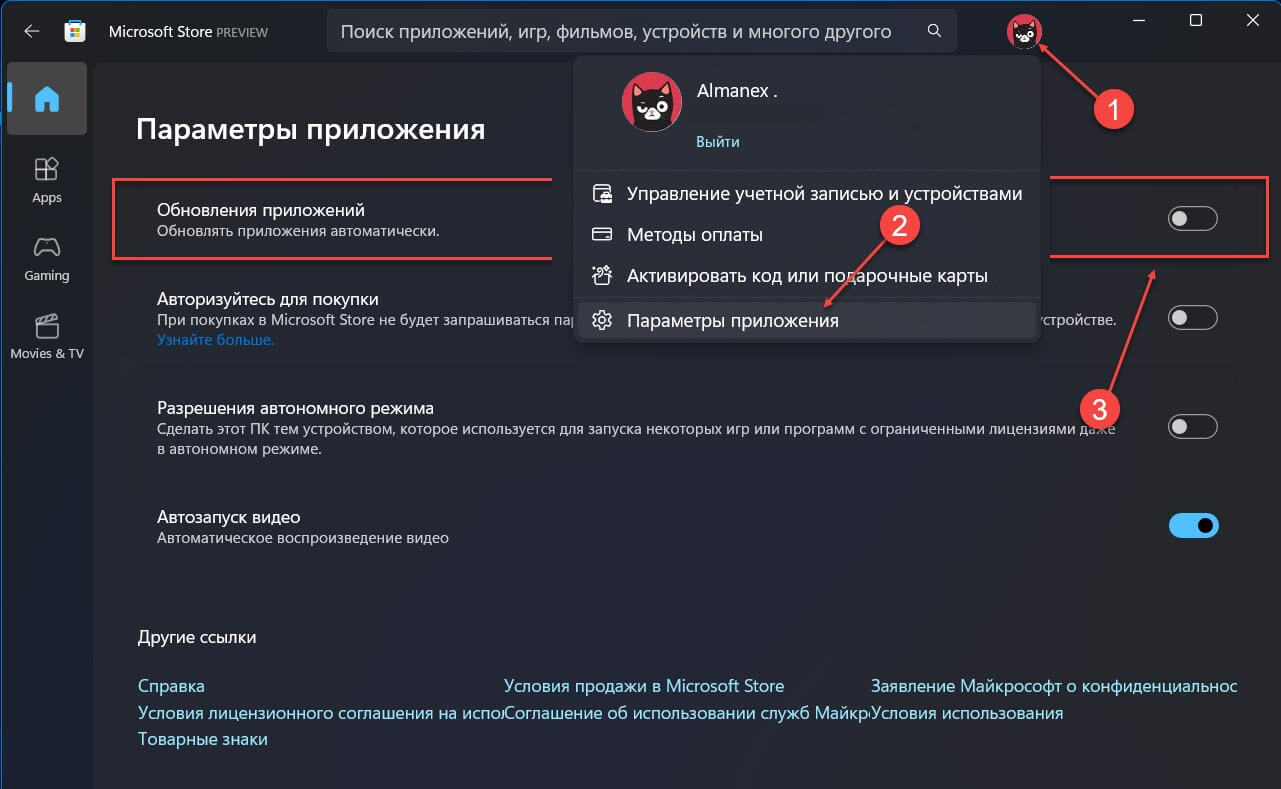
Если вы хотите, чтобы будущие обновления для подсистемы Windows для Android не сбросили выполненный вами процесс, вы можете отключить автоматические обновления для приложений в Магазине Microsoft: перейдите в меню «Профиль» → «Параметры приложения» и отключите автоматическое «Обновление приложений». Если вы хотите обновить другие приложения, вам необходимо обновить их вручную.
Вопросы.
- Могу ли я использовать Google Play Store для установки приложений в Windows 11?
Да, Google Play Store полностью работает в Windows 11. Спасибо пользователю Twitter ADeltaX.
- Нужен ли мне канал Windows Beta для запуска приложений Android в Windows 11?
Официально да. Но вы можете установить модифицированный пакет Msixbundle, чтобы он работал в любой сборке Windows 11.
- Как удалить приложение Android из Windows 11?
Чтобы удалить приложение Android из Windows 11, откройте меню «Пуск» найдите приложение, которое хотите удалить. кликните приложение правой кнопкой мыши и выберите «Удалить».
В течение многих лет владельцам компьютеров на Windows приходилось использовать эмуляторы, если они хотели запускать Android-приложения. Теперь, когда вышла Windows 11, можно запросто делать это благодаря системной функции Windows Subsystem for Android (WSA), а также интеграции с магазином Amazon Appstore, который является единственным официальным источником APK-файлов для Windows. Несмотря на то, что существуют и другие способы загрузки Android-приложений в Windows 11, включая Google Play, все они требуют определённых манипуляций или внесения изменений в систему.
Внутренняя архитектура уровня подсистемы Windows для Android немного отличается от обычного Android-устройства. Например, здесь нет интерфейса bootloader / fastboot, через который можно прошивать разделы. Доступный пользователю режим восстановления также отсутствует, поэтому нет возможности заменить его кастомным Recovery, (например, TWRP) и устанавливать различные модификации. Поскольку Microsoft обновляет подсистему Windows для Android через свой магазин, было бы проще получить установочный пакет WSA и модифицировать его перед установкой. Вот тут на помощь приходит WSAPackagingTool.
WSAPackagingTool — это набор скриптов, которые упрощают процесс локального изменения WSA. Инструмент создан разработчиками форума XDA mlgmxyysd и XiaoMengXinX, он состоит из двух компонентов, позволяющих извлечь содержимое пакета MSIX WSA для модификации и создать новый установщик после внесения необходимых изменений.
Как использовать WSAPackagingTool
Для работы инструмента требуется PowerShell 6.0 или более поздняя версия, которую можно установить отсюда.
- Загрузите последний официальный установочный пакет WSA. Инструкцию можно найти на XDA.
- Загрузите последнюю версию WSAPackageTool.
- Откройте архив, извлеките его содержимое в папку (например, D:\WSAPackagingTool-master).
- Скопируйте пакет WSA MSIX (с расширением .msixbundle) в указанную выше папку.
- Перетащите файл msixbundle, чтобы начать распаковку. Можно использовать следующую команду: .\unpack.cmd <msixbundle>
- После успешной распаковки содержимое будет находиться во временной папке.
- При необходимости внесите изменения в распакованный вариант WSA. Например, можно применить скрипт WSA GApps к установщику подсистемы Windows для Android.
- После модификаций запустите файл repack.cmd, чтобы переупаковать WSA.
- Новый установщик будет помещён в папку out. Чтобы установить модифицированный пакет msixbundle нужно запустить install.cmd от имени администратора.
- Как Nokia проиграла в Android: рождение и мгновенная смерть Х-смартфонов
- Теперь не боюсь за Windows: точки восстановления создаются каждый день. Вот как это настроить
- 7 функций, которые сделают Windows 12 лучшей системой. Если Microsoft пойдёт на это
- Эта бесплатная утилита от Microsoft в разы ускоряет работу. Она существует ещё с Windows 95
- Антивор, история уведомлений и ещё 7 полезных функций Android, спрятанных глубоко в настройках
Windows Subsystem For Android v2309.40000.2.0: Windows 11 for ARM Processors

Builds Last Updated:
— 27/09/2023 11:00 GMT (Reason: Initial Release)
Information:
For anyone updating from a previous WSA Build, please backup your Userdata VHDX using this guide, in the case that the builds in this release do not work as intended (crashes, bugs or not working), so that you can revert to the old version if needs be.
Please rename the folder (after extraction) to a shorter name, for example WSA. This will help you avoid the potential issues that may occur during installation and after install.
Warning
Read the guide in full before installing. Ensure you meet the full requirements for an installation on Windows 11.
Note
If you’re updating WSA, merge the folders and replace the files for all items when asked
Follow these steps to install on Windows 11.
Note :
If you have the official WSA installed, you must completely uninstall it to use MagiskOnWSA
- Extract the .7z archive using 7-zip (recommended) and rename the extracted folder to
WSA - Delete the .7z archive (It is recommended to keep the .7z archive until WSA has been installed and is working properly)
- Move the newly extracted folder to a suitable location (Documents folder is a good choice), as you will need to keep the folder on your PC to use MagiskOnWSA
- Open the WSA folder and double-click Run.bat
Notice:
- As stated in the Requirements, You can only install WSA on a NTFS partition, not on an exFAT partition.
- You can NOT delete the WSA installation folder.
WhatAdd-AppxPackage -Register .\AppxManifest.xmldoes is to register an appx package with some existing unpackaged files,
so you need to keep them as long as you want to use WSA.
Check https://learn.microsoft.com/en-us/powershell/module/appx/add-appxpackage?view=windowsserver2022-ps for more details. - You need to register your WSA appx package before you can run WSA.
For WSABuilds and MagiskOnWSALocal users, you need to runRun.batin the extracted dir.
If the script fails, you can take the following steps for diagnosis (admin privilege required):- Open a PowerShell window and change working directory to your WSA directory.
- Run
Add-AppxPackage -ForceApplicationShutdown -ForceUpdateFromAnyVersion -Register .\AppxManifest.xmlin PowerShell.
This should fail with an ActivityID, which is a UUID required for the next step. - Run
Get-AppPackageLog -ActivityID <UUID>in PowerShell.
This should print the log of the failed operation. - Check the log for the reason of failure and fix it.
Changelog
- Microsoft’s Official Changelog
- Update from WSA
v2308.40000.3.0arm64 —->v2309.40000.2.0arm64 - WSA Android Version: Android 13
- MindTheGapps 13.0 arm64
- Magisk Canary
d4e552d0 (26301) - Magisk Stable
v26.3 - KernelSU
v0.6.8 - Amazon Appstore Removed
Difference Between Versions In This Release:
- WSA_XXXX.X0000.X.0_XXXX_Release-Nightly-MindTheGapps-XX.X-RemovedAmazon.7z
— Contains Google Play Store and Services
— No Amazon App Store
- WSA_XXXX.X0000.X.0_XXXX_Release-Nightly-MindTheGapps-XX.X.7z
— Contains Google Play Store and Services
— Contains Amazon App Store
- WSA_XXXX.X0000.X.0_XXXX_Release-Nightly-NoGApps-RemovedAmazon.7z
— No Amazon App Store
— No Google Play Store and Services
- WSA_XXXX.X0000.X.0_XXXX_Release-Nightly-NoGApps.7z
— Amazon App Store Included
— No Google Play Store and Services
- WSA_XXXX.X0000.X.0_XXXX_Release-Nightly-kernelsu-vX.X.X-MindTheGapps-XX.X-RemovedAmazon.7z
— No Amazon App Store
— Contains Google Play Store and Services
— Contains KernelSU (for Root Access)
- WSA_XXXX.X0000.X.0_XXXX_Release-Nightly-with-magisk-XX.X.XXXX.-stable-MindTheGapps-XX.X.7z
— Amazon App Store Included
— Contains Google Play Store and Services
— Contains Magisk Stable (for Root Access)
- WSA_XXXX.X0000.X.0_XXXX_Release-Nightly-with-magisk-XX.X.XXXX.-stable-NoGApps-RemovedAmazon.7z
— No Amazon App Store
— Contains Magisk Stable (for Root Access)
- WSA_XXXX.X0000.X.0_XXXX_Release-Nightly-magisk-XXXXX.XXXX.-canary-MindTheGapps-XX.X-RemovedAmazon.7z
— No Amazon App Store
— Contains Google Play Store and Services
— Contains Magisk Canary (for Root Access)
Additional Information
-
If the Magisk App does not appear after the installation of the WSA build with Magisk, download it from here and sideload it into WSA
-
For Builds with KernelSU, you will need to sideload the KernelSU Manager in order to use it. You can get this by going to the releases here, and scrolling down the list of assets, until you find it
Credits:
https://github.com/LSPosed/MagiskOnWSALocal
Windows Subsystem For Android v2309.40000.2.0: Windows 11 x64
Builds Last Updated:
— 27/09/2023 11:00 GMT (Reason: Initial Release)
Information:
For anyone updating from a previous WSA Build, please backup your Userdata VHDX using this guide, in the case that the builds in this release do not work as intended (crashes, bugs or not working), so that you can revert to the old version if needs be.
Please rename the folder (after extraction) to a shorter name, for example WSA. This will help you avoid the potential issues that may occur during installation and after install.
Warning
Read the guide in full before installing. Ensure you meet the full requirements for an installation on Windows 11.
Note
If you’re updating WSA, merge the folders and replace the files for all items when asked
Follow these steps to install on Windows 11.
Note :
If you have the official WSA installed, you must completely uninstall it to use MagiskOnWSA
- Extract the .7z archive using 7-zip (recommended) and rename the extracted folder to
WSA - Delete the .7z archive (It is recommended to keep the .7z archive until WSA has been installed and is working properly)
- Move the newly extracted folder to a suitable location (Documents folder is a good choice), as you will need to keep the folder on your PC to use MagiskOnWSA
- Open the WSA folder and double-click Run.bat
Notice:
- As stated in the Requirements, You can only install WSA on a NTFS partition, not on an exFAT partition.
- You can NOT delete the WSA installation folder.
WhatAdd-AppxPackage -Register .\AppxManifest.xmldoes is to register an appx package with some existing unpackaged files,
so you need to keep them as long as you want to use WSA.
Check https://learn.microsoft.com/en-us/powershell/module/appx/add-appxpackage?view=windowsserver2022-ps for more details. - You need to register your WSA appx package before you can run WSA.
For WSABuilds and MagiskOnWSALocal users, you need to runRun.batin the extracted dir.
If the script fails, you can take the following steps for diagnosis (admin privilege required):- Open a PowerShell window and change working directory to your WSA directory.
- Run
Add-AppxPackage -ForceApplicationShutdown -ForceUpdateFromAnyVersion -Register .\AppxManifest.xmlin PowerShell.
This should fail with an ActivityID, which is a UUID required for the next step. - Run
Get-AppPackageLog -ActivityID <UUID>in PowerShell.
This should print the log of the failed operation. - Check the log for the reason of failure and fix it.
Changelog
- Microsoft’s Official Changelog
- Update from WSA
v2308.40000.3.0x86_64 —>v2309.40000.2.0x86_64 - WSA Android Version: Android 13
- MindTheGapps 13.0 x86_64
- Magisk Canary
d4e552d0 (26301) - Magisk Stable
v26.3 - KernelSU
v0.6.8 - Amazon Appstore Removed
Difference Between Versions In This Release:
- WSA_XXXX.X0000.X.0_XXXX_Release-Nightly-MindTheGapps-XX.X-RemovedAmazon.7z
— Contains Google Play Store and Services
— No Amazon App Store
- WSA_XXXX.X0000.X.0_XXXX_Release-Nightly-MindTheGapps-XX.X.7z
— Contains Google Play Store and Services
— Contains Amazon App Store
- WSA_XXXX.X0000.X.0_XXXX_Release-Nightly-NoGApps-RemovedAmazon.7z
— No Amazon App Store
— No Google Play Store and Services
- WSA_XXXX.X0000.X.0_XXXX_Release-Nightly-NoGApps.7z
— Amazon App Store Included
— No Google Play Store and Services
- WSA_XXXX.X0000.X.0_XXXX_Release-Nightly-kernelsu-vX.X.X-MindTheGapps-XX.X-RemovedAmazon.7z
— No Amazon App Store
— Contains Google Play Store and Services
— Contains KernelSU (for Root Access)
- WSA_XXXX.X0000.X.0_XXXX_Release-Nightly-with-magisk-XX.X.XXXX.-stable-MindTheGapps-XX.X.7z
— Amazon App Store Included
— Contains Google Play Store and Services
— Contains Magisk Stable (for Root Access)
- WSA_XXXX.X0000.X.0_XXXX_Release-Nightly-with-magisk-XX.X.XXXX.-stable-NoGApps-RemovedAmazon.7z
— No Amazon App Store
— Contains Magisk Stable (for Root Access)
- WSA_XXXX.X0000.X.0_XXXX_Release-Nightly-magisk-XXXXX.XXXX.-canary-MindTheGapps-XX.X-RemovedAmazon.7z
— No Amazon App Store
— Contains Google Play Store and Services
— Contains Magisk Canary (for Root Access)
Additional Information
-
If the Magisk App does not appear after the installation of the WSA build with Magisk, download it from here and sideload it into WSA
-
For Builds with KernelSU, you will need to sideload the KernelSU Manager in order to use it. You can get this by going to the releases here, and scrolling down the list of assets, until you find it
Credits:
https://github.com/LSPosed/MagiskOnWSALocal
Windows Subsystem For Android v2309.40000.2.0: Windows 10 x64
Builds Last Updated:
— 27/09/2023 11:00 GMT (Reason: Initial Release)
Information:
For anyone updating from a previous WSA Build, please backup your Userdata VHDX using this guide, in the case that the builds in this release do not work as intended (crashes, bugs or not working), so that you can revert to the old version if needs be.
Please rename the folder (after extraction) to a shorter name, for example WSA. This will help you avoid the potential issues that may occur during installation and after install.
Warning
Read the guide in full before installing. Ensure you meet the full requirements for an installation on Windows 11.
Note
If you’re updating WSA, merge the folders and replace the files for all items when asked
Follow these steps to install on Windows 10.
Note :
If you have the official WSA installed, you must completely uninstall it to use MagiskOnWSA
- Extract the .7z archive using 7-zip (recommended) and rename the extracted folder to
WSA - Delete the .7z archive (It is recommended to keep the .7z archive until WSA has been installed and is working properly)
- Move the newly extracted folder to a suitable location (Documents folder is a good choice), as you will need to keep the folder on your PC to use MagiskOnWSA
- Open the WSA folder and double-click Run.bat
Notice:
- As stated in the Requirements, You can only install WSA on a NTFS partition, not on an exFAT partition.
- You can NOT delete the WSA installation folder.
WhatAdd-AppxPackage -Register .\AppxManifest.xmldoes is to register an appx package with some existing unpackaged files,
so you need to keep them as long as you want to use WSA.
Check https://learn.microsoft.com/en-us/powershell/module/appx/add-appxpackage?view=windowsserver2022-ps for more details. - You need to register your WSA appx package before you can run WSA.
For WSABuilds and MagiskOnWSALocal users, you need to runRun.batin the extracted dir.
If the script fails, you can take the following steps for diagnosis (admin privilege required):- Open a PowerShell window and change working directory to your WSA directory.
- Run
Add-AppxPackage -ForceApplicationShutdown -ForceUpdateFromAnyVersion -Register .\AppxManifest.xmlin PowerShell.
This should fail with an ActivityID, which is a UUID required for the next step. - Run
Get-AppPackageLog -ActivityID <UUID>in PowerShell.
This should print the log of the failed operation. - Check the log for the reason of failure and fix it.
Changelog
- Microsoft’s Official Changelog
- Windows 10 Patch Applied (Credit: Cinit)
- Update from WSA
v2308.40000.3.0x86_64 —>v2309.40000.2.0x86_64 - WSA Android Version: Android 13
- MindTheGapps 13.0 x86_64
- Magisk Canary
d4e552d0 (26301) - Magisk Stable
v26.3 - KernelSU
v0.6.8 - Amazon Appstore Removed
Difference Between Versions In This Release:
- WSA_XXXX.X0000.X.0_XXXX_Release-Nightly-MindTheGapps-XX.X-RemovedAmazon_Windows_10.7z
— Contains Google Play Store and Services
— No Amazon App Store
- WSA_XXXX.X0000.X.0_XXXX_Release-Nightly-MindTheGapps-XX.X_Windows_10.7z
— Contains Google Play Store and Services
— Contains Amazon App Store
- WSA_XXXX.X0000.X.0_XXXX_Release-Nightly-NoGApps-RemovedAmazon_Windows_10.7z
— No Amazon App Store
— No Google Play Store and Services
- WSA_XXXX.X0000.X.0_XXXX_Release-Nightly-NoGApps_Windows_10.7z
— Amazon App Store Included
— No Google Play Store and Services
- WSA_XXXX.X0000.X.0_XXXX_Release-Nightly-kernelsu-vX.X.X-MindTheGapps-XX.X-RemovedAmazon_Windows_10.7z
— No Amazon App Store
— Contains Google Play Store and Services
— Contains KernelSU (for Root Access)
- WSA_XXXX.X0000.X.0_XXXX_Release-Nightly-with-magisk-XX.X.XXXX.-stable-MindTheGapps-XX.X_Windows_10.7z
— Amazon App Store Included
— Contains Google Play Store and Services
— Contains Magisk Stable (for Root Access)
- WSA_XXXX.X0000.X.0_XXXX_Release-Nightly-with-magisk-XX.X.XXXX.-stable-NoGApps-RemovedAmazon_Windows_10.7z
— No Amazon App Store
— Contains Magisk Stable (for Root Access)
- WSA_XXXX.X0000.X.0_XXXX_Release-Nightly-magisk-XXXXX.XXXX.-canary-MindTheGapps-XX.X-RemovedAmazon_Windows_10.7z
— No Amazon App Store
— Contains Google Play Store and Services
— Contains Magisk Canary (for Root Access)
Additional Information
-
If the Magisk App does not appear after the installation of the WSA build with Magisk, download it from here and sideload it into WSA
-
For Builds with KernelSU, you will need to sideload the KernelSU Manager in order to use it. You can get this by going to the releases here, and scrolling down the list of assets, until you find it
Credits:
https://github.com/LSPosed/MagiskOnWSALocal
https://github.com/cinit/WSAPatch
Windows Subsystem For Android v2308.40000.3.0: Windows 11 for ARM Processors
Builds Last Updated:
— 19/09/2023 12:00 GMT (Reason: Initial Release)
Information:
For anyone updating from a previous WSA Build, please backup your Userdata VHDX using this guide, in the case that the builds in this release do not work as intended (crashes, bugs or not working), so that you can revert to the old version if needs be.
Please rename the folder (after extraction) to a shorter name, for example WSA. This will help you avoid the potential issues that may occur during installation and after install.
Warning
Read the guide in full before installing. Ensure you meet the full requirements for an installation on Windows 11.
Note
If you’re updating WSA, merge the folders and replace the files for all items when asked
Follow these steps to install on Windows 11.
Note :
If you have the official WSA installed, you must completely uninstall it to use MagiskOnWSA
- Extract the .7z archive using 7-zip (recommended) and rename the extracted folder to
WSA - Delete the .7z archive (It is recommended to keep the .7z archive until WSA has been installed and is working properly)
- Move the newly extracted folder to a suitable location (Documents folder is a good choice), as you will need to keep the folder on your PC to use MagiskOnWSA
- Open the WSA folder and double-click Run.bat
Notice:
- As stated in the Requirements, You can only install WSA on a NTFS partition, not on an exFAT partition.
- You can NOT delete the WSA installation folder.
WhatAdd-AppxPackage -Register .\AppxManifest.xmldoes is to register an appx package with some existing unpackaged files,
so you need to keep them as long as you want to use WSA.
Check https://learn.microsoft.com/en-us/powershell/module/appx/add-appxpackage?view=windowsserver2022-ps for more details. - You need to register your WSA appx package before you can run WSA.
For WSABuilds and MagiskOnWSALocal users, you need to runRun.batin the extracted dir.
If the script fails, you can take the following steps for diagnosis (admin privilege required):- Open a PowerShell window and change working directory to your WSA directory.
- Run
Add-AppxPackage -ForceApplicationShutdown -ForceUpdateFromAnyVersion -Register .\AppxManifest.xmlin PowerShell.
This should fail with an ActivityID, which is a UUID required for the next step. - Run
Get-AppPackageLog -ActivityID <UUID>in PowerShell.
This should print the log of the failed operation. - Check the log for the reason of failure and fix it.
Changelog
- Microsoft’s Official Changelog
- Update from WSA
v2308.40000.1.0arm64 —->v2308.40000.3.0arm64 - WSA Android Version: Android 13
- MindTheGapps 13.0 arm64
- Magisk Canary
0fe46c5a (26301)—>d4e552d0 (26301) - Magisk Stable
v26.3 - KernelSU
v0.6.7—>v0.6.8 - Amazon Appstore Removed
Difference Between Versions In This Release:
- WSA_XXXX.X0000.X.0_XXXX_Release-Nightly-MindTheGapps-XX.X-RemovedAmazon.7z
— Contains Google Play Store and Services
— No Amazon App Store
- WSA_XXXX.X0000.X.0_XXXX_Release-Nightly-MindTheGapps-XX.X.7z
— Contains Google Play Store and Services
— Contains Amazon App Store
- WSA_XXXX.X0000.X.0_XXXX_Release-Nightly-NoGApps-RemovedAmazon.7z
— No Amazon App Store
— No Google Play Store and Services
- WSA_XXXX.X0000.X.0_XXXX_Release-Nightly-NoGApps.7z
— Amazon App Store Included
— No Google Play Store and Services
- WSA_XXXX.X0000.X.0_XXXX_Release-Nightly-kernelsu-vX.X.X-MindTheGapps-XX.X-RemovedAmazon.7z
— No Amazon App Store
— Contains Google Play Store and Services
— Contains KernelSU (for Root Access)
- WSA_XXXX.X0000.X.0_XXXX_Release-Nightly-with-magisk-XX.X.XXXX.-stable-MindTheGapps-XX.X.7z
— Amazon App Store Included
— Contains Google Play Store and Services
— Contains Magisk Stable (for Root Access)
- WSA_XXXX.X0000.X.0_XXXX_Release-Nightly-with-magisk-XX.X.XXXX.-stable-NoGApps-RemovedAmazon.7z
— No Amazon App Store
— Contains Magisk Stable (for Root Access)
- WSA_XXXX.X0000.X.0_XXXX_Release-Nightly-magisk-XXXXX.XXXX.-canary-MindTheGapps-XX.X-RemovedAmazon.7z
— No Amazon App Store
— Contains Google Play Store and Services
— Contains Magisk Canary (for Root Access)
Additional Information
-
If the Magisk App does not appear after the installation of the WSA build with Magisk, download it from here and sideload it into WSA
-
For Builds with KernelSU, you will need to sideload the KernelSU Manager in order to use it. You can get this by going to the releases here, and scrolling down the list of assets, until you find it
Credits:
https://github.com/LSPosed/MagiskOnWSALocal
Windows Subsystem For Android v2308.40000.3.0: Windows 11 x64
Builds Last Updated:
— 19/09/2023 12:00 GMT (Reason: Initial Release)
Information:
For anyone updating from a previous WSA Build, please backup your Userdata VHDX using this guide, in the case that the builds in this release do not work as intended (crashes, bugs or not working), so that you can revert to the old version if needs be.
Please rename the folder (after extraction) to a shorter name, for example WSA. This will help you avoid the potential issues that may occur during installation and after install.
Warning
Read the guide in full before installing. Ensure you meet the full requirements for an installation on Windows 11.
Note
If you’re updating WSA, merge the folders and replace the files for all items when asked
Follow these steps to install on Windows 11.
Note :
If you have the official WSA installed, you must completely uninstall it to use MagiskOnWSA
- Extract the .7z archive using 7-zip (recommended) and rename the extracted folder to
WSA - Delete the .7z archive (It is recommended to keep the .7z archive until WSA has been installed and is working properly)
- Move the newly extracted folder to a suitable location (Documents folder is a good choice), as you will need to keep the folder on your PC to use MagiskOnWSA
- Open the WSA folder and double-click Run.bat
Notice:
- As stated in the Requirements, You can only install WSA on a NTFS partition, not on an exFAT partition.
- You can NOT delete the WSA installation folder.
WhatAdd-AppxPackage -Register .\AppxManifest.xmldoes is to register an appx package with some existing unpackaged files,
so you need to keep them as long as you want to use WSA.
Check https://learn.microsoft.com/en-us/powershell/module/appx/add-appxpackage?view=windowsserver2022-ps for more details. - You need to register your WSA appx package before you can run WSA.
For WSABuilds and MagiskOnWSALocal users, you need to runRun.batin the extracted dir.
If the script fails, you can take the following steps for diagnosis (admin privilege required):- Open a PowerShell window and change working directory to your WSA directory.
- Run
Add-AppxPackage -ForceApplicationShutdown -ForceUpdateFromAnyVersion -Register .\AppxManifest.xmlin PowerShell.
This should fail with an ActivityID, which is a UUID required for the next step. - Run
Get-AppPackageLog -ActivityID <UUID>in PowerShell.
This should print the log of the failed operation. - Check the log for the reason of failure and fix it.
Changelog
- Microsoft’s Official Changelog
- Update from WSA
v2308.40000.1.0x86_64 —>v2308.40000.3.0x86_64 - WSA Android Version: Android 13
- MindTheGapps 13.0 x86_64
- Magisk Canary
0fe46c5a (26301)—>d4e552d0 (26301) - Magisk Stable
v26.3 - KernelSU
v0.6.7—>v0.6.8 - Amazon Appstore Removed
Difference Between Versions In This Release:
- WSA_XXXX.X0000.X.0_XXXX_Release-Nightly-MindTheGapps-XX.X-RemovedAmazon.7z
— Contains Google Play Store and Services
— No Amazon App Store
- WSA_XXXX.X0000.X.0_XXXX_Release-Nightly-MindTheGapps-XX.X.7z
— Contains Google Play Store and Services
— Contains Amazon App Store
- WSA_XXXX.X0000.X.0_XXXX_Release-Nightly-NoGApps-RemovedAmazon.7z
— No Amazon App Store
— No Google Play Store and Services
- WSA_XXXX.X0000.X.0_XXXX_Release-Nightly-NoGApps.7z
— Amazon App Store Included
— No Google Play Store and Services
- WSA_XXXX.X0000.X.0_XXXX_Release-Nightly-kernelsu-vX.X.X-MindTheGapps-XX.X-RemovedAmazon.7z
— No Amazon App Store
— Contains Google Play Store and Services
— Contains KernelSU (for Root Access)
- WSA_XXXX.X0000.X.0_XXXX_Release-Nightly-with-magisk-XX.X.XXXX.-stable-MindTheGapps-XX.X.7z
— Amazon App Store Included
— Contains Google Play Store and Services
— Contains Magisk Stable (for Root Access)
- WSA_XXXX.X0000.X.0_XXXX_Release-Nightly-with-magisk-XX.X.XXXX.-stable-NoGApps-RemovedAmazon.7z
— No Amazon App Store
— Contains Magisk Stable (for Root Access)
- WSA_XXXX.X0000.X.0_XXXX_Release-Nightly-magisk-XXXXX.XXXX.-canary-MindTheGapps-XX.X-RemovedAmazon.7z
— No Amazon App Store
— Contains Google Play Store and Services
— Contains Magisk Canary (for Root Access)
Additional Information
-
If the Magisk App does not appear after the installation of the WSA build with Magisk, download it from here and sideload it into WSA
-
For Builds with KernelSU, you will need to sideload the KernelSU Manager in order to use it. You can get this by going to the releases here, and scrolling down the list of assets, until you find it
Credits:
https://github.com/LSPosed/MagiskOnWSALocal
Windows Subsystem For Android v2308.40000.3.0: Windows 10 x64
Builds Last Updated:
— 19/09/2023 12:00 GMT (Reason: Initial Release)
Information:
For anyone updating from a previous WSA Build, please backup your Userdata VHDX using this guide, in the case that the builds in this release do not work as intended (crashes, bugs or not working), so that you can revert to the old version if needs be.
Please rename the folder (after extraction) to a shorter name, for example WSA. This will help you avoid the potential issues that may occur during installation and after install.
Warning
Read the guide in full before installing. Ensure you meet the full requirements for an installation on Windows 11.
Note
If you’re updating WSA, merge the folders and replace the files for all items when asked
Follow these steps to install on Windows 10.
Note :
If you have the official WSA installed, you must completely uninstall it to use MagiskOnWSA
- Extract the .7z archive using 7-zip (recommended) and rename the extracted folder to
WSA - Delete the .7z archive (It is recommended to keep the .7z archive until WSA has been installed and is working properly)
- Move the newly extracted folder to a suitable location (Documents folder is a good choice), as you will need to keep the folder on your PC to use MagiskOnWSA
- Open the WSA folder and double-click Run.bat
Notice:
- As stated in the Requirements, You can only install WSA on a NTFS partition, not on an exFAT partition.
- You can NOT delete the WSA installation folder.
WhatAdd-AppxPackage -Register .\AppxManifest.xmldoes is to register an appx package with some existing unpackaged files,
so you need to keep them as long as you want to use WSA.
Check https://learn.microsoft.com/en-us/powershell/module/appx/add-appxpackage?view=windowsserver2022-ps for more details. - You need to register your WSA appx package before you can run WSA.
For WSABuilds and MagiskOnWSALocal users, you need to runRun.batin the extracted dir.
If the script fails, you can take the following steps for diagnosis (admin privilege required):- Open a PowerShell window and change working directory to your WSA directory.
- Run
Add-AppxPackage -ForceApplicationShutdown -ForceUpdateFromAnyVersion -Register .\AppxManifest.xmlin PowerShell.
This should fail with an ActivityID, which is a UUID required for the next step. - Run
Get-AppPackageLog -ActivityID <UUID>in PowerShell.
This should print the log of the failed operation. - Check the log for the reason of failure and fix it.
Changelog
- Microsoft’s Official Changelog
- Windows 10 Patch Applied (Credit: Cinit)
- Update from WSA
v2308.40000.1.0x86_64 —>v2308.40000.3.0x86_64 - WSA Android Version: Android 13
- MindTheGapps 13.0 x86_64
- Magisk Canary
0fe46c5a (26301)—>d4e552d0 (26301) - Magisk Stable
v26.3 - KernelSU
v0.6.7—>v0.6.8 - Amazon Appstore Removed
Difference Between Versions In This Release:
- WSA_XXXX.X0000.X.0_XXXX_Release-Nightly-MindTheGapps-XX.X-RemovedAmazon_Windows_10.7z
— Contains Google Play Store and Services
— No Amazon App Store
- WSA_XXXX.X0000.X.0_XXXX_Release-Nightly-MindTheGapps-XX.X_Windows_10.7z
— Contains Google Play Store and Services
— Contains Amazon App Store
- WSA_XXXX.X0000.X.0_XXXX_Release-Nightly-NoGApps-RemovedAmazon_Windows_10.7z
— No Amazon App Store
— No Google Play Store and Services
- WSA_XXXX.X0000.X.0_XXXX_Release-Nightly-NoGApps_Windows_10.7z
— Amazon App Store Included
— No Google Play Store and Services
- WSA_XXXX.X0000.X.0_XXXX_Release-Nightly-kernelsu-vX.X.X-MindTheGapps-XX.X-RemovedAmazon_Windows_10.7z
— No Amazon App Store
— Contains Google Play Store and Services
— Contains KernelSU (for Root Access)
- WSA_XXXX.X0000.X.0_XXXX_Release-Nightly-with-magisk-XX.X.XXXX.-stable-MindTheGapps-XX.X_Windows_10.7z
— Amazon App Store Included
— Contains Google Play Store and Services
— Contains Magisk Stable (for Root Access)
- WSA_XXXX.X0000.X.0_XXXX_Release-Nightly-with-magisk-XX.X.XXXX.-stable-NoGApps-RemovedAmazon_Windows_10.7z
— No Amazon App Store
— Contains Magisk Stable (for Root Access)
- WSA_XXXX.X0000.X.0_XXXX_Release-Nightly-magisk-XXXXX.XXXX.-canary-MindTheGapps-XX.X-RemovedAmazon_Windows_10.7z
— No Amazon App Store
— Contains Google Play Store and Services
— Contains Magisk Canary (for Root Access)
Additional Information
-
If the Magisk App does not appear after the installation of the WSA build with Magisk, download it from here and sideload it into WSA
-
For Builds with KernelSU, you will need to sideload the KernelSU Manager in order to use it. You can get this by going to the releases here, and scrolling down the list of assets, until you find it
Credits:
https://github.com/LSPosed/MagiskOnWSALocal
https://github.com/cinit/WSAPatch
Windows Subsystem For Android v2308.40000.1.0: Windows 11 for ARM Processors
Builds Last Updated:
— 08/09/2023 11:20 GMT (Reason: Initial Release)
Information:
For anyone updating from a previous WSA Build, please backup your Userdata VHDX using this guide, in the case that the builds in this release do not work as intended (crashes, bugs or not working), so that you can revert to the old version if needs be.
Please rename the folder (after extraction) to a shorter name, for example WSA. This will help you avoid the potential issues that may occur during installation and after install.
Warning
Read the guide in full before installing. Ensure you meet the full requirements for an installation on Windows 11.
Note
If you’re updating WSA, merge the folders and replace the files for all items when asked
Follow these steps to install on Windows 11.
Note :
If you have the official WSA installed, you must completely uninstall it to use MagiskOnWSA
- Extract the .7z archive using 7-zip (recommended) and rename the extracted folder to
WSA - Delete the .7z archive (It is recommended to keep the .7z archive until WSA has been installed and is working properly)
- Move the newly extracted folder to a suitable location (Documents folder is a good choice), as you will need to keep the folder on your PC to use MagiskOnWSA
- Open the WSA folder and double-click Run.bat
Notice:
- As stated in the Requirements, You can only install WSA on a NTFS partition, not on an exFAT partition.
- You can NOT delete the WSA installation folder.
WhatAdd-AppxPackage -Register .\AppxManifest.xmldoes is to register an appx package with some existing unpackaged files,
so you need to keep them as long as you want to use WSA.
Check https://learn.microsoft.com/en-us/powershell/module/appx/add-appxpackage?view=windowsserver2022-ps for more details. - You need to register your WSA appx package before you can run WSA.
For WSABuilds and MagiskOnWSALocal users, you need to runRun.batin the extracted dir.
If the script fails, you can take the following steps for diagnosis (admin privilege required):- Open a PowerShell window and change working directory to your WSA directory.
- Run
Add-AppxPackage -ForceApplicationShutdown -ForceUpdateFromAnyVersion -Register .\AppxManifest.xmlin PowerShell.
This should fail with an ActivityID, which is a UUID required for the next step. - Run
Get-AppPackageLog -ActivityID <UUID>in PowerShell.
This should print the log of the failed operation. - Check the log for the reason of failure and fix it.
Changelog
- Microsoft’s Official Changelog
- Update from WSA v2307.40000.6.0 arm64 —-> WSA v2308.40000.1.0 arm64
- WSA Android Version: Android 13
- MindTheGapps 13.0 arm64
- Magisk Canary de00f1d5 (26202) —-> Magisk Canary 0fe46c5a (26301)
- Magisk Stable v26.3
- KernelSU v0.6.7
- Amazon Appstore Removed
Difference Between Versions In This Release:
- WSA_XXXX.X0000.X.0_XXXX_Release-Nightly-MindTheGapps-XX.X-RemovedAmazon.7z
— Contains Google Play Store and Services
— No Amazon App Store
- WSA_XXXX.X0000.X.0_XXXX_Release-Nightly-MindTheGapps-XX.X.7z
— Contains Google Play Store and Services
— Contains Amazon App Store
- WSA_XXXX.X0000.X.0_XXXX_Release-Nightly-NoGApps-RemovedAmazon.7z
— No Amazon App Store
— No Google Play Store and Services
- WSA_XXXX.X0000.X.0_XXXX_Release-Nightly-NoGApps.7z
— Amazon App Store Included
— No Google Play Store and Services
- WSA_XXXX.X0000.X.0_XXXX_Release-Nightly-kernelsu-vX.X.X-MindTheGapps-XX.X-RemovedAmazon.7z
— No Amazon App Store
— Contains Google Play Store and Services
— Contains KernelSU (for Root Access)
- WSA_XXXX.X0000.X.0_XXXX_Release-Nightly-with-magisk-XX.X.XXXX.-stable-MindTheGapps-XX.X.7z
— Amazon App Store Included
— Contains Google Play Store and Services
— Contains Magisk Stable (for Root Access)
- WSA_XXXX.X0000.X.0_XXXX_Release-Nightly-with-magisk-XX.X.XXXX.-stable-NoGApps-RemovedAmazon.7z
— No Amazon App Store
— Contains Magisk Stable (for Root Access)
- WSA_XXXX.X0000.X.0_XXXX_Release-Nightly-magisk-XXXXX.XXXX.-canary-MindTheGapps-XX.X-RemovedAmazon.7z
— No Amazon App Store
— Contains Google Play Store and Services
— Contains Magisk Canary (for Root Access)
Additional Information
-
If the Magisk App does not appear after the installation of the WSA build with Magisk, download it from here and sideload it into WSA
-
For Builds with KernelSU, you will need to sideload the KernelSU Manager in order to use it. You can get this by going to the releases here, and scrolling down the list of assets, until you find it
Credits:
https://github.com/LSPosed/MagiskOnWSALocal
Windows Subsystem For Android v2308.40000.1.0: Windows 11 x64
Builds Last Updated:
— 08/09/2023 11:20 GMT (Reason: Initial Release)
Information:
For anyone updating from a previous WSA Build, please backup your Userdata VHDX using this guide, in the case that the builds in this release do not work as intended (crashes, bugs or not working), so that you can revert to the old version if needs be.
Please rename the folder (after extraction) to a shorter name, for example WSA. This will help you avoid the potential issues that may occur during installation and after install.
Warning
Read the guide in full before installing. Ensure you meet the full requirements for an installation on Windows 11.
Note
If you’re updating WSA, merge the folders and replace the files for all items when asked
Follow these steps to install on Windows 11.
Note :
If you have the official WSA installed, you must completely uninstall it to use MagiskOnWSA
- Extract the .7z archive using 7-zip (recommended) and rename the extracted folder to
WSA - Delete the .7z archive (It is recommended to keep the .7z archive until WSA has been installed and is working properly)
- Move the newly extracted folder to a suitable location (Documents folder is a good choice), as you will need to keep the folder on your PC to use MagiskOnWSA
- Open the WSA folder and double-click Run.bat
Notice:
- As stated in the Requirements, You can only install WSA on a NTFS partition, not on an exFAT partition.
- You can NOT delete the WSA installation folder.
WhatAdd-AppxPackage -Register .\AppxManifest.xmldoes is to register an appx package with some existing unpackaged files,
so you need to keep them as long as you want to use WSA.
Check https://learn.microsoft.com/en-us/powershell/module/appx/add-appxpackage?view=windowsserver2022-ps for more details. - You need to register your WSA appx package before you can run WSA.
For WSABuilds and MagiskOnWSALocal users, you need to runRun.batin the extracted dir.
If the script fails, you can take the following steps for diagnosis (admin privilege required):- Open a PowerShell window and change working directory to your WSA directory.
- Run
Add-AppxPackage -ForceApplicationShutdown -ForceUpdateFromAnyVersion -Register .\AppxManifest.xmlin PowerShell.
This should fail with an ActivityID, which is a UUID required for the next step. - Run
Get-AppPackageLog -ActivityID <UUID>in PowerShell.
This should print the log of the failed operation. - Check the log for the reason of failure and fix it.
Changelog
- Microsoft’s Official Changelog
- Update from WSA v2307.40000.6.0 x86_64 —-> WSA v2308.40000.1.0 x86_64
- WSA Android Version: Android 13
- MindTheGapps 13.0 x86_64
- Magisk Canary de00f1d5 (26202) —-> Magisk Canary 0fe46c5a (26301)
- Magisk Stable v26.3
- KernelSU v0.6.7
- Amazon Appstore Removed
Difference Between Versions In This Release:
- WSA_XXXX.X0000.X.0_XXXX_Release-Nightly-MindTheGapps-XX.X-RemovedAmazon.7z
— Contains Google Play Store and Services
— No Amazon App Store
- WSA_XXXX.X0000.X.0_XXXX_Release-Nightly-MindTheGapps-XX.X.7z
— Contains Google Play Store and Services
— Contains Amazon App Store
- WSA_XXXX.X0000.X.0_XXXX_Release-Nightly-NoGApps-RemovedAmazon.7z
— No Amazon App Store
— No Google Play Store and Services
- WSA_XXXX.X0000.X.0_XXXX_Release-Nightly-NoGApps.7z
— Amazon App Store Included
— No Google Play Store and Services
- WSA_XXXX.X0000.X.0_XXXX_Release-Nightly-kernelsu-vX.X.X-MindTheGapps-XX.X-RemovedAmazon.7z
— No Amazon App Store
— Contains Google Play Store and Services
— Contains KernelSU (for Root Access)
- WSA_XXXX.X0000.X.0_XXXX_Release-Nightly-with-magisk-XX.X.XXXX.-stable-MindTheGapps-XX.X.7z
— Amazon App Store Included
— Contains Google Play Store and Services
— Contains Magisk Stable (for Root Access)
- WSA_XXXX.X0000.X.0_XXXX_Release-Nightly-with-magisk-XX.X.XXXX.-stable-NoGApps-RemovedAmazon.7z
— No Amazon App Store
— Contains Magisk Stable (for Root Access)
- WSA_XXXX.X0000.X.0_XXXX_Release-Nightly-magisk-XXXXX.XXXX.-canary-MindTheGapps-XX.X-RemovedAmazon.7z
— No Amazon App Store
— Contains Google Play Store and Services
— Contains Magisk Canary (for Root Access)
Additional Information
-
If the Magisk App does not appear after the installation of the WSA build with Magisk, download it from here and sideload it into WSA
-
For Builds with KernelSU, you will need to sideload the KernelSU Manager in order to use it. You can get this by going to the releases here, and scrolling down the list of assets, until you find it
Credits:
https://github.com/LSPosed/MagiskOnWSALocal
Windows Subsystem For Android v2308.40000.1.0: Windows 10 x64
Builds Last Updated:
— 08/09/2023 11:20 GMT (Reason: Initial Release)
Information:
For anyone updating from a previous WSA Build, please backup your Userdata VHDX using this guide, in the case that the builds in this release do not work as intended (crashes, bugs or not working), so that you can revert to the old version if needs be.
Please rename the folder (after extraction) to a shorter name, for example WSA. This will help you avoid the potential issues that may occur during installation and after install.
Warning
Read the guide in full before installing. Ensure you meet the full requirements for an installation on Windows 11.
Note
If you’re updating WSA, merge the folders and replace the files for all items when asked
Follow these steps to install on Windows 11.
Note :
If you have the official WSA installed, you must completely uninstall it to use MagiskOnWSA
- Extract the .7z archive using 7-zip (recommended) and rename the extracted folder to
WSA - Delete the .7z archive (It is recommended to keep the .7z archive until WSA has been installed and is working properly)
- Move the newly extracted folder to a suitable location (Documents folder is a good choice), as you will need to keep the folder on your PC to use MagiskOnWSA
- Open the WSA folder and double-click Run.bat
Notice:
- As stated in the Requirements, You can only install WSA on a NTFS partition, not on an exFAT partition.
- You can NOT delete the WSA installation folder.
WhatAdd-AppxPackage -Register .\AppxManifest.xmldoes is to register an appx package with some existing unpackaged files,
so you need to keep them as long as you want to use WSA.
Check https://learn.microsoft.com/en-us/powershell/module/appx/add-appxpackage?view=windowsserver2022-ps for more details. - You need to register your WSA appx package before you can run WSA.
For WSABuilds and MagiskOnWSALocal users, you need to runRun.batin the extracted dir.
If the script fails, you can take the following steps for diagnosis (admin privilege required):- Open a PowerShell window and change working directory to your WSA directory.
- Run
Add-AppxPackage -ForceApplicationShutdown -ForceUpdateFromAnyVersion -Register .\AppxManifest.xmlin PowerShell.
This should fail with an ActivityID, which is a UUID required for the next step. - Run
Get-AppPackageLog -ActivityID <UUID>in PowerShell.
This should print the log of the failed operation. - Check the log for the reason of failure and fix it.
Changelog
- Microsoft’s Official Changelog
- Windows 10 Patch Applied (Credit: Cinit)
- Update from WSA v2307.40000.6.0 x86_64 —-> WSA v2308.40000.1.0 x86_64
- WSA Android Version: Android 13
- MindTheGapps 13.0 x86_64
- Magisk Canary de00f1d5 (26202) —-> Magisk Canary 0fe46c5a (26301)
- Magisk Stable v26.3
- KernelSU v0.6.7
- Amazon Appstore Removed
Difference Between Versions In This Release:
- WSA_XXXX.X0000.X.0_XXXX_Release-Nightly-MindTheGapps-XX.X-RemovedAmazon_Windows_10.7z
— Contains Google Play Store and Services
— No Amazon App Store
- WSA_XXXX.X0000.X.0_XXXX_Release-Nightly-MindTheGapps-XX.X_Windows_10.7z
— Contains Google Play Store and Services
— Contains Amazon App Store
- WSA_XXXX.X0000.X.0_XXXX_Release-Nightly-NoGApps-RemovedAmazon_Windows_10.7z
— No Amazon App Store
— No Google Play Store and Services
- WSA_XXXX.X0000.X.0_XXXX_Release-Nightly-NoGApps_Windows_10.7z
— Amazon App Store Included
— No Google Play Store and Services
- WSA_XXXX.X0000.X.0_XXXX_Release-Nightly-kernelsu-vX.X.X-MindTheGapps-XX.X-RemovedAmazon_Windows_10.7z
— No Amazon App Store
— Contains Google Play Store and Services
— Contains KernelSU (for Root Access)
- WSA_XXXX.X0000.X.0_XXXX_Release-Nightly-with-magisk-XX.X.XXXX.-stable-MindTheGapps-XX.X_Windows_10.7z
— Amazon App Store Included
— Contains Google Play Store and Services
— Contains Magisk Stable (for Root Access)
- WSA_XXXX.X0000.X.0_XXXX_Release-Nightly-with-magisk-XX.X.XXXX.-stable-NoGApps-RemovedAmazon_Windows_10.7z
— No Amazon App Store
— Contains Magisk Stable (for Root Access)
- WSA_XXXX.X0000.X.0_XXXX_Release-Nightly-magisk-XXXXX.XXXX.-canary-MindTheGapps-XX.X-RemovedAmazon_Windows_10.7z
— No Amazon App Store
— Contains Google Play Store and Services
— Contains Magisk Canary (for Root Access)
Additional Information
-
If the Magisk App does not appear after the installation of the WSA build with Magisk, download it from here and sideload it into WSA
-
For Builds with KernelSU, you will need to sideload the KernelSU Manager in order to use it. You can get this by going to the releases here, and scrolling down the list of assets, until you find it
Credits:
https://github.com/LSPosed/MagiskOnWSALocal
https://github.com/cinit/WSAPatch
Windows Subsystem For Android v2307.40000.6.0: Windows 11 for ARM Processors
Builds Last Updated:
— 31/08/2023 23:30 GMT (Reason: Initial Release)
Information:
For anyone updating from a previous WSA Build, please backup your Userdata VHDX using this guide, in the case that the builds in this release do not work as intended (crashes, bugs or not working), so that you can revert to the old version if needs be.
Please rename the folder (after extraction) to a shorter name, for example WSA. This will help you avoid the potential issues that may occur during installation and after install.
Warning
Read the guide in full before installing. Ensure you meet the full requirements for an installation on Windows 11.
Note
If you’re updating WSA, merge the folders and replace the files for all items when asked
Follow these steps to install on Windows 11.
Note :
If you have the official WSA installed, you must completely uninstall it to use MagiskOnWSA
- Extract the .7z archive using 7-zip (recommended) and rename the extracted folder to
WSA - Delete the .7z archive (It is recommended to keep the .7z archive until WSA has been installed and is working properly)
- Move the newly extracted folder to a suitable location (Documents folder is a good choice), as you will need to keep the folder on your PC to use MagiskOnWSA
- Open the WSA folder and double-click Run.bat
Notice:
- As stated in the Requirements, You can only install WSA on a NTFS partition, not on an exFAT partition.
- You can NOT delete the WSA installation folder.
WhatAdd-AppxPackage -Register .\AppxManifest.xmldoes is to register an appx package with some existing unpackaged files,
so you need to keep them as long as you want to use WSA.
Check https://learn.microsoft.com/en-us/powershell/module/appx/add-appxpackage?view=windowsserver2022-ps for more details. - You need to register your WSA appx package before you can run WSA.
For WSABuilds and MagiskOnWSALocal users, you need to runRun.batin the extracted dir.
If the script fails, you can take the following steps for diagnosis (admin privilege required):- Open a PowerShell window and change working directory to your WSA directory.
- Run
Add-AppxPackage -ForceApplicationShutdown -ForceUpdateFromAnyVersion -Register .\AppxManifest.xmlin PowerShell.
This should fail with an ActivityID, which is a UUID required for the next step. - Run
Get-AppPackageLog -ActivityID <UUID>in PowerShell.
This should print the log of the failed operation. - Check the log for the reason of failure and fix it.
Changelog
- Microsoft’s Official Changelog: No Changelog at the time of this release. I will update this release, if one is made available.
- Update from WSA v2307.40000.5.0 arm64 —-> WSA v2307.40000.6.0 arm64
- Adding
VPNDialogsback into the releases - Added Post-installation pages for builds
- Shorten name of folder inside .7z builds to avoid issues during and after install
- WSA Android Version: Android 13
- MindTheGapps 13.0 arm64)
- Magisk Canary de00f1d5 (26202)
- KernelSU v0.6.7
- Amazon Appstore Removed
Difference Between Versions In This Release:
- WSA_XXXX.X0000.X.0_XXXX_Release-Nightly-MindTheGapps-XX.X-RemovedAmazon.7z
— Contains Google Play Store and Services only
— No Amazon App Store
- WSA_XXXX.X0000.X.0_XXXX_Release-Nightly-MindTheGapps-XX.X.7z
— Contains Google Play Store and Services
— Contains Amazon App Store
- WSA_XXXX.X0000.X.0_XXXX_Release-Nightly-NoGApps-RemovedAmazon.7z
— Base Window Subsystem for Android
— No Amazon App Store
- WSA_XXXX.X0000.X.0_XXXX_Release-Nightly-NoGApps.7z
— Base Window Subsystem for Android
— Amazon App Store Included
- WSA_XXXX.X0000.X.0_XXXX_Release-Nightly-magisk-XXXXX.XXXX.-canary-MindTheGapps-XX.X-RemovedAmazon.7z
— No Amazon App Store
— Contains Google Play Store and Services
and
— Contains Magisk (for Root Access)
- WSA_XXXX.X0000.X.0_XXXX_Release-Nightly-kernelsu-vX.X.X-MindTheGapps-XX.X-RemovedAmazon.7z
— No Amazon App Store
— Contains Google Play Store and Services
and
— Contains KernelSU (for Root Access)
Additional Information
-
If the Magisk App does not appear after the installation of the WSA build with Magisk, download it from here and sideload it into WSA
-
For Builds with KernelSU, you will need to sideload the KernelSU Manager in order to use it. You can get this by going to the releases here, and scrolling down the list of assets, until you find it
Credits:
https://github.com/LSPosed/MagiskOnWSALocal
Несколько дней назад Microsoft начала тестирование подсистемы Windows Subsystem for Android (WSA), которая позволяет запускать Android-приложения в Windows 11.
Сейчас функция доступна только участникам программы Windows Insider на канале Beta, что несколько удивительно, так как обычно все новшества вначале появляются на канале Dev. Но даже если вы используете канал Beta, то для установки подсистемы из Microsoft Store потребуется сменить регион на США в самой Windows 11.
Microsoft обещает, что инсайдеры на канале Dev также вскоре получат доступ к Windows Subsystem for Android, но какие-либо конкретные сроки не называются. Если вы не хотите ждать, то можете установить подсистему вручную. Для этого вам потребуются прямые руки и небольшие навыки работы в PowerShell.
Важно! Все действия вы делаете на свой страх и риск.
Благодарим aleks242007 и участников чата Community в Telegram за помощь в составлении инструкции.
Инструкция
Установка Windows Subsystem for Android
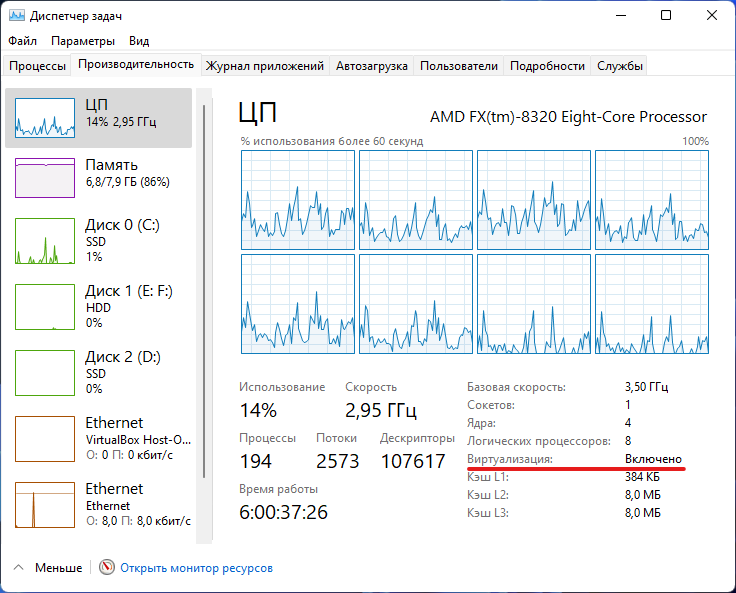
- Для начала убедитесь, что ваш компьютер поддерживает виртуализацию. Для этого откройте «Диспетчер задач», перейдите на вкладку «Производительность», выберите CPU и посмотрите текст под графиком. Там должно было указано: «Виртуализация: Включено».

- Если виртуализация отключена, то вам необходимо включить её в BIOS. У разных производителей настройка может располагаться в разных разделах и называться по-разному, так что можно поискать информацию в Google для вашего конкретного устройства.
- Если в BIOS настройка отсутствует или значение в «Диспетчере задач» не меняется, то вы вряд ли сможете запустить Windows Subsystem for Android на своём компьютере.
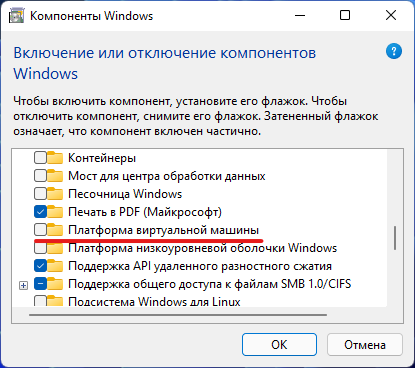
- Следом откройте меню «Пуск», введите в поле поиска «Включение или отключение компонентов Windows» и выберите соответствующий результат.
- В открывшемся окне установите галочку напротив пункта «Платформа виртуальной машины», нажмите «ОК», дождитесь применения изменений и перезагрузите ПК.
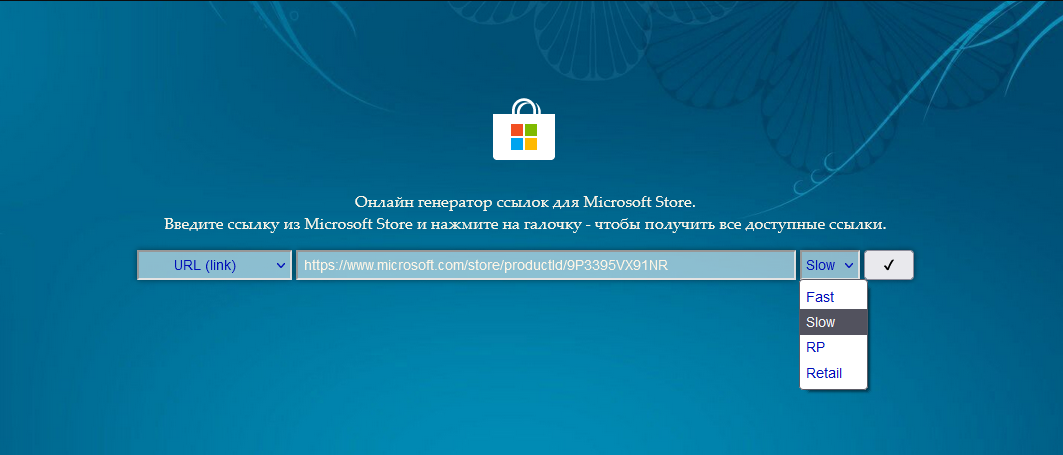
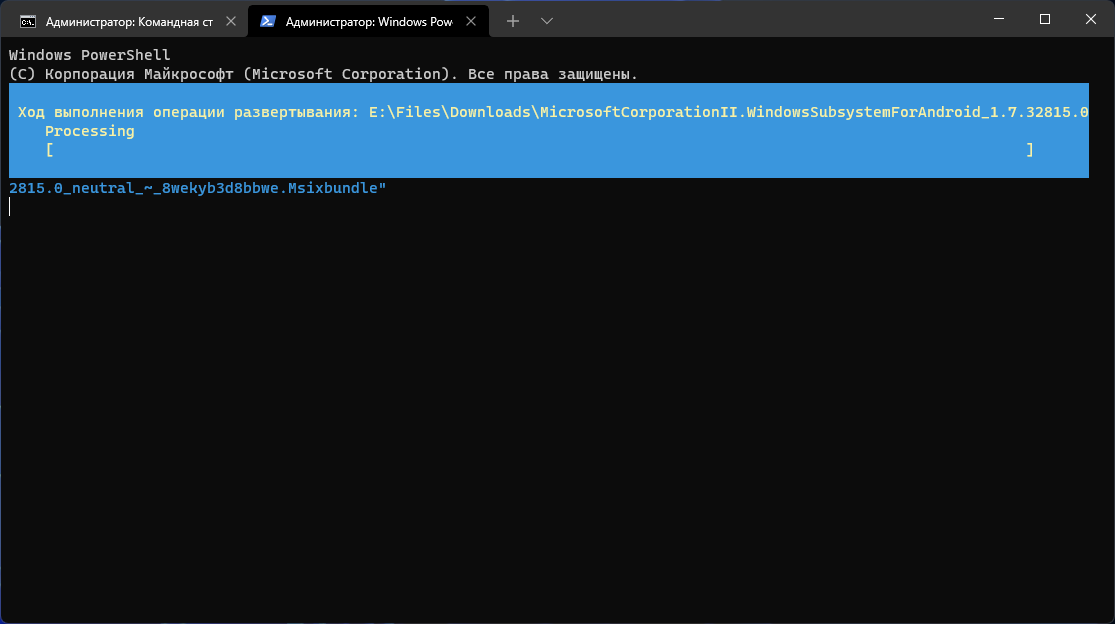
- Далее нам потребуется скачать установщик Windows Subsystem for Android в формате MSIXBUNDLE с сервера Microsoft Store:
- Перейдите на сайт Microsoft Store — Generation Project (от rgadguard) по этой ссылке.
- В поле на сайте вставьте следующую ссылку:
https://www.microsoft.com/store/productId/9P3395VX91NR - Справа от поля в выпадающем меню выберите Slow и нажмите на галочку.
- В появившемся списке найдите файл с примерно таким названием (номер версии может отличаться):
MicrosoftCorporationII.WindowsSubsystemForAndroid_1.7.32815.0_neutral_~_8wekyb3d8bbwe.msixbundle - Нажмите на название этого файла и сохраните файл в любой папке на вашем компьютере. Обратите внимание, что файл должен быть в формате .MSIXBUNDLE. Если это не так, то просто смените расширение файла на нужное. Файл должен весить примерно 1,2 ГБ.
- Запустите PowerShell или Windows Terminal (нужна вкладка с PowerShell) от имени администратора.
- Введите в консоль следующую команду:
Add-AppxPackage -Path "C:\Users\user1\Desktop\MyApp.msix"- «C:\Users\user1\Desktop\MyApp.msix» — путь к файлу MSIXBUNDLE, сохранённому на шаге 4. Чтобы быстро его получить, вы можете нажать правой кнопкой мыши по файлу в «Проводнике» и выбрать пункт «Копировать как путь».
- Решение ошибки:
Add-AppxPackage: The ‘Add-AppxPackage’ command was found in the module ‘Appx’, but the module could not be loaded. For more information, run ‘Import-Module Appx’.
Если вы увидели такое сообщение в PowerShell, то введите следующую команду:
Import-Module Appx -UseWindowsPowerShellПосле этого вновь введите команду Add-AppxPackage из шага 6.
- Нажмите Enter и дождитесь завершения установки.
- Если всё прошло успешно, то в меню «Пуск» появится приложение под названием Windows Subsystem for Android.
Установка APK-файлов
Теперь подсистема Windows Subsystem for Android работает, однако с установкой приложений есть некоторые сложности. Как вы уже знаете, вместо Google Play здесь используется Amazon Appstore. Причём отображаются там лишь приложения, которые Microsoft и Amazon протестировали на работоспособность в подсистеме.
Правда воспользоваться Amazon Appstore всё равно не получится. Приложение не только требует учётную запись Amazon, но и проверяет ваше местоположение. Можно, конечно, подключить VPN, но есть ли в этом смысл?
К счастью, Windows Subsystem for Android поддерживает установку приложений с помощью APK-файлов. Вы можете воспользоваться либо утилитой WSATools, о которой мы рассказали в статье по этой ссылке, либо устанавливать вручную с помощью командной строки по инструкции ниже.
- Скачайте SDK Platform Tools для Windows с сайта Android, перейдя по этой ссылке.
- Извлеките папку
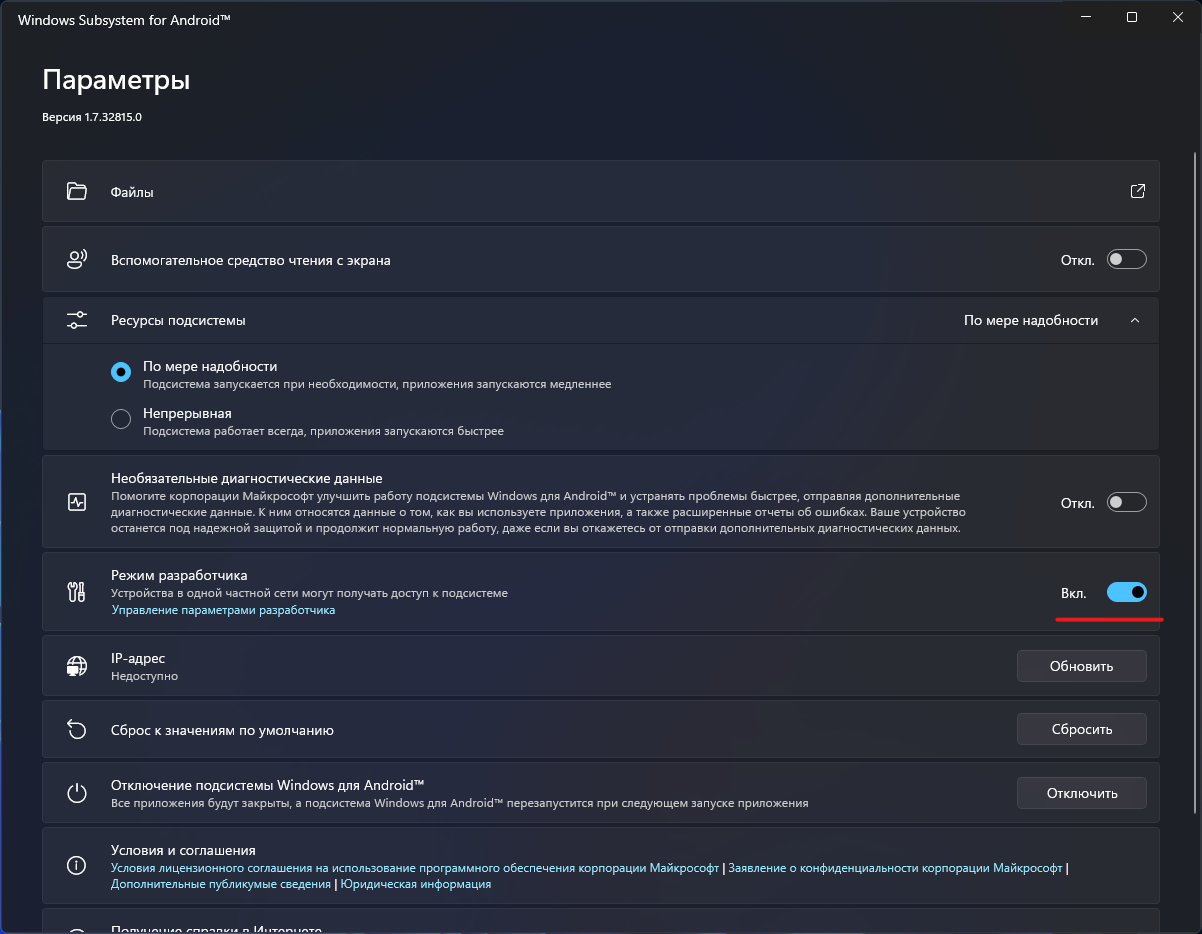
platform-tools, например, в корень диска C (рядом с папками Windows, Program Files и т. д.) - Откройте приложение Windows Subsystem for Android и включите «Режим разработчика».
- Нажмите на кнопку рядом с элементом «Файлы». Начнётся запуск подсистемы Windows Subsystem for Android.
- Нажмите на кнопку «Обновить» рядом с элементом «IP-адрес».
- В описании для элемента «Режим разработчика» появится IP-адрес, который мы будем использовать для подключения к подсистеме с помощью ADB.
- Откройте командную строку (или Windows Terminal) и перейдите в папку с установленным SDK Platform Tools, подставив нужный путь к папке:
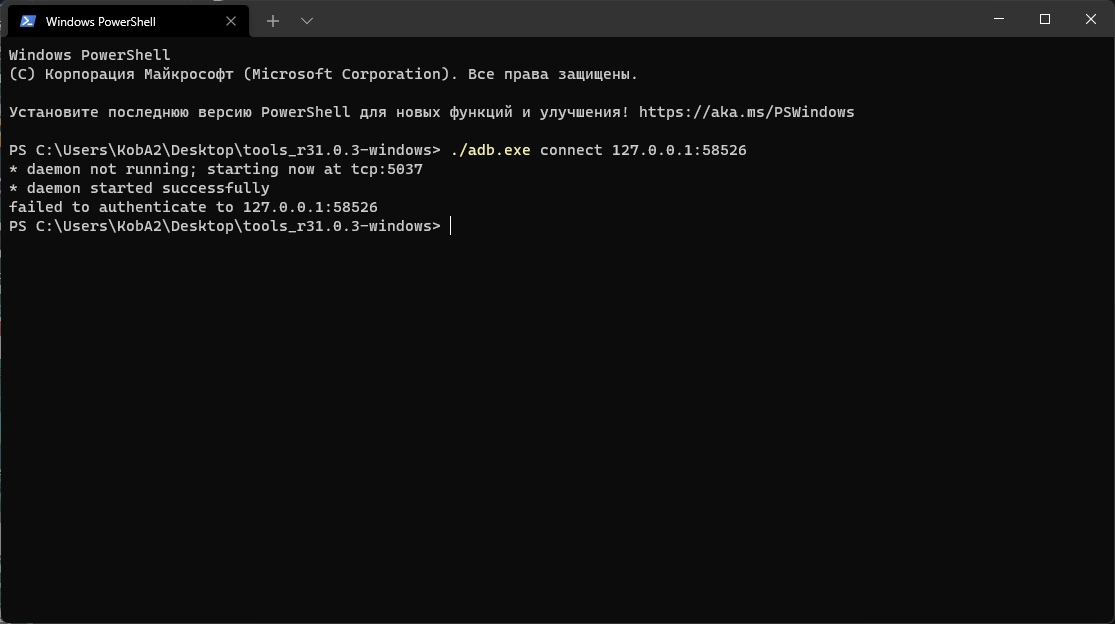
cd C:\platform-tools - Введите следующую команду, подставив в неё IP-адрес из предыдущего пункта:
adb.exe connect 127.0.0.1:58526Примечание. Если выполнять команды через PowerShell, то перед ADB следует прописать ./
- Убедитесь, что результат в командной строке примерно такой, как на скриншоте ниже:
- Скачайте APK-файл нужного Android-приложения, например, воспользовавшись сервисом APKMirror.
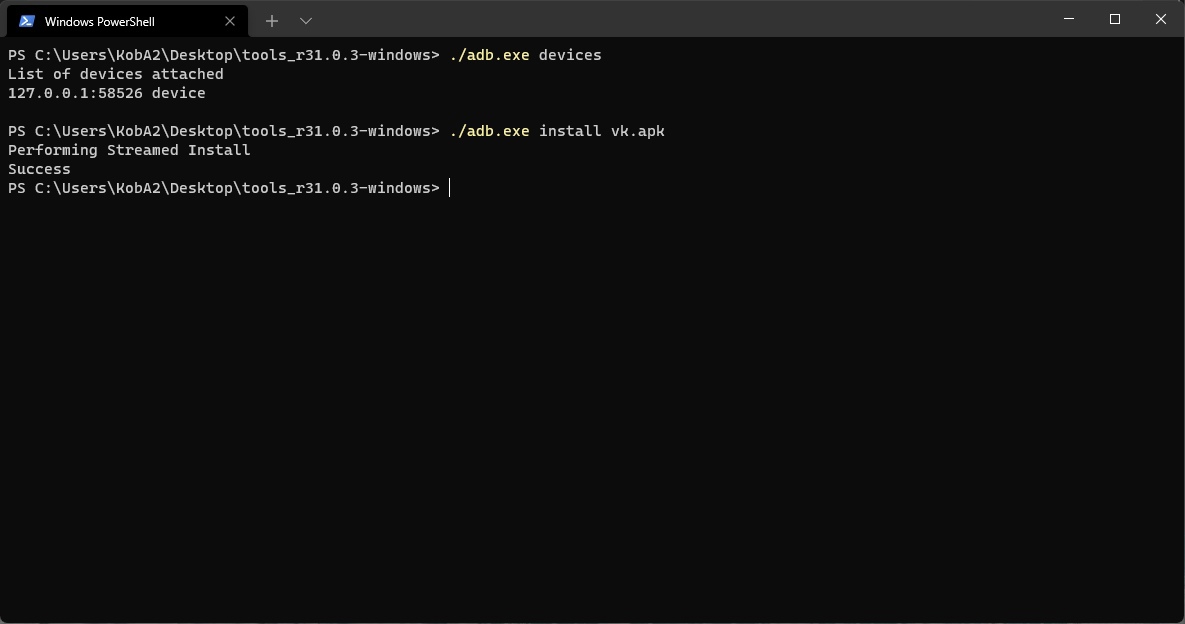
- В командной строке выполните следующую команду, подставив в неё путь к скачанному APK-файлу:
adb.exe install edge.apkЧтобы быстро скопировать путь к файлу, нажмите по нему правой кнопкой мыши и выберите «Копировать как путь». Затем вставьте его после adb.exe install и нажмите Enter.
- Дождитесь надписи «Success» в командной строке.
- Если всё прошло успешно, то ярлык установленного приложения должен появиться в меню «Пуск». Установленные приложения запускаются так же, как и приложения для Windows, то есть простым нажатием по иконке в меню «Пуск».
Поделиться впечатлениями о работе Windows Subsystem for Android и обсудить сценарии её использования вы можете в нашем чате в Telegram. Там же можете задавать вопросы, если возникли какие-либо сложности с установкой подсистемы или Android-приложений.
Поскольку далеко не все Android-приложения корректно работают в подсистеме, пользователи решили составить таблицу с информацией о работоспособности приложений в WSA. Найти и внести свой вклад вы можете на GitHub.
UPD: Возможна установка и на Release билды Windows 11. Регион не имеет значения. Спасибо за проверку @De Lancre
Вторая часть статьи:
Вчера (20.10.2021) Microsoft официально выпустила Windows Subsystem for Android, который позволил пользователям Windows 11 устанавливать приложения из Amazon Appstore (на самом деле, можно устанавливать совершенно любые Android-приложения, но про это уже в другой статье).
Однако, нововведение получили только участники канала Beta обновлений, то есть канал Dev, который по логике должен был получить его уже давно, остался на данный момент ни с чем.
UPD: Способ работает и на стабильных (Release) версиях Windows 11.
Данное недоразумение достаточно легко решить и вот шаги, которые помогут вам достичь цели:
Скачиваем .msixbundle (установщик)
Из Microsoft Store нам напрямую никак не удастся получить его, так что нужно прибегнуть к некоторой хитрости — мы скачаем этот пакет прямой ссылкой, без всяких магазинов.
Если браузер будет выдавать ошибку при открытии ссылки, то удостоверьтесь, что он не использует Always HTTPS.
Зеркало:
Устанавливаем его
Казалось бы, что только и нужно нажать и оно спокойно установится, но нет. Установщик пакетов выдаст ошибку.
Поэтому мы должны использовать консоль Powershell. Её надо запустить от имени администратора и ввести следующую команду:
add-appxpackage <путь до .msixbundle пакета>
Теперь всё устанавливается и нам остаётся подождать пару минут.
И вот мы попадаем в заветное меню
Для доступа к файловой системе Android необходимо нажать на кнопку Files.
…но тут приключения не заканчиваются
Хотели мы уже наконец во всю начать пользоваться новыми возможностями, но вот незадача — ошибочка появляется…
Собственно, для соответствия требованиям, показанным в ошибке, нам потребуется:
1) Включить Virtual Machine Platform в optionalfeatures (можно вбить в поиск по приложениям и оно покажет нужный пункт)
2) Включить виртуализацию в BIOS вашей материнской платы.
Тут общего решения нет — материнки у всех разные, так что из решений только могу предложить гугление того, где находится виртуализация конкретно у вас.
И вот теперь уже всё точно работает!
«Откуда взять Amazon Appstore?»
Amazon Appstore автоматически появится в системе как только вы впервые успешно запустите субсистему (без ошибки о выключенной виртуализации, которая была разобрана выше).
Удалить его будет нельзя, ибо он утащит за собой субсистему заодно, о чём предупредит перед удалением.
Как вы уже могли понять по снимку экрана выше, на WSfA можно поставить свои приложения. Использовать их получается без лишних зависаний (!), но с некоторыми ограничениями (одно из главных — доступ к файловой системе у них фактически полностью обрезан).
Про установку различных приложений, встреченные проблемы и даже неожиданные открытия следующая статья: