Modern Setup Host is a key component in Windows Update
by Matthew Adams
Matthew is a freelancer who has produced a variety of articles on various topics related to technology. His main focus is the Windows OS and all the things… read more
Updated on
- Updating your PC to Windows 10 is mandatory, so no Modern Setup Host error is accepted.
- When this happens, ensure the hard drive storage space isn’t an issue or adjust the Windows language settings.
- You can bypass all Windows Update errors when knowing the quickest fixes to apply.
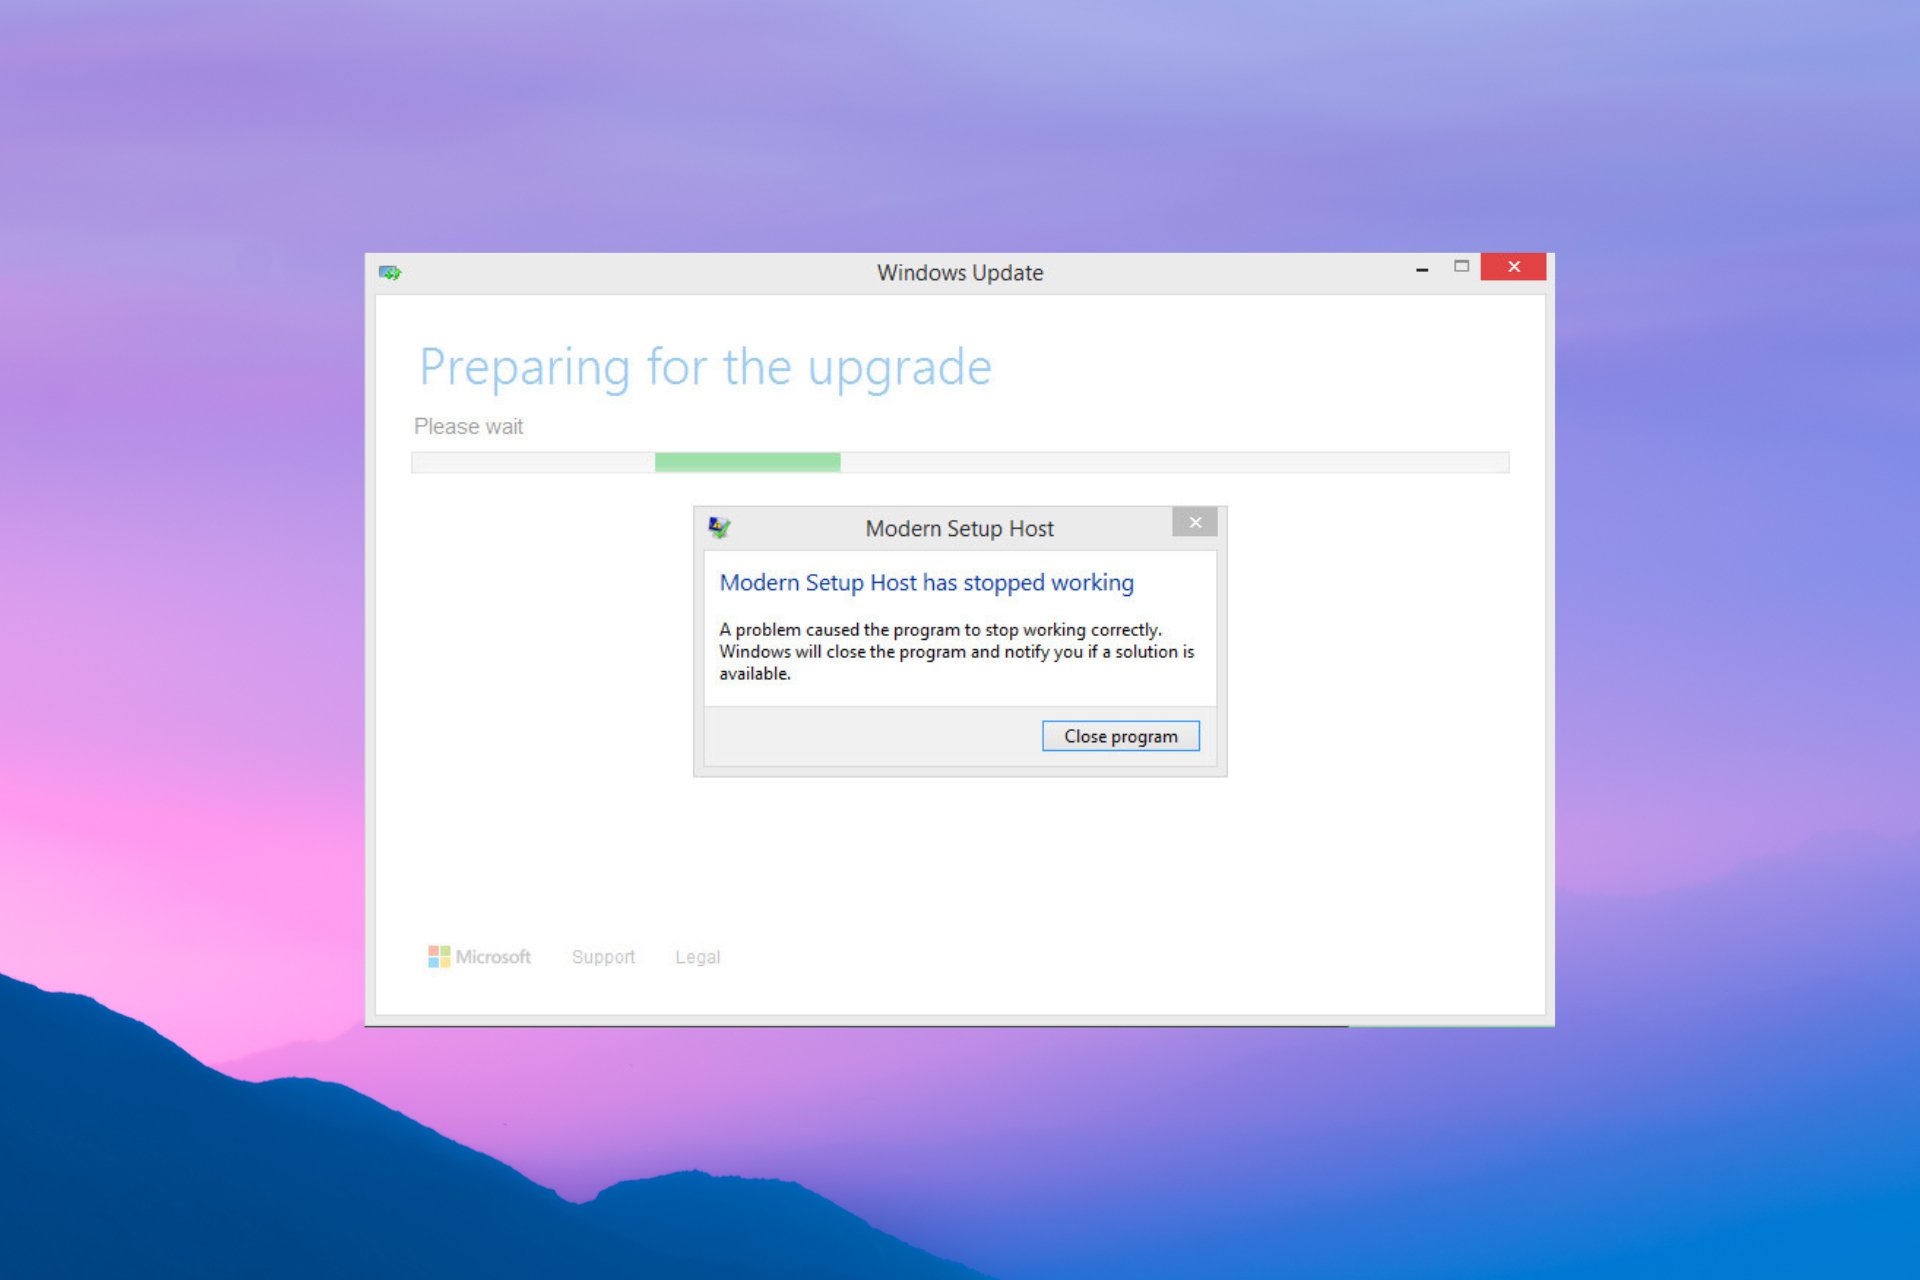
The Modern Setup Host is an important Windows 10 update component, but some users are complaining that it stopped working on their PCs for some reason. Unfortunately, this error usually happens when upgrading to Windows 10 or updating the OS.
Consequently, users are unable to perform the upgrade. If you are also dealing with this issue, the solutions in this guide should help you restore normalcy and push the upgrade through.
What does Modern Setup Host has stopped working mean?
Modern Setup has stopped working, meaning a program might interfere with your Windows 10 update. Below are some of the causes of the issue:
- Corrupt system files: Sometimes, faulty or broken system files can cause the Modern Setup Host has stopped working during a Windows 10 update. You can fix this by restoring these files.
- Interference from third-party apps: Sometimes, a third-party app or process running a counter-program can lead to this issue. Performing a clean boot and probably uninstalling the app should fix this.
- Issues with Windows update components: Another potential cause of this problem is the glitches with some update components. The solution to this is to restart these components.
How can I fix the Modern Setup Host error on Windows 10?
1. Free up some hard drive storage space
First, ensure there’s enough hard drive system partition space to upgrade to Windows 10. Users will need at least 15 GB of free HDD storage to upgrade to Windows 10 with the Media Creation Toolkit.
The best way to free up storage space is to uninstall superfluous software. Check out our guide on how to free up hard drive storage.
How we test, review and rate?
We have worked for the past 6 months on building a new review system on how we produce content. Using it, we have subsequently redone most of our articles to provide actual hands-on expertise on the guides we made.
For more details you can read how we test, review, and rate at WindowsReport.
2. Clean Boot Windows
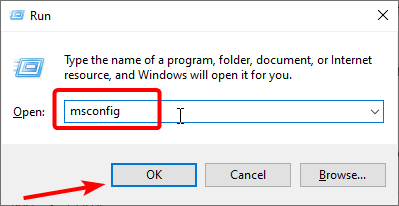
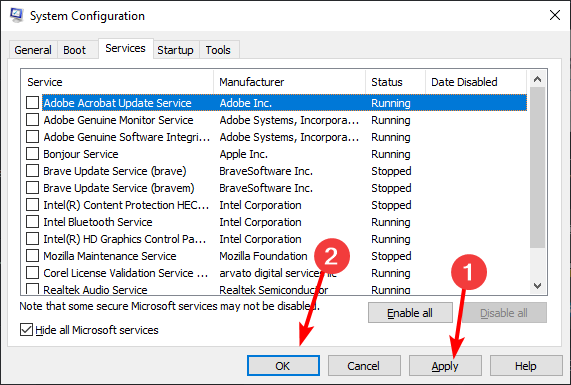
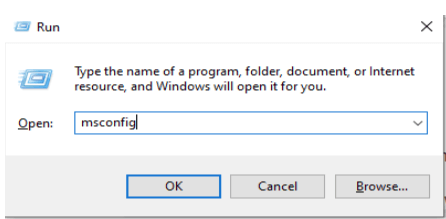
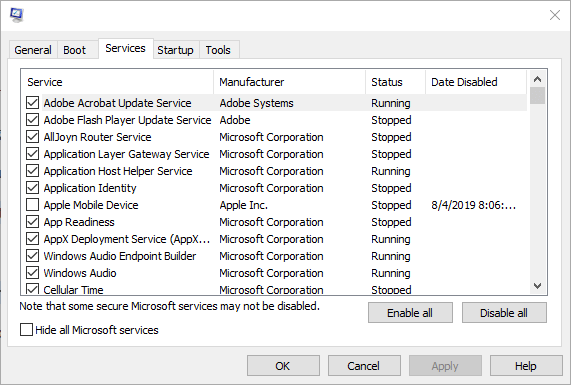
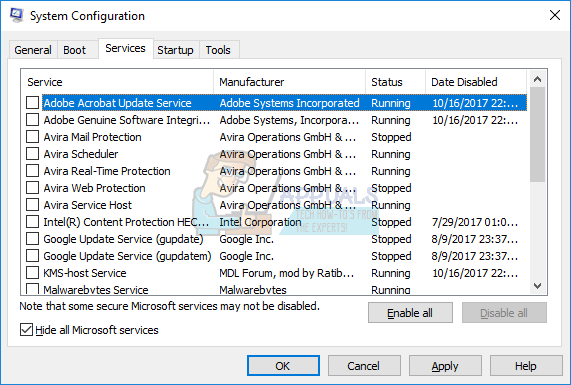
- Press the Windows key + R, type msconfig, and click OK.

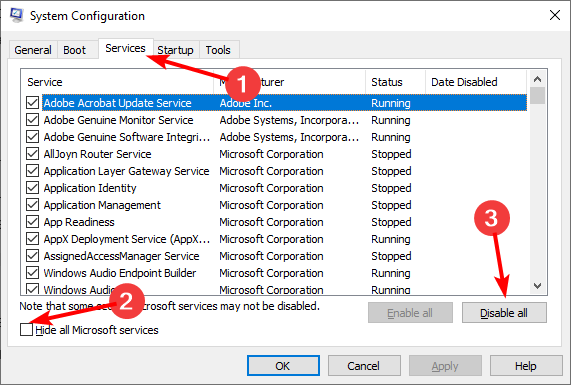
- Select Services, check the Hide all Microsoft services box, and click the Disable all button.

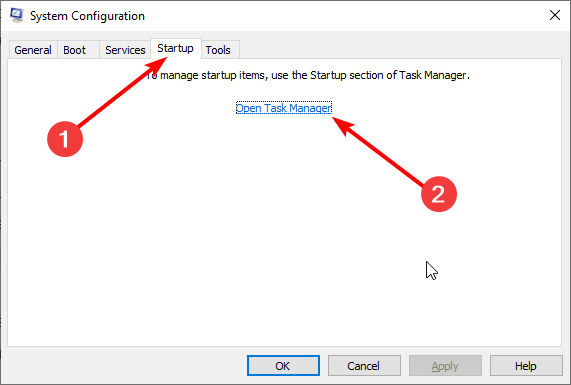
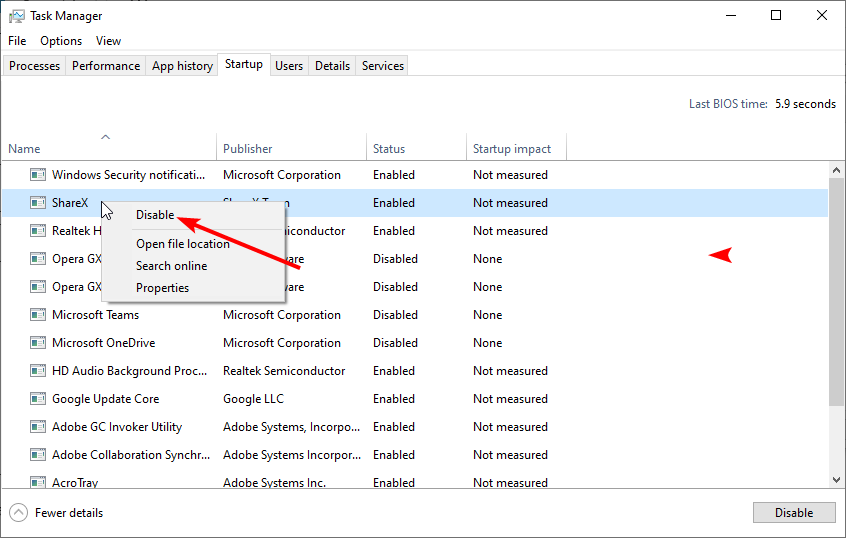
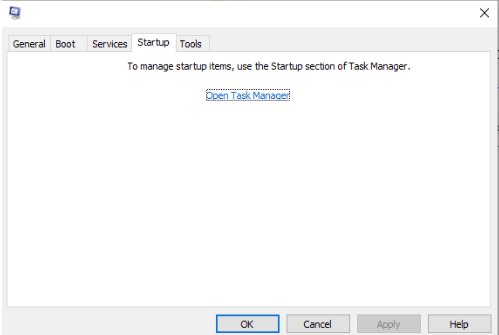
- Now, click the Startup tab and select Open Task Manager.
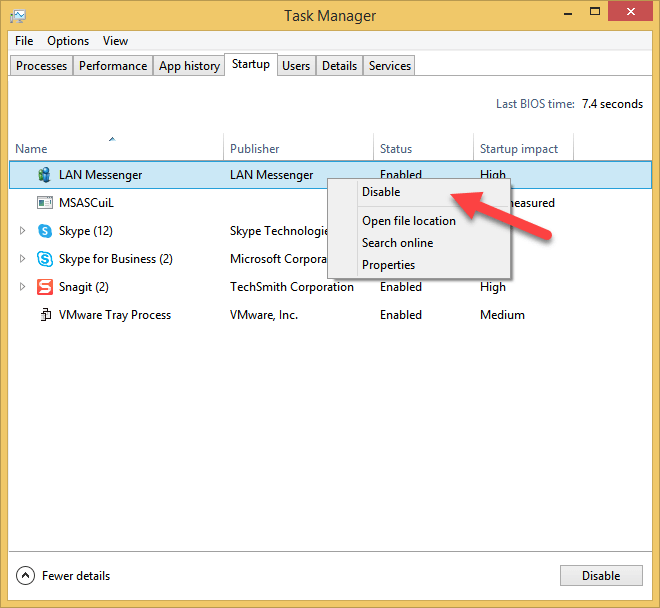
- Right-click each of the apps there and select Disable.

- Next, go back to the System Configuration window and click Apply, followed by OK.
- Finally, restart your PC and try installing the update.
Clean Boot eliminates software conflicts that may sometimes occur when ins
Clean-booting Windows will ensure that third-party software doesn’t conflict with the upgrade process.
3. Run Deployment Image and System File Scans
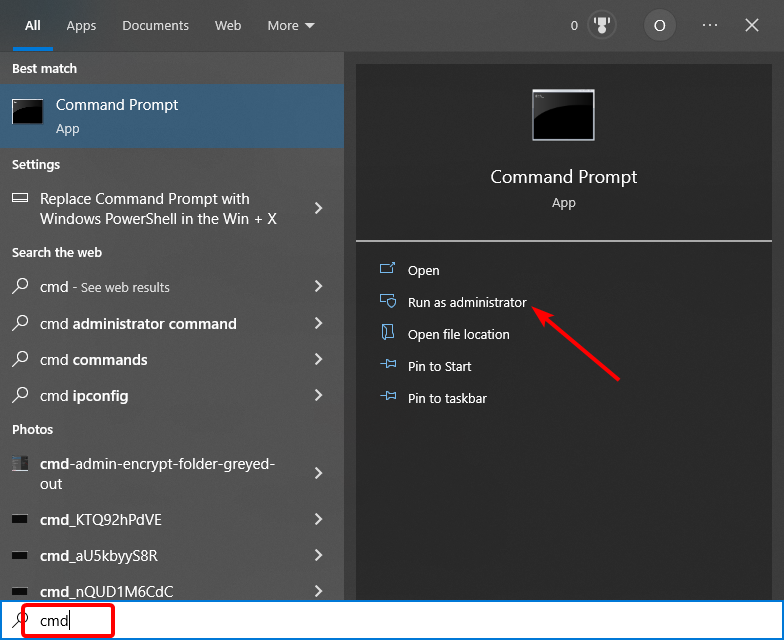
- Press the Windows key, type cmd, and select Run as administrator under Command Prompt.

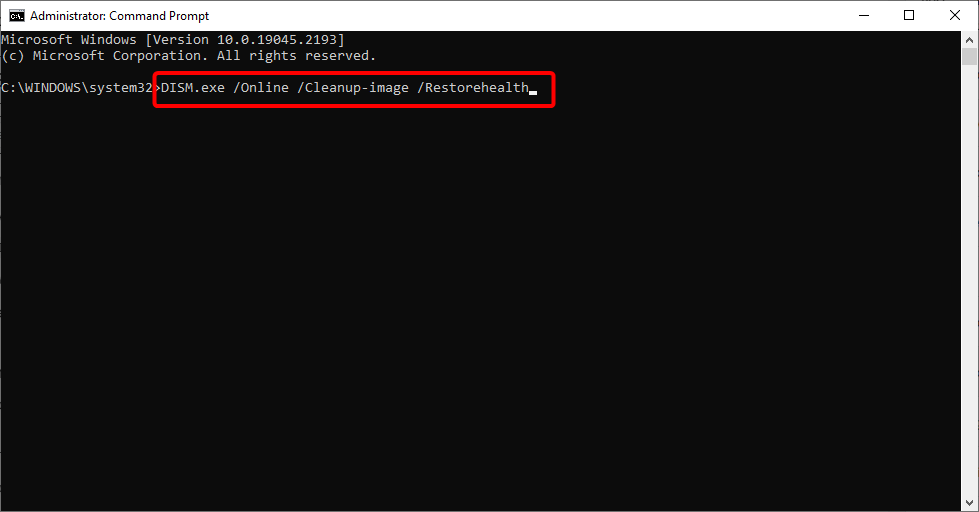
- Type the command below and hit Enter to run it:
DISM.exe /Online /Cleanup-image /Restorehealth
- Now, wait for the command to finish running.
- Next, type the command below and press Enter:
sfc /scannow - Finally, wait for the command to finish running and restart your PC.
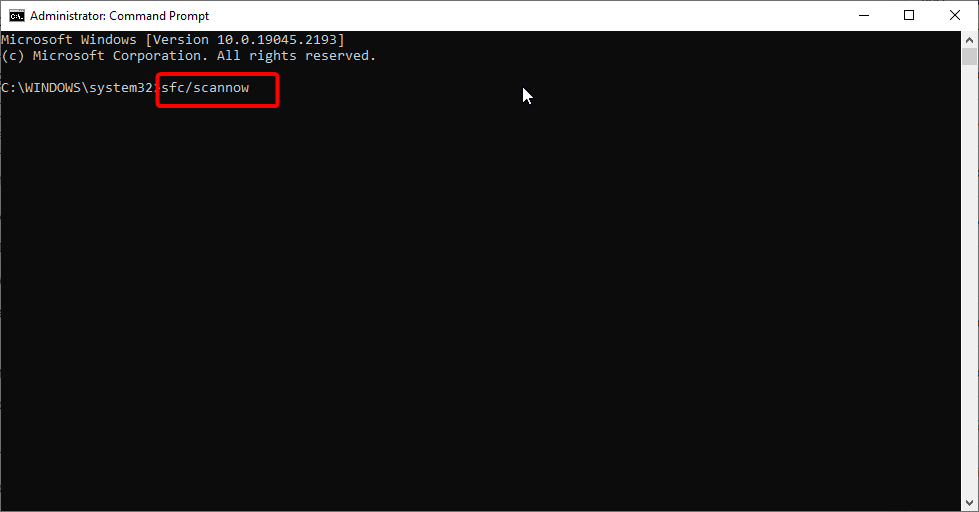
In some cases, faulty system files can cause the Modern Setup Host has stopped working issue. Thankfully, Windows has a couple of tools to repair these files.
Alternatively, you can use a dedicated tool to repair and restore your registry and to replace any broken file with the original
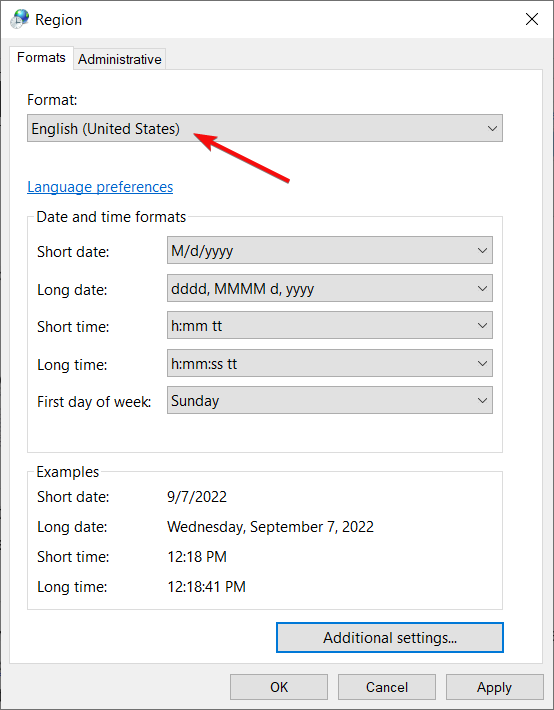
4. Check if the Default Language is configured to U.S. English
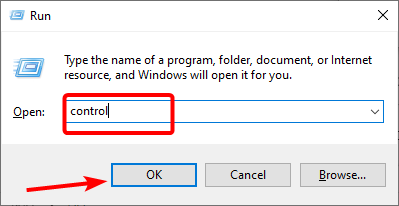
- Press the Windows key + R, type control, and click OK.
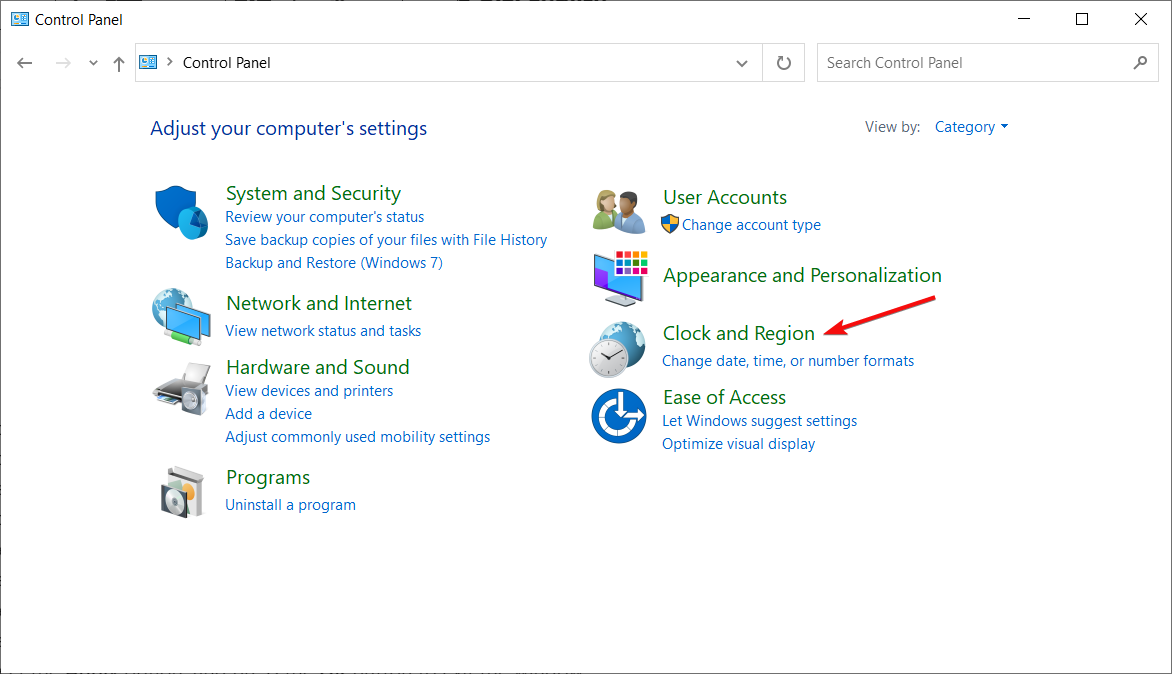
- Click the View by drop-down menu to select Category.
- Now, click Clock and Region to open the applet.

- Then, click Region.
- Select English (United States) on the Format drop-down menu.

- Select the Apply option and press the OK button to exit the window.
- After that, restart the desktop or laptop.
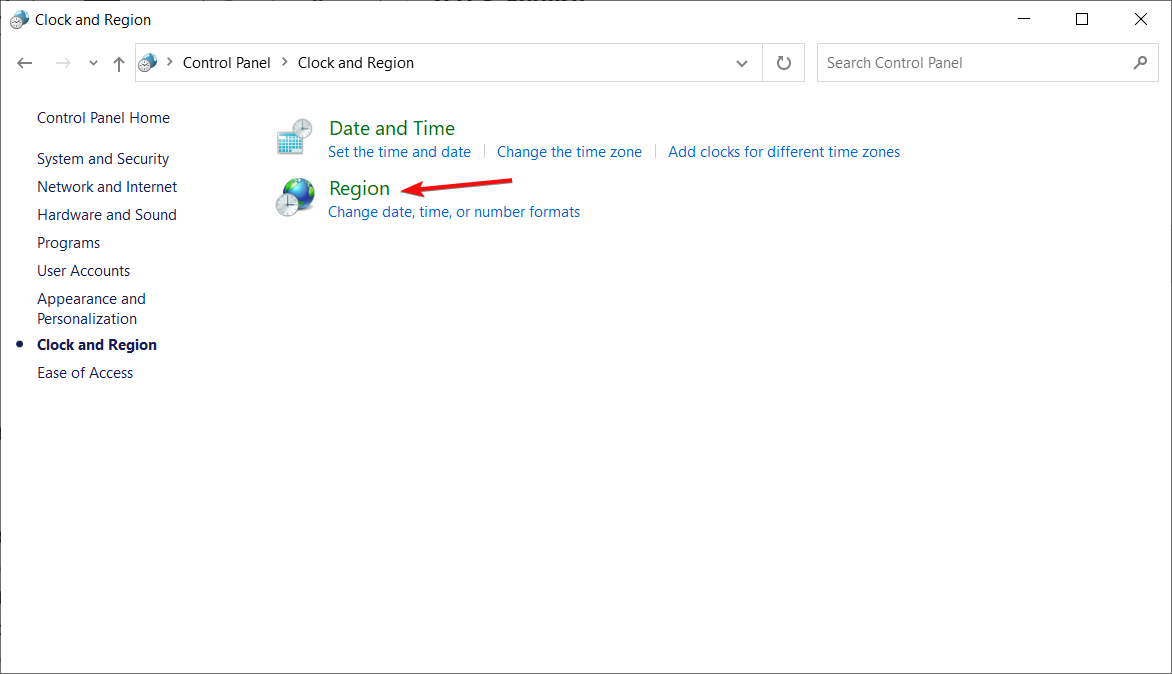
Some users have said that adjusting the Windows language settings to U.S. English can fix the MSH error.
5. Run setupprep.exe to resume the system upgrade
- Open Run with the Windows key + R keyboard shortcut.
- Then enter the following command in Run and press the OK button:
C:\$Windows.~WS\Sources\Windows\sources\setupprep.exe - Finally, restart the upgrade process.

If you are dealing with Modern Setup Host that has stopped working during a Windows 10 upgrade, the command above should help you restart the process.
6. Run the Windows Update troubleshooter
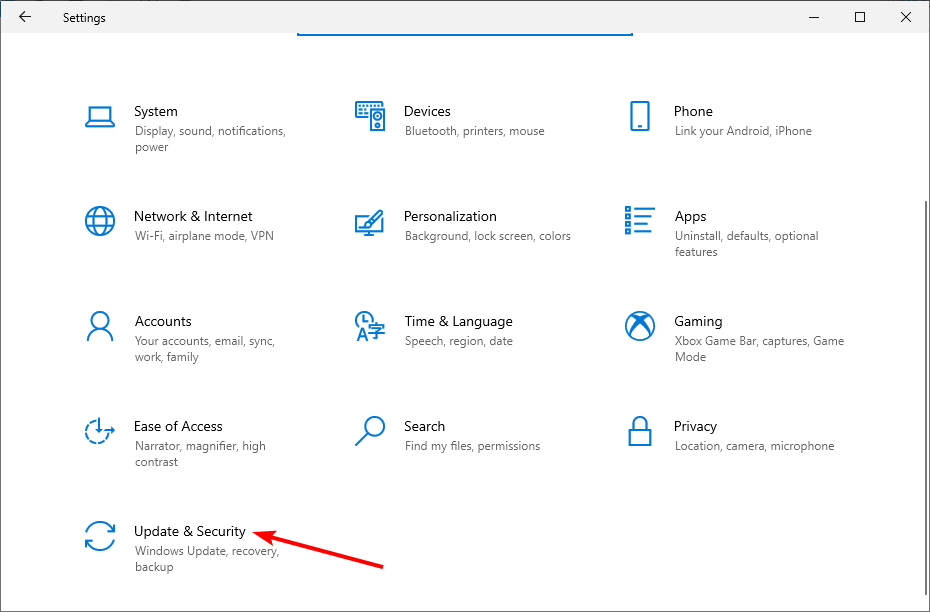
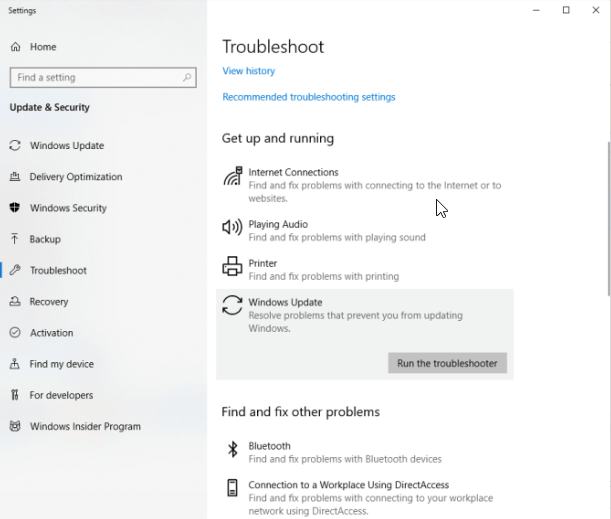
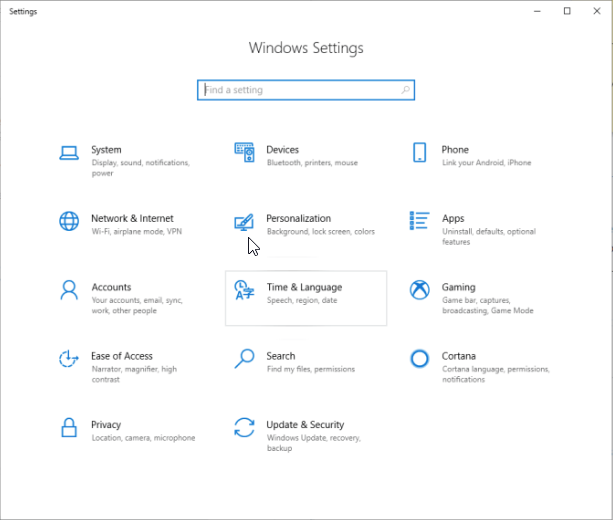
- Press the Windows key + I to open the Settings app, and select Update & Security.

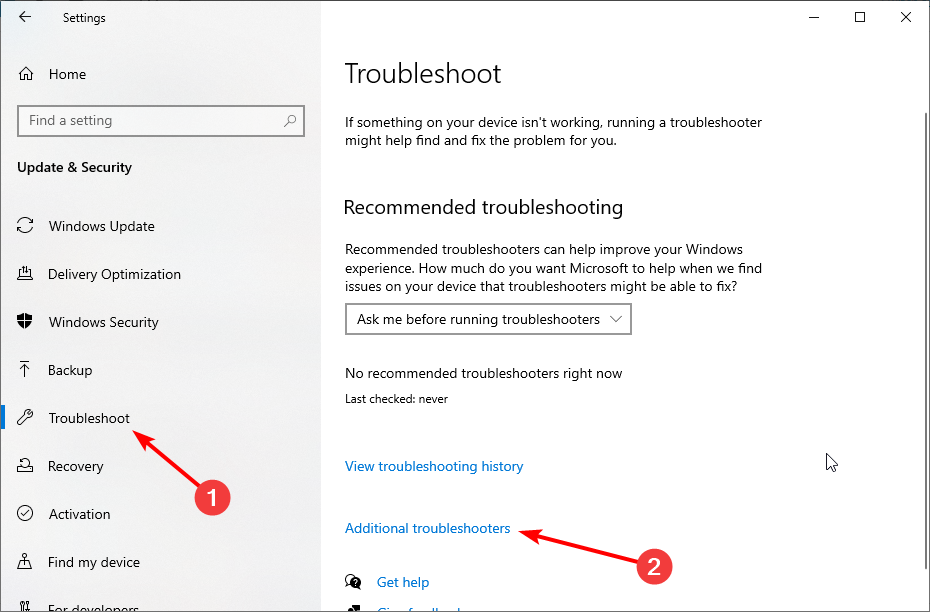
- Choose Troubleshoot in the left pane and click Additional troubleshooters.
- Now, select Windows Update and click Run the troubleshooter.

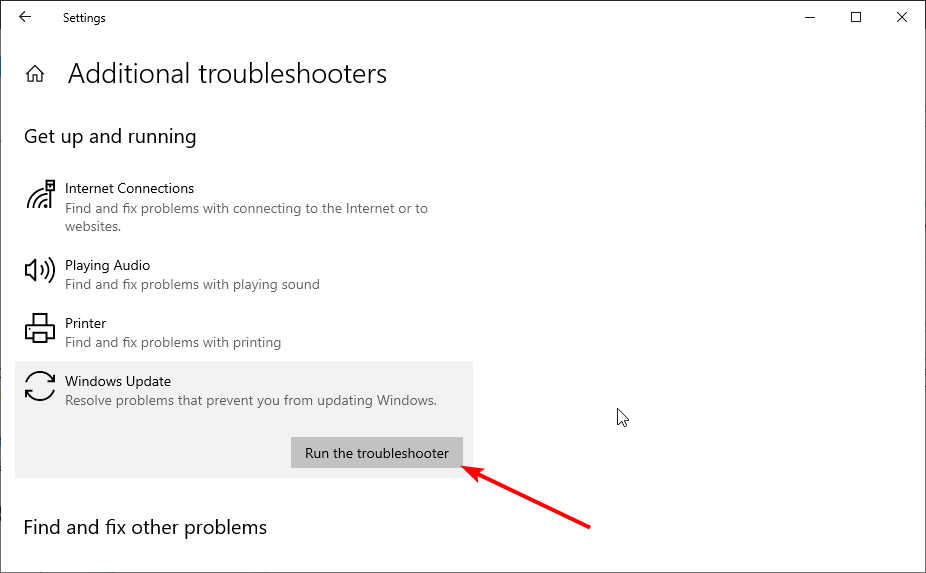
All Windows versions feature a dedicated Windows Update Troubleshooter that can detect and fix update errors. So if you are dealing with the Modern Setup Host has stopped working issue, try running this tool.
- Windows Update process (wuauserv) high CPU usage
- Fix: Windows Update is not working in Windows 10/11
- Security Settings Blocked Self-signed Application [Fix]
- Fix: Page Fault in Nonpaged Area on Windows 10
- Bindflt.sys Blue Screen: How to Fix It in 5 Steps
- Fix: A Service Installation Section in this INF is Invalid
7. Reset Windows update components
- Press the Windows key + S, type cmd, and select Run as administrator under Command Prompt.
- Now, type the following commands and press Enter after each:
net stop wuauservnet stop cryptSvcnet stop bitsnet stop msiserverren C:\Windows\SoftwareDistribution SoftwareDistribution.oldren C:\Windows\System32\catroot2 Catroot2.oldnet start wuauservnet start cryptSvcnet start bitsnet start msiserver - Finally, close Command Prompt and restart your PC.
Another potential solution to this issue is to restart the Windows update components. This should clear up the glitches that might be stopping your updates.
Those are some potential resolutions that might fix the error when installing Windows 10 Modern Setup Host has stopped working for some users.
They can also upgrade to Windows 10 with a bootable USB drive that includes a Windows image.
We also have a comprehensive guide on what to do if you receive the error Couldn’t connect to the Update Service on Windows 10.
For any suggestions or questions, use the comments section below to write them down.
![]()
Многие пользователи Windows 7, 8 и 8.1 сталкиваются с некоторыми проблемами при обновлении своих версий Windows до Windows 10. Среди этих проблем наиболее распространенной является ошибка « Хост современной установки перестал работать », которая возникает из-за таких проблем, как неправильный конфигурация системы или проблемы с процессом обновления.
Если вы также столкнулись с проблемой Modern Setup Host Has Stopped Working при обновлении вашей системы до Windows 10, эта статья поможет вам решить вашу проблему, чтобы вы могли улучшить свой компьютер до лучшей версии.

Конечно, как и другие пользователи Windows 7, 8 или 8.1, вы хотите обновить свой компьютер с Windows до Windows 10, потому что это более продвинуто и выгодно. Но, к сожалению, при этом вы сталкиваетесь с некоторыми препятствиями. Вы не одиноки, так как это стало распространенной проблемой в наши дни. И прежде чем двигаться дальше, чтобы найти решение, мы должны сначала узнать больше об этом. Итак, давайте начнем с того, что «что такое современный установочный хост перестал работать?» первый.
Modern Setup Host (SetupHost.exe) — это самораспаковывающийся архив и установщик, который вы можете найти в папке с исходниками C:$ Windows.Bt . Он запускается как запланированная задача каждый раз, когда пользователь входит в систему, чтобы выполнить процесс с привилегиями локальных пользователей в контексте его родительского процесса windowsstoresetupbox.exe .
Это требуется во время обновления вашего ПК до Windows 10. Но когда по какой-то причине происходит сбой, возникает эта ошибка, и процесс обновления останавливается. В общем, есть три распространенных способа обновления бета-версий ПК 32 до Windows 10.
1. Первый способ — использовать загрузочный VSB или DVD (рекомендуемый метод).
2. Второй способ — обновить Windows с помощью Центра обновления Windows.
3. Третий способ, с помощью которого вы можете обновить свои окна, — это использовать инструмент для создания носителя.
Но при выполнении любого из этих трех методов появляется сообщение об ошибке «Хост современной установки перестал работать», что затем прерывает процесс обновления.
Содержание
- 1 Методы решения ошибки Modern Setup Host перестал работать
- 1.1 Решение 1. Проверьте свободное место на жестком диске
- 1.2 Решение 2. Подготовьте ПК с Windows к обновлению
- 1.3 Решение 3. Создайте загрузочный USB-накопитель и обновите компьютер до Windows 10
- 1.4 Решение 4. Запустите очистку диска и удалите папку $Windows.~WS
- 1.5 Решение 5. Возобновите обновление, запустив Setupprep.exe
- 1.6 Решение 6. Используйте DISM для восстановления Windows
- 1.7 Решение 7. Запустите средство проверки системных файлов
- 1.8 Решение 8. Установите или обновите привод видеокарты
- 1.9 Решение 9. Переместите папку пользователя в папку по умолчанию
- 1.10 Решение 10. Окно чистой установки 10
- 2 Заключение
Методы устранения ошибки «Хост современной установки перестал работать»
Чтобы остановить ошибку Modern Setup Host Has Stopped Working, у нас есть 10 способов, из которых вы можете выбрать любой из методов в соответствии с вашим случаем.
Решение 1. Проверьте свободное место на жестком диске
Одной из причин, вызывающих эту ошибку, может быть меньше свободного места на системном разделе. У вас должно быть не менее 15 ГБ дополнительного хранилища для ваших приложений и данных, потому что самому Media Creation Toolkit требуется 8 ГБ для загрузки обновления, а также вам потребуется дополнительное пространство для приложений после обновления.
Таким образом, проверьте свободное место на жестком диске на вашем компьютере и удалите все ненужные данные, что в некоторой степени увеличит вашу системную память. Наряду с этим вы можете создавать резервные копии своих данных на внешних устройствах хранения, USB-накопителе, в облачном хранилище и т. д.
Если вы не знаете, как сделать резервную копию, вы можете найти это в Google, а затем следовать этому методу. Таким образом, освобождение дополнительного места путем удаления всех ненужных данных может помочь вам избавиться от проблемы Modern Setup Host Has Stopped Working.
Решение 2. Подготовьте ПК с Windows к обновлению
Этот метод очень эффективен, но требует немного времени. Это совместимо только с Windows 7, Windows 8 и Windows 8.1. Если ваша версия Windows XP, вы можете пропустить этот метод.
Это метод отключения служб, не связанных с Microsoft, отключение автозапуска программ и изменение региональных настроек Windows. Эти изменения устранят потенциальные проблемы, вызванные конфликтами в системе.
В первую очередь нужно отключить службы, не относящиеся к Microsoft. Для этого выполните следующие действия:
Шаг 1: Во-первых, удерживайте логотип Windows и нажмите R , а затем введите msconfig и нажмите Enter .

Шаг 3: Теперь вы находитесь в разделе «Конфигурация системы» и вам нужно выбрать «Службы » . После этого в нижнем левом углу нажмите Скрыть все службы Microsoft .

Шаг 4: Наконец, в правом нижнем углу нажмите « Отключить все » . Затем нажмите «Применить » и нажмите «ОК». Нет необходимости отключать все программы автозагрузки
Для пользователей Windows 7
Шаг 1: Прежде всего, удерживайте логотип Windows и нажмите R.

Шаг 2: После этого введите msconfig и нажмите Enter , чтобы открыть « Конфигурация системы», а затем выберите вкладку «Автозагрузка» .

Шаг 3: Затем нажмите « Отключить все присутствующие» в правом нижнем углу, затем нажмите « Применить », а затем « ОК » .

Шаг 4: Наконец, перезагрузите компьютер с Windows.
Шаг 5: Затем запустите обновление Windows.
Для пользователей Windows 8 и 8.1
Шаг 1: Во-первых, удерживайте логотип Windows и нажмите R.

Шаг 2: Затем введите msconfig и нажмите Enter, чтобы открыть « Конфигурация системы» , выберите вкладку «Автозагрузка» и нажмите « Открыть диспетчер задач » .

Шаг 3: После этого снова выберите вкладку «Автозагрузка» и отключите все приложения на это время, щелкнув правой кнопкой мыши приложение.
Шаг 4: Теперь вы можете закрыть диспетчер задач и перезагрузить компьютер.
Шаг 5: Наконец, запустите обновление Windows.
Примечание . Третий шаг потребует изменения региональных настроек. Сделать это можно через Панель управления.
Для пользователей Windows 7
Шаг 1: Прежде всего, удерживайте логотип Windows и нажмите R.
Шаг 2: После этого введите Панель управления и нажмите Enter, чтобы открыть Панель управления.
Шаг 3: Теперь вы можете выбрать «Просмотр по категориям» .
Шаг 4: Затем нажмите «Часы, язык и регион» .

Шаг 5: После этого нажмите « Регион и язык» , а затем выберите вкладку «Расположение» .

Шаг 6. В разделе « Текущее местоположение » выберите «Ваша страна» .

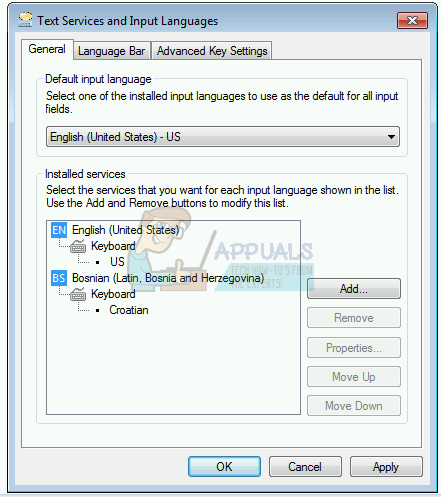
Шаг 7: Затем выберите «Клавиатуры и языки» , после чего нажмите «Изменить клавиатуру».

Шаг 8: Теперь выберите вкладку «Общие» . и в разделе «Язык ввода по умолчанию» выберите « Английский (США)» .

Шаг 10: Теперь нажмите «Применить », затем «ОК» и закройте панель управления.
Шаг 11: Наконец, перезагрузите компьютер с Windows, а затем запустите обновление Windows.
Для пользователей Windows 8 и 8.1
Шаг 1: Во-первых, удерживайте логотип Windows и нажмите R.
Шаг 2: Затем введите Панель управления и нажмите Enter , чтобы открыть Панель управления.

Шаг 3: После этого выберите Просмотр по категориям .
Шаг 4. Теперь нажмите « Часы, язык и регион», затем нажмите «Регион», а затем перейдите на вкладку «Выбор местоположения» .

Шаг 5: В разделе «Домой» выберите свою страну.
Шаг 6: Затем нажмите «Применить », а затем «ОК».
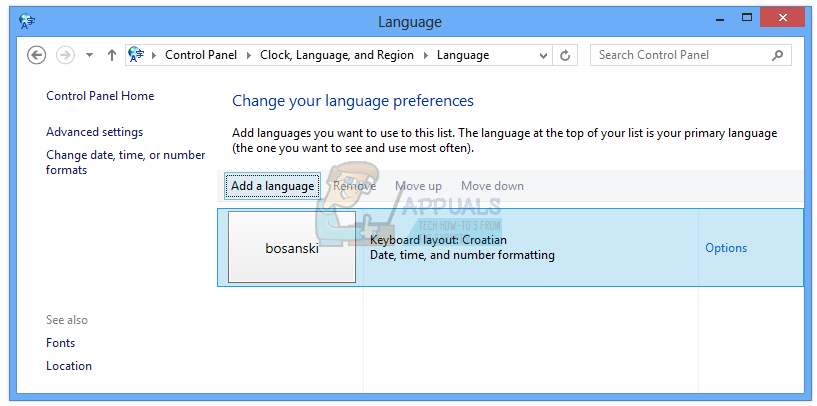
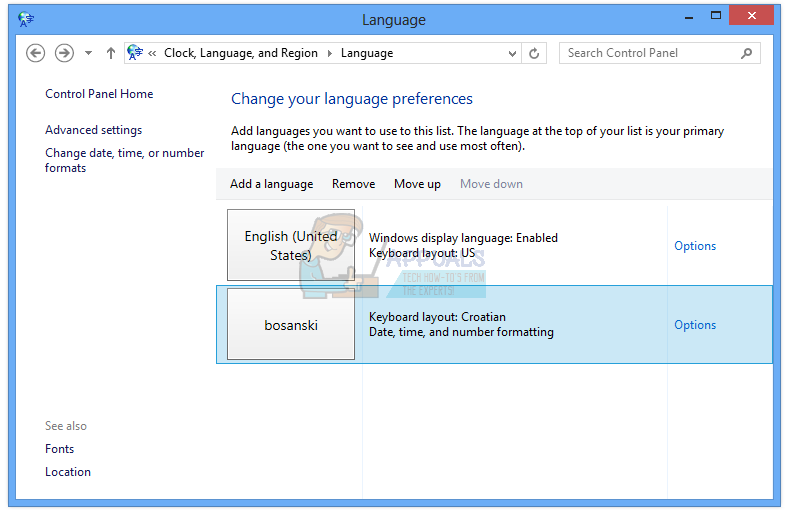
Шаг 7. В разделе «Часы, язык и регион » нажмите «Язык» , чтобы добавить еще один язык.

Шаг 8: Теперь нажмите «Добавить язык » .
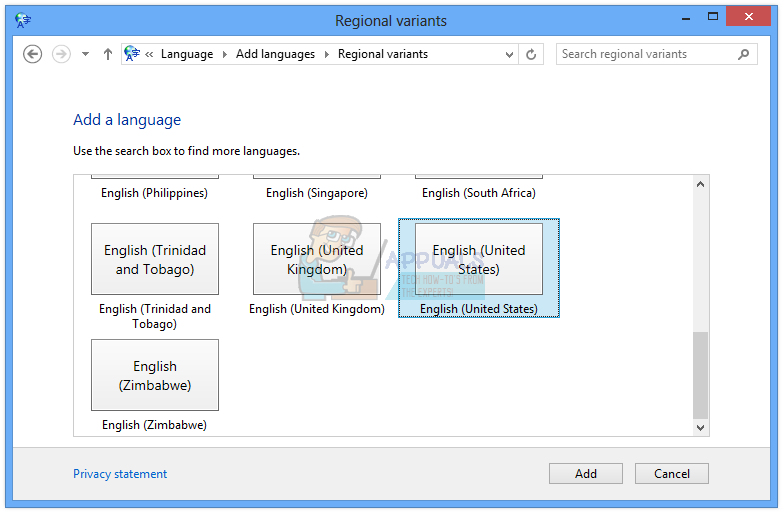
Шаг 9: После этого выберите английский и нажмите «Открыть».

Шаг 10: Затем выберите свой язык (например, русский) и нажмите « Добавить » .

Шаг 11: В разделе «Языки» выберите предыдущий язык и нажмите «Удалить » .

Шаг 12: Затем закройте панель управления и перезагрузите компьютер. Теперь вы можете обновиться до Windows 10.
Шаг 13: Наконец, включите службы , программы запуска и региональные настройки изменения .
Решение 3. Создайте загрузочный USB-накопитель и обновите компьютер до Windows 10.
Вы также можете обновить свой компьютер до Windows 10 с помощью загрузочного USB-накопителя. Для этого, прежде всего, создайте загрузочный носитель. Вы можете использовать программу «Rufus», небольшую утилиту для создания загрузочного носителя. После этого перенастройте BIOS и UEFI, чтобы ваша машина могла загружаться с USB-накопителя. Для этого вам нужно сначала зайти в BIOS, нажав клавишу F2 , а затем выбрать порядок загрузки.
Затем перенесите свой USB наверх в качестве первого загрузочного устройства. Затем нажмите «Сохранить изменения» и, наконец, перезагрузите систему, чтобы применить эти изменения. Теперь вы можете загрузить свою систему с помощью USB, а затем обновить Windows.
Решение 4. Запустите очистку диска и удалите папку $Windows.~WS
Очистка диска — это встроенная в Windows утилита, которая помогает удалять ненужные файлы с жесткого диска (что, в свою очередь, помогает повысить скорость работы системы).
Таким образом, вы можете сначала запустить очистку диска в своей системе, а затем удалить папку $Windows.~WS. $Windows.~WS — это одна из двух скрытых папок, которые вы увидите, когда начнете процедуру обновления вашего ПК до Windows 10. Таким образом, ваша проблема будет решена, и ошибка больше не появится.
Решение 5. Возобновите обновление, запустив Setupprep.exe
Если вышеуказанные методы не сработали для вас, вы можете попробовать этот метод, так как этот метод сработал для многих других пользователей. В этом способе в первую очередь нужно запустить процесс обновления и одновременно запустить файл setupprep.exe, который возобновит последнюю операцию, а не начнет ее полностью заново. Следующие шаги помогут вам сделать то же самое:
Шаг 1. Прежде всего, запустите обновление Windows через Windows с помощью Media Creation Toolkit .
Шаг 2. После получения сообщения об ошибке закройте Центр обновления Windows или Media Creation Tool.
Шаг 3: Удерживая логотип Windows, нажмите R.

Шаг 4: После этого введите следующее:
C:\$Windows.~WS\Sources\Windows\sources\setupprep.exeC:\$Windows.~WS\Sources\Windows\sources\setupprep.e
Затем нажмите Enter , чтобы возобновить обновление Windows.
Шаг 5: Наконец, дождитесь завершения обновления Windows.
Скорее всего, это решит вашу проблему. Также имейте в виду, что эта процедура совместима с Windows 7, Windows 8 и Windows 8.1.
Решение 6. Используйте DISM для восстановления Windows
Для этого метода мы рекомендуем вам использовать инструмент DISM (Обслуживание образов развертывания и управление ими), который является частью Windows ADK (Windows Assessment and Deployment Kit). По сути, этот инструмент поможет вам смонтировать файл образа Windows (install.wim) и обслуживание образа, включая установку, удаление, настройку и обновление Windows. Таким образом, загрузите этот инструмент и следуйте инструкциям (из Google), чтобы восстановить Windows и обновить машину до Windows 10.
Решение 7. Запустите средство проверки системных файлов
Средство проверки системных файлов ( SFC ) — это встроенная в Windows утилита командной строки, которая проверяет наличие повреждений системных файлов. В случае, если будут обнаружены какие-либо проблемы, SFC автоматически их исправит.
Но чтобы использовать утилиту SFC, вы должны быть администратором, запускающим консольный сеанс. Кроме того, он также включает SCANNOW , который в дальнейшем поможет в диагностике и устранении других проблем в системе. Таким образом, это также поможет вам решить эту проблему с современной настройкой.
Решение 8. Установите или обновите привод видеокарты
Вы также можете попытаться избавиться от этой ошибки Modern Setup Host Has Stopped Working, установив или обновив драйвер видеокарты в вашей системе. А если вам повезет, то это решит вашу проблему, и тогда вы сможете обновить свою винду.
Решение 9. Переместите папку пользователя в папку по умолчанию
Эта проблема также может возникнуть, если вы изменили папку пользователя в другое место. Если это так, вы можете снова изменить папку своего профиля пользователя на папку по умолчанию C:\Users\YourUserProfile, и, таким образом, ваша проблема будет решена. Теперь вы можете обновить свой компьютер до Windows 10.
Решение 10. Окно чистой установки 10
Этот метод явно работает для пользователей Windows XP, потому что их ОС не поддерживает прямое обновление до Windows 10. Таким образом, чистая установка — лучший способ для этой первой проверки того, что ваша материнская плата должна поддерживать обновление Windows 10. Во-вторых, запишите все приложения, которые вы используете в настоящее время, чтобы вы могли переустановить их после обновления.
Рекомендуется сделать резервную копию всех ваших данных на внешнем хранилище или на USB-накопителе, потому что чистая установка удалит все ваши данные. Таким образом, помните об этих моментах, а затем переходите к чистой установке Windows 10. Это обязательно решит вашу проблему.
Также читайте
- Ошибка приложения регистрации устройства цифрового ТВ-тюнера
- Панель управления NVIDIA отсутствует в Windows 10
- Код ошибки Центра обновления Windows 0x800705b4 Ошибка
- Ethernet не имеет допустимой конфигурации IP
Вывод
Сообщение об ошибке « Хост современной установки перестало работать» можно очень быстро устранить с помощью методов, упомянутых выше в этой статье. Нужно немного терпения, и тогда вы справитесь с этой проблемой любым из способов.
Просто имейте в виду, что ваши важные данные всегда должны быть в резервной копии, чтобы все, что происходит с вашим компьютером, не повлияло на ваши данные. Надеюсь, эта статья была вам полезна, и теперь вы можете обновить свою бета-версию Windows до лучшей версии Windows 10.
Windows 10 offers a lot of benefits. The most popular among them is upgrading from Windows 7, Windows 8 without losing data, application, or settings. But certain users have reported encountering Modern Setup Host has stopped working error message when upgrading to Windows, using Windows 10 Media Creation Tool.
What is a Modern Setup Host?
Modern Setup Host is a self-extracting archive and installer. You can find it under the C:\$Windows.BTSources folder as a Modern Setup Host.exe. When the system detects or installs updates, this file runs in the background. Moreover, when upgrading to Windows 10, we need this file as it runs the setup file.
This means if it stops working while installing Windows 10, you will face a lot of problems.
Therefore, to help resolve the issue here, we bring certain fixes.
Before we move ahead and learn how to fix Modern Setup Host has stopped working a few things you should keep in mind.
- Temporarily disable 3rd party antivirus or firewall
- Disconnect unnecessary external devices
- Make sure your disk has enough free space, i.e. at least 20 GB.
However, if you don’t have enough space and would like to free up space to see if it helps, here you go.
Low storage space on any operating system is the most dreaded error message. We all fear encountering it. But when we are here, there’s nothing to worry about.
Here we explain a simple way to free up storage space occupied by unwanted files. This means you don’t have to move any of your important data.
To make space for important files and to fix Modern Setup Host has stopped working we will use the best PC optimizer – Advanced System Optimizer.
This one-click PC cleaner and optimizer works wonderfully on your Windows operating system. Using it in no time, you can get rid of junk files and other unwanted data that clutter your system.
To use it you need to download and install it. To download

Once installed, click Start Smart PC Care, and let the scan run.
In addition to this, using the excellent optimization tool, you can fix invalid registry errors, outdated drivers, clean virus malware, and boost system speed. This is the least time consuming of all methods. Give it a try.
How to fix Modern Setup Host Has Stopped Working Error?
Below- mentioned solutions will help fix Modern Setup Host has stopped working Windows 10 error message. Use the solution one by one to see which one works for you.
Method 1: Check free Hard Drive space
Since the Media Creation Toolkit alone required 8 GB for downloading the update, you need to have a minimum of 15+ GB free storage. If you have less free space on your system, you might end up facing Modern Setup Host has stopped working. Here are some tips using which you can free up space:
- Delete unnecessary hard disk partitions
- Backup data to external storage, cloud storage like Google Drive, OneDrive, etc.
However, if you think this is time-consuming, you can use Advanced System Optimizer. The best solution to free up disk space and help fix Modern Setup Host Stopped Working Error.
This advanced tool repair & scans your system for DLL errors, junk files, temporary files, and other unwanted data. Using it, you can fix common Windows errors and solve BSOD problems caused due to outdated drivers, damaged system files, etc.
Method 2: Disable Unwanted Startup Items
Sometimes disabling third party services and removing unwanted startup items helps fix Modern Setup Host stopped working error messages. To disable services that are not related to Microsoft and see if it helps, follow the steps explained below:
1. Press Windows + R keys together
2. Next in Run windows types MSConfig and press Enter.
3. You will now see the System Configuration window. Here click Services tab and check the box next to Hide all Microsoft services.

4. Once done, click Disable all to stop running third party services > Apply > OK.

After this, click the Startup tab > Open Task Manager. Select each service individually and click Disable.

Select each service individually and click Disable.

Note: The above steps will work on Windows 8 also.
However, if you are using Windows 7, under the System Configuration window click Startup tab > Disable All. This will disable all third-party services.
To save changes, we recommend restarting Windows operating system.
Method 3: Create and use a bootable USB to upgrade to Windows 10
Since you are facing Modern Setup Host has stopped working installing on Windows 10 when using Media Creation Toolkit, we suggest using a bootable USB flash drive. Click here to learn how to create a bootable USB to install Windows. This will help upgrade Windows machine to Windows 10.
Method 4: Run Disk Cleanup and delete $Windows.~WS folder
In this method, we will learn how to run Disk Cleanup and delete $Windows.~WS from the disk partition.
What is Disk Cleanup utility?
Disk Cleanup is a Windows integrated utility that helps remove unnecessary files from the hard drive. It is found in almost all Windows versions, and it helps increase system performance.
To learn how to use Disk Cleanup Utility click here.
Next, we will delete the $Windows.~WS folder. Generally, when you upgrade to Windows 10 from previous version two hidden folders on your C Drive (where Windows is installed are created) One of those hidden folders are $Windows.~WS
Note: Deleting $Windows.~WS means you won’t be able to revert to the previous version of Windows.
Method 5: Run setupprep.exe to resume upgrade
If the above solution did not help try running setupprep.exe file. This file, instead of starting over, help resume the last operation and is compatible with Windows 7, Windows 8, and Windows 8.1.
To run setupprep.exe file, follow the steps below:
- Use Media Creation Toolkit to run windows upgrade.
- Once you get Modern Setup Host stopped working error message, exit Media Creation Tool or Windows update.
- Next press Windows + R keys together.
- This will open Run window here paste:
C:\$Windows.~WS\Sources\Windows\sources\setupprep.exeand press - This will resume the Windows upgrade. Now, wait for the process to finish.
You should not face any problem.
Method 6: Use DISM to repair Windows
To perform this method, we need to run DISM (Deployment Image Servicing and Management). To do so, follow the steps below:
1. In Windows search bar type Command Prompt
2. Now from the right pane click Run as administrator.

3. This will open the Command Prompt window in admin mode. Type following commands one by one and press enter after each command:
DISM /Online /Cleanup-Image /CheckHealth
DISM /Online /Cleanup-Image /ScanHealth
DISM /Online /Cleanup-Image /RestoreHealth

4. Wait for the process to finish. Once done restart Windows and check whether the modern setup host windows 10 error is fixed or not.
Method 7: Run System File Checker
System File Checker (SFC) command is used to fix system file corruption. To use it, we need to add a command like SCANNOW.
This command scans all protected system files and repairs files with problems. To run the command and fix Modern Setup Host has stopped working, follow the steps below:
1. Type cmd in the Windows search bar.
2. Click Run as administrator from the right pane

3. Next, in Command Prompt, window type SFC/scannow and press the Enter key.

4. Wait for the scan to finish.
5. Once done, you will see the corrupted files that might be causing Modern Setup Host stopped working when installing Windows has been fixed.
Restart the Windows operating system and check if the Modern Setup Host error message is fixed or not.
Method 8: Install or upgrade graphics card driver
Corrupt graphic card drivers can also cause Modern Setup Host to stop working. To fix it you can manually update drivers from Device Manager. Or can use the Driver Updater module of Advanced System Optimizer.
This driver updater feature automatically scans your system for outdated and corrupt drivers and updates them in a single click. You can find Driver Updater under the Windows Optimizer module.
Additional Information:
Moving the user profile from Windows installation drive (C:\) also causes Modern Setup Host error. Therefore, if you have ever moved it, put it back to the default location C:\Users\YourUserProfile.
Once done, try upgrading to Windows 10. You should be able to do it without getting any error message.
Method 9: Do a Clean Boot
If the Modern Setup Host error message is not yet fixed, try performing a clean boot of Windows 10. This will help fix the error message. To do so, follow the steps below:
1. Type MSConfig in Windows search bar > select System Configuration and press Enter.

2. If you receive UAC box press enter. This will open the System Configuration window.
3. Click General tab > Selective startup

4. Uncheck both Load system services & Load startup items > Apply.

5. Next, make sure Use original boot configuration feature is checked.
6. Afterwards, click the Services tab. Check the box next to Hide All Microsoft Services > click Disable all button.

7. Restart Windows.
8. Now check your system Modern Setup Host has stopped working windows 10 update error should now be fixed.
Note: If the problem is fixed after using the above method undo above modification and restore to default.
This all for now. We hope using these steps you were able to fix Modern Host Setup has stopped working Windows 10 error message. Also, note only after trying these steps, we have listed them. This means you will be able to fix Modern Setup Host error and can upgrade to Windows 10 without any problem.
We hope you like the article and found it helpful in solving the issue. Please share your views about it. We’d love to hear from you. Also share it with your friends and connect on our social network.
Do you have a slow computer and the Task Manager shows you a process called Modern Setup Host highly consuming your system’s CPU and Memory? You might also come across an error message like “Modern Setup Host has stopped functioning” while trying to upgrade to Windows 10 from Windows 7.
Before we dig deeper into the topic in this post, we will first brief you up on what exactly is this process? You need to comprehend its function and then be informed about the fixes when this error leads to high CPU usage by the Modern setup host process.
What is Modern Setup Host?
It is basically an installer that is located in a self-extracting archive within the $Windows.BTSources folder. In other words, this is a self-extracting archive and installer that triggers system updates. It circumstantially shows up on systems that runs the Windows beta system version (Windows Technical Preview).
This process appears to be running in the background of computers when it is installing an update or is running the installation setup file to upgrade a computer from Windows 7 to Windows 10. The Modern setup host itself functions within the context of the parent Windowsstoresetup.exe (which is directly executed by Microsoft Windows Update).
Thus, users can see an error when they are trying to upgrade to Windows 10 but they won’t b able to complete the upgradation process without fixing this error.
Troubleshoot methods to fix Modern Setup Host error:
Users often encounter two chief problems that are as follows:
- Heavy CPU and memory consumption by Modern setup host
- The Modern setup host stops functioning.
Generally, this issue rises prevalently when Windows Update issues occur. You can try the below-suggested fixes to resolve the issues mentioned above and also to optimize the speed of the Windows PC when there is 100% disk usage.
1. Use Windows Update Troubleshooter Tool
The Windows Update Troubleshooter is a built-in tool on Windows 10. The below steps can guide you to run the tool:
- Go to the Search bar located at the bottom left corner beside the Start menu on your computer screen.
- Search for the Troubleshooter tool here by typing “Troubleshoot” and select it.
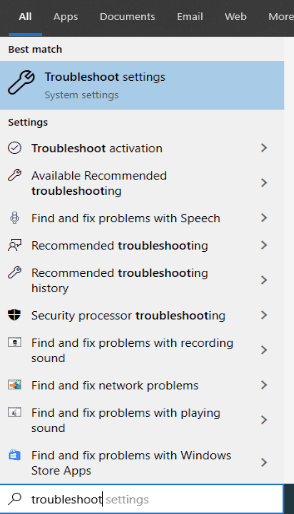
- Once the tool window opens, click on the Windows Update section and further run the application by clicking on the ‘Run the troubleshooter’ button.
- Let the tool detect the problems and rectify them.
- You can further follow the pop-up instructions to finish the process of resolving the issue.
If you are still on Windows 7 or 8, then you can use the below steps to solve the problem arising due to the Modern setup host.
- You need to first download and install the troubleshooter program from the Microsoft website.
- Then, the following process is similar to the above-described steps from the Windows 10 segment.
2. Use DISM Tool
If the Windows Update process has gone corrupted, then it may give rise to this sort of error which can be resolved effortlessly with the Deployment Image Servicing and Management (DISM) tool of Windows 10 as per the below-given steps.
- Open Command Prompt by typing “cmd” in the Search bar located beside the Start menu.
- Use the right-click option on the Command Prompt and choose the ‘Run as Administrator’ option.
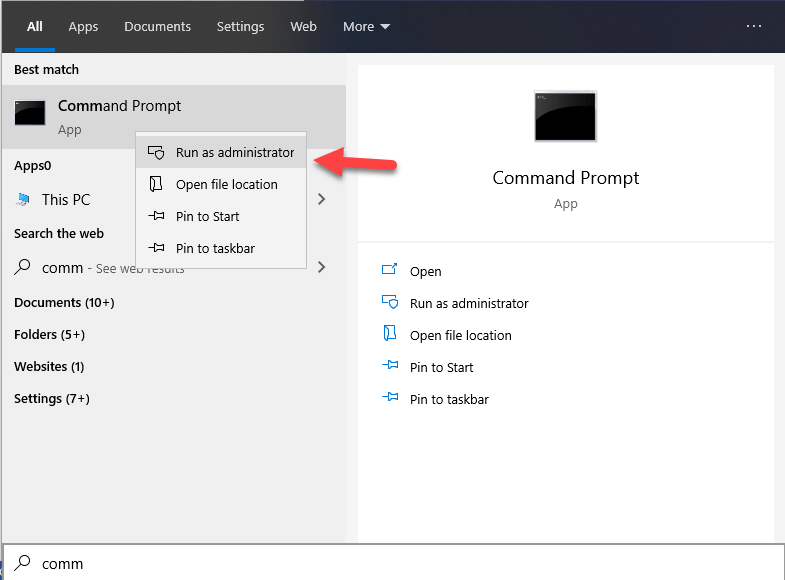
- Permit by clicking ‘Yes’ if asked for permission requests.
- Further, run the following commands:
DISM.exe /Online /Cleanup-image /Scanhealth
DISM.exe /Online /Cleanup-image /Checkhealth
DISM.exe /Online /Cleanup-image /Restorehealth.
Once the scanning process is complete, verify if the problem has resolved or it persists.
3. Perform Clean Boot
Sometimes, high CPU usage due to Modern setup host can occur if the Windows Update fails due to interferences from background programs. A clean boot can be performed to deal with this problem as per the following steps:
- Open the Run dialog box by pressing Win key + R key.
- Type “msconfig” to open the System Configuration window.
- Under the General tab of the System Configuration window, uncheck the ‘Load startup items’ box.

- Under the Services tab, check the box which says ‘Hide all Microsoft services’ and then click on the ‘Disable all’ radio button.
- Then, switch to the Startup tab and open Task Manager by clicking on it.
- Now, on the Startup tab of Task Manager, every startup item that shows up has to be disabled by clicking right on the items and choosing the ‘Disable’ option.
- Then, move back to the Startup tab of the System Configuration window and select the ‘OK’ option.
- Finally, restart your computer to see if the problem still persists or has resolved.
4. Use the Ideal Default System Language
Windows Update may encounter a problem if the language of the system is not the same as that of the default language of the system UI. Windows 10 users can check what is the default system language by the following steps:
- Go to the Start menu and open the Command Prompt window by typing “cmd” and select the ‘Run as Administrator’ option by utilizing the right-click option.
- Enter the following command and press the Enter key to see the default system UI language:
dism /online /get-intl
To check the setup system language, use the below steps:
- Go to the Windows Settings.
- Select the Time & Language option and then click on the Language segment.
- This should display the language on the right-hand side pane which is currently set up on your computer. If you notice a contradiction here, then change it to match the default system UI language. If this doesn’t resolve the issue, then use the following method to solve the Modern setup host high disk usage issue.

5. Empty the Software Distribution Folder
The software distribution folder is responsible for storing all the important temporary files required for Windows Update. However, if too many files occupy the folder, then it may create an interference with the Windows Update. To remove unnecessary files, you can try to utilize the following steps:
- Go to the Run dialog box by holding and pressing together the Windows key + R key.
- Using the below path, go to the respective location and then select all the files and delete them from the folder.
C:\Windows\SoftwareDistribution\Download
- You might be prompted with an ‘Access Denied’ message. If so, then choose the ‘Do this for all current items’ option and further choose the ‘Continue’ option.
- Further, restart your PC and verify if the problem persists.
6. Disable Windows Update
Finally, if the above fixes did not solve the problem at hand, then you must be wondering what can be further done to resolve the Modern setup host issue.
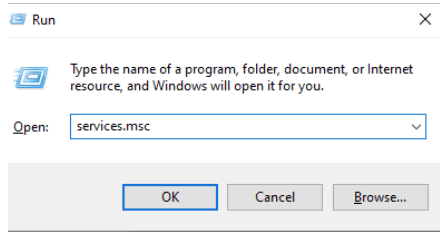
- Open the Run dialog box and input “services.msc” in the type box to open the Services window.
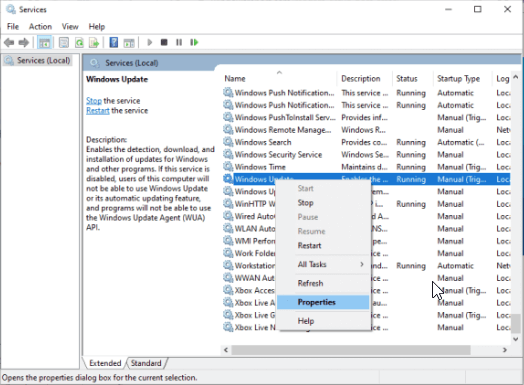
- Here, right-click on the Windows Update to select the ‘Properties’ option.
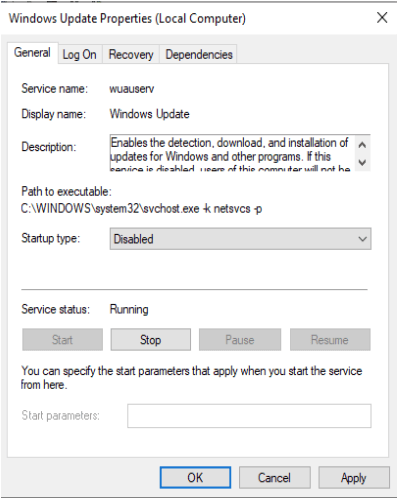
- Under the General tab, make sure that the Startup type option is set to ‘Disabled.’ Further, you can click on the Stop button.
- Then, go to the Recovery tab and ensure that the First failure option is set as “Take No Action.”
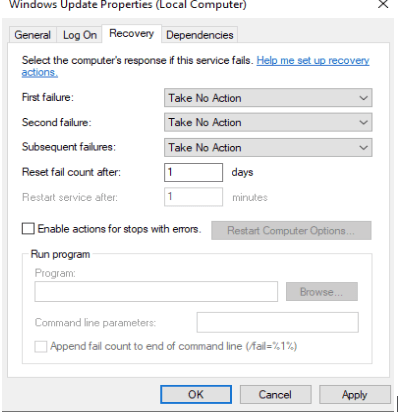
- Apply your changes and get a confirmation of whether the problem has resolved in its entirety.
Lastly, if all the above methodologies did not yield the desired result and the problem persists on your computer, then try to find an ideal driver update software that can automatically scan your system for slowdowns, performance issues and driver-related troubles. The Driver updater utility can detect outdated drivers and replace them by installing the latest drivers on your computer.
Final Thoughts
From this article, you not only acquired knowledge about the Modern setup host process but also had a fair idea on how you can fix the associated problems of high CPU consumption and disk space usage.
There are a lot of benefits which come with Window 10. If you are using Windows 7, Windows 8 and Windows 8.1 you can upgrade your Windows machine to Windows 10 without losing data, application, and settings. But, if you are using Windows XP and Windows Vista, you will not be able to upgrade your Windows machine to Windows 10. In that case, you will need to do a clean install. Before doing clean installation you will need to check does your motherboard support newer operating system and you should backup your data to USB flash disk, network storage or cloud storage. If you do not need your data, you can do the clean installation without backup.
You can upgrade your Windows machine to Windows 10 by using three methods. The first method includes upgrading your Windows by using bootable USB or DVD. These days vendors are manufacturing notebooks without DVD RW drives, so we are recommending you to use bootable USB. The second method includes upgrading your machine by using Windows Update and the third method includes upgrading your machine by using Media Creation Tool.
Few users started upgrade procedure and encouraged upgrade issues including error message Modern Setup Host has stopped working.

This issue occurs if you are trying to do upgrade Windows 7, Windows 8 and Windows 8.1 to Windows 10. There are different issues why this problem occurs including wrong system configuration, the problem with upgrade process and others.
We created few methods which will help you to solve this problem. So, let’s start.
Method 1: Check free Hard Drive space
One of the reasons why you can not upgrade your Windows machine is because you do not have enough free space on your system partition. Media Creation Toolkit requires 8 GB for downloading the update to your machine. We are recommending you to have much more than 8 GB because after the upgrade you will need additional free storage for your applications, data, and work. So, how much data do you need? We are recommending you minimum 15 GB + additional storage for your apps and data. You will need to check free hard disk space on your machine and delete unnecessary applications and data. Here are some tips:
- If you are using unnecessary data you can delete them from your system partitions
- You can backup your data to USB flash disk, external storage, network shared storage or cloud storage (OneDrive, Google Drive, and others). You can read instructions at https://appuals.com/how-to-backup-files-from-command-prompt/
Method 2: Prepare Windows machine for upgrade
In this method, we will need to do some system changes, including disabling services not related to Microsoft, disabling startup programs and changing regional Windows settings. We will describe the procedure for Windows 7, Windows 8 and Windows 8.1. By doing this method we will eliminate potential problems occurred because of conflict between different applications.
At first, we will disable services not related to Microsoft. This method is compatible with Windows 7, Windows 8 and Windows 8.1.
- Hold Windows logo and press R
- Type msconfig and press Enter to open System Configuration
- Choose Services
- At the bottom, left corner click Hide all Microsoft services
- At the bottom right corner click Disable all
- Click Apply and then OK
In the second step, we will disable all startup programs.
If you are using Windows 7
- Hold Windows logo and press R
- Type msconfig and press Enter to open System Configuration
- Choose Startup tab
- At the bottom right corner click Disable all

- Click Apply and then OK
- Restart your Windows machine
- Run Windows upgrade

If you are using Windows 8 and Windows 8.1
- Hold Windows logo and press R
- Type msconfig and press Enter to open System Configuration
- Choose Startup tab and then click Open Task Manager
- Choose Startup tab, again
- Disable all application for this time, by doing right click on application and choose

- Close Task Manager
- Restart your Windows machine
- Run Windows upgrade

The third step will include changing regional settings through Control Panel.
For Windows 7
- Hold Windows logo and press R
- Type control panel and press Enter to open Control Panel
- Choose View by Category
- Click Clock, Language, and Region
- Click Region and Language

- Choose Location tab
- Under Current location choose the United States

- Choose Keyboards and Languages
- Click Change keyboards…
- Choose General tab
- Under Default input language choose English (United States)

- Click Apply and then OK
- Close Control Panel
- Restart your Windows machine
- Run Windows upgrade


For Windows 8 and Windows 8.1
- Hold Windows logo and press R
- Type control panel and press Enter to open Control Panel
- Choose View by Category
- Click Clock, Language, and Region
- Click Region
- Choose Location tab
- Under Home, location choose the United States

- Click Apply and then OK
- Under Clock, Language, and Region click Language to add another one language

- Click Add a language

- Choose English and click Open

- Choose English (United States) and click Add

- Under languages select your previous language and choose Remove

- Close Control Panel
- Restart your Windows machine
- Upgrade to Windows 10
- Enable services, startup programs and change regional settings


Method 3: Create bootable USB and upgrade your machine to Windows 10
In this method, you need to upgrade your Windows machine to Windows 10 by using bootable USB flash drive. At first, you will need to create https://appuals.com/how-to-create-windows-10-bootable-usb-using-rufus/ which is compatible with computers and notebooks. After that you will need to reconfigure your BIOS or UEFI, so your machine can boot from USB flash drive. How will you do it? Please check instructions on https://appuals.com/how-to-fix-boot-error-0xc000000f/, by following method 1. After that boot your Windows machine by using USB and run upgrade procedure.
Method 4: Run Disk Cleanup and delete $Windows.~WS folder
In this method, you will need to run Disk Cleanup and delete folder $Windows.~WS from your system partition. Disk Cleanup is utility integrated into Windows which helps you in removing the unnecessary files from your hard disk in order to boots the speed of your Windows machine.
Please check instructions on running Disk Cleanup at https://appuals.com/how-to-do-disk-cleanup-in-windows-8-and-10/ . The procedure is compatible with Windows 7, Windows 8 and Windows 8.1.
Next step will include deleting $Windows.~WS folder. When you upgrade your previous Windows to Windows 10 rather than clean install, you will see two hidden folders on your C Drive (any drive where you installed Windows). One of those hidden folders will be $Windows.~WS Please check instructions at $Windows.~WS folder from your hard disk.
Method 5: Resume upgrade by running setupprep.exe
This solution helped so many users, and it includes starting upgrade process and running setupprep.exe file which will resume the last operation instead of starting completely a new. The procedure is compatible with Windows 7, Windows 8 and Windows 8.1.
- Run Windows upgrade through Windows by using Media Creation Toolkit
- After you get error, close the Windows Update or Media Creation Tool
- Hold Windows logo and press R
- Type C:\$Windows.~WS\Sources\Windows\sources\setupprep.exe and press Enter to resume Windows upgrade
- Wait until Windows is finished upgrade
Method 6: Use DISM to repair Windows
For this method, we will need to use a tool named DISM (Deployment Image Servicing and Management). The DISM is command line tool which allows you to mount Windows image file (install.wim) and do image servicing including installing, uninstalling, configuring and Windows update. DISM is a part of Windows ADK (Windows Assessment and Deployment Kit) which you can download on this LINK. The procedure of repairing Windows image is the same for operating systems Windows 7 to Windows 8.1. Please check instructions at https://appuals.com/use-dism-repair-windows-10/
Method 7: Run System File Checker
System File Checker (SFC) is a command line utility integrated into Windows that checks for system file corruption. In case SFC found some issues with system file corruption, SFC will try to fix them. You must be an administrator running a console session in order to use the SFC utility. SFC includes additional commands as SCANNOW. SCANNOW scans integrity of all protected system files and repairs files with problems when possible. Please check instructions how to run SFC /Scannow.
Method 8: Install or upgrade graphics card driver
Few users solved their problem by reinstalling or installing the graphics card driver. Please check instructions at https://appuals.com/how-to-fix-display-adapter-or-gpu-showing-yellow-exclamation-mark/
Method 9: Move User folder to default location
Did you move your user profile to another location? If not, please read next method. If yes, you will need to move back your user profile to default location C:\Users\YourUserProfile. After that, you will need to run upgrade. Few users moved their user profile from system partition to another location and Windows upgrade was not able to continue the procedure.
Method 10: Clean install Window 10
If you do not want to play anymore with troubleshooting steps, you can to clean installation of your Windows 10. Before doing that, please check does your motherboard, brand name computer or notebook support Windows 10. Second, you will need to make a list of software you are using, so you can install later on your Windows 10. Third, you will need to backup your personal or business data to USB flash drive, external hard disk, network shared storage or cloud storage. Please check instructions https://appuals.com/how-to-clean-install-windows-10/.