Из-за различных серверных необходимостей, может возникнуть проблема того, что микрофон не работает через RDP, и данную функцию нужно включать вручную. В данной инструкции мы наглядно расскажем о способах исправления данной проблемы.
Настройка служб перенаправления устройств
Запускаем gpedit.msc на локальной машине, с которой будем подключаться к удаленному терминалу.
Обратите внимание, что на локальном компьютере у вас должны быть права администратора.

Внимание: Если у вас вылезает ошибка о том, что не удается найти редактор групповой политики, то воспользуйтесь данной инструкцией
Идем по пути:
Политика «Локальный компьютер» -> Административные шаблоны -> Компоненты Windows -> Службы удаленных рабочих столов -> Узел сеансов удаленных рабочих столов-> Перенаправление устройств -> Включаем “Разрешить перенаправление воспроизведения звука” и “Разрешить перенаправление записи звука“.

Такую же политику необходимо применить и на удаленном сервере.

Внимание: Служба должна быть включена на локальном сервере и на сервере к которому вы подключаетесь
Включение служб Windows Audio
В службах на обеих машинах необходимо включить Windows Audio. Для этого перейдите в меню служб:

Пролистайте вниз и найдите службу Windows Audio:
 Затем в меню данной службы выберите «Properties»:

В открывшимся меню в пункте «Startup type» в выпадающем списке выберите «Automatic», чтобы служба автоматически включалась при запуске системы:

После чего запустите службу:

Обновление параметров реестра.
После этого обновите параметры реестра.
Для этого нажмите Win +R и выполните команду REGEDIT:

Затем идем по пути:
HKEY_LOCAL_MACHINE\SYSTEM\CurrentControlSet\Control\Terminal Server\WinStations\RDP-Tcp
Найдите файл fDisavleAudioCapture:

Два раза кликаем по файлу и у нас откроется меню в котором необходимо изменить пункт «Value data» на восемь нулей «00000000»:

Добавляем роль «Remote Desktop Session Host»
В меню пуск запускаем программу «Server Manage»:

В правом углу нажмите на меню «Manage» и в нем выберите «Adding roles and Features»:

Затем, в открывшемся меню нажмите «Next»:

В меню «Installation Type» выберите «Role-based or Fearure-based installation», как показано на скриншоте:

Далее поставьте галочку в меню «Remote Deskctop Services», после чего нажмите «Next»:

Следующим шагом поставьте галочку на «Remote Desktop Services»:

Следующим шагом просто нажимаем «Next»:

На шаге «Role Services» выберите «Remote Desktop Session Host» и в открывшимся окне выбираем «Add features»:

После чего просто нажимаем «Next».
На шаге «Confirmation» ставим галочку в поле «Restart the destination server…», затем нажимаем «Install»:

После чего начнется загрузка:

Сервер перезапустится, добавленная роль появится.
Настройка Remote Audio.
Далее откройте настройки подключения к удаленному рабочему столу на вашем локальном сервере:
 Нажмите на кнопку “Show options”, затем перейдите в “Local resources” и выберите “Remote Audio”:

Затем в настройках выберите пункты «Play on this computer» и «Record from this computer»:

Кликаем «ОК».
Кликаем на иконку звука с помощью правой кнопки мыши и выбираем меню «Sound»:

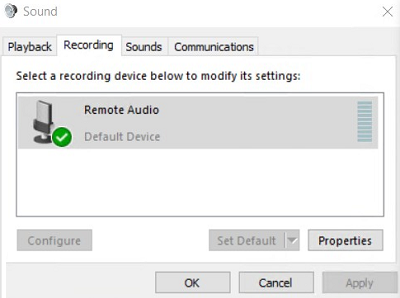
В нем переходим во вкладку «Recording». И проверяем наличие «Удаленного аудио».

Поздравляем! Нас теперь будет слышно на удаленном терминале. Для того чтобы он работал корректно, в приложениях используйте микрофон по умолчанию.
191028
Санкт-Петербург
Литейный пр., д. 26, Лит. А
+7 (812) 403-06-99
![]()
700
300
ООО «ИТГЛОБАЛКОМ ЛАБС»
191028
Санкт-Петербург
Литейный пр., д. 26, Лит. А
+7 (812) 403-06-99
![]()
700
300
ООО «ИТГЛОБАЛКОМ ЛАБС»
В этой статье, мы покажем, как сконфигурировать перенаправление микрофона и аудио в RDP сессии.
По умолчанию при использовании удаленного рабочего стола Windows вы не можете использовать свой микрофон для записи звука в программах, запущенных на удаленном компьютере в терминальной (RDP/RDS) сессии. Если вам нужно, чтобы ваш микрофон мог передавать звук в приложение (Teams, Skype, и т.д.), установленное на удаленном хосте, вам нужно проверить настройки как на стороне клиента, так и сервера.
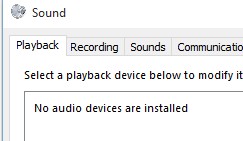
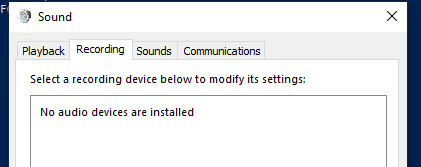
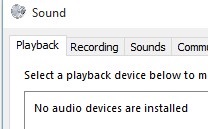
Если открыть вкладку Recording в настройках звука на удаленном рабочем столе, там скорее всего будет надпись:
No audio devices are installed

Включить поддержку проброса аудиоустройств на RDP/RDS сервере
Сначала нужно сконфигурировать удаленный компьютер Windows для корректной работы аудиоустройств в Remote Desktop сессии.
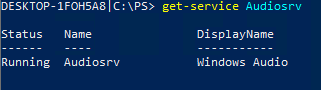
- Проверьте, что на RDP сервере и на клиенте установлена и запущена служба Windows Audio. Проверить что служба работает можно с помощью PowerShell:
get-service Audiosrv Также проверьте, что запущена служба Remote Desktop Services UserMode Port Redirector (UmRdpService).
В Windows Server служба Audiosrv по умолчанию отключена.
- Откройте редактор локальных групповых политик (
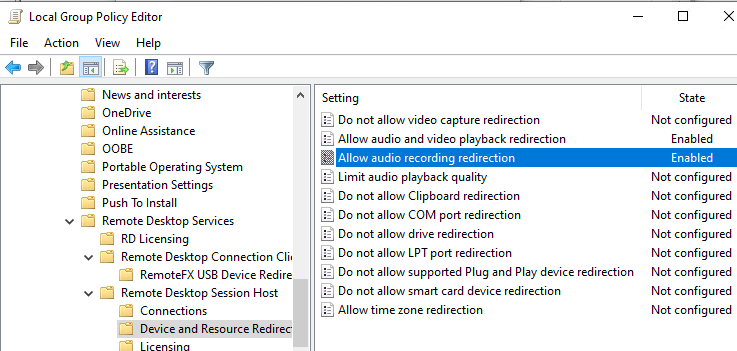
gpedit.msc), перейдите в раздел GPO Computer Configuration -> Administrative Templates -> Windows Components -> Remote Desktop Services -> Remote Desktop Session Host. Включите политики “Allow audio and video playback redirection” и “Allow audio recording redirection”.
Затем измените настройки параметра «Do not allow supported Plug and Play device redirection» на Disabled.Обновите настройки GPO командой:gpupdate /force. Перезапустите службу TermService (Remote Desktop Services);
 Также проверьте, что запущена служба Remote Desktop Services UserMode Port Redirector (UmRdpService).
Настраиваем проброс локального микрофона в RDP сессию
Теперь нужно проверить настройки RDP клиента и включить проброс микрофона.
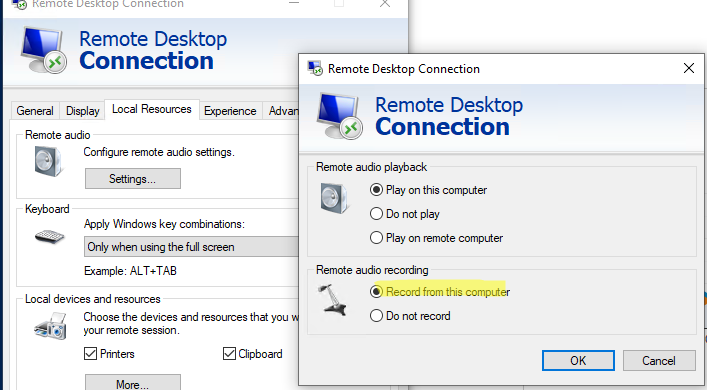
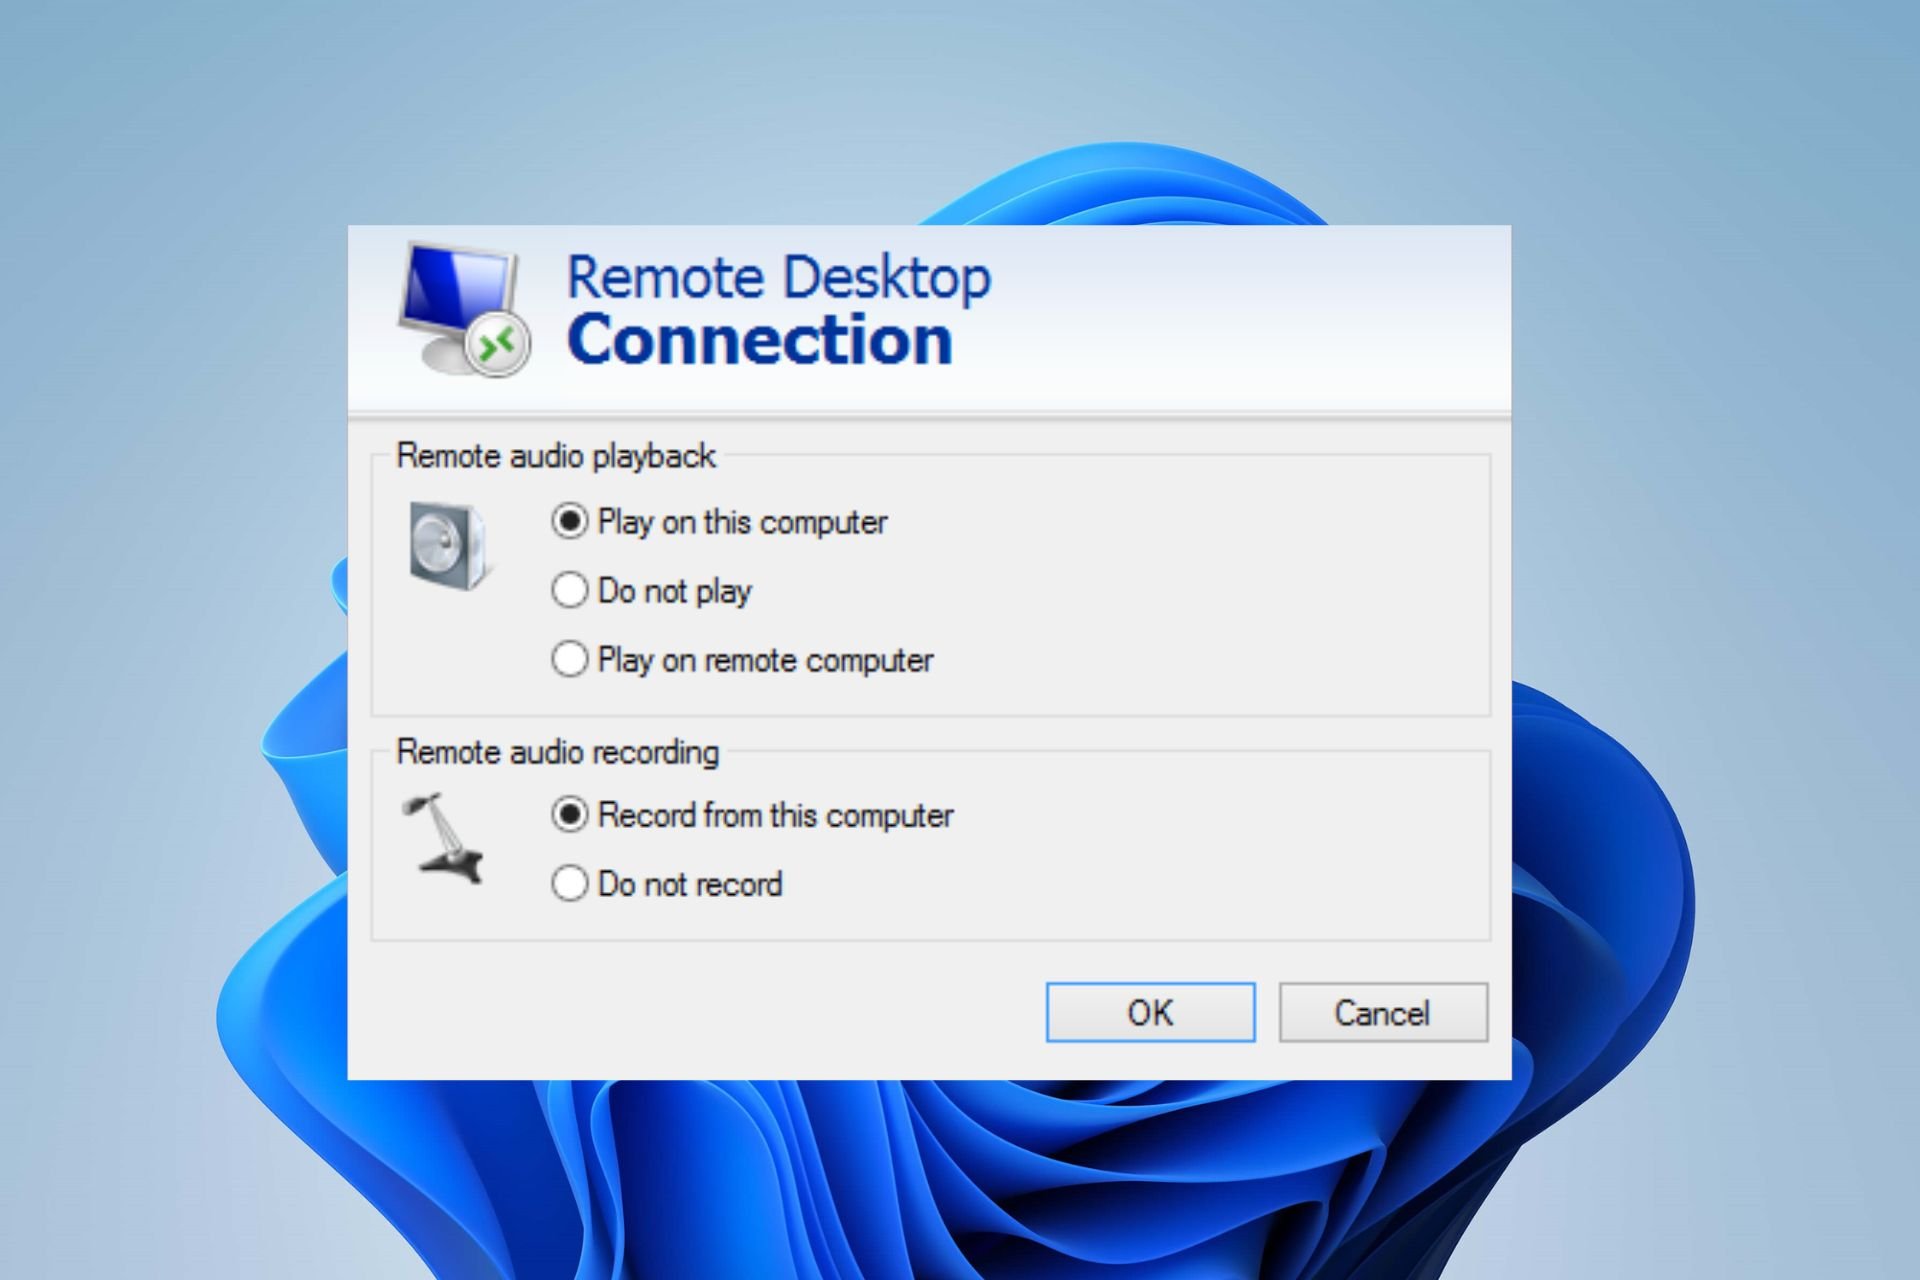
Если вы используется для подключения к RDP стандартный клиент mstsc.exe, проверьте его настройки. Нажмите на кнопку Show Options, перейдите на вкладку Local Resources, в секции Remote audio нажмите на кнопку Settings. В Remote audio recording измените настройки с Do not record на Record from this computer.
Если после этого в RDP сессии появился звук, но запись звука не работает, создайте в ветке реестра HKLM\SYSTEM\CurrentControlSet\Control\Terminal Server\WinStations\RDP-Tcp параметр типа DWORD с именем fDisableAudioCapture и значением 0.
Теперь подключитесь к удаленному рабочему столу. Убедитесь, что в секции Sound панели управления на вкладке Recording указано, что устройство Remote Audio используется по умолчанию для записи звука.
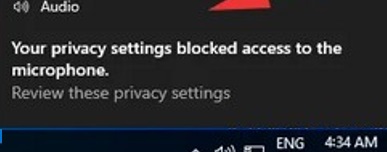
При попытке открыть меню Sound Settings может появится уведомление:
Audio
Your privacy settings blocked access to the microphone.
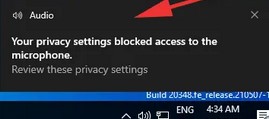
Это частая проблема на Windows Server 2019 RDS, когда звук есть, а устройство записи (микрофон) не работает. Это связано с тем, что настройках конфиденциальности профиля пользователя на сервере по умолчанию запрещают использование микрофона приложениями.
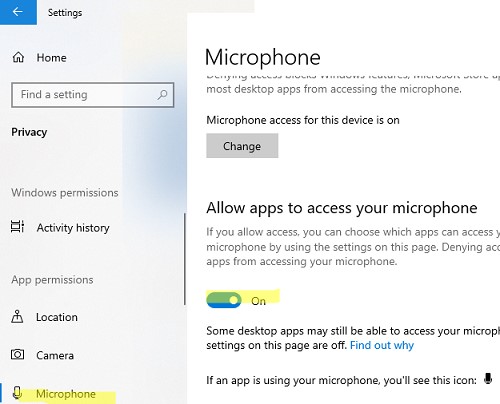
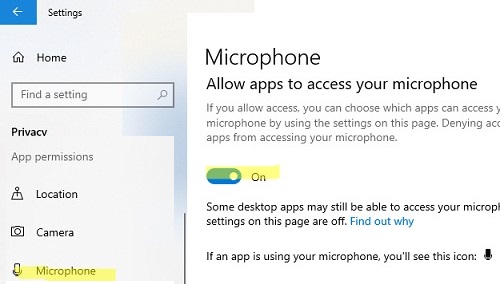
В этом случае откройте Settings -> Privacy -> Microphone и включите опцию Allow apps to access your microphone.
Если приложение опубликована на удаленном рабочем столе Windows Server RDS в виде RemoteApp, вам нужно отредактировать .rdp файл, использующийся для подключения. Добавьте в него следующие строки:
audiocapturemode:i:1
audiomode:i:0
Audiocapturemode = 1— включает запись звука с локального микрофона и передачу его в удаленный сеансAudiomode = 0– воспроизводить звуки из RDP сеанса на локальном компьютере
После этого проброс микрофона станет доступен как в полноценных RDP сессиях, так и в RDS RemoteApp. Не забудьте выбрать данный Remote Audio микрофон в качестве основного источника звука в ваших приложениях на RDP хосте.
Проброс звука с удаленного рабочего стола Windows
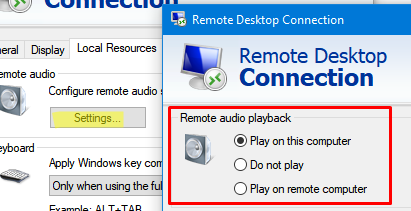
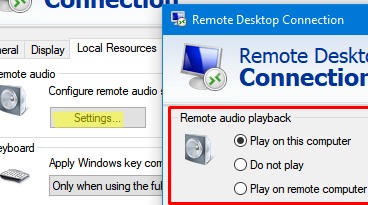
Запустите ваш RDP клиент (mstsc.exe), перейдите на вкладку Advanced -> Remote Audio -> Settings.
В секции Remote Audio Playback доступны три режима:
- Play on this computer
- Do not play
- Play on remote computer
Чтобы звук с RDS хоста воспроизводился на вашем локально компьютере, выберите первую опцию.
Подключитесь к RDP хосту. Откройте настройки звука (Панель управления -> Оборудование -> Звук).
Если на вкладке Playback указано No audio device installed, проверьте что на удаленном хосте запущена служба Windows Audio.
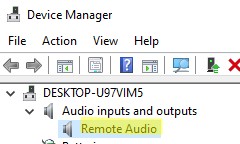
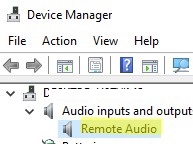
Откройте диспетчер устройств и проверьте, что в секции Audio inputs and outputs есть активное устройство Remote Audio. Устройство должно быть включено.
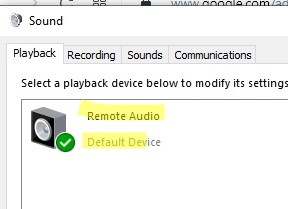
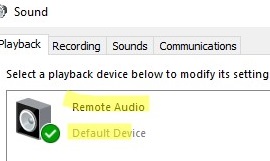
Если все, ОК по умолчанию в панели управление звука должно быть выбрано устройство Remote Audio.
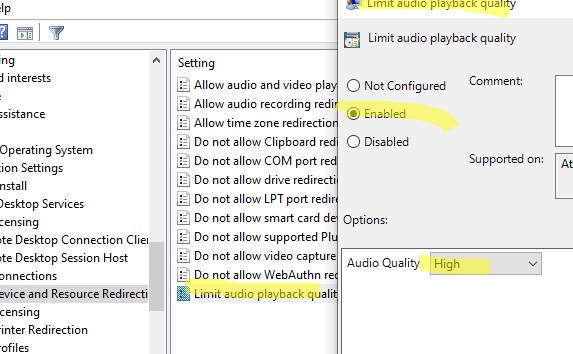
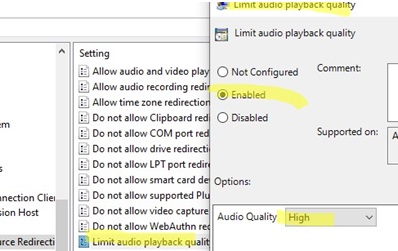
Чтобы улучшит качество звука, включите параметра GPO Limit audio playback quality и установите Audio Quality = High.
При использовании виртуальных машин, RDSH Remote Apps, терминальных решений VMware Horizon или Citrix ICA для корректной работы звука в браузере на основе движка Chromium нужно в реестре отключить параметр Audio Sandbox.
- Для Google Chrome:
[HKEY_LOCAL_MACHINE\SOFTWARE\Policies\Google\Chrome]
"AudioSandboxEnabled"=dword:00000000
- Для Microsoft Edge:
[HKEY_LOCAL_MACHINE\SOFTWARE\Policies\Microsoft\Edge]
"AudioSandboxEnabled"=dword:00000000
In this article, we’ll show you how to configure microphone and audio redirection in a Remote Desktop (RDP) session.
By default, when using Windows Remote Desktop, you cannot use your local microphone to record sound in programs running on the remote computer in a terminal session (RDP/RDS). If you need to redirect your local microphone device to an app (Teams, Skype, etc.) installed on a Remote Desktop host, you need to check the settings on both the client and server-side.
If you open the Recording tab in the Sound settings on the Remote Desktop computer, you will most likely see the caption:
No audio devices are installed
Enable Audio Device Redirecting on RDP (RDS) Computer
First, you need to configure the remote Windows computer so that redirected audio devices work correctly in a Remote Desktop session.
- Check that the Windows Audio service is installed and running on both the RDP server and client. Also, check that the Remote Desktop Services UserMode Port Redirector (UmRdpService) service is running. You can use PowerShell to check that the service is running:
Get-Service Audiosrv, UmRdpService Audiosrv service is disabled by default on Windows Server.
- Open the Local Group Policy Editor (
gpedit.msc), go to the following GPO section Computer Configuration -> Administrative Templates -> Windows Components -> Remote Desktop Services -> Remote Desktop Session Host. Enable two GPO options ‘Allow audio and video playback redirection‘ and ‘Allow audio recording redirection‘. Then change the ‘Do not allow redirection of supported Plug and Play devices‘ policy value to Disabled. Update the GPO settings with the command:gpupdate /forceRestart the TermService (Remote Desktop Services) service;


At this point, you will need to check the settings on your RDP client and enable the microphone redirection feature.
If you are using the built-in mstsc.exe client (Remote Desktop Connection) to connect to RDP, and check its settings. Click on the Show Options button, navigate to the Local Resources tab, and click on the Settings button in the Remote audio section. Change from “Do not record” to “Record from this computer” in Remote audio recording.

If after that sound appears in the RDP session, but the sound recording doesn’t work, create a DWORD parameter named fDisableAudioCapture with a value of 0 under the registry key HKLM\SYSTEM\CurrentControlSet\Control\Terminal Server\WinStations\RDP-Tcp
Now connect to the Remote Desktop. Open the Sound item in the Control Panel, go to the Recording tab, and make sure that the Remote Audio device is selected by default for sound recording.

A notification may appear when you try to open the Sound settings menu:
Audio

Your privacy settings blocked access to the microphone.
This is a known issue with Windows Server 2019 RDS where the remote audio works fine, but the recording device (microphone) does not work. This is because the server’s default user profile privacy settings prevent applications from using the microphone.
In this case, go to Settings -> Privacy -> Microphone and enable the “Allow applications to access your microphone” option.
If the application is published as a RemoteApp on Windows Server RDS, you will need to edit the .rdp file used to connect. Add the following lines to this file:
audiocapturemode:i:1

audiomode:i:0
- Audiocapturemode = 1 – enables audio recording from a local microphone and redirects it to the remote session
- Audiomode = 0 – play sounds from RDP session on local computer
After that, the redirected microphone device will become available both in RDP sessions and in RemoteApps. Don’t forget to select this Remote Audio microphone as the main audio source in your applications on the RDP host.
Enable Audio Redirection over Remote Desktop on Windows
Run your RDP client (mstsc.exe). Navigate to the Advanced -> Remote Audio -> Settings tab.
There are three modes available in the Remote Audio Playback section:
- Play on this computer
- Do not play
- Play on remote computer
If you want to play the audio from the RDS host on your local computer, select the first option.
Connect to your Remote Desktop host. Open the sound settings (Control Panel -> Hardware -> Sound).
If the Playback tab shows No audio device installed, check that the Windows Audio service is running on the remote host.
Open Device Manager and check that there is an active Remote Audio device in the Audio inputs and outputs section.
The Remote Audio device should be selected by default in the Sound Control Panel if everything is configured correctly.
To improve audio quality, enable the GPO option Limit audio playback quality and set Audio Quality = High.
If you are using virtual machines, RDSH Remote Apps, VMware Horizon, or Citrix ICA terminal solutions, you will need to disable the Audio Sandbox parameter in the registry for sound to work correctly in Chromium-based browsers.
- For Google Chrome:
[HKEY_LOCAL_MACHINE\SOFTWARE\Policies\Google\Chrome]"AudioSandboxEnabled"=dword:00000000 - For Microsoft Edge:
[HKEY_LOCAL_MACHINE\SOFTWARE\Policies\Microsoft\Edge]"AudioSandboxEnabled"=dword:00000000
Outdated audio drivers can cause such issues in Remote Desktop
by Henderson Jayden Harper
Passionate about technology, Crypto, software, Windows, and everything computer-related, he spends most of his time developing new skills and learning more about the tech world. He also enjoys… read more
Updated on
- Some users reported that the remote desktop is not detecting the microphone, but this article will show how you can easily solve it.
- Before going through any stress, you should check if your ports and cables are in good working condition.
- Another efficient option to fix your remote desktop microphone is to update associated drivers.
Several users have been complaining about Remote Desktop not detecting the microphone, but not to worry, this comprehensive guide provides simplified fixes for this issue.
Some users also specify the connection errors they encounter, such as; Remote Desktop microphone with no input devices found, headphones not working on Remote Desktop, and so forth.
These problems are common; however, the solutions can fix both built-in microphones and external headsets’ microphones.
If your Remote Desktop presents this problem, this guide will help you fix your microphone.
How we test, review and rate?
We have worked for the past 6 months on building a new review system on how we produce content. Using it, we have subsequently redone most of our articles to provide actual hands-on expertise on the guides we made.
For more details you can read how we test, review, and rate at WindowsReport.
Why is my mic not being detected?
- Microphone Permission turned off: If your microphone is not detected after updating Windows, then it could be that the app permissions have been turned off, hence the need to toggle it back on.
- Microphone not set as default device: If you have connected multiple microphones and headset devices to your computer, it may have selected the wrong device for use. To fix this, you need to choose the microphone device of your choice and set it as default.
- Outdated audio drivers: You may experience Remote Desktop not detecting microphone errors when your audio drives are outdated. To fix this, you need to update your audio drivers.
How can I fix the Remote Desktop if it fails to detect the microphone?
1. Enable your disabled microphone
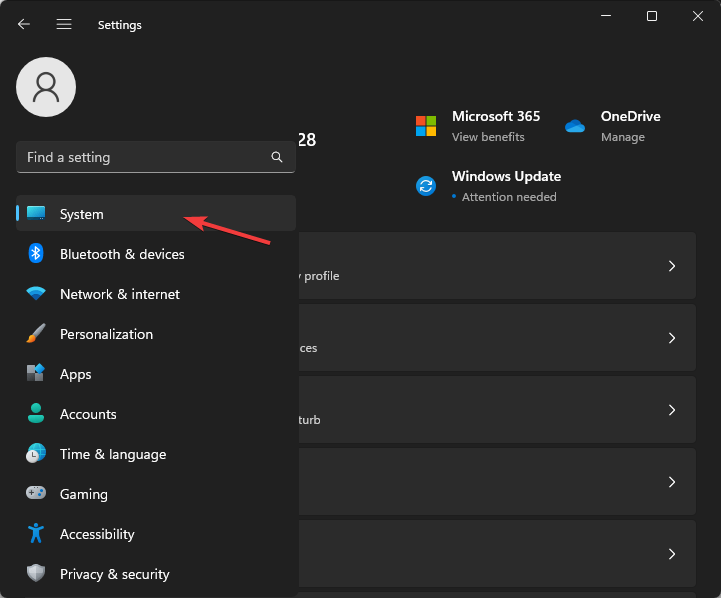
- Click the Starts button and select Settings.
- Navigate to System settings.
- Click on Sound in the left sidebar.

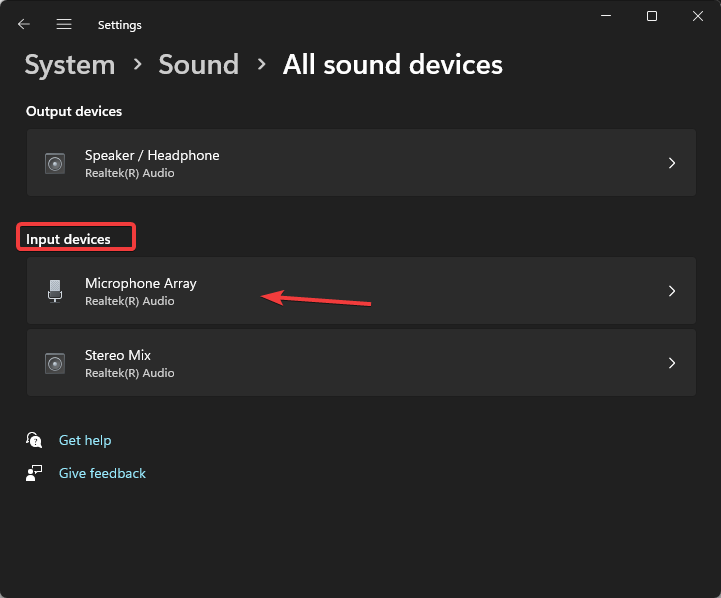
- Next, locate and click on Manage sound devices in the Input devices settings.
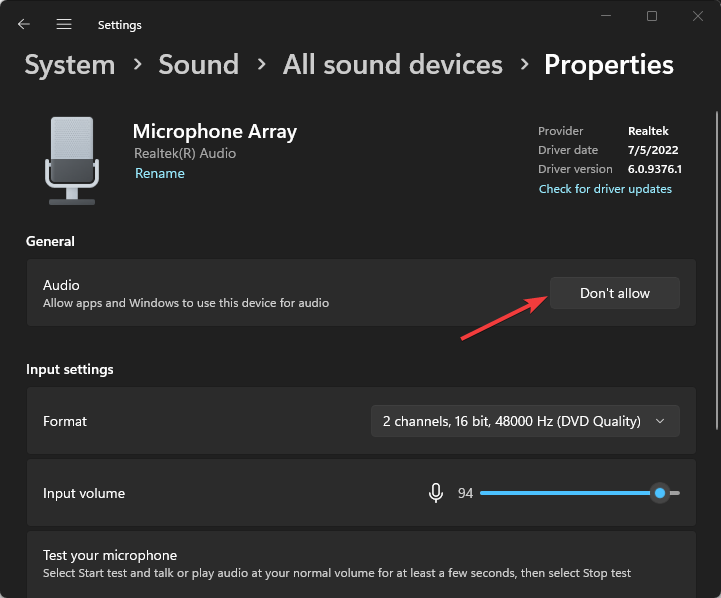
- Locate your microphone device under the Allow or Don’t allow section.
- Click on Allow to enable your microphone.

2. Adjust the default audio settings
- Press the Starts button and select Settings.
- Navigate to System settings from the list of options.
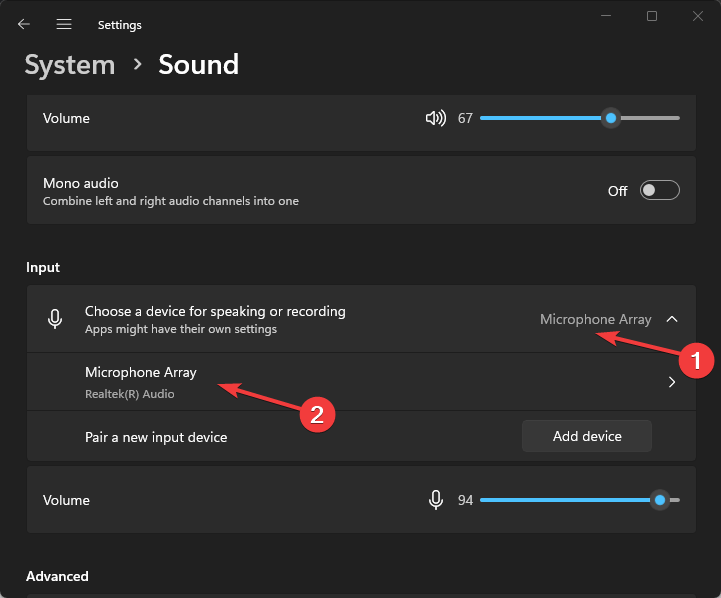
- Then, click on Sound in the menu on the left sidebar.
- Open the Input devices dropdown menu and select your microphone as the default audio.

3. Confirm that the microphone and computer’s ports are working
Firstly, check if your microphone’s wire is not broken, especially at the ends where it connects to your PC.
If there’s any other available device, plug your microphone into its ports to test if it works. Inspect the connecting jack to see if there are any bending or burns.
In the availability of other devices, you can test it by plugging it into the same port you’ve tested with your microphone to see if it works.
- How to Type Accents on Windows 11
- How to Disable the Insert Your Security Key Into the USB Port popup
4. Update the audio drivers
- Press the Windows + R keys to launch the Run dialog box.
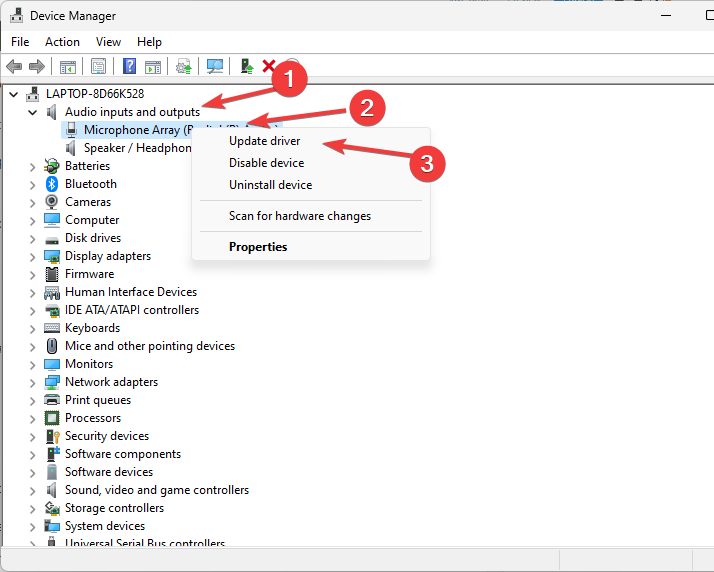
- Input devmgmt.msc and press Enter to launch the Device Manager.
- Locate the Audio Inputs and Outputs and expand it.

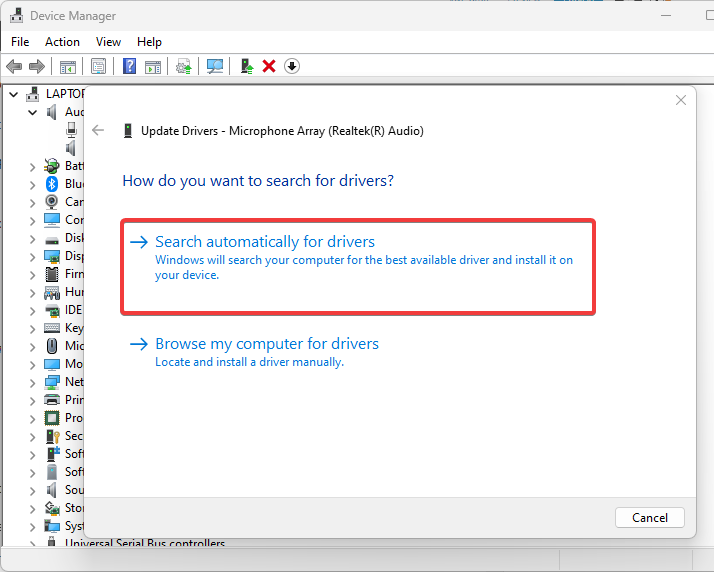
- Right-click the audio driver and choose Update driver.
- Then select Search automatically for drivers.
Alternatively, you can use third-party tools to download and install the latest drivers for all your devices. Instead of having to manually download each driver, you can automatically download all the drivers your PC needs.
Often, your computer system might not be able to update the generic drivers for your hardware and peripherals correctly. There are vital differences between a generic driver and a manufacturer’s driver. Finding the correct driver versions for every hardware component can become tiresome.That’s why a dependable updater can help you find and update your drivers automatically. We strongly suggest the Outbyte Driver Updater, and here’s how to do it:
- Download and install the Outbyte Driver Updater app.
- Launch the software and wait for the app to detect all incompatible drivers.
- Now, it will show you a list of all outdated drivers to select the ones to Update or Ignore.

- Click on Update & Apply Selected to download and install the latest versions.
- Restart your PC to ensure the applied changes.


Outbyte Driver Updater
Maintain your device healthy by letting OutByte Driver Updater find the latest driver options.
Disclaimer: You may need to upgrade the app from the free version to perform specific actions.
Does the microphone work through RDP?
You cannot access your microphone over a Remote Desktop Protocol unless you enable it manually.
Also, you can explore any of the solutions provided above if you experience Remote Desktop not detecting microphone errors. You can also check our detailed guide on quick ways to fix the microphone not working in Windows 11.
However, if you have issues with your built-in microphone, you can check the troubleshooting steps for the built-in microphone not working on Windows 10.
At times, users who are not tech-savvy may find it difficult to access their microphones. Hence, you can follow the easy ways to turn on the microphone in Windows 10/11 to know better.
![]()
Подключение по RDP (удаленному рабочему столу) – очень удобная и популярная функция операционной системы Windows 10, которая позволяет работать на удаленном компьютере, используя свой компьютер в качестве виртуального рабочего стола. Однако, иногда пользователи сталкиваются с проблемой отсутствия звука с микрофона при подключении к удаленному рабочему столу. Если у вас возникла такая проблема, не отчаивайтесь – в этой статье мы рассмотрим 10 способов ее решения.
1. Проверьте настройки звука на локальном и удаленном компьютере. Убедитесь, что микрофон не отключен и находится включенном состоянии на обоих компьютерах. Проверьте также уровень громкости и другие параметры звука.
2. Убедитесь, что микрофон корректно работает на локальном компьютере. Проверьте работу микрофона в других приложениях или программных средствах записи звука, чтобы исключить возможность его неисправности.
3. Перезапустите удаленное подключение. Иногда проблема с микрофоном может быть вызвана некорректной установкой удаленного подключения. Перезагрузите удаленную сессию и попробуйте подключиться снова.
4. Обновите драйверы звука. Проверьте наличие последних версий драйверов для звуковой карты на обоих компьютерах. Установите актуальные драйверы, если это необходимо.
5. Проверьте настройки звука в настройках удаленного рабочего стола. Убедитесь, что в настройках удаленного рабочего стола включена передача звука и микрофона. Проверьте также настройки сжатия звука и качество передачи.
6. Измените звуковые настройки в групповых политиках. Некоторые ограничения и настройки звука могут быть заданы через групповые политики. Убедитесь, что в групповых политиках разрешена передача звука и микрофона через RDP.
7. Проверьте наличие конфликтов с другими программами. Возможно, некоторые программы или приложения на вашем компьютере мешают нормальной работе микрофона при подключении по RDP. Попробуйте временно выключить такие программы и повторите попытку.
8. Проверьте физическое подключение микрофона. Проверьте целостность кабеля микрофона и правильность его подключения к компьютеру. Попробуйте использовать другой кабель или порт USB.
9. Переустановите удаленное подключение. Если проблема с микрофоном не решается, попробуйте переустановить удаленное подключение с удаленного компьютера или обновить клиентское приложение.
10. Обратитесь за помощью к специалисту. Если все предыдущие способы не привели к решению проблемы, обратитесь за помощью к специалисту или свяжитесь с технической поддержкой Microsoft.
Проверьте настройки микрофона в RDP
Когда вы подключаетесь к удаленному компьютеру с помощью RDP на Windows 10, возможно, у вас могут возникнуть проблемы с использованием микрофона. Если микрофон не работает должным образом или его сигнал неверно передается, есть несколько настроек, которые можно проверить.
1. Убедитесь, что микрофон обнаружен и правильно настроен на вашем локальном компьютере. Для этого откройте «Параметры» > «Система» > «Звук» и проверьте настройки микрофона. Убедитесь, что микрофон выбран в качестве устройства записи по умолчанию.
2. Проверьте настройки микрофона на удаленном компьютере. Подключитесь к удаленному компьютеру с помощью RDP и откройте «Панель управления». Затем выберите категорию «Аппаратное оборудование и звук» и перейдите к разделу «Звук». Убедитесь, что микрофон выбран в качестве устройства записи по умолчанию.
3. Проверьте настройки звука в RDP. Перейдите к окну подключения RDP на локальном компьютере и щелкните на кнопке «Настройки». Затем перейдите на вкладку «Локальные ресурсы» и убедитесь, что опция «Запись звука» включена. Если эта опция уже включена, попробуйте ее отключить и снова включить.
4. Проверьте настройки микрофона в программе, которую вы используете на удаленном компьютере для записи звука. Убедитесь, что микрофон правильно настроен в программе и не заблокирован для использования.
5. Проверьте настройки безопасности на удаленном компьютере. Некоторые настройки безопасности могут блокировать микрофон и предотвращать его использование через RDP. Проверьте настройки безопасности и разрешите использование микрофона.
Если после проверки всех этих настроек проблема с микрофоном все еще не устраняется, возможно, вам придется обратиться за помощью к специалисту или воспользоваться другим методом, чтобы передать звуковой сигнал с локального компьютера на удаленный.