Windows Server 2019 was available for public (GA) from early October 2018. In past I have written many articles about domain migrations by covering different Active Directory versions. So, it is time me to write about AD 2019 migrations. In this demo I am going to demonstrate how to migrate from Active Directory 2012 R2 to Active Directory 2019. The same procedure is going to apply for any AD version from Windows Server 2008.
Migration itself is very straight forward task, however, there are other things you need to consider before you do an AD migration. I have listed a checklist below you can use in many occasions.
- Evaluate business requirement for active directory migration
- Perform Audit on Existing Active Directory Infrastructure
- Provide Plan for implementation Process
- Prepare Physical / Virtual resources for Domain Controller
- Install Windows server 2019 Standard / Datacenter
- Patch Servers with latest Windows Updates
- Assign Dedicate IP address to Domain Controller
- Install AD DS Role
- Migrate Application and Server Roles from the Existing Domain Controllers.
- Migrate FSMO roles to new Domain Controllers
- Add New Domain controllers to the Existing Monitoring system
- Add New Domain controllers to the Existing DR Solution
- Decommission old domain controllers
- Raise the Domain and Forest Functional level
- On Going Maintenance

As per the above figure therebeladmin.com domain has two domain controllers. In here, the FSMO role holder is running windows server 2012 R2. Domain and forest functional level currently operating at Windows server 2012 R2. A new domain controller with Windows server 2019 will be introduce and it will be the new FSMO role holder for the domain. once FSMO role migration completed, Domain controller running windows server 2012 R2 will be decommissioned. After that forest and domain function level will raised to the windows server 2019.
In the demonstration, REBEL-DC2012 is the domain controller with windows server 2012 R2 and REBEL-DC2016 is the domain controller with windows server 2019.
Note – When you introduce new domain controllers to the existing infrastructure it is recommended to introduce to the forest root level first and then go to the domain tree levels.

- Log in to the Server 2019 as a member of local administrators group.
- Add server to the existing domain as member

- After restart, log in to the server as Enterprise Administrator
- Assign static IP address to the server
- Launch the PowerShell Console as an Administrator
- Before the configuration process, we need to install the AD DS Role in the given server. In order to do that we can use Following command.
Install-WindowsFeature –Name AD-Domain-Services -IncludeManagementTools

- Configure the new server as additional domain controller.
Install-ADDSDomainController
-CreateDnsDelegation:$false
-NoGlobalCatalog:$true
-InstallDns:$true
-DomainName «therebeladmin.com»
-SiteName «Default-First-Site-Name»
-ReplicationSourceDC «REBEL-DC2012.therebeladmin.com»
-DatabasePath «C:\Windows\NTDS»
-LogPath «C:\Windows\NTDS»
-NoRebootOnCompletion:$true
-SysvolPath «C:\Windows\SYSVOL»
-Force:$true

There are no line breaks for the command and I have listed it as above to allow readers to identify on the parameters clearly.
|
Argument |
Description |
|
Install-ADDSDomainController |
This cmdlet will install the domain controller in active directory infrastructure. |
|
-NoGlobalCatalog |
If you do not need to create the domain controller as global catalog server, this parameter can use. By default, system will enable global catalog feature. |
|
-SiteName |
This Parameter can use to define the active directory site name. the default value is Default-First-Site-Name |
|
-DomainName |
This parameter defines the FQDN for the active directory domain. |
|
-ReplicationSourceDC |
Using this parameter can define the active directory replication source. By default, it will use any available domain controller. But if need we can be specific. |
Once execute the command it will ask for SafeModeAdministrator Password. Please use complex password to proceed. This will be used for DSRM.
- After configuration completed, restart the system and log back in as administrator to check the AD DS status.
Get-Service adws,kdc,netlogon,dns

Will confirm the status of the AD DS service.
Get-ADDomainController -Filter * | Format-Table Name, IPv4Address, Site

Will list down the domain controllers along with the IP address and Sites it belongs to.
- Migrate all five FSMO roles to the New domain controller using following command,
Move-ADDirectoryServerOperationMasterRole -Identity REBEL-DC2019 -OperationMasterRole SchemaMaster, DomainNamingMaster, PDCEmulator, RIDMaster, InfrastructureMaster
In above the REBEL-DC2019 is domain controller running with Windows Server 2019.

Once its completed, we can verify the new FSMO role holder using
Netdom query fsmo

- The new step of the process is to decommission the old windows domain controller which running with Windows Server 2012 R2. To do that execute the following command as enterprise administrator from the relevant DC.
Uninstall-ADDSDomainController -DemoteOperationMasterRole -RemoveApplicationPartition
After execute the command it will ask to define password for the local administrator account.

Once its completed it will be a member server of the rebeladmin.com domain.
- Next step is to raise the domain and forest functional level to windows server 2019. To do that can use the following commands.
To upgrade domain functional levels
Set-ADDomainMode –identity therebeladmin.com -DomainMode Windows2016Domain
To upgrade forest function levels
Set-ADForestMode -Identity therebeladmin.com -ForestMode Windows2016Forest

Note – With Windows Server 2019, there is no domain or forest functional level called windows2019. It is still 2016.
Now we have completed the migration from AD DS 2012R2 to AD DS 2019. Same steps apply when migrate from windows server 2008, Windows server 2008 R2, Windows server 2012 & Windows server 2016.
- After the migration completes, we still need to verify if its completes successfully.
Get-ADDomain | fl Name,DomainMode
This command will show the current Domain functional level of the domain after the migration.
Get-ADForest | fl Name,ForestMode
Above command will show the current forest functional level of the domain.


KEEP IN MIND
- In this scenario, the Active Directory and DNS are migrated from Microsoft Server 2012 to Microsoft Server 2019.
- The migration process is configured in Virtual lab environment using VMware workstation.
- This migration is conducted without a migration tool and ideal for small to medium sized business environment.
- Before the migration, it is advised to back up the DC and remove the shares from ‘Files and Storage Services’.
- To make it easier to follow, the tutorial is mainly divided into 4 sections.
-
- Pre-configuration tasks
- Install Active Directory and promote the new Server 2019
- Confirm Replication & DNS in Server 2012 and 2019
- Transfer FSMO roles to the new server (Server 2019)
01 Pre-configuration tasks
The domain is already configured as ‘techin.com’
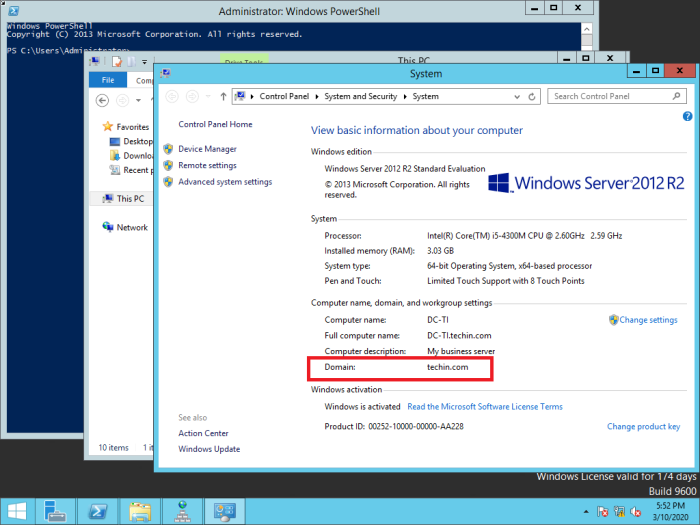
The old server 2012 is already installed with Active Directory, DNS
Windows 10 computer is added to the domain
Users are created in ‘Active Directory Users and Computers’
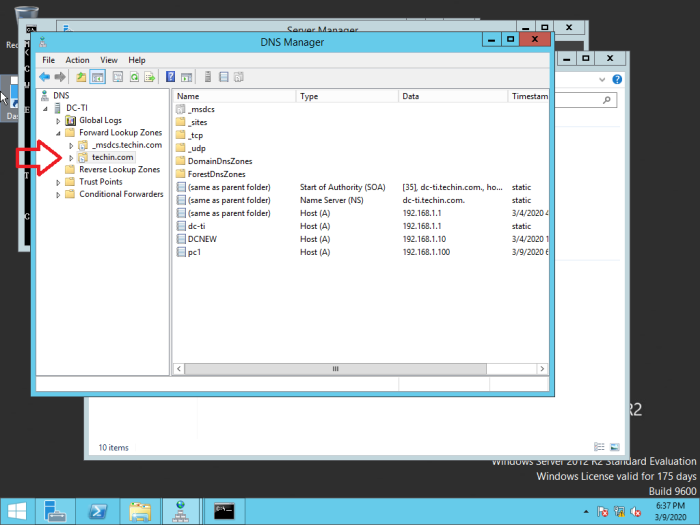
The following DNS configurations are visible
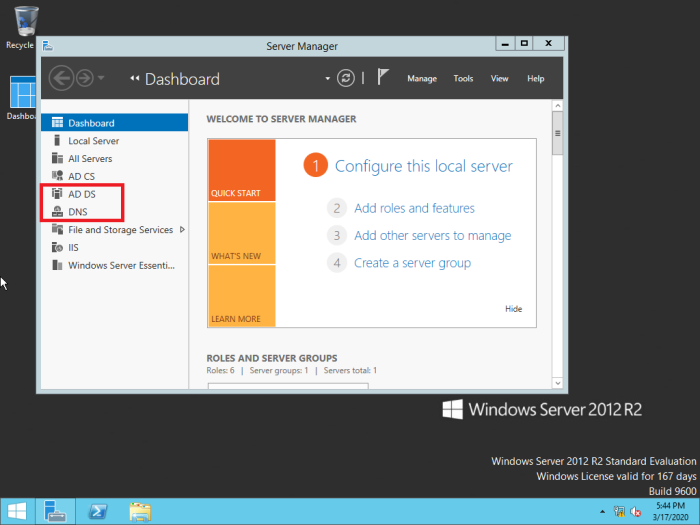
02 Install Active Directory and promote the new Server 2019
Firstly, you have to install Windows Server 2019 to a new server machine.
Refer article : https://techencyclopedia.wordpress.com/2020/02/15/microsoft-windows-server-2019-installation-step-by-step-guide/
After Installing Windows Server 2019, add the new server to the existing domain (In this case techin.com). And log in as the domain administrator
After adding to the domain install active directory and DNS
You can get an idea from the following article on how to install AD DS and DNS properly. However, you have to make slight changes during installation and screenshots are provided below.
Refer article : https://techencyclopedia.wordpress.com/2020/02/16/how-to-install-active-directory-in-windows-server-2019-step-by-step-guide/
When the server is promoted, instead of adding a new forest and providing a root domain name you have to add the domain controller to the existing domain which is ‘techin.com’.
And also make sure the credentials provided have permission to perform installation
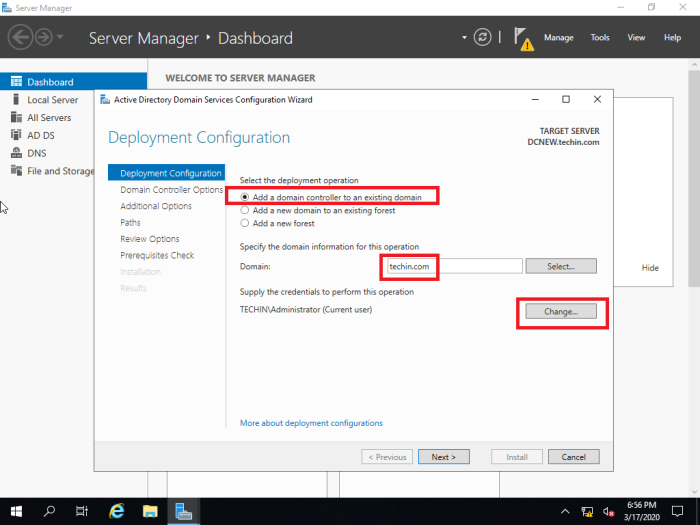
The replication should be from the main server 2012. This needs to be chosen correctly and will be an issue if the organization has multiple domain controllers.

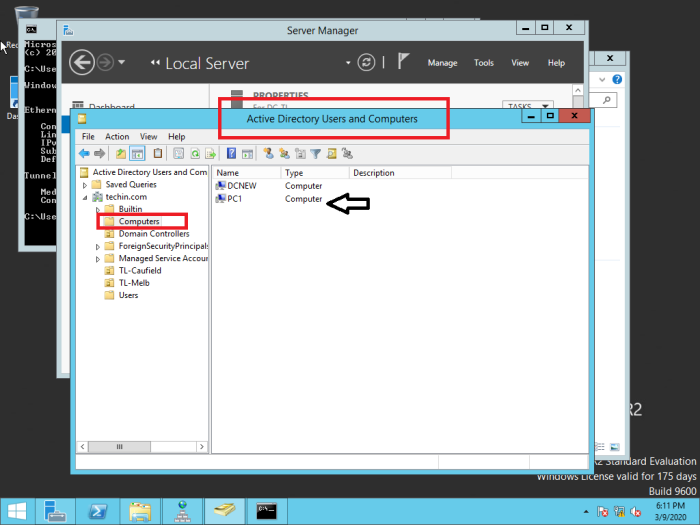
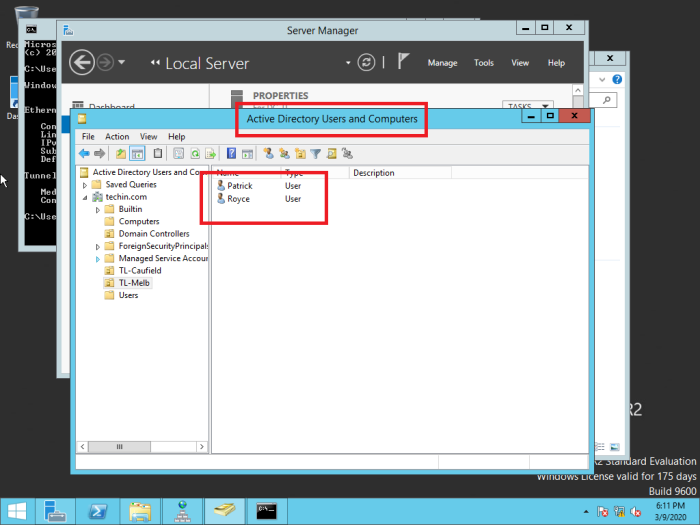
03 Confirm Replication & DNS in Server 2012 and 2019
After the active directory and DNS installation you have to confirm the replication from old 2012 server to new 2019 server
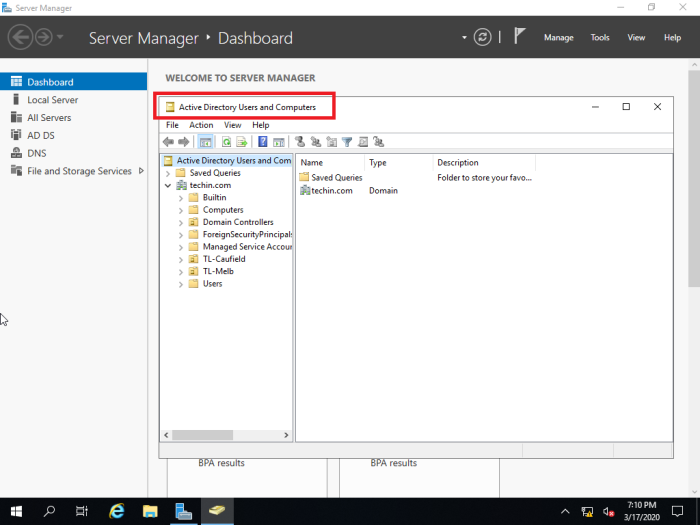
Check Active Directory Users and Computers
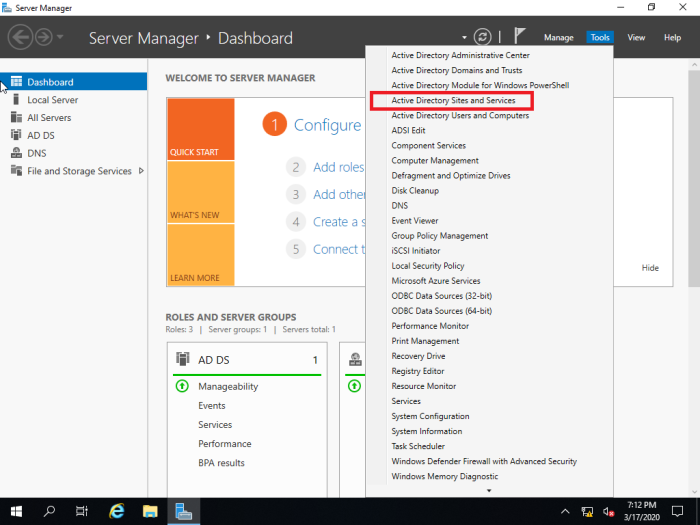
Check DNS Manager

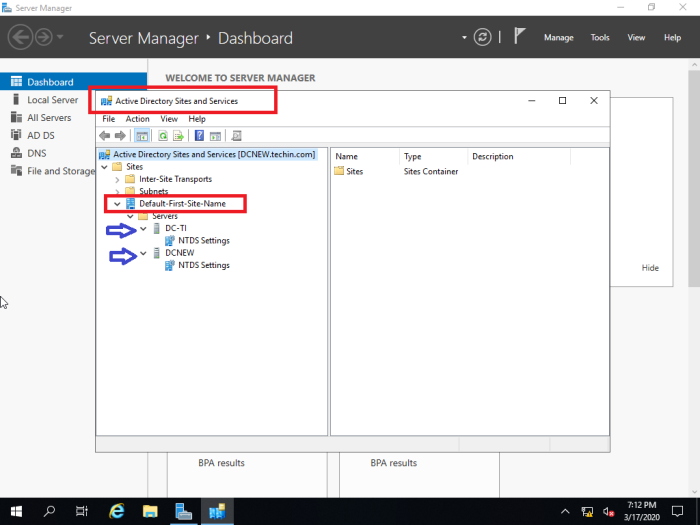
If it is not replicated from old DC you have to use ‘Active Directory Sites and Services’ to replicate manually.
Following is done in the newly installed 2019 server. The manual replication can also be done from the old 2012 server as well.

After confirming replication, you can login to the already added workstation from a domain user to check the success of the replication process. Before log in make sure that you configure the DNS accordingly. It should be the DNS of the newly configured Server.
04 Transfer FSMO roles to the new server (Server 2019)
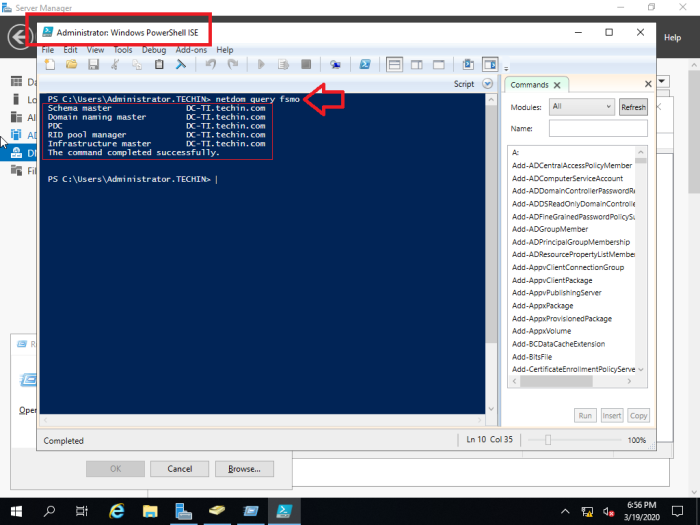
Finally, you have to transfer the Flexible Single-Master Operations (FSMO) roles. There are 5 FSMO roles that needs to be transferred namely Schema master, Domain naming master, RID master, PDC emulator and Infrastructure master.
Firstly, open the PowerShell and run ‘netdom query fsmo’ command to locate the server where the FSMO roles are based. (In this case it is the old 2012 server and we need to transfer them to the new 2019 server one by one)
netdom query fsmo
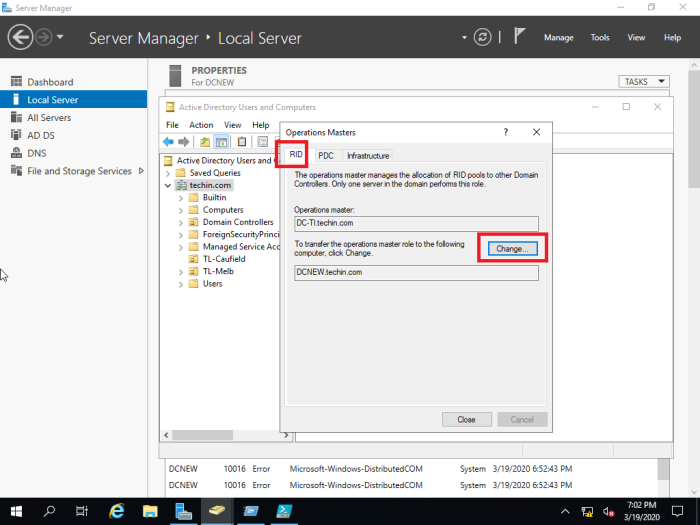
Transfer the RID master, PDC emulator and Infrastructure Master Roles
These three FSMO roles can be transferred using single MMC
go to
Server Manager > Tools > Active Directory Users and Computers
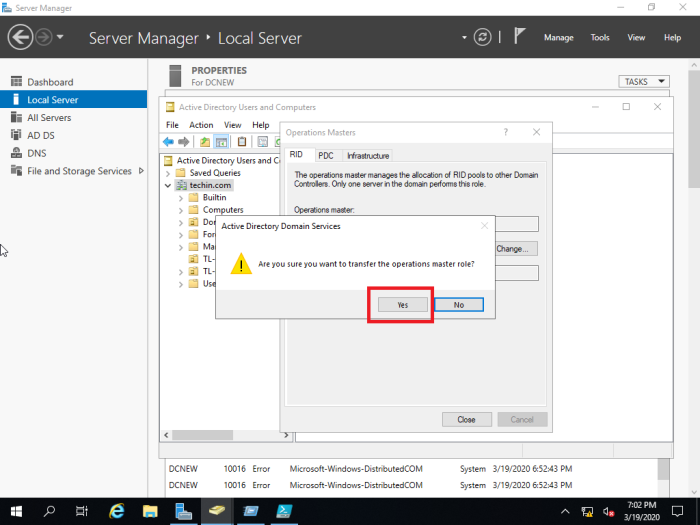
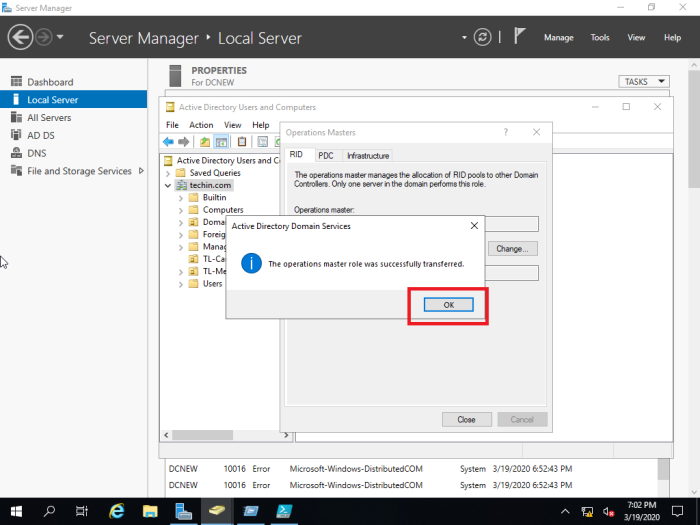
In the MMC right click on the domain name and select operations masters
Change all three of them
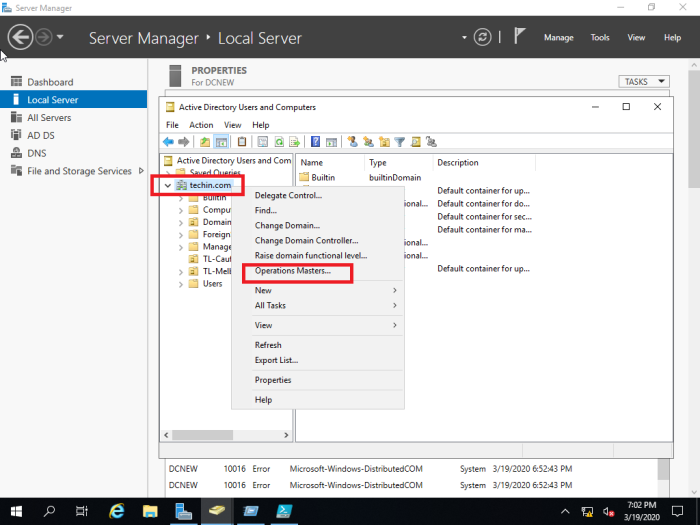
In this case only RID master role is shown and PDC and Infrastructure can be transferred in the same manner.
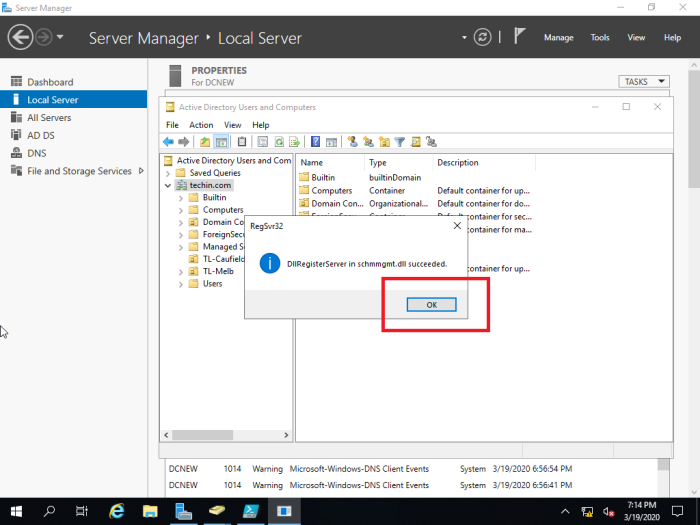
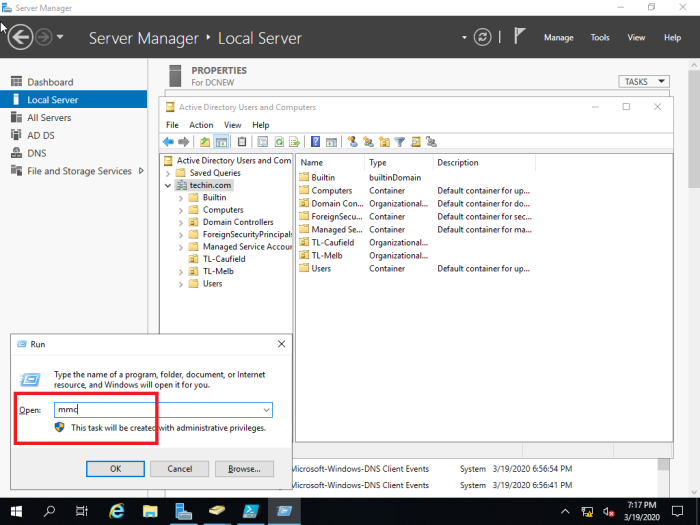
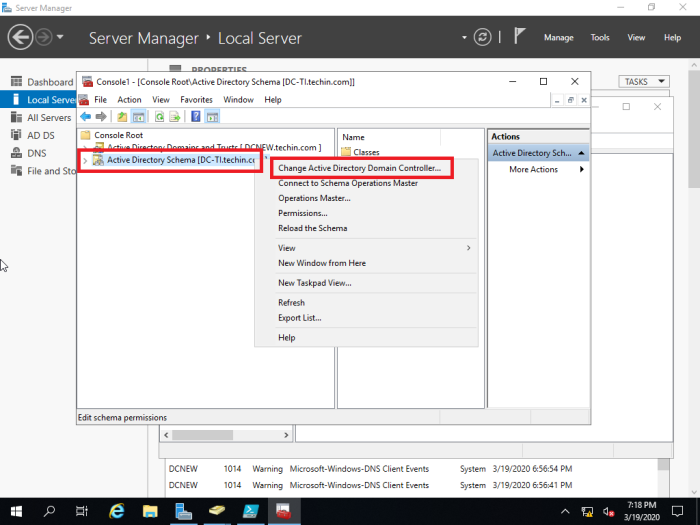
Transfer schema master role
Type run command regsvr32 schmmgmt.dll and Press OK in the next window
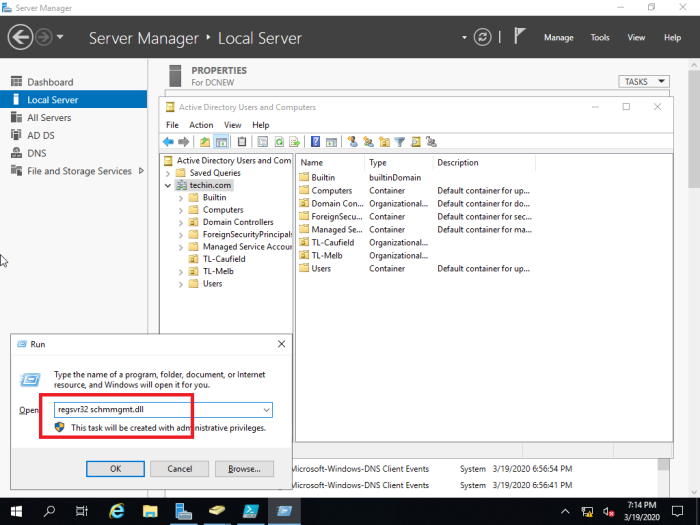
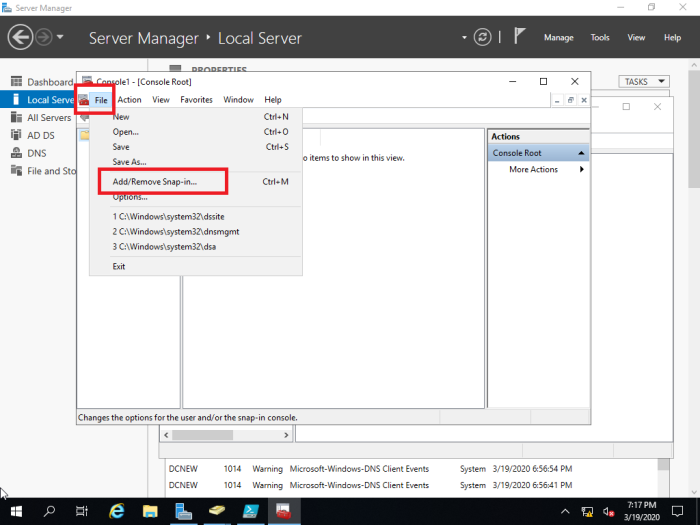
Type run command mmc
File > Add/Remove Snap-in…
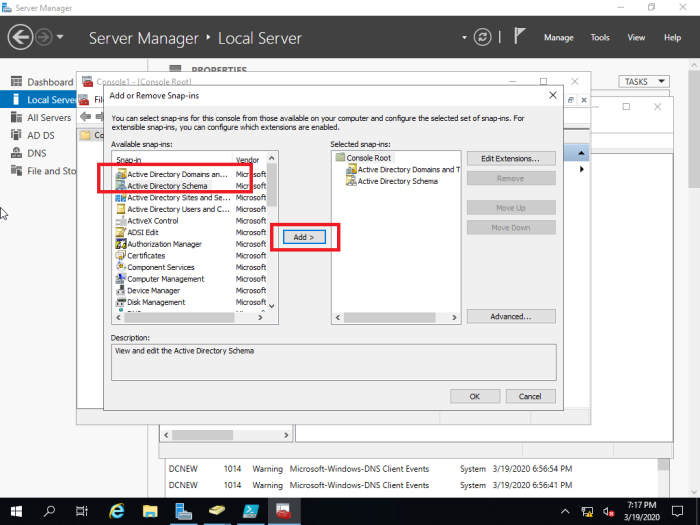
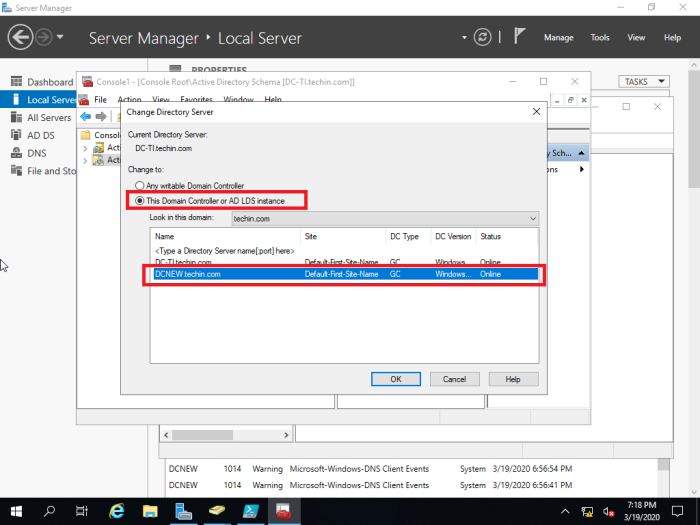
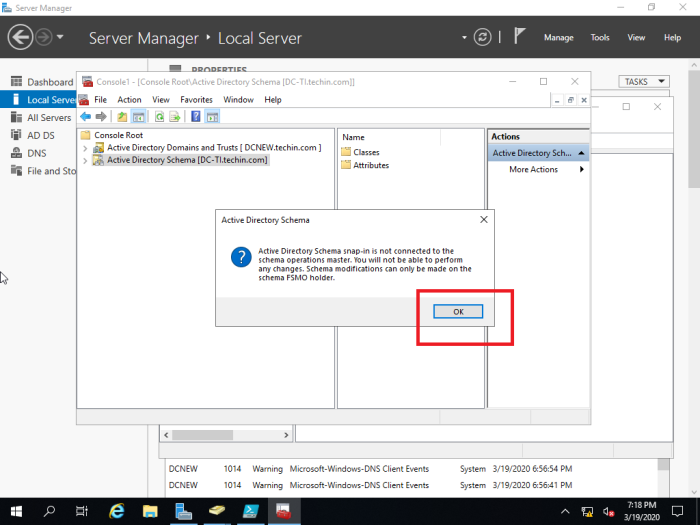
Choose and add ‘Active Directory Schema’ from ‘Available snap-ins’ and ‘Selected snap-ins’ (in this case ‘Active Directory Domains and Trusts’ are also added since it is needed to transfer ‘domain naming master role’)
You have to change the domain controller to the new DC to proceed and steps are shown below
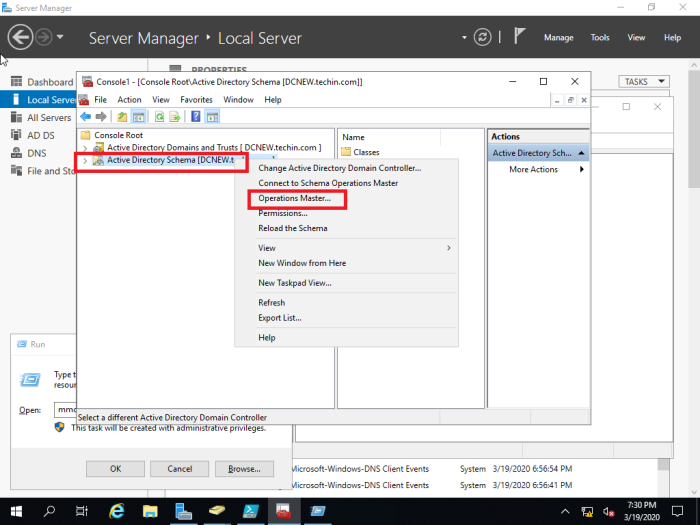
Transfer Domain Naming Master
This is similar to transferring ‘Schema master role’


Uninstall Old DC (Server 2012)
Lastly, you can uninstall old Domain controller (server 2012) from the network.
Hi folks, this is a very quick post where I will explain the steps to upgrade Active Directory from 2012 R2 to 2019.
If you are still running 2012 R2 you will be missing out on some of the features to integrate your on-prem AD into Azure Active Directory so its definitely a requirement to take advantage of Azure AD.
The biggest things which upgrading to 2019 will bring to the table are:
- Privileged Access Management
- Enables Azure Active Directory join for Windows 10 devices
- Connecting domain-joined devices to Azure AD for Windows 10 devices
- Enables Microsoft Passport for Work
- Deprecation of FRS and 2003 Functional levels
To view more information on this then you can find more information here – https://docs.microsoft.com/en-us/windows-server/identity/whats-new-active-directory-domain-services
Upgrade the Schema
OK so lets begin the process. The first step in upgrading Active Directory is to upgrade the schema in preparation for the upgrade. You need to upgrade the schema on the forest and the domain which you are upgrading.
The first one that needs to be done is the Forest. So you need to log onto a Domain Controller that is a member of the Forest and run the following command:
adprep /forestprep

You need to confirm by typing C and then the process will begin

What is happening here is that .ldf files are being imported into the Active Directory database. These are basically changes to the database which support the new features. If you are interested you can open up these files and see what they contain.
Next we need to run the domain prep which is pretty much the same thing, but just applies to the domain specific domain controllers.
The command to run is:
adprep /domainprep

Upgrade the Operating System
Now that we have done the prep work we can begin the upgrade process. For this post I will be performing an in place upgrade since its just one domain controller on my lab.
However, in a production environment I would highly recommend building new Active Directory Controllers and then decommissioning your legacy domain controllers.
I won’t bore you with the whole upgrade bit its pretty much a next next next job


After the install has completed then log onto one of the upgrade domain controllers and run dcdiag. DCDiag is a tool used to check Active Directory and make sure that everything is working OK. If there are any problems then they need to be looked at and investigated before proceeding any further.

Upgrade Forest Functional Level
Now that we have upgraded our Domain Controllers to Server 2019 we need to upgrade the Active Directory level to 2016 to fully take advantage of the new features.
Note that EVERY domain controller in your Forest has to be upgraded to 2016 before this can be done.
Open up Active Directory Domains and Trusts, and select “Raise Forest Functional Level”

Select “Windows Server 2016” from the drop down box. Note there isn’t one for 2019 as there are no new major features for AD in 2019. Press OK to continue.

You should receive this message saying that the functional level was raised successfully.

Upgrade Domain Functional Level
To upgrade the domain functional level open up Active Directory Users and Computers (dsa.msc) and select “Raise domain functional level”

Select “Windows Server 2016” from the drop down box. Note there isn’t one for 2019 as there are no new major features for AD in 2019.
You will receive a message saying that it is not reversible, which is kind of true. I presume you have backed up your AD before doing so? If not go do it now before pressing that OK button 

If everything has gone to plan you should see this message saying the that the domain functional level was upgraded successfully.

Congrats you are now ready to do some Azure AD Integration and Azure domain joining
This guide will show you how to migrate Windows 2012 R2 active directory services to Windows server 2019. These steps can also be applied if you are migrating from Windows server 2008 R2 to Windows Server 2019 or Windows server 2016 to Windows server 2019.
Active Directory migration is now a very simple and straight forward task but still few important things you need to consider before you jump into migration process of your active directory domain controllers.
- Evaluate organizational requirement for active directory migration
- Make Plan for implementation Process
- Prepare Physical / Virtual resources for Domain Controller
- Install Windows server 2019 Standard or Datacenter edition
- Install latest patches from Windows Updates
- Assign Static IP address to Domain Controller
- Install Active Directory Domain Services Role
- Migrate Application and Server Roles from the Existing Domain Controllers.
- Migrate FSMO roles to new Domain Controllers
- Demote old Active Directory domain controllers
- Raise the Domain and Forest Functional level
As per the below diagram techsupportpk.com domain has single domain controller with all 5 FSMO role running on Windows server 2012 R2. Domain and forest functional level currently operating at Windows server 2012 R2. We will add a new domain controller with Windows server 2019 and it will be the new FSMO role holder for the domain. once FSMO role migration completed, Domain controller running windows server 2012 R2 will be demoted. After that, forest and domain function level will be raised to the latest available version.
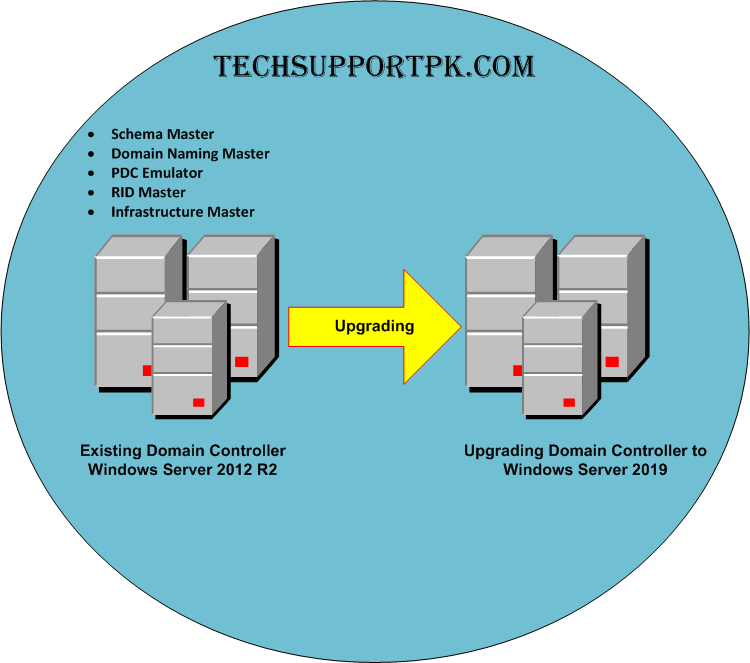
Note: When you add a new domain controllers to the existing infrastructure it is recommended to add it to the forest root level first and then go to the domain tree levels.
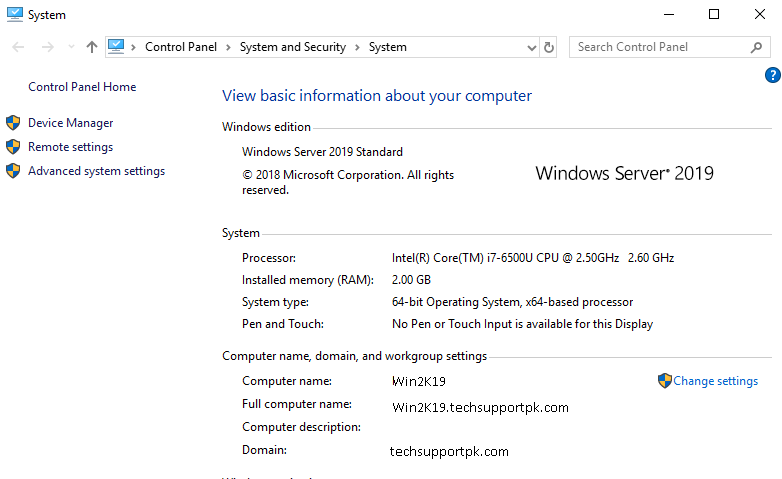
This guide will use Win2K12R2 as the hostname for domain controller on Windows server 2012 R2 and Win2K19 as the hostname for domain controller on Windows server 2019.
STEP1 — Add Windows server 2019 to the existing domain as member
Log in to the Server 2019 as a member of local administrators group and join your server to domain. After restart, log in to the server as Enterprise Administrator.
Assign static IP address to the server. Launch the PowerShell Console as an Administrator. Install the AD DS Role using the following command:
Install-WindowsFeature –Name AD-Domain-Services -IncludeManagementTools
When above process completed then configure the new server as additional domain controller using the following command:
Install-ADDSDomainController
-CreateDnsDelegation:$false
-NoGlobalCatalog:$true
-InstallDns:$true
-DomainName "techsupportpk.com"
-SiteName "Default-First-Site-Name"
-ReplicationSourceDC "Win2K12R2.techsupportpk.com"
-DatabasePath "C:\Windows\NTDS"
-LogPath "C:\Windows\NTDS"
-NoRebootOnCompletion:$true
-SysvolPath "C:\Windows\SYSVOL"
-Force:$true
Make sure to replace Win2K12R2.techsupportpk.com with your existing FQDN.
Once execute the command it will ask for SafeModeAdministrator Password. Please use complex password to proceed.
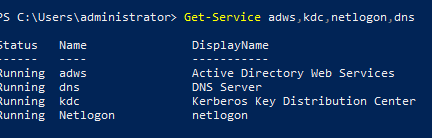
After configuration completed, restart the system and log back in as administrator to check the AD DS status using the following command:
Get-Service adws,kdc,netlogon,dns
Execute the following command to list down the domain controllers along with the IP address and Sites it belongs to.
Get-ADDomainController -Filter * | Format-Table Name, IPv4Address, Site
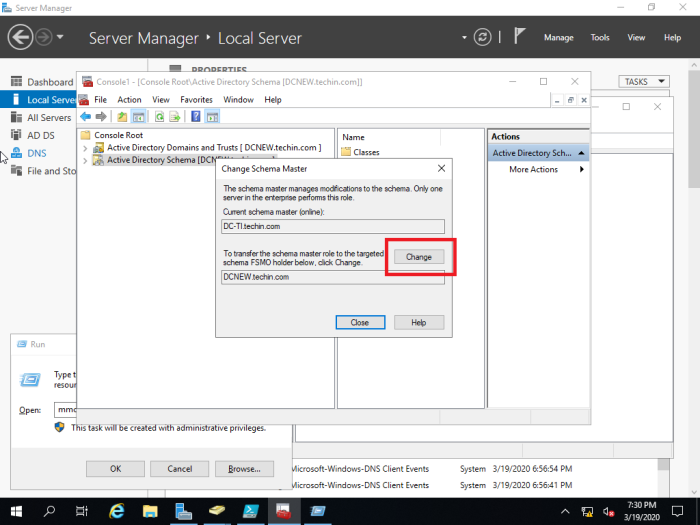
STEP2 — Migrate FSMO Roles
Its time to migrate all five FSMO roles to the new domain controller using the following command:
Move-ADDirectoryServerOperationMasterRole -Identity Win2K19 -OperationMasterRole SchemaMaster, DomainNamingMaster, PDCEmulator, RIDMaster, InfrastructureMaster
Make sure to replace Win2K19 with your Windows Server 2019 computer name.
Press to «A» Yes to All
Once migration process completed, you can verify the new FSMO role holder using the following command:
Netdom query fsmo
This will confirm that you are now running all 5 FSMO roles on Windows Server 2019 domain.
STEP3 — Demote Windows 2012 R2 Domain
At this point we need to demote the old windows domain controller which running with windows server 2012 R2. To do that execute the following command as enterprise administrator from the relevant DC.
Open up PowerShell on Windows 2012 R2 domain controller and execute the following command:
Uninstall-ADDSDomainController -DemoteOperationMasterRole -RemoveApplicationPartition
Once execute the above command it will ask to define password for the local administrator account.
STEP4 — Raise Domain and Forest Functional Level
The last step is to raise the domain and forest functional level to windows server 2019. To do that, execute the following commands on Windows Server 2019 domain controller:
To upgrade domain functional levels:
Set-ADDomainMode –identity techsupportpk.com -DomainMode Windows2016Domain
Make sure to replace techsupportpk.com with your domain name.
To upgrade forest function levels
Set-ADForestMode -Identity techsupportpk.com -ForestMode Windows2016Forest
Note: With windows server 2019, there is no domain or forest functional level called windows2019 so we have to keep 2016.
Now you have successfully completed the migration from Active Directory domain services from Windows 2012 R2 to Windows Server 2019.
Although this blog is mosty centered arount VMware related topics I sometimes find myself presented with other challenges in the field. In this case I needed to upgrade a couple of Windows domain controllers to Windows Server 2019. However because the existing servers were bare metal and I had no way of accessing them remotely other than a KVM switch I decided to perform an in-place upgrade. When performing an in-place upgrade there are some things to be mindfull of.
Schema upgrades
When introducing a new domain controller in your environment the ‘Promote This Server To Domain Controller’ wizard will not only join a server to an existing domain, but also make sure the forest and domain schema’s are upgraded to support the OS version you are installing. If you decide to upgrade a domain controller instead, you need to perform the schema changes yourself. To do this, execute the following steps as a user which is a member of the Schema Admins, Enterprise Admins, and Domain Admins groups:
- Mount the Windows server installation media
- Open an elevated command prompt and go to the
support\adprepdirectory of the installation media - Type:
adprep /forestprep - Confirm you want to proceed by typing C and allow the process to finish
- Type:
adprep /domainprep
Once this is finished you are done upgrading the schema’s. You can check the schema version using this Powershell command: Get-ADObject (Get-ADRootDSE).schemaNamingContext -Property objectVersion
You can lookup what schema version is related to which OS version with this table.
| Windows Server version | objectVersion value |
| Windows Server 2000 | 13 |
| Windows Server 2003 | 30 |
| Windows Server 2003 R2 | 31 |
| Windows Server 2008 | 44 |
| Windows Server 2008 R2 | 47 |
| Windows Server 2012 | 56 |
| Windows Server 2012 R2 | 69 |
| Windows Server 2016 | 87 |
| Windows Server 2019 | 88 |
Migrate FRS to DFSR
If you upgraded from previous versions of Windows Server, chances are that the way SYSVOL information is replicated is handled by the file replication service (FSR). FSR has been around since the NT era and Microsoft decided to move away from that technology in favor of the more modern DFS Replication. Windows server 2016 RS3 and onwards won’t even ship with the FSR binaries anymore. So if you still find yourself using FSR in 2020 it is definitely time to switch as Microsoft requires you to use DFSR with Windows Server 2019.
The migration is a really straightforward process:
- If you haven’t installed the DFS Management tools already, install them using this Powershell one-liner:
Install-WindowsFeature RSAT-DFS-Mgmt-Con - Run
dfsrmig /getglobalstateto confirm the DFSR migration process has never been run before - Make sure your SYSVOL is in a consistent state across all domain controllers
- Log on to the domain controller which holds the PDC Emulator FSMO role with a user that is a member of the Domain Admins group
- Type:
dfsrmig /setglobalstate 1. This will enter the first state of the migration: Prepared - Periodically run:
dfsrmig /getmigrationstateto check the migration process. - When all domain controllers entered the prepared state, run
dfsrmig /setglobalstate 2to proceed to the next step of the migration: Redirected - Periodically run:
dfsrmig /getmigrationstateto check the migration process. - When all domain controllers entered the redirected state check the DFS Management utility and check if the replication group ‘Domain System Volume’ exists and all domain controllers are a member. Also check if the SYSVOL_DFSR folder (which is stored in the systemroot location by default) is in a consistent state before running the next command. This is important because all previous steps were easy to roll back.
- Type:
dfsrmig /setglobalstate 3to proceed to the final step of the migration: Eliminated - Periodically run:
dfsrmig /getmigrationstateto check the migration process.
When all domain controllers have finished and entered the eliminated phase you will find that all domain controllers will have the FRS service disabled an all SYSVOL replication is now handled by DFS. Of course this is a very brief summary of the steps involved in the upgrade. If you are looking for a more detailed explanation of the migration, this has been well documented by Microsoft (here and here for instance).
The actual upgrade
Well, this will be very anticlimactic. The upgrade of the Windows Server OS itself is a really straightforward process which has been streamlined for years. Simply mount your installation media, start the setup wizard and choose to keep all applications and settings.
The only thing I encountered after a succesfull upgrade is that some services like DHCP require an activation wizard to be run. Thankfully that is also very much a next-next-finish process.
If all domain controllers are at Server 2019 you can of course proceed to raise the forest and domain functional levels. Before you do this make sure to have a recent backup available in case you run into an issue.
Good luck with your upgrades!

Rudolf Kleijwegt
I am an experienced IT professional with over 20 years of hands-on experience designing, deploying, and maintaining IT infrastructure in both enterprise and service provider environments. My skills span across Linux and Windows and a multitude of server applications, allowing me to excel in a wide range of IT roles. Currently, my primary focus is on Software Defined DataCenter and DevOps. I am passionate about staying up to date with the latest trends in the industry to achieve superior outcomes.