Last Updated on August 12, 2020 by
As you may already know, Windows Server 2008 and 2008 R2 products reached End of Extended support on 1/14/2020. So if your Active Directory is running on Windows Server 2008, It is time to look for upgrade options.
In this blog post, I am going to demonstrate how to migrate Active Directory from Windows Server 2008 to Windows Server 2019.
AD Migration task itself is very straight forward. But there are other things you need to consider before you do an AD migration. Below I listed a checklist you can use on many occasions.
Active Directory Migration Check List
• Evaluate business requirement for Active Directory migration
• Perform Audit on Existing Active Directory Infrastructure to make sure there are no existing health issues
• Provide Plan for implementation Process
• Prepare Physical / Virtual resources for Domain Controller
• Install Windows server 2019 Standard / Datacenter
• Patch Servers with latest Windows Updates
• Assign Dedicate IP address to Domain Controller
• Install AD DS Role
• Migrate Application and Server Roles from the Existing Domain Controllers.
• Migrate FSMO roles to new Domain Controllers
• Add New Domain controllers to the Existing Monitoring system
• Add New Domain controllers to the Existing DR Solution
• Decommission old domain controllers
• Raise the Domain and Forest Functional level
• On-Going Maintenance (Group Policy Review, New Features Implementations, Identify and fix active directory infrastructure issues)
If organizations running AD DS, it’s obvious it to have active directory integrated applications. Some of those may use it just for LDAP authentication and some may use advanced integration with modified active directory schema. with active directory migration, some of these applications may require modifications or upgrades to match with the new AD DS version. Therefor before the implementation process, it is important to recognize these active directory integrated applications and evaluate its impact on the migration.
LDAP Connection String Modifications – To use single-sign-on (SSO) with applications it may use LDAP connections to domain controllers. sometimes applications use hardcoded hostnames or IP addresses of domain controllers to define the connections. If domain migration involves IP address changes and Hostname changes, alternation to these records will be needed.
Schema Version Changes – Some legacy applications only support certain versions of active directory schema. This is specifically applying for custom made active directory integrated applications. This is very rare but I have to face these in my active directory migrations projects. Therefore if it’s not well-known applications, check with the application vendor if it supported new AD DS schema version.
Application Migrations – Some organizations have legacy application versions that no longer support or develop by its vendor. There are occasions where these types of issues turn to be bottlenecks for AD Migration projects. Once I was working on AD DS 2003 to AD DS 2012 R2 migration project. The organization had a legacy application that runs on windows server 2000 system. AD DS 2012 R2 does not support windows server 2000-member servers. The vendor who created the application no longer in business. Then we had to users to similar type application which supports new operating systems before we start the Active Directory migrations.
Server Roles/Applications installed on Domain Controllers – In the majority of the cases, once FSMO roles migrated to new domain controllers, old domain controllers will be decommissioned. Even though Microsoft recommends not to install applications or other server roles in domain controllers, people still do it. Some of the common roles installed in domain controllers are DHCP, File Servers, Licensing Server. If existing domain controllers are subject decommission these applications and server roles need to migrate new servers.
Most Common Questions About Active Directory Migrations
In below I listed some of the most common questions I get about AD migration,
1. Can I keep the same IP address for the PDC? Yes, you can. Active Directory fully supports for IP address changes. Once FDMO role migration is completed, you can swap the IP addresses of Domain Controllers.
2. Can I downgrade forest/domain functional levels? Yes, you can do it from Windows server 2008 R2.
3. Do I need to migrate the DNS role? No, it is part of the AD. When you add a new domain controller, you can make it as DNS server too.
4. Do I need to change SYSVOL replication from FRS to DFS? If your domain is built based on Windows server 2008 or Windows Server 2008 R2, you are already using DFS for SYSVOL replication. If you originally migrated from Windows server 2003, it’s more likely you are still using FRS. In that case, after the migration, you can also change the SYSVOL replication method from FRS to DFS. I already have a blog post covering this topic https://www.rebeladmin.com/2015/04/step-by-step-guide-for-upgrading-sysvol-replication-to-dfsr-distributed-file-system-replication/
5. Can I keep Windows 2008 Domain Controllers and upgrade forest and domain functional level to Windows Server 2016? (Windows server 2019 does not have the forest and domain functional level name as Windows server 2019. it is still called Windows server 2016) – No, you can’t. Before forest and domain functional level upgrade, you need to decommission Windows server 2008 domain controllers.
Demo Environment
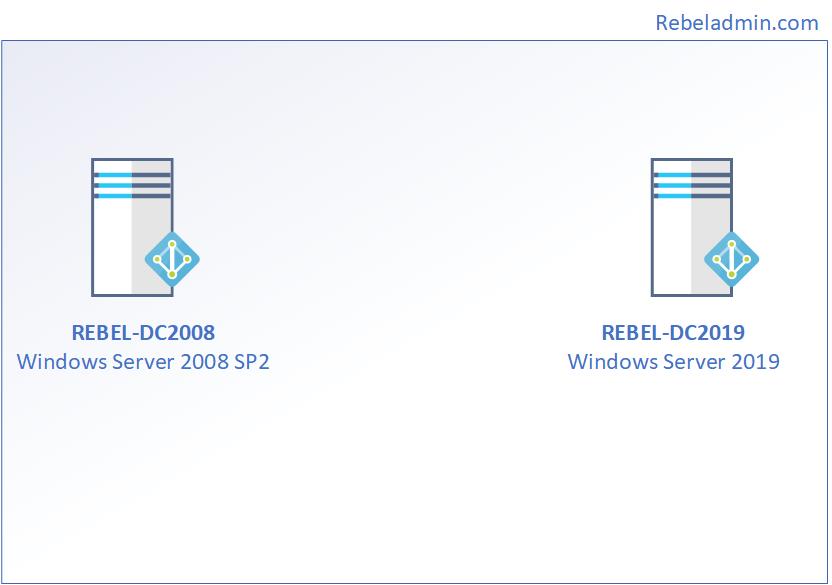
As per the above figure, rebeladmin.com domain has two domain controllers. The FSMO role holder (REBEL-DC2008) is running a domain controller based on windows server 2008. Domain and forest functional level currently operating at Windows server 2008. A new domain controller with Windows Server 2019 (REBEL-DC2019) will be introduced and it will be the new FSMO role holder for the domain. once FSMO role migration completed, Domain controller running windows server 2008 will be decommissioned. After that forest and domain, the functional level will be raised to the windows server 2019.
Note – When you introduce new domain controllers to the existing infrastructure it is recommended to introduce to the forest root level first and then go to the domain tree levels.
Add Windows server 2019 Domain Controller
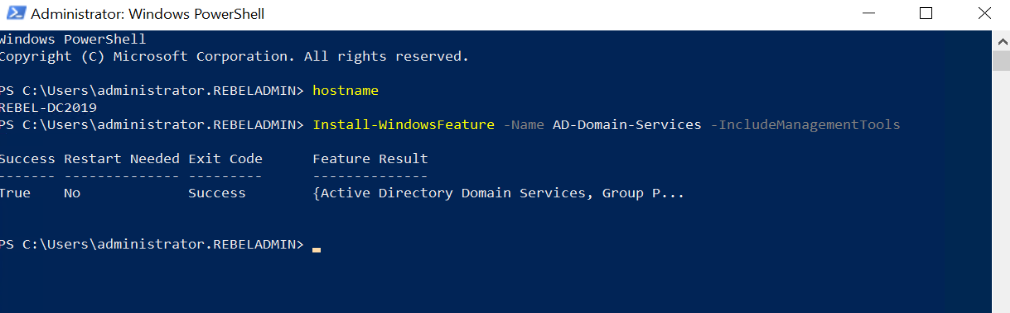
As the first part of the configuration, we need to make REBEL-DC2019 as an Additional Domain Controller. To do that,
1. Log in to the Server as a member of the local administrators’ group.
2. Add server to the existing domain as a member.
3. Log in to the domain controller as an enterprise administrator.
4. Verify the static IP address allocation using ipconfig /all.
5. Launch the PowerShell Console as an Administrator
6. Before the configuration process, we need to install the AD DS Role in the given server. To do that we can use the following command.
Install-WindowsFeature –Name AD-Domain-Services -IncludeManagementTools
7. Configure the new server as an additional domain controller using,
Install-ADDSDomainController
-CreateDnsDelegation:$false
-InstallDns:$true
-DomainName “rebeladmin.com”
-SiteName “Default-First-Site-Name”
-ReplicationSourceDC “REBEL-DC2008.rebeladmin.com”
-DatabasePath “C:\Windows\NTDS”
-LogPath “C:\Windows\NTDS”
-SysvolPath “C:\Windows\SYSVOL”
-Force:$true
Note – There are no line breaks for the command and I have listed it as above to allow readers to focus on the parameters.
The following table explain the PowerShell arguments and what it will do.
| Argument | Description |
| Install-ADDSDomainController | This cmdlet will install the domain controller in active directory infrastructure. |
| -CreateDnsDelegation | Using this parameter can define whether to create DNS delegation that reference active directory integrated DNS. |
| -InstallDns | Using this can specify whether DNS role need to install with active directory domain controller. For new forest, it is default requirement to set it to $true. |
| -DomainName | This parameter defines the FQDN for the active directory domain. |
| -SiteName | This Parameter can use to define the active directory site name. the default value is Default-First-Site-Name |
| -ReplicationSourceDC | Using this parameter can define the active directory replication source. By default, it will use any available domain controller. But if need we can be specific. |
| -DatabasePath | This parameter will use to define the folder path to store active directory database file (Ntds.dit) |
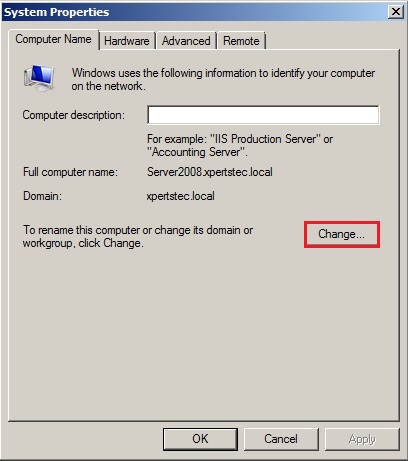
| -LogPath | Log path can use to specify the location to save domain log files. |
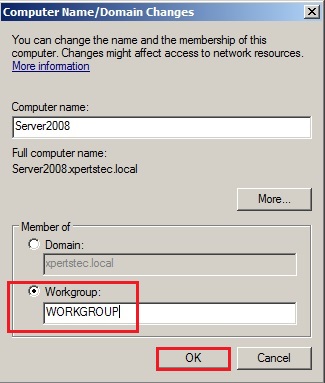
| -SysvolPath | This is to define the SYSVOL folder path. Default location for it will be C:\Windows |
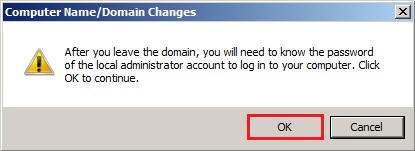
| -Force | This parameter will force command to execute by ignoring the warning. It is typical for the system to pass the warning about best practices and recommendations. |
Once execute the command it will ask for SafeModeAdministrator Password. Please use a complex password to proceed. This will be used for DSRM.
After the server is rebooted, log back in as an administrator to check the AD DS status.
Get-Service adws,kdc,netlogon,dns
Will confirm the status of the AD DS service.

Then run following to confirm the current FSMO role holder.
$FormatEnumerationLimit =-1
Get-ADDomainController -Filter * | Select-Object Name, Domain, Forest, OperationMasterRoles | Where-Object {$_.OperationMasterRoles} | out-string -Width 160

In the above, I used $FormatEnumerationLimit to show more data in output without truncating.
As we can see in output REBEL-DC2008 holds all five FSMO roles.
Move Active Directory FSMO roles
The next part of the migration is to move FSMO roles to the new Windows Server 2019 Domain controller (REBEL-DC2019).
We can do this by running,
Move-ADDirectoryServerOperationMasterRole -Identity REBEL-DC2019 -OperationMasterRole SchemaMaster, DomainNamingMaster, PDCEmulator, RIDMaster, InfrastructureMaster

This command needs to run in the new windows 2019 domain controller as Enterprise Administrator.
Then rerun the following command to verify the new FSMO role owner.
Get-ADDomainController -Filter * | Select-Object Name, Domain, Forest, OperationMasterRoles | Where-Object {$_.OperationMasterRoles} | out-string -Width 160

Decommission Old Domain Controller
Now we moved FSMO roles over and the next step is to decommission old DC which is running with windows server 2008.
To do that,
1. log in to old DC as enterprise administrator
2. Go to Run | dcpromo
3. It will open up the dcpromo wizard. Click on Next to continue.

4. In the next page also click on Next.
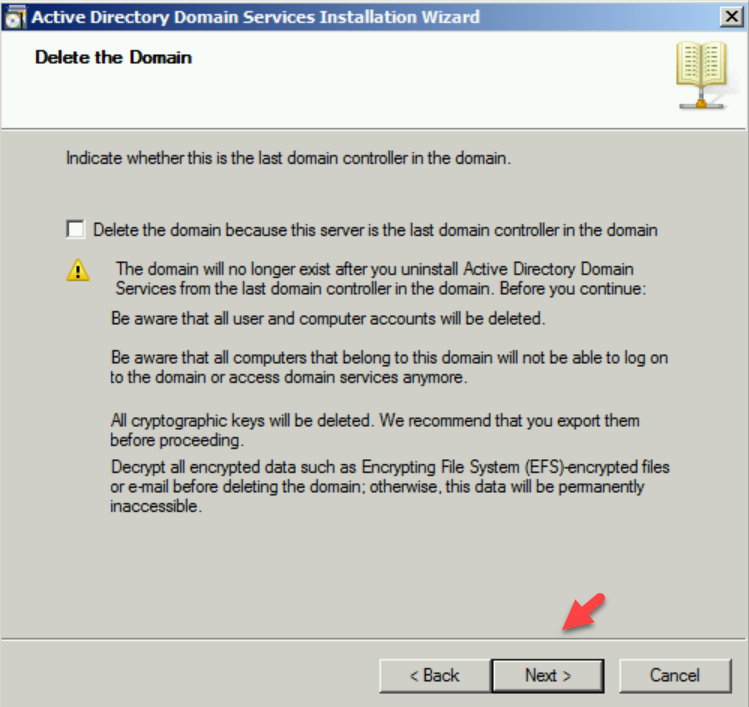
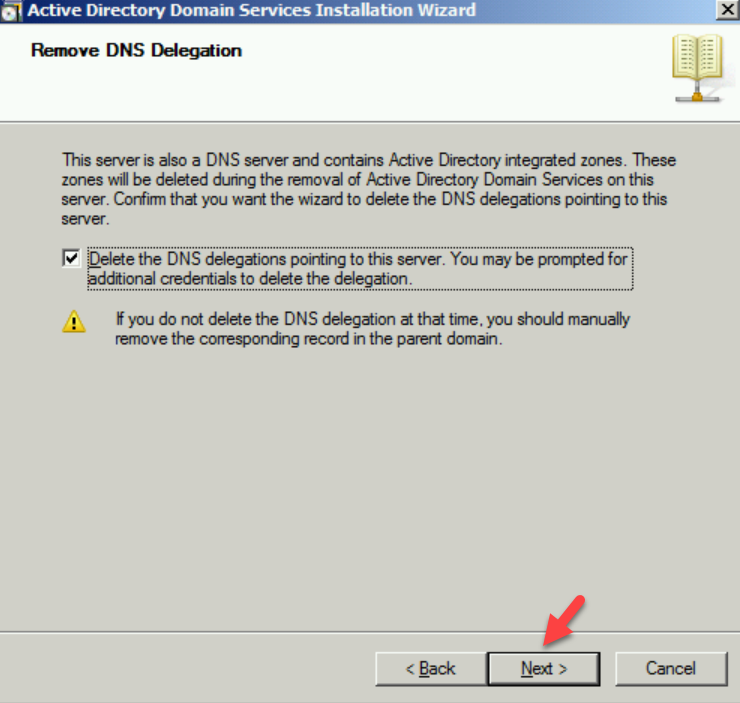
5. In Remove DNS Delegation page keep the default selection and click on Next.
6. Then the system will prompt for credentials. Provide Domain Admin credentials here.
7. On the next page, type a new password for the local administrator account.

8. In summary, page, click on Next to complete the process.

Once the process is completed, reboot the server.
Raise Domain and Forest Functional level
After you demote your last domain controller running with windows server 2008 we can raise Domain and Forest Functional level to windows server 2016 ( Windows server 2019 is the same).
To upgrade the domain functional level, you can use the following PowerShell command in the Windows server 2019 domain controller.
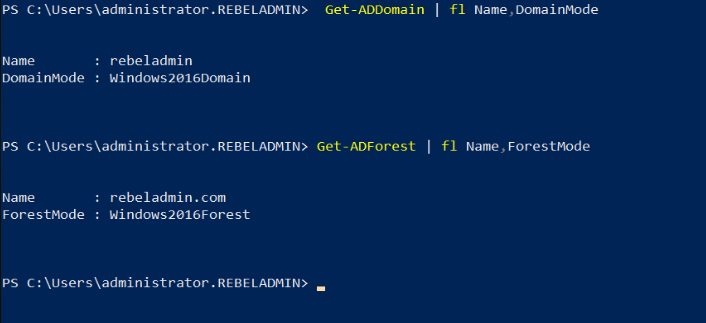
Set-ADDomainMode –identity rebeladmin.com -DomainMode Windows2016Domain

To upgrade the forest function level, you can use the following command
Set-ADForestMode -Identity rebeladmin.com -ForestMode Windows2016Forest

After the migration completes, we still need to verify if it completes successfully.
Get-ADDomain | fl Name,DomainMode
This command will show the current Domain functional level of the domain after the migration.
Get-ADForest | fl Name,ForestMode
The above command will show the current forest functional level of the domain.
This marks the end of this blog post. Hope now you know how to migrate Active Directory from Windows server 2008 to Windows Server 2019. If you have any questions feel free to contact me on rebeladm@live.com also follow me on twitter @rebeladm to get updates about new blog posts.
Перенос контроллера домена с одного сервера на другой — это важный процесс, который может быть немного сложным и требовать определенных навыков. В этой статье мы рассмотрим подробное руководство по переносу контроллера домена с сервера 2008 на сервер 2019.
Первым шагом в этом процессе является подготовка сервера 2019. Убедитесь, что у вас есть достаточно мощного сервера, на котором можно установить сервер 2019, а также убедитесь, что у вас есть все необходимые лицензии и ключи для активации сервера.
После установки сервера 2019 вам нужно будет проделать несколько дополнительных шагов для подготовки к переносу контроллера домена. Эти шаги включают в себя настройку сетевых параметров, установку обновлений и установку необходимых компонентов.
Затем вы можете начать процесс переноса контроллера домена. Этот процесс включает в себя выполнение резервного копирования активной директории и базы данных AD, установку роли службы домена Active Directory на сервере 2019, а затем восстановление данных из резервной копии на новом сервере.
После завершения переноса контроллера домена с сервера 2008 на сервер 2019 важно провести тестирование, чтобы убедиться, что все работает правильно, и что пользователи могут успешно входить в домен. Также не забудьте настроить репликацию между старым и новым контроллерами домена для обеспечения надежной работы системы.
Содержание
- Почему важно перенести контроллер домена с сервера 2008 на сервер 2019?
- Подготовка к переносу контроллера домена с сервера 2008 на сервер 2019
- Создание резервной копии активной директории перед переносом
- Установка Windows Server 2019 и настройка контроллера домена
- Шаг 1: Установка Windows Server 2019
- Шаг 2: Настройка контроллера домена
- Перенос активной директории и настройка синхронизации
- Тестирование и завершение процесса переноса контроллера домена
- Вопрос-ответ
- Как перенести контроллер домена с сервера 2008 на сервер 2019?
- Какие роли нужно установить на новый сервер для переноса контроллера домена?
- Как проверить, что новый контроллер домена работает корректно после переноса?
Почему важно перенести контроллер домена с сервера 2008 на сервер 2019?
В настоящее время многие организации используют Windows Server для управления своей инфраструктурой. Контроллер домена (Domain Controller) — это сервер, который управляет доступом пользователей и групп внутри домена Windows.
Переход с сервера 2008 на сервер 2019 является важным шагом для обновления и улучшения инфраструктуры вашей организации. Вот несколько причин, почему это важно:
-
Безопасность: Старые версии операционных систем, такие как Windows Server 2008, больше не получают обновлений безопасности от Microsoft. Это означает, что ваш сервер может быть подвержен уязвимостям и атакам хакеров. Переход на Server 2019 обеспечит вам обновления безопасности и защиту от новых угроз.
-
Новые функции и возможности: Windows Server 2019 включает в себя множество новых функций и улучшений по сравнению с версией 2008. Новые возможности в области безопасности, виртуализации, хранилищ и сетей позволят вашей организации быть более гибкой и эффективной.
-
Поддержка и обслуживание: Большинство сторонних разработчиков и поставщиков программного обеспечения перестают поддерживать старые версии ОС. Переход на Windows Server 2019 обеспечит вам доступ к поддержке и обновлениям от Microsoft и сторонних поставщиков, что позволит вам сохранить работоспособность и безопасность вашей инфраструктуры.
-
Улучшение производительности: Windows Server 2019 оптимизирован для работы современного аппаратного обеспечения и может обеспечить более высокую производительность и масштабируемость по сравнению с версией 2008. Это позволит вашей организации эффективнее использовать ресурсы и обрабатывать большее количество запросов.
В целом, перенос контроллера домена с сервера 2008 на сервер 2019 является важным шагом для обновления и улучшения вашей инфраструктуры. Он обеспечит вашей организации безопасность, доступ к новым функциям и возможностям, а также поддержку и обслуживание от Microsoft и сторонних поставщиков.
Подготовка к переносу контроллера домена с сервера 2008 на сервер 2019
Перенос контроллера домена с сервера 2008 на сервер 2019 может быть сложной и ответственной задачей. Перед тем как начать процесс переноса, необходимо выполнить определенные подготовительные действия, чтобы избежать проблем и снизить риск потери данных.
Вот некоторые важные шаги, которые следует выполнить перед переносом контроллера домена:
- Создание резервной копии данных — перед началом переноса необходимо создать полную резервную копию всех данных, связанных с текущим контроллером домена. Это позволит восстановить данные в случае возникновения проблем во время процесса переноса.
- Проверка состояния серверов — убедитесь, что сервера 2008 и 2019 соответствуют минимальным требованиям для установки контроллера домена. Проверьте, что серверы имеют достаточное количество выделенных ресурсов и обновленные версии операционной системы.
- Проверка состояния домена — убедитесь, что текущий контроллер домена на сервере 2008 выполняет все необходимые функции и находится в допустимом состоянии. Проверьте состояние репликации, доступность службы Active Directory и другие важные параметры.
- Подготовка софтверного окружения — перед переносом контроллера домена убедитесь, что на сервере 2019 установлены необходимые компоненты для работы службы домена. Установите Windows Server 2019 и обновите его до последней версии.
- Перенос глобальных каталогов — если на сервере 2008 функционируют глобальные каталоги, убедитесь, что они успешно реплицированы на другие серверы. Укажите новый сервер 2019 как предпочтительный для репликации данных.
- Перенос FSMO-ролей — задачей является перемещение FSMO-ролей с сервера 2008 на сервер 2019. Для этого воспользуйтесь инструментом «Active Directory Users and Computers» и следуйте инструкциям.
- Тестирование системы — после переноса контроллера домена убедитесь, что все функции работают должным образом. Проверьте работу службы Active Directory, репликацию данных и доступность ресурсов.
Выполнение этих шагов перед переносом контроллера домена позволит снизить риск возникновения проблем и сбоев во время переноса. Тщательно спланируйте процесс переноса и удостоверьтесь, что ваши данные и система безопасны.
Создание резервной копии активной директории перед переносом
Перед переносом контроллера домена с сервера 2008 на сервер 2019 необходимо создать резервную копию активной директории. Это действие является важным для обеспечения безопасности и восстановления данных в случае необходимости.
Для создания резервной копии активной директории можно использовать инструмент Windows Server Backup, который входит в состав операционной системы Windows Server.
- Откройте «Server Manager» на сервере 2008.
- Перейдите на вкладку «Features» и установите «Windows Server Backup», если он еще не установлен.
- Откройте «Windows Server Backup» через меню «Start».
- В левом верхнем углу нажмите правой кнопкой мыши на «Local Backup» и выберите «Backup Once».
- Включите опцию «Different Options» и нажмите «Next».
- Выберите «Custom» и нажмите «Next».
- Отметьте галочкой «System State» и нажмите «Next».
- Выберите место для сохранения резервной копии (лучше выбрать отдельный диск или сетевое хранилище) и нажмите «Next».
- Проверьте настройки и нажмите «Finish», чтобы начать создание резервной копии.
После завершения создания резервной копии активной директории на сервере 2008, вам рекомендуется проверить правильность выполнения операции и доступность резервной копии перед продолжением переноса контроллера домена на сервер 2019.
Создание резервной копии активной директории является хорошей практикой и поможет вам избежать потери данных или проблем при переносе контроллера домена.
Установка Windows Server 2019 и настройка контроллера домена
Установка и настройка контроллера домена на Windows Server 2019 – это важный шаг в процессе обновления инфраструктуры вашей сети. В данной статье будет рассмотрен практический гайд по установке и настройке контроллера домена.
Шаг 1: Установка Windows Server 2019
- Скачайте образ Windows Server 2019 с официального сайта Microsoft.
- Создайте загрузочную USB-флешку с помощью программы Rufus или любой другой программы для создания загрузочных носителей.
- Подключите USB-флешку к серверу и загрузитесь с нее.
- Выберите язык установки, желаемое расположение и нажмите «Далее».
- Примите лицензионное соглашение.
- Выберите тип установки «Пользовательская: установка Windows только с удаленного десктопа (Desktop Experience)».
- Выберите жесткий диск для установки операционной системы и нажмите «Далее».
- Дождитесь завершения установки и перезагрузите сервер.
Шаг 2: Настройка контроллера домена
- После перезагрузки сервера войдите в систему с помощью учетной записи администратора.
- Откройте «Центр управления сервером» и выберите «Добавить роли и компоненты».
- В мастере установки ролей и компонентов выберите «Установка ролей» и нажмите «Далее».
- Выберите «Активный каталог» и нажмите «Далее».
- Нажмите «Далее» для пропуска информационных окон.
- Выберите «Контроллер домена» и нажмите «Далее».
- Выберите «Контроллер домена в новом лесу» и нажмите «Далее».
- Укажите имя нового леса и корневой домен. Например, имя леса может быть «mydomain.local» и корневой домен «mydomain». Нажмите «Далее».
- Выберите уровень функциональности леса, рекомендуется выбрать «Windows Server 2019». Нажмите «Далее».
- Укажите место для хранения файлов базы данных и журналов, нажмите «Далее».
- Укажите пароль для учетной записи «Администратора домена» и нажмите «Далее».
- Проверьте настройки и нажмите «Установить».
- Дождитесь завершения установки и перезагрузите сервер.
Поздравляю, вы успешно установили и настроили контроллер домена на Windows Server 2019. Теперь ваша сеть готова к работе с новой версией операционной системы.
Перенос активной директории и настройка синхронизации
Перенос активной директории с сервера 2008 на сервер 2019 может быть выполнен с помощью процедуры миграции. Ниже представлено подробное руководство по этому процессу:
-
Подготовка к переносу:
- Установите Windows Server 2019 на новый сервер и настройте его.
- Обновите текущий сервер 2008 до последней версии и убедитесь, что аппаратное и программное обеспечение соответствуют требованиям.
- Сделайте резервную копию активной директории на сервере 2008.
-
Перенос активной директории:
- Создайте новый доменный контроллер на сервере 2019 с помощью команды «dcpromo».
- Произведите перенос ролей FSMO и настроек на новый сервер с помощью утилиты «Active Directory Users and Computers».
- Проверьте, что все роли успешно перенесены на новый сервер.
- Настройте перенаправление DNS-запросов на сервер 2019.
- Проверьте работоспособность активной директории на новом сервере.
-
Настройка синхронизации:
- Установите и настройте Active Directory replication для синхронизации информации между старым и новым серверами.
- Проверьте работу синхронизации и убедитесь, что данные активной директории на обоих серверах совпадают.
Выполняя все указанные шаги в этом руководстве, вы сможете успешно перенести активную директорию с сервера 2008 на сервер 2019 и настроить синхронизацию между ними.
Тестирование и завершение процесса переноса контроллера домена
После успешного переноса контроллера домена с сервера 2008 на сервер 2019 необходимо провести тестирование и завершить процесс, чтобы убедиться в его работоспособности и корректности.
- Проверка доступности нового контроллера домена:
- Убедитесь, что новый контроллер домена функционирует и доступен через сеть.
- Проверьте возможность авторизации пользователей на новом контроллере домена.
- Удостоверьтесь, что новый контроллер домена виден другим компьютерам в сети.
- Проверка репликации домена:
- Проверьте, что репликация данных между новым контроллером домена и другими контроллерами домена происходит без ошибок.
- Убедитесь в синхронизации между новым контроллером домена и другими контроллерами домена.
- Проверка функциональности служб и ролей:
- Убедитесь, что все службы и роли, связанные с контроллером домена (например, служба DNS, служба Active Directory и т.д.), функционируют корректно.
- Проверьте настройки и конфигурацию служб и ролей, связанных с контроллером домена, и внесите необходимые изменения при необходимости.
- Документирование:
- Создайте подробную документацию о процессе переноса контроллера домена с сервера 2008 на сервер 2019, включающую все этапы и настройки.
- Зарегистрируйте все изменения в системном журнале и запишите необходимые данные для последующей отладки и анализа.
- Завершение процесса:
- Убедитесь, что старый контроллер домена, с которого были перенесены все функции на новый сервер 2019, больше не требуется и может быть выведен из эксплуатации.
- Если старый контроллер домена будет удален, убедитесь в наличии достаточных резервных копий данных для восстановления системы, если это потребуется.
Следуя данным рекомендациям, вы успешно выполните тестирование и завершите процесс переноса контроллера домена с сервера 2008 на сервер 2019.
Вопрос-ответ
Как перенести контроллер домена с сервера 2008 на сервер 2019?
Для переноса контроллера домена с сервера 2008 на сервер 2019 необходимо выполнить несколько шагов. Во-первых, необходимо создать новый сервер с операционной системой Windows Server 2019. Затем нужно подключить сервер к домену и установить на него роли Active Directory Domain Services и DNS Server. После этого нужно перенести данные с сервера 2008 на сервер 2019 с помощью инструментов миграции. Наконец, необходимо протестировать новый контроллер домена, убедиться, что все работает корректно, и отключить старый сервер 2008.
Какие роли нужно установить на новый сервер для переноса контроллера домена?
Для переноса контроллера домена с сервера 2008 на сервер 2019 необходимо установить роли Active Directory Domain Services и DNS Server на новый сервер. Роль Active Directory Domain Services отвечает за управление и аутентификацию пользователями и компьютерами в домене, а роль DNS Server обеспечивает функционирование системы именования домена.
Как проверить, что новый контроллер домена работает корректно после переноса?
После переноса контроллера домена с сервера 2008 на сервер 2019 рекомендуется выполнить несколько проверок, чтобы убедиться, что все работает корректно. Во-первых, нужно убедиться, что все пользователи и компьютеры успешно аутентифицируются в домене. Для этого можно попробовать выполнить вход от имени разных пользователей и проверить доступность общих ресурсов. Кроме того, важно убедиться, что репликация между контроллерами домена работает без ошибок. Для этого можно воспользоваться инструментами проверки репликации, такими как Active Directory Users and Computers или Repadmin.
Время на прочтение
9 мин
Количество просмотров 32K

Windows Server уже 27 лет и с каждым новым обновлением компания Microsoft всё больше совершенствует свое детище. С момента выхода Windows Server 2016 прошло уже 4 года, но с этим обновлением — компанией был выбран новый курс обновления, разделенный на 2 канала.
1. Знакомство с Windows Server 2019, нововведения и обновления

LTSC (Long-term servicing channel) — это первый канал обновлений и выхода релизов от Microsoft. Релизы, выпущенные в LTSC — выходят каждые 2-3 года и поддерживаются эти релизы достаточно долго. Если быть точнее, то LTSC-релизы поддерживаются компанией на протяжении 5 лет после выхода. Вы можете обзавестись и расширенной поддержкой релиза сроком еще на 5 лет после истечения срока действия основной.
Semi-Annual Channel — это промежуточные релизы, выходящие в свет каждые полгода. Такие релизы поддерживаются компанией на протяжении 6 месяцев, по истечению срока действия основной поддержки пользователь может обзавестись расширенной поддержкой еще на полтора года.
Спустя 3 года после релиза Windows Server 2016 и принятия решения о новой системе обновлений — на свет появился новый релиз — Windows Server 2019. Направления, в которых работали сотрудники компании Microsoft создавая этот продукт были следующими:
- Гибридное облако — целью было связать новый релиз с облачным хранилищем компании Microsoft Azure. Такое решения было принято из-за проблемы утери данных на физических носителях пользователей. Гибридное облако сделало возможным backup информации с серверов Microsoft с целью последующего восстановления.
- Безопасность системы и информации — одним из главных плюсов нового релиза стала обновленная система безопасности, с встроенными службами — затрудняющими проникновение и внедрение вредоносного ПО.
- Развитие контейнеров и поддержка Linux — контейнеры Microsoft пользовались популярностью после выхода Windows Server 2016, благодаря их использованию осуществлялась доставка приложений в различные системы. С релизом Windows Server 2019 компания не только усовершенствовала привычные пользователю контейнеры, но и добавила поддержку контейнеров Linux и подсистему Windows для Linux (WSL).
- Гиперконвергентная инфраструктура — благодаря такой инфраструктуре пользователь может собрать на одной архитектуре и вычисления и хранилище данных — без потерь в производительности. Такой подход обходится пользователю дешевле и не требует увеличения производительности для корректной работы.
Система управления так же получила дополнение в виде Windows Admin Center.
Это средство администрирования загружается локально и вносится в вашу инфраструктуру, благодаря чему у пользователя есть возможность управлять не только локальными и облачными версиями Windows Server, но и компьютерами под управлением Windows 10, а также кластерами и гиперконвергентными инфраструктурами.
2. Отличия между релизами Windows Server 2008 и Windows Server 2019

В течение жизненного цикла Windows Server обзавелась несколькими версиями. Самыми популярными релизами компании Microsoft признаны версии 2008 и 2019 года. Ниже представлена таблица, где собраны различия между этими двумя версиями:
Подводя итоги, можно с уверенностью сказать — Windows Server 2008 не может составить конкуренцию обновленному продукту Microsoft. Релиз 2008 года чересчур устарел, а из-за потери поддержки со стороны компании-создателя, старая версия в скором времени станет крайне нестабильной системой и, следовательно, не самым лучшим вариантом при выборе ОС для создания сервера.
Кстати, наша компания предлагает виртуальные серверы на Windows Server. Для автоматической установки доступны Windows Server 2012, 2016 или 2019, лицензия уже входит в стоимость!
3. Как выиграть время перед переходом на новую версию Windows Server

Период основной поддержки релиза Windows Server 2008 компания Microsoft прекратила еще в 2015 году. Единственным выходом для компаний, чья работа была завязана на этом релизе системы — стала расширенная программа поддержки, предполагающая под собой лишь обновления системы безопасности. Расширенная программа поддержки функционировала на протяжении 3-х лет и по окончанию ее работы у пользователей возник вопрос, как выиграть время перед переходом на новую версию ПО?
Есть несколько возможностей отсрочить переход, но самым безопасным способом “отсрочки” является предложенный самой компанией Microsoft вариант.
4. Облачное размещение данных в Azure для последующего переноса

Microsoft с окончанием периода поддержки WS 2008 получала сотни писем с вопросом, как же оттянуть переход системы на новую версию ПО, без риска для данных.
Компания не заставила пользователей долго ждать ответа и анонсировала переход на облачное хранилище Azure. Такой вариант подойдет, если в данный момент у вас нет возможности перейти на новое ПО — а деятельность завязана именно на WS 2008.
Вы можете перенести все данные на виртуальную систему и продолжить работу. Если хостинг уже оплачивается — компания предоставит все обновления системы безопасности бесплатно, ну а если нет — обновления системы придется докупить.
Перейдя на облачное хранилище Azure, можно оттянуть переход на обновленную систему. Таким образом будет достаточно времени собрать всю необходимую информацию для переноса данных на новую версию Windows Server.
5. Решения Veeam как один из вариантов для безопасного переноса данных

Еще один помощник для плавного перехода на новую версию ПО — это Veeam Backup & Replication.
Данная утилита способна копировать информацию любых объемов для последующего восстановления системы или переноса файлов в облако Azure. Помимо облака Azure есть также возможность воспользоваться облачным хранилищем компании Veeam.
Еще одним плюсом данного софта является то, что Veeam Backup & Replication поддерживает восстановление данных. Эта функция будет крайне полезна если вы часто сталкиваетесь со сбоями в системах. Моментальное восстановление данных в Veeam Backup & Replication стало возможным благодаря фирменной технологии компании- vPower.
6. Сравнение софта для копирования данных

Помимо Veeam Backup & Replication на рынке есть еще несколько программ для переноса данных. Для упрощения выбора подходящего ПО — мы собрали в таблице сходства и различия.
Vmware Data Recovery + vCenter —удобный пакет, обладающий сравнительно урезанным функционалом в сравнении со своими оппонентами, тем не менее, главным плюсом данного софта является возможность ввода Data Recovery в систему на любом этапе работы.
Veeam BackUp& Replication — один из лидеров среди программ для создания backup в VSphere. Данный софт обладает огромным потенциалом благодаря наличию различного рода дополнительных опций, которые пользователь может приобрести отдельно. Veeam BackUp& Replication способен похвастаться самым полным пакетом функций.
В Veeam BackUp& Replication имеется крайне удобная функция репликации данных. Эта функция будет полезна, если вы хотите не просто обезопасить свои данные от утери, но и проводить тесты на стрессоустойчивость системы с разными параметрами и в разных ситуациях — без риска для данных.
Большим преимуществом данного софта является возможность мгновенного восстановления системы в случае непредвиденных обстоятельств. Такая возможность станет очень полезна после перехода на новую ОС Windows Server 2019 и возобновления работы на новой операционной системе.
Symantec Backup Exec System Recovery — сильными сторонами данного софта можно назвать возможность восстановления системы c использованием другой аппаратной среды, наличие функции преобразования виртуальной среды в физическую, а также возможность интеллектуального копирования на USB носитель.
Для создания копии с файл-сервера необходима лишь одна лицензия — SSR, но для использования данного софта в полной мере и работы с разными базами и структурами пользователю потребуются агенты — которых необходимо будет приобрести отдельно.
Еще одна сильная сторона данного софта — и одно из его главных отличий — это способность агентов Symantec распознавать все типы серверов, в том числе и те, что созданы для определенных ОС. Благодаря этому программа копирует данные, с учетом особенностей каждого сервера.
Acronis Backup & Recovery 10 — данный софт использует технологии, схожие с технологиями Veeam BackUp& Replication. Продукт компании Acronis также способен на мгновенное восстановление системы в случае технических ошибок или неисправностей. Еще одним плюсом данного софта смело можно назвать цену — стоимость пакета Acronis Backup & Recovery 10 держится на средней отметке среди своих конкурентов и при этом предлагает схожий пакет функций. Благодаря своей стоимости и функционалу этот софт способен составить конкуренцию Veeam BackUp& Replication, ввиду схожих возможностей.
7. Порядок перехода на новую ОС

Microsoft предлагает несколько вариантов обновления операционной системы Windows Server.
Первый и, пожалуй, самый безопасный метод — “чистая установка”.
Под чистой установкой подразумевается создание новой среды на основе обновленной WS 2019. Пользователям придется перекодировать имеющиеся данные согласно требованиям операционной системы и продолжить работу уже на обновленной ОС. Это самый безопасный метод, но с точки зрения затраты времени, это несколько проблематично, а если у пользователя имеются обязательства перед сервисом или же организацией — такой метод не подойдет.
Второй вариант миграции на обновленную ОС — плавный переход от версии к версии. Для этого необходимо скопировать все данные и постепенно сменить версии ОС, начиная с WS 2012 и вплоть до относительно недавно вышедшей WS 2019.
Такой метод рекомендует сама Microsoft с целью минимизировать риски потери данных, а также, как выход для компаний, у которых в данный момент нет возможности перейти сразу на последнюю версию ОС.
Для копирования данных и последующего их хранения вы можете воспользоваться утилитами от лидеров ниши и впоследствии перенести их на облачное хранилище Azure.
Третий путь — небольшая хитрость, оставленная Microsoft на радость пользователям.
Для ускоренного перехода первоначально необходимо перейти на версию WS 2012 R2. Перенеся систему на W S2012 R2, можно без труда обновиться до последней доступной версии Windows Server 2019.
8. Безопасность каждого из вариантов миграции, положительные и отрицательные стороны

Миграция с одной ОС на другую — всегда ответственный шаг. Важно выбрать подходящий метод перехода. Ниже перечень сильных и слабых сторон каждого из методов:
Если разобраться детально и взвесить все факторы, можно смело сказать, что нет единого — самого безопасного и удобного метода перехода на новую ОС. Ввиду определенных параметров и обязательств каждого пользователя — выбор подходящего метода миграции остается за вами.

Active Directory Migration – In this blog, we’ll move the roles on our Server2008 (Windows Server 2008 R2 SP1) AD server to Server2019 (new Windows Server 2019 Standard).
Before proceeding to migrate an Active Directory from Windows Server 2008 R2 to Windows Server 2019, you want to first install Windows Server 2019 on a replacement machine which can then be promoted to Active Directory Server 2019.
Install Windows Server 2019.
How to Install Windows Server 2019, Click here
Rename Windows Server 2019.
How to rename Windows Server 2019, Click here
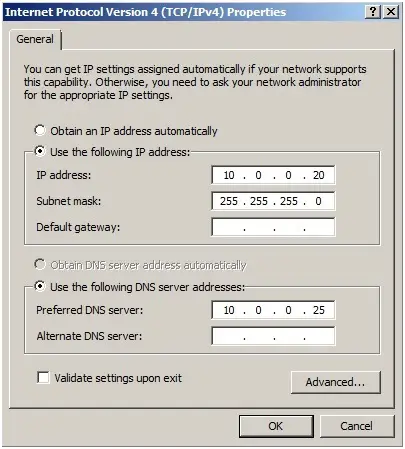
Configure the IP Addresses in Server 2019.
The next step is to configure the IP and the DNS Addresses on the new server.
Windows Server 2008
R2
Windows Server 2019
Computer Name: Server2008 Server2019
Domain Name:
xpertstec.local
IP Address (Static): 10.0.0.20
10.0.0.22
Subnet Mask:
255.255.255.0 255.255.255.0
Default Gateway: 10.0.0.1 10.0.0.1
Preferred DNS Server: 10.0.0.20 10.0.0.20
Active Directory Migration 2008
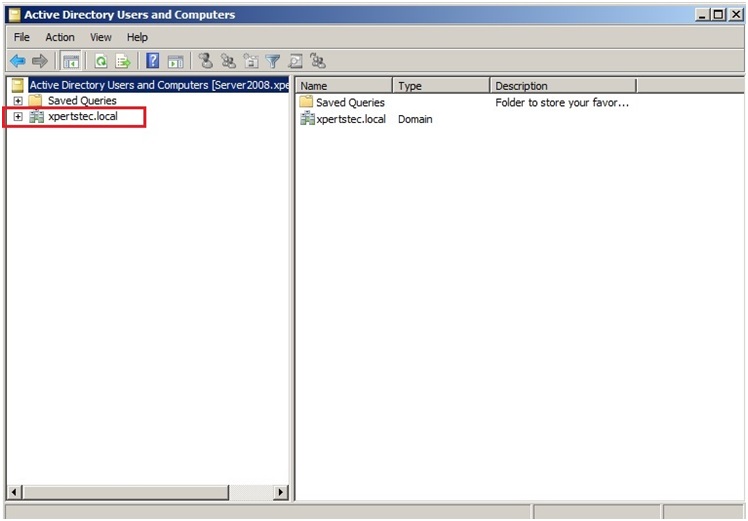
1- First, let’s have a glance at my environment. we have a domain controller xpertstec.local which is installed on Windows Server 2008 R2.
Raise the Forest Functional Levels and Domain Functional Levels in Windows Server 2008 R2.
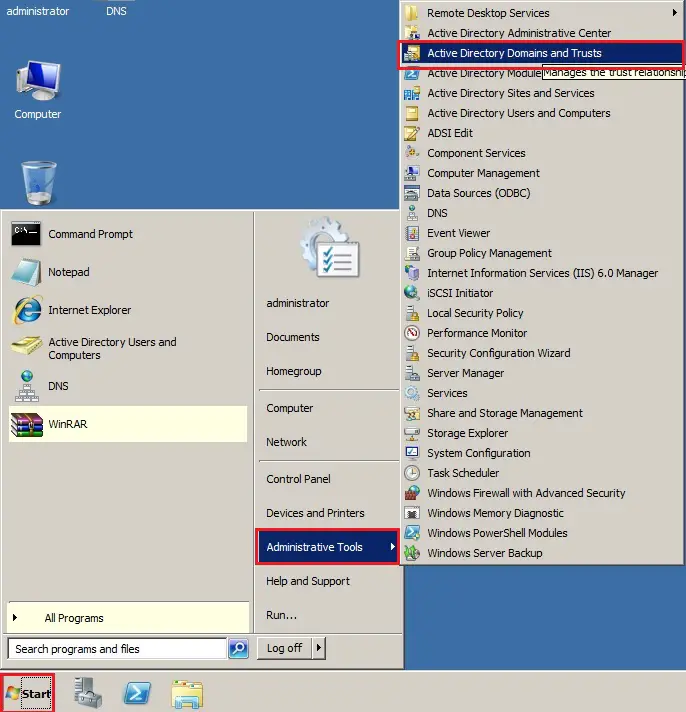
2- Click Start and select Administrative Tools and then Active Directory Domains and Trusts.
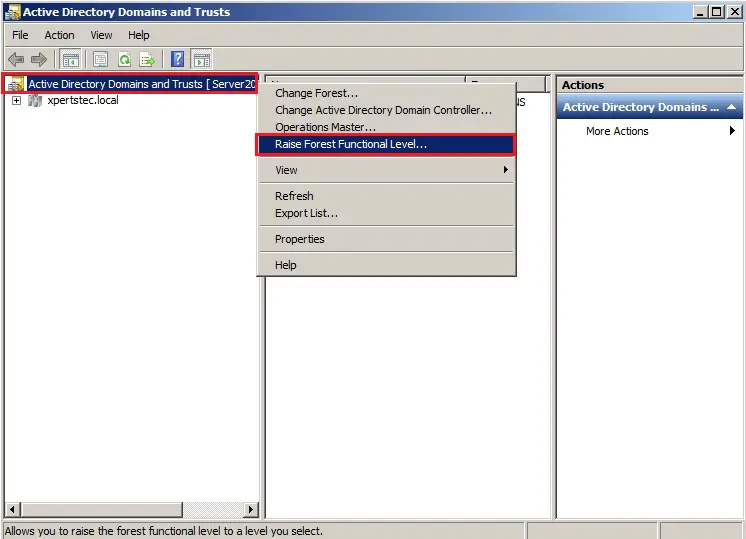
3- Right click on Active Directory Domains and Trusts and choose Raise Forest Functional Level.
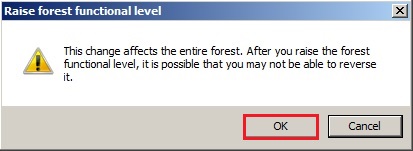
4- Select an available forest functional level “Windows Server 2008 R2 and click Raise.
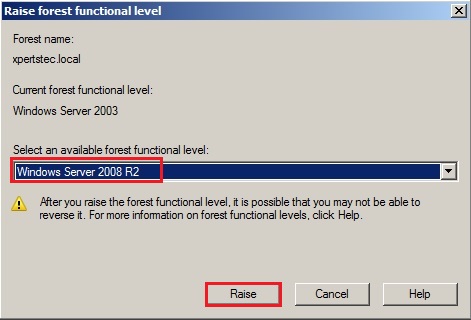
5- Now click on OK.
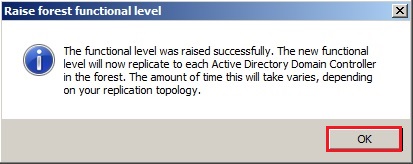
6- The forest functional level was raised successfully so click on ok.
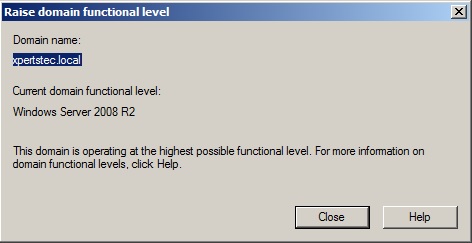
Now Raising the Function Level of the Domain
7- Right click on the Domain name (xpertstec.local) and click Raise Domain Functional Level.
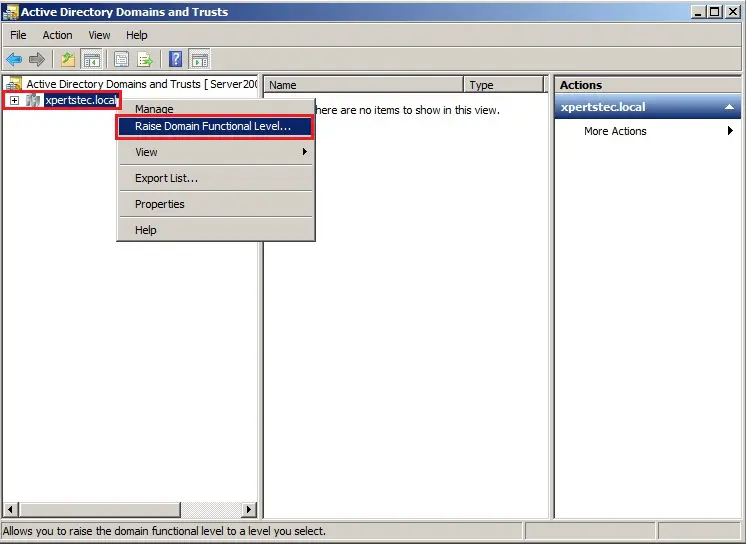
8- It has already got raised the Domain Functional Level to Windows Server 2008 R2 so click on close.
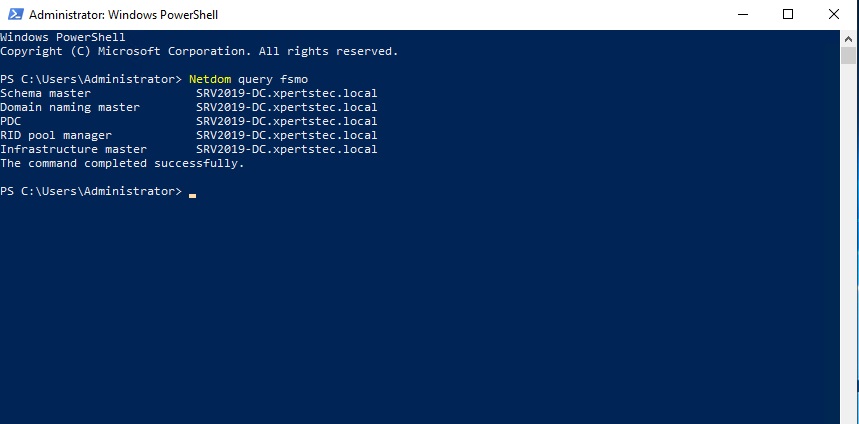
9- Now type the Netdom query fsmo command to check which server has installed FSMO roles.

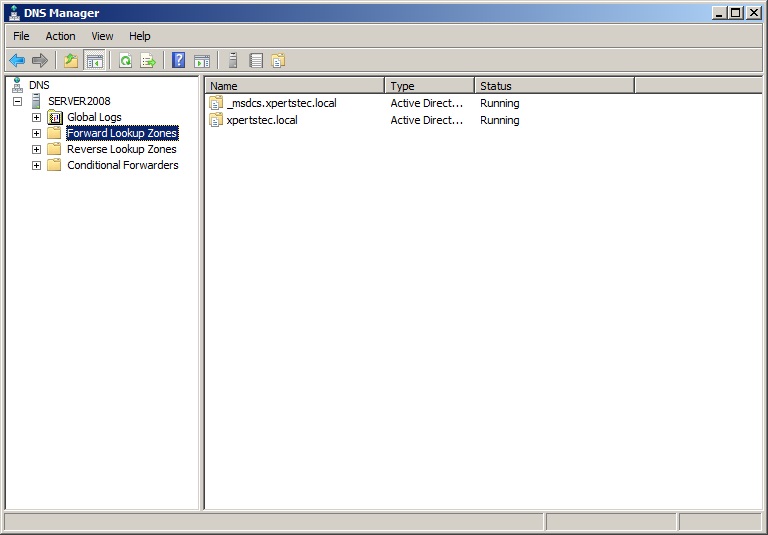
10- DNS Manager.
Active Directory Migration Steps
Join Windows Server 2019 to an Active Directory Domain.
How to Join Windows Server 2019 to an Active Directory Domain, Click here
Now sign in Windows Server 2019 with the domain administrator account.
Create Additional Domain Controller (ADC) In Windows Server 2019
How to Create Additional Domain Controller (ADC) In Windows Server 2019 so Click here
11- Now have a look at my active directory Domain Controllers Server2008. We can now see that our server Server2019 is in the domain role.

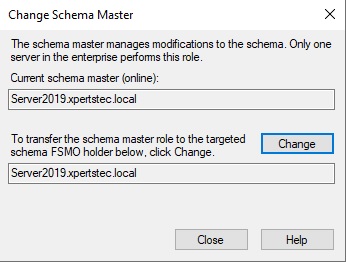
Transferring the Flexible Single
Master Operations (FSMO) Role
I have a Windows Server 2008 Domain Controller (server2008) and have a further Windows Server 2019 domain controller (Server2019). To finish the migration. We’d like to transfer 5 FSMO roles to the new domain controller.
- Schema Master
- Domain Naming Master
- PDC
- RID pool manager
- Infrastructure Master
12- To find which server is currently holding FSMO then run the following command. netdom query fsmo
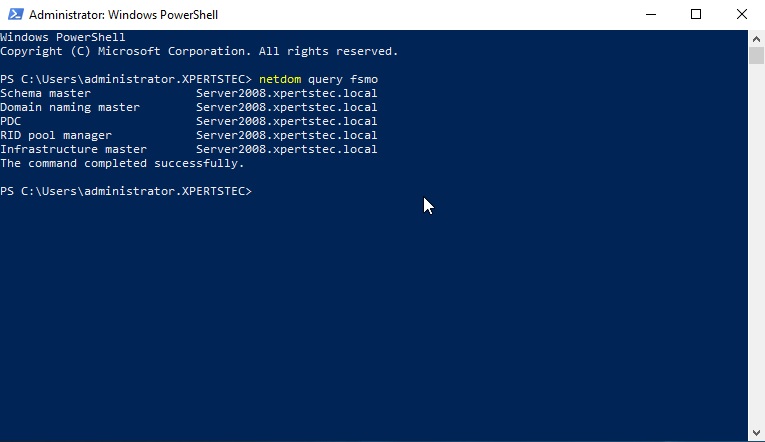
The FSMO roles are currently with the Windows Server 2008 R2 Active Directory domain controller (server2008)
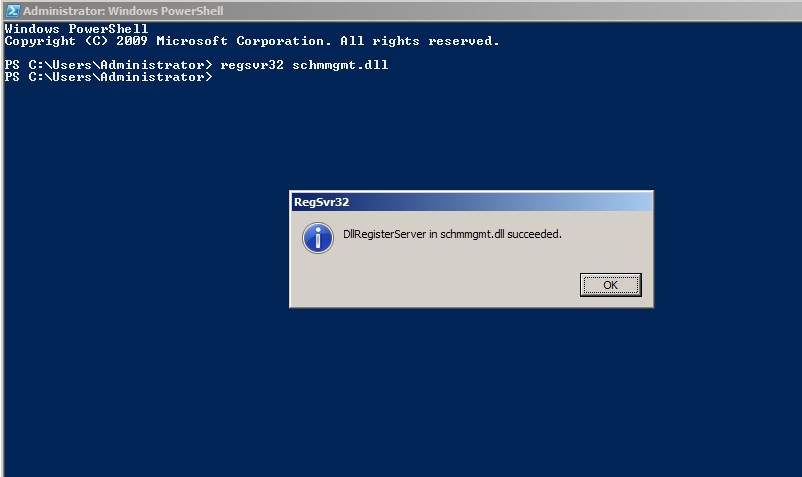
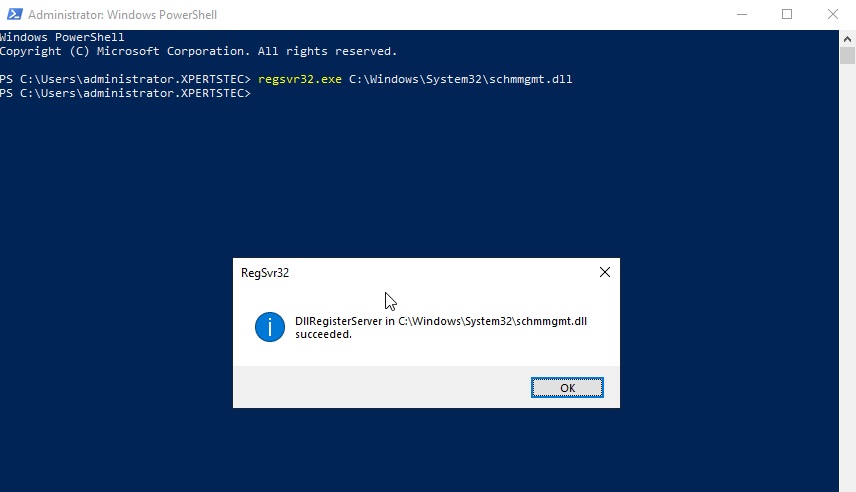
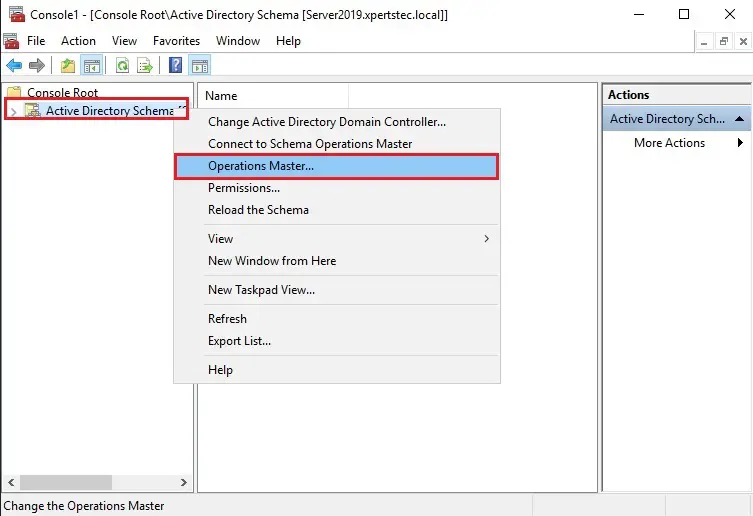
Using Active Directory Schema snap-in to transfer the Schema Master role 13- Open Command Prompt in administrative mode and type regsvr32 schmmgmt.dll and then click on ok.
Operations Master Roles Tranfer
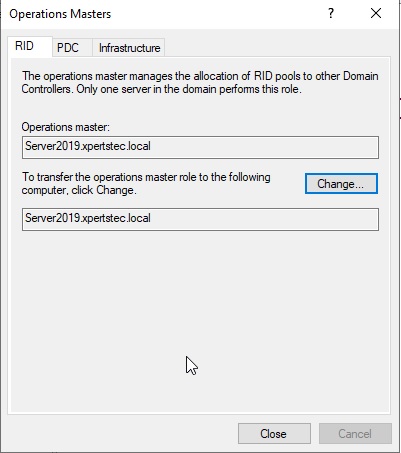
14- On the Server2019 server, open Active Directory Users and Computers, right click domain xpertstec.local and then click Operations Masters.
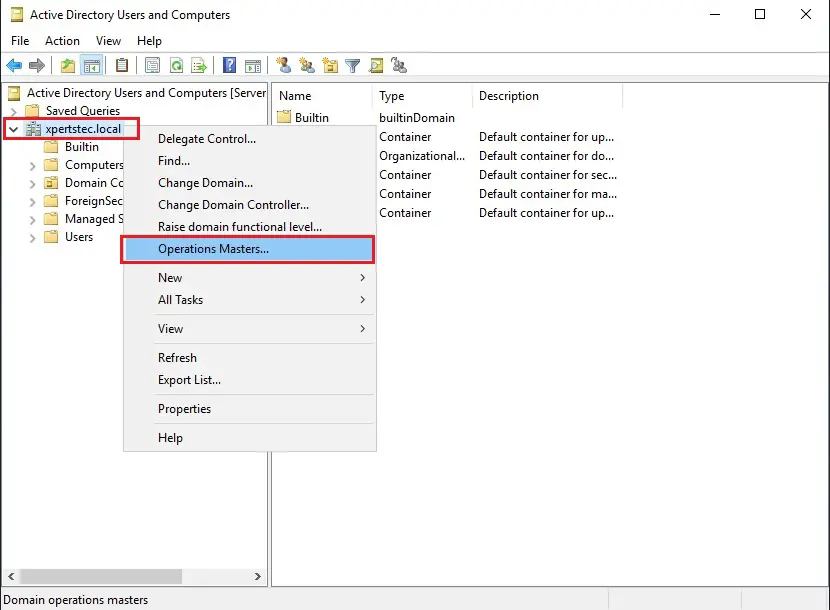
15- On the Operations Masters, Select the RID tab and select the Change button.
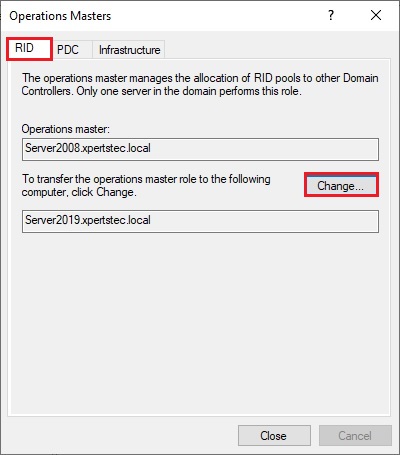
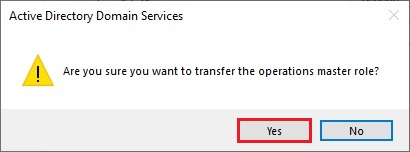
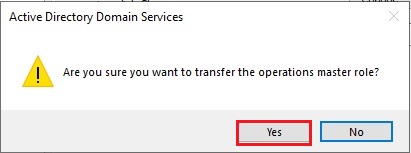
16- Now click Yes.
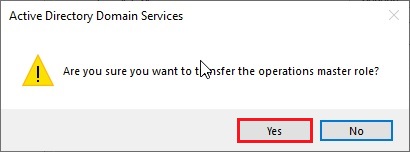
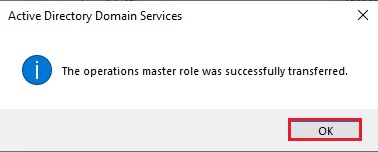
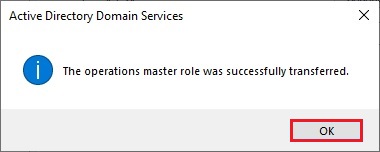
17- The operations master role was successfully transferred so click ok.
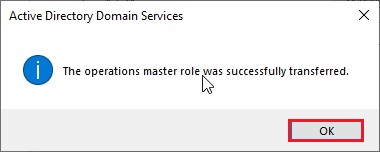
18- Now you can verify that Operation master now transferred to our new Server Server2019.xpertstec.local
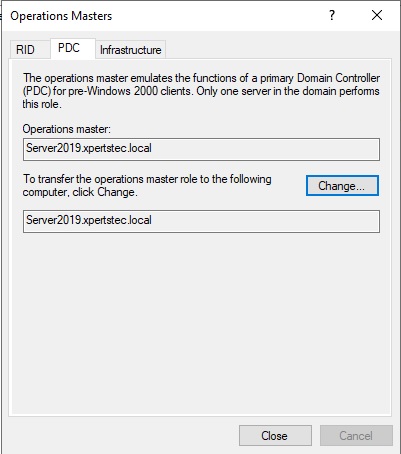
19- On the Operations Masters, select the PDC tab and then click the change button.
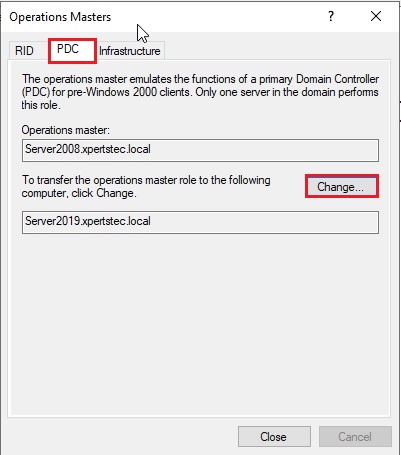
20- Now click Yes.
21- The operations master role was successfully transferred, then click ok.
22- Now you can verify that Operation master now transferred to our new Server Server2019.xpertstec.local
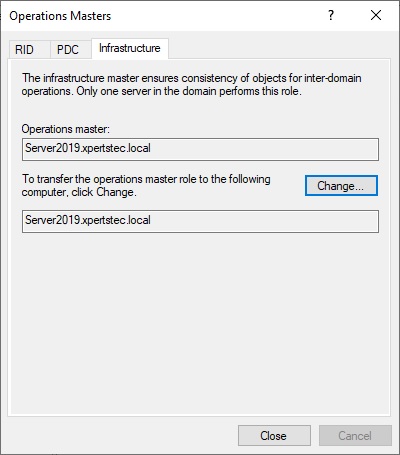
23- On the Operations Masters, select the Infrastructure tab and click on change button.
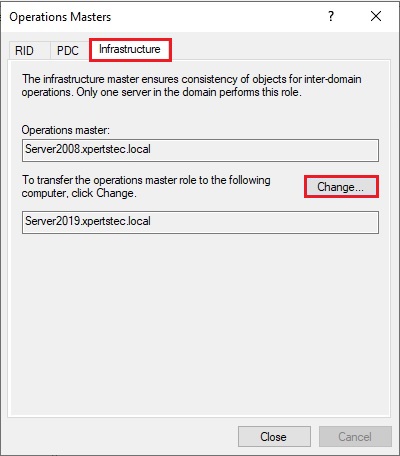
24- Then click Yes.
25- The operations master role was successfully transferred, then click ok.
26- Now you can verify that Operation master now transferred to our new Server Server2019.xpertstec.local
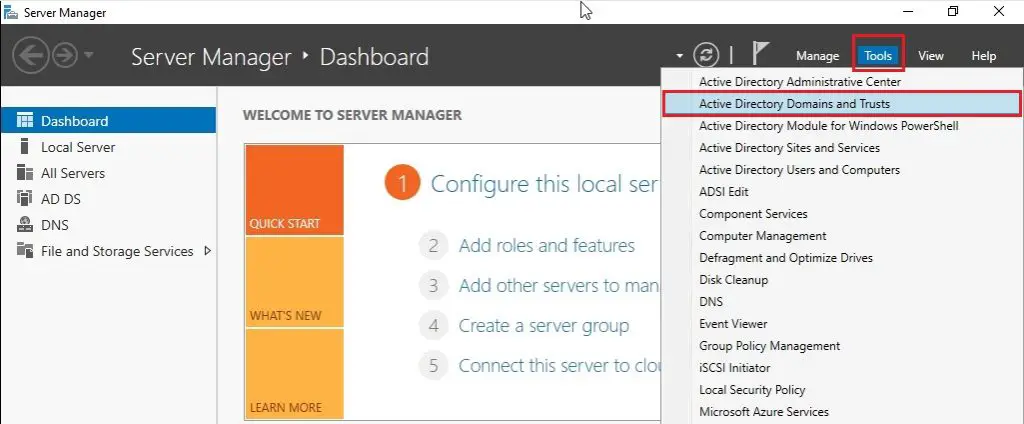
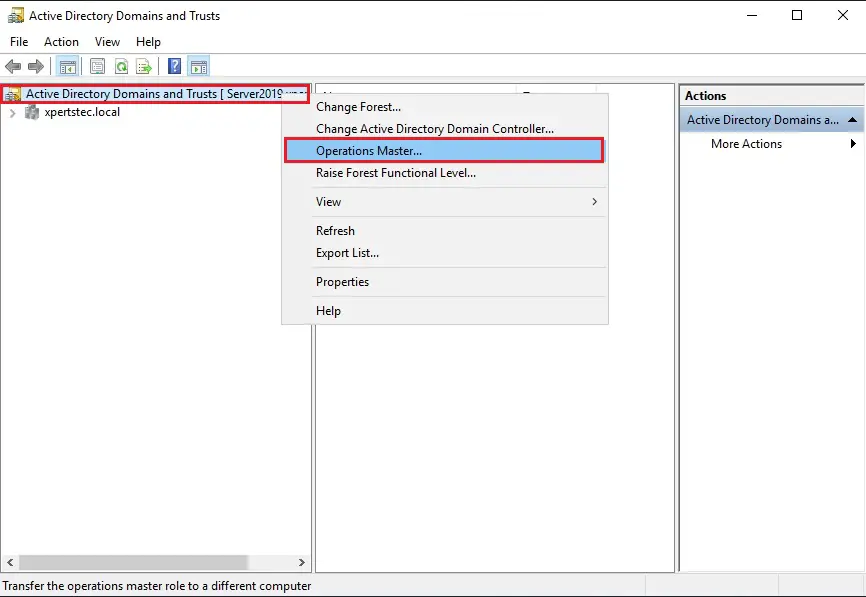
27- Open Server Manager and select Tools and then click Active Directory Domains and Trusts.
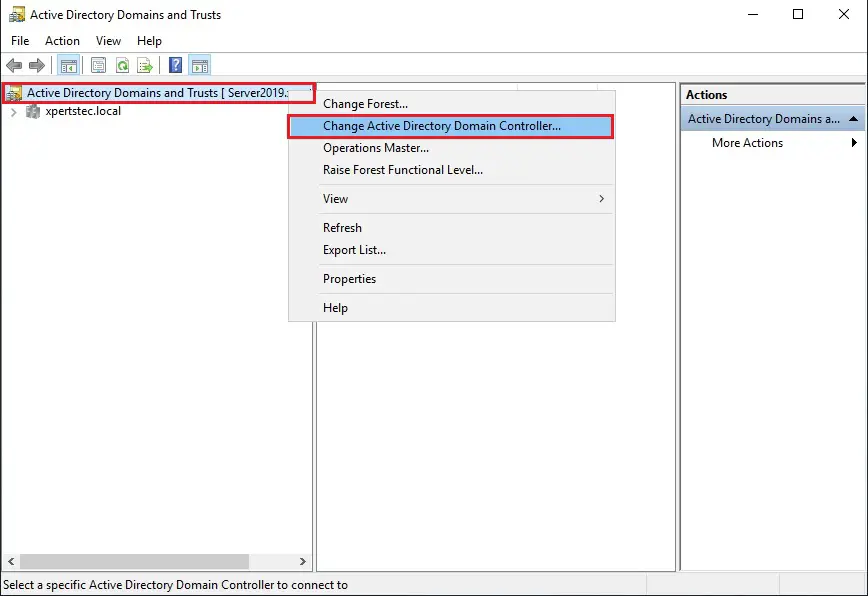
28- Right click on Active Directory Domains and Trusts and then select change active directory domain controller.
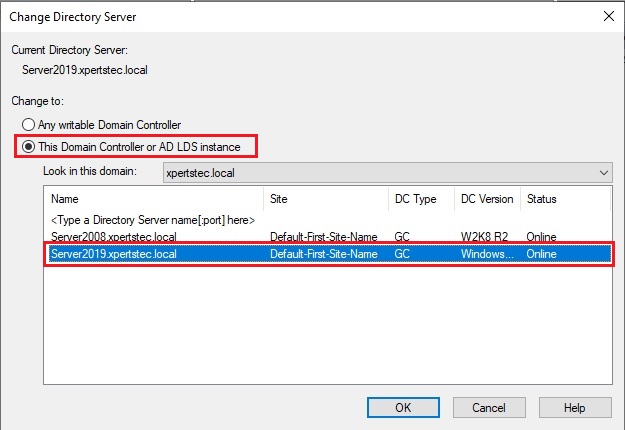
29- Select this Domain Controller or AD LDS Instance and click on the domain controller that you want to be the schema master role and then click ok.
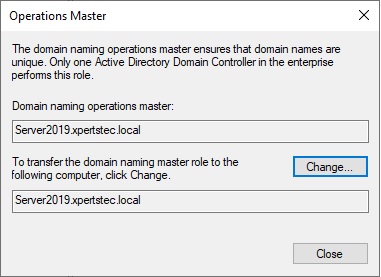
Transfer Domain Master Role
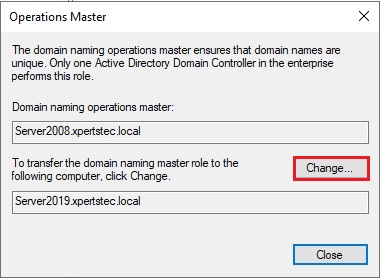
30- Right click Active Directory Domains and Trusts and then select Operations Master.
31- Now click on Change
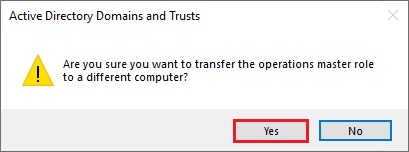
32- then click Yes.
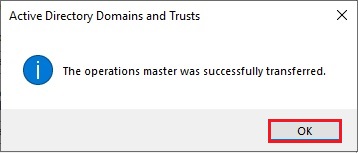
33- The operations master was successfully transferred then click ok.
34- Confirmed the domain naming operation master role and click on Close.
35- Now we need to move our Schema Master role, so we need to register the schmmgmt.dll open command prompt and run the command below.
Regsvr32.exe C: \ windows \ system32 \ schmmgmt.dll
The process was completed successfully so click on ok.
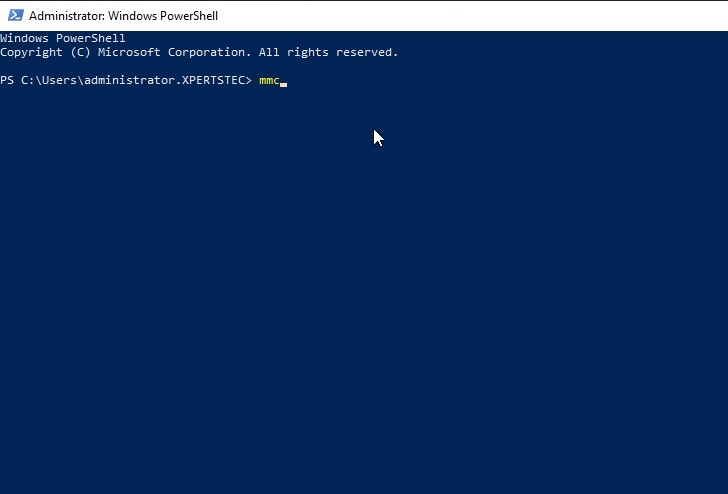
36- Open Microsoft Management Console mmc type mmc and then hit enter.
Console
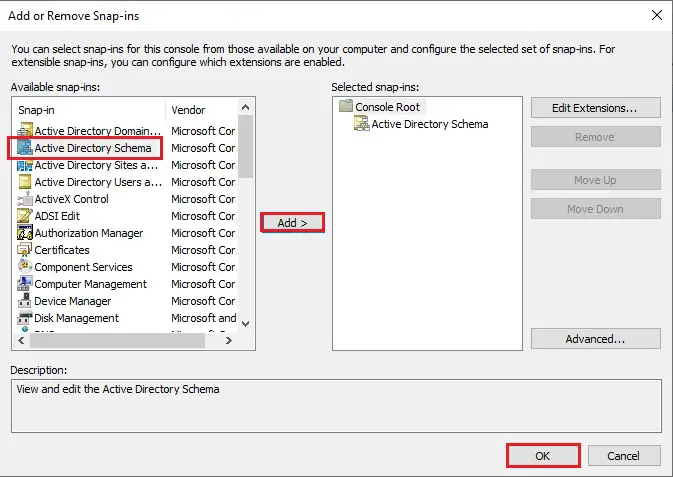
37- Select the File tab and then select Add/Remove Snap-in.
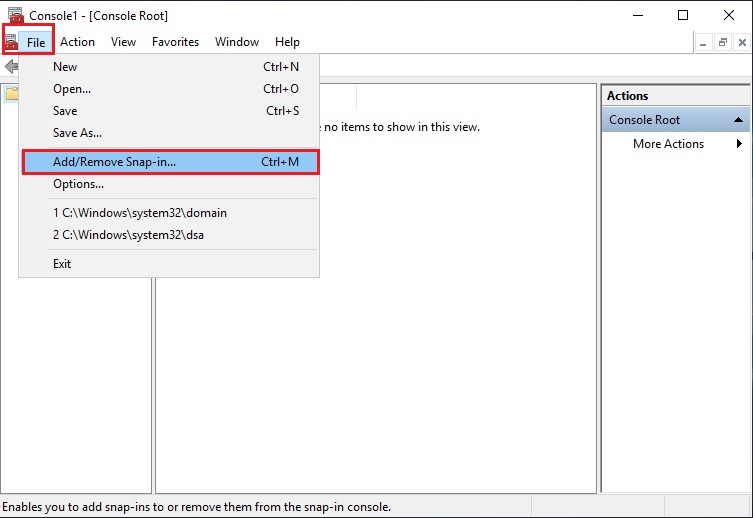
38- From the left side, under Available Snap-ins, Select Active Directory Schema, click Add button and then click ok.
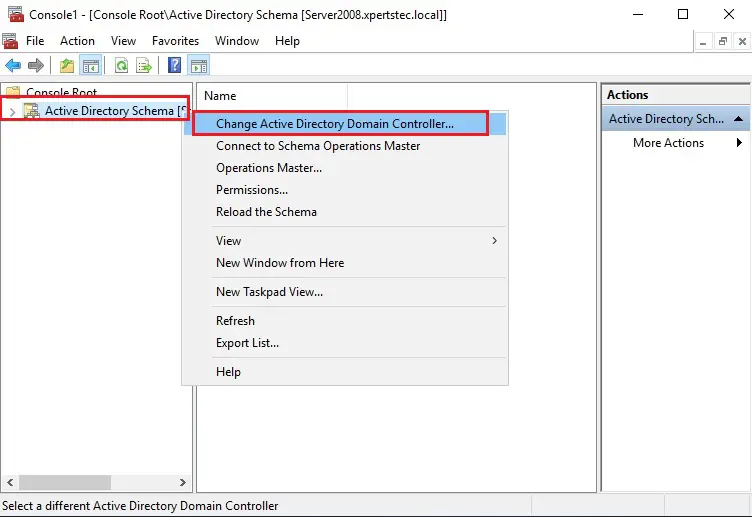
39- Right click Active Directory Schema, and then select Change Active Directory Domain Controller.
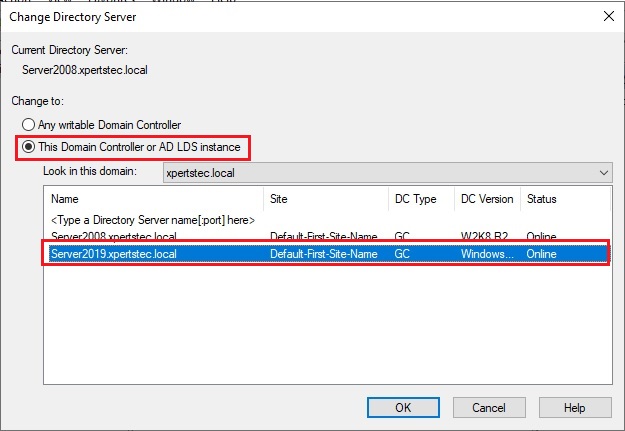
40- Select this Domain Controller or AD LDS Instance, click on the domain controller that you want to be the schema master role and then click on ok.
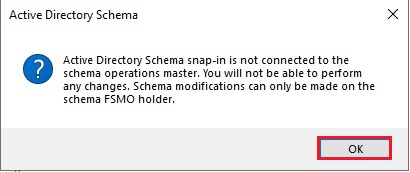
41- Now click OK.
42- In the console1, right click Active Directory Schema (Server2019.xpertstec.local) and then select Operations Master.
43- Select the Change button.
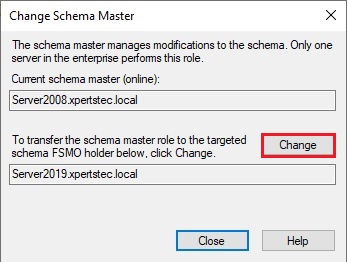
44- then click Yes.
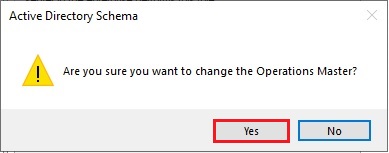
45- The active directory schema Operations Master successfully transferred then click ok.
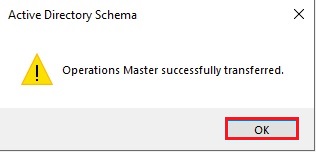
46- Now confirm your current schema master which is Server2019 and then click Close.
47- Now run the Netdom query fsmo command, so we can now see that our roles have been moved to our Windows Server 2019 Additional Domain Controller.
48- Now change the DNS address of our additional Domain Controller server to be the IP address of our Windows Server 2019 Domain Controller server.
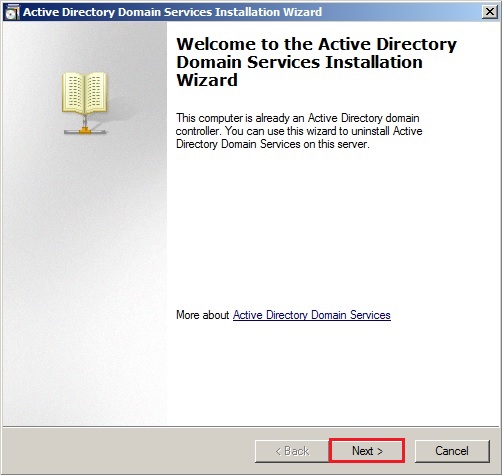
After completing Active Directory Migration, Now the ultimate step is to get rid of (uninstalling) server2008 Active Directory domain controller.
Remove Active Directory Domain Controller 2008
49- Open command prompt Type dcpromo and then hit Enter.
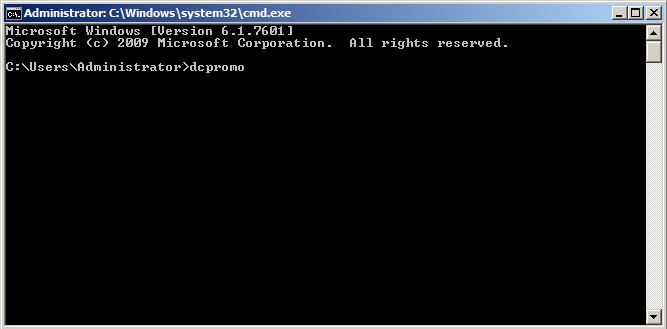
50- Click Next.
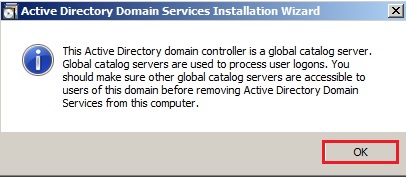
51- The Active Directory domain controller has the global catalog service, make sure your primary DC also has the service enabled and click on ok.
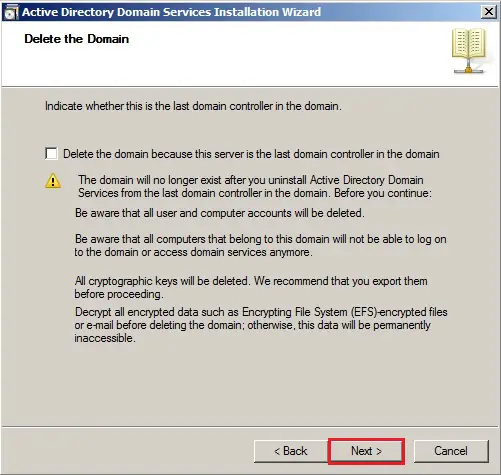
52- Confirmed that the delete this domain, because this server is the last domain controller in the domain, is UNCHECKED and then click next.
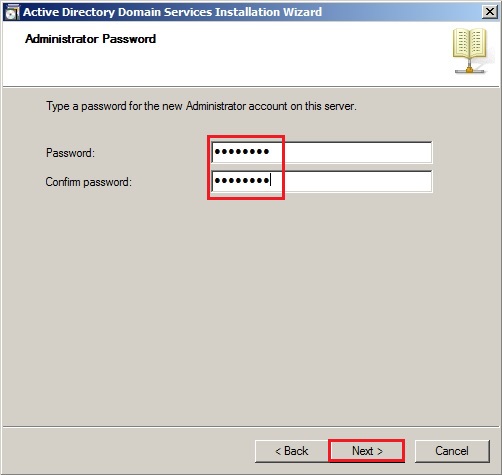
53- Type a password for the new Administrator account on this server and click next.
54- Review the remove active directory domain services Summary and click Next.
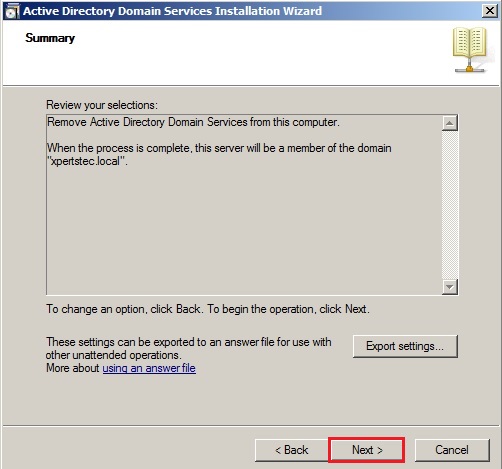
55- Check the Reboot on completion box to restart the server after the service has been removed

56- After rebooting server2008 DC. Now log in with the local administrator account and then open Server Manager.

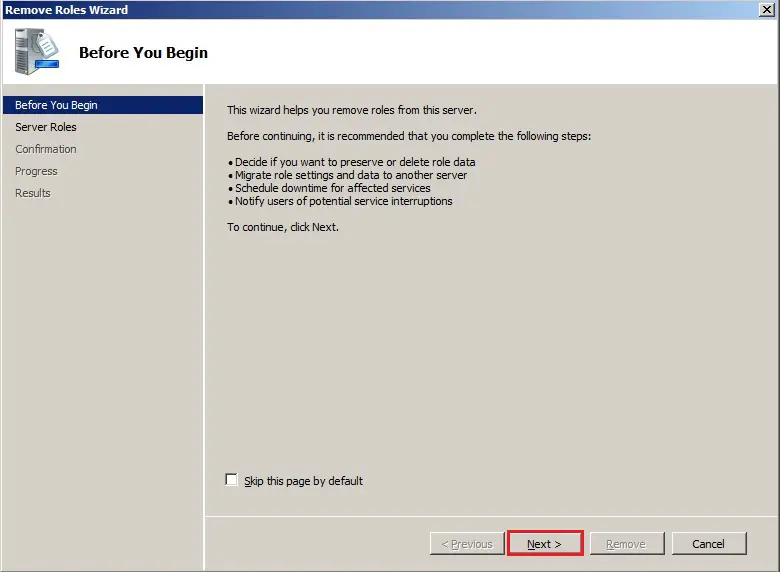
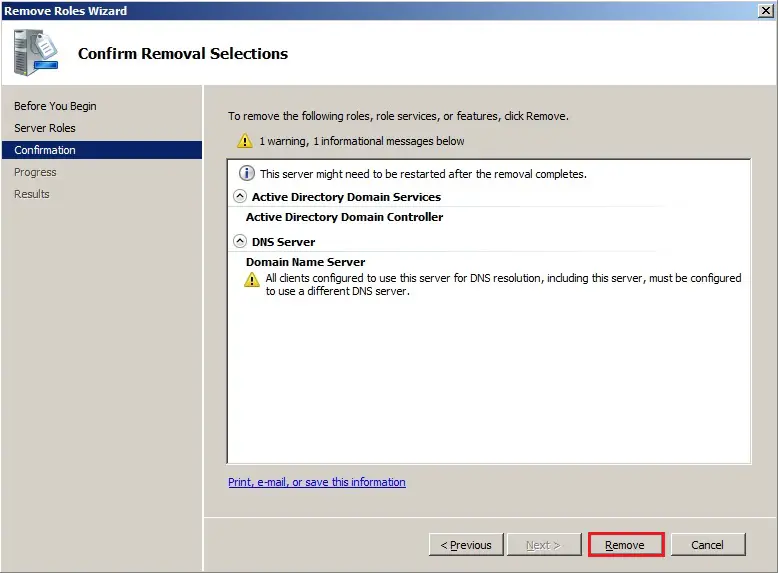
57- In Server Manager click Roles under Roles Summary and click Remove Roles.
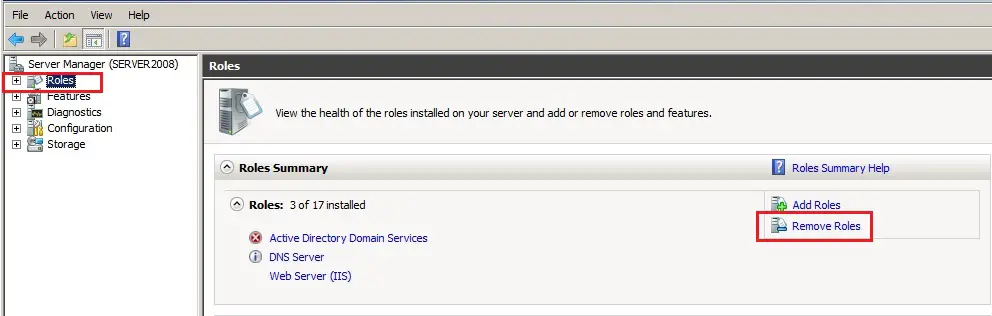
58- Remove active directory domain controller 2008 Roles wizard, click next.
59- Uncheck Active Directory Domain Services and DNS Server box and click next.
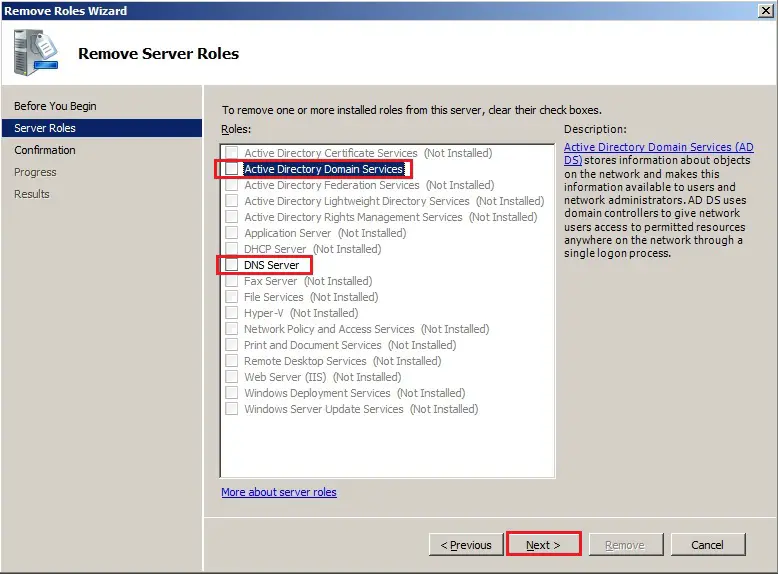
60- Click Remove.
61- Now click Close.
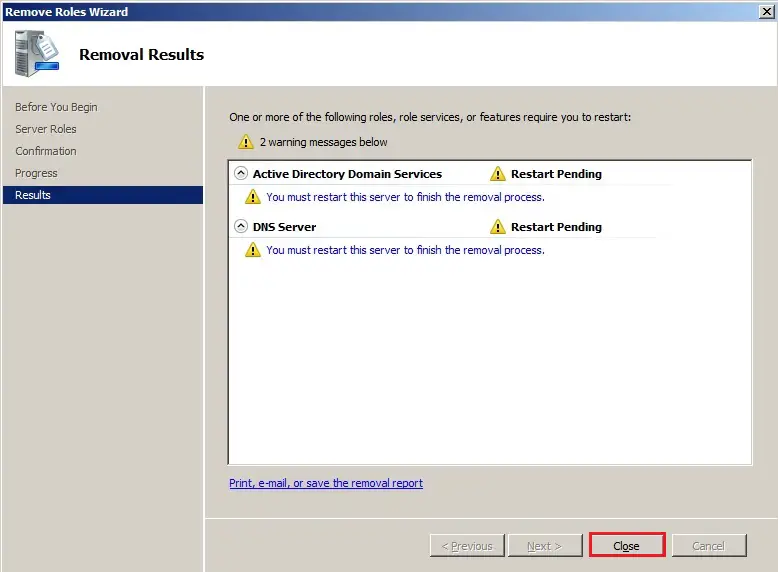
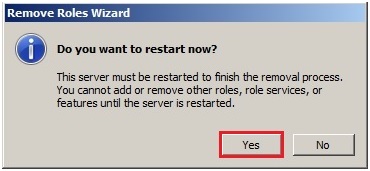
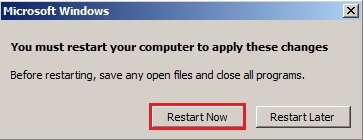
62- Do you want to restart now so click on Yes.
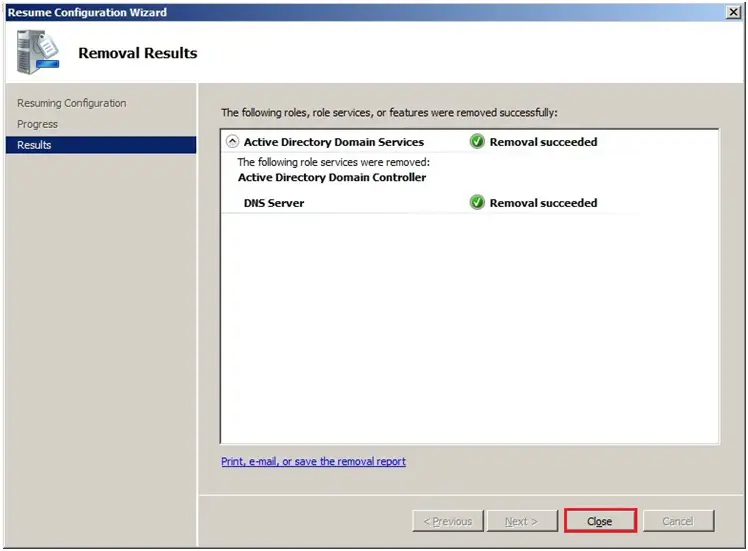
63- After rebooting server Log back to server2008, active directory domain services removal succeeded and click Close.
64- Disjoin the machine from the domain
Join to Workgroup
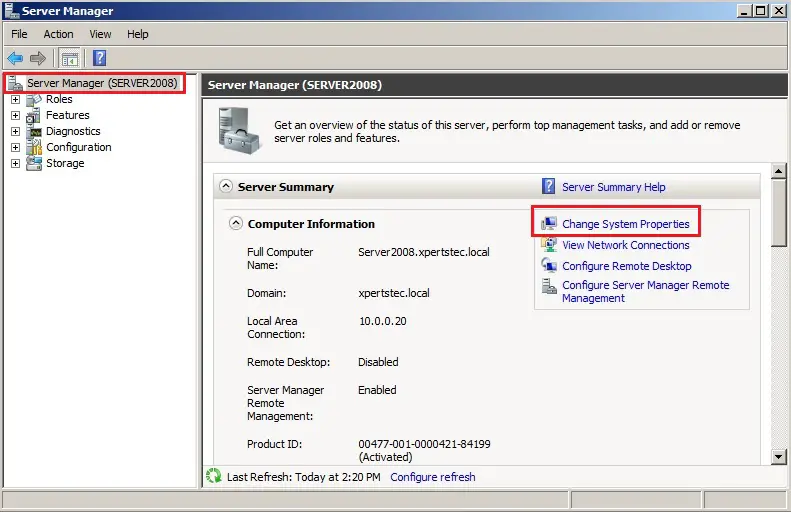
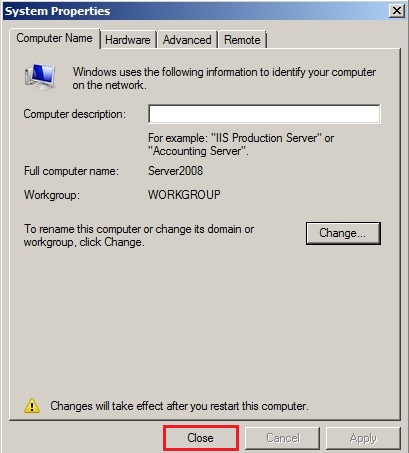
In the Server Manager, under Server Summary and click Change System Properties.
65- On the System Properties and click the change button.
66- Select Workgroup type in a workgroup name and then click on ok.
67- After leaving the domain Warning message so click ok.
68- Welcome to the workgroup and click on ok.
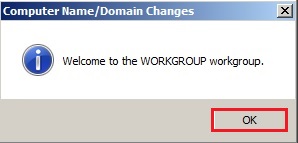
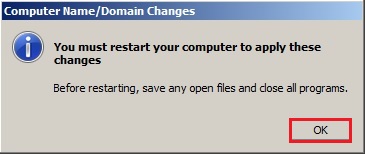
69- Click OK to restart the server.
70- System Properties, click Close.
71- Click Restart Now or Restart Later and shut down this server.
Like and subscribe our YouTube channel to watch updated videos.
For more information click here
Jamil Parvezhttps://www.xpertstec.com
Jamil Pervez works as a Network Administrator, based in Kuwait with a Primary focus on Microsoft technologies. Microsoft Certified MCSE, MCTP, MCITP, CCNP, CCIP, CCVP with 20 years of experience in administering Windows Servers, Exchange, VMWare, Veeam B&R, Veritas BackupExec.
Evaluation of production AD infrastructure
First we have to do the evolution of production active directory server which is running on windows server 2008 R2
IP address of 2008 R2 Server is 192.168.1.10
We should check further more to collect below details:
Check FSMO role holders using netdom command : cmd>netdom query fsmo
Check Forest and Domain Functional Levels : AD users and computers(dsa.msc)>select your domain>right click to properties
Check all objects that needs to be migrated such as Users,Computers,OUs,Groups, DNS Zones,etc
So why do we need to check schema version. Okay lets discuss..
What is Active Directory Schema:
An Active Directory Schema is a description of all directory objects and attributes in the Windows domain. The schema contains the definitions of each class of objects that can be created in an Active Directory forest (User, Printer, Computer, Group, Site, etc.). Also, the schema contains formal definitions for each attribute that can or should exist in an Active Directory object. The AD schema reflects the basic structure of the catalog and is critical for its proper functioning.
AD schema is extended/upgraded for several reasons. The most common is the implementation of an application that requires an extension of the schema (for products such as Microsoft Exchange, Lync/Skype for Business, SCCM) or when you add a new domain controller with a new version of Windows Server.
How to Check Current AD Schema Version?
You can find schema version from registry edit or you can use dsquery tool or PowerShell commands:
From Registry Editor
regedit->LUM->systems->Currentcontrolset->services->NTDS->Parameters->Schema version (47)
Using DSQuery Tool
dsquery * cn=schema,cn=configuration,dc=domainname,dc=local -scope base -attr objectVersion
Using Powershell
Get-ADObject (Get-ADRootDSE).schemaNamingContext -Property objectVersion
The following table lists the correspondence between Windows Server versions and versions of the Active Directory Schema.
| Windows Server version | AD Schema objectVersion | |
| Windows 2000 | 13 | |
| Windows 2003 | 30 | |
| Windows 2003 R2 | 31 | |
| Windows 2008 | 44 | |
| Windows 2008 R2 | 47 | |
| Windows 2012 | 56 | |
| Windows 2012 R2 | 69 | |
| Windows Server 2016 | 87 | |
| Windows Server 2019 | 88 |
In Windows 2008 R2 and lower, to successfully add the controller running a newer Windows Server version, you have to manually update the forest and the domain schema version. In Windows Server 2012 and newer, when you add a new domain controller, the schema is updated automatically.
Therefore, you will need an adprep utility from the installation media with Windows Server 2019. Run the command prompt with administrator privileges and go to the support\adprep directory on the Windows Server installation disk.
cd f:\support\adprep
Lets install a windows server 2019 server physically or virtually as per business requirement. First of all we have to set a side by side ip address, in this case lets set ip address as 102.168.1.110 and DNS as same 192.168.1.10(Production DC). Don’t forget to check the connectivity and name resolution using ping command
ie, cmd> ping 192.168.1.10 and cmd> ping example.com (domain name)
Next we should add this server to the domain and log in as an domain administrator, i hope that you all already should know that so I am not briefing it
Prepare Active Directory on Windows Server 2019 server
Now as you know about schema upgarade and why de we need that lets try on production.
Mount or insert 2019 server image and navigate to support folder then adprep, there you can see all the schema files. Now we can run this using cmd by following commands:
| cmd>d:\support\adprep\adprep.exe /forestprep |
| cmd>d:\support\adprep\adprep.exe /domainprep |
| cmd>d:\support\adprep\adprep.exe /gpprep |
Promote Windows Server 2019 as Domain Controller
Once you successfully upgrade schema to latest on Windows Server 2008 R2, Then login into 2019 server as domain administrator and install ADDS role and promote Domain controller from Existing domain, you have to select that option (existing domain, ie example.com)
Now the new DC must be added on domain controller object in Production DC. As we know now our new DC is in place in the network so we can add Alternate DNS as 192.168.1.110
Replicate objects from Windows 2008 R2 DC to Windows Server 2019 DC
Launch AD sites and services on 2019 server and navigate to Sites>Open proper site or default site> Servers>2019 DC>NTDS settings>all tasks>check replication topology. Now you can see that a new replication link will create and select that link and replicate now
Same has to do on windows server 2008 R2 server as well ( Create replication and replicate now)
We can verify the replication using repadmin /replsummary or just create a test user and check that is replicated to the new AD
Okay, now this is the time to transfer the FSMO roles… excited 😉 lets do it…
Transfer FSMO Roles
You can transfer FSMO roles by using the Ntdsutil.exe command-line utility or by using an MMC snap-in tool. Depending on the FSMO role that you want to transfer, you can use one of the following three MMC snap-in tools:
- Active Directory Schema snap-in
- Active Directory Domains and Trusts snap-in
- Active Directory Users and Computers snap-in
To transfer the FSMO role the administrator must be a member of the following group:
| FSMO Role | Administrator must be a member of |
| Schema | Schema Admins |
| Domain Naming | Enterprise Admins |
| RID | Domain Admins |
| PDC Emulator | |
| Infrastructure |
Transferring the RID Master, PDC Emulator, and Infrastructure Masters via GUI
To Transfer the Domain-Specific RID Master, PDC Emulator, and Infrastructure Master FSMO Roles:
- Open the Active Directory Users and Computers snap-in from the Administrative Tools folder.
- If you are NOT logged onto the target domain controller, in the snap-in, right-click the icon next to Active Directory Users and Computers and press Connect to Domain Controller.
- Select the domain controller that will be the new role holder, the target, and press OK.
- Right-click the Active Directory Users and Computers icon again and press Operation Masters.
- Select the appropriate tab for the role you wish to transfer and press the Change button.
- Press OK to confirm the change.
- Press OK all the way out.
To Transfer the Domain Naming Master Role:
- Open the Active Directory Domains and Trusts snap-in from the Administrative Tools folder.
- If you are NOT logged onto the target domain controller, in the snap-in, right-click the icon next to Active Directory Domains and Trusts and press Connect to Domain Controller.
- Select the domain controller that will be the new role holder and press OK.
- Right-click the Active Directory Domains and Trusts icon again and press Operation Masters.
- Press the Change button.
- Press OK to confirm the change.
- Press OK all the way out.
Transferring the Schema Master via GUI
To Transfer the Schema Master Role:
- Register the Schmmgmt.dll library by pressing Start > RUN and typing:
regsvr32 schmmgmt.dll
- Press OK. You should receive a success confirmation.
- From the Run command open an MMC Console by typing MMC.
- On the Console menu, press Add/Remove Snap-in.
- Press Add. Select Active Directory Schema.
- Press Add and press Close. Press OK.
- If you are NOT logged onto the target domain controller, in the snap-in, right-click the Active Directory Schema icon in the Console Root and press Change Domain Controller.
- Press Specify …. and type the name of the new role holder. Press OK.
- Right-click right-click the Active Directory Schema icon again and press Operation Masters.
- Press the Change button.
- Press OK all the way out.
To transfer the FSMO roles from the Ntdsutil command:
- On any domain controller, click Start, click Run, type Ntdsutil in the Open box, and then click OK.
Microsoft Windows [Version 5.2.3790]
(C) Copyright 1985-2003 Microsoft Corp.

C:\WINDOWS>ntdsutil
ntdsutil:
- Type roles, and then press ENTER.
ntdsutil: roles
fsmo maintenance:
Note: To see a list of available commands at any of the prompts in the Ntdsutil tool, type ?, and then press ENTER.
- Type connections, and then press ENTER.
fsmo maintenance: connections
server connections:
- Type connect to server <servername>, where <servername> is the name of the server you want to use, and then press ENTER.
server connections: connect to server server100
Binding to server100 ...
Connected to server100 using credentials of locally logged on user.
server connections:
- At the server connections: prompt, type q, and then press ENTER again.
server connections: q
fsmo maintenance:
- Type transfer <role>. where <role> is the role you want to transfer.
For example, to transfer the RID Master role, you would type transfer rid master:
Options are:
Transfer domain naming master
Transfer infrastructure master
Transfer PDC
Transfer RID master
Transfer schema master
- You will receive a warning window asking if you want to perform the transfer. Click on Yes.
- After you transfer the roles, type q and press ENTER until you quit Ntdsutil.exe.
- Restart the server
Verify that all FSMO roles have transferred to Serer 2019 using command
now lets move to raise your functional levels…
Raise Forest Functional Level and Domain Functional Level
I hope you guys all must know about FLs. I am not discussing that
Raising Domain Functional Level
Lets launch Active Directory Users and Computers snap in select your domain <example.com> right click and click on raise domain functional level and raise to appropriate functional level (2012/2016/2019)
Raising Forest Functional Level
Lets launch Active Directory Domain and Trusts snap in and select root folder > right click on it and select raise forest functional level then you can select appropriate FFL (2012/2016/2019). Note: you can also raise DFL from this snap in.
Now we are good to go… its successfully migrated Active Directory from Production DC to new DC
Remove the Server 2008R2 from Global Catalog
Launch Active Directory Users and computers snap in, navigate to domain controllers container then select 2008R2 DC and right click and take properties. There you can see NTDS settings option, click on that and uncheck Global Catalog and apply>Ok
Change the Preferred DNS Address on Server 2008R2 as New DC IP
- On Server 2008R2: Open Network and Sharing Center.
- Right click on Local Area Connection and click Properties.
- Double click on Internet Protocol TCP/IP.
- Change the Preferred DNS server address to match the Server 2019 IP Address that is 192.168.1.110
- Change the Alternate DNS server address to Server’s 2008R2 IP Address ie, 192.168.1.10
- Click OK and close all windows.
Demote Server 2008R2 from Domain Controller
On your old Server 2008R2 open Command Prompt.
Type the following command and press Enter
cmd> dcpromo
and follow the uninstallation wizard to demote
Change the Static IP Address on Server 2008R2 & Server 2019
As now, we have successfully upgraded your Active Directory Server 2008R2 to Server 2019 and we have removed the AD services from your old Server 2008R2. Now we have to swap Server 2019 IP address and Server 2008R2 IP address
- .Temporarily, disconnect the Server 2008R2 from the network (remove the LAN cable)
- On Server 2008R2, change ip address to 192.168.1.110
- On Server 2019, Change ip address to 192.168.1.10
- On Server 2019, Set preferred DNS as 192.168.1.10
Finally to apply changes, from Server 2016 machine, open Command Prompt As Administrator and run the following commands in order:
- ipconfig /flushdns
- ipconfig /registerdns
- dcdiag /fix
- Reconnect the Server 2008R2 on the network (re-attach the LAN cable)
- Reboot both servers
That’s it!!! Please let me know if this article was helped you by leaving your comments and please like and share this guide to others.
Thank you for your time and support….