About Midas.dll
Midas.dll, is a dll file developed by Embarcadero Technologies, Inprise Corporation.
The Midas.dll file is 0.42 MB. The download links are current and no negative feedback has been received by users. It has been downloaded 26118 times since release and it has received 3.5 out of 5 stars.
Table of Contents
- About Midas.dll
- Operating Systems Compatible with the Midas.dll File
- All Versions of the Midas.dll File
- Guide to Download Midas.dll
- How to Install Midas.dll? How to Fix Midas.dll Errors?
- Method 1: Solving the DLL Error by Copying the Midas.dll File to the Windows System Folder
- Method 2: Copying The Midas.dll File Into The Software File Folder
- Method 3: Doing a Clean Install of the software That Is Giving the Midas.dll Error
- Method 4: Solving the Midas.dll error with the Windows System File Checker
- Method 5: Fixing the Midas.dll Error by Manually Updating Windows
- Explanations on Updating Windows Manually
- Most Seen Midas.dll Errors
- Dll Files Related to Midas.dll
Operating Systems Compatible with the Midas.dll File
- Windows 10
- Windows 8.1
- Windows 8
- Windows 7
- Windows Vista
- Windows XP
All Versions of the Midas.dll File
The last version of the Midas.dll file is the 15.0.3890.34076 version. Before this version, there were 7 versions released. Downloadable Midas.dll file versions have been listed below from newest to oldest.
- 15.0.3890.34076 — 32 Bit (x86) Download directly this version
- 7.1.1692.668 — 32 Bit (x86) Download directly this version
- 6.0.10.160 — 32 Bit (x86) Download directly this version
- 6.0.10.155 — 32 Bit (x86) (2010-03-31) Download directly this version
- 6.0.10.155 — 32 Bit (x86) Download directly this version
- 7.0.4.453 — 32 Bit (x86) Download directly this version
- 6.0.6.163 — 32 Bit (x86) (2012-01-31) Download directly this version
- 6.0.6.163 — 32 Bit (x86) Download directly this version
Guide to Download Midas.dll
- First, click on the green-colored «Download» button in the top left section of this page (The button that is marked in the picture).

Step 1:Start downloading the Midas.dll file - After clicking the «Download» button at the top of the page, the «Downloading» page will open up and the download process will begin. Definitely do not close this page until the download begins. Our site will connect you to the closest DLL Downloader.com download server in order to offer you the fastest downloading performance. Connecting you to the server can take a few seconds.

How to Install Midas.dll? How to Fix Midas.dll Errors?
ATTENTION! Before continuing on to install the Midas.dll file, you need to download the file. If you have not downloaded it yet, download it before continuing on to the installation steps. If you are having a problem while downloading the file, you can browse the download guide a few lines above.
Method 1: Solving the DLL Error by Copying the Midas.dll File to the Windows System Folder
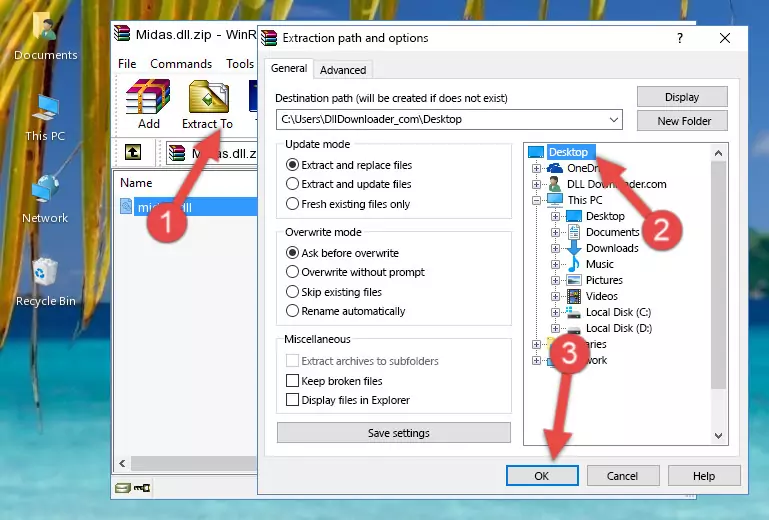
- The file you are going to download is a compressed file with the «.zip» extension. You cannot directly install the «.zip» file. First, you need to extract the dll file from inside it. So, double-click the file with the «.zip» extension that you downloaded and open the file.
- You will see the file named «Midas.dll» in the window that opens up. This is the file we are going to install. Click the file once with the left mouse button. By doing this you will have chosen the file.
Step 2:Choosing the Midas.dll file - Click the «Extract To» symbol marked in the picture. To extract the dll file, it will want you to choose the desired location. Choose the «Desktop» location and click «OK» to extract the file to the desktop. In order to do this, you need to use the Winrar software. If you do not have this software, you can find and download it through a quick search on the Internet.
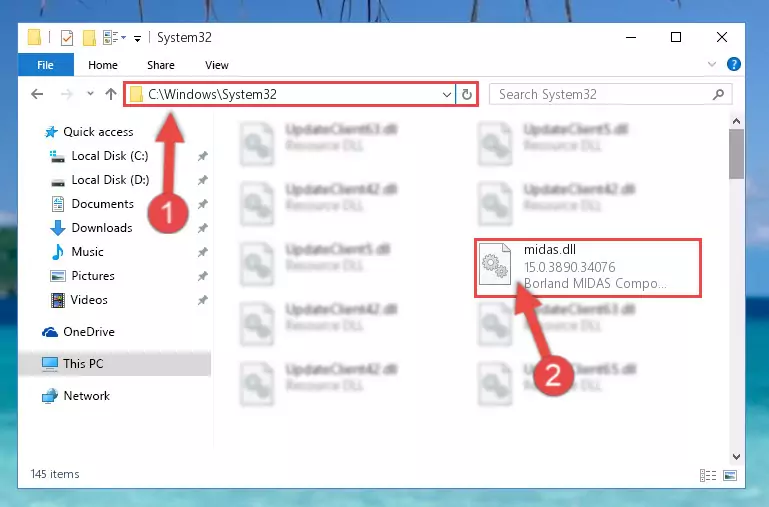
- Copy the «Midas.dll» file you extracted and paste it into the «C:\Windows\System32» folder.
Step 4:Copying the Midas.dll file into the Windows/System32 folder - If you are using a 64 Bit operating system, copy the «Midas.dll» file and paste it into the «C:\Windows\sysWOW64» as well.
NOTE! On Windows operating systems with 64 Bit architecture, the dll file must be in both the «sysWOW64» folder as well as the «System32» folder. In other words, you must copy the «Midas.dll» file into both folders.
Step 5:Pasting the Midas.dll file into the Windows/sysWOW64 folder - In order to complete this step, you must run the Command Prompt as administrator. In order to do this, all you have to do is follow the steps below.
NOTE! We ran the Command Prompt using Windows 10. If you are using Windows 8.1, Windows 8, Windows 7, Windows Vista or Windows XP, you can use the same method to run the Command Prompt as administrator.
- Open the Start Menu and before clicking anywhere, type «cmd» on your keyboard. This process will enable you to run a search through the Start Menu. We also typed in «cmd» to bring up the Command Prompt.
- Right-click the «Command Prompt» search result that comes up and click the Run as administrator» option.
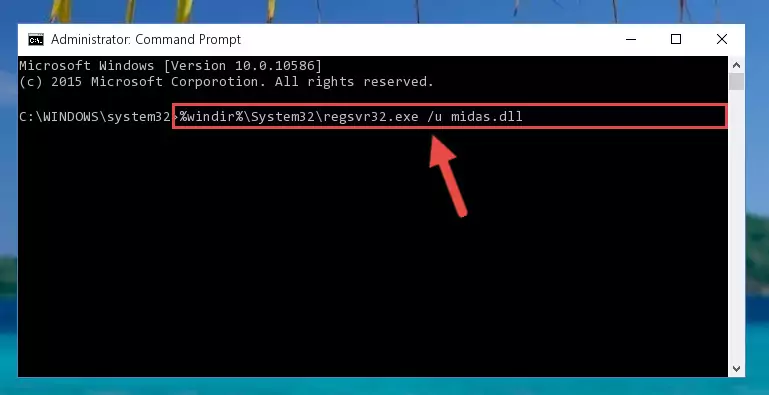
Step 6:Running the Command Prompt as administrator - Paste the command below into the Command Line window that opens up and press Enter key. This command will delete the problematic registry of the Midas.dll file (Nothing will happen to the file we pasted in the System32 folder, it just deletes the registry from the Windows Registry Editor. The file we pasted in the System32 folder will not be damaged).
%windir%\System32\regsvr32.exe /u Midas.dll
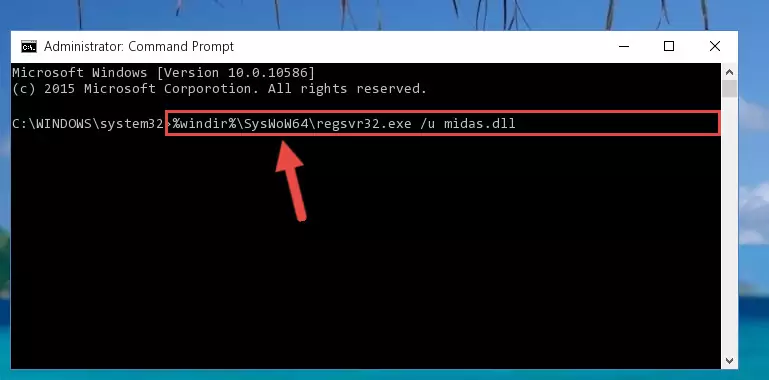
Step 7:Cleaning the problematic registry of the Midas.dll file from the Windows Registry Editor - If you have a 64 Bit operating system, after running the command above, you must run the command below. This command will clean the Midas.dll file’s damaged registry in 64 Bit as well (The cleaning process will be in the registries in the Registry Editor< only. In other words, the dll file you paste into the SysWoW64 folder will stay as it).
%windir%\SysWoW64\regsvr32.exe /u Midas.dll
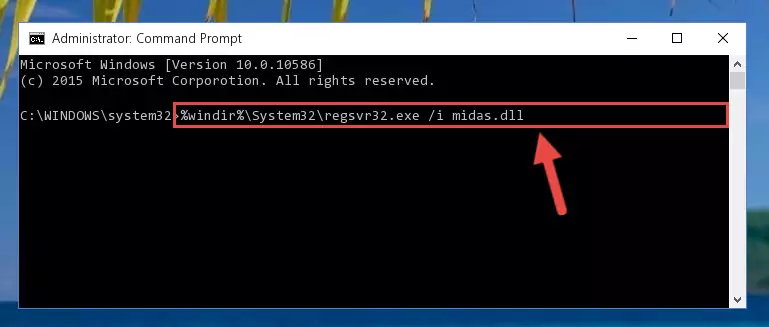
Step 8:Uninstalling the Midas.dll file’s broken registry from the Registry Editor (for 64 Bit) - We need to make a clean registry for the dll file’s registry that we deleted from Regedit (Windows Registry Editor). In order to accomplish this, copy and paste the command below into the Command Line and press Enter key.
%windir%\System32\regsvr32.exe /i Midas.dll
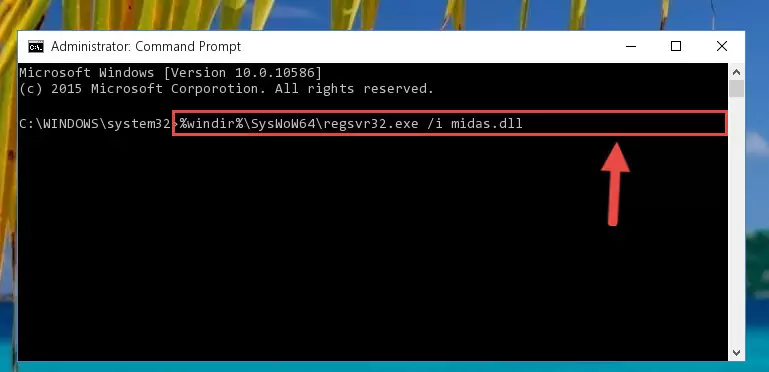
Step 9:Making a clean registry for the Midas.dll file in Regedit (Windows Registry Editor) - If you are using a 64 Bit operating system, after running the command above, you also need to run the command below. With this command, we will have added a new file in place of the damaged Midas.dll file that we deleted.
%windir%\SysWoW64\regsvr32.exe /i Midas.dll
Step 10:Reregistering the Midas.dll file in the system (for 64 Bit) - You may see certain error messages when running the commands from the command line. These errors will not prevent the installation of the Midas.dll file. In other words, the installation will finish, but it may give some errors because of certain incompatibilities. After restarting your computer, to see if the installation was successful or not, try running the software that was giving the dll error again. If you continue to get the errors when running the software after the installation, you can try the 2nd Method as an alternative.


Most Seen Midas.dll Errors
When the Midas.dll file is damaged or missing, the softwares that use this dll file will give an error. Not only external softwares, but also basic Windows softwares and tools use dll files. Because of this, when you try to use basic Windows softwares and tools (For example, when you open Internet Explorer or Windows Media Player), you may come across errors. We have listed the most common Midas.dll errors below.
You will get rid of the errors listed below when you download the Midas.dll file from DLL Downloader.com and follow the steps we explained above.
- «Midas.dll not found.» error
- «The file Midas.dll is missing.» error
- «Midas.dll access violation.» error
- «Cannot register Midas.dll.» error
- «Cannot find Midas.dll.» error
- «This application failed to start because Midas.dll was not found. Re-installing the application may fix this problem.» error
- Mtxcat.dll
- Mtxact.dll
- Mtxas.dll
- Mt7s110.dll
- Mtxcatu.dll
Описание dll файла: Borland MIDAS Component Package
Вероятная ошибка dll:
отсутствует MIDAS.DLL
Совместимые операционные системы: Windows 7, Windows 8, Windows 10
Ниже расположены прямые ссылки на файлы библиотеки dll из нашей коллекции.
- midas.dll [32 bit] — версия 7.1.1692.666
- midas.dll [32 bit] — версия 7.0.4.453
- midas.dll [32 bit] — версия 6.0.10.155
ВАЖНО! Устанавливая библиотеку, вы принимаете на себя все риски, связанные с вмешательством в работу вашей операционной системы.
Как скачать MIDAS.DLL и установить ее
Откройте загруженный zip-файл. Извлеките MIDAS.DLL в папку на вашем компьютере. Мы рекомендуем вам распаковать его в директорию программы, которая запрашивает MIDAS.DLL. Если это не работает, вам придется извлечь MIDAS.DLL в вашу системную директорию. По умолчанию это:
C: \ Windows \ System (Windows 95/98/Me)
C: \ WINNT \ System32 (Windows NT/2000)
C: \ Windows \ System32 (Windows XP, Vista, 7, 8, 8.1, 10)
Если вы используете 64-разрядную версию Windows, вы должны также положить MIDAS.DLL в C: \ Windows \ SysWOW64 \. Убедитесь, что вы перезаписали существующие файлы (но не забудьте сделать резервную копию оригинального файла). Перезагрузите ваш компьютер. Если ошибка dll сохраняется, попробуйте следующее: Откройте меню Пуск и выберите пункт «Выполнить». Введите CMD и нажмите Enter (или если вы используете Windows ME, наберите COMMAND). Введите regsvr32 MIDAS.DLL и нажмите Enter.
Внимание! Скачать MIDAS.DLL из сети Интернет очень легко, однако велика вероятность заражения вашего компьютера вредоносным кодом. Пожалуйста, проверяйте ВСЕ скаченные из Интернет файлы антивирусом! Администрация сайта download-dll.ru не несет ответственность за работоспособность вашего компьютера.
Обратите также внимание, что каждый файл имеет версию и разрядность (32 или 64 бита). Установка в систему DLL файлов помогает не в 100% случаев, но в основном проблемы с программами и играми решаются таким незамысловатым методом. Чаще всего с DLL вы сталкиваетесь при ошибках в операционной системе. Некоторые библиотеки поставляются с системой Windows и доступны для любых Windows-программ. Замена DLL-файлов с одной версии на другую позволяет независимо наращивать систему, не затрагивая прикладные программы.
![]()
Информация о системе:
На вашем ПК работает: …
Ошибка Midas.dll: как исправить?
В начале нужно понять, почему midas.dll файл отсутствует и какова причина возникновения midas.dll ошибки. Часто программное обеспечение попросту не может функционировать из-за недостатков в .dll-файлах.
Что означает DLL-файл? Почему возникают DLL-ошибки?
DLL (Dynamic-Link Libraries) являются общими библиотеками в Microsoft Windows, которые реализовала корпорация Microsoft. Известно, что файлы DLL так же важны, как и файлы с расширением EXE. Реализовать DLL-архивы, не используя утилиты с расширением .exe, нельзя.
Файлы DLL помогают разработчикам применять стандартный код с информаций, чтобы обновить функциональность программного обеспечения, не используя перекомпиляцию. Получается, файлы MSVCP100.dll содержат код с данными на разные программы. Одному DLL-файлу предоставили возможность быть использованным иным ПО, даже если отсутствует необходимость в этом. Как итог – нет нужно создавать копии одинаковой информации.
Когда стоит ожидать появление отсутствующей ошибки Midas.dll?
Когда перед пользователем возникает данное сообщения, появляются неисправности с Midas.dll
- Программа не может запуститься, так как Midas.dll отсутствует на ПК.
- Midas.dll пропал.
- Midas.dll не найден.
- Midas.dll пропал с ПК. Переустановите программу для исправления проблемы.
- «Это приложение невозможно запустить, так как Midas.dll не найден. Переустановите приложения для исправления проблемы.»
Что делать, когда проблемы начинают появляться во время запуска программы? Это вызвано из-за неисправностей с Midas.dll. Есть проверенные способы, как быстро избавиться от этой ошибки навсегда.
Метод 1: Скачать Midas.dll для установки вручную
В первую очередь, необходимо скачать Midas.dll на компьютер только с нашего сайта, на котором нет вирусов и хранятся тысячи бесплатных Dll-файлов.
- Копируем файл в директорию установки программы только тогда, когда программа пропустит DLL-файл.
- Также можно переместить файл DLL в директорию системы ПК (для 32-битной системы — C:\Windows\System32, для 64-битной системы — C:\Windows\SysWOW64\).
- Теперь следует перезагрузить свой ПК.
Метод не помог и появляются сообщения — «midas.dll Missing» или «midas.dll Not Found»? Тогда воспользуйтесь следующим методом.
Midas.dll Версии
Метод 2: Исправить Midas.dll автоматически благодаря инструменту для исправления ошибок
Очень часто ошибка появляется из-за случайного удаления файла Midas.dll, а это моментально вызывает аварийное завершение работы приложения. Программы с вирусами делают так, что Midas.dll и остальные системные файлы повреждаются.
Исправить Midas.dll автоматически можно благодаря инструмента, который исправляет все ошибки! Подобное устройство необходимо для процедуры восстановления всех поврежденных или удаленных файлов, которые находятся в папках Windows. Следует только установить инструмент, запустить его, а программа сама начнет исправлять найденные Midas.dll проблемы.
Данный метод не смог помочь? Тогда переходите к следующему.
Метод 3: Устанавливаем/переустанавливаем пакет Microsoft Visual C ++ Redistributable Package
Ошибку Midas.dll часто можно обнаружить, когда неправильно работает Microsoft Visual C++ Redistribtable Package. Следует проверить все обновления или переустановить ПО. Сперва воспользуйтесь поиском Windows Updates для поиска Microsoft Visual C++ Redistributable Package, чтобы обновить/удалить более раннюю версию на новую.
- Нажимаем клавишу с лого Windows для выбора Панель управления. Здесь смотрим на категории и нажимаем Uninstall.
- Проверяем версию Microsoft Visual C++ Redistributable и удаляем самую раннюю из них.
- Повторяем процедуру удаления с остальными частями Microsoft Visual C++ Redistributable.
- Также можно установить 3-ю версию редистрибутива 2015 года Visual C++ Redistribtable, воспользовавшись загрузочной ссылкой на официальном сайте Microsoft.
- Как только загрузка установочного файла завершится, запускаем и устанавливаем его на ПК.
- Перезагружаем ПК.
Данный метод не смог помочь? Тогда переходите к следующему.
Метод 4: Переустановка программы
Необходимая программа показывает сбои по причине отсутствия .DLL файла? Тогда переустанавливаем программу, чтобы безопасно решить неисправность.
Метод не сумел помочь? Перейдите к следующему.
Метод 5: Сканируйте систему на вредоносные ПО и вирусы
System File Checker (SFC) является утилитой в операционной системе Windows, которая позволяет проводить сканирование системных файлов Windows и выявлять повреждения, а также с целью восстановить файлы системы. Данное руководство предоставляет информацию о том, как верно запускать System File Checker (SFC.exe) для сканирования системных файлов и восстановления недостающих/поврежденных системных файлов, к примеру, .DLL. Когда файл Windows Resource Protection (WRP) имеет повреждения или попросту отсутствует, система Windows начинает вести себя неправильно и с проблемами. Часто определенные функции Windows перестают функционировать и компьютер выходит из строя. Опцию «sfc scannow» используют как один из специальных переключателей, которая доступна благодаря команды sfc, команды командной строки, которая используется на запуск System File Checker. Для ее запуска сперва необходимо открыть командную строку, после чего ввести «командную строку» в поле «Поиск». Теперь нажимаем правой кнопкой мыши на «Командная строка» и выбираем «Запуск от имени администратора». Необходимо обязательно запускать командную строку, чтобы сделать сканирование SFC.
- Запуск полного сканирования системы благодаря антивирусной программы. Не следует надеяться лишь на Windows Defender, а выбираем дополнительно проверенную антивирусную программу.
- Как только обнаружится угроза, нужно переустановить программу, которая показывает уведомление о заражении. Лучше сразу переустановить программу.
- Пробуем провести восстановление при запуске системы, но только тогда, когда вышеперечисленные методы не сработали.
- Если ничего не помогает, тогда переустанавливаем ОС Windows.
В окне командной строки нужно ввести команду «sfc /scannow» и нажать Enter. System File Checker начнет свою работу, которая продлится не более 15 минут. Ждем, пока сканирование завершится, после чего перезагружаем ПК. Теперь ошибка «Программа не может запуститься из-за ошибки Midas.dll отсутствует на вашем компьютере не должна появляться.
Метод 6: Очиститель реестра
Registry Cleaner считается мощной утилитой для очищения ненужных файлов, исправления проблем реестра, выяснения причин замедленной работы ПК и устранения неисправностей. Утилита идеальна для всех компьютеров. Пользователь с правами администратора сможет быстрее проводить сканирование и последующее очищение реестра.
- Загрузка приложения в ОС Windows.
- Устанавливаем программу и запускаем ее – все процессы очистки и исправления проблем на ПК пройдут автоматически.
Метод не сумел помочь? Перейдите к следующему.
Часто задаваемые вопросы (FAQ)
— последняя версия midas.dll, которая доступна для скачивания
midas.dll обязательно нужно расположить в системной папке Windows
Самый простой метод – это использовать инструмент для исправления ошибок dll
Эта страница доступна на других языках:
English |
Deutsch |
Español |
Italiano |
Français |
Indonesia |
Nederlands |
Nynorsk |
Português |
Українська |
Türkçe |
Malay |
Dansk |
Polski |
Română |
Suomi |
Svenska |
Tiếng việt |
Čeština |
العربية |
ไทย |
日本語 |
简体中文 |
한국어
Note: Outbyte PC Repair tool has been proven to identify and fix the MIDAS.DLL error. See more information about Outbyte and Uninstall Instructions. Please review Outbyte EULA and Privacy Policy.
Introduction
One of the most common errors a Windows user faces is the missing DLL error. This error will simply not let you run the application. When you try to open the application you will notice a pop-up window with the following error message.
‘The program can’t start because MIDAS.DLL is missing from your computer’
Don’t worry! This is a common issue faced by Windows users all over the world and there are several ways to fix this.
In this detailed post, I’ll provide multiple solutions to fix the DLL file not found errors on Windows 11, 10, 8.1, 8, and 7 PCs.
What is a MIDAS.DLL error?
The term ‘DLL’ refers to dynamically linked libraries, which may be found in Windows 11, 10, 8, 7, and other previous OS versions. A dynamic link library (DLL) is a collection of small programs that larger programs can load when needed to complete specific tasks. The small program, called a DLL file, contains instructions that help the larger program handle what may not be a core function of the original program. These instructions can be called upon multiple programs simultaneously. When you run a program on any Windows operating system, much of the functionality of the program may be provided by DLLs.
A dependency is created every time a DLL is used by a program. If another program uses a DLL and somehow breaks the dependency between the two programs then the first program will no longer execute. That is when you will see errors like,
‘The program can’t start because MIDAS.DLL is missing from your computer. Try reinstalling the program to fix this problem.’
Causes of MIDAS.DLL Missing Error
The typical reasons for the ‘MIDAS.DLL missing error’ on Windows 10, 11, 8, 7, and other versions, are compiled below,
a) Deleted or corrupted MIDAS.DLL — The DLL file used by a certain program has modified or deleted MIDAS.DLL.
b) Missing or corrupted files of Microsoft Visual C++ Redistributable — The MIDAS.DLL file is part of the Microsoft Visual C++ software runtime library. VC++ Runtime libraries are DLL files required to run programs compiled with Microsoft Visual Studio. If some files are missing or if Visual Studio is not installed correctly, then the ‘MIDAS.DLL is missing’ error might appear.
c) System is infected with virus or malware – There is a possibility your system is corrupted or damaged with virus/malware. As a result, MIDAS.DLL may have been damaged or corrupt.
d) Damaged/corrupted System files – If your Windows system files are corrupted after engaging with programs containing a virus or some malicious applications then MIDAS.DLL might not work correctly.
Some other common MIDAS.DLL errors include:
MIDAS.DLL is missing
Cannot register MIDAS.DLL
Problem starting MIDAS.DLL
MIDAS.DLL Access Violation
The procedure entry point MIDAS.DLL error
MIDAS.DLL error loading
MIDAS.DLL crash
Cannot find MIDAS.DLL
MIDAS.DLL was not found
MIDAS.DLL could not be located
![]()
The program can’t start because MIDAS.DLL is missing from your computer. Try reinstalling the program to fix the problem.
There are several ways to fix this DLL error and we will be looking at them in detail below.
1. Download MIDAS.DLL
The MIDAS.DLL file can be manually downloaded and added/replaced with the missing or corrupt DLL file.
Step 1: Select and download the DLL files from the table below irrespective of the version of your OS i.e. Windows 11, 10, 8.1, 8 or 7.,
Download MIDAS.DLL
| Version | Description | OS | Size | Language | MD5 | SHA1 | Download |
|---|---|---|---|---|---|---|---|
| 15.0.3890.34076 | Embarcadero MIDAS Component Package | 32 | 0.42 MB | U.S. English |
f6c43f8… f6c… |
0969a56… 096… |
|
| 6.0.10.155 | — | 32 | 0.28 MB | — |
dda709b… dda… |
97ceade… 97c… |
|
| 6.0.6.163 | — | 32 | 0.28 MB | — |
ad59b73… ad5… |
fa3a331… fa3… |
Step 2: Once downloaded, extract each file into separate folders using either Windows Compressed folders (comes with windows) or with an app like WinRAR.
Step 3: Next, copy the 64-bit ‘MIDAS.DLL’ file and paste it into the C:\Windows\System32 folder. And copy the 32-bit ‘MIDAS.DLL’ file and paste it into the C:\Windows\SysWOW64 folder. If there is an existing ‘MIDAS.DLL’ file in either of these folders then replace it with the new file. However, if you have a 32-bit Windows system then place only the 32-bit file into the C:\Windows\System32 folder.
Re-launch the affected program to see if the issue is fixed. If not, please try the next method.
2. Fix missing MIDAS.DLL error automatically
The missing DLL error can be fixed using a repair tool, like Outbyte PC Repair, which helps to solve any system issues, cleans up junk files, and fixes any DLL errors in the process.
Step 1: Download the installation file from here.
Step 2: Install PC Repair and scan your PC
Step 3: Click ‘Repair’ to fix all items that may cause the missing DLL errors.
Step 4: Launch the application to see if the error is fixed.
Recommended Download: Fix MIDAS.DLL error or missing MIDAS.DLL error with Outbyte.
![]()
Compatible with Windows 11, 10, 8, 7, Vista, XP and 2000
3. Re-register the DLL file
Another efficient method to fix the DLL error is to re-register the DLL file.
Step 1: Launch the Run utility by pressing Windows + R keys on your keyboard. Type in ‘cmd’ in the text input field. Then press Ctrl+Shift+Enter keys to open the Command Prompt in administrator mode.
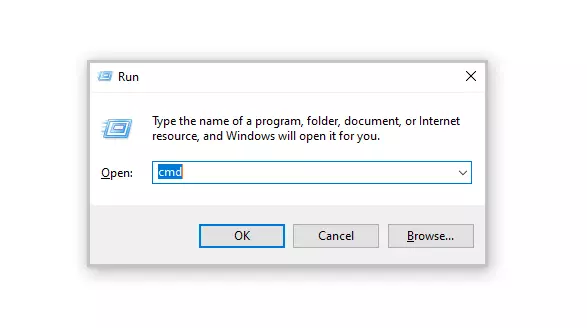
Step 2: In the prompt window, select ‘Yes’ to allow Command Prompt to make modifications to your device.
Step 3: Now it’s time to unregister the DLL file from your computer. Type in or copy and paste the following command, then press Enter,
regsvr32 /u MIDAS.DLL
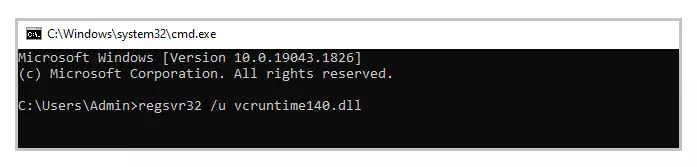
Note: Replace vcruntime140.dll with MIDAS.DLL
Step 4: Next, you need to re-register the file. To do this run the following command,
regsvr32 MIDAS.DLL
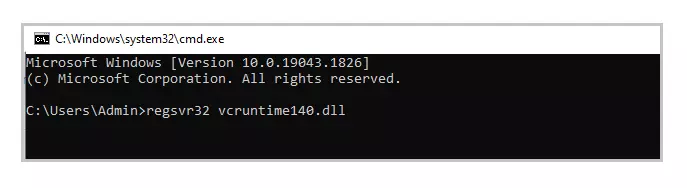
Note: Replace vcruntime140.dll with MIDAS.DLL
Step 5: Exit the Command Prompt and run the application again.
4. Reinstall the Latest Visual C++ Redistributable 2015 — 2022 for Visual Studio
The most commonly used solution is to re-install Microsoft Visual C++ Redistributable to fix DLL errors. Follow the steps mentioned below,
Step 1: To access the official page from where Microsoft Visual C++ Redistributable can be downloaded, please click on the link provided here
Select ‘Install’. The installation will begin and will take a couple of seconds to complete.
Step 2: Alternatively, you can also download it from below based on the version of Windows,
Download x86 version from here
Download x64 version from here
Step 3: Once you’ve selected the file, proceed to download. The download may take a while, depending on your internet connection speed.
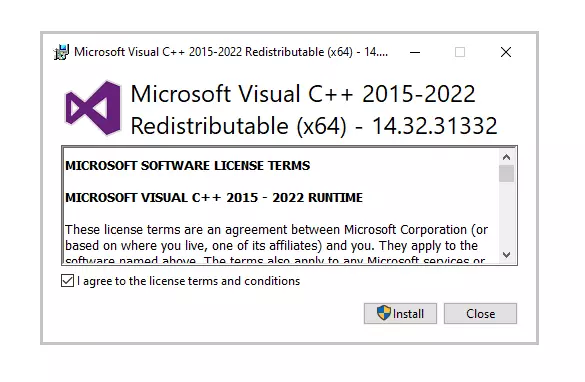
Step 4: Once the download is complete install the downloaded file. When the installation begins tick the ‘I agree to the license terms and conditions’ box and then click on ‘Install’.
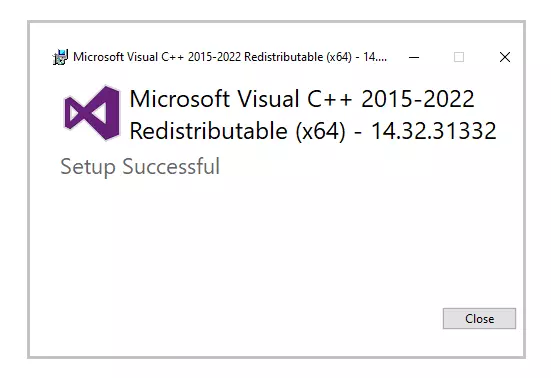
Step 5: It may take a few minutes for the installation to finish. Once the installation is completed restart the computer and launch the program again to see if the DLL error is fixed.
5. Run System File Checker (SFC) Scan
Step 1: To open the Run utility, press Windows + R on your computer. Enter ‘cmd’ in the input area and then press Ctrl+Shift+Enter.
Step 2: Select ‘Yes’ in the pop-up window to open the command prompt in administrator mode.
Step 3: Next, enter the below command and press Enter to execute it,
sfc/scannow
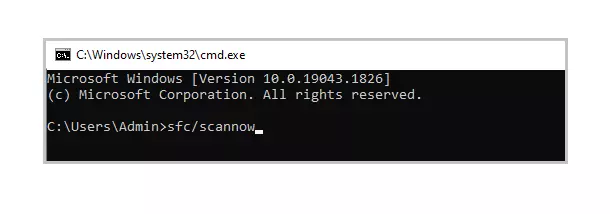
Step 4: This command will try to search and fix corrupt system files (including DLL files). Once the process is complete, you can check the log file created in the path shown in the command prompt. If in the log file you find details of the fixed DLL File then you can run the application again.

6. Reinstall the Program that cannot be launched
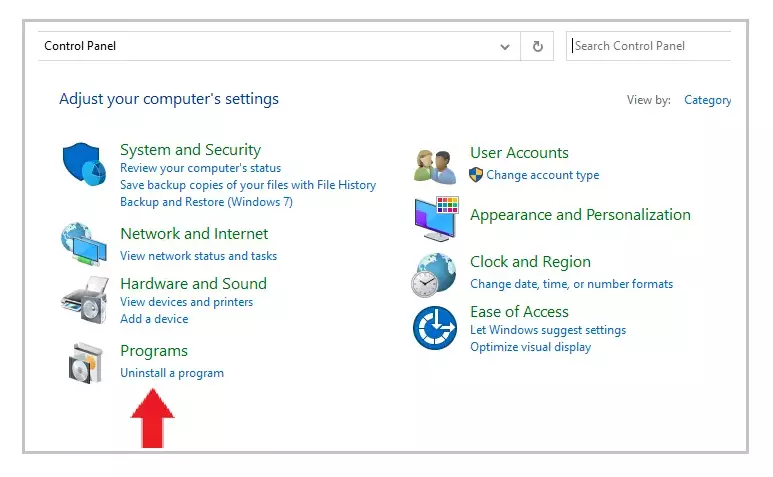
Step 1: Open Control Panel and click on ‘Uninstall a program’ under ‘Programs’.
Step 2: Search and find the program you’re experiencing problems with and click on it.
Step 3: Then click on the ‘Uninstall’ button, and proceed to continue with the uninstallation procedure of the application.
Step 4: Reinstall the program from its source. Either download the setup file or if you already have it then run the installation again to check if you can run the application this time.
7. Update drivers
In some cases, DLL errors can occur due to drivers. If the DLL error message appeared during or after you installed a program, then first update your drivers to the latest version.
Alternatively, there is also a possibility you might face the DLL error after updating drivers. In such a scenario, you need to roll back the driver to the previous version.
There are two ways to update drivers,
Method 1: Automatically Update Drivers
Step 1: Use a tool like Outbyte Driver Updater that automatically searches for missing and out dated drivers in your system and updates it. You can download the tool from here
Step 2: Download time depends on your internet speed connection. Once the download is completed start with the installation of the tool.
Step 3: Launch the application.
Step 4: Inside the application run update. Then, the Driver Updater tool will scan your computer for out dated and missing drivers.
Step 5: Finally, select the drivers and click update.
Method 2: Manually Update Drivers
Step 1: Go to the Taskbar search box – enter the text Device Manager and select Device Manager.
Step 2: Select the hardware device that needs to be updated. Expand the selection – select the device, right-click and select ‘Update Driver’.
Step 3: Choose the ‘Search automatically for drivers’ option.
Step 4: If the latest drivers are found then they will be installed automatically.
Step 5: Sometimes, Windows might not be able to find the latest driver. In such cases, the user can visit the manufacturer’s website, search for the driver, and instructions on how to proceed with the installation.
8. System Restore
In this method, your PC needs to be restored to its earlier version when it was working without any error. There is a chance the new updates to your PC caused the error, so the user must remove the new updates and roll back to a previous version.
To apply System Restore, first, check if you have a previous backup of your system. To check this,
Step 1: Begin by clicking on the start button.
Step 2: To access the System Properties window, search for ‘Create a restore point’ and click the first result.
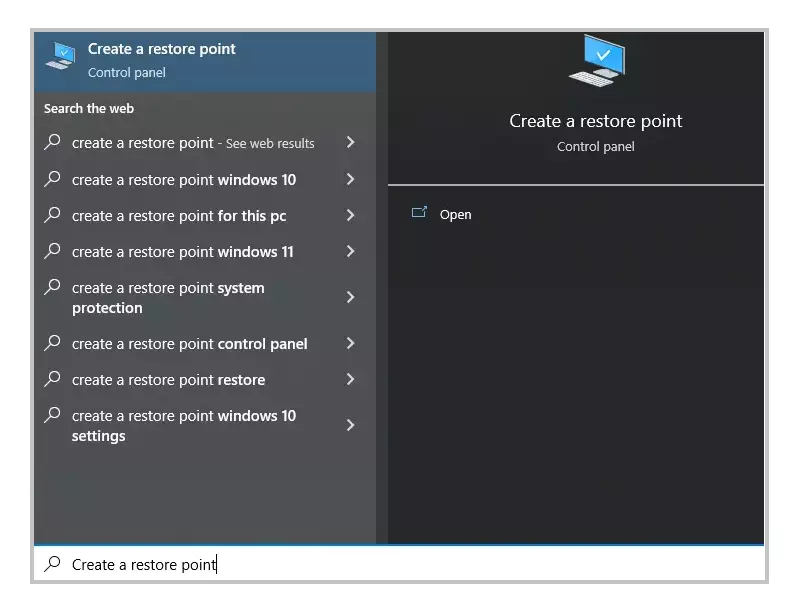
Step 3: Under the ‘System Protection’ tab select the ‘System’ drive. ‘Protection’ should be turned on for this drive.
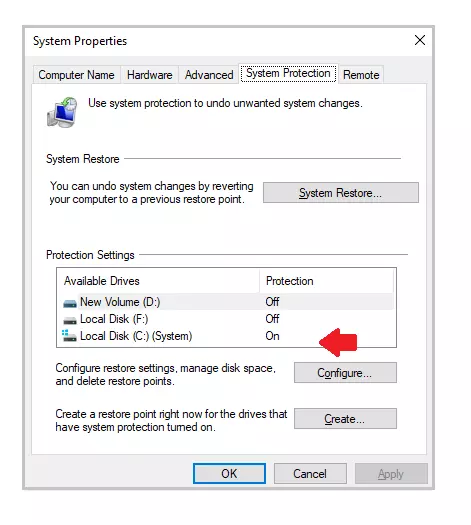
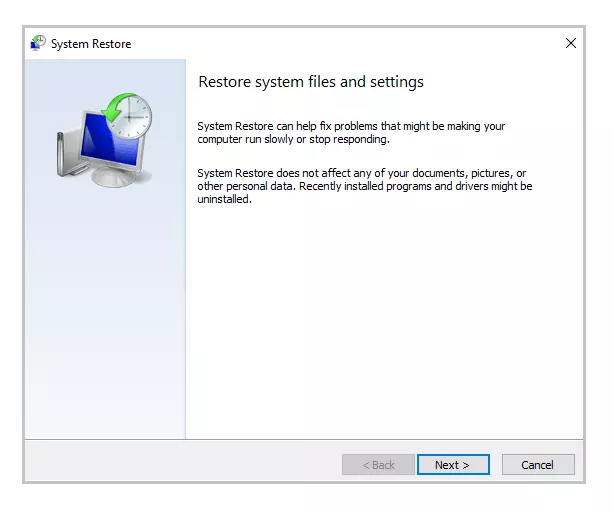
Step 4: Select ‘System Restore’ and click ‘Next’ on the initial screen
Step 5: A list of restore points will be displayed. Select the restore point when your application was running correctly without any error. Then select ‘Next’.
Step 6: Review your selection and click ‘Finish’. If a warning window pop-up appears then select Yes’.
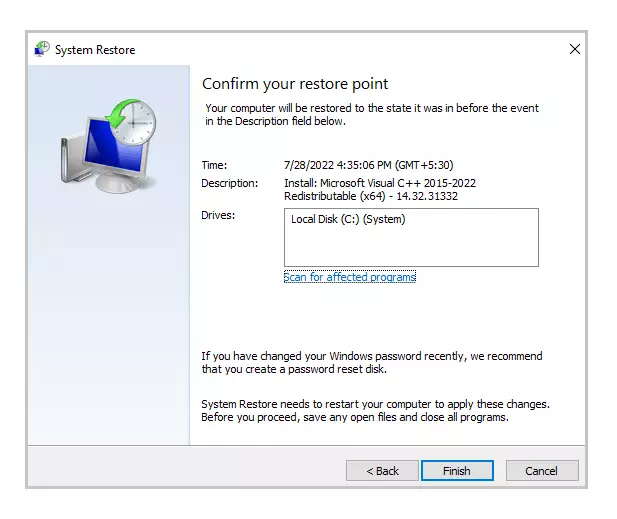
Step 7: The System Restore will begin and your PC will restart once the process is complete. When you log in again, you will see a notification that the System Restore is complete. Now, you can run the application again to see if the error is fixed.
Note: If System Restore was not set up earlier or you’ve never backed up your PC before then this method might not apply to you.
9. Update Windows
MIDAS.DLL missing issues have been reported by several windows users to disappear by upgrading to the latest edition of Windows.
Step 1: Go to settings by selecting Start > Settings or using Windows + I shortcut
Step 2: Open the ‘Update and security’ option.

Step 3: See if there are any new updates by clicking on ‘Check for updates.’
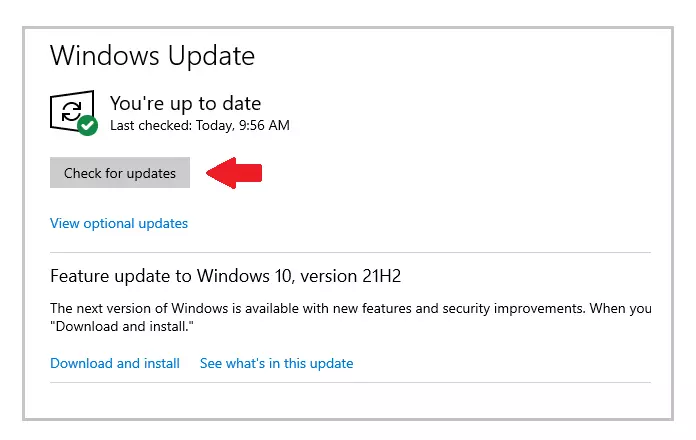
Step 4: If a newer version is discovered, then the windows update will download and install to the latest version.
Step 5: After installing the newest version, run the program again to check if you face the MIDAS.DLL was not found error.
Following these steps should have definitely helped you to fix the missing MIDAS.DLL error.
Скачать сейчас
Ваша операционная система:
Как исправить ошибку Midas.dll?
Прежде всего, стоит понять, почему midas.dll файл отсутствует и почему возникают midas.dll ошибки. Широко распространены ситуации, когда программное обеспечение не работает из-за недостатков в .dll-файлах.
What is a DLL file, and why you receive DLL errors?
DLL (Dynamic-Link Libraries) — это общие библиотеки в Microsoft Windows, реализованные корпорацией Microsoft. Файлы DLL не менее важны, чем файлы с расширением EXE, а реализовать DLL-архивы без утилит с расширением .exe просто невозможно.:
Когда появляется отсутствующая ошибка Midas.dll?
Если вы видите эти сообщения, то у вас проблемы с Midas.dll:
- Программа не запускается, потому что Midas.dll отсутствует на вашем компьютере.
- Midas.dll пропала.
- Midas.dll не найдена.
- Midas.dll пропала с вашего компьютера. Попробуйте переустановить программу, чтобы исправить эту проблему.
- «Это приложение не запустилось из-за того, что Midas.dll не была найдена. Переустановка приложения может исправить эту проблему.»
Но что делать, когда возникают проблемы при запуске программы? В данном случае проблема с Midas.dll. Вот несколько способов быстро и навсегда устранить эту ошибку.:
метод 1: Скачать Midas.dll и установить вручную
Прежде всего, вам нужно скачать Midas.dll на ПК с нашего сайта.
- Скопируйте файл в директорию установки программы после того, как он пропустит DLL-файл.
- Или переместить файл DLL в директорию вашей системы (C:\Windows\System32, и на 64 бита в C:\Windows\SysWOW64\).
- Теперь нужно перезагрузить компьютер.
Если этот метод не помогает и вы видите такие сообщения — «midas.dll Missing» или «midas.dll Not Found,» перейдите к следующему шагу.
Midas.dll Версии
Версия
биты
Компания
Размер
6.0.6.163
32 bit
not available
0.28 MB
метод 2: Исправление Midas.dll автоматически с помощью инструмента для исправления ошибок
Как показывает практика, ошибка вызвана непреднамеренным удалением файла Midas.dll, что приводит к аварийному завершению работы приложений. Вредоносные программы и заражения ими приводят к тому, что Midas.dll вместе с остальными системными файлами становится поврежденной.
Вы можете исправить Midas.dll автоматически с помощью инструмента для исправления ошибок! Такое устройство предназначено для восстановления поврежденных/удаленных файлов в папках Windows. Установите его, запустите, и программа автоматически исправит ваши Midas.dll проблемы.
Если этот метод не помогает, переходите к следующему шагу.
метод
3: Установка или переустановка пакета Microsoft Visual C ++ Redistributable Package
Ошибка Midas.dll также может появиться из-за пакета Microsoft Visual C++ Redistribtable Package. Необходимо проверить наличие обновлений и переустановить программное обеспечение. Для этого воспользуйтесь поиском Windows Updates. Найдя пакет Microsoft Visual C++ Redistributable Package, вы можете обновить его или удалить устаревшую версию и переустановить программу.
- Нажмите клавишу с логотипом Windows на клавиатуре — выберите Панель управления — просмотрите категории — нажмите на кнопку Uninstall.
- Проверить версию Microsoft Visual C++ Redistributable — удалить старую версию.
- Повторить деинсталляцию с остальной частью Microsoft Visual C++ Redistributable.
- Вы можете установить с официального сайта Microsoft третью версию редистрибутива 2015 года Visual C++ Redistribtable.
- После загрузки установочного файла запустите его и установите на свой ПК.
- Перезагрузите компьютер после успешной установки.
Если этот метод не помогает, перейдите к следующему шагу.
метод
4: Переустановить программу
Как только конкретная программа начинает давать сбой из-за отсутствия .DLL файла, переустановите программу так, чтобы проблема была безопасно решена.
Если этот метод не помогает, перейдите к следующему шагу.
метод
5: Сканируйте систему на наличие вредоносного ПО и вирусов
System File Checker (SFC) — утилита в Windows, позволяющая пользователям сканировать системные файлы Windows на наличие повреждений и восстанавливать их. Данное руководство описывает, как запустить утилиту System File Checker (SFC.exe) для сканирования системных файлов и восстановления отсутствующих или поврежденных системных файлов (включая файлы .DLL). Если файл Windows Resource Protection (WRP) отсутствует или поврежден, Windows может вести себя не так, как ожидалось. Например, некоторые функции Windows могут не работать или Windows может выйти из строя. Опция «sfc scannow» является одним из нескольких специальных переключателей, доступных с помощью команды sfc, команды командной строки, используемой для запуска System File Checker. Чтобы запустить её, сначала откройте командную строку, введя «командную строку» в поле «Поиск», щелкните правой кнопкой мыши на «Командная строка», а затем выберите «Запустить от имени администратора» из выпадающего меню, чтобы запустить командную строку с правами администратора. Вы должны запустить повышенную командную строку, чтобы иметь возможность выполнить сканирование SFC.
- Запустите полное сканирование системы за счет антивирусной программы. Не полагайтесь только на Windows Defender. Лучше выбирать дополнительные антивирусные программы параллельно.
- После обнаружения угрозы необходимо переустановить программу, отображающую данное уведомление. В большинстве случаев, необходимо переустановить программу так, чтобы проблема сразу же исчезла.
- Попробуйте выполнить восстановление при запуске системы, если все вышеперечисленные шаги не помогают.
- В крайнем случае переустановите операционную систему Windows.
В окне командной строки введите «sfc /scannow» и нажмите Enter на клавиатуре для выполнения этой команды. Программа System File Checker запустится и должна занять некоторое время (около 15 минут). Подождите, пока процесс сканирования завершится, и перезагрузите компьютер, чтобы убедиться, что вы все еще получаете ошибку «Программа не может запуститься из-за ошибки Midas.dll отсутствует на вашем компьютере.
метод 6: Использовать очиститель реестра
Registry Cleaner — мощная утилита, которая может очищать ненужные файлы, исправлять проблемы реестра, выяснять причины медленной работы ПК и устранять их. Программа идеально подходит для работы на ПК. Люди с правами администратора могут быстро сканировать и затем очищать реестр.
- Загрузите приложение в операционную систему Windows.
- Теперь установите программу и запустите ее. Утилита автоматически очистит и исправит проблемные места на вашем компьютере.
Если этот метод не помогает, переходите к следующему шагу.
Frequently Asked Questions (FAQ)
QКакая последняя версия файла midas.dll?
A6.0.6.163 — последняя версия midas.dll, доступная для скачивания
QКуда мне поместить midas.dll файлы в Windows 10?
Amidas.dll должны быть расположены в системной папке Windows
QКак установить отсутствующую midas.dll
AПроще всего использовать инструмент для исправления ошибок dll