Содержание
- 1 Ремонт Windows 10 Пуск меню
- 2 Переустановите меню Пуск (ShellExperienceHost StartMenuExperienceHost) и Кортана вручную
- 3 Запустите Пуск меню Устранение неполадок
- 4 Критическая ошибка: меню Пуск и Кортана
- 4.1 Запустите Windows 10 в безопасном режиме, а затем перезапустите в обычном режиме.
- 4.2 Восстановите базу данных меню «Пуск» или переустановите ВСЕ встроенные приложения
Иногда значки кнопки «Пуск», панели задач и области уведомлений могут застрять или зависнуть; нажатие на них ничего не делает. Когда элементы в области уведомлений заморожены, вы не сможете получить доступ к Центру поддержки, настройкам сети Wi-Fi и т. Д.
Если меню «Пуск» в Windows 10 зависло или не отвечает и не работает, или показывает Критическая ошибка сообщение, вот список шагов по устранению неполадок, которые вы можете выполнить. Исправления включают запуск меню «Пуск», устранение неполадок или ручную регистрацию ShellExperienceHost. Пакет StartMenuExperienceHost использует PowerShell или восстанавливает меню «Пуск» по умолчанию, перестраивая базу данных «Пуск».
В этой статье объясняется, как восстановить, сбросить или переустановить меню «Пуск» в Windows 10.
Ремонт Windows 10 Пуск меню
- Переустановите меню Пуск (StartMenuExperienceHost ShellExperienceHost) и Кортана
- Запустите Пуск меню Устранение неполадок
- Критическая ошибка: Меню Пуск и Кортана не работают
- Запустите Windows 10 в безопасном режиме, а затем перезапустите в обычном режиме.
- Восстановите базу данных меню «Пуск» или переустановите ВСЕ встроенные приложения
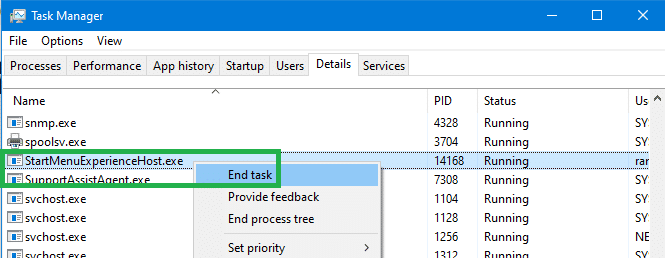
- Откройте диспетчер задач и перейдите на вкладку Сведения.
- Найдите
StartMenuExperienceHost.exeобработать и выбрать его. - Щелкните правой кнопкой мыши
StartMenuExperienceHost.exeи нажмите Конечная задача. Процесс StartMenuExperienceHost.exe существует только в Windows 10 v1903 и выше.
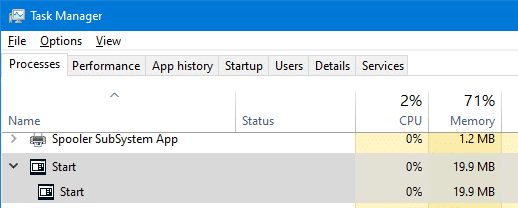
Примечание. На вкладке «Процессы» оно будет отображаться как Начало

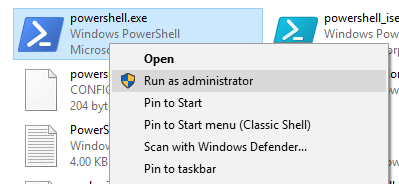
- Запустите проводник и просмотрите эту папку:
C:\Windows\System32\WindowsPowerShell\v1.0

- Щелкните правой кнопкой мыши PowerShell.exe и нажмите Запуск от имени администратора.
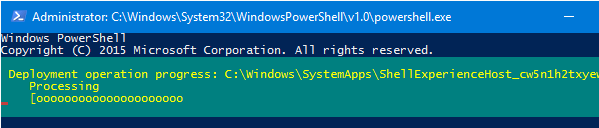
- Скопируйте следующую командную строку, вставьте в окно PowerShell и нажмите клавишу ВВОД:
Get-AppxPackage Microsoft.Windows.StartMenuExperienceHost | Foreach {Add-AppxPackage -DisableDevelopmentMode -Register "$($_.InstallLocation)\AppXManifest.xml"}Заметка: Если при запуске вышеуказанной команды запущен StartMenuExperienceHost.exe, вы получите следующую ошибку:
Add-AppxPackage: сбой развертывания с HRESULT: 0x80073D02, пакет не может быть установлен, так как в настоящее время используются измененные им ресурсы. ошибка 0x80073D02: невозможно установить, поскольку следующие приложения должны быть закрыты. Microsoft.Windows.StartMenuExperienceHost.
- Аналогично, запустите эти две команды:
Get-AppxPackage Microsoft.Windows.ShellExperienceHost | Foreach {Add-AppxPackage -DisableDevelopmentMode -Register "$($_.InstallLocation)\AppXManifest.xml"}
Get-AppxPackage Microsoft.Windows.Cortana | Foreach {Add-AppxPackage -DisableDevelopmentMode -Register "$($_.InstallLocation)\AppXManifest.xml"}
На выходе должно появиться сообщение «Ход выполнения развертывания».

Примечание. Если после выполнения вышеуказанной команды вы видите сообщение «Get-AppxPackage: доступ запрещен», вы не запускаете PowerShell от имени администратора.
Это переустанавливает или восстанавливает меню «Пуск» и панель задач (на основе StartMenuExperienceHost и ShellExperienceHost) и Cortana.
Запустите Пуск меню Устранение неполадок
Microsoft запустила диагностический пакет устранения неполадок меню «Пуск», который находит и устраняет проблемы с меню «Пуск» и Cortana. Этот замечательный инструмент выполняет всесторонние проверки, чтобы определить, что именно мешает правильному функционированию меню «Пуск».
Загрузите средство устранения неполадок меню «Пуск» (startmenu.diagcab) от Microsoft и запустите его.
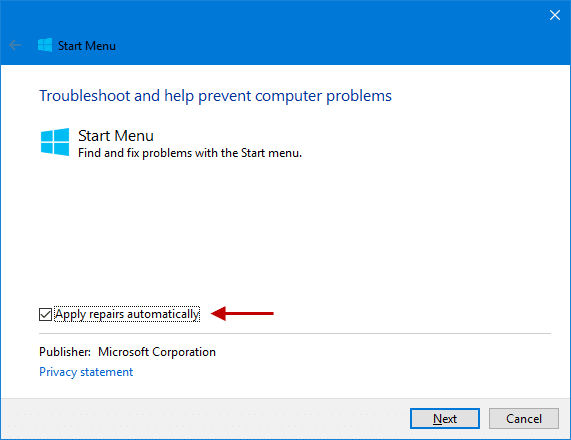
Чтобы применить исправления автоматически, нажмите кнопку «Дополнительно» и включите «Применить исправления автоматически». Но если вы просто хотите сделать пробный прогон, сначала снимите флажок.

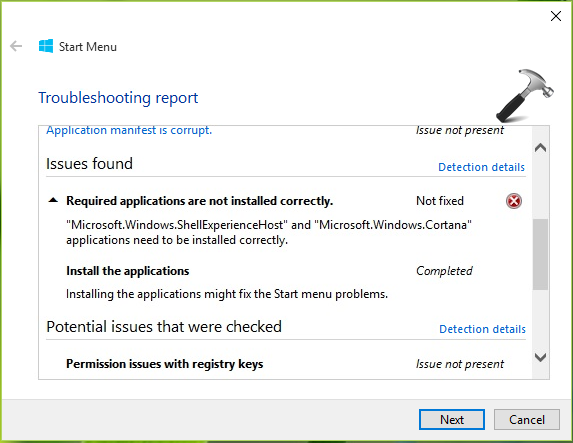
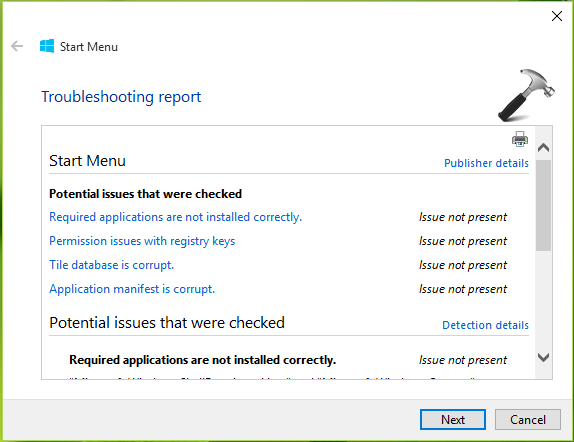
Средство устранения неполадок меню «Пуск» в первую очередь проверяет наличие следующих потенциальных проблем:
1. Требуемые приложения установлены неправильно
Проверяет, установлены ли приложения «Microsoft.Windows.ShellExperienceHost» и «Microsoft.Windows.Cortana» правильно или нет, и при необходимости переустанавливает пакеты автоматически.
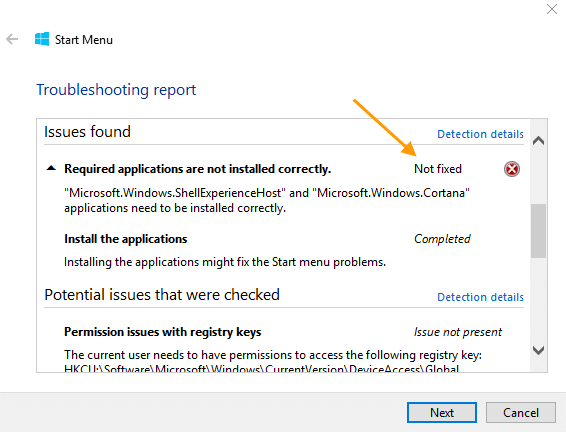
Если средство устранения неполадок не может переустановить пакеты, попробуйте переустановить ShellExperienceHost и Cortana вручную. Прокрутите вниз до конца этой статьи для получения инструкций.
2. Проблемы с разрешениями с ключами реестра
Проверяет, есть ли у текущего пользователя разрешения на доступ к следующему разделу реестра, и исправляет ACL, если это необходимо:
HKEY_CURRENT_USER\Software\Microsoft\Windows\CurrentVersion\DeviceAccess\Global
3. Плитка базы данных повреждена
Файл базы данных плиток находится здесь:
%localappdata%\TileDataLayer\Database\vedatamodel.edb
Средство устранения неполадок проверяет, существует ли этот файл и используется ли он в данный момент вошедшим в систему пользователем. Если это так, это воспринимается как хороший знак. В противном случае он удаляет поврежденный файл базы данных плиток и создает новую копию.
4. Манифест приложения поврежден
Проверяет, отсутствует ли следующий файл манифеста и пусто ли его содержимое.
C:\Windows\ImmersiveControlPanel\Application.manifest
Если этот файл отсутствует или поврежден, это может вызвать проблемы с пользовательским интерфейсом в нескольких областях Windows. Как примечание, запуск SFC и / или DISM должен восстановить оригинальную копию этого файла из источника.
Критическая ошибка: меню Пуск и Кортана
Иногда вы можете получить одно из следующих сообщений при запуске:
Меню Пуск и Кортана не работают. Мы постараемся исправить это при следующем входе в систему.
Критическая ошибка — меню «Пуск» не работает. Мы постараемся исправить это при следующем входе в систему.
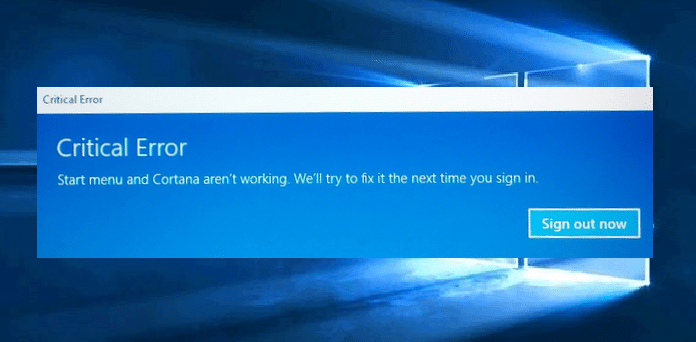
Следуйте методам устранения неполадок, описанным выше в этой статье. Если они не помогают, попробуйте это:
Запустите Windows 10 в безопасном режиме, а затем перезапустите в обычном режиме.
Запустите Windows 10 в безопасном режиме, а затем перезапустите в обычном режиме. Для запуска в безопасном режиме:
- Выйдите из своей учетной записи.
- Нажмите и удерживайте клавишу Shift, одновременно нажимая значок питания и выбирая «Перезагрузка».
- После входа в среду восстановления Windows нажмите Устранение неполадок.
- Нажмите «Дополнительные параметры», «Параметры запуска» и «Перезагрузить».
- Когда вы видите несколько вариантов запуска, нажмите 5 или F5 для Безопасный режим с поддержкой сети.
- После входа в свою учетную запись в безопасном режиме перезагрузите систему, чтобы вернуться к нормальная загрузка.
Это работает в некоторых случаях. Но если это не так, и проблема повторяется при каждом запуске, используйте эти шаги:
Восстановите базу данных меню «Пуск» или переустановите ВСЕ встроенные приложения
Восстановите свежую копию базы данных меню «Пуск» с именем vedatamodel.edb. Вы можете найти больше информации об этом в статье Как сделать резервную копию макета меню Пуск в Windows 10? Если восстановление новой копии базы данных меню «Пуск» не помогает, переустановите все встроенные приложения с помощью PowerShell. Когда вы это сделаете, он автоматически перестроит базу данных меню «Пуск».
Запустите PowerShell от имени администратора и выполните следующую команду:
Get-AppxPackage –allusers | Foreach {Add-AppxPackage -DisableDevelopmentMode -Register "$($_.InstallLocation)\AppXManifest.xml"}
Перезагрузите Windows.
Надеюсь, что это исправляет неотвечающее меню «Пуск» и панель задач Windows 10, а также исправляет «Критическую ошибку». Давайте знать ваши комментарии ниже.
You may encounter the Start menu issue if the Windows and Drivers of your system are outdated. Moreover, conflicting applications like Dropbox or Adobe Creative Cloud may also cause the error at hand.
The issue arises when the Start menu of the user does not open/function and upon running the Start menu troubleshooter, the user gets the following message:
Microsoft.Windows.ShellExperienceHost and Microsoft.Windows.Cortana applications need to be installed correctly

Before proceeding, check if booting your system with the bare minimum or in the safe mode resolves the issue.
Following workarounds are reported by users to temporary solve the issue:
- Creating a new virtual desktop.
- Changing the Windows theme or reverting to the default Windows theme.
- Pressing Ctrl + Alt + Del button and choosing Switch User. Then signing in with your current user account.
- Launching the Ctfmon.exe from the following location:
C:\Windows\system32\
- Toggling (on or off) ‘Show more Tiles on Start’ in Taskbar Settings > Start tab.

Toggle Show more Tiles on Start - Restarting the Firewall service and Windows Explorer process.

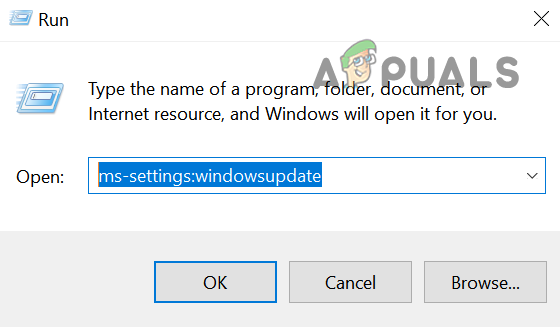
Solution 1: Update the BIOS, Drivers, and Windows of Your PC
The incompatibility between the essential system modules (i.e., BIOS, Drivers, and Windows) may cause the issue at hand as these entities are not updated to the latest builds. In this context, updating BIOS, Drivers, and Windows to the latest releases may solve the problem.
- Update the Windows of your PC to the latest build (you may need to open Setting via executing “ms-settings:windowsupdate” in the Run command box). You can also use the offline installer of the latest Windows update.

Launch Windows Update Through the Run Box - Then update the drivers of your PC to the latest build (you may right-click on This PC and choose Manage). Make sure the BIOS of your system is also updated. If you are using an update utility by the OEM (e.g., Dell Support Assistant), then use that utility to update the system’s drivers. If you are using an external graphics card, then make sure to update its drivers through the OEM application (like NVIDIA GeForce Experience).

Open Computer Management - Now check if the system is clear of the applications’ error.
- If not, then launch a web browser and navigate to the OEM website (for example, HP or Nvidia website).
- Now download the drivers for your PC and install the drivers with the administrator privileges.
- Then reboot your PC and check if the Start menu issue is resolved.

Solution 2: Disable/Remove the Conflicting Applications
You may encounter the issue at hand if any of the installed applications is hindering the operation of the essential OS entities. In this case, removing the conflicting applications may solve the problem. As the Start menu is not working, you have to dig deeper to make these instructions work for you.
- Boot your computer into safe mode and then clean boot it to check if the issue is resolved.
- If so, then you may enable processes/applications/services one by one (that were disabled during the clean boot process) till you find the problematic one.
Once the problematic application is found, you may keep it disabled at the system’s start or uninstall it. Following applications are reported by the users to create the issue:
- AppLocker (a tool used by I.T. administrators to secure the infrastructure)
- Adobe Creative Cloud
- CorelDraw
- Dropbox
- Comodo Internet Security (it will be better to check if the antivirus of your system is not creating the issue).
For elucidation, we will discuss the process for Dropbox (make sure to back up the essentials).
- Launch the Run command box (by simultaneously pressing Windows + R keys) and execute (make sure to enter the colon at the end):
ms-settings:

Open the System’s Settings Through the Run Box - Then open Apps and then expand Dropbox.

Open Apps in the Windows Settings - Now click on Uninstall and then confirm to uninstall Dropbox.

Uninstall the Dropbox Application - Then let the uninstallation complete and reboot your PC.
- Upon reboot, check if the Start menu issue is resolved. If so, then you may install the latest version of the problematic application.


If the issue persists, then check if disabling the Fast Startup sorts out the Start menu problem.
Solution 3: Reinstall the Graphics Driver
The corrupt graphics driver (the Nvidia drivers are reported to create the issue) may also cause the start menu issue at hand. In this context, reinstalling the graphics driver may solve the problem.
- Launch a web browser and navigate to the website of the graphics driver manufacturer (like the Nvidia website).
- Then download and install (with administrator privileges) the latest drivers for your graphics adapter.
- Now reboot your PC and check if the start menu issue is resolved.
- If not, then right-click on This PC and choose Manage (or execute ‘devmgmt.msc’ in the Run command box). If that is not an option, then you may try the following steps in safe mode.

Run the devmgmt.msc Command - Now expand the option of Display Adapters and right-click on the graphics device (e.g., Nvidia graphics card).
- Then select Uninstall Device and in the window shown, checkmark the option of Delete the Driver Software for This Device.

Uninstall the Graphics Driver of the 2nd Monitor - Now click on Uninstall and let the uninstallation of the graphics driver complete.
- Then reboot your PC and upon reboot, let Windows install the default drivers and check if the system’s start menu is functioning normally.
- If not, install the downloaded driver at step 2 and check if the start menu problem is solved.
- If not, then repeat steps 4 to 6, but at step 6, disable the graphics card and check if the start menu is operating normally. If that is not an option, then check if disabling the graphics card in the system’s BIOS solves the problem.


Solution 4: Edit the System’s Registry
If none of the solutions has worked for you, then editing the related registry keys may solve the problem. But keep in mind that these keys may not be available to all users.
Warning: Progress at your own risk and with the extrema care as editing the system’s registry is a skillful task and if not done properly, you may cause everlasting damage to your data/PC.
Before advancing, make sure to back up your system’s registry.
Disable WpnUserService
- Press Windows + R keys and in the Run box, type: Regedit. Then press the Ctrl + Shift + Enter keys to launch the editor as administrator. If that is not an option, then launch the Registry Editor in the safe mode or use the Command Prompt/Task Manager.

Run the RegEdit Command - Navigate to the following path:
Computer\HKEY_LOCAL_MACHINE\SYSTEM\CurrentControlSet\Services\WpnUserService
- Now, in the right pane, double-click on Start and changes its value to 4.

Disable the WpnUserService - Then exit the editor and reboot your PC to check if the Start menu has started to work fine.


Edit Permission of HKEY_CLASSES_ROOT
- Launch the Registry Editor (as discussed above) and navigate to the following:
Computer\HKEY_CLASSES_ROOT
- Now, in the left pane, right-click on HKEY_CLASSES_ROOT and choose Permissions.

Open Permissions of HKEY_CLASSES_ROOT - Then check if All Application Packages is listed in the section of Group or User Name. If so, proceed to step 6.
- If All Application Packages is not present, click on Add and then click on the Advanced button.

Click on the Add Button in the HKEY_CLASSES_ROOT Permissions - Now click on Find Now and then, in the results shown, double-click on All Application Packages.

Double-Click All Application Packages - Then click on OK and then, in the Group or User Names, select All Application Packages.
- Now, in the section of Permissions for All Application Packages, make sure only Read permission is selected in the Allow column.

Set the Permission of All Application Packages to Read - Then Apply your changes and reboot your PC after exiting the editor.
- Upon reboot, check if the Start menu issue is sorted out.


Delete the Search Key
- Open the Registry Editor and navigate to the following path:
HKEY_CURRENT_USER\SOFTWARE\Microsoft\Windows\CurrentVersion\Search
- Then, in the left pane, right-click on Search and select Delete.

Delete the Search Key - Now confirm to delete the key and reboot your PC after exiting the editor.
- Upon reboot, check if the Start menu is clear of the error.

Reset the DCOM Permissions
- If your event log is also showing some DCOM errors, then launch the Registry Editor and navigate to the following:
HKEY_LOCAL_MACHINE\SOFTWARE\Microsoft\Ole
- Then, in the right pane, delete the following keys:
DefaultAccessPermission

DefaultLaunchPermission

MachineAccessRestriction

MachineLaunchRestriction

Delete the Values in OLE Key - Now exit the editor and reboot your PC to check if the Start menu issue is resolved.

Solution 5: Use the PowerShell Commands
If the issue is still there, then you can reinstall the Windows Start menu by reregistering the Windows 10 apps through the PowerShell which may solve the problem.
Launch the Administrator PowerShell
As the Start menu and Cortana are not working, we may have to try some alternative ways to open the PowerShell.
- Right-click on the Start menu button and in the Quick Access menu, choose Windows PowerShell (Admin).
- If that did not do the trick, press Windows + R keys (to launch the Run box) and type: PowerShell. Now press Ctrl + Shift + Enter keys to launch the PowerShell as administrator.

Open the PowerShell Through the Run Command - If that is not an option, then launch the Task Manager (Ctrl + Alt + Delete keys) and open the File menu. Then select Run a New Task and type: PowerShell. Now checkmark Create This Task with Administrator Privileges and click on OK.

Open the PowerShell Through the Task Manager - If you still cannot launch the PowerShell, then launch the PowerShell.exe as administrator from the following:
\Windows\System32\WindowsPowerShell\v1.0


Reinstall the Windows 10 Apps
- Now execute the following one by one:
Get-AppXPackage -AllUsers | Foreach {Add-AppxPackage -DisableDevelopmentMode -Register "$($_.InstallLocation)\AppXManifest.xml"} Get-appxpackage -all *shellexperience* -packagetype bundle |% {add-appxpackage -register -disabledevelopmentmode ($_.installlocation + “\appxmetadata\appxbundlemanifest.xml”)} - Then check if the Start menu issue is resolved.
Reregister the Cortana and ShellExperienceHost
- In the PowerShell, execute the following one by one:
Get-AppxPackage Microsoft.Windows.ShellExperienceHost | Foreach {Add-AppxPackage -DisableDevelopmentMode -Register "$($_.InstallLocation)\AppXManifest.xml"}

Get-AppxPackage Microsoft.Windows.Cortana | Foreach {Add-AppxPackage -DisableDevelopmentMode -Register "$($_.InstallLocation)\AppXManifest.xml"}
ReRegister the ShellExperienceHost - Now check if the Start menu issue is resolved.

Use the Local AppxPackage
- Execute the following one by one:
Add-AppxPackage -register "C:\Windows\SystemApps\Microsoft.Windows.Cortana_cw5n1h2txyewy\appxmanifest.xml" -DisableDevelopmentMode

Add-AppxPackage -register "C:\Windows\SystemApps\ShellExperienceHost_cw5n1h2txyewy\appxmanifest.xml" -DisableDevelopmentMode

Use the Local Appx Packages - Then check if the package issue is resolved.

Reinstall the Applications for All Users
- Execute the following one by one:
Get-AppXPackage -AllUsers |Where-Object {$_.InstallLocation -like "*SystemApps*"} | Foreach {Add-AppxPackage -DisableDevelopmentMode -Register "$($_.InstallLocation)\AppXManifest.xml"} Get-AppXPackage -AllUsers |Where-Object {$_.InstallLocation -like "*Cortana*"} | Foreach {Add-AppxPackage -DisableDevelopmentMode -Register "$($_.InstallLocation)\AppXManifest.xml"} Get-AppXPackage -AllUsers |Where-Object {$_.InstallLocation -like "*ShellExperienceHost*"} | Foreach {Add-AppxPackage -DisableDevelopmentMode -Register "$($_.InstallLocation)\AppXManifest.xml"} - Then check if the Start menu is working fine.
Solution 6: Create a New Windows Account
The Start menu issue may arise if your Windows user profile is corrupt. In this context, creating another Windows user account may solve the problem.
- On your Desktop, right-click on the icon of This PC and choose Manage.
- Now, in the left pane, expand ‘Local Users and Groups’ and right-click on Users.
- Then select ‘New User…’ and fill-out the details.

Create a New User in Local Users and Groups - Now logout of the current user and log into the newly created account to check if the Start menu issue is resolved. If so, then you may transfer the user data to the new profile and delete the old one.

If you cannot open Computer Management at step 1, then you may execute ‘control userpasswords2’ in the Run command box to open the user management window.
If you cannot open the Run command box, then you may execute any one of the following in an Administrator Command Prompt to add the new user account (you may execute it in the Advanced Options in Troubleshoot):
net user "username" "password" /add

net user /add Admin2

net localgroup administrators Admin2 /add

If the issue is still there, then you may perform a DISM scan of your PC. If that did not do the trick, then you either perform an In-Place Upgrade or a clean installation of Windows.

Kevin Arrows
Kevin Arrows is a highly experienced and knowledgeable technology specialist with over a decade of industry experience. He holds a Microsoft Certified Technology Specialist (MCTS) certification and has a deep passion for staying up-to-date on the latest tech developments. Kevin has written extensively on a wide range of tech-related topics, showcasing his expertise and knowledge in areas such as software development, cybersecurity, and cloud computing. His contributions to the tech field have been widely recognized and respected by his peers, and he is highly regarded for his ability to explain complex technical concepts in a clear and concise manner.
Если после запуска средства устранения неполадок с меню «Пуск» в Windows 10 вы получаете сообщение об ошибке Microsoft.Windows.ShellExperienceHost и Microsoft.Windows.Cortana должна быть правильно установлена , которую не удается устранить средством устранения неполадок, вот несколько примеров. вещи, которые вы могли бы попробовать.

Приложения Microsoft.Windows.ShellExperienceHost и Microsoft.Windows.Cortana должны быть установлены правильно
Из сообщения ясно, что произошло некоторое повреждение, и средство устранения неполадок просит вас переустановить эти два процесса. Ну вот несколько вещей, которые вы должны попробовать. Но прежде чем начать, не забудьте сначала создать точку восстановления системы.
1] Запустите следующую команду в командной строке с повышенными привилегиями, чтобы запустить Проверка системных файлов .
sfc/scannow
Перезагрузите компьютер после завершения сканирования и посмотрите, помогло ли это. Вы также можете использовать наш FixWin для запуска проверки системных файлов одним щелчком мыши.
2] Восстановить образ Windows . Откройте повышенную копию CMD, вставьте следующее и нажмите Enter
Dism/Online/Cleanup-Image/RestoreHealth
Перезагрузите компьютер после завершения сканирования и посмотрите, помогло ли это.
Кроме того, вы также можете использовать наш FixWin для восстановления образа системы одним щелчком мыши.

3] Выполните следующую команду, чтобы переустановить меню «Пуск» .
Чтобы открыть окно PowerShell с повышенными привилегиями, введите PowerShell на панели задач Поиск и в появившемся окне «Windows PowerShell» щелкните правой кнопкой мыши и выберите «Запуск от имени администратора».
Введите следующее и нажмите Enter:
Get-AppxPackage Microsoft.Windows.ShellExperienceHost | Foreach {Add-AppxPackage -DisableDevelopmentMode -Register "$ ($ _. InstallLocation) \ AppXManifest.xml"}
Чтобы перерегистрировать Cortana , выполните следующую команду:
Get-AppxPackage Microsoft.Windows.Cortana | Foreach {Add-AppxPackage -DisableDevelopmentMode -Register "$ ($ _. InstallLocation) \ AppXManifest.xml"
Перезагрузите компьютер и проверьте.
Вы также можете сделать это, чтобы открыть окно командной строки или Powershell. Нажмите Ctrl + Shift + Esc, чтобы открыть диспетчер задач. Нажмите меню «Файл»> «Запустить новое задание». Чтобы открыть окно командной строки, введите cmd . Чтобы открыть приглашение PowerShell, введите powershell . Не забудьте установить флажок Создать эту задачу с правами администратора . Затем нажмите Enter.
СОВЕТ . Вы можете использовать нашу бесплатную программу FixWin для повторной регистрации всех приложений Магазина Windows одним щелчком мыши.
4] Если ничего не помогает, создайте резервную копию своих данных и используйте параметр Сбросить этот компьютер или параметр Новый запуск . Бесплатное восстановление настроек Cortana также является вариантом, который вы можете рассмотреть.
Надеюсь, что-нибудь поможет.
Start PowerShell as Administrator. PowerShell.exe is located in this folder:
C:\Windows\System32\WindowsPowerShell\v1.0
Right-click PowerShell.exe and click Run as Administrator.
Execute these two commands:
Get-AppxPackage Microsoft.Windows.ShellExperienceHost | Foreach {Add-AppxPackage -DisableDevelopmentMode -Register "$($_.InstallLocation)\AppXManifest.xml"}

Get-AppxPackage Microsoft.Windows.Cortana | Foreach {Add-AppxPackage -DisableDevelopmentMode -Register "$($_.InstallLocation)\AppXManifest.xml"}
This reinstalls ShellExperienceHost and Cortana.
Src: Start menu and Taskbar Stuck in Windows 10. How to Fix it?
answered Sep 12, 2016 at 5:19
![]()
w32shw32sh
11.6k2 gold badges40 silver badges44 bronze badges
2
w32sh’s answer has the standard way of reinstalling these. However, for me this didn’t work at all, nor did any other suggested solutions. My issue came with the taskbar, start menu and W10 apps being unusable.
If w32sh’s solution doesn’t work for you, have a look at my answer here.
answered May 6, 2017 at 22:40
![]()
If re-registering the Windows 10 apps does not work, and this is a domain user…
I discovered that the default profile I created in \domain\SYSVOL\domain\scripts was breaking the profiles.
I tested this theory by creating a new profile on the local machine (before joining to domain) and it working normally after the 1706 update. I then joined domain, and verified creating a domain profile account broke the start menu. Then I removed the «Default User.v6» from my logon scripts, and created a second domain user account. The start menu worked as expected.
answered Aug 4, 2017 at 19:45
![]()
1
Adding on late in case someone else stumbles across this as I did: AppLocker can break the Start menu and Cortana. I attempted to follow w32sh’s answer, and got the following error message:
Add-AppxPackage : Deployment failed with HRESULT: 0x80073D01, The package deployment operation is blocked by policy.
Please contact your system administrator. (Exception from HRESULT: 0x80073D01)
error 0x800704EC: Deployment of package
Microsoft.Windows.ShellExperienceHost_10.0.15063.674_neutral_neutral_cw5n1h2txyewy was blocked by AppLocker.
When I enabled AppLocker I had it create default rules and autocreate rules based on what was on the system, but apparently that wasn’t sufficient. Perhaps an update broke it.
Regardless, the fix for me was to change the enforcement to «Audit» mode. Be aware that this disables the protections you get from AppLocker. And it’s tricky since the damned start menu is broken. You can get around this by using Windows-X and clicking the Console or Powershell (depending on your setup) with Admin Priveleges. Then run secpol.msc and follow the instructions
at Configure an AppLocker Policy for Audit Only in the section To audit rule collections by using the Local Security Policy snap-in
In case that site ever goes away, here are the rather quick steps:
- Click Start, type secpol.msc in the Search programs and files box, and then press ENTER.
- If the User Account Control dialog box appears, confirm that the action it displays is what you want, and then click Yes.
- In the console tree, double-click Application Control Policies, right-click AppLocker, and then click Properties.
- On the Enforcement tab, select the Configured check box for the rule collection that you want to enforce, and then verify that Audit
only is selected in the list for that rule collection.- Repeat step 4 to configure the enforcement setting to Audit only for additional rule collections.
- Click OK.
answered Oct 16, 2017 at 17:34
![]()
So I have a fix for this. It’s pretty easy.
Install the newest cumulative update for W10. If you’re unable to install it remove the newest one and re-install it.
https://www.microsoft.com/en-us/itpro/windows-10/release-information is where you can find the newest updates. Manually download the relevant cumulative release.
answered Apr 20, 2018 at 18:15
![]()
depending on what caused this.
- 1) system restore
- 2) sfc /scannow using CMD window in admin mode.
- 3) create new local administrator account
check for windows updates.
answered Sep 12, 2016 at 1:18
![]()
If the Start Menu, Apps, or the Wifi network buttons do not expand to show signals and drop down menus, then:
-
Start CMD as administrator (rightclick Command Prompt & run as administrator)
-
Paste this single lined command in and press enter-
powershell -EncodedCommand IAAgACAARwBlAHQALQBBAHAAcAB4AFAAYQBjAGsAYQBnAGUAIAAtAEEAbABsAFUAcwBlAHIAcwB8ACAARgBvAHIAZQBhAGMAaAAgAHsAQQBkAGQALQBBAHAAcAB4AFAAYQBjAGsAYQBnAGUAIAAtAEQAaQBzAGEAYgBsAGUARABlAHYAZQBsAG8AcABtAGUAbgB0AE0AbwBkAGUAIAAtAFIAZQBnAGkAcwB0AGUAcgAgABwgJAAoACQAXwAuAEkAbgBzAHQAYQBsAGwATABvAGMAYQB0AGkAbwBuACkAXABBAHAAcABYAE0AYQBuAGkAZgBlAHMAdAAuAHgAbQBsAB0gfQAgAA==
Its just a way to reload the Windows Store and apps which includes the Shell Experience.
I posted the same solution here — https://answers.microsoft.com/en-us/windows/forum/windows_10-start-win_menu/windows-10-start-menu-broken-after-april-2018/f9fccd53-0dd3-42e6-a6e9-f4fa102c0a3e
answered Sep 12, 2018 at 13:54
![]()
3
You must log in to answer this question.
Not the answer you’re looking for? Browse other questions tagged
.
Not the answer you’re looking for? Browse other questions tagged
.
Start Menu is one of the highlighted feature in Windows 10. The reason is that Microsoft removed Start Menu in Windows 8 and a lot of users asked the ‘Redmond software giant‘ to restore it. The company listened to their consumers and Start Menu finally returned to Windows 10. When you have problems with Start Menu, most of Windows experts will suggest you to run Start Menu troubleshooter mentioned here:
How to download and use Start Menu troubleshooter in Windows 10
However, after running troubleshooter, some of the users found that few detected issues are still present and troubleshooter is unable to fix them. Following is one of those issues:
Page Contents
“Microsoft.Windows.ShellExperienceHost” and “Microsoft.Windows.Cortana” applications need to be installed correctly.
Since the issue is not fixed by troubleshooter, you need to take manual steps to fix it. But how? Well if you’ve this problem, no need to worry much! You can try these simple suggestions to easily get rid of this problem.
FIX : Microsoft.Windows.ShellExperienceHost And Microsoft.Windows.Cortana Applications Need To Be Installed Correctly In Windows 10
FIX 1 – General Suggestions
1. Run System File Checker scan, if it fails, run DISM commands.
2. Try creating a new user account and check if Start Menu works on that account. If yes, go ahead with that account. If no, read on suggestions mentioned below.
3. Since the issue is with in-built apps installation, we must give a try to re-registering all apps using step 1 & 5 mentioned here.
If the issue still persists, check advanced FIX 2.
This problem is can be very easily solved by re-registering Start Menu. The steps required to perform for that are mentioned in our following guide:
Steps to re-register Start Menu in Windows 10
I’m quite sure, after registering Start Menu, if you re-run Start Menu troubleshooter, you’ll find that the issue no longer present.
That’s it!
READ THESE ARTICLES NEXT
- Fix: Script Errors on Windows 11 startup
- Fix: Windows 11 Start button not working
- Fix: Start Menu not working in Windows 11
- Hide Recently Opened Items In Jump Lists For Windows 10
- FIX: Start Menu Critical Error After Installing KB4517389
- [How To] Remove Most Used List From Start Menu In Windows 10
- [How To] Remove Recently Added List From Start Menu In Windows 10
- [FIX] Shut Down, Sleep, Restart Options Missing From WinX Menu In Windows 10
- [How To] Disable Suggested Apps Ad In Windows 10 Start Menu
- [FIX] Start Menu Layout In Windows 10 Not Working