This article gives a short overview of how to create a Microsoft Windows Failover Cluster (WFC) with Windows Server 2019 or 2016. The result will be a two-node cluster with one shared disk and a cluster compute resource (computer object in Active Directory).
Preparation
It does not matter whether you use physical or virtual machines, just make sure your technology is suitable for Windows clusters. Before you start, make sure you meet the following prerequisites:
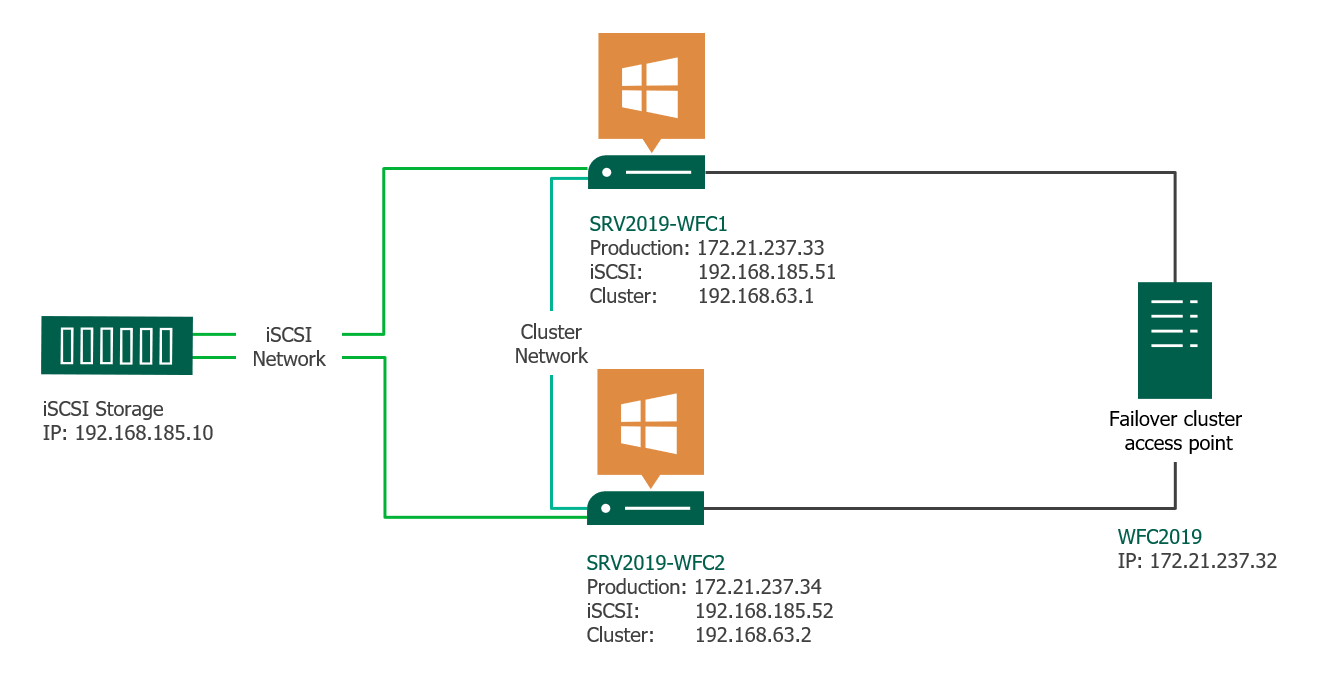
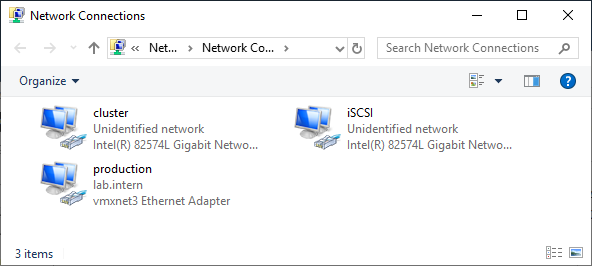
Two Windows 2019 machines with the latest updates installed. The machines have at least two network interfaces: one for production traffic, one for cluster traffic. In my example, there are three network interfaces (one additional for iSCSI traffic). I prefer static IP addresses, but you can also use DHCP.
Join both servers to your Microsoft Active Directory domain and make sure that both servers see the shared storage device available in disk management. Don’t bring the disk online yet.
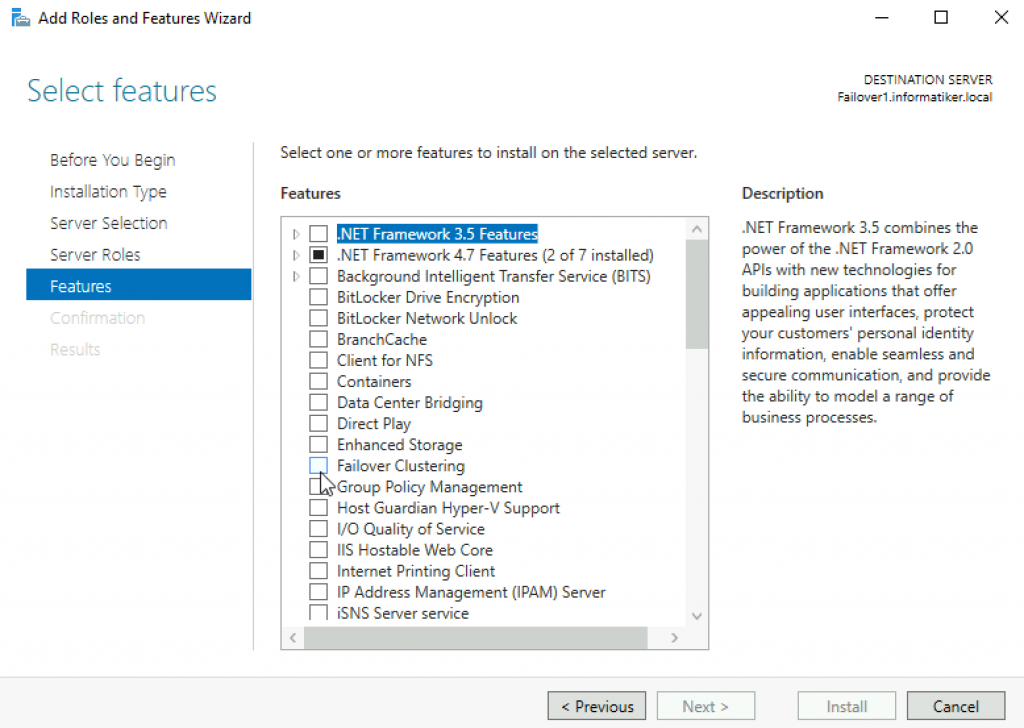
The next step before we can really start is to add the Failover clustering feature (Server Manager > add roles and features).
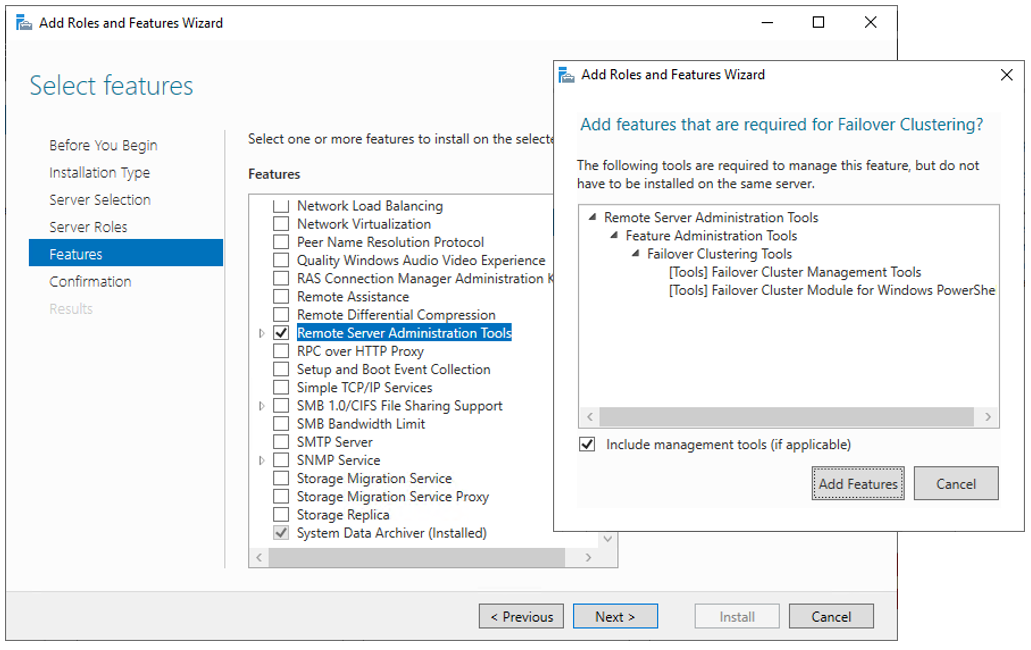
Reboot your server if required. As an alternative, you can also use the following PowerShell command:
Install-WindowsFeature -Name Failover-Clustering –IncludeManagementTools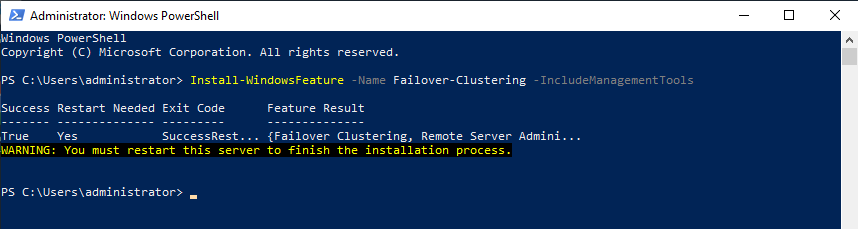
After a successful installation, the Failover Cluster Manager appears in the start menu in the Windows Administrative Tools.
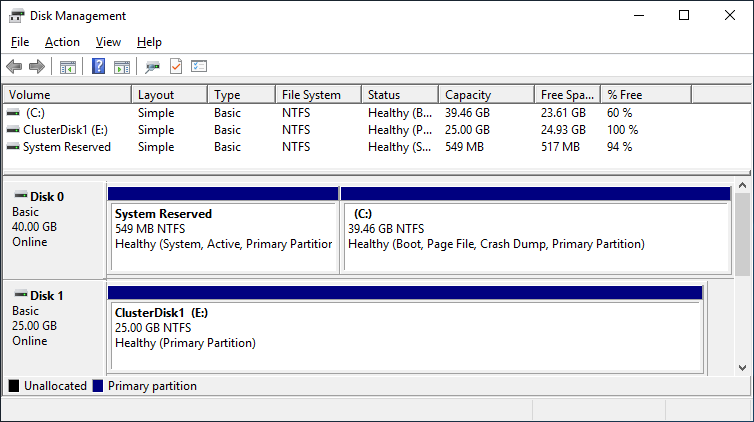
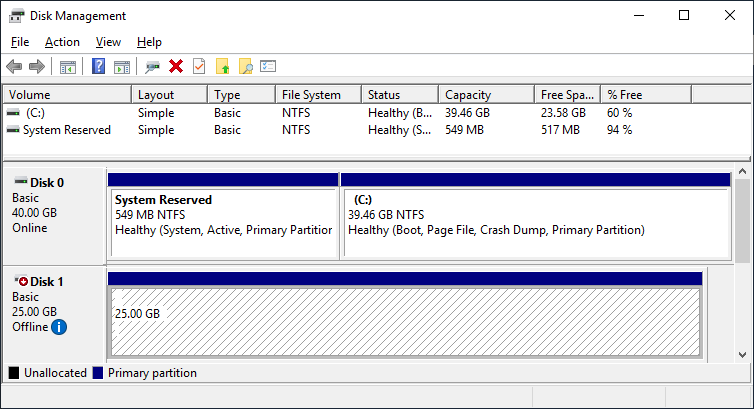
After you installed the Failover-Clustering feature, you can bring the shared disk online and format it on one of the servers. Don’t change anything on the second server. On the second server, the disk stays offline.
After a refresh of the disk management, you can see something similar to this:
Server 1 Disk Management (disk status online)
Server 2 Disk Management (disk status offline)
Failover Cluster readiness check
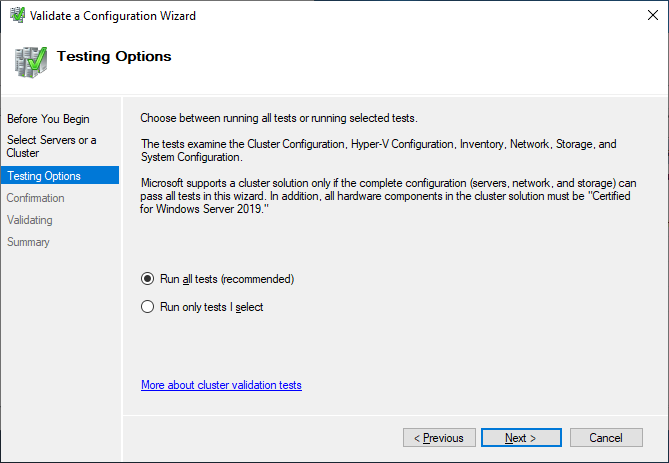
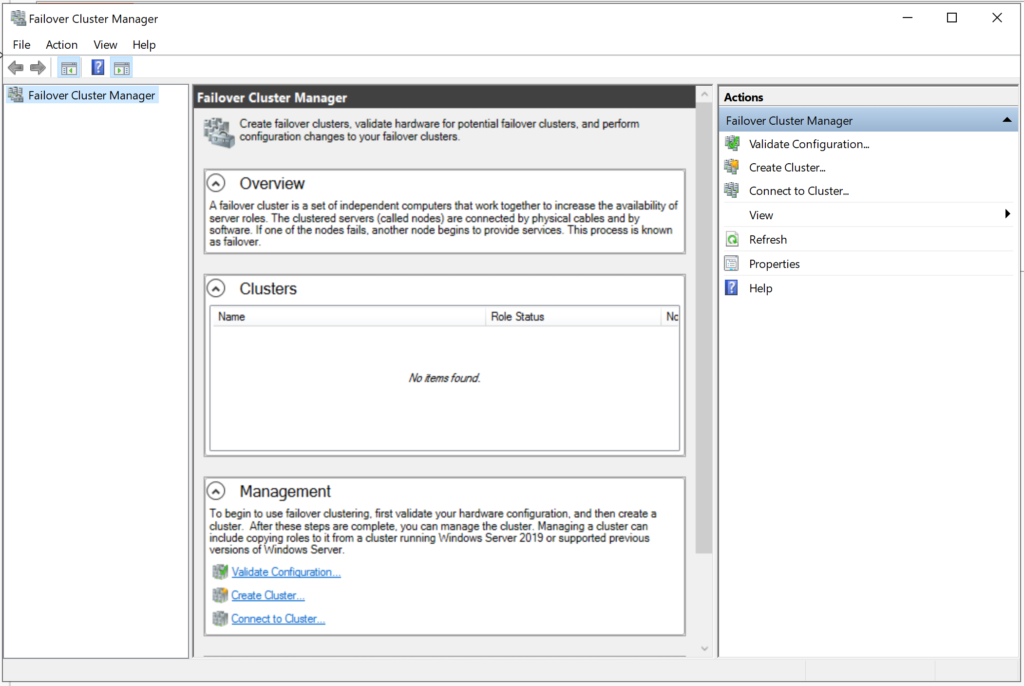
Before we create the cluster, we need to make sure that everything is set up properly. Start the Failover Cluster Manager from the start menu and scroll down to the management section and click Validate Configuration.

Select the two servers for validation.

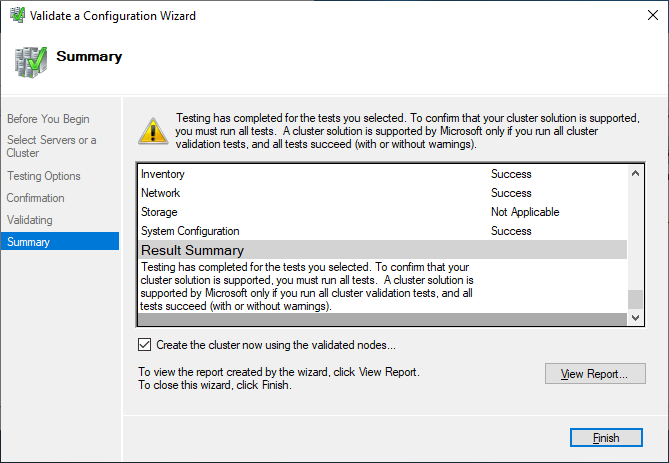
Run all tests. There is also a description of which solutions Microsoft supports.
After you made sure that every applicable test passed with the status “successful,” you can create the cluster by using the checkbox Create the cluster now using the validated nodes, or you can do that later. If you have errors or warnings, you can use the detailed report by clicking on View Report.
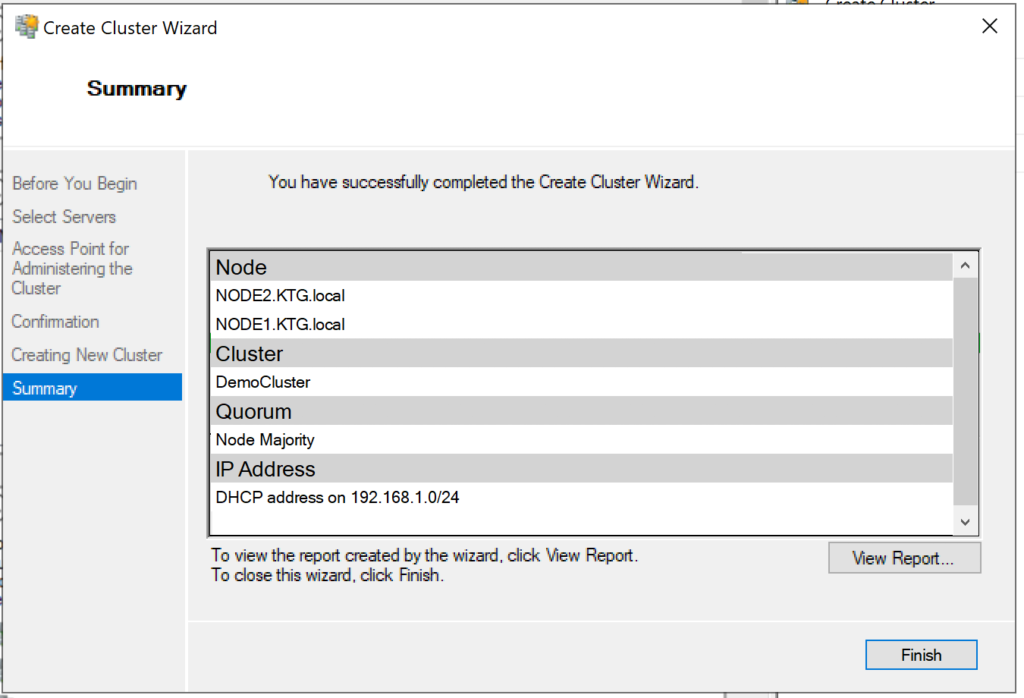
If you choose to create the cluster by clicking on Create Cluster in the Failover Cluster Manager, you will be prompted again to select the cluster nodes. If you use the Create the cluster now using the validated nodes checkbox from the cluster validation wizard, then you will skip that step. The next relevant step is to create the Access Point for Administering the Cluster. This will be the virtual object that clients will communicate with later. It is a computer object in Active Directory.
The wizard asks for the Cluster Name and IP address configuration.
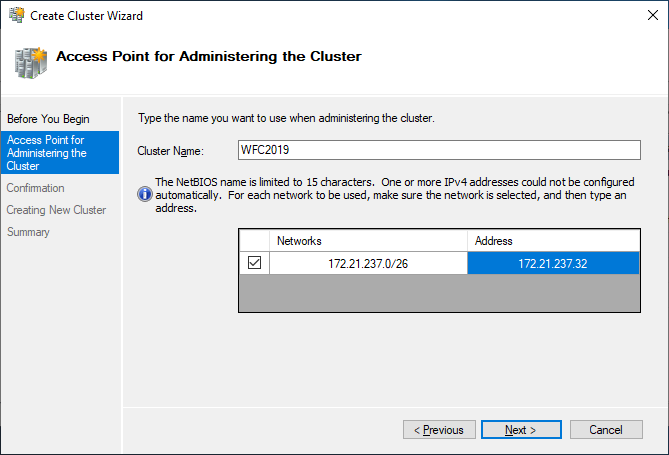
As a last step, confirm everything and wait for the cluster to be created.
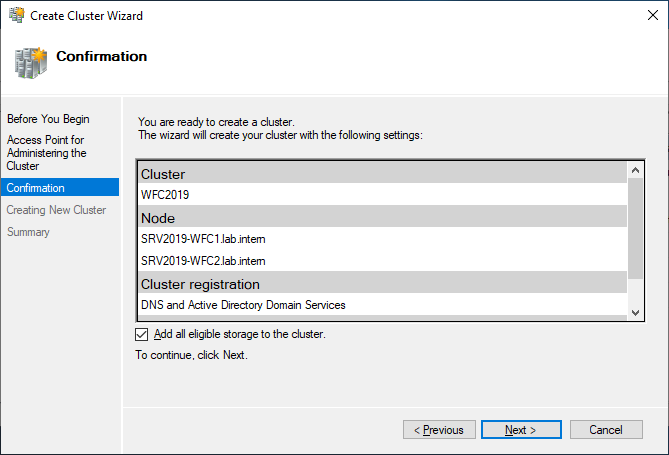
The wizard will add the shared disk automatically to the cluster per default. If you did not configure it yet, then it is also possible afterwards.
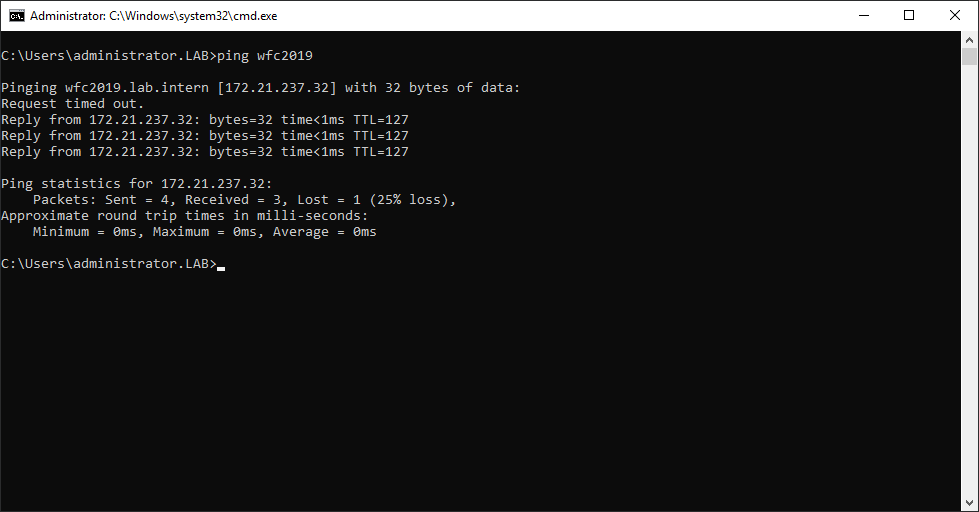
As a result, you can see a new Active Directory computer object named WFC2019.

You can ping the new computer to check whether it is online (if you allow ping on the Windows firewall).
As an alternative, you can create the cluster also with PowerShell. The following command will also add all eligible storage automatically:
New-Cluster -Name WFC2019 -Node SRV2019-WFC1, SRV2019-WFC2 -StaticAddress 172.21.237.32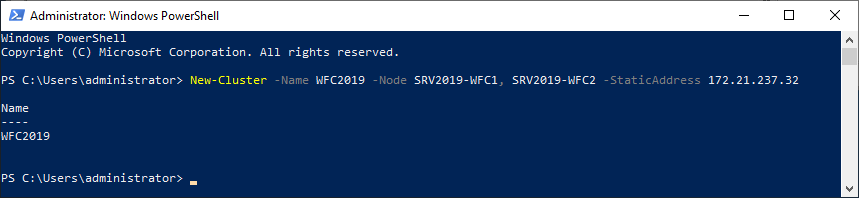
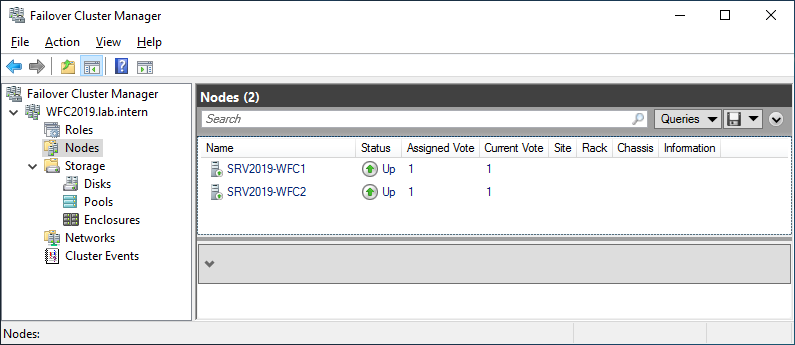
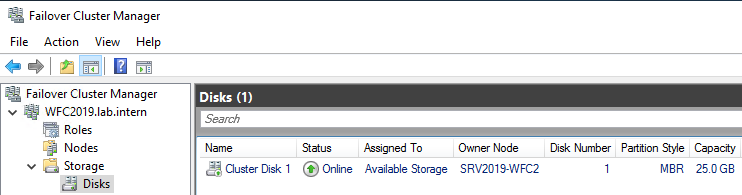
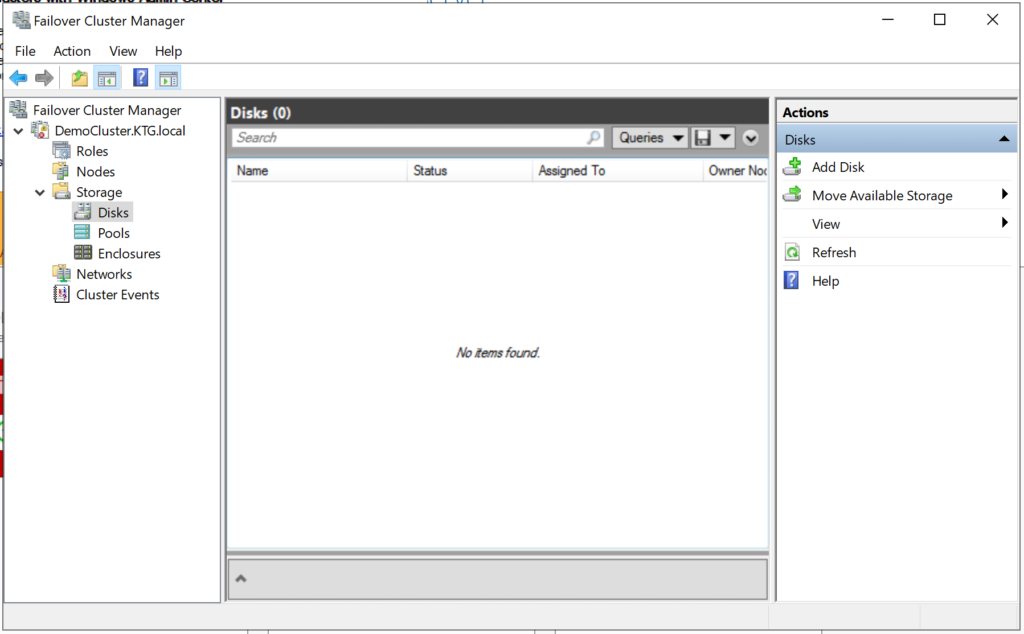
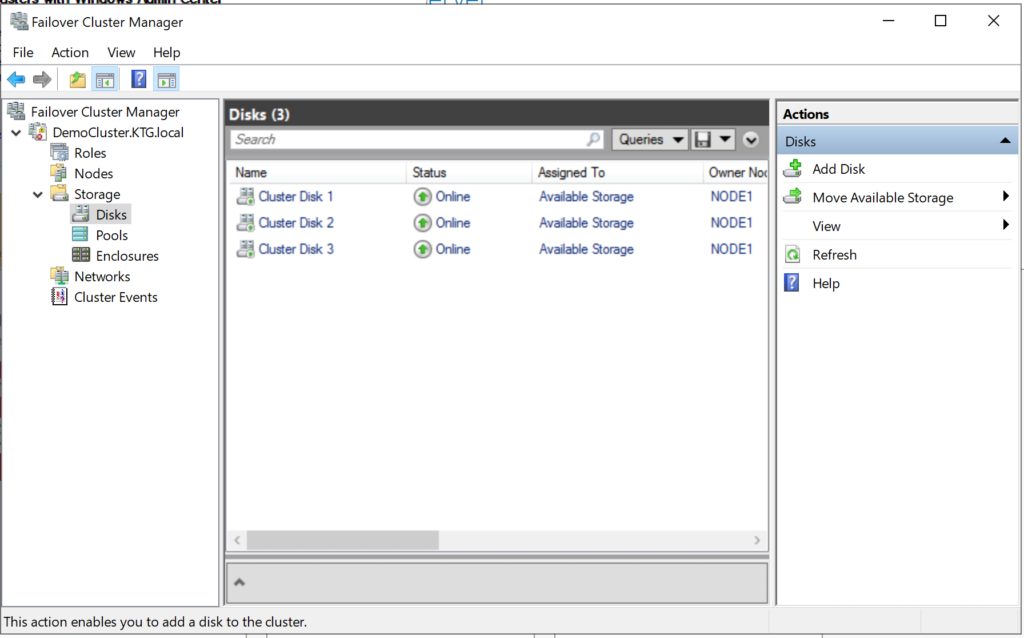
You can see the result in the Failover Cluster Manager in the Nodes and Storage > Disks sections.
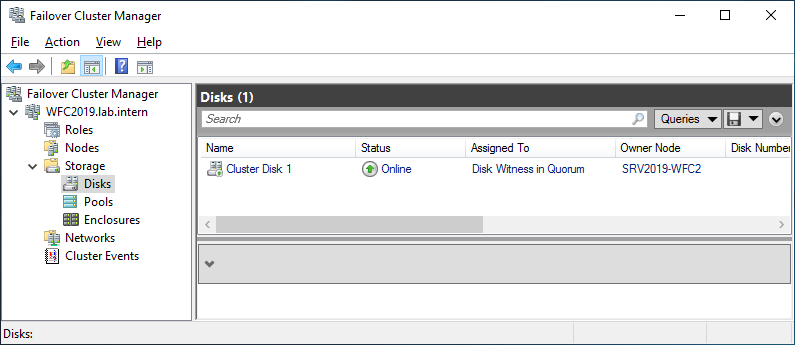
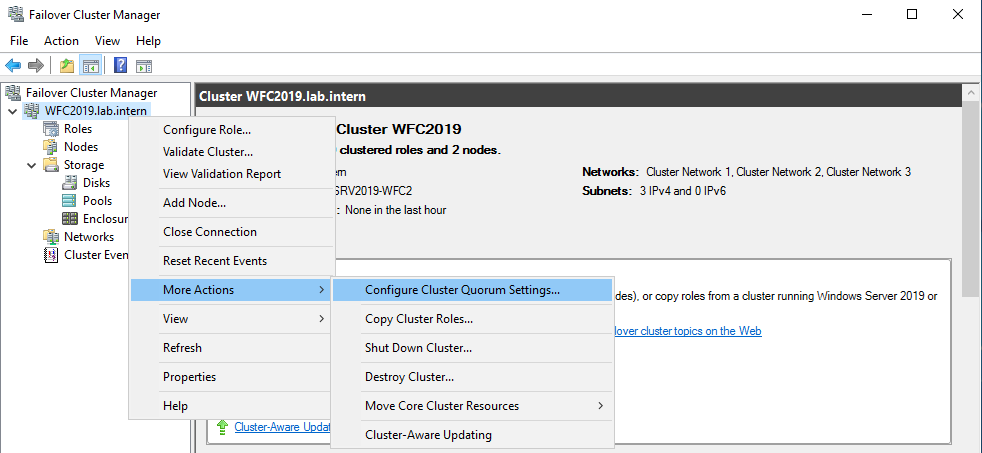
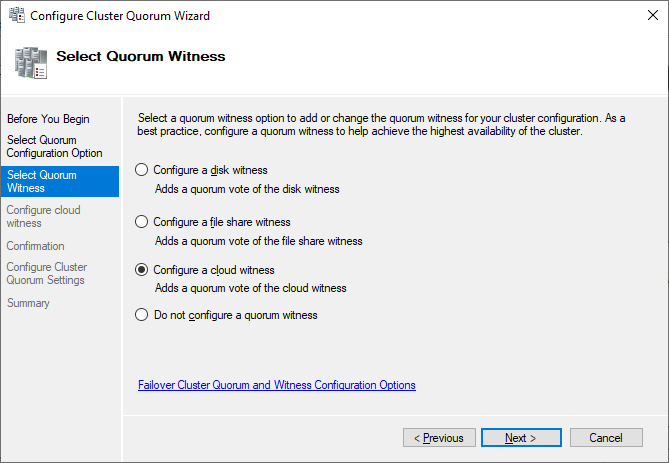
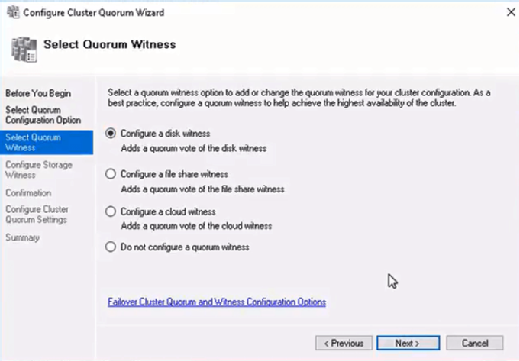
The picture shows that the disk is currently used as a quorum. As we want to use that disk for data, we need to configure the quorum manually. From the cluster context menu, choose More Actions > Configure Cluster Quorum Settings.
Here, we want to select the quorum witness manually.
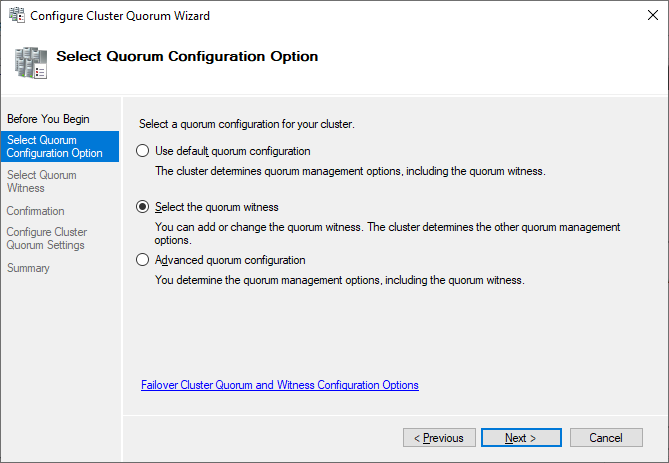
Currently, the cluster is using the disk configured earlier as a disk witness. Alternative options are the file share witness or an Azure storage account as witness. We will use the file share witness in this example. There is a step-by-step how-to on the Microsoft website for the cloud witness. I always recommend configuring a quorum witness for proper operations. So, the last option is not really an option for production.
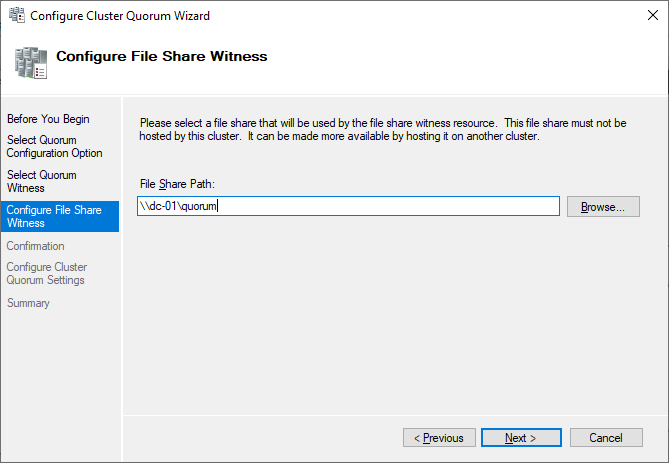
Just point to the path and finish the wizard.
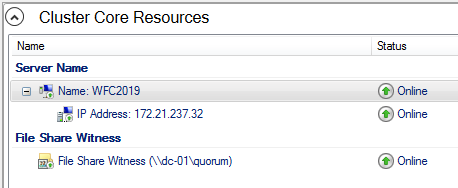
After that, the shared disk is available for use for data.
Congratulations, you have set up a Microsoft failover cluster with one shared disk.
Next steps and backup
One of the next steps would be to add a role to the cluster, which is out of scope of this article. As soon as the cluster contains data, it is also time to think about backing up the cluster. Veeam Agent for Microsoft Windows can back up Windows failover clusters with shared disks. We also recommend doing backups of the “entire system” of the cluster. This also backs up the operating systems of the cluster members. This helps to speed up restore of a failed cluster node, as you don’t need to search for drivers, etc. in case of a restore.
See More:
- On-Demand Sessions from VeeamON Virtual
Windows Server Failover Clustering (WSFC) — a feature of Microsoft Windows Server operating system for fault tolerance and high availability (HA) of applications and services — enables several computers to host a service, and if one has a fault, the remaining computers automatically take over the hosting of the service. It is included with Windows Server 2022, Windows Server 2019, Windows Server 2016 and Azure Stack HCI.
In WSFC, each individual server is called a node. The nodes can be physical computers or virtual machines, and are connected through physical connections and through software. Two or more nodes are combined to form a cluster, which hosts the service. The cluster and nodes are constantly monitored for faults. If a fault is detected, the nodes with issues are removed from the cluster and the services may be restarted or moved to another node.
Capabilities of Windows Server Failover Clustering (WSFC)
Windows Server Failover Cluster performs several functions, including:
- Unified cluster management. The configuration of the cluster and service is stored on each node within the cluster. Changes to the configuration of the service or cluster are automatically sent to each node. This allows for a single update to change the configuration on all participating nodes.
- Resource management. Each node in the cluster may have access to resources such as networking and storage. These resources can be shared by the hosted application to increase the cluster performance beyond what a single node can accomplish. The application can be configured to have startup dependencies on these resources. The nodes can work together to ensure resource consistency.
- Health monitoring. The health of each node and the overall cluster is monitored. Each node uses heartbeat and service notifications to determine health. The cluster health is voted on by the quorum of participating nodes.
- Automatic and manual failover. Resources have a primary node and one or more secondary nodes. If the primary node fails a health check or is manually triggered, ownership and use of the resource is transferred to the secondary node. Nodes and the hosted application are notified of the failover. This provides fault tolerance and allows rolling updates not to affect overall service health.
Common applications that use WSFC
A number of different applications can use WSFC, including:
- Database Server
- Windows Distributed File System (NFS) Namespace Server
- File Server
- Hyper-V
- Microsoft Exchange Server
- Microsoft SQL Server
- Namespace Server
- Windows Internet Name Server
WSFC voting, quorum and witnesses
Every cluster network must account for the possibility of individual nodes losing communication to the cluster but still being able to serve requests or access resources. If this were to happen, the service could become corrupt and serve bad responses or cause data stores to become out of sync. This is known as split-brain condition.
WSFC uses a voting system with quorum to determine failover and to prevent a split-brain condition. In the cluster, the quorum is defined as half of the total nodes. After a fault, the nodes vote to stay online. If less than the quorum amount votes yes, those nodes are removed. For example, a cluster of five nodes has a fault, causing three to stay in communication in one segment and two in the other. The group of three will have the quorum and stay online, while the other two will not have a quorum and will go offline.
In small clusters, an extra witness vote should be added. The witness is an extra vote that is added as a tiebreaker in clusters with even numbers of nodes. Without a witness, if half of the nodes go offline at one time the whole service is stopped. A witness is required in clusters with only two nodes and recommended for three and four node clusters. In clusters of five or more nodes, a witness does not provide benefits and is not needed. The witness information is stored in a witness.log file. It can be hosted as a File Share Witness, an Azure Cloud Witness or as a Disk Witness (aka custom quorum disk).
A dynamic quorum allows the number of votes to constitute a quorum to adjust as faults occur. This way, as long as more than half of the nodes don’t go offline at one time, the cluster will be able to continuously lose nodes without it going offline. This allows for a single node to run the services as the «last man standing.»
Windows Server Failover Clustering and Microsoft SQL Server Always On
SQL Server Always On is a high-availability and disaster recovery product for Microsoft SQL server that takes advantage of WSFC. SQL Server Always On has two configurations that can be used separately or in tandem. Failover Cluster Instance (FCI) is a SQL Server instance that is installed across several nodes in a WSFC. Availability Group (AG) is a one or more databases that fail over together to replicated copies. Both register components with WSFC as cluster resources.

Windows Server Failover Clustering Setup Steps
See Microsoft for full documentation on how to deploy a failover cluster using WSFC.
- Verify prerequisites
- All nodes on same Windows Server version
- All nodes using supported hardware
- All nodes are members of the same Active Directory domain
- Install the Failover Clustering feature using Windows Server Manager add Roles and Features
- Validate the failover cluster configuration
- Create the failover cluster in server manager
- Create the cluster roles and services using Microsoft Failover Cluster Manager (MSFCM)
See failover cluster quorum considerations for Windows admins, 10 top tips to maximize hyper-converged infrastructure benefits and how to build a Hyper-V home lab in Windows Server 2019.
This was last updated in March 2022
Continue Reading About Windows Server Failover Clustering (WSFC)
- How does a Hyper-V failover cluster work behind the scenes?
- Manage Windows Server HCI with Windows Admin Center
- Guest clustering achieves high availability at the VM level
- 5 skills every Hyper-V administrator needs to succeed
- How does a Hyper-V failover cluster work behind the scenes?
Dig Deeper on IT operations and infrastructure management
-

Microsoft Exchange Server
By: Nick Barney
-
Microsoft Cloud Witness
By: Katie Terrell Hanna
-
failover cluster
By: Rahul Awati
-
cluster quorum disk
By: Andrew Zola


Skip to content

Implementing Failover Cluster in Windows Server 2019
Today’s “always-on” and “always available” IT environments require a highly available infrastructure design. Simply put in other words- you don’t want to have a single point of failure in your business-critical infrastructure. If so, it quickly becomes apparent that you are only as good as your weakest link. Redundancy needs to exist throughout the environment, including your physical infrastructure and applications.
When it comes to your hosts that run applications and services, you want to ensure you have multiple hosts that can provide redundancy when one of your hosts fails. This is true when you have hosts running applications like MS SQL Server or if you have hosts that are serving as virtual hosts for your virtualized environments.
In the world of Microsoft Windows, Windows Server Failover Cluster is the mechanism used for hosting applications and hypervisors in a highly available way so as to provide minimum disruptions when there is a failure in the environment.
Windows Server 2019 provides the most advanced Windows Server to date; as it provides the most advanced features in terms of Windows Failover capabilities. In this article let’s take a look at Windows Failover Clustering in general, What is it? What is Hyper-V Failover Cluster?, How do they work? What is new in Windows Server 2019 Failover Cluster along with all its use cases? as well as the implementation of the Windows Failover Cluster in Windows Server 2019.
What is Windows Failover Clustering?
In order to increase high-availability for your business-critical data using Windows Server, you need Failover Clustering in Windows Server to achieve it.

What is a failover cluster?
The failover cluster in Windows Server is a group of independent nodes that work together as a single logical unit to increase the availability and scalability of the roles and services that run on top of the failover cluster; this can be a well-known application like MS SQL Server or virtualization specific roles like Hyper-V.
A failover cluster is generally connected together via physical means as well as via software or at the application layer. The general advantage of running these applications on top of a failover cluster is if one or more cluster nodes fail, other nodes are there to pick up the application, service, or role of the failed node. This process is referred to as failover and hence it is named as “failover cluster”.
Hyper-V Failover Cluster
To put it in a simple way, A group of similar Hyper-V Servers/ Windows Servers enabled with Hyper-V roles connected and working together in order to balance the situation when one of the connected servers running any application, service or role goes down or fails; the hyper-v servers are referred as nodes in tech terms.
Working Mechanism of Failover Cluster
Failover clusters have an internal monitoring mechanism that constantly queries the nodes that are members of the failover clusters to ensure they are healthy, alive, and are functioning properly; this is referred to as “heartbeat”. Sometimes if a node becomes unhealthy, the clustered service or application that exists on the unhealthy node may be restarted to resolve the issue or completely fail over as mentioned above.
Failover Clusters provide another extremely powerful storage mechanism called Cluster Shared Volume (CSV). CSV allows providing shared storage between cluster nodes so that a consistent, distributed namespace is provided to access shared storage from all nodes. This provides the necessary multi-connected storage functionality for Hyper-V machines also.
Quorum in a failover clustering configuration is a special voting mechanism that helps to prevent a situation called split-brain.
What is split-brain? – A split-brain situation can develop in the case of a failure or impairment of any one of the cluster nodes. As mentioned above, there is a special type of communication that is maintained between the nodes of a Windows Server Failover Cluster. If anything happens then the nodes in the failover cluster are separated from one another, then the nodes may assume they need to take ownership of cluster resources.
Read more: Understanding Quorum in a Failover cluster
What is new in Windows Server 2019 Failover Cluster?
With each new release of Windows Server, Microsoft generally adds features and functionalities to the Failover Cluster feature. Windows Server 2019 is no exception; there have been some really great feature improvements with Windows Server 2019 that make the Failover Cluster feature even more powerful than previous releases.
Let’s check that out:
- Cluster sets – One of the great new features of the Windows Server 2019 software-defined data center solution is the ability to form cluster sets.
- Azure-aware clusters – Microsoft is making it easier and easier to run workloads inside the Azure IaaS environment. With Azure-aware clusters, Windows Failover Clusters can now detect while they are running inside Azure. When they are running in the Azure IaaS environment, they automatically optimize themselves to provide proactive failover and logging of Azure planned maintenance events, etc. Additionally, you no longer have to configure the load balancer with a dynamic network name.
- Cross-domain cluster migration – Windows Failover Clusters that are running on top of Windows Server 2019 can now be moved between different Active Directory domains. This is a long-requested feature for Windows Failover Clusters that opens many possibilities and eases the pains of domain consolidations, mergers, etc.
- USB witness – With the USB witness configuration, the two-node Windows Failover Cluster, you can use a simple USB device that is attached to a commodity network device such as a router, etc to provide the witness component for a quorum, this is called true two-node.
- Cluster infrastructure improvements – With Windows Server 2019, the CSV cache is enabled by default to boost the performance of virtual machines running on Cluster Shared Volumes. Additionally, there have been enhancements to allow the Windows Failover Cluster to have more ability and logic to detect problems with the cluster and to automatically repair it. This includes partitioned nodes and the use of network route detection also.
- Cluster Aware Updating supports Storage Spaces Direct – A great improvement to Windows Failover Clusters in Windows Server 2012 was the Cluster Aware Updating feature. This automates the process of applying software updates on clustered servers while maintaining the availability of the roles that are housed on the cluster. This feature has been improved with each release of Windows Server. Now with Windows Server 2019, the CAU feature recognizes and is integrated with Storage Spaces Direct (S2D). The feature orchestrates restarts of all servers in the cluster for maintenance operations including updates.
- File share witness enhancements – New enhancements, improvements, and failsafe with the file share witness have been implemented with Windows Server 2019. This includes using the file share witness in poor internet-connected remote locations, lack of shared drives, lack of a domain controller such as in a DMZ, workgroup or cross-domain clusters, as well as blocking DFS file shares.
- Cluster hardening – Communication within the cluster over SMB for CSV volumes and S2D leverages certificates to make the communication as secure as possible and eliminates the dependencies on New Technology LAN Manager (NTLM).
- Failover cluster no longer uses NTLM authentication – NTLM has gone by the way-side with Windows Server 2019 Failover Cluster authentication. With Windows Server 2019, failover clusters use Kerberos and certificate-based authentication exclusively.
What is a cluster set? – A loosely-coupled grouping of multiple failover clusters including compute, storage, and hyper-converged infrastructure that enables you to move virtual machines between clusters and different cluster sets.
With this newest version of Failover Clustering available in Windows Server 2019, there are many new enhancements to make note of. Perhaps one of the most common roles that are hosted on a Windows Server Failover Cluster is Hyper-V. This allows running virtual machines in a highly-available way; specific to Hyper-V.
Prerequisites for Installing the Windows Failover Clustering
Before installing the Windows feature component, you need to verify the prerequisites. What are those? The following are generally noted by Microsoft as the prerequisites of installing the Windows Failover Clustering feature and those specific to Hyper-V:
- Install the same version of Windows Server for all Failover Cluster nodes
- Have servers with the same or similar hardware configurations
- Make sure storage and network components are adequate for connections, etc
- Shared storage – Failover clustering requires shared storage, either in the form of Storage Spaces Direct (S2D) or shared storage. The shared storage can be traditional shared storage via SAN devices with iSCSI and NFS targets as well as with new software-defined approaches such as Storage Spaces Direct.
- Attached storage should contain multiple physical disks that are configured in a way that provides redundancy. Some configurations may utilize a disk or logical storage as a disk witness
- Basic, not dynamic disks are supported
- With Cluster Shared Volumes, use NTFS- with S2D, it is recommended to use ReFS
- Especially for software-defined Windows Failover Cluster solutions (i.e. Storage Spaces Direct, etc), use WSSD certified hardware solutions
- https://www.microsoft.com/en-us/cloud-platform/software-defined-datacenter
- If you are running specialized Windows Failover Clusters such as Storage Spaces Direct (S2D), you have to pay close attention to the hardware requirements as S2D has very specific requirements
- For Hyper-V specific clusters, the cluster servers must support the hardware requirements for the Hyper-V role which includes having processors with hardware-assisted virtualization. This includes Intel Virtualization Technology (Intel VT) or AMD Virtualization (AMD-V) technology. Additionally, Hardware-enforced DEP must also be enabled.
How to Implement Failover Clustering in Windows Server?
In the following walkthrough, let’s take a look at the implementation of failover clustering in Windows Server 2019. This involves a few steps as that of the following:
- Installing the same version of Windows Server and patches on at least two failover cluster nodes.
- Deciding on domain-joined, multi-domain, or workgroup clusters.
- Configuring shared storage between the failover cluster nodes.
- Installing the Failover Cluster feature and Role services you want to cluster (Hyper-V, etc…).
- Testing the cluster configuration.
- Creating the Failover Cluster.
- Configuring quorum.
You can find brief explanations for the above-said steps in the following sections:
-
Install Windows Server 2019 and Patches
Let’s skip past the point of installing Windows Server as we have already installed Windows Server 2019 on two failover cluster hosts. One important point to note is that you want to make sure your failover cluster hosts are running the same version of Windows Server and also are at the same patch level. This ensures that everything between the hosts operates consistently and there is no unexpected behavior or variance between your nodes.
Ensure your failover cluster hosts are running the same Windows version and patch level.
-
Active Directory Domain Join?
With Windows Server 2016, Microsoft opened up some new and very exciting capabilities with Windows Server Failover Clusters in the realm of providing domain join flexibility.
Starting with Windows Server 2016 and extended to 2019, you can have clusters that are domain-joined, cross-domain joined (multi-domain), or workgroup clusters. For the lab walkthrough, we are using the typical domain-joined cluster configuration. Just note the other options that are now available.
Both cluster hosts are joined to the domain.
-
Shared Storage
Below, there are two shared drives that are mounted via iSCSI connections to SAN storage. As you can see, there is a volume mounted for quorum purposes and a larger volume that will be used to actually store data for Hyper-V virtual machines.
You will want to ensure all cluster hosts have connectivity to the shared volumes so that cluster failover, quorum, and other processes function as needed.
When the cluster is created, the cluster wizard is generally effective at choosing the disk you want to use for quorum purposes (smallest disk, etc). However, you can manually assign the disk for a quorum as well in the Configure Cluster Quorum Wizard found in the Failover Cluster Manager.
Right-click on the Failover Cluster name in the Failover Cluster Manager > More Actions > Configure Cluster Quorum Settings.
Manually assigning quorum
Mounting two volumes for failover cluster shared storage.
-
Install Hyper-V and Other Roles to Cluster
Since these two nodes will serve as Hyper-V hosts, we will install the Hyper-V Role on each host to get ready to add both to the failover cluster for hosting virtual machines. You can use Server Manager to install Roles/Features, however, PowerShell is a great way to quickly and easily install Windows Server components such as roles and features. To install Hyper-V, use the following one-liner.
- Install-WindowsFeature -Name Hyper-V -IncludeAllSubFeature-IncludeManagementTools -Restart
Installing the Hyper-V role on the failover cluster hosts
-
Install Failover Clustering Feature
Let’s now install the Failover Clustering feature as well as the management tools (Failover Cluster Manager) to manage the failover clustering feature. Again, PowerShell is a great way to do this. Use the following PowerShell one-liner:
- Install-WindowsFeature –Name Failover-Clustering –IncludeManagementTools
Install the Failover Clustering feature.
-
Testing the Failover Cluster Configuration
One of the tools provided by Microsoft that is helpful when configuring a Windows Server Failover Cluster is the Validate Configuration tool that can be found in the Failover Cluster Manager. This helps to shed light on any issues with the configuration before creating the cluster.
The validation runs extensive tests on very common problem areas of cluster configurations, including network configuration as well as storage configuration. It ensures that the shared storage configured meets the requirements needed by Windows Server failover clustering, including iSCSI Persistent reservations.
Using the Validate Cluster tool to validate the failover cluster configuration,
you can also use PowerShell to run the validation against the prospective failover cluster hosts.- Test-Cluster < node1 >,< node2 >
Running the Test-Cluster cmdlet against your cluster hosts before creating the failover cluster.
The Validation process creates a report located on the cluster host it was running from, The Validation report is created in the C:\Windows\Cluster\Reports directory on the failover cluster host.
Viewing the Validation report created
The validation process creates a very detailed report divided up into the major sections of validation. This includes the Hyper-V configuration, inventory, network, storage, system configuration, etc. You will want to make note of any errors or warnings in the report to make sure these are corrected before proceeding with the failover cluster configuration.
Viewing the failover cluster validation report
-
Creating the Failover Cluster
Once you have verified the cluster configuration and resolved any issues found, you are ready to create the failover cluster. Creating the Windows Server Failover Cluster is easily accomplished in PowerShell:
- New-Cluster -Name HyperVCluster -node < node1 >,< node2 > -staticAddress < IP Address >
Creating a new Windows Server Failover Cluster
After the cluster is created, you can verify that the Active Directory object was created and that you see the cluster in the Failover Cluster Manager.
Thus, a New Failover Cluster computer object is created in Active Directory.


Concluding Thoughts
Windows Server Failover Clusters provide a very robust and resilient platform to run business-critical applications and services. With each release of the Windows Server platform, failover clustering has continued to be enhanced. And in the release of Windows Server 2019 has the most feature-rich failover clustering platform to date.
No matter how resilient your platform from a high-availability perspective, you must ensure your data is protected. This means you should have effective backups of your mission-critical data running on your Windows Server Failover Clusters, including Hyper-V virtual machines.
Once such an effective backup solution in the market is the Vembu BDR Suite which allows you to ensure complete data-availability for your Hyper-V environments that include standalone Hyper-V hosts to multiple Windows Server Failover Clusters hosting the Hyper-V role.
In Vembu BDR Suite, even when your virtual machines are moved to another Hyper-V host, the backups will continue to function without interruptions. Used in conjunction with the native high availability features within Hyper-V, the Vembu Backup for Microsoft Hyper-V ensures data availability for your Hyper-V production workloads even at times of disasters.
Vembu BDR Suite provides a very robust backup solution with the enterprise-class features for protecting your Hyper-V clusters effectively at a surprising price range. Download a free, fully-featured trial of Vembu BDR Suite.
Follow our Twitter and Facebook feeds for new releases, updates, insightful posts and more.

In this tutorial, we would learn how to install and setup Failover cluster in Windows Server 2019 step by step. In the previous tutorial, we configures an iSCSI storage server and created three virtual disk.
To install and configure a failover cluster, let’s look at our network setup, then we follow some steps
- Our Network Environment
- Determine the Cluster Disks
- Add Failover Clustering Role
- Create the Failover Cluster
- Add Disks to the Cluster
1. Our Network Environment
Our lab network is set up using VirtualBox and consists of 4 computers:.
How to set up a domain network is explained here.
DC (192.168.1.90) – This is our domain controller.
Node1 (192.168.1.91) – This is one of the failover cluster nodes and a iSCSI initiator.
Node2 (192.168.1.92) – This is the second failover cluster nodes and an iSCSI initiator.
Node3 (192.168.1.93) – This is out iSCSI target server. It hosts the virtual disks
2. Determine the Cluster Disks
Before you start creating the failover cluster, you need to determine the disk that hold the cluster data. This is so that if a member of the cluster fails, then the data would still be available. In our setup, we have decided to host the disks in another computer (Node3). This is configured as iSCSI target server and contain 3 virtual disk.
The figure below shows Node3 with the 3 iSCSI disks configured.
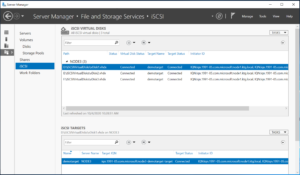
How to configure iSCSI target server and disks
Note: Ensure that the disks are iSCSI virtual disks are initialized on one of the failover nodes
3. Add the Failover Clustering Role
Now we have to install the Failover cluster role in Node1 and Node2. Follow the steps below to do that.
Step 1 – In Node1, click on Add Roles and Feature. This will launch the Add Roles and Features wizard. Follow the steps and select Failover Clustering as shown below. Then complete the installation.
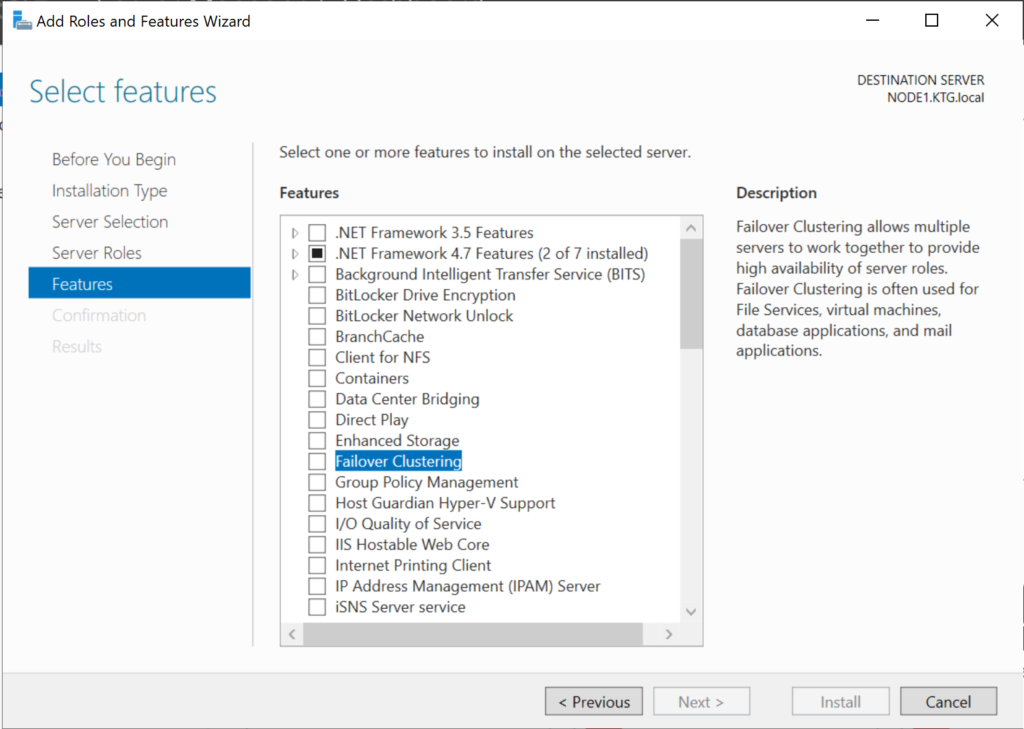
Step 2 – Repeat the process for Node2
4. Create the Failover Cluster
We would now use the Failover cluster manager to create a cluster. Follow the steps below:
Step 1 – In Node1, click on Manager and select Failover Cluster Manager. The window is shown below
Step 2 – Click on Validate Configuration and follow the wizard steps to do the validation (this is done only in Node1). The wizard will ask you to specify the Servers you want to participate in the clustering. You will use AD to find Node1 and Node2 and select them.
At the end of the validation, you may have warning relating to unsigned drivers. Ignore these warnings because they come from VirtualBox Guest Additions.
Step 3 – Click on Create Cluster. You will have to select the Node1 and Node1. Then you need to specify the cluster name. The complete the cluster creation. The figure below shows the final screen indicating the cluster creation was successful.
5. Add Disks to the Cluster
Failover clusters require disks and in this case we would used virtual disks from the iSCSI target server.
Step 1– Add storage to the cluster. To do that open the Failover Cluster manager as shown below.
Step 2 – Click on Add Disk. The three iSCSI disks would be listed. Ensure that they are selected.
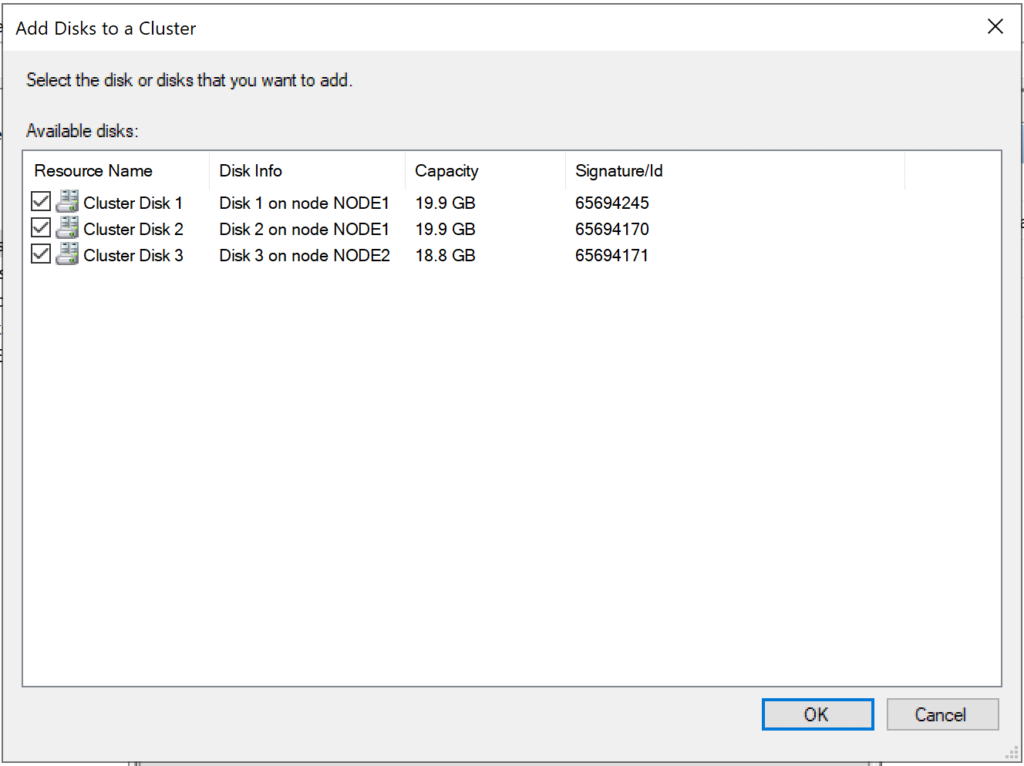
Click on OK.
At this point, the disks are added to the cluster and they are online as well. See the figure below
In subsequent tutorials, I discuss the concept of Witness in failover cluster and how to configure Quorum witness and Disk witness.
I also recommend you watch the video in my Youtube Channel.
Failover clustering will enable you to make you Windows Server services highly available. In this guide we will go just through simple setup of failover clustering on Windows Server 2019 without setting up any services.
Before we begin
These are the resources you will need if you are completely new to Failover Clustering – https://docs.microsoft.com/en-us/windows-server/failover-clustering/create-failover-cluster
Prerequisites
I assume you know basic things about Windows Server before you attempt to do this.
DC
LAB for this guide consists of following:
Domain: informatiker.local
Domain Controller named DC1 – 10.0.0.31
ISCSI
One Windows Server ISCSI Target server named ISCSI1 (if you don’t know how to make ISCSI target server, here is the guide)
ISCSI1 – 10.0.0.50
That machine has one additional disk of 40GBs that will be assigned to ISCSI Target.
Optionally, you don’t have to bring up iscsi target server and configure iscsi for failover cluster – you can also bring up failover cluster without storage.
Failover cluster
We will have two nodes that will have failover clustering installed. These machines will have two network cards – one for communication with network, and another one for clustering communication.
Failover1 – NIC1 10.0.0.52 NIC2 192.168.4.2
Failover2 – NIC1 10.0.0.53 NIC2 192.168.4.3
192.168.4.xx network is only for internal cluster configuration (heartbeat). On netowrk cards that will serve you as heartbeat and internal cluster communication – Control Panel | Network and Sharing Center | Change Adapter Settings | right click on network adapter that will serve for cluster communication – Properties | under Networking tab select IPv4 – Properties | click on Advanced button | under DNS tab deselect Register this connection’s addresses in DNS | WINS tab – select Disable NetBIOS over TCP/IP. Do this ONLY ON network adapters that will server for internal cluster communication!
All of these machines should be part of domain.
Be sure to enable MPIO Feature and iSCSI Initiator on both Failover1 and Failover2 machines. Be sure to follow my guide I posted above for creating ISCSI target, it has all the details in it.
MPIO is very important when you use shared storage.
Connect one 40GB disk you defined as ISCSI target to both Failover1 and Failover2, leave it offline at failover2 node.
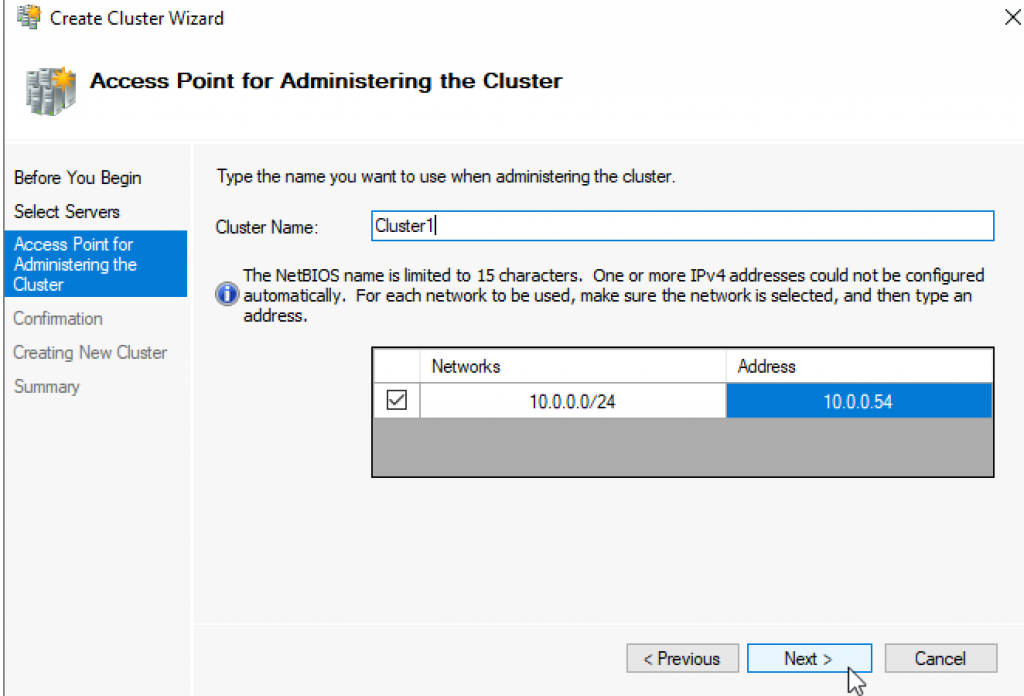
Cluster is going to be named Cluster1
Cluster1 – 10.0.0.54
Cluster Witness. We need additional VM that will hold file share that ill be available to our cluster – Witness1
Witness1 – 10.0.0.55
Install Failover Clustering
We will go through the process on Failover1 node, you will repeat the process on Failover2 node. I will show you only important parts, I assume you know how to use Server Manager.
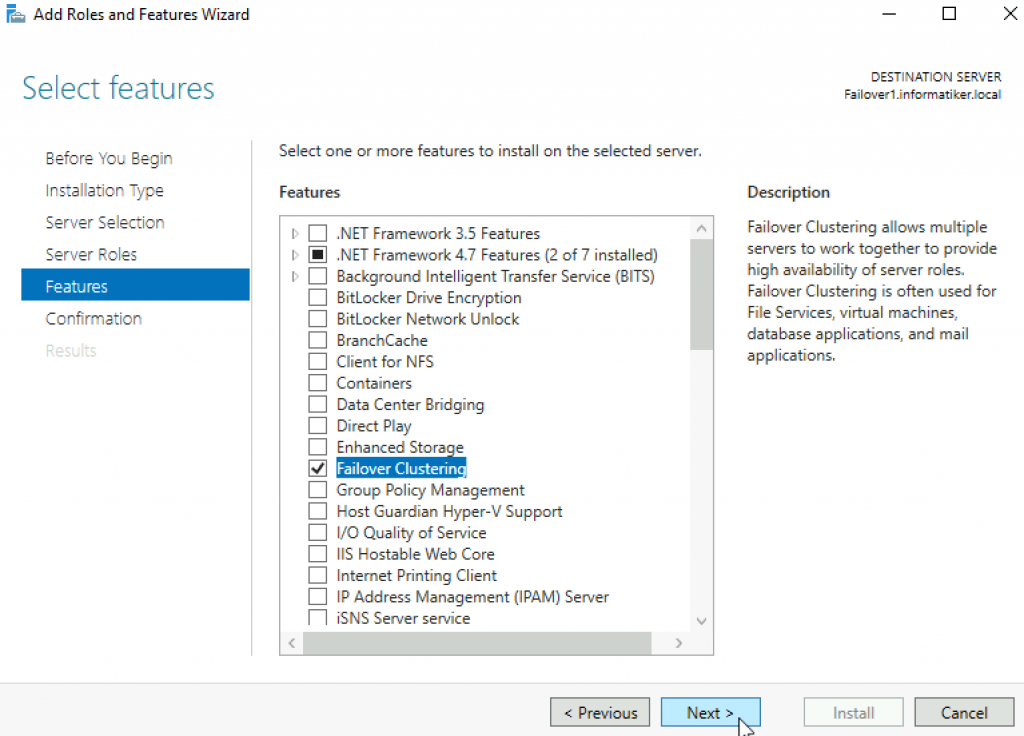
Open Server Manager | click on Manage | Add Roles And Features | on Features screen select Failover Clustering
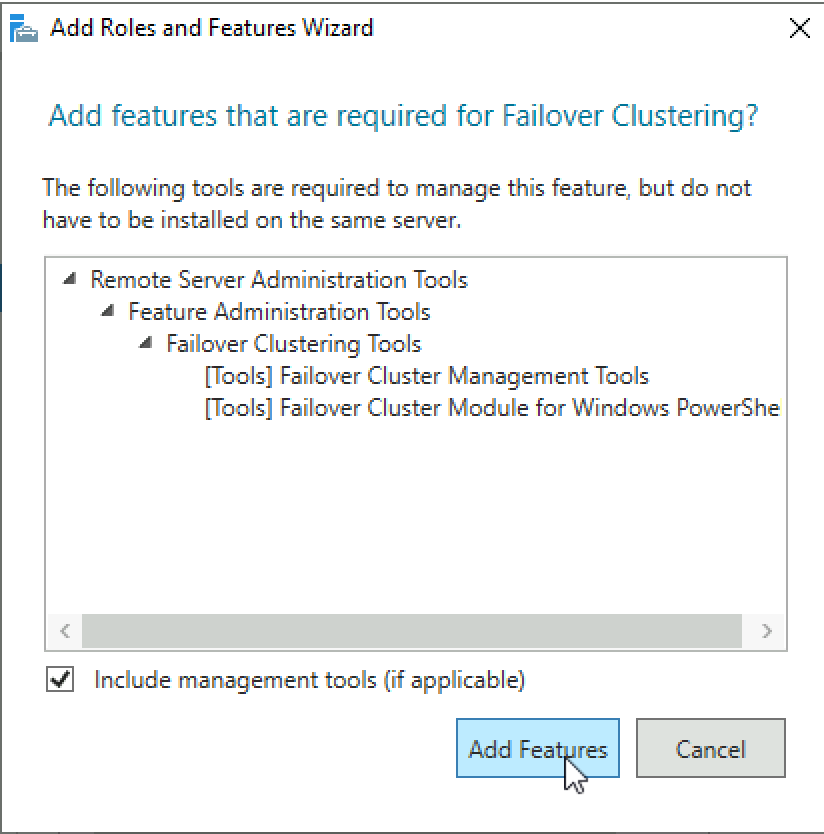
Additional pop-up will appear, click on Add Features
Next
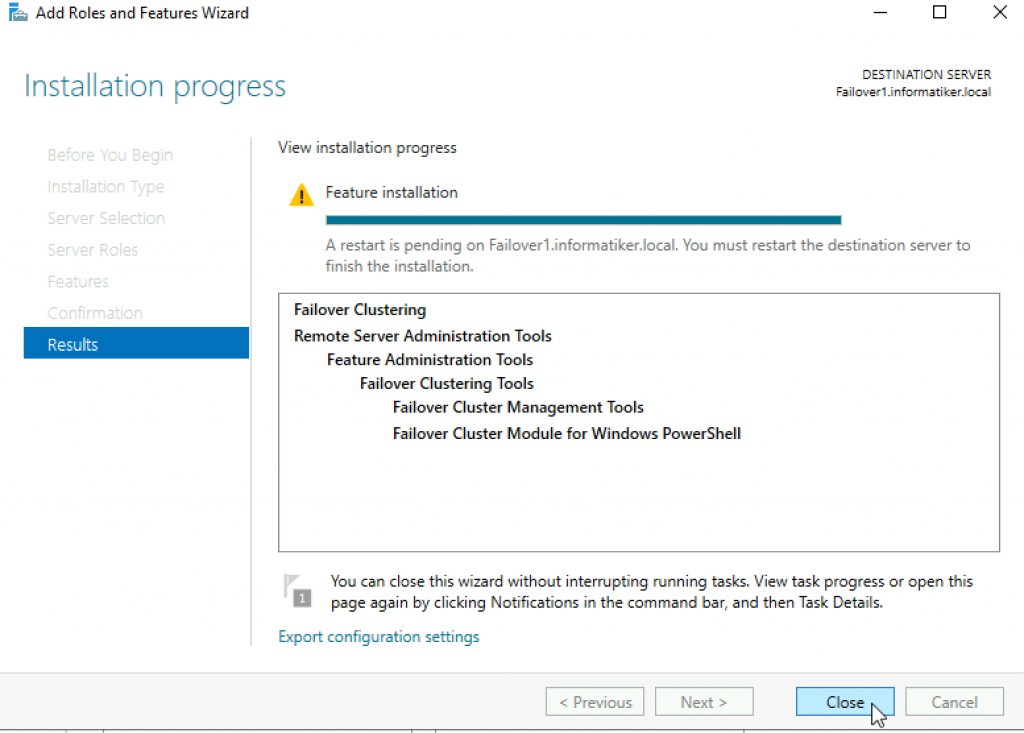
Install
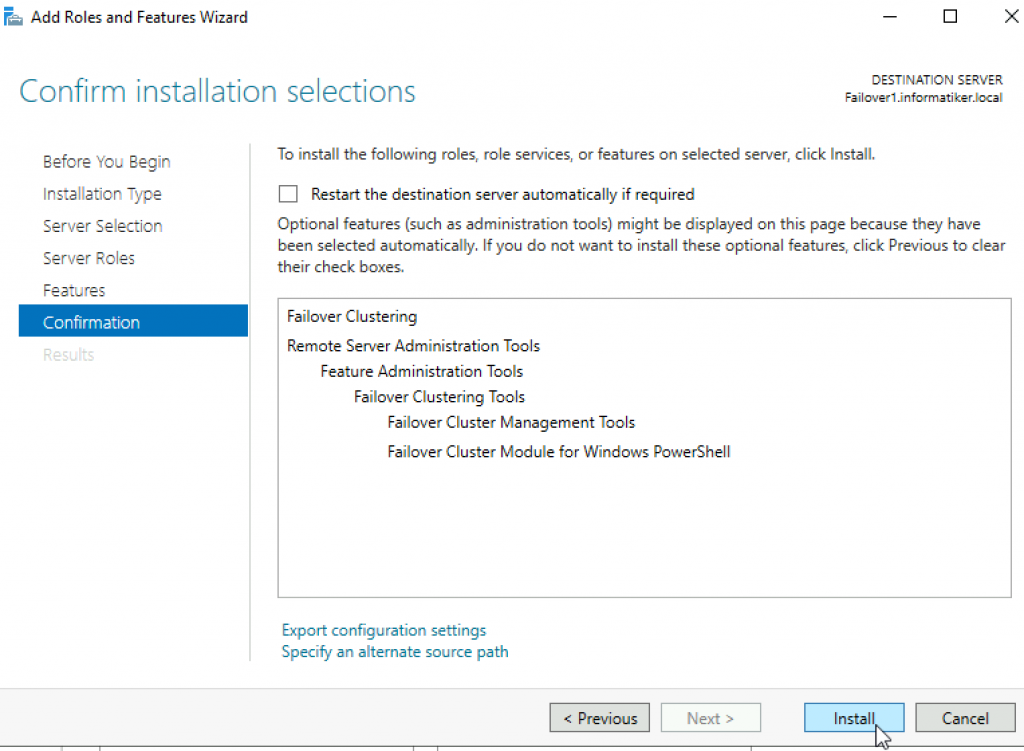
Close wizard and reboot server.
Repeat this process on Failover2 node.
Validate Cluster Configuration
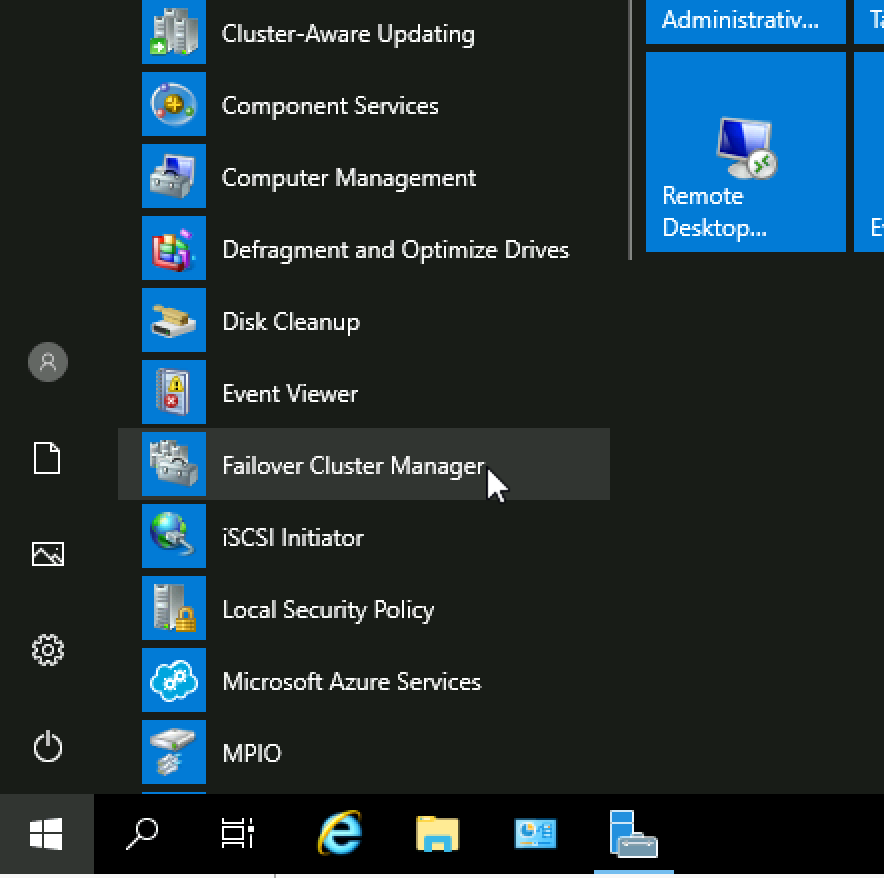
After you installed Failover Clustering on both nodes, login to Failover1 node, click on Start | Windows Administrative Tools | select Failover Cluster Manager
Click on Failover Cluster Manager, and from the middle screen select Validate Configuration…
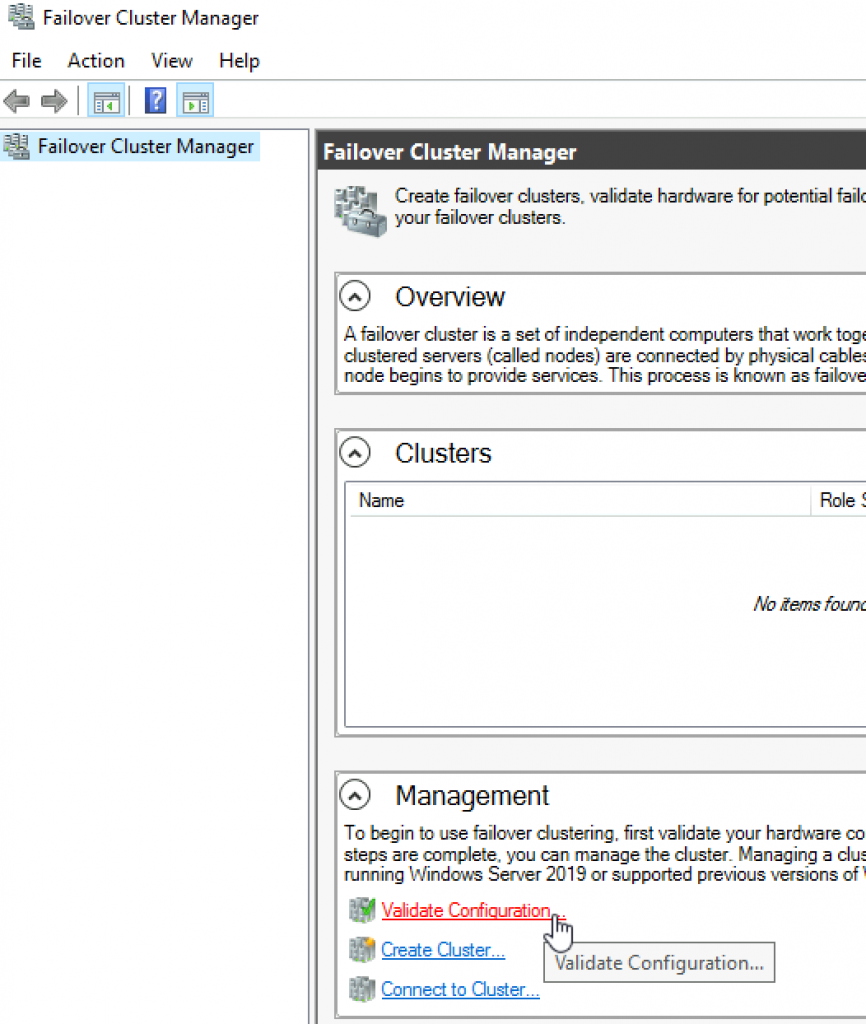
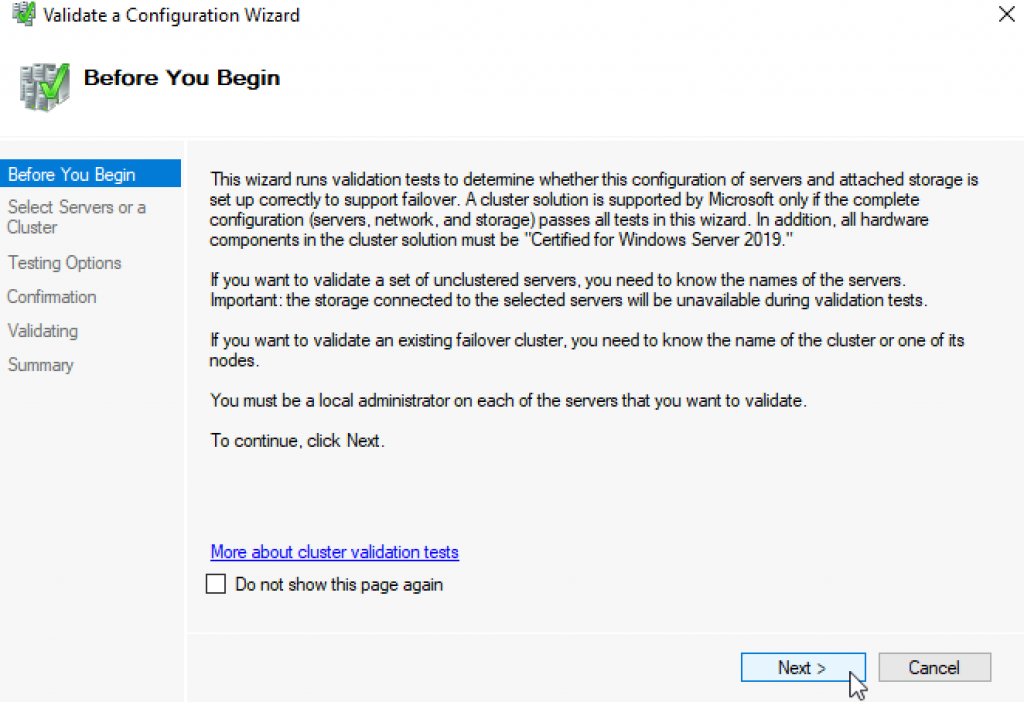
Next
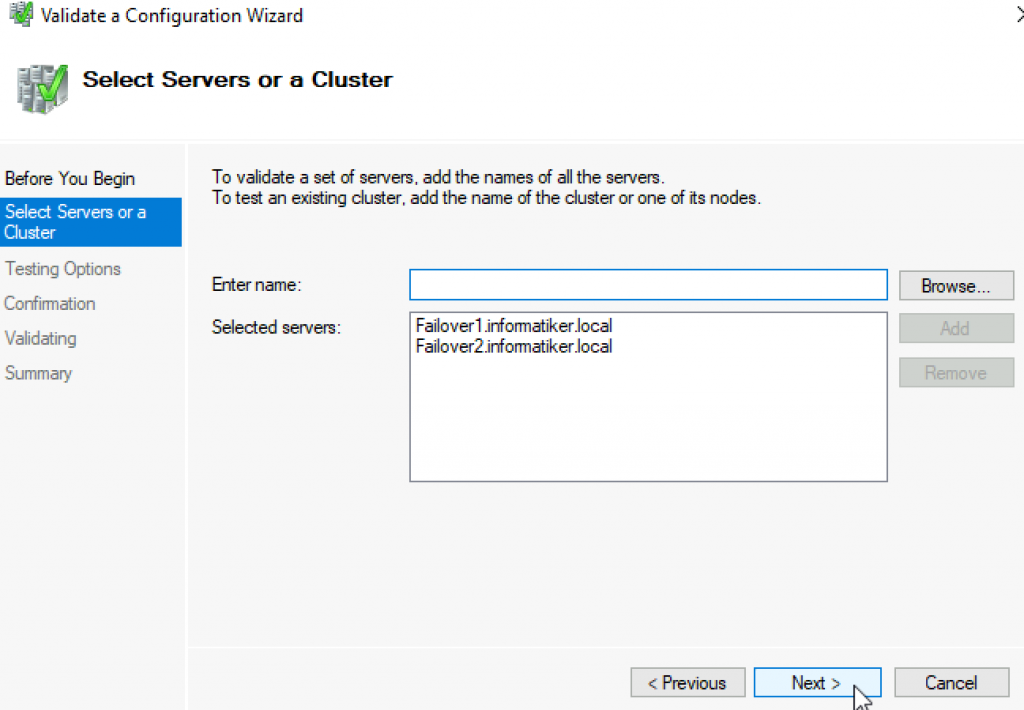
Select both servers (in my case Failover1 and Failover2) and select Next
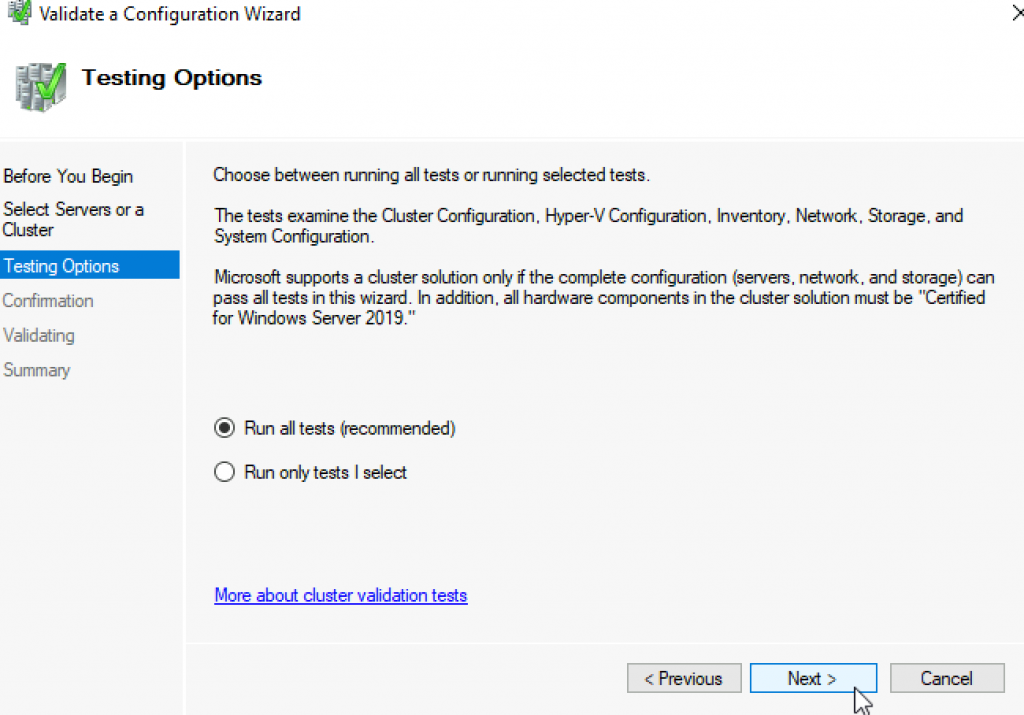
Run all tests | Next
Next
…
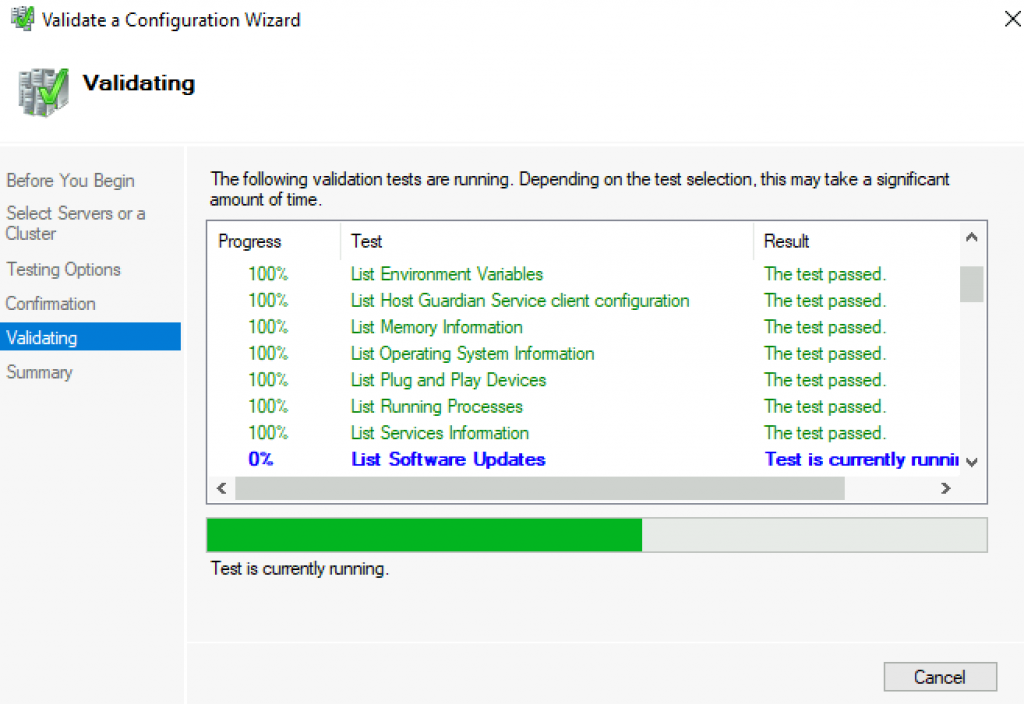
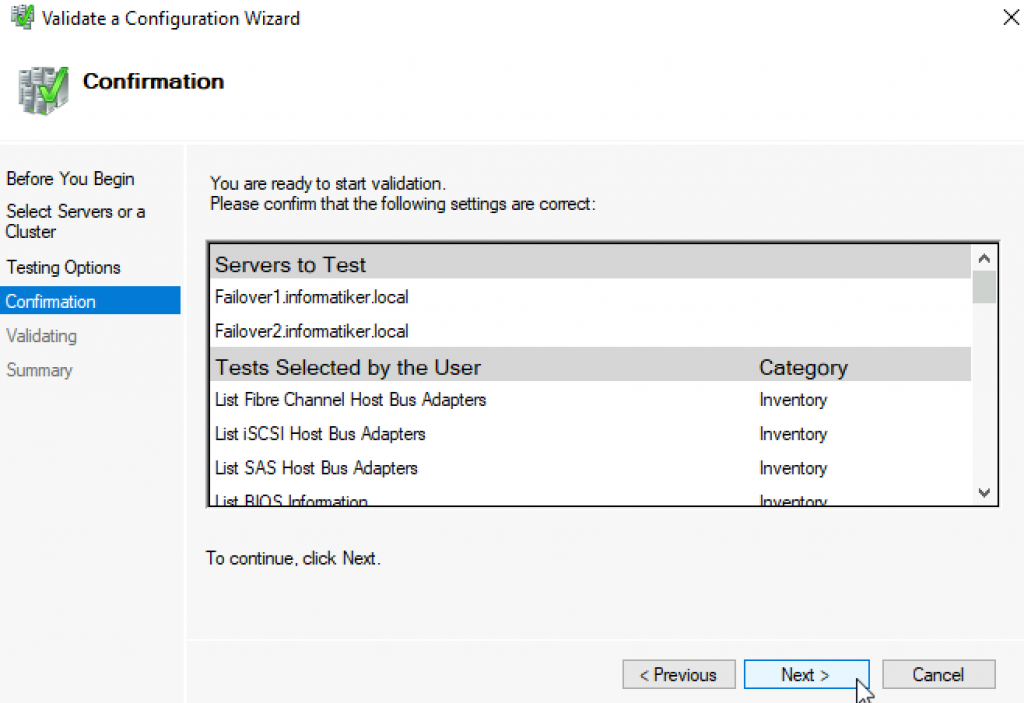
All test were success | Finish
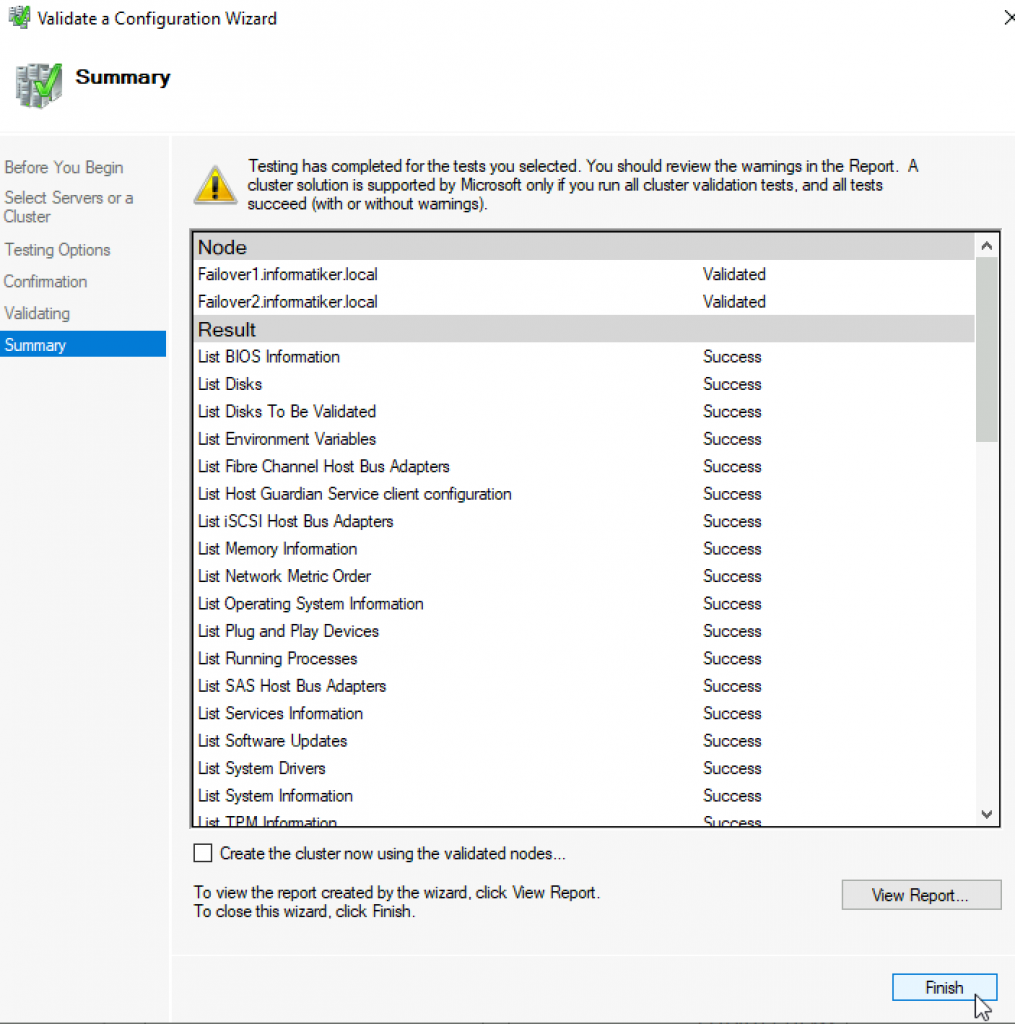
We can proceed to creating cluster
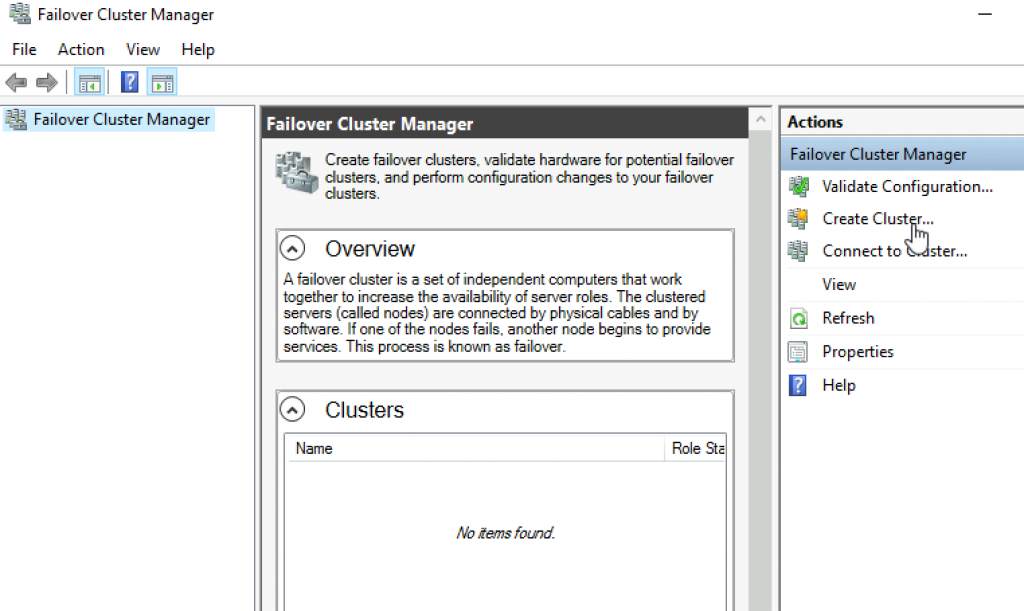
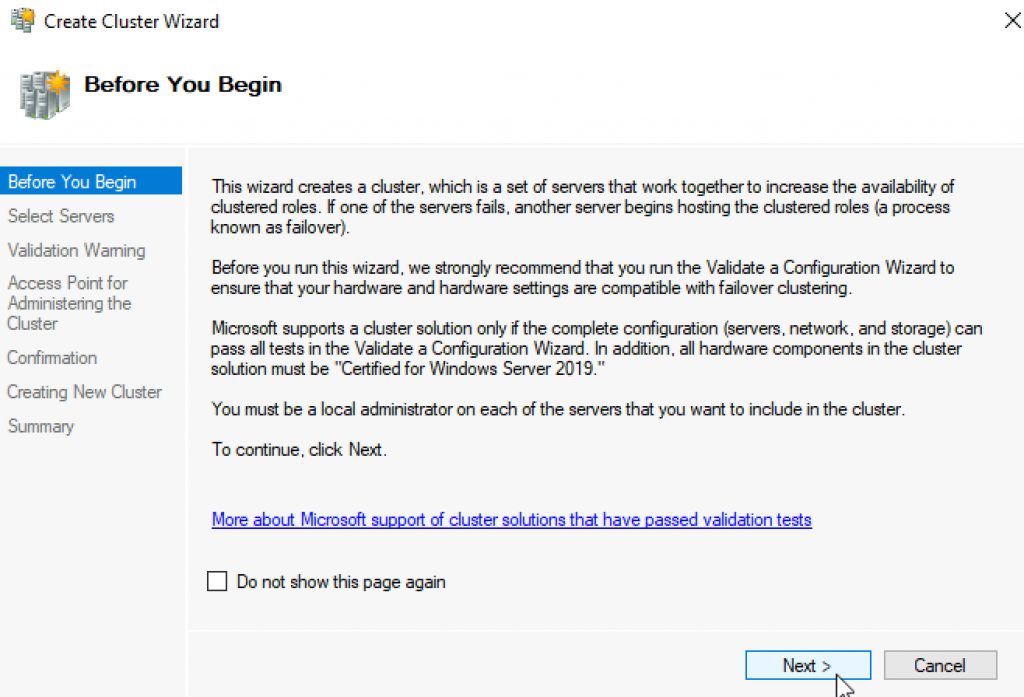
Failover Cluster Manager | from Action screen, select Create Cluster
Next
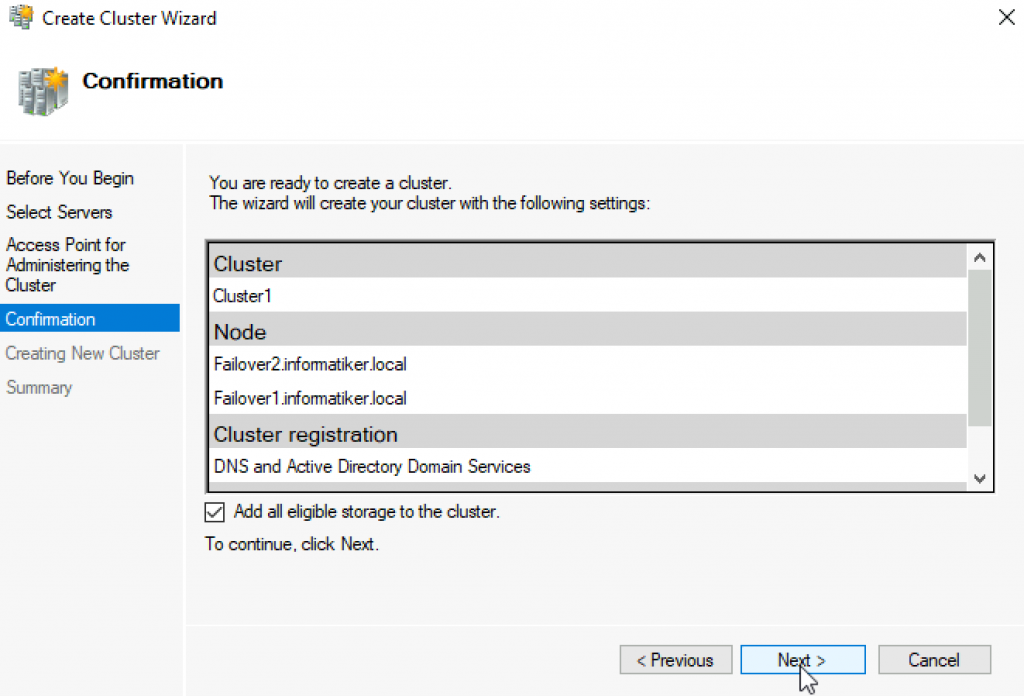
Again select both servers that will be part of the cluster | Next
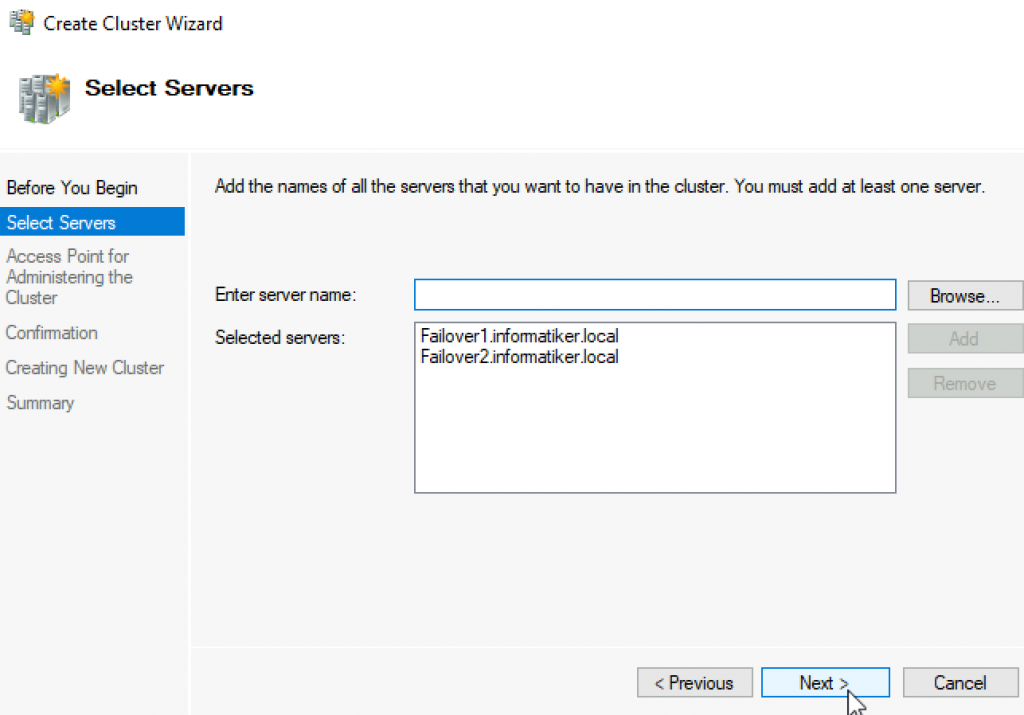
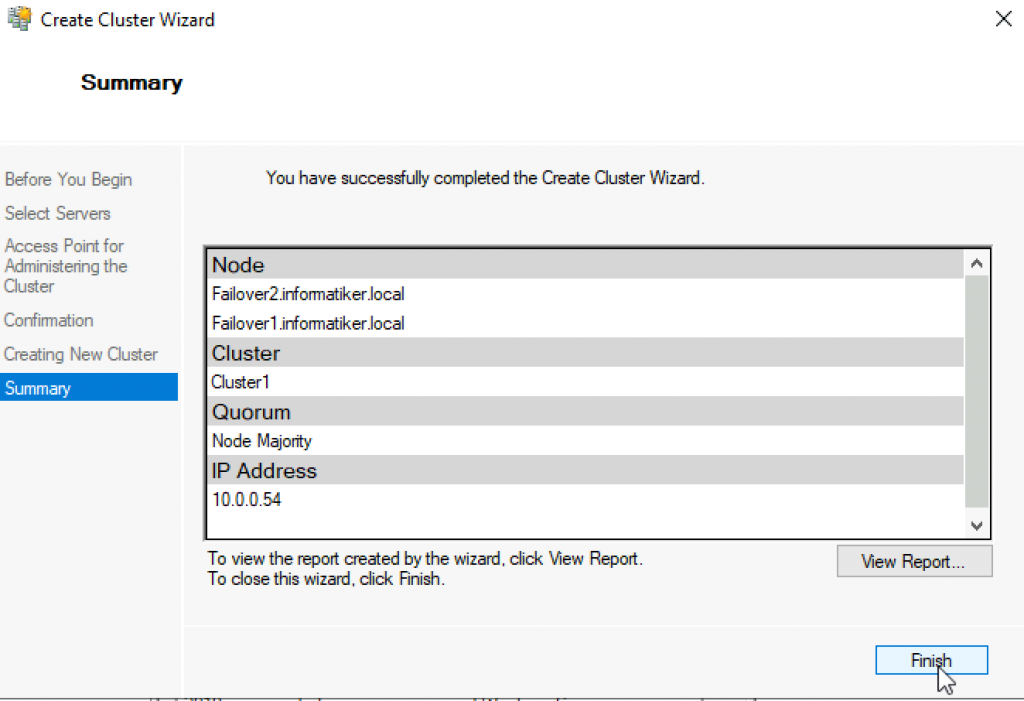
I will name cluster – Cluster1 and give it IP 10.0.54 | Next
Next
…
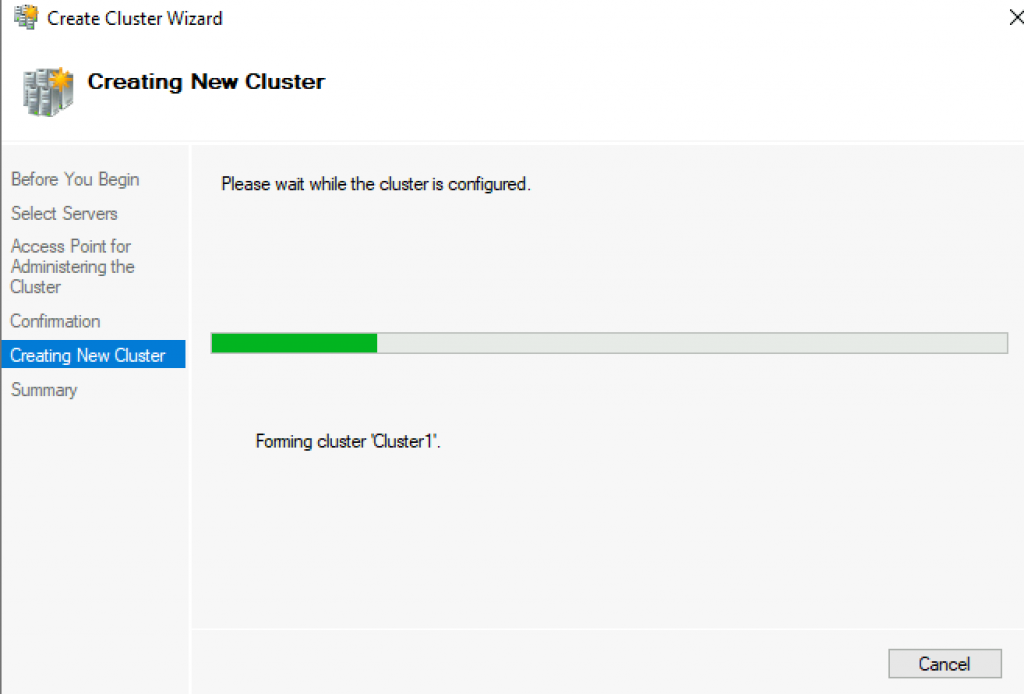
Success! Finish
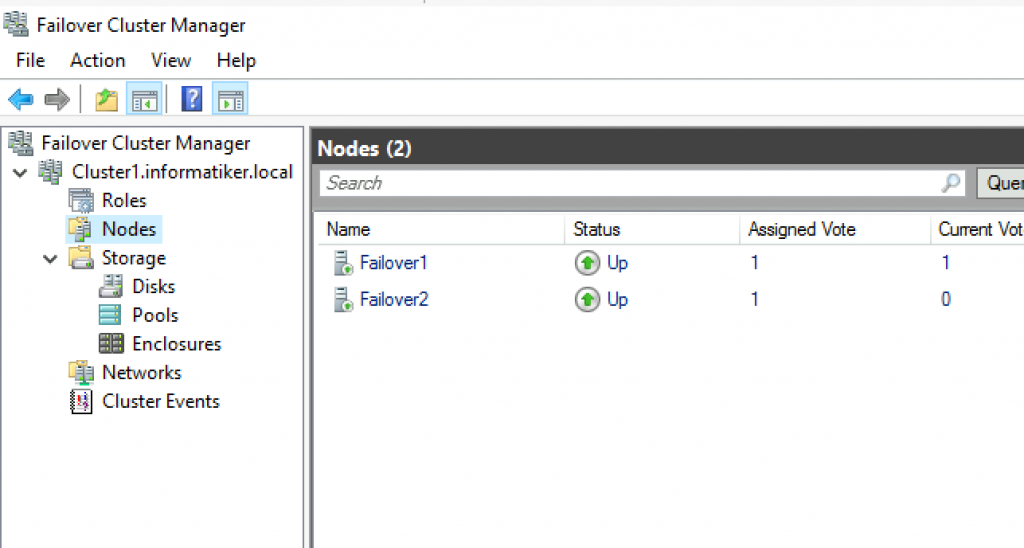
We can now see created cluster1 and two nodes as part of it.
Add Cluster Quorum Witness
Cluster Quorum Witness will enhance your Failover Cluster Availability. I will not go into detail about witness role, you can find many more details here – https://docs.microsoft.com/en-us/windows-server/failover-clustering/manage-cluster-quorum
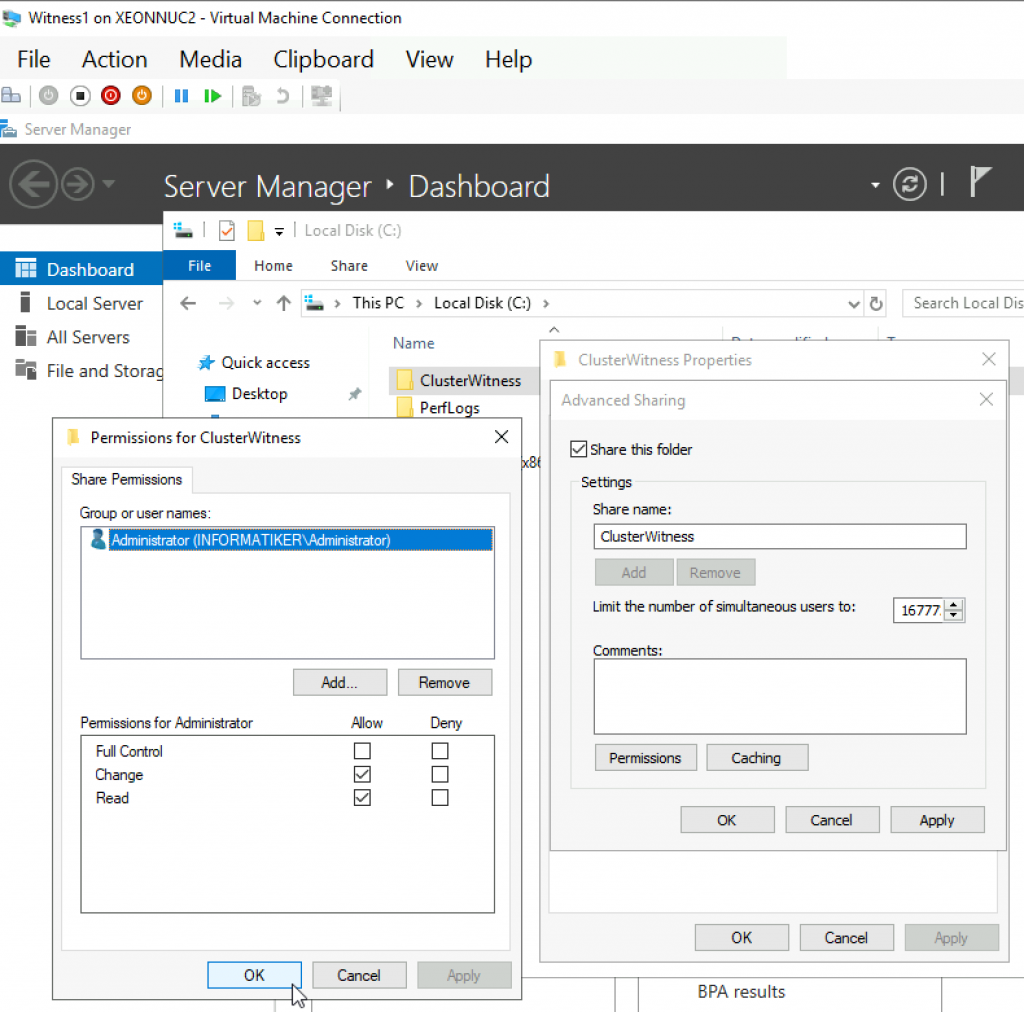
In our scenario, we will add File Share as Witness. since we have only two nodes, witness and one node will always have to be up, for cluster to be valid. So, make sure you plan you outages and patching so that you always have two nodes up.
On Witness1 machine, I added folder named ClusterWitness and shared it. In the screenshot below – three things are MISSING – you should also add Failover1, Failover2 and Cluster1 computers to this fileshare with full rights. Also, visit security tab of the shared folder and repeat procedure there!!
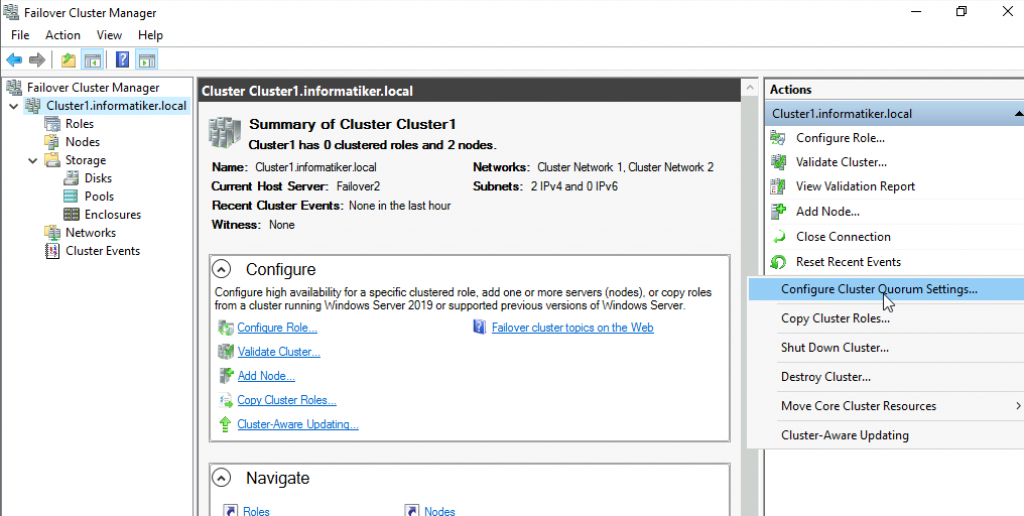
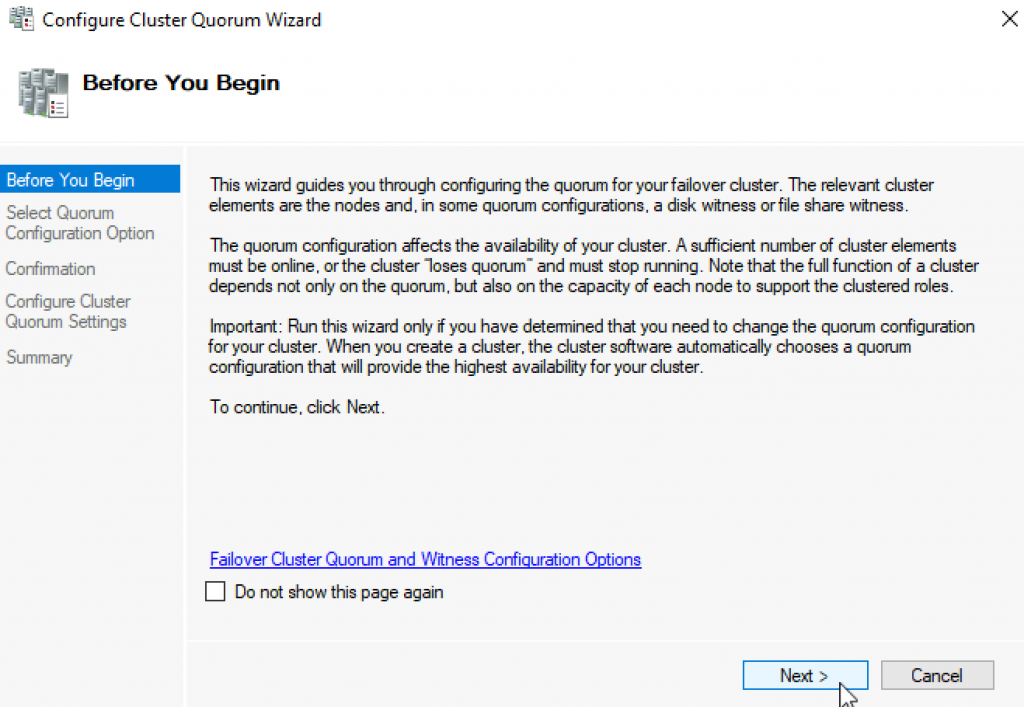
Back to Failover1 node – Open Failover Cluster Manager | select Actions | More Actions | Configure Cluster Quorum Settings
Next
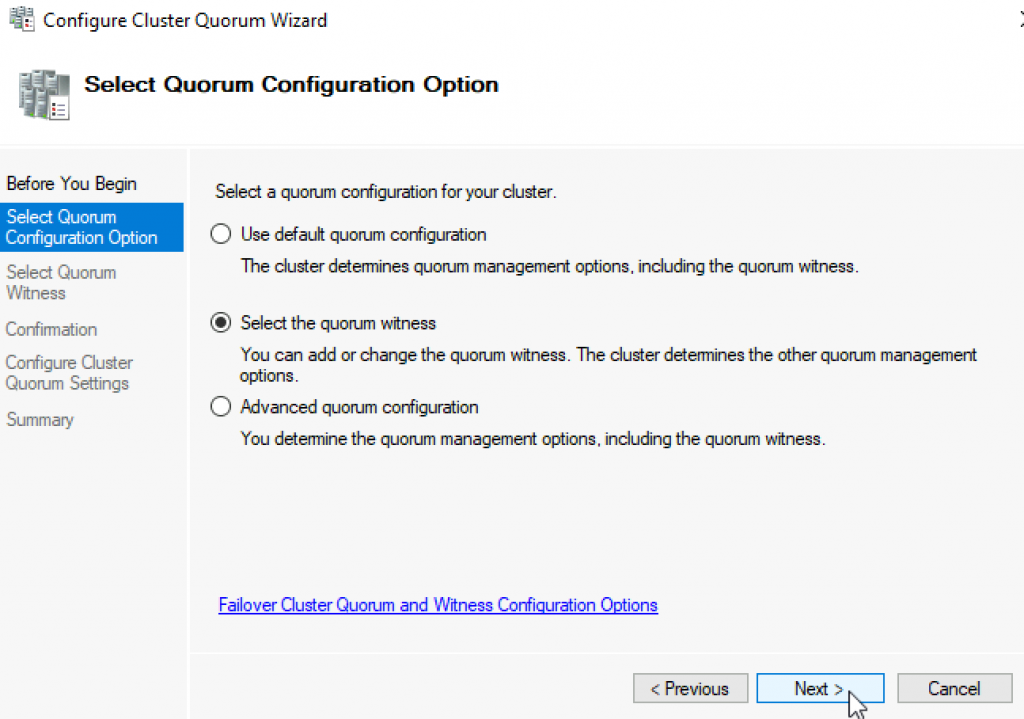
Select the quorum witness | Next
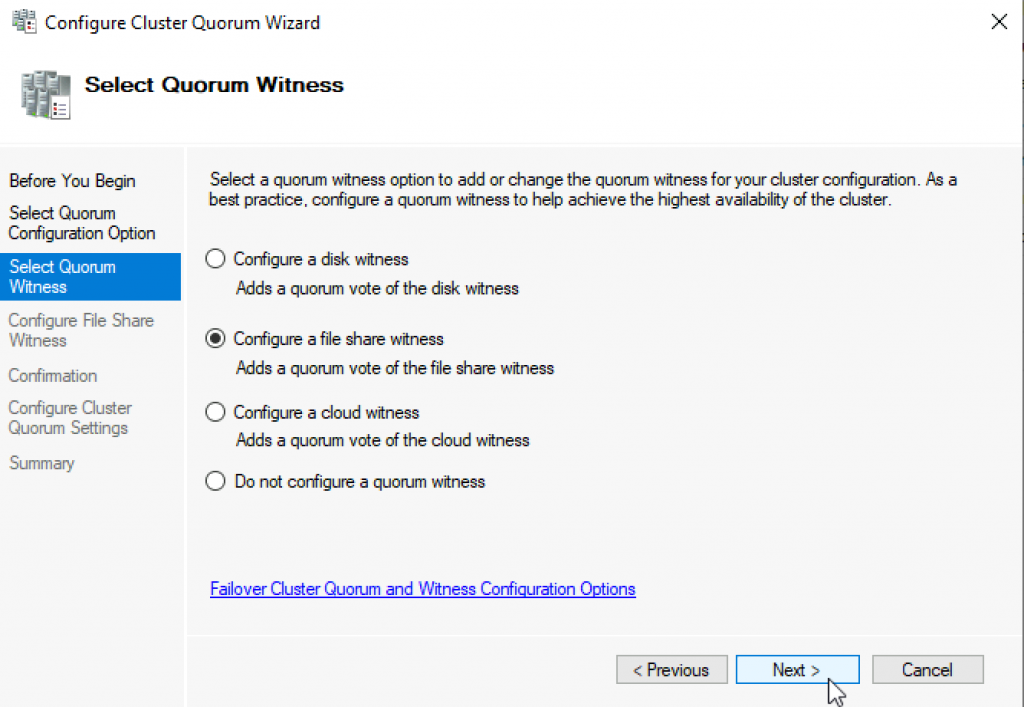
You have many options, today we will select “Configure a file share witness” Next
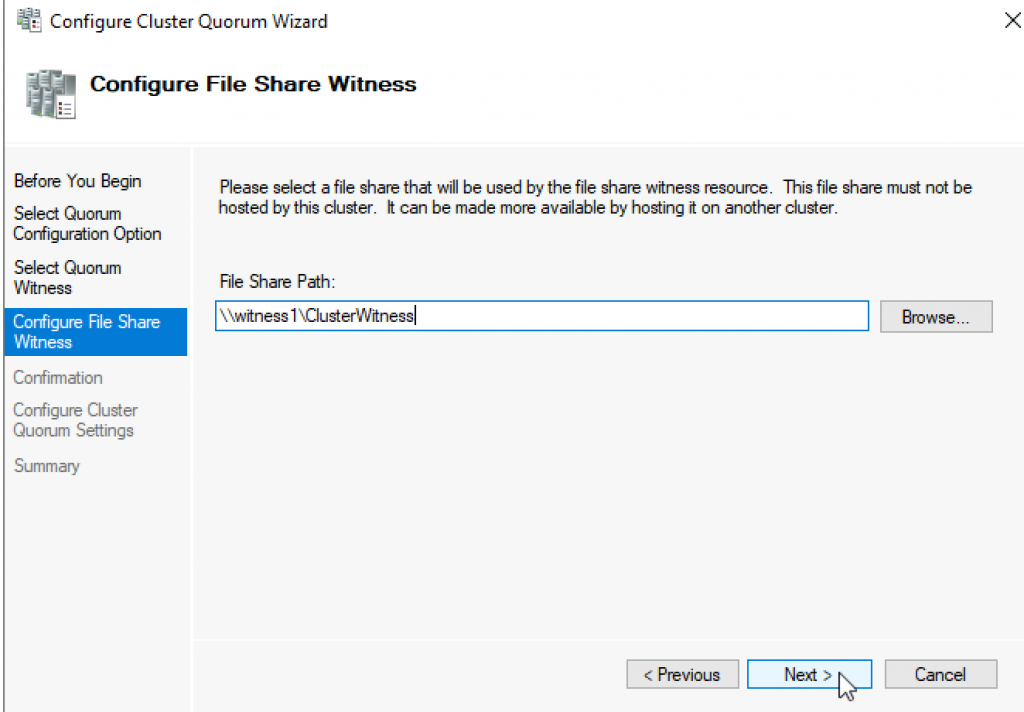
Enter FQDN to your file share on witness1. In my case it is \witness1\ClusterWitness | Next
Review and click Next
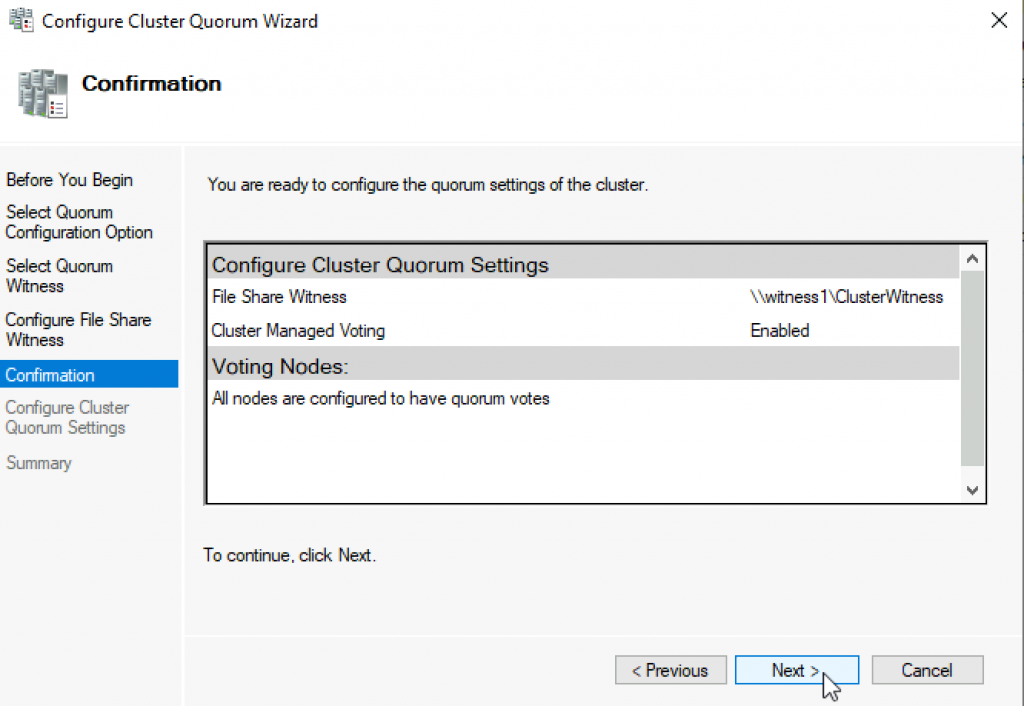
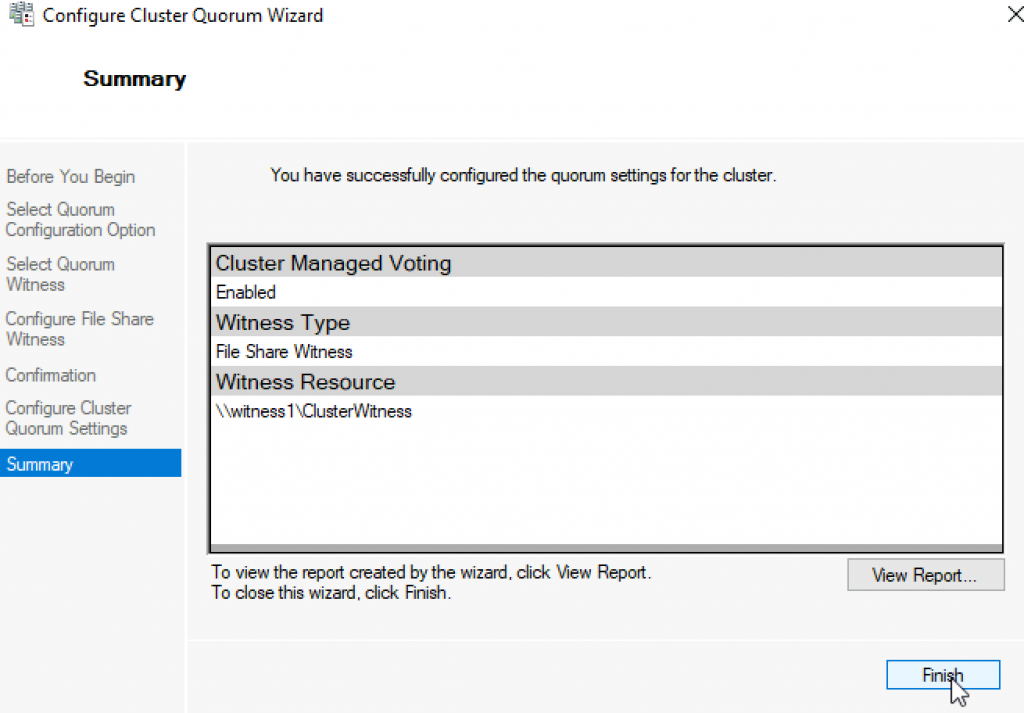
Success! Finish
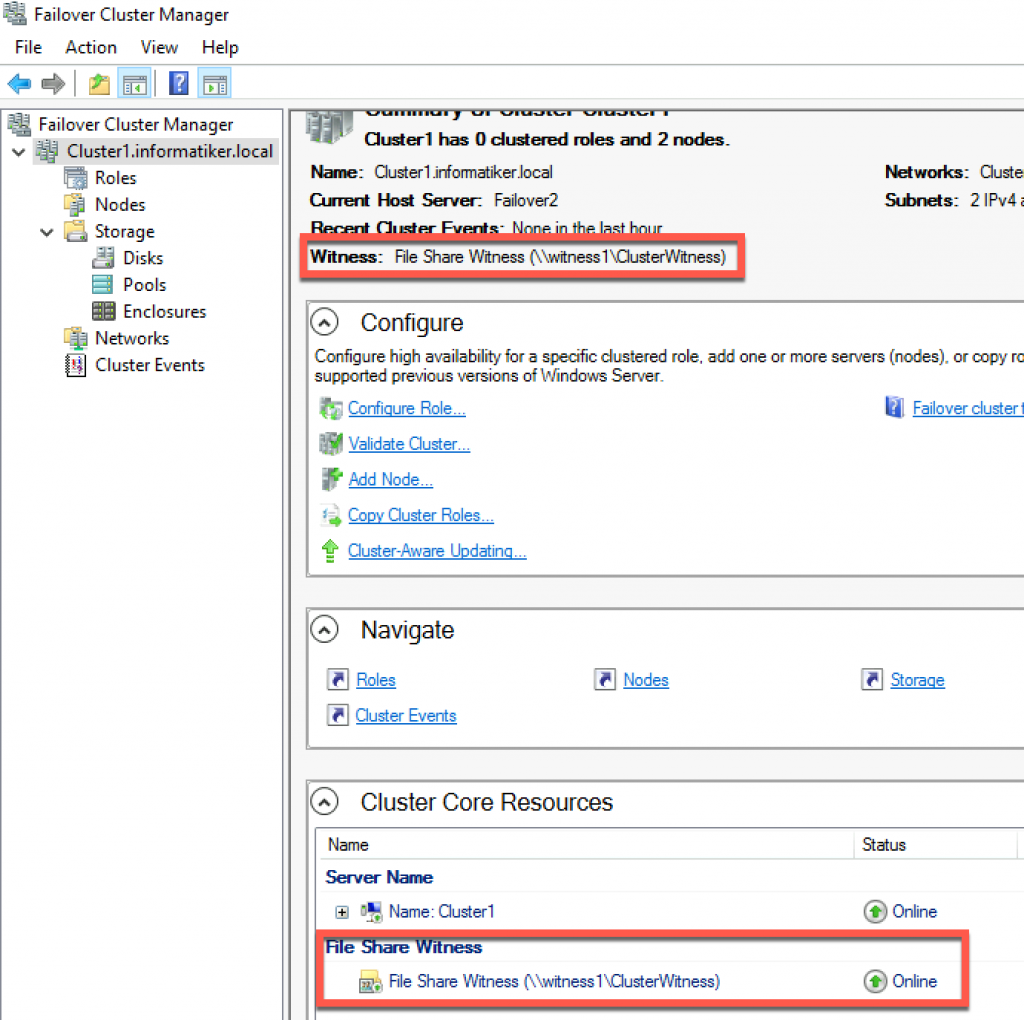
Now, we can see in Failover Cluster Manager that Witness is available.
That is it, we covered the basics and we can now start deploying various services in our clustered scenario.
Disclaimer