Время на прочтение
3 мин
Количество просмотров 87K
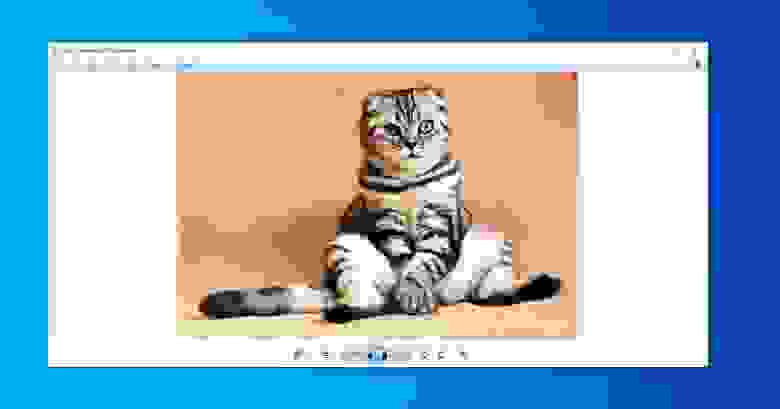
Начиная с Windows 10, за открытие файла с изображением отвечает уже не Windows Photo Viewer. Вам предлагают новую программу, Microsoft Photos, в которой полно проблем с быстродействием и надёжностью.
И хотя Windows Photo Viewer ушёл в отставку, это всё же простая и небольшая программа для просмотра цифровых фото на ПК. В отличие от Microsoft Photos, Windows Photo Viewer работает быстрее и облегчает просмотр фотографий, хранящихся у вас на локальных носителях.
Если вы обновляли систему с Windows 7 или 8, тогда вам будет легко вернуть назад Windows Photo Viewer – нужно лишь сменить настройки приложений по умолчанию.
Для этого в меню Пуск выберите Параметры > Приложения > Приложения по умолчанию, и выберите для просмотра фотографий Windows Photo Viewer.
После выхода из меню настроек фотографии можно будет просматривать при помощи Windows Photo Viewer. Но это сработает, только если вы обновились с Windows 7 или 8, и не устанавливали систему с нуля.
Если вы ставили Windows 10 с нуля, вам нужно прописать определённые настройки в реестре Windows.
Как вернуть Windows Photo Viewer
Чтобы вернуть Windows Photo Viewer после свежей установки Windows 10, нужно сохранить следующий текст в файле с расширением «.reg»:
Windows Registry Editor Version 5.00

[HKEY_CLASSES_ROOT\Applications\photoviewer.dll]

[HKEY_CLASSES_ROOT\Applications\photoviewer.dll\shell]

[HKEY_CLASSES_ROOT\Applications\photoviewer.dll\shell\open]
"MuiVerb"="@photoviewer.dll,-3043"

[HKEY_CLASSES_ROOT\Applications\photoviewer.dll\shell\open\command]
@=hex(2):25,00,53,00,79,00,73,00,74,00,65,00,6d,00,52,00,6f,00,6f,00,74,00,25,\
00,5c,00,53,00,79,00,73,00,74,00,65,00,6d,00,33,00,32,00,5c,00,72,00,75,00,\
6e,00,64,00,6c,00,6c,00,33,00,32,00,2e,00,65,00,78,00,65,00,20,00,22,00,25,\
00,50,00,72,00,6f,00,67,00,72,00,61,00,6d,00,46,00,69,00,6c,00,65,00,73,00,\
25,00,5c,00,57,00,69,00,6e,00,64,00,6f,00,77,00,73,00,20,00,50,00,68,00,6f,\
00,74,00,6f,00,20,00,56,00,69,00,65,00,77,00,65,00,72,00,5c,00,50,00,68,00,\
6f,00,74,00,6f,00,56,00,69,00,65,00,77,00,65,00,72,00,2e,00,64,00,6c,00,6c,\
00,22,00,2c,00,20,00,49,00,6d,00,61,00,67,00,65,00,56,00,69,00,65,00,77,00,\
5f,00,46,00,75,00,6c,00,6c,00,73,00,63,00,72,00,65,00,65,00,6e,00,20,00,25,\
00,31,00,00,00

[HKEY_CLASSES_ROOT\Applications\photoviewer.dll\shell\open\DropTarget]
"Clsid"="{FFE2A43C-56B9-4bf5-9A79-CC6D4285608A}"

[HKEY_CLASSES_ROOT\Applications\photoviewer.dll\shell\print]

[HKEY_CLASSES_ROOT\Applications\photoviewer.dll\shell\print\command]
@=hex(2):25,00,53,00,79,00,73,00,74,00,65,00,6d,00,52,00,6f,00,6f,00,74,00,25,\
00,5c,00,53,00,79,00,73,00,74,00,65,00,6d,00,33,00,32,00,5c,00,72,00,75,00,\
6e,00,64,00,6c,00,6c,00,33,00,32,00,2e,00,65,00,78,00,65,00,20,00,22,00,25,\
00,50,00,72,00,6f,00,67,00,72,00,61,00,6d,00,46,00,69,00,6c,00,65,00,73,00,\
25,00,5c,00,57,00,69,00,6e,00,64,00,6f,00,77,00,73,00,20,00,50,00,68,00,6f,\
00,74,00,6f,00,20,00,56,00,69,00,65,00,77,00,65,00,72,00,5c,00,50,00,68,00,\
6f,00,74,00,6f,00,56,00,69,00,65,00,77,00,65,00,72,00,2e,00,64,00,6c,00,6c,\
00,22,00,2c,00,20,00,49,00,6d,00,61,00,67,00,65,00,56,00,69,00,65,00,77,00,\
5f,00,46,00,75,00,6c,00,6c,00,73,00,63,00,72,00,65,00,65,00,6e,00,20,00,25,\
00,31,00,00,00

[HKEY_CLASSES_ROOT\Applications\photoviewer.dll\shell\print\DropTarget]
"Clsid"="{60fd46de-f830-4894-a628-6fa81bc0190d}"
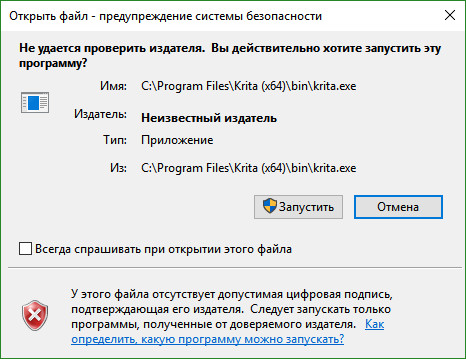
Затем двойным щелчком на этом файле нужно импортировать его в реестр Windows. При определённых настройках система запросит у вас подтверждения на запуск файла:
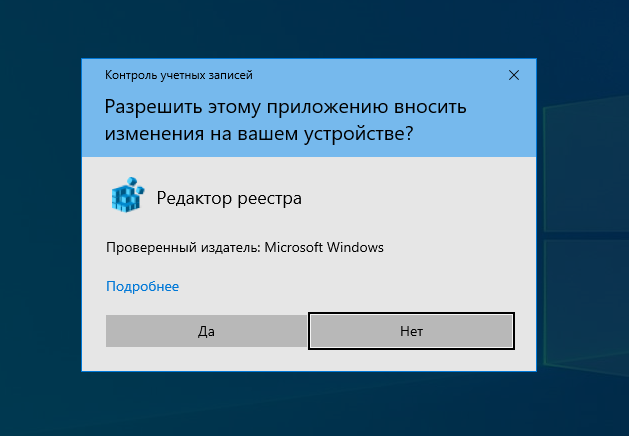
Если вы подтвердите запуск, то вы увидите окно системы контроля учётных записей, подтверждающих запуск редактора реестра:
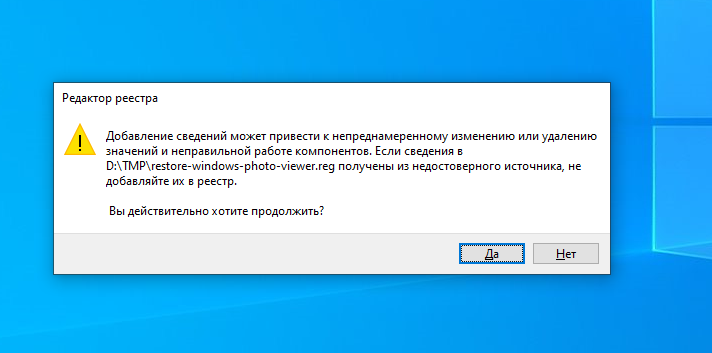
Если вы утвердительно ответите и тут, тогда вы увидите запрос на добавление данных, содержащихся в файле, в системный реестр:
После подтверждения вы получите уведомление об успешном добавлении данных:
После этого вы сможете вновь пользоваться Windows Photo Viewer, однако тут есть подвох – для каждого типа графического файла вам нужно будет вручную выбрать Windows Photo Viewer в качестве программы по умолчанию.
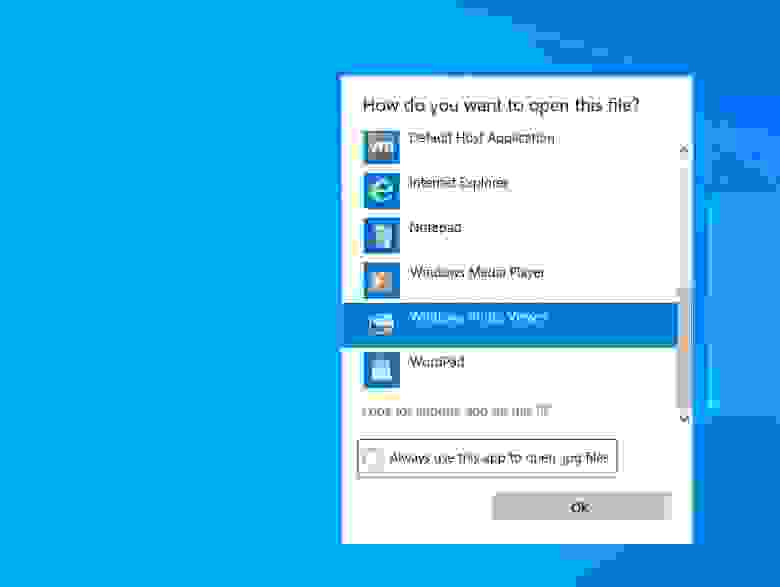
Для этого кликните правой клавишей на нужном файле, выберите в меню пункт «Открыть с помощью», и далее «Выбрать другое приложение». После этого выберите Windows Photo Viewer в качестве приложения по умолчанию:
Это нужно будет повторить для всех остальных типов файлов, которые вы хотите просматривать при помощи Windows Photo Viewer.
Средство просмотра фотографий Windows не включено в Windows 10, но если вы перешли с Windows 7 или Windows 8.1, оно может быть у вас на компьютере. Чтобы проверить это, нажмите и удерживайте (или щелкните правой кнопкой мыши) фотографию в проводнике, выберите пункт Открыть с помощью. Если Windows Photo Viewer нет в списке, его невозможно установить в Windows 10.
Приложение «Фотографии» в Windows 10 выполняет то же самое, что и средство просмотра фотографий и многое другое.
-
Нажмите клавишу Ctrl + колесико мыши для увеличения или уменьшения. Измените параметры колесика мыши в разделе Дополнительно> Параметры.
-
Для просмотра фотографий в папке откройте фотографию из представления папки или в проводнике, а затем проведите пальцем вправо или используйте клавиши со стрелками для просмотра следующего элемента.
-
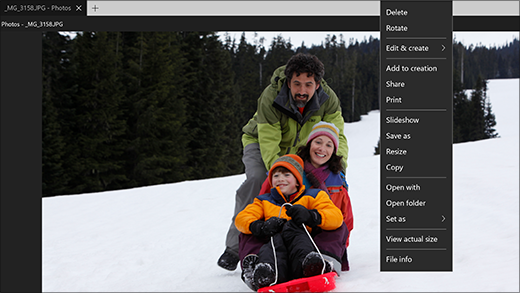
Щелкните фотографию, чтобы отобразить кнопки сверху, включая Масштабирование, Удалить, Поворот, Изменить и создать, Поделиться и Печать. Нажмите и удерживайте (или щелкните правой кнопкой мыши) для получения дополнительных команд, таких как «Сохранить как», «Копировать» и «Установить как».
Откройте приложение «Фотографии» с помощью кнопки ниже.
Открытие приложения «Фотографии»ms-photos://
Нужна дополнительная помощь?
Нужны дополнительные параметры?
Изучите преимущества подписки, просмотрите учебные курсы, узнайте, как защитить свое устройство и т. д.
В сообществах можно задавать вопросы и отвечать на них, отправлять отзывы и консультироваться с экспертами разных профилей.
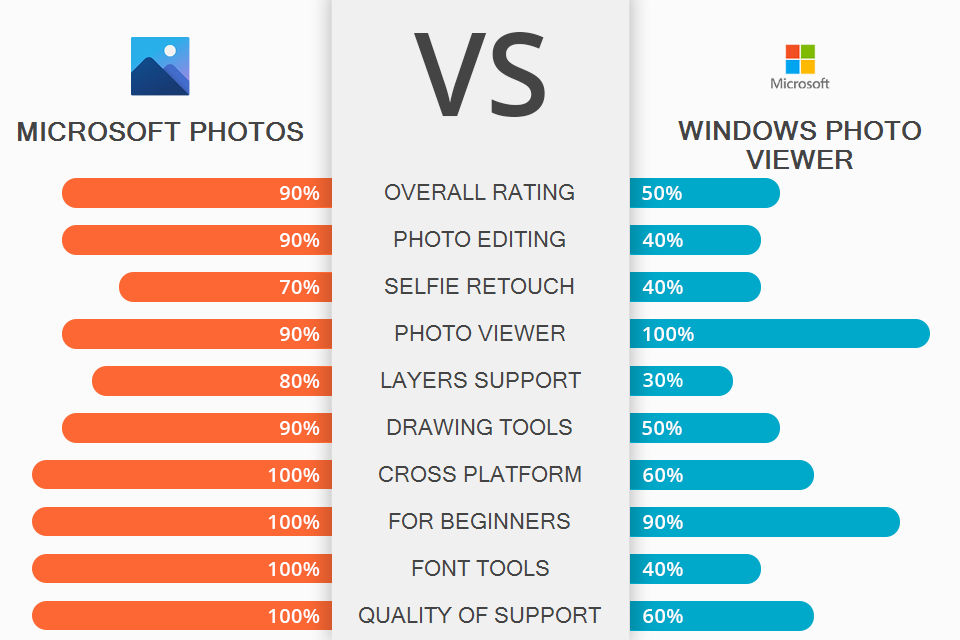
When Microsoft released Windows 10, many users stood in front of a choice, as they had to pick what software from the Microsoft Photos vs Windows Photo Viewer battle suits them better. Since the company made many changes to the Windows OS, including a complete rework of the Windows Photo Viewer that was replaced with the more modern Photos application, many don’t know what software to use. Even though both options handle the main task of viewing images on PC well, there are still a few key distinctions between the two competing utilities.
Microsoft Photos is an image viewing software that is included in Windows 8, Windows 8.1, and Windows 10. This software allows you to manage videos, sort images, and work with raster graphics. Your photos can be integrated with Microsoft Sway and user-selected images can become assets for creating Sway projects. The software can also upload images to OneDrive, Facebook, Twitter, Instagram, and GroupMe for sharing.
Windows Photo Viewer represents a fantastic photo album software that is provided with all recent Windows OS versions. Thanks to its simple UI and low resource requirements, it can be considered the simplest utility for viewing images and watching slideshows out there. That said, Windows Photo Viewer doesn’t provide a lot of options for working with images, allowing you only to rotate or delete them. The main purpose of this utility is to view image files (.JPG, .PNG) that you store in your folders.
What Is Microsoft Photos?

Microsoft Photos offers an extremely simple interface that opens a single window. It allows you to sort photos in a gallery by selecting them and categorizing them into albums. By default, the software uses the «Collection» view, which sorts photos by date. Users can also view elements in «Album» and «Folder» modes.
You can choose what folders to display, and which files are included in each album. It also allows you to see the occupied space and files in OneDrive by using the “Parameters” section. The software lets you perform several useful actions with the photos by using the side panel, which is identical to the one you’ll find in Google Photos, as it has settings for shadows, highlights, and sharpness, as well as a filter gallery. Additionally, Microsoft Photos allows users to crop, slow down, and save images from video footage.
PhotoDirector: Pros and Cons
Simple intuitive UI. The Microsoft Photos UI is divided into five main modes: Collection, Albums, People, Folders, and Video editor. Collection sorts everything by date. Albums include both automatically generated albums and user-created ones. Folders show images based on their hard drive location. Regardless of the mode, you can always click on any individual photo to view and edit it.
Easy image scaling. If you want to zoom in or out of an image in the Microsoft app, you have to double click the image or rotate the mouse wheel while keeping the Ctrl key pressed down in data collection mode or simply move the mouse wheel in editing mode. You can also use the “Fit screen” icon or the “+” and “-” buttons in the bottom right corner.
OneDrive integration. This means that the photos you take with your smartphone will automatically show up in the Collection section as long as they are automatically uploaded to OneDrive. Microsoft Photos also includes an “Import” feature that works with any memory device that is connected to your PC.
Terrific file support. Microsoft Photos supports all RAW camera image formats, which is a notable advantage for anyone who takes digital photography seriously. The software also supports the highest quality image formats and can even open new formats like Canon .CR3 and images that were taken with the help of Nikon .NEF cameras.
Automatic album collection. Microsoft Photos generates albums for users based on date, allowing you to receive automatically created slideshow videos. You can edit albums to your liking and the software lets you share your online galleries using links given they’re synchronized with iCloud and OneDrive.
Lacks photo editing tools. Microsoft doesn’t provide selective focusing or color correction tools and doesn’t have features for noise reduction, chromatic aberration removal, and geometry correction, which you can find in more advanced software like Adobe Photoshop Elements.
What Is Windows Photo Viewer?

Photo Viewer is a folder-based image viewing software that serves two purposes. The first one is to show your photos in full-screen mode using either a manual or dedicated slideshow. The second purpose is to let you enjoy viewing your photos with a clean UI and broad zoom range.
This photo viewer allows you to enter full-screen mode, change the slideshow intervals, order and background color, select the visible area, and much more. The range of formats supported by this software includes JPG, PNG, GIF (including animated GIFs), BMP, and TIFF. Photo Viewer can print and export images, crop, resize and convert them, as well as export them in batch mode.
Windows Photo Viewer: Pros and Cons
Simple menu. The software’s tools are represented by the main menu located at the top of the window and the toolset panel located at the bottom. The main menu includes the following sections: File, Print, Email, Burn, and Open.
Easy image copying. Similarly, to how you use Windows Explorer, you need to provide a destination folder and type in a name. By default, you’ll be offered to use the same name as the original file. The copy creation process can be finalized by clicking on the Save button.
Convenient printing parameter setup. The Print menu allows you to select a printer that will be used for printing from a dropdown list. If you don’t have any printers installed at the moment, then you can use the appropriate feature to start the installation process and set up any connected printer.
The Paper size section lets you pick the paper format that will be used for printing. By default, this parameter is set to A4 since this format is the most popular one among users. Similarly, the Print quality section allows you to pick the desired image quality.
Slideshow creation. This software, akin to most Windows Photo Viewer alternatives, allows you to put together image slideshows. In full-screen mode, the slideshow displays the main EXIF data right on the screen. To start the demonstration of an automatic slideshow, you simply need to press the “S” key.
Long list of supported image formats. The software allows you to work with RAW files taken with DSLR cameras (NEF, RAW, CR2, CRW, RAF, ARW, MRW, SRF, ORF, PEF, DCR, ERF, DNG from Canon, Nikon, Pentax, Sony, Minolta, Olympus, FujiFilm, etc.)
No editing tools. This fully-functional image viewer allows you to conveniently browse through your photos and look at the EXIF data of each file but it doesn’t have any image editing features.
Windows 10 uses the new Microsoft Photos application as its default image viewer but many users still prefer the old Windows Photo Viewer solution. Thankfully, you can get Photo Viewer back on your Windows 10 system by performing a series of straightforward steps. Regardless of whether you prefer Microsoft Photos or Windows Photo Viewer, both tools are available to all users completely for free.
Microsoft Photos vs Windows Photo Viewer: Who Wins?
Microsoft Photos offers cross-platform capabilities for Windows users. The software’s interface provides additional features for working with photos and videos. You can easily view, change, and compare images as well as create albums and movies based on the memories you treasure the most.
Windows Photo Viewer is a free image viewing utility that improves the quality of your photos while improving the viewing experience. This photo viewer for Windows 10 doesn’t have any toolset panels or menus, meaning it’s extremely simple to navigate and use.
Both options run on Windows OS and offer terrific capabilities for viewing images or photos. However, if you need a more powerful tool that will allow you to edit your photos, then Microsoft Photos is the clear winner in the Microsoft Photos vs Windows Photo Viewer battle since the latter doesn’t include even the most basic image editing tools.
Заголовок этой статьи может заставить задаться вопросом, зачем восстанавливать и использовать Windows Photo Viewer в Windows 10. Кажется, что это приложение из прошлого, но оно не исчезнет в ближайшее время и многие им до сих пор пользуются.
«Просмотр фотографий Windows» (Windows Photo Viewer) является приложением по умолчанию для работы с фотографиями в Windows 7 и 8, но Microsoft заменила его приложением «Фотографии» для универсальной платформы Windows.
Кроссплатформенные возможности «Фотографии» перспективны и удобны для пользователей планшетов на Windows. С другой стороны, приложение использует намного больше памяти по сравнению со своим предшественником и во многих случаях оно сложнее.
К счастью, если вас не устраивает новый вариант, можно обойтись без приложений сторонних разработчиков на замену старому Photo Viewer. Данная программа по-прежнему спрятана в системе. При желании вы можете вернуть её в список установленных приложений. В этой статье будет рассказано, как восстановить и использовать Windows Photo Viewer в Windows 10.
Как восстановить Windows Photo Viewer после обновления с Windows 7 или 8
Если ваш компьютер обновился до Windows 10 с Windows 7 или 8, вернуть Windows Photo Viewer будет просто.
Приложение никуда не делось. С установкой Windows 10 (а вместе с ней и Microsoft «Фотографии») изменилось приложение по умолчанию для открытия изображений. К счастью, для изменения приложения по умолчанию на Windows Photo Viewer не требуется много действий.
Откройте приложение «Параметры»
Вы можете найти его в меню «Пуск», нажав на иконку в форме шестерёнки. Или нажмите на кнопку «Пуск» и наберите в поиске «параметры», нажмите на результат.
Когда откроете «Параметры», перейдите в раздел «Приложения».
Нажмите на «Приложения по умолчанию»
Здесь будет список категорий программ и сами программы в каждой категории, которые применяются по умолчанию.
Нажмите на область под надписью «Просмотр фотографий» и в появившемся диалоговом окне найдите и дважды нажмите на «Просмотр фотографий Windows» (Windows Photo Viewer), чтобы установить его в качестве приложения по умолчанию для просмотра изображений.
Теперь у вас должен быть установлен Windows Photo Viewer в качестве приложения для фотографий по умолчанию. Если вы не видите эту программу в списке, вам необходимо выполнить действия, описанные далее.
Как восстановить Windows Photo Viewer, если вы установили Windows 10 с нуля
Если вы выполнили чистую установку Windows 10, процесс чуть усложняется. Хотя приложение Windows Photo Viewer есть в коде системы, для доступа к программе придётся использовать реестр.
Действий потребуется чуть больше, чем описано выше, но вы всё равно сможете вернуть приложение.
Скачайте файл реестра
Сначала загрузите файл реестра с сайта компании BleepingComputer.
Этот файл настроит реестр, чтобы Windows 10 могла видеть, что Windows Photo Viewer существует. Сохраните этот файл в легкодоступном месте, таком как рабочий стол или папка «Загрузки».
Дважды нажмите на файл реестра для его запуска
Вы увидите несколько окон с вопросом, хотите ли вы продолжить. Сначала вам будет предложено диалоговое окно с вопросом, хотите ли вы внести изменения в устройство, нажмите «Да».
Затем появится диалоговое окно редактора реестра с вопросом, хотите ли вы продолжить. Ещё раз нажмите «Да». Затем вы получите сообщение о том, что код был успешно добавлен в реестр. Нажмите «ОК».
Теперь реестр ОС обновлён и программа просмотра фотографий Windows разблокирована. Осталось настроить некоторые параметры, чтобы иметь возможность использовать её. К сожалению, вы не можете просто установить Windows Photo Viewer в качестве приложения по умолчанию, как это могут делать пользователи после обновления до Windows 10.
Изменение настроек
Чтобы настроить параметры для изображений, нажмите правой кнопкой мыши на изображение, которое вы хотите открыть, и наведите указатель мыши на «Открыть с помощью».
Вы увидите дополнительное контекстное меню, в котором показаны способные открыть этот файл приложения. Внизу вы увидите опцию «Выбрать другое приложение», на которую нужно нажать.
Выберите приложение Windows Photo Viewer
Когда откроется новое диалоговое окно, прокрутите вниз, где будет написано «Ещё приложения», и нажмите для раскрытия доступных вариантов.
Бинго! Здесь вы найдёте приложение «Просмотр фотографий Windows».
Установите тип файла по умолчанию для Windows Photos Viewer
Если вы хотите, чтобы все изображения выбранного формата открывались в Windows Photo Viewer, установите флажок «Всегда использовать это приложение для открытия [формат] файлов».
Например, если вы пытаетесь открыть файл в формате JPEG, появится текст «Всегда использовать это приложение для открытия .jpg файлов».
Далее нажмите «ОК», чтобы подтвердить свой выбор.
Почему стоит выбрать «Просмотр фотографий Windows» вместо Microsoft «Фотографии»?
Новое приложение Microsoft «Фотографии» прошло долгий путь с момента его первого появления в Windows 10. Там есть новые функциональные возможности, позаимствованные в том числе у Windows Photo Viewer, такие как контекстное меню.
Но по сравнению со своим предшественником программа расходует больше ресурсов. Если вы хотите иметь возможность быстро загружать и прокручивать множество изображений, не нагружая свой компьютер, Windows Photo Viewer станет лучшим вариантом.
Пользовательский интерфейс «Просмотр фотографий Windows» также немного проще, поскольку он в основном сосредоточен внизу.
TrashExpert Staff
Над статьей работал не только один автор, но и другие члены команды TrashExpert: администратор, редакторы или коллектив авторов.
From Wikipedia, the free encyclopedia
Windows Photo Viewer in Windows 11 |
|
| Developer(s) | Microsoft |
|---|---|
| Operating system |
|
| Predecessor | Imaging for Windows, Windows Photo Gallery |
| Successor | Microsoft Photos |
| License | Proprietary |
| Website | windows |
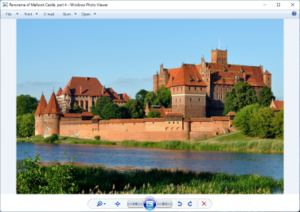
Windows Photo Viewer (formerly Windows Picture and Fax Viewer)[1] is an image viewer included with the Windows NT family of operating systems. It was first included with Windows XP and Windows Server 2003 under its former name. It was temporarily replaced with Windows Photo Gallery in Windows Vista,[2] but was reinstated in Windows 7.[3] This program succeeds Imaging for Windows. In Windows 10, it is deprecated in favor of a Universal Windows Platform app called Photos, although it can be brought back with a registry tweak.[4]
Windows Photo Viewer can show individual pictures, display all pictures in a folder as a slide show, reorient them in 90° increments, print them either directly or via an online print service, send them in e-mail or burn them to a disc.[3][5][6] Windows Photo Viewer supports images in BMP, JPEG, JPEG XR (formerly HD Photo), PNG, ICO, GIF and TIFF file formats.[7]
Evolution[edit]
Compared to Windows Picture and Fax Viewer, changes have been made to the graphical user interface in Windows Photo Viewer.[citation needed]
Whereas Windows Picture and Fax Viewer uses GDI+,[8] Windows Photo Viewer uses Windows Imaging Component (WIC)[9] and takes advantage of Windows Display Driver Model.[10]
Although GIF files are supported in Windows Photo Viewer, whereas Windows Picture and Fax Viewer displays animated GIFs, Windows Photo Viewer only displays the first frame.[11] Windows Picture and Fax Viewer was also capable of viewing multi-page TIFF files, (except those that employ JPEG compression)[12] as well as annotating the TIFF files.[13][14] Windows Photo Viewer, on the other hand, has added support for JPEG XR file format[7] and ICC profiles.[15][16]
Bugs[edit]
Some devices and Android phones are able to take photos and screenshots and have a custom ICC Profile being applied to said pictures, however Windows Photo Viewer will render an error when trying to display the picture with an «Windows Photo Viewer can’t display this picture because there might not be enough memory available on your computer.» exception when an unknown ICC Profile is detected. A patch is available on GitHub that fixes this behavior.[17]
Also regarding ICC profiles, when a custom Display ICC profile is applied after installing a Monitor driver, Windows Photo Viewer wrongly shifts the picture hue to a warm tint. The feature is intentional but greatly exaggerated. This is fixed by removing or replacing the Display ICC Profile.[18]
In Windows 10 and Windows 11[edit]
In support documentation, Microsoft states that Windows Photo Viewer is not part of Windows 10, and a user still has it only if they upgraded from Windows 7 or 8.1.[19] However, it can be brought back in Windows 10 and Windows 11 with registry editing, by adding the appropriate entries («capabilities») in HKEY_LOCAL_MACHINE\SOFTWARE\Microsoft\Windows Photo Viewer\Capabilities\FileAssociations. It is also possible to restore the Preview option in the context menu. Windows Photo Viewer itself remains built-in, and is set as default for the Tagged Image File Format files (.tif).[4][20][21]
See also[edit]
- Imaging for Windows
- Comparison of image viewers
- Windows Color Management
References[edit]
- ^ «Windows Picture and Fax Viewer overview». Windows XP Professional Product Documentation. Microsoft Corporation. Archived from the original on 2 December 2010. Retrieved 23 November 2010.
- ^ «What happened to the Windows Picture and Fax Viewer?». Windows Vista Help & How-to. Microsoft Corporation. Archived from the original on 9 June 2016. Retrieved 22 November 2010.
- ^ a b «View and use your pictures in Windows Photo Viewer». Windows 7 Help & How-to. Microsoft Corporation. Archived from the original on 5 January 2008. Retrieved 23 November 2010.
- ^ a b Tkachenko, Sergey (31 July 2015). «How get Windows Photo Viewer working in Windows 10». winaero.com. Archived from the original on 11 November 2020. Retrieved 1 December 2022.
- ^ «Windows Photo Viewer slideshow turns secondary monitor black». Microsoft TechNet Forums. Microsoft Corporation. 5 February 2010. Archived from the original on 22 July 2011. Retrieved 29 January 2011.
- ^ «How to Run the Windows Photo Viewer Slide Show on a Secondary Monitor». WindowsSevenForums Tutorials. Designer Media Ltd. 2 October 2010. Archived from the original on 18 January 2011. Retrieved 29 January 2011.
- ^ a b Understanding Picture File Types Archived 17 July 2013 at the Wayback Machine
- ^ «Microsoft Security Bulletin MS11-029 – Critical». docs.microsoft.com. Retrieved 8 May 2022.
- ^ «Introduction (How to Write a WIC-Enabled Codec) (Windows)». Microsoft Developer Network. Microsoft Corporation. 22 November 2010. Archived from the original on 28 December 2010. Retrieved 29 January 2011.
- ^ «Windows Vista Display Driver Model». Microsoft Developer Network. Microsoft Corporation. July 2006. Archived from the original on 23 February 2011. Retrieved 29 January 2011.
- ^ Zhu, Sean (1 June 2010). «Why does Windows Picture Viewer does not show animated GIFs?». TechNet forum. Microsoft Corporation. Archived from the original on 24 November 2010. Retrieved 24 November 2010.
Q: I have noticed that in Windows 7, the Windows Picture viewer only displays the first frame of an animated GIF. Why is this? [~snip~] A: Hi, this is by design.
- ^ You Cannot View TIFF Images Using Windows Picture and Fax Viewer Archived 4 March 2011 at the Wayback Machine
- ^ «Windows Picture and Fax Viewer Annotation overview». Windows XP Professional Product Documentation. Microsoft Corporation. Archived from the original on 4 November 2012. Retrieved 23 November 2010.
- ^ «Annotation toolbar overview». Windows XP Professional Product Documentation. Microsoft Corporation. Archived from the original on 4 November 2012. Retrieved 23 November 2010.
- ^ «Delete Calibrated Display Profile to Increase Speed of Windows 7 Photo Viewer». My Digital Life. 24 January 2010. Archived from the original on 27 January 2011. Retrieved 29 January 2011.
- ^ «Windows Vista Photo Gallery Yellow Tint Background Problem». My Digital Life. 11 July 2007. Archived from the original on 26 January 2011. Retrieved 29 January 2011.
- ^ «Patch «Out of memory» exception when opening images containing an unknown color profile». GitHub.
- ^ «Fix Windows Photo Viewer Yellow Tint Background». OptimWise.
- ^ «Photo Viewer for Windows 10». Microsoft Support.
- ^ Tkachenko, Sergey. «How to Enable Windows Photo Viewer in Windows 11». Winaero.
- ^ «How to open .tif files without compromising on quality». Windows Report.
External links[edit]
- Official website
- Windows Picture and Fax Viewer overview
- Windows Picture and Fax Viewer Overview at the Wayback Machine (archived 5 January 2008)
