
- Remove From My Forums
порядок служб доступа к сети
-
Вопрос
-
Помогите пожалуйста ! Не могу найти где меняется порядок служб доступа к сети.
Хочу поставить более высокий приоритет на второй сетевой адаптер.
Ответы
-
Всё там есть, Alt нажмите и появится меню «Дополнительно».
Все ответы
-
Пуск-настройка-пань управления — сетевые подключения — Дополнительно (там где файл, правка, вид и т.д.) — дополнительные настройки
Start-Settings-Control Panel — Network connections-Advanced — Advanced Settings
В списке соединений при помощи зеленых стрелок справа можно изменить приоритет сетевых адаптеров
-
Alexey_Zhogolev написано: Пуск-настройка-пань управления — сетевые подключения — Дополнительно (там где файл, правка, вид и т.д.) — дополнительные настройки
Спасибо, но это в ХР так делается, а меня интересует Vista Ultimate , там вообще нет никаких ДОПОЛНИТЕЛЬНО (меню вообще нет). Пытался искать ответ в инете, но это не дало никаких результатов. Спать нормально уже не могу.
-
Всё там есть, Alt нажмите и появится меню «Дополнительно».
-
Спасибо большое !!! А ларчик просто открывался !!!
Windows 7 Enterprise Windows 7 Home Basic Windows 7 Professional Windows 7 Starter Windows 7 Home Premium Windows 7 Ultimate More…Less
 This is a step-by-step article.
Summary
This article briefly explains how to change the priority of network connections in Windows 7 so that they follow a specific connection order.
Steps to change the network connection priority in Windows 7
-
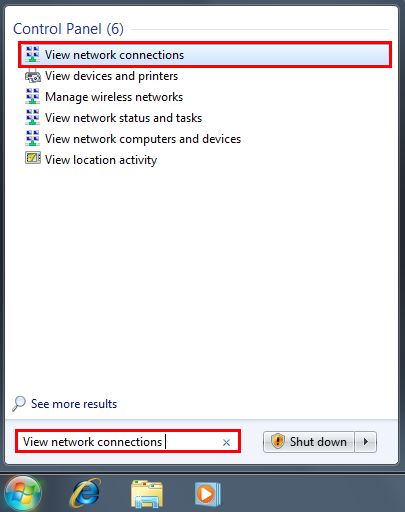
Click Start, and in the search field, type View network connections.

-
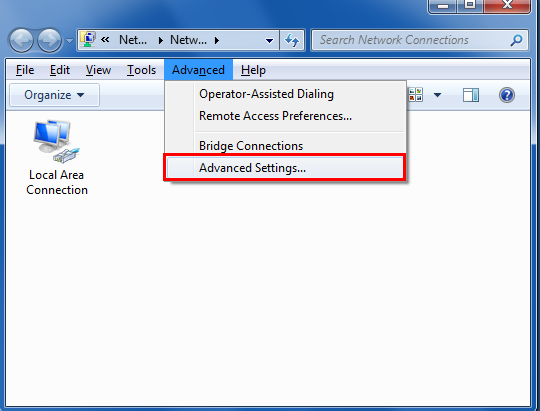
Press the ALT key, click Advanced Options and then click Advanced Settings…
-
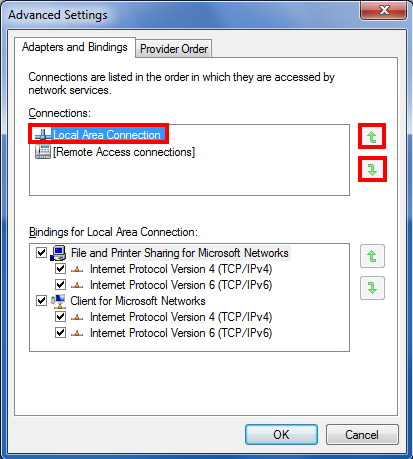
Select Local Area Connection and click the green arrows to give priority to the desired connection.
-
After organizing the network connections available according to your preferences, click OK.
-
The computer will now follow an order of priority when detecting available connections.
Steps to change wireless network connection priority in Windows 7
The computer can detect more than one wireless network at a time. This article explains how to prioritize the wireless network you want to connect to first.
-
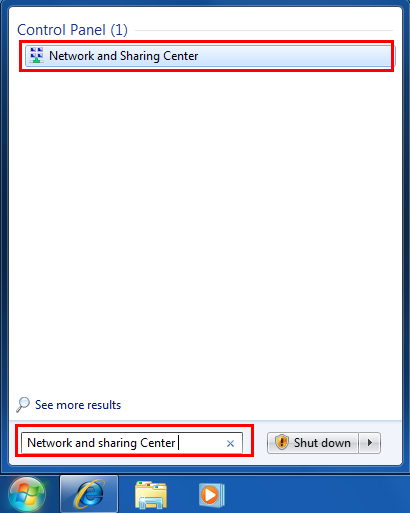
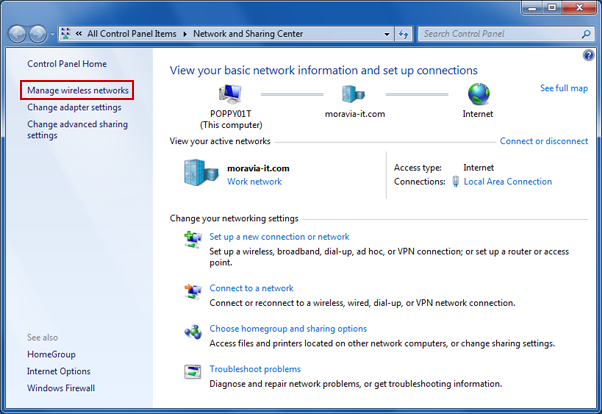
Click Start, and in the search field, type Network and Sharing Center.
-
In Network and Sharing Center, click Manage wireless networks.
-
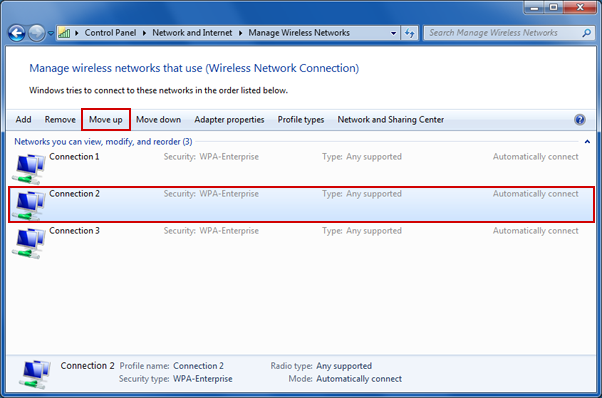
Click the connection to be given priority (e.g. Connection 2 has less priority than Connection 1), and then click Move up.
-
The next time it is detecting the networks, the computer will give more priority to Connection 2 than to Connection 1.

Your opinion is important to us: Send your opinion on these articles using the comments field at the bottom. You’ll be helping us to improve the content. Thank you very much!
Need more help?
Want more options?
Explore subscription benefits, browse training courses, learn how to secure your device, and more.
Communities help you ask and answer questions, give feedback, and hear from experts with rich knowledge.
Windows automatically prioritizes network connections that have multiple routes available based on the the interface speed, for example if you are connected to the same network through WiFi and hard-wire. It may, at times, be necessary to prioritize network traffic out a different interface, for example if you are testing a specific network connection. This can be done by adjusting the IPv4 Interface Metric on the adapters.
Viewing Interface Metrics
The following command will output the network interfaces on the local computer sorted by the interface metric. Windows will prioritize network traffic over lower metrics.
> Get-NetIPInterface | Sort-Object InterfaceMetric

ifIndex InterfaceAlias                  AddressFamily NlMtu(Bytes) InterfaceMetric Dhcp     ConnectionState PolicyStore
------- --------------                  ------------- ------------ --------------- ----     --------------- -----------
58      vEthernet (Ethernet 3)          IPv4                  1500              15 Disabled Connected       ActiveStore
46      vEthernet (vEthernet (LAN))     IPv4                  1500              15 Disabled Connected       ActiveStore
40      vEthernet (Default Switch)      IPv4                  1500              15 Disabled Connected       ActiveStore
21      vEthernet (LAN)                 IPv4                  1500              25 Enabled  Connected       ActiveStore
1       Loopback Pseudo-Interface 1     IPv6            4294967295              75 Disabled Connected       ActiveStore
1       Loopback Pseudo-Interface 1     IPv4            4294967295              75 Disabled Connected       ActiveStore
52      Ethernet 3                      IPv4                  1500              99 Enabled  Connected       ActiveStore
Get-NetIPInterface | Sort-Object InterfaceMetric
Viewing Routes for a Specific Address
If you’d like to look at a route for a specific destination, you can search based on the network prefix:
> Get-NetRoute -DestinationPrefix 192.168.2.0/24

ifIndex DestinationPrefix                              NextHop                                  RouteMetric ifMetric PolicyStore
------- -----------------                              -------                                  ----------- -------- -----------
52      192.168.2.0/24                                 0.0.0.0                                          256 99       ActiveStore
If you want to query for addresses on the internet, you’ll most likely need to look at the default route:
> Get-NetRoute -DestinationPrefix 0.0.0.0/0

ifIndex DestinationPrefix                              NextHop                                  RouteMetric ifMetric PolicyStore
------- -----------------                              -------                                  ----------- -------- -----------
52      0.0.0.0/0                                      192.168.2.1                                        0 25       ActiveStore
21      0.0.0.0/0                                      192.168.86.254                                     0 25       ActiveStore
As you can see 0.0.0.0/0 has 2 possible routes with the same metric, so you can’t guarantee which one traffic will take.
Changing Interface Metrics
To change the metrics for a specific interface, you can navigate to the Advanced IPv4 settings in the network control panel, or just change it with PowerShell
> Set-NetIPInterface -ifIndex 52 -InterfaceMetric 99The command won’t return anything, but running the Get-NetIPInterface command again will show that the interface has a metric of 99 which is higher than anything Windows will automatically assign to an interface.
A PowerShell Function
As a parting note, I decided to write a simple function in PowerShell to help gather all the pertinent information that I often times need to get quickly. The below function returns the following information about each network interface:
- Interface Alias — What you can expect to see in Control Panel as the name of each interface
- Interface Index — The index that you’d use for other PowerShell networking commands
- Interface Description — The description that you’ll see in Control Panel
- Address — The CIDR representation of the IP address and subnet mask
- Metric — I don’t think I have to explain this again
- Speed — The physical link speed
function Get-NetInterfaceInformation {
  [CmdletBinding()]
  param (
    [ValidateSet("IPv4","IPv6")]
    [String]$AddressFamily
  )

  Get-NetIPInterface @PSBoundParameters | Sort-Object InterfaceMetric | ForEach-Object {
    if($_.ifIndex -eq 1) { return; }
    $adapter = $_ | Get-NetAdapter
    $address = $_ | Get-NetIPAddress
    [PSCustomObject]@{
      InterfaceAlias=$_.InterfaceAlias;
      InterfaceIndex=$_.ifIndex;
      InterfaceDescription=$adapter.InterfaceDescription;
      Address="$($address.IPAddress)/$($address.PrefixLength)"
      Metric=$_.InterfaceMetric;
      Speed=$adapter.LinkSpeed;
    }
  }
}
On Windows 10, if you have a device with more than one network adapter (such as Ethernet and Wi-Fi), each interface receives a priority value automatically based on its network metric, which defines the primary connection that your device will use to send and receive networking traffic.
Although, for the most part, Windows 10 does a pretty good job selecting an optimal connection to access the network, sometimes you may need to configure the order of the network adapters manually. For example, if you want to use a Wi-Fi over an Ethernet interface when both adapters are connected to the network.
You could disable those adapters you don’t use, but it may not be the best solution as you may need them as backups. Instead, a more straightforward solution is to adjust the interface metric to specify in which order your device should use each network adapter, which you can do using Control Panel and PowerShell.
In this Windows 10 guide, we’ll walk you through the steps to change the network adapter priorities to stay connected using your prefered adapter when using multiple interfaces.
- How to change network adapter priorities using Control Panel
- How to change network adapter priorities using PowerShell
How to change network adapter priorities using Control Panel
If you want to change the order in which Windows 10 uses network adapters, do the following:
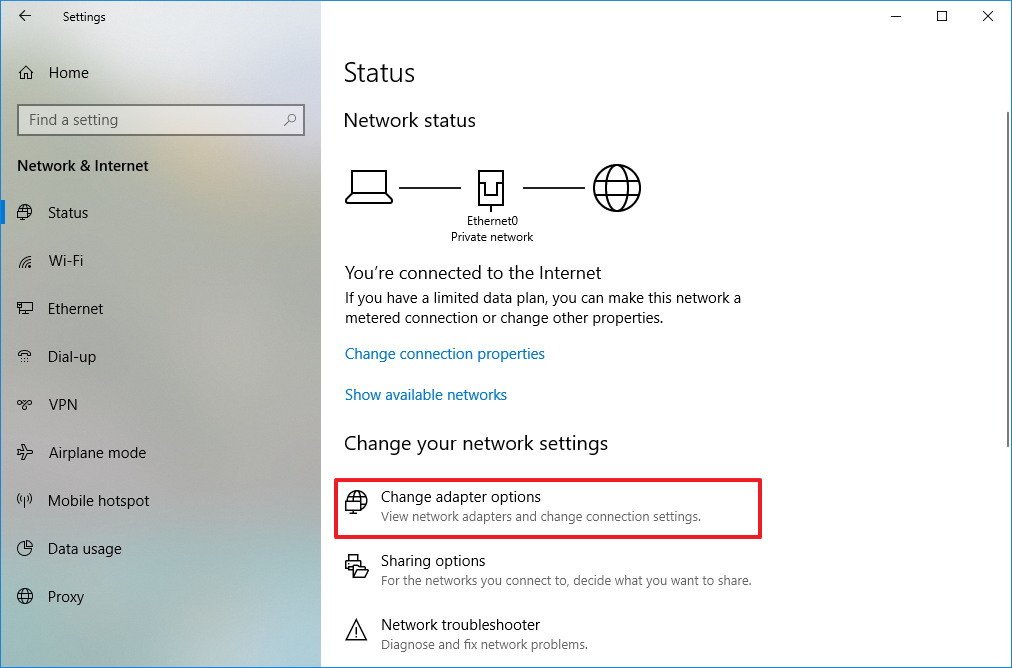
- Open Settings.
- Click on Network & Internet.
- Click on Status.
- Click the Change Adapter options item.
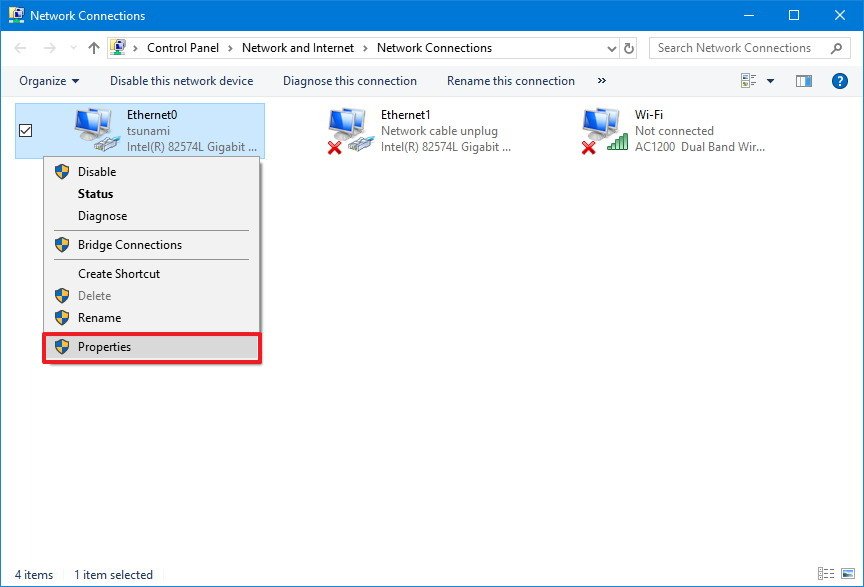
- Right-click the network adapter you want to prioritize, and select Properties.
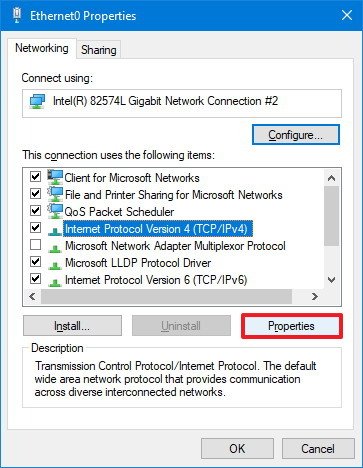
- Select the Internet Protocol Version 4 (TCP/IPv4) item.
- Click the Properties button.
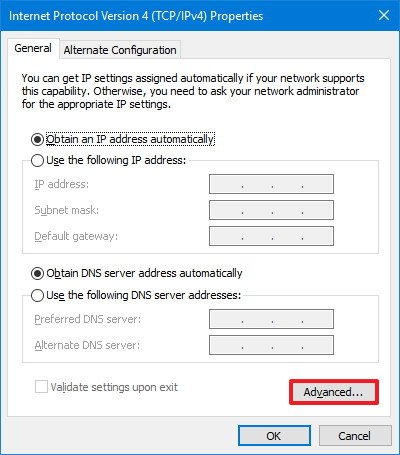
- In the «General» tab, click the Advanced button.
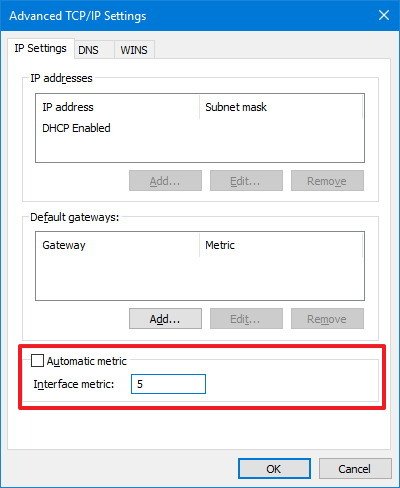
- Clear the Automatic metric option.
- In the «Interface metric» field assign a priority value for the adapter.Quick Tip: The lower the metric number means higher priority, and a higher number indicates lower priority.
- Click the OK button.
- Click the OK button again.
- Click the Close button.
Once you’ve completed the steps, Windows 10 will prioritize the network traffic depending on your configuration.
The only caveat using the Control Panel experience is that depending on your network setup, you may need to adjust the metric for the Internet Protocol Version 6 (TCP/IPv6) as well, if that’s the protocol you’re using. (Usually, you will be using the TCP/IPv4 protocol.)
At any time, you can revert the changes using the same instructions, but on step No. 9, make sure to check the Automatic metric option.
How to change network adapter priorities using PowerShell
Alternatively, you can change network adapters priorities on a device with multiple interfaces using PowerShell with these steps:
- Open Start.
- Search for Windows PowerShell, right-click the top result a select Run as administrator.
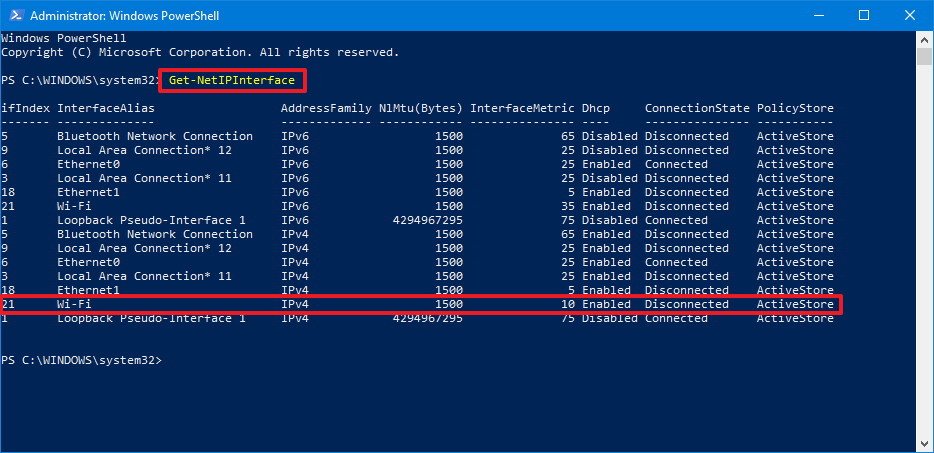
- Type the following command to identify the current interface metric and interface index number and press Enter:
Get-NetIPInterface
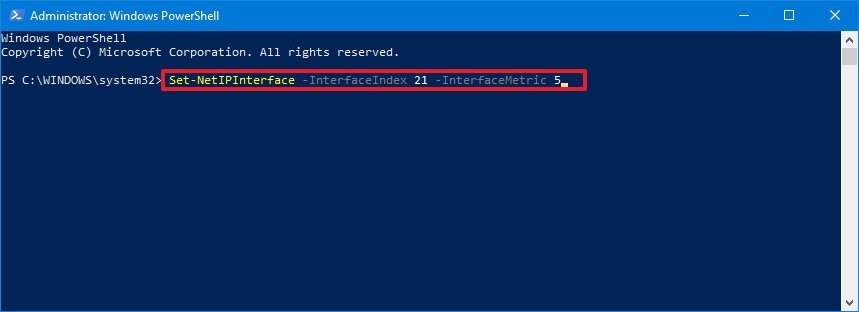
- Type the following command to change the priority order of the network adapter and press Enter:
Set-NetIPInterface -InterfaceIndex 21 -InterfaceMetric 10In the command, make sure to change the -InterfaceIndex value to reflect the network adapter you want to prioritize and change the -InterfaceMetric value to assign a priority. Also, remember that a lower metric number means higher priority, and a higher metric number means lower priority.
- Type the following command to see the new metric applied to the network adapter and press Enter:
Get-NetIPInterface
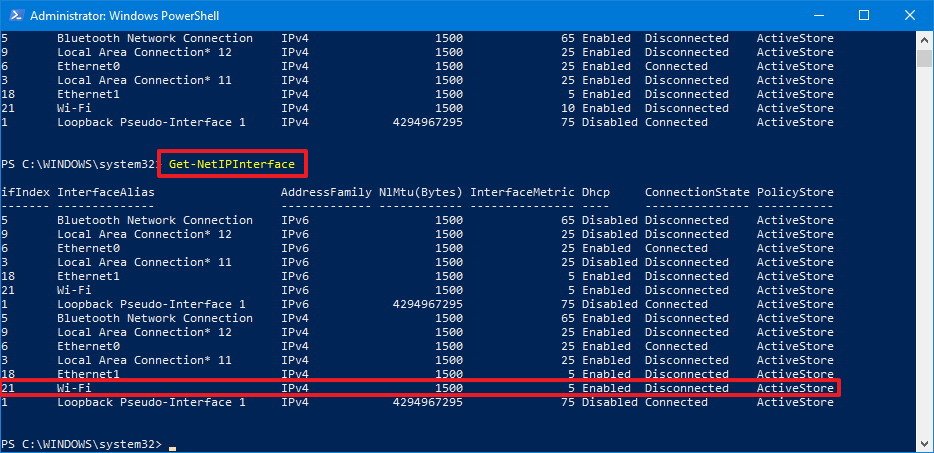
After completing the steps, Windows 10 will prioritize the network traffic depending on your configuration when multiple network adapters are connected to the network.
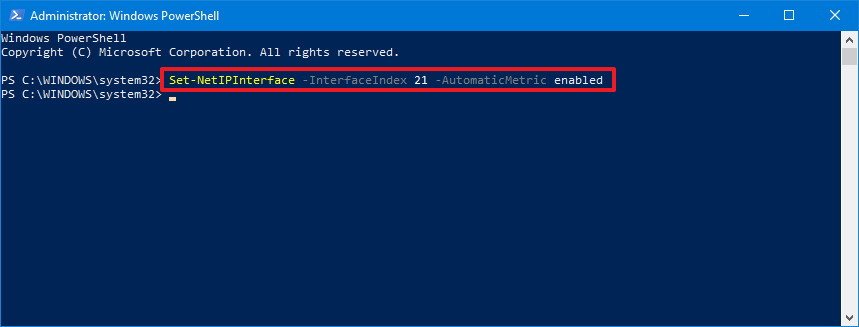
At any time, you can go back to the previous behavior allowing Windows 10 to decide the network adapter priority using these steps:
- Open Start.
- Search for Windows PowerShell, right-click the top result a select Run as administrator.
- Type the following command to identify the current interface metric and interface index number and press Enter:
Set-NetIPInterface -InterfaceIndex 21 -AutomaticMetric enabledIn the command, make sure to change the -InterfaceIndex value with the correct number of the network adapter you want to apply an automatic metric.
More Windows 10 resources
For more helpful articles, coverage, and answers to common questions about Windows 10, visit the following resources:
- Windows 10 on Windows Central – All you need to know
- Windows 10 help, tips, and tricks
- Windows 10 forums on Windows Central
All the latest news, reviews, and guides for Windows and Xbox diehards.
Mauro Huculak is technical writer for WindowsCentral.com. His primary focus is to write comprehensive how-tos to help users get the most out of Windows 10 and its many related technologies. He has an IT background with professional certifications from Microsoft, Cisco, and CompTIA, and he’s a recognized member of the Microsoft MVP community.
Changing the Network Connection Order in Windows 10
If you’re like me, you have more than one network connection on your PC. For example, my desktop computer has two wired Ethernet adapters and one Wi-Fi adapter. And those are just the physical adapters… there are also virtual adapters for remote access and virtualization.
For instructor-led Windows 10 training, see our complete Windows 10 course schedule.
Some of these adapters are connected to internal resources, and some to external networks. And because I test and experiment with my PC, those connections change periodically. So it wouldn’t be fair for me to expect Windows 10 to sort that out perfectly every time.
I want the most efficient and fastest network connections on this computer. Windows 10 does a pretty darn good job of figuring out what connection to use first all by itself. But occasionally I need to tweak it. This is how I change the order that Windows 10 uses network connections. The setting is somewhat hidden and difficult to locate, so you might want to bookmark this one.
First, fire up Control Panel. The old, classic Control Panel, not the Settings menu. I usually do this my pressing Windows + R, typing Control, and then pressing Enter.
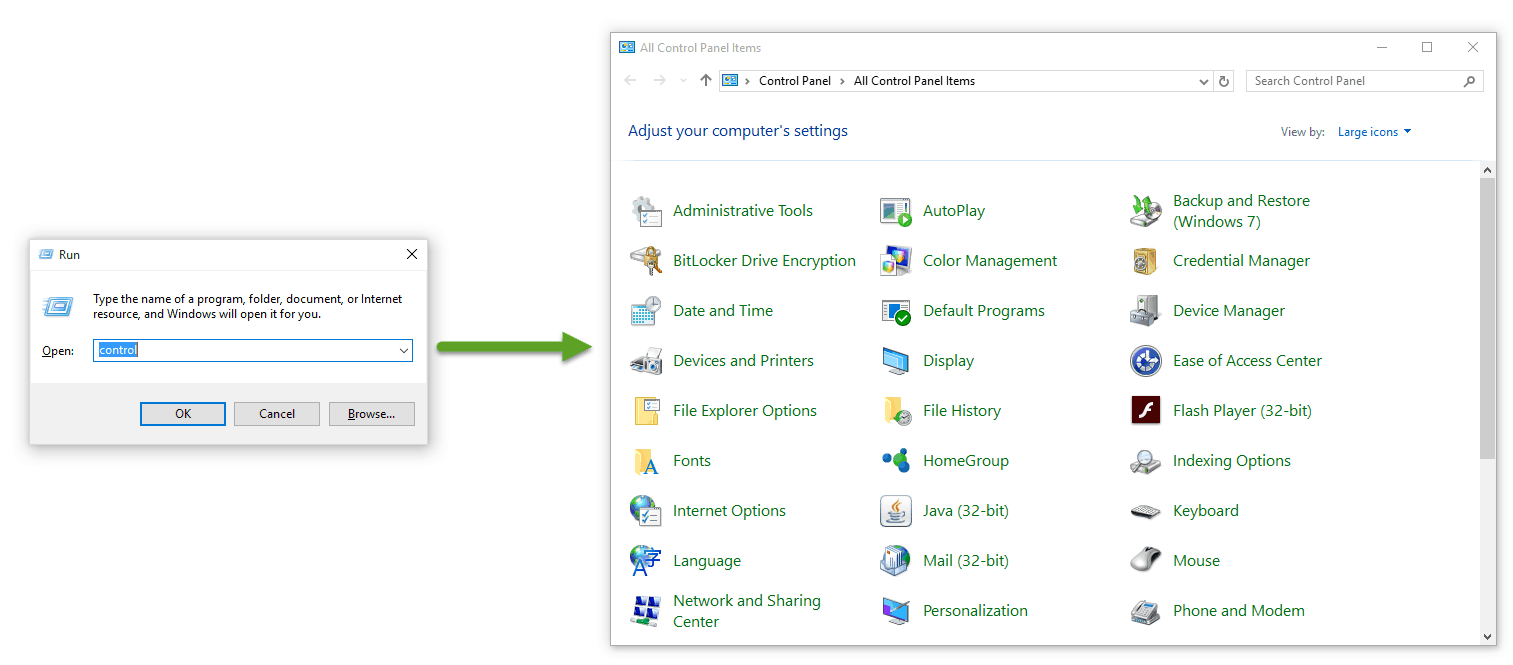
Next click on Network and Sharing Center.
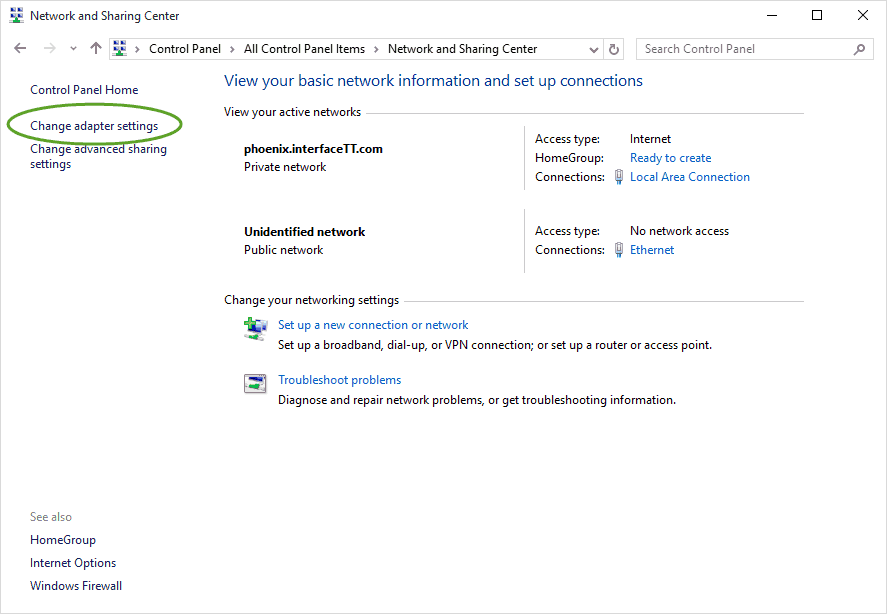
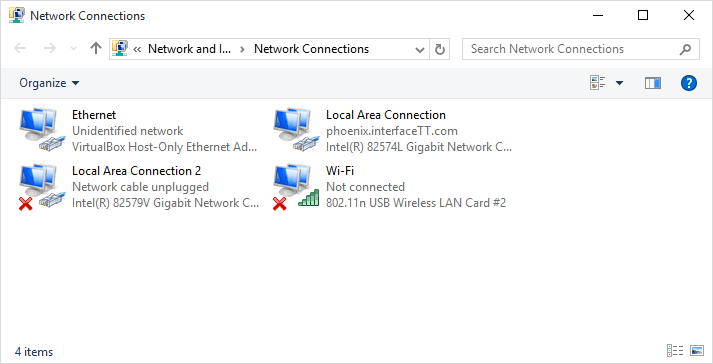
In Network and Sharing Center, in the left-hand column, click Change adapter settings. This will show you the Network Connections interface.
The option is here. But it’s hidden. To unhide it, tap the Alt key. You’ll see the menu bar unhide itself.
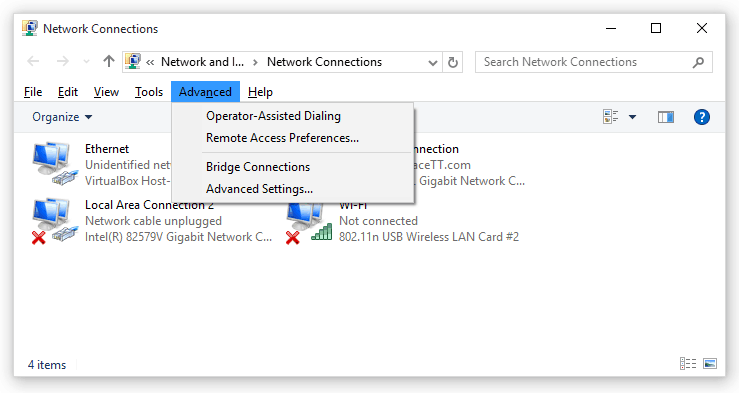
Now click the Advanced menu and you can select Advanced Settings. This shows you the Advanced Settings dialog.

This is it! To modify the connection order, click the adapter name in the Connections list and then click the up arrow or down arrow. The higher the connection in the list, the higher the priority to Windows.
Enjoy!
Mike Danseglio – CISSP, MCSE, and CEH
Mike Danseglio teaches IT Security Training, Windows, System Center and Windows Server 2012 classes at Interface Technical Training. His classes are available in Phoenix, AZ and online with RemoteLive™.