Keep your device drivers updated
by Loredana Harsana
Loredana is a passionate writer with a keen interest in PC software and technology. She started off writing about mobile phones back when Samsung Galaxy S II was… read more
Updated on
- Plug n Play manager has two parts: Kernel PNP and user mode PNP managers.
- These PNP managers enable a computer to adjust to hardware changes with minimal intervention.
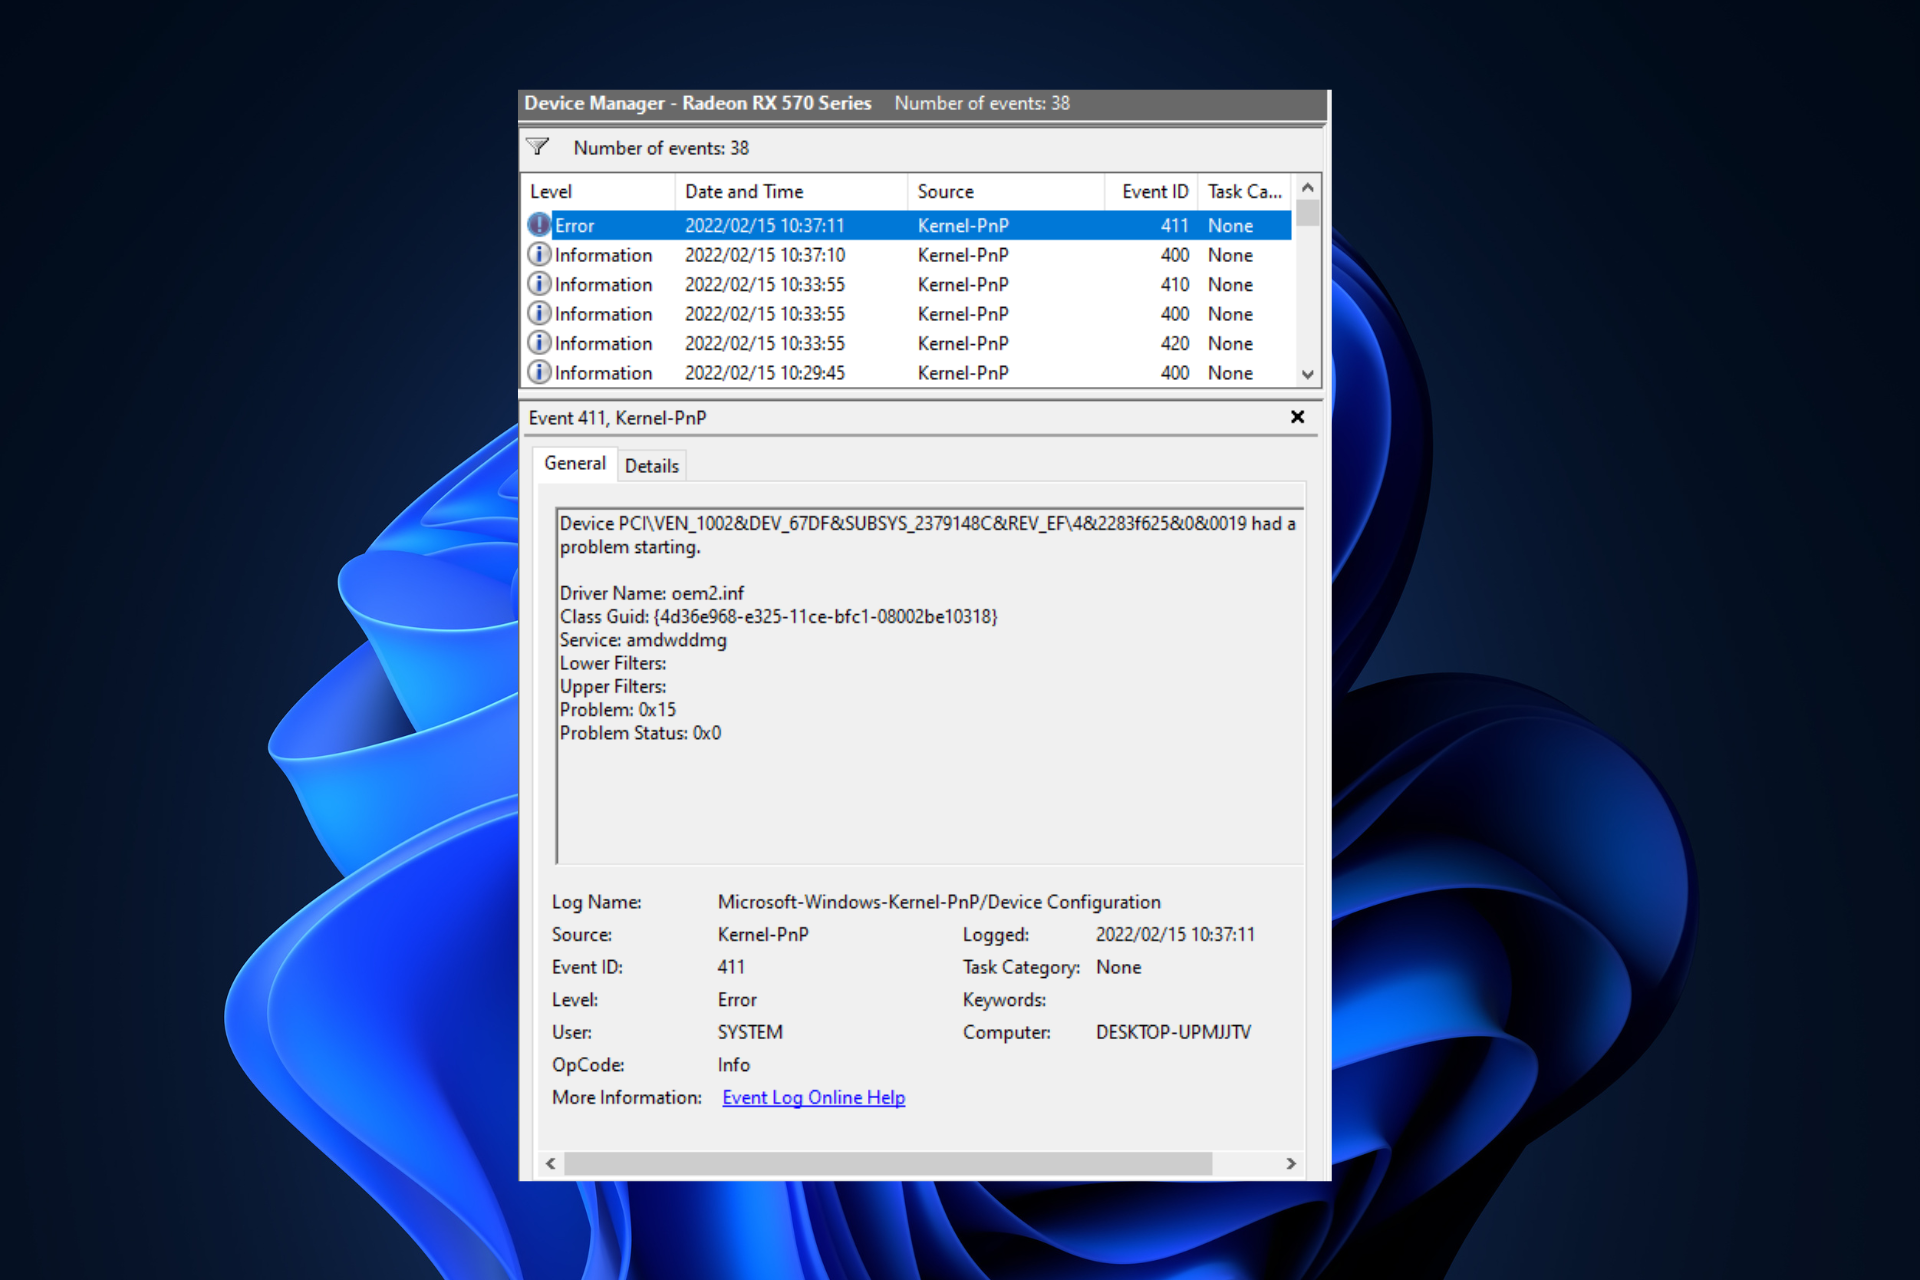
- If you see an error related to Kernel in Event Viewer, particularly, Event ID 411, it could be due to outdated drivers or misconfigured devices.
XINSTALL BY CLICKING THE DOWNLOAD
FILE
If you keep getting Kernel PNP error 411 in the Event Viewer and are concerned about what to do, then you are in the right place.
This guide will discuss what Kernel PNP is and how to deal with Kernel PNP errors. Let’s start!
What is Kernel PNP?
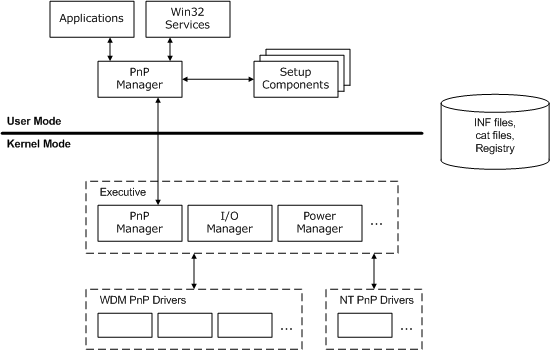
Kernel mode PNP manager is a part of Plug and Play manager. It interacts with OS drivers and components to manage, configure and maintain devices. PnP drivers support a machine’s physical, logical, and virtual devices.
How we test, review and rate?
We have worked for the past 6 months on building a new review system on how we produce content. Using it, we have subsequently redone most of our articles to provide actual hands-on expertise on the guides we made.
For more details you can read how we test, review, and rate at WindowsReport.
What is the Kernel PNP error?
A Kernel PNP error usually comes up on Windows if you have malfunctioning hardware or outdated device drivers. Therefore, for PNP mode to work, all the drivers installed must work properly.
How do I fix Kernel PNP Error 411?
Before moving to the detailed troubleshooting, let us try some quick fixes that can help us with the error:
- Restore your PC to the last known good configuration.
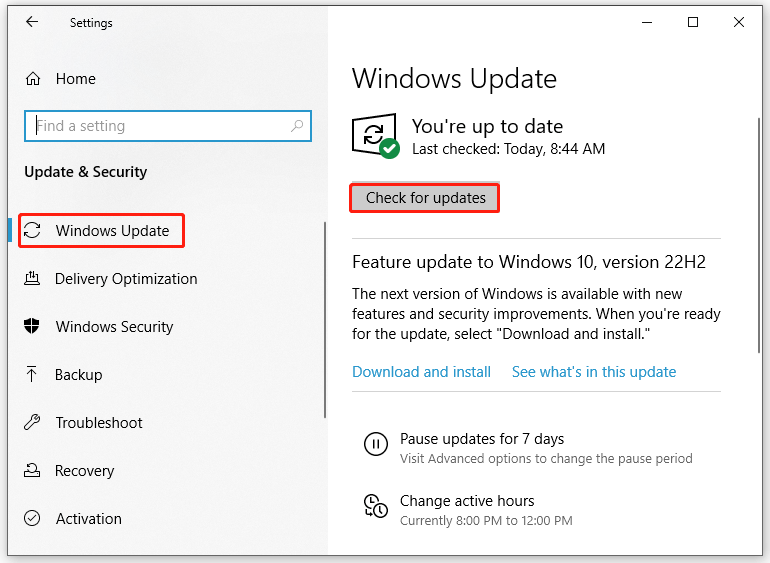
- Check Windows for updates.
- Make sure BIOS is up to date.
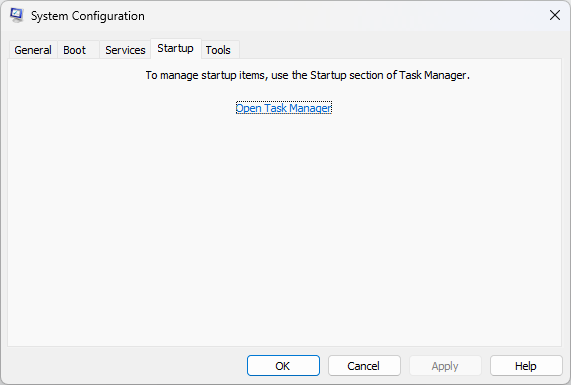
1. Clean Boot your PC
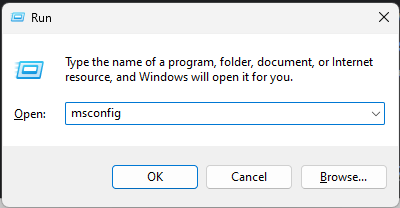
- Press the Windows + R key to get the Run console.

- Type msconfig and press Enter.
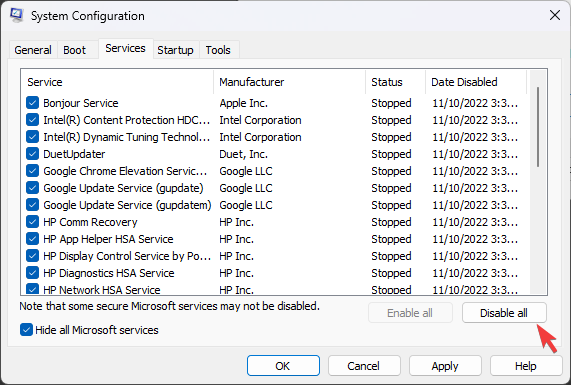
- On the Services tab, place a checkmark beside Hide all Microsoft Services and then click Disable all.

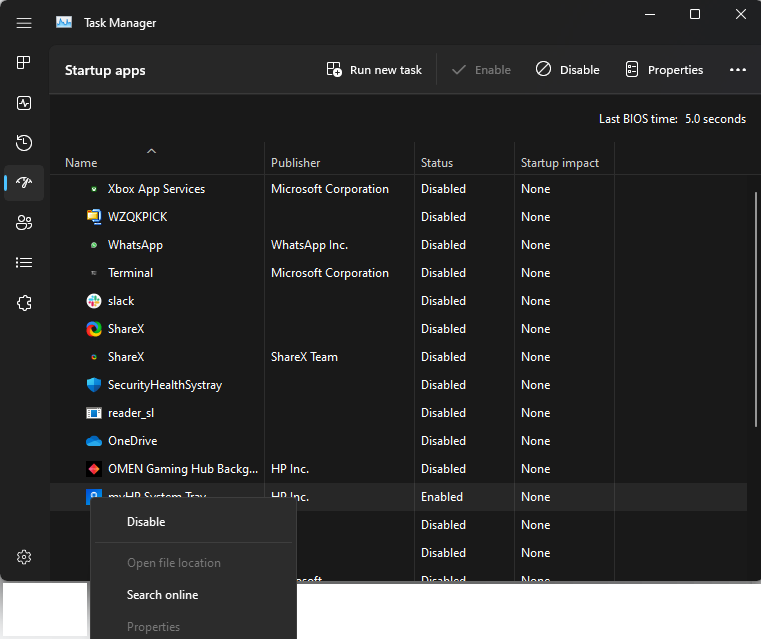
- Go to the Startup tab, and click Open Task Manager.
- Locate each Enabled item, right-click on it, and select Disable.

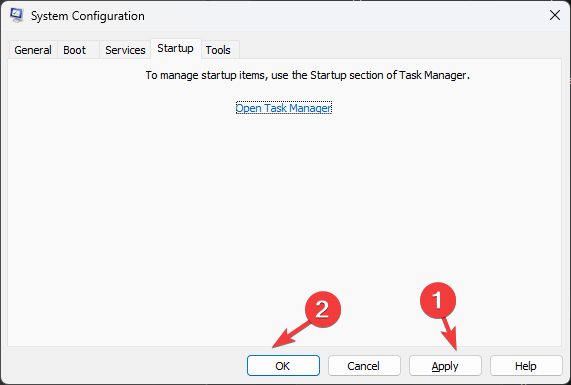
- Close Task Manager. Click Apply and OK on the System Configuration window.
- Restart your computer when prompted.
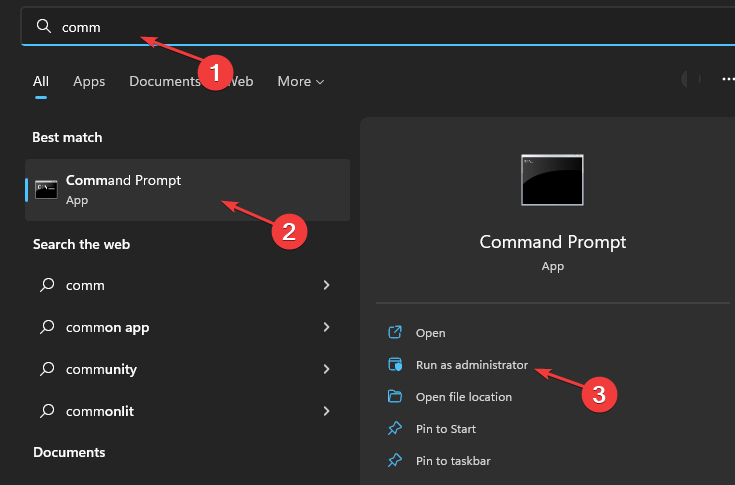
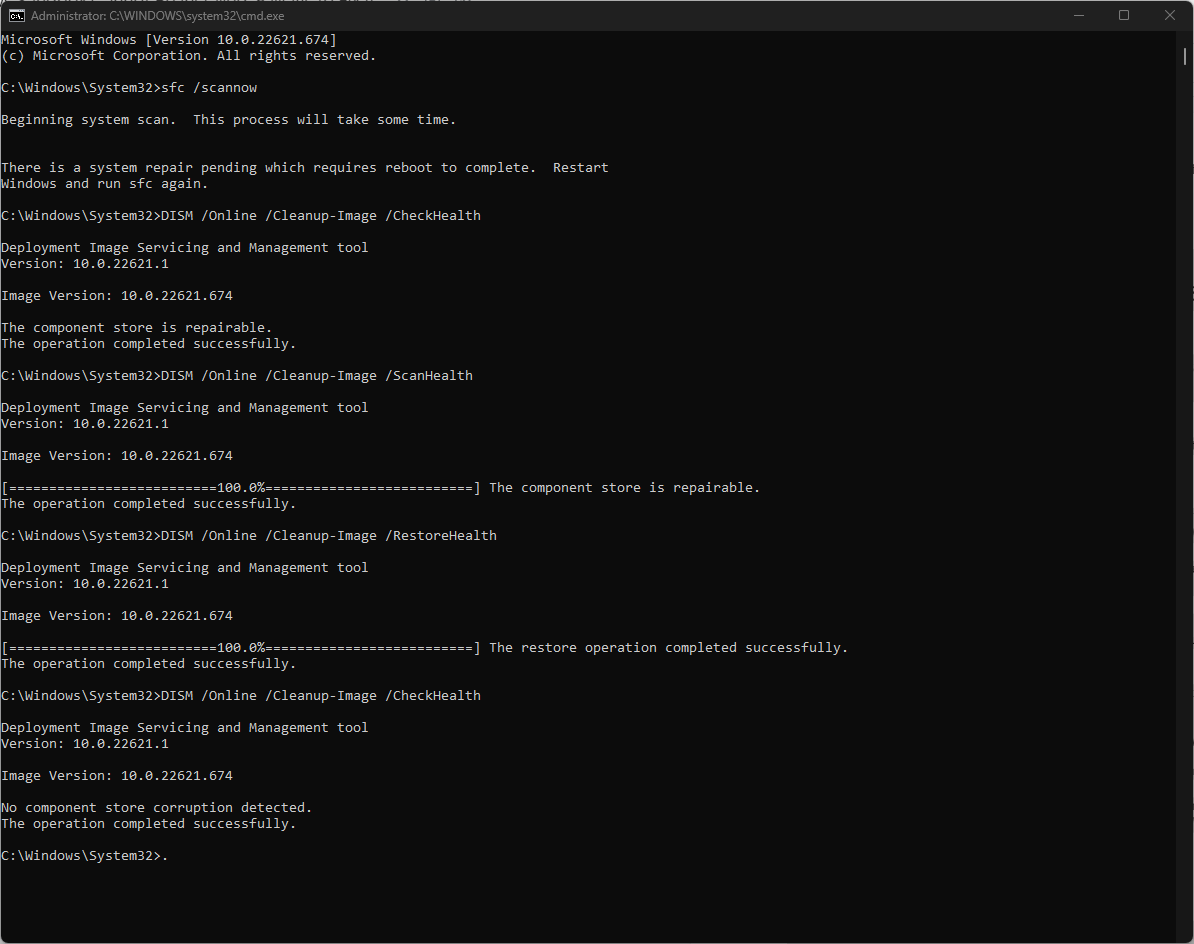
2. Use Command Prompt
- Press the Windows key, type CMD, and click Run as administrator.

- Type the following command and press Enter:
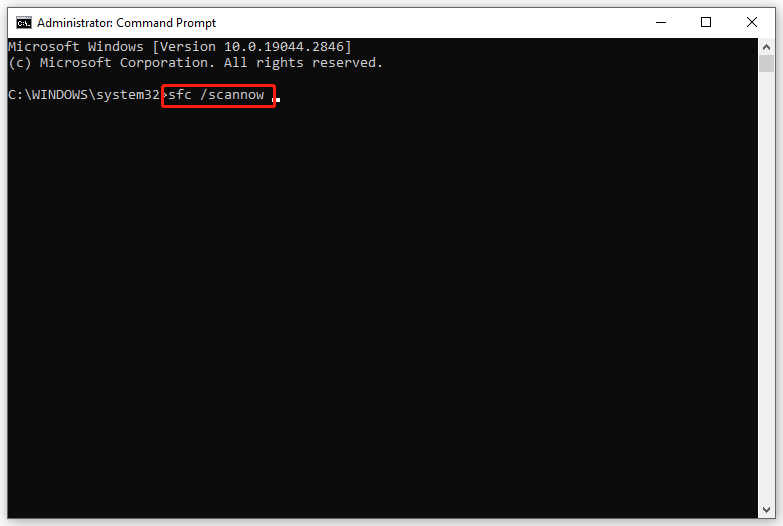
sfc/scannow - Copy and paste the following commands and press Enter after every command:
Dism /Online /Cleanup-Image /CheckHealthDism /Online /Cleanup-Image /ScanHealthDISM /Online /Cleanup-Image /RestoreHealth
- Restart your computer.
3. Install/ Update Drivers
3.1 Install Drivers Manually
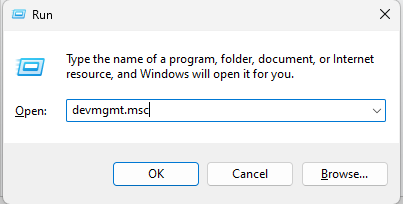
- Press Windows + R to get the Run window.
- Type devmgmt.msc and hit Enter.

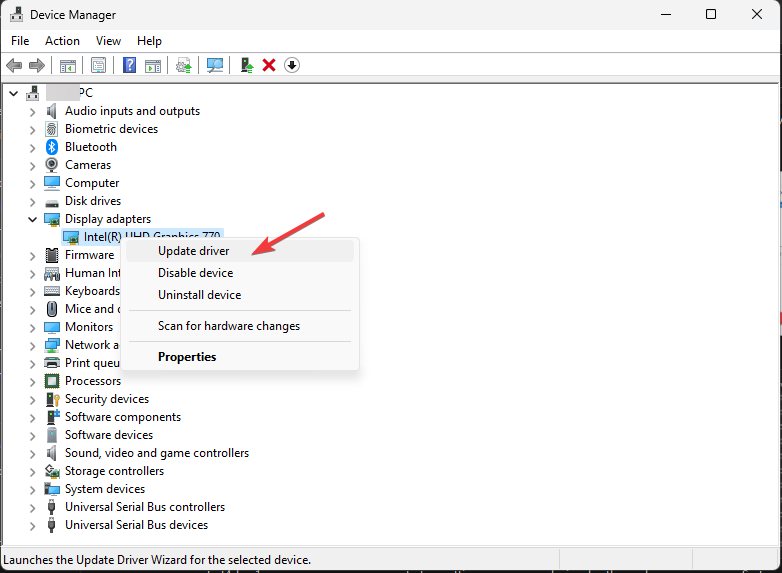
- Click on Display drivers to expand, right-click on the Graphics Driver, and click Update driver.

- Now go to System devices, expand it, and follow the same process to update the chipset drivers.
- Reboot your computer.
3.2 Use a third-party tool
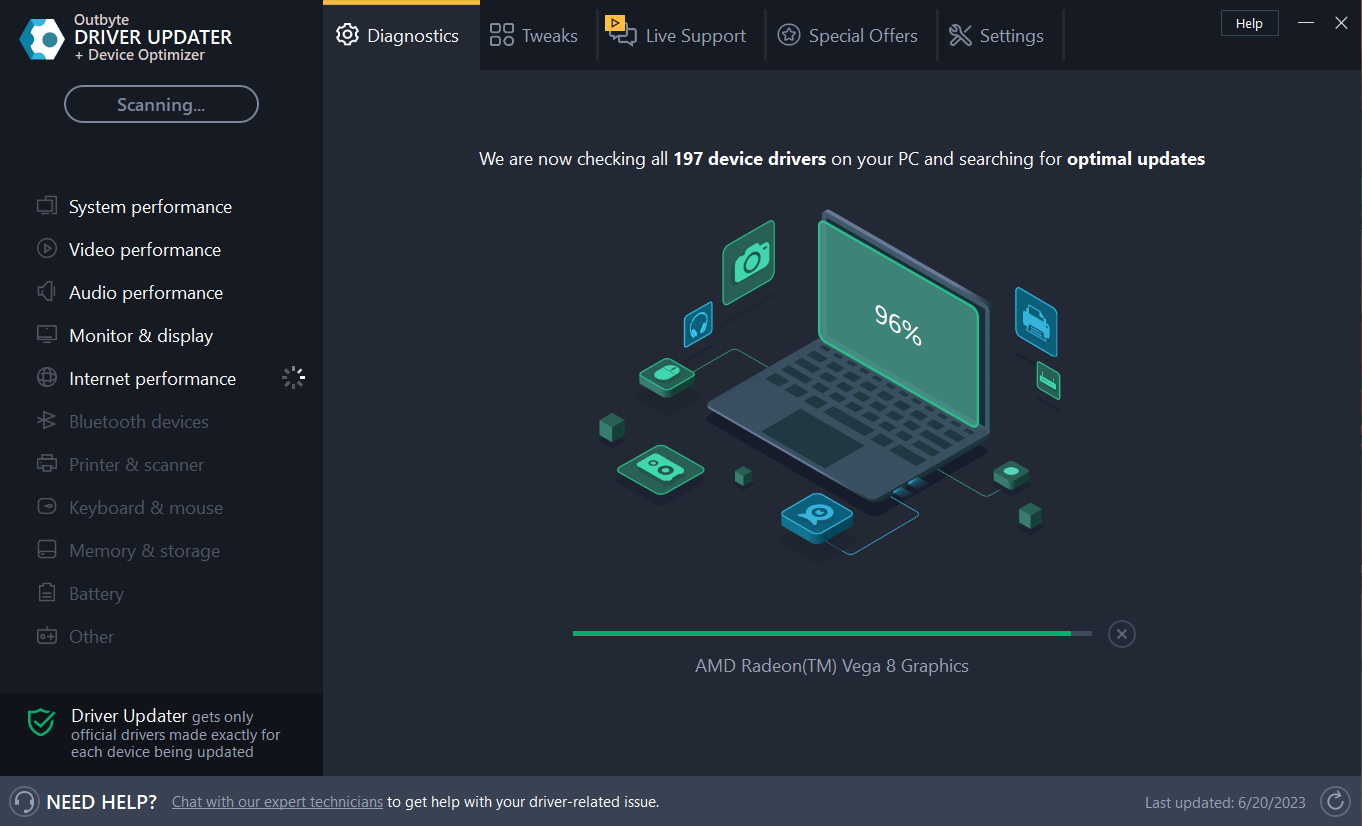
Keeping your device drivers updated with a reliable driver updater tool such as Outbyte Driver Updater is easy and less time taking. This driver updater downloads and installs the best drivers for your device in a few clicks.
- Download and install Outbyte Driver Updater.
- Launch the app to scan your computer for obsolete drivers.
- Once the scan is complete, select the drivers and click Update.

- The tool will start downloading the latest drivers for your PC.
- Now click Next and follow the on-screen instructions, then restart your computer.

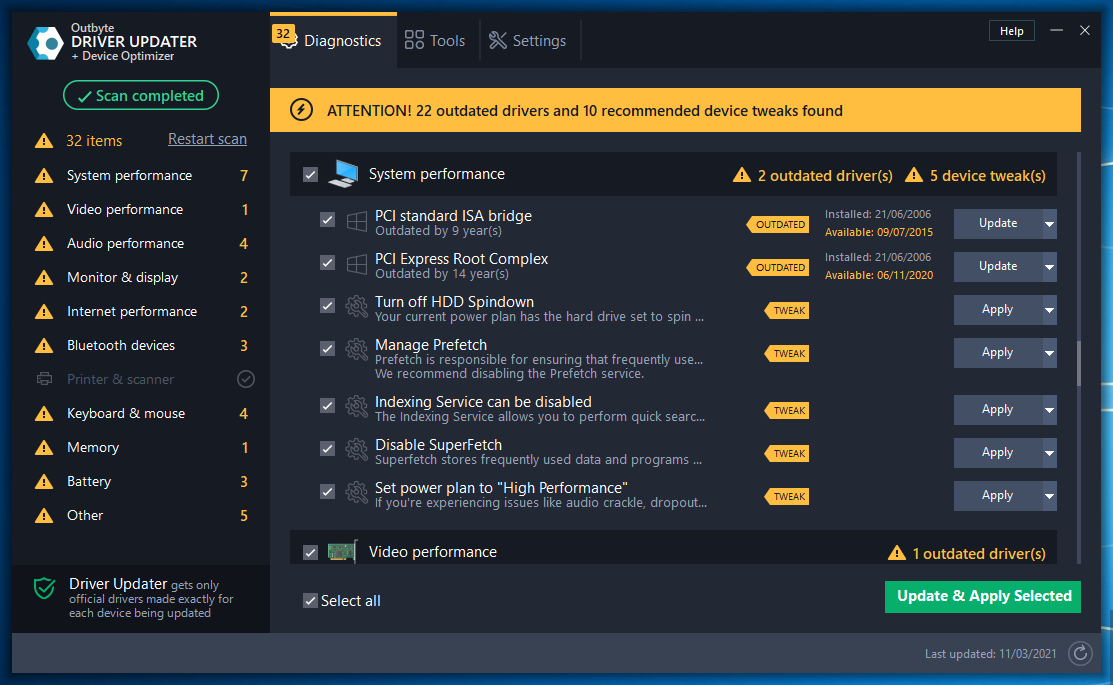
Using Outbyte Driver Updater will make sure that all drivers are updated safely and your PC will automatically receive any other future updates.
⇒ Get Outbyte Driver Updater
4. Disable Fast Startup
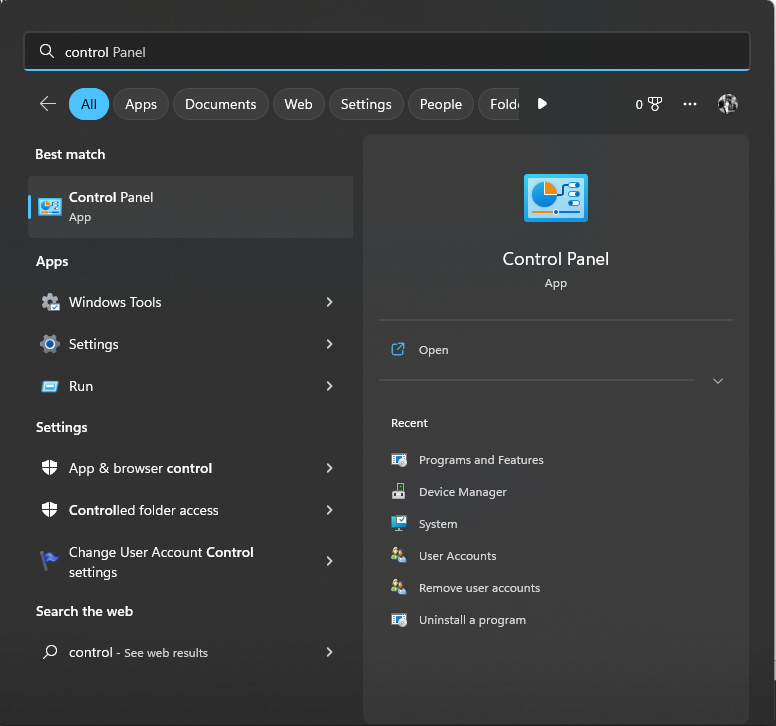
- Press the Windows key, type Control Panel, and click Open.

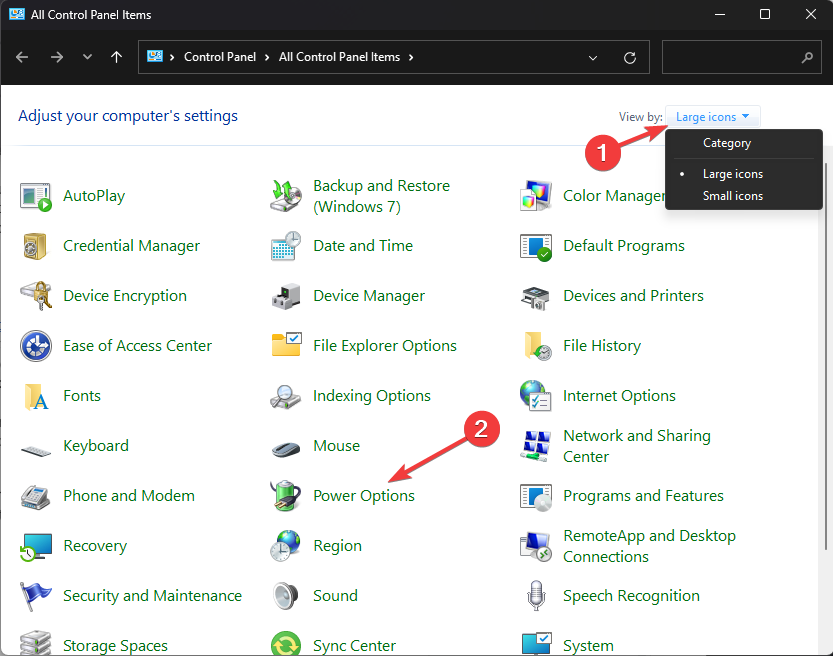
- Go to the right side of the panel and select Large icons from View by drop-down menu.
- Click Power Options.

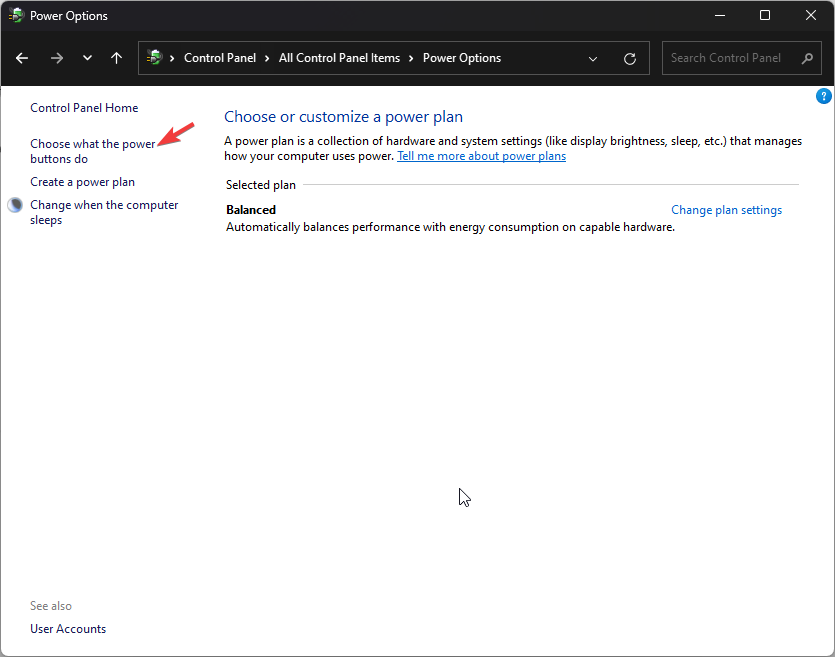
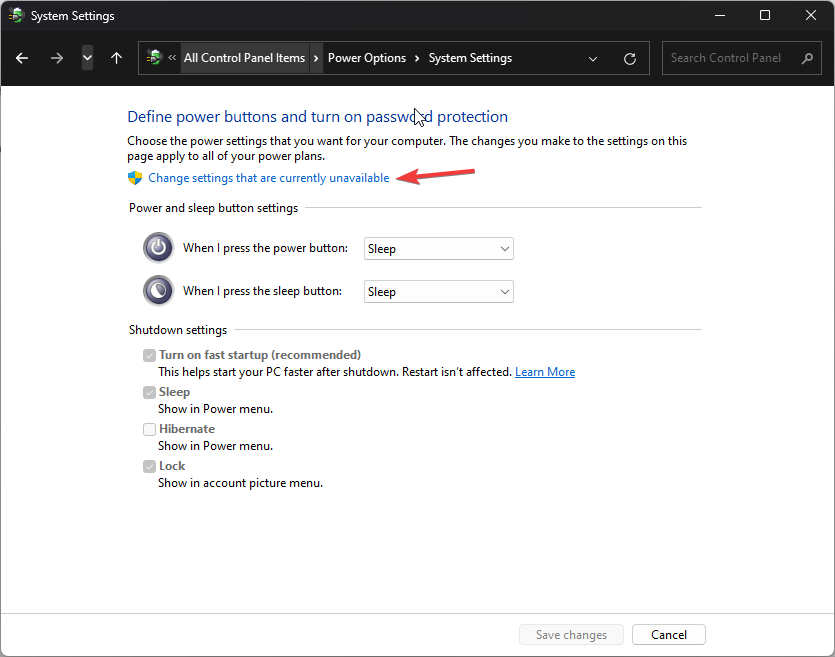
- Now select Choose what the power buttons do.

- Click Change settings that are currently available.
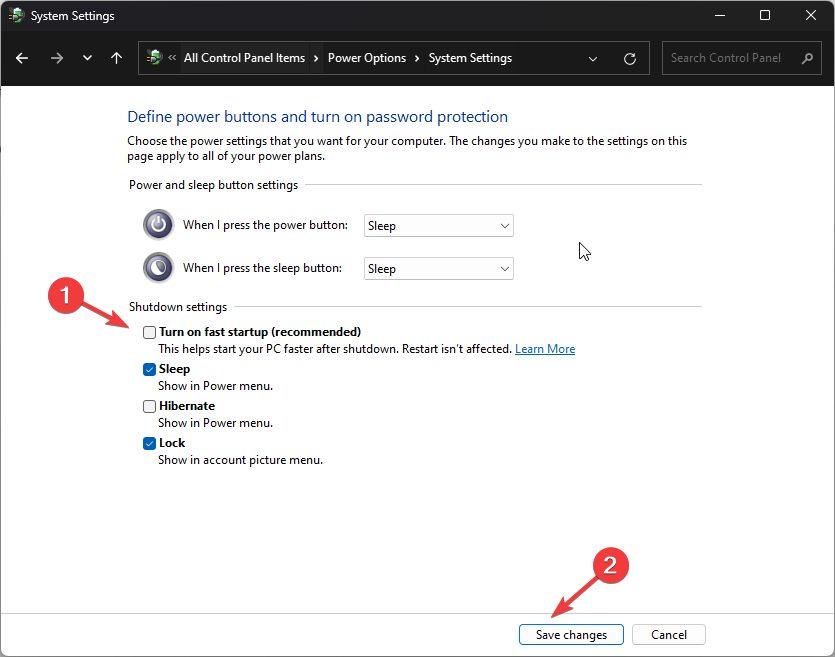
- Remove the checkmark beside Turn on fast startup.
- Click Save changes.
- How to Disable Windows Event Log [Easy Steps]
- Windows Event Log Keeps Stopping? Here’s What to do
5. Perform in-place upgrade
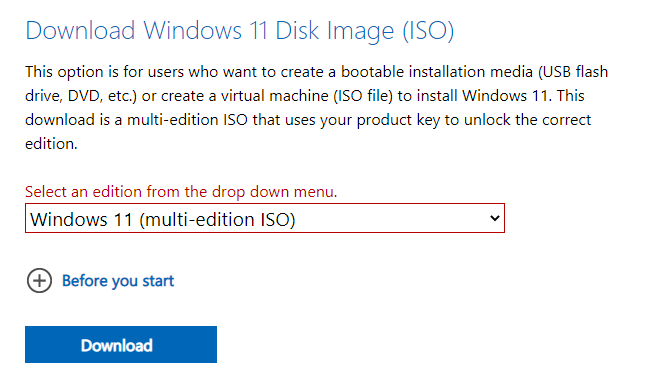
- Go to Microsoft’s software download page, and select the Windows version to install.
- Download Windows 11 ISO and select Windows 11 (multi-edition ISO).

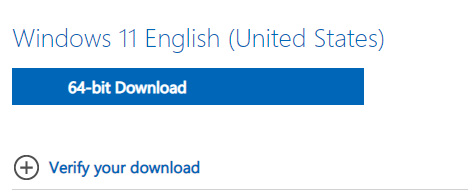
- Select the product language, select English, click Confirm, and then Download.

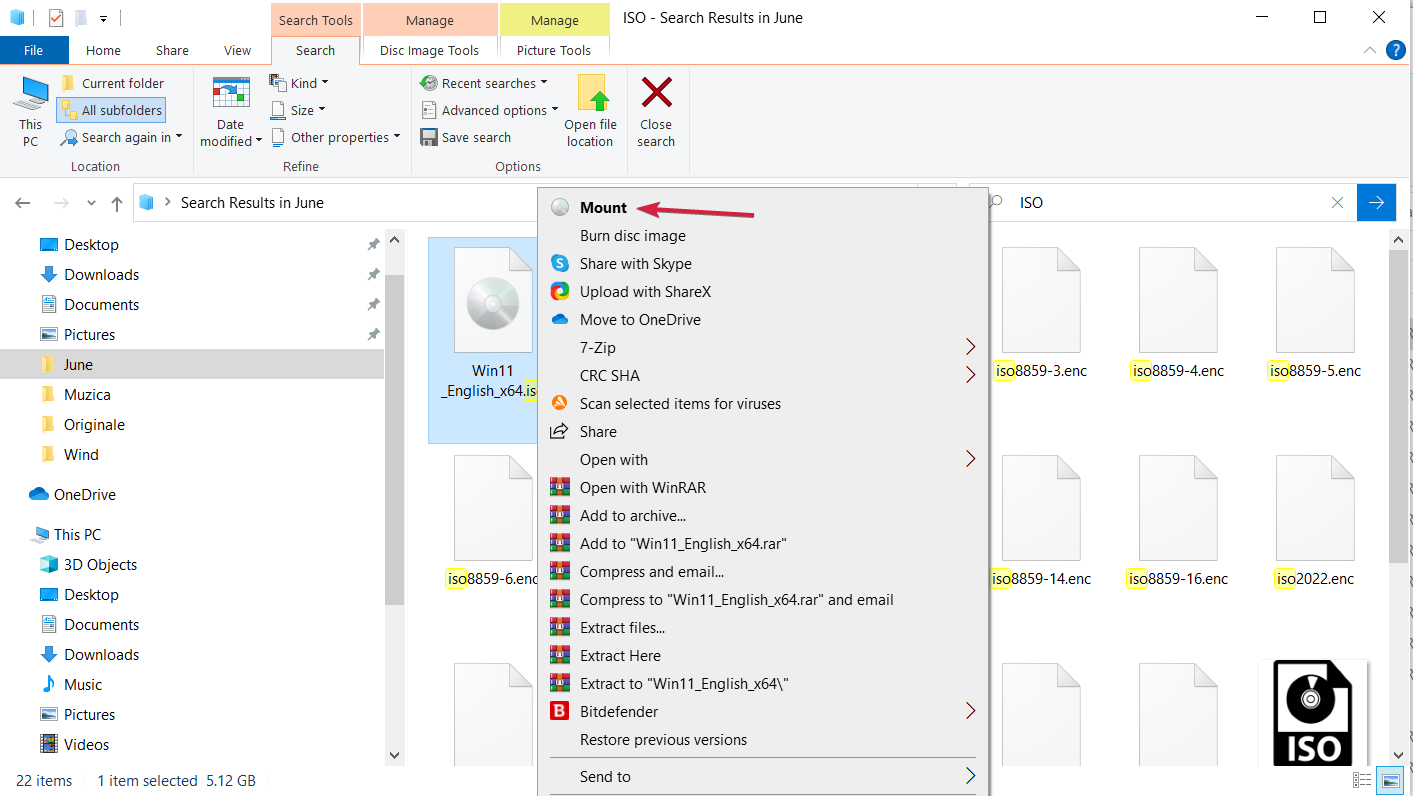
- Right-click on ISO and choose Mount. Now click Setup.exe.

- On the Install Windows 11 dialog box, select Next.
- Now, click Accept to agree to the license terms.
- Follow the on-screen prompts to complete.

Tip
When you get to the Ready to Install page, select Keep personal files and apps to ensure your files are not deleted during the process.
So, these are steps to fix Kernel PNP error 411 on Windows. Try these steps and let us know which method worked for you in the comments section below.
![]()
It is extremely frustrating to encounter Kernel PnP error 411 in Event Viewer because this might make your internet very unstable. Don’t worry! This post on MiniTool Website will give a full guide on how to fix Kernel-PnP Event ID 411 on Windows 10/11.
Kernel PnP Event ID 411
Kernal PnP (also known as Kernel Plug and Play) is a Windows inbuilt technology that interacts with drivers & components to manage, configure, and maintain devices. Sometimes, when you encounter some connection issues you might receive Kernel-PnP Event ID 411 in Event Viewer.
Kernel-PnP Event ID 411 indicates that the device driver fails to load during the Plug and Play process. After that, you might suffer from internet connection issues, USB ports not working or Blue Screen of Death. In the following part, we will show you how to fix Kernel-PnP Event ID 411 Windows 10/11 step by step.
How to Fix Kernel-PnP Event ID 411 on Windows 10/11?
Fix 1: Perform a Clean Boot
Performing a clean boot can help to exclude the interference of third-party applications or services. To do so:
Step 1. Press Win + R altogether to open the Run box.
Step 2. Type msconfig and hit OK to open System Configuration.
Step 3. Under the Services tab, tick Hide all Microsoft Services and hit Disable all.

Step 4. Under the Startup tab, hit Open Task Manager.
Step 5. Right-click on each enabled item and choose Disable.
Step 6. Quit Task Manager and hit Apply & OK in System Configuration.
Step 7. Reboot your computer.
If Kernel-PnP Event ID 411 disappears in the clean boot system, you need to uninstall the suspicious applications or services.
Fix 2: Run SFC & DISM
Another cause for Kernel-PnP Event ID 411 might be faulty system files. If this is the case, you can run the combination of SFC and DISM to fix the corrupted system files.
Step 1. Type cmd in the search bar to locate Command Prompt.
Step 2. Right-click on it to choose Run as administrator.
Step 3. Type sfc /scannow and hit Enter.
Step 4. After the scanning is done, run the following commands one after another:
dism /online /cleanup-image /scanhealth
dism /online /cleanup-image /checkhealth
dism /online /cleanup-image /restorehealth
Step 5. Reboot your system.
Fix 3: Disable Fast Startup
Fast Startup allows Windows to startup quicker but it is also known to trigger many issues. Therefore, check if this utility is enabled. If so, try disabling it.
Step 1. Type control panel in the search bar and hit Enter.
Step 2. Click on the inverted triangle icon beside View by and select Large icons.
Step 3. Go to Power Options > Choose what the power buttons do > Change settings that are currently available.
Step 4. Uncheck Turn on fast startup and hit Save changes.

Fix 4: Check for Updates
The latest Windows update might fix most glitches in the former version and contain some powerful features. Thus, updating your Windows to the latest version can help to get rid of error Kernel-PnP Event ID 411.
Step 1. Press Win + I to open Windows Settings.
Step 2. Go to Update & Security > Windows Update > Check for updates.
Fix 5: Place an In-place Upgrade
If everything fails to solve Kernel-PnP Event ID 411, you can try performing an in-place upgrade. Although your data will probably not be erased during the process, you still need to back up your data as a precaution.
Move 1: Back up Your Files
Step 1. Download and install MiniTool ShadowMaker.
MiniTool ShadowMaker TrialClick to Download100%Clean & Safe
Step 2. Click on Keep Trial and go to the Backup page.
Step 3. In this page, you can go to SOURCE > Folders and Files to choose the files you want to secure. As for choosing a storage path for the backup image, go to DESTINATION.

Step 4. Click on Back Up Now to start the backup task immediately.
Move 2: Perform an In-Place Upgrade
Step 1. Go to the Microsoft’s Software Download page and choose the Windows version.
Step 2. Click on Download now to download Windows 10/11 Installation Media.
Step 3. After downloading it, run the setup file and choose Upgrade this PC now to perform an in-place upgrade.

Step 4. Click on Next and then follow the on-screen instructions to complete the process.
Ошибки библиотеки динамической компоновки microsoft-windows-kernel-pnp-events.dll.mui
Файл microsoft-windows-kernel-pnp-events.dll.mui считается разновидностью DLL-файла. DLL-файлы, такие как microsoft-windows-kernel-pnp-events.dll.mui, по сути являются справочником, хранящим информацию и инструкции для исполняемых файлов (EXE-файлов), например sapisvr.exe. Данные файлы были созданы для того, чтобы различные программы (например, Windows) имели общий доступ к файлу microsoft-windows-kernel-pnp-events.dll.mui для более эффективного распределения памяти, что в свою очередь способствует повышению быстродействия компьютера.
К сожалению, то, что делает файлы DLL настолько удобными и эффективными, также делает их крайне уязвимыми к различного рода проблемам. Если что-то происходит с общим файлом MUI, то он либо пропадает, либо каким-то образом повреждается, вследствие чего может возникать сообщение об ошибке выполнения. Термин «выполнение» говорит сам за себя; имеется в виду, что данные ошибки возникают в момент, когда происходит попытка загрузки файла microsoft-windows-kernel-pnp-events.dll.mui — либо при запуске приложения Windows, либо, в некоторых случаях, во время его работы. К числу наиболее распространенных ошибок microsoft-windows-kernel-pnp-events.dll.mui относятся:
- Нарушение прав доступа по адресу — microsoft-windows-kernel-pnp-events.dll.mui.
- Не удается найти microsoft-windows-kernel-pnp-events.dll.mui.
- Не удается найти C:\Windows\System32\en-US\microsoft-windows-kernel-pnp-events.dll.mui.
- Не удается зарегистрировать microsoft-windows-kernel-pnp-events.dll.mui.
- Не удается запустить Windows. Отсутствует требуемый компонент: microsoft-windows-kernel-pnp-events.dll.mui. Повторите установку Windows.
- Не удалось загрузить microsoft-windows-kernel-pnp-events.dll.mui.
- Не удалось запустить приложение, потому что не найден microsoft-windows-kernel-pnp-events.dll.mui.
- Файл microsoft-windows-kernel-pnp-events.dll.mui отсутствует или поврежден.
- Не удалось запустить это приложение, потому что не найден microsoft-windows-kernel-pnp-events.dll.mui. Попробуйте переустановить программу, чтобы устранить эту проблему.
Файл microsoft-windows-kernel-pnp-events.dll.mui может отсутствовать из-за случайного удаления, быть удаленным другой программой как общий файл (общий с Windows) или быть удаленным в результате заражения вредоносным программным обеспечением. Кроме того, повреждение файла microsoft-windows-kernel-pnp-events.dll.mui может быть вызвано отключением питания при загрузке Windows, сбоем системы при загрузке microsoft-windows-kernel-pnp-events.dll.mui, наличием плохих секторов на запоминающем устройстве (обычно это основной жесткий диск) или, как нередко бывает, заражением вредоносным программным обеспечением. Таким образом, крайне важно, чтобы антивирус постоянно поддерживался в актуальном состоянии и регулярно проводил сканирование системы.
- Менеджер Plug n Play состоит из двух частей: ядра PNP и менеджеров PNP пользовательского режима.
- Эти диспетчеры PNP позволяют компьютеру приспосабливаться к аппаратным изменениям с минимальным вмешательством.
- Если вы видите ошибку, связанную с ядром в средстве просмотра событий, это может быть связано с устаревшими драйверами или неправильно настроенными устройствами.
- В этом руководстве будут объяснены все методы решения проблемы.

Если вы продолжаете получать ошибку Kernel PNP 411 в средстве просмотра событий и не знаете, что делать, то вы попали по адресу.
В этом руководстве мы обсудим, что такое Kernel PNP и как бороться с ошибками Kernel PNP. Давайте начнем!

Менеджер PNP в режиме ядра является частью диспетчера Plug and Play. Он взаимодействует с драйверами и компонентами ОС для управления, настройки и обслуживания устройств. Драйверы PnP поддерживают физические, логические и виртуальные устройства машины.
Что такое ошибка ядра PNP?
Ошибка Kernel PNP обычно возникает в Windows, если у вас неисправное оборудование или устаревшие драйверы устройств. Поэтому для работы режима PNP все установленные драйвера должны работать исправно.
Как исправить ошибку ядра PNP 411?
Прежде чем перейти к подробному устранению неполадок, давайте попробуем несколько быстрых исправлений, которые могут помочь нам с ошибкой:
- Восстановите свой компьютер до последней удачной конфигурации.
- Проверьте Windows на наличие обновлений.
- Убедитесь, что BIOS обновлен.
1. Чистая загрузка вашего ПК
- нажмите Окна + р ключ, чтобы получить Бегать консоль.
- Тип msconfig и нажмите Enter.
- На Услуги вкладку, поставьте галочку напротив Скрыть все службы Microsoft а затем нажмите Отключить все.
- Перейти к Запускать вкладку и нажмите Откройте диспетчер задач.
- Найдите каждый включенный элемент, щелкните его правой кнопкой мыши и выберите Запрещать.
- Закройте диспетчер задач. Нажмите Применять и ХОРОШО в окне конфигурации системы.
- Перезагрузите компьютер при появлении запроса.


2. Используйте командную строку
- нажмите Окна ключ, тип CMDи нажмите Запустить от имени администратора.
- Введите следующую команду и нажмите Enter:
sfc/scannow - Скопируйте и вставьте следующие команды и нажимайте Enter после каждой команды:
Dism /Online /Cleanup-Image /CheckHealthDism /Online /Cleanup-Image /ScanHealthDISM /Online /Cleanup-Image /RestoreHealth - Перезагрузите компьютер.


3. Установите/обновите драйверы
3.1 Установка драйверов вручную
- Нажимать Окна + р чтобы получить Бегать окно.
- Тип devmgmt.msc и нажмите Enter.
- Нажмите на Драйверы дисплея чтобы развернуть, щелкните правой кнопкой мыши Графический драйвери нажмите Обновить драйвер.
- Теперь перейдите к Системные устройстваразверните его и выполните тот же процесс для обновления драйверов набора микросхем.
- Перезагрузите компьютер.


3.2 Используйте сторонний инструмент
Обновлять драйверы устройств с помощью надежного средства обновления драйверов, такого как DriverFix, легко и быстро. Это средство обновления драйверов загружает и устанавливает лучшие драйверы для вашего устройства в несколько кликов.
- Скачайте и установите Драйверфикс.
- Запустите приложение, чтобы просканировать компьютер на наличие устаревших драйверов.

- После завершения сканирования выберите драйверы и нажмите Обновлять.

- Инструмент начнет загрузку последних версий драйверов для вашего ПК.

- Теперь нажмите «Далее» и следуйте инструкциям на экране, затем перезагрузите компьютер.


Использование DriverFix гарантирует, что все драйверы будут обновлены безопасно, и ваш компьютер будет автоматически получать любые другие будущие обновления.
⇒ Получить DriverFix
4. Отключить быстрый запуск
- нажмите Окна ключ, тип Панель управленияи нажмите Открыть.
- Перейдите в правую часть панели и выберите Большие иконки от Просмотр по выпадающее меню.
- Нажмите Параметры питания.
- Теперь выберите Выберите, что делают кнопки питания.
- Нажмите Изменить доступные в данный момент настройки.
- Снимите галочку рядом Включите быстрый запуск.
- Нажмите Сохранить изменения.


5. Выполните обновление на месте
- Перейдите на страницу загрузки программного обеспечения Microsoft и выберите версию Windows для установки.
- Скачать ISO-образ Windows 11 и выберите Windows 11 (многосерийный ISO).
- Выберите язык продукта, выберите Английскийнажмите Подтверждать, а потом Скачать.
- Щелкните правой кнопкой мыши на ISO и выберите Устанавливать. Теперь нажмите Setup.exe.
- В диалоговом окне «Установка Windows 11» выберите Следующий.
- Теперь нажмите Принимать согласиться с условиями лицензии.
- Следуйте инструкциям на экране для завершения.


Кончик
Когда вы перейдете на страницу «Все готово к установке», выберите Храните личные файлы и приложения чтобы ваши файлы не были удалены во время процесса.
Итак, это шаги по исправлению ошибки Kernel PNP 411 в Windows. Попробуйте эти шаги и сообщите нам, какой метод сработал для вас, в разделе комментариев ниже.
Kernel PnP or Kernel Plug and Play is a combination of software and hardware technologies that enables a Windows computer to recognize when a device is connected to it. The Kernel PnP error may cause issues with the hardware devices or the system’s hardware components. Some users experienced such an issue. For some users, the USB ports stopped working, whereas, some users experienced a Blue Screen error. However, in every case, the error is the same. In this article, we will see how to fix Kernel-PnP Event ID 411 on Windows 11/10.

After experiencing issues on Windows PC, when users investigated the cause in the Event Viewer, they saw the EventID 411 with the log name “Microsoft-Windows-Kernel-PnP.” If you are under the same situation, the following solutions will help you fix the Kernel-PnP Event ID 411 on Windows 11/10.
- Connect another USB device
- Uninstall and reinstall the USB Root Hub driver
- Update your Graphics Card driver
- Uninstall and reinstall your GPU driver
- Are you experiencing internet connectivity issues?
- Turn off fast Startup
- Update your BIOS and Chipset driver
- Perform an In-place Upgrade
Let’s see all these fixes in detail.
1] Connect another USB device
According to the users, their USB devices stopped working. When they investigated the cause of the issue in the Event Viewer, they saw this error message. The Kernel-PnP error usually occurs due to hardware issues. We suggest you connect another USB device to the same USB port or connect the same USB device to another USB port. If your device works after connecting it to another USB port, the problem may be associated with the USB port to which the device was connected previously.
If another device works fine after connecting it to the same USB port, the problem may be associated with your USB device. Uninstall and reinstall your USB device driver and see if it helps.
2] Uninstall and reinstall the USB Root Hub driver
For some users, USB ports stopped working. This happened when they disconnected and reconnected their USB devices. If all the USB ports stop working, the problem may be with the USB Root Hub driver. Open the Device Manager and see if the USB Root HUb driver shows any warning signs or not.
- Open the Device Manager.
- Expand Universal Serial Bus controllers branch.
- Double-click on USB Root Hub to open its Properties.
- See if any error message is shown under the General tab.
- If yes, uninstall the USB Root Hub driver and restart your computer.
After restarting your computer, check if the problem persists or not.
3] Update your Graphics Card driver
Some users experienced frequent crashes with their games. In such a case, the issue may be associated with the Graphics Card driver. Make sure that your GPU driver is up to date. Outdated versions of GPU driver causes several issues. Update your GPU driver to fix the issue.
For some users, installing the older version of the GPU driver worked. This can be done by rolling back the driver via the Device Manager (if the option is available).
4] Uninstall and reinstall your GPU driver
If updating the GPU driver did not help, uninstall it completely by using DDU and then reinstall it. Before uninstalling your GPU driver, download its latest version from the official website.
5] Are you experiencing internet connectivity issues?
Some users experienced internet connectivity issues due to the Kernel-PnP error with Event ID 411. The users who experienced internet connectivity issues on their PCs due to this error found that the problem was with their WiFi or network card. For them, replacing the network card resolved the issue.
When a network card fails, your computer is not able to connect to any WiFi network. You can check if the Device Manager is showing any error for your Network Adapter or not. You can contact a computer technician for further assistance regarding the health of your network card.
6] Turn off fast Startup

Turning off the Fast Startup did the trick for many affected users. You should also try this. Check if the Fast Startup is enabled. If yes, disable it.
7] Update your BIOS and Chipset driver
If the issue still persists or if you are experiencing a BSOD error, we suggest you update your system BIOS and chipset driver.
8] Perform an In-place Upgrade
If none of the above solutions worked for you, perform an In-place Upgrade. An In-place Upgrade repairs the Windows OS without uninstalling it. During this process, your data will not be erased but from the safety point of view, we recommend you back up your data.
How do I fix Kernel Power 41 in Windows 11?
The Kernel Power 41 issue can occur due to many reasons, like corrupted system files, corrupted drivers, etc. Hardware issues can also be responsible for triggering this error. To fix this, you can try some things like running the Power Troubleshooter, updating your device drivers, updating BIOS, etc.
What is the Kernel issue in Windows 10?
The Kernel is a core component of an operating system that manages communication between software (user-level applications) and hardware (memory, CPU, etc.). Kernel issues are the errors that occur when a Kernel detects some problems with your system. Kernel issues can also occur due to Kernel crash. In this case, you will experience BSOD errors on your system.
Read next: Fix Event ID 55 (Kernel-Processor-Power) error.