Search code, repositories, users, issues, pull requests…
Provide feedback
Saved searches
Use saved searches to filter your results more quickly
Sign up
![]() Если к службе Microsoft SQL Server должны подключаться программы с других компьютеров в сети, то необходимо чтобы правильным образом был настроен Брандмауэр Windows на сервере, где запущена служба. А именно разрешены входящие подключения по определенному порту, используемому компонентой Database Engine SQL Server. О том как узнать, какой порт использует SQL Server, изменить этот порт, а также настроить Брандмауэр Windows читайте в данной статье.
Если к службе Microsoft SQL Server должны подключаться программы с других компьютеров в сети, то необходимо чтобы правильным образом был настроен Брандмауэр Windows на сервере, где запущена служба. А именно разрешены входящие подключения по определенному порту, используемому компонентой Database Engine SQL Server. О том как узнать, какой порт использует SQL Server, изменить этот порт, а также настроить Брандмауэр Windows читайте в данной статье.
0. Оглавление
- Что понадобится
- Определение / изменения порта для «экземпляра по умолчанию»
- Определение / изменения порта для именованного экземпляра SQL Server
- Добавление правила в Брандмауэр Windows
1. Что понадобится
- Статья будет актуальна для Microsoft SQL Server 2012 и для Microsoft SQL Server 2008 (R2).
- В качестве операционной системы сервера рассматриваются Microsoft Windows Server 2012 (R2) или Microsoft Windows Server 2008 (R2)
2. Определение / изменения порта для «экземпляра по умолчанию»
По умолчанию SQL Server использует для соединения порт 1433. Чтобы проверить это, запустим оснастку «Диспетчер конфигурации SQL Server» (SQL Server Configuration Manager). В Microsoft Windows Server 2012 (R2) ее можно найти в списке всех программ.

В Microsoft Windows Server 2008 (R2) в меню «Пуск» (Start) — «Microsoft SQL Server 2012» — «Средства настройки» (Configuration Tools) — «Диспетчер конфигурации SQL Server» (SQL Server Configuration Manager)

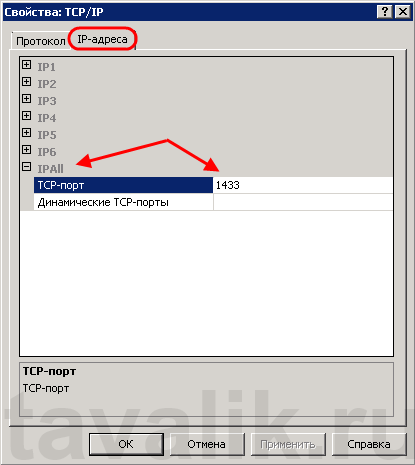
В запустившейся оснастке раскроем вкладку «Сетевая конфигурация SQL Server» (SQL Server Network Configuration), затем выделим вкладку «Протоколы для MSSQLSERVER» (Protocols for MSSQLSERVER). В окне слева в таблице найдем протокол TCP/IP, кликнем по нему правой кнопкой мыши и в контекстном меню выберем «Свойства» (Properties).

В открывшемся окне свойств перейдем на вкладку «IP-адреса» (IP Addresses), затем найдем и раскроем в дереве настроек ветку «IPAll». Здесь мы видим, что выбранный экземпляр SQL Server использует TCP-порт по умолчанию, а именно порт 1433. Если по каким то причинам требуется использовать другой номер порта, необходимо просто поменять текущее значение, нажать «Применить» (Apply) и перезапустить службу SQL Server.
3. Определение / изменения порта для именованного экземпляра SQL Server
В случае использования именованного экземпляра SQL Server ситуация аналогичная, за тем лишь исключением, что используются динамические TCP-порты. Это значит, что для каждого отдельного экземпляра будет назначен свой номер порта.
Для определения / изменения текущего порта, найдем в оснастке «Диспетчер конфигурации SQL Server» (SQL Server Configuration Manager) вкладку с сетевой конфигурацией необходимого нам экземпляра SQL Server и перейдем в свойства протокола TCP/IP для данного экземпляра. Здесь, как и в предыдущем случае, на вкладке «IP-адреса» (IP Addresses) в ветке «IPAll» можно узнать, а также изменить динамический TCP-порт для текущего экземпляра SQL Server.

4. Добавление правила в Брандмауэр Windows
Теперь, когда мы определились с номером порта, который будет использоваться для подключения к службе SQL Server, создадим разрешающее правило в Брандмауэре Windows на сервере, где запущена служба.
О том, как добавить разрешающее правило для определенного порта в Microsoft Windows Server 2008 (R2) я уже писал здесь. В Windows Server 2012 (R2) действия аналогичны.
Запускаем брандмауэр Windows (Windows Firewall). Сделать это можно кликнув правой кнопкой мыши по «Пуск» (Start), затем «Панель управления» (Control Panel) — «Система и безопасность» (System and Security) — «Брандмауэр Windows» (Windows Firewall). Или же выполнив команду firewall.cpl (для этого необходимо нажать комбинацию клавиш Win + R, в окне «Отрыть» (Open) ввести имя команды и нажать «ОК» ) .

Далее нажимаем на «Дополнительные параметры» (Advanced Settings) в меню слева.

В открывшемся окне, в дереве слева откроем вкладку «Правила для входящих подключений» (Inbound Rules), а затем в меню «Действия» (Actions) выберем пункт «Создать правило…» (New Rule…).

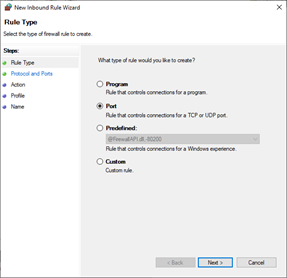
Запустится «Мастер создания правила для нового входящего подключения» (New Inbound Rule Wizard). На первой странице выберем тип правила (Rule Type) «Для порта» (Port) и нажмем «Далее» (Next).

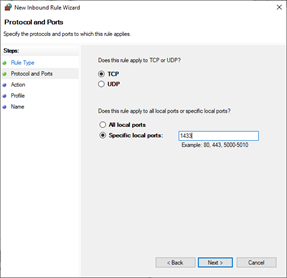
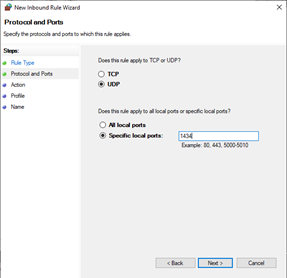
Затем необходимо указать протокол (в нашем примере это TCP) и, непосредственно, номер порта (Specific local ports), который открываем. После чего жмем «Далее» (Next).

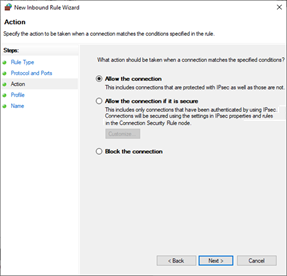
Теперь укажем действие связанное с добавляемым правилом. Выберем «Разрешить подключение» (Allow the connection) и нажмем «Далее» (Next).

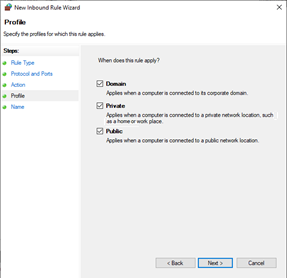
На следующей странице нужно указать, для каких профилей брандмауэра будет действовать правило. Отмечаем нужные профили галочками и жмем «Далее» (Next).

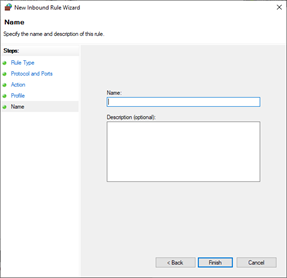
Ну и наконец, вводим имя и описание для нового правила и нажимаем «Готово» (Finish) для завершения работы мастера.

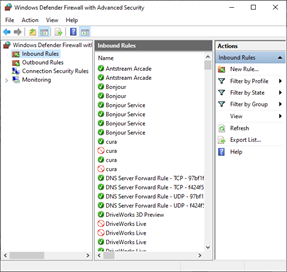
А в оснастке «Брандмауэр Windows в режиме повышенной безопасности» (Windows Firewall with Advanced Security) в таблице «Правила для входящих подключений» (Inbound Rules) мы увидим только что созданное правило.

На этом настройка Брандмауэра завершена. Клиентские программы должны без препятствий подключиться к службе SQL Server.
5. Порт для администрирования MS SQL Server
Для того, чтобы к MS SQL Server можно было подключиться с помощью программы SQL Management Studio, необходимо также добавить правило для протокола UDP и порта 1434.
Подробнее о используемых SQL Server портах здесь.
This document will show you how to open remote access to SQL Server by configuring Windows Firewall.
Applies To
- Windows 8.1
- Windows 10
- Windows Server 2016
- Windows Server 2019
- Microsoft SQL Server Express/Standard or higher editions 2012 or later.
- Microsoft SQL Server Compact Edition 4.0 or later.
Prerequisites
To follow the steps in this document you will need to have one of the versions of SQL Server running on one of the versions of Windows mentioned above.
This article only applies to Windows Defender Firewall. Other Firewalls may have similar settings that can be applied.
It is also assumed that you have configured SQL Server for remote access, either manually, or by following the steps in How To: Configure SQL Server for Remote Access.
You need to be a member of the Administrators group to perform the steps in this document.
Configure Windows Firewall
There are two methods for configuring Windows Firewall for SQL Server.
Choose one of the two methods below, that best suits your IT policy:
- Create Inbound Rules for the SQL Server Ports
- Allow the SQL Server applications in the Firewall
Create Inbound Rules for the SQL Server Ports
This method will target the specific ports SQL Server uses for communication.
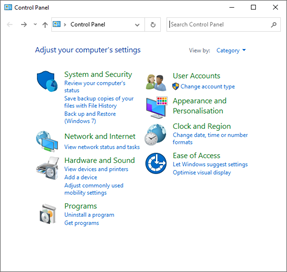
- Open Windows Control Panel and select System and Security.

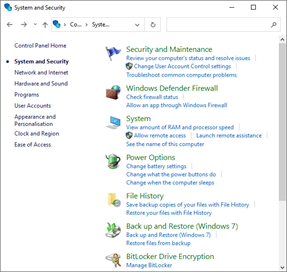
- From the System and Security window, click Windows Defender Firewall.
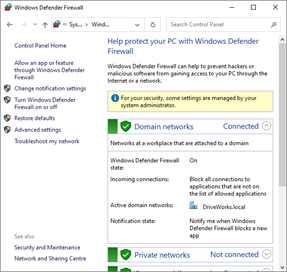
- From the Windows Defender Firewall window, click Advanced Settings.
- Add the port SQL uses for TCP.
From the Windows Defender Firewall with Advanced Security window:
Select Inbound Rules from the left hand column.
Click New Rule… from the Actions column.
- From the New Inbound Rule Wizard, select Port.
Click Next.
- Select TCP.
Select Specific local ports.
Enter 1433.
Click Next.
- Select Allow the connection.
Click Next.
- Select Domain, Private and Public.
Click Next.
- Enter a name for the rule.
For example: SQL TCP.
- Add the port SQL uses for UDP.
From the Windows Defender Firewall with Advanced Security window:
Select Inbound Rules from the left hand column.
Click New Rule… from the Actions column.
- From the New Inbound Rule Wizard, select Port.
Click Next.
- Select UDP.
Select Specific local ports.
Enter 1434.
Click Next.
- Select Allow the connection.
Click Next.
- Select Domain, Private and Public.
Click Next.
- Enter a name for the rule.
For example: SQL TCP.
Click Finish.
Allow the SQL Server applications in the Firewall
This method will open all ports for access to SQL Server.
- Open Windows Control Panel and select System and Security.
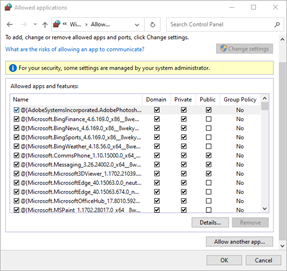
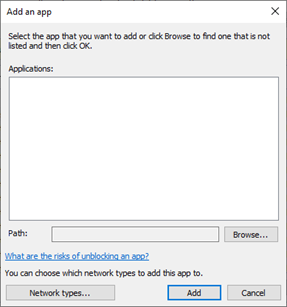
- From the System and Security window, click the link to Allow an app through Windows Firewall.
- Allow the SQL Server Browser:
Click the Allow another app… button.
If your Windows Firewall settings are managed by your system administrator, you may need to click the Change Settings button.
- Click the Browse button.
Browse to sqlbrowser.exe
This is located in the default installation folder:
C:\Program Files (x86)\Microsoft SQL Server\90\Shared
Click the Add button.
- Allow the SQL Server Application:
Click the Allow another app… button.
- Click the Browse button.
Browse to sqlserver.exe
This is located in the default installation folder:
C:\Program Files\Microsoft SQL Server\<Version and Edition>\MSSQL\Binn
Version and Edition
The Version and Edition folder depends on the installed SQL Server.
For instance:
- SQL Server 2012 (Express) is located within the folder MSSQL11.SQLEXPRESS
- SQL Server 2017 (Express) is located within the folder MSSQL14.SQLEXPRESS
Other versions and editions will be similarly named and cannot be confused with the other folders in the Microsoft SQL Server folder.
Click the Add button.
- Click the OK button to save and apply the changes.
| Knowledge Base Article Ref: | KB13103002 |
|---|
(Updated 2016-10-24)
Intro
If you want to allow remote computers on your network to access an instance of Sql Server running on one machine, you’ll have to add some new Incoming rules to the Windows Firewall, or no connections can come through. So, let’s show you what has to be considered and how to achieve this.
Sql Server Instance Types
Before you can configure the Windows Firewall to allow remote access to your Sql Server instance, it’s important to understand the “instance type” of the Sql Server that you are running. For Sql Server, its “instance type” can either be the default instance, an unnamed instance, or a named instance. Which one you have determines which port you have to open in Windows Firewall.
- When SQL Server is installed as the default instance, it does not require a client to specify the name of the instance to make a connection. The client only has to know the server name. This typically uses Port 1433 in the TCP protocol.
- A named instance is identified by the network name of the computer plus the instance name that you specify during installation (i.e. \\ComputerName\SqlExpress or something similar). The client must specify both the server name and the instance name when connecting. This typically uses the Sql Server Browser service to find the Sql Server instance, and that requires access to Port 1434 UDP protocol.
Windows Firewall Setup to Allow Remote Access
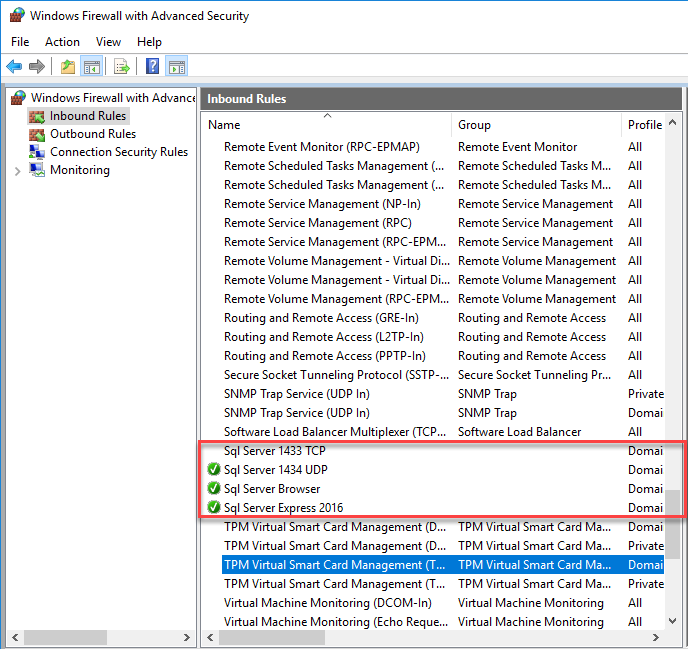
So, in order to allow remote access to the Sql Server instance, you will need to add these Incoming rules to the Windows Firewall:
- Add an Incoming rule to all access the application SqlServr.exe (C:\Program Files\Microsoft SQL Server\MSSQL13.SQLEXPRESS\MSSQL\Binn\sqlservr.exe)
- If you want to access the Sql Server Instance from other computers by using the computer name (i.e. {ComputerName}\SQLEXPRESS, you will need to add an Incoming rule to allow access to the application SqlBrowser.exe (C:\Program Files (x86)\Microsoft SQL Server\90\Shared\sqlbrowser.exe). Note: If you are only going to use the IP address {xxx.xxx.xxx.xxx}\SQLEXPRESS, then you will not need this rule for SqlBrowser.exe.
- Add an Incoming rule for the correct port (1433 TCP or 1434 UDP depending on Sql Server instance type (from above)).
You can use these handy Poweshell scripts to add the above Firewall rules:
|
# http://mattslay.com/opening-up-windows-firewall-to-allow-sql-server-to-allow-remote-connections/ # https://blog.brankovucinec.com/2015/12/04/scripts-to-open-windows-firewall-ports-for-sql-server/ Write-host Enabling SQLServer Default instance port 1433 TCP Inbound New-NetFirewallRule -DisplayName «SQL Server TCP Port 1433» –Direction inbound -Protocol TCP –LocalPort 1433 -Action Allow Write-host Enabling SQLServer Named Instance port 143 UDP Inbound New-NetFirewallRule -DisplayName “SQL Server UDP Port 1434” -Direction Inbound –Protocol UDP –LocalPort 1434 -Action allow Write-host Enabling SQLServer EXE Application rule New-NetFirewallRule -DisplayName “SQL Server EXE” -Direction Inbound -Program «C:\Program Files\Microsoft SQL Server\MSSQL13.SQLEXPRESS\MSSQL\Binn\sqlservr.exe» -Action allow Write-host Enabling SQLServer Browser Application rule New-NetFirewallRule -DisplayName “SQL Server Browser” -Direction Inbound -Program «C:\Program Files (x86)\Microsoft SQL Server\90\Shared\sqlbrowser.exe» -Action allow |
You should see the new rules here:
Sql Server Full version
For the full version of Sql Server (not Express), by default it installs as the default instance unless you specify an instance name. So, the next step to allow remote connections to the default instance is to add a Port Rule to open Port 1433 for the TCP protocol.
Sql Server Express
SQL Server Express always installs by default as a named instance unless you force a default instance during setup. So, if you are running a named instance of Sql Server (or Sql Server Express), and you want to allow remote connections to it, add an Incoming port rule for Port 1434 for the UDP protocol.
Since I was running a named instance, I found that I did not need the 1433 TCP port rule at all, I only needed the 1434 UDP port rule (along with the two application rules) to get it working on my network.
Other steps to check
This post only covers the Windows Firewall. There are other steps required in configuring Sql Server itself:
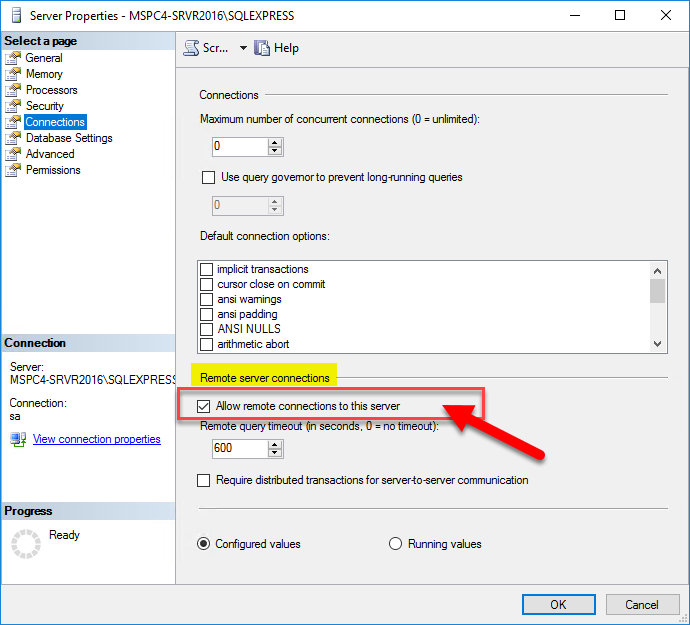
- Enabling the correct protocols, and make sure Sql Server has the option “Allow remote connections to this server” checked on the Connections tab of the Server properties. You can access this setting in Sql Server Management Studio tool.
- Enable the correct protocols in the Sql Server Configuration Management Tool, under the Sql Server Network Configuration node. Honest, I wasn’t sure exactly which I needed, so I enabled all 3. I’m pretty sure TCP/IP was disable by default.

Some details pulled from these links:
https://technet.microsoft.com/en-us/library/ms165614%28v=sql.90%29.aspx
and a comment by user J_m on this Technet article: https://technet.microsoft.com/en-us/library/ms175043%28v=sql.110%29.aspx
Doctor of Code
Home » SQL » Configure Windows Firewall Ports for SQL Server Settings

Stephen West ~
Modified: March 14th, 2023 ~ SQL ~ 3 Minutes Reading

SQL server is a database management system developed by Microsoft and it is used to manage and store information on the SQL database. A database is a collection of data that is organised in such a way so that it can easily be managed, accessed, and updated.
To prevent unauthorised access of a database, there is a need of firewall settings on the SQL server. SQL server firewall settings can be done by using SQL server configuration manager. Therefore, in this post, we are going to discussed how to configure firewall for SQL Server by using SQL Server configuration manager.
Table of Content
- Ports in Use by SQL Server
- Configuration Manager
- Conclusion
Ports Used By SQL Server
Static Port: At the time of SQL server configuration, default instance of SQL Server listens on port 1433. This is called static or fixed port. The port can be changed for security purpose or client application requirement.
Dynamic Port: The named instances (including SQL Server Express) are configured to listen on dynamic ports, by default. It means that, when the Database Engine starts, it finds an available port every time and uses that port number.
Configure Firewall For SQL Server Using Configuration Manager
Follow the below-mentioned procedures to configure firewall for SQL server using SQL server configuration manager:
For Static Port:
- Go to Start>Run and type WF.msc and then click on OK button
- Under the Windows Firewall with Advanced Security, right-click on Inbound Rules, and then click on New Rule
- In the Rule Type box, select the option Port, and then click on Next button
- In the dialog box of Port, select the option TCP. Then, select the option Specific local ports, after that type the port number 1433 for the static instance. After that click on Next button
- Select Allow the action under the Action dialog box and then click on Next button
- Now, Under the Profile dialog box, select any profiles which you want to connect to the SQL server, and then click on Next button
- Type a name and description of the rule, in the Name dialog box and then click on Finish button
For Dynamic Port:
- Go to Start>Run and type WF.msc and then click on OK button
- Under the Windows Firewall with Advanced Security, right-click on Inbound Rules, and then click on New Rule
- In the Rule Type box, select Program, and then click on Next button
- Now, under the Program dialog box, select the option This program path. After that, click on Browse, and go to the SQL Server instance that you want to access by using the firewall, and then click on Open. The location of SQL Server by default is C:\ProgramFiles\MicrosoftSQLServer\MSSQL11.MSSQLSERVER\MSSQL\Binn\Sqlservr.exe. After that, click on Next
- Select Allow the action under the Action dialog box and then click on Next
- Now, Under the Profile dialog box, select any profiles which you want to connect to the SQL server, and then click on Next button
- Type a name and description of the rule, in the Name dialog box and then click on Finish button
Conclusion
In this post, we have discussed the procedures of SQL server firewall settings using SQL server configuration manager for static or dynamic port. By default, the value of static port is 1433. This port number can be changed for security purpose or client application requirement.
If it is changed than, it becomes dynamic port. By following the above-mentioned steps, users can configure firewall for SQL server to prevent unauthorised access to a network.