В данной статье показаны действия, с помощью которых можно включить или отключить функцию Печать в PDF (Microsoft Print to PDF) в операционной системе Windows 10.
Печать в PDF (Microsoft Print to PDF) — функция представленная в Windows 10, которая позволяет легко конвертировать и сохранять любые документы в формате PDF с помощью операции печати без установки сторонних инструментов PDF.
С помощью этой функции можно забыть обо всех других инструментах, которые вы когда-либо использовали для сохранения PDF-копий документов любого типа, будь то веб-страница или изображение JPEG, PNG на вашем компьютере, документ word и т. д.
Функция Печать в PDF (Microsoft Print to PDF) по умолчанию включена, но если вы не видите её в списке в диалоговом окне печать, скорее всего она была отключена. Также, если по какой-то причине функция печати в PDF работает не корректно или мешает другому инструменту, который вы используете для печати, то можно отключить её.
Содержание
- Как отключить или включить Печать в PDF (Microsoft Print to PDF) в окне «Компоненты Windows»
- Как включить или отключить функцию Печать в PDF (Microsoft Print to PDF) в Windows PowerShell
- Как включить или отключить функцию Печать в PDF (Microsoft Print to PDF) в командной строке
- Видео-инструкция
Как отключить или включить Печать в PDF (Microsoft Print to PDF) в окне «Компоненты Windows»
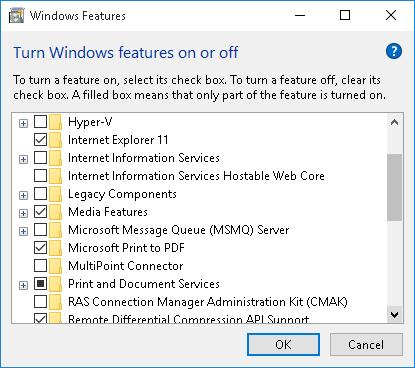
Чтобы отключить функцию Печать в PDF (Microsoft Print to PDF), нажмите сочетание клавиш + R, в открывшемся окне Выполнить введите OptionalFeatures и нажмите кнопку OK.
В окне «Компоненты Windows», снимите флажок чтобы отключить параметр Печать в PDF (Майкрософт) и нажмите кнопку OK.
После того как Windows применит требуемые изменения, нажмите кнопку Закрыть, при этом перезагрузка компьютера не требуется.
Как включить или отключить функцию Печать в PDF (Microsoft Print to PDF) в Windows PowerShell
Также отключить или включить функцию Печать в PDF (Microsoft Print to PDF) можно в консоли PowerShell.
Чтобы отключить функцию (компонент) Печать в PDF (Microsoft Print to PDF), откройте консоль Windows PowerShell от имени администратора и выполните следующую команду:
Disable-WindowsOptionalFeature -FeatureName «Printing-PrintToPDFServices-Features» -Online
После выполнения команды, изменения вступают в силу сразу, перезагрузка компьютера не требуется.
Чтобы включить функцию (компонент) Печать в PDF (Microsoft Print to PDF), откройте консоль Windows PowerShell от имени администратора и выполните следующую команду:
Enable-WindowsOptionalFeature -FeatureName «Printing-PrintToPDFServices-Features» -Online
После выполнения команды, изменения вступают в силу сразу, перезагрузка компьютера не требуется.
Как включить или отключить функцию Печать в PDF (Microsoft Print to PDF) в командной строке
Ещё, можно отключить или включить функцию Печать в PDF (Microsoft Print to PDF) используя командную строку.
Чтобы отключить функцию (компонент) Печать в PDF (Microsoft Print to PDF), запустите командную строку от имени администратора и выполните следующую команду:
Dism /online /Disable-Feature /FeatureName:»Printing-PrintToPDFServices-Features»
После выполнения команды, изменения вступают в силу сразу, перезагрузка компьютера не требуется.
Чтобы включить функцию (компонент) Печать в PDF (Microsoft Print to PDF), запустите командную строку от имени администратора и выполните следующую команду:
Dism /online /Enable-Feature /FeatureName:»Printing-PrintToPDFServices-Features»
После выполнения команды, изменения вступают в силу сразу, перезагрузка компьютера не требуется.
Используя различные способы представленные выше, можно включить или отключить функцию Печать в PDF (Microsoft Print to PDF) в операционной системе Windows 10.
Видео-инструкция
Также, можно посмотреть видео ролик в котором показано как включить или отключить функцию Печать в PDF (Microsoft Print to PDF) в операционной системе Windows 10.
.
Продолжаем знакомиться с новыми функциями Windows 10. Сегодня речь пойдет о малоизвестной, но крайне полезной функции Windows 10 – поддержки виртуального PDF принтера, позволяющего выполнять печать любых документов или веб-страниц в PDF файл. Теперь для создания PDF файла из любого документа не требуется установка сторонних утилит. Таким образом, Windows 10 стала первой версией Windows с нативной поддержкой печати в PDF файл (это также косвенно говорит о том, что Майкрософт не планирует в дальнейшем продвигать свой формат XPS).
Посмотрим, как включить поддержку Print to PDF в Windows 10 и как воспользоваться виртуальным PDF принтером.
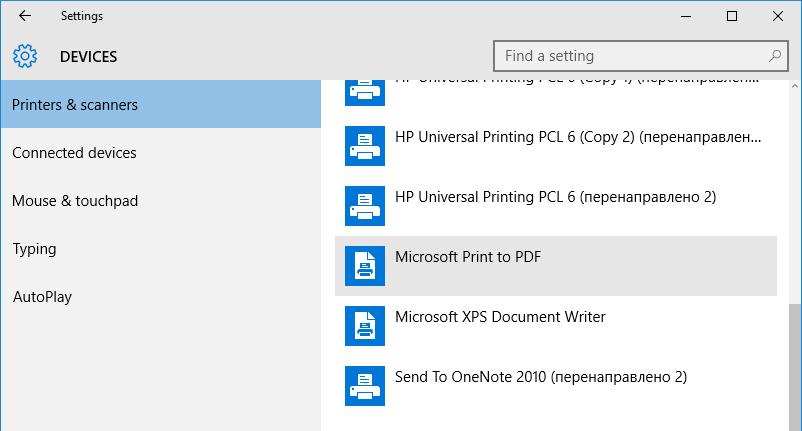
Откройте современную панель управления (Settings) Windows 10 и перейдите в раздел Devices (Устройства). Найдите в списке уставленных принтеров виртуальный принтер с именем Microsoft Print to PDF. Это и есть виртуальный PDF принтер.
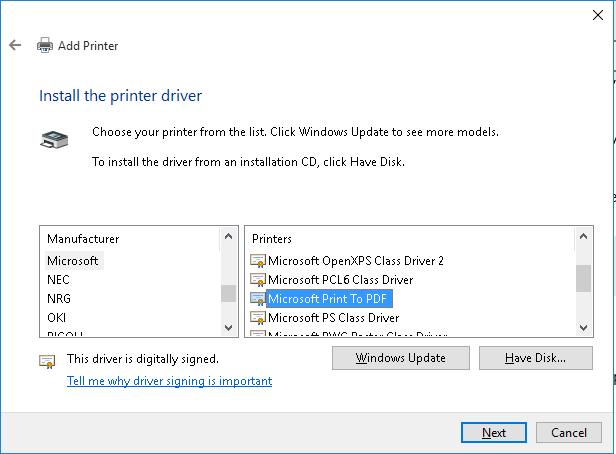
- Add a local printer or network printer with manual settings
- Порт: FILE: (Print to File)
- Драйвер: Microsoft Print to PDF (находится в разделе Microsoft)
Возможность быстро создать PDF-документ практически из любого файла – это одна из новых полезных, но все еще мало известных функций Windows 10. В сущности, новая операционная система является первой версией Windows, которая по умолчанию включает в себя виртуальный принтер для создания файлов в этом формате.
Виртуальный принтер называется Microsoft Print to PDF, и чтобы им воспользоваться, нужно перейти в раздел «Печать» внутри документа или файла, который требуется преобразовать в PDF. Например, чтобы преобразовать в PDF веб-страницу, которая открыта в браузере Microsoft Edge, вы должны открыть меню опций (три точки в верхнем правом углу экрана), а затем нажать кнопку «Печать». Более быстрый способ заключается в нажатии сочетания клавиш Ctrl + P.
Так вы откроете окно параметров печати, которое и позволит вам выполнить печать в формате PDF. Здесь же можно настроить некоторые параметры, в том числе указать диапазон страниц.
После нажатия на кнопку «Печать» страница будет автоматически преобразована в PDF-файл, который будет сохранен в папке «Документы».
Данная процедура будет в точности такая же и с любым другим типом файла, который можно распечатать. Нужно просто зайти в меню «Печать» и выбрать Microsoft Print to PDF.
Что делать, если у меня нет Microsoft Print to PDF?
Если виртуальный принтер не отображается в параметрах печати, вы можете добавить его вручную, выполнив следующие шаги:
- Перейдите в Параметры -> Устройства -> Принтеры и сканеры.
- Нажмите «Добавить принтер или сканер».
- Затем нажмите «Необходимый принтер отсутствует в списке».
- В окне мастера установки принтера выберите последний вариант «Добавить локальный или сетевой принтер с параметрами, заданными вручную» и нажмите «Далее».
- На следующей странице вам будет предложено указать порт принтера. Выберите вариант «Использовать существующий порт», а внутри него выберите порт «FILE: (Печать в файл)».
- В списке производителей принтеров найдите Microsoft, а в колонке справа выберите Microsoft Print to PDF, и нажмите «Далее».
- Далее желательно сохранить текущий драйвер, выбрав опцию «Использовать уже установленный драйвер».
- Вот мы и закончили. Остается только присвоить принтеру имя, нажать кнопку «Далее» и выбрать, хотите ли вы чтобы он был принтером по умолчанию.
Чтобы создать PDF с помощью созданного принтера, следуйте тем же шагам, которые я описал в первой части данного руководства.
Отличного Вам дня!
I’ve always been a fan of tools, such as CutePDF Writer, that allow me to generate a PDF file via a print option. There are just so many instances where this capability can come in extremely handy.
For example, a company where I once worked had a large variety of knowledgebase content locked away in an old Lotus Notes database. Not all of the information was still pertinent, but there were a quite a few gems that folks in the office found valuable. Unfortunately, the export options on the Notes client were lousy, and much of the original formatting would be lost in the process, thus making the information difficult to decipher. As the old hardware running the Lotus Notes server was on its last leg, getting those gems out as quickly as possible became very important. To solve the problem, I suggested installing CutePDF Writer on our Windows XP workstations. We then began saving the valuable information in PDF files.
Boy, what I would have given to have a native PDF printer back in those days!
Well, fortunately, Microsoft has finally bestowed such a feature in Windows 10. Called Microsoft Print to PDF, this feature is installed as a native printer in Windows 10, right next to the good old Microsoft XPS Document Writer. Let’s take a closer look.
Print to PDF
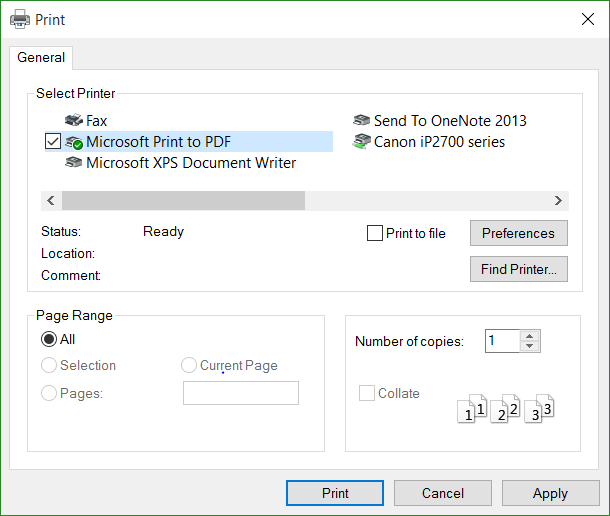
Of course, the Microsoft Print to PDF feature is available in every application in Windows 10 that has printing capability. You just access the Print dialog box from a standard Windows application (Figure A) or a Windows Store app (Figure B) and select the Microsoft Print to PDF option.
Figure A
You’ll find the Microsoft Print to PDF feature in the Print dialog box from a standard Windows application.
Figure B
You’ll find the Microsoft Print to PDF feature in the Print dialog box from a Windows Store app.
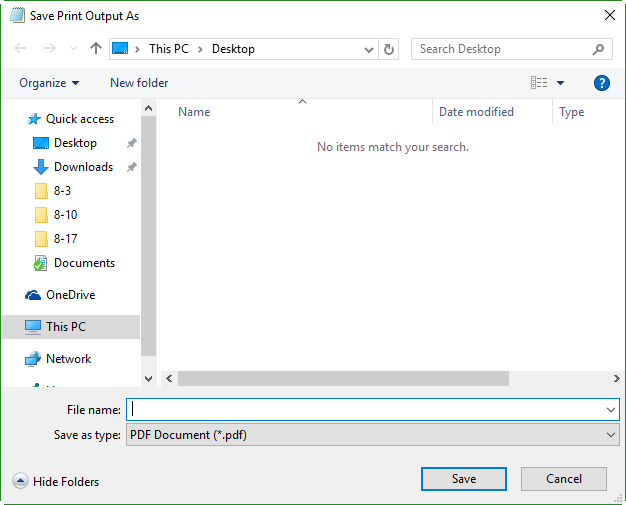
When you select the Microsoft Print to PDF option from a standard Windows application, you’ll see standard looking save dialog box, titled Save Print Output As. You’ll be prompted for a filename and will see that the file type is PDF (Figure C).
Figure C
From a standard Windows application, you’ll be prompted to provide a filename for the PDF.
When you select the Microsoft Print to PDF option from a Windows Store app, the file will automatically be saved to the Documents folder, and you’ll see a toast when it’s complete (Figure D).
Figure D
From an Windows Store app, the PDF file will be automatically saved, and you’ll see a toast when it is complete.
Take advantage of print to PDF
While printing to PDF might seem like a pretty mundane task, there are a number of situations where this capability can come in extremely handy. And now that it’s natively available in Windows 10, it’s easy too. Here are some situations where I take advantage of the Microsoft Print to PDF option.
As you may know from reading my articles, I have an HP Stream 7 tablet, and it’s now running Windows 10. I literally take it with me wherever I go, and I usually don’t have access to a network printer. I’ll be sitting in a Starbucks, drinking a cup of Pike Place, and surfing the net in Microsoft Edge. If I find some information that I want to have available at a later date, I’ll just use the Microsoft Print to PDF option.
I was recently running System Information on a couple of Windows 8 systems with the aim of gathering details on the system drivers on those systems. As I was doing so, I wished that Windows 8 had Microsoft Print to PDF. A light bulb flashed in my head, and I jumped over to my Windows 10 system. Using Remote Desktop, with Printers selected in the Local Resources tab, I connected to each of the Windows 8 systems in succession and ran System Information. I then accessed the Microsoft Print to PDF option and saved the information as a PDF file on my Windows 10 system. (I know that I could have used System Information’s Remote Computer feature, but opted for Remote Desktop instead.)
Over the years, I’ve collected a bunch of XPS files. While the XPS format is easy enough to use, I’ve often wanted to have some of those documents in PDF format. So, I just opened those documents in Windows 10’s XPS Viewer application, accessed the Print command, and selected the Microsoft Print to PDF option.
I know plenty of folks who often convert their JPG photos into PDF format for a number of reasons that I’m not going to get into here. With the Microsoft Print to PDF option, you no longer have to go in search of a third-party solution–just fire up Windows 10’s Photos app, load an image, access the Print command, and select the Microsoft Print to PDF option.
What your take?
What do you think about Windows 10’s Microsoft Print to PDF option? I shared several situations where I’ve found it advantageous to be able to natively print to a PDF file. Do you have a situation where you use, or would like to use, Windows 10’s Microsoft Print to PDF option? Share your opinion in the discussion thread below.
The Microsoft «Print to PDF» feature was a much-awaited feature that Microsoft finally introduced with Windows 10. Mac and Linux have already provided this feature to their users for quite some time now. Although Microsoft joined the party a bit late, the Print to PDF feature is now available in almost all the printable applications of Microsoft, such as Word, Excel, PowerPoint, etc. With this feature, you can now create a printable PDF document easily and instantly. So, if you have just heard of the Print to PDF feature and want to learn how to use it, then this article is for you. Here we will present a detailed step-by-step guide on how to use Print to PDF in Windows 11, 10, and 7. Besides, a universal PDF editing tool for all platforms will be introduced. Read on to find out.
Supports Windows 7 or later100% secure
Supports macOS 10.14.6 or later100% secure
Part 1. Everything You Should Know About Print to PDF
Print to PDF is a useful feature for anyone who wants to quickly create a PDF file from a Microsoft application. So, let’s now cover all the basics about the Print to PDF feature worth knowing.
1.1 What is «Print to PDF»? Does it Actually Print Anything?
As the name implies, Print to PDF is a feature that allows you to save a file in a printable PDF format. If you are using one of Microsoft’s printable applications, such as Word, Excel, or PowerPoint, you can use the Microsoft Print to PDF feature to instantly create a PDF document of the Microsoft application file.
Although it has the word «print» in its name, it does not print the file immediately. Instead, it saves the file in PDF format but allows you to customize the PDF file according to your printing needs, such as orientation, paper size, margins, etc. This way, when you want to print the PDF file, you can instantly print it with the desired settings. In short, Print to PDF in Windows 10 and 11 lets you save the file in PDF easily and instantly.
1.2 What’s the Difference between «Print to PDF» and «Save as PDF»?
Many users question that Microsoft already provides us the option to «Save as PDF», then what difference does «Print to PDF» bring?
The «Save as PDF» feature saves the original file version and converts it into PDF format without making any changes. On the other hand, the «Print to PDF» feature lets you create a PDF file in the digital paper layout, showing how it will look when printed. Therefore, it only extracts the data from the file that fits with the requested print dimensions.
Some of the other differences between “Print to PDF” and “Save as PDF” are as follows:
- Fixed Layout: Print to PDF automatically creates a fixed layout that fits the paper size, while Save as PDF saves the original layout structure of the file.
- Hyperlinks: Print to PDF most likely makes the hyperlinks in the file inactive, while Save as PDF keeps the hyperlink active.
- Bookmarks: Print to PDF removes bookmarks from the file, while Save as PDF keeps the bookmarks.
- Background: Print to PDF will not always save the same background color of the file, while Save as PDF will keep the same background color.
In short, Print to PDF and Save as PDF features have their own benefits and outputs. If you want to create a printable PDF layout, then Print to PDF should be your pick, while if you want to convert an original file version in PDF, then Save as PDF should be your pick.
Part 2. A Simple and Instant Way to Print to PDF in Microsoft
Microsoft Print to PDF looks like a handy feature to instantly create a PDF of any file. In Part 3, we’ll show you the steps on how to use Print to PDF in Microsoft. But before that, it is important to mention the limitations of this feature, as follows:
- It creates a PDF with a large file size.
- Once it creates a PDF, you cannot edit it unless you use a third-party tool.
- It makes hyperlinks inactive, removes bookmarks, and even changes the background/layout.
So, what if we tell you that you have a better alternative than Microsoft Print to PDF, which not just instantly creates PDFs but also provides other wide range of customization options. That’s where UPDF comes into action.
UPDF is a one-stop tool for creating PDFs from any printable application on Windows without losing formatting. It provides all the powerful PDF tools you need to print and edit PDFs without hassle. Moreover, it offers a user-friendly interface, making it easy for anyone to quickly print a PDF on Windows.
Key Features of UPDF
- It provides a click-based interface to instantly generate printable PDFs of files.
- It provides rich printing settings.
- It is compatible with all major platforms, including Windows, Mac, iOS, and Android.
- It provides feature-rich editing capabilities, such as editing text, modifying images, etc.
- It allows annotating PDFs with highlights, sticky notes, stickers, stamps, underlines, etc.
- Its enterprise version is available for businesses.
Follow the below steps to use UPDF to print a PDF in Windows:
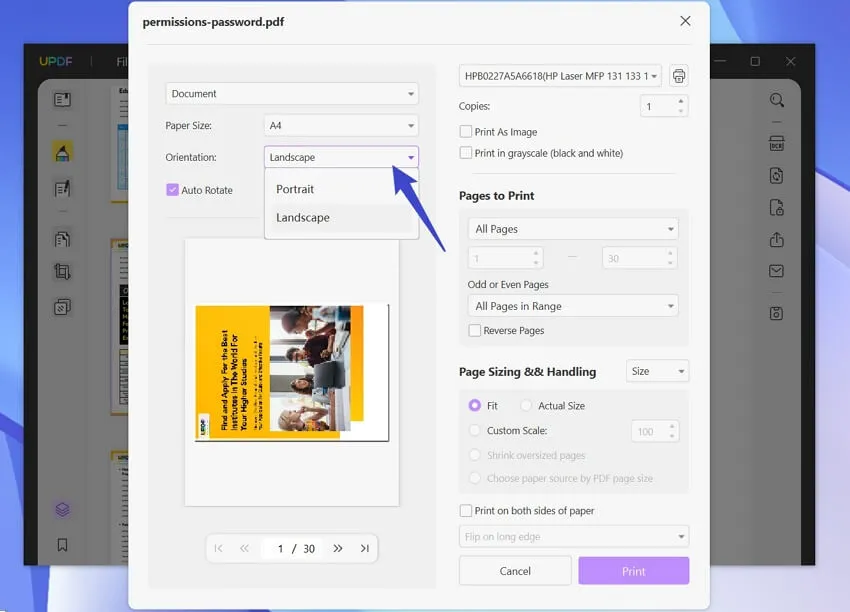
Step 1. Open the file with UPDF and click File > Print.
Step 2. Set the printing properties, such as page size, orientation, pages to print, etc.
Step 3. Click the «Print» button.
That’s it! So, a three-step process lets you quickly print a PDF no matter which Windows version you are using.
Part 3. How to Print to PDF in Microsoft (Win 10 & 11 Only)
Every Microsoft printable application allows you to use the Print to PDF feature in its own way. So, let’s now explore how to use Print to PDF in popular Microsoft applications:
3.1 Print to PDF in Microsoft Word
Open the file in Microsoft Word and follow the below steps:
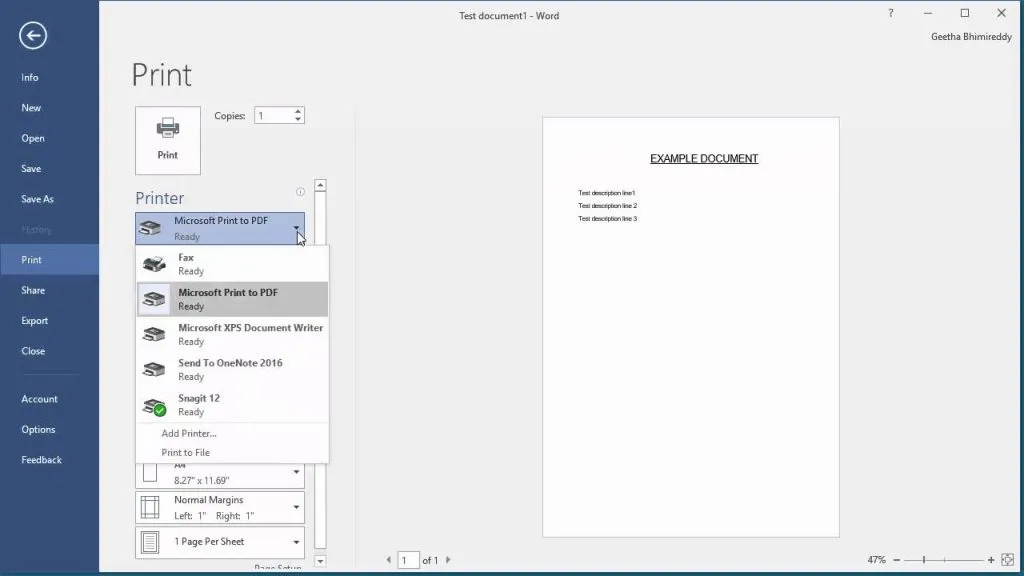
- Click «File» from the top left corner and then click «Print«. Alternatively, press the «Ctrl + P» shortcut keys.
- Click the drop-down menu under the «Printer» section and choose «Microsoft Print to PDF«. You can also customize other print-related settings, such as orientation, paper size, margins, etc.
- Lastly, click the «Print» button.
This way, a PDF file will be created of your Word document.
3.2 Print to PDF in Microsoft Excel
The «Print to PDF» feature in Microsoft Excel is similar to using in Microsoft Word. Just open the file in Microsoft Excel and follow the below steps:
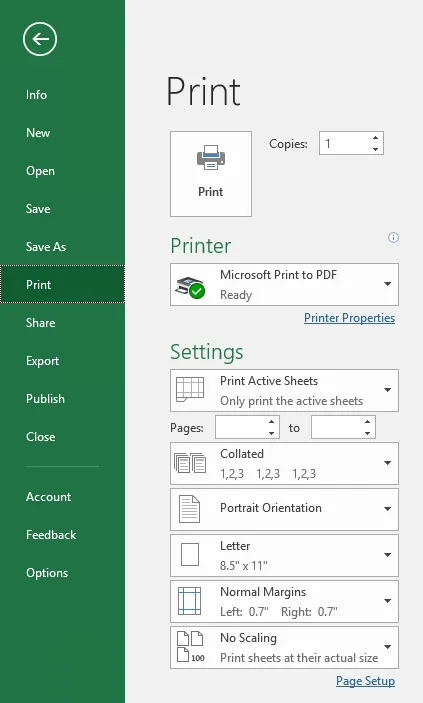
- Click «File» > «Print» or press the «Ctrl + P» alternatively.
- Click «Printer» > «Microsoft Print to PDF«.
- Finally, click the «Print» button.
This way, a PDF file will be created of your Excel file.
3.3 Print to PDF in Microsoft PowerPoint
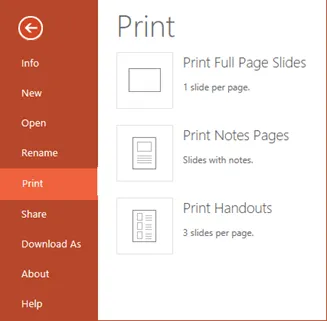
Like Microsoft Word and Excel, you can easily create a printable PDF in PowerPoint using the Print to PDF feature. You can follow the steps mentioned above to do so since they are similar.
Part 4. Bonus Tips Related to «Microsoft Print to PDF»
4.1 What if «Microsoft Print to PDF» is missing from the printer list?
If the «Microsoft Print to PDF» feature is missing from your printer list, then it is likely that the feature is disabled currently. However, please note that this feature is only available in Windows 10 and 11. So, if you are looking for Microsoft Print to PDF in Windows 7, then you won’t find it.
For Windows 10 and 11, follow the below steps to enable Microsoft Print to PDF feature:
- Click the «Win + X» keys and select «Control Panel«.
- Click «Program» and then click «Turn Windows features on or off«.
- Tick the checkbox next to «Microsoft Print to PDF» and then click «OK«.
That’s it. Now the Microsoft Print to PDF option should be available in your printer list.
4.2 What can I do when a Microsoft PDF printer is printing pages in the wrong order?
If the Microsoft PDF printer is printing pages in the wrong order, you can follow the below steps to fix the problem:
- Rename the files according to the page number, such as 1.jpg, 2.jpg, and so on.
- Sort the files in ascending order by clicking View > Sort by Name > Ascending.
- Select all the files by pressing «Ctrl + A«.
- Right-click the first file and select «Print«. It should now provide the preview of pages in the right order.
- Lastly, choose «Print to PDF» and click «Print«.
This way, you can use the Microsoft PDF printer with the right order of pages.
Conclusion
Microsoft Print to PDF feature is a handy feature to quickly create a printable PDF file from any printable application of Microsoft. However, it only works with Windows 10 and 11, creates a large-size PDF file, and also lacks editing and other customization features. Therefore, if you are looking to use the Print to PDF feature on Windows or other operating systems without losing formatting, along with access to all the editing and customization features, then UPDF is the ideal pick for you. Its intuitive interface and feature-rich capabilities make it the best PDF tool to save, print, or edit PDFs.


