Если вы интересуетесь сетевыми технологиями, наверняка, вам уже приходилось сталкиваться с таким понятием как интерфейс Loopback, или адаптер замыкания на себя. Данная технология позволяет тестировать сетевые приложения без передачи данных на сетевую карту, перенаправляя исходящий пакет на вход системы. Примером использования интерфейса Loopback может служить проверка работы сервера и клиента при условии, что оба они установлены на одном компьютере.
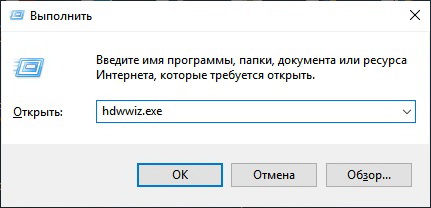
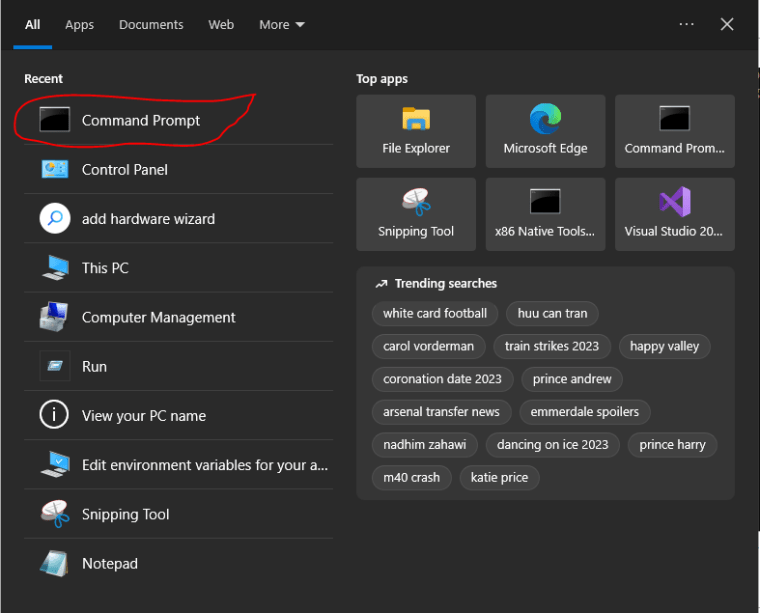
Кольцевой адаптер, предназначенный для тестирования виртуальной сети, поставляется вместе с Windows 10, но по умолчанию этот компонент не активен. Чтобы его установить, сначала введите в строке «Выполнить» (вызывается сочетанием Win+R) команду hdwwiz.exe.
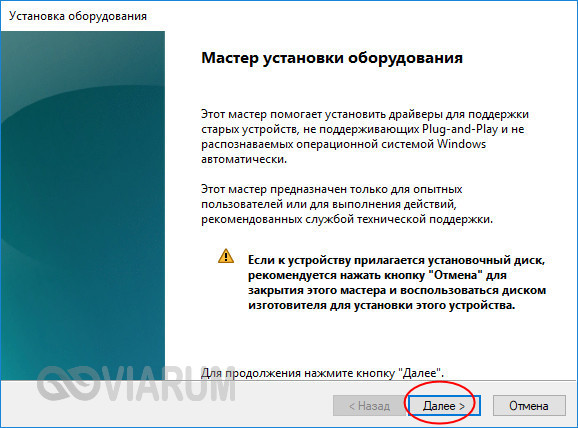
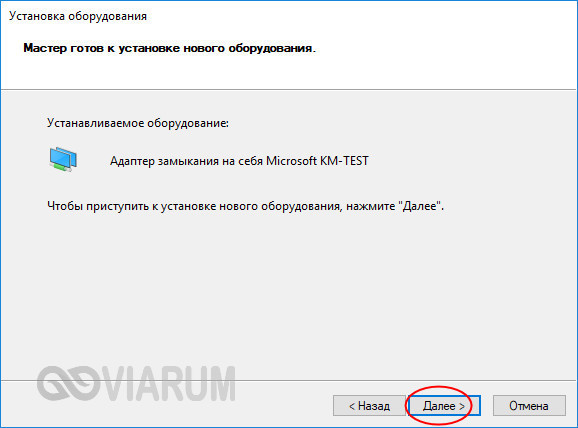
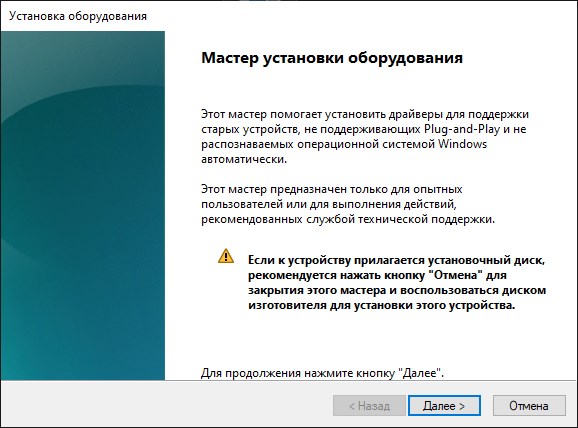
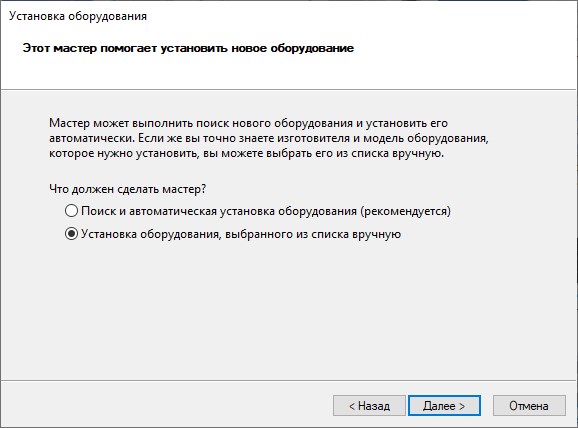
Затем в появившемся окне Мастера установки оборудования нажмите «Далее».
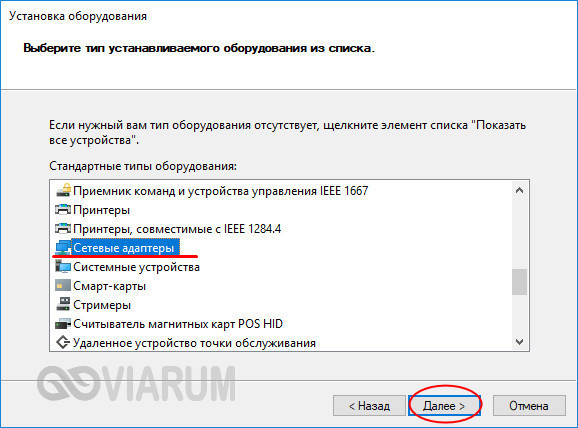
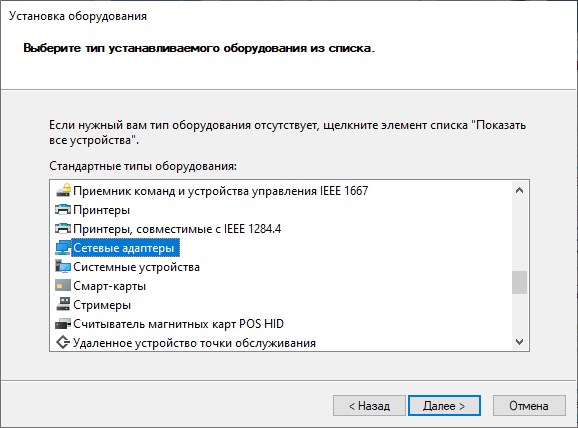
В следующем окне переключитесь в ручной режим выбора оборудования, вновь нажмите «Далее» и отыщите в списке устройств «Сетевые адаптеры».

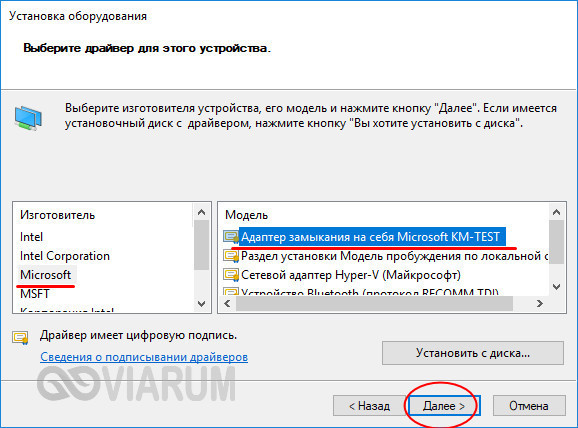
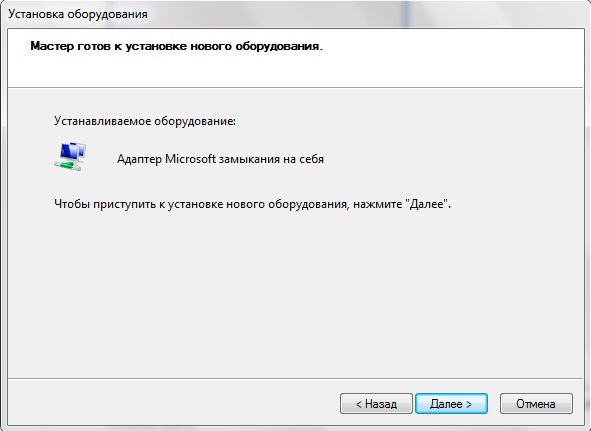
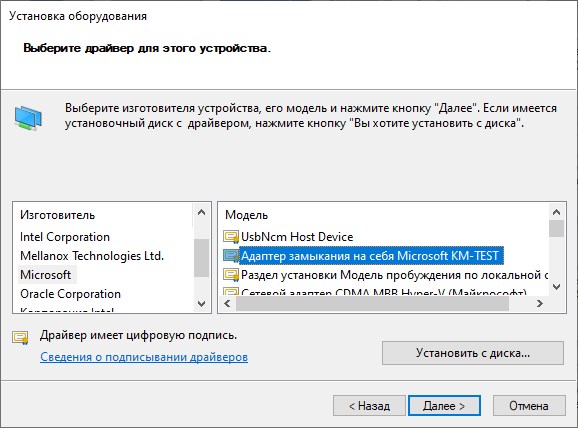
После очередного нажатия кнопки «Далее» вам будет предложено выбрать изготовителя и модель. В качестве изготовителя драйвера выбираем «Microsoft», в качестве модели – «Адаптер замыкания на себя Microsoft KM-TEST».
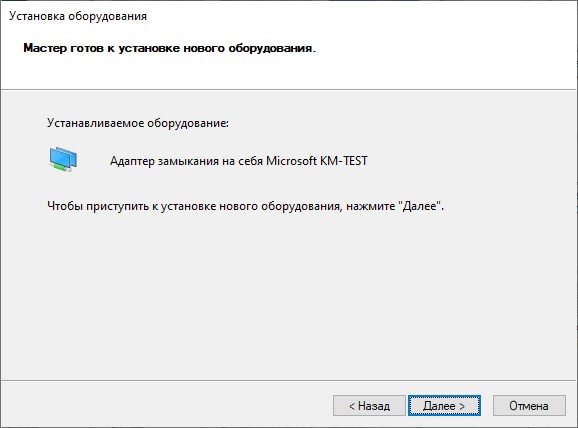
Потом кликаем «Далее» и приступаем к установке оборудования.
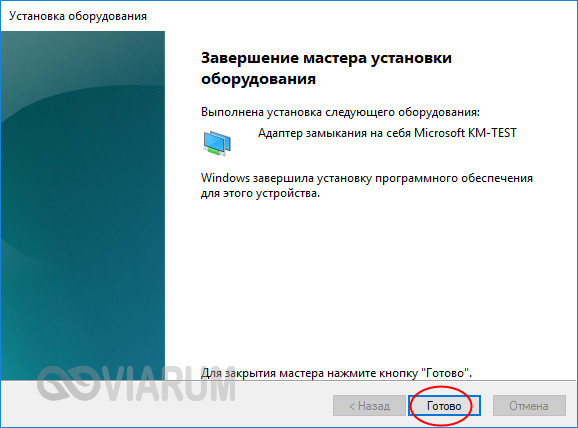
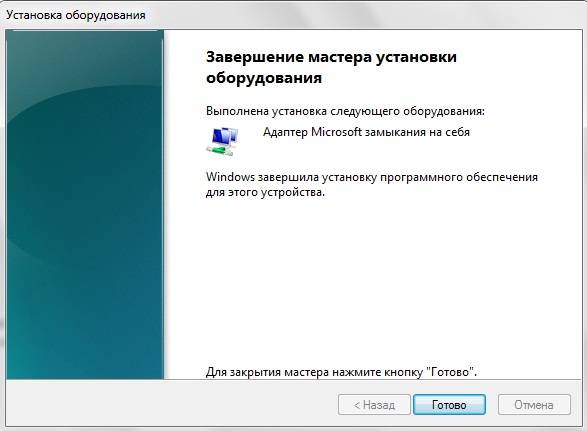
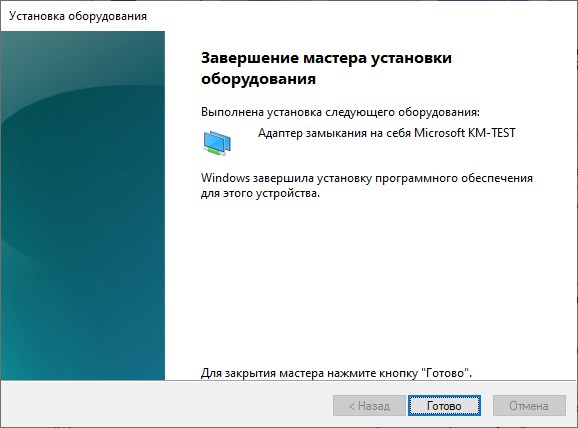
После завершения инсталляции жмем «Готово» и заходим в Диспетчер устройств.
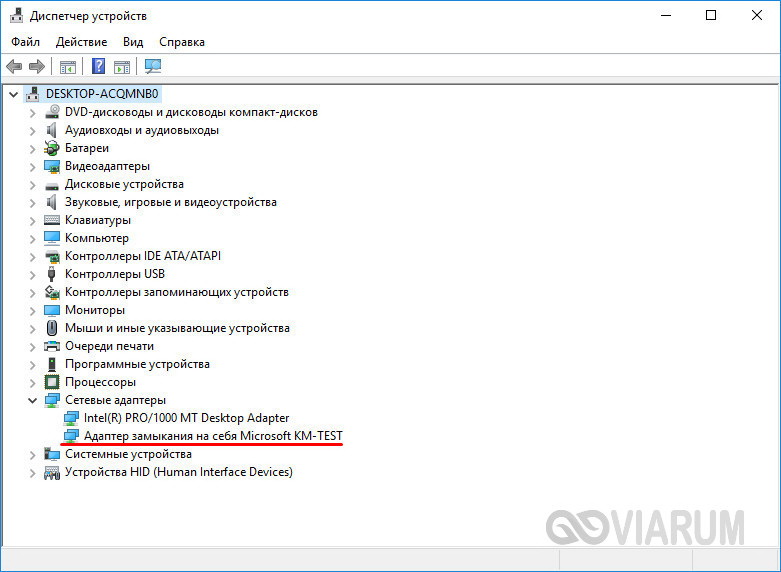
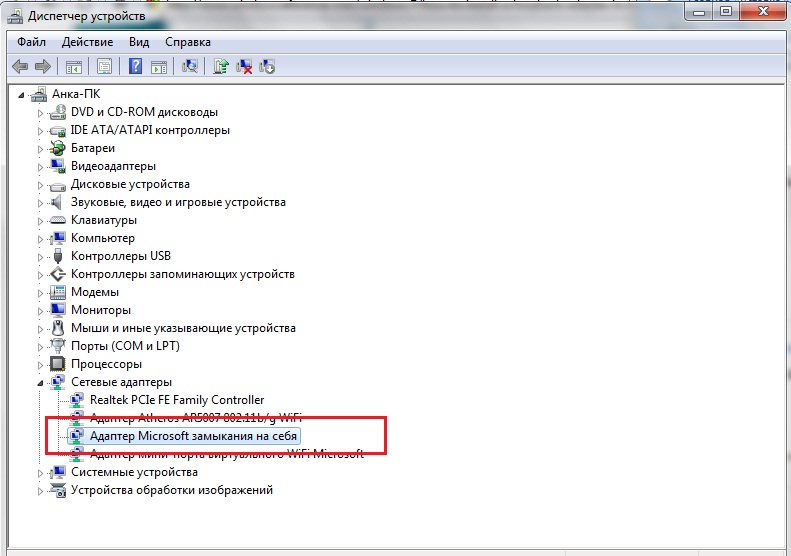
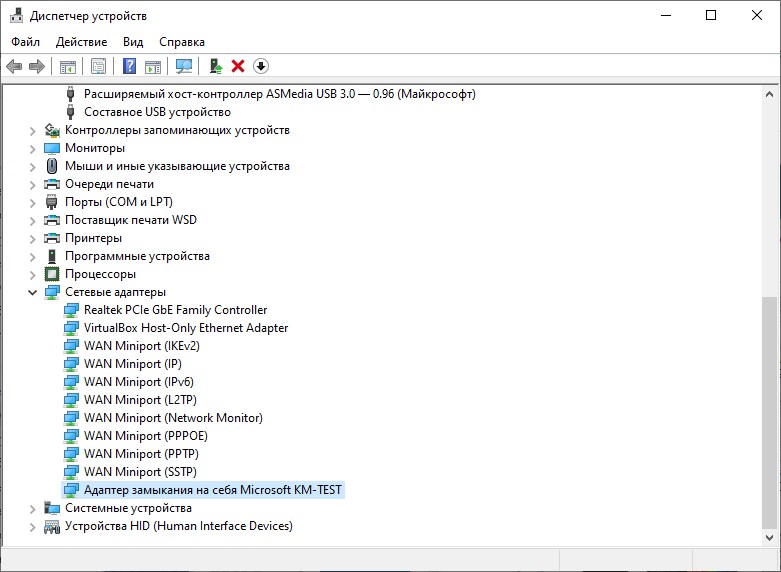
В списке сетевых адаптеров должен появиться наш адаптер замыкания на себя.
In Windows 10, a loopback adapter is a virtual interface that you can use to make internal connections and to make external connections to your virtual machines.
This post provides information you need to install a loopback adapter in Microsoft Windows 10.
- Go to the Windows 10 search bar, type Device Manager, then select Device Manager.
- Select an item in the list.
- Go to action, then choose add legacy hardware.
- Click next.
- Choose install the hardware that I manually select from a list (Advanced) and click next.
- Click network adapters, then click next.
- Select Microsoft and choose Microsoft KM-TEST Loopback Adapter, then click next.
- Click next, then click finish.
The installation of the Windows Loopback Adapter is complete. Now check if you see the Loopback Adapter in your Windows 10 operating system. Open command prompt, type the command below, then press Enter.ipconfig/all
How to configure a loopback adapter in Windows 10
The configuration of a loopback adapter is identical to any other network card that you have in your computer. By default, the network card automatically receives network settings, such as IP address, gateway, DNS, but if you don’t want to, you can configure your loopback adapter to use static configuration.
Removing a loopback adapter in Windows 10
- Navigate to the Windows 10 search box, type device manager, then choose device manager in the search result.
- Select network adapters and expand it.
- Right click on Microsoft KM-TEST loopback Adapter, then choose uninstall device.
- Select uninstall, then click OK.
How to install Microsoft a loopback adapter in Windows 10
What To Read Next
- How to Make VirtualBox Full Screen Windows 10
- Enable remote desktop on Windows 10
- How to turn on Bluetooth on Windows 10
- Run Windows Command Prompt as Administrator
If you like the content of this post or if it has been useful to you, please consider sharing it on your social media and follow me on Facebook and Twitter for more exclusive content.
Recently I have started playing around a bit with Windows PCs. I needed to add a Microsoft KM-Loopback adapter on a Virtual Windows 10 Enterprise. As a primary Linux developer I had to faff around a bit before I could actually figure it out. So thought it may be helpful for someone to have it all in one place.
Add as new hardware
Though the loopback adapter is going to be a virtual interface, windows treats it as a new hardware. Hence, we need to add a new hardware in the system. To do that follow the steps described in the following sections.
Bring up the command promopt
Go to Start (Windows 10), type command, let the command prompt appear on the start menu search result (as below):
Run as administrator
Right click on the command prompt and click Run as administrator as below:

At this point it may ask for your admin user and password. Type those in and it should open the command prompt with admin privileges.
Bring up the add hardware wizard
In the command prompt type hdwwiz.exe and press Enter (shown below):

This should open you Add Hardware wizard as below (this how it looks in Windows 10 Enterprise):

Click Next. Then select “Install the hardware that I manually select from a list (Advanced)” as selected below:

Click Next.
Select the Hardware Type
At this point you will see a screen like the below:

Scroll down the list and go till you see “Network adapters” in the list, and when you see, select it as shown below:

Then click Next again.
Select Hardware Manufacturer
Now you should able to see a wizard window like the below:

On the left hand pane (Manufacturer list), scroll down and look out for Microsoft, and once you see it in the list, select it as shown:

Now scroll down the right hand side list and look for “Microsoft KM-TEST Loopback Adapter” in the list. Select it as shown below:

And then press Next. It will ask for a final confirmation as below:

Once you click Next, windows will create the adapter and the finish window will appear as below:

Click Finish in the last window.
Check the interface
Now Click Start > Control Panel:

Click “View network status and tasks” under Network and Internet and you should be able to see a window somewhat like the below:

The highlighted interface is the suspected newly created network adapter interface in the above screenshot.
Configure the interface
Now we need to configure the newly created adapter interface. The network configuration will depend on you and how you want to configure it. As an example I will assign an IP address 192.168.20.2/24 for the interface and will use 192.168.20.1 as the default gateway for the interface.
To configure the IP address we need to now click on the “Change adapter settings” on the left hand pane as shown below:

Once you click on the “Change adapter settings” option you should be able to see the available interfaces in the list. This is what I have in my VM PC at the moment:

Notice the first one in the list is marked as “Unidentified network” as probably because we haven’t configured the interface yet.
Open the properties
Right click on it and you should be able to see Properties in the drop down menu.

Click on the Properties and it will ask for admin user and pass. Type in the admin user and pass and it will present the Properties window for the interface:

Look for Internet Protocol Version 4 (TCP/IPv4), select it and click Properties:

Assign IP address
Click on Properties, select “Use the following IP address” radio button, type in the IP address you would like the interface to have (static IP assignment), type in the Subnet mask (in my case it is 255.255.255.0) and the default Gateway (192.168.20.1):

Type in the DNS server details as well. It will vary from setup to setup and hence I will not fill it in for now. Click Ok and you should have your KM-TEST adapter ready for use.
Hope I haven’t missed anything; however happy to hear from you in case I missed anything.
Windows, Windows 10, Windows 7
- 29.01.2020
- 15 099
- 0
- 30.01.2020
- 19
- 19
- 0

- Содержание статьи
- Описание
- Как установить адаптер замыкания на себя в Windows XP
- Как установить адаптер замыкания на себя в Windows 7
- Как установить адаптер замыкания на себя в Windows 10
- Добавить комментарий
Описание
Адаптер Microsoft замыкания на себя – это инструмент тестирования виртуальной сетевой среды, в которой нет доступа к сети. С помощью него можно связать сетевые клиенты, протоколы и другие компоненты параметров сетевого адаптера, а также установить драйвер сетевого адаптера или сам сетевой адаптер позже, сохранив информацию о параметрах сети. Также можно установить адаптер замыкания на себя в процессе автоматической установки.
Как установить адаптер замыкания на себя в Windows XP
Для установки адаптера замыкания на себя в Windows XP, нужно:
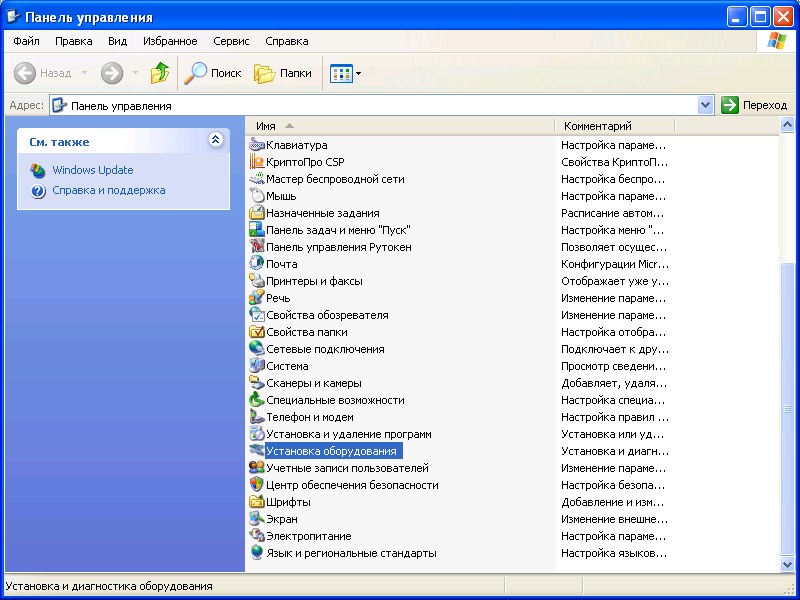
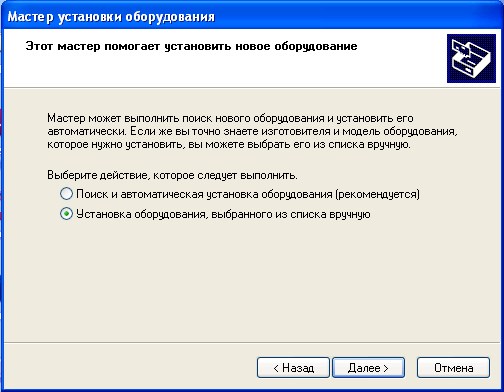
- Запустить Панель управления, и выбрать пункт «Установка оборудования».

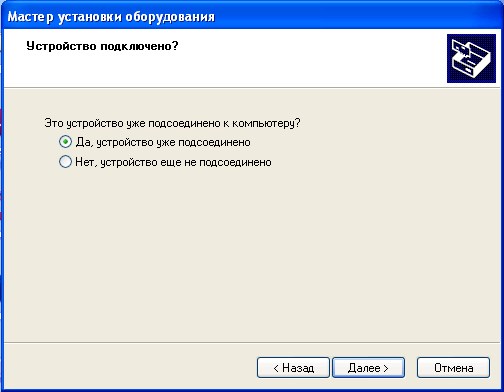
- Откроется Мастер установки оборудования, в котором нужно нажать кнопку «Далее». Затем, когда Мастер спросить «Это устройство уже подсоединено к компьютеру», нужно выбрать «Да, устройство уже подсоединено».

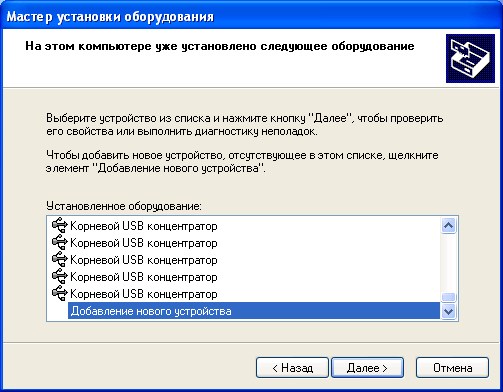
- Откроется список установленного оборудования. В нем нужно прокрутить в самый низ, и выбрать «Добавление нового устройства».

- Затем, нужно выбрать «Установка оборудования, выбранного из списка вручную».
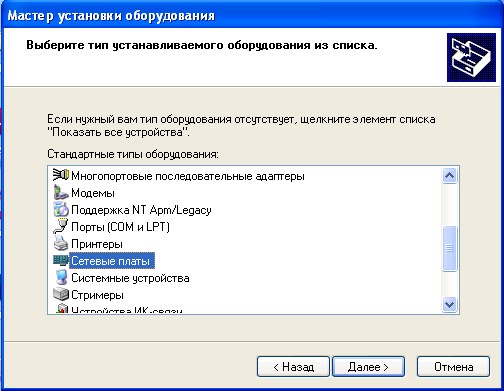
- И затем выбрать «Сетевые платы».

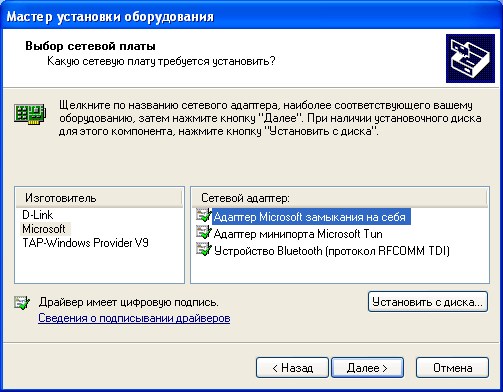
- Следующим шагом будет выбрать «Изготовитель» — «Microsoft», и «Сетевой адаптер» — «Адаптер Microsoft замыкания на себя».
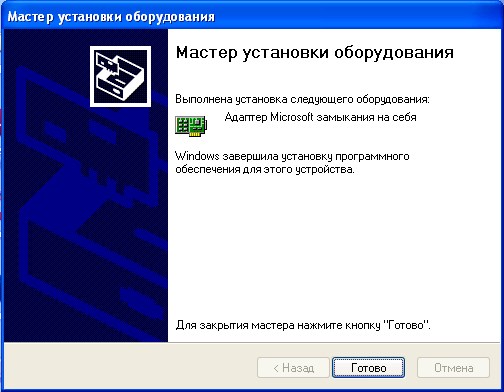
- На следующем шаге, где будет сообщено о устанавливаемом оборудовании — «Адаптер Microsoft замыкания на себя», ничего делать не нужно, просто нажать «Далее». По завершению установки адаптера, Мастер выдаст соответствующее сообщение.
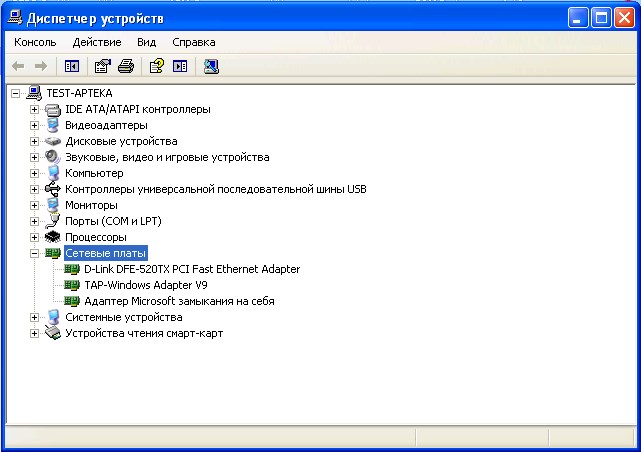
- Для проверки установки адаптера, достаточно просто открыть «Диспетчер устройств» (Панель управления — Система — Оборудование — Диспетчер устройств). В нем, в разделе «Сетевые платы» должен появится адаптер Microsoft замыкания на себя.

Как установить адаптер замыкания на себя в Windows 7
Чтобы установить адаптер замыкания на себя в Windows 7:
- Запустите командную строку от имени администратора.
- В командной строке запустите команду
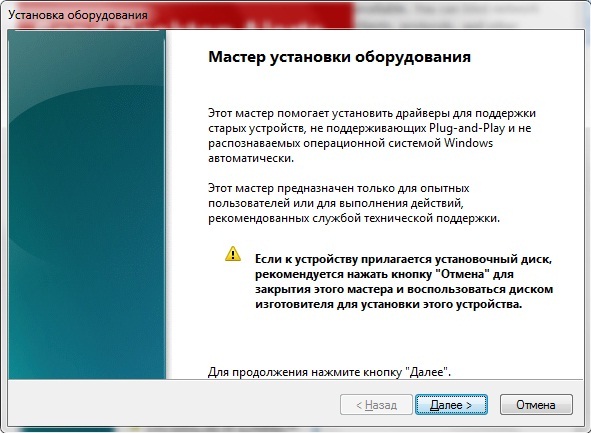
hdwwiz.exe, после чего откроется окно Мастера установки оборудования.
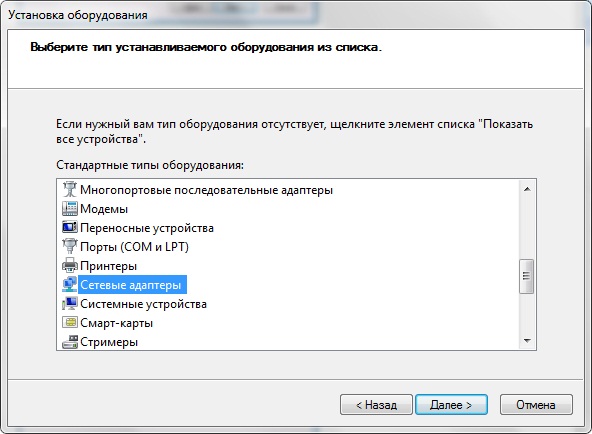
- Нажмите Далее. Выберите «Установка оборудования, выбранного из списка вручную». Выберите Сетевые адаптеры и нажмите Далее.

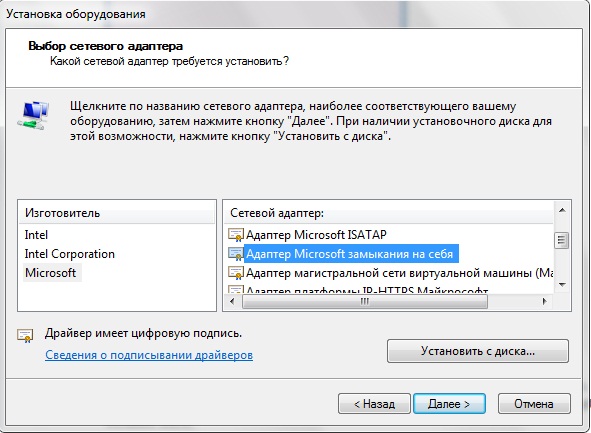
- В «Изготовителях» выберите Microsoft и выберите «Адаптер Microsoft замыкания на себя» в разделе «Сетевой адаптер» и нажмите Далее.

- Далее начнется установка оборудования и после ее окончания, надо будет нажать кнопку Готово.

- Чтобы убедиться, что адаптер замыкания на себя установлен, откройте правой кнопкой Компьютер, выберите Свойства. Откройте диспетчер устройств и разверните пункт Сетевые адаптеры, и вы увидите, что в списке появился адаптер замыкания на себя.

Как установить адаптер замыкания на себя в Windows 10
Чтобы установить адаптер замыкания на себя в Windows 10, нужно:
- Первым делом нужно запустить командную строку от имени администратора.
- В командой строке нужно ввести
hdwwiz.exe, и нажать клавишу ввода. Запустится Мастер установки оборудования.

- Для продолжения установки нужно нажать кнопку «Далее». В следующем окне нужно выбрать пункт «Установка оборудования, выбранного из списка вручную», и вновь нажать «Далее».
- Теперь нужно выбрать из списка пункт «Сетевые адаптеры», и нажать «Далее».
- В окне выбора драйвера, нужно выбрать издателем «Microsoft», а в списке моделей — «Адаптер замыкания на себя Microsoft KM-TEST». Снова нужно нажать «Далее».
- Мастер установки оборудования сообщит о своей готовности к установке нового оборудования, и вновь потребует нажать кнопку «Далее».
- По нажатию кнопки «Далее» начнется процесс установки оборудования, по завершению которого будет показано соответствующее уведомление, где нужно будет нажать кнопку «Готово».
- Для проверки, что адаптер замыкания на себя установился, нужно просто открыть Диспетчер устройств (правой кнопкой мыши по Пуску — Диспетчер устройств), и в разделе «Сетевые адаптеры» найти «Адаптер замыкания на себя Microsoft KM-TEST».

You can install a loopback adapter on Windows 10 manually by right-clicking the start menu icon. Click Device manager and choose Add legacy hardware. Choose the hardware to install. You can also manually select hardware to install, including network adapters. Once installed, the loopback adapter allows you to test network connections. This feature is useful for monitoring traffic and identifying viruses and unauthorized access.
To install a loopback adapter in Windows 10, you first need to find a network interface on your PC. Microsoft Loopback Adapter is an application that routes network traffic within the computer. The program is not included in Windows 10. However, there is an alternative. VB-Audio VoiceMeeter can be installed for free. If you are using a Mac or Linux computer, you can use the StrongLoop Process Manager.
Once you have installed the driver, you can configure your loopback adapter. Alternatively, you can use CommView to capture loopback traffic. The loopback adapter driver is automatically updated if your public IP changes. You can also enable static configuration. To enable static configuration, go to device manager and search for “Network adapters.”
If you’re unsure how to create a loopback adapter in Windows 10, follow these steps. First, you’ll need to install TCP/IP, which will automatically update your driver when your Public IP changes. After that, you’ll install the Loopback adapter and name it. You can now use the loopback adapter on your computer. Then, you can test the basic function of the ports.
To enable the loopback adapter, open Network and Sharing Center, then click the “Add Network Adapters” button. Type in your local IP address to test whether it matches. A button will appear, indicating that your PC is now using a loopback adapter. This is a handy feature if you’re trying to diagnose a problem on your computer. It’s also a great way to diagnose network problems.
The Loopback Adapter is part of the Computer Management console, and it is an essential piece of software to enable a connection to the Internet. It is installed by default in Windows, but it can be manually removed if you’d like. You can also enable it in Device Manager by adding legacy hardware. If you don’t need this network adapter on your PC, uninstall it from your computer.
Is Loopback Available For Windows?
Microsoft Loopback adapter is a network technology for Windows 10. This network technology allows computers to talk to each other through their Ethernet or WiFi network. To install it, right-click the network adapter icon in the start menu and choose “Add Legacy Hardware.” Once this device has been installed, open the properties dialog box to see its IP address and port name. If you do not have this device installed on your PC, you can manually install it by following these instructions:
Microsoft Loopback adapter is a network device that allows virtual machines to talk to each other. It can act as a bridge between two PCs and connect them to the Internet. It uses IP 0.0.0.0 as its meta-address, which has a specific meaning for clients and servers. This network device also allows users to test network connections. Installing this network device is very simple and easy.
How Do I Find My Loopback Adapter?
There are two ways to find your Loopback Adapter in Windows 10. The first way is to use the Device Manager. Right-click on the device manager icon and select Add Legacy Hardware. Next, type the IP address and port name of your Loopback Adapter in the box. This should bring up the properties dialog box. After that, follow the on-screen instructions to install your Loopback Adapter.
The second method involves using the command prompt to find your loopback adapter. It should appear under the Network Adapters section of the Control Panel. Once installed, you can rename or change the adapter’s name. You can check to see if the loopback adapter is set as your primary network adapter with the command ipconfig /all. Once it’s set, you can use it to communicate with your computer.
In Windows 10, your Loopback Adapter will be located under the Networks and Internet section. The Loopback Adapter is responsible for data transfer between your computer and other devices. Hence, it is important to understand its function. If you want to use it to test out network problems, you should know how to use the loopback adapter. You can use the ipconfig command to check the loopback adapter’s status and rename it if you need to.
What Tool is Loopback Adapter?
A network adapter is a piece of hardware that allows you to access the internet. Loopback adapters are also known as local area connections. In order to use them, you must have a PC with an Internet Protocol (IP) connection. A loopback adapter is a great tool for network testing, and it can help you quickly diagnose network problems. To use it, go to the Network and Sharing Center, click Properties, and then double-click Microsoft Loopback Adapter.
You can also use a loopback adapter to connect non-networked computers to a network. This device assigns a local IP address to the computer. You can test whether your loopback adapter is installed by using the ipconfig command. If you don’t see any error messages, you should install the loopback adapter. To install it, follow the installation procedure. If you’re not sure whether it’s installed, you can run the ipconfig /all command.
How Do I Manually Add a Device in Windows 10?
A loopback adapter is a virtual network interface that enables users to connect internal and externally to other PCs, virtual machines, or even other computers. The loopback adapter can be manually added in Windows 10 Device Manager and can also be manually added to legacy hardware. The first step is to run ipconfig /all to check if it has been installed on your system.
The next step is to locate the Microsoft Loopback adapter. Open the device manager and right-click it. When it is displayed, click the Add Legacy Hardware option. Then, in the Connect Using field, enter the IP address and port name of the device. Once this is done, your device will be added to your PC. Now, you can connect to the Internet. Regardless of whether your network connection is wireless or wired, it should work in Windows 10.
Alternatively, you can open Device Manager and search for the device. If the loopback adapter does not show up in the list, double-click the Device Manager icon. Double-click the Loopback adapter and select “Manually Add Hardware”. Once you have selected the device, close the Properties dialog box. After this, you’ll need to restart your PC to make changes to it.
What is Software Loopback Interface?
A software loopback interface is used in networks and is often referred to as a “loopback address”. The loopback address is not a representation of the device’s actual hardware, but is the easiest way to identify a network device. Its purpose is to connect applications to local servers and is helpful in troubleshooting. If an application cannot connect to a server because the network topology is changing, it can connect to a different server and identify its status.
The loopback interface is a virtual network interface that is always up. Because it is not tied to the standard IP address 127.0.0.1, it is not tied to any hardware network interface controller. Instead, it can be assigned its own IP address. Often, loopback interfaces are used as termination addresses in routing protocols. But how does the loopback interface work? Read on to learn more. Its importance is crucial to understand how loopback interfaces function.
How Do I Enable NAT Loopback?
To enable NAT loopback on Windows 10, you can use a hardware device called a loopback adapter. This hardware device makes internal and external connections to virtual machines. To install this device, you can use Windows 10’s Device Manager. You can either use the free Hyper-V Server or install it manually. Once it is installed, you should see it in Device Manager. Once you have it, you can enable or disable it.
You can also use the simulatortoolhelper to test your NAT loopback configuration. If you have a lot of IP addresses, you can use the NAT loopback feature on your network. The public IP address is 203.0.113.5. By setting a public IP address to a private IP, you can use it with a large number of IP addresses. The Windows 10 simulatortoolhelper lets you test your NAT loopback settings.
In order to configure a NAT in Windows 10 using the virtual switch, you should select vEthernet (NAT) as the network interface. In the same way, you should select the subnet and the pool of IP addresses. You should specify the prefix for the internal IP interface. The NAT object will use the top IP address. The subnet you select will be 10.0.75.1.
Learn More Here:
1.) Windows Help Center
2.) Windows – Wikipedia
3.) Windows Blog
4.) Windows Central