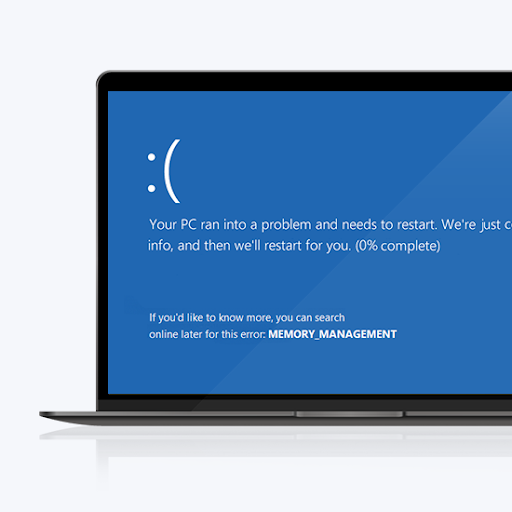
System crashes should be taken seriously. If you recently encountered the MEMORY_MANAGEMENT stop code on a blue screen, you’re in the right place to learn what it is and how to prevent it. This is a common Blue Screen of Death error that many Windows 10 users reported coming across.
The Memory Management stop code is a BSoD error. It’s an error specific to your system’s memory management, as it tells you where the error occurred. Troubleshooting the issue is simple. In this guide, you’ll learn why memory management is important and how to solve the MEMORY_MANAGEMENT stop code BSOD error in Windows 10.
Table of Content
- What Is Memory Management in Windows 10?
- What Causes the Stop Code Memory Management BSoD Error?
- How To Fix MEMORY_MANAGEMENT Stop Code in Windows 10
- Method 1. Scan Your PC for Possible Virus or Malware Infection
- Method 2. Run Windows Memory Diagnostic Tool
- Method 3. Update Your Drivers
- Method 4. Scan and Repair Disk Errors
- Method 5. Repair Corrupted System Files
- Method 6. Clear Temporary Files and Folders
- Method 7. Check Newly Installed Applications
- Method 8. Install Pending Windows Updates
- Method 9. Reset Windows 10
- Final Thoughts
What Is Memory Management in Windows 10?
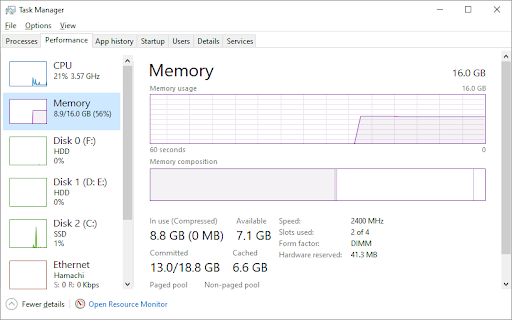
Memory management is an important part of your Windows 10 operating system. It takes control of the system and coordinates computer memory, keeping the RAM usage steady. It assigns memory blocks to various running applications as required by the program.
Simply put, memory management manages the memory usage of your computer, and its function helps to optimize the overall system performance.
When the memory management process fails, rogue processes may soak up all of your computer’s available memory, leaving no reserved RAM for other processes. This may make your system become prone to other problems, such as service failures and crashes. The result of this is often a Blue Screen of Death.
If this happens on your device, you’ll see the BSoD screen with the stop code MEMORY_MANAGEMENT error code to indicate the memory issue.
What Causes the Stop Code Memory Management BSoD Error?
The Memory Management error hints at a severe problem with your PC’s system and memory. The system-side problem is usually hardware related, but may sometimes be a software related problem. In rare cases, the error may indicate firmware issues.
So, your computer has a memory problem. This could either be a one-off occurrence, or a severe memory management issue. The possible causes specific to the MEMORY_MANAGEMENT stop code are:
A one-time memory error
- Software issues, including corrupted files in the system directory
- Software or hardware conflict
- RAM errors, faulty physical memory sticks
- Issues with new hardware, for example, a graphics card
- Outdated hardware or hardware failure
- Faulty drivers, missing or outdated
- Disk errors
- Firmware, virus, or malware infection
- Outdated Windows 10 OS
These are some of the known possible causes of the memory management BSoD error, but they are not the only possible ones. You could encounter the error due to a different reason within your system. Even if you’re reading with a unique case, our methods aim to help you restore your computer at all cost.
How To Fix MEMORY_MANAGEMENT Stop Code in Windows 10
When you first encounter the Memory Management error, it might scare you for a good reason. It’s possible that you lost some of your data or progress on a project. Luckily, you don’t need to worry — you can fix it.
Start by restarting your system and see if the error persists. If it doesn’t return after the restart, then it might have been just a one-time thing. Even if this happens, look into the error and perform the steps below to prevent it from happening again. Fix the MEMORY_MANAGEMENT stop code entirely with the 9 solutions in this article.
Method 1. Scan Your PC for Possible Virus or Malware Infection
One of the leading causes of computer problems is malware infection. Malicious scripts and applications are capable of causing irreversible harm on one’s device. Although a rare occurrence, the memory management error may be a result of a virus operating in your system.
Scan your system with a quality antivirus program. If you don’t have a third-party antivirus program installed on your PC, use the built-in Windows Defender.
- Open the search bar in your taskbar by clicking on the magnifying glass icon. You can also bring it up with the Windows + S keyboard shortcut.
- Type in Windows Security and launch it from the search results.
- Switch to the Virus & Threat Protection tab using the home screen or the menu in the left-side pane. Click on the Scan Options link.
- Select the Full scan option. This is going to check every single file on all of your drives to ensure no threats can hide. Take note that this scan may last over 1-2 hours, depending on how many files you have on your system.
- Click on the Scan now button to begin the scan. If a threat is detected, Windows 10 will automatically quarantine or remove it entirely. You can review the scan results afterward to see what infected files were removed.
Method 2. Run Windows Memory Diagnostic Tool
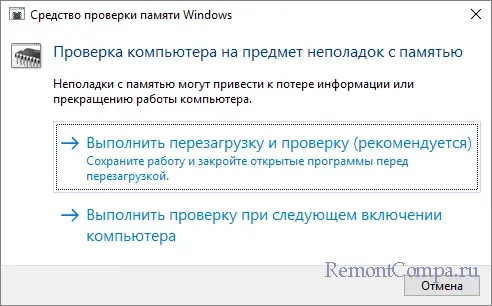
The Windows Memory Diagnostic tool is a Windows built-in tool to help find and resolve system errors related to Windows memory. It will test your RAM and inform you if there are any issues that are affecting its functionality.
- Press the Windows + R keys on your keyboard to bring up the Run utility. Here, simply type in «mdsched.exe» and press the OK button.
- Choose «Restart now and check for problems (recommended)» to instantly begin a memory scan. Make sure to save any files and close all open applications before clicking on this option.
- Alternatively, choose «Check for problems the next time I start my computer» and restart the device at a more convenient time.
- The Windows Memory Diagnostics Tool interface will then show up and automatically start testing your PC’s memory problems. The process may take a few minutes, so you should be patient and let it run till completion and display the test results.
If the Windows diagnostic tool doesn’t find or display any errors now or the next time you log on), chances are your PC’s memory is fine. In this case, proceed to the methods below to continue investigating the error.
Method 3. Update Your Drivers
It is possible that the computer has outdated hardware drivers, or a rogue or faulty hardware driver is causing the MEMORY_MANAGEMENT stop code. Check for drivers that need to update, or update all hardware drivers at once.
Check for Driver Updates
- Click on the Windows icon in the bottom left of your screen to bring up the Start menu. Choose Settings, or alternatively use the Windows + I shortcut.
- Click on the Update & Security tile. This is where you can find most of your Windows Update settings.
- Go to the Windows Update section, and then click on the View optional updates link if available.
- Expand the Driver updates section, and review what drivers currently need an update. To update the drivers, simply place a checkmark next to them, and then click the Download and install button.
- Allow Windows 10 to update your drivers, and then reboot your computer.
Update Specific Drivers
If you have an idea of the device drivers that are causing the memory management issue, you can update each of them manually. We recommend updating your video card driver and updating the PCI Memory Controller driver. If you aren’t sure of the drivers, look for devices that have yellow exclamation marks next to them.
- Press the Windows + X keys on your keyboard and click on the Device Manager option from the WinX menu.
- Right-click on any driver you want to update, and then select Update driver from the context menu.
- Select the method of updating your driver. You can either let Windows 10 search for a driver automatically or manually locate a new driver file already on your computer.
- Wait for the driver installation to complete. Repeat this for any other drivers you wish to update, and see if the high CPU issue has been fixed.
Method 4. Scan and Repair Disk Errors
To scan and repair a disk error, run the Check Disk (chkdsk) command. Disk errors can be caused by hardware issues, such as bad disk sectors or corruption in the NTFS volume. All of these can result in the MEMORY_MANAGEMENT blue screen error. The chkdsk tool will identify and repair these errors, fixing the Blue Screen of Death.
- Open the search bar in your taskbar by clicking on the magnifying glass icon. You can also bring it up with the Windows + S keyboard shortcut.
- Type Command Prompt in the search box. When you see it in the results, right-click on it and choose Run as Administrator.
- When prompted by the User Account Control (UAC), click Yes to allow the app to launch with administrative permissions.
- Type chkdsk C: /f /r and press Enter. This command scans and repairs any errors in the C: drive. To check other disks, you will need to replace the C: with the other disks’ entry letter.
- You may see the «Chkdsk cannot run because another process uses the drive» error message. In this case, press Y, and then press Enter. Chkdsk will automatically scan and repair bad sectors the next time you boot the system.
- Chkdsk cannot run because the volume is in use by another process
- Restart your device. Wait for the Check Disk command to finish analyzing your system. It’ll attempt to fix issues with the drive and recover any readable information.
Method 5. Repair Corrupted System Files
Corrupted systems files can also cause problems with Memory Management, leading to the BSOD error. You can find and repair them through the SFC scan.
The System File Checker (SFC) is a built-in tool to help to troubleshoot in Windows 10. It’s able to automatically detect corrupted system files, and repair them to working order. You can use the SFC scan to potentially fix BSoD errors with the MEMORY_MANAGEMENT stop code.
- Open the elevated Command Prompt. Check «Method 4. Scan and Repair Disk Errors» above for the instructions.
- Once the Command Prompt window is open, type in the following command and press Enter to execute it: sfc /scannow
- Wait for the System File Checker to finish scanning your computer. If any discrepancy is detected, the utility will restore the necessary system files and attempt to fix all errors related to them.
The SFC scan may take some time to run through your system and identify any missing or corrupted system files. Even if the scan fails to find anything, some users have reported that their PC’s functionality improved after running it.
Method 6. Clear Temporary Files and Folders
Windows 10 often creates temporary files and folders. If they accumulate, it can affect your PC’s speed and even cause stop code memory management errors. Delete junk files using the Disk Cleanup utility to save space and fix computer memory problems.
- Open the search bar in your taskbar by clicking on the magnifying glass icon. You can also bring it up with the Windows + S keyboard shortcut.
- Type in Disk Cleanup and click on the first search result.
- Select the Windows 10 system drive, and then click the OK button. Usually, the system is installed on disk C:.
- In the new window, you’ll see all space taken by temporary files. Make sure that Temporary Internet Files and Temporary Files are selected. You may also delete other junk files, such as Thumbnails or DirectX Shader Cache. When you’re done selecting what you want to remove, click OK.
- Click on the Delete Files button in the dialog box that pops up. The removal process will start and free up space on your device.
- Are you sure you want to permanently delete these files? Click Yes.
Method 7. Check Newly Installed Applications
Check if you’ve installed any new software recently. Some newly installed applications may be incompatible with your operating system or conflict with other programs on your PC. This could be the trigger to the memory management BSOD error.
If you find newly installed applications causing the error, you should uninstall them immediately and see if the error still persists.
- Click on the Windows icon in the bottom left of your screen to bring up the Start menu. Choose Settings, or alternatively use the Windows + I shortcut.
- Click on the Apps tile. This is where you can find every application installed on your computer.
- Sort your applications by Install date.
- Click on a newly installed app once to select it, and then click on the Uninstall button.
- Click Uninstall again to confirm your choice, and then follow any on-screen instructions given by the program’s uninstaller. Make sure to entirely remove the software.
- Repeat these steps for all of the applications in the list. After you uninstall all problematic applications, restart your computer and see if the Blue Screen of Death has been resolved.
Method 8. Install Pending Windows Updates
Sometimes, pending Windows 10 updates cause the problem you see with memory management. Check for pending Windows Update packages, and install them to see if the error persists.
- Click on the Windows icon in the bottom left of your screen to bring up the Start menu. Choose Settings, or alternatively use the Windows + I shortcut.
- Click on the Update & Security tile. This is where you can find most of your Windows Update settings.
- Check if there are pending updates that need to be installed. If so, click the Install Updates button to install the Windows Updates. If not, click on the Check for updates option and wait for Windows 10 to find available updates.
- Also check if there are updates that need to be downloaded, then click Download. Let any new Windows 10 components download, and then install the updates.
It’s recommended to have Windows 10 check for updates in regular intervals to ensure your system is always up to date. Updates will squish bugs, fix security holes, and bring new features to all users eligible to install them.
Method 9. Reset Windows 10
If nothing above worked, your issue may only be fixed if you reset or reinstall Windows 10. Depending on your preferences, you may reinstall the system without losing any personal files. Unfortunately, most of your applications and system configuration will be deleted in order to give your device a fresh start.
Check our How to Install Windows 10, 8.1 or 7 Using a Bootable USB guide for detailed, step-by-step instructions on how to install Windows 10. For refresh and reset instructions, head to the official Microsoft support page.
Final Thoughts
Our Help Center offers hundreds of guides to assist you if you’re in need of further help. Return to us for more informative articles, or get in touch with our experts for immediate assistance.
One More Thing
Would you like to receive promotions, deals, and discounts to get our products for the best price? Don’t forget to subscribe to our newsletter by entering your email address below! Be the first to receive the latest news in your inbox.
You May Also Like
» How To Fix SYSTEM_SERVICE_EXCEPTION (dxgmms2.sys) in Windows 10
» Fix Unexpected Store Exception Error in Windows 10 [Updated]
» How To Fix the “Kernel Security Check Failure” Error in Windows 10
Содержание:
- 1 Основные причины неполадки
- 2 Откат Windows к точке восстановления
- 3 Проверка целостности системных файлов
- 4 Диагностика ОЗУ
- 5 Восстановление прежней конфигурации
- 6 Сканирование на предмет заражения
- 7 Поиск проблемных драйверов
- 8 Конфликтные службы
- 9 Неисправность оборудования
- 10 Прочие причины
Падение системы в BSOD с последующим появлением «синего экрана смерти» в большинстве случаев бывает вызвано либо аппаратными проблемами, либо сбоем в работе драйверов. Однако иногда источником проблемы становятся неполадки в работе программного обеспечения, с «железом» напрямую не связанного. Примером тому может служить ошибка Memory Management, сталкиваться с которой приходится при различных обстоятельствах как в Windows 10, так и в более ранних версиях операционной системы. Но что такое Memory Management, и почему именно эта надпись фигурирует в описании ошибки?
Основные причины неполадки
Дословно название ошибки переводится как «Управление памятью», следовательно, она каким-то образом связана со сбоями в работе оперативной памяти компьютера. При этом далеко не всегда ошибка указывает на физическую неисправность планки ОЗУ. Ее возникновение могут спровоцировать сбой в работе драйверов, повреждение некоторых системных файлов, несовместимость компонентов «железа» (часто наблюдается при апгрейде), их перегрев, некорректные настройки BIOS и электропитания, ошибки в обновлениях ОС и работа стороннего ПО.
Зачастую установить причины появления синего экрана Memory Management сходу не представляется возможным. Исключением являются те случаи, когда пользователь выполнял такие действия как обновление драйверов, замену компонентов, разгон и тому подобное. Каждая из этих процедур чревата сбоями. Если к возникновению ошибки вроде бы ничего не располагало, действовать придется методом исключения, переходя от одного способа решения проблемы к другому.
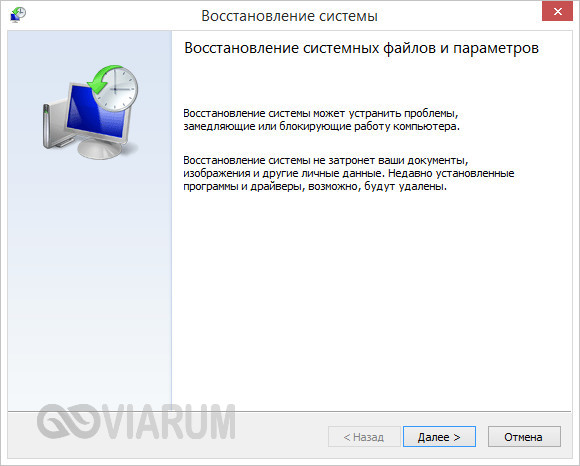
Это доступный, простой и универсальный способ устранения многих проблем, в том числе, ошибки Memory Management в Windows 10. В процессе отката к предыдущей точке восстановления в системе будут восстановлены старые драйвера, системный реестр и наиболее важные файлы. Если проблема была скрыта в этой области, то система должна заработать нормально. Напоминаем, что запустить окно мастера восстановления можно командой rstrui, а подробная инструкция по процедуре отката Windows 10 до работоспособного состояния располагается здесь.
Проверка целостности системных файлов
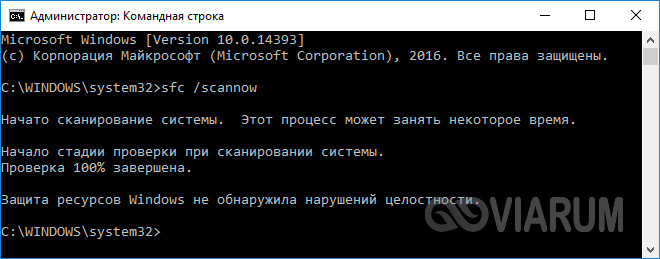
Не станет лишней и проверка на предмет удаления, повреждения или подмены файлов операционной системы. В Windows 10 для этих целей существует команда sfc /scannow, выполняемая в запущенной с админскими привилегиями командной строке или PowerShell. При обнаружении каких-то изменений утилита в ходе следующей загрузки Windows восстановит оригинальные файлы из локального хранилища.
Диагностика ОЗУ
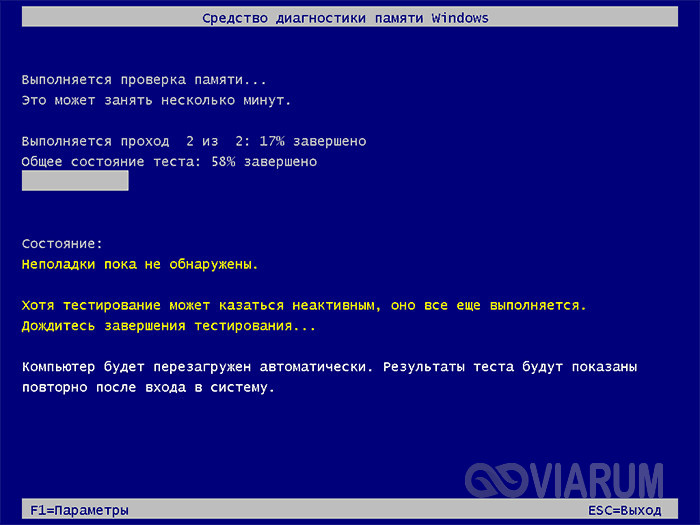
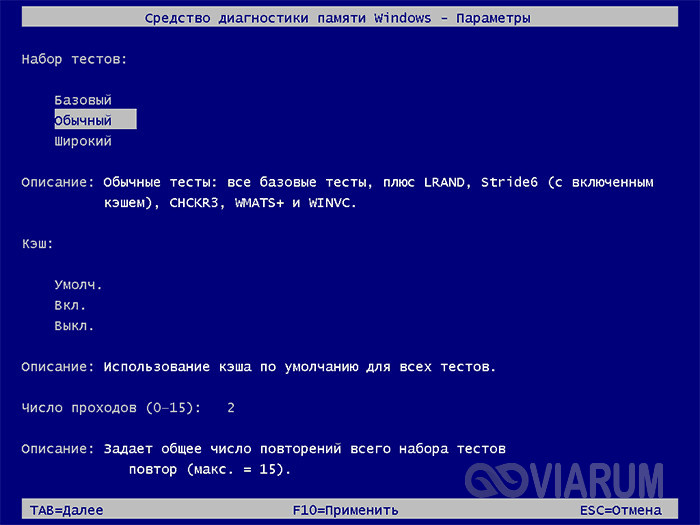
Поскольку код остановки Memory Management иногда вызывается аппаратными неполадками в самой памяти, обязательно выполните ее диагностику встроенной в Windows утилитой mdsched. Запускается она как из окошка «Выполнить», так и из командной строки. Тест ОЗУ будет произведен после перезагрузки компьютера, при этом вы сможете выбрать режим сканирования (базовый, обычный и широкий).
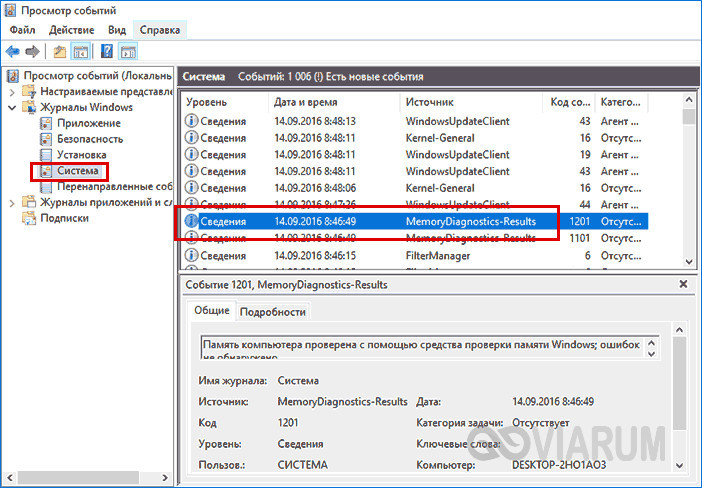
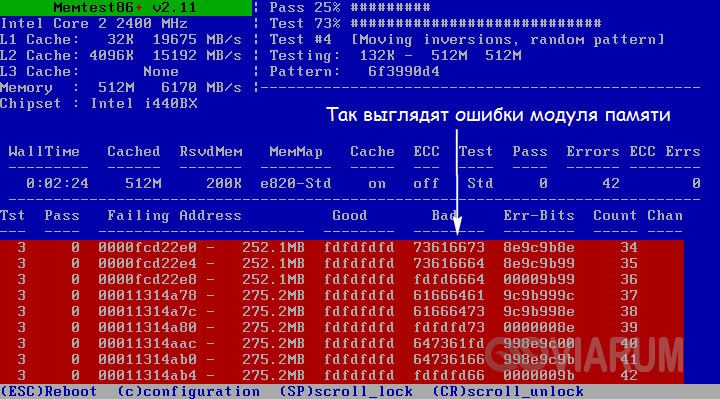
После того, как компьютер загрузится, на экране отобразятся результаты проверки. Если же этого вдруг не произойдет, откройте Журнал событий Windows и отыщите в разделе «Система» запись MemoryDiagnostics-Results. Обнаруженные ошибки с большой долей вероятности укажут на повреждение ячеек памяти, что возможно потребует ее замены.
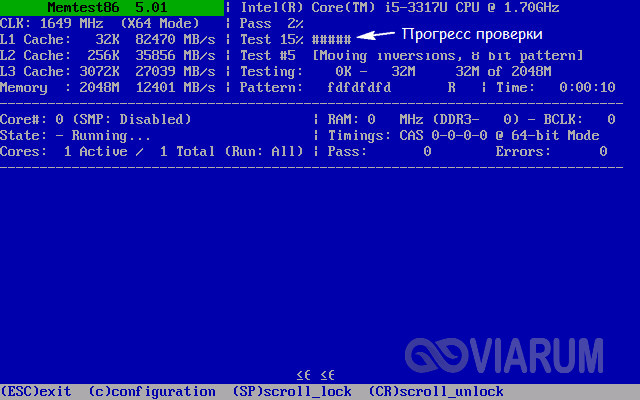
Альтернативой штатному средству диагностики памяти Виндовс выступают сторонние утилиты вроде Memtest86.
Восстановление прежней конфигурации
Если ошибка возникла после установки сторонних программ, обновления драйверов и системы, замены комплектующих или разгона памяти, попытайтесь восстановить последнюю рабочую конфигурацию. Установленное ПО удаляем, старые компоненты и/или драйверы восстанавливаем, настройки в утилитах для оверклоккинга сбрасываем на дефолтные. В случае апгрейда «железа» можно пойти прогрессивным путем – не ставить обратно старые компоненты, а обновить драйвера для новых, скачав их с официального ресурса производителя устройства либо прибегнув к помощи программы DriverPack Solution.
Сканирование на предмет заражения
Наименее вероятной причиной появления синего экрана с кодом остановки Memory Management в Windows 10 является заражение вирусами, тем не менее, не стоит исключать и такой вариант. Выполните углубленное сканирование системного раздела и загрузочных областей хорошим антивирусом, желательно из-под LiveCD.
Поиск проблемных драйверов
Теперь посмотрим, как исправить ошибку Memory Management, вызываемую конфликтом драйвера с ядром операционной системы. Какой именно драйвер сбоит, придется определять вручную, поскольку на экране BSOD об этом ничего не говорится. Выявить проблемное ПО можно с помощью штатного Диспетчера проверки драйверов и утилиты чтения дампов памяти BlueScreenView, но для этого нужно обладать определенной сноровкой. Если вы имеете хотя бы базовые навыки работы с дампами памяти, попробуйте и этот способ.
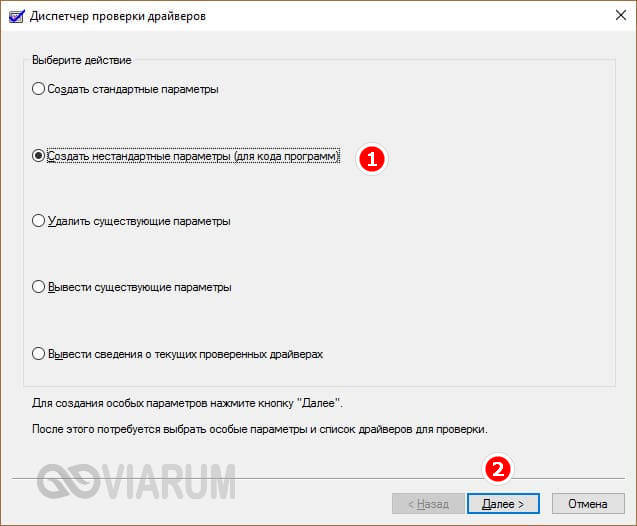
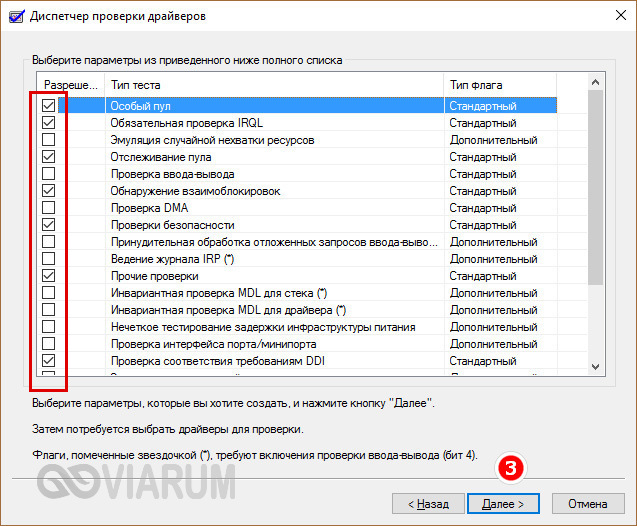
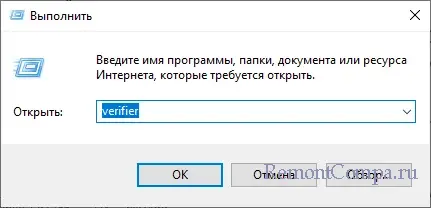
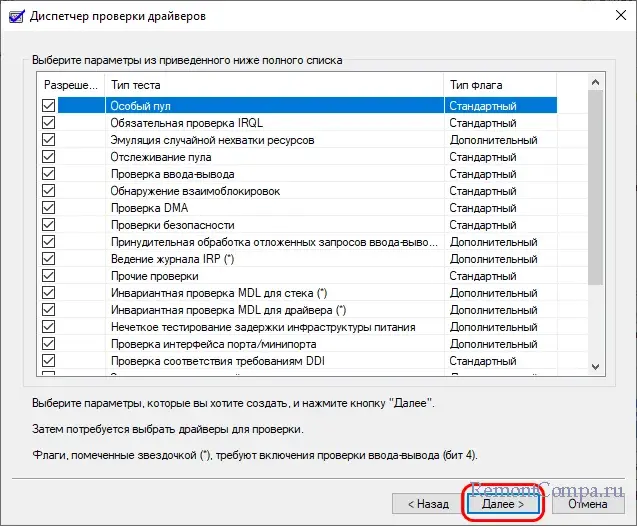
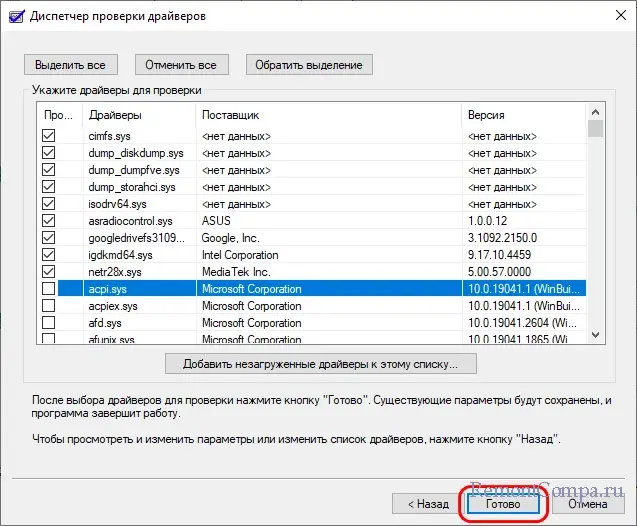
Загрузившись в безопасном режиме, запустите Диспетчер проверки драйверов командой verifier, активируйте в открывшемся окошке радиокнопку «Создать нестандартные параметры», нажмите «Далее» и отметьте галочками указанные на скриншоте пункты.
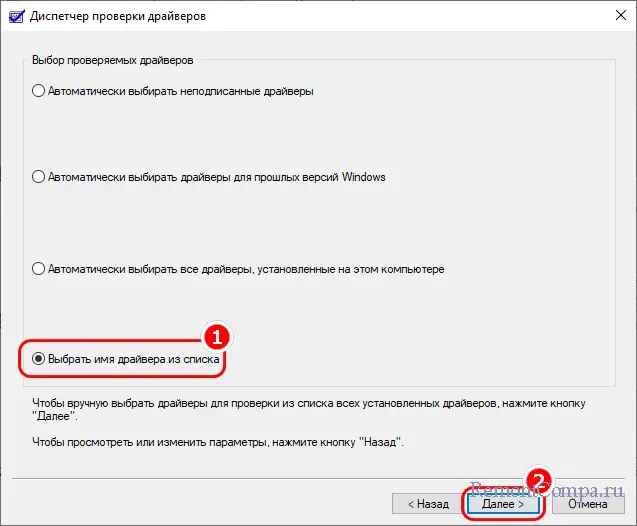
Затем, нажав «Далее», отметьте опцию «Выбирать имя драйвера из списка», отсортируйте выведенные драйвера по поставщику и поснимайте галки со всех драйверов, разработанных Microsoft. Нажмите «Готово» и перезагрузитесь для запуска процедуры сбора информации.
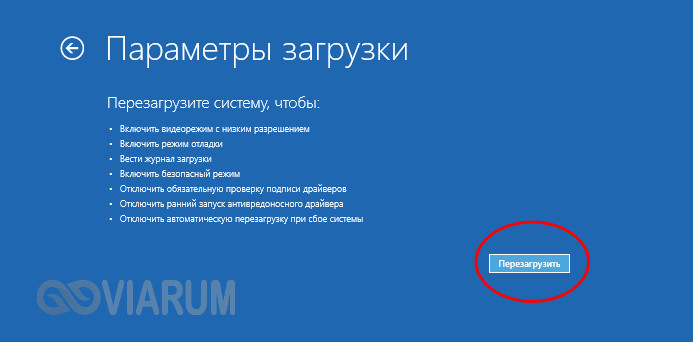
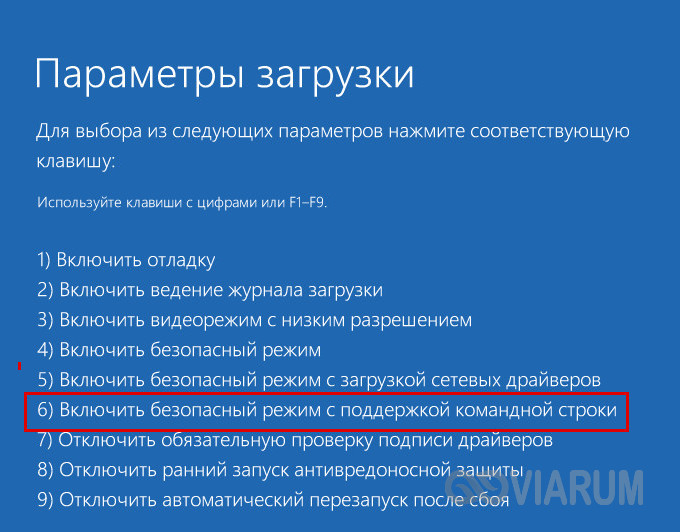
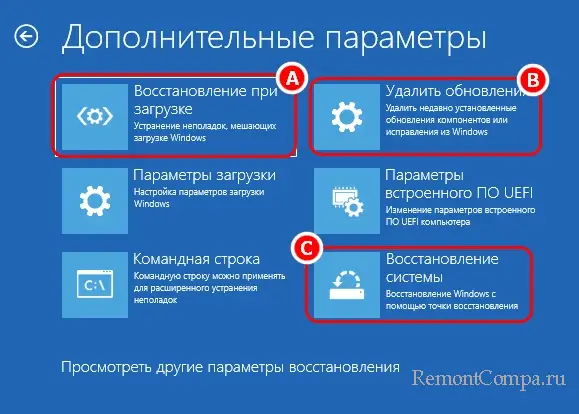
На этом этапе вас может ждать неприятный сюрприз, а именно синий экран с последующей перезагрузкой. Если вдруг вы столкнетесь с подобным поведением Windows 10, пропустите две перезагрузки компьютера, после чего выберите в появившемся меню дополнительных параметров перезагрузку в безопасном режиме с поддержкой командной строки.
Когда система запустится, откройте консоль CMD и выполните в ней сначала команду verifier /reset, а затем shutdown -r -t 0. Компьютер перезагрузится в стандартном режиме.
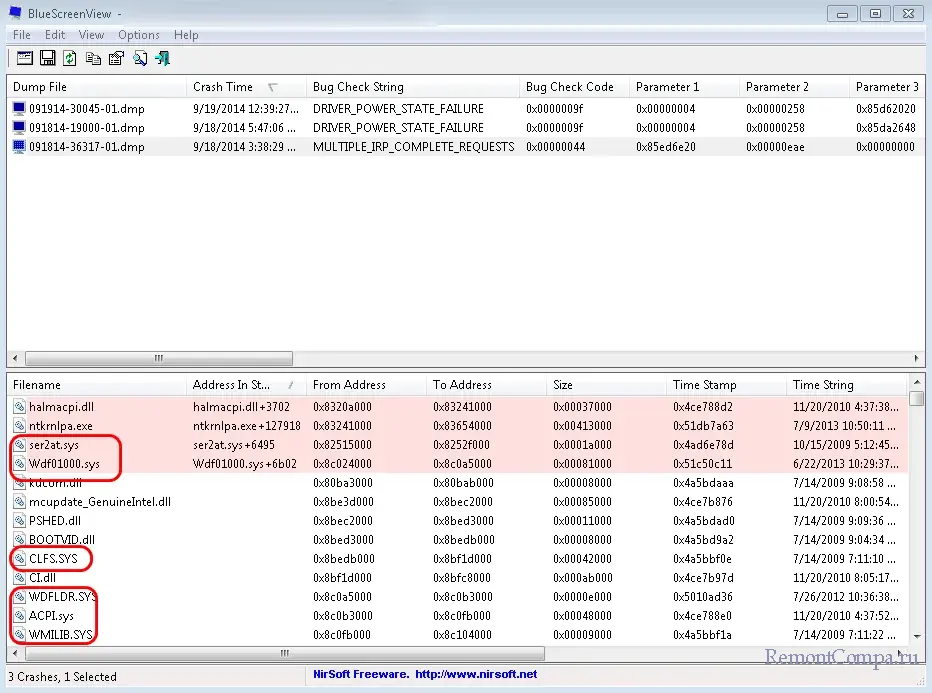
Далее заходим в расположение C:/windows/minidump, находим там созданный файл дампа DMP и открываем его утилитой BlueScreenView. Обращаем внимание на драйвера, отмеченные розовым цветом – они возможные виновники неполадки.
Конфликтные службы
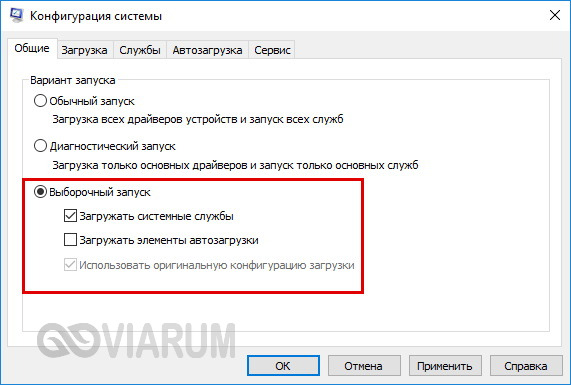
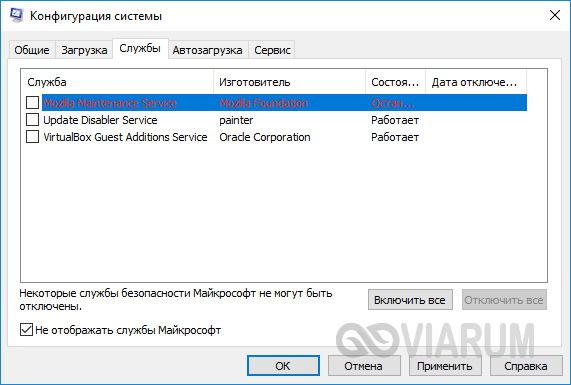
При возникновении ошибки после установки стороннего программного обеспечения последнее нужно удалить, но если это не критично, можно обойтись и отключением его службы. Найти ее в оснастке управления служб не составляет труда, поскольку описание обычно содержит название самой программы. Выявить конфликтные службы также позволяет утилита msconfig. В ее окне на вкладке «Общие» включаем настройку «Выборочный запуск» и снимаем галочку с пункта «Загружать элементы автозагрузки».
Затем, перейдя на вкладку «Службы», отключаем показ служб Microsoft и деактивируем все сторонние службы.
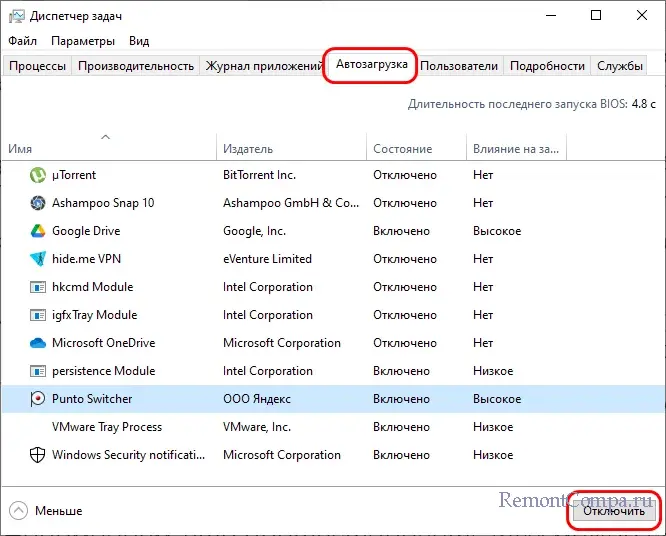
Далее в Диспетчере задач отключаем элементы автозагрузки, перезагружаем компьютер и смотрим, будет ли появляться ошибка Memory Management. Если нет, значит, она вызывается одним из отключенных ранее компонентов. Каким именно, выясняем методом исключения, активируя функции одну за другой пока неполадка не проявит себя.
Неисправность оборудования
Не только сам модуль ОЗУ, но и другие аппаратные компоненты могут спровоцировать ошибку управления памяти. Если вы перепробовали все программные способы ее устранения, следует перейти к диагностике железа. Это дело лучше доверить специалистам сервисного центра, так как у них есть все необходимое оборудование.
Прочие причины
Вызвать ошибку Memory Management в «десятке» может и банальный перегрев оборудования. Проверьте работу системы охлаждения и примите нужные меры. Также настройте схему питания, выставив на мобильных устройствах «Сбалансированное электропитание» при работе от батареи и от сети. Наконец, внимание следует уделить BIOS, проверив, не сбились ли часом его настройки. Правда, последнее случается редко, еще реже «слетевшие» настройки базовой системы ввода-вывода становятся причиной появления ошибки Memory Management.
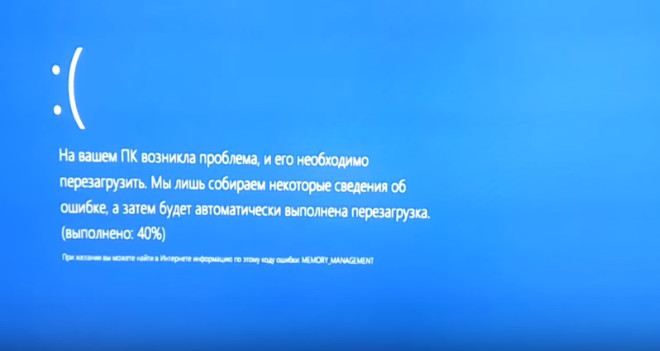
Все стоп-ошибки BSOD можно условно разделить на две группы: в первую входят ошибки, более или менее точно указывающие на определенную проблему, вторую составляют те, которые могут иметь множество причин, что весьма затрудняет их диагностику. Ошибка синего экрана MEMORY MANAGEMENT, о которой сегодня пойдет речь, относится как раз ко второму типу. Хотя заголовок ошибки и указывает на проблемы с памятью, истинный виновник критического сбоя часто оказывается в тени.
Название ошибки «Управление памятью» указывает, что в подсистеме памяти компьютера имел место сбой на аппаратном или программном уровне. Чаще всего сбой происходит на уровне драйвера, поэтому будет вполне логичным начать поиск источника проблемы с тестирования работы драйверов, тем не менее, мы рекомендуем начать с более простого – с исключения влияния сторонних процессов и служб при условии, что вы не имеете других догадок о том, что же стало причиной ошибки.
Что мы имеем ввиду? Допустим, вы обновили драйвера какого-то устройства, после чего у вас начались проблемы и стала появляться ошибка MEMORY MANAGEMENT. Очевидно, что в данном случае неполадка связана с установленным драйвером, и начинать решать проблему нужно именно с этого драйвера – с его удаления или отката к предыдущей версии в Диспетчере устройств.
Если ошибка возникла после установки обновлений Windows, удаляем обновления или откатываемся к ближайшей точке восстановления; если после установки программы – деинсталлируем программу; если после замены оборудования – восстанавливаем старую аппаратную конфигурацию или ищем и устанавливаем оригинальные драйвера устройств.
Кстати, ошибка MEMORY MANAGEMENT может появиться и после чистой установки Windows – признак ограниченной совместимости драйверов Microsoft с оборудованием. Также ошибка может быть вызвана разгоном процессора, видеокарты, оперативной памяти, изменением настроек BIOS – в первом случае отменяем разгон, во втором – восстанавливаем измененные настройки или сбрасываем BIOS.
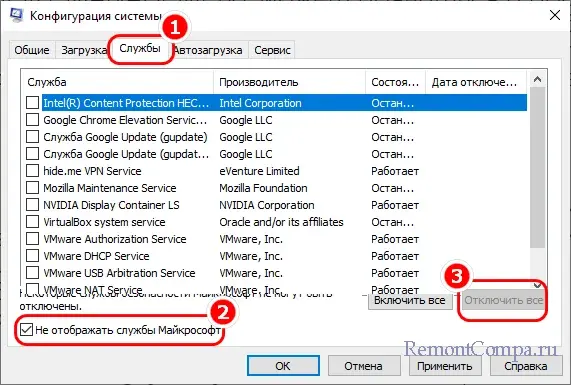
Если предположений на счет причины ошибки нет, действуем методом исключения, проверяя работу компонентов системы один за другим. Для начала рекомендуем выполнить чистую загрузку. Запустите штатную утилиту «Конфигурация системы» командой msconfig в диалоговом окошке «Выполнить», отметьте на вкладке «Общие» пункт «Выборочный запуск» и отключите опцию «Загружать элементы автозагрузки».
Затем переключитесь на вкладку «Службы», отметьте флажком чекбокс «Не отображать службы Майкрософт» и нажмите кнопку «Отключить все». Сохраните настройки.
Дополнительно рекомендуется отключить также и элементы автозагрузки в Диспетчере задач.
После этого перезагружаем компьютер и смотрим, как поведет себя система. Если ошибка перестала появляться, значит дело в одной из программ в автозагрузке или сторонней службе, отключенной в «Конфигурации системы». Действуя методом исключения, включая один компонент за другим, находим тот, который вызывает ошибку и отключаем его.
Поскольку неполадка может быть вызвана сбоями в работе самой оперативной памяти, не будет лишним проверить и ее. Напоминаем, что протестировать RAM можно средствами штатной утилиты mdsched либо более продвинутого стороннего инструмента memtest86+.
Но все же чаще причиной ошибки MEMORY MANAGEMENT становятся драйвера. Выявить, какой именно драйвер работает некорректно, можно с помощью встроенного инструмента «Диспетчер проверки драйверов». Утилита поддерживает два основных режима работы: со стандартными и нестандартными настройками. Если вы хотите протестировать работу сторонних драйверов, используйте режим нестандартных параметров.
1. Перезагрузите компьютер в безопасном режиме с помощью утилиты «Конфигурация системы».
2. Запустите «Диспетчер проверки драйверов» командой verifier в диалоговом окошке «Выполнить».
3. В окне мастера выберите опцию «Создать нестандартные параметры (для кода программ)» и нажмите «Далее».
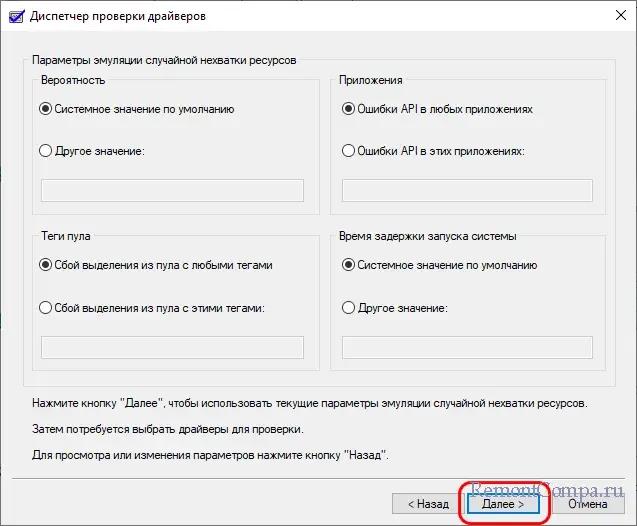
4. В следующем окне отмечаем все пункты, жмем «Далее» и переходим к следующему этапу настройки.
5. Отметьте опцию «Выбрать имя драйвера из списка» и нажмите «Далее».
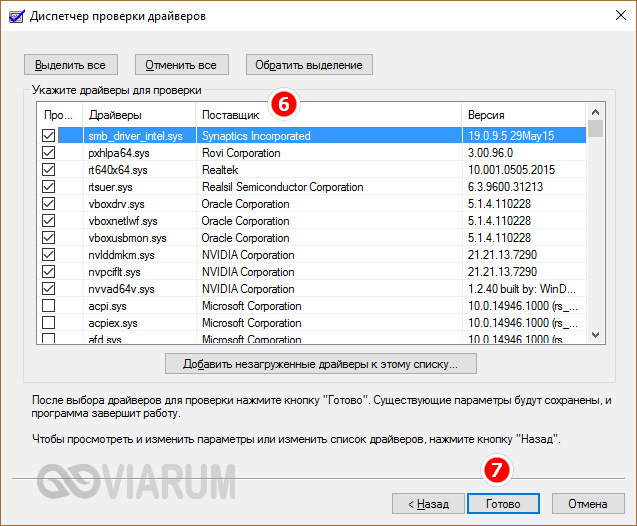
6. Отсортировав драйвера по поставщику, отметьте флажками все драйвера, кроме поставляемых Microsoft. Нажмите «Готово».
7. Отключите загрузку в безопасном режиме и перезагрузите компьютер.
Дальнейшие действия будут зависеть от того, как поведет себя система и что покажет экран BSOD. Если через некоторое время появится синий экран с именем файла драйвера – запишите его, скорее всего, это и есть источник проблемы. Если название драйвера указано не будет, проанализируйте последний файл минидампа DMP из папки %SystemRoot%\Minidump утилитой BlueScreenView – проблемный драйвер будет указан в расшифрованном отчете.
После определения сбойного драйвера не забудьте отключить режим тестирования драйверов, выполнив в запущенной от имени администратора командной строке команду verifier /reset.
Если после включения режима проверки драйверов Windows перестанет загружаться, отключить проверку можно будет той же командой verifier /reset, но уже из среды восстановления, в которую система предложит войти после второго сбоя. Но может статься и так, что система перестанет загружаться после первого же получения ошибки MEMORY MANAGEMENT, и вы не сможете включить режим проверки драйверов.
В этом случае загрузитесь в среду восстановления и выполните откат к ближайшей точке восстановления либо удалите последние обновления, если таковые установлены. Наконец, вы всегда можете сбросить или переустановить систему, в том числе с предварительной интеграцией в дистрибутив оригинальных драйверов устройств.
