If you are getting to see Memory integrity is off your device may be vulnerable error on windows settings due to incompatible drivers which enables it to protect against vulnerability on windows 11 computer from inserting malicious code and prevent attacks on windows 11 computer and fix incompatible drivers issue when enabling windows integrity.
Memory integrity is off your device may be vulnerable
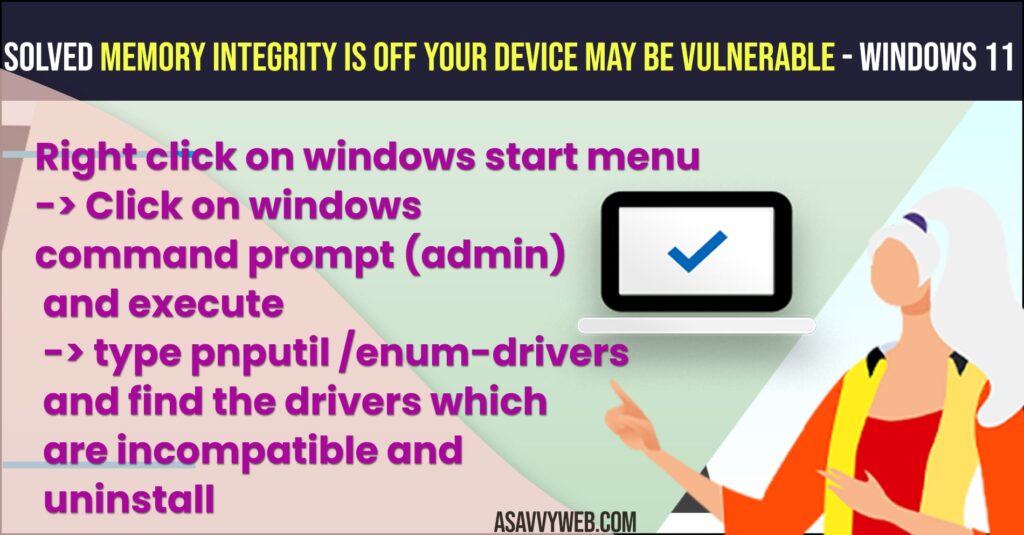
You can fix memory integrity off error in windows 11 using command prompt admin by executing a few commands.
Step 1: Turn on Memory integrity on windows 11 computer and you will see message memory integrity is off – your device may be vulnerable.
Step 2: Click on review incompatible drivers and make a note of incompatible drivers.
Step 3: Now, Right click on Windows start menu
Step 2: Select Command Prompt (admin) option and open terminal.
Step 3: In Terminal -> type pnputil /enum-drivers and hit enter and you will see list of all drivers here.
Step 4: Find incompatible drivers installed on your windows 11 which is causing memory integrity to be off error.
Step 5: Now, you need to uninstall the driver, in terminal -> type pnputil /delete-driver oem<xx> .inf replace it with your driver name here and hit enter.
Step 6: Wait for driver to uninstall completely.
Now, go ahead and turn on memory integrity on windows computer and it may ask you to reboot and your issue of Memory integrity is off your device may be vulnerable error message will be gone.
Also Read:
1) How to Fix Memory Management Error Windows 11 or 10
2) How to fix ntoskrnl.exe High Memory Usage in Windows 11
3) Turn off Memory Integrity Protection to Continue to Update Windows 10
4) How to fix your computer is low on memory windows 10
5) How to fix windows 10 high memory Usage Issue
How to Review Incompatibility Drivers When Enabling Memory Integrity
When you enable memory integrity on windows computer you will see a message review incompatibility drivers option -> Click on Review incompatibility drivers option and you will see a list of all incompatibility drivers which is causing memory integrity error.
Why Memory integrity is off your device may be vulnerable
Due to incompatibility drivers or outdated drivers installed on your windows 11 computer you will experience this issue when you turn on memory integrity on windows 11 laptop or pc and you need to update driver to latest version.
Should Memory integrity be turned on or off?
Memory integrity should be turned on and it will prevent your windows 11 computer from attackers who try to inject malicious code on your windows computer.
What happens if I turn off memory integrity?
If you turn off the memory integrity core isolation process then your windows 11 device may be vulnerable and allow attackers to insert malicious code on your windows 11 computer.
Core isolation memory integrity not turning on
If windows memory integrity core isolation is not turning on then you need to uninstall or update driver issues which are incompatible and fix drivers issues and turn on core isolation memory integrity on windows computer.
Does memory integrity affect performance?
Yes! This does somehow affect the gaming performance on your windows 11 computer when core isolation memory integrity is turned on and it’s confirmed by Microsoft and it can hit frame per second when playing game.
Swapna Reddyhttps://www.asavvyweb.com/
Swapna Reddy is a Tech Content Writer and has a Degree of MTech Completed in 2011 and has an experience of more than 8 years as tech content writer and she writes about methods and solutions to fixing daily experiencing issues and helps users to resolve issues with All Smart tv’z, Computers, iPhone, Android, Windows, Mac and Optimizing methods and other tech related articles with real time experiences and fixes.

Windows 10 and 11 have a security feature called Core Isolation Memory Integrity that isolates important core processes from malicious software. It accomplishes this by running those core processes in a virtual environment.
In this post, we provide solutions to the Memory Integrity greyed out or won’t turn on or off for Device Security in the Windows Security app on Windows 11 and Windows 10 computers.
Recently some windows users are facing this issue where when they open their windows security, they get the following message:
Memory integrity is off your device may be vulnerable
And later when they try to fix it, they get an error saying
“memory integrity can’t be turned on try resolving any incompatibilities with your drivers”
Theis error usually occurs when you have some incompatible drivers installed in your windows 10 or windows 11. In this article we will see …
How to fix memory integrity cannot be turned on windows
By removing all those incompatible drivers.
Before we start make sure your windows 10 or 11 is up to date to the latest version.
To check for update open settings by pressing [windows] + [i] and then go to the windows Update section, it should show that you’re up to date, if it shows any update available click on update and restart your windows.

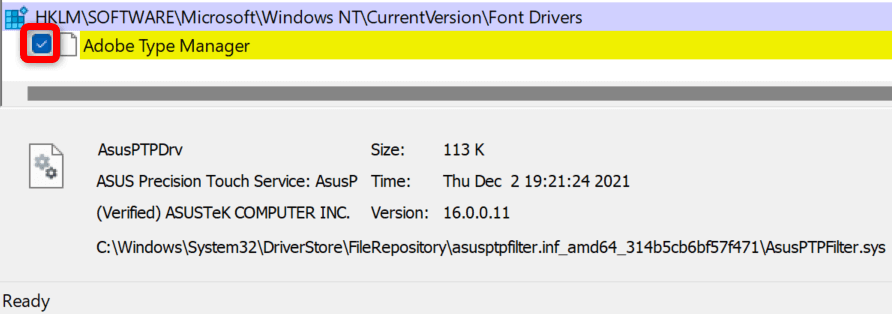
Solution 1: Delete incompatible drivers manually
In order to fix memory integrity cannot be turned on in windows, we will be manually deleting all the incompatible drivers one by one, to do that follow the steps:
- First open setting and then go to privacy and security
- After that go to windows security and click on open windows security
- Under device security click on go to settings
- From there click on review incompatible drivers
- You’ll find a list of incompatible drivers listed with their names.

- Now press the [windows] + [x] key and from the list of menus click on device manager.

- After opening device manager click on view and the click on devices by driver

- There you’ll find a list of drivers by their name, now find those incompatible drivers’ names from step 5 and delete it from the device manager.

- To delete those drivers simply find that incompatible driver from step 5 and copy their published name and look for that published name in device manager, after that right click on that driver
- Now click on remove driver and after that check both boxes and click on remove.


Do this for all the incompatible drivers and after that restart your computer, it should solve memory integrity cannot be turned on error.
In case you find this method a little intimidating and are looking for an easy solution to remove those drivers, the below solution might be a good fit.
Solution 2: Delete incompatible automatically using DriverStore explorer
To delete incompatible drivers using driver explorer follow the steps:
- First visit here and download driverstore explorer zip file

- Now extract the zip folder somewhere and install the Rapr application.

- Now open the app and after a few seconds of scanning it will show you all the drivers.

- Now open setting by pressing [windows] + [i]
- then go to privacy and security
- After that go to windows security and click on open windows security
- Under device security click on go to settings
- From there click on review incompatible drivers
- You’ll find a list of incompatible drivers listed with their names.

- Now from step 4 look for all the incompatible drivers and uninstall them one by one.


After deleting all the incompatible drivers, restart your computer.
Hopefully it should fix your memory integrity won’t turn on issues.
you can also watch this video for better understanding
Also read:
How to take full page scrolling screenshot in windows 10 or 11 easily
steam_api64.dll : Free Download for windows
[Fixed] minecraft stuck on white loading screen problem in windows 10 edition
How To Fix blinking Red Light On Spectrum Router in 2022: Easy Guide

In addition to being a journalist and an editor for windows ground, He is a programmer, writer, and tech enthusiast. He loves exploring new technologies and writing technical how-to tips to help people solve their daily life tech problems. He can be found on Twitter @forfsakeplease
Do you see a “Memory inis off. Your device may be vulnerable.” error and can’t turn on the feature on your Windows 11 PC? Your installed device drivers may be faulty, leading to this issue. Here are a few ways to fix corrupt drivers and other causes of this problem on your computer.
Other reasons you see the above error are that your Windows Security app is faulty, you have problematic third-party apps, Windows system files are corrupt, and more.
Force Enable Memory Integrity From Registry Editor
If you have trouble enabling Memory Integrity from the Windows Security app, use an alternative method to activate this security feature. You can tweak a value in your Windows registry to turn on this feature, which is possible using your PC’s built-in Registry Editor tool.
Note that making incorrect changes to the registry can render your system unstable. So, you should only change the recommended values to ensure your PC remains working.
- Open the Run dialog box by pressing Windows + R.
- Type regedit in the box and press Enter to open the Registry Editor tool.
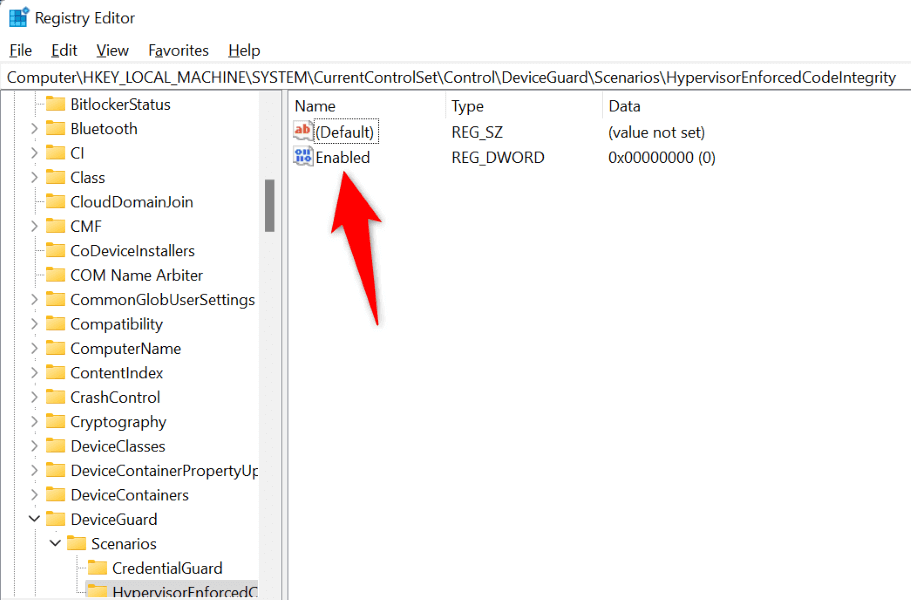
- Head to the following path when Registry Editor opens:
Computer\HKEY_LOCAL_MACHINE\SYSTEM\CurrentControlSet\Control\DeviceGuard\Scenarios\HypervisorEnforcedCodeIntegrity - Double-click the Enabled key on the right.
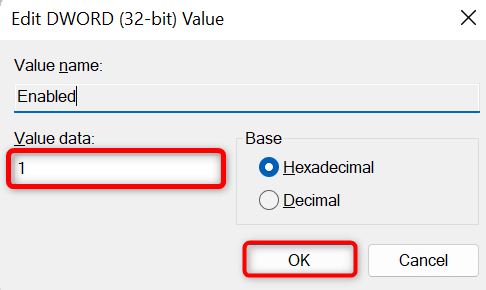
- Type 1 in the Value data field and select OK.
- Close Registry Editor.
- Restart your PC by opening the Start menu, selecting the Power icon, and choosing Restart.
Disable Faulty Device Drivers
The most common reason you get the above error and can’t turn on Memory Integrity is that your installed device drivers are corrupt. Faulty drivers often cause many issues, making your PC malfunction or unstable.
You can prevent such bad drivers from loading when you turn on your PC by disabling them with a free tool called Autoruns. This tool highlights the bad drivers for you and allows you to turn those drivers off and back on.
- Open your preferred web browser and launch the Autoruns website.
- Download, extract, and launch the tool on your PC.
- Navigate to the Drivers tab in the tool and let the tool scan for installed drivers.
- Autoruns highlights your faulty drivers. Untick the boxes next to these drivers to turn these drivers off.
- Restart your PC.
Remove Corrupt or Incompatible Drivers
If your Memory Integrity issue is resolved after disabling the faulty drivers, remove those drivers to fix the problem for good. You can then download the proper drivers for your device from your device manufacturer’s site or Device Manager.
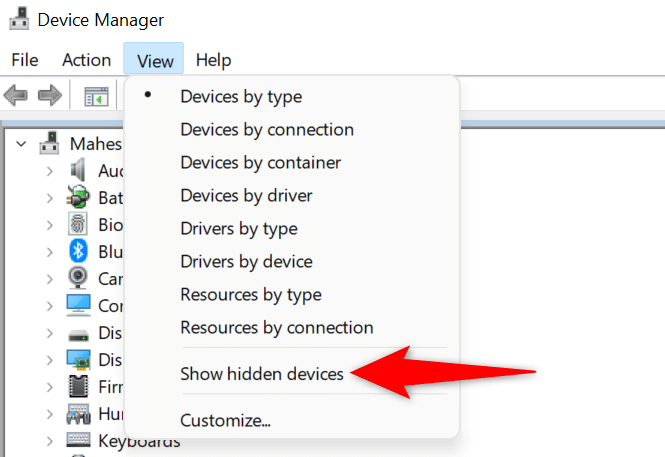
- Right-click the Start menu icon and choose Device Manager.
- Select View > Show hidden devices in Device Manager to list all available devices.
- Expand the category for your faulty device, right-click the device, and choose Uninstall device.
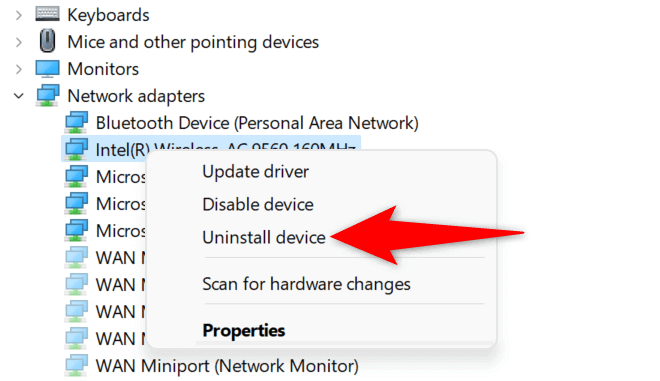
- Select Uninstall in the prompt to remove the device.
- Restart your PC.
If you installed your device drivers from a CD, DVD, or USB drive before, then this time around, download and install the latest drivers from the manufacturer’s website. This will update drivers and fix any issues caused by your drivers, allowing you to turn on your device’s security feature.
Reset the Windows Security App
The Windows Security app’s issues can prevent you from enabling the Memory Integrity feature. One way to fix this app’s problems is by resetting the app to the factory defaults. This deletes any custom configuration in the app and fixes the bugs that may be causing your Memory Integrity problem.
You can use Windows’ built-in option to repair your Windows Security app. Doing this also ensures your PC is safe from malware and viruses.
- Open Windows Settings by pressing Windows + I.
- Select Apps in the left sidebar and Apps & features on the right pane.
- Select the three dots next to Windows Security on the list and choose Advanced options.
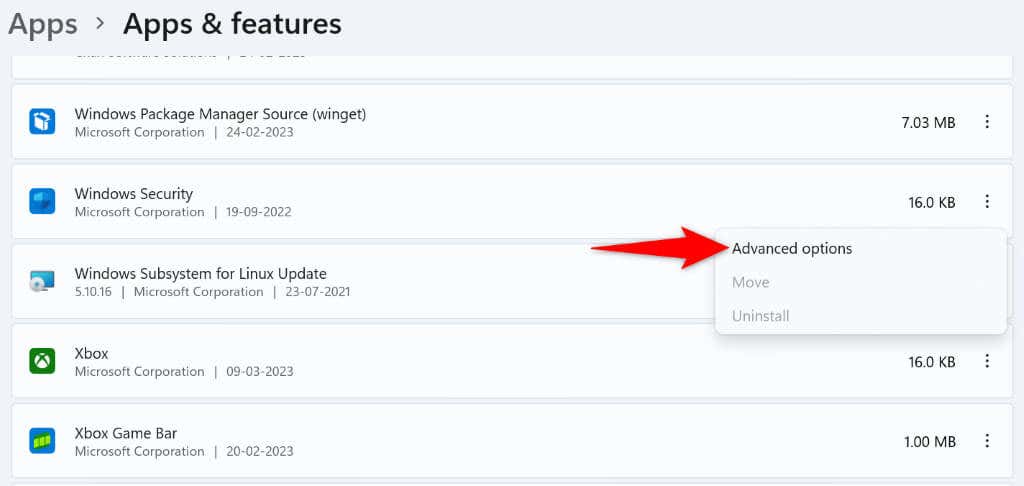
- Select Reset on the following page.
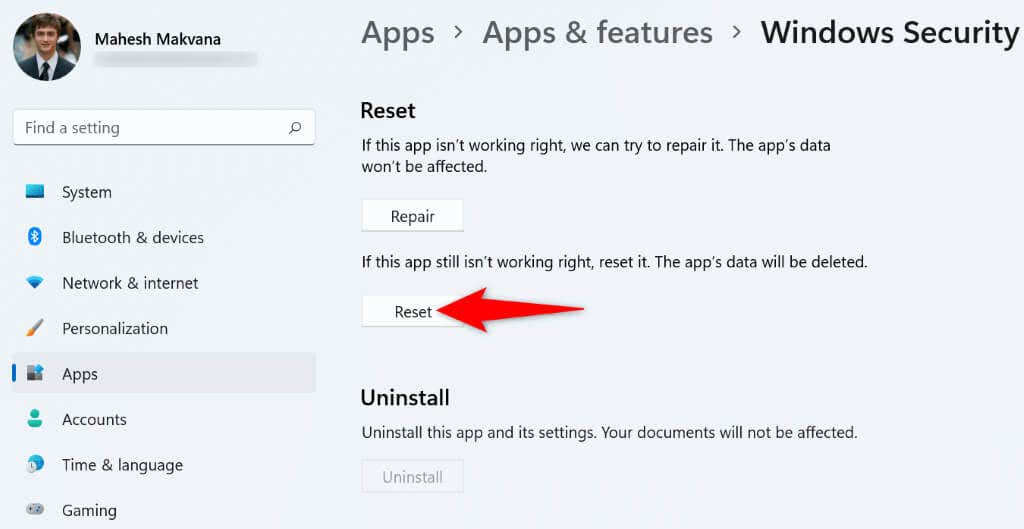
- Choose Reset in the prompt that opens.
- Reboot your PC when you’ve reset your Windows Security app.
Uninstall Problematic Applications
Your Windows 11 PC may have problematic malicious software installed, causing interference with Windows’ Memory Integrity feature. If you’ve started experiencing this issue after installing a particular app, remove that app from your PC to resolve your issue. Removing bad apps also helps improve system performance.
You can then find a better alternative to your app and continue your tasks.
- Launch Settings by pressing Windows + I.
- Select Apps in the left sidebar and Apps & features on the right pane.
- Choose the three dots next to the problematic app and select Uninstall.
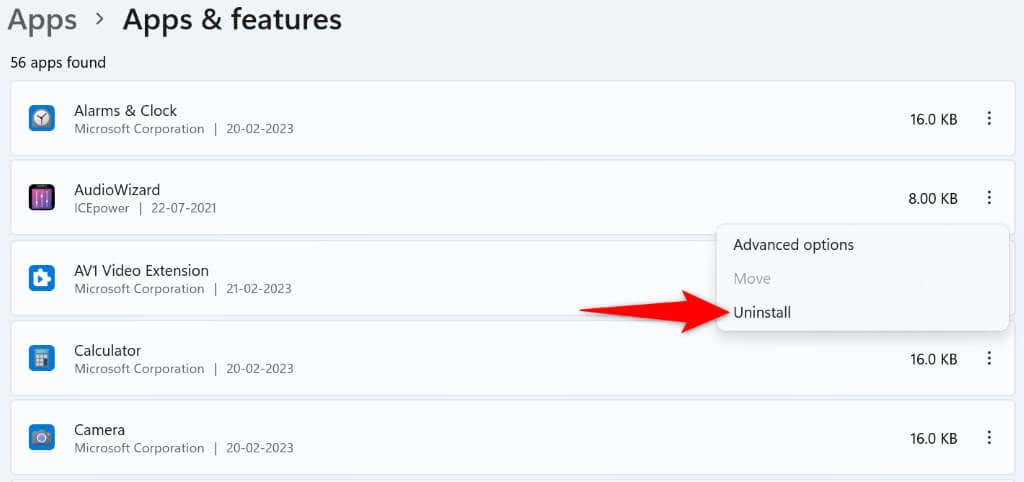
- Select Uninstall in the prompt to remove the app.
- Restart your PC.
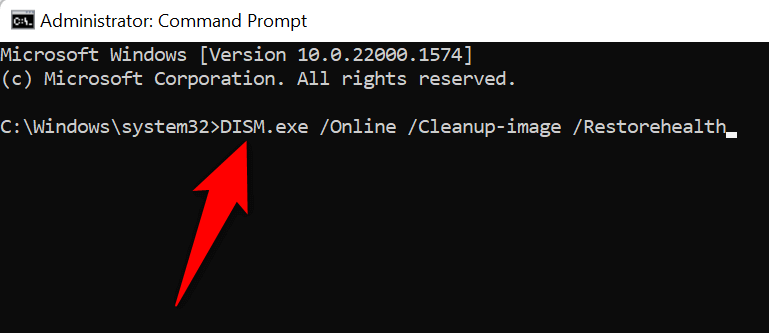
Fix Windows’ Corrupt System Files
One possible reason you see a “Memory integration is off. Your device may be vulnerable.” error and can’t turn on Memory Integrity is that your Windows system files are corrupt. These faulty files prevent your system functions from working normally, causing many problems.
Luckily, your Windows 11 PC includes a tool to scan for and fix bad system files. You can use your PC’s SFC (System File Checker) tool to find faulty files and fix those files. This tool runs from Command Prompt and works on its own for the most part.
- Open the Start menu, search for Command Prompt, and select Run as administrator.
- Choose Yes in the User Account Control prompt.
- Type the following command in the CMD window and press Enter. This command requests Windows Update to download the files required to fix your corrupt files.
DISM.exe /Online /Cleanup-image /Restorehealth
- After running the above command, execute the following command to start finding and fixing corrupt Windows files: sfc /scannow
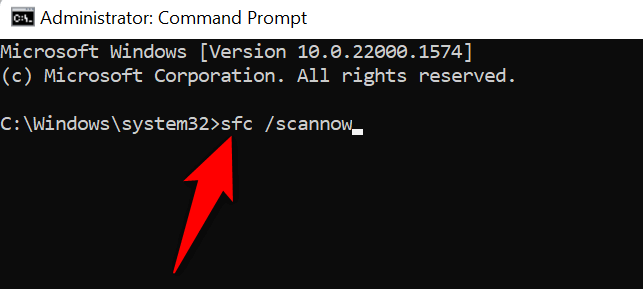
- Wait for the tool to finish its job.
Your system files that went corrupt due to malicious code or another cause are now fixed.
Update Windows 11
Microsoft often pushes various Windows 11 operating system updates, allowing you to patch system bugs, get new features, and optimize your overall experience. However, your “Memory integration is off. Your device may be vulnerable.” issue may have occurred due to a system problem. In this case, update your Windows software to the latest version, which will resolve your issue.
- Press Windows + I to open Settings.
- Select Windows Update in the left sidebar.
- Choose Check for updates on the right pane.
- Download and install the available updates.
- Restart your PC.
Troubleshoot Windows 11 Memory Integrity Problems on Your PC
Windows 11’s Memory Integrity issue occurs for various reasons, with corrupt device drivers being the leading cause. Hopefully, the troubleshooting steps above are all you need to resolve your issue.
You can then turn on and off Memory Integrity as and when you want. Enjoy!
Microsoft has improved the default Windows Defender by leaps and bounds with Windows 10 update. It’s the default and preferred choice for many to keep their computer virus-free. The system has a ‘Memory Integrity’ security feature to protect critical processes and attacks at the kernel levels. However, the function seems to be disabled for many due to incompatible drivers and you receive error “Memory integrity is off. Your device may be vulnerable.” If you are one of the affected ones, read the troubleshooting steps to fix the problem.
Memory integrity prevents attacks from inserting malicious code into high-security processes. Once you resolve incompatibilities with drivers, the system will enable the function for your PC.
Here are top 6 ways that can fix Memory integrity is off. Your device may be vulnerable. error on Windows 11.
1. Enable Memory Integrity via Group Policy Editor
Group Policy Editor menu is available only to Windows 11 Pro users. You can use it to enable Memory integrity on your PC. Follow the steps below.
Step 1: Press the Windows key and search for Group Policy Editor.
Step 2: Head to Computer Configuration > Administrative Templates.

Step 3: Select the System folder.

Step 4: Open ‘Device Guard’.

Step 5: Select ‘Turn On Virtualization Based Security’.

Step 6: Select the radio button beside ‘Enabled’ and hit Apply. Select Ok, and you are good to go.

Restart your PC.
2. Enable Optional Features on Windows 11
If ‘Virtual Machine Platform’ and ‘Windows Hypervisor Platform’ features are disabled on your PC, it may affect the memory integrity feature. Follow the steps below.
Step 1: Press Windows + I keys to open the Windows Settings menu.
Step 2: Select ‘Apps’ from the left sidebar.
Step 3: Open ‘Optional features’.

Step 4: Scroll down to more Windows features.
Step 5: Enable Virtual Machine Platform and Windows Hypervisor Platform options and hit OK.

Once Windows applys the changes, reboot the PC and enable Memory integrity from the Windows Security menu.
3. Perform a Clean Boot
If the memory integrity function is still not enabled on your computer, it’s time to perform a clean boot. Here, you basically turn off all services except the essential Microsoft services. It’s quite easy and straightforward to boot your PC into a clean state.
Step 1: Press Windows + R keys to open the Run menu.
Step 2: Type msconfig and hit OK.

Step 3: Select ‘Selective startup’ and click ‘Load system services’.

Step 4: Move to the Services tab and select ‘Hide all Microsoft services’. Click ‘Disable all’.

Step 5: Click Appy and select Ok.
Restart your PC and head to Windows Security to enable Memory Integrity function.
4. Update Incompatible Drivers
You can update outdated drivers on your computer and enable memory integrity without any problem. You need to use the Device Manager menu to make changes.
Step 1: Right-click on Windows key and open the Device Manager menu.
Step 2: Select ‘View’ in the menu bar.
Step 3: Select ‘Show hidden devices’.

Step 4: Check for yellow exclamation marks beside outdated drivers from the list.
Step 5: Right-click on such drivers and select ‘Update drivers’ from the context menu.

Step 6: Follow on-screen instructions to complete the update process.
For more details, read our dedicated post to update drivers on Windows.
5. Use Security Processor Troubleshooting
You can run security processor troubleshooting and reset TPM (Trusted Platform Module) to fix issues like memory integrity greyed out.
Step 1: Press the Windows key and search for Windows Security.
Step 2: Hit Enter to open the app.
Step 3: Select ‘Device security’ from the left sidebar.
Step 4: Open Security processor details.

Step 5: Select ‘Security processor troubleshooting’.
Step 6: Click ‘Clear TPM’ and restart the PC.

6. Update Windows 11
An outdated Windows 11 build can lead to issues like incompatible drivers errors for memory integrity. Microsoft frequently releases new updates to add features, install the latest drivers, and fix bugs.
Step 1: Open the Windows Settings menu.
Step 2: Select Windows Update from the left sidebar.
Step 3: Download and install the pending Windows update on your PC.

If you face issues with installing the latest Windows update, read our troubleshooting guide to fix the problem.
Secure Your Windows PC
We don’t recommend using your Windows PC with the memory integrity option disabled. Which trick worked for you? Share your findings in the comments below.
Memory Integrity is a security feature in Windows 11 that monitors all memory access and prevents unauthorized programs from accessing sensitive data or code. However, if this feature is disabled, Windows 11 may display the ‘Memory integrity is off. Your device may be vulnerable’ errors.

While you can easily enable the Memory integrity feature from the Windows Security app, there can be times when the feature appears grayed out on your PC. If this has happened to you, here are some troubleshooting tips to help.
1. Scan for Incompatible Drivers and Update Them
One of the primary causes of the ‘Memory integrity is off’ error message on Windows 11 is the presence of incompatible drivers. First, scan your PC for incompatible drivers using the Windows Security app. Here’s how to do it.
Step 1: Click the Windows Search icon on the taskbar, type in windows security and press Enter.

Step 2: In the Home tab, click on Device security.

Step 3: Click on Core isolation details.

Step 4: Enable the toggle under Memory integrity. If the option is grayed out, you will see the ‘Resolve any driver incompatibilities and scan again’ error. Click the Review incompatible drivers link to continue.

Step 5: Note down the name of the problematic incompatible driver.

Step 6: Close the Windows Security app. Right-click on the Start icon and select Device Manager from the list.

Step 7: Click the View menu at the top and select ‘Show hidden devices.’

Step 8: Locate the problematic incompatible driver on the list. Right-click on it and select Update driver.

Follow the on-screen prompts to finish updating the driver and see if you can enable the Memory Integrity feature after that.
2. Uninstall Problematic Drivers and Related Programs
If updating the driver does not help, your next best option is to remove the faulty driver from your PC. Here’s how to do it.
Step 1: Press the Windows + S keyboard shortcut to open the search menu. Type in device manager and press Enter.

Step 2: Click the View menu at the top and select ‘Show hidden devices’ from the list.
Step 3: Right-click on the faulty driver and select Uninstall device.

Additionally, you can also remove any programs or software related to the problematic driver. To do so, use these steps:
Step 1: Right-click on the Start icon and select Installed apps from the list.

Step 2: Locate the app or program related to the troublesome driver. Click the three horizontal dot menu icon next to it and select Uninstall.

After completing the above steps, check if you can turn on Memory Integrity on your Windows 11 PC.
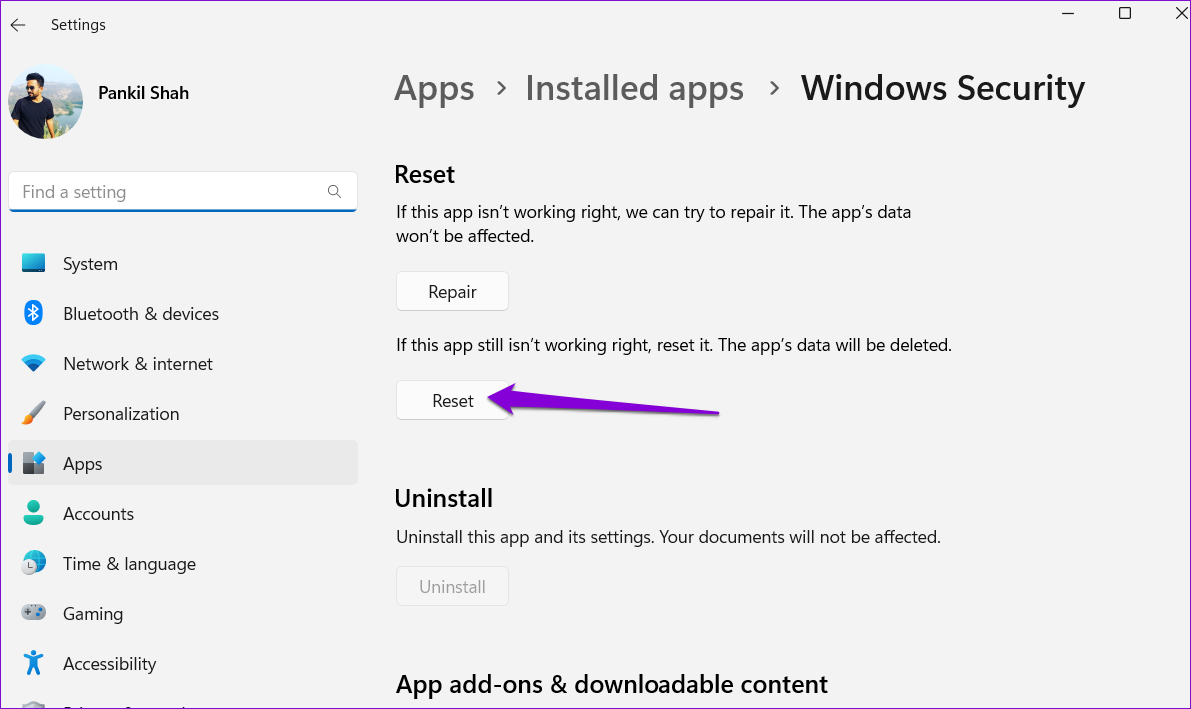
3. Reset the Windows Security App
There’s a chance that the ‘Memory integrity is off’ error has nothing to do with the drivers but rather the Windows Security app itself. If that’s the case, resetting the Windows Security app should help solve the problem.
Step 1: Press the Windows + S keyboard shortcut to open the search menu. Type in Windows Security, right-click on the first result that appears, and select App settings.

Step 2: Click the Reset button.
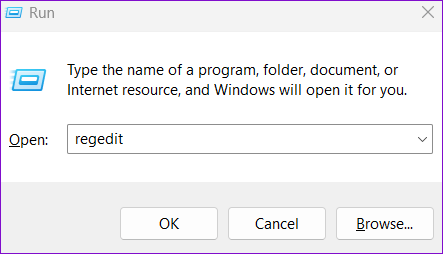
4. Use Registry Editor to Enable Memory Integrity
If you still can’t turn on the Memory Integrity feature through Windows Security, you can edit a few registry files to enable the feature. However, since editing registry files is slightly risky, you should consider backing up all the registry files or creating a restore point before proceeding.
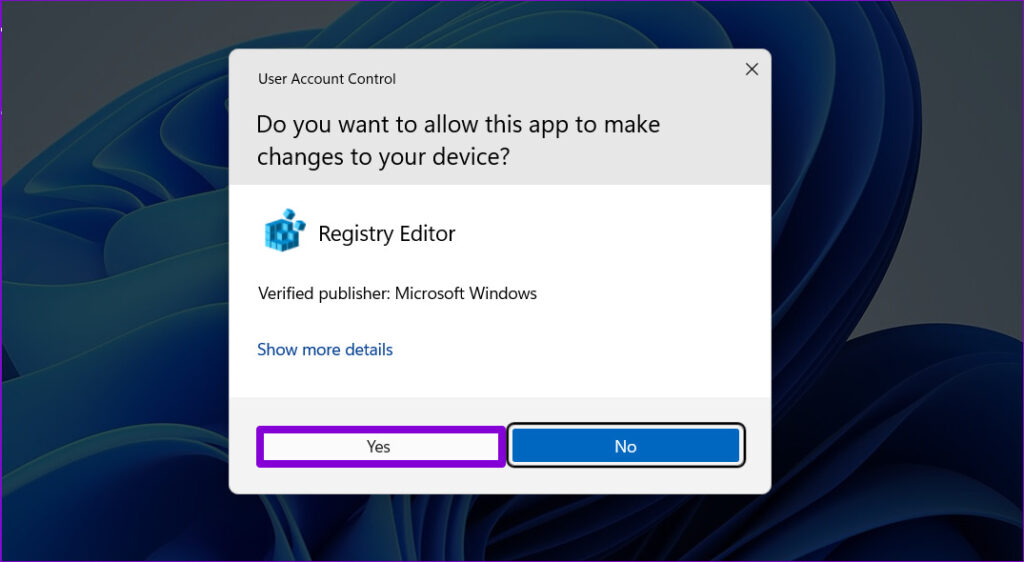
Step 1: Press the Windows + R keyboard shortcut to open the Run dialog box. Type regedit in the box and press Enter.
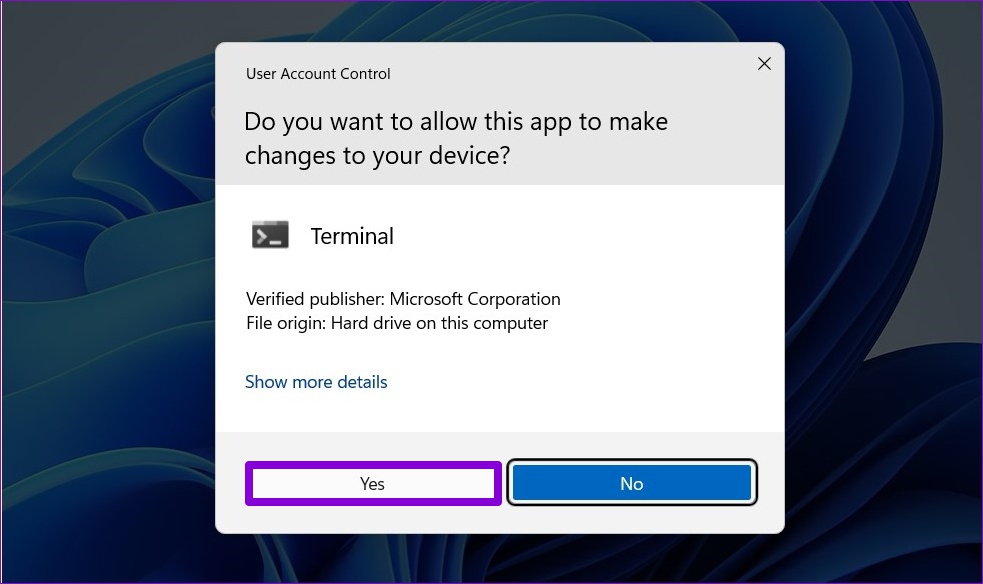
Step 2: Select Yes when the User Account Control (UAC) prompt appears.
Step 3: Paste the following path in the address bar at the top and hit Enter.
Computer\HKEY_LOCAL_MACHINE\SYSTEM\CurrentControlSet\Control\DeviceGuard\Scenarios\HypervisorEnforcedCodeIntegrity

Step 4: Double-click the Enabled entry in the right pane and enter 1 in the Value data field. Then, click OK.

After completing the above steps, restart your PC and see if you get the ‘Memory integrity is off’ error in Windows 11.
5. Run SFC and DISM Scans
Another reason why the Memory Integrity feature may appear grayed out on your Windows 11 PC is if some of the system files are corrupt or missing. Running the SFC (System File Checker) and DISM (Deployment Image Servicing and Management) scans can help you repair such problematic system files.
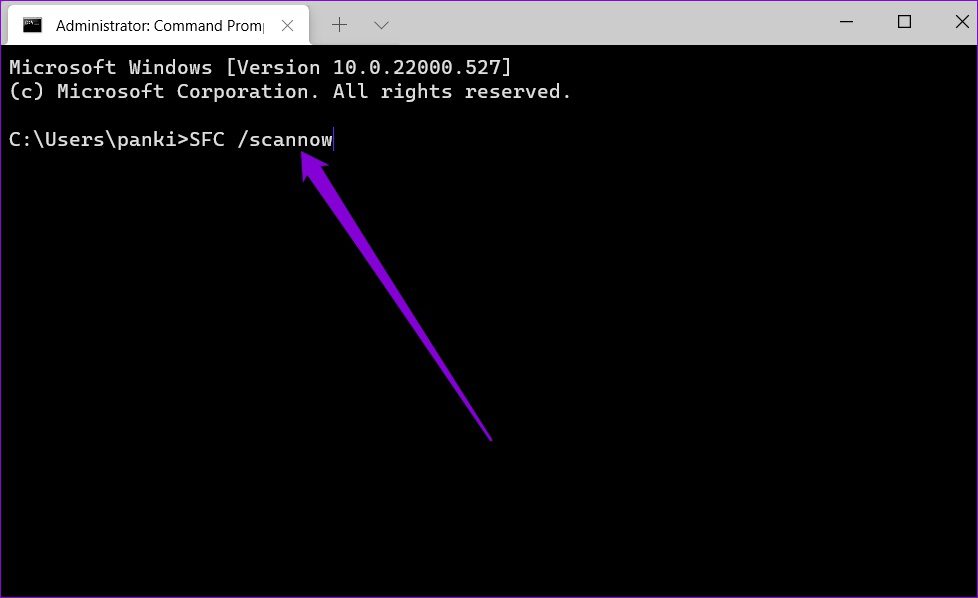
Step 1: Press the Windows + X keyboard shortcut to open the Power User menu and select Terminal (Admin) from the list.

Step 2: Select Yes when the User Account Control (UAC) prompt appears.
Step 3: Type the following command and press Enter:
SFC /scannow
Step 4: Run the following commands one by one and press Enter after each one to run the DISM scan:
DISM /Online /Cleanup-Image /CheckHealth
DISM /Online /Cleanup-Image /ScanHealth
DISM /Online /Cleanup-Image /RestoreHealth

Restart your PC one more time and check if the issue is still there.
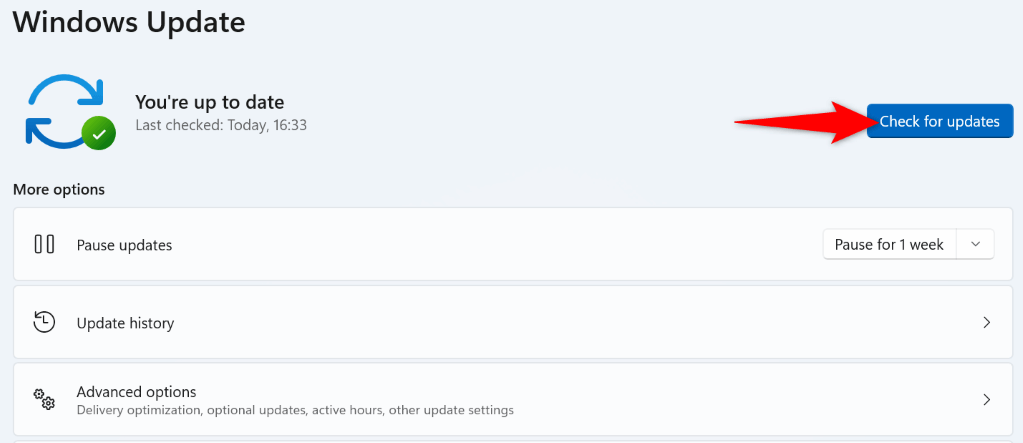
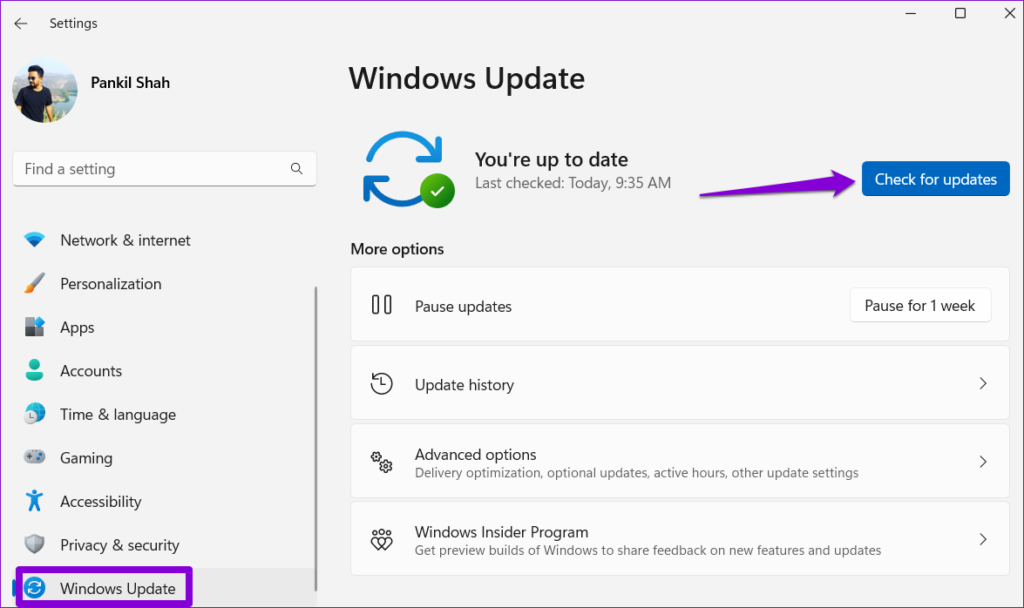
6. Install Windows Updates
Running an outdated version of Windows can also lead to such problems. So, if the above fixes prove ineffective, try installing any pending system updates and see if that helps.
Press the Windows + I keyboard shortcut to open the Settings app and navigate to the Windows Update tab. Click the Check for updates button in the top right corner to download and install pending updates.
Enjoy a Safer Computing Experience
Memory Integrity is an essential feature ensuring only trusted code and drivers can run in the Windows kernel, protecting your system from malware. Hence, it’s critical not to ignore errors like ‘Memory integrity is off’ on your Windows 11 computer and resolve them promptly.