Meet Now в Windows 10 – это новая функция, которая позволяет пользователям удаленно проводить собрания и посещать их с помощью Skype.
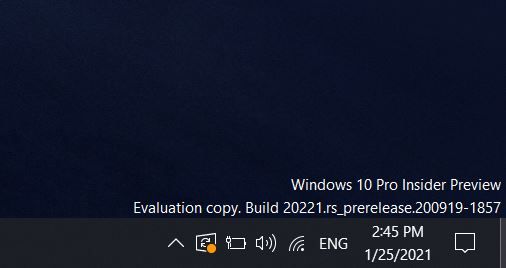
Значок Meet Now на панели задач был добавлен в Windows 10 версии 1903 или новее с обязательными обновлениями за декабрь 2020 года. С тех пор, как эта функция была официально объявлена, у людей были смешанные чувства по поводу подхода Microsoft, некоторые пользователи называли это вредоносным ПО «Meet Now».
Чтобы скрыть значок на панели задач Meet Now, вы можете просто щелкнуть правой кнопкой мыши значок нового видео на панели задач и выбрать «скрыть», как показано на скриншоте ниже.
![]()
Если вы по-прежнему не можете скрыть значок, вам необходимо открыть настройки панели задач или редактор групповой политики, чтобы навсегда отключить функцию Meet Now.
Как скрыть значок Meet Now в Windows 10
Чтобы скрыть значок Meet Now на панели задач, выполните следующие действия:
- Щелкните правой кнопкой мыши панель задач и выберите «Параметры панели задач».
- В окне «Параметры» прокрутите вниз и нажмите ссылку «Включение или выключение системных значков».
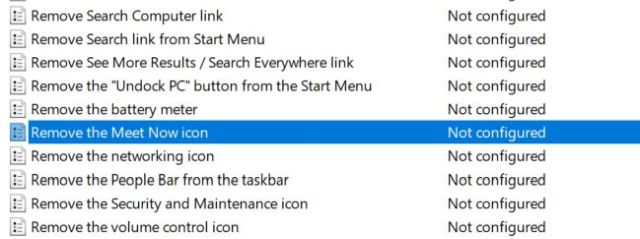
- Найдите в списке значок «Провести собрание».

- Выберите параметр и переключите его на «Выкл», щелкнув по нему.
Как удалить значок Meet Now с панели задач
Если значок по-прежнему закреплен на панели задач, вы также можете удалить значок, выполнив следующие действия:
- Зайдите в Параметры > Персонализация > Панель задач.
- Нажмите «Выберите значки, отображаемые в панели задач» в области уведомлений.
- Кликните на значок уведомления Meet Now, и он исчезнет с панели задач.
Отключить значок Meet Now на панели задач с помощью редактора групповой политики
Редактор групповой политики предоставляет вам набор правил, управляющих работой функции Meet Now в ОС. Чтобы навсегда отключить Meet Now в Windows 10 для всех учетных записей пользователей, выполните следующие действия:
- Откройте редактор групповой политики.
- Перейдите в Конфигурация пользователя > Административные шаблоны.
- Выберите «Пуск и панель задач».
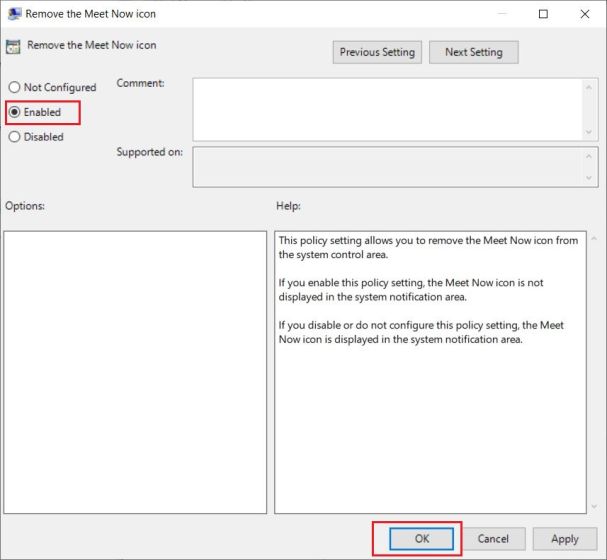
- На правой панели дважды щелкните политику «Удалить значок Meet Now».
- Выберите «Отключено».
- Нажмите ОК и закройте редактор.
После значок исчезнет с панели задач для всех учетных записей пользователей.
Также стоит отметить, что технический гигант постепенно продвигает функцию Meet Now в другие продукты, такие как Outlook и Microsoft Edge. С помощью этого принудительного обновления Microsoft может помочь Skype поддерживать и защищать свою базу пользователей от конкурентов, таких как Zoom.
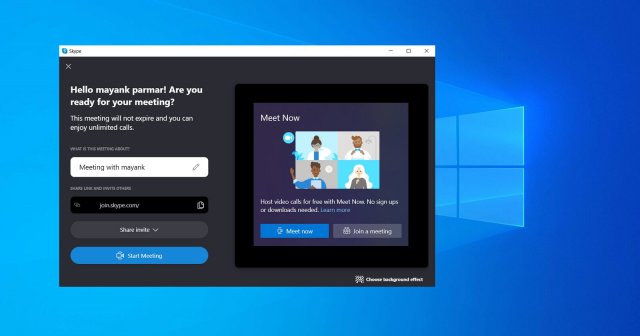
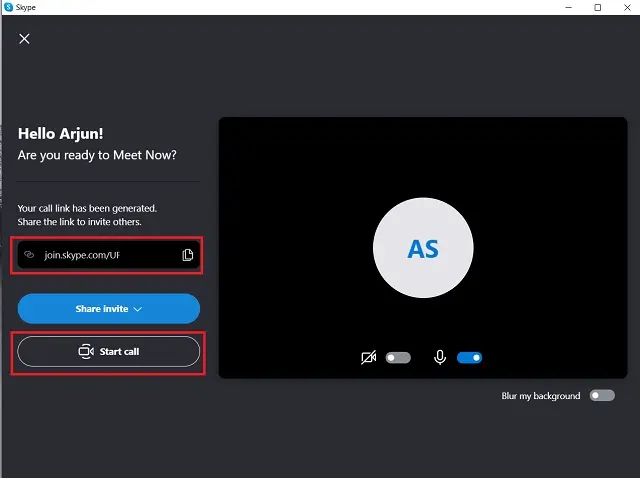
Как мы упоминали в самом начале, Meet Now интегрирован в Skype и позволяет пользователям начинать собрания без учетной записи Microsoft или Skype.
Процесс также довольно прост, так как вам нужно всего лишь щелкнуть значок и создать уникальную ссылку, которой вам нужно будет поделиться с участниками.
Если вы хотите снова включить эту функцию, вы можете вернуться к тем же настройкам панели задач и переключить опцию на «Вкл.».
У некоторых пользователей Windows 10 в панели задач появился новый неизвестный значок. Если тоже заметили его у себя, то знакомьтесь — функция называется «Провести собрание», а вы попали в расширенную тестовую группу. В будущем кнопка для создания собраний станет частью панели задач на всех компьютерах, и многие могут задаться вопросом, что она делает, почему находится там и как её удалить. Все ответы в данной статье.
Что такое «Провести собрание» в Windows 10
«Провести собрание» — бесплатная функция, позволяющая легко звонить любому человеку буквально в два клика. Теперь в Windows 10 можно мгновенно связываться с членами семьи, друзьями, коллегами и устраивать групповые видеоконференции, нажав «Провести собрание» в области уведомлений на панели задач. Инструмент призван упростить звонки и организацию совместных рабочих пространств для пользователей Windows на фоне пандемии коронавируса.
Технология работает на базе сервиса Skype, не требуя регистраций и загрузок отдельных приложений. Вы можете присоединяться к собраниям без учётной записи Skype и приглашать других таких же участников по специальному приглашению в виде ссылки. Если на устройстве установлено приложение Skype, собрание откроется в нём, в противном случае присоединение произойдёт в онлайн-формате через интернет. Поддерживаются браузеры Microsoft Edge, Google Chrome и Apple Safari актуальных версий.
Как просто убрать значок «Провести собрание» из панели задач
Если вы не планируете использовать функцию «Провести собрание», значок в панели задач будет раздражать и занимать лишнее место, не предоставляя ничего полезного. Есть быстрый способ убрать его — это простейший вариант без глубокого вмешательства в недра операционной системы. Иконка лишь пропадёт из виду, но сама функция останется в Windows 10 и по-прежнему может быть активирована в желаемый момент.
Что нужно сделать:
1️⃣ Нажмите правой кнопкой мыши по значку «Провести собрание» в панели задач.
2️⃣ Во всплывающем контекстном меню выберите «Скрыть».
3️⃣ Готово! Значок «Провести собрание» сразу исчезнет из панели задач.
В данном случае значок не скрывается, а выключается полностью, поэтому вы больше не увидите его даже после перезагрузки.
Удаляем значок «Провести собрание» через редактор групповой политики
Адинистраторы Windows 10 могут на системном уровне отключить отображение значка «Провести собрание» в панели задач. Обратите внимание: редактор локальной групповой политики доступен только в редакции Windows 10 Pro.
Что нужно сделать:
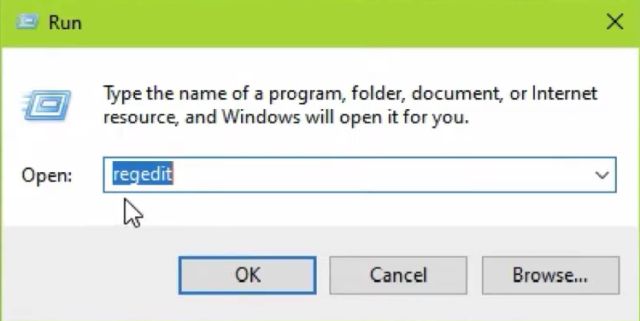
1️⃣ Используйте сочетание клавиш Windows + R для открытия утилиты «Выполнить» и введите в поле запуска «gpedit.msc», после чего нажмите «OK». Или найдите через поиск «Изменение групповой политики».
2️⃣ В редакторе локальной групповой политики перейдите в раздел «Конфигурация пользователя» → «Административные шаблоны» → «Меню „Пуск“ и панель задач».
3️⃣ Прокрутите вниз и найдите параметр «Удалить значок „Провести собрание“», дважды кликните по нему.
4️⃣ Установите для параметра состояние «Включено», чтобы удалить значок из панели задач Windows 10.
5️⃣ Перезагрузите компьютер.
Удаляем значок «Провести собрание» через редактор реестра
Что нужно сделать:
Используйте сочетание клавиш Windows + R для открытия утилиты «Выполнить» и введите в поле запуска «regedit.exe», после чего нажмите «OK». Или найдите через поиск «Редактор реестра».
Для индивидуального пользователя:
1️⃣ Перейдите в HKEY_CURRENT_USER\Software\Microsoft\Windows\CurrentVersion\Policies\Explorer.
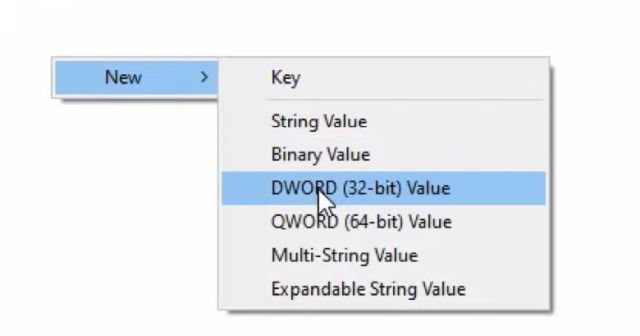
2️⃣ Нажмите правой кнопкой мыши на группу «Explorer» и в контекстном меню выберите «Создать» → «Параметр DWORD (32 бита)».
3️⃣ Назовите его «HideSCAMeetNow».
4️⃣ Присвойте ему значение 1.
5️⃣ Перезагрузите компьютер.
Для всех пользователей:
1️⃣ Перейдите в HKEY_LOCAL_MACHINE\SOFTWARE\Microsoft\Windows\CurrentVersion\Policies\Explorer.
2️⃣ Нажмите правой кнопкой мыши на группу «Explorer» и в контекстном меню выберите «Создать» → «Параметр DWORD (32 бита)».
3️⃣ Назовите его «HideSCAMeetNow».
4️⃣ Присвойте ему значение 1.
5️⃣ Перезагрузите компьютер.
- Теперь не боюсь за Windows: точки восстановления создаются каждый день. Вот как это настроить
- Эта бесплатная утилита от Microsoft в разы ускоряет работу. Она существует ещё с Windows 95
- Эта утилита показывает, где используется выбранный файл в Windows и что мешает удалить его
- Мод Windows 10 для игр: тестирую Atlas OS, из которого вырезали лишнее ради производительности
- 10 приложений, которые нужно сразу установить на новый компьютер
Removing Meet Now from Windows 10 can be a challenging process, especially if you are not tech savvy. However, if you follow the right steps, you can easily remove Meet Now from your Windows 10 device. In this article, we will provide you with the step-by-step instructions to delete Meet Now from your Windows 10 computer and prevent it from coming back. With this guide, you will be able to keep your Windows 10 device free from any unwanted apps and programs. Let’s get started!
How to Remove Meet Now From Windows 10?
1. Go to Settings in Windows 10.
2. Click on Privacy.
3. In the left pane, choose Camera.
4. In the right pane, toggle off the Allow apps to access your camera setting.
5. Go to Start menu, type Meet Now and choose the first result.
6. Right-click on the Meet Now icon and select Uninstall.
7. Follow the on-screen instructions to complete the uninstallation.
![]()
Understanding Meet Now in Windows 10
Meet Now is a feature in Windows 10 that allows users to quickly and easily start a video call with anyone, without having to download any additional applications. It provides an easy way to connect with up to 50 people at a time. The feature was first introduced in Windows 10 May 2020 Update and is currently available in all versions of Windows 10.
When Meet Now is enabled, its icon appears in the Windows 10 taskbar. It also appears the first time a user opens the Photos or Camera app. The feature is designed to make it easy for users to make video calls with friends and family, but some users may find it intrusive or unnecessary. Fortunately, Meet Now can be easily disabled.
Disabling Meet Now in Windows 10
There are two ways to disable Meet Now in Windows 10. The first is to disable it from the taskbar, and the second is to disable it from the Photos and Camera apps.
Disabling Meet Now from the Taskbar
To disable Meet Now from the taskbar, right-click on the Meet Now icon and select “Disable Meet Now” from the context menu. This will disable the Meet Now button from the taskbar, but it will still appear in the Photos and Camera apps.
Disabling Meet Now from the Photos and Camera Apps
To disable Meet Now from the Photos and Camera apps, open the Photos or Camera app, and click on the Meet Now icon. In the menu that appears, select “Disable Meet Now”. This will disable the Meet Now feature from both apps, and it will no longer appear in the taskbar.
Preventing Meet Now from Re-Enabling
Once Meet Now is disabled, it can be re-enabled by opening the Photos or Camera app and clicking on the Meet Now icon. To prevent this from happening, users can disable the Photos and Camera apps from the Windows Settings. To do this, open the Settings app, select “Apps” and then select “Apps & features”. Find the Photos and Camera apps in the list and select them. Click on the “Advanced options” link and then select “Disable”. This will prevent the Photos and Camera apps from being opened, and it will also prevent Meet Now from being re-enabled.
Using Group Policy to Disable Meet Now
For users who have Windows 10 Pro or Enterprise edition, the Meet Now feature can be disabled using the Group Policy Editor. To do this, open the Group Policy Editor, go to the “Computer Configuration” folder, and then select “Administrative Templates”. Expand the “Windows Components” folder, and select “Meet Now”. Under the Meet Now folder, double-click on the “Disable Meet Now” policy. Select “Enabled” from the drop-down menu and click “OK”. This will disable Meet Now from the taskbar and from the Photos and Camera apps.
Using Local Group Policy to Disable Meet Now
For users who do not have Windows 10 Pro or Enterprise edition, the Meet Now feature can be disabled using the Local Group Policy Editor. To do this, open the Local Group Policy Editor, go to the “Computer Configuration” folder, and then select “Administrative Templates”. Expand the “Windows Components” folder, and select “Meet Now”. Under the Meet Now folder, double-click on the “Disable Meet Now” policy. Select “Enabled” from the drop-down menu and click “OK”. This will disable Meet Now from the taskbar and from the Photos and Camera apps.
Top 6 Frequently Asked Questions
Q1: What is Meet Now?
A1: Meet Now is a feature in Windows 10 that allows users to easily and quickly create video meetings with friends, family and colleagues. It works by creating a direct connection between the meeting participants, allowing for instant video conferencing without needing to download any extra software. Meet Now is integrated into the Windows 10 operating system and is available from the Taskbar or by searching for it.
Q2: How do I access Meet Now?
A2: Meet Now is accessible from the Windows 10 Taskbar. To get started, simply click on the Taskbar and then select the Meet Now icon. If you do not see the icon, you can search for it in the search bar. You can also access Meet Now by pressing the Windows key and typing in “Meet Now”.
Q3: What are the advantages of using Meet Now?
A3: Meet Now is a great way to stay connected with friends, family and colleagues. It is an easy and convenient way to hold video meetings without having to download additional software. It also allows up to 50 participants to join a meeting and supports up to 49 screens at once.
Q4: How do I remove Meet Now from Windows 10?
A4: Meet Now is a feature of Windows 10, so it can’t be fully removed from the operating system. However, you can disable the Meet Now feature by going to Settings > Apps > Apps & Features, and then toggling the switch for Meet Now to off. You can also uninstall any applications associated with Meet Now.
Q5: Is Meet Now available for other operating systems?
A5: Meet Now is currently only available for Windows 10. However, some third-party applications such as Zoom, Skype and Google Meet offer similar features for other operating systems.
Q6: Is Meet Now free?
A6: Meet Now is free to use with no additional costs. There are no subscription fees or payment plans associated with the feature, so you can use it as often as you’d like without any extra costs.
How to Uninstall Meet Now from Windows 10 – 2021
Removing Meet Now from Windows 10 is a straightforward and easy process. All you have to do is open the Settings app, go to the Privacy tab, and disable the Meet Now feature. This will help you keep your computer secure while also preventing any unwanted contact. By taking these simple steps, you can ensure that your Windows 10 device is safe and private.
With the release of the Windows 10 May 2020 update, Microsoft made a lot of new changes that didn’t go down well with many users. The company changed how the Alt+Tab app switcher worked and changed the appearance and size of tasks in the overview menu. So we wrote a detailed guide on how to restore the old Alt+Tab switcher in Windows 10. And now, Microsoft has presented us with another problem, i.e. Meet Now has been permanently added to the Windows 10 Taskbar — something that people didn’t even ask for. So if you wish to uninstall Meet Now from Windows 10, follow our guide below.
Permanently Uninstall Meet Now From Windows 10 (2022)
In this tutorial, we have mentioned four ways to uninstall Meet Now from Windows 10. You can hide, disable, or uninstall Meet Now from Windows 10’s Taskbar. Expand the table below and move to any section you want.
Table of Contents
What is the Meet Now Icon in Windows 10’s Taskbar?
Since the COVID-19 pandemic, Microsoft has been putting in efforts to make people use its own video calling solution instead of Zoom or Google Meet. Meet Now is an instant video conferencing solution, which is powered by Skype, and is integrated within Windows 10. Right from the Taskbar, you can now start a meeting and share the link with your family members, friends, or colleagues. It’s entirely free and supports up to 100 participants in a single Meet Now link.
It supports all standard video conferencing features like custom backgrounds, Grid view, etc. Not to mention, participants can directly join the call without requiring a Microsoft account. Having said that, many users don’t prefer Microsoft’s video conferencing platform and want to get rid of the Meet Now icon in the Taskbar. Also, it constantly runs in the background and eats up major system resources. So if you want to uninstall Meet Now from Windows 10, follow our tutorial below.
Hide Meet Now From Windows 10 Using Settings
The easiest way to hide Meet Now from Windows 10’s Taskbar is through the Settings page. It does not uninstall the app, but permanently hides the Meet Now icon from the Taskbar. Here is how you can do that:
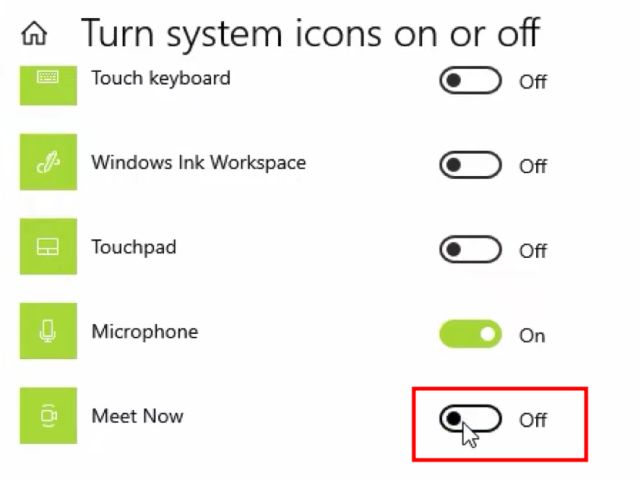
1. First, right-click on the Taskbar and open “Taskbar Settings“.
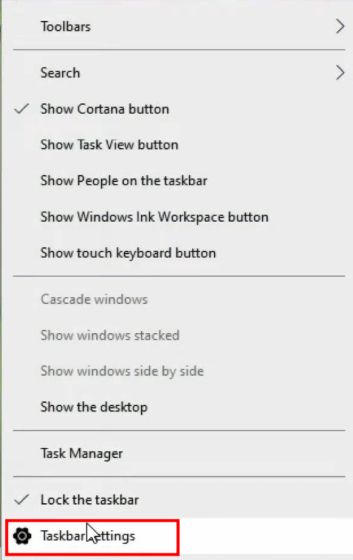
2. Next, scroll down and look for “Turn system icons on or off“. Click on it.

3. Now, scroll to the bottom and disable the “Meet Now” toggle. This will remove Meet Now from Windows 10’s Taskbar.
Uninstall Meet Now From Windows 10 Using PowerShell
If you want to completely uninstall Meet Now from Windows 10, you will need to use a simple command in PowerShell. It will remove the APPX package for this app from your PC right away. Here are the steps to follow.
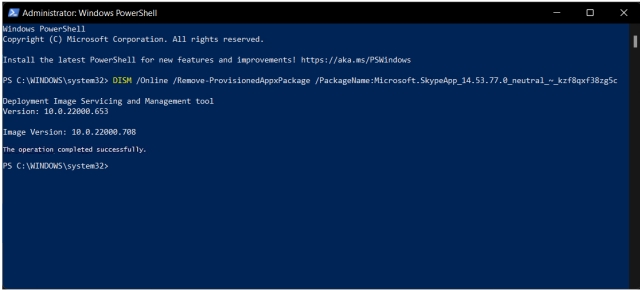
1. Right-click on the Windows Start Menu and open “Windows PowerShell (Admin)”.
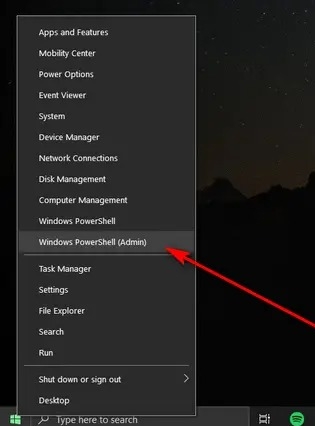
2. In the PowerShell window, run the below command and hit Enter. This will uninstall Meet Now from your Windows 10 PC right away. You are done.
DISM /Online /Remove-ProvisionedAppxPackage /PackageName:Microsoft.SkypeApp_14.53.77.0_neutral_~_kzf8qxf38zg5c
Remove Meet Now From Windows 10 Using Group Policy
To permanently uninstall Meet now from Windows 10, we will use Group Policy Editor. Unfortunately, Group Policy Editor is not available on Windows 10 Home, but there is a workaround to enable it. So go ahead and enable Group Policy Editor on Windows 10 Home to use this method. If you are on Windows 10 Pro, Enterprise, or any other edition, simply go through the steps below:
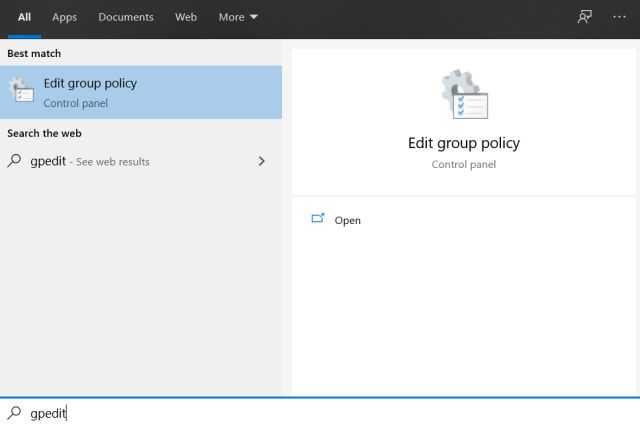
1. With Group Policy enabled, you need to press the Windows key and search for “gpedit“. Now, click on “Edit group policy”.
3. Here, under the User Configuration section, navigate to Administrative Templates -> Start Menu and Taskbar in the left sidebar.
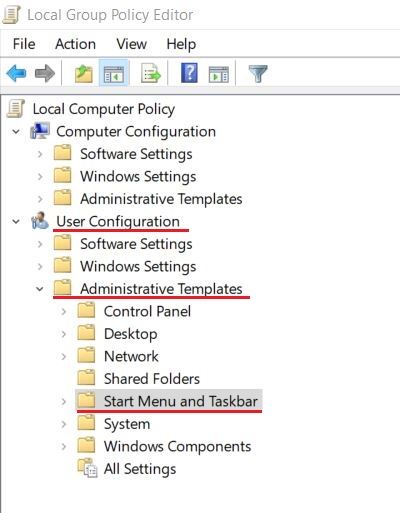
4. Now, scroll down and look for “Remove the Meet Now icon” in the right pane.
5. Finally, double-click on it and select “Enabled“ in the pop-up window. After that, click on the “OK” button.
6. Now, restart your computer, and Meet Now will be gone from Windows 10 for good. That’s it.
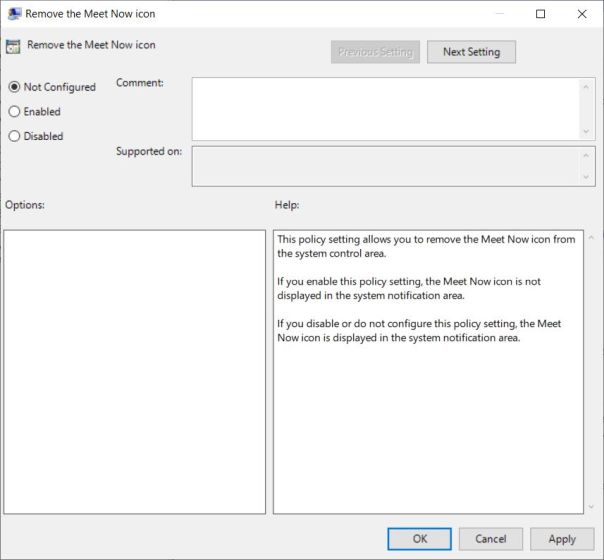
7. In case you want to enable it once again, follow the steps above and choose “Not Configured” in step #5.
Disable Meet Now From Windows 10 Using Registry Editor
1. In case you want to permanently disable Meet Now from Windows 10 Taskbar, you can do so with Registry Editor. Press the Windows 10 keyboard shortcut “Windows + R” to open the Run prompt. Here, type regedit and hit Enter.
2. Next, paste the below path into Registry Editor’s address bar and hit Enter. This will directly take you to the Explorer folder.
Computer\HKEY_CURRENT_USER\Software\Microsoft\Windows\CurrentVersion\Policies\Explorer

3. After that, right-click in the right pane under “Explorer” and choose New -> DWORD (32-bit) Value.
4. Rename the new key to HideSCAMeetNow.

5. Now, double-click on “HideSCAMeetNow” and open it. Here, change the “Value data” to 1 and click on “OK”.

6. Now, close the Registry Editor and restart your Windows 10 PC. You will find that Meet Now is nowhere to be found on your PC.
Disable Meet Now on Windows 10 With Ease
So that was our guide on how to disable Meet Now from the Taskbar on Windows 10. Now, you won’t be bothered by Meet Now on any of the accounts on the PC. This also means that your computer will be responsive after every reboot, reducing the startup process lag. You can go through our guide on how to speed up Windows 10 to find more such ways to improve performance on your PC. Anyway, that is all from us. If you are face any issues in this guide, do let us know in the comment section below.
Если вы используете последнюю версию операционной системы Microsoft Windows 10, возможно, вы заметили новый значок на панели задач Meet Now, который компания добавила в октябре 2020 года. Microsoft планирует представить значок всем пользователям Windows 10 в будущем, и многие могут задаться вопросом, что делает кнопка, почему она там и как ее удалить.
Что такое Meet Now?
Чтобы ответить на первый вопрос: Meet Now — это функция коммуникационного программного обеспечения Skype. Ранее в этом году Microsoft представила Meet Now в Skype как способ настроить видеоконференцию всего несколькими щелчками мыши.
Хотя необходимо начать конференцию из Skype или Skype в Интернете, участникам, которые присоединяются к ней, не требуется установка учетной записи или Skype для присоединения. Создатель конференции получает пригласительные ссылки, которыми можно поделиться с другими с помощью встроенных инструментов или другими способами, например.грамм. скопировав ссылку и вставив ее в приложение для обмена сообщениями или в социальные сети.
Если в системе доступен Skype, он запускается, и участник сразу же присоединяется к комнате. Если он не установлен, вместо него загружается веб-версия Skype, и комната присоединяется в браузере. Для обоих не требуется учетная запись Skype, а веб-версия поддерживает даже только прослушивание звука (без предоставления аудио- или видеопотока из локальной системы).
Вы можете узнать больше о Meet Now на веб-сайте Microsoft Skype.
Почему на панели задач Windows 10 есть значок Meet Now?

Microsoft добавила значок Meet Now на панель задач Windows 10. Microsoft добавила кнопку, чтобы пользователям ее операционной системы было проще создавать собрания или присоединяться к собраниям.
Теперь вы можете легко настроить видеозвонок и мгновенно связаться с друзьями и семьей, щелкнув значок Meet Now в области уведомлений (на панели задач) на панели задач в Windows 10. Никаких подписок или загрузок не требуется.
Примечание: Новый значок Meet Now не добавляется в системах Windows 10 Enterprise или учетных записях Azure Active Directory.
Как удалить значок Meet Now в Windows 10
Meet Now полезен для некоторой части пользователей. Если вы не планируете использовать его, вы можете удалить его с панели задач, поскольку он занимает место, не предоставляя вам ничего полезного.
Доступны несколько вариантов удаления Meet Now из системы. Один из самых простых вариантов включает в себя щелчок правой кнопкой мыши по значку Meet Now и выбор «скрыть» в открывшемся контекстном меню. Значок Meet Now удаляется с панели задач Windows 10.
Другой вариант, который у вас есть, — открыть приложение настроек в системе, e.грамм. используя ярлык Windows-I или выбрав Пуск> Параметры, выбрав Персонализация> Панель задач, выбрав «включить или выключить системные значки» и переключив «Встретиться сейчас» на открывшейся странице. Вы можете восстановить Meet Now в любое время с помощью приложения «Настройки», но убедитесь, что эта функция включена в это время.
Удаление Meet Now через групповую политику
Системные администраторы могут отключить (или включить) значок Meet Now на панели задач Windows 10 с помощью групповой политики. Групповая политика доступна только в профессиональных выпусках Windows 10, но не в Windows 10 Home.
Вот как это делается:
- Вам необходимы повышенные права для использования групповой политики.
- Используйте Windows-R, чтобы открыть окно запуска.
- Введите gpedit.msc и выберите ОК.
- Перейдите в раздел «Конфигурация пользователя»> «Административные шаблоны»> «Пуск» и «Панель задач»
- Дважды щелкните «Удалить значок Meet Now».
- Установите для функции значение «Включено», чтобы скрыть значок на панели задач операционной системы Windows 10.
- Перезагрузите компьютер.
Удаление Meet Now с помощью реестра
Вы также можете удалить Meet Now в Windows 10 с помощью реестра.
- Используйте Windows-R, чтобы открыть окно запуска.
- Введите regedit.exe и выберите ОК.
- Для индивидуальных пользователей перейдите в HKEY_CURRENT_USER \ Software \ Microsoft \ Windows \ CurrentVersion \ Policies \ Explorer
- Щелкните правой кнопкой мыши Explorer и выберите New> Dword (32-bit) Value.
- Назовите его HideSCAMeetNow.
- Установите его значение на 1.
- Для всех пользователей перейдите в HKEY_LOCAL_MACHINE \ SOFTWARE \ Microsoft \ Windows \ CurrentVersion \ Policies \ Explorer
- Щелкните правой кнопкой мыши Explorer и выберите New> Dword (32-bit) Value.
- Назовите его HideSCAMeetNow.
- Установите его значение на 1.
- Перезагрузите компьютер.
Теперь ваша очередь: вы использовали Meet Now?? Что ты думаешь об этом?