
Contents
- 1 Windows Server 2019 Media Creation Tool
- 2 Creating A Bootable Usb Flash Drive To Install Microsoft Windows Server 2019.
- 2.1 Conclusion
- 2.1.1 Related image with windows server 2019 media creation tool
- 2.1.2 Related image with windows server 2019 media creation tool
- 2.1 Conclusion
Join us as we celebrate the beauty and wonder of Windows Server 2019 Media Creation Tool, from its rich history to its latest developments. Explore guides that offer practical tips, immerse yourself in thought-provoking analyses, and connect with like-minded Windows Server 2019 Media Creation Tool enthusiasts from around the world. Need to the a easiest this on physical device- this you Yes installed way on the some windows windows if physical virtual physical process server media works a to creating usb 2016- is is disk install server server also get equally well you a can- windows want however world- on server- in os 2019 have you to a
Windows Server 2019 Media Creation Tool
Windows Server 2019 Media Creation Tool
Description windows server 2019 is the operating system that bridges on premises environments with azure services enabling hybrid scenarios maximizing existing investments. increase security and reduce business risk with multiple layers of protection built into the operating system. Windows server 2019 is the operating system that bridges on premises environments with azure services enabling hybrid scenarios maximizing existing investments.

Windows Server 2019 Media Creation Tool
Windows Server 2019 Media Creation Tool
First, plug in your usb drive to your computer. open a powershell using the run as administrator option. you will need to change the path of the windows server 2019 iso, and you will need to replace the usb friendly name in the script. reminder: the following commands will wipe the usb drive completely. 1. click the windows start button, and click windows usb dvd download tool in the all programs list to open the windows usb dvd download tool. 2. in the source file box, type the name and path of your windows iso file, or click browse and select the file from the open dialog box. click next. Yes, you can. however, this is in a virtual world. you need to have some physical media if you want to install the os on a physical device. creating a windows server 2019 usb disk is the easiest way to get windows server installed on a physical server. this process also works equally well on windows server 2016. Click start to format the usb drive. click ok in the warning dialog to confirm that formatting the drive will erase all data. create a bootable usb drive for windows server 2019 installation.

Windows Server 2019 Media Creation Tool
Windows Server 2019 Media Creation Tool
Yes, you can. however, this is in a virtual world. you need to have some physical media if you want to install the os on a physical device. creating a windows server 2019 usb disk is the easiest way to get windows server installed on a physical server. this process also works equally well on windows server 2016. Click start to format the usb drive. click ok in the warning dialog to confirm that formatting the drive will erase all data. create a bootable usb drive for windows server 2019 installation. Learn how. to create the installation media, here’s what you’ll need: a pc with a reliable internet connection. the download time will vary, depending on your internet connection. a usb flash drive, external hard drive, or dvd. a blank usb flash drive or external hard drive with at least 8 gb of space, or a blank dvd (and dvd burner). 1. on the first screen, select installation language, time and keyboard layout the click “ next “. 2. start the installation by clicking on “ install now “. the setup should start in a short while. 3. select the windows server 2019 edition to install and click next. 4.

Windows Server 2019 Media Creation Tool
Windows Server 2019 Media Creation Tool
Learn how. to create the installation media, here’s what you’ll need: a pc with a reliable internet connection. the download time will vary, depending on your internet connection. a usb flash drive, external hard drive, or dvd. a blank usb flash drive or external hard drive with at least 8 gb of space, or a blank dvd (and dvd burner). 1. on the first screen, select installation language, time and keyboard layout the click “ next “. 2. start the installation by clicking on “ install now “. the setup should start in a short while. 3. select the windows server 2019 edition to install and click next. 4.

Windows Server 2019 Media Creation Tool
Windows Server 2019 Media Creation Tool
Creating A Bootable Usb Flash Drive To Install Microsoft Windows Server 2019.
Creating A Bootable Usb Flash Drive To Install Microsoft Windows Server 2019.
this is a short video showing you how to create a bootable usb flash drive to be used to install windows server 2019. the same in this tutorial, i have demonstrated how to download windows server 2019 and install it on vmware workstation. in this video you will learn how to download, install and configure windows server 2019 os on vmware workstation. just follow this video will show you how to create a windows server 2019 bootable usb using rufus. for rufus: bit.ly 2zjuh4r for this is how to create a bootable windows 2019 essentials usb media fash drive stick using rufus. for rufus: rufus.ie in this ittaster video we look at performing the initial setup & configuration of windows server 2019. this video follows the previous
Conclusion
All things considered, it is clear that post delivers informative insights concerning Windows Server 2019 Media Creation Tool. Throughout the article, the author illustrates an impressive level of expertise about the subject matter. Notably, the discussion of X stands out as a key takeaway. Thank you for taking the time to the article. If you have any questions, please do not hesitate to reach out via social media. I look forward to your feedback. Furthermore, below are some relevant content that might be interesting:
Windows Server 2019 Media Creation Tool
Welcome to our blog, where Windows Server 2019 Media Creation Tool takes center stage and sparks endless possibilities. Through our carefully curated content, we aim to demystify the complexities of Windows Server 2019 Media Creation Tool and present them in a way that is accessible and engaging. Join us as we explore the latest advancements, delve into thought-provoking discussions, and celebrate the transformative nature of Windows Server 2019 Media Creation Tool. Click start to format the usb drive- click ok in the warning dialog to confirm that formatting the drive will erase all data- create a bootable usb drive for windows server 2019 installation-
Windows Server 2019 Media Creation Tool
Windows Server 2019 Media Creation Tool
Description windows server 2019 is the operating system that bridges on premises environments with azure services enabling hybrid scenarios maximizing existing investments. increase security and reduce business risk with multiple layers of protection built into the operating system. Windows server 2019 is the operating system that bridges on premises environments with azure services enabling hybrid scenarios maximizing existing investments.

Windows Server 2019 Media Creation Tool
Windows Server 2019 Media Creation Tool
First, plug in your usb drive to your computer. open a powershell using the run as administrator option. you will need to change the path of the windows server 2019 iso, and you will need to replace the usb friendly name in the script. reminder: the following commands will wipe the usb drive completely. 1. click the windows start button, and click windows usb dvd download tool in the all programs list to open the windows usb dvd download tool. 2. in the source file box, type the name and path of your windows iso file, or click browse and select the file from the open dialog box. click next. Yes, you can. however, this is in a virtual world. you need to have some physical media if you want to install the os on a physical device. creating a windows server 2019 usb disk is the easiest way to get windows server installed on a physical server. this process also works equally well on windows server 2016. Click start to format the usb drive. click ok in the warning dialog to confirm that formatting the drive will erase all data. create a bootable usb drive for windows server 2019 installation.

Windows Server 2019 Media Creation Tool
Windows Server 2019 Media Creation Tool
Yes, you can. however, this is in a virtual world. you need to have some physical media if you want to install the os on a physical device. creating a windows server 2019 usb disk is the easiest way to get windows server installed on a physical server. this process also works equally well on windows server 2016. Click start to format the usb drive. click ok in the warning dialog to confirm that formatting the drive will erase all data. create a bootable usb drive for windows server 2019 installation. Learn how. to create the installation media, here’s what you’ll need: a pc with a reliable internet connection. the download time will vary, depending on your internet connection. a usb flash drive, external hard drive, or dvd. a blank usb flash drive or external hard drive with at least 8 gb of space, or a blank dvd (and dvd burner). 1. on the first screen, select installation language, time and keyboard layout the click “ next “. 2. start the installation by clicking on “ install now “. the setup should start in a short while. 3. select the windows server 2019 edition to install and click next. 4.
Windows Server 2019 Media Creation Tool
Windows Server 2019 Media Creation Tool
Learn how. to create the installation media, here’s what you’ll need: a pc with a reliable internet connection. the download time will vary, depending on your internet connection. a usb flash drive, external hard drive, or dvd. a blank usb flash drive or external hard drive with at least 8 gb of space, or a blank dvd (and dvd burner). 1. on the first screen, select installation language, time and keyboard layout the click “ next “. 2. start the installation by clicking on “ install now “. the setup should start in a short while. 3. select the windows server 2019 edition to install and click next. 4.
Creating A Bootable Usb Flash Drive To Install Microsoft Windows Server 2019.
Creating A Bootable Usb Flash Drive To Install Microsoft Windows Server 2019.
this is a short video showing you how to create a bootable usb flash drive to be used to install windows server 2019. the same microsoft windows server 2019 installation this ittaster video is a walk through of how to install microsoft windows server 2019, in this tutorial, i have demonstrated how to download windows server 2019 and install it on vmware workstation. this video will show you how to create a windows server 2019 bootable usb using rufus. for rufus: bit.ly 2zjuh4r for this is how to create a bootable windows 2019 essentials usb media fash drive stick using rufus. for rufus: rufus.ie in this video you will learn how to download, install and configure windows server 2019 os on vmware workstation. just follow
Conclusion
Taking everything into consideration, it is evident that the post offers useful information regarding Windows Server 2019 Media Creation Tool. From start to finish, the writer illustrates an impressive level of expertise about the subject matter. Notably, the discussion of X stands out as a highlight. Thanks for the post. If you have any questions, please do not hesitate to contact me via the comments. I am excited about hearing from you. Furthermore, below are some relevant posts that you may find useful:
Related image with Windows Server 2019 Media Creation Tool
Related image with Windows Server 2019 Media Creation Tool
This blog post covers how you can create a bootable USB media drive to install Windows Server 2019 on a physical server. This blog post will not use any third-party tools; it only uses built-in tools that you can find on Windows 10 or Windows Server. Depending on your system you will need it to install it on a BIOS system or a UEFI based system, which is slightly different since UEFI will use GPT disks and BIOS will use an MBR disk. Here is how you create a USB Drive for a Windows Server 2019 installation.
Getting ready to create a USB Drive for a Windows Server 2019 Installation
First, you will need to have all the prerequisites in place.
- Download the Windows Server 2019 ISO File
- A USB Drive with at least 8GB size
Windows Server 2019 USB Thumb Drive for UEFI (GPT) systems
To create the USB drive to install Windows Server 2019 on a UEFI (GPT system, you do the following steps:
- The at least an 8GB USB drive has to be formatted in FAT32
- The USB needs to be GPT and not MBR
- Copy all files from the ISO to the USB drive
This is it, and here is how you do it. First, plug in your USB drive to your computer.
Open a PowerShell using the Run as Administrator option. You will need to change the path of the Windows Server 2019 ISO, and you will need to replace the USB Friendly Name in the script.
REMINDER: The following commands will wipe the USB Drive completely. So backup everything before you run through the PowerShell.
# Define Path to the Windows Server 2019 ISO
$ISOFile = "C:\Temp\WindowsServer2019.iso"

# Get the USB Drive you want to use, copy the friendly name
Get-Disk | Where BusType -eq "USB"

# Get the right USB Drive (You will need to change the FriendlyName)
$USBDrive = Get-Disk | Where FriendlyName -eq "Kingston DT Workspace"

# Replace the Friendly Name to clean the USB Drive (THIS WILL REMOVE EVERYTHING)
$USBDrive | Clear-Disk -RemoveData -Confirm:$true -PassThru

# Convert Disk to GPT
$USBDrive | Set-Disk -PartitionStyle GPT

# Create partition primary and format to FAT32
$Volume = $USBDrive | New-Partition -UseMaximumSize -AssignDriveLetter | Format-Volume -FileSystem FAT32 -NewFileSystemLabel WS2019

# Mount iso
$ISOMounted = Mount-DiskImage -ImagePath $ISOFile -StorageType ISO -PassThru

# Driver letter
$ISODriveLetter = ($ISOMounted | Get-Volume).DriveLetter

# Copy Files to USB
Copy-Item -Path ($ISODriveLetter +":\*") -Destination ($Volume.DriveLetter + ":\") -Recurse

# Dismount ISO
Dismount-DiskImage -ImagePath $ISOFile
After that, you can safely remove the USB drive and use it to boot your server from.
Important:
If Install.wim is larger than 4GB, you cannot copy the file to the drive, because of the FAT32 based partition limitation. The solution for this is to split the wim file into smaller files.
split wim file using dism (you may have to change the drive letters):
dism /Split-Image /ImageFile:e:\sources\install.wim /SWMFile:k:\sources\install.swm /FileSize:4096
Windows Server 2019 USB Thumb Drive for BIOS (MBR) systems
To create the USB drive to install Windows Server 2019 on BIOS (MBR) systems, you can follow these steps:
- The at least an 8GB USB drive has to be formatted in NTFS
- USB drive needs to us MBR
- The partition needs to be set active
- Copy all files from the ISO to the USB Drive
This is it, and here is how you do it. First, plug in your USB drive to your computer.
Open a PowerShell using the Run as Administrator option. You will need to change the path of the Windows Server 2019 ISO, and you will need to replace the USB Friendly Name in the script.
REMINDER: The following commands will wipe the USB Drive completely. So backup everything before you run through the PowerShell.
# Define Path to the Windows Server 2019 ISO
$ISOFile = "C:\Temp\WindowsServer2019.iso"

# Get the USB Drive you want to use, copy the friendly name
Get-Disk | Where BusType -eq "USB"

# Get the right USB Drive (You will need to change the FriendlyName)
$USBDrive = Get-Disk | Where FriendlyName -eq "Kingston DT Workspace"

# Replace the Friendly Name to clean the USB Drive (THIS WILL REMOVE EVERYTHING)
$USBDrive | Clear-Disk -RemoveData -Confirm:$true -PassThru

# Convert Disk to MBR
$USBDrive | Set-Disk -PartitionStyle MBR

# Create partition primary and format to NTFS
$Volume = $USBDrive | New-Partition -UseMaximumSize -AssignDriveLetter | Format-Volume -FileSystem NTFS -NewFileSystemLabel WS2019

# Set Partiton to Active
$Volume | Get-Partition | Set-Partition -IsActive $true

# Mount ISO
$ISOMounted = Mount-DiskImage -ImagePath $ISOFile -StorageType ISO -PassThru

# Driver letter
$ISODriveLetter = ($ISOMounted | Get-Volume).DriveLetter

# Copy Files to USB
Copy-Item -Path ($ISODriveLetter +":\*") -Destination ($Volume.DriveLetter + ":\") -Recurse

# Dismount ISO
Dismount-DiskImage -ImagePath $ISOFile
After that, you can safely remove the USB drive and use it to boot your server from to install Windows Server 2019.
If you have any questions, please let me know in the comments.
Tags: BIOS, Boot from USB, Format Disk, gpt, Install USB Drive, Install Windows Server 2019, installation, iso, MBR, Microsoft, Mount ISO, PowerShell, UEFI, USB, USB Drive, USB media drive, USB Windows Server 2019, Windows Server, Windows Server 2019 Last modified: November 22, 2021
About the Author / Thomas Maurer

Thomas works as a Senior Cloud Advocate at Microsoft. He engages with the community and customers around the world to share his knowledge and collect feedback to improve the Azure cloud platform. Prior joining the Azure engineering team, Thomas was a Lead Architect and Microsoft MVP, to help architect, implement and promote Microsoft cloud technology.
If you want to know more about Thomas, check out his blog: www.thomasmaurer.ch and Twitter: www.twitter.com/thomasmaurer

habibzain Follow
Just husband, father and enthusiastic men about System Administration. Love to write short article about it. Perhaps can help and be useful for others.
1 min read
If we want to install windows server on a bare metal device, the traditional way is to burn the ISO to a CD/DVD. But what is the maximum size of the DVD? The largest DVD storage size is around 4.4 GB. The problem occurs is the ISO file size of the Windows Server installer is 6.5GB.
Hmm. Of course it won’t fit if the Windows Server ISO file is burned to a DVD. It could be split, split into 2 DVDs. But it’s a lot of effort to do.
Basically making bootable for windows is easy. Especially for Windows 10 or Windows 11. We just download the Windows Creation Tool and plug in the USB. It will automatically download the installer itself online and stored on the USB.
But what if we want to create a bootable USB for windows server? Unfortunately the Windows Creation Tool does not have a menu to create a bootable Windows Server. So we have to look for other alternative tools that can make Windows Server bootable.
Make Bootable Windows Server with “diskpart”
Step 1. Insert the USB drive on your PC. Go to Start and type cmd in the search box. Click on Run as administrator to open a command prompt.
Step 2. Type command diskpart and press enter.
Step 3. Type the following command one by one and press enter:
- list disk and press enter to appear disk list.
- select disk x
Where ‘x’ is the number of your flash drive.
Type the following commands one by one:
- clean.
- create partition primary.
- select partition 1.
Next we will select the partition as per your own requirement.
- format fs=ntfs quick (if you want to create UEFI bootable USB, type “format fs=fat32 quick”).
- active.
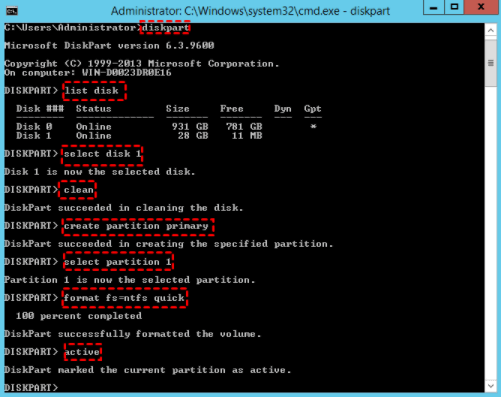
Step 4. Type Exit and press enter. It will close the diskpart command.
- assign letter= r or other available letter.
Then type “Exit” to leave the Diskpart command environment.
Step 4. Find the Windows Server setup ISO in your computer and double click on it to mount the ISO.
Step 5. Copy the entire contents of the mounted ISO drive to your bootable USB flash drive.
Step 6. Now, back to the Command Prompt window again and run the following command.
H:cd\boot\ bootsect.exe /nt60 R:to build the boot sector code in the specified partition. (H:\ is the drive letter of the mounted Windows ISO and R:\ is the destination USB drive letter)
We have built a Bootable USB from ISO by following the steps outlined above.
Make Bootable Windows Server with RUFUS
Rufus is third party tool open source for make USB bootable for Linux Distro. But we can use rufus to create bootable USB for windows server.
Step 1. Download Rufus Software and run it.
Plug USB drive and file ISO windows server. Set parameter like image below. And then start.

Rufus is easiest solution open source to make Bootable Windows Server.
reference:
- https://www.diskpart.com/server-2016/windows-server-2016-bootable-usb-7201.html
- https://rufus.ie/en/
Let's Buy Me Coffee.https://saweria.co/habibzain https://ko-fi.com/habibzain
Windows Server

Muhammad FaizanSeptember 9, 2020 — Last Updated: December 14, 2020
0 2,339 2 minutes read

Muhammad Faizan
Hi, My name is Muhammad Faizan and i have spent last 15 years working as System Administrator mainly with Microsoft Technologies. I am MCSE, MCTP, MCITP, certified professional. I love scripting and Powershell is the scripting language i am in love with.
-
Website
-
Facebook