How to effectively solve Windows 10 setup cannot find USB flash drive error? Work out with these tips.
| Workable Solutions | Step-by-step Troubleshooting |
|---|---|
| Fix 1. Try a different USB drive | You can do to fix the we can’t find a usb flash drive error is to try connecting a different USB device…Full steps |
| Fix 2. Check USB 3.0 or 2.0 port | There would be problems with USB port although USB 3.0 ports are compatible with the USB 2.0 ports…Full steps |
| Fix 3. Check bad sectors on USB | If there are bad sectors on the USB drive, Windows 10 setup we can’t find a usb drive error arise…Full steps |
| Fix 4. Update USB drivers | You should consider updating the USB drivers when there are issues with Windows 10 media creation tool…Full steps |
| 3 more useful solutions | Re-format the USB flash drive; check if the USB is set as the primary drive,use a tool to create bootable…Full steps |
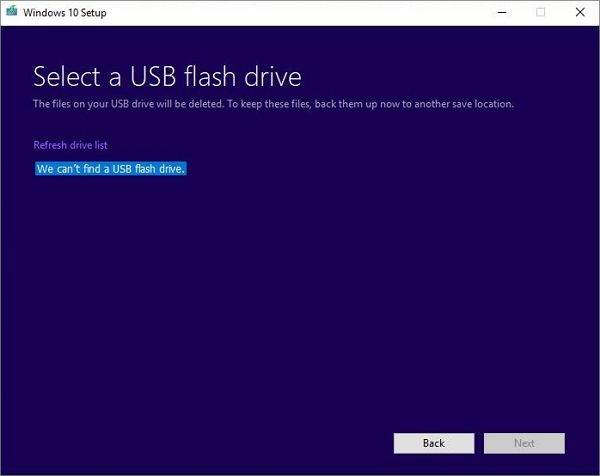
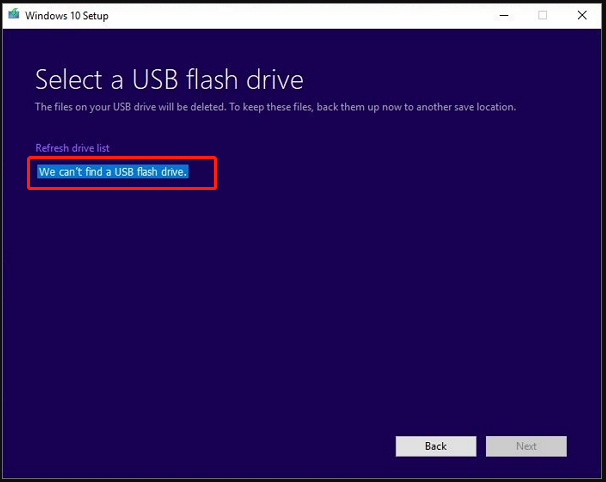
«We can’t find a USB flash drive» is an annoying error that occurs when you upgrade Windows 10 by creating a bootable USB drive with the Windows Media Creation Tool. The strange thing about the Windows media creation tool can’t find USB flash drive error in Windows setup is that you can see the USB on your computer, but the system says it’s not.
No matter how many times you refresh the drive list, the media creation tool can’t find USB. Windows 10 installation has to suspend because you don’t have other options to move on unless you can figure out why your USB flash drive is not showing up.
Worry not for this error. We’re going to share some experience in troubleshooting the Windows media creation tool «We can’t find a USB flash drive. Windows 10 setup error 64-bit or 32-bit». The full explanations of all the solutions are below.
Possible Reasons for We Can’t Find a USB Flash Drive
- Windows Media Creation Tool can’t find USB flash drive if it’s a SanDisk drive.
- Before you install, update the drivers on your Windows 10 computer.
- The 64-bit installation size is a bit larger than your 4GB USB drive, especially when you’re told that xx GB of free disk space is needed on the selected drive.
- USB 3.0 port or USB 2.0 port issues cause Windows 10 Media Creation Tool to be unable to recognize the flash drive even correctly connected.
- USB flash drive itself has corruption or bad sectors; it’s currently malfunctioning.
- USB flash drive is wrongly set as the primary drive in Windows.
- USB flash drive shows up as CD drive or even C drive in Windows.
7 Fixes for Windows Media Creation Tool Can’t Find USB Drive
Let’s go from easy to difficult to solve Windows media creation tool can’t find USB problem. There are seven solutions in all for certain situations that may fix the issue.
1. Try a Different USB Drive
You should first check if you can access the USB flash drive from your computer in File Explorer. If there is no problem, the next thing to fix we can’t find a USB flash drive error is trying connecting a different USB drive.
Some users have also reported that they encountered a media creation tool can’t find USB issue exclusively with SanDisk USB drive. So, you can use different USB flash drives, like Lexar and Toshiba, if it’s the SanDisk USB flash drive that Windows Media Creation Tool can’t find even on several computers.
2. Check USB 3.0 or USB 2.0 Port Issues
Although USB 3.0 ports are compatible with USB 2.0 ports, problems can still arise. Try to change the connection between the USB 2.0 port and USB 3.0 port. Fix USB 3.0 fails to work issues if necessary.
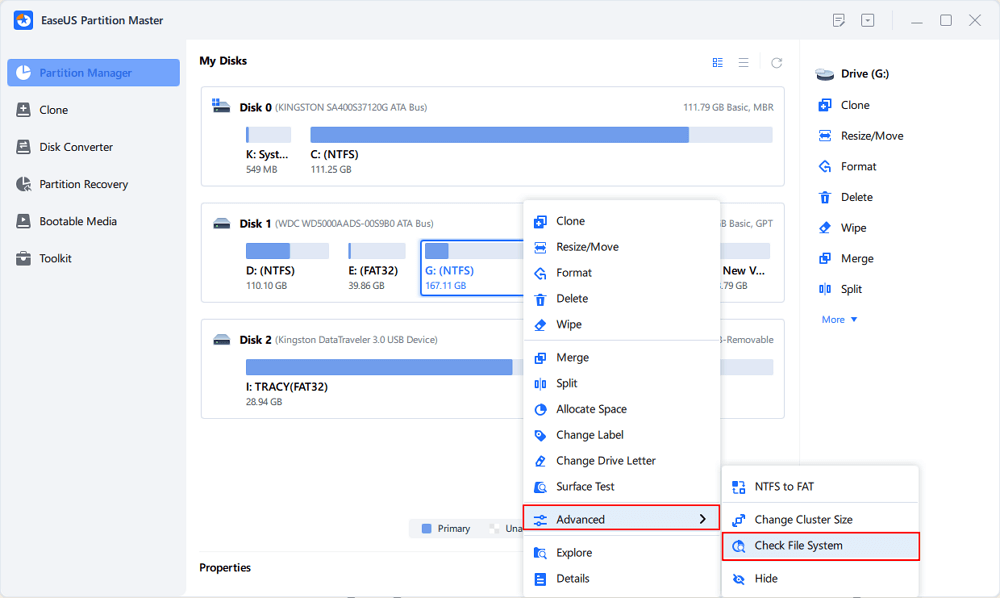
3. Check and Repair Bad Sectors on the USB Drive
If there are bad sectors on your USB drive, we can’t find a USB flash drive problem that could still appear. You can use a professional partition tool — EaseUS Partition Master to check and repair the file system to troubleshoot.
EaseUS disk management tool provides full-around partition solutions for both beginners and experts. You can use it to create a partition, resize/move the partition (allocate space from D drive to C drive), merge/wipe/format partition, clone disk, wipe data, and so on.
Step 1. Open EaseUS Partition Master on your computer. Then, locate the disk, right-click the partition you want to check, and choose «Advanced» > «Check File System».
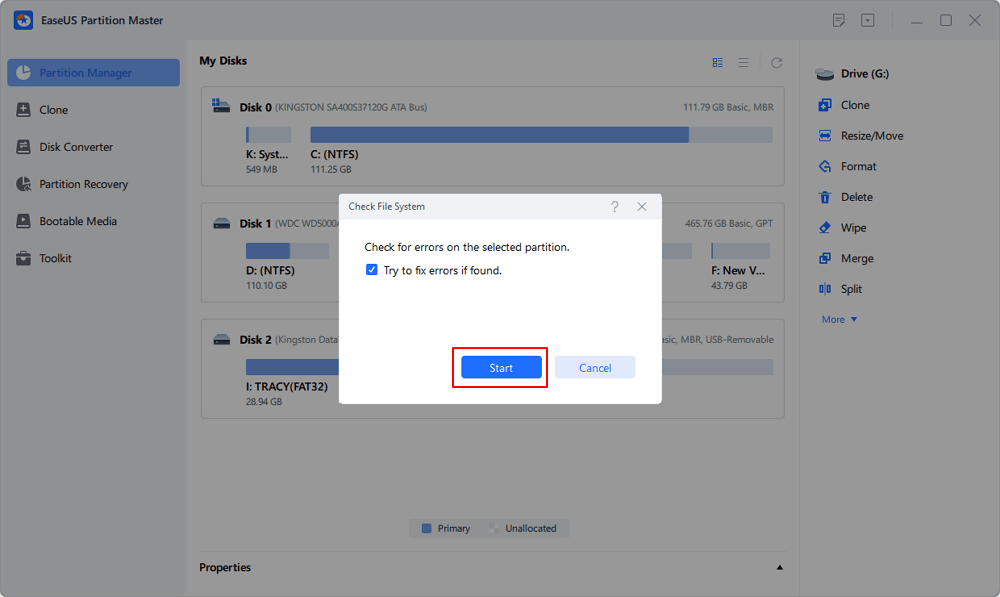
Step 2. In the Check File System window, keep the «Try to fix errors if found» option selected and click «Start».
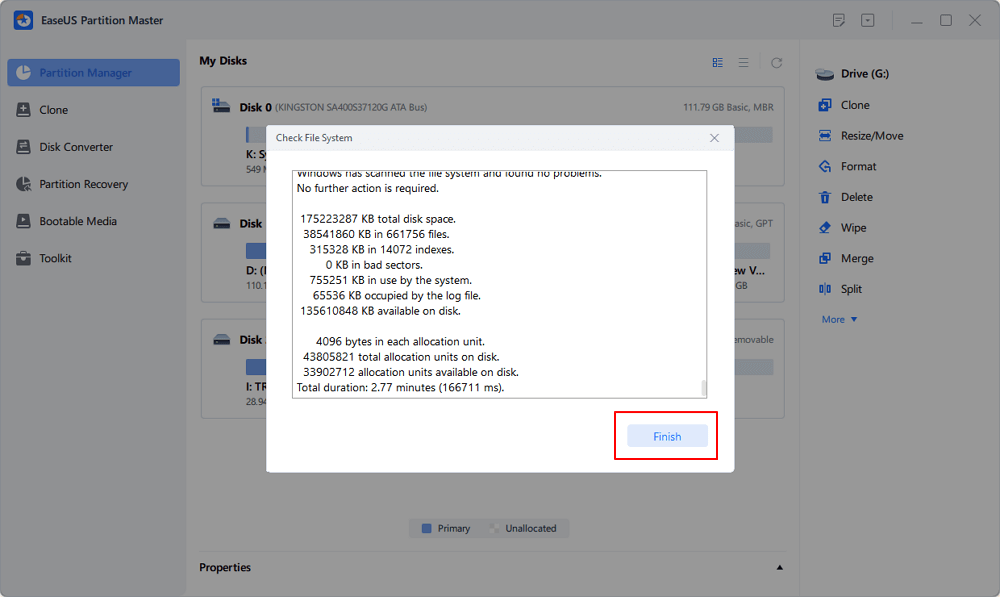
Step 3. The software will begin checking your partition file system on your disk. When it completes, click «Finish».
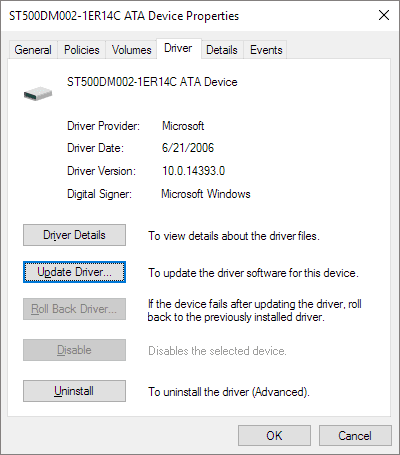
4. Update USB Drivers
When We can’t find a USB flash drive error appears, something might be wrong with the USB or the tool so that you might check out USB problems, such as the USB driver.
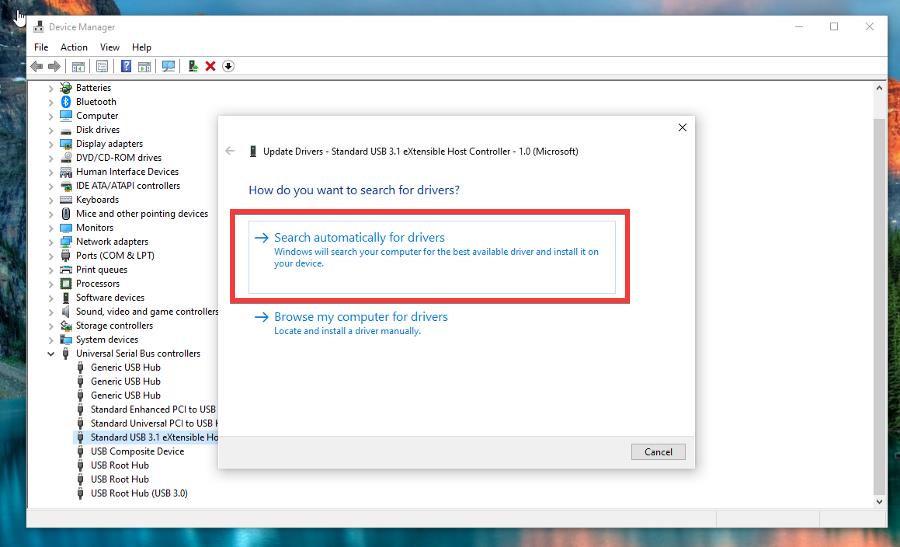
Step 1. Right-click the Start button and choose Device Manager.
Step 2. Expand Disk drivers. Right-click on the USB drive and select «Properties», and under the «Driver» tab, click on «Update driver». You can proceed with «Search automatically for updated driver software».
5. Re-Format the USB Flash Drive
Before creating the bootable USB drive, the installer formats the USB. It can also cause we can’t find a USB flash drive problem if the formatting goes wrong. In this case, reformat your USB and check if the Windows media creation tool can recognize the USB.
You have four best USB format tools listed here to format a USB flash drive on Windows 10; go to learn detailed steps.
- Use EaseUS Partition Master
- Use File Explorer
- Use Disk Management
- Use Diskpart in Command Prompt
6. Check if the USB Is Set as the Primary Drive
If the USB flash drive is set as the primary drive, it will not show up in the drive list. Then, you will get a Windows media creation tool can’t find USB error. It is also possible that the USB drive has a primary disk in it.
To fix the issue, you can go to Disk Management and check if the USB is set as the primary partition. If so, delete the partition and use the format option to turn it into a standard drive.
Or you can directly convert the primary partition to logical drives with EaseUS partition management software.
Step 1. Download and run EaseUS Partition Master and go to Partition Manager.
Step 2. Right-click the partition you want to convert and click «Advanced», choose the convert option:
- 1. Primary to Logical
- 2. Logical to Primary
Step 3. Click the «Execute 1 Task» button and then choose «Apply» to begin the conversion.
0:00 — 0:30 Convert Primary to Logical; 0:31 — 0:50 Convert Logical to Primary.
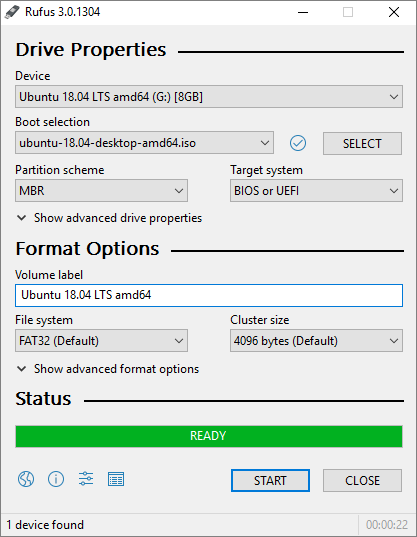
7. Use Refus to Create a Bootable USB Drive
To create a bootable USB drive to upgrade Windows 10, you can use some simple utilities instead of the Windows media creation tool. Rufus helps to format and create a bootable USB drive in an easy way.
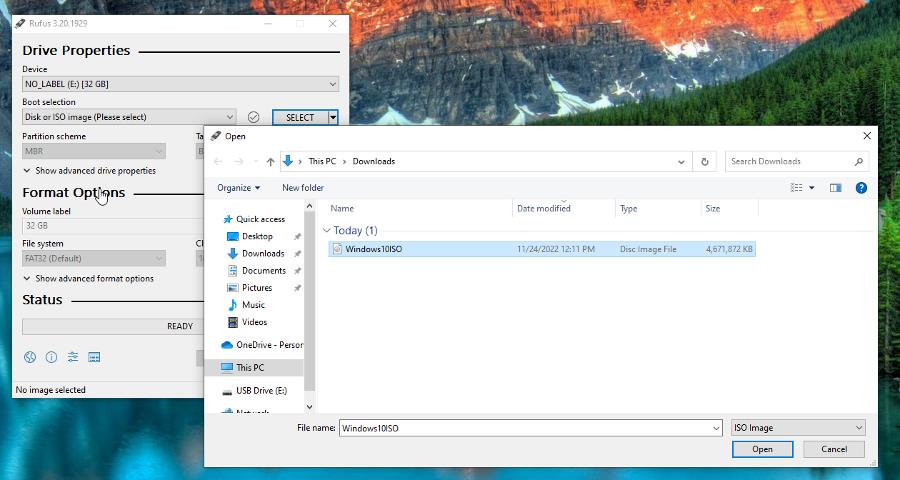
Step 1. Plug your USB drive into the computer. Download Rufus from this website.
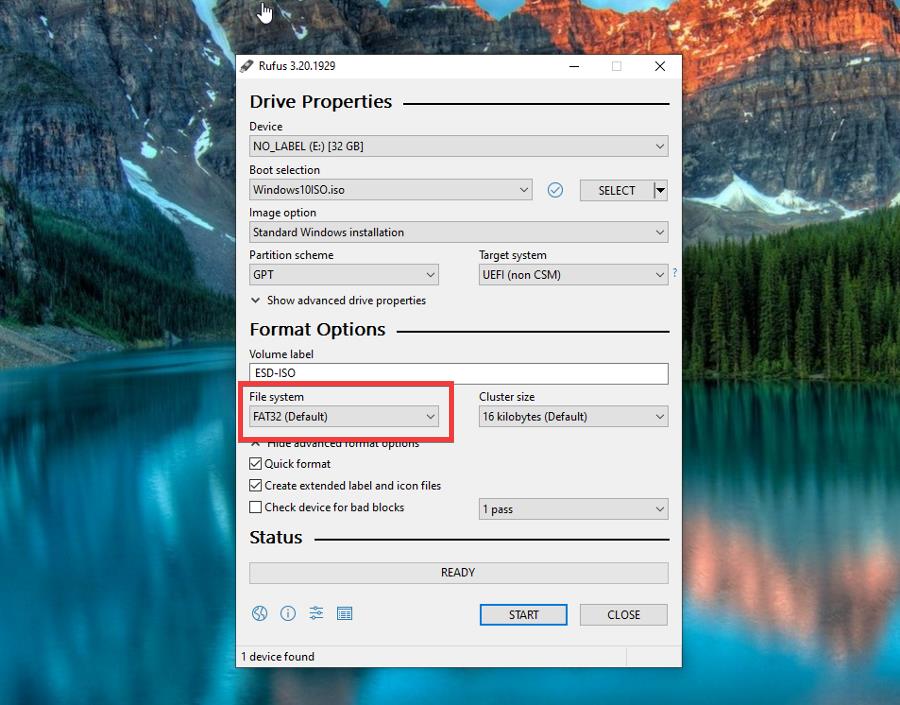
Step 2. Under the Device section, open the tool, click on the drop-down menu, and choose your USB device from the list.
Step 3. When format, make sure you choose the GPT partition scheme for UEFI and leave the File system option as FAT32. Leave the Cluster size to default.
Step 4. Click the disk icon and choose your .iso file containing Windows 10 installation.
Step 5. Click Start and wait for the process to finish. When it completes, you will have your bootable USB drive for Windows 10 installing.
Wrap Things Up
This post introduces all the causes and methods to help fix the We can’t find a USB flash drive — Windows 10 Setup Error. To solve the issue, you need to check if the USB device is accessible on your computer or try a different USB flash drive and USB ports.
In addition, you can try updating the USB driver in the Device Manager, checking the file system, reformatting the USB drive, as well as checking the primary partition, and applying another tool to create Windows 10 installation bootable USB.
If none of the Methods have resolved the issue for you, instantly contact our technical support team for help via LiveChat or emailing to [email protected].
Fix this problem so you can properly create a bootable USB drive with Windows 10
by Cesar Cadenas
Cesar has been writing for and about technology going on for 6 years when he first started writing tech articles for his university paper. Since then, his passion… read more
Updated on
- The Media Creation Tool is an alternative way for people to update or install Windows 10 on their computers.
- It’s possible to use a USB drive, but sometimes the dongle can’t be found, usually due to corrupted files.
- This guide will show you how to fix Media Creation Tool’s inability to find your USB to update your OS correctly.
The Media Creation Tool is software that burns a copy of Windows 10 onto a bootable USB drive. Sometimes you may get an error message stating the USB drive cannot be found.
To give you an example, you can get a Windows Media Creation tool cannot find a USB message when trying to utilize your flash drive.
Other similar errors regarding this error may come as Windows installation Media Creation Tool cannot find a USB flash drive or cannot find a USB SanDisk.
This may be because there’s something wrong that must be fixed. Or perhaps the problem lies with the USB drive itself. If that is the case, the error appears as Media Creation Tool not working.
How we test, review and rate?
We have worked for the past 6 months on building a new review system on how we produce content. Using it, we have subsequently redone most of our articles to provide actual hands-on expertise on the guides we made.
For more details you can read how we test, review, and rate at WindowsReport.
Problems between the Media Creation Tools and external drivers usually come down to something being corrupted. The following list mentioned the more likely culprits of this error.
- Your USB drive is infected with malware: Your computer may be trying to protect you from something malicious. Fortunately, there are antivirus apps that can clean up infected USB drives.
- The USB drive is damaged in some way: Files in the drive may have gotten damaged beyond repair. This can be caused by pulling the drive out without going through the proper procedure.
- The system files on your computer are corrupted: This results from malware going from the USB drive to your computer. You’ll have to run the SFC scan to fix that.
- Your antivirus software is preventing the port from being used: Some antivirus apps can be overzealous and stop certain functions on your computer from working properly.
The more complex solutions will require you to go into your computer’s menus to update some things or create a bootable version of the USB, so that it can get a little complicated.
Before moving forward, we recommend trying one of the more straightforward fixes and seeing if it works.
- Restart your computer. That’s one of the easiest and best things you can do to fix any error.
- Use a different USB drive. Cleaning one out can take some time. Switching to another device is much faster.
- Plug your USB device into a different port. For example, many computers typically have USB ports with different standards: USB 2.0 vs. 3.0. The latter is more recent, faster, and less prone to problems.
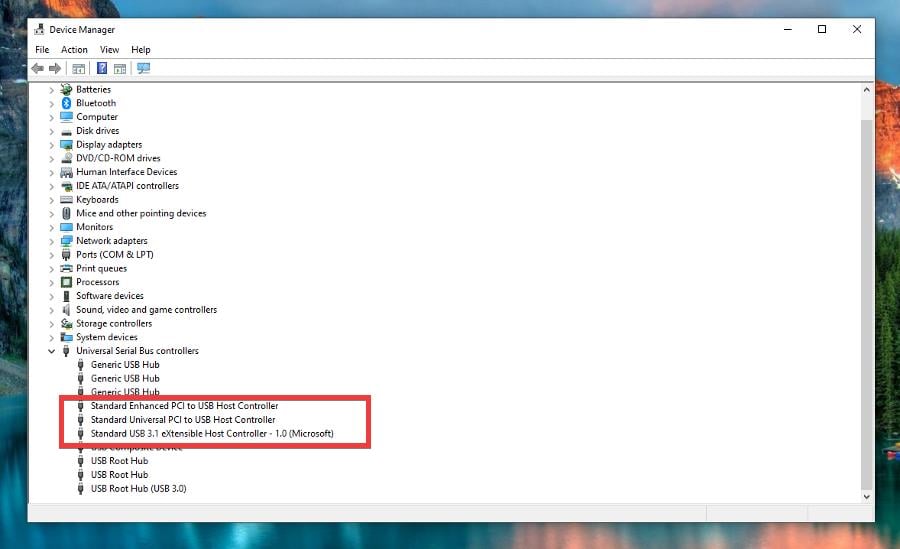
1. Update drivers
- Search for the Device Manager in the Windows 10 menu and select the first entry you see.

- Expand Universal Serial Bus and right-click the specifically named entries. Or, at the very least, the ones with the minor generic names like Standard USB.3.1 eXtensible Host Controller.

- Select Update driver in the new window that appears.
- Click Search automatically for drivers in the new window to automatically install the software.


If this method didn’t work as planned, we recommend you use a specialized tool that will automatically find all outdated drivers and updated them to their latest versions.
Most common Windows errors and bugs can result from faulty or incompatible drivers. An outdated system can lead to lags, system issues, or even BSoDs.
You can prevent these problems by using an automatic tool that will search and install the correct drivers on your computer with just a few clicks. That’s why we recommend you use Outbyte Driver Updater.
Here’s how to do it:
- Download and install the Outbyte Driver Updater app.
- Launch the software.
- Wait for the app to detect all incompatible drivers.

- Afterward, it will show you a list of the drivers found to select the ones to Update or Ignore.
- Click on Update & Apply Selected to download and install the newest versions.
- Restart your PC to ensure the applied changes.


Outbyte Driver Updater
Use this software and solve all driver-related issues from your PC.
Disclaimer: You may need to upgrade the app from the free version to perform specific actions.
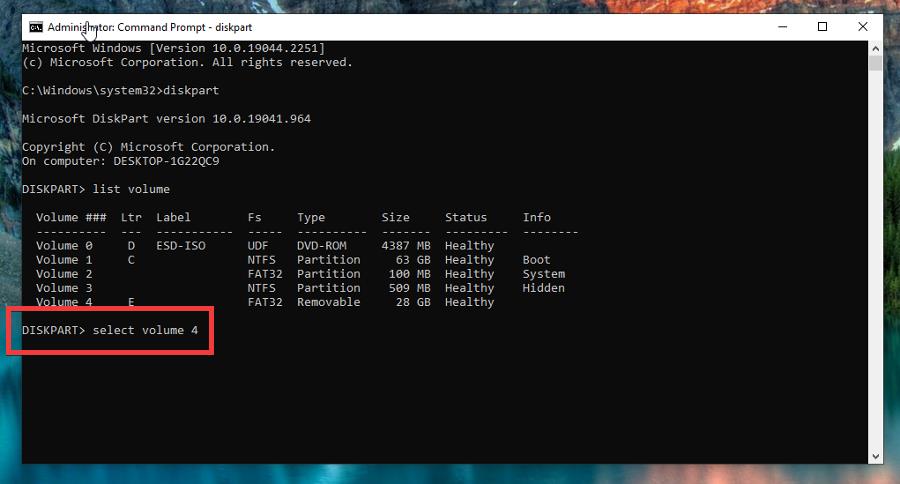
2. Run Diskpart
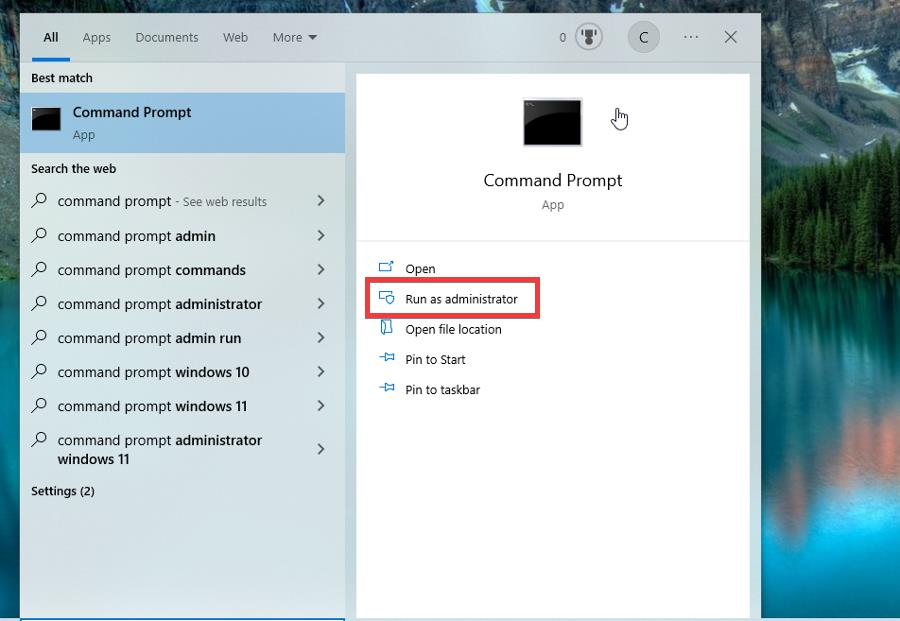
- Bring up the Windows 10 menu and search for the Command Prompt.
- Select Run as administrator when it appears as an entry.

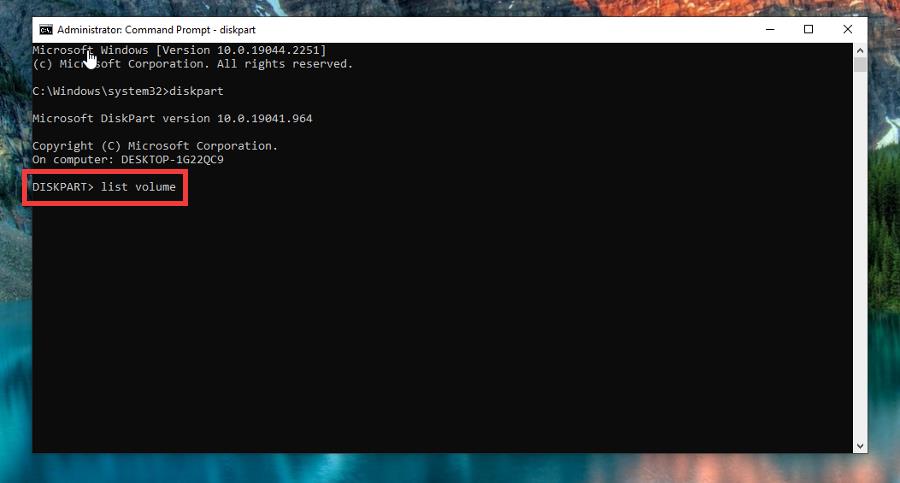
- Select Yes if a User Access Control window asks you if you want to make changes.
- Type diskpart in your Command Prompt and hit Enter on your keyboard. This will allow your computer to run Diskpart commands.
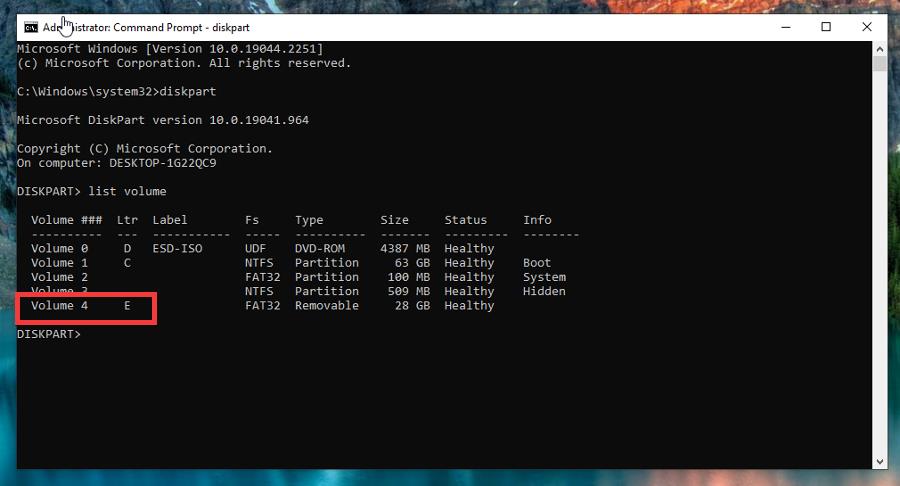
- In the same line as DISKPART, type list volume and hit Enter.

- Take note of your USB driver’s volume number and designated letter. In this example, it’s Volume 4 and the letter E.

- Type select and then the volume where your USB device is connected to. In this case, it would be select volume 4.

- Hit Enter to select the USB volume.
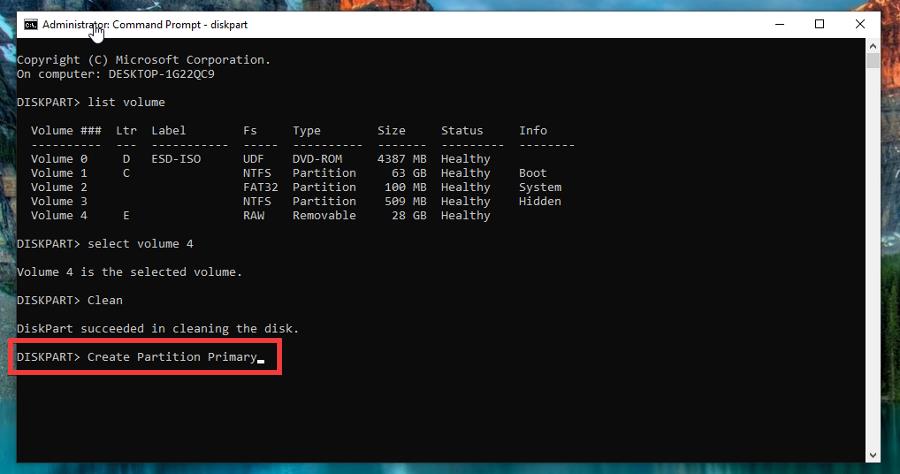
- Now type Clean on the Diskpart line in the Command Prompt and hit Enter.

- Then type Create Partition Primary and hit Enter.
- Type Exit to leave Diskpart.
- Restart your computer to finish.

- Is Windows 11 Faster Than Windows 10?
- How to Change the Icon Size on Windows 10
- Are Windows 11 Product Keys Backward Compatible?
- Microsoft Store Apps vs Desktop Apps: Which Ones to Use?
- How to Open & Use the Emoji Panel on Windows 10
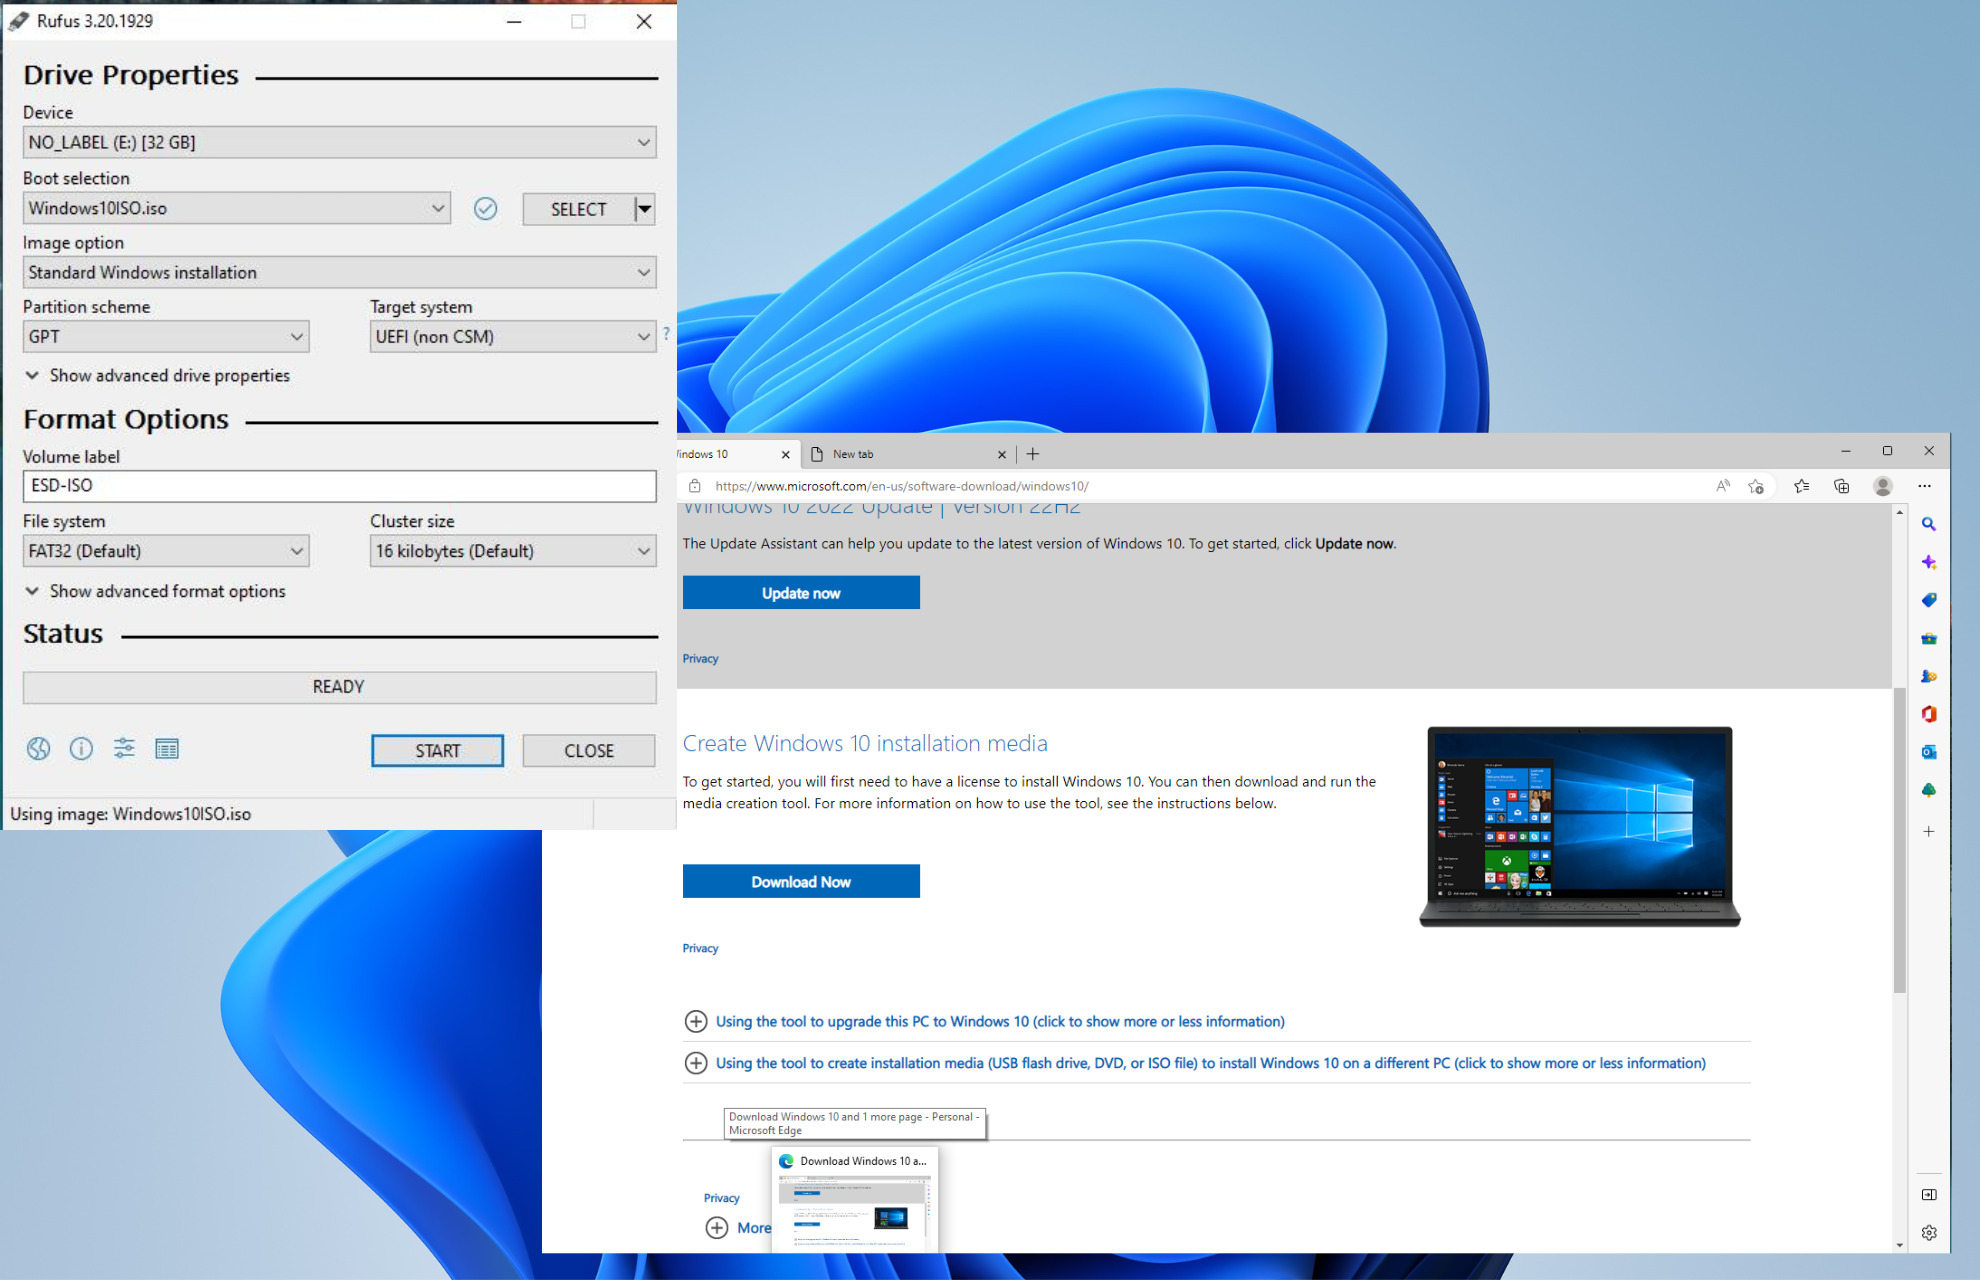
3. Create a bootable drive
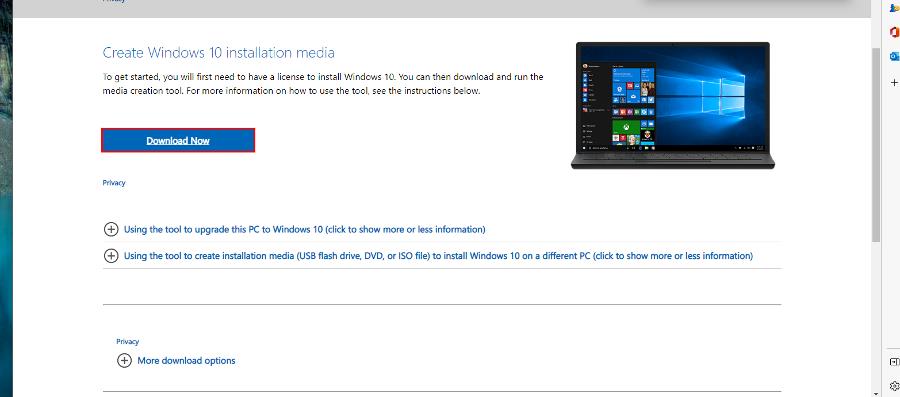
- First, go to Microsoft’s Windows 10 installation media page.
- Select Download Now to download the latest version of Windows 10.

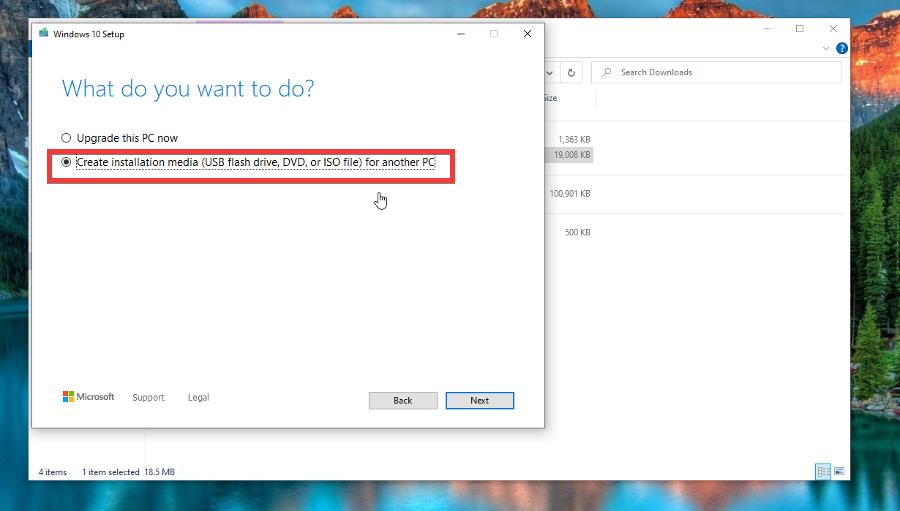
- Run the installation media you just downloaded and wait for it to finish setting up.
- Click Create installation media when the selection appears and continue with the installation wizard.

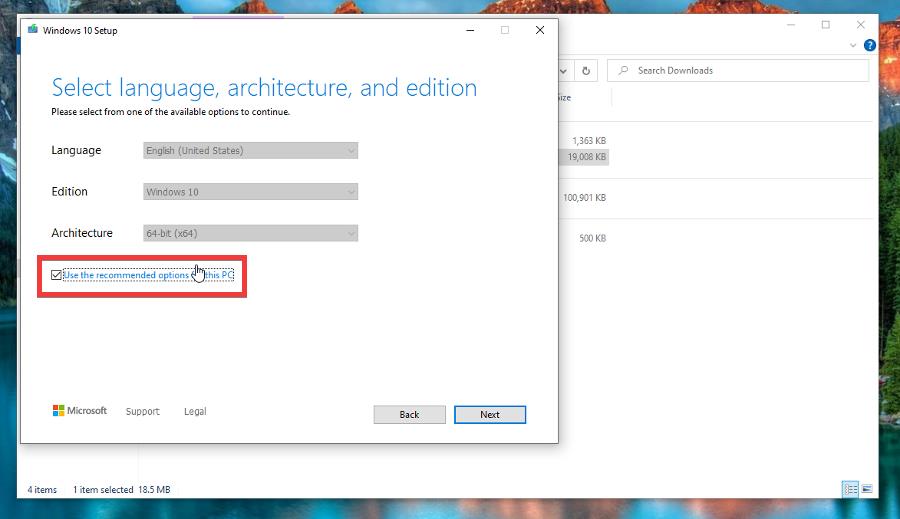
- Ensure the box next to Use the recommended options for this PC is checked. Click Next to continue.

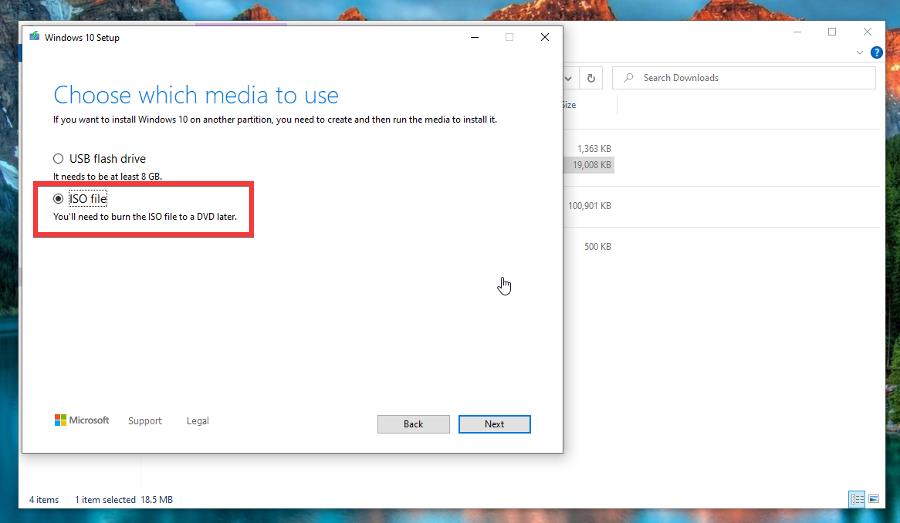
- Select the ISO file, then continue.

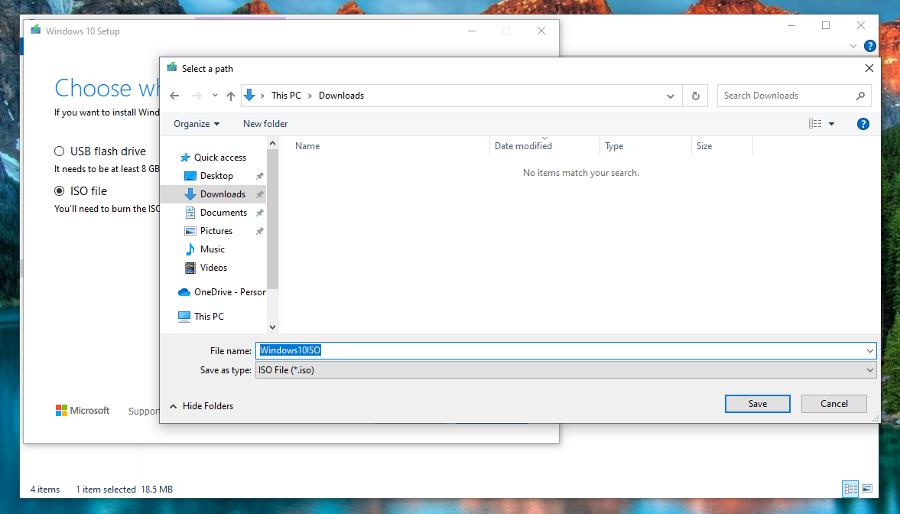
- Find a place on your computer to save the ISO file. Then, give the software time to finish the process.

- Now go to the Rufus download page and click the Download button to get the software.
- After downloading Rufus, please open the file to install it. It will launch automatically.
- If you haven’t plugged in your USB drive, do it now. Rufus will automatically detect it.

- Under Boot Selection, click the SELECT button and connect the Windows 10 ISO file you created.

- Expand the File System menu and select FAT32.

- Click the Start button to begin the process. It may take a while, so give your computer time to finish.

What are other problems that Windows 10 users may face?
There are a few worth mentioning because of how annoying they are. For example, some people have complained about being unable to turn off Sticky Keys on Windows 10.
Your computer may have been infected with malware causing these problems, or your keyboard drivers are out of whack. We also recommend learning about missing brightness sliders.
Microsoft has been seen removing this particular control from specific Windows 10 builds. However, it is possible to put it back by either changing drivers or with a third-party app.
Feel free to comment below if you have questions about other Windows 10 problems. And please tell us if there’s a specific guide for any Windows operating system you’d like to see.
![]()
Media creation tool — это удобный инструмент, предоставляемый Microsoft, который позволяет операционной системе Windows создавать загрузочный USB-накопитель или загрузочный диск для установки новой версии Windows.
Однако, иногда пользователи сталкиваются с проблемой, когда Media creation tool не распознает флешку. Это может быть вызвано различными причинами, такими как несовместимость флешки с системой или проблемы с драйверами USB порта.
Чтобы исправить эту проблему, вам можно попробовать следующие рекомендации:
- Проверьте флешку и USB-порт: убедитесь, что флешка работает корректно и не повреждена. Попробуйте подключить флешку к другому порту USB на вашем компьютере или попробуйте другую флешку.
- Обновите драйверы USB портов: проверьте наличие обновленных драйверов для USB портов на вашем компьютере. Вы можете сделать это через менеджер устройств в системе Windows.
- Используйте альтернативные инструменты: если вы продолжаете сталкиваться с проблемой, вы можете попробовать использовать альтернативные инструменты для создания загрузочного накопителя или диска, например Rufus или Universal USB Installer.
Следуя этим рекомендациям, вы сможете исправить проблему, когда Media creation tool не распознает флешку и успешно создать загрузочный накопитель или диск для установки Windows.
Содержание
- Media creation tool и проблема с распознаванием флешки
- 1. Проверьте флешку
- 2. Используйте другой порт USB
- 3. Проверьте настройки BIOS
- 4. Попробуйте другую флешку
- Несколько причин возникновения проблемы
Одной из распространенных проблем при использовании Media Creation Tool является нераспознавание флешки. Если вы столкнулись с этой проблемой, в данной статье мы рассмотрим несколько простых способов ее решения.
1. Проверьте флешку
Первым делом, убедитесь, что флешка функционирует нормально. Подключите ее к компьютеру и убедитесь, что она видна в проводнике. Попробуйте открыть и скопировать на нее другие файлы, чтобы убедиться, что она работает правильно. Если флешка не распознается или вызывает ошибки, возможно, она повреждена и требует замены.
2. Используйте другой порт USB
Иногда проблема с распознаванием флешки может быть связана с неисправностью порта USB. Попробуйте подключить флешку к другому порту USB на компьютере и проверьте, распознается ли она. Если флешка успешно распознается на другом порту USB, значит проблема была в неисправности предыдущего порта, и вам потребуется ремонт или замена этого порта USB.
3. Проверьте настройки BIOS
Если флешка все еще не распознается, возможно, проблема связана с настройками BIOS. Войдите в настройки BIOS компьютера и убедитесь, что порт USB, к которому подключена флешка, включен и правильно настроен. Проверьте также, нет ли проблем с драйверами USB в настройках BIOS.
4. Попробуйте другую флешку
Возможно, проблема с распознаванием флешки связана именно с ней, а не с Media Creation Tool. Попробуйте подключить другую флешку к компьютеру и проверьте, видит ли ее Media Creation Tool. Если другая флешка успешно распознается, значит проблема была именно с предыдущей флешкой, и вам потребуется заменить ее.
В рамках данной статьи были рассмотрены несколько простых способов решения проблемы с распознаванием флешки при использовании Media Creation Tool. Учитывайте указанные рекомендации и, вероятнее всего, проблема будет успешно решена.
Несколько причин возникновения проблемы
Существует несколько возможных причин, по которым программа Media Creation Tool может не распознавать флешку:
- Неисправность флешки или порта USB: Возможно, проблема заключается в самой флешке или порте USB. Попробуйте подключить флешку к другому порту или использовать другую флешку, чтобы исключить неисправности оборудования.
- Отсутствие прав доступа: Вам может не хватать прав доступа к флешке или к папке, в которой находятся необходимые файлы для Media Creation Tool. Убедитесь, что у вас есть необходимые разрешения для доступа к флешке и файлам.
- Несовместимость файловой системы: Флешка может быть отформатирована в файловой системе, несовместимой с Media Creation Tool. Убедитесь, что флешка отформатирована в FAT32 или NTFS, так как эти файловые системы обычно поддерживаются программой.
- Проблемы с драйверами: Если флешка все еще не распознается, возможно, проблема связана с драйвером USB-порта на вашем компьютере. Убедитесь, что у вас установлены последние обновления драйверов или попробуйте обновить драйверы вручную.
Совсем недавно вышла новая Windows 11, в этой статье давайте разберем как сделать загрузочную флешку для установки Windows 11. Для ее создания можно использовать несколько разных способов: с помощью официальной утилиты Media Creation Tool или других инструментов, если у вас уже имеется загруженный ISO образ с системой.

Содержание
- Способ 1. Используем Media Creation Tool от Microsoft
- Способ 2. Используем Rufus.
- Способ 3. Используем Rufus для компьютера без TPM 2.0 и SecureBoot.
- Вопросы и ответы
- Комментарии
Хочу отметить, что описанными способам можно создать загрузочную флешку Windows 11, как из-под Windows 10, так и с помощью Windows 11. И второе, не обязательно, чтобы компьютер, на котором создаётся загрузочная флешка, был совместим с Windows 11.
Перейти к просмотру

💻 Создание загрузочной флешки для установки Windows 11💻
Способ 1. Используем Media Creation Tool от Microsoft
Возьмите USB флешку размером не менее 8 Гб. Учитывайте, что при записи образа все данные с неё будут удалены. Зайдите на официальную страницу Майкрософт по загрузке Windows 11.

Видим раздел «Создание установочного носителя Windows 11». Нажмите «Скачать», и загрузите Media Creation Tool – официальную программу установки Windows 11 от Microsoft. После этого, запускаем утилиту и принимаем соглашения.

На экране «Выбор языка и выпуска» по умолчанию установлены параметры, которые соответствуют текущей системе. При желании, их можно изменить. Подтвердите ваш выбор нажатием «Далее».

На даyном этапе, программа установки предложит выбрать носитель. Выберите «USB-устройство флэш-памяти» и нажмите «Далее». Выберите флешку в списке съемных накопителей, на которую будете производить запись. Обратите внимание, что после нажатия «Далее» все данные с неё будут удалены.

После завершения создания установочной флешки вы увидите сообщение – «USB-устройство флэш-памяти готово». Нажмите «Готово» и ваша загрузочная флешка с Windows 11 готова к работе.

Способ 2. Используем Rufus.
Второй способ будет актуален в том случае, если у вас УЖЕ имеется образ ISO с Windows 11. Скачать его можно с той же страницы Microsoft, где и Media Creation Tool. Здесь указаны все предлагаемые Microsoft варианты.

Или создать с помощью Media Creation Tool. Для этого, на странице Media Creation Tool «Выберите носитель», укажите «ISO-файл» вместо «USB-устройство флеш-памяти». Укажите папку, куда его сохранить. И дождитесь окончания загрузки и создания образа системы. По окончанию ISO-файл Windows 11 будет сохранён в указанную папку.

Для создания загрузочной флешки я воспользуюсь программой Rufus. Но Rufus не единственная программа для записи образов на носители. Аналогичных есть много. В списке популярных можно выделить такие программы как: Win32 Disk Imager, UltraISO, UNetBootting, WinToFlash, Universal USB Installer, и им подобные.

И так, для начала, запустите программу. Далее, выбираем нужный нам файл образа системы и нажимаем “Выбрать”. Потом, выбираем нужный нам тип носителя, то есть устройство “USB”. Если важных файлов на данном накопителе у вас нет, нажимаем “Старт”.

Снова подтверждаем то, что программа удалит все файлы на носителе и ожидаем завершения копирования файлов на Вашу флешку. После завершения видим сообщение “Готово”, то есть, загрузочная флешка готова. Можно приступать к установке Windows 11.
Но имейте ввиду, что установить Windows 11 с загрузочной флешки, созданной этими двумя способами, получится только на совместимом устройстве: с TPM (не ниже версии 2.0) и SecureBoot.
Способ 3. Используем Rufus для компьютера без TPM 2.0 и SecureBoot.
Если же ваш компьютер не оборудован доверенным платформенным модулем и в нем нет режима безопасной загрузки, то при установке вы увидите ошибку о том, что ваше устройство не соответствует минимальными системными требованиям для установки Windows 11.

В таком случае, для установки Windows 11 на неподдерживаемый компьютер, нужно создать загрузочную флешку особым способом. Их также уже есть несколько, но мне понравилось, как данная функция реализована в Rufus. Тем более, что программа является абсолютно бесплатной и с открытым кодом.
Процесс создания загрузочной флешки для несовместимого с Windows 11 ПК такой же. Единственным отличием будет то, что в меню «Параметры образа» нужно выбрать «Extended Windows 11 Installation» (no TPM/no Secure Boot) – то есть «…для установки на устройство без TPM и Secure Boot…»

При установке Windows 11 с помощью такой флешки на ПК без TPM и Secure Boot, не будет ошибки о несовместимости устройства.
When creating a USB bootable media, many users are troubled by the Windows 10 media creation tool we can’t find a USB flash drive error. If you are also trying to fix the issue, this post of MiniTool Partition Wizard is what you need.
The media creation tool is a practical utility that can be used to create a bootable USB drive for reinstalling or upgrading Windows 10. However, a lot of users encounter the Windows 10 we can’t find a USB flash drive error in the Setup screen. Here is a true example from the answer.microsoft forum:
I’m trying to make a USB for the windows 10 install. I’m using the Windows 10 media creation tool to create that USB. When I get to the area that says would you like to create the USB or ISO file I select USB. When I click on Next, it tells me that the USB cannot be found. I have tried this on two separate computers and get the same results. In addition, I can navigate using file explorer and see the USB but the creation tool will not find it. Does anybody have any help with this?https://answers.microsoft.com/en-us/windows/forum/windows_10-windows_install-winpc
According to user reports, the Windows 10 media creation tool we can’t find a USB flash drive error often appears on the Select a USB flash drive screen. No matter how many times they click on Refresh drive list, the Windows 10 setup not finding USB error still pops up. The strange thing is that the USB flash drive can be seen in the File Explorer or Disk Management.
What causes the Windows media creation tool can’t find USB error? After investigating extensive user reports and references, we find there are some possible causes of the error:
- Incompatible USB flash drive: Many users reported that they encounter the Windows 10 we can’t find a USB flash drive error especially when using a SanDisk USB.
- A corrupted USB flash drive: If there are bad sectors or file system errors on the USB drive, the Windows 10 setup not finding USB can occur.
- Outdated USB drivers: Since the Windows 10 media creation tool is a relatively new utility, you may encounter the media creation tool not recognizing USB issue if associated drivers are outdated.
Based on these possible causes, we explored corresponding solutions. Let’s see how to fix Windows 10 media creation tool we can’t find a USB flash drive.
Here we summarize 5 effective troubleshooting methods that you can try one by one until the Windows 10 setup not finding USB issue is resolved.
Fix 1. Use a Different USB Flash Drive
The simplest and most direct method is to use a different USB flash drive. This is because a lot of users reported that the media creation tool not recognizing USB error appears when using a SanDisk drive. We don’t know the actual reason for the incompatibility, but many users managed to fix the error by using a different USB brand like Kinston, Toshiba, or Lexar. Here you may have a try. Make sure you connect a USB drive that has 8GB free space at least and is formatted to FAT32.
Fix 2. Check Your USB Drive for Errors
If the Windows 10 ISO file happens to be located in the bad sectors or file system errors of the USB drive, you may encounter the Windows media creation tool can’t find USB issue. In this case, you need to check your USB drive for errors. How to check bad sectors and file system errors together?
Here MiniTool Partition Wizard can help you check them with ease. It is an all-in-one partition manager that boasts many powerful features like convert NFTS to FAT, data recovery, migrate OS, disk benchmark, resize partition, etc.
Now, let’s see how to check file system errors and bad sectors using MiniTool Partition Wizard.
MiniTool Partition Wizard FreeClick to Download100%Clean & Safe
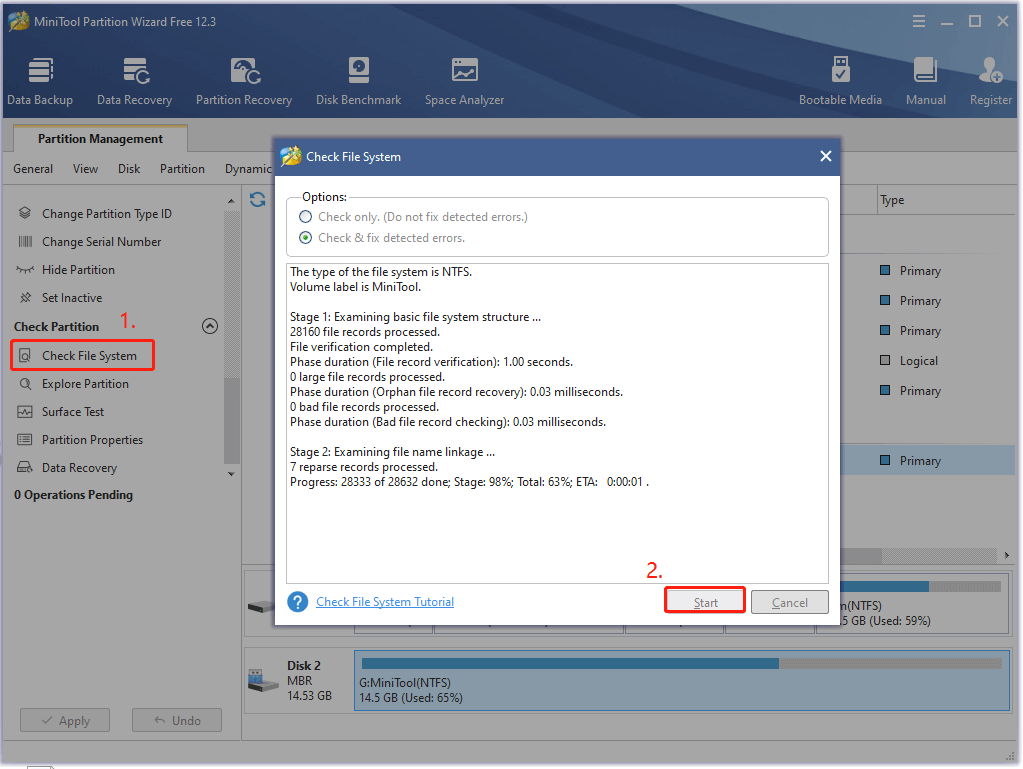
Step 1. Launch MiniTool Partition Wizard to enter its main interface, and then select the USB drive from the disk map and click on Check File System from the left pane.
Step 2. In the pop-up window, select the Check & fix detected errors option and click on Start. After that, this program will automatically scan the USB drive for file system errors and try repairing them.
Step 3. If the Windows 10 setup not finding USB error persists, you can perform a Surface Test to check bad sectors. To do so, select the USB flash drive again and click on Surface Test from the left pane.
Step 4. Click on Start Now to start scanning the USB drive. Once any bad sectors are detected, this program will make the blocks with red color.
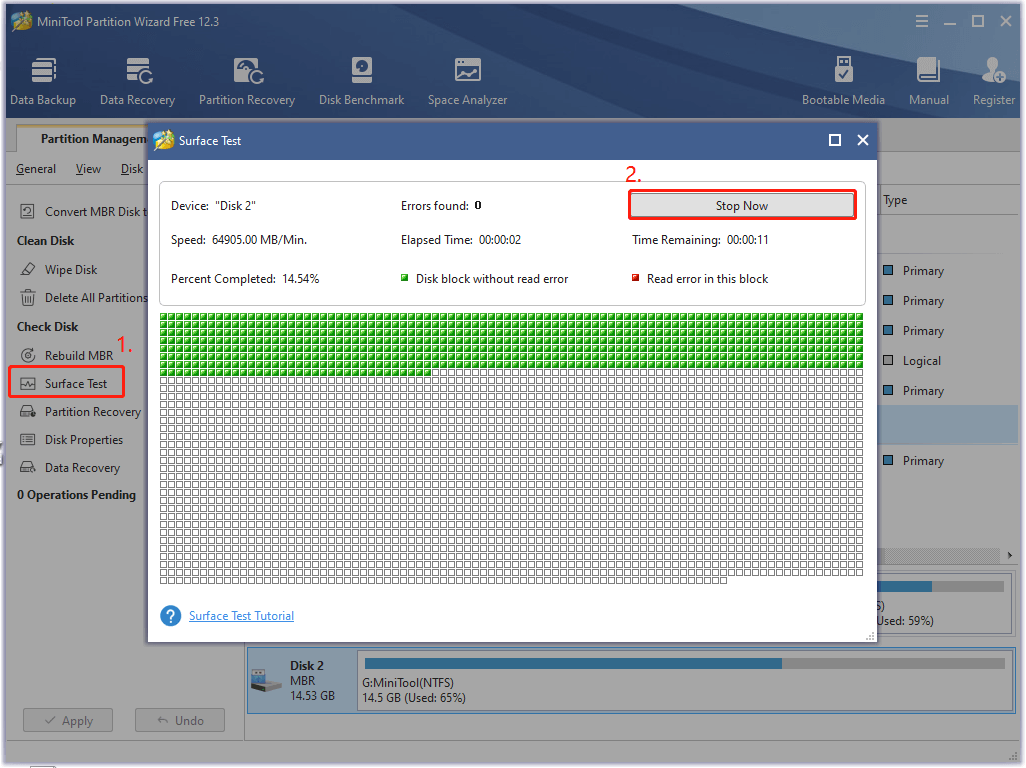
If you find the bad sectors on the USB drive, we recommend you switch to a new USB drive as Windows 10 bootable media.
Fix 3. Update the Related USB Drivers
As mentioned above, the associated USB driver issues are responsible for Windows 10 media creation tool we can’t find a USB flash drive. To resolve the problem, connect the USB to your computer and follow the steps below to update related USB drivers.
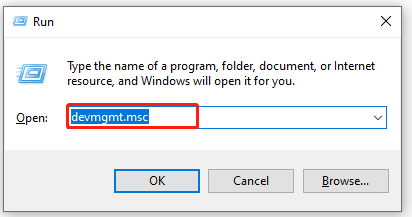
Step 1. Press Win + R keys to open the Run dialog box, and then type devmgmt.msc in the box and hit Enter to open Device Manager.
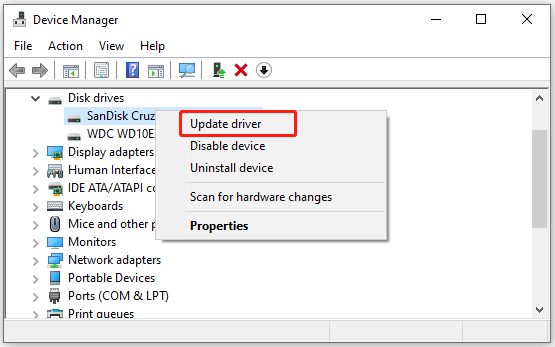
Step 2. Expand the Disk drivers category, and then right-click your USB driver and select Update driver.
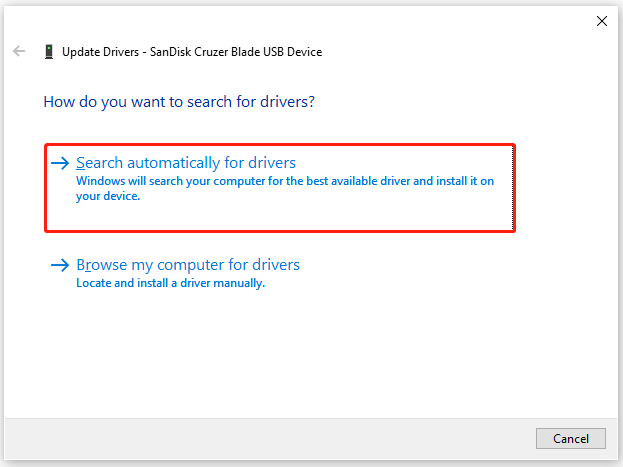
Step 3. In the pop-up window, select the Search automatically for drivers option and follow the on-screen prompts to complete the update.
Tip: Alternatively, you can select Browser my computer for drivers. Then click on Let me pick from a list of available drivers on my computer, and select the available updated USB driver and install it.
Step 4. You need to update the USB root Hub driver as well. Expand the Universal Serial Bus controllers menu, and then right-click the USB root Hub driver and select Update driver.
Step 5. Now, you can update the driver automatically or manually like in Step 3.
Step 6. In addition, make sure the USB Mass Storage Device driver is enabled. If not, right-click the driver and select Enable Device.
After that, you can restart the computer and check if the Windows 10 we can’t find a USB flash drive error is resolved.
Fix 4. Reformat the USB Flash Drive
If all the above methods fail to work, you may have to reformat the USB drive or try using an alternative tool to create a Windows 10 bootable media. This part focuses on how to reformat a USB drive.
When comes to formatting a USB drive, most people may select Disk Management, File Explorer, and Disk Management. But as you know, these Windows utilities have some drawbacks such as can’t format a drive larger than 32GB to FAT32 or formatting takes forever.
To reformat a USB drive quickly and easily, we highly recommend you use MiniTool Partition Wizard. Here’s how:
MiniTool Partition Wizard FreeClick to Download100%Clean & Safe
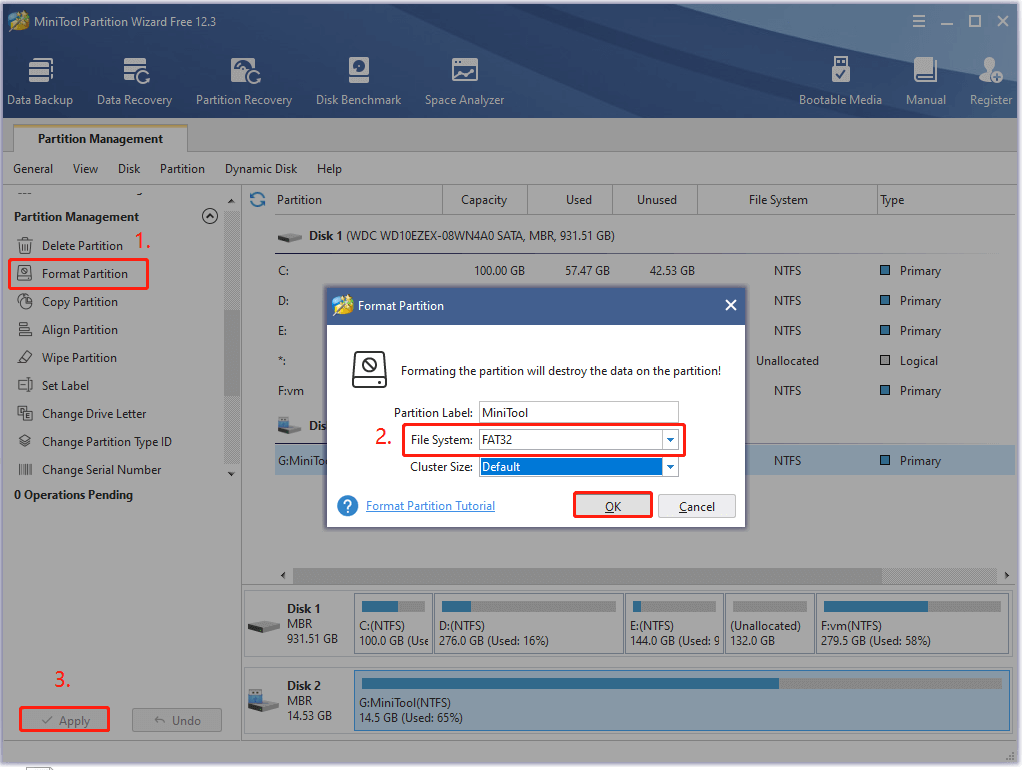
Step 1. In the main interface, select the USB drive that you connected to the computer and click on Format Partition from the left pane.
Step 2. Select FAT32 from the File System drop-down menu, and then you can set its Partition Label and Cluster Size based on your needs. Once done, click on OK to save changes.
Step 3. Click on the Apply button to execute this formatting.
If the Windows 10 setup not finding USB problem still exists, you can proceed with the following method.
Fix 5. Alternative to Create a Windows 10 Bootable USB
In addition, you can download the ISO file of Windows and then use professional software to burn the file to your USB directly. Here is a guide for you.
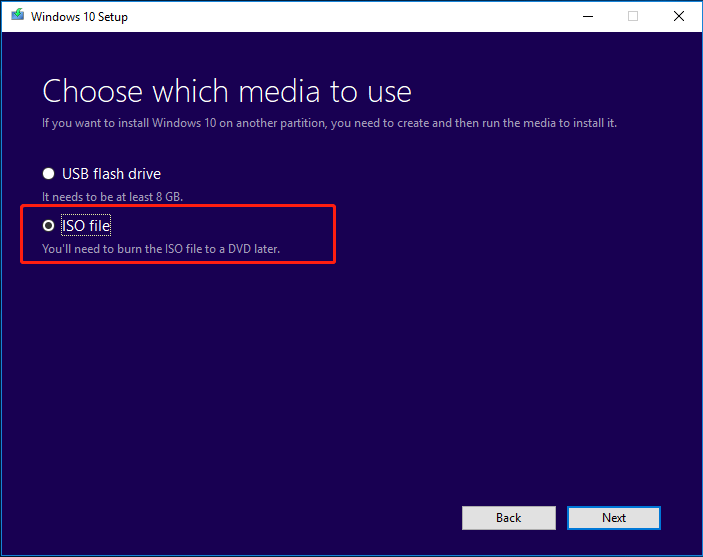
Step 1. In the Choose which media to use page, select ISO file instead and save the file to a location on your computer.
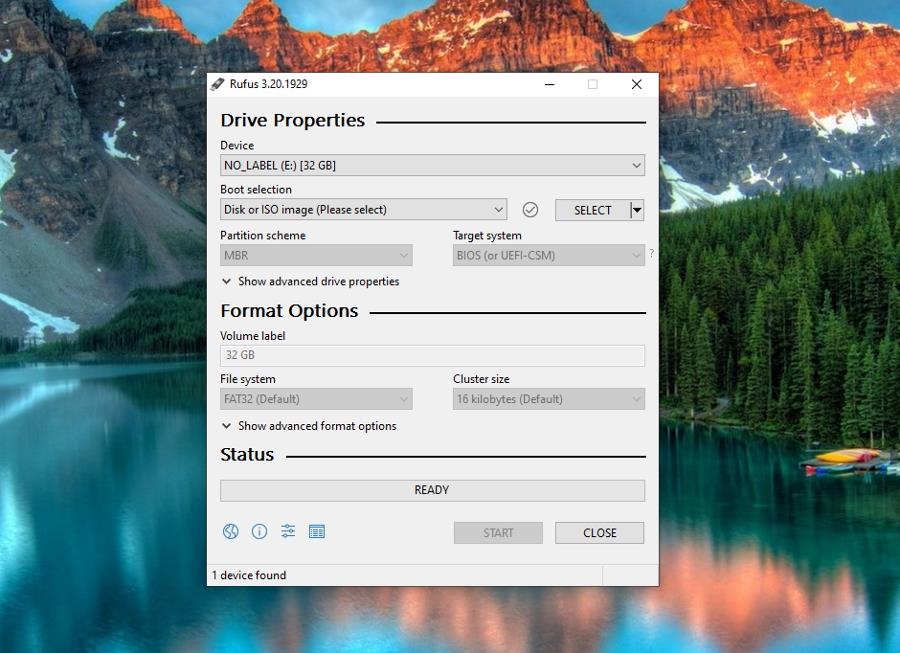
Step 2. To create a bootable USB from the ISO, you need to use a professional ISO burn tool like Rufus. Click here to open the official website of Rufus, then download and install it on your Windows 10 PC.
Step 3. Plug your USB flash drive into your PC and launch Rufus to enter its main interface.
Step 4. Now, the tool will automatically detect the USB drive. Click on Select to choose the ISO file you downloaded, and then you can specify the partition scheme and label. After that, click on START to start creating a bootable USB from the ISO file.
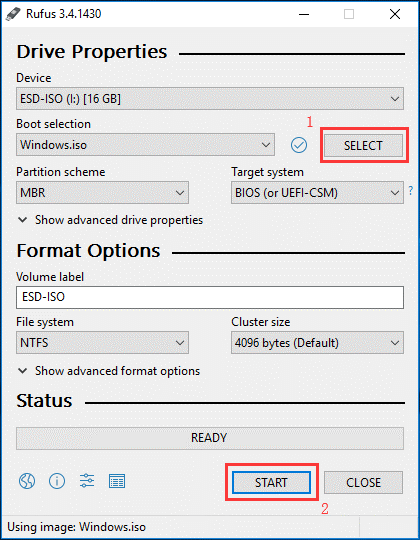
Step 5. Once the ISO file is burned to the USB drive successfully, click on CLOSE to exit the tool.
When creating a USB bootable media, I’m stuck in the Windows 10 media creation tool we can’t find a USB flash drive page. Fortunately, this post helped me fix the error. Perhaps you also need it.Click to Tweet
Bottom Line
How to fix Windows 10 setup not finding USB? The top 5 methods have been elaborated on in this post. Do you have any better ideas on this subject? You can leave your words in the following comment area.
If you encounter any issues while using MiniTool Partition Wizard, please give us feedback. You can contact us by sending an email via [email protected].
Why does my USB flash drive not showing up?
According to a survey, the USB drive not showing up can be caused by various factors, including outdated USB driver, damaged USB drive, wrong file system, and device conflicts.
How to boot my computer from a USB?
- Insert the bootable USB that you burned Windows 10 ISO file in and press the Power button to start your computer.
- During the initial startup screen, press ESC, F1, F2, Delete, or F10 key to enter BIOS
- Navigate to the Boot tab and put the USB drive to the first boot sequence by using the arrow keys.
- Press the F10 key to save the boot order changes and exit BIOS. Then your Windows 10 computer will restart from the USB.
Does formatting USB delete everything?
Formatting a USB will delete all the data on the drive and set a file system to prepare an available space for the operating system. There are three levels when formatting: low-level formatting, formatting, and high-level formatting. Only the high-level formatting will erase data.