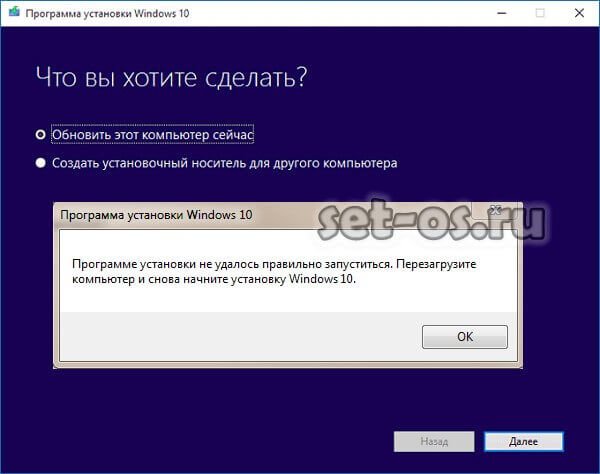
Те пользователи, которые самостоятельно скачивали официальный установочный образ операционной системы Windows 10, конечно же знакомы со специальной утилитой Media Creation Tool. Это фирменный инструмент от Microsoft, предназначенный для создания загрузочных носителей для установки и обновления операционной системы.
Но иногда у Вас может возникнуть проблема при запуске Media Creation Tool. Например, ошибка «Программе установки не удалось правильно запуститься, перезагрузите компьютер». Либо приложение вообще не стартует.
Причин такого явления может быть несколько.
Самая частая причина заключается в том, что Media Creation Tool не работает из-за того, что её неправильно распознаёт Ваша система безопасности и блокирует любую подозрительную активность. Поэтому, начать стоит с того, что отключить антивирусную программу и брандмауэр(файрвол).
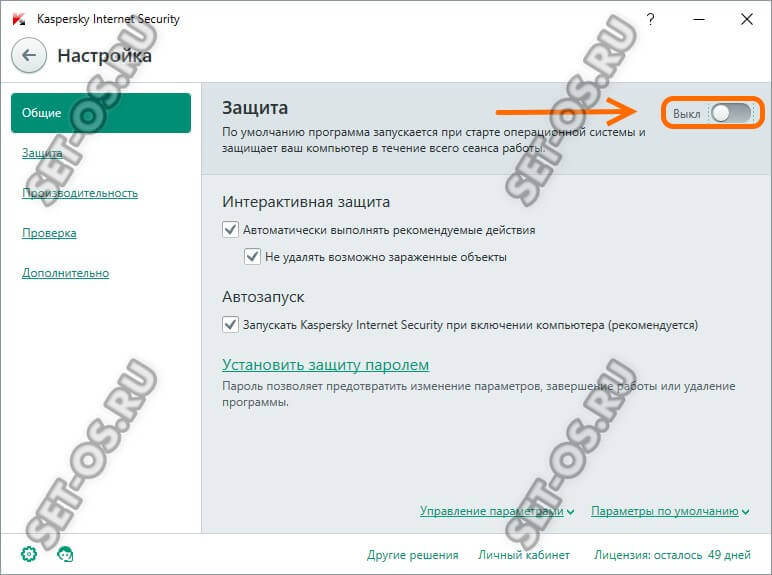
Проверяем работу Медиа Криэйшн Тул. Не помогло? Идём дальше.
Следующая возможная причина — Вашей учётной записи не хватает прав на запуск программы. Попробуйте кликнуть на её значке правой кнопкой и в появившемся меню выберите пункт «Запуск от имени Администратора». Как вариант, можно попробовать создать ещё одну учётную запись Windows с административными правами и попробовать — запустится ли утилита теперь.
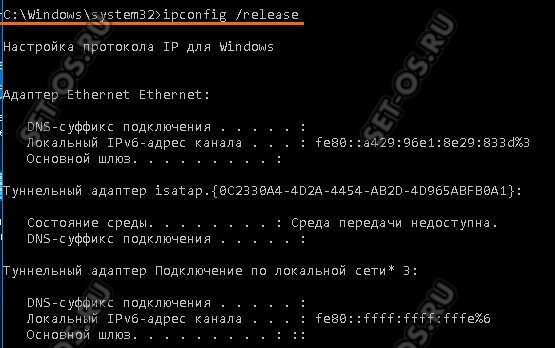
Следующая причина почему не работает Media Creation Tool — это проблемы с локальной сетью. Попробуйте сделать следующее. Запустите командную строку с правами Администратора. Затем введите по очереди следующие команды:
ipconfig/release
Освобождаем IP-адрес, если он получается от DHCP-сервера автоматически.
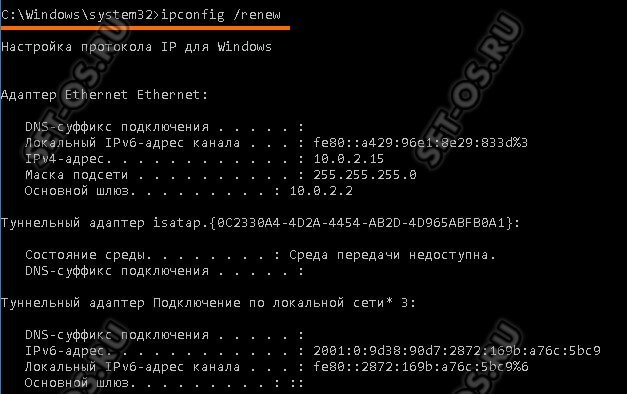
Затем:
ipconfig/renew
Этим мы обновим свой IP-адрес.
И в завершении очистим кеш ДНС:
ipconfig/flushdns
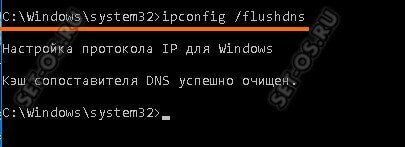
Теперь нужно проверить что есть доступ в сеть Интернет и после этого проверить работу Медиа Криэйшн Тул.
Ещё один способ, которым иногда тоже получается устранить проблему при запуске Media Creation Tool — это очистка временных файлов системы. Чтобы это сделать, надо в адресной строке проводника Windows прописать вот такой адрес:
%TEMP%
Нажимаем клавишу «Enter». Откроется папка, в которой хранятся временные файлы программного обеспечения, которое работает или работало в системе. Выглядит она примерно так:
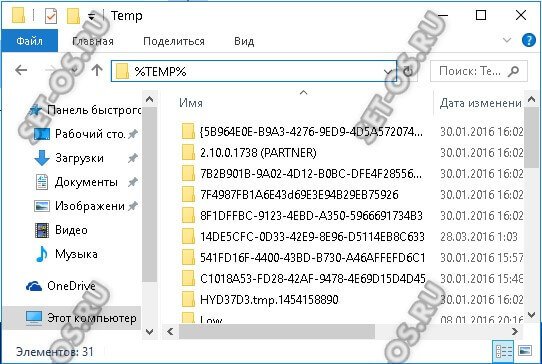
Полностью очищаем её содержимое и перезагружаемся.
Ну уж если и после этого не работает Media Creation Tool, то тогда выход один единственный — скачивать установочный образ и создавать загрузочный диск на другом компьютере, а тогда уже переходить на этот и переустанавливать ОС.
Советы подписчиков:
1. Запустите командную строку с правами Администратора. Для этого в Windows 10 нажмите правой клавишей мыши на кнопку пуск или на клавиатуре сочетание клавиш Win+X.
2. В появившемся меню выберите вариант «командная строка(администратор)» или «PowerShell(администратор)».
3. В открывшемся окне введите команду: Dism /Online /Cleanup-Image /RestoreHealth и нажмите «Enter».
4. Дождитесь результата выполнения команды.
5. Введите команду sfc /scannow и нажмите Enter.
6. Дождитесь выполнения команды и перезагрузите компьютер.
Windows Media Creation Tool is a very useful tool that can help you upgrade your Windows system to the latest version or install the latest Windows 10/11 on your device. However, if Windows Media Creation Tool is not working, do you know how to fix it? You can find some easy solutions here.
Windows Media Creation Tool is an official tool from Microsoft. You can use it to upgrade your system to the latest version or install the latest Windows 10/11 on your device. MiniTool Software has talked about Windows 10 Media Creation Tool in this article: A Complete Guide to Windows 10 Media Creation Tool: How to Use.
However, the usage of Windows 10 Media Creation Tool and Windows 11 Media Creation Tool is slightly different.
For example,
You can use Windows 10 Media Creation Tool to:
- Upgrade your PC to the latest version.
- Create a Windows 10 installation USB drive.
- Download a Windows 10 ISO file.
You can use Windows 11 Media Creation Tool to:
- Create a Windows 11 installation USB drive.
- Download a Windows 11 ISO file.
You see the only difference is that you can’t use Windows 11 Media Creation Tool to directly upgrade your PC now. But it is not a big problem. You can use Windows 11 Installation Assistant to update your system. The effect is the same.
Windows 10/11 Media Creation Tool is not preinstalled on your PC. You need to download it from the Microsoft software download site.
- Download Windows 10 Media Creation Tool
- Download Windows 11 Media Creation Tool
After downloading Windows 10/11 Media Creation Tool, you can directly open and run it to do what you want to do. However, some users report that their Windows Media Creation Tool is not working.
There are multiple scenarios for this problem. For example:
- Windows 11 Media Creation Tool not working
- Windows 10 Media Creation Tool not working
- Windows Media Creation Tool won’t run
- Windows Media Creation Tool won’t open
- Windows Media Creation Tool couldn’t run on a PC
- And more….
We propose some solutions to these problems. You can try them to help you out.
If Windows Media Creation Tool is not working or you can’t open it on your PC, you can delete the tool and download it again. This is the quickest way to solve this issue: you need to make sure your downloaded Media Creation Tool is complete.
Your internet connection should be enabled and work smoothly during the download process. This is also to ensure the integrity of the download. On the other hand, it also requires a good network connection when using Windows Media Creation Tool.
If the above method doesn’t work for you, you can run the tool as administrator to have a try. You can right-click the Media Creation Tool and select Run as administrator. If the User Account Control interface pops up, you need to click the Yes button to continue.

Fix 3: Create an AllowOSUpgrade Registry Key
Windows Registry is an administrative tool that saves information about your installed programs and services on your Windows PC. It contains an OSUpgrade registry key and it is related to your Windows update. You can create an AllowOSUpgrade Registry key to allow Windows Media Creation Tool to run and upgrade your system.
Tips:
You should back up the registry key in advance to protect your system.
Step 1: Click the search icon from the taskbar, then search for Registry Editor. Select Registry Editor to open this tool. If you receive the User Account Control interface, click the Yes button to continue.
Step 2: Go to the following path. You can directly copy and paste this path to the address bar and press Enter to open the path.
Computer\HKEY_LOCAL_MACHINE\SOFTWARE\Microsoft\Windows\CurrentVersion\WindowsUpdate\OSUpgrade
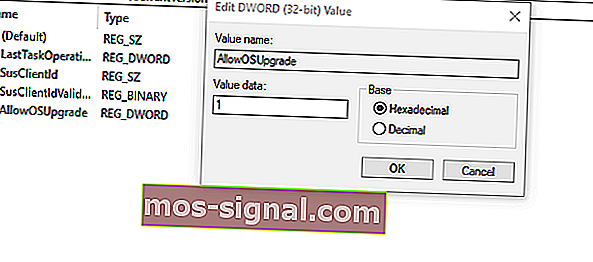
Step 3: Right-click the OSUpgrade key and go to New > DWORD (32-bit) Value to create a new key. Then, rename the new key to AllowOSUpgrade.
Step 4: Double-click the newly created value to open it. Then, change the value data to 1.

Step 5: Click OK to save the change.
Step 6: Restart your computer.
After these steps, you can run Windows Media Creation Tool again and check if it runs normally.
Fix 4: Enable the Relevant Services
If Windows Media Creation Tool is not working on your PC, you also need to check if the Windows update relevant services are enabled.
You may disable one or more of the following services by mistake but you don’t it:
- Background Intelligent Transfer Service (BITS)
- Server
- TCP/IP NetBIOS Helper
- Workstation
- IKE and AuthIP IPsec Keying Modules
- Windows Update
Any service being shut down will affect Windows 10/11 Media Creation Tool. You can open Services to check.
Step 1: Press Windows + R to open Run.
Step 2: Type services.msc in the Run dialog and press Enter to open the Services app.
Step 3: Check if the above services are enabled. If one service is disabled, you can double-click that service and select Automatic for Status type. Then, click Apply and OK to save the change.
Step 4: Close Services.
After these steps, you can run Media Creation Tool again and see if it can run successfully.
Fix 5: Check the Available Space on Your System Disk
You should have at least 8 GB of free space on the C drive to run Media Creation Tool on your PC. You can go to File Explorer to check if the free space is enough. If not, you can delete unimportant files on the C drive to free up more space. You can also run Disk Cleanup to get more available space.
Here are 10 ways to free up disk space on Windows 10/11.
Fix 6: Use another Way to Upgrade Your PC
Using Media Creation Tool is not the only way to upgrade your PC. If you can’t use this tool to perform a Windows 10/11 update, you can use another way to do the job.
For example, you can check for updates in Windows Update, then download and install the available update on your device.
You can also download a Windows 10/11 disk image (ISO), create a Windows 10/11 installation USB drive using Rufus, and then install Windows 10/11 from USB.
Fix 7: Use another Way to Create a Windows 10/11 Installation USB Drive
If you can’t use Windows Media Creation Tool to create an installation USB drive, you can try another tool like Rufus to create a Windows installation USB drive. This method is free: Rufus is free for download, and Windows 10/11 ISO file is free for download. You just need to prepare a USB drive that has at least 8 GB of space.
Fix 8: Use another Way to Download a Windows 10/11 ISO File
If you can’t use Windows Media Creation Tool to download an ISO file due to Media Creation Tool not working or opening, you still have other choices to download a Windows 10/11 ISO file.
Microsoft allows you to directly download a Windows 10 ISO file (all editions) on a non-Windows device from the Windows 10 software download page. You can set a non-Windows agent in Chrome and then download a Windows 10 ISO file.
Windows 11 ISO download is different. You can download the Windows 11 disk image directly from Microsoft’s official site.
So, it is not a big deal if Windows Media Creation Tool is not working on your PC. You see, there are many ways to replace this tool.
Click to Tweet
Recover Your Lost and Deleted Files on Windows 10/11
Usually, Windows 10/11 updates via Media Creation Tool will not delete files on your device. But to protect your files and system, you’d better use MiniTool ShadowMaker to back up your computer to an external hard drive. If a Windows update destroys your system or deletes your files, you can restore them using your backup.
MiniTool ShadowMaker TrialClick to Download100%Clean & Safe
However, if there is no available backup to restore your files, what can you do to save your losses? You can try professional data recovery software like MiniTool Power Data Recovery.
It is a free file recovery tool that is specially designed to recover files from different types of data storage devices. This MiniTool data recovery software can work in different situations. For example:
- When you permanently delete a file from your computer, you can recover it using this software as long as that file is not overwritten by new data.
- When you can’t open a data storage drive, you can use this tool to rescue your files and then fix the inaccessible drive.
- If you want to recover data from an SD card, you can also try this tool.
- When your Windows system corrupts, you can boot your device from the bootable edition of this software and then recover data. After that, you can feel free to reinstall Windows or use other methods to fix the system.
- If you can’t find some of your important files after upgrading Windows 10/11 to the latest version, you can run this software to scan the drive that previously saved the files and recover them.
You can first run the MiniTool Power Data Recovery trail edition to see if it can find your needed files and then decide whether to use this tool to recover data.
MiniTool Power Data Recovery TrialClick to Download100%Clean & Safe
You can follow these steps to recover data using this MiniTool software.
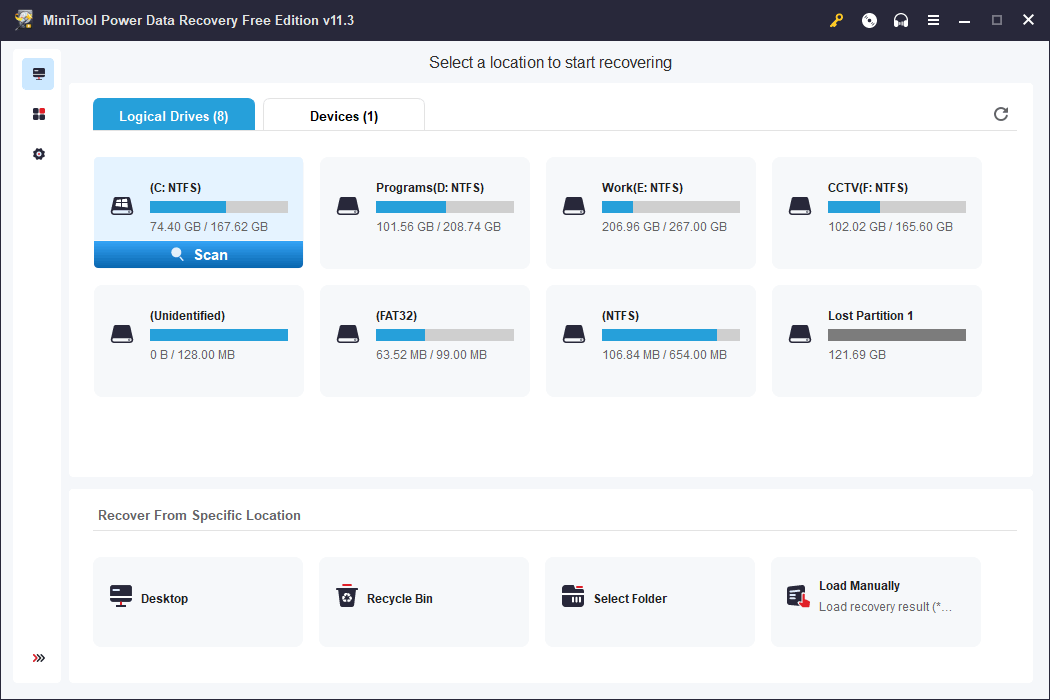
Step 1: Launch MiniTool Power Data Recovery.
Step 2: You need to find the drive where the lost files were previously saved, hover over that drive, and then click the Scan button to start scanning.
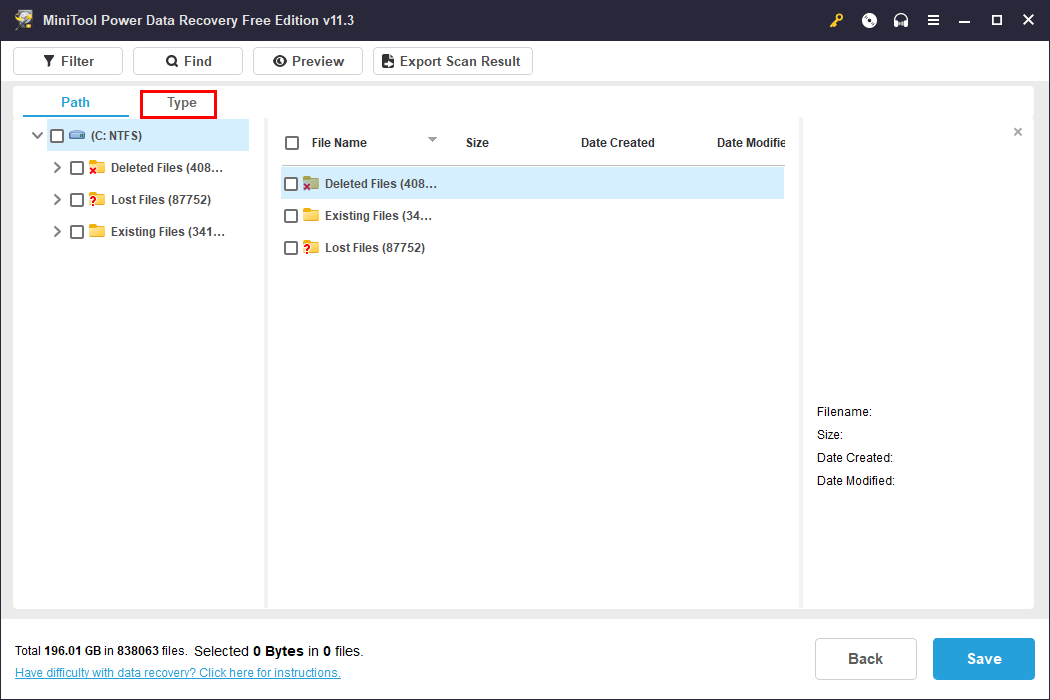
Step 3: After scanning, this software will show you the files it finds. These files are listed by path by default. You can open each path to look for your needed items. If you want to find certain types of files, you can switch to Type to make this software display files by type, then you can find files by type.
To recover data using this software, you need to use a full edition of this software. You can get a license key from the MiniTool official site, then click the key icon from the above ribbon menu, enter the license key, and press Enter to register the software.
After registering the software, you can select all your needed files once, then click the Save button, and select a suitable path to save them. To avoid data from being overwritten, the destination folder should not be the original location of the lost files.
Wrap Things up
By reading this, you should know the things you can do to fix the issue if Windows Media Creation Tool is not working on your PC. You can take steps to resolve the problem. You can also use another way to do the same thing that Media Creation Tool should do for you.
Additionally, if you are looking for a data recovery program to retrieve your files, you can try MiniTool Power Data Recovery.
Should you have other related issues that need to be fixed, you can let us know in the comments. You can also contact us via [email protected].
Ошибка 0x80072f8f 0x20000 появляется при двух распространенных ситуациях. Первая из них – при обновлении с Windows 7 до более свежей версии или просто при установке Windows 10. Вторая частая ситуация заключается в появлении ошибки при запуске Media Creation Tool. Причины появления, как и особенности проявления в каждой них, будут разными. Но есть и хорошая новость, она заключается в том, что есть довольно четкое представление об ошибке и эффективное решение к каждой вариации проблемы.

Почему появляется ошибка 0x80072f8f 0x20000?
Нам придется разделять две ситуации появления ошибки. Хотя они и имеют идентичный код, но во всем остальном сильно отличаются. Основная причина сбой с кодом 0x80072f8f 0x20000 при установке Windows 10 – отсутствие поддержки протоколов безопасности TLS. В Windows 7 Service Pack 1 по умолчанию включена поддержка только TLS 1.0. Сейчас же сервера Microsoft более не поддерживают столь устаревший стандарт. Требуется версия TLS 1.1 и TLS 1.2, которые по умолчанию отключены в старой операционной системе Windows 7. Их включение должно исправить проблему.
Если ошибка появляется при обновлении Windows, в основном через официальную утилиту Media Creation Tool, то проблема в некорректных файлах обновления. Видимо, система пыталась загрузить файлы для апдейта, но они оказались поврежденными. Нужно принудительно удалить их.
Как исправить ошибку 0x80072f8f 0x20000 при установке Windows 10?
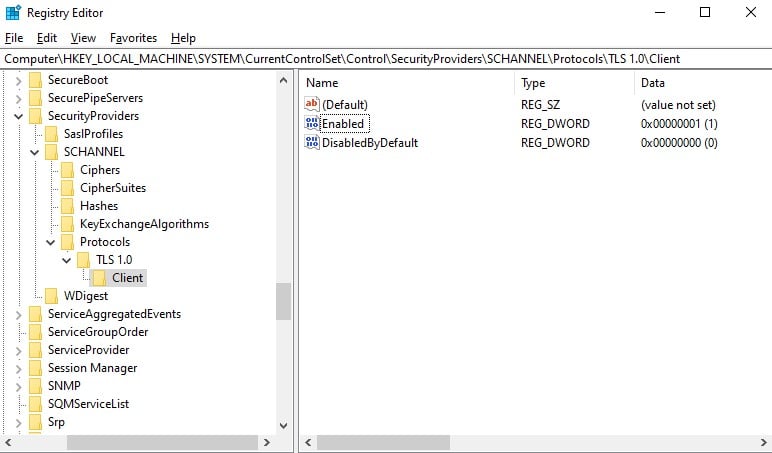
Как мы и писали, нам нужно заставить Windows 7 работать с TLS 1.1 и TLS 1.2. Это вполне реально сделать, если подкорректировать реестр операционной системы. Можно запустить Windows в безопасном режиме и сделать необходимые изменения. Это можно сделать вручную, но есть и более быстрый способ – запустить файл. Нам нужен один из файлов Microsoft, вот ссылка. Скачиваем его, запускаем и через пару секунд исправления должны быть внесены. Можно перезагружать ПК и снова пытаться установить Windows 10.
Что нужно сделать вручную:
- Нажимаем комбинацию Win + R, вводим regedit и нажимаем Enter.
- Идем по пути HKEY_LOCAL_MACHINE\SYSTEM\CurrentControlSet\Control\SecurityProviders\SCHANNEL\Protocols\TLS 1.1\Client.
- Изменяем значение параметра DisabledByDefault на 0 (если его нет, то просто создаем его).
- Переходим в ветку HKEY_LOCAL_MACHINE\SYSTEM\CurrentControlSet\Control\SecurityProviders\SCHANNEL\Protocols\TLS 1.2\Client.
- Тоже создаем или изменяем существующий параметр DisabledByDefault в значение 0.
Важно! Есть еще один интересный способ – запустить установку через ISO. Для этого нужно войти на сайт Microsoft с клиентом Windows и скачать его. Обязательно следует использовать для этого телефон. Затем передаем файл на ПК и запускаем его. У многих такое решение сработало.
Как исправить ошибку при обновлении через Media Creation Tool?
Для решения проблемы нужно зачистить файлы в одной из важных директорий, а также запустить обновление другим способом.
Пошаговая инструкция:
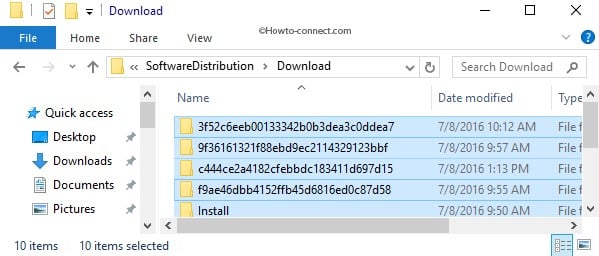
- Переходим по пути C:\Windows\SoftwareDistribution\Download.
- Удаляем все файлы, которые хранятся в этой папке.
- Кликаем правой кнопкой мыши по Пуску и выбираем «Командная строка (администратор).
- Вводим команду wuauclt.exe /updatenow.
Теперь вы знаете, что делать, если появляется ошибка 0x80072f8f 0x20000 при разных обстоятельствах. Включение поддержки TLS 1.1 и новее поможет успешно завершить установку операционной системы, а очистка файлов и обновление через консоль избавит от неполадки при апдейте Windows.
Будем рады увидеть ваши комментарии в отношении данной ошибки. Давайте вместе сделаем статью максимально полной.

Распространение программного обеспечения в настоящее время в основном цифровое, и даже Microsoft изменила свой подход, выпустив Windows 10. Однако Windows 10 Media Creation Tool, лучший инструмент для работы, не так безупречен, как можно было бы представить. Иногда он предлагает пользователям сообщение « При запуске этого инструмента возникла проблема » в Windows 10.
За ошибкой обычно следует буквенно-цифровой код ошибки, который может быть разным. Поскольку эта ошибка возникает в разных сегментах, единого решения для ее устранения не существует. Решение зависит от различных факторов, таких как версия Windows, архитектура, размер USB-накопителя и т. Д.
Для этого мы подготовили список возможных решений, которые помогут вам решить проблему с помощью этого отличного инструмента. Если вы застряли при обновлении, обновлении или создании загрузочного носителя с помощью Media Creation Tool, обязательно проверьте перечисленные ниже решения.
При запуске этого инструмента возникла проблема: 6 шагов, чтобы исправить эту ошибку
- Запустите инструмент создания Windows Media от имени администратора
- Отключите антивирус
- Попробуйте другой компьютер и проверьте объем памяти
- Проверить обновления
- Настроить реестр
- Попробуйте вместо этого сторонний инструмент для создания медиа
Решение 1. Запустите средство создания Windows Media от имени администратора.
Некоторым программам требуется специальное разрешение для доступа и изменения системных настроек. Теперь, даже если Media Creation Tool предоставляется Microsoft, простого двойного щелчка будет недостаточно. Особенно в старых версиях Windows.
Чтобы избежать возникшей ошибки, обязательно запустите Media Creation Tool от имени администратора. Более того, если вы хотите использовать Media Creation Tool для обновления с Windows 7 или 8.1, стоит попробовать изменить режим совместимости.
Если вы не знаете, как это сделать, внимательно следуйте приведенным ниже инструкциям, и все будет в порядке:
- Загрузите установочный файл Media Creation Tool .
- Щелкните файл установки правой кнопкой мыши и откройте Свойства .
- На вкладке «Совместимость» выберите «Запустить эту программу в режиме совместимости» .

- В раскрывающемся меню выберите Windows 7 .
- Теперь установите флажок «Запускать эту программу от имени администратора» .
- Подтвердите изменения и снова запустите Media Creation Tool .

Если проблема не устраняется и каждый раз при запуске Media Creation Tool возникает повторяющаяся ошибка, обязательно ознакомьтесь с дополнительными шагами, представленными ниже.
Решение 2. Отключите антивирус.
Отношения любви и ненависти между Windows 10 и сторонними антивирусными решениями хорошо задокументированы. А именно, по мере роста мощности и возможностей Защитника Windows потребность в сторонних альтернативах неуклонно снижается.
Кроме того, некоторые решения для защиты от вредоносных программ не оптимизированы для среды Windows 10 и могут, помимо нескольких ложных срабатываний, блокировать определенные функции Windows. В этом случае Windows Media Creation Tool и процессы, связанные с обновлением.
По сути, вам ничего не будет стоить временно отключить антивирус до завершения работы Media Creation Tool. Однако не забудьте включить его позже.
Отсутствие защиты в реальном времени в течение продолжительных периодов времени является серьезной проблемой. Более того, некоторые пользователи решили проблему, только полностью удалив антивирус. Мы оставим это в крайнем случае, так как это длительная и рискованная операция.
9 лучших антивирусных программ с шифрованием для защиты ваших данных в 2019 году
Решение 3. Попробуйте другой компьютер и проверьте место для хранения.
Если у вас есть несколько компьютеров дома или в офисе, и первый отказывается подчиняться, просто попробуйте другой. Пользователи сообщали, что на компьютерах, отличных от Windows 10, возник ряд ошибок, за которыми следовала проблема «При запуске этого инструмента возникла проблема». Это означает, что Media Creation Tool лучше всего работает в Windows 10.
Итак, если у вас есть альтернативный компьютер, обязательно используйте его для создания загрузочного файла USB или ISO. Кроме того, мы советуем вам использовать USB, который содержит не менее 6 ГБ дискового пространства.
Несмотря на то, что основная установка Windows 10 занимает около 4 ГБ, этого размера недостаточно для обновлений. Кроме того, если вы используете Media Creation Tool для обновления Windows 10 до последней сборки, убедитесь, что у вас достаточно места в системном разделе (в большинстве случаев C:).
Наконец, некоторым пользователям удалось решить проблему, отформатировав USB-флешку в формат NTFS вместо FAT32. После этого кажется, что Media Creation Tool работает нормально.
Решение 4. Проверьте наличие обновлений
Многие пользователи обращаются к Media Creation Tool, когда хотят ускорить обновление до основной сборки. Теперь этот инструмент, как и функция Центра обновления Windows, использует службы, связанные с обновлением, и это сильно зависит от их производительности. Такие службы, как BITS, имеют первостепенное значение даже для неродных приложений, таких как Media Creation Tool.
Итак, что вам нужно сделать, так это убедиться, что все службы, связанные с обновлениями, работают. Эти инструкции должны показать вам, где искать и что делать со службами обновления:
- В строке поиска Windows введите services.msc и откройте Службы .
- Найдите эти службы в списке и убедитесь, что они работают:
- Фоновая интеллектуальная служба передачи (BITS)
- Сервер
- Модули ключей IKE и AuthIP IPsec
- TCP / IP NetBIOS Helper
- Рабочая станция
- Центр обновления Windows или автоматические обновления
- Если какая-либо из этих служб остановлена, щелкните правой кнопкой мыши и выберите Пуск для каждой отдельно.
- Перезапустите Media Creation Tool и поищите изменения.
Этого обходного пути может быть достаточно, чтобы избавить вас от ошибки «При запуске этого инструмента возникла проблема», но похоже, что это не всегда так. Для дальнейшего устранения неполадок вам необходимо обратиться к реестру.
- ЧИТАЙТЕ ТАКЖЕ: Исправлено: не удалось подключиться к службе обновлений Windows 10, ошибка
Решение 5.Настройте реестр.
Реестр — опасная почва для новичков, и не рекомендуется бродить и менять значения самостоятельно. По крайней мере, если вы не уверены в своих действиях. И большинство людей не делает этого, пока не произойдет критический сбой системы и не разразится ад.
Теперь, шутки в сторону, есть кое-что, что вы можете и должны изменить в реестре, чтобы, возможно, решить проблемы с обновлением с помощью Media Creation Tool. Конечно, прежде чем мы начнем, рекомендуется создать резервную копию реестра, а затем перейти к настройке.
Следуйте приведенным ниже инструкциям, чтобы внести определенные изменения в реестр:
- На панели поиска Windows введите regedit и откройте редактор реестра.
- Выберите « Файл» в строке меню и нажмите « Экспорт» .
- Экспортируйте реестр, чтобы создать резервную копию.
- Теперь иди по этому пути:
- HKEY_LOCAL_MACHINE \ SOFTWARE \ Microsoft \ Windows \ Текущая версия \ WindowsUpdate \ OSUpgrade
- Щелкните правой кнопкой мыши пустое место и выберите « Создать»> «DWORD» . Назовите новое двойное слово AllowOSUpgrade и установите для него значение 1 .
- Перезагрузите компьютер.
- ЧИТАЙТЕ ТАКЖЕ: нет доступа к редактору реестра в Windows 10 [FIX]
Решение 6. Вместо этого попробуйте сторонний инструмент.
Наконец, если у вас есть ISO-файл Windows 10, но вы не можете использовать Media Creation Tool для создания загрузочного носителя, всегда есть альтернатива.
Большинство пользователей немедленно обратятся к Rufus, небольшому портативному стороннему инструменту. С его помощью вы сможете создать загрузочный носитель USB и избежать вышеупомянутых ошибок с помощью Media Creation Tool. Вы можете найти и скачать Rufus, перейдя по этой ссылке.
На этом шаге мы можем закончить эту статью. Если у вас есть вопросы или альтернативные решения относительно ошибки Media Creation Tool, было бы неплохо поделиться ими с нами в разделе комментариев ниже.
Примечание редактора: этот пост был первоначально опубликован в сентябре 2017 года и с тех пор был полностью переработан и обновлен для обеспечения свежести, точности и полноты.
The media creation tool serves a prominent function as it lets you download a Windows 11 or 10 installation file to a flash drive (or DVD) which can be used later in reinstalling the same. This backup option is critical if something goes wrong with your computer and can throw an error 0x8007043C-0x90018. Furthermore, having a physical copy of the operating system is advantageous.
However, despite how beneficial this tool may sound it’s prone to errors like the recent ones with the code 0x8007043C-0x90018. For a user, it may become irritating to witness such an error code, so we have found some ways to resolve this issue which this post will deal with. See – Fix: Error 0xa0000400 Media Creation Tool or Update Assistant Windows 10.
Here is how to fix Media Creation Tool Error code 0x8007043C-0x90018 in Windows 11 or 10 –
Way-1: Create AllowOSUpgrade Registry key
The registry database can be crucial in resolving the error code 0x8007043C-0x90018 as you’ll see an OSUpgrade key associated with the latest Windows update there. For Media Creation Tool OR MCT to function and perform the necessary upgrades, you must first set up an “AllowOSUpgrade” entry.
- Click the search icon in the taskbar
- Type – regedit.exe.
- Press Enter.
- If the User Account Control interface appears, click the Yes option to continue.
- Follow the path indicated. You may copy and paste this path straight into the address bar, then press Enter to open it.
Computer\HKEY_LOCAL_MACHINE\SOFTWARE\Microsoft\Windows\CurrentVersion\WindowsUpdate\OSUpgrade- Right click on WindowsUpdate.
- Select New followed by Key.
- Name this entry OSUpgrade.
- Now, go to the right pane and right click on an empty space.
- Select New => DWORD (32-bit) Value.
- Rename the newly created value to AllowOSUpgrade.
- To open the newly generated value, double-click it. Then, replace the data value with 1.
- Click OK to save the modification.
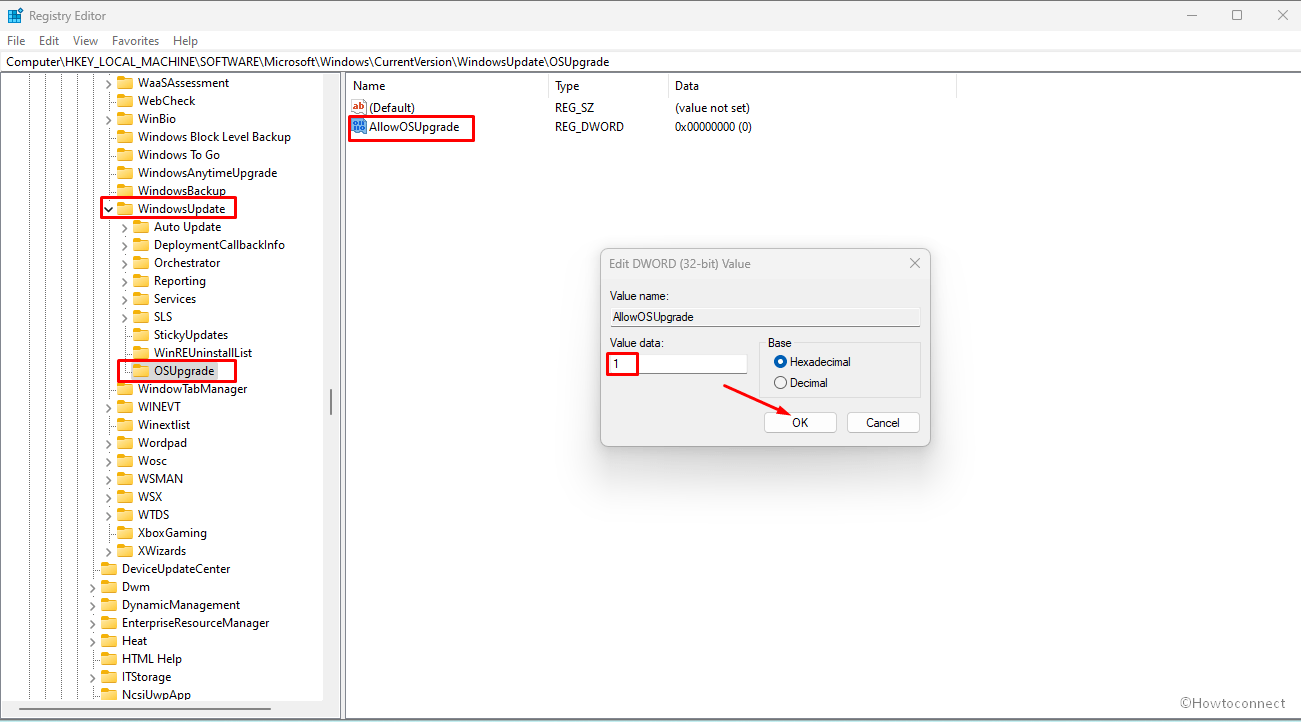
- Then, Restart the PC.
Way-2: Turn on the Services related to Windows update
If Media Creation Tool doesn’t work and is continuously showing 0x8007043C-0x90018 error, you should check if the Windows update services are turned on or not.
You might have accidentally turned off one or more of the services like TCP/IP, NetBIOS Helper, Background Intelligent Transfer Service (BITS), Server, Workstation, Windows Update or IKE, and AuthIP IPsec Keying Modules.
The Windows 10/11 Media Creation Tool is affected by any of these aforementioned services’ status. To rectify it, follow the below-mentioned steps:
- To open Run, press Windows + R.
- Type services.msc and hit Enter.
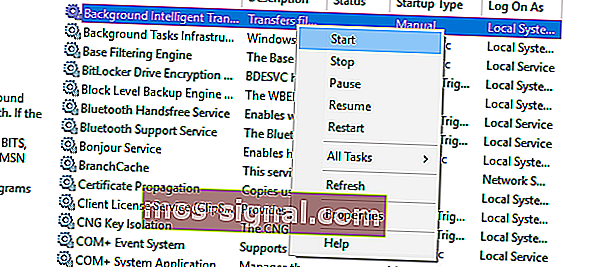
- Look for Background Intelligent Transfer Service (BITS) and right-click on it.
- From the context menu, select Properties.
- Click the Start button in the Properties dialog. If the service is currently running, you can restart it. For this click on Stop and then on Start.
- Select Automatic as the Startup type.
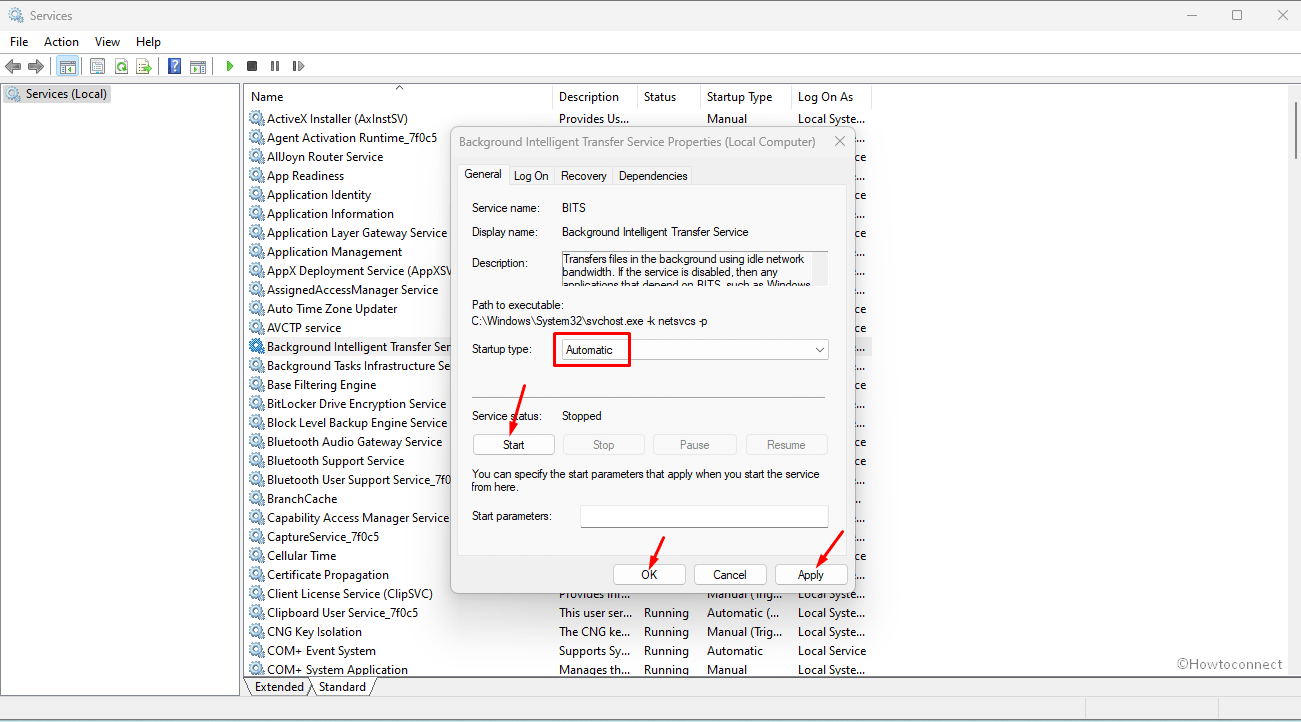
- Follow the same procedure for the other services like TCP/IP, NetBIOS Helper, Background Intelligent Transfer Service (BITS), Server, Workstation, Windows Update or IKE, and AuthIP IPsec Keying Modules.
- Close the Services window and verify if you can now use the Media Creation tool without any problems.
Most of the time this way proves to be useful and helps in termination of the such error, however, if you still witness it, try following the next way.
Way-3: Run MCT as Administrator
Running Windows as an administrator gives you the authority to make system-wide modifications and provides you complete control over the system.
Furthermore, it allows making changes to any aspect including security, software, hardware, user accounts, and file access. To fix 0x8007043C-0x90018 this issue, follow these steps:
- Right-click on Media Creation Tool (such as MediaCreationTool22H2.exe).
- Then, choose from the drop-down list to Run as administrator.
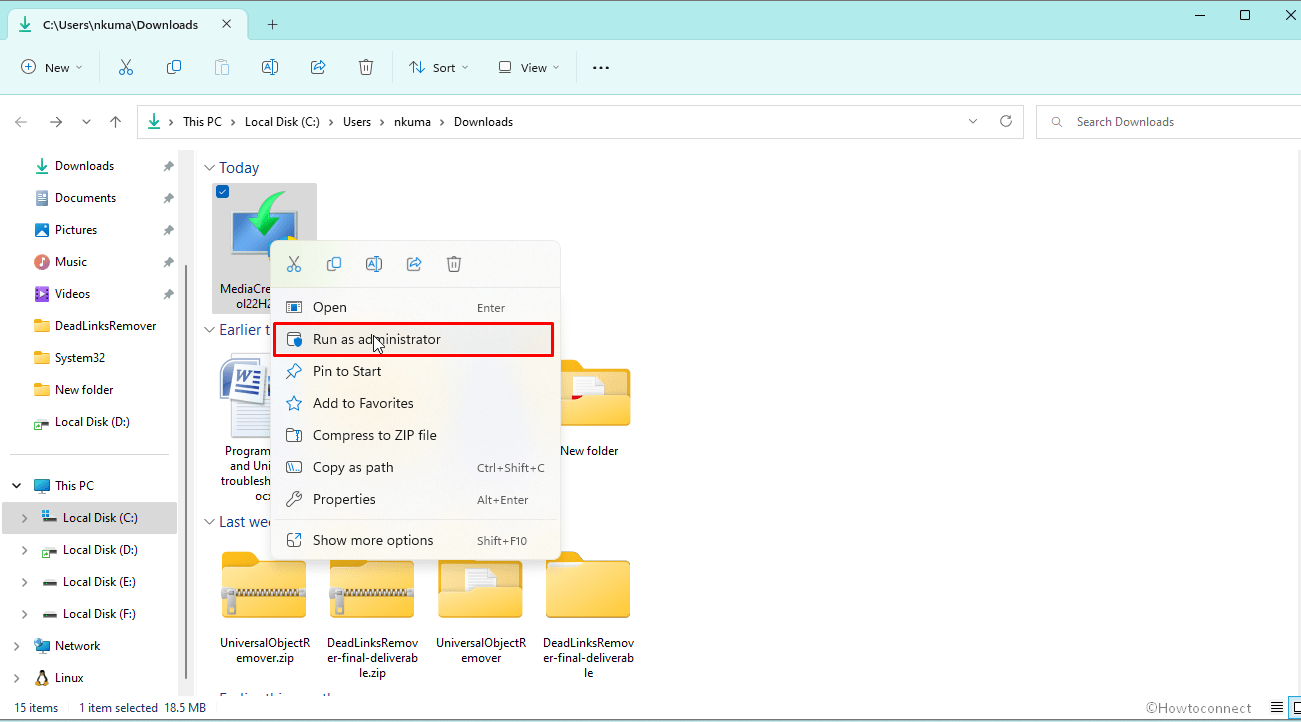
- If the User Account Control dialog box appears, you must click the Yes option to proceed.
See – How to Fix Media Creation Tool Won’t Open in Windows 10.
Way-4: Maintain Enough Space in your PC
To resolve the error code 0x8007043C-0x90018 you would need to allocate at least 8 GB of free space for the Media Creation Tool on the C drive.
You may use File Explorer to see if there is enough room. If not, you can free up space on the concerned disc by deleting irrelevant files. Additionally, you can run Disk Cleanup to arrange additional space.
- Click Start.
- Type cleanmgr and press Enter.
- Select (C:) from the drop-down and click on OK.
- On the next window, click on Clean up system files.
- Again, choose the same disk and click on OK.
- When the Disk Cleanup for (C:) window appears, click on OK.
- Select Yes on the verification prompt.
Way-5: Delete and Redownload the Media Creation Tool
Media Creation Tool does not work problem can be rescued by removing and redownloading the same setup file. Because this is the easiest approach to address the issue of 0x8007043C-0x90018, ensure that your concerned download is complete.
Way-6: Ensure that pending updates are installed
Keeping Windows up-to-date is essential. The most recent upgrades include new features and ensure that your computer and its apps remain compatible. The majority of updates also include security patches and bug fixes, allowing you to eliminate Windows difficulties with no effort.
If your version of Windows is out-of-date, you may experience troubles with the Media Creation tool that might show error codes like 0x8007043C-0x90018. Follow the procedures below to install the most recent Windows updates –
- Right click on Start and select Settings.
- Select Windows Update from the menu on the left.
- Click the check for Updates on the window’s right side.
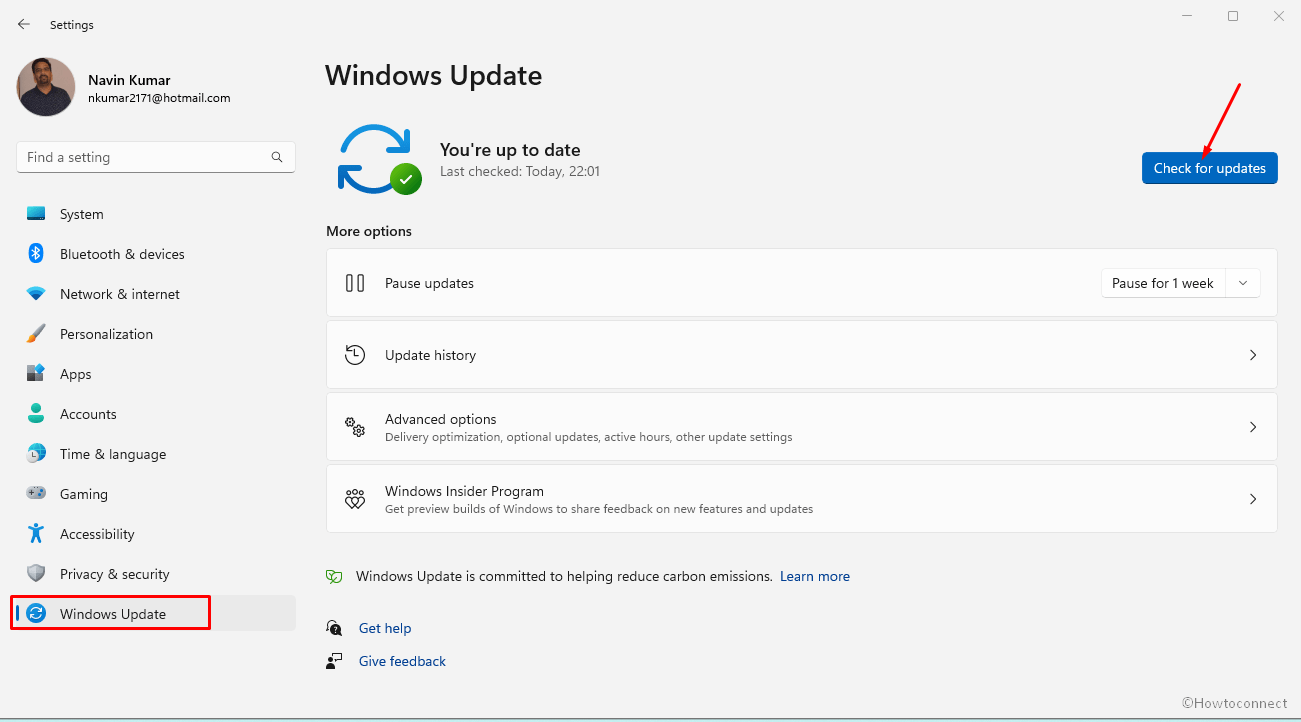
- The system will check for available updates and alert you if any are found. Install any pending updates individually if any are found.
Way-7: Use Rufus to create bootable media
Encountering 0x8007043C-0x90018 is not a problem when you use an alternative like Rufus to create bootable media. Even this tool will remove the system requirements restrictions imposed for Windows 11 like TPM and Secure Boot hence go ahead with it –
- Follow How to Use Rufus to Install Windows 10.
- Then plug in the USB and power on the computer.
- Select the peripheral in Boot device option.
- Go with the instructions on setup and complete installation.
We are certain that any of the 7 ways presented should be effective in repairing the Media Creation Tool error code 0x8007043C-0x90018 on Windows 11 or 10.
Methods:
Way-1: Create AllowOSUpgrade Registry key
Way-2: Turn on the Services related to Windows update
Way-3: Run MCT as Administrator
Way-4: Maintain Enough Space in your PC
Way-5: Delete and Redownload the Media Creation Tool
Way-6: Ensure that pending updates are installed
Way-7: Use Rufus to create bootable media
That’s all!!
Repair any Windows problems such as Blue/Black Screen, DLL, Exe, application, Regisrty error and quickly recover system from issues using Reimage.