Ошибка 0x80072f8f 0x20000 появляется при двух распространенных ситуациях. Первая из них – при обновлении с Windows 7 до более свежей версии или просто при установке Windows 10. Вторая частая ситуация заключается в появлении ошибки при запуске Media Creation Tool. Причины появления, как и особенности проявления в каждой них, будут разными. Но есть и хорошая новость, она заключается в том, что есть довольно четкое представление об ошибке и эффективное решение к каждой вариации проблемы.

Почему появляется ошибка 0x80072f8f 0x20000?
Нам придется разделять две ситуации появления ошибки. Хотя они и имеют идентичный код, но во всем остальном сильно отличаются. Основная причина сбой с кодом 0x80072f8f 0x20000 при установке Windows 10 – отсутствие поддержки протоколов безопасности TLS. В Windows 7 Service Pack 1 по умолчанию включена поддержка только TLS 1.0. Сейчас же сервера Microsoft более не поддерживают столь устаревший стандарт. Требуется версия TLS 1.1 и TLS 1.2, которые по умолчанию отключены в старой операционной системе Windows 7. Их включение должно исправить проблему.
Если ошибка появляется при обновлении Windows, в основном через официальную утилиту Media Creation Tool, то проблема в некорректных файлах обновления. Видимо, система пыталась загрузить файлы для апдейта, но они оказались поврежденными. Нужно принудительно удалить их.
Как исправить ошибку 0x80072f8f 0x20000 при установке Windows 10?
Как мы и писали, нам нужно заставить Windows 7 работать с TLS 1.1 и TLS 1.2. Это вполне реально сделать, если подкорректировать реестр операционной системы. Можно запустить Windows в безопасном режиме и сделать необходимые изменения. Это можно сделать вручную, но есть и более быстрый способ – запустить файл. Нам нужен один из файлов Microsoft, вот ссылка. Скачиваем его, запускаем и через пару секунд исправления должны быть внесены. Можно перезагружать ПК и снова пытаться установить Windows 10.
Что нужно сделать вручную:
- Нажимаем комбинацию Win + R, вводим regedit и нажимаем Enter.
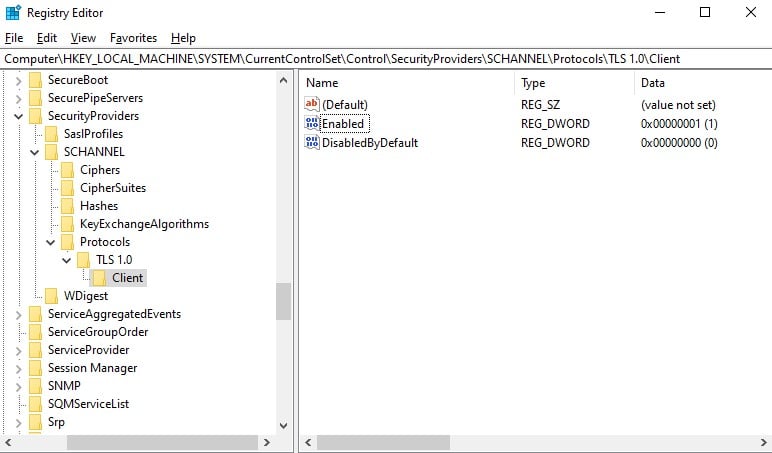
- Идем по пути HKEY_LOCAL_MACHINE\SYSTEM\CurrentControlSet\Control\SecurityProviders\SCHANNEL\Protocols\TLS 1.1\Client.
- Изменяем значение параметра DisabledByDefault на 0 (если его нет, то просто создаем его).
- Переходим в ветку HKEY_LOCAL_MACHINE\SYSTEM\CurrentControlSet\Control\SecurityProviders\SCHANNEL\Protocols\TLS 1.2\Client.
- Тоже создаем или изменяем существующий параметр DisabledByDefault в значение 0.
Важно! Есть еще один интересный способ – запустить установку через ISO. Для этого нужно войти на сайт Microsoft с клиентом Windows и скачать его. Обязательно следует использовать для этого телефон. Затем передаем файл на ПК и запускаем его. У многих такое решение сработало.
Как исправить ошибку при обновлении через Media Creation Tool?
Для решения проблемы нужно зачистить файлы в одной из важных директорий, а также запустить обновление другим способом.
Пошаговая инструкция:
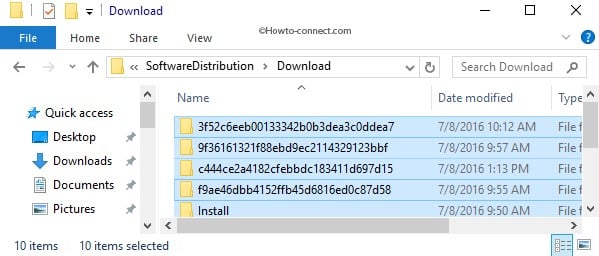
- Переходим по пути C:\Windows\SoftwareDistribution\Download.
- Удаляем все файлы, которые хранятся в этой папке.
- Кликаем правой кнопкой мыши по Пуску и выбираем «Командная строка (администратор).
- Вводим команду wuauclt.exe /updatenow.
Теперь вы знаете, что делать, если появляется ошибка 0x80072f8f 0x20000 при разных обстоятельствах. Включение поддержки TLS 1.1 и новее поможет успешно завершить установку операционной системы, а очистка файлов и обновление через консоль избавит от неполадки при апдейте Windows.
Будем рады увидеть ваши комментарии в отношении данной ошибки. Давайте вместе сделаем статью максимально полной.
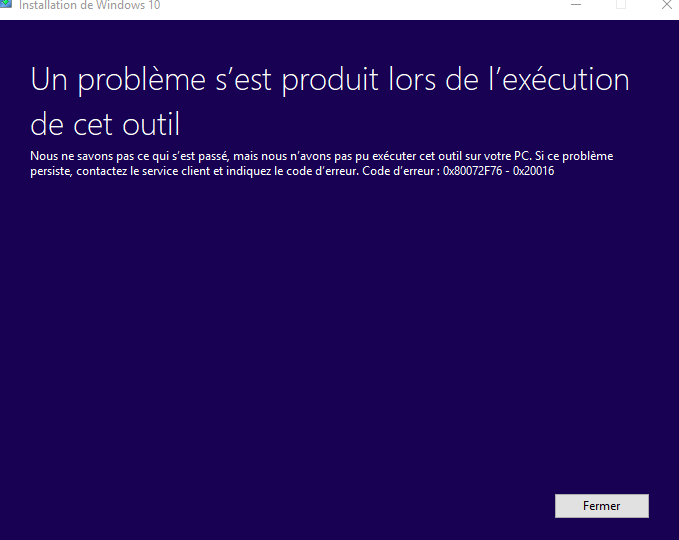
Error 0x80072f76 0x20016 commonly occurs at the time a user tries to use Media Creation Tool for the installation of Windows 10. It is reported to happen after a couple of seconds after launching the Microsoft Refresh tool or MCT.
The issue can evolve because of an unstable internet connection, an interrupted download or many more. Before that, let’s have an eye on the causes responsible for it in below part –
Here is how to Media Creation Tool Error 0x80072f76 0x20016 Install Windows 10 –
1] Run Windows Update troubleshooter
Sometimes, Error 0x80072f76 0x20016 error takes place due to Windows Update related issues. In this respect, you can seek favor from Update Troubleshooter. This is a handy a Microsoft tool equipped with various repair strategies and can resolve the issue effectively. Here is the way to move on –
- Press Windows key and R together to invoke Run dialog.
- Enter keynote “ms-settings:troubleshoot” in the empty text box and hit Enter key.
- The above action will launch the Troubleshoot section of Windows Settings.
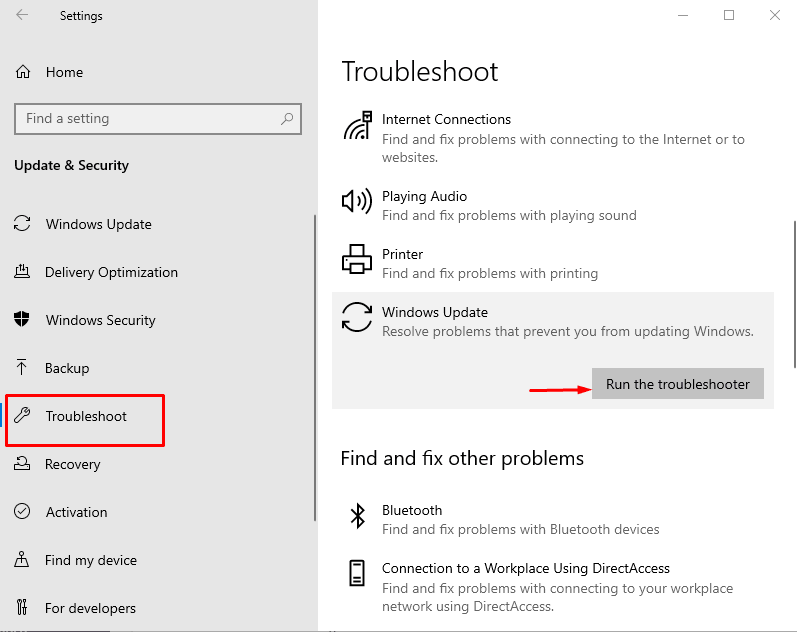
- Select Windows Update from the right pane.
- Click on Run the Troubleshooter button from the extended tray.
- This process will investigate the whole system and throw a wizard on display.
- From there, click on Apply this fix to execute the recommended repair scheme automatically.
- Once the Process ends up successfully, Restart Windows.
- Prior to returning back in operation, check if the error exists.
2] Fix Corruption in Windows Update files
The issue is very likely to occur when System Files have corruption inside especially in the Windows update components. If that happens, renaming the SoftwareDistribution and Catroot2 folder may be a perfect solution. Additionally, clearing WINDOWS.~BT and$Windows.~WS cache folders will be helpful.
Windows Update components often gets corrupted and end up throwing Media Creation Tool Error 0x80072f76 0x20016. In that scenario, resetting the Windows Update components might easily resolve the issue. To accomplish the workaround, guidelines are as follows –
- Press the combination of Win+S keys to call up Taskbar Search.
- In the provided text space, type cmd.exe.
- Do a right-click on Command Prompt once visible in results. Choose Run as Administrator.
- When UAC dialog prompts, select Yes to give consent.
- After reaching to elevated command prompt window, enter following texts at the base of winking cursor one by one and press Enter each time –
net stop bits
net stop wuauserv
net stop appidsvc
net stop cryptsvc
- Pressing Enter key will instantly stop the services like BITS, Windows Update, moreover Cryptographic.
- After ending up the above action fully, insert below commands one after another there –
Ren %systemroot%\SoftwareDistribution SoftwareDistribution.bak
Ren %systemroot%\system32\catroot2 catroot2.bak
- Press Enter key and system will rename the software distribution folders backup copies.
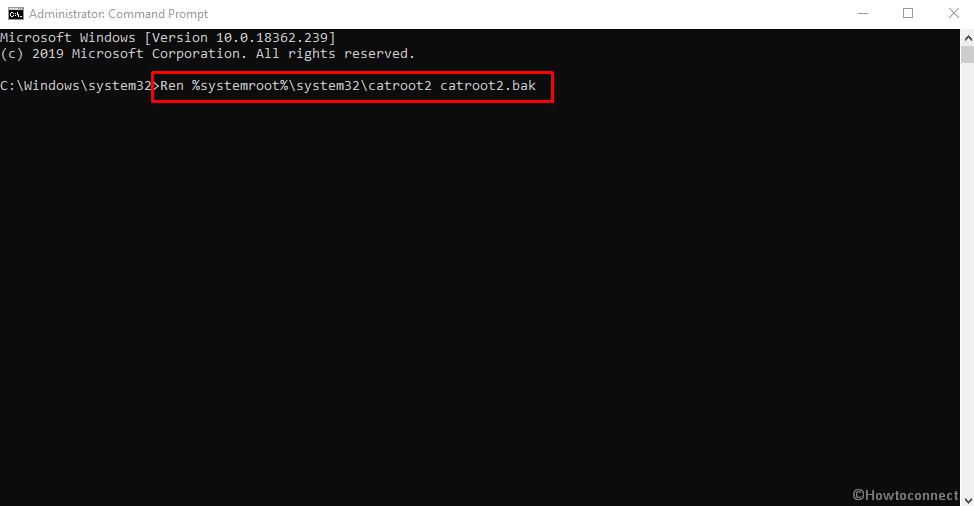
Important – Above commands will force the Operating System to create new folders for software distribution, which will help to avoid any issues caused by file corruption.
- After the task completes, copy these commands and paste at the base of the blinking cursor –
net start bits
net start wuauserv
net start appidsvc
net start cryptsvc
- Hit Enter after each command and in order to restart the services you had stopped previously.
- Finally, exit Elevated Command Prompt and restart Windows.
- Once signs back in, check if the Media Creation Tool Error has been resolved already.
3] Clear contents from $WINDOWS.~BT & $Windows.~WS folders
It’s not really rare that Windows Update files get corrupted and cause some serious issues. There might be conflict as well while downloading and installing a Windows Update. So, to resolve this problem we can remove $Windows.~BT and $Windows.~WS folders. To access the workaround, proceed with below instructions –
- Press Win+E hotkeys and open the File Explorer.
- Enter the View tab and put a checkmark on Hidden items. Otherwise, these files may not appear in your system.
- Now, locate the $Windows.~BT and $Windows.~WS folders and open their contents separately.
- Clear all the data inside making Right click on each and selecting Delete option.
- Once done, Reboot the Windows.
4] Modify the AllowOSUpgrade value using Registry Editor
You might be confronting Media Creation Tool Error 0x80072f76 0x20016 because your current Windows version is configured to reject an OS upgrade. If that happens, you need to edit the value of AllowOSUpgrade going through Registry Editor. The detailed process is as follows –
- Click on Start icon, type “Regedit.exe” and then press Enter.
- When User Account Control asks your permission, hit Yes to continue.
- Now, from the left pane in Registry Editor, navigate to the following path –
HKEY_LOCAL_MACHINE\SOFTWARE\Microsoft\Windows\CurrentVersion\WindowsUpdate\OSUpgrade- If you don’t find the OSUpgrade key, do a right click on WindowsUpdate and then choose New => Key.
- Rename the new key to OSUpgrade.
- Navigate to the right, right-click on an empty field and select New => DWORD (32-bit).
- Rename this key to AllowOSUpgrade.
- Now, make a double click on “AllowOSUpgrade” and put in value 1. Also, change the Base to Hexadecimal.
- Once everything is done correctly, close Registry Editor and reboot Windows.
- On starting up next, check if the Error code 0x80072f76 0x20016 has been resolved.
5] Perform a Refresh using Windows Security
One of the best ideas to resolve Error 0x80072f76 0x20016 is to perform Refresh using Windows Security. You can proceed to the resolution using the below guidelines –
- Open the Taskbar Search pressing Win+S hotkeys.
- Type “Windows Security” and choose the app from appearing results.
- When the Interface shows up, select Device performance & health option lying in the left pane.
- On the corresponding right, reach to Fresh start section and click on the Additional info link available.
- Once the succeeding page unrolls, hit Get started button.
6] Disable S.M.A.R.T from BIOS settings
0x80072f76 0x20016 error code might be a cause of S.M.A.R.T. feature in BIOS settings. Often HDD/SSD monitoring system can trigger this issue in devices with a specific configuration. Hence, disabling S.M.A.R.T feature from BIOS will be useful. Here is how to disable the feature –
- Launch the Windows Settings by pressing Win+I hotkey.
- From App home page, select Update & security.
- When the following page loads, choose Recovery from the left pane.
- Shift to adjacent right and hit Restart Now located underneath Advanced startup.
- Windows will now reboot and when it turns to Startup, you can see few options.
- Click on Troubleshoot from there.
- Upon heading to the succeeding page, choose Advanced options.
- From the new window on loading, select UEFI Firmware Settings. If you don’t notice this option, press F1/F2 keys at the Startup to access BIOS.
- Moving on the next page, hit Restart option. When the device starts now, you will be in the BIOS straightaway.
- When you are there, enter the Main tab to get an overview of all HDDs / SSDs.
- Choose the HDD where you are confronting this error and disable SMART Monitoring.
- Save these changes and Get the Device to its Normal Operation.
Hopefully, 0x80072f76 0x20016 error will not appear again in your Device.
7] Use another browser to download MCT
There might be issues with default browser while downloading Media Creation Tool from its site. In that case, try changing the Browser in use. If you don’t have any more browsers, install a new one. After that, Download and Install the Media Creation Tool from another authorized location unlike the earlier one.
8] Try to Change the DNS to another
Switching DNS server might help in resolving Media Creation Tool Error 0x80072f76 0x20016. Here is how you can accomplish the task –
- Open Run dialog box.
- When the dialog arrives, type “inetcpl.cpl” in its empty field.
- Press Enter key to see the Internet Properties.
- Enter into the Connections tab from appearing wizard.
- Move to the next wizard and click on “LAN settings” button.
- Another popup will appear in a moment. Now, make sure the option “Automatically detect settings” is checked from Automatic configuration section.
- Proceed to the Proxy server area and unmark the option saying “Use a proxy server for your LAN (These settings will not apply to dial-up or VPN connections).”
- Finally, click Apply and then Ok buttons to save these changes.
- Restart Windows 10 to make the changes effectuate the modification.
- Upon returning back to operation, check if the error is fixed.
Important – in case of using a third-party proxy service, you have to disable it
9] Change the ISP connection
Media Creation Tool Error 0x80072f76 0x20016 may occur when Microsoft server gets interrupted due to some bug. If it is blocked from Internet Service Provider or ISP, the same result will be there. To fix the issue, you can change the Internet connectivity and check of it resolved the error.
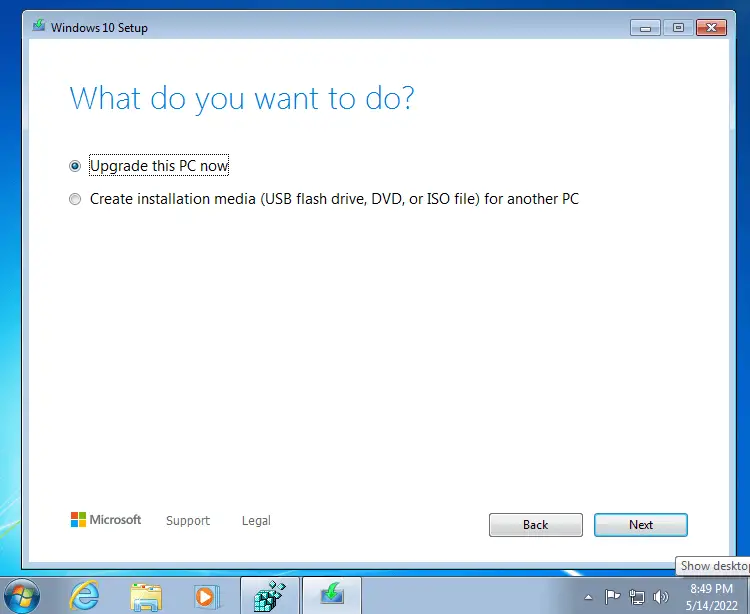
10] Try using Windows 10 Update Assistant Either
Rather than Windows Media Creation Tool, we have another handy utility to upgrade or install the current version of OS. Windows 10 Update Assistant is also competent to seamlessly help you to perform the Windows Updates.
That’s all about the resolutions in order to Media Creation Tool Error 0x80072f76 0x20016 Install Windows 10. Hope you have already resolved the issue.
Methods:
1] Run Windows Update troubleshooter
2] Fix Corruption in Windows Update files
3] Clear contents from $WINDOWS.~BT & $Windows.~WS folders
4] Modify the AllowOSUpgrade value using Registry Editor
5] Perform a Refresh via Windows Defender Security Center
6] Disable S.M.A.R.T
7] Use another browser to download the tool to another location.
8] Change DNS to another like OpenDNS.
9] Change the ISP connection.
10] Use Windows 10 Update Assistant instead
That’s all!!
Repair any Windows problems such as Blue/Black Screen, DLL, Exe, application, Regisrty error and quickly recover system from issues using Reimage.
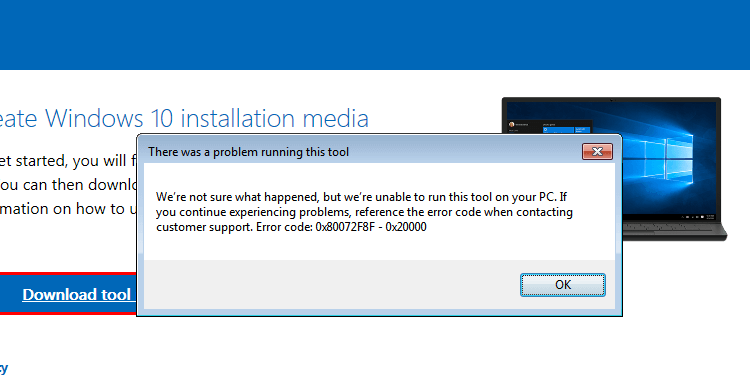
When you attempt to upgrade to Windows 10 from a Windows 7/8 computer using Microsoft’s Media Creation Tool, the error 0x80072F8F - 0x20000 may appear. The full error message verbatim is below:
There was a problem running this tool

We're not sure what happened, but we're unable to run this tool on your PC. If you continue experiencing problems, reference the error code when contacting customer support. Error code: 0x80072F8F - 0x20000
Let’s see how to fix this error on Windows 7 and Windows 8.
Important: Information in this article (and the registry fix) is for Windows 7 SP1 and Windows 8 systems only. They don’t apply to Windows 8.1 and higher!
Cause
The error 0x80072F8F - 0x20000 happens because the Media Creation Tool uses the TLS 1.2 Protocol, but the protocol is disabled by default on Windows 7 and Windows 8 computers. By default, only SSL3 and TLS1 are enabled in Windows 7 and Windows 8. On Windows 8.1 and Windows 10, SSL3, TLS1.0, TLS1.1, and TLS1.2 are enabled by default.
To resolve the Media Creation Tool Error 0x80072F8F – 0x20000 error on Windows 7 and Windows 8 computers, enable the TLS 1.1 and TLS 1.2 protocols. Follow these steps to do so:
Method 1: Enable TLS 1.1 and TLS 1.2 via the registry (Windows 7 & 

- Make sure your system is fully updated.
- Open Notepad.
- Copy the following lines into Notepad.
Windows Registry Editor Version 5.00

[HKEY_LOCAL_MACHINE\SOFTWARE\Microsoft\Windows\CurrentVersion\Internet Settings\WinHttp]
"DefaultSecureProtocols"=dword:00000a00

[HKEY_LOCAL_MACHINE\SOFTWARE\Wow6432Node\Microsoft\Windows\CurrentVersion\Internet Settings\WinHttp]
"DefaultSecureProtocols"=dword:00000a00

[HKEY_LOCAL_MACHINE\SYSTEM\CurrentControlSet\Control\SecurityProviders\SCHANNEL\Protocols\TLS 1.1\Client]
"DisabledByDefault"=dword:00000000
"Enabled"=dword:00000001

[HKEY_LOCAL_MACHINE\SYSTEM\CurrentControlSet\Control\SecurityProviders\SCHANNEL\Protocols\TLS 1.2\Client]
"DisabledByDefault"=dword:00000000
"Enabled"=dword:00000001
- Save the file with a .reg extension — e.g.,
enable_tls.reg - Double-click the
enable_tls.regfile to apply the settings into the registry. Click Yes when asked for confirmation. - Download the KB3140245 package (TLS 1.1/1.2 enablement update) from Microsoft and install it.
- Restart Windows.
- Download registry files: If you wish to download premade registry file(s), download enable-tls.zip. Unzip and run the enclosed file enable_tls.reg. To reverse/undo the setting to Windows 7/8 defaults, run the
undo.regregistry file.
(Credits to Markus for the fix.)
Method 2: Easy Fix (for Windows 7)
The above registry fix was created incorporating the suggestions in the Microsoft article titled Update to enable TLS 1.1 and TLS 1.2 as default secure protocols in WinHTTP
The article talks about the Microsoft Update with will enable TLS 1.1 and TLS 1.2 support via KB3140245 package. Here are the instructions:
- Download the KB3140245 package. Don’t run it yet.
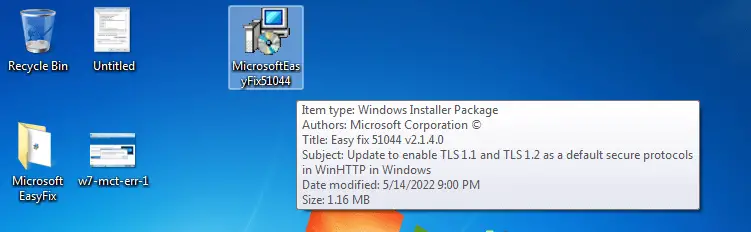
- Download the “Easy Fix” executable via the above link (direct download) and run it. The fix will create the
DefaultSecureProtocolsregistry value which is a prerequisite for the Microsoft update. - Now run the KB3140245 .msi package you downloaded in Step 1.
This automatically enables TLS 1.1 and TLS 1.2 on the computer.
Re-run the Media Creation Tool now. It should work now!
Editor’s note
Note that the Easy Fix sets the “DefaultSecureProtocols” registry value only; it doesn’t write to the SCHANNEL registry location. But the manual registry fix in “Method 1” above does both! So, if you’ve explicitly disabled the TLS 1.1 and TLS 1.2 protocols via the SCHANNEL registry modification (e.g., by using the nisudf.reg registry fix to resolve a game/server connectivity issue), then the “Easy Fix” tool won’t help. You need to use “Method 1” in that case.
One small request: If you liked this post, please share this?
One «tiny» share from you would seriously help a lot with the growth of this blog.
Some great suggestions:
- Pin it!
- Share it to your favorite blog + Facebook, Reddit
- Tweet it!
So thank you so much for your support. It won’t take more than 10 seconds of your time. The share buttons are right below. 
Ramesh Srinivasan is passionate about Microsoft technologies and he has been a consecutive ten-time recipient of the Microsoft Most Valuable Professional award in the Windows Shell/Desktop Experience category, from 2003 to 2012. He loves to troubleshoot and write about Windows.
Ramesh founded Winhelponline.com in 2005.
Several users complained encountering an error code 0x8007043C – 0x90017 when they were using the Media creation tool. This problem often accompanies an error message that reads – “There was a problem running this tool. We are not sure what happened but we’re unable to run this software on your PC“.
If you are also facing this error code and wondering what to do next, we suggest following and applying the fixes discussed in this guide. In this post, we will discuss the probable reasons causing this error code and seven working ways that should resolve the error code 0x8007043C – 0x90017.
What causes Media Creation tool to fail on error 0x8007043C?
There are several reasons likely to erupt this error code on Windows 11/10. They include Missing or corrupt system files, outdated device drivers, presence of malware or viruses on your device. There’s an entry named “AllowOSUpgrade” insdie the registry which must be set to auto. If not, this may also interfere with installing Windows using the Media Creation tool.
SFC and Disk Cleanup are two important tools that you may try to address file corruption and delete unnecessarily stored cache on your computer. Perform a full scan of PC, Update Windows manually, and update all your device drivers also work as the diagnostic methods. Let’s explore these solutions in somewhat more detail –
If you are unable to install Windows 11/10 on account of facing an error code 0x8007043C – 0x90017, we suggest trying out these solutions one after another.
- Perform a full virus scan
- Update All Device Drivers
- Tweak Registry Editor
- Perform SFC command
- Perform Disk Cleanup
- Uninstall Recent Applications
- Clean install Windows 11/10
1] Perform a full virus scan using Windows Defender
This error mostly appears when the bootable media is corrupt on account of malware or viruses. As a result of this, you can’t use the Media Creation tool. Check for possible viruses on your device using Windows Defender. Here’s how to perform this task –
- Jointly press Win + S to launch Windows Search.
- Type Windows Security on it followed by the Enter key.
- When Window Security opens up, select Virus & threat protection and then Scan options.
- Succeeding after, check the Full Scan Radio button followed by Scan now option to begin this process.
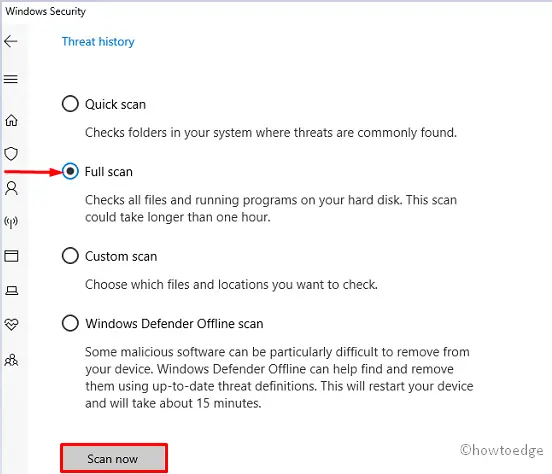
- This application will now check for faulty files on your computer and resolve them (if it finds any).
Once the scanning completes, reboot your device and try installing the update again.
2] Update all device drivers
Device Manager was earlier used to check for pending driver updates and update them directly from there. However, Microsoft has now added this feature to Windows update. So, go to Settings > Windows update > Advanced options, and click on optional updates. In fact, if there are driver updates available for your system, the same will appear under this section.
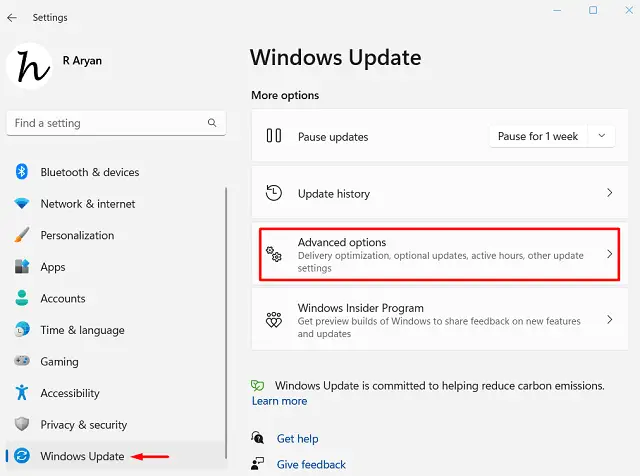
Under optional updates, tick all the checkboxes against pending updates, and hit Download and Install. After you install all driver updates or if there isn’t any pending driver updates, restart your PC.

Many a time, the system couldn’t connect to Microsoft servers online and thus doesn’t find any driver update for your PC.
3] Modify or Add an entry inside the Registry
The error code 0x8007043C – 0x90017 might also occur when there are some issues within your registry. Go and check if the registry is all good on your Windows 10 PC. For this, you need to follow these steps –
Note: Incorrect changes inside the registry might corrupt your entire operating system. This is why we suggest creating the registry backup and then only, applying the below steps.
Wrongdoing inside the Registry might be risky to your system. It can even sometimes corrupt your OS and access different apps. Therefore, you must be careful while performing any changes manually under the registry.
- Press Win & R to launch the Run dialog box.
- Type Regedit on it followed by the OK button.
- When the UAC window prompts, hit Yes to authorize accessing it.
- On the registry, navigate to the below path –
HKEY_LOCAL_MACHINE\SOFTWARE\Microsoft\Windows\CurrentVersion\WindowsUpdate\OSUpgrade
- You may even copy/paste the above path inside the registry’s address bar, and hit Enter.
- Once you are there, create a new entry and name this WindowsUpdate. In case there is already an entry with a similar name, right-click on it and select New > Key.
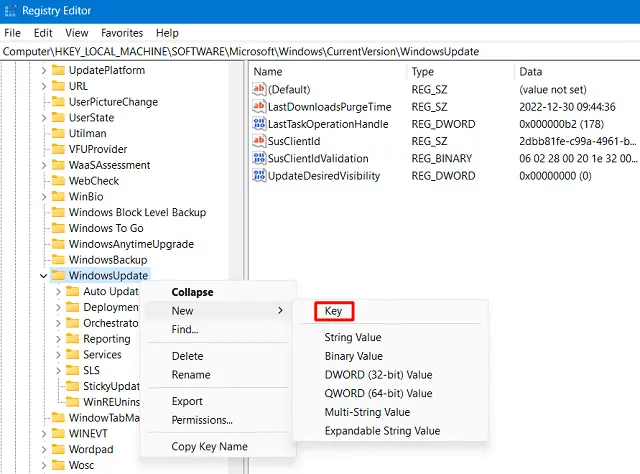
- Rename this key as OSUpgrade. Select this newly created key and head over to the right pane.
- Right-click anywhere on the right pane and select New > DWORD (32-bit) Value.
- Now, rename this DWORD entry to AllowOSUpgrade.
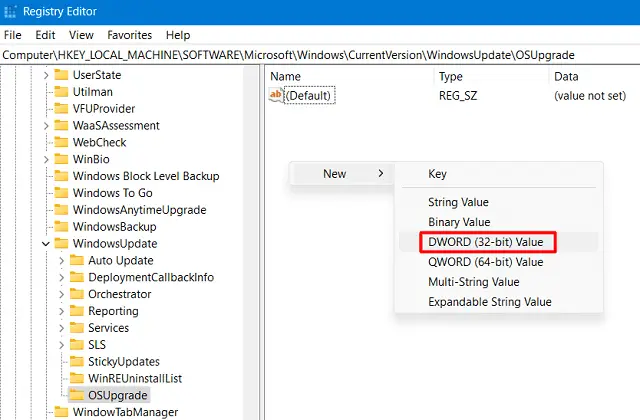
- Double-click on this entry and change its Value data field to “1”. By default, this entry is set to “0” which means your device is not set to allow upgrades.

Now that you have changed this configuration to always check and install pending updates, go to Settings > Windows Update, and hit Check for updates.
Once this gets over, Restart your system and check if you can install OS without 0x8007043C – 0x90017 issue.
How do I back up the registry?
Before making any changes to the registry, make sure to create a manual registry backup. Here’s how to do this –
- Launch Registry editor first.
- Go to File > Export next and browse to a folder where you would like to create the registry backup.
- Click on the Save button and wait for the system to successfully generate a registry backup.
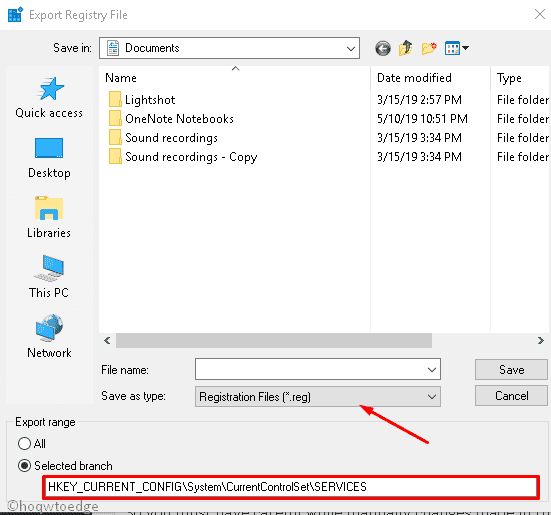
Make sure to save the file name as a .reg file and check the Selected branch radio button under Export Range (Lower section of the same page).
4] Use the System File Checker utility
Due to the presence of corrupt files or folders, Windows often fails to update when using a Media creation tool. To overcome this issue, you must use the SFC utility program. This tool will check for corrupt system files and repair them. Here’s how to try out this tool on Windows 11/10 –
- Go to Windows Search (Win + S) and type Command Prompt on it.
- Right-click on the well-matching result, and select Run as Administrator.
- If the UAC window prompts, hit Yes to grant permission.
- On the elevated console, type the following and press Enter –
sfc /scannow
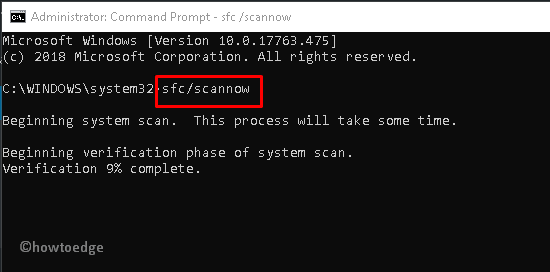
- This whole scanning/repairing process will take approximately 10-15 minutes, so wait patiently. In quite a few scenarios, this might even take more time. Well, once started, we don’t recommend hindering the ongoing process.
After this scanning/repairing process is over, restart your PC, and check if you can update Windows 11/10 using the Media creation tool.
5] Use Disk Cleanup to clear temp files
To install Windows 11 or 10 on a computer using the Media creation tool, you need to have sufficient storage space. In case there isn’t enough disk space on your PC, you may use the Disk Cleanup tool and purge the temp files from your system.
Follow the below instruction on how to use the Disk Cleanup tool and purge unnecessarily stored cache and junk files on your Windows PC.
- Right-click on the Windows icon and select the Run dialog box.
- When the popup window appears, type
cleanmgrin the text box. - Click OK to confirm opening the Disk Cleanup tool.
- Select the drive (C:) using the drop-down menu, and hit OK.

- If the root drive differs in your case, select your drive letter using the drop-down menu, and hit OK.
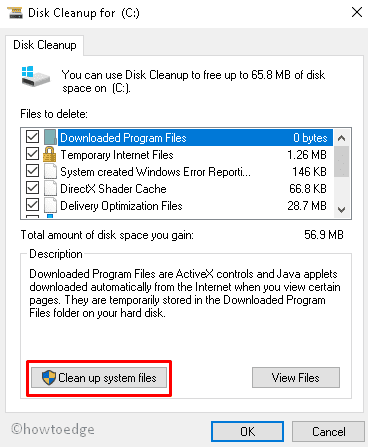
- The tool will analyze and present the disk spaces that it can free up.
- Check all the boxes, and hit Clean up system files. Doing so will force the system to check for system files that are either residual or leftover files of uninstalled apps, already installed Windows Updates, and others.
- The disk cleanup tool will appear again, pick the C: drive, and hit OK.
- The system will check again for temp or junk files that it can free up.
- Tick all the checkboxes on the upcoming screen and hit OK.
- When a confirmation message appears, click yes to confirm the deletion of marked boxes.
After this cleaning process completes, restart your PC, and check if you can update Windows using the regular way.
Note: Make a habit of regularly cleaning the disk spaces to avoid such errors in the near future.
6] Uninstall recently installed apps
Media Creation Tool might fail to install Windows OS if you have recently installed a buggy application and that app is preventing the update from ever happening. If you do remember installing a new application on your computer, make sure to uninstall that first. Here’s the complete process for this –
- Press Win & S hotkey together to open the Search window.
- Type Control Panel and press Enter.
- Use the drop-down menu available in the top-right corner and change this to Large icons instead of Category.
- Locate the recently installed application, right-click on that and choose the Uninstall button.

- If a confirmation message appears afterward, hit the Uninstall button again.
- Wait for the application to uninstall successfully, and restart your PC.
When Windows reloads, check if you can use the Media creation tool and install Windows OS without getting into an error code 0x8007043C – 0x90017.
7] Clean installation of Windows 10
If none of the above workarounds help to resolve the error code 0x8007043C – 0x90017, we recommend downloading Windows 10 ISO from its official site and making it bootable via Rufus.
Once you have the bootable media, insert it in one of your device’s ports, and clean install Windows 11/10.
How do I Check for pending Windows updates?
Microsoft allows installing the pending updates directly from the Settings (Win + I) page. As long as you don’t want to upgrade to Windows 11, you may update your Windows 10 directly from the Windows update section. Follow the below instructions on how to perform this task –
- Press Win & I hotkey to launch the Settings app.
- Select Update & Security thereafter Windows Update from the left column.
- Switch to the right-hand side and make click on Check for Updates button.

- Doing so will check for pending updates for your computer.
- In case the system does find any updates available for your Windows PC, the same will be downloaded and installed automatically on your computer.
Fix: Check For Updates doesn’t work in Windows 10
I hope the Media Creation Tool error 0x8007043C – 0x90017 resolves after applying the above fixes. If you do face any difficulty following the above sections, let us know in the comment section.