Math recognizer в Windows 10 — это удивительная функция, которая позволяет распознавать математические выражения с помощью камеры вашего устройства. Это полезное приложение, которое облегчает работу со сложными математическими формулами и уравнениями.
С помощью Math recognizer вы можете напрямую вводить математические выражения, даже если у вас нет клавиатуры или математического инструмента. Просто включите камеру на вашем устройстве и сфокусируйтесь на математическом выражении, которое вы хотите распознать.
Приложение сразу же распознает выражение и предоставит вам его текстовое представление. Вы сможете скопировать его в буфер обмена и вставить в другое приложение или программу для дальнейшего использования.
Math recognizer также имеет некоторые полезные функции, такие как распознавание рукописного ввода и показ результатов в режиме реального времени. Вы также можете сохранять результаты распознавания для последующего использования или анализа.
Содержание
- Math recognizer Windows 10:
- Что это и как использовать
- Распознавание математических символов в Windows 10
- Как работает Math recognizer
- Как использовать Math recognizer в Windows 10
- Установка и настройка Math recognizer
- Подготовка документа для распознавания
- Форматирование и распознавание текста
Math recognizer Windows 10:
С помощью этой функции пользователи могут написать уравнение или задачу на экране с помощью стилуса или пальца, после чего Windows 10 распознает написанный текст и предлагает решение.
Math recognizer Windows 10 также может использоваться для работы с математическими приложениями, такими как Microsoft OneNote, где пользователи могут использовать функцию для создания математических записей или расчетов.
Эта функция особенно полезна для студентов, учителей и профессионалов, работающих с математикой, так как она позволяет быстро и удобно решать сложные математические задачи и делиться результатами с другими пользователями.
Math recognizer Windows 10 обладает высокой точностью распознавания текста и широким набором математических символов и операций, что делает его удобным инструментом для работы с математикой на ПК под управлением Windows 10.
Что это и как использовать
Для использования Math recognizer необходимо открыть соответствующее приложение или программу на устройстве с Windows 10. Приложение обычно имеет интуитивно понятный интерфейс, который позволяет пользователям вводить или писать математические выражения.
После того, как выражение введено или записано, Math recognizer автоматически распознает его и выполняет вычисления. Результат может быть отображен на экране, сохранен в файле или скопирован в буфер обмена для дальнейшего использования.
Math recognizer поддерживает широкий спектр математических операций, включая основные арифметические операции (сложение, вычитание, умножение, деление), возведение в степень, извлечение корня, тригонометрические функции, логарифмы и другие.
Использование Math recognizer может быть полезным для учебных и научных целей, а также в повседневной жизни, например, для решения математических задач, проверки результатов вычислений или преобразования выражений для удобства работы с ними.
В целом, Math recognizer в Windows 10 представляет собой удобный инструмент, который поможет вам с легкостью выполнять математические вычисления и решать задачи, связанные с математикой.
Распознавание математических символов в Windows 10
Операционная система Windows 10 предлагает несколько способов использования функции распознавания математических символов. Во-первых, пользователи могут использовать встроенное ПО, такое как OneNote или Windows Ink Workspace, для написания математических формул на экране с помощью стилуса или пальца. Затем эти формулы автоматически распознаются и конвертируются в компьютерный формат.
Кроме того, пользователи могут использовать специализированные приложения или программы для распознавания математических символов, такие как MathType или Math Input Panel, которые предлагают дополнительные функции и возможности для работы с математическими формулами.
| Преимущества | Недостатки |
|---|---|
| Удобство использования и экономия времени при работе с математическими формулами | Требуется наличие стилуса или планшетного устройства для оптимального использования функции |
| Возможность автоматического распознавания и конвертирования формул в компьютерный формат | Некоторые приложения или программы могут быть платными или иметь ограниченный функционал в бесплатной версии |
| Использование стилуса или пальца для написания формул на экране делает процесс естественным и интуитивным | Точность распознавания может зависеть от качества написания формул и выбранной программы или приложения |
В целом, распознавание математических символов в Windows 10 — это удобная и эффективная функция, которая сделает работу с математическими формулами более удобной и быстрой. Независимо от того, нужно ли вам использовать встроенные инструменты Windows 10 или специализированные приложения, распознавание математических символов поможет вам повысить производительность и точность при работе с математикой на вашем компьютере.
Как работает Math recognizer
Когда пользователь вводит математическое выражение, Math recognizer разбирает его на отдельные символы, такие как числа, операторы и скобки. Затем он анализирует комбинации символов, чтобы определить их семантику и связи друг с другом.
Math recognizer использует словарь математических символов и операторов, чтобы правильно распознавать их и соответствующим образом интерпретировать выражение. Если он обнаруживает ошибки или неопределенности, он может предложить исправления или дополнительную информацию.
Кроме того, Math recognizer может использоваться в сочетании с другими приложениями и программами, чтобы облегчить ввод и обработку математических данных. Например, его можно использовать в текстовых редакторах или учебных приложениях для распознавания и выделения математических выражений.
Все это делает Math recognizer полезным инструментом для студентов, преподавателей и всех, кто регулярно работает с математическими выражениями.
Как использовать Math recognizer в Windows 10
Чтобы использовать Math recognizer в Windows 10, следуйте этим простым шагам:
- Откройте приложение, в котором вы хотите использовать Math recognizer, например, Word, OneNote или Sticky Notes.
- Выберите инструмент «Ручка» или «Перо» в приложении для написания математических уравнений.
- Напишите уравнение с помощью ручки или пера. Постарайтесь писать ясно и разборчиво.
- Когда вы закончите писать уравнение, выберите его или касанием или обведением.
- Щелкните правой кнопкой мыши по выбранному уравнению и выберите опцию «Преобразовать в текст».
- Math recognizer распознает написанное уравнение и преобразует его в дигитальный формат.
Теперь вы можете использовать распознанное уравнение в вашем приложении как обычный текст или продолжать работу с ним, изменяя его или копируя в другие документы.
Math recognizer в Windows 10 позволяет значительно упростить работу с математическими уравнениями и сэкономить время пользователей, которые регулярно сталкиваются с этими задачами.
Установка и настройка Math recognizer
- Перейдите в Магазин Microsoft на вашем компьютере с Windows 10.
- В поисковой строке введите Math recognizer.
- Выберите соответствующее приложение из результатов поиска.
- Нажмите на кнопку Установить и дождитесь завершения установки.
После установки Math recognizer вы можете перейти к его настройке:
- Откройте приложение Math recognizer, которое вы только что установили.
- Настройте предпочтения, выбрав язык и другие параметры в соответствующем разделе настроек.
- Убедитесь, что ваш компьютер подключен к интернету для полноценной работы Math recognizer.
После завершения установки и настройки Math recognizer готов к использованию. Откройте любое приложение, где требуется распознавание математических выражений, и начните писать или вводить эти выражения с помощью клавиатуры или пера. Math recognizer будет распознавать ваш ввод в режиме реального времени и выводить результаты на экран.
Подготовка документа для распознавания
Перед началом использования Math recognizer в Windows 10 необходимо подготовить документы для распознавания математической нотации. Следующие шаги помогут вам правильно подготовить документ перед использованием распознавания математических формул:
1. Выберите правильный формат:
Math recognizer поддерживает несколько форматов документов для распознавания математических формул, включая Microsoft Word (.docx) и LaTeX (.tex). Убедитесь, что ваш документ находится в одном из поддерживаемых форматов.
2. Подготовьте чистую копию документа:
Перед началом распознавания убедитесь, что ваш документ не содержит никаких ненужных элементов, таких как изображения или графики, которые могут помешать корректной работе распознавания.
3. Установите правильные параметры распознавания:
Windows 10 Math recognizer предлагает несколько параметров, которые можно настроить для достижения наилучших результатов. Это включает выбор языка распознавания и режима распознавания, таких как режим распознавания с рукописного ввода или режим распознавания на основе сканированных документов. Установите параметры, которые наиболее подходят для вашего документа.
4. Проверьте качество и правильность распознавания:
После того, как документ будет подготовлен для распознавания, рекомендуется проверить качество и правильность распознавания математических формул. Перепроверьте результаты и внесите изменения при необходимости.
При следовании этим рекомендациям вы сможете более эффективно использовать Math recognizer в Windows 10 для распознавания математической нотации в ваших документах.
Форматирование и распознавание текста
Форматирование текста позволяет улучшить его вид и структуру. Используя различные инструменты форматирования, такие как шрифты, размер текста, выравнивание и отступы, можно создавать математические выражения, которые легко читать и понимать. Это особенно полезно при работе с сложными математическими формулами, где правильное форматирование помогает ясно выразить свои мысли.
Распознавание текста позволяет преобразовывать рукописные или напечатанные математические выражения в цифры и символы, которые можно использовать в дальнейшем. Это удобно для тех, кто предпочитает рисовать математические формулы вручную или имеет сложности с клавиатурным вводом. Кроме того, распознавание текста позволяет быстро преобразовывать рукописные заметки в электронный формат.
В целом, форматирование и распознавание текста являются мощными инструментами, которые делают работу с Math Recognizer в Windows 10 более удобной и эффективной. Они помогают улучшить внешний вид и понятность математических выражений, а также позволяют быстро преобразовывать рукописные или напечатанные формулы в цифровой вид. Эти функции особенно полезны для студентов, учителей и всех, кто часто работает с математическими выражениями.
- What is math recognizer?
- What is Microsoft Math recognizer?
- Can I uninstall Windows Hello face?
- Does Windows 10 home have Hello?
- What Windows 10 apps can I delete?
- Does Windows 10 need 3D Viewer?
- What is the Math Input Panel used for?
- How do I stop Microsoft Hello?
- How do I opt out of windows Hello?
- Why can’t I remove Windows Hello pin?
- What is Microsoft hello face?
- Why is Windows Hello fingerprint not working?
- Why is Windows Hello face not working?
What is math recognizer?
The Wolfram System uses the Microsoft math recognizer that is built into Windows 7 and higher to recognize handwritten mathematical expressions. This allows you to enter handwritten standardized mathematical notation into a Wolfram System notebook in TraditionalForm. … The Math Handwriting Input window will appear.
What is Microsoft Math recognizer?
Math Input Panel uses the math recognizer that’s built into Windows 8 to. recognize handwritten math expressions. You can then insert the recognized math. into a word-processing or computational program. Math Input Panel recognizes high school and college-level math.
Can I uninstall Windows Hello face?
Click Start , and then click Settings . Click Accounts. On the Settings menu, click Sign-in options. In the Windows Hello area under Face Recognition, click Remove.
Does Windows 10 home have Hello?
Windows Hello has a relatively low barrier to entry, but it does come with specific hardware requirements. Microsoft’s Surface Pro, Surface Book and most Windows 10 PCs equipped with fingerprint scanners or cameras that can capture two dimensional infrared spectroscopy are compatible with Windows Hello.
What Windows 10 apps can I delete?
Here are several unnecessary Windows 10 apps, programs, and bloatware you should remove.
…
12 Unnecessary Windows Programs and Apps You Should Uninstall
- QuickTime.
- CCleaner. …
- Crappy PC Cleaners. …
- uTorrent. …
- Adobe Flash Player and Shockwave Player. …
- Java. …
- Microsoft Silverlight. …
- All Toolbars and Junk Browser Extensions.
Does Windows 10 need 3D Viewer?
Microsoft’s fascination with 3D technology makes for flashy demos, but it’s irrelevant for the rest of us. If you have a 3D printer, take a look at the 3D Viewer and Print 3D apps and decide whether they’re good enough for your day-to-day use.
What is the Math Input Panel used for?
«Math Input Panel is a great little application from Windows which lets you use input devices such as touchscreens, external digitizers or even a mouse, to write mathematical formulas that are automatically recognized and can be inserted into different types of documents.
How do I stop Microsoft Hello?
Go to Computer Configuration -> Administrative Templates -> System -> Logon . On the right side, double click on Turn on PIN sign-in and select Disabled. Similarly disable the other Windows Hello options if any.
How do I opt out of windows Hello?
Press Windows key+I to open Settings and search for and select Change the sign-in requirements. Click on the Windows Hello PIN option once to reveal a menu. Here, you can recover PIN if you have forgotten it, remove it if you don’t want to use it, and change it. Click on Remove.
Why can’t I remove Windows Hello pin?
Windows Hello PIN Remove button grayed out
If you can’t click on the Remove button because it’s grayed out under Windows Hello PIN, it means you have the “Require Windows Hello sign-in for Microsoft accounts” option enabled. Disable it and the PIN remove button will be clickable again.
What is Microsoft hello face?
Windows Hello face authentication utilizes a camera specially configured for near infrared (IR) imaging to authenticate and unlock Windows devices as well as unlock your Microsoft Passport.
Why is Windows Hello fingerprint not working?
With the Windows Hello fingerprint sign-in not working, you’ll need to revert to using your password or PIN to login and check for Windows Updates manually. Install all pending and detected updates, and restart your computer. Try signing in with fingerprint authentication again.
Why is Windows Hello face not working?
There may be hardware driver updates that are available or pending a restart. Updating your Surface might fix issues you’re having with Windows Hello. To check for updates, select Start > Settings > Update & security > Windows Update > Check for updates. Install any updates that you need.

Компания Microsoft подробно описала функци, которые устарели или были удалены в Windows 11.
Вот полный список устаревших функций:
• Cortana больше не будет включена в опыт первой загрузки или закреплена на панели задач;
• Обои рабочего стола нельзя перемещать на устройство или с устройства при входе в систему с учетной записью Microsoft;
• Internet Explorer отключен. Microsoft Edge является рекомендуемой заменой и включает режим IE, который может быть полезен в некоторых сценариях;
• Math Input Panel удалена. Math Recognizer устанавливается по запросу и включает в себя средство управления математическим вводом и распознаватель. Это изменение не повлияет на рукописный ввод математики в таких приложениях, как OneNote;
• Новости и интересы эволюционировали. Добавлена новая функциональность, которую можно найти, щелкнув иконку виджетов на панели задач;
• Быстрый статус с экрана блокировки и связанные с ним настройки удалены;
• S Mode теперь доступен только для редакции Windows 11 Home;
• Snipping Tool по-прежнему доступен, но старый дизайн и функциональность в версии Windows 10 были заменены на те, которые были в приложении, ранее известном как Snip & Sketch;
• Пуск значительно изменено в Windows 11, включая следующие ключевые устаревания и удаления:
o Именованные группы и папки приложений больше не поддерживаются, и размер макета в настоящее время нельзя изменить;
o Закрепленные приложения и сайты не будут перенесены при обновлении с Windows 10;
o Живые плитки больше не доступны. Для наглядного динамического контента см. новую функцию виджетов;
• Режим планшета удален, и включены новая функциональность и возможности для прикрепления и отсоединения клавиатуры;
• Изменена функциональность панели задач, в том числе:
o Людей больше нет на панели задач;
o Некоторые иконки могут больше не отображаться в системном трее (systray) для обновленных устройств, включая предыдущие настройки;
o Выравнивание по нижней части экрана — единственное допустимое место;
o Приложения больше не могут кастомизировать области панели задач;
• Временная шкала удалена. Некоторая аналогичная функциональность доступна в Microsoft Edge;
• Сенсорная клавиатура больше не будет закреплять и откреплять раскладки клавиатуры на экранах размером 18 дюймов и больше;
• Кошелек удален;
Вот четыре приложения, которые будут удалены:
• 3D Viewer;
• OneNote for Windows 10;
• Paint 3D;
• Skype;
Math Recognizer is a new feature introduced in Windows 11 that allows users to write mathematical equations and expressions on a touchscreen or with a stylus, and have them converted into digital form. This feature uses artificial intelligence to analyze and interpret the handwritten input and convert it into standard mathematical notation. Math Recognizer in Windows 11 provides a convenient way for users to input mathematical equations and expressions into various applications like word processors, note-taking apps, or mathematical software. It can be particularly useful for students, teachers, and professionals who work with mathematics and need an efficient way to input complex equations digitally. With Windows 11’s Math Recognizer, users can seamlessly integrate mathematical content into their digital workflow, providing a more intuitive and efficient experience for mathematical input on compatible devices.
Video Tutorial:How do I use math input panel in Windows 11?
How do I reinstall math recognizer?
To reinstall the math recognizer, you can follow these steps:
1. On your iPhone 14, go to the home screen and open the «Settings» app.
2. Scroll down and tap on «General.«
3. Now, select «Keyboard» from the list.
4. Under the Keyboard settings, tap on «Keyboards.«
5. Here, you will see a list of keyboards installed on your device. Look for the math recognizer keyboard and tap on it.
6. On the next screen, tap the «Delete Keyboard» option to remove the math recognizer keyboard from your device.
7. After deleting the keyboard, go back to the previous screen and tap on «Add New Keyboard.«
8. Search for the math recognizer keyboard and select it to add it back to your device.
9. Once added, go back to any app or text field where you need to use the math recognizer keyboard, tap on the text input area, and then tap on the globe icon or the keyboard icon until you see the math recognizer appear.
By following these steps, you should be able to reinstall the math recognizer keyboard on your iPhone 14 running iOS 16.
What are the new features in Windows 11?
Windows 11, the latest operating system from Microsoft, introduces several exciting new features and improvements. One notable change is the redesigned and centered Start Menu, which provides a fresh look and a more streamlined experience. The new Taskbar is also centered, and it offers better functionality with improved support for multitasking.
Windows 11 includes a new feature called «Snap Layouts» that makes it easier to organize and work with multiple open windows. This feature allows users to quickly snap windows into various useful layouts, optimizing productivity and multitasking.
Microsoft has also introduced «Snap Groups,» which remember the apps you were using together and allow you to switch between them seamlessly. This feature is particularly helpful for users who work on multiple projects simultaneously or frequently switch between different tasks.
Windows 11 enhances the gaming experience with DirectStorage, a technology that optimizes game-loading times and allows for faster access to game assets on compatible hardware. Additionally, the integration of Microsoft’s Xbox app brings some of the best features from the Xbox console ecosystem to Windows 11, including Xbox Game Pass and the ability to easily access and play games.
The new Microsoft Store in Windows 11 has been rebuilt from the ground up, offering a faster and more user-friendly experience. It boasts a wider selection of apps and supports popular apps like Microsoft Teams, Visual Studio, and Adobe Creative Cloud directly from the Store.
Windows 11 also introduces improved touch controls, allowing for better touch interactions on touch-enabled devices. The operating system’s system requirements have been updated, ensuring better performance and security with newer hardware.
In terms of accessibility, Windows 11 brings new features like «Focus Assist,» which helps users minimize distractions, and «Voice Typing,» which allows for easy text input through voice commands.
These are just some of the highlights of Windows 11. Overall, it offers users an enhanced and modernized experience with several new features and improvements across various aspects of the operating system.
What is Windows math input panel?
Windows Math Input Panel is a built-in feature of the Windows operating system that provides users with a handwriting recognition tool specifically designed for mathematical equations and expressions. It allows users to write mathematical formulas and equations on a touchscreen or with a compatible pen input device. Windows Math Input Panel then converts the handwritten input into digital format, allowing users to input mathematical content directly into various applications such as word processors, equation editors, or calculation software.
This feature assists users in quickly and accurately entering complex mathematical equations, particularly for those who are more comfortable with handwriting or have difficulty using a traditional keyboard input method for mathematical symbols and expressions. The Math Input Panel recognizes various mathematical symbols, including operators, numbers, functions, and special characters, offering a convenient and intuitive way to input mathematical content.
Windows Math Input Panel can be accessed by selecting the corresponding option in the Windows Start menu or through the handwriting input toolbar available in supported applications. Once the panel is open, users can write their mathematical expressions, and the tool will analyze and convert the input into digital content. The recognized expressions can then be copied and pasted into the desired application or directly inserted into the active document.
Overall, Windows Math Input Panel enhances productivity and ease of use for individuals working with mathematical equations on Windows devices, providing a flexible and intuitive method for inputting complex mathematical content.
What is the math input panel software?
The math input panel software is a tool that allows users to input mathematical equations and formulas on their devices. It provides a user-friendly interface where users can write or draw mathematical expressions using their mouse, touchpad, or stylus. The software then recognizes and converts the input into standardized mathematical notation or formats. This tool is particularly useful for individuals working in fields that involve complex mathematical equations, such as scientists, engineers, mathematicians, and students studying STEM subjects. With the math input panel software, users can easily input and manipulate mathematical expressions, making it more efficient and convenient to work with mathematical content on digital platforms.
How do I use Microsoft math input panel?
The Microsoft Math Input Panel is a useful tool for inputting mathematical equations and expressions into various applications. To use it, follow these steps:
1. Open the application or document where you want to input the mathematical equation.
2. Click on the input area where you want to insert the equation.
3. Open the Math Input Panel by clicking on the Windows start menu and searching for «Math Input Panel.» Click on the app when it appears in the search results.
4. The Math Input Panel will open, providing you with a writing area where you can draw or write the mathematical expression.
5. Use your mouse or stylus to write the equation in the writing area. The panel recognizes your handwriting and converts it into digital text in real-time.
6. As you write or draw, you can also use the available mathematical symbols on the panel’s toolbar to supplement your equation. These symbols include fractions, exponents, square roots, integrals, and more.
7. If needed, you can edit or correct any mistakes in the recognized equation by selecting and modifying the text with your input device.
8. Once you have finished inputting the equation, click on the «Insert» button on the Math Input Panel or press Enter on your keyboard to insert the equation into the desired application or document.
It’s worth noting that the Math Input Panel is available on devices running Windows operating systems, including Windows 10. So, ensure your device is running the necessary Windows version to access this feature.
Using the Microsoft Math Input Panel can significantly simplify the process of inputting mathematical equations and expressions, especially for those who are more comfortable with handwriting rather than typing.
How to install MathType free?
As a tech blogger, I will provide you with a professional answer on how to install MathType for free. It’s important to note that MathType is a commercial software, and obtaining it for free may infringe upon copyright laws and licensing agreements. It is always recommended to acquire software through legitimate means and support the developers.
However, if you are looking for a free alternative to MathType, you can consider using other open-source or free software that offers similar functionality. Here are a few options:
1. LibreOffice Math: LibreOffice is a popular open-source office suite that includes a mathematical formula editor called LibreOffice Math. You can download the suite from the official website and then install it to access the Math component.
2. LaTeX: LaTeX is a typesetting system commonly used for scientific and mathematical documents. It offers powerful mathematical typesetting capabilities and is widely used in the academic community. You can download LaTeX distributions like TeX Live or MiKTeX, and then use LaTeX editors like TeXstudio or Overleaf to create and edit mathematical formulas.
3. MathMagic Lite: MathMagic Lite is a free version of the commercial software MathMagic. It provides basic equation editing functionality and can be used for personal and educational purposes. You can download MathMagic Lite from the official MathMagic website.
Remember to carefully research and evaluate these alternatives to determine which one best suits your needs. Always prioritize the use of legal and licensed software to support the developers and comply with copyright laws.
Asked by: Eleanore Little II
Score: 4.1/5
(54 votes)
The Wolfram System uses the Microsoft math recognizer that is built into Windows 7 and higher to recognize handwritten mathematical expressions. … This allows you to enter handwritten standardized mathematical notation into a Wolfram System notebook in TraditionalForm.
What is maths Recogniser Windows 10?
Math Recognizer: The Math Input Panel is a tool that converts handwritten math into digital text. Microsoft Paint: Basic image editing program.
How do I install math recognizer?
If you already had it then it’s probably still in Settings > Apps > Apps & Features > Programs & Features > Turn Windows Features On or Off, select Math Recognizer, OK, restart PC.
How do I open the math Input Panel in Windows 10?
The fastest way to find and open Math Input Panel in Windows 10 is to use Cortana. Click or tap on the search field from your taskbar and enter the word math in it. Then, from the list of results, click or tap on Math Input Panel.
How can I write math on my computer easily?
Write an equation or formula
- Choose Insert > Equation and choose the equation you want from the gallery.
- After you insert the equation the Equation Tools Design tab opens with symbols and structures that can be added to your equation.
43 related questions found
How do I type math symbols on my laptop?
On the Insert tab, in the Symbols group, click the arrow under Equation, and then click Insert New Equation. Under Equation Tools, on the Design tab, in the Symbols group, click the More arrow. Click the arrow next to the name of the symbol set, and then select the symbol set that you want to display.
How do I show math on my computer?
Ways to Show Math Work Digitally
- Type all of the equations you used. This way is most helpful with word problems (including multi-step word problems). …
- Type all of the steps you used to solve a problem. (First I…. …
- Upload or email a picture showing your work. …
- Blog Posts and Free Guides. …
- Digital Learning Activities.
What is the Windows Math Input Panel?
«Math Input Panel is a great little application from Windows which lets you use input devices such as touchscreens, external digitizers or even a mouse, to write mathematical formulas that are automatically recognized and can be inserted into different types of documents.
How do you insert on the Math Input Panel?
Open the Math Input Panel
- In the main toolbar, click the Magic Box. icon.
- In the Magic Box window, click the Tools. icon.
- Double-click or drag the math input icon. from the list of icons to add to the canvas.
What is the math Recognizer app?
The Wolfram System uses the Microsoft math recognizer that is built into Windows 7 and higher to recognize handwritten mathematical expressions. This allows you to enter handwritten standardized mathematical notation into a Wolfram System notebook in TraditionalForm.
Can I uninstall math recognizer?
You can uninstall everything on the list, and Windows will continue to work just fine. … Windows Fax and Scan. Microsoft Quick Assist. Math Recognizer.
How do I uninstall Math Input Panel?
The Math Input Panel ia part of the Tablet PC Components package of program accessories. If you want to uninstall the Math Input Panel, click Start and type optionalfeatures.exe then hit Enter↵.
What Windows features should be turned off Windows 10?
Unnecessary Features You Can Turn Off In Windows 10
- Internet Explorer 11. …
- Legacy Components – DirectPlay. …
- Media Features – Windows Media Player. …
- Microsoft Print to PDF. …
- Internet Printing Client. …
- Windows Fax and Scan. …
- Remote Differential Compression API Support. …
- Windows PowerShell 2.0.
Should I turn on all Windows features?
All these Windows 10 features take up space on your hard drive whether you have them enabled or not. But you shouldn’t just enable every feature–that could result in security problems and slower system performance. Only enable the features you need and will actually use.
Which optional features should I install in Windows 10?
Optional features available in Windows 10
- . …
- . …
- Active Directory Lightweight Directory Services: Adds Lightweight Directory Access Protocol (LDAP) support for directory-enabled applications. …
- Containers: Provides services and tools to create and manage Windows Server Containers and Hyper-V containers on your desktop.
How do you write math equations on a Mac?
You can also choose Insert > Equation (from the Insert menu at the top of your screen). If you have MathType installed, a dialog appears, asking whether to use Pages to create the equation. Click Use Pages. Enter an equation in the field using LaTeX commands or MathML elements.
How do you write math equations on iPad?
Add an equation with LaTeX or MathML
, then tap Equation. Enter a LaTeX or MathML equation using the keyboard and the maths symbols above the keyboard. On iPad, some keys have multiple characters at the top. To type one of these characters, touch and hold the key, then swipe diagonally left or right.
How do I type math in Windows?
If you want to be more geeky in terms of launching the Math Input Panel tool then you can do so by using the Run box. To launch this simply tool in your Windows 10 machine, all you need to do is press the Windows + R keys and the Run tool should appear at the bottom-left portion of your computer screen.
What is the definition of input in math?
In mathematics, a function is any expression that produces exactly one answer for any given number that you give it. The input is the number you feed into the expression, and the output is what you get after the look-up work or calculations are finished.
How do I copy from Math Input Panel to Word?
How to copy equations in Math Input Panel ?
- Open Maths Input Panel (MIP).
- Open the program that you want to Insert your maths expression into (it must support Maths Markup Language). …
- Write your maths expression in MIP (correct if necessary).
How do I write equations in Windows 10?
Video: Insert equations
- Select Insert > Equation or press Alt + =.
- To use a built-in formula, select Design > Equation.
- To create your own, select Design > Equation > Ink Equation.
- Use your finger, stylus, or mouse to write your equation.
- Select Insert to bring your equation into the file.
How do students show math virtually?
Google Jamboards is an excellent way for students to show their math work online. Students can use these digital whiteboards to draw, type, and insert shapes. Teachers can easily share Google Slides with students via Google Drive and Google Classroom. Students can also collaborate using Google Jamboards.
How do you show maths on Google Classroom?
A simple way to create an interactive document for math is to use the Google Docs Equation Editor. Once the document is created, it can be uploaded to Google Classroom for students to complete individually or as a collaborative group. Students can also use the Equation Editor to complete the assignment.
Освобождаем место от ненужных инструментов, которые заботливо предустанавливает для нас Microsoft.

Windows 10 напичкана разными функциями, и далеко не все из них могут быть вам полезны. Многие компоненты можно удалить, чтобы они не мозолили глаза, да и место на диске освободится. Для обладателей ультрабуков с SSD на 128 ГБ это неплохо.
Большую часть указанных в этой статье приложений можно найти, нажав «Пуск» → «Параметры» → «Приложения» → «Приложения и возможности» → «Дополнительные компоненты». Здесь надо выбрать ненужный компонент и нажать «Удалить».
Для тех частей системы, которые не удаляются в меню «Дополнительные компоненты», предоставлены отдельные инструкции.
Удалённые пакеты можно восстанавливать, нажав «Добавить компонент». Так что при необходимости вы сумеете привести систему в первозданный вид. Итак, начнём очистку.
1. Cortana
С последним обновлением 20H1 на компьютерах под управлением Windows 10 появилась Cortana — даже на тех, где её раньше не было. Российские пользователи с замиранием сердца щёлкают заветный синий кружок… и видят надпись «Кортана недоступна в вашем регионе».
Зачем добавлять в системы с русской локализацией ассистента, который не говорит по-русски, неизвестно. Поэтому лучше удалить её, чтобы не занимала место.
Нажмите правой кнопкой мыши по значку «Пуск», затем выберите «Windows PowerShell (Администратор)». Введите команду:
Get-appxpackage -allusers Microsoft.549981C3F5F10 | Remove-AppxPackage
И нажмите Enter. Cortana будет удалена.
Если когда-нибудь Microsoft всё-таки сделает Cortana доступной для России, вы сможете запросто установить её обратно из Microsoft Store.
2. Internet Explorer
Обычно Internet Explorer используется для скачивания Chrome или Firefox после переустановки Windows 10. А после его тоже можно смело удалить.
Нажмите «Пуск» → «Параметры» → «Приложения» → «Приложения и возможности» → «Дополнительные компоненты». Выберите Internet Explorer и нажмите «Удалить». Вот и всё.
Если окажется, что Internet Explorer вам всё-таки нужен, нажмите «Добавить компонент» в этом же окне, выделите соответствующий пакет и нажмите «Установить».
3. Windows Media Player
На редкость бесполезный проигрыватель, который выглядит как во времена старой доброй Windows XP. Microsoft, видимо, и сами осознают его ненужность, потому что в системе кроме него есть «Музыка Groove» и «Кино и ТВ».
Поскольку большинство пользователей после установки Windows 10 всё равно используют упомянутые программы от Microsoft или скачивают сторонние проигрыватели, Windows Media Player можно и удалить. Сделать это можно в окне «Дополнительные компоненты».
4. Paint
Некоторые рисуют в Paint примитивные комиксы, но для большинства людей этот редактор бесполезен. У него есть очень много качественных бесплатных альтернатив.
Раньше Paint был встроен в систему так, что удалить его было нельзя, но с обновлением 20H1 Microsoft предоставили пользователям Windows 10 такую возможность. Найти Paint можно в меню «Дополнительные компоненты».
5. WordPad
Простенький встроенный текстовый редактор без каких-либо выдающихся возможностей. Открывать форматы DOC и DOCX не умеет, а набранные тексты сохраняет в не самом популярном формате RTF. Короче говоря, довольно-таки бесполезная штука.
WordPad удаляется через «Дополнительные компоненты». Вместо него можно использовать Microsoft Word, Open Office или Google Docs.
Эта штука необходима, если ваш компьютер стоит в офисе. Но среди домашних пользователей полно тех, у которых нет ни сканера, ни принтера. Ну а что касается факса… многие и не вспомнят, когда в последний раз отправляли факс.
В меню «Дополнительные компоненты» найдите пакет «Факсы и сканирование Windows» и нажмите удалить. При желании его легко можно вернуть на место.
7. «Быстрая поддержка»
Встроенный инструмент Windows 10 «Быстрая помощь» — хорошая в теории вещь, которой мало кто пользуется на практике. Все в основном помогают своим друзьям через альтернативные программы удалённого доступа.
Если у вас уже установлен TeamViewer, либо ваши знакомые в состоянии без посторонней помощи зайти в «Одноклассники» — пакет «Быстрая поддержка» можно удалить.
8. «Просмотр задач»
«Просмотр задач» или Timeline — эта та кнопка рядом с меню «Пуск», при нажатии на которую перед вами появляются недавно открытые файлы и документы. Если вы пользуетесь аккаунтом и мобильными приложениями Microsoft, то здесь же можно найти файлы с других устройств, например документы Word, открытые на вашем iPhone или Android.
Это забавная штука, но пока она тянет разве что на концепт. Ориентироваться в файлах тут очень неудобно. И непонятно, зачем что-то искать на временной шкале, если есть поиск, папки и меню недавних документов в «Проводнике» и на панели задач. В общем, Timeline — красивый, но едва ли полезный инструмент.
Чтобы отключить его, нажмите «Пуск» → «Параметры» → «Конфиденциальность» → «Журнал действий».
Отключите галочки «Сохранить мой журнал активности на этом устройстве» и «Отправить мой журнал активности в Microsoft». Затем отключите свой аккаунт в разделе «Показать действия с этих учетных записей» и нажмите «Очистить».
Напоследок щёлкните правой кнопкой мыши панель задач и отключите функцию «Показать кнопку Просмотра задач».
9. Кнопка «Люди»
Эта кнопка на панели задач отображает ваши контакты и позволяет прикреплять их к панели задач. В принципе, задумка неплохая, но эта функция интегрируется только с «Почтой» Windows 10 и Skype, так что проку от неё, считайте, никакого.
Щёлкните правой кнопкой мыши таскбар и нажмите «Показывать панель «Люди» на панели задач». Вот и все.
10. Универсальные приложения
Кроме вышеуказанных компонентов, в Windows 10 присутствует ещё немало «Универсальных приложений». Это те самые, которые открываются при нажатии на плиточки в меню «Пуск». Они оптимизированы для сенсорных экранов.
Их полезность разнится от случая к случаю, например, «Почта» или «Фотографии» — вполне стоящие программы. Но зачем вам «Средство 3D-просмотра» или «Компаньон консоли Xbox», если у вас нет ни 3D-принтера, ни консоли Microsoft?
Удалить «Средство 3D-просмотра» можно командой Windows PowerShell:
Get-AppxPackage *3d* | Remove-AppxPackage
А для удаления «Компаньона консоли Xbox» надо набрать:
Get-AppxPackage *xboxapp* | Remove-AppxPackage
С полным списком команд для удаления прочих универсальных приложений можно ознакомиться в нашем руководстве.
Если решите восстановить эти программы, их можно найти в Microsoft Store. Или наберите команду Windows PowerShell, чтобы восстановить всё скопом.
Get-AppxPackage -AllUsers| Foreach {Add-AppxPackage -DisableDevelopmentMode -Register "$($_.InstallLocation)AppXManifest.xml"}
Но учтите, выполнять команду нужно только если вы очень любите приложения от Microsoft.
Читайте также 🧐
- 12 вещей, которые нужно сделать после установки Windows 10
- 12 программ на Windows 10, которые вы должны удалить прямо сейчас
- 10 причин отказаться от антивирусов в 2020 году
Компания Microsoft подробно описала функци, которые устарели или были удалены в Windows 11.
Вот полный список устаревших функций:
• Cortana больше не будет включена в опыт первой загрузки или закреплена на панели задач;
• Обои рабочего стола нельзя перемещать на устройство или с устройства при входе в систему с учетной записью Microsoft;
• Internet Explorer отключен. Microsoft Edge является рекомендуемой заменой и включает режим IE, который может быть полезен в некоторых сценариях;
• Math Input Panel удалена. Math Recognizer устанавливается по запросу и включает в себя средство управления математическим вводом и распознаватель. Это изменение не повлияет на рукописный ввод математики в таких приложениях, как OneNote;
• Новости и интересы эволюционировали. Добавлена новая функциональность, которую можно найти, щелкнув иконку виджетов на панели задач;
• Быстрый статус с экрана блокировки и связанные с ним настройки удалены;
• S Mode теперь доступен только для редакции Windows 11 Home;
• Snipping Tool по-прежнему доступен, но старый дизайн и функциональность в версии Windows 10 были заменены на те, которые были в приложении, ранее известном как Snip & Sketch;
• Пуск значительно изменено в Windows 11, включая следующие ключевые устаревания и удаления:
o Именованные группы и папки приложений больше не поддерживаются, и размер макета в настоящее время нельзя изменить;
o Закрепленные приложения и сайты не будут перенесены при обновлении с Windows 10;
o Живые плитки больше не доступны. Для наглядного динамического контента см. новую функцию виджетов;
• Режим планшета удален, и включены новая функциональность и возможности для прикрепления и отсоединения клавиатуры;
• Изменена функциональность панели задач, в том числе:
o Людей больше нет на панели задач;
o Некоторые иконки могут больше не отображаться в системном трее (systray) для обновленных устройств, включая предыдущие настройки;
o Выравнивание по нижней части экрана — единственное допустимое место;
o Приложения больше не могут кастомизировать области панели задач;
• Временная шкала удалена. Некоторая аналогичная функциональность доступна в Microsoft Edge;
• Сенсорная клавиатура больше не будет закреплять и откреплять раскладки клавиатуры на экранах размером 18 дюймов и больше;
• Кошелек удален;
Вот четыре приложения, которые будут удалены:
• 3D Viewer;
• OneNote for Windows 10;
• Paint 3D;
• Skype;
Did you know that Windows 10 has lots of optional features that you can enable? Let’s look at what they do and how to enable them.
Windows 10 isn’t short on features. In fact, the operating system is continually updated to add new ones. But did you know that Windows 10 contains some optional features that you can enable?
These optional features are targeted more at power users and IT administrators, though there are some that the average person might want to make use of.
We’re going to explore the different places where you can enable optional Windows 10 features and explain what they do.
What Are Windows 10 Optional Features?
Optional features are precisely that: functionality that you can choose to enable if you wish.
However, there’s no point enabling functionality just for the sake of it. In fact, some features are designed specifically for use in business or education where an administrator needs greater control over the computer network. Enabling these features on an individual machine is pointless.
However, there are some Windows legacy tools that are now classed as optional. These include the likes of Internet Explorer, Windows Media Player, and WordPad. You can enable these through optional features.
Confusingly, there are two places in Windows 10 that you can manage optional features: in the newer Settings area and the older Control Panel. The features available in each do overlap, though some are unique to each.
The features available to you will depend on what edition of Windows 10 you have. We’ll be covering Windows 10 Pro. If you use Home, not all the optional features will be available to you. Here’s how to check what edition of Windows you have.
How to Enable Windows 10 Optional Features in Settings
To access Windows 10 optional features in Settings, press Windows key + I to open Settings and go to Apps > Optional features.
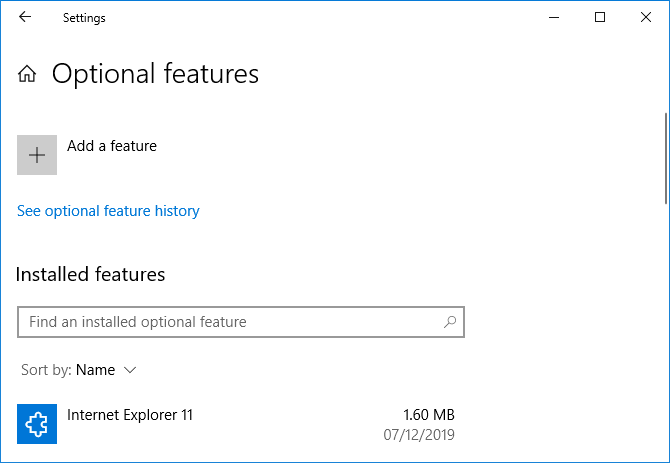
The list here shows all of your Installed features. Unless you’ve removed any in the past, there should already be some here by default like Notepad and Microsoft Paint.
You can use the Sort by dropdown to order the list by Name, Installation Size, and Installation Date.
If you don’t use a feature and want to clear up a bit of storage space, you can select it on the list and click Uninstall.
Above the list, you can click See optional feature history to see a record of when things were installed and uninstalled.
To add an optional feature, click Add a feature. This brings up a window where you can tick the box of any feature you want to install. You can click a feature to see a brief description of what it is. When you’re ready, click Install.
You’ll notice that lots of the features on this list are language packs. This is so that you can view menus, dialog boxes, and supported apps and websites in that language. Your primary language should have been installed alongside Windows 10, but here you can add alternatives if desired.
How to Enable Windows 10 Optional Features in Control Panel
To access Windows 10 optional features in Control Panel, do a system search for Turn Windows features on or off and select the relevant result.
Alternatively, press Windows key + R to open Run, input optionalfeatures, and click OK.
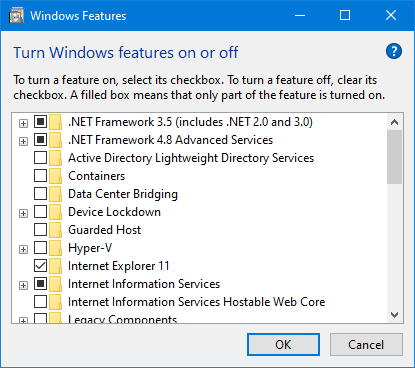
To enable a feature, tick the box next to it. If the box has a black fill, that means only part of the feature is enabled. Click the plus icon to expand the feature, wherein you can enable and disable specific elements. If the box is blank, that means the feature is disabled.
Once you’ve made your changes, click OK to save them. Your computer might need to restart to apply the changes.
Explaining the Windows 10 Optional Features
Here are some of the optional features available on Windows 10 and what they do:
- .NET Framework 3.5 (includes .NET 2.0 and 3.0) and .NET Framework 4.8 Advanced Services: Support for applications using these versions of the .NET framework.
- Containers: Provides services and tools to create and manage Windows Server Containers.
- Device Lockdown: Protect against drive writes, have an unbranded boot screen, and filter keyboard strokes—designed for machines in public settings.
- Guarded Host: Configure guarded hosts and run shield virtual machines on a server.
- Hyper-V: Services and management tools for running virtual machines.
- Internet Explorer 11: Microsoft’s web browser, since replaced by Edge.
- Math Recognizer: The Math Input Panel is a tool that converts handwritten math into digital text.
- Microsoft Paint: Basic image editing program.
- Microsoft Print to PDF: Export a file to the PDF format.
- Microsoft Quick Assist: A tool that allows Microsoft support to connect to your device and see your screen.
- Microsoft WebDriver: Automated Microsoft Edge testing and hosts of the EdgeHTML platform.
- Notepad: Basic plain text viewer and editor.
- OpenSSH Client: Client for secure key management and access to remote machines.
- Print Management Console: Management of printers, printer drivers, and printer servers.
- Steps Recorder: Capture steps with screenshots to share for troubleshooting.
- Telnet Client: A command-line tool to remote manage another system. It’s not secure, so don’t use it unless you know what you’re doing.
- TFTP Client: A command-line tool to transfer files using the Trivial File Transfer Protocol. Unsecure and outdated, so don’t use unless you have to.
- Windows Fax and Scan: Integrated fax and scan application.
- Windows Hello Face: Windows Hello is Windows 10’s biometric login.
- Windows Media Player: Microsoft’s old audio and video player.
- Windows PowerShell 2.0: Similar to Command Prompt, but more advanced and allows for task automation.
- Windows PowerShell Integrated Scripting Environment: A graphical editor for PowerShell scripts.
- Windows TIFF IFilter: Index and search Tagged Image File Format (TIFF) files using Optical Character Recognition (OCR).
- Wireless Display: Allows other devices to wirelessly project to your computer.
- WordPad: A text editor slightly more advanced than Notepad.
- XPS Viewer: Read, copy, print, sign, and set permissions for XPS documents.
Windows 10 Is Always Adding New Features
That’s everything you need to know about Windows 10 and the different methods to enable its optional features.
Windows 10 is always changing and updating with new features. To find out what the latest is, here are the best features available in the newest Windows 10 update.
Did you know that Windows 10 has lots of optional features that you can enable? Let’s look at what they do and how to enable them.
Windows 10 isn’t short on features. In fact, the operating system is continually updated to add new ones. But did you know that Windows 10 contains some optional features that you can enable?
These optional features are targeted more at power users and IT administrators, though there are some that the average person might want to make use of.
We’re going to explore the different places where you can enable optional Windows 10 features and explain what they do.
What Are Windows 10 Optional Features?
Optional features are precisely that: functionality that you can choose to enable if you wish.
However, there’s no point enabling functionality just for the sake of it. In fact, some features are designed specifically for use in business or education where an administrator needs greater control over the computer network. Enabling these features on an individual machine is pointless.
However, there are some Windows legacy tools that are now classed as optional. These include the likes of Internet Explorer, Windows Media Player, and WordPad. You can enable these through optional features.
Confusingly, there are two places in Windows 10 that you can manage optional features: in the newer Settings area and the older Control Panel. The features available in each do overlap, though some are unique to each.
The features available to you will depend on what edition of Windows 10 you have. We’ll be covering Windows 10 Pro. If you use Home, not all the optional features will be available to you. Here’s how to check what edition of Windows you have.
How to Enable Windows 10 Optional Features in Settings
To access Windows 10 optional features in Settings, press Windows key + I to open Settings and go to Apps > Optional features.
The list here shows all of your Installed features. Unless you’ve removed any in the past, there should already be some here by default like Notepad and Microsoft Paint.
You can use the Sort by dropdown to order the list by Name, Installation Size, and Installation Date.
If you don’t use a feature and want to clear up a bit of storage space, you can select it on the list and click Uninstall.
Above the list, you can click See optional feature history to see a record of when things were installed and uninstalled.
To add an optional feature, click Add a feature. This brings up a window where you can tick the box of any feature you want to install. You can click a feature to see a brief description of what it is. When you’re ready, click Install.
You’ll notice that lots of the features on this list are language packs. This is so that you can view menus, dialog boxes, and supported apps and websites in that language. Your primary language should have been installed alongside Windows 10, but here you can add alternatives if desired.
How to Enable Windows 10 Optional Features in Control Panel
To access Windows 10 optional features in Control Panel, do a system search for Turn Windows features on or off and select the relevant result.
Alternatively, press Windows key + R to open Run, input optionalfeatures, and click OK.
To enable a feature, tick the box next to it. If the box has a black fill, that means only part of the feature is enabled. Click the plus icon to expand the feature, wherein you can enable and disable specific elements. If the box is blank, that means the feature is disabled.
Once you’ve made your changes, click OK to save them. Your computer might need to restart to apply the changes.
Explaining the Windows 10 Optional Features
Here are some of the optional features available on Windows 10 and what they do:
- .NET Framework 3.5 (includes .NET 2.0 and 3.0) and .NET Framework 4.8 Advanced Services: Support for applications using these versions of the .NET framework.
- Containers: Provides services and tools to create and manage Windows Server Containers.
- Device Lockdown: Protect against drive writes, have an unbranded boot screen, and filter keyboard strokes—designed for machines in public settings.
- Guarded Host: Configure guarded hosts and run shield virtual machines on a server.
- Hyper-V: Services and management tools for running virtual machines.
- Internet Explorer 11: Microsoft’s web browser, since replaced by Edge.
- Math Recognizer: The Math Input Panel is a tool that converts handwritten math into digital text.
- Microsoft Paint: Basic image editing program.
- Microsoft Print to PDF: Export a file to the PDF format.
- Microsoft Quick Assist: A tool that allows Microsoft support to connect to your device and see your screen.
- Microsoft WebDriver: Automated Microsoft Edge testing and hosts of the EdgeHTML platform.
- Notepad: Basic plain text viewer and editor.
- OpenSSH Client: Client for secure key management and access to remote machines.
- Print Management Console: Management of printers, printer drivers, and printer servers.
- Steps Recorder: Capture steps with screenshots to share for troubleshooting.
- Telnet Client: A command-line tool to remote manage another system. It’s not secure, so don’t use it unless you know what you’re doing.
- TFTP Client: A command-line tool to transfer files using the Trivial File Transfer Protocol. Unsecure and outdated, so don’t use unless you have to.
- Windows Fax and Scan: Integrated fax and scan application.
- Windows Hello Face: Windows Hello is Windows 10’s biometric login.
- Windows Media Player: Microsoft’s old audio and video player.
- Windows PowerShell 2.0: Similar to Command Prompt, but more advanced and allows for task automation.
- Windows PowerShell Integrated Scripting Environment: A graphical editor for PowerShell scripts.
- Windows TIFF IFilter: Index and search Tagged Image File Format (TIFF) files using Optical Character Recognition (OCR).
- Wireless Display: Allows other devices to wirelessly project to your computer.
- WordPad: A text editor slightly more advanced than Notepad.
- XPS Viewer: Read, copy, print, sign, and set permissions for XPS documents.
Windows 10 Is Always Adding New Features
That’s everything you need to know about Windows 10 and the different methods to enable its optional features.
Windows 10 is always changing and updating with new features. To find out what the latest is, here are the best features available in the newest Windows 10 update.
The Windows operating system has never ceased to surprise us through the years. This fact has continued through the different versions of the operating system that has been released one after the other and though there are features in it that still looks the same, it is an undeniable fact that the modern editions of the OS starting in Windows 8 down to Windows 8.1 and now Windows 10 itself has brought so much change!
However, as we have mentioned earlier, most of the tools and features that were introduced in the past are still found even in the most modern editions of Windows and one of them is called the “Math Input Panel” tool. Have you ever worked on a document that needed so much math formulas to be typed in but you don’t know where to find those varied symbols in the Microsoft Office application that you are using? That’s exactly what the Math Input Panel is intended for and in this tutorial, we will be showing you how to access it, use it and even introduce some other apps that work in conjunction with the Math Input Panel tool.
If you want to learn more about this built-in feature found in your Windows 10 computer then be sure to get your computer started up and follow the steps that we are going to show below.
What Exactly is the Math Input Panel Tool?
Math Input Panel is a tiny application that is found in the Windows operating system and it lets you use input devices such as external digitizers, touchscreens and even your simply mouse to write mathematical problems in the form of formulas.
The formulas are then made recognizable so they can be inserted into different document types using Microsoft Word, Excel and others. The good thing about the formulas that you create with the Math Input Panel tool is that they are completely editable which means that you can tweak the output formula as if you are editing a normal text.
This handy tool can improve your productivity especially if you are working on documents or presentations that need a lot of mathematical formulas to be typed in and now that you know what the Math Input Panel tool is all about, it is time to learn how you can launch it in different Windows OS versions and we’ll start with Windows 10
Accessing Math Input Panel in Windows 10
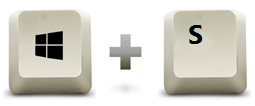
There are many different ways in accessing the Math Input Panel tool in Windows 10 just like some other tools that are built within the operating system itself. If you are fond of using shortcuts then you can access this tool in your computer by using the Search feature. To launch Search in your Window 10 machine, all you need to do is press the Windows + S keyboard shortcut combination.
After these keys are pressed, the Search feature should launch instantly on the bottom-left portion of your computer screen. From here, all you need to do is type the words “math input panel” into the search box that is found at the bottom of the Search feature. After you do this, all you need to do is click on the “Math Input Panel” shortcut link that is found just above the search input box as you can see on the screenshot below.
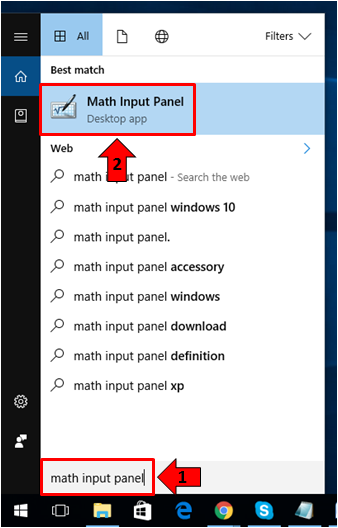
Right after clicking on the shortcut link, the Math Input Panel tool should launch in an instant and it would then be ready for you to use as you create a document or presentation that needs some mathematical formulas in it.
Launching the Math Input Panel Tool from the Start Menu
Another easy method that you can use in launching the Math Input Panel tool on your Windows 10 machine is done from the Start Menu. To do this, you must first open the Start Menu simply by clicking on the Start Button or pressing the Windows key. Once the Start Menu launches, you will need to scroll down on the “All apps” section of the Start Menu until you reach the “W” section and once you are on it, simply click on the folder that is labeled “Windows Accessories” as you can see below.
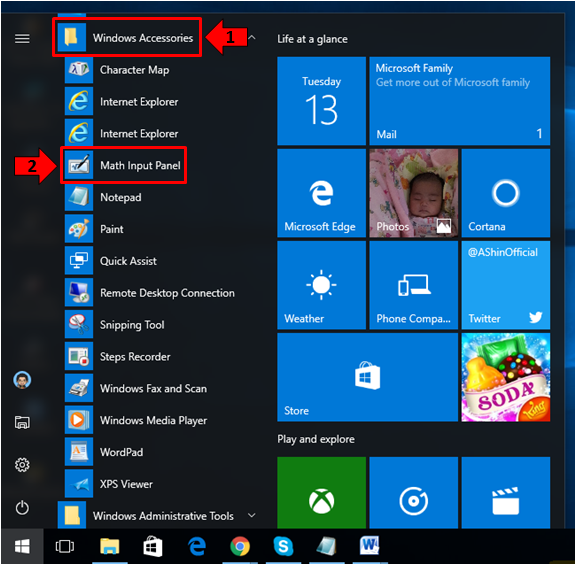
The Windows Accessories folder will then expand and under its contents, all you need to do is click on the shortcut link that is labeled “Math Input Panel” as highlighted above. Doing this will launch the Math Input Panel Tool in an instant.
How to Open the Math Input Panel Tool Using the Run Box
If you want to be more geeky in terms of launching the Math Input Panel tool then you can do so by using the Run box. To launch this simply tool in your Windows 10 machine, all you need to do is press the Windows + R keys and the Run tool should appear at the bottom-left portion of your computer screen.

On the Run box tool, you should be able to see a text input box that is labeled “Open” and from here, all you need to do is enter the word “mip” (excluding the quotation marks) and after doing this, just click on the button that is found at the bottom of the Run box which says “OK” in order to open the Math Input Panel tool right away.

So these are the three quick methods that you can use in launching the Math Input Panel tool in your Windows 10 machine and you can freely choose the one which fits your taste.
How to Launch Math Input Panel in Windows 8.1
While it is a fact that most are now using Windows 10, it is also an undeniable fact that there are still others who are using Windows 8.1 and so we’re going to show the simplest way in launching the Math Input Panel tool in this Windows operating system version.
As usual, the quickest way in doing this is accomplished with the use of the Search feature so just go ahead and launch the Start Screen by pressing the Windows key then once it opens, you can start typing the words “math input panel” on your computer’s keyboard and while you are doing so, the Search screen should slide-in from the right edge. The words that you typed will now be in the search input box and the shortcut link for the Math Input Panel tool which you will need to click will be located just below the input box as you can see on the screenshot below.

After the Math Input Panel shortcut link is clicked, the tool’s Window should launch in an instant and you can now start inputting formulas to it. If you don’t have a clue on how this is done, you’ll need to follow the instructions that we’re going to show below as we move through in this tutorial.
Launching the Math Input Panel Tool in Windows 7
Finally, if you have a computer in your office which still runs on Windows 7 and you need to use it in creating a document or presentation that contains a bunch of mathematical formulas, you can launch the Math Input Panel tool in it so you can have a handy tool that will help inputting mathematical stuff easier. To launch this tool in Windows 7, here’s what you need to do.
First, you will need to launch the Start Menu by pressing the Windows key or clicking on the Start Button. Once the menu launches, simply click on the “All Programs” link then from the list of Programs that will appear, just expand the folder which is labeled “Accessories” and under it, click on the shortcut link that says “Math Input Panel” as highlighted on the screenshot below.

And that’s one of the quickest method in launching the Math Input Panel tool in your Windows 7 machine. Now that you have the tool opened in your Windows 10, Windows 8.1 or Windows 7 computer, let’s start working with it so we can insert some mathematical formulas into a document or presentation.
NOTE:
The Math Input Panel may loo quite different in these three Windows operating system versions that we’ve talked about above but it generally works the same. The menus, options and others are the same and the only difference is the appearance of the Window. Since the tool works the same in all operating system versions, you can follow the steps that are going to be shown next without being worried that they are actually taken from Windows 10.
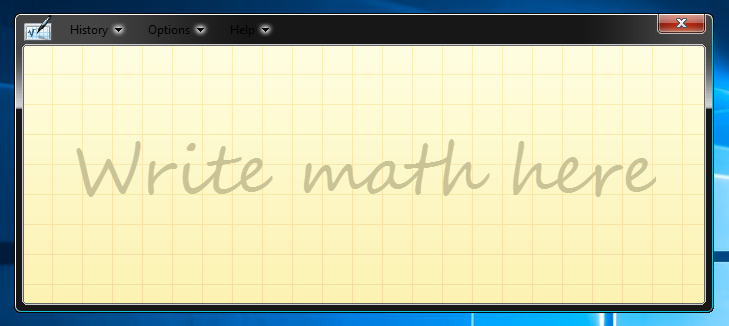
How to Input Math Formula into Math Input Panel
After you open the Math Input Panel tool, you should be able to see a wide space that has grids on it with a message that says “Write math here” as you can see on the screenshot below. This is the area where you need to enter the formula which you want to input into a document or presentation so just go ahead and write using your mouse or any other digitizing hardware. If your computer has a touchscreen monitor, you can use your finger in writing the formula yourself.
When you start writing a formula, the tool and formatting buttons will appear at the right edge of the Math Input Panel Window as you can see on the screenshot below. Now, if you notice that the tool does not correctly recognize the stuff that you are writing, just finish the formula and it will eventually read what you wrote correctly.

If you are the meticulous type of person, you might write the formula many times the just erase it after seeing that your didn’t have a good handwriting but don’t worry because the tool will automatically convert it into the font style that is used in the document or presentation that you are working on so good handwriting doesn’t really matter. What matters is making it clear enough for the tool to recognize it correctly.
How to Insert Formula into a Document or Presentation
After you are done writing the formula, all you need to do is click on the “Insert” button that is found at the bottom-right portion of the Math Input Panel tool and voila! the formula will automatically be inserted/pasted into the document/presentation that you are making.

As you can see on the screenshot above, the formula that was written on the Math Input Panel tool has been instantly pasted into a document and this happened quickly after the “Insert” button is clicked.
Now, if the formula that you wrote into the Math Input Panel tool is not automatically pasted into a document or presentation after clicking on the “Insert” button, you don’t need to panic because the formula which you typed are automatically saved into the clipboard after you hit the “Insert” button so you can just open the document that you are working on then press the “CTRL + V” keys which is the keyboard shortcut combination for “Paste” in order to insert the formula.
Correcting Certain Characters in a Formula
Now, even if you wrote the characters very well, there will still be rare instances that the Math Input Panel tool would not recognize certain characters very well. If this is the case for a formula that you have written, you can correct a single mistaken character in it by first clicking on the “Select and Correct” button that is found at the right portion of the Math Input Panel tool as shown on the screenshot below.
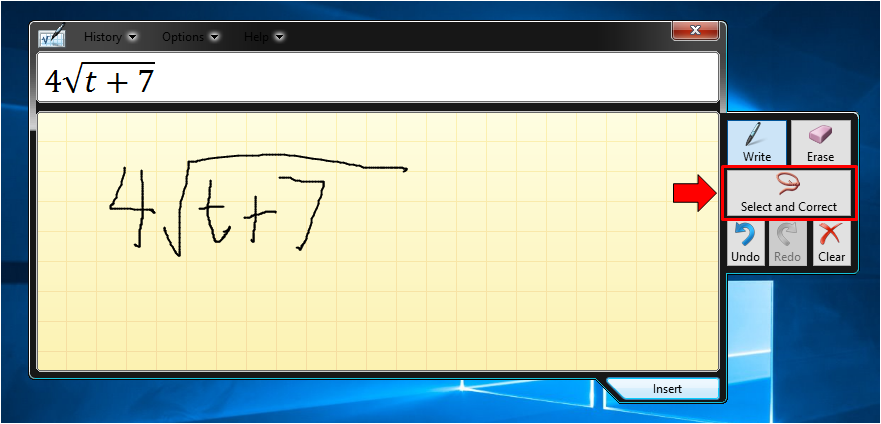
After the tool is clicked, all you need to do is select the character that you want to correct and after you do so, a drop-down options box will appear which allows you to select the correct character that you want to actually use on the formula that you wrote into the tool.
If the correct character does not appear on the drop-down options box, you can choose to erase the character by clicking on the “Erase” option on the right then just select the character that you want to delete. If you are ready to continue writing, simply click on the “Write” option and if you want to go back one step in your writing, just hit “Undo” or go forward by hitting “Redo”. To clear the screen, just hit the “Clear” option and the Math Input Panel screen will automatically be empty and ready for new formulas to be written to it once again.
Configuring the Math Input Panel Tool
Because of its simplicity yet unequaled usefulness, the Math Input Panel tool only offers very few options for configuring how it works. In order to access these options, all you need to do is click on the “Options” tab on top of the tool Window as you can see on the screenshot below.

The options that will appear are pretty simple and self-explanatory so you should be able to know what each one of them are used for but if the Math Input Panel tool already works great for you then just leave it as is and don’t enable or disable anything in it.
Types of Math Supported by Math Input Panel
Microsoft has made sure that the Math Input Panel tool is useful to the general public so what they did is to make sure that it supports US high school and college level mathematics. This includes algebra, arithmetic, functions, calculus, sets, set theory, combinatorics, geometry, definitions and applied mathematics, theorems, axioms, mathematical logic, vectors, probability and statistics and 3D analytic geometry. The tool does not support other math aside from what was mentioned above so if you are working with other formulas that are related to chemistry, the tool will not be able to work with it.
Which Applications Recognize and Support the Math Input Panel Tool
Finally, in order to really use the Math Input Panel tool to its fullest, you will need to use it in conjunction with applications that work with the Mathematical Markup Language also known as MathML. This language is supported by the major Microsoft Office applications starting version 2007 down to the latest which is Office 365. It also works with other office products such as LibreOffice and OpenOffice and even by other mathematical software application products like Mathematica and others.
Inputting Math Formulas Made Easy with the Math Input Panel Tool
As you can see, Windows actually has a tool that will help you become more productive especially if you’re working with some math on the documents or presentations that you are creating. If you’ve been struggling with math-related stuff before then you should be able to deal with it now that you already know about this handy tool that is a available on your Windows machine.
How did the Math Input Panel help you? How did it make your work become easier? We’d like to hear your experience using the tool and if you want to share them, please feel free to post them on the comments section below.