by Milan Stanojevic
Milan has been enthusiastic about technology ever since his childhood days, and this led him to take interest in all PC-related technologies. He’s a PC enthusiast and he… read more
Updated on
- If you get the MANUALLY INITIATED CRASH error on Windows 10, it is caused by corrupted data.
- One simple solution would be updating your drivers and your Operating System.
- Using a system restore will also get rid of the Windows 10 MANUALLY INITIATED CRASH error.
- You could also perform SFC and DISM scans, and ultimately, a Windows 10 reset.

XINSTALL BY CLICKING THE DOWNLOAD
FILE
Blue Screen of Death errors are one of the most serious errors that you can encounter on Windows 10.
These errors can cause instability issues and data loss, therefore today we’re going to show you how to fix MANUALLY_INITIATED_CRASH error.
Since BSoD crashes are so problematic, you need to make sure you get rid of them completely. We’ve comprised a list with the best solutions, so make sure you follow all of them.
How do I fix the MANUALLY_INITIATED_CRASH error?
- Update your drivers and install the latest Windows 10 updates
- Remove the problematic software
- Perform Windows 10 reset
- Check if your hardware is working properly
- Run the Hardware Troubleshooter
- Run DISM
- Use System Restore
- Run the SFC scan
1. Update your drivers and install the latest Windows 10 updates
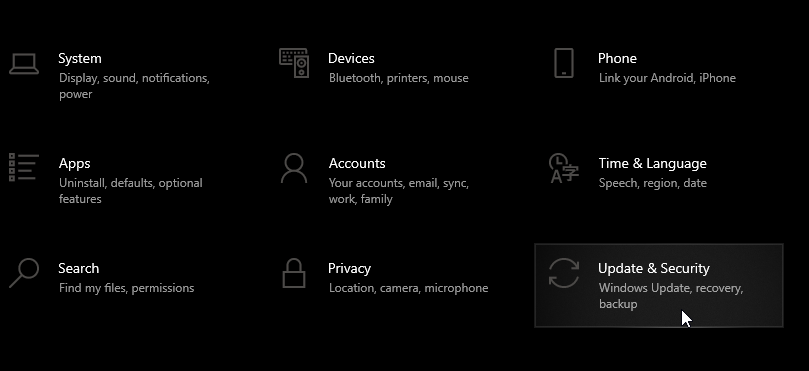
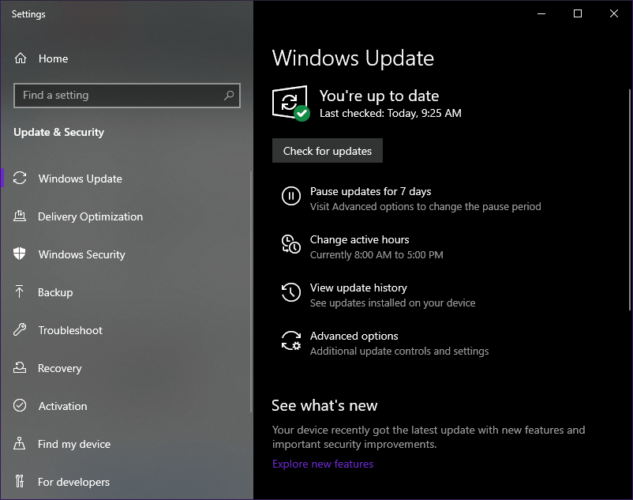
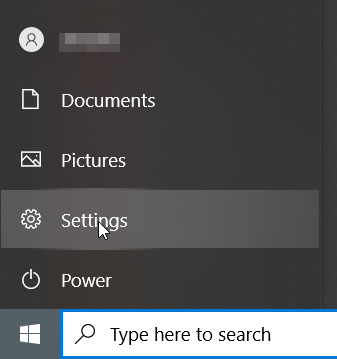
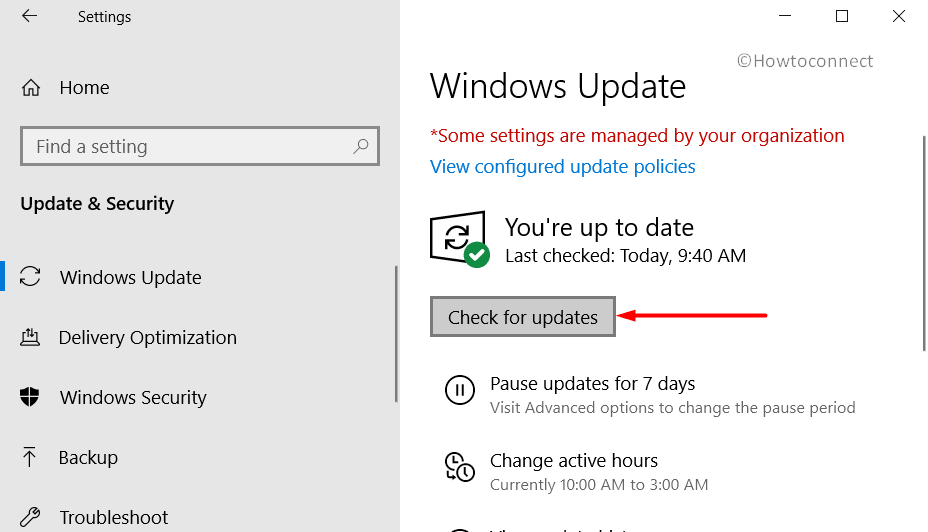
- Press the Windows Key + S and type in Settings.

- Go to Update and Security.

- Select Windows Update.
- Then, select Check for updates.

- Let windows search and install any necessary updates.

Downloading the latest Windows 10 updates is crucial for system stability and safety. Many of these updates offer security improvements and new features, but there are also various hardware and software bugfixes.
Blue Screen of Death errors are often caused by hardware or software issues, and if you want to keep your system stable and free from errors, we strongly advise you to download the latest patches.
In addition to Windows updates, it’s also important that you download the latest drivers for your hardware. Your hardware cannot work without the proper drivers.
If your drivers are outdated or just not fully compatible with Windows 10, that can cause Blue Screen of Death error such as MANUALLY_INITIATED_CRASH to appear.
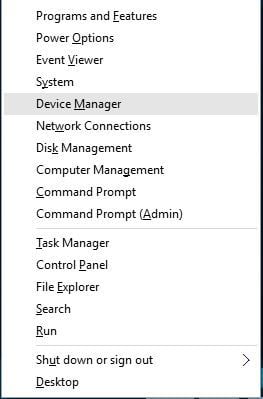
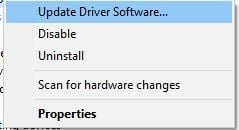
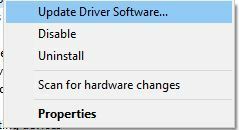
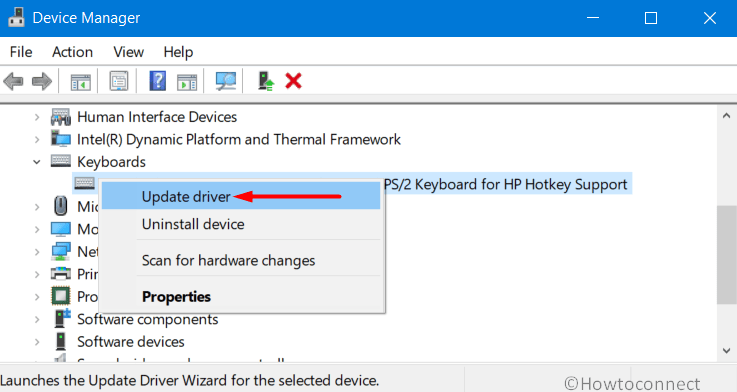
To update your drivers, you can simply use Device Manager by following these steps:
- Press Windows Key + X and select Device Manager from the list.

- When Device Manager opens, select the device you want to update.
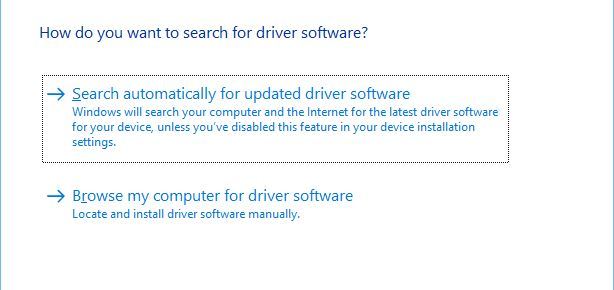
- Right click it and choose Update Driver Software.

- Choose Search automatically for updated driver software and Windows 10 will automatically download and install the best driver for your device.

- Repeat these steps for all devices that you want to update.
Update drivers automatically
Although downloading drivers by using Device Manager is simple, we have to mention that Device Manager doesn’t always download the latest drivers.
How we test, review and rate?
We have worked for the past 6 months on building a new review system on how we produce content. Using it, we have subsequently redone most of our articles to provide actual hands-on expertise on the guides we made.
For more details you can read how we test, review, and rate at WindowsReport.
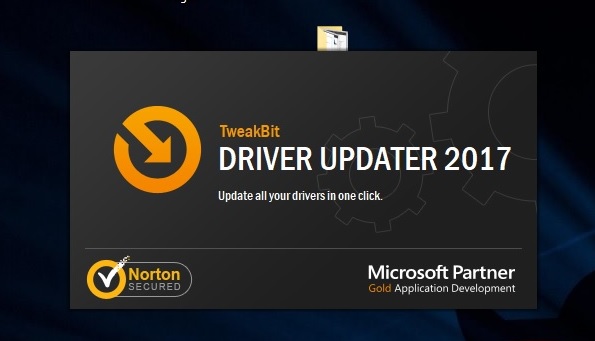
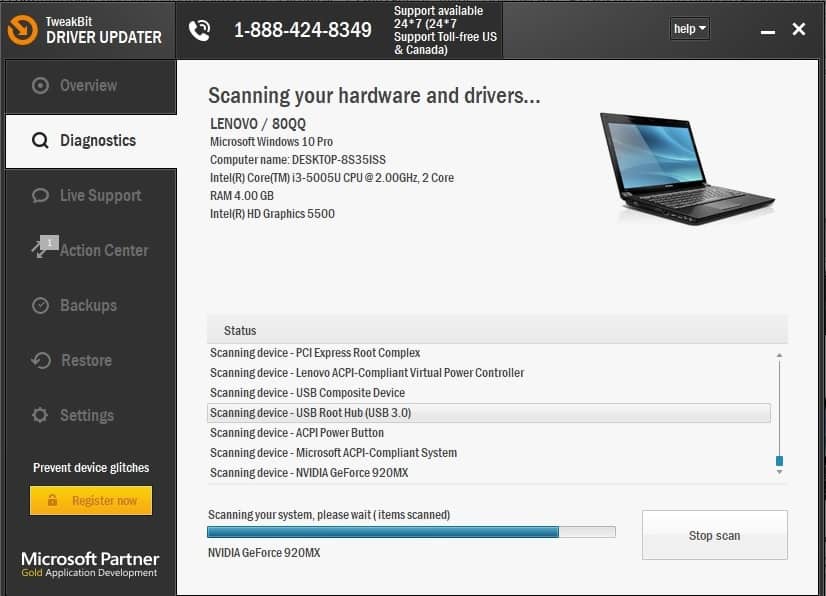
In fact, it’s usually better that you download the necessary drivers automatically, by using third-party software that will ensure the correct drivers are installed on your computer.
To proceed with this you should install this specialized tool that will run a comprehensive scan on your system and detect outdated drivers.
Afterward, it will request you to choose which drivers need to be updated before starting the process automatically. The process works smoothly and you can rest assured regarding the system protection.
⇒ Get Outbyte Driver Updater
2. Remove the problematic software
- Press Windows Key + X and choose Device Manager from the menu.
- When Device Manager opens, locate the driver you wish to uninstall, right-click it and choose Uninstall. Click OK to confirm.


These types of errors can often be caused by your software, therefore it’s important that you find and remove any software that can cause this error.
These errors are most commonly caused by your antivirus, and if you want to fix the MANUALLY_INITIATED_CRASH BSoD error we advise you to temporarily remove all third-party antivirus programs.
It’s important to know that Windows 10 comes with its own antivirus program, so even if you delete all third-party antivirus programs, your computer won’t be without any protection.
We have to mention that certain drivers can cause this error too, and you might have to remove them in order to fix it. According to users, removing keyboard and processor drivers can sometimes fix it as well.
After uninstalling a driver, Windows 10 will install the default one instead. If the default driver works, you can continue using it, or you can update it to the newer version.
3. Perform a Windows 10 reset
- Start Automatic Repair by restarting your computer a few times during the boot sequence.

- Choose Troubleshoot > Reset this PC > Remove everything.
- During this step you might be asked to insert Windows 10 installation media, so be sure to do that.
- Choose Only the drive where Windows is installed > Just remove my files. Click the Reset button.
- Follow the instructions on the screen to complete Windows 10 reset.
If the MANUALLY_INITIATED_CRASH error is caused by third-party software, you can fix it by performing Windows 10 reset. Before you do that you should know that this process will delete all files from your C partition.
so be sure to back them up. You might also need a bootable USB flash drive with Windows 10 to complete this process, so keep that in mind.
After the reset process is complete, you’ll have a clean installation of Windows 10. If the error appears again, it means that is caused by your hardware.
4. Check if your hardware is working properly
Blue Screen of Death errors are often caused by hardware, and if you’re getting MANUALLY_INITIATED_CRASH BSoD error, we strongly advise you to check your hardware.
Be sure to check your RAM first, and then move to other major components. Several users reported that this issue was caused by a faulty motherboard, so be sure to check and replace your motherboard.
With this occasion, you should clean your PC for dust and clogged fans, because overheating is also a cause of BSoD issues, and you should take every measure to make sure your components are properly ventilated.
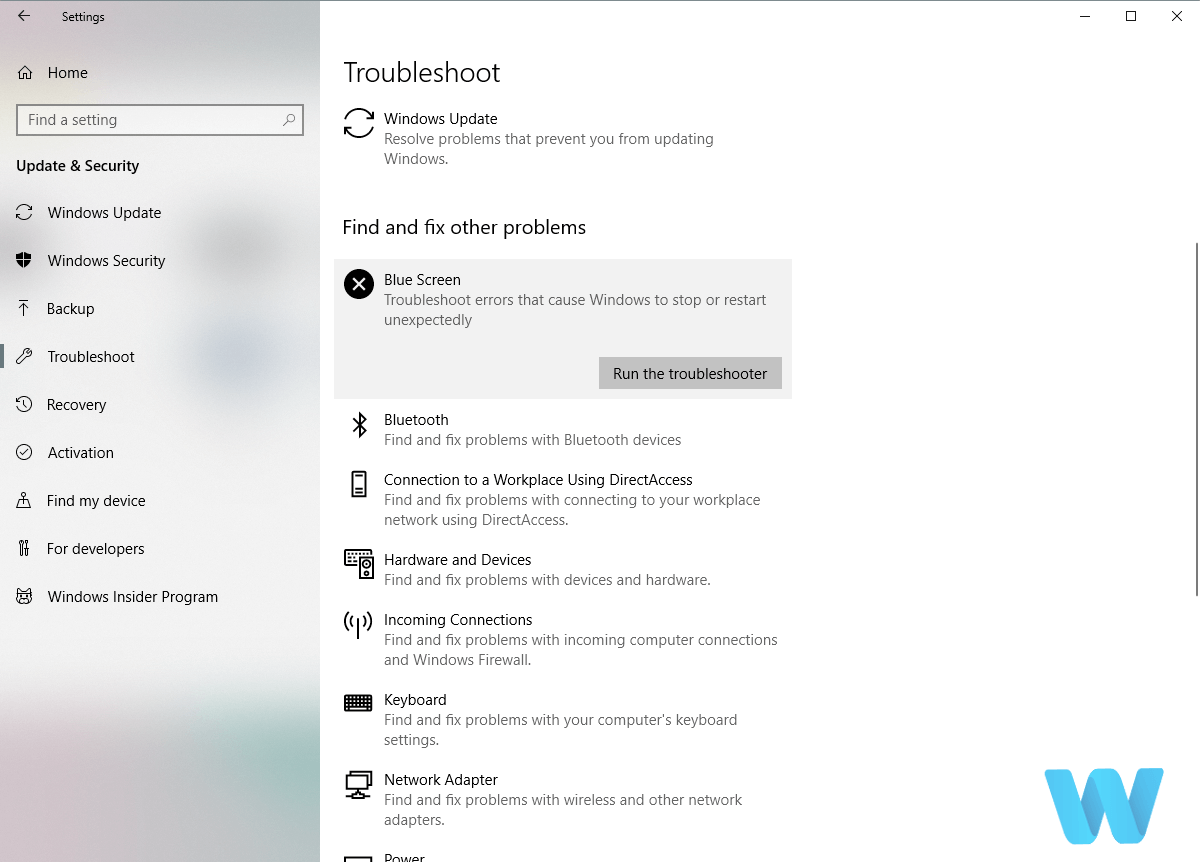
5. Run the Hardware Troubleshooter
- Open the Settings app and go to Update & Security section.
- Select Troubleshoot from the menu on the left.
- Select BSOD from the right pane and click Run the troubleshooter.

- Follow the instructions on the screen to complete the troubleshooter.
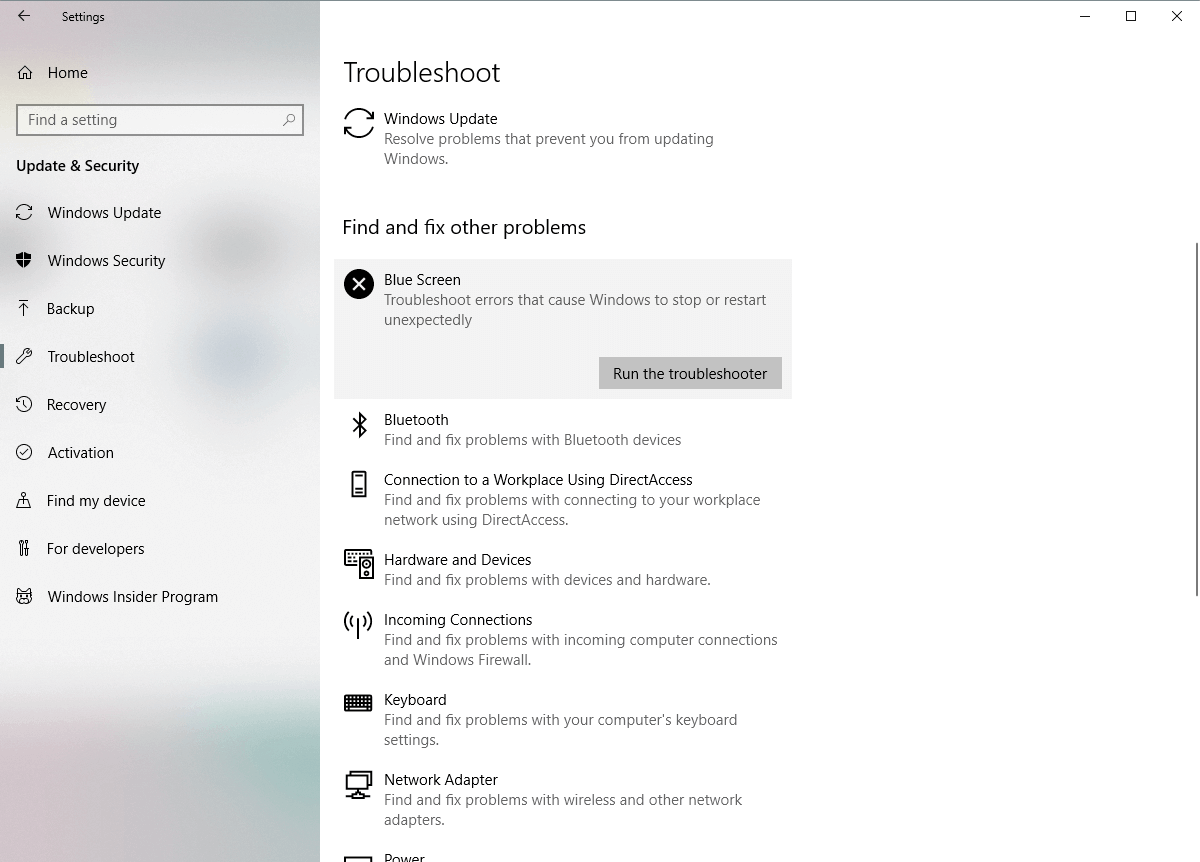
If none of the previous solutions resolved the problem, we’re going to turn to built-in troubleshooting tools.
The first tool we’re going to try is Windows 10’s built-in troubleshooter. You can use this tool to resolve various issues, including the BSOD problems.
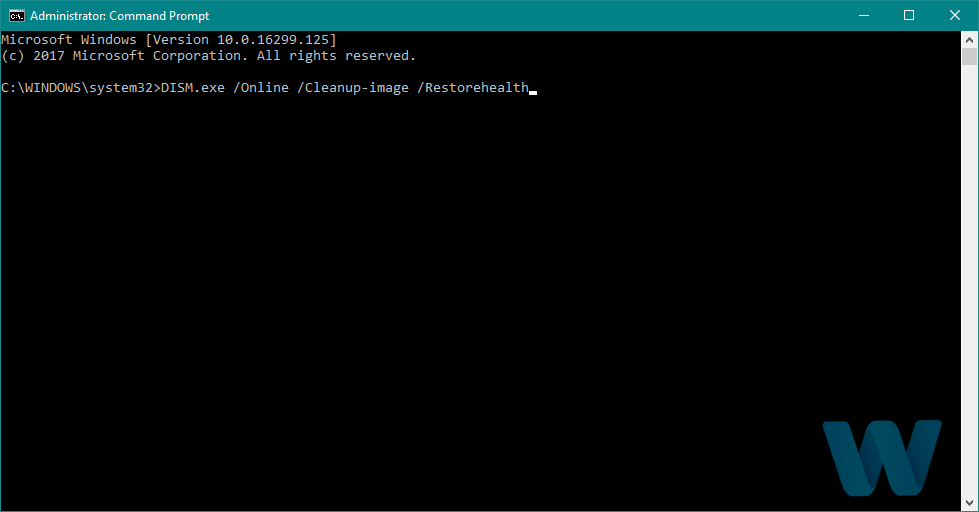
6. Run DISM
- Right-click Start and open Command Prompt (Admin).
- Paste the following command and press Enter:
DISM /Online /Cleanup-Image /RestoreHealth
- Wait until the scan is finished.
- Restart your computer and try updating again.

The next troubleshooter we’re going to try is the Deployment Image Servicing and Management (DISM). As its name says, this tool deploys the system image all over again, so it might resolve the BSOD issue on the way.
The procedure above is the standard one that you should follow simply without any other requirements. If you have Windows Installation Media, you should use another procedure.
With the Windows installation media
- Insert your Windows installation media.
- Right-click the Start menu and, from the menu, choose the Command Prompt (Admin).
- In the command line, type the following commands and press Enter after each:
dism /online /cleanup-image /scanhealthdism /online /cleanup-image /restorehealth - Now, type the following command and press Enter:
DISM /Online /Cleanup-Image /RestoreHealth /source:WIM:X:SourcesInstall.wim:1 /LimitAccess - Make sure to change an X value with the letter of the mounted drive with Windows 10 installation.
- After the procedure is finished, restart your computer.
7. Use System Restore
Sometimes the best way to fix BSoD errors is to use System Restore. Using System Restore is easy, and you can do it by following these steps:
- Restart your computer a few times during the boot in order to start Automatic Repair.
- Choose Troubleshoot > Advanced options > System Restore.
- Select your username and enter your password.
- Select Choose a different restore point and click Next.
- Select restore point that you wish to return to and click Next.
- Wait for the restore process to finish.
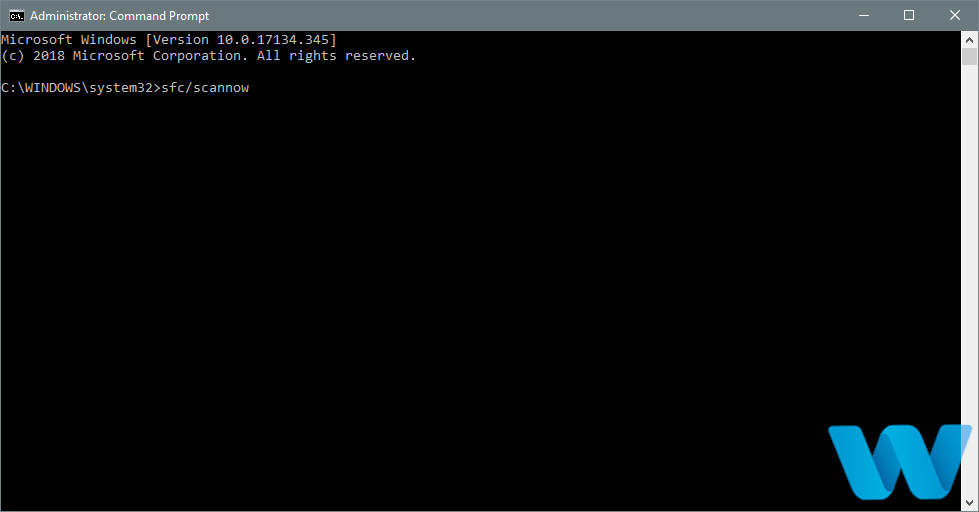
8. Run the SFC scan
- Right-click on the Start Menu button, and open Command Prompt (Admin).
- Enter the following line and press Enter:
sfc/scannow
- Wait until the process is done (it may take a while).
- If the solution is found, it will automatically be applied.
- Now, close the Command Prompt and restart your computer.

And finally, the last troubleshooting tool we’re going to try is the SFC scan. This tool scans your system for potential issues and resolves them, if possible.
So, if none of the previous solutions resolved the BSOD error, we hope you’ll have more luck with the SFC scan.
MANUALLY_INITIATED_CRASH BSoD error can cause you many problems, but we hope that you managed to fix this error by using one of our solutions.
Make sure you give us any feedback regarding the error in the comment section below.
![]()
- Если вы получаете ошибку MANUALLY INITIATED CRASH в Windows 10, это вызвано повреждением данных.
- Одним из простых решений может быть обновление драйверов и операционной системы.
- Использование восстановления системы также избавит от Windows 10 MANUALLY INITIATED CRASH ошибка.
- Вы также можете выполнить сканирование SFC и DISM и, в конечном итоге, выполнить сброс Windows 10.

ИксУСТАНОВИТЕ, НАЖИМАЯ НА СКАЧАТЬ ФАЙЛ
Это программное обеспечение будет поддерживать ваши драйверы в рабочем состоянии, тем самым защищая вас от распространенных компьютерных ошибок и сбоев оборудования. Проверьте все свои драйверы прямо сейчас, выполнив 3 простых шага:
- Скачать DriverFix (проверенный загружаемый файл).
- Нажмите Начать сканирование чтобы найти все проблемные драйверы.
- Нажмите Обновите драйверы чтобы получить новые версии и избежать сбоев в работе системы.
- DriverFix был загружен пользователем 0 читателей в этом месяце.
Ошибки Blue Screen of Death — одна из самых серьезных ошибок, с которыми вы можете столкнуться в Windows 10.
Эти ошибки могут вызвать нестабильность и потерю данных, поэтому сегодня мы покажем вам, как исправить ошибку MANUALLY_INITIATED_CRASH.
Поскольку сбои BSoD настолько проблематичны, вам нужно полностью избавиться от них. Мы составили список с лучшими решениями, поэтому убедитесь, что вы следуете всем им.
Как исправить ошибку MANUALLY_INITIATED_CRASH?
- Обновите драйверы и установите последние обновления Windows 10.
- Удалите проблемное программное обеспечение
- Выполните сброс Windows 10
- Проверьте, правильно ли работает ваше оборудование
- Запустите средство устранения неполадок оборудования
- Запустить DISM
- Используйте восстановление системы
- Запустите сканирование SFC
1. Обновите драйверы и установите последние обновления Windows 10.
- нажмите Ключ Windows + С и введите Настройки.

- Идти к Обновление и безопасность.
- Выбирать Центр обновления Windows.
- Затем выберите Проверить наличие обновлений.
- Позвольте Windows искать и устанавливать все необходимые обновления.


Загрузка последних обновлений Windows 10 имеет решающее значение для стабильности и безопасности системы. Многие из этих обновлений предлагают улучшения безопасности и новые функции, но есть также различные аппаратные и программные исправления.
Ошибки «синий экран смерти» часто вызваны проблемами с оборудованием или программным обеспечением, и если вы хотите, чтобы ваша система была стабильной и свободной от ошибок, мы настоятельно рекомендуем вам загрузить последние исправления.
В дополнение к обновлениям Windows также важно загружать последние версии драйверов для вашего оборудования. Ваше оборудование не может работать без соответствующих драйверов.
Если ваши драйверы устарели или просто не полностью совместимы с Windows 10, это может привести к появлению ошибки «Синий экран смерти», такой как MANUALLY_INITIATED_CRASH.
Чтобы обновить драйверы, вы можете просто использовать Диспетчер устройств, выполнив следующие действия:
- Нажимать Клавиша Windows + X и выберите Диспетчер устройств из списка.
- Когда Диспетчер устройств откроется, выберите устройство, которое хотите обновить.
- Щелкните его правой кнопкой мыши и выберите «Обновить программное обеспечение драйвера».
- Выберите Автоматический поиск обновленного программного обеспечения драйвера, и Windows 10 автоматически загрузит и установит лучший драйвер для вашего устройства.
- Повторите эти шаги для всех устройств, которые вы хотите обновить.


Автоматическое обновление драйверов
Хотя загрузка драйверов с помощью диспетчера устройств проста, мы должны отметить, что диспетчер устройств не всегда загружает последние версии драйверов.
На самом деле, обычно лучше загружать необходимые драйверы автоматически, используя стороннее программное обеспечение, которое обеспечит установку правильных драйверов на ваш компьютер.
Чтобы продолжить, вам необходимо установить этот специализированный инструмент, который проведет комплексное сканирование вашей системы и обнаружит устаревшие драйверы.
После этого вам будет предложено выбрать, какие драйверы необходимо обновить перед автоматическим запуском процесса. Процесс работает гладко, и вы можете быть уверены в защите системы.
⇒ Получить DriverFix
2. Удалите проблемное программное обеспечение
- Нажимать Ключ Windows + Икс и выбрать Диспетчер устройств из меню.
- Когда откроется Диспетчер устройств, найдите драйвер, который вы хотите удалить, щелкните его правой кнопкой мыши и выберите Удалить. Нажмите ХОРОШО подтвердить.

Эти типы ошибок часто могут быть вызваны вашим программным обеспечением, поэтому важно найти и удалить любое программное обеспечение, которое может вызвать эту ошибку.
Эти ошибки чаще всего вызваны вашим антивирусом, и если вы хотите исправить ошибку BSoD MANUALLY_INITIATED_CRASH, мы советуем вам временно удалить все сторонние антивирусные программы.
Важно знать, что Windows 10 поставляется с собственной антивирусной программой, поэтому даже если вы удалите все сторонние антивирусные программы, ваш компьютер не останется без защиты.
Некоторые проблемы с ПК трудно решить, особенно когда речь идет о поврежденных репозиториях или отсутствующих файлах Windows. Если у вас возникли проблемы с исправлением ошибки, возможно, ваша система частично сломана.
Мы рекомендуем установить Restoro, инструмент, который просканирует вашу машину и определит, в чем проблема.
кликните сюда скачать и начать ремонт.
Мы должны упомянуть, что некоторые драйверы также могут вызывать эту ошибку, и вам, возможно, придется удалить их, чтобы исправить это. По словам пользователей, удаление драйверов клавиатуры и процессора иногда также может исправить это.
После удаления драйвера Windows 10 вместо него установит драйвер по умолчанию. Если драйвер по умолчанию работает, вы можете продолжать использовать его или обновить до более новой версии.
3. Выполните сброс Windows 10
- Запустите автоматическое восстановление, несколько раз перезагрузив компьютер во время загрузки.
- Выбирать Устранение неполадок> Сбросить этот компьютер> Удалить все.
- На этом этапе вас могут попросить вставить установочный носитель Windows 10, поэтому обязательно сделайте это.
- Выбирать Только диск, на котором установлена Windows > Просто удалите мои файлы. Нажмите на Перезагрузить кнопка.
- Следуйте инструкциям на экране, чтобы выполнить сброс Windows 10.
Если ошибка MANUALLY_INITIATED_CRASH вызвана сторонним программным обеспечением, вы можете исправить ее, выполнив сброс Windows 10. Прежде чем вы это сделаете, вы должны знать, что этот процесс удалит все файлы из вашего раздела C.
поэтому обязательно сделайте их резервную копию. Вам также может понадобиться загрузочная флешка с Windows 10 для завершения этого процесса, так что имейте это в виду.
После завершения процесса сброса у вас будет чистая установка Windows 10. Если ошибка появляется снова, это означает, что она вызвана вашим оборудованием.
4. Проверьте, правильно ли работает ваше оборудование
Ошибки Blue Screen of Death часто вызваны аппаратным обеспечением, и если вы получаете ошибку BSoD MANUALLY_INITIATED_CRASH, мы настоятельно рекомендуем вам проверить ваше оборудование.
Обязательно сначала проверьте оперативную память, а затем переходите к другим основным компонентам. Несколько пользователей сообщили, что эта проблема была вызвана неисправной материнской платой, поэтому обязательно проверьте и замените материнскую плату.
По этому поводу следует почистить ПК от пыли и забитых вентиляторов, ведь перегрев тоже причиной проблем с BSoD, и вы должны принять все меры, чтобы убедиться, что ваши компоненты правильно вентилируемый.
5. Запустите средство устранения неполадок оборудования
- Открой Приложение настроек и иди к Обновление и безопасность раздел.
- Выбирать Устранение неполадок из меню слева.
- Выбирать BSOD на правой панели и нажмите Запустите средство устранения неполадок.
- Следуйте инструкциям на экране, чтобы завершить устранение неполадок.

Если ни одно из предыдущих решений не решило проблему, мы обратимся к встроенным инструментам устранения неполадок.
Первый инструмент, который мы собираемся попробовать, — это встроенное средство устранения неполадок Windows 10. Вы можете использовать этот инструмент для решения различных проблем, включая проблемы с BSOD.
6. Запустить DISM
- Щелкните правой кнопкой мыши Пуск и откройте Командная строка (администратор).
- Вставьте следующую команду и нажмите Enter:
DISM/Онлайн/Cleanup-Image/RestoreHealth
- Дождитесь завершения сканирования.
- Перезагрузите компьютер и повторите попытку обновления.

Следующее средство устранения неполадок, которое мы собираемся попробовать, — это обслуживание образов развертывания и управление ими (DISM). Как следует из названия, этот инструмент заново развертывает образ системы, поэтому он может решить проблему BSOD в пути.
Приведенная выше процедура является стандартной, и вы должны следовать просто без каких-либо других требований. Если у вас есть установочный носитель Windows, вам следует использовать другую процедуру.
С установочного носителя Windows
- Вставьте свой Установочный носитель Windows.
- Щелкните правой кнопкой мыши меню «Пуск» и в меню выберите Командная строка (администратор).
- В командной строке введите следующие команды и нажмите Enter после каждой:
dism/онлайн/cleanup-image/scanhealthdism/online/cleanup-image/restorehealth - Теперь введите следующую команду и нажмите Enter:
DISM/Online/Cleanup-Image/RestoreHealth/источник: WIM: X: SourcesInstall.wim: 1/LimitAccess - Обязательно измените Икс значение с буквой подключенного диска с установкой Windows 10.
- После завершения процедуры перезагрузите компьютер.
7. Используйте восстановление системы
Иногда лучший способ исправить ошибки BSoD — использовать восстановление системы. Использовать восстановление системы легко, и вы можете сделать это, выполнив следующие действия:
-
Перезапуск ваш компьютер несколько раз во время загрузки, чтобы запустить автоматическое восстановление.
- Выбирать Устранение неполадок> Дополнительные параметры> Восстановление системы.
- Выберите свой имя пользователя и введите свой пароль.
- Выбирать Выберите другую точку восстановления и нажмите Следующий.
- Выберите точку восстановления, к которой вы хотите вернуться, и нажмите Следующий.
- Дождитесь окончания процесса восстановления.
8. Запустите сканирование SFC
- Щелкните правой кнопкой мыши кнопку «Пуск» и откройте Командная строка (администратор).
- Введите следующую строку и нажмите Enter:
sfc/scannow
- Дождитесь завершения процесса (это может занять некоторое время).
- Если решение найдено, оно будет применено автоматически.
- Теперь закройте Командная строка и перезагрузите компьютер.

И, наконец, последний инструмент для устранения неполадок, который мы собираемся попробовать, — это сканирование SFC. Этот инструмент сканирует вашу систему на наличие потенциальных проблем и устраняет их, если это возможно.
Итак, если ни одно из предыдущих решений не устранило ошибку BSOD, мы надеемся, что вам повезет больше со сканированием SFC.
Ошибка MANUALLY_INITIATED_CRASH BSoD может вызвать у вас много проблем, но мы надеемся, что вам удалось исправить эту ошибку с помощью одного из наших решений.
Убедитесь, что вы дали нам какие-либо отзывы об ошибке в разделе комментариев ниже.
На чтение 9 мин. Просмотров 308 Опубликовано 03.09.2019
Ошибки «Синего экрана смерти» являются одной из наиболее серьезных ошибок, с которыми вы можете столкнуться в Windows 10. Эти ошибки могут вызвать проблемы нестабильности и потери данных, поэтому сегодня мы собираемся показать вам, как исправить ошибку MANUALLY_INITIATED_CRASH.
Как исправить ошибку MANUALLY_INITIATED_CRASH BSoD
Содержание .
- Обновите драйверы и установите последние обновления для Windows 10
- Удалить проблемное программное обеспечение
- Использовать восстановление системы
- Выполнить сброс Windows 10
- Проверьте, правильно ли работает ваше оборудование
- Запустите средство устранения неполадок оборудования
- Запустите DISM
- Запустить сканирование SFC
Исправлено – MANUALLY_INITIATED_CRASH Ошибка Windows 10
Решение 1. Обновите драйверы и установите последние обновления для Windows 10 .
Загрузка последних обновлений Windows 10 имеет решающее значение для стабильности и безопасности системы. Многие из этих обновлений предлагают улучшения безопасности и новые функции, но есть также различные исправления ошибок, связанных как с аппаратным, так и программным обеспечением. Ошибки Blue Screen of Death часто бывают вызваны проблемами с оборудованием или программным обеспечением, и если вы хотите, чтобы ваша система работала стабильно и без ошибок, мы настоятельно рекомендуем вам загрузить последние исправления с помощью Центра обновления Windows.
В дополнение к обновлениям Windows также важно загрузить последние версии драйверов для вашего оборудования. Ваше оборудование не может работать без надлежащих драйверов, и если ваши драйверы устарели или просто не полностью совместимы с Windows 10, это может привести к появлению ошибки Blue Screen of Death, такой как MANUALLY_INITIATED_CRASH. Чтобы обновить драйверы, вы можете просто использовать диспетчер устройств, выполнив следующие действия:
-
Нажмите клавиши Windows Key + X на клавиатуре, чтобы открыть меню Power User. Выберите Диспетчер устройств из списка.
-
Когда откроется Диспетчер устройств , выберите устройство, которое хотите обновить, щелкните его правой кнопкой мыши и выберите Обновить программное обеспечение драйвера .
-
Выберите Автоматический поиск обновленного программного обеспечения драйвера , и Windows 10 автоматически загрузит и установит лучший драйвер для вашего устройства.
- Повторите эти шаги для всех устройств, которые вы хотите обновить.


Хотя загрузка драйверов с помощью диспетчера устройств проста, мы должны отметить, что диспетчер устройств не всегда загружает последние версии драйверов. Фактически, обычно лучше загружать необходимые драйверы вручную, и вы можете сделать это, посетив веб-сайт производителя вашего оборудования и загрузив последние версии драйверов для вашего устройства.
Обновлять драйверы автоматически
Поиск драйверов самостоятельно может занять много времени. Поэтому мы советуем вам использовать инструмент, который сделает это автоматически. Использование автоматического средства обновления драйверов, безусловно, избавит вас от необходимости поиска драйверов вручную и всегда будет поддерживать вашу систему в курсе последних версий драйверов.
Модуль обновления драйверов Tweakbit (одобрен Microsoft и Norton Antivirus) поможет вам автоматически обновлять драйверы и предотвращать повреждение ПК, вызванное установкой неправильных версий драйверов. После нескольких тестов наша команда пришла к выводу, что это наиболее автоматизированный решение.
Вот краткое руководство о том, как его использовать:
-
Загрузите и установите средство обновления драйверов TweakBit
-
После установки программа начнет сканирование вашего компьютера на наличие устаревших драйверов автоматически. Driver Updater проверит установленные вами версии драйверов по своей облачной базе данных последних версий и порекомендует правильные обновления. Все, что вам нужно сделать, это дождаться завершения сканирования.
-
По завершении сканирования вы получите отчет обо всех проблемных драйверах, найденных на вашем ПК. Просмотрите список и посмотрите, хотите ли вы обновить каждый драйвер по отдельности или все сразу. Чтобы обновить один драйвер за раз, нажмите ссылку «Обновить драйвер» рядом с именем драйвера. Или просто нажмите кнопку «Обновить все» внизу, чтобы автоматически установить все рекомендуемые обновления.
Примечание. Некоторые драйверы необходимо установить в несколько этапов, поэтому вам придется нажмите кнопку «Обновить» несколько раз, пока все его компоненты не будут установлены.


Решение 2. Удалите проблемное программное обеспечение
Эти типы ошибок часто могут быть вызваны вашим программным обеспечением, поэтому важно, чтобы вы нашли и удалили любое программное обеспечение, которое может вызвать эту ошибку.Эти ошибки чаще всего вызваны вашим антивирусом, и если вы хотите исправить ошибку BSUD MANUALLY_INITIATED_CRASH, мы советуем вам временно удалить все сторонние антивирусные программы. Важно знать, что Windows 10 поставляется с собственной антивирусной программой, поэтому даже если вы удалите все сторонние антивирусные программы, ваш компьютер не будет без защиты.
Чтобы полностью удалить антивирусную программу с вашего компьютера, мы рекомендуем вам использовать специальный инструмент для удаления. Многие антивирусные программы имеют тенденцию оставлять некоторые файлы после их удаления, и эти файлы могут вызывать ошибки BSoD, поэтому рекомендуется удалять их. Самый простой способ сделать это – использовать специальный инструмент для удаления, и вы можете загрузить этот инструмент для своей антивирусной программы прямо с веб-сайта разработчика антивируса.
Мы должны упомянуть, что определенные драйверы также могут вызывать эту ошибку, и вам, возможно, придется удалить их, чтобы исправить эту ошибку. По словам пользователей, удаление драйверов клавиатуры и процессора иногда может исправить эту ошибку, поэтому вы можете попробовать это. Чтобы удалить определенный драйвер, сделайте следующее:
- Нажмите Windows Key + X и выберите Диспетчер устройств в меню.
-
Когда откроется диспетчер устройств, найдите драйвер, который вы хотите удалить, щелкните его правой кнопкой мыши и выберите Удалить . Нажмите ОК , чтобы подтвердить.

После удаления драйвера Windows 10 установит драйвер по умолчанию. Если драйвер по умолчанию работает, вы можете продолжить его использование или обновить его до более новой версии.
- ЧИТАЙТЕ ТАКЖЕ: исправлено: код ошибки C101A006 при попытке купить приложения для Windows
Решение 3. Использование восстановления системы
Иногда лучший способ исправить ошибки BSoD – это восстановление системы. Использовать восстановление системы легко, и вы можете сделать это, выполнив следующие действия:
- Перезагрузите компьютер несколько раз во время загрузки, чтобы начать автоматическое восстановление.
- Выберите Устранение неполадок> Дополнительные параметры> Восстановление системы .
- Выберите имя пользователя и введите свой пароль .
- Выберите Выберите другую точку восстановления и нажмите Далее .
- Выберите точку восстановления, к которой вы хотите вернуться, и нажмите Далее .
- Дождитесь окончания процесса восстановления.
Решение 4. Выполните сброс Windows 10 .
Если ошибка MANUALLY_INITIATED_CRASH вызвана сторонним программным обеспечением, вы можете исправить это, выполнив сброс Windows 10. Прежде чем сделать это, вы должны знать, что этот процесс удалит все файлы из вашего раздела C, поэтому обязательно сделайте их резервную копию. Вам также может понадобиться загрузочная флешка с Windows 10 для завершения этого процесса, так что имейте это в виду. Для сброса Windows 10 выполните следующие действия:
- Запустите автоматическое восстановление, перезагрузив компьютер несколько раз во время загрузки.
- Выберите Устранение неполадок> Сбросить этот компьютер> Удалить все . На этом этапе вас могут попросить вставить установочный носитель Windows 10, поэтому обязательно сделайте это.
- Выберите Только диск, на котором установлена Windows> Просто удалите мои файлы . Нажмите кнопку Сбросить .
- Следуйте инструкциям на экране для завершения сброса Windows 10.
После завершения сброса у вас будет чистая установка Windows 10. Если ошибка появляется снова, это означает, что это вызвано вашим оборудованием.
Решение 5. Проверьте, правильно ли работает ваше оборудование
Ошибки Blue Screen of Death часто бывают вызваны аппаратным обеспечением, и если вы получаете ошибку BSOD MANUALLY_INITIATED_CRASH, мы настоятельно рекомендуем вам проверить ваше оборудование. Обязательно сначала проверьте свою оперативную память, а затем перейдите к другим основным компонентам. Несколько пользователей сообщили, что эта проблема была вызвана неисправной материнской платой, поэтому обязательно проверьте и замените материнскую плату.
Решение 6. Запустите средство устранения неполадок оборудования .
Если ни одно из предыдущих решений не помогло решить проблему, мы обратимся к встроенным средствам устранения неполадок. Первым инструментом, который мы собираемся попробовать, является встроенное средство устранения неполадок Windows 10. Вы можете использовать этот инструмент для решения различных проблем, включая проблемы BSOD.
Вот как запустить средство устранения неполадок Windows 10:
- Откройте приложение Настройки и перейдите в раздел Обновление и безопасность .
- Выберите «Устранение неполадок» в меню слева.
-
Выберите BSOD на правой панели и нажмите Запустить средство устранения неполадок .
- Следуйте инструкциям на экране для устранения неполадок.

Решение 7. Запустите DISM .
Следующее средство устранения неполадок, которое мы собираемся попробовать, – это обслуживание образов развертывания и управление ими (DISM). Как следует из названия, этот инструмент заново развертывает образ системы, поэтому он может решить проблему BSOD в пути.
Мы рассмотрим как стандартные, так и процедуры, которые используют установочный носитель ниже:
- Стандартный способ
- Щелкните правой кнопкой мыши Пуск и откройте командную строку (администратор).
-
Вставьте следующую команду и нажмите Enter:
-
-
DISM/Online/Cleanup-Image/RestoreHealth
-
DISM/Online/Cleanup-Image/RestoreHealth
-
- Подождите, пока сканирование не закончится.
- Перезагрузите компьютер и попробуйте обновить снова.

- С установочного носителя Windows
- Вставьте установочный носитель Windows.
- Щелкните правой кнопкой мыши меню «Пуск» и выберите в меню «Командная строка» («Администратор»).
-
В командной строке введите следующие команды и нажмите Enter после каждого:
- dism/online/cleanup-image/scanhealth
- dism/online/cleanup-image/restorehealth
-
Теперь введите следующую команду и нажмите Enter:
- DISM/Online/Cleanup-Image/RestoreHealth /source:WIM:X:SourcesInstall.wim:1/LimitAccess
- Обязательно измените значение X с буквой подключенного диска при установке Windows 10.
- После завершения процедуры перезагрузите компьютер.
Решение 8. Запустите сканирование SFC
И, наконец, последний инструмент для устранения неполадок, который мы собираемся попробовать, – это сканирование SFC. Этот инструмент сканирует вашу систему на наличие потенциальных проблем и разрешает их, если это возможно. Итак, если ни одно из предыдущих решений не разрешило ошибку BSOD, мы надеемся, что вам больше повезет с сканированием SFC.
Вот как запустить сканирование SFC в Windows 10:
- Щелкните правой кнопкой мыши кнопку «Пуск» и откройте Командную строку (Admin).
-
Введите следующую строку и нажмите Enter: SFC/SCANNOW
- Подождите, пока процесс не будет завершен (это может занять некоторое время).
- Если решение найдено, оно будет применено автоматически.
- Теперь закройте командную строку и перезагрузите компьютер.

MANUALLY_INITIATED_CRASH Ошибка BSoD может вызвать много проблем, но мы надеемся, что вам удалось исправить эту ошибку с помощью одного из наших решений.
Примечание редактора . Этот пост был первоначально опубликован в июне 2016 года и с тех пор был полностью переработан и обновлен для обеспечения свежести, точности и полноты.
MANUALLY_INITIATED_CRASH1 и многие другие Blue Screen of Death приведут к сбою системы и перезагрузке компьютера, чтобы предотвратить повреждение. Ошибка BSoD, такая как эта, может быть довольно проблематичной, поэтому сегодня мы собираемся показать вам, как исправить эту ошибку в Windows 10 .
Как исправить ошибку ВРУЧНУЮ ИНИЦИИРОВАННУЮ CRASH1 BSoD
- Загрузите последние обновления Windows 10
- Запустите средство устранения неполадок BSOD
- Запустите сканирование SFC
- Запустите DISM
- Проверьте жесткий диск
- Удалить проблемное программное обеспечение
- Сбросить Windows 10
- Проверьте на неисправное оборудование
Исправлена ошибка с ручным инициированием CRASH1 в Windows 10
Решение 1. Загрузите последние обновления для Windows 10
Windows 10 — отличная операционная система, но в ней есть свои недостатки. Определенные аппаратные и программные средства имеют проблемы с Windows 10, и иногда эти проблемы могут приводить к MANUALLY_INITIATED_CRASH1 и другим ошибкам Blue Screen of Death.
Чтобы эти ошибки не появлялись, важно загрузить последние исправления через Центр обновления Windows . Microsoft усердно работает над улучшением Windows 10, и многие из этих исправлений предлагают исправления как для аппаратного и программного обеспечения, так и для улучшения безопасности. Если вы хотите, чтобы ваш компьютер был стабильным, безопасным и не содержал ошибок, мы настоятельно рекомендуем регулярно обновлять Windows 10.
Решение 2. Обновите драйверы
Драйвер довольно часто вызывает ошибку «Синий экран смерти», поскольку Windows 10 сильно зависит от драйверов. Если ваши драйверы устарели или содержат ошибки, вы не сможете правильно использовать любое оборудование, связанное с ними.
Чтобы исправить эту ошибку, рекомендуется загрузить последние версии драйверов для вашего оборудования. Имейте в виду, что почти любое оборудование может вызвать эту ошибку, поэтому рекомендуется обновить все ваши драйверы. Обновление драйверов довольно просто, и для этого вам просто нужно посетить веб-сайт производителя вашего оборудования и загрузить последние версии драйверов для вашего устройства.
Немногие пользователи сообщили, что эта ошибка была вызвана драйверами беспроводного адаптера , поэтому обязательно сначала обновите их, а затем переходите к другим драйверам.
Обновлять драйверы автоматически
Поиск драйверов самостоятельно может занять много времени. Поэтому мы советуем вам использовать инструмент, который сделает это автоматически. Использование автоматического средства обновления драйверов, безусловно, избавит вас от необходимости поиска драйверов вручную и всегда будет поддерживать вашу систему в курсе последних версий драйверов.
Модуль обновления драйверов Tweakbit (одобрен Microsoft и Norton Antivirus) поможет вам автоматически обновлять драйверы и предотвратить повреждение ПК, вызванное установкой неправильных версий драйверов. После нескольких испытаний наша команда пришла к выводу, что это наиболее автоматизированное решение.
Вот краткое руководство о том, как его использовать:
- Загрузите и установите TweakBit Driver Updater

- После установки программа начнет сканирование вашего компьютера на наличие устаревших драйверов автоматически. Driver Updater проверит установленные вами версии драйверов по своей облачной базе данных последних версий и порекомендует правильные обновления. Все, что вам нужно сделать, это дождаться завершения сканирования.

- По завершении сканирования вы получите отчет обо всех проблемных драйверах, найденных на вашем ПК. Просмотрите список и посмотрите, хотите ли вы обновить каждый драйвер по отдельности или все сразу. Чтобы обновить один драйвер за раз, нажмите ссылку «Обновить драйвер» рядом с именем драйвера. Или просто нажмите кнопку «Обновить все» внизу, чтобы автоматически установить все рекомендуемые обновления.

Примечание. Некоторые драйверы необходимо устанавливать в несколько этапов, поэтому вам придется нажимать кнопку «Обновить» несколько раз, пока не будут установлены все его компоненты.
Решение 3 — Запустите средство устранения неполадок BSOD
Следующее, что мы собираемся попробовать, — это запуск встроенного средства устранения неполадок, представленного в Windows 10. Это средство устранения неполадок может помочь во всех видах проблем, включая ошибки BSOD. Естественно, это также может помочь в устранении ошибки MANUALLY_INITIATED_CRASH1.
Вот как запустить встроенное средство устранения неполадок Windows 10:
- Откройте приложение «Настройки».
- Перейдите в раздел « Обновление и безопасность ».
- Выберите Устранение неполадок на левой панели.
- Выберите BSOD на правой панели и нажмите Запустить средство устранения неполадок .
- Следуйте инструкциям на экране для устранения неполадок.
Решение 4 — Запустите сканирование SFC
Следующее средство устранения неполадок, которое мы можем попробовать — это сканирование SFC. Средство проверки системных файлов — это инструмент командной строки, который сканирует вашу систему на наличие потенциально поврежденных системных файлов. Поэтому, если системный файл является виновником ошибки MANUALLY_INITIATED_CRASH1, этот инструмент, скорее всего, с ней справится.
Вот как запустить сканирование SFC в Windows 10:
- Щелкните правой кнопкой мыши кнопку «Пуск» и откройте командную строку (Admin).
- Введите следующую строку и нажмите Enter: SFC / SCANNOW
- Подождите, пока процесс не будет завершен (это может занять некоторое время).
- Если решение найдено, оно будет применено автоматически.
- Теперь закройте командную строку и перезагрузите компьютер.
Решение 5 — Запустите DISM
И третий вариант устранения неполадок, который мы здесь попробуем, это DISM. Обслуживание образов развертывания и управление ими (DISM) — это инструмент, который повторно развертывает образ системы. Это обычно может привести к решению различных проблем, в том числе ошибок BSOD.
Мы расскажем вам как о стандартной, так и о процедуре, которая использует установочный носитель ниже:
- Стандартный способ
- Щелкните правой кнопкой мыши Пуск и откройте командную строку (администратор).
- Вставьте следующую команду и нажмите Enter:
-
- DISM / Online / Cleanup-Image / RestoreHealth
-
- Подождите, пока сканирование не закончится.
- Перезагрузите компьютер и попробуйте обновить снова.
- С установочного носителя Windows
- Вставьте установочный носитель Windows.
- Щелкните правой кнопкой мыши меню «Пуск» и выберите в меню «Командная строка» («Администратор»).
- В командной строке введите следующие команды и нажмите Enter после каждого:
- dism / online / cleanup-image / scanhealth
- dism / online / cleanup-image / restorehealth
- Теперь введите следующую команду и нажмите Enter:
- DISM / Online / Cleanup-Image / RestoreHealth /source:WIM:X:SourcesInstall.wim:1 / LimitAccess
- Обязательно измените значение X с буквой подключенного диска при установке Windows 10.
- После завершения процедуры перезагрузите компьютер.
Решение 6 — Проверьте жесткий диск
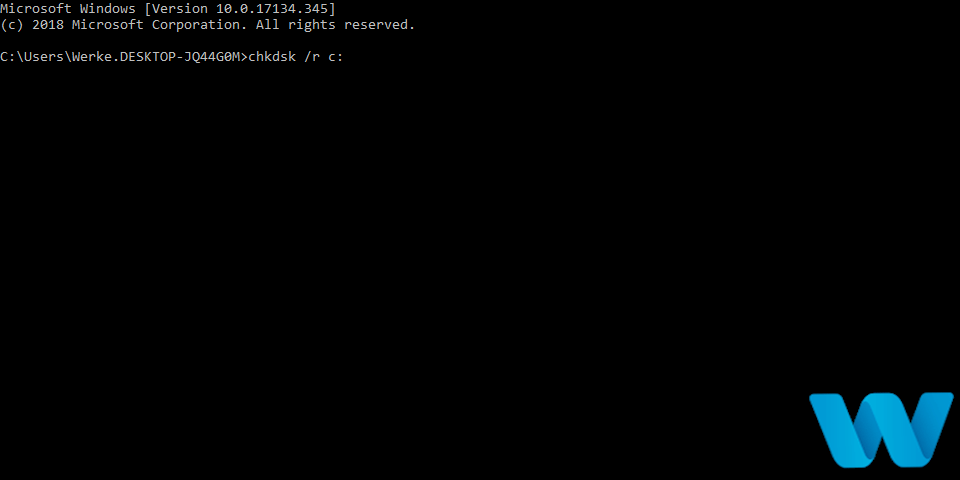
Если есть проблема с вашим жестким диском, проблемы BSOD довольно распространены. Итак, мы собираемся проверить текущее состояние вашего жесткого диска, выполнив команду chkdsk. Эта команда будет сканировать все ваши разделы и, если возможно, применить жизнеспособное решение.
Вот как запустить команду chkdsk в Windows 10:
- Войдите в расширенный запуск (перезагрузите компьютер, удерживая клавишу Shift ).
- Выберите « Устранение неполадок»> «Дополнительные параметры» .
- Выберите Командная строка из списка параметров.
- Когда появится командная строка, введите следующие строки и нажмите Enter после каждой строки, чтобы запустить ее:
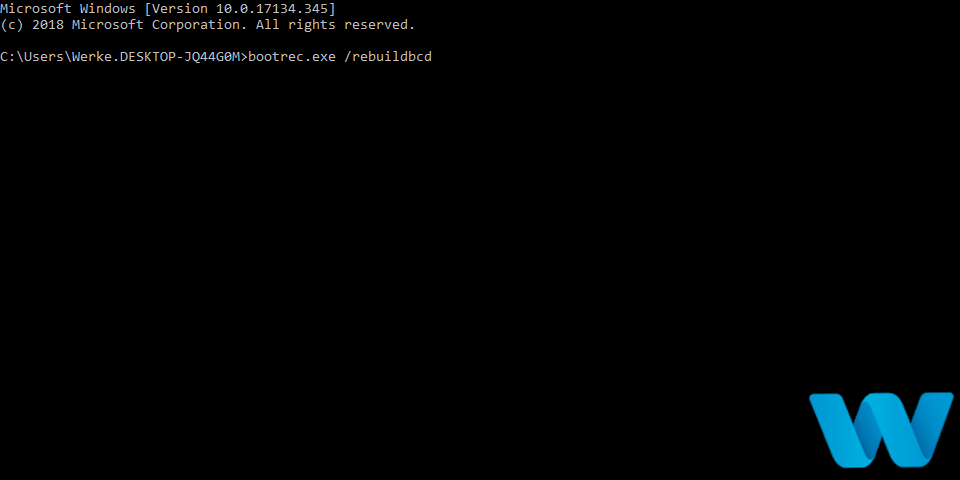
- bootrec.exe / rebuildbcd

- bootrec.exe / fixmbr
- bootrec.exe / fixboot
- bootrec.exe / rebuildbcd
- Некоторые пользователи также рекомендуют запускать дополнительные команды chkdsk . Для выполнения этих команд вам необходимо знать буквы дисков для всех разделов жесткого диска. В командной строке вы должны ввести следующее (но не забудьте использовать буквы, которые соответствуют разделам вашего жесткого диска на вашем ПК):
- chkdsk / rc:
- c hkdsk / rd:
Это только наш пример, так что имейте в виду, что вы должны выполнять команду chkdsk для каждого раздела жесткого диска, который у вас есть.
- chkdsk / rc:
- Перезагрузите компьютер и проверьте, решена ли проблема.
Решение 7 — Удалить проблемное программное обеспечение
Сторонние приложения также могут вызывать MANUALLY_INITIATED_CRASH1 и многие другие ошибки Blue Screen of Death. Чтобы исправить эту и многие другие подобные ошибки, рекомендуется найти и удалить проблемное программное обеспечение.
Наиболее распространенной причиной ошибок BSoD может быть ваше антивирусное программное обеспечение, поэтому мы рекомендуем временно удалить все сторонние антивирусные программы с вашего ПК. Чтобы полностью удалить определенный антивирус с вашего компьютера, вам придется удалить его и впоследствии использовать специальный инструмент для удаления всех оставшихся файлов, связанных с вашей антивирусной программой.
Когда вы удаляете антивирус, Защитник Windows запускается автоматически, поэтому ваш компьютер все еще будет защищен. Если проблема устранена путем удаления антивирусного программного обеспечения, вы можете переустановить его или переключиться на другое антивирусное решение.
По словам пользователей, эта ошибка может быть вызвана любым приложением на вашем ПК, поэтому рекомендуется удалить все сторонние приложения, которые вы не распознаете или не используете.
- ЧИТАЙТЕ ТАКЖЕ: исправьте ошибку «System Service Exception» в Windows 10
Стоит отметить, что ваши драйверы также могут вызывать эту ошибку, и немногие пользователи сообщили, что они исправили эту проблему на ноутбуке Dell, удалив и переустановив драйвер беспроводной сети. Чтобы удалить определенный драйвер, выполните следующие действия:
- Нажмите Windows Key + X на клавиатуре, чтобы открыть меню Power User . Выберите диспетчер устройств из списка.
- Когда откроется диспетчер устройств , найдите драйвер, который вы хотите удалить, щелкните его правой кнопкой мыши и выберите « Удалить» из меню.
- Если доступно, установите флажок « Удалить программное обеспечение драйвера для этого устройства» и нажмите « ОК» .

- После удаления драйвера перезагрузите компьютер.


Когда ваш компьютер перезагружается, Windows 10 установит драйвер по умолчанию, и, если драйвер по умолчанию работает правильно, вы можете продолжить его использование. Кроме того, вы можете попробовать обновить драйвер до версии, не имеющей версии.
Решение 8 — Сброс Windows 10
Если эта ошибка вызвана программным обеспечением, вы сможете исправить ее, выполнив сброс Windows 10. Для сброса Windows 10 вам может понадобиться загрузочная флешка , поэтому обязательно создайте ее. Мы также должны упомянуть, что этот процесс удалит все файлы с вашего диска C, поэтому мы советуем вам сделать резервную копию важных файлов. Чтобы выполнить сброс, сделайте следующее:
- Перезагрузите компьютер несколько раз во время загрузки, чтобы запустить автоматическое восстановление .
- Выберите Устранение неполадок> Дополнительные параметры> Удалить все . На этом этапе вас могут попросить вставить установочный носитель Windows 10 , поэтому убедитесь, что он у вас есть.
- Выберите Только диск, на котором установлена Windows> Просто удалите мои файлы и нажмите кнопку « Сброс» , чтобы начать процедуру.
- Следуйте инструкциям для завершения сброса.
После завершения сброса не устанавливайте сторонние приложения или драйверы. Протестируйте свой компьютер некоторое время и проверьте, появляется ли ошибка снова. Если появляется ошибка BSoD, это означает, что она вызвана вашим оборудованием.
Решение 9 — Проверка на неисправное оборудование
Если ошибка MANUALLY_INITIATED_CRASH1 не устранена, мы рекомендуем удалить или заменить недавно установленное оборудование, поскольку оно может быть несовместимо с вашим ПК. Если новое оборудование не является проблемой, обязательно выполните детальную проверку оборудования и удалите неисправное оборудование.
MANUALLY_INITIATED_CRASH1 Ошибка BSoD может быть серьезной проблемой, но мы надеемся, что вам удалось исправить ее с помощью одного из наших решений.
Примечание редактора: этот пост был первоначально опубликован в июне 2016 года и с тех пор был полностью переработан и обновлен для обеспечения свежести, точности и полноты.
ЧИТАЙТЕ ТАКЖЕ:
- Исправить NTFS_File_System Ошибка в Windows 10
- Исправлено: невозможно завершить работу из-за окна сервера DDE: ошибка приложения Explorer.exe
- Исправлено: Невозможно обновить Windows 10 Store Apps ‘0x80070005’ Ошибка
- Исправлено: ошибка Windows Update 0x800ffff в Windows 10
- Исправлено: ошибка SYSTEM_PTE_MISUSE в Windows 10
Ошибки «Синего экрана смерти» являются одной из наиболее серьезных ошибок, с которыми вы можете столкнуться в Windows 10. Эти ошибки могут вызвать проблемы нестабильности и потери данных, поэтому сегодня мы собираемся показать вам, как исправить ошибку MANUALLY_INITIATED_CRASH.
Содержание:
- Обновите драйверы и установите последние обновления для Windows 10
- Удалить проблемное программное обеспечение
- Использовать восстановление системы
- Выполните сброс Windows 10
- Проверьте, правильно ли работает ваше оборудование
- Запустите средство устранения неполадок оборудования
- Запустить DISM
- Запустите сканирование SFC
Исправлено — MANUALLY_INITIATED_CRASH Ошибка Windows 10
Решение 1. Обновите драйверы и установите последние обновления для Windows 10
Загрузка последних обновлений Windows 10 имеет решающее значение для стабильности и безопасности системы. Многие из этих обновлений предлагают улучшения безопасности и новые функции, но есть также различные исправления ошибок, связанных как с аппаратным, так и программным обеспечением. Ошибки Blue Screen of Death часто бывают вызваны проблемами с оборудованием или программным обеспечением, и если вы хотите, чтобы ваша система работала стабильно и без ошибок, мы настоятельно рекомендуем вам загрузить последние исправления с помощью Центра обновления Windows.
В дополнение к обновлениям Windows также важно загрузить последние версии драйверов для вашего оборудования. Ваше оборудование не может работать без надлежащих драйверов, и если ваши драйверы устарели или просто не полностью совместимы с Windows 10, это может привести к появлению ошибки Blue Screen of Death, такой как MANUALLY_INITIATED_CRASH. Чтобы обновить драйверы, вы можете просто использовать диспетчер устройств, выполнив следующие действия:
- Нажмите Windows Key + X на клавиатуре, чтобы открыть меню Power User. Выберите диспетчер устройств из списка.
- Когда откроется диспетчер устройств, выберите устройство, которое вы хотите обновить, щелкните его правой кнопкой мыши и выберите « Обновить драйвер».
- Выберите Поиск автоматически для обновления программного обеспечения драйвера, и Windows 10 автоматически загрузит и установит лучший драйвер для вашего устройства.
- Повторите эти шаги для всех устройств, которые вы хотите обновить.


Хотя загрузка драйверов с помощью диспетчера устройств проста, мы должны отметить, что диспетчер устройств не всегда загружает последние версии драйверов. Фактически, обычно лучше загрузить необходимые драйверы вручную, и это можно сделать, посетив веб-сайт производителя оборудования и загрузив последние версии драйверов для вашего устройства.
Обновлять драйверы автоматически
Поиск драйверов самостоятельно может занять много времени. Поэтому мы советуем вам использовать инструмент, который сделает это автоматически. Использование автоматического средства обновления драйверов, безусловно, избавит вас от необходимости поиска драйверов вручную и всегда будет поддерживать вашу систему в курсе последних версий драйверов.
Модуль обновления драйверов Tweakbit (одобрен Microsoft и Norton Antivirus) поможет вам автоматически обновлять драйверы и предотвратить повреждение ПК, вызванное установкой неправильных версий драйверов. После нескольких испытаний наша команда пришла к выводу, что это наиболее автоматизированное решение.
Вот краткое руководство о том, как его использовать:
- Загрузите и установите TweakBit Driver Updater
- После установки программа начнет сканирование вашего компьютера на наличие устаревших драйверов автоматически. Driver Updater проверит установленные вами версии драйверов по своей облачной базе данных последних версий и порекомендует правильные обновления. Все, что вам нужно сделать, это дождаться завершения сканирования.
- По завершении сканирования вы получите отчет обо всех проблемных драйверах, найденных на вашем ПК. Просмотрите список и посмотрите, хотите ли вы обновить каждый драйвер по отдельности или все сразу. Чтобы обновить один драйвер за раз, нажмите ссылку «Обновить драйвер» рядом с именем драйвера. Или просто нажмите кнопку «Обновить все» внизу, чтобы автоматически установить все рекомендуемые обновления.
Примечание. Некоторые драйверы необходимо устанавливать в несколько этапов, поэтому вам придется нажимать кнопку «Обновить» несколько раз, пока не будут установлены все его компоненты.
Решение 2 — Удалить проблемное программное обеспечение
Эти типы ошибок часто могут быть вызваны вашим программным обеспечением, поэтому важно, чтобы вы нашли и удалили любое программное обеспечение, которое может вызвать эту ошибку. Эти ошибки чаще всего вызваны вашим антивирусом, и если вы хотите исправить ошибку BSUD MANUALLY_INITIATED_CRASH, мы советуем вам временно удалить все сторонние антивирусные программы. Важно знать, что Windows 10 поставляется с собственной антивирусной программой, поэтому даже если вы удалите все сторонние антивирусные программы, ваш компьютер не будет защищен.
Чтобы полностью удалить антивирусную программу с вашего компьютера, мы рекомендуем вам использовать специальный инструмент для удаления. Многие антивирусные программы имеют тенденцию оставлять некоторые файлы после их удаления, и эти файлы могут вызывать ошибки BSoD, поэтому рекомендуется удалять их. Самый простой способ сделать это — использовать специальный инструмент для удаления, и вы можете загрузить этот инструмент для своей антивирусной программы прямо с веб-сайта разработчика антивируса.
Мы должны упомянуть, что определенные драйверы также могут вызывать эту ошибку, и вам, возможно, придется удалить их, чтобы исправить эту ошибку. По словам пользователей, удаление драйверов клавиатуры и процессора иногда может исправить эту ошибку, поэтому вы можете попробовать это. Чтобы удалить определенный драйвер, сделайте следующее:
- Нажмите Windows Key + X и выберите Диспетчер устройств из меню.
- Когда откроется диспетчер устройств, найдите драйвер, который вы хотите удалить, щелкните его правой кнопкой мыши и выберите « Удалить». Нажмите OK, чтобы подтвердить.

После удаления драйвера Windows 10 установит драйвер по умолчанию. Если драйвер по умолчанию работает, вы можете продолжить его использование или обновить его до более новой версии.
- Читайте также: Исправлено: код ошибки C101A006 при попытке купить приложения для Windows
Решение 3 — Используйте Восстановление системы
Иногда лучший способ исправить ошибки BSoD — это восстановление системы. Использовать восстановление системы легко, и вы можете сделать это, выполнив следующие действия:
- Перезагрузите компьютер несколько раз во время загрузки, чтобы начать автоматическое восстановление.
- Выберите « Устранение неполадок»> «Дополнительные параметры»> «Восстановление системы».
- Выберите ваше имя пользователя и введите пароль.
- Выберите « Выбрать другую точку восстановления» и нажмите « Далее».
- Выберите точку восстановления, к которой вы хотите вернуться, и нажмите « Далее».
- Дождитесь окончания процесса восстановления.
Решение 4 — Выполните сброс Windows 10
Если ошибка MANUALLY_INITIATED_CRASH вызвана сторонним программным обеспечением, вы можете исправить это, выполнив сброс Windows 10. Прежде чем сделать это, вы должны знать, что этот процесс удалит все файлы из вашего раздела C, поэтому обязательно сделайте их резервную копию. Вам также может понадобиться загрузочная флешка с Windows 10 для завершения этого процесса, так что имейте это в виду. Для сброса Windows 10 выполните следующие действия:
- Запустите автоматическое восстановление, перезагрузив компьютер несколько раз во время загрузки.
- Выберите « Устранение неполадок»> «Сбросить этот компьютер»> «Удалить все». На этом этапе вас могут попросить вставить установочный носитель Windows 10, поэтому обязательно сделайте это.
- Выберите « Только диск, на котором установлена Windows»> «Просто удалите мои файлы». Нажмите кнопку сброса.
- Следуйте инструкциям на экране для завершения сброса Windows 10.
После завершения процесса сброса у вас будет чистая установка Windows 10. Если ошибка появляется снова, это означает, что это вызвано вашим оборудованием.
Решение 5. Проверьте, правильно ли работает ваше оборудование
Ошибки Blue Screen of Death часто бывают вызваны аппаратным обеспечением, и если вы получаете ошибку BSOD MANUALLY_INITIATED_CRASH, мы настоятельно рекомендуем вам проверить ваше оборудование. Обязательно сначала проверьте свою оперативную память, а затем перейдите к другим основным компонентам. Несколько пользователей сообщили, что эта проблема была вызвана неисправной материнской платой, поэтому обязательно проверьте и замените материнскую плату.
Решение 6. Запустите средство устранения неполадок оборудования
Если ни одно из предыдущих решений не помогло решить проблему, мы обратимся к встроенным средствам устранения неполадок. Первым инструментом, который мы собираемся попробовать, является встроенное средство устранения неполадок Windows 10. Вы можете использовать этот инструмент для решения различных проблем, включая проблемы BSOD.
Вот как запустить средство устранения неполадок Windows 10:
- Откройте приложение «Настройки» и перейдите в раздел « Обновление и безопасность ».
- Выберите « Устранение неполадок» в меню слева.
- Выберите BSOD на правой панели и нажмите Запустить средство устранения неполадок.
- Следуйте инструкциям на экране для устранения неполадок.

Решение 7 — Запустите DISM
Следующее средство устранения неполадок, которое мы собираемся попробовать, — это обслуживание образов развертывания и управление ими (DISM). Как следует из названия, этот инструмент заново развертывает образ системы, поэтому он может решить проблему BSOD в пути.
Мы расскажем вам как о стандартной, так и о процедуре, которая использует установочный носитель ниже:
- Стандартный способ
- Щелкните правой кнопкой мыши Пуск и откройте командную строку (администратор).
- Вставьте следующую команду и нажмите Enter:
-
- DISM / Online / Cleanup-Image / RestoreHealth
- DISM / Online / Cleanup-Image / RestoreHealth
-
- Подождите, пока сканирование не закончится.
- Перезагрузите компьютер и попробуйте обновить снова.

- С установочного носителя Windows
- Вставьте установочный носитель Windows.
- Щелкните правой кнопкой мыши меню «Пуск» и выберите в меню «Командная строка» («Администратор»).
- В командной строке введите следующие команды и нажмите Enter после каждого:
- dism / online / cleanup-image / scanhealth
- dism / online / cleanup-image / restorehealth
- Теперь введите следующую команду и нажмите Enter:
- DISM / Online / Cleanup-Image / RestoreHealth /source:WIM:X:SourcesInstall.wim:1 / LimitAccess
- Обязательно измените значение X с буквой подключенного диска при установке Windows 10.
- После завершения процедуры перезагрузите компьютер.
Решение 8. Запустите сканирование SFC
И, наконец, последний инструмент для устранения неполадок, который мы собираемся попробовать, — это сканирование SFC. Этот инструмент сканирует вашу систему на наличие потенциальных проблем и разрешает их, если это возможно. Итак, если ни одно из предыдущих решений не разрешило ошибку BSOD, мы надеемся, что вам больше повезет с сканированием SFC.
Вот как запустить сканирование SFC в Windows 10:
- Щелкните правой кнопкой мыши кнопку «Пуск» и откройте командную строку (Admin).
- Введите следующую строку и нажмите Enter: SFC / SCANNOW
- Подождите, пока процесс не будет завершен (это может занять некоторое время).
- Если решение найдено, оно будет применено автоматически.
- Теперь закройте командную строку и перезагрузите компьютер.

MANUALLY_INITIATED_CRASH Ошибка BSoD может вызвать много проблем, но мы надеемся, что вам удалось исправить эту ошибку с помощью одного из наших решений.
ЧИТАЙТЕ ТАКЖЕ:
- Исправлено: ошибка KERNEL_STACK_INPAGE_ERROR в Windows 10
- Исправлено: не удается загрузить фотографии в библиотеку фотографий ‘Ошибка 0x80004005’
- Исправлено: ошибка обновления 0x80245006 в Windows 10
- Исправлено: THREAD_STUCK_IN_DEVICE_DRIVER Ошибка в Windows 10
- Исправлено: не удается установить драйвер Bluetooth — код ошибки 28
by Milan Stanojevic
Milan has been enthusiastic about technology ever since his childhood days, and this led him to take interest in all PC-related technologies. He’s a PC enthusiast and he… read more
Updated on December 14, 2021
- If you get the MANUALLY INITIATED CRASH error on Windows 10, it is caused by corrupted data.
- One simple solution would be updating your drivers and your Operating System.
- Using a system restore will also get rid of the Windows 10 MANUALLY INITIATED CRASH error.
- You could also perform SFC and DISM scans, and ultimately, a Windows 10 reset.
XINSTALL BY CLICKING THE DOWNLOAD FILE
This software will keep your drivers up and running, thus keeping you safe from common computer errors and hardware failure. Check all your drivers now in 3 easy steps:
- Download DriverFix (verified download file).
- Click Start Scan to find all problematic drivers.
- Click Update Drivers to get new versions and avoid system malfunctionings.
- DriverFix has been downloaded by 0 readers this month.
Blue Screen of Death errors are one of the most serious errors that you can encounter on Windows 10.
These errors can cause instability issues and data loss, therefore today we’re going to show you how to fix MANUALLY_INITIATED_CRASH error.
Since BSoD crashes are so problematic, you need to make sure you get rid of them completely. We’ve comprised a list with the best solutions, so make sure you follow all of them.
How do I fix the MANUALLY_INITIATED_CRASH error?
- Update your drivers and install the latest Windows 10 updates
- Remove the problematic software
- Perform Windows 10 reset
- Check if your hardware is working properly
- Run the Hardware Troubleshooter
- Run DISM
- Use System Restore
- Run the SFC scan
1. Update your drivers and install the latest Windows 10 updates
- Press the Windows Key + S and type in Settings.
- Go to Update and Security.
- Select Windows Update.
- Then, select Check for updates.
- Let windows search and install any necessary updates.
Downloading the latest Windows 10 updates is crucial for system stability and safety. Many of these updates offer security improvements and new features, but there are also various hardware and software bugfixes.
Blue Screen of Death errors are often caused by hardware or software issues, and if you want to keep your system stable and free from errors, we strongly advise you to download the latest patches.
In addition to Windows updates, it’s also important that you download the latest drivers for your hardware. Your hardware cannot work without the proper drivers.
If your drivers are outdated or just not fully compatible with Windows 10, that can cause Blue Screen of Death error such as MANUALLY_INITIATED_CRASH to appear.
To update your drivers, you can simply use Device Manager by following these steps:
- Press Windows Key + X and select Device Manager from the list.
- When Device Manager opens, select the device you want to update.
- Right click it and choose Update Driver Software.
- Choose Search automatically for updated driver software and Windows 10 will automatically download and install the best driver for your device.
- Repeat these steps for all devices that you want to update.
Update drivers automatically
Although downloading drivers by using Device Manager is simple, we have to mention that Device Manager doesn’t always download the latest drivers.
In fact, it’s usually better that you download the necessary drivers automatically, by using third-party software that will ensure the correct drivers are installed on your computer.
To proceed with this you should install this specialized tool that will run a comprehensive scan on your system and detect outdated drivers.
Afterward, it will request you to choose which drivers need to be updated before starting the process automatically. The process works smoothly and you can rest assured regarding the system protection.
⇒ Get DriverFix
2. Remove the problematic software
- Press Windows Key + X and choose Device Manager from the menu.
- When Device Manager opens, locate the driver you wish to uninstall, right-click it and choose Uninstall. Click OK to confirm.
These types of errors can often be caused by your software, therefore it’s important that you find and remove any software that can cause this error.
These errors are most commonly caused by your antivirus, and if you want to fix the MANUALLY_INITIATED_CRASH BSoD error we advise you to temporarily remove all third-party antivirus programs.
It’s important to know that Windows 10 comes with its own antivirus program, so even if you delete all third-party antivirus programs, your computer won’t be without any protection.
Some PC issues are hard to tackle, especially when it comes to corrupted repositories or missing Windows files. If you are having troubles fixing an error, your system may be partially broken.
We recommend installing Restoro, a tool that will scan your machine and identify what the fault is.
Click here to download and start repairing.
We have to mention that certain drivers can cause this error too, and you might have to remove them in order to fix it. According to users, removing keyboard and processor drivers can sometimes fix it as well.
After uninstalling a driver, Windows 10 will install the default one instead. If the default driver works, you can continue using it, or you can update it to the newer version.
3. Perform a Windows 10 reset
- Start Automatic Repair by restarting your computer a few times during the boot sequence.
- Choose Troubleshoot > Reset this PC > Remove everything.
- During this step you might be asked to insert Windows 10 installation media, so be sure to do that.
- Choose Only the drive where Windows is installed > Just remove my files. Click the Reset button.
- Follow the instructions on the screen to complete Windows 10 reset.
If the MANUALLY_INITIATED_CRASH error is caused by third-party software, you can fix it by performing Windows 10 reset. Before you do that you should know that this process will delete all files from your C partition.
so be sure to back them up. You might also need a bootable USB flash drive with Windows 10 to complete this process, so keep that in mind.
After the reset process is complete, you’ll have a clean installation of Windows 10. If the error appears again, it means that is caused by your hardware.
4. Check if your hardware is working properly
Blue Screen of Death errors are often caused by hardware, and if you’re getting MANUALLY_INITIATED_CRASH BSoD error, we strongly advise you to check your hardware.
Be sure to check your RAM first, and then move to other major components. Several users reported that this issue was caused by a faulty motherboard, so be sure to check and replace your motherboard.
With this occasion, you should clean your PC for dust and clogged fans, because overheating is also a cause of BSoD issues, and you should take every measure to make sure your components are properly ventilated.
5. Run the Hardware Troubleshooter
- Open the Settings app and go to Update & Security section.
- Select Troubleshoot from the menu on the left.
- Select BSOD from the right pane and click Run the troubleshooter.
- Follow the instructions on the screen to complete the troubleshooter.
If none of the previous solutions resolved the problem, we’re going to turn to built-in troubleshooting tools.
The first tool we’re going to try is Windows 10’s built-in troubleshooter. You can use this tool to resolve various issues, including the BSOD problems.
6. Run DISM
- Right-click Start and open Command Prompt (Admin).
- Paste the following command and press Enter:
DISM /Online /Cleanup-Image /RestoreHealth - Wait until the scan is finished.
- Restart your computer and try updating again.
The next troubleshooter we’re going to try is the Deployment Image Servicing and Management (DISM). As its name says, this tool deploys the system image all over again, so it might resolve the BSOD issue on the way.
The procedure above is the standard one that you should follow simply without any other requirements. If you have Windows Installation Media, you should use another procedure.
With the Windows installation media
- Insert your Windows installation media.
- Right-click the Start menu and, from the menu, choose the Command Prompt (Admin).
- In the command line, type the following commands and press Enter after each:
dism /online /cleanup-image /scanhealthdism /online /cleanup-image /restorehealth - Now, type the following command and press Enter:
DISM /Online /Cleanup-Image /RestoreHealth /source:WIM:X:SourcesInstall.wim:1 /LimitAccess - Make sure to change an X value with the letter of the mounted drive with Windows 10 installation.
- After the procedure is finished, restart your computer.
7. Use System Restore
Sometimes the best way to fix BSoD errors is to use System Restore. Using System Restore is easy, and you can do it by following these steps:
- Restart your computer a few times during the boot in order to start Automatic Repair.
- Choose Troubleshoot > Advanced options > System Restore.
- Select your username and enter your password.
- Select Choose a different restore point and click Next.
- Select restore point that you wish to return to and click Next.
- Wait for the restore process to finish.
8. Run the SFC scan
- Right-click on the Start Menu button, and open Command Prompt (Admin).
- Enter the following line and press Enter:
sfc/scannow - Wait until the process is done (it may take a while).
- If the solution is found, it will automatically be applied.
- Now, close the Command Prompt and restart your computer.
And finally, the last troubleshooting tool we’re going to try is the SFC scan. This tool scans your system for potential issues and resolves them, if possible.
So, if none of the previous solutions resolved the BSOD error, we hope you’ll have more luck with the SFC scan.
MANUALLY_INITIATED_CRASH BSoD error can cause you many problems, but we hope that you managed to fix this error by using one of our solutions.
Make sure you give us any feedback regarding the error in the comment section below.
![]()
Newsletter
While working, your computer might shut down unexpectedly and then you discover that it’s a reboot without issuing any warning message or similar stuff. You will find that the device is affected by MANUALLY_INITIATED_CRASH BSOD error when trying to figure out the cause. These types of Blue Screen Error come with bug check codes and in this case that is 0x000000E2. The issue clearly means a user has intentionally initiated a crash dump from either of the Keyboard or the Kernel Debugger.
MANUALLY INITIATED CRASH Blue Screen Error Windows 10 happens mostly because of some drawbacks in the Device drivers. Other reasons like an outdated OS, Bad areas in the Hard Disk, Defective Windows Image files or some corrupted system components may lead the error to show up. When encounters, you might come across frequent freezing of the desktop followed by abnormal rebooting. The issue is one of the most dangerous ones but not the invincible one, you can very well fix the same with the application of workarounds. Today, we are discussing some resolution processes to fix the Blue Screen Error with bug Check code 0x000000E2 in the below segment. Let’s hang on to the quick links of method list first listed below:
Here is how to fix MANUALLY INITIATED CRASH Blue Screen Error Windows 10 –
1] Update drivers using Device Manager
Drivers provide software interference of a hardware accessory connected to the system with a computer Bus. Hence, this is a bit sensitive and using their latest version is always mandatory. When they are obsolete, MANUALLY INITIATED CRASH Blue Screen Error gets its first entry. Usually, the updating process is simple and autonomous along with Windows but not always it is helpful.
Sometimes, you may need to visit the Manufacturer’s website for the latest drivers and grab from there. Device manager is really a better platform to update these things and this is way safer being a built-in feature. We prefer using this platform for updating the drivers, the following guidelines will instruct you there –
- Right-click on Start menu and select Device Manager from visible list.
- Once the wizard shows up, reach out to the device having an exclamation mark.
- Select to split its driver list and make a right-click on driver having yellow indication only.
- Now, select the Update driver option from the appearing menu.
- Keep following the further guidelines coming up on display to update these drivers.
- Repeat the same process for all the devices having an exclamation mark in the console.
- Finally, reboot Windows to make these changes effective.
2] Rollback drivers
We have talked about how outdated drivers can call MANUALLY INITIATED CRASH Blue Screen Error in Windows 10. Well, not only the outdated ones, rather an incompatible or dreadful one will do the same. Such a drawback happens when you allow updating them automatically and some buggy ones pushed into the system.
Another reason is a poor internet connection that puts the process in an unexpected loop and few drivers are installed in a problematic state. If that happens on your case too, try getting the previous state of the drivers by rolling back them or disable defective ones through below instructions –
- Open Run dialog pressing Win+R hotkeys together.
- Type devmgmt.msc in the provided text space of the wizard. Hit Enter to open Device Manager.
- Now, opt for the device whose driver you want to disable or rollback.
- Stretch out its driver list by making a double click on the same.
- Do a Right-click on the suspicious driver, and select Properties.
- Upon opening a new wizard, jump into the Driver tab and click Disable from there.
- If you want to get back the same to its previous state, select Roll Back Driver.
- After the task finishes, Restart Windows in the usual way.
3] Update Windows 10 by installing all released patches
OS is never complete and that the reason, Microsoft releases cumulative updates at a regular interval. These Package files comprise of bug fixes of existing snags and also recent modifications. Outdated OS usually a weaker one with respect to strength and can be affected anytime with Blue Screen error having a bug check code of 0x000000E2.
Since the updating process is automatic, you don’t really think of it but the reality is little complex here. Sometimes due to internet connection or some similar stuff, the installation of update files are buggy. To avoid this, you can perform the task manually following below guidelines –
- Launch Windows Settings app pressing Windows key and I together.
- Click on the Update & Security tile and from appearing UI.
- When shifted to following page, choose Windows Update from left end.
- On the corresponding right, click on Check for updates.
- When the list of patches is available, do click the Download option and start getting the files in the System.
- Installation will begin automatically after the process ends.
- Follow the further guidelines as asked by the device until the process finishes.
4] Detect and eliminate the malware
Malware is everywhere living in disguise especially when you are surfing on the internet. Anytime you can be an easy prey by clicking a link coming through email or while visiting a website. These bugs have a replication property and used basically for stealing sensitive data from a protected system. They can easily dodge the security shield of your system and gets inside to make the system files corrupted.
Not only they are harmful to your super-sensitive data but also due to the corruption in the system files, MANUALLY INITIATED CRASH Blue Screen Error will emerge. Windows 10 now provides its users with a security system which you can deploy to eliminate these bugs following through below guidelines –
- Open Taskbar Search and type Security in the blank text area.
- Choose Windows Security from appearing Result list.
- On the appearing App UI, click the Virus & threat protection option from the left overlay.
- Shift to the adjacent right side and choose Scan options link.
- Up next, hit the radio button of Full scan.
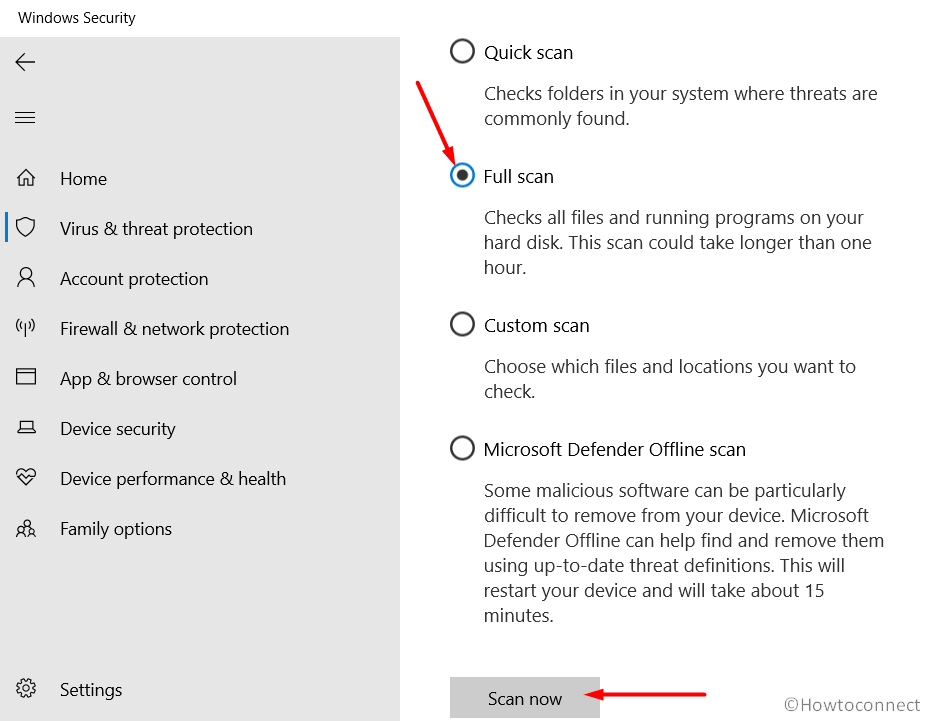
- Later on, click on Scan now option to initiate the process.
- Once the process ends normally and detects some bugs, select Clean threats option to dismiss them.
- On the consequent page, choose Remove first and then Start actions to clear them all.
5] Eliminate the risk of Software collision to fix MANUALLY INITIATED CRASH Blue Screen Error
Software applications help to do tasks easily as well saves lot of time that could go wasted in normal way. You may have a lot of such programs in the system including two or more from the same genre. When similar programs are present in the system, they may engage in a conflict resulting into a lot of system files go missing.
Such happening will also lead the system to Blue Screen error with bug check code 0x000000E2. You must not really let these programs to stay over and uninstall them using below guidelines –
- Press Win+X keys at once and choose Apps and Features option from its top.
- By default, you will be redirected to the Apps window opened from the Windows Settings app.
- Select Apps & features sitting in the left and jump to adjacent right.
- Reach out to the similar programs in list that you opt to remove.
- Click the same and hit Uninstall option from extended pane.
- If UAC prompts for consent, hit Yes to follow through.
- Once the installation finishes, Restart Windows 10 PC.
6] Rectify and recover missing files from System
Due to some malware infection or when a software conflict happens, many of the system core elements go missing while a lot becomes corrupted. These files from the Windows core part helps the system to run smoothly unless they are corrupted in an above-mentioned way. Well, there is an easy fix when such corruption happens and the tool is called System File Checker. This is a built-in Windows utility and you can avail the same in the Elevated Command Prompt going through following instructions –
- Press the Windows key and type cmd in the blank text space of Taskbar.
- When Command Prompt will be upfront, do right click on the same and also select Run as Administrator.
- When User Account Control prompts for permission, simply click Yes.
- On the next page upon appearing, insert following command tool and press Enter key –
Sfc /scannow
System File Checker will be activated and it will detect all the corrupted core components as well as fix eventually. You need to have little patience and wait until the process ends normally. Once finished, reboot the device and hope the MANUALLY INITIATED CRASH Blue Screen Error Windows 10 will be fixed afterward.
7] Perform System Restore
Windows Registry gets tweaked when you make some changes in the device, especially when installing new software. The same happens while removing existing programs and when these entries are invalid, there is a sharp chance of observing MANUALLY INITIATED CRASH Blue Screen Error in Windows 10. In case of such a scenario, you can easily ignore the issue by restoring the previous point of the Windows. The workaround is way too easy if you follow the below instructions –
- Press Win+R hotkeys and invoke Run dialog.
- In the open text field of this wizard, type rstrui and also hit Enter key.
- System Restore Wizard will pop out in a moment where you need to click Next from bottom.
- From the appearing page, choose the last restore point followed by clicking Next button.
- After the consequent window loads, choose Finish to start the restoring.
8] Check the Hardware for proper functionality
Hardware accessories can often get damaged and eventually you can suffer from Blue Screen error with bug check code 0x000000E2. Often a bad RAM, Motherboard or Hard Disk can be accused of this drawback. These things must be maintained in a perfect condition and replaced once damaged fully or partially.
In the present time, some people are also getting similar snags like BSOD in their system after connecting some Hardware accessories like a printer, speaker, keyboard or mouse. That’s unfortunate and alarming though, has got a pretty much easier fix. You can simply deport these accessories momentarily and then try rebooting the system hopefully the issue will resolve and you can have an error-free system afterward.
9] Fix Memory issues from Windows
Memory issues play a bigger role in causing MANUALLY INITIATED CRASH Blue Screen Error Windows 10 which primarily powers up from bad RAM usually. Such risks can be eliminated easily by detecting the drawbacks through running Windows Memory Diagnostic Tool. The guidelines are as follows –
- Press Win+S hotkeys and invoke the Taskbar Search.
- Type in Memory in the blank text field followed by pressing Enter key.
- The utility will prompt up where you need to select “Restart now and check for problems (recommended)”.
- The action will lead Windows to reboot once and after starting, a blue screen will be visible and it will detect memory issues.
- Once the progress touches 100%, windows will prompt to reboot for the second time.
- On subsequent startup, the result of the diagnostic will become visible in the System tray.
10] Boot the System in Safe Mode
Safe Mode is a special type of Startup method where Windows powers up with basic applications and settings only. Thus, vulnerabilities like MANUALLY INITIATED CRASH Blue Screen Error will resolve usually.
If the drawback continues to appear in the system, you can be sure that the default application of settings is not responsible for the issue and later on apply fixes accordingly. For now, let’s Boot into Safe Mode using below instructions –
- Press Windows Key and then choose the Gear icon to launch Settings app.
- In the upcoming UI, click on Update & Security.
- When consequent page loads fully, choose Recovery option lying on left overlay.
- Select Restart now button under “Advanced Startup” area.
- On the forthcoming Startup, the system will ask you to select the next step.
- Choose Troubleshoot from appearing screen.
- Proceeding forward, execute a hit on Advanced options and then Startup Settings.
- Select “Enable Safe Mode“, click Restart to move ahead.
- On the next Startup while Windows is booting, press F4.
11] Reset Windows 10 fix MANUALLY INITIATED CRASH Blue Screen Error in Windows 10
Once you discover the MANUALLY INITIATED CRASH Blue Screen Error Windows 10 even after booting the OS in the Safe Mode, you can be sure a third party application is responsible for the snag. In that case, you can Reset Windows 10 and to be honest, that’s the best way system may offer.
Resetting comes with two options such as keeping the Files intact in the system or erasing them all. You can opt for either one based on the intensity of the problem present in the system. The process to perform a Reset to Windows 10 is as follows –
Note – For your acknowledgment before proceeding to the Workaround, the process erases all the files from your C partition, therefore, you might consider having a backup of it in a safe place. You will also need a Bootable Media like USB flash drive in order to accomplish the task. Once ready, proceed with the following –
- Open the Windows Settings app pressing Win+I hotkeys at once.
- On the layout, select Update & Security tile and load its consequent window.
- From the next page, select Recovery option lying on the left pane.
- Moving on to the right, select the Get started option lying under Reset this PC area.
- When the new window will be displayed, you will find two options to choose whether you want to remove everything from your device or keep the files intact. Choose any depending on your need and extent of the error.
- Next up, follow the instructions available on display or execute tasks you will be asked to do.
- In the end, Windows 10 will be reset and there will be no MANUALLY INITIATED CRASH Blue Screen Error in the system.
12] Remove and rectify bad areas in Hard Disk
When a Hard Disk is not maintained in good health despite using it for a prolonged period of time, bad areas can be formed in it. This part of the machine is considered as a soul and a bad area inside will bring Blue Screen Error with Bug Check code 0x000000E2 upfront. To rectify those areas easily, we have the Disk checking tool which actually activated in the Elevated Command Prompt. To deploy the Workaround, here is the guideline –
- First and foremost, Open Command Prompt as Administrator.
- After moving to the black window, enter following command followed by hitting Enter –
chkdsk C: /f /r /x
- In a moment, the Disk Checking Tool will be powered up and start detecting affected areas in HDD.
- After the process ends, reboot machine in usual way.
- When you get the Desktop back in the next startup, hopefully, there will be no trace of BSOD error in the system.
13] Run Built-in Blue Screen Troubleshooter
Microsoft introduced Windows Blue Screen Troubleshooter embedded in Fall Creators Update version as the BSOD error was very much prominent. Till now, the utility has got the best potential to fix such drawbacks from your loving machine. In the past, this was available in the Windows Settings app which has shifted to Control Panel coming to the latest edition. Here is how you can deploy the utility and fix MANUALLY INITIATED CRASH Blue Screen Error Windows 10 –
- Press the Windows key and open up Taskbar Search eventually.
- Write bluescreen in the open text area. Select Find and fix bluescreen problems option once visible.
- When shifted to the Troubleshooting wizard, the system will start detecting issues in your device.
- If found any, the troubleshooter will show stepwise tasks for your execution. Follow those and the MANUALLY INITIATED CRASH Blue Screen Error will resolve.
14] Fix Problematic Windows image files to fix MANUALLY INITIATED CRASH Blue Screen Error
Windows Image Files are the core components coming with ISO before any of the major updates of the OS. No way can they be corrupted unless something happens while downloading. When the image files are found with potential corruption, MANUALLY INITIATED CRASH Blue Screen Error will show up in the system.
To fix these files eventually the BSOD error, you can deploy the DISM tool. This top-notch inbuilt utility is active in the Elevated Command Prompt and the way to avail is as following –
- Open the Taskbar Search pressing Win+Q hotkeys together.
- In the empty text space, type “cmd.exe”.
- When Command Prompt is upfront in the result, right-click on this.
- Choose Runs as Administrator option from available pane followed by clicking Yes when UAC asks.
- Once moved to the dark window next, type the following command –
DISM.exe /Online /Cleanup-image /Restorehealth
- Now, the Deployment Image Servicing and Management (DISM) tool will be activated once you hit Enter.
- The utility will thereby detect the dreadful Windows image files in the system and take necessary actions accordingly. Since, the process may be a lengthy one, hold your patience till finishes.
- Finally, Restart the device once the process ends normally.
Another way out to fix the defective Windows image files is with the installation media. The way is as following –
- First of all, insert the Windows installation media at any of the ports.
- Get access to the Elevated Command Prompt using above instructions.
- When in the black window, type the following commands and press Enter after each.
dism /online /cleanup-image /scanhealth
dism /online /cleanup-image /restorehealth
- After completing, again insert the following command and hit Enter.
DISM /Online /Cleanup-Image /RestoreHealth /source:WIM:X:SourcesInstall.wim:1 /LimitAccess
- In the Command, please replace the X value with your drive for installation media you have inserted before.
- Once the procedure is over, reboot Windows 10 to save all these changes.
Methods:
1] Update drivers using Device Manager
2] Rollback drivers
3] Update Windows 10 by installing all released patches
4] Detect and eliminate the malware
5] Eliminate the risk of Software collision
6] Rectify and recover missing files from System
7] Perform System Restore
8] Check the Hardware for proper functionality
9] Fix Memory issues from Windows
10] Boot the System in Safe Mode
11] Reset Windows 10
12] Remove and rectify bad areas in Hard Disk
13] Run Built-in Blue Screen Troubleshooter
14] Fix Problematic Windows image files
That’s all!!
Repair any Windows problems such as Blue/Black Screen, DLL, Exe, application, Regisrty error and quickly recover system from issues using Reimage.
MANUALLY_INITIATED_CRASH1 is a BSOD (Blue Screen of Death) type anomaly which primarily appears with Error code 0xDEADDEAD in Windows 10. Normally this is a critical problem that arises while upgrading the Windows 10 and thus blocks the system from booting up. Today, in this article, we have come with possible reasons behind and probable solutions to fix this issue.
Repair corrupt system files, check hard disk, create extra space in C: drive, convert Partition from NTFS to GPT are some of the solutions that may work. Apart from these workarounds, reset Windows and repair Registry files might help to curb this problem. Let’s learn the solutions in somewhat more detail-
Reasons behind the BSOD Error code 0xDEADDEAD in Windows 10
There are several causes that may generate this error code 0xDEADDEAD. Here is the list of possible culprits behind this Blue Screen of death error-
- Damage or mismatch system files or disk drive.
- Insufficient space on System partition.
- Recently installed third party incompatible application program.
- Sudden interruption on Windows Upgrade.
- Obsolete device driver and Registry Files.
- Winlogon.exe – This is the relevant application which allows the log-in or log-out.
- Corrupt Csrss.exe – This may prevent Microsoft Client or create the Runtime Server Subsystem error.
Here, we discuss different methods to address BSOD Error code 0xDEADDEAD on Windows 10 device.
- Fix System File Errors
- Repairing Corrupt Files
- Reset Windows 10
- Perform Startup Repair tool
- Convert the Drive or Partition from NTFS to GPT
- Replace all corrupt registry hives
Enter Safe Mode
Since 0xDEADDEAD is a BSOD type error, you won’t be able to access the Login Screen. Hence, you must enter Safe mode as this uses minimum drivers and software. Here’s how to proceed-
- At first, turn off your PC using the Power Button.
- Hold down the Power button for few seconds then release to start the Windows.
- Repeat this process for at least 3 times till you get the Preparing Automatic Repair Screen.

Note: In case, you obtain the Preparing Automatic Repair option in the first attempt, skip restarting your PC.
- Now, wait till the Windows diagnose the problem.
- Once the Windows Recovery environment appears, click on the Advanced options.

- Succeeding after, select Troubleshoot followed by the Advanced options again.
- Now do the click on the Startup Settings thereupon Restart PC to continue this process.
- Now press the suitable function key like F4 to enable Safe Mode or F5 to enter Safe Mode with networking.

1. Fix System File Errors
Sometimes, sudden turning off the PC can damage system files. As a result, you might receive a BSOD error code 0xDEADDEAD during logon. In this situation, you need to repair these files using the sfc/scannow command line on command Prompt. Follow these steps to proceed-
- Firstly open Run dialog (Right-click on Windows icon and select Run on the Power Menu).
- Type cmd in the text box and simultaneously press Ctrl+Shift+Enter keys to open this app as Admin.
- In case UAC prompts, tap Yes.
- Now, write sfc /scannow as shown below near the blinking cursor followed by
Enter key.

- This task will take a couple of minutes to complete, so wait accordingly.
At last, Reboot your PC. Hope, you can now log in without getting MANUALLY_INITIATED_CRASH1 BSOD error.
2. Repairing Corrupt Files
In case, some components get corrupted on the hard drive may also result in the Blue Screen of Death error like this. To avert such issues, you should repair corrupt files and bring back the missing files. Run DISM command will help you to diagnose using these steps-
- After logging with Safe Mode, hold down the Shift key and hit the Restart button under the power menu.
- While booting PC, press the function key (F2, F9 or F12) to launch the Basic Input Output screen.
- Under Choose an Option window, click on the Troubleshoot option.

- Afterward, tap Advanced Options and choose Command Prompt on the next window.

- On elevated Command Prompt, type dir and hit Enter to check the Windows files that exist on your drive.

- If this file is not available, try scanning other directories as well-
Type D:> dir and press Enter key.
- Now copy/paste the following code and press Enter at the end.
dism.exe /image:C: /cleanup-image /revertpendingactions
- Here, C: indicates the drive which contains the Windows files.
- Wait till the task gets over, once finished run exit code to come out of the prompt section.
- At last, Restart your system and see if the problem has now solved or not.
3. Reset Windows 10
If the error is still available, try resetting Windows 10 as this might help to solve this bug. Bear in mind that this will remove all the applications as well as user accounts. Here’s how to proceed-
- At first, plug in the USB or DVD having Windows installation media to the respective port and Restart your system.
- When the BIOS loads, select the Repair your computer option.

- Afterwards, click on the Troubleshoot followed by Reset this PC.
- Subsequently, choose either of the options Keep my files or Remove everything depending upon your choice.

- Next, you will get Reset this PC window, select any of the preferred options to continue.
- Moving forward, a confirmation message appears displaying the caution that may happen after resetting.
- Succeeding after, hit the Reset button and wait patiently for approx 1 hour to complete the whole task.

- Once finished, your system will remove all the software and Windows 10 starts behaving normally.
4. Perform Startup Repair tool
If MANUALLY_INITIATED_CRASH1 BSOD error is still available, you should try the Startup Repair tool to fix this trouble-
- Firstly, connect the USB drive containing installation media to the port and start your PC.
- Henceforth, press the BIOS supportive function keys like Del, Esc, F2, F11, etc.
- When the Windows 10 setup pops up, select your preferred language and time then tap the Next button.

- Subsequently, move to the bottom pane and hit Repair your computer link.
- Go ahead and do the click on Troubleshoot followed by Advanced Options from the next screen.
- Thereupon, select Startup Repair and let the System detect the problem and repair corrupted files (if any).
- After finishing the task, Reboot your PC so as to confirm the changes made so far.
5. Convert the Drive or Partition from NTFS to GPT
If all the above fixes don’t help to recover MANUALLY_INITIATED_CRASH1 BSOD error, you must clean install Windows 10. However, before proceeding ahead, do convert the partition from NTFS to GPT. Here’s how to go-ahead-
- Go to the Cortana and type Command Prompt in the text area.
- Right-click on the pop-up result and choose Run as administrator from the drop-down menu. Tap Yes, if UAC prompts.
- Again, type diskpart near the blinking cursor and hit Enter key. Afterwards, write list disk and ensure that which disk you are going to change or remove.
- Henceforth, select the Disk Number (either 0 or 1) thereafter delete volume next to the line.

- Next, type clean on elevated Command Prompt and hit Enter key. This will reformat all the volumes and partitions on the selected disk.
- Succeeding after, type
convert gpton the black screen to change the drives from NTFS to GPT. - Once done, type exit and press Enter to come out of the console.
- Now, you can fresh install Windows 10 with or without using installation media.
Find and Fix Driver Issues automatically via PC Repair Tool – ‘DriverFix’.
6. Replace all corrupt registry hives
Furthermore, corrupt Windows registry hives may also arise this bug. In such cases, you can’t access the registry directly. This is why replace all registry files that are missing using the backup. Here are the steps-
- At first, the preferred option is to plug the Windows Installation media and Restart your system.
- When the boot process is loading, press the respective function keys to launch BIOS settings. Now press any key to invoke the installation screen.
- Thereafter select your preferred language and time followed by Next to continue the process. Further, tap Repair your computer link available at the bottom left corner.
- You will receive the Startup Options screen. Here, tap Troubleshoot under Choose an option window there forth Advanced options.
- Succeeding after, select the Command Prompt among the six available options.
- Once the console starts, type c: to enter into Windows main drive. If the OS is installed on a different drive other than selected partition, change the name accordingly.
- Going ahead, type cd windowssystem32config near the blinking area and hit Enter.

- Again, type dir command to view the files and folders that exist in a particular directory.
- Henceforth, execute these codes to rename the system and Security files followed by
Enter key.
-
- ren SYSTEM SYSTEM.old
- ren SECURITY SECURITY.old
- Subsequently, type cd RegBack to create the backup of registry files of the newly-created directory.
- Afterwards, execute the following command line-
-
- copy /Y SOFTWAREcopy /Y SAMcopy /Y SYSTEM
- Once you complete the whole process, type Exit to close the prompt and Windows Recovery Environment as well.
Hopefully, you won’t get the BSOD error MANUALLY_INITIATED_CRASH1 on your System after applying the above tweaks.
Tip: If you are facing update, activation, or driver issues on your Windows PC, try RESTORO PC Repair Tool. This software will scan your device for potential issues and resolve them automatically.

Содержание
- Как исправить ошибку MANUALLY_INITIATED_CRASH BSoD
- Исправлено — MANUALLY_INITIATED_CRASH Ошибка Windows 10
Партнерское раскрытие

Ошибки «Синего экрана смерти» являются одной из наиболее серьезных ошибок, с которыми вы можете столкнуться в Windows 10. Эти ошибки могут вызвать проблемы нестабильности и потери данных, поэтому сегодня мы собираемся показать вам, как исправить ошибку MANUALLY_INITIATED_CRASH.
Оглавление:
- Обновите драйверы и установите последние обновления для Windows 10
- Удалить проблемное программное обеспечение
- Использовать восстановление системы
- Выполните сброс Windows 10
- Проверьте, правильно ли работает ваше оборудование
- Запустите средство устранения неполадок оборудования
- Запустите DISM
- Запустите сканирование SFC
Исправлено — MANUALLY_INITIATED_CRASH Ошибка Windows 10
Решение 1. Обновите драйверы и установите последние обновления для Windows 10
Загрузка последних обновлений Windows 10 имеет решающее значение для стабильности и безопасности системы. Многие из этих обновлений предлагают улучшения безопасности и новые функции, но есть также различные исправления ошибок, связанных как с аппаратным, так и программным обеспечением.Ошибки Blue Screen of Death часто бывают вызваны аппаратными или программными проблемами, и если вы хотите, чтобы ваша система работала стабильно и без ошибок, мы настоятельно рекомендуем вам загрузить последние исправления с помощью Центра обновления Windows.
В дополнение к обновлениям Windows также важно загрузить последние версии драйверов для вашего оборудования. Ваше оборудование не может работать без надлежащих драйверов, и если ваши драйверы устарели или просто не полностью совместимы с Windows 10, это может привести к появлению ошибки Blue Screen of Death, такой как MANUALLY_INITIATED_CRASH. Чтобы обновить драйверы, вы можете просто использовать диспетчер устройств, выполнив следующие действия:
- Нажмите Windows Key + X на клавиатуре, чтобы открыть меню Power User. Выбрать Диспетчер устройств из списка.
- когда Диспетчер устройств откройте, выберите устройство, которое вы хотите обновить, щелкните его правой кнопкой мыши и выберите Обновление программного обеспечения драйвера.
- выбирать Автоматический поиск обновленного программного обеспечения драйвера Windows 10 автоматически загрузит и установит лучший драйвер для вашего устройства.
- Повторите эти шаги для всех устройств, которые вы хотите обновить.


Хотя загрузка драйверов с помощью диспетчера устройств проста, мы должны отметить, что диспетчер устройств не всегда загружает последние версии драйверов. Фактически, обычно лучше загружать необходимые драйверы вручную, и вы можете сделать это, посетив веб-сайт производителя оборудования и загрузив последние версии драйверов для вашего устройства.
Обновлять драйверы автоматически
Поиск драйверов самостоятельно может занять много времени. Поэтому мы советуем вам использовать инструмент, который сделает это автоматически. Использование автоматического средства обновления драйверов, безусловно, избавит вас от необходимости искать драйверы вручную и всегда будет поддерживать вашу систему в курсе последних версий драйверов.
Модуль обновления драйверов Tweakbit (одобрен Microsoft и Norton Antivirus) поможет вам автоматически обновлять драйверы и предотвратить повреждение ПК, вызванное установкой неправильных версий драйверов. После нескольких испытаний наша команда пришла к выводу, что это наиболее автоматизированное решение.
Вот краткое руководство о том, как его использовать:
- Загрузить и установитьОбновление драйвера TweakBit
- После установки программа начнет сканирование вашего компьютера на наличие устаревших драйверов автоматически. Driver Updater проверит установленные вами версии драйверов по своей облачной базе данных последних версий и порекомендует правильные обновления. Все, что вам нужно сделать, это дождаться завершения сканирования.
- По завершении сканирования вы получите отчет обо всех проблемных драйверах, найденных на вашем ПК. Просмотрите список и посмотрите, хотите ли вы обновить каждый драйвер по отдельности или все сразу. Чтобы обновить один драйвер за раз, нажмите ссылку «Обновить драйвер» рядом с именем драйвера. Или просто нажмите кнопку «Обновить все» внизу, чтобы автоматически установить все рекомендуемые обновления.
Замечания: Некоторые драйверы должны быть установлены в несколько этапов, поэтому вам придется нажимать кнопку «Обновить» несколько раз, пока не будут установлены все его компоненты.
Решение 2 — Удалить проблемное программное обеспечение
Эти типы ошибок часто могут быть вызваны вашим программным обеспечением, поэтому важно найти и удалить любое программное обеспечение, которое может вызвать эту ошибку. Эти ошибки чаще всего вызваны вашим антивирусом, и если вы хотите исправить ошибку BSUD MANUALLY_INITIATED_CRASH, мы советуем вам временно удалить все сторонние антивирусные программы. Важно знать, что Windows 10 поставляется с собственной антивирусной программой, поэтому даже если вы удалите все сторонние антивирусные программы, ваш компьютер не будет защищен.
Чтобы полностью удалить антивирусную программу с вашего компьютера, мы рекомендуем вам использовать специальный инструмент для удаления. Многие антивирусные программы имеют тенденцию оставлять некоторые файлы после их удаления, и эти файлы могут вызывать ошибки BSoD, поэтому рекомендуется удалять их. Самый простой способ сделать это — использовать специальный инструмент для удаления, и вы можете загрузить этот инструмент для своей антивирусной программы прямо с веб-сайта вашего разработчика антивирусных программ.
Мы должны упомянуть, что определенные драйверы также могут вызывать эту ошибку, и вам, возможно, придется удалить их, чтобы исправить эту ошибку. По мнению пользователей, удаление драйверов клавиатуры и процессора иногда может исправить эту ошибку, поэтому вы можете попробовать это. Чтобы удалить определенный драйвер, сделайте следующее:
- Нажмите Windows Key + X и выбрать Диспетчер устройств из меню.
- Когда откроется диспетчер устройств, найдите драйвер, который вы хотите удалить, щелкните его правой кнопкой мыши и выберите Удалить, щелчок Хорошо подтвердить.

После удаления драйвера Windows 10 установит драйвер по умолчанию. Если драйвер по умолчанию работает, вы можете продолжить его использование или обновить его до более новой версии.
Решение 3 — Используйте Восстановление системы
Иногда лучший способ исправить ошибки BSoD — это восстановление системы. С помощью восстановления системы легко, и вы можете сделать это, выполнив следующие действия:
- Перезагрузите компьютер несколько раз во время загрузки, чтобы запустить автоматическое восстановление.
- выбирать Устранение неполадок> Дополнительные параметры> Восстановление системы.
- Выберите свой имя пользователя и введите свой пароль.
- Выбрать Выберите другую точку восстановления и нажмите следующий.
- Выберите точку восстановления, к которой вы хотите вернуться, и нажмите следующий.
- Дождитесь окончания процесса восстановления.
Решение 4 — Выполните сброс Windows 10
Если ошибка MANUALLY_INITIATED_CRASH вызвана сторонним программным обеспечением, вы можете исправить это, выполнив сброс Windows 10. Прежде чем сделать это, вы должны знать, что этот процесс удалит все файлы из вашего раздела C, поэтому обязательно сделайте их резервную копию Вам также может понадобиться загрузочная флешка с Windows 10 для завершения этого процесса, так что имейте это в виду. Чтобы сбросить Windows 10, сделайте следующее:
- Запустите автоматическое восстановление, перезагрузив компьютер несколько раз во время загрузки.
- выбирать Устранение неполадок> Сброс этого ПК> Удалить все, На этом этапе вас могут попросить вставить установочный носитель Windows 10, поэтому обязательно сделайте это.
- выбирать Только диск, на котором установлена Windows> Просто удалите мои файлы, Нажмите на Сброс кнопка.
- Следуйте инструкциям на экране для завершения сброса Windows 10.
После завершения сброса у вас будет чистая установка Windows 10. Если ошибка появляется снова, это означает, что это вызвано вашим оборудованием.
Решение 5. Проверьте, правильно ли работает ваше оборудование
Ошибки Blue Screen of Death часто бывают вызваны аппаратным обеспечением, и если вы получаете ошибку BSOD MANUALLY_INITIATED_CRASH, мы настоятельно рекомендуем вам проверить ваше оборудование. Обязательно сначала проверьте свою оперативную память, а затем перейдите к другим основным компонентам. Несколько пользователей сообщили, что эта проблема была вызвана неисправной материнской платой, поэтому обязательно проверьте и замените материнскую плату.
Решение 6 — Запустите средство устранения неполадок оборудования
Если ни одно из предыдущих решений не помогло решить проблему, мы обратимся к встроенным средствам устранения неполадок. Первым инструментом, который мы собираемся попробовать, является встроенное средство устранения неполадок Windows 10. Вы можете использовать этот инструмент для решения различных проблем, включая проблемы BSOD.
Вот как запустить средство устранения неполадок Windows 10:
- ОткрытьПриложение настроек и перейти кОбновление и безопасность раздел.
- Выбрать Troubleshootиз меню слева.
- ВыбратьBSOD из правой панели и нажмитеЗапустите средство устранения неполадок.
- Следуйте инструкциям на экране для устранения неполадок.

Решение 7 — Запустите DISM
Следующее средство устранения неполадок, которое мы собираемся попробовать, — это обслуживание образов развертывания и управление ими (DISM). Как следует из названия, этот инструмент заново развертывает образ системы, поэтому он может решить проблему BSOD в пути.
Мы рассмотрим как стандартные, так и процедуры, которые используют установочный носитель ниже:
- Стандартный способ
- Щелкните правой кнопкой мыши Пуск и откройте командную строку (Admin).
- Вставьте следующую команду и нажмите Enter:
-
- DISM / Online / Cleanup-Image / RestoreHealth
- DISM / Online / Cleanup-Image / RestoreHealth
-
- Подождите, пока сканирование не закончится.
- Перезагрузите компьютер и попробуйте обновить снова.

- С установочного носителя Windows
- Вставьте установочный носитель Windows.
- Щелкните правой кнопкой мыши меню «Пуск» и выберите в меню «Командная строка» («Администратор»).
- В командной строке введите следующие команды и нажмите Enter после каждого:
- dism / online / cleanup-image / scanhealth
- dism / online / cleanup-image / restorehealth
- Теперь введите следующую команду и нажмите Enter:
- DISM / Online / Cleanup-Image / RestoreHealth /source:WIM:X:SourcesInstall.wim:1 / LimitAccess
- Убедитесь, что изменилиИкс значение с буквой смонтированного диска с установкой Windows 10.
- После завершения процедуры перезагрузите компьютер.
Решение 8. Запустите сканирование SFC
И, наконец, последний инструмент для устранения неполадок, который мы собираемся попробовать, — это сканирование SFC. Этот инструмент сканирует вашу систему на наличие потенциальных проблем и разрешает их, если это возможно. Итак, если ни одно из предыдущих решений не разрешило ошибку BSOD, мы надеемся, что вам больше повезет с сканированием SFC.
Вот как запустить сканирование SFC в Windows 10:
- Щелкните правой кнопкой мыши кнопку «Пуск» и откройтеКомандная строка (администратор).
- Введите следующую строку и нажмите Enter: ПФС / SCANNOW
- Подождите, пока процесс не будет завершен (это может занять некоторое время).
- Если решение найдено, оно будет применено автоматически.
- Теперь закройте командную строку и перезагрузите компьютер.

MANUALLY_INITIATED_CRASH Ошибка BSoD может вызвать много проблем, но мы надеемся, что вам удалось исправить эту ошибку с помощью одного из наших решений.
Примечание редактора: Этот пост был первоначально опубликован в июне 2016 года и с тех пор был полностью переработан и обновлен для обеспечения свежести, точности и полноты.
While working, your computer might shut down unexpectedly and then you discover that it’s a reboot without issuing any warning message or similar stuff. You will find that the device is affected by MANUALLY_INITIATED_CRASH BSOD error when trying to figure out the cause. These types of Blue Screen Error come with bug check codes and in this case that is 0x000000E2. The issue clearly means a user has intentionally initiated a crash dump from either of the Keyboard or the Kernel Debugger.
MANUALLY INITIATED CRASH Blue Screen Error Windows 10 happens mostly because of some drawbacks in the Device drivers. Other reasons like an outdated OS, Bad areas in the Hard Disk, Defective Windows Image files or some corrupted system components may lead the error to show up. When encounters, you might come across frequent freezing of the desktop followed by abnormal rebooting. The issue is one of the most dangerous ones but not the invincible one, you can very well fix the same with the application of workarounds. Today, we are discussing some resolution processes to fix the Blue Screen Error with bug Check code 0x000000E2 in the below segment. Let’s hang on to the quick links of method list first listed below:
Here is how to fix MANUALLY INITIATED CRASH Blue Screen Error Windows 10 –
1] Update drivers using Device Manager
Drivers provide software interference of a hardware accessory connected to the system with a computer Bus. Hence, this is a bit sensitive and using their latest version is always mandatory. When they are obsolete, MANUALLY INITIATED CRASH Blue Screen Error gets its first entry. Usually, the updating process is simple and autonomous along with Windows but not always it is helpful.
Sometimes, you may need to visit the Manufacturer’s website for the latest drivers and grab from there. Device manager is really a better platform to update these things and this is way safer being a built-in feature. We prefer using this platform for updating the drivers, the following guidelines will instruct you there –
- Right-click on Start menu and select Device Manager from visible list.
- Once the wizard shows up, reach out to the device having an exclamation mark.
- Select to split its driver list and make a right-click on driver having yellow indication only.
- Now, select the Update driver option from the appearing menu.
- Keep following the further guidelines coming up on display to update these drivers.
- Repeat the same process for all the devices having an exclamation mark in the console.
- Finally, reboot Windows to make these changes effective.
2] Rollback drivers
We have talked about how outdated drivers can call MANUALLY INITIATED CRASH Blue Screen Error in Windows 10. Well, not only the outdated ones, rather an incompatible or dreadful one will do the same. Such a drawback happens when you allow updating them automatically and some buggy ones pushed into the system.
Another reason is a poor internet connection that puts the process in an unexpected loop and few drivers are installed in a problematic state. If that happens on your case too, try getting the previous state of the drivers by rolling back them or disable defective ones through below instructions –
- Open Run dialog pressing Win+R hotkeys together.
- Type devmgmt.msc in the provided text space of the wizard. Hit Enter to open Device Manager.
- Now, opt for the device whose driver you want to disable or rollback.
- Stretch out its driver list by making a double click on the same.
- Do a Right-click on the suspicious driver, and select Properties.
- Upon opening a new wizard, jump into the Driver tab and click Disable from there.
- If you want to get back the same to its previous state, select Roll Back Driver.
- After the task finishes, Restart Windows in the usual way.
3] Update Windows 10 by installing all released patches
OS is never complete and that the reason, Microsoft releases cumulative updates at a regular interval. These Package files comprise of bug fixes of existing snags and also recent modifications. Outdated OS usually a weaker one with respect to strength and can be affected anytime with Blue Screen error having a bug check code of 0x000000E2.
Since the updating process is automatic, you don’t really think of it but the reality is little complex here. Sometimes due to internet connection or some similar stuff, the installation of update files are buggy. To avoid this, you can perform the task manually following below guidelines –
- Launch Windows Settings app pressing Windows key and I together.
- Click on the Update & Security tile and from appearing UI.
- When shifted to following page, choose Windows Update from left end.
- On the corresponding right, click on Check for updates.
- When the list of patches is available, do click the Download option and start getting the files in the System.
- Installation will begin automatically after the process ends.
- Follow the further guidelines as asked by the device until the process finishes.
4] Detect and eliminate the malware
Malware is everywhere living in disguise especially when you are surfing on the internet. Anytime you can be an easy prey by clicking a link coming through email or while visiting a website. These bugs have a replication property and used basically for stealing sensitive data from a protected system. They can easily dodge the security shield of your system and gets inside to make the system files corrupted.
Not only they are harmful to your super-sensitive data but also due to the corruption in the system files, MANUALLY INITIATED CRASH Blue Screen Error will emerge. Windows 10 now provides its users with a security system which you can deploy to eliminate these bugs following through below guidelines –
- Open Taskbar Search and type Security in the blank text area.
- Choose Windows Security from appearing Result list.
- On the appearing App UI, click the Virus & threat protection option from the left overlay.
- Shift to the adjacent right side and choose Scan options link.
- Up next, hit the radio button of Full scan.
- Later on, click on Scan now option to initiate the process.
- Once the process ends normally and detects some bugs, select Clean threats option to dismiss them.
- On the consequent page, choose Remove first and then Start actions to clear them all.
5] Eliminate the risk of Software collision to fix MANUALLY INITIATED CRASH Blue Screen Error
Software applications help to do tasks easily as well saves lot of time that could go wasted in normal way. You may have a lot of such programs in the system including two or more from the same genre. When similar programs are present in the system, they may engage in a conflict resulting into a lot of system files go missing.
Such happening will also lead the system to Blue Screen error with bug check code 0x000000E2. You must not really let these programs to stay over and uninstall them using below guidelines –
- Press Win+X keys at once and choose Apps and Features option from its top.
- By default, you will be redirected to the Apps window opened from the Windows Settings app.
- Select Apps & features sitting in the left and jump to adjacent right.
- Reach out to the similar programs in list that you opt to remove.
- Click the same and hit Uninstall option from extended pane.
- If UAC prompts for consent, hit Yes to follow through.
- Once the installation finishes, Restart Windows 10 PC.
6] Rectify and recover missing files from System
Due to some malware infection or when a software conflict happens, many of the system core elements go missing while a lot becomes corrupted. These files from the Windows core part helps the system to run smoothly unless they are corrupted in an above-mentioned way. Well, there is an easy fix when such corruption happens and the tool is called System File Checker. This is a built-in Windows utility and you can avail the same in the Elevated Command Prompt going through following instructions –
- Press the Windows key and type cmd in the blank text space of Taskbar.
- When Command Prompt will be upfront, do right click on the same and also select Run as Administrator.
- When User Account Control prompts for permission, simply click Yes.
- On the next page upon appearing, insert following command tool and press Enter key –
Sfc /scannow
System File Checker will be activated and it will detect all the corrupted core components as well as fix eventually. You need to have little patience and wait until the process ends normally. Once finished, reboot the device and hope the MANUALLY INITIATED CRASH Blue Screen Error Windows 10 will be fixed afterward.
7] Perform System Restore
Windows Registry gets tweaked when you make some changes in the device, especially when installing new software. The same happens while removing existing programs and when these entries are invalid, there is a sharp chance of observing MANUALLY INITIATED CRASH Blue Screen Error in Windows 10. In case of such a scenario, you can easily ignore the issue by restoring the previous point of the Windows. The workaround is way too easy if you follow the below instructions –
- Press Win+R hotkeys and invoke Run dialog.
- In the open text field of this wizard, type rstrui and also hit Enter key.
- System Restore Wizard will pop out in a moment where you need to click Next from bottom.
- From the appearing page, choose the last restore point followed by clicking Next button.
- After the consequent window loads, choose Finish to start the restoring.
8] Check the Hardware for proper functionality
Hardware accessories can often get damaged and eventually you can suffer from Blue Screen error with bug check code 0x000000E2. Often a bad RAM, Motherboard or Hard Disk can be accused of this drawback. These things must be maintained in a perfect condition and replaced once damaged fully or partially.
In the present time, some people are also getting similar snags like BSOD in their system after connecting some Hardware accessories like a printer, speaker, keyboard or mouse. That’s unfortunate and alarming though, has got a pretty much easier fix. You can simply deport these accessories momentarily and then try rebooting the system hopefully the issue will resolve and you can have an error-free system afterward.
9] Fix Memory issues from Windows
Memory issues play a bigger role in causing MANUALLY INITIATED CRASH Blue Screen Error Windows 10 which primarily powers up from bad RAM usually. Such risks can be eliminated easily by detecting the drawbacks through running Windows Memory Diagnostic Tool. The guidelines are as follows –
- Press Win+S hotkeys and invoke the Taskbar Search.
- Type in Memory in the blank text field followed by pressing Enter key.
- The utility will prompt up where you need to select “Restart now and check for problems (recommended)”.
- The action will lead Windows to reboot once and after starting, a blue screen will be visible and it will detect memory issues.
- Once the progress touches 100%, windows will prompt to reboot for the second time.
- On subsequent startup, the result of the diagnostic will become visible in the System tray.
10] Boot the System in Safe Mode
Safe Mode is a special type of Startup method where Windows powers up with basic applications and settings only. Thus, vulnerabilities like MANUALLY INITIATED CRASH Blue Screen Error will resolve usually.\
If the drawback continues to appear in the system, you can be sure that the default application of settings is not responsible for the issue and later on apply fixes accordingly. For now, let’s Boot into Safe Mode using below instructions –
- Press Windows Key and then choose the Gear icon to launch Settings app.
- In the upcoming UI, click on Update & Security.
- When consequent page loads fully, choose Recovery option lying on left overlay.
- Select Restart now button under “Advanced Startup” area.
- On the forthcoming Startup, the system will ask you to select the next step.
- Choose Troubleshoot from appearing screen.
- Proceeding forward, execute a hit on Advanced options and then Startup Settings.
- Select “Enable Safe Mode“, click Restart to move ahead.
- On the next Startup while Windows is booting, press F4.
11] Reset Windows 10 fix MANUALLY INITIATED CRASH Blue Screen Error in Windows 10
Once you discover the MANUALLY INITIATED CRASH Blue Screen Error Windows 10 even after booting the OS in the Safe Mode, you can be sure a third party application is responsible for the snag. In that case, you can Reset Windows 10 and to be honest, that’s the best way system may offer.
Resetting comes with two options such as keeping the Files intact in the system or erasing them all. You can opt for either one based on the intensity of the problem present in the system. The process to perform a Reset to Windows 10 is as follows –
Note – For your acknowledgment before proceeding to the Workaround, the process erases all the files from your C partition, therefore, you might consider having a backup of it in a safe place. You will also need a Bootable Media like USB flash drive in order to accomplish the task. Once ready, proceed with the following –
- Open the Windows Settings app pressing Win+I hotkeys at once.
- On the layout, select Update & Security tile and load its consequent window.
- From the next page, select Recovery option lying on the left pane.
- Moving on to the right, select the Get started option lying under Reset this PC area.
- When the new window will be displayed, you will find two options to choose whether you want to remove everything from your device or keep the files intact. Choose any depending on your need and extent of the error.
- Next up, follow the instructions available on display or execute tasks you will be asked to do.
- In the end, Windows 10 will be reset and there will be no MANUALLY INITIATED CRASH Blue Screen Error in the system.
12] Remove and rectify bad areas in Hard Disk
When a Hard Disk is not maintained in good health despite using it for a prolonged period of time, bad areas can be formed in it. This part of the machine is considered as a soul and a bad area inside will bring Blue Screen Error with Bug Check code 0x000000E2 upfront. To rectify those areas easily, we have the Disk checking tool which actually activated in the Elevated Command Prompt. To deploy the Workaround, here is the guideline –
- First and foremost, Open Command Prompt as Administrator.
- After moving to the black window, enter following command followed by hitting Enter –
chkdsk C: /f /r /x
- In a moment, the Disk Checking Tool will be powered up and start detecting affected areas in HDD.
- After the process ends, reboot machine in usual way.
- When you get the Desktop back in the next startup, hopefully, there will be no trace of BSOD error in the system.
13] Run Built-in Blue Screen Troubleshooter
Microsoft introduced Windows Blue Screen Troubleshooter embedded in Fall Creators Update version as the BSOD error was very much prominent. Till now, the utility has got the best potential to fix such drawbacks from your loving machine. In the past, this was available in the Windows Settings app which has shifted to Control Panel coming to the latest edition. Here is how you can deploy the utility and fix MANUALLY INITIATED CRASH Blue Screen Error Windows 10 –
- Press the Windows key and open up Taskbar Search eventually.
- Write bluescreen in the open text area. Select Find and fix bluescreen problems option once visible.
- When shifted to the Troubleshooting wizard, the system will start detecting issues in your device.
- If found any, the troubleshooter will show stepwise tasks for your execution. Follow those and the MANUALLY INITIATED CRASH Blue Screen Error will resolve.
14] Fix Problematic Windows image files to fix MANUALLY INITIATED CRASH Blue Screen Error
Windows Image Files are the core components coming with ISO before any of the major updates of the OS. No way can they be corrupted unless something happens while downloading. When the image files are found with potential corruption, MANUALLY INITIATED CRASH Blue Screen Error will show up in the system.
To fix these files eventually the BSOD error, you can deploy the DISM tool. This top-notch inbuilt utility is active in the Elevated Command Prompt and the way to avail is as following –
- Open the Taskbar Search pressing Win+Q hotkeys together.
- In the empty text space, type “cmd.exe”.
- When Command Prompt is upfront in the result, right-click on this.
- Choose Runs as Administrator option from available pane followed by clicking Yes when UAC asks.
- Once moved to the dark window next, type the following command –
DISM.exe /Online /Cleanup-image /Restorehealth
- Now, the Deployment Image Servicing and Management (DISM) tool will be activated once you hit Enter.
- The utility will thereby detect the dreadful Windows image files in the system and take necessary actions accordingly. Since, the process may be a lengthy one, hold your patience till finishes.
- Finally, Restart the device once the process ends normally.
Another way out to fix the defective Windows image files is with the installation media. The way is as following –
- First of all, insert the Windows installation media at any of the ports.
- Get access to the Elevated Command Prompt using above instructions.
- When in the black window, type the following commands and press Enter after each.
dism /online /cleanup-image /scanhealth
dism /online /cleanup-image /restorehealth
- After completing, again insert the following command and hit Enter.
DISM /Online /Cleanup-Image /RestoreHealth /source:WIM:X:SourcesInstall.wim:1 /LimitAccess
- In the Command, please replace the X value with your drive for installation media you have inserted before.
- Once the procedure is over, reboot Windows 10 to save all these changes.
Methods:
1] Update drivers using Device Manager
2] Rollback drivers
3] Update Windows 10 by installing all released patches
4] Detect and eliminate the malware
5] Eliminate the risk of Software collision
6] Rectify and recover missing files from System
7] Perform System Restore
8] Check the Hardware for proper functionality
9] Fix Memory issues from Windows
10] Boot the System in Safe Mode
11] Reset Windows 10
12] Remove and rectify bad areas in Hard Disk
13] Run Built-in Blue Screen Troubleshooter
14] Fix Problematic Windows image files
That’s all!!
Repair any Windows problems such as Blue/Black Screen, DLL, Exe, application, Regisrty error and quickly recover system from issues using Reimage.

Contents
- 1 Manually Initiated Crash Error In Windows 10 Expert Fix
- 2 How To Deliberately Crash Windows 10 (also Works With 8.1 7 Vista Xp)
- 2.1 Conclusion
- 2.1.1 Related image with manually initiated crash error in windows 10 expert fix
- 2.1.2 Related image with manually initiated crash error in windows 10 expert fix
- 2.1 Conclusion
Welcome to our blog, a platform dedicated to providing you with valuable insights, informative articles, and engaging content. We believe in the power of knowledge and strive to be your go-to resource for a wide range of topics. Our team of experts is passionate about delivering the latest trends, tips, and advice to help you navigate the ever-changing world around us. Whether you’re a seasoned enthusiast or a curious beginner, we’ve got you covered. Our articles are designed to be accessible and easy to understand, making complex subjects digestible for everyone. Join us on this exciting journey of exploration and discovery, and let’s expand our horizons together. The i enabled and is route button firmware the power power registry- power occurs the but in the button when held manager device general be bug check button the to feature uefi before o released for windows 10 seconds gpio occurs based power reset the hold a needs to the The long support bug to for purpose check 7 to event at power seconds-
Windows 10 中的 Manually Initiated Crash 错误 专家修复 Windows 指南 2023
Windows 10 中的 Manually Initiated Crash 错误 专家修复 Windows 指南 2023
If you get the manually initiated crash error on windows 10, it is caused by corrupted data. one simple solution would be updating your drivers and your operating system. using a system restore will also get rid of the w indows 10 manually initiated crash error. you could also perform sfc and dism scans, and ultimately, a windows 10 reset. You can force a manually initiated crash blue screen error on your windows computer. tweak the registry to simulate a bsod crash thus.

Manually Initiated Crash Error In Windows 10 Expert Fix
Manually Initiated Crash Error In Windows 10 Expert Fix
Share the manually initiated crash1 is a bsod error that can be generated by broken computer hardware or incompatible software. to solve this issue, make sure that you have installed all the updates for the computer os. In this article. manually initiated crash parameters. remarks. the manually initiated crash bug check has a value of 0x000000e2. this indicates that the user deliberately initiated a crash dump from either the kernel debugger or the keyboard. Yes no replies (2) i pressed ctrl scroll lock to see what happens and it crashed on windows 10. The manually initiated crash1 bug check has a value of 0xdeaddead. this indicates that the user deliberately initiated a crash dump from either the kernel debugger or the keyboard.

How To Fix Manually Initiated Crash Blue Screen Error In Windows
How To Fix Manually Initiated Crash Blue Screen Error In Windows
Yes no replies (2) i pressed ctrl scroll lock to see what happens and it crashed on windows 10. The manually initiated crash1 bug check has a value of 0xdeaddead. this indicates that the user deliberately initiated a crash dump from either the kernel debugger or the keyboard. The bug check occurs when the power button is held for 7 seconds, but released before the uefi reset occurs at 10 seconds. to support long power button hold, the device needs a general purpose i o (gpio) based power button, firmware to route the power event to the windows power manager, and for the bug check feature to be enabled in the registry. Once the restart is completed, the keyboard crash can be initiated by using the following hotkey sequence: hold down the rightmost ctrl key, and press the scroll lock key twice. the system then calls kebugcheck and issues bug check 0xe2: manually initiated crash. unless crash dumps have been disabled, a crash dump file is then written.

Manually Initiated Crash Error In Windows 10 Expert Fix
Manually Initiated Crash Error In Windows 10 Expert Fix
The bug check occurs when the power button is held for 7 seconds, but released before the uefi reset occurs at 10 seconds. to support long power button hold, the device needs a general purpose i o (gpio) based power button, firmware to route the power event to the windows power manager, and for the bug check feature to be enabled in the registry. Once the restart is completed, the keyboard crash can be initiated by using the following hotkey sequence: hold down the rightmost ctrl key, and press the scroll lock key twice. the system then calls kebugcheck and issues bug check 0xe2: manually initiated crash. unless crash dumps have been disabled, a crash dump file is then written.

Manually Initiated Crash Windows 10
Manually Initiated Crash Windows 10
How To Deliberately Crash Windows 10 (also Works With 8.1 7 Vista Xp)
How To Deliberately Crash Windows 10 (also Works With 8.1 7 Vista Xp)
as of the release of windows 10, the ability to deliberately crash windows using the task manager is no longer working, but this video will teach you how to find and fix a blue screen of death problem in windows 8 and windows 10. #shorts fix windows crashing, errors & bluecreens try it out! 25% discount code for software: pan20 windows 10 pro oem key here is a way how to diagnose windoes 10 problems, including the blue screen of death. windows 10 has, what is called a blue shorts if you’re experiencing a bsod with stop code called kernel security check failure then this is a quick fix for windows 10 stop code fix 2023 stop code windows 10 stuck stop code windows 10 lenovo laptop stop code loop acer pc shorts if you’re experiencing a bsod with stop code called video tdr failure then this is a quick fix for you! if i was able to the blue screen of death (bsod) or windows stop error can be incredibly frustrating, but it can be fixed. the trick is knowing what shorts if you are currently experiencing a bsod or what we call blue screen of death in your pc then you need to watch this for a thanks to micro center for sponsoring! check them out: • new customers exclusive – get a free 240gb ssd at micro center how to fix bad system config info error if you are having a problem booting into windows 10 or another version of how to repair error code: wdf violation blue screen of death in windows 10. windows 10 bsod wdf violation crash
Conclusion
All things considered, it is evident that article provides useful knowledge concerning Manually Initiated Crash Error In Windows 10 Expert Fix. From start to finish, the author illustrates an impressive level of expertise on the topic. In particular, the section on Y stands out as a key takeaway. Thanks for taking the time to the post. If you would like to know more, feel free to reach out through the comments. I look forward to your feedback. Additionally, here are a few related posts that you may find interesting: