Update for 2023 using Ubuntu 22.04LTS desktop and creating a Windows 10 installation bootable USB; I doubt very much the 17 other answers missed this, so I think it must be much easier in 22.04 than it was in previous Ubuntu versions. Please note that this approach requires that your system (Bios) can boot into a NTFS formatted drive. If that’s not the case, look at the other answers below. You may be able to find out if your hardware can boot into NTFS by looking at its documentation. Older hardware will likely not be able to boot into NTFS, and even some newer ones as the comments show.
I couldn’t get WoeUSB to work in 22.04 and judging by the recent review scores, it’s probably not working for most people now.
It seems you can now do it without any special tools. You do need to install gparted which isn’t installed by default in Ubuntu, but in my view it’s a useful tool to have anyway.
Note that I have done this for Windows 10 and confirm it works; I’ve included the Windows 11 download link in this answer but haven’t tested that.
1. Download the Windows iso from Microsoft
Download at:
https://www.microsoft.com/en-gb/software-download/windows10ISO (Windows 10)
https://www.microsoft.com/en-gb/software-download/windows11 (Windows 11)
Save the iso file somewhere sensible (eg Downloads). Note (in case your internet is metered, limited or slow), that it is about 5-6GB.
2. install gparted from the software store
Just search for gparted and it’s a simple installation from Ubuntu Software.
3. Format your USB drive using gparted:
Be very careful to select the correct device at the top — whatever you format will lose any data on it.
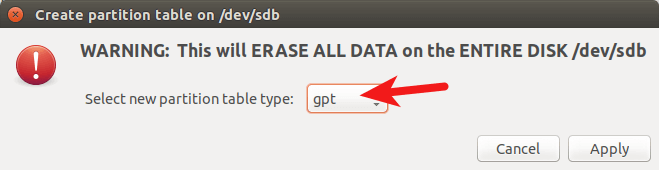
Click ‘Device’ then ‘Create Partition Table’.
In the drop-down menu, use ‘gpt’ for the partition type, note the warning and click ‘Apply’.
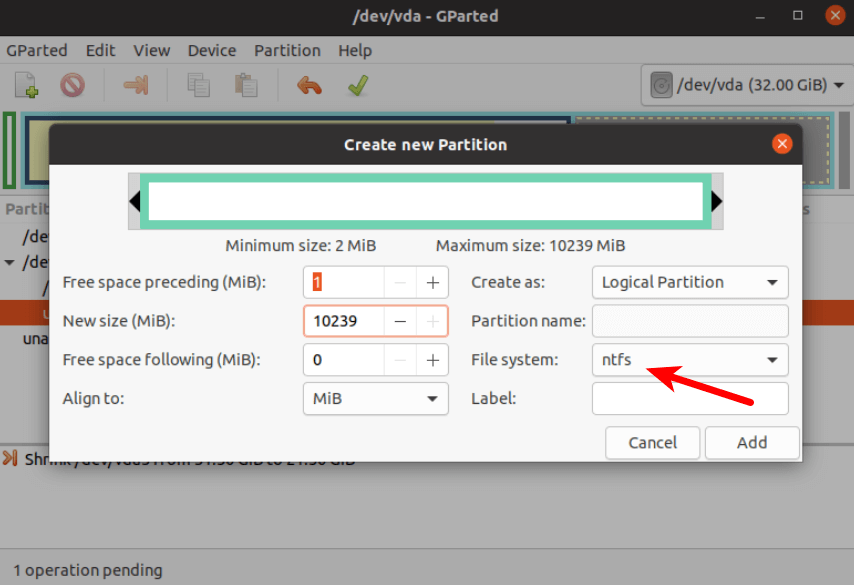
Click on the ‘Partition’ menu, then select ‘New’.
In the dialog box, chose ‘NTFS’ as the filesystem. (You can’t use FAT32 as that only supports files up to 4GB and one of the files is over 5GB.)
Click the green tick at the top to enact your changes — and your USB should be formatted and ready to go.
4. Open the iso to see the files and copy across
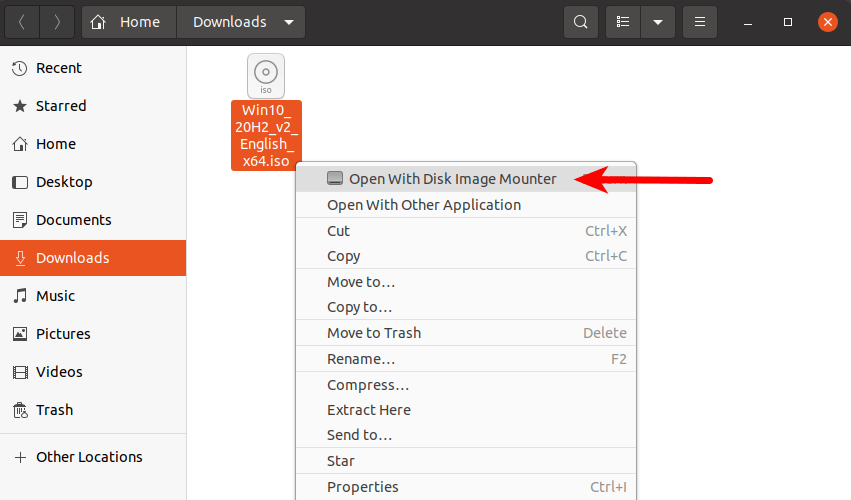
Navigate to your .iso download.
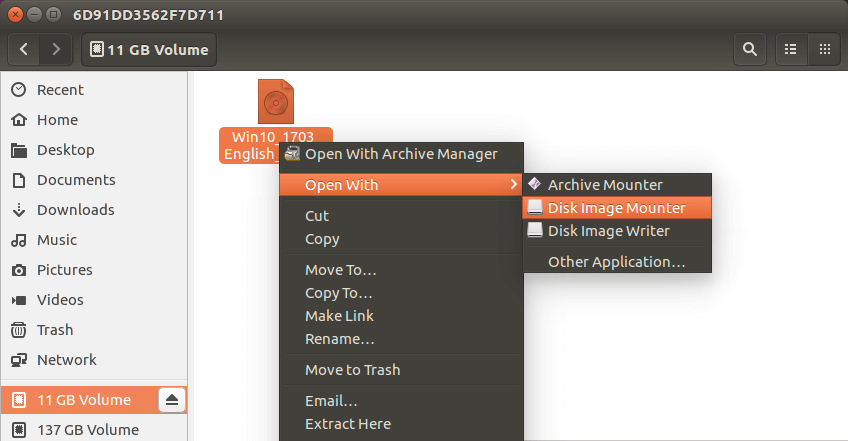
Right-click on the file and a pop-up should give you the option ‘Open With Disk Image Mounter’ — select that (in fact it is usually the default option if you double-click).
Your iso should now open as if it were a separate drive, and appear in the dock like a hard drive.
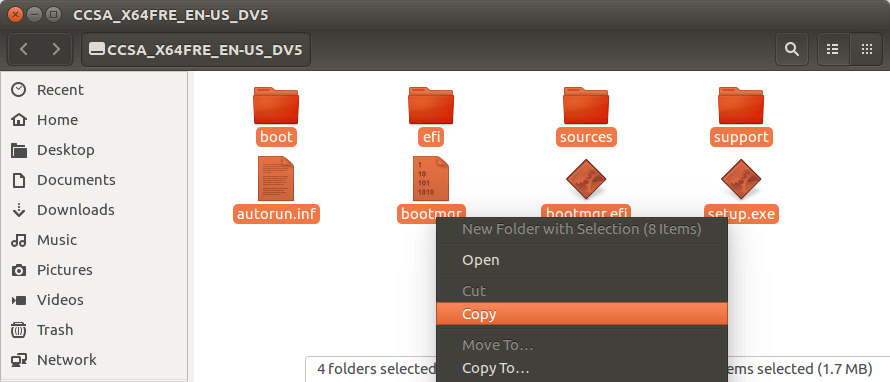
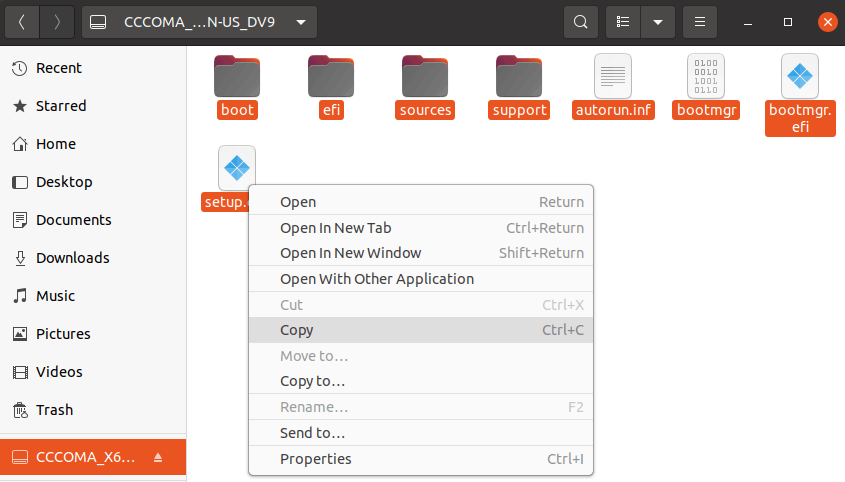
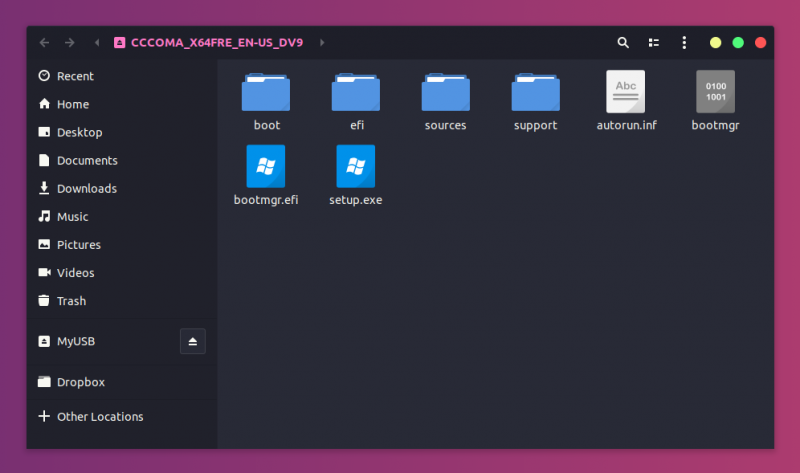
Double-click on the iso drive in the dock — it should open with a bunch of files and folders.
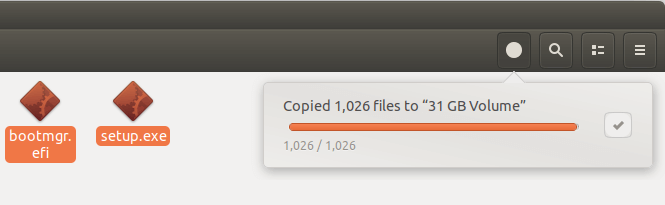
Copy the entire contents of that drive to your USB.
5. Set a boot flag for the USB
In gparted, select the USB device
Click on the graphical display of the partition you created.
Click on the ‘Partition’ menu at the top and select ‘Manage Flags’
Place a tick in the ‘boot’ box
That’s it!
This tutorial is going to show you an easy way to create a Windows 10 bootable USB on Linux. I use Ubuntu 20.04 as an example. The method applies to any Linux distribution. I use Windows to do online banking because my bank doesn’t support Linux and sometimes play games that can’t run on Linux.
What you need
- A computer running Linux
- A USB flash drive at least 8GB
- Windows 10 ISO
Download Windows 10 ISO
First, you should download Windows 10 ISO from Microsoft official download link. Note that you might not be able to download the ISO from this link on a Windows computer. This download link is visible to users on Linux computer. Once downloaded, follow the instructions below.
Note: It’s recommended to download the Windows 10 April 2018 update ISO, because the October Update ISO contains a file that is larger than 4GB, which can not be copied to a FAT32 partition.

Update: Microsoft doesn’t allow you to download the Windows 10 April 2018 Update ISO from their website anymore. You can download the ISO via this link: Win10 1803 English x64 ISO
Creating a Windows 10 Bootable USB for UEFI Firmware
This method works for UEFI firmware and is very simple. You create a GUID partition table on your USB stick, create a FAT32 file system on it, and then mount Windows 10 ISO image and copy those Windows 10 files to your USB stick and you are done. The following is a step-by-step guide.
First, install GParted partition editor on your Linux distribution. Ubuntu users run the following command.
sudo apt install gparted
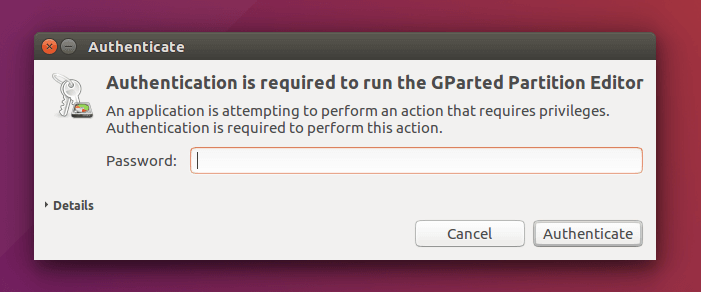
Then insert your USB stick to your computer. Make sure you back up important files in your USB stick if there’s any. Next, launch Gparted. You will need to enter your password in order to use GParted.
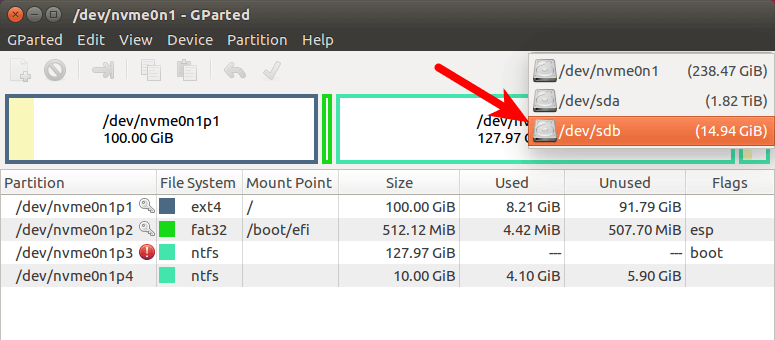
Select your USB stick from the drop-down menu on the upper-right corner. My USB stick is /dev/sdb. Yours may be different.
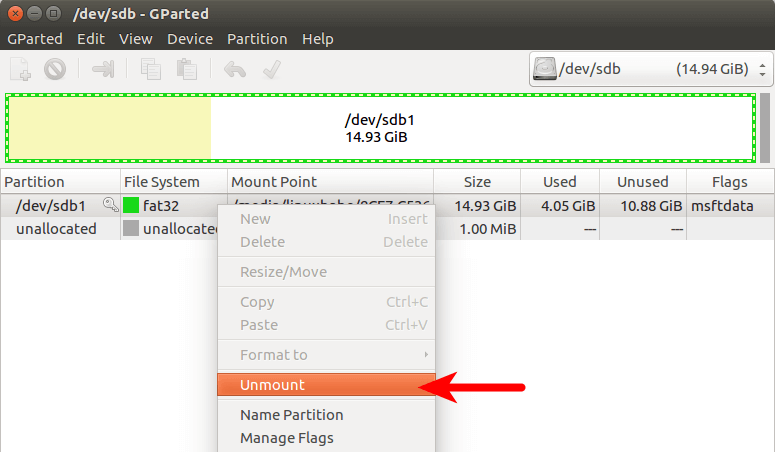
If there’s a key icon after the partition name, that means the partition is mounted. Make sure all partitions on your USB stick are unmounted. To unmount a partition, simply right-click on it and select unmount.
Next, on the menu bar, select Device > Create partition table.
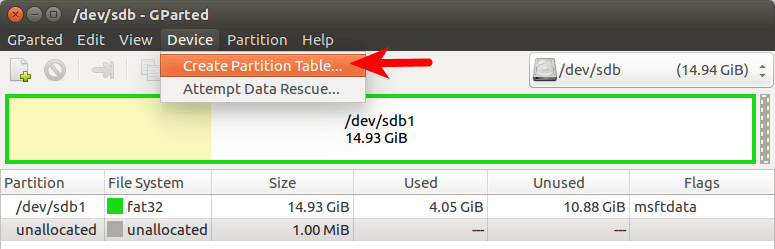
Choose GPT as the partition table type and click Apply.
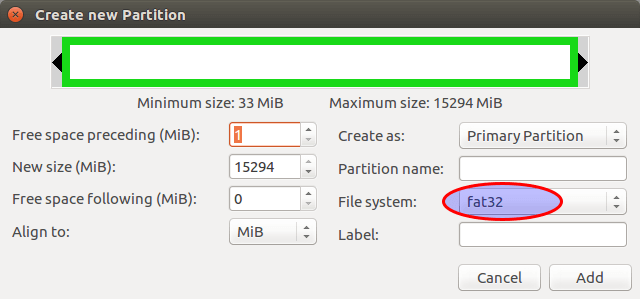
Then right-click on the unallocated space and select New to create a new partition.

Change file system type from ext4 to fat32 and click Add.
Note: The install.wim file in Windows 10 October 2018 update ISO is 4.1G, so if you downloaded this ISO image, you need to change ext4 to ntfs. If you downloaded Windows 10 April 2018 Update ISO, which contains a 3.9G size install.wim file, you can change ext4 to fat32
Update: It is my observation that my NTFS formatted USB stick isn’t bootable on my old laptop, which was bought in 2012. However, it is bootable on my desktop computer, which was bought in 2017. It has a graphical UEFI firware (I can use my mouse to configure firmware settings).
Next, click the green check button on the toolbar to apply this operation. Once that’s done, close GParted (This is important), then find your Windows 10 ISO in file manager. Open it with disk image mounter.
Open the mounted file system. Select all files and folders and copy them to your USB stick.
Sometimes the file manager on Ubuntu hangs and it seems that the copy operation has stopped. Actually it’s working, just be patient. When you see a check mark, it means the copy operation has finished.
If your file manager doesn’t have the Disk image mounter in the context menu, then you can use the following commands to mount. The first command will create a mount point for Windows 10 ISO and the second command will mount Windows 10 ISO under that mount point.
sudo mkdir /mnt/windows10/

sudo mount -t auto -o loop /path/to/window-10-iso /mnt/windows10/
Now in your file manager, go to /mnt/windows10/ and copy all files and folders to your USB stick.
Once the file and folders are copied, your windows 10 bootable USB is created! You can shut down your computer, boot it from this USB stick and install Windows 10 in UEFI mode. Keep in mind that you may need to disable compatibility support module (CSM) in the firmware in order to boot in UEFI mode. You may also need to remove USB stick from your computer and insert it back in order for the firmware to detect the boot loader on your USB stick.
Boot Windows 10 ISO Installer without USB (BIOS & UEFI)
Ever wondered if you can boot Windows 10 ISO installer without a USB flash drive? Yes, you can do it with GRUB2, which is the standard boot loader on Linux.
GRUB2 can not boot Windows 10 ISO directly. You need to create a separate NTFS partition on your hard disk or SSD with a partition editor like GParted and extract the Windows 10 ISO to that partition. Download the Windows 10 ISO file. The latest Windows 10 ISO file is 5.8G. The new NTFS partition should be at least 7G and it should not be used to store any other files.
Then find your Windows 10 ISO in file manager. Open it with disk image mounter.
Open the mounted file system. Select all files and folders and copy them to the NTFS partition.
Sometimes the file manager on Ubuntu hangs and it seems that the copy operation has stopped. Actually, it’s working. Just be patient. When you see a checkmark, it means the copy operation has finished.
Next, open up a terminal window and edit the /etc/grub.d/40_custom file with a text editor such as Nano.
sudo nano /etc/grub.d/40_custom
In this file, we can add custom entries to the GRUB boot menu. In this case, we want to add an entry to boot the Windows 10 installer. If your computer still uses the traditional BIOS firmware, then add the following lines in this file.
menuentry "Windows-10-Installer.iso" {
  set root=(hd0,6)
  insmod part_msdos
  insmod ntfs
  insmod ntldr
  #uncomment the following line if your computer has multiple hard drives.
  #drivemap -s (hd0) ${root}
  ntldr /bootmgr
}
My NTFS partition is the 6th partition on my first disk, so I use (hd0,6) as the root. You can run sudo parted -l command to check your NTFS partition number. If your computer has multiple hard drives, use the drivemap command to set the partition (hd0,6) as the first hard disk, so Windows will be able to boot.
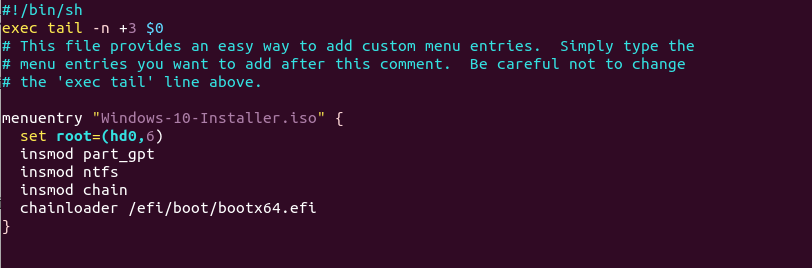
If your computer uses UEFI firmware, then add the following text in this file.
menuentry "Windows-10-Installer.iso" {
  set root=(hd0,6)
  insmod part_gpt
  insmod ntfs
  insmod chain
  chainloader /efi/boot/bootx64.efi
}
Save and close the file. (Press Ctrl+O, then press Enter to save a file in Nano text editor. Press Ctrl+X to exit.)
Then update GRUB boot menu.
sudo grub-mkconfig -o /boot/grub/grub.cfg
or
sudo grub2-mkconfig -o /boot/grub2/grub.cfg
Next, set GRUB to boot the Windows 10 installer for the next boot with the following command.
sudo grub-reboot Windows-10-Installer.iso
or
sudo grub2-reboot Windows-10-Installer.iso
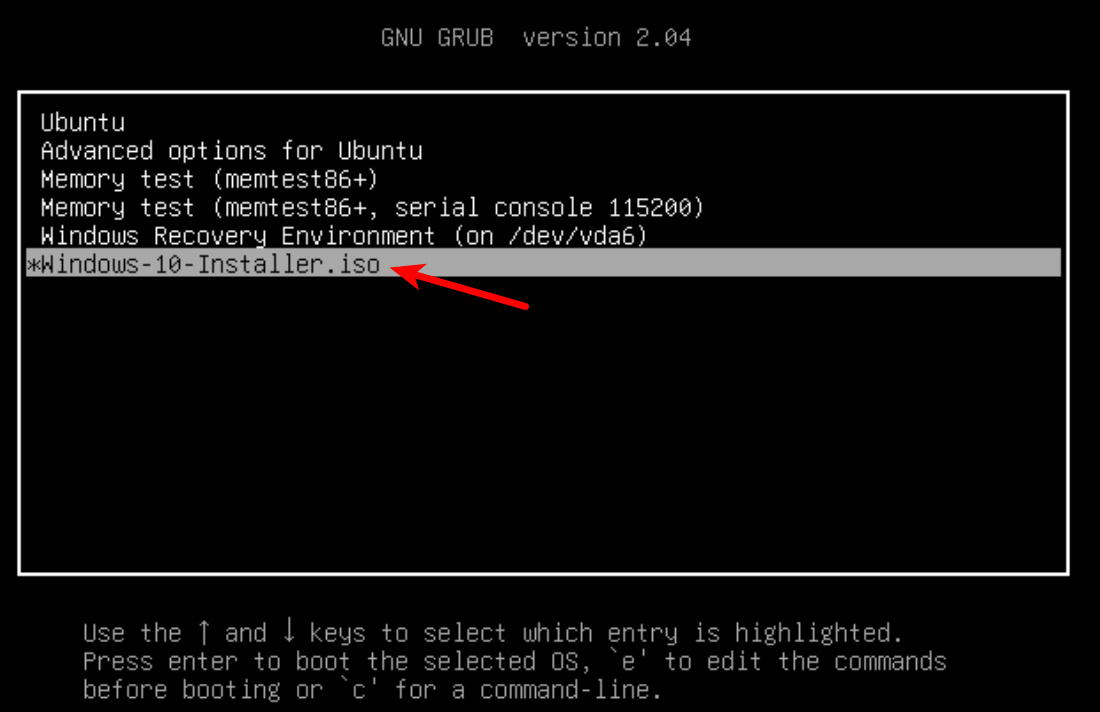
Unplug all your external USB storage devices, then reboot your computer. GRUB will choose the Windows 10 installer.
GRUB2 can also boot Linux ISO files stored on the hard drive, so you don’t need to create Linux live USB.
- How to Boot ISO Files From GRUB2 Boot Loader
Creating a Windows 10 Bootable USB for Legacy BIOS Using WoeUSB
WoeUSB is a fork of WinUSB. Both of them are open-source software (licensed in GPL) for making Windows bootable USB sticks on Linux platform, but the latter hasn’t been updated since 2012. You may be wondering why it’s named WoeUSB. The author said it’s a GNU convention to abbreviate software that support Windows to “woe”.
To install WoeUSB on Ubuntu 14.04/16.04/17.04, you can use the following PPA. Simply open up a terminal window and run the following commands one by one. Other Linux distro users can compile this software by following the instructions on the Github project page.
sudo add-apt-repository ppa:nilarimogard/webupd8

sudo apt update

sudo apt install woeusb
This PPA contains many other software. If you don’t need them, you can now remove this PPA from your system.
sudo add-apt-repository --remove ppa:nilarimogard/webupd8

sudo apt update
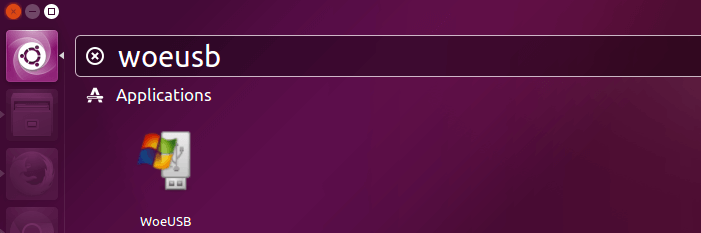
You can launch WoeUSB from Unity Dash or your application menu.
You can also start it from command line with:
woeusbgui
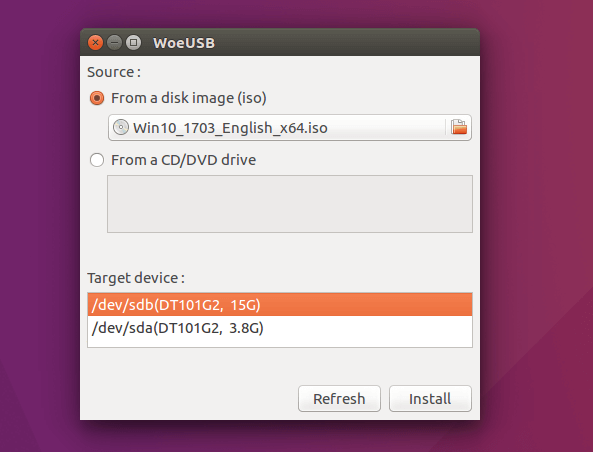
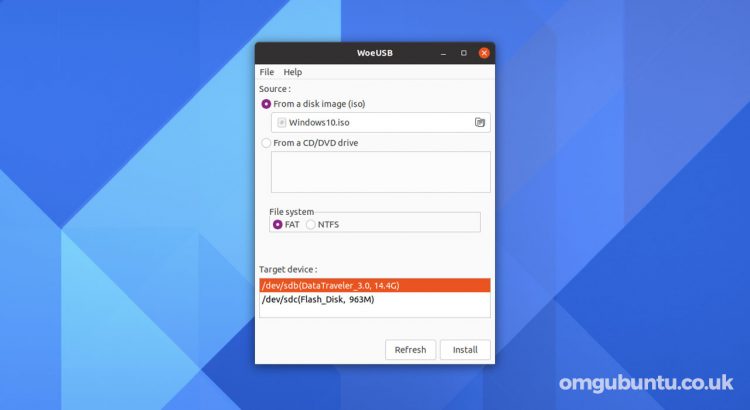
It’s very easy to use the WoeUSB GUI. Select Windows ISO image and your target USB device. Make sure your data on the USB device is backed up before hitting the Install button.
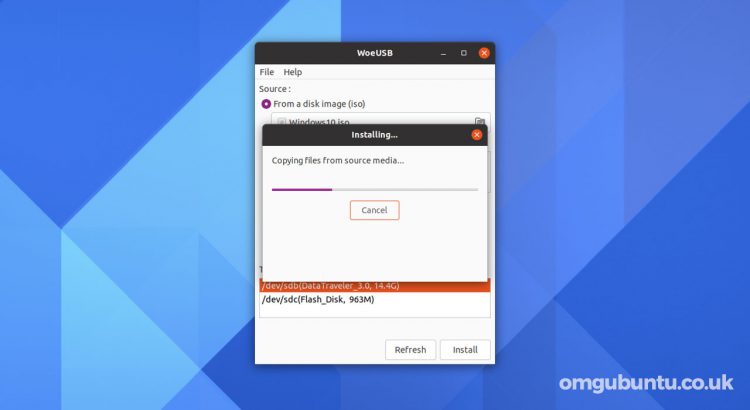
Then wait for the installation to complete.
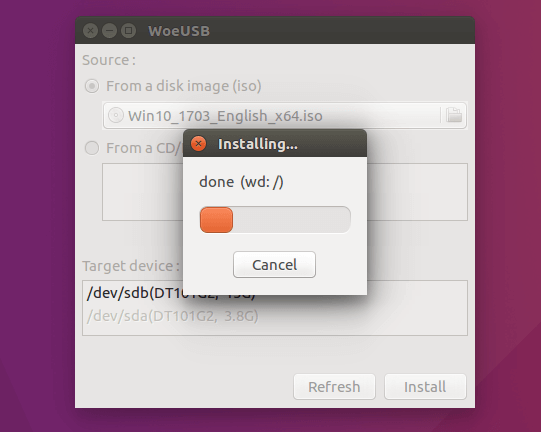
Once done, you can use the bootable USB to install Windows 10 on your computer.
How to Use WoeUSB From the Command Line
First, find the device name of your USB stick using the following command.
lsblk
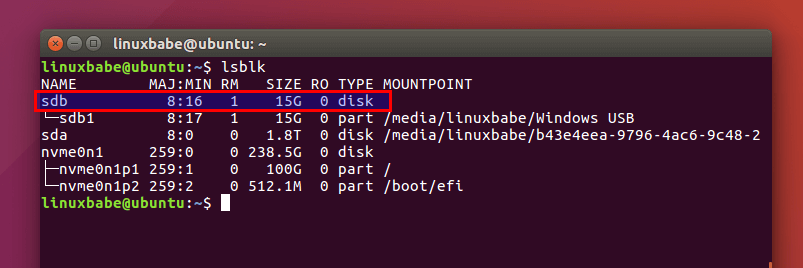
Mine is /dev/sdb. Make sure your USB is unmounted with the following command. Replace /dev/sdb1 with your own partition name.
sudo umount /dev/sdb1
Then create a bootable Windows 10 USB like below. Red texts shoudl be adapted to your own ISO file name and USB device name. The -v (--verbose) option will give more detailed output.
sudo woeusb -v --device windows-10.iso /dev/sdb
In my test, the Windows 10 USB created with WoeUSB can boot in both legacy and UEFI mode on my old computer. On my new computer, it can boot in legacy mode but failed in UEFI mode. I don’t know the exact reason, but it’s probably because of bug in this software.
That’s it! I hope this tutorial helped you create windows 10 bootable USB on Ubuntu or any Linux distribution. As always, if you found this post useful, then subscribe to our free newsletter to get new tutorials.
Rate this tutorial
[Total: 112 Average: 4.3]
Learn how to create a bootable Windows 10 USB on Ubuntu and Linux Mint using a free application called ‘WoeUSB’ in this guide.
While I don’t use Windows 10 as my primary OS I do know, every now and then, need to. And should I need to create a bootable Windows 10 USB to install the system from I like do it from my Ubuntu desktop.
There are several ways to perform this particular task, but the steps in this post walk through what I consider to be the easy way to create a bootable Windows 10 USB (one that actually boots).
Ready to learn more?
WoeUSB is the (oddly named) app to use to make a bootable Windows 10 USB stick on Ubuntu. A fork of an earlier tool called WinUSB, WoeUSB is free open source software and is available as a graphical app (GUI) and a command-line only (CLI) client.
In this tutorial we focus on using the WoeUSB GUI app.
So what does it do?

Related Guide
How to Install WSL 2 on Windows 10
Well, WoeUSB lets you make a bootable USB for various Windows releases, including Windows Vista, Windows 7, Window 8, and Windows 10.
All languages and all variants of Windows, including Pro, Home, N, 32-bit, and more. are supported, and the tool works with both ‘legacy’ and ‘UEFI’ bootmodes, too.
For advanced use cases I recommend using the WoeUSB CLI as it has all sorts of flags and switches to curate custom installs with specialist needs.
But for everyone else the WoeUSB GUI client is all that’s needed.
Before we begin make sure you have all of the following to handy, as all are required to create a bootable Windows 10 USB on Ubuntu:
- WoeUSB app
- USB flash drive (4GB minimum)
- Windows 10 .iso file
Remember: you can download Windows 10 disc images from the Microsoft website. If you don’t currently have one you should go there to grab one. You do need a valid Windows license to activate and use most versions of Windows, but you don’t need one to create an installable USB of Windows or perform the install.
1. Install WoeUSB on Ubuntu
First the drawback: WoeUSB is not longer actively maintained upstream, meaning you can no longer download the tool direct from its original GitHub page.
However, since the tool is so useful the community has stepped in to fork the app and continue development. They have also created personal package archive (PPA) for users to install WoebUSB on Ubuntu 18.04 LTS through 20.04 LTS.
To add the WoeUSB PPA to your software sources run the following two commands from a terminal emulator of your choice:
sudo add-apt-repository ppa:tomtomtom/woeusb
sudo apt update && sudo apt install woeusb-frontend-wxgtk
If you use a 32-bit version of Ubuntu 16.04 LTS you can download a Ubuntu 32-bit WoeUSB installer.
2. Run WoeUSB
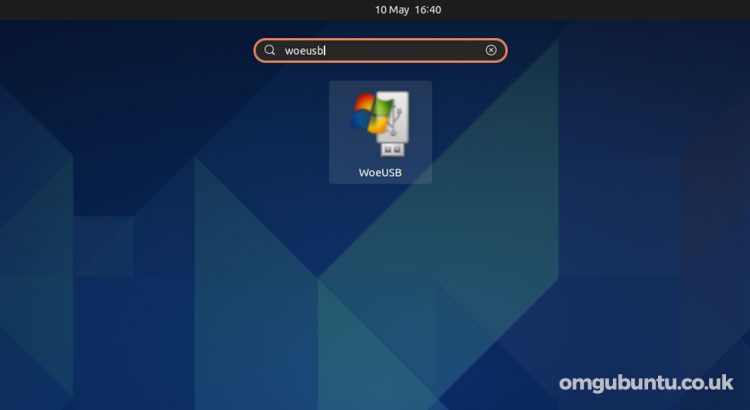
With WoeUSB installed on your system the next step is to open it. Go to your preferred application menu (on Ubuntu press the Super key) and find ‘WoeUSB’.
The app is quick to open and is easy to use.
First, select a valid Windows 10 .ISO image using the file selector button, then select the USB drive you want to install it to from the ‘Target device’ section.
If you don’t see your USB device listed in the ‘Target device’ section first make sure it’s plugged in correctly and then click the ‘refresh’ button to update the list of attached devices.
3. Create Windows 10 Bootable USB
Before you go ahead and hit ‘install’ to create your bootable Windows USB please, please double-check that you’ve selected the correct drive first. The install process will wipe the contents of the selected USB drive. You will lose any data stored on it.
Other than that, the tool does the rest so just let it run its course
Once flashing is complete you’ll see a small notification. Close WoeUSB, safely eject the USB drive you’ve created, and use it as a boot device elsewhere to install Windows 10.
I have talked a lot about creating bootable USB of Linux in Windows. How about the other way around? How about creating a bootable Windows 10 USB in Linux?
If you are uninstalling Linux from dual boot or if you want to reinstall Windows completely or you simply want to have a Windows installation disk ready, you’ll need a bootable Windows 10 USB or DVD.
In this tutorial, I am going to show you how to create a Windows 10 bootable USB in Linux.
There are two ways to do that and I have discussed both in this tutorial.
- The first method is mounting the ISO image of Windows to a USB disk formatted in ExFAT system. This works most of the time but there could be instances where it wouldn’t boot.
- The second method is to use a tool like Ventoy. It creates a UEFI compatible bootable disk.
📋
I am using Ubuntu for this tutorial but the steps should be valid for other Linux distributions as well.
Creating a Bootable Windows 10 USB in Linux
Prerequisite: Get Microsoft Windows 10 ISO and a USB of at least 8 GB in size
You can download Windows 10 ISO from Microsoft’s website. You have to specify the Windows 10 version, language and then you should see the link to download Windows 10.
Note that the Windows 10 ISO download link is valid for 24 hours only. So use a download manager in Linux to download the ~5-6 GB file and finish it within 24 hours.
Since the ISO and its content are more than 4 GB in size, I recommend a USB of at least 8 GB in size.
I have also made a video of this tutorial so that you can see the steps in action.
Step 2: Properly format the USB for creating bootable Windows USB
Insert your USB. You have to format it so make sure that you don’t have important data on the USB key.
In Ubuntu, press Super key (Windows key) and search for ‘Disks’. You have to use this tool to format the USB key.

In the Disks tool, make sure to select your USB drive and hit format.
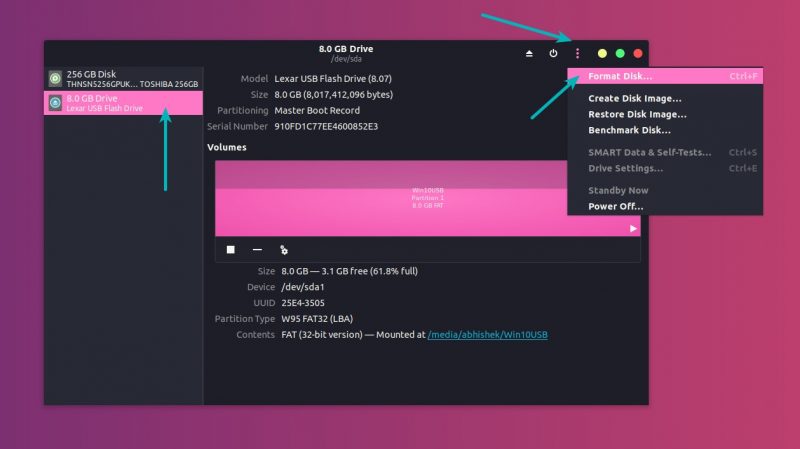
It will ask to choose a partitioning scheme. It could be either MBR or GPT. Select one of them and hit Format.
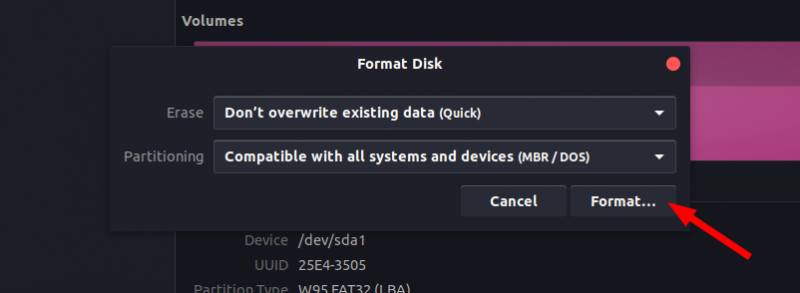
It will show you a warning that you data will be erased.

The formatting of USB is not over yet. Now, you need to create a partition on the newly formatted USB.
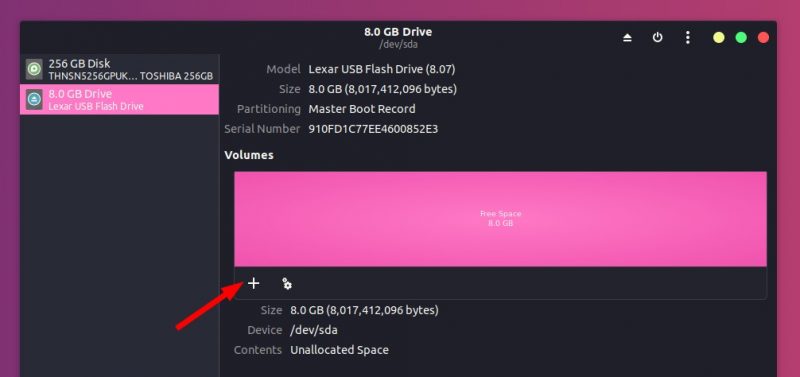
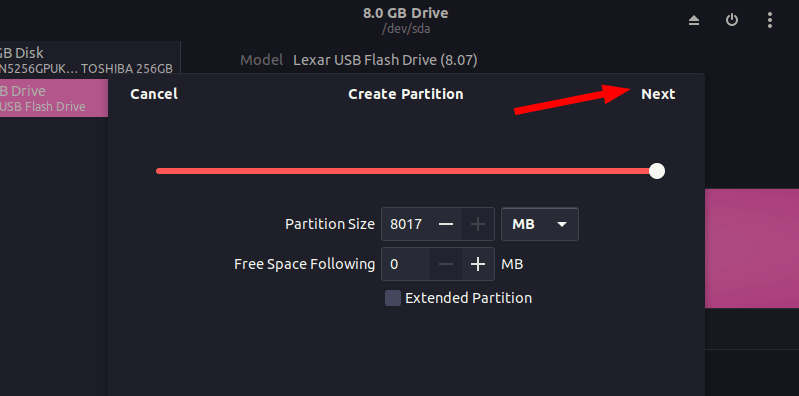
Select the entire USB disk as the partition size.
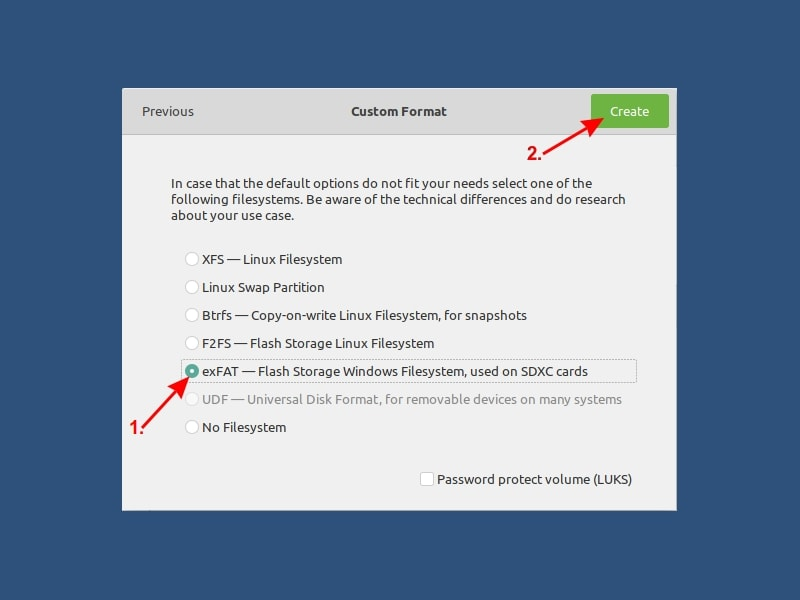
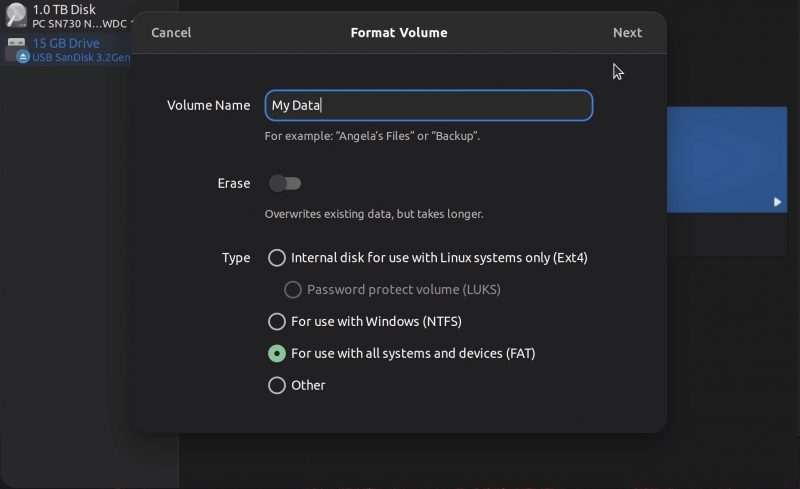
Give a name to your USB and then go to the Other option in the Type of disk. It’s because you have to format the USB in exFAT filesystem.
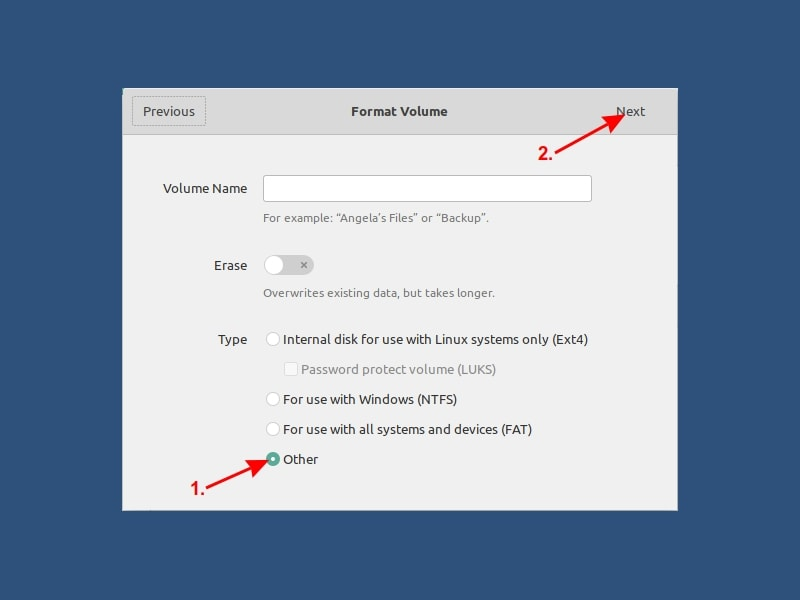
Here, choose exFAT as the filesystem type. The exFAT file system will you to copy files larger than 4 GB.
Once done, your USB should be automatically mounted. It is now ready for creating a bootable Windows 10 USB disk.
Step 3: Copy the content of the ISO to USB
Now, it’s time to copy the content of the Windows 10 ISO to the newly formatted USB.
You may ask, Abhishek, there is only one file, which is the ISO file itself. What are you talking about?
ISO is basically an archive format and you can see its content like any zip file in Linux. But to do that, you need to use ‘Disk Image Mounter’ tool that is installed by default in Ubuntu.
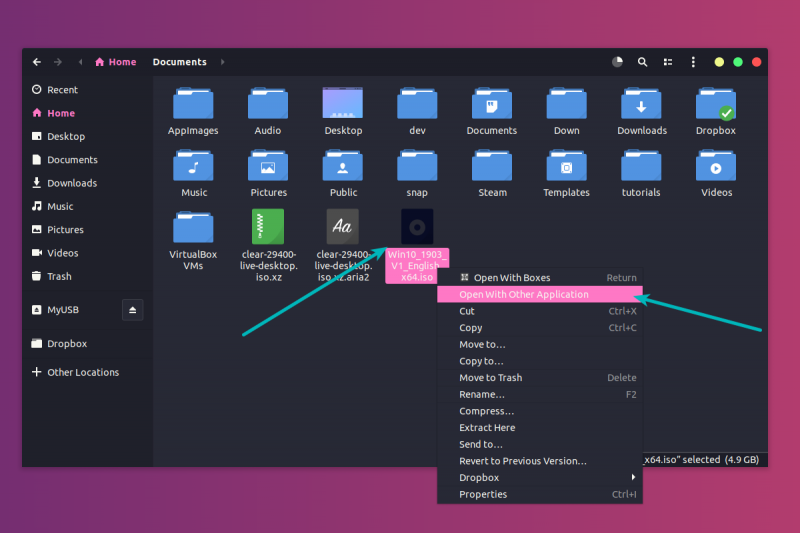
Go to your Windows 10 ISO, select it and right click on it. Now select ‘Open with other application’.
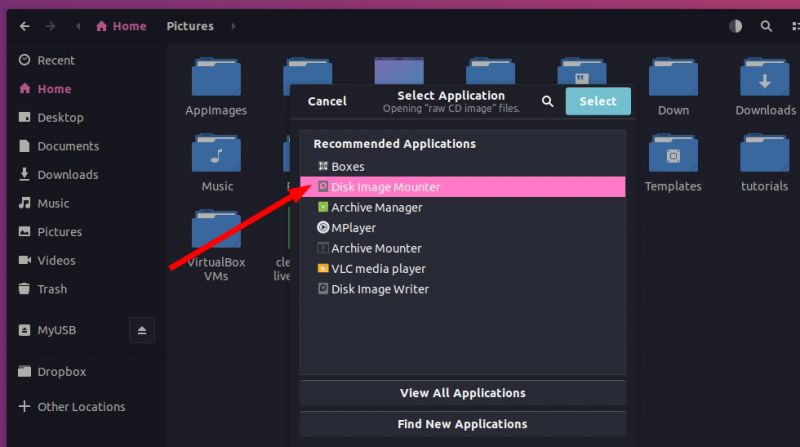
In the applications list, select Disk Image Mounter:
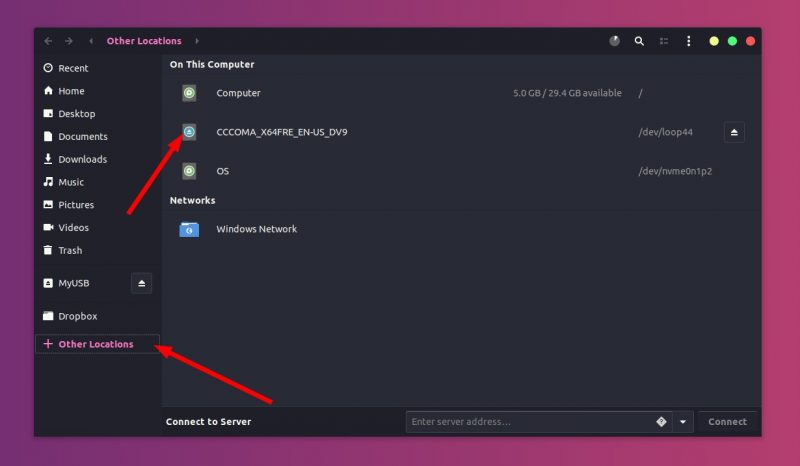
The ISO will be mounted. You may not see it in the left sidebar but if you click on the Other Locations, you should see it. Click on it to enter this mounted ISO folder.
You’ll see its content. All you need to do is select all the files (Ctrl+A), copy it (Ctrl+C) and paste them in the USB drive (Ctrl+V).
Wait for the copying process to finish as it may take some time in copying 4-5 GB of data. Once it’s done, you have a bootable Windows 10 USB in your hand.
Unmount the USB and use it with any system you want, restart the system and change the boot settings to boot from the USB.
📋
Some readers find that this method is not working well. No worries. You can use Ventoy for your Windows USB.
Method 2: Create bootable Windows 10 USB using Ventoy
Ventoy is an open source tool for making live USBs. You can use it to create a multi-boot USB, persistent Linux live USB and bootable Windows USB.
I find Ventoy an unorthodox tool. It is slightly tricky to use and this is the reason I am writing this step-by-step tutorial.
Step 1: Prepare your USB drive
Ventoy formats the USB disk while creating the bootable disk. However, I noticed it failed to do so for an already bootable Linux disk. For this reason, I advise you to format the USB disk before you proceed further.
Plug in and then format the USB disk. You can do that by right-clicking on the mounted disk and then selecting the format option.

It doesn’t matter which filesystem you choose during formatting. It will be formatted again by Ventoy in the later steps.
Once it is formatted, keep it plugged in and go on to the next step of installing Ventoy.
Step 2: Download and install Ventoy on Linux
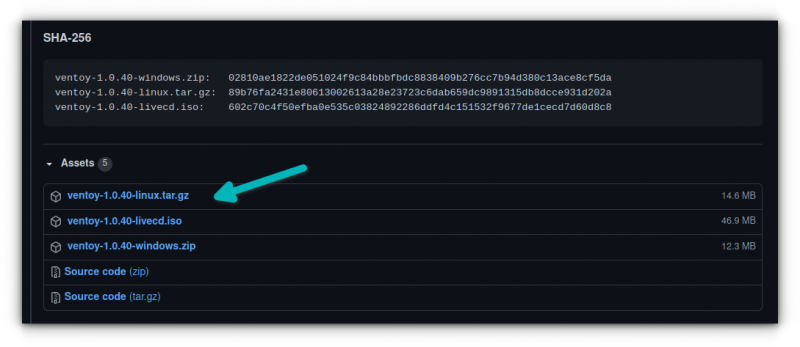
Ventoy is a mix of GUI and CLI tool. It can be used on any Linux distribution. Download Ventoy for Linux from the release page of its GitHub repository.
You’ll find the .tar.gz file with Linux in its name. This is the file you should download.
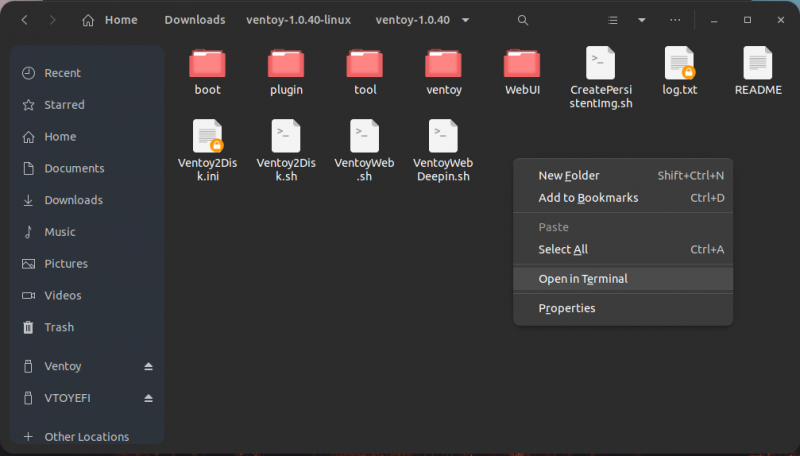
Once downloaded, extract the tar gz file. Simply right click on it and extract it.

Go inside the extracted folder, and you’ll find a few scripts in it. You need to run one named VentoyWeb.sh. To do that, you’ll have to use the command line.
Now if you are familiar with Linux command line, I presume that you can easily find your way to the file by using the cd command.
Alternatively, you can use the “open in terminal” feature of the file manager to open the location in a terminal.
Once you are in the correct directory in the terminal, use the following command to run Ventoy:
sudo ./VentoyWeb.shVentoy runs inside a browser. It will give you the URL when you run it. Copy this URL and paste it in a browser.
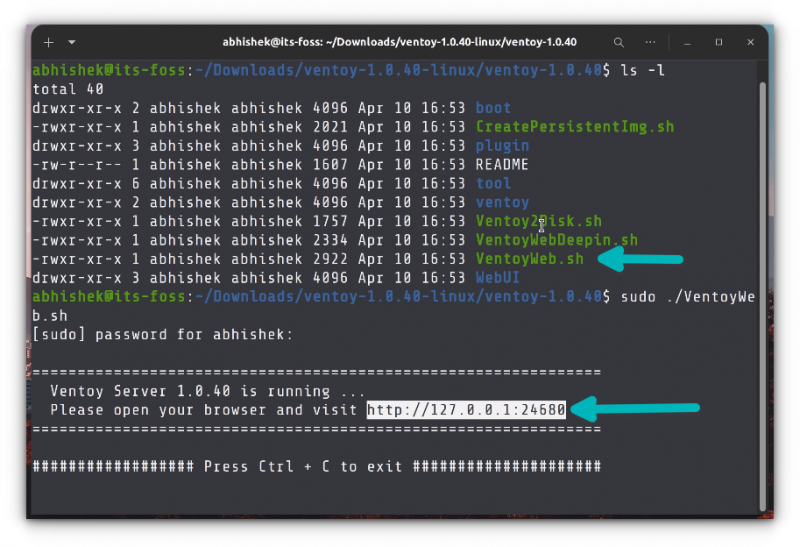
It will open a web page with Ventoy running in it and if the USB is already plugged in, it should recognize it. If not, press the refresh button.
Step 3: Use Ventoy to create bootable Windows 10 USB disk
Though Ventoy has the option to create a bootable disk with secure boot, it is experimental and may not work.
Considering you are going for a UEFI installation, it will be wise use GPT for partitioning scheme.
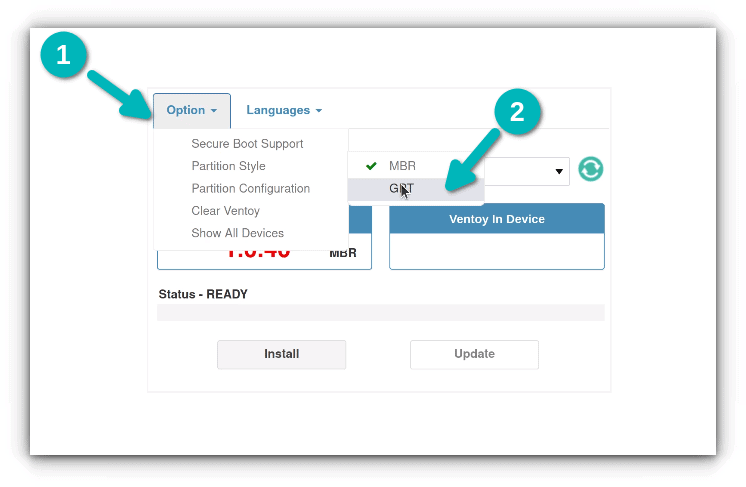
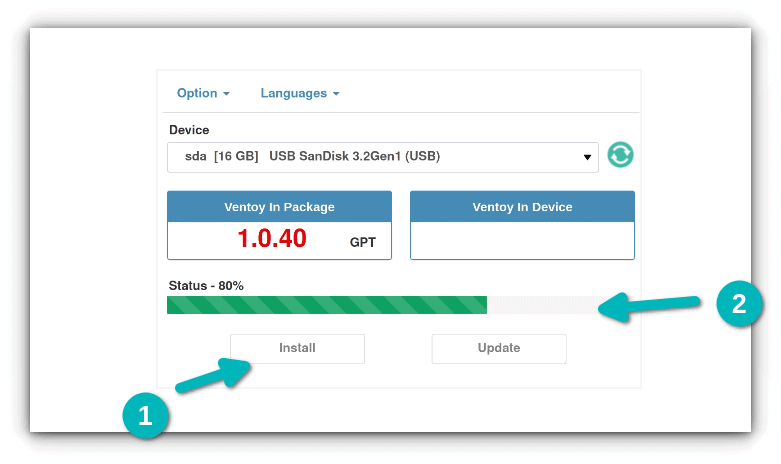
Once things are set, hit the install button. It will show you a couple of obligatory warnings. If the installation completes successfully, you should see a success message.
Note: If you do not see Ventoy disk mounted after the successful installation, please plug out the USB and then plug it in again.
When you hit the install button, it creates two partitions on the USB disk.
- VTOYEFI: A small partition for the UEFI files.
- Ventoy: A big, empty partition in ExFAT format where you’ll copy the ISO image.
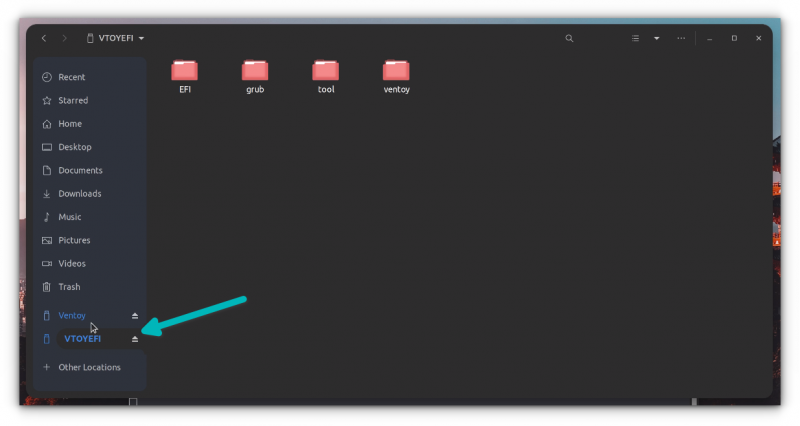
Yes. That’s what you need to do. Copy the ISO image of the Windows 10 into the bigger ExFAT partition on the USB disk.
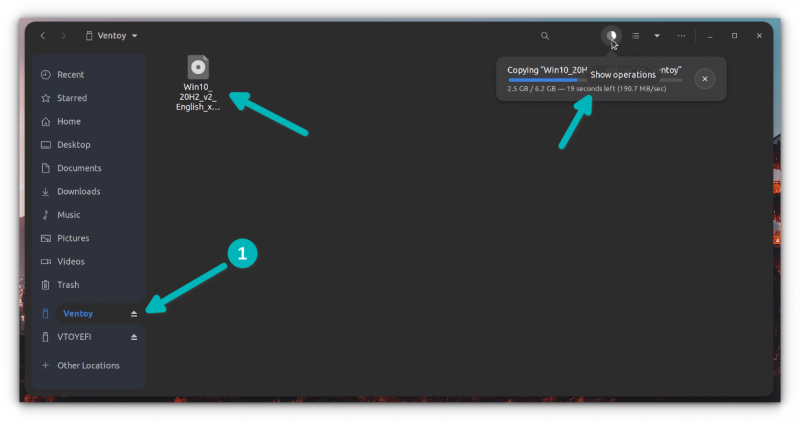
Once the copying finishes, DO NOT RUSH to plug out the USB just yet. Click on the unmount option from the file manager. Chances are that some files are still being written and it may show an error message.

Wait for a few more minutes and you should see a message that it is safe to remove the disk. Now you can unplug it and use it on whichever system you want.
Step 4: Using the bootable Windows 10 disk
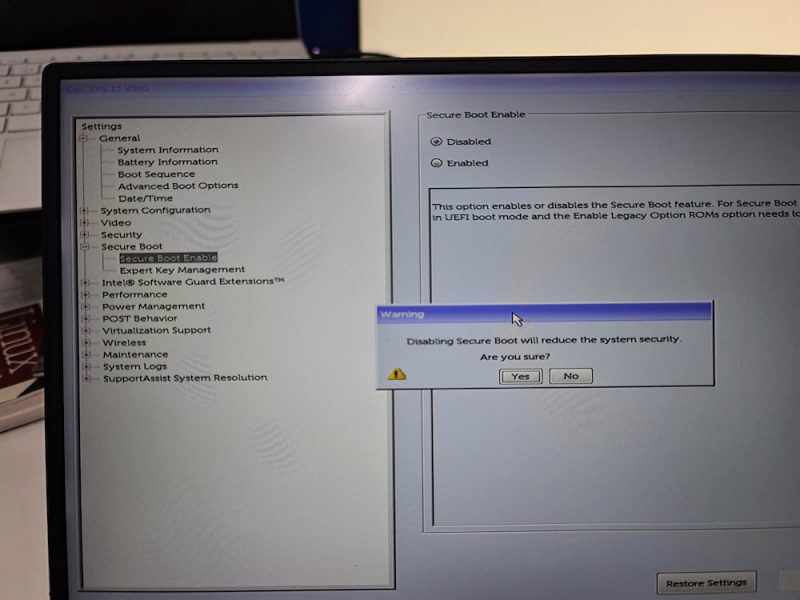
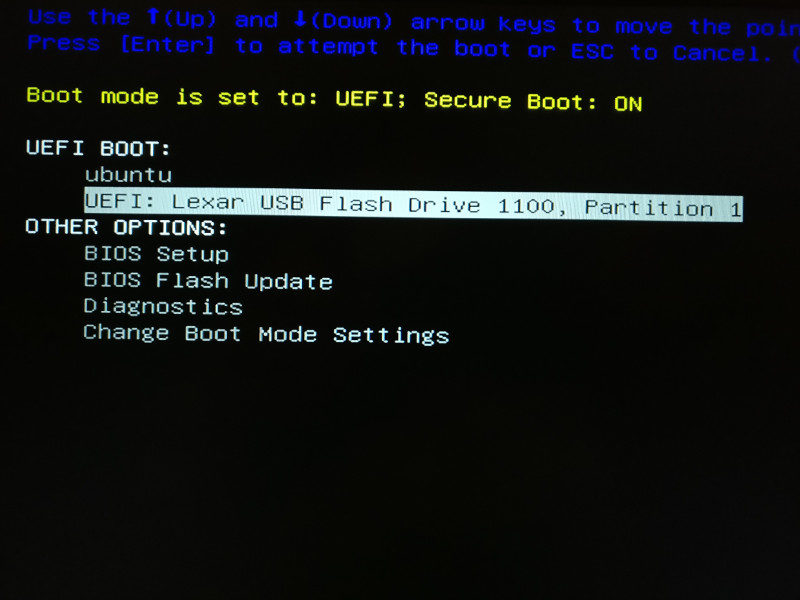
Alright! You are almost there. Plug in your bootable Windows USB you created in the previous section. Start the computer and go to the BIOS setting by using the F2/F10 or F12 key at the time you see the logo of your computer’s manufacturer.
In here, look for the secure boot settings and disable it. If the secure boot is enabled, chances are that your system won’t allow you to boot from the USB disk (to secure your system and data at boot time).
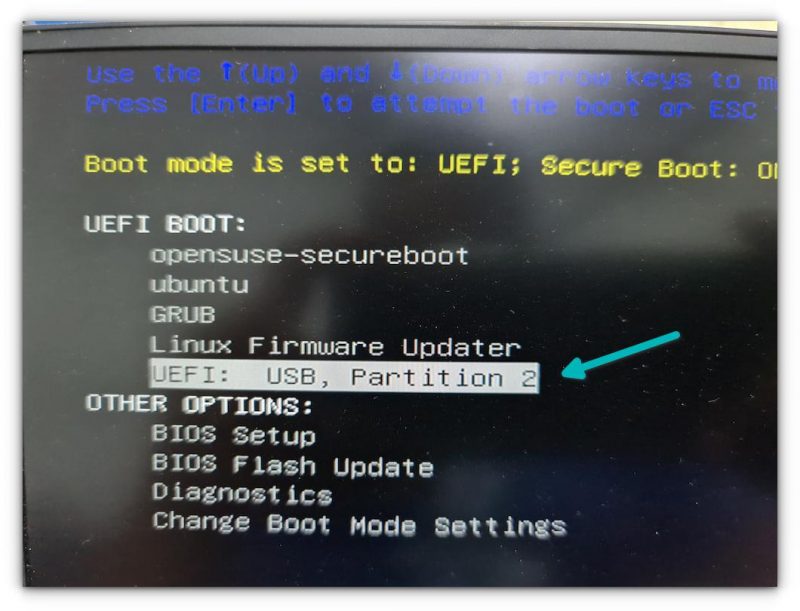
After disabling the secure boot, go into the boot order and then choose the UEFI USB Disk to boot from. Some systems will give this option after you press F12 or F10 button.
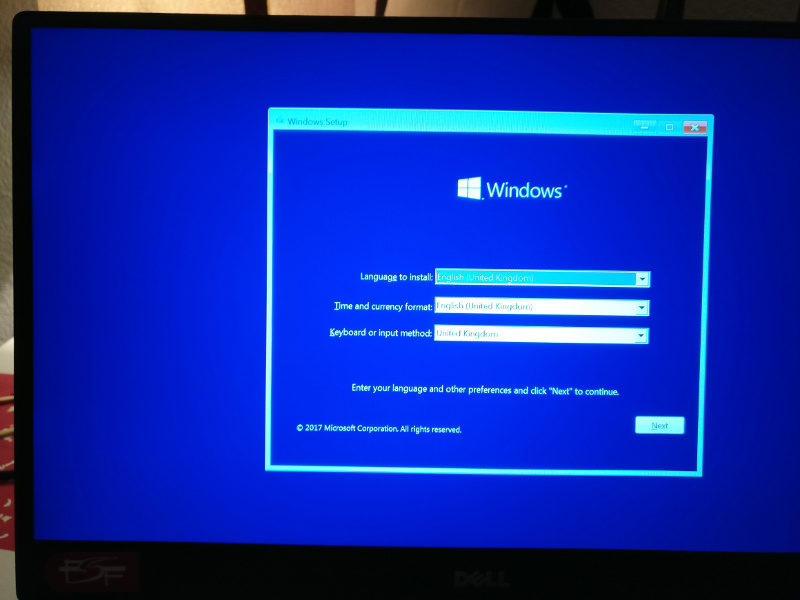
It takes a couple of minutes to start the Windows disk. You should see a screen like this and it will give you the option to repair boot or install Windows.
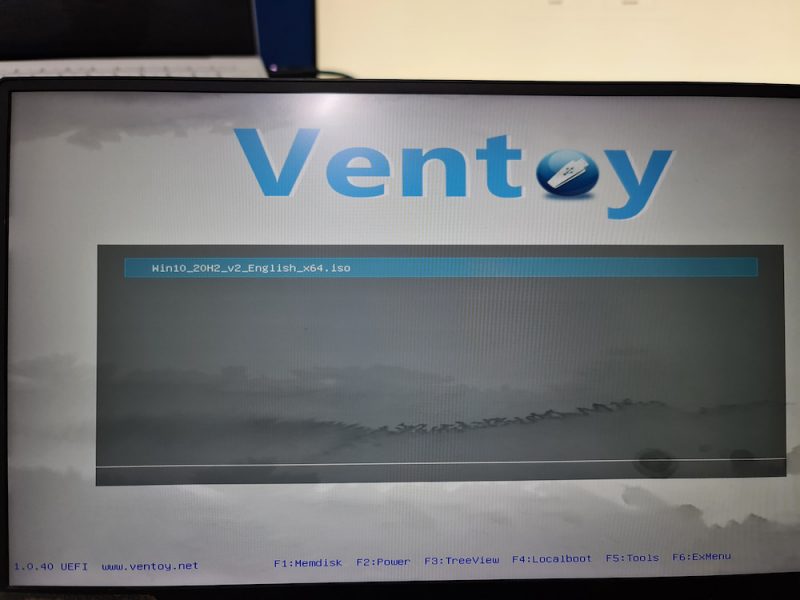
I think you can take things from here. Enjoy it 
There is another popular tool WoeUSB that can also be used for this purpose.
Step 4: Using Windows 10 bootable USB
Once the bootable USB is ready, restart your system. At boot time, press F2 or F10 or F12 repeatedly to go to the boot settings. In here, select to boot from USB.
You’ll see that Windows 10 is being booted and it gives you the option to install or repair your system. You know what to do now from here.
I hope you find this tutorial useful for creating bootable USB of Windows 10 in Linux. If you have questions or suggestions, please feel free to leave a comment.
Бывают случаи, когда вам нужно записать Windows на флешку в Linux, например, когда вы хотите поставить эту систему второй для использования специализированных программ, или вам нужно переустановить операционку своим знакомым. Или же есть пользователи Linux, которые решили вернуться на Windows, но единственную флешку уже перезаписали под Linux LiveUSB.
Загрузочная флешка Windows в Linux создается достаточно просто. Я предлагаю несколько способов решения этой проблемы. Все их я перечислил ниже.
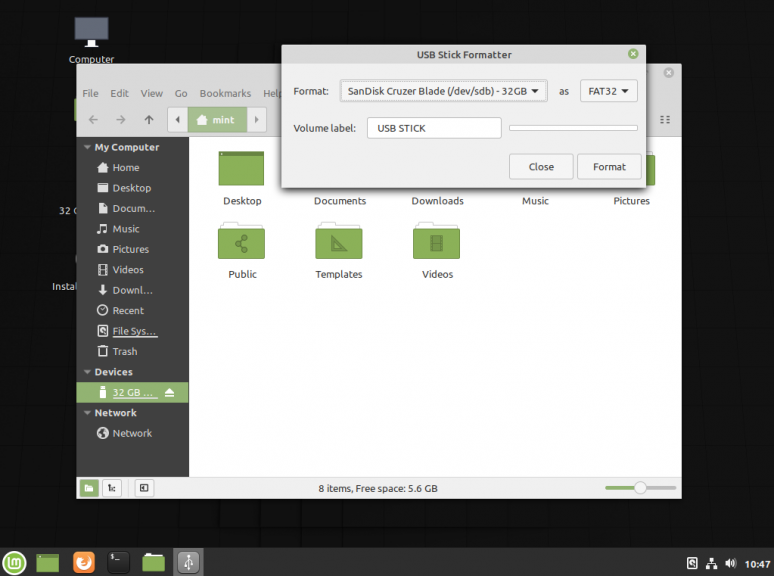
Загрузочную флешку можно создать с помощью терминала или специальных графических утилит. Настоятельно рекомендую отформатировать флешку в Fat32 (или Exfat) перед использованием любого из предложенных методов. Форматирование можно выполнить через Gparted, сfdisk+mkfs или через usb stick formatter (форматирование USB флеш накопителя).
Способ 1. Утилита USB Image Write
Для создания флешки можно воспользоваться утилитой Запись образа на USB. В некоторых дистрибутивах она уже предустановленна (Ubuntu, Mint и др.):
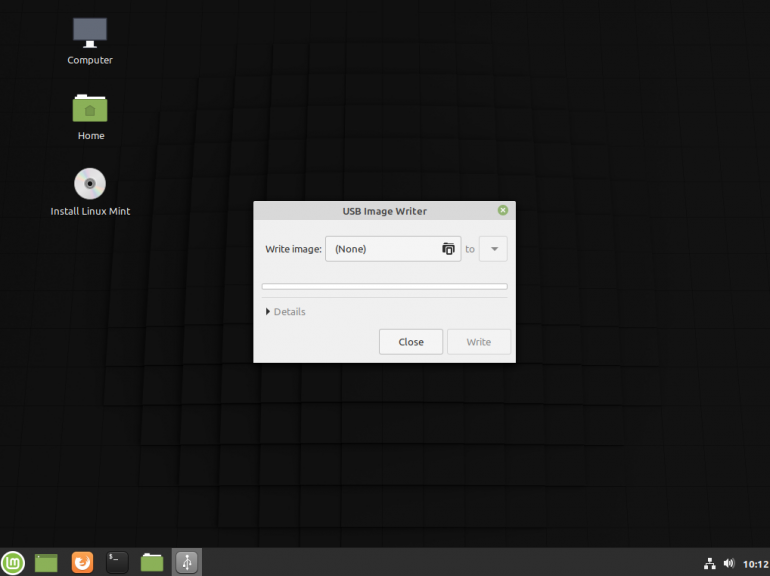
Выбрать образ в графе Write image образ и в поле to выбрать флешку. Далее нажимаем Write.
Способ 2. Утилита WoeUSB
Пожалуй, это самый простой способ создания. Установка в Ubuntu выполняется с помощью таких команд:
sudo add-apt-repository ppa:nilarimogard/webupd8
sudo apt update
sudo apt install woeusb
Откройте утилиту в меню приложений:
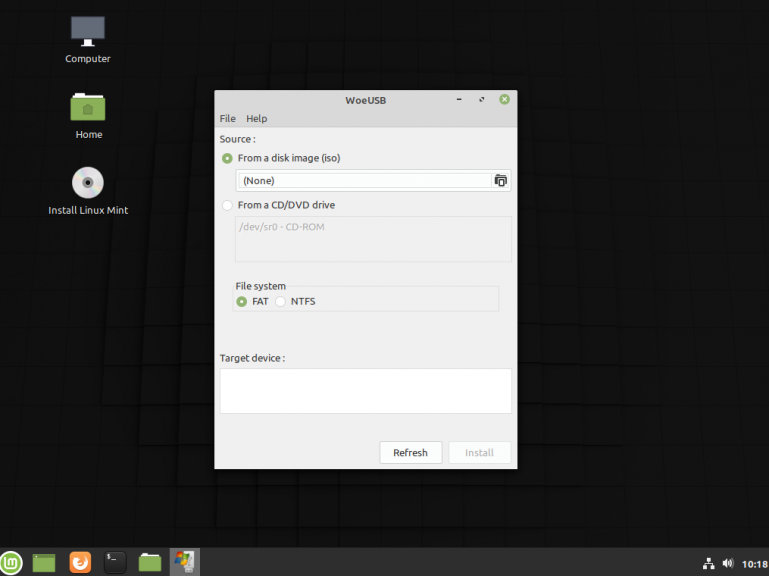
Интерфейс простой. Нажмите на кнопку Обзор со значком папки и выберите образ. Target device это флешка, на которую будет идти запись, если у вас их несколько выберите нужную. Ещё есть поле File system, где нужно выбрать какую файловую систему будете использовать. Рекомендую FAT. Затем нажмите Install и дождитесь окончания.
При появлении ошибки с кодом 256 Source media is currently mounted, размонтируйте образ ISO с Windows, если вы его смонтировали. При ошибке Target device is currently busy, извлеките флешку, затем снова подключите её. Если не сработало, попробуйте отформатировать её.
Способ 3. Терминал и Gparted
Положите образ в домашнюю папку и переименуйте его в windows.iso во избежание проблем с пробелами. Затем перейдите в терминале в домашнюю папку
cd ~
Запустите терминал через главное меню или с помощью сочетания клавиш Ctrl + Alt + T затем используйте команду dd для записи образа на флешку:
dd if=/windows.iso of=/dev/sdX
Замените X на букву вашей флешки! Узнать её можно через Gparted. В правом верхнем углу есть кнопка переключения дисков:
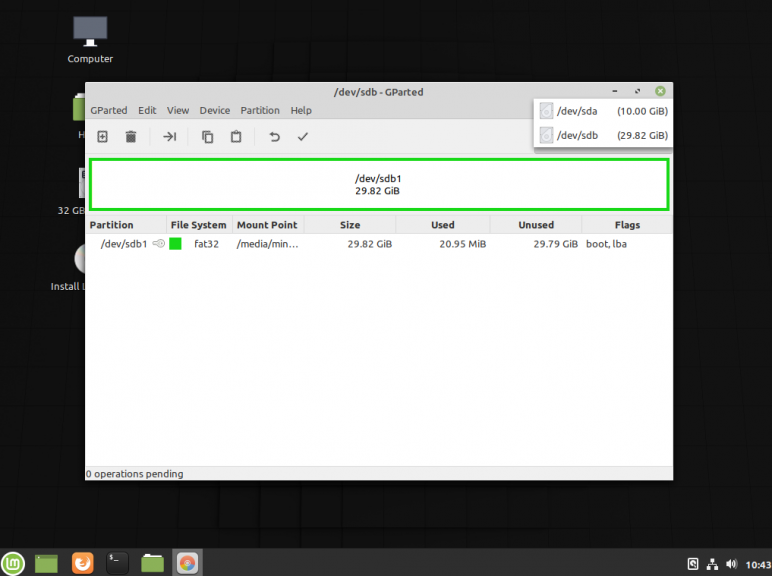
Тот диск который соответствует размеру вашей флешки и есть ваша флешка. В моем случае флешка на 32 гб это /dev/sdb. Значит команда будет иметь вид:
dd if=/windows.iso of=/dev/sdb
Дождитесь окончания записи и извлеките флешку.
Выводы
Как видите, создание загрузочной флешки Windows в Linux не представляет сложности. Это были все способы, которые я знаю. Если они вам помогли, напишите об этом. Если вы знаете еще способы, обязательно напишите о них в комментариях!
Обнаружили ошибку в тексте? Сообщите мне об этом. Выделите текст с ошибкой и нажмите Ctrl+Enter.
Об авторе

Здравствуйте, я изучаю Linux и обладаю хорошими знаниями английского.