| Workable Solutions | Step-by-step Troubleshooting |
|---|---|
| 1. Create Windows 10 Bootable USB on Mac with Boot Camp | Go to Finder. Choose Applications. Select Utilities. Open Boot Camp Assistant. Click on Continue…Full steps |
| 2. Create Windows 10 Bootable USB on Mac with UUByte ISO Editor | Install UUByte ISO Editor on your Mac. Connect the USB drive to the system. The software will detect the…Full steps |
| 3. Create Bootable USB on Mac for Windows with Disk Utility | Plug the USB drive into the system. Open Disk Utility. Format the USB flash drive via MS-DOS (FAT)…Full steps |
| 4. Using Terminal to Create Windows 10 Bootable USB on Mac | Plug the USB drive into your Mac. Open Terminal. To do so, choose Terminal from Utilities folder. Type…Full steps |
Do you want to create Windows 10 bootable USB on macOS Ventura/Monterey/Big Sur? Multiple reasons may prompt a user to do so. Firstly, a new operating system aids in clearing out existing malware. Secondly, it cleans up the system and improves efficiency. Moreover, you can easily create a bootable USB on Mac for Windows.
Creating a Windows 10 Bootable USB on a Windows computer is no big deal. But is it possible to create Windows 10 bootable USB on Mac without Bootcamp? Yes, you can! You can also create Mac bootable USB from Windows.
The latest silicon chips on Mac do not have Bootcamp installed. The new ARM chip architecture doesn’t allow it, so conventional Windows installation is impossible. However, multiple solutions can aid Mac users. It is hassle-free to create Windows 10 bootable USB on Mac with Terminal.
How to Download Windows 10 ISO File for Bootable USB
The best option to attain the Windows 10 ISO File is to visit Microsoft’s official website. Here are the steps you need to follow:
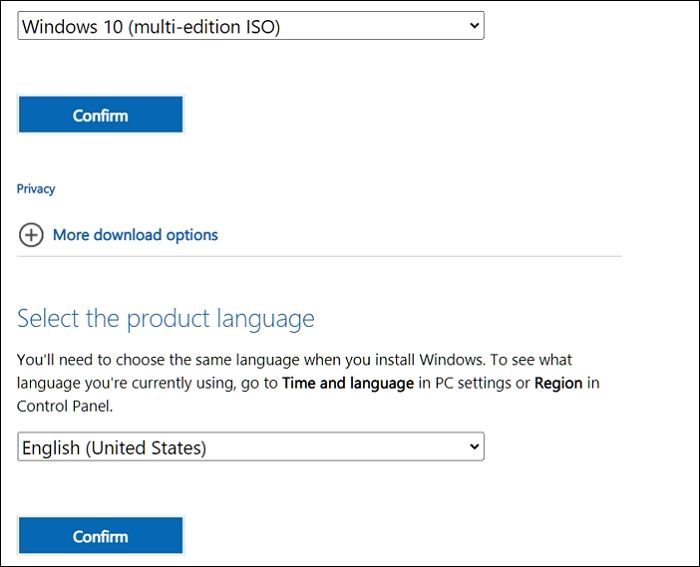
Step 1. Visit the Microsoft Windows 10 download page.

Step 2. Click on the dropdown under Windows 10 version, and then click on confirm.
Step 3. Next, select the language and edition. Click Confirm.
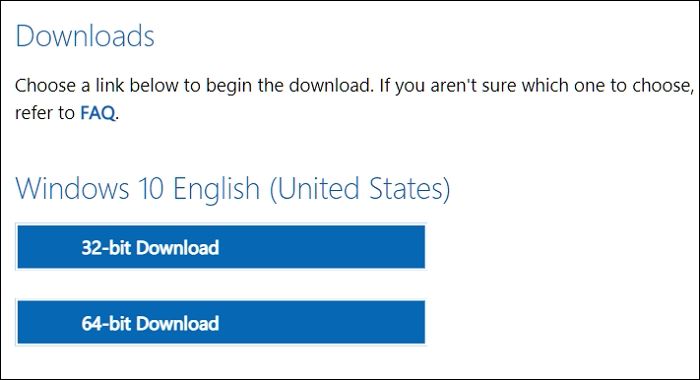
Step 4. Another page will open, giving you a download link. You can choose between Windows 10 32-bit ISO or 64-Bit ISO.
Step 5. Select where you want to save the ISO file. Wait for the download to complete.
How to Format a USB Correctly to Create Windows 10 Bootable USB
Before you go ahead with creating Windows 10 Bootable USB on Mac, it is vital to format the USB. Most users have no idea how to do this or why this is even important. Formatting the USB will erase all existing data and make the space free for the download. Moreover, you also need to ensure that the formatting is compatible with the system you will use it with.
Take a look at the steps you can follow to format drives on Macs:
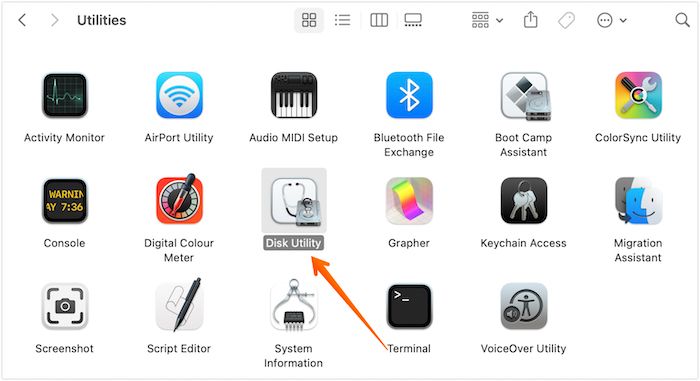
Step 1. Plug in the USB drive. Open Disk Utility. To do so, you need to open the Applications folder. Under that, open the Utilities folder, where you will find Disk Utility app.
Step 2. Choose the USB drive from the list. You will find it on the left-hand sidebar.
Step 3. Choose Erase. Now, type the name you want for the drive.

Step 4. Choose the Format you want. Select Erase.
Step 5. After some time, choose Done. Allow some time for the process to complete.
Download Recovery Software to Avoid Data Loss [Important]
Did you know you may lose data while using Mac to create a bootable USB? Yes! That’s a real possibility. If you want to create a Windows bootable USB on Mac, your Windows PC cannot boot and needs to recover data. Moreover, you can also face data loss after formatting the USB drive. In that case, taking the assistance of professional data recovery software is a great idea.
The EaseUS Data Recovery Wizard for Mac is a highly efficient and user-friendly data recovery tool for Mac. With this tool, you can recover lost data due to various causes, such as malware attacks, USB formatting, accidental deletion, etc. Moreover, you can also retrieve data from Mac-based devices like SSD, HDD, fusion drive, and more!
EaseUS Data Recovery Wizard
- Recover data from formatted USB drive on Mac. It can recover deleted files, documents, photos, audio, music, etc.
- Support data recovery on multiple devices, including USB drives, memory cards, internal hard drives, and digital cameras.
- Recover data from unbootable Mac. If your Mac cannot boot, you can create bootable media with this recovery tool.
Other exciting features include file filters, data protection, iCloud recovery, etc. You can also seek remote IT support if you encounter any issues. Are you eager to use EaseUS Data Recovery Wizard for Mac? In that case, follow these simple steps listed here:
Step 1. Search for lost files
Select the disk location to search for lost files (it can be an internal HDD/SSD or a removable storage device) on macOS Sierra, High Sierra, Mojave, Catalina, Big Sur, Monterey, Ventura, and the latest Sonoma. Click the «Search for lost files» button.
Note: Before data recovery, you’d better click «Disk Backup» from the left sidebar to create a backup of your Mac to avoid further data loss. After backing up, the software can recover data from the Mac backup, and your computer can wirte new data again.

Step 2. Go through the scanning results
EaseUS Data Recovery Wizard for Mac will immediately scan your selected disk volume and display the scanning results.

Step 3. Select the file(s) and recover
In the scan results, select the file(s) to preview and click the «Recover» button to have them back.

Method 1. Create Windows 10 Bootable USB on Mac with Boot Camp
One of the most straightforward solutions to create a Windows 10 Bootable USB on Mac is to use Mac Boot Camp Assistant. It is a multi-faceted boot program that requires an installed Windows ISO file and a USB drive.
Take a look at the steps you need to follow:
Step 1. Go to Finder.
Step 2. Choose Applications.
Step 3. Select Utilities.
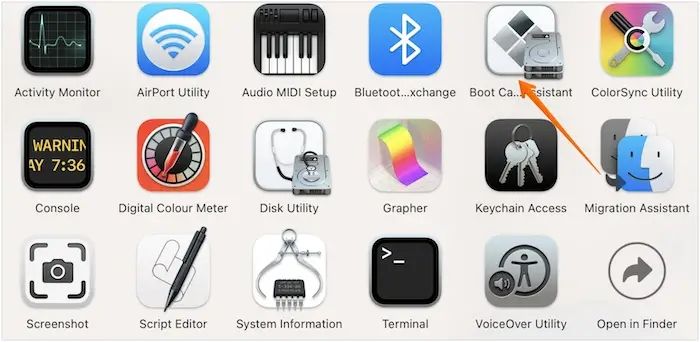
Step 4. Open Boot Camp Assistant.
Step 5. Click on Continue.
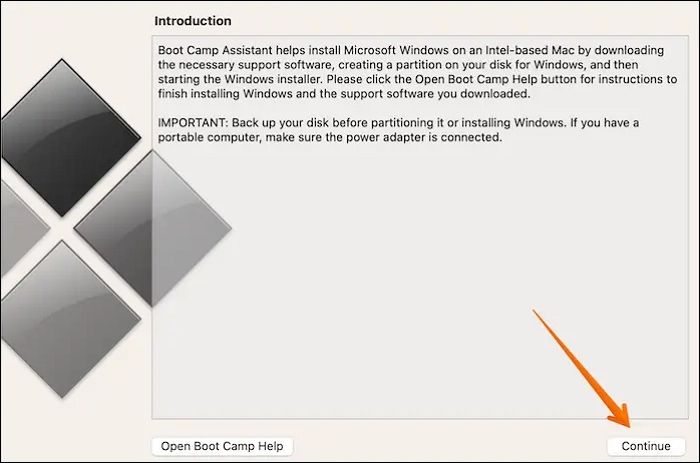
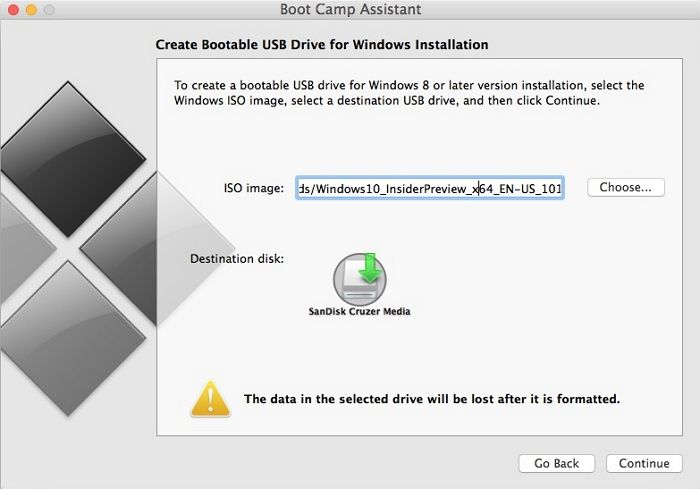
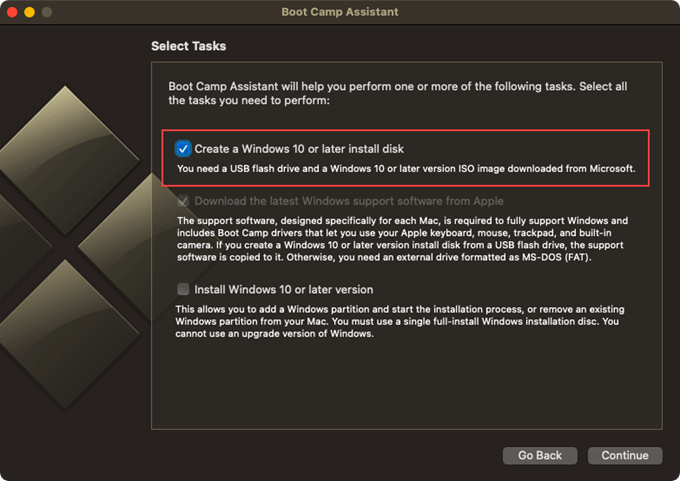
Step 6. Select the «Create a Windows 10 or later version installs disk» option. Click on Continue. Select Choose.
Step 7. Import the ISO file. Go ahead with Continue. Wait for the process to complete.
Step 8. Check if the bootable USB is named WININSTALL.
Step 9. If it appears so, you can remove the USB.
Note: This solution is only applicable to Intel-based Macs. You can opt for the following methods if you have Macs with an M1 chip.
Method 2. Create Windows 10 Bootable USB on Mac with UU Byte ISO Editor
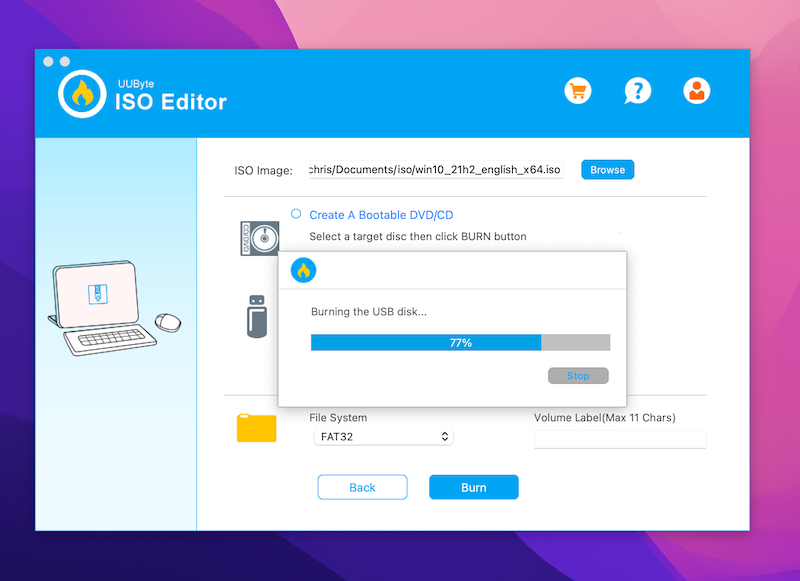
Another excellent method to create Windows 10 Bootable USB on Mac is with UUByte ISO Editor. The UUByte ISO Editor is a robust tool that enables users to complete the process easily. Most importantly, this app is fully compatible with Apple M1 and M2 Mac. In addition, you can run this app perfectly on the latest macOS Ventura. Here are the steps to follow:
Step 1. Download UUByte ISO Editor app from this link and Install it on your Mac.
Step 2. Connect the USB drive to the system.
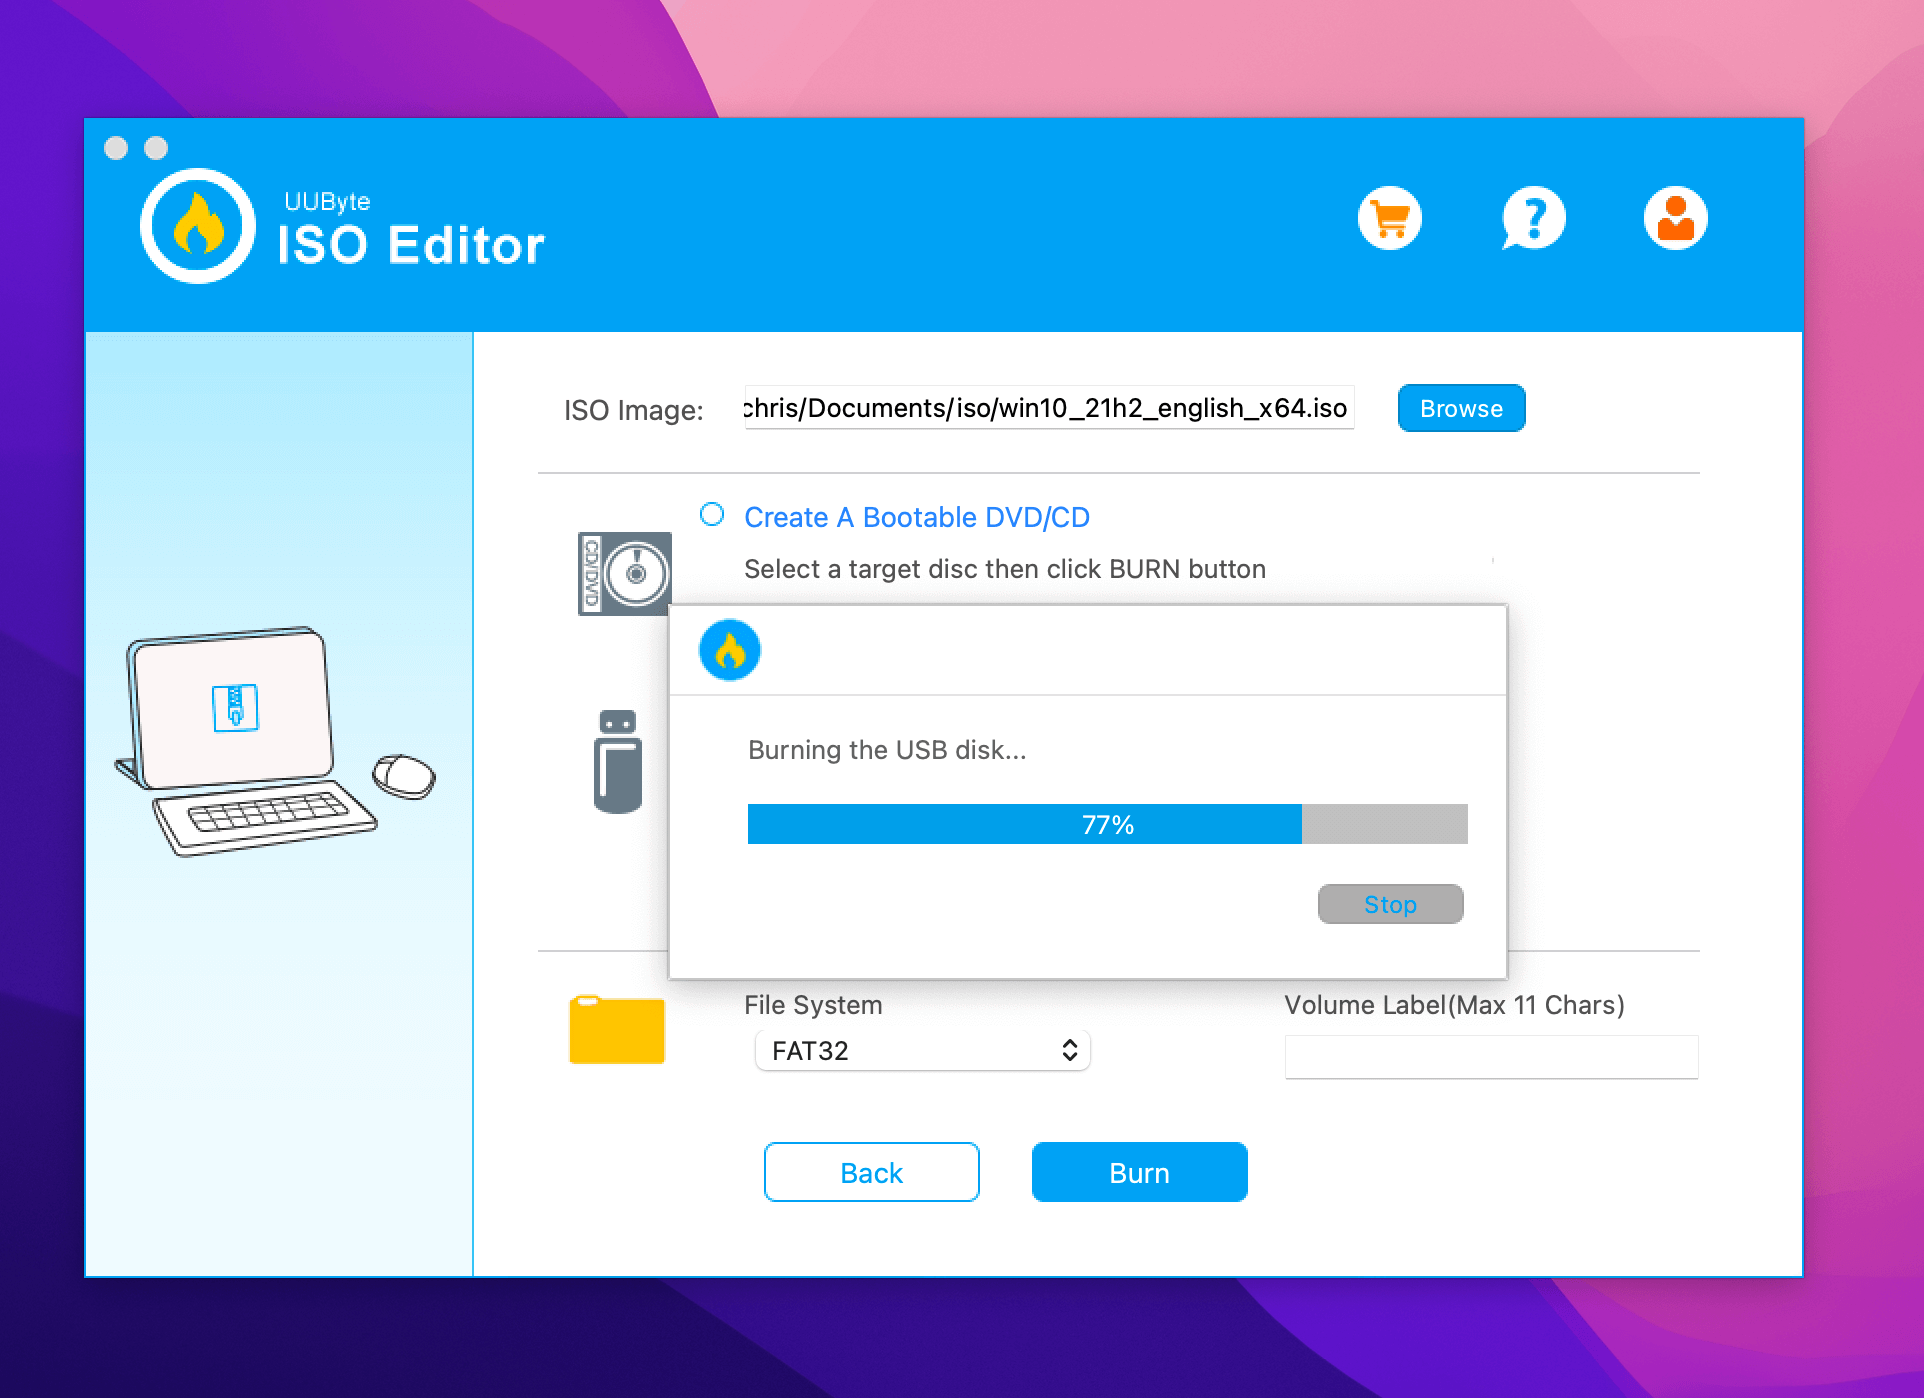
Step 3. Click the Burn tab on the welcome screen and you can see the software detect the USB.

Step 4. Import Windows 10 ISO into the app and choose the right USB drive.

Step 5. Now, click the Burn button at the bottom to start the process. Wait for some time for the completion of the process. It takes approximately 7 minutes to create a bootable USB on Mac. During this step, you can see ISO Editor splits the install.wim file automatically at the end.
Note: While the process is simple, you should be very careful with it, especially don’t touch the USB device. If you have created Windows 10 bootable USB successfully, remember to share this post with more users!
Method 3. Create Bootable USB on Mac for Windows with Disk Utility
Did you know you can create Bootable USB on Mac for Windows with Disk Utility? For that, you need to follow some simple steps –
Step 1. Plug the USB drive into the system.
Step 2. Open Disk Utility.
Step 3. Format the USB flash drive via MS-DOS (FAT).
Step 4. Send the Windows ISO file to the USB.
Step 5. Wait for the ISO file writing process to complete.
Now, you can use the USB to install Windows on Mac. However, it is essential to understand that this method favors older Mac models. If you have the latest version, use other solutions.
Method 4. Use Terminal to Create Windows 10 Bootable USB on Mac
You can use Mac Terminal to create Windows 10 Bootable USB on Mac. We have also included a video to help out users. Take a look:
- 00:48 Download the Windows 10 ISO file.
- 03:00 Copy the ISO file to the USB drive.
- 04:24 Use the Homebrew package manager.
- 07:32 Create a new folder on the USB drive and copy the downloaded contents.
Check out the written steps to follow:
Step 1. Plug the USB drive into your Mac.
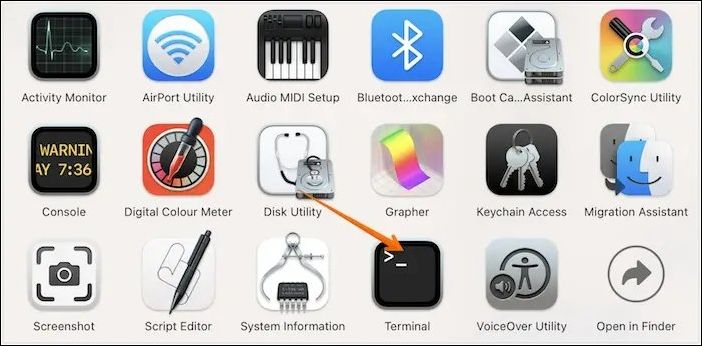
Step 2. Open Terminal. To do so, choose Terminal from Utilities folder.
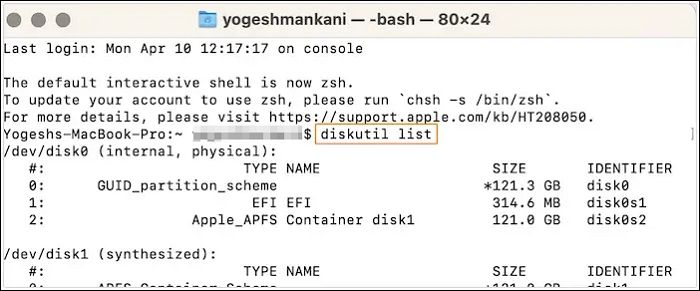
Step 3. Type diskutil list to find the USB name and press the Enter key.
Step 4. Type diskutil eraseDisk MS-DOS «WINDOWS10» GPT drive name@. Here, the drive name is the name of your USB drive.
Step 5. Download the Windows 10 ISO file.
Step 6. Type hdiutil mount ~/Downloads/WINDOWS10IMAGE.iso. Here, it would be best if you used the ISO file name instead of WINDOWS10IMAG.
Step 7. Next, type cp -rp /Volumes/MOUNTED-ISO/* /Volumes/WINDOWS10/. Here, MOUNTED will be replaced by the name of the ISO mounted.
Step 8. Lastly, type hdiutil unmount/Volumes/MOUNTED-ISO. The Terminal will close, and you will get a bootable USB.
If you are also interested in creating macOS Sonoma bootable USB on Mac, check the following passage:

Create macOS Sonoma Bootable USB Installer
If you have macOS Sonoma installed, then it’s essential to create a bootable USB in case of an issue with the OS. Read more >>
Summary
Isn’t creating Windows 10 Bootable USB on Mac easy? This article lists four methods you can use to create Bootable USB on Mac for Windows. You can follow these hassle-free steps and get it done.
However, data loss is always possible while creating Windows 10 Bootable USB on Mac. For that, you need help from reliable data recovery software. You can check out EaseUS Data Recovery Wizard for Mac in that case. It is a practical yet easy-to-use tool that aids in recovering lost data.
Haven’t you installed EaseUS Data Recovery Wizard for Mac yet? Download it today!
Create Windows 10 Bootable USB on Mac FAQs
You can create Windows 10 Bootable USB on Mac in these different ways. To know more, read the questions and answers listed below —
1. How to create macOS Ventura bootable USB on Mac?
To create macOS Ventura bootable USB on Mac, follow these steps:
- 1. Go to the Apple Store and download macOS Ventura.
- 2. Run Terminal on the system.
- 3. Connect the USB to the Mac.
- 4. Type in sudo /Applications/Install\ macOS\ Ventura. app/Contents/Resources/createinstallmedia —volume /Volumes/MyVolume in the Terminal.
- 5. Hit the Return key.
- 6. Enter the password when prompted.
2. How to rescue data from an unbootable Windows computer?
There are multiple ways to rescue data from an unbootable Windows computer. For instance, you can unplug various cables and reset the connection. You can also use the BIOS feature or eject RAM. However, if nothing works, you can opt for professional data recovery software, EaseUS Data Recovery Wizard for Mac.
3. Can I create Windows 10 bootable USB on a Mac with Terminal?
Yes, you can create Windows 10 bootable USB on a Mac with Terminal. But for that, you must use the diskutil, hdiutil commands with mount and unmount. You will also need to copy the ISO to the USB.
- 1. Download the ISO file from Windows.
- 2. Plug the USB drive into your system.
- 3. Enter «diskutil list» on Terminal to see where the USB is.
- 4. Enter «diskutil eraseDisk MS-DOS «WINDOWS10″ GPT@»
- 5. Now, enter «hdiutil mount ~/Downloads/WINDOWS10IMAGE.iso»
- 6. After that, type «cp -rp /Volumes/MOUNTED-ISO/* /Volumes/WINDOWS10/»
- 7. At last, enter «hdiutil unmount /Volumes/MOUNTED-ISO».
4. How to install macOS Ventura on a Windows PC?
To install macOS Ventura on a Windows PC, follow these steps:
- 1. Create a Bootable USB installer for macOS Ventura.
- 2. Go ahead with the EFI partitions configuration.
- 3. Adjust BIOS settings.
- 4. Install macOS Ventura on the system.
With the increasing popularity of Apple computers and the vast number of Windows applications and games, many Mac users find themselves in situations where they need to use a Windows operating system. One solution is to make a bootable Windows USB on Mac, which allows you to run Windows OS on your Mac computer without making any permanent changes to the system. In this blog post, we will discuss the process of creating a Windows bootable USB on a Mac, the challenges you might face, and the Windows version you should choose in 2023. We will also address some frequently asked questions and provide a summary of the topic.
There are several reasons why a Mac user may need to create a Windows bootable USB:
- Running Windows-exclusive applications: Some software is only available for Windows operating systems, and having a Windows bootable USB allows you to access these applications on your Mac.
Dual booting: If you need to use both macOS and Windows on a regular basis, a Windows bootable USB enables you to switch between the two operating systems easily. - Troubleshooting: A bootable Windows USB can be useful for troubleshooting purposes, such as fixing a corrupted Windows installation or recovering lost data.
- Testing software: Developers may need to test their applications on multiple operating systems to ensure compatibility and optimal performance.
- Gaming: Many popular games are only available on Windows, so having a bootable Windows USB allows you to enjoy these games on your Mac.
Video Tutorial:
Can You Make Windows Bootable USB on Apple M1 or M2 Mac?
Yes, it is possible to create a Windows bootable USB on an Apple M1 or M2 Mac, although the process is slightly different and may require additional steps. Some third-party applications, such as UTM or Parallels, can help facilitate the process. However, be aware that not all Windows applications and games may be compatible with the M1/M2 architecture due to its ARM-based design.
Method 1: Create a Windows Bootable USB on Mac with Bootcamp (Intel Mac Only)
Boot Camp is a utility provided by Apple that allows users to install and run Windows on their Mac computers alongside macOS. It enables users to switch between macOS and Windows as needed, providing the best of both worlds for those who require access to Windows-only applications or games. In this guide, we will introduce Boot Camp and provide step-by-step instructions on how to use it to create a Windows 10 bootable USB on your Mac.
1. Before starting the process, ensure that you have a USB drive with at least 8 GB of storage space. Connect the USB drive to your Mac and format it using Disk Utility (choose either FAT32 or exFAT as the file system).
2. Visit Microsoft’s website and download the Windows 10 ISO file. Select the edition and language of your choice, and make sure to download the 64-bit version.
3. Navigate to the Applications folder on your Mac, open the Utilities folder, and launch Boot Camp Assistant.
4. In Boot Camp Assistant, click on «Action» in the menu bar and select «Download Windows Support Software.» Choose your USB drive as the destination and click «Save.» Once the software has been downloaded, Boot Camp Assistant will automatically create the bootable USB drive containing the Windows 10 installation files.
Pros:
- Native support: Boot Camp is an Apple-provided utility, ensuring better compatibility and support for your Mac hardware.
- Dual booting: Boot Camp allows you to run both macOS and Windows on the same machine without the need for virtualization software.
- Better performance: Running Windows natively on your Mac through Boot Camp generally provides better performance compared to virtualization solutions.
Cons:
- Limited to Intel-based Macs: Boot Camp is not available for Apple M1 or M2 Macs, which use ARM-based architecture.
- Partitioning required: Boot Camp requires a dedicated partition on your Mac’s internal drive, which may not be ideal for users with limited storage space.
- No live boot option: Boot Camp installs Windows on your Mac’s internal drive, unlike a traditional bootable USB that allows you to run Windows without installing it on the host machine.
Method 2: Create a Windows Bootable USB on Mac with ISO Editor (All Macs)
UUByte ISO Editor is a versatile third-party tool that allows users to manage ISO files efficiently. With its user-friendly interface and powerful features, UUByte ISO Editor is an excellent choice for creating bootable USB drives for various operating systems, including Windows 10. In this guide, we will introduce UUByte ISO Editor and provide step-by-step instructions on how to use it to create a Windows 10 bootable USB on your Mac.


How to Use UUByte ISO Editor to Create a Windows 10 Bootable USB on Mac:
1. Ensure that you have a USB drive with at least 8 GB of storage space. Connect the USB drive to your Mac.
2. Go to Microsoft’s website and download the Windows 10 ISO file. Select the edition and language of your choice, and make sure to download the 64-bit version.
3. Visit the official UUByte website, download the macOS version of UUByte ISO Editor, and install it on your Mac. Launch UUByte ISO Editor: Open the UUByte ISO Editor application on your Mac.
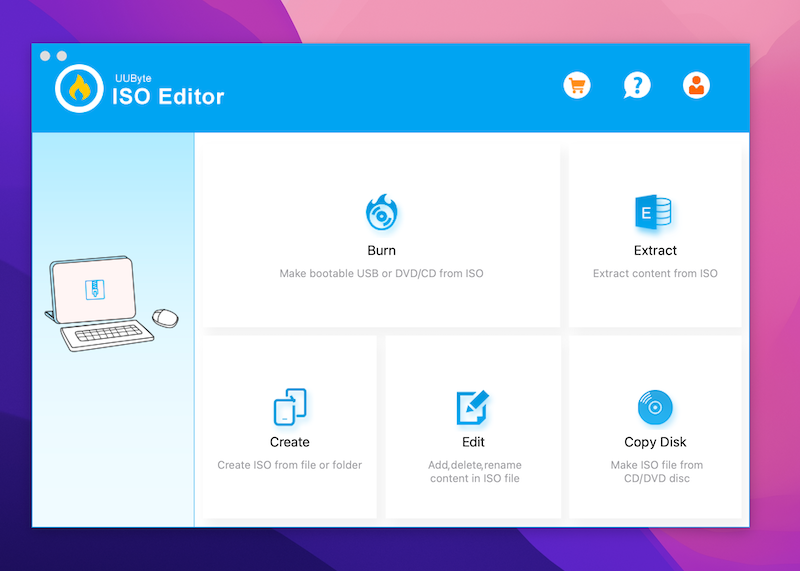
5. Click on the «Burn» option in the main interface, and then click on the «Browse» button to select the Windows ISO file you downloaded earlier.
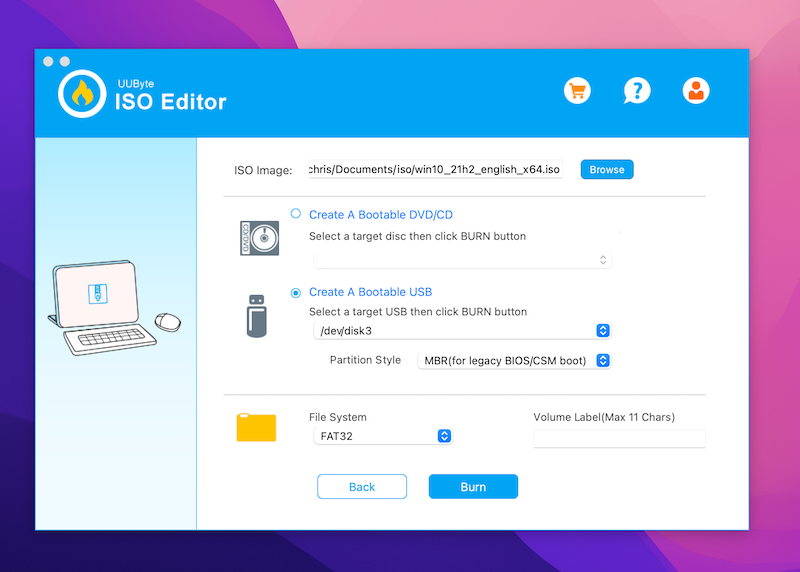
6. Create a bootable USB: Choose your USB drive from the «Destination» dropdown menu. Ensure that the «Create a bootable USB» option is selected, and then click on the «Burn» button to start the process. UUByte ISO Editor will format your USB drive and create a bootable Windows USB.
Pros:
- User-friendly interface: UUByte ISO Editor offers a simple, easy-to-use interface that makes creating a bootable USB drive straightforward, even for beginners.
- Versatility: In addition to creating bootable USB drives, UUByte ISO Editor can also extract, edit, and create ISO files for various purposes.
- Compatibility: UUByte ISO Editor works with both Intel-based and M1/M2 Macs, making it a flexible solution for creating Windows bootable USB drives.
Cons:
- Third-party software: As a third-party application, UUByte ISO Editor may not have the same level of support or compatibility as Apple’s native tools like Boot Camp.
- Cost: Unlike Boot Camp, which is included with macOS, UUByte ISO Editor is a paid software that requires a license to access its full features.
- No automatic driver installation: Unlike Boot Camp, UUByte ISO Editor does not automatically install drivers for your Mac’s hardware when creating a bootable USB drive, which may require additional steps to ensure compatibility with Windows 10.
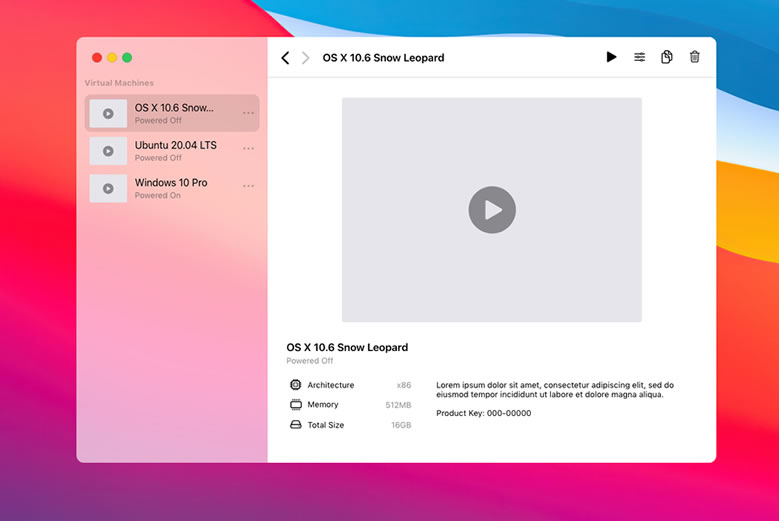
Method 3: Create a Windows Bootable USB on Mac with UTM (M1/M2 Macs)
UTM is an open-source virtualization solution that allows users to run multiple operating systems on their macOS, iOS, and iPadOS devices. However, UTM is not designed for creating bootable USB drives. Instead, it enables users to run Windows (or other operating systems) within a virtual machine on their Mac, iPhone, or iPad without the need for a separate bootable USB drive or partition.
How to use UTM to Create Windows Bootable USB on a Mac:
1. Visit the official UTM website and download the latest version of UTM for macOS.
2. Follow the instructions on the UTM website to install the application on your Mac.
3. Visit Microsoft’s website and download the Windows ISO file of your choice, such as Windows 10 or Windows 11.
4. Launch UTM and click the «+» button to create a new virtual machine. Give it a name and configure the virtual hardware as needed, such as allocating RAM and creating a virtual disk.
5. In the UTM virtual machine configuration, click on the «CD/DVD» tab, and then click on the «+» button to add the Windows ISO file you downloaded earlier.
6. Click the «Start» button in the UTM interface to boot the virtual machine using the Windows ISO file.
7. Follow the on-screen instructions to install Windows within the virtual machine.
8. Get into Windows virtual machine and download Rufus free software to create a Windows bootable USB in short time.
Pros:
- No bootable USB needed: UTM allows users to run Windows on their Mac without the need for a separate bootable USB drive or partition, making the process simpler and more streamlined.
- Isolation: Running Windows within a virtual machine keeps it isolated from your main macOS environment, reducing the risk of system instability or data loss.
- Easy switching: With UTM, users can easily switch between macOS and Windows without needing to reboot their Mac.
Cons:
- Performance: Running Windows within a virtual machine may result in reduced performance compared to running it natively using a tool like Boot Camp.
- Limited hardware access: Windows running in a virtual machine may not have full access to your Mac’s hardware, which may lead to compatibility issues or reduced functionality.
- Complexity: Setting up and configuring a virtual machine using UTM can be more complex and time-consuming than simply creating a bootable USB drive.
while UTM is an excellent solution for running Windows within a virtual machine on a Mac, it is not designed for creating Windows bootable USB drives. If you are specifically looking to create a bootable USB drive for Windows on a Mac, consider using other methods, such as Boot Camp Assistant, UUByte ISO Editor, or the Terminal app.
Why You Can’t Make Windows Bootable USB on Mac
If you encounter issues creating a Windows bootable USB on your Mac, there may be several reasons:
- Incompatible macOS version: Ensure that your macOS version supports the creation of Windows bootable USB drives.
- Incorrect file format: The Windows ISO file must be in the correct format (FAT32 or exFAT) for the process to work. Double-check that you have formatted your USB drive correctly.
- Insufficient storage space: Ensure that your USB drive has enough storage capacity to accommodate the Windows installation files.
- Third-party application issues: If you are using a third-party application to create the bootable USB, make sure it is compatible with your Mac and up to date.
The Challenges of Creating Windows Bootable USB on Mac
Creating a Windows bootable USB on a Mac is more challenging than doing so on a Windows PC due to several factors, including differences in hardware, file systems, and native support. Below are some of the key challenges associated with this process:
- Limited native support: Unlike Windows PCs, macOS does not provide native tools or utilities for creating Windows bootable USB drives. As a result, Mac users must rely on third-party applications, such as Boot Camp Assistant, UNetbootin, or balenaEtcher, to create a bootable USB drive.
- Different file systems: macOS and Windows use different file systems, which can complicate the process of creating a bootable USB drive. macOS typically uses Apple File System (APFS) or Hierarchical File System Plus (HFS+), while Windows uses the New Technology File System (NTFS). The bootable USB drive must be formatted with a compatible file system (usually FAT32 or exFAT) to work on both platforms.
- Hardware differences: Mac computers use different hardware configurations compared to Windows PCs, which may cause compatibility issues when creating a Windows bootable USB. For instance, Macs with Apple’s M1 or M2 chips use an ARM-based architecture, while most Windows PCs use an x86 or x64 architecture. This difference may require additional steps or adjustments when creating a bootable USB on a Mac.
- BIOS vs. UEFI: Most modern Macs use the Unified Extensible Firmware Interface (UEFI) for booting, while some older Windows PCs may still use the Basic Input/Output System (BIOS). This difference can cause issues when creating a Windows bootable USB on Mac, as the USB drive must be set up correctly to boot in either UEFI or BIOS mode, depending on the target system.
Despite these challenges, it is still possible to create a Windows bootable USB on a Mac with the help of third-party applications and careful attention to detail. By understanding these challenges, users can better navigate the process and successfully create a bootable Windows USB drive on their Mac.
Frequently Asked Questions
Q1: Can I create a bootable Windows USB drive using macOS’s built-in Disk Utility?
A: No, Disk Utility does not support the creation of Windows bootable USB drives. You will need to use a third-party application to complete the process.
Q2: How long does it take to create a Windows bootable USB on Mac?
A: The process can take anywhere from 15 minutes to an hour, depending on the speed of your USB drive and Mac.
Q3: Can I use a bootable Windows USB drive created on a Mac with a Windows PC?
A: Yes, a Windows bootable USB drive created on a Mac should work on a Windows PC without any issues.
Q4: Do I need a product key to create a bootable Windows USB on Mac?
A: While you don’t need a product key to create the bootable USB drive, you will need one to activate Windows after installation.
Q5: Will creating a bootable Windows USB on my Mac affect my existing macOS installation?
A: No, creating a Windows bootable USB will not alter your macOS installation, as it is a separate, external drive.
Final Words
Creating a bootable Windows USB on a Mac is a useful solution for Mac users who need to access Windows-exclusive applications, games, or troubleshoot issues. Although the process can be more challenging than on a Windows PC, it is possible to create a bootable Windows USB on both Intel-based and M1/M2 Macs using third-party applications. In 2023, it is recommended to choose Windows 11 if your hardware meets the requirements. Be aware of the challenges and potential issues that may arise during the process and refer to the frequently asked questions for additional guidance.
The last release of Mac OS doesn’t have the option to create a bootable USB from Bootcamp like previous versions, and it is a problem because that require uses other tools.
I am updating this post today Dec 12, 2018. The reason is that I was only using UNetbootin to create the bootable USB, I will leave guide as a second method since it still working, and I will explain to you how you can create the bootable Windows USB without extra software.
The first step for both methods requires to format your USB device to NTFS, this is the default filesystem, alternative you can use ExFAT but the installation could fail.
Format USB to ExFAT (Under your own risk)
In order to boot from the USB, you need to format the USB to ExFAT, you can do it using Disk Utility (it comes with MacOS).
This step is the same for both methods. You need to show all the devices in Disk Utility» before to start the process.

Select your USB device in the list (not the partition), right click and then click on the Erase option:

In the next screen make sure you select these two options:
- Format: ExFAT
- Scheme: Master Boot Record
Click the Erase button.

If for some reason it fails, probably is because MacOS still using the USB, just repeat the steps, but if you see a screen similar to above screen is because the operation is successful.

Format USB with the terminal
You also can format the USB from the terminal, but you have to take care to use the correct device because, if you use the wrong name you will lose everything.
With this command you can list the device on MacOS:
diskutil list
This is an example, my USB is the disk2:

This command is to format the USB, the last parameter is the the USB:
diskutil eraseDisk ExFAT "WINDOWS10" MBRFormat disk2

Copy Windows files to USB — Method 1
This process is very easy doesn’t require to install other software, and they are just a few steps:
Open Windows ISO
Just double click on the ISO image, MacOS mount the image automatically.

Copy files
Now you only need to copy the files and paste them to the USB.
Command + ASelect all files.Command + CCopy files.- Go to your USB
Command + Vpaste the files.

This process could fail if you are using a USB with FAT32 because the file install.win is over 4GB, if this is the case try to open the terminal and copy paste the files from there (no always works. Try to follow the instructions to format the USB in ExFAT, NTFS works for some BIOS).

This is the command to copy the files from the ISO to the USB:
cp -rp /Volumes/CCCOMA_X64FRE_EN-US_DV9/* /Volumes/WINDOWS10/
And that is all, now you can try boot from the USB.
UNetbootin — Method 2
I will show you how you can use UNetbootin to create a bootable USB, it can be used no only for Mac but for Windows and Linux distributions too.
UNetbootin is free software and it is also available for Windows and Linux.
Check the path name of your USB Disk.
Always in Disk Utility, select the new partition that we created in the previous step, and click on the information button, it will give you the information about the new partition.

You also can use the terminal and the command diskutil to see the list of drives:
diskutil list
Download UNetbootin:
-
Download the
dmgdirectly from the Website.
And copy theappto the/Applicationfolder. -
I prefer to use homebrew to install applications, you can check this article for more information: Installing Applications on Mac with Homebrew:
brew cask install --appdir="/Applications" unetbootin
Makes the USB booteable
Open UNetbootin and you only need select 3 options:
- Diskimage and ISO
- Now we need open the ISO Windows image that is on our computer.
- Select your USB device on UNetbootin.
- Click on the OK, button and wait to the process end it will take a time.

NOTES:
- I tested other tools like
ddandEtcherbut they are not working because Windows requires extra steps, for the moment this is the only easy tool that I know that works if you are on Windows try Rufus. - Some users reported that UNetbootin is not working, if after to format the USB drive and change the block size is not working for you try another Drive with enough space.
Most new PCs don’t come with DVD drives anymore. So it can be a pain to install Windows on a new computer.
Luckily, Microsoft makes a tool that you can use to install Windows from a USB storage drive (or «thumbdrive» as they are often called).
But what if you don’t have a second PC for setting up that USB storage drive in the first place?
In this tutorial we’ll show you how you can set this up from a Mac.
Step 1: Download the Windows 10 ISO file
You can download the ISO file straight from Microsoft. That’s right — everything we’re going to do here is 100% legal and sanctioned by Microsoft.
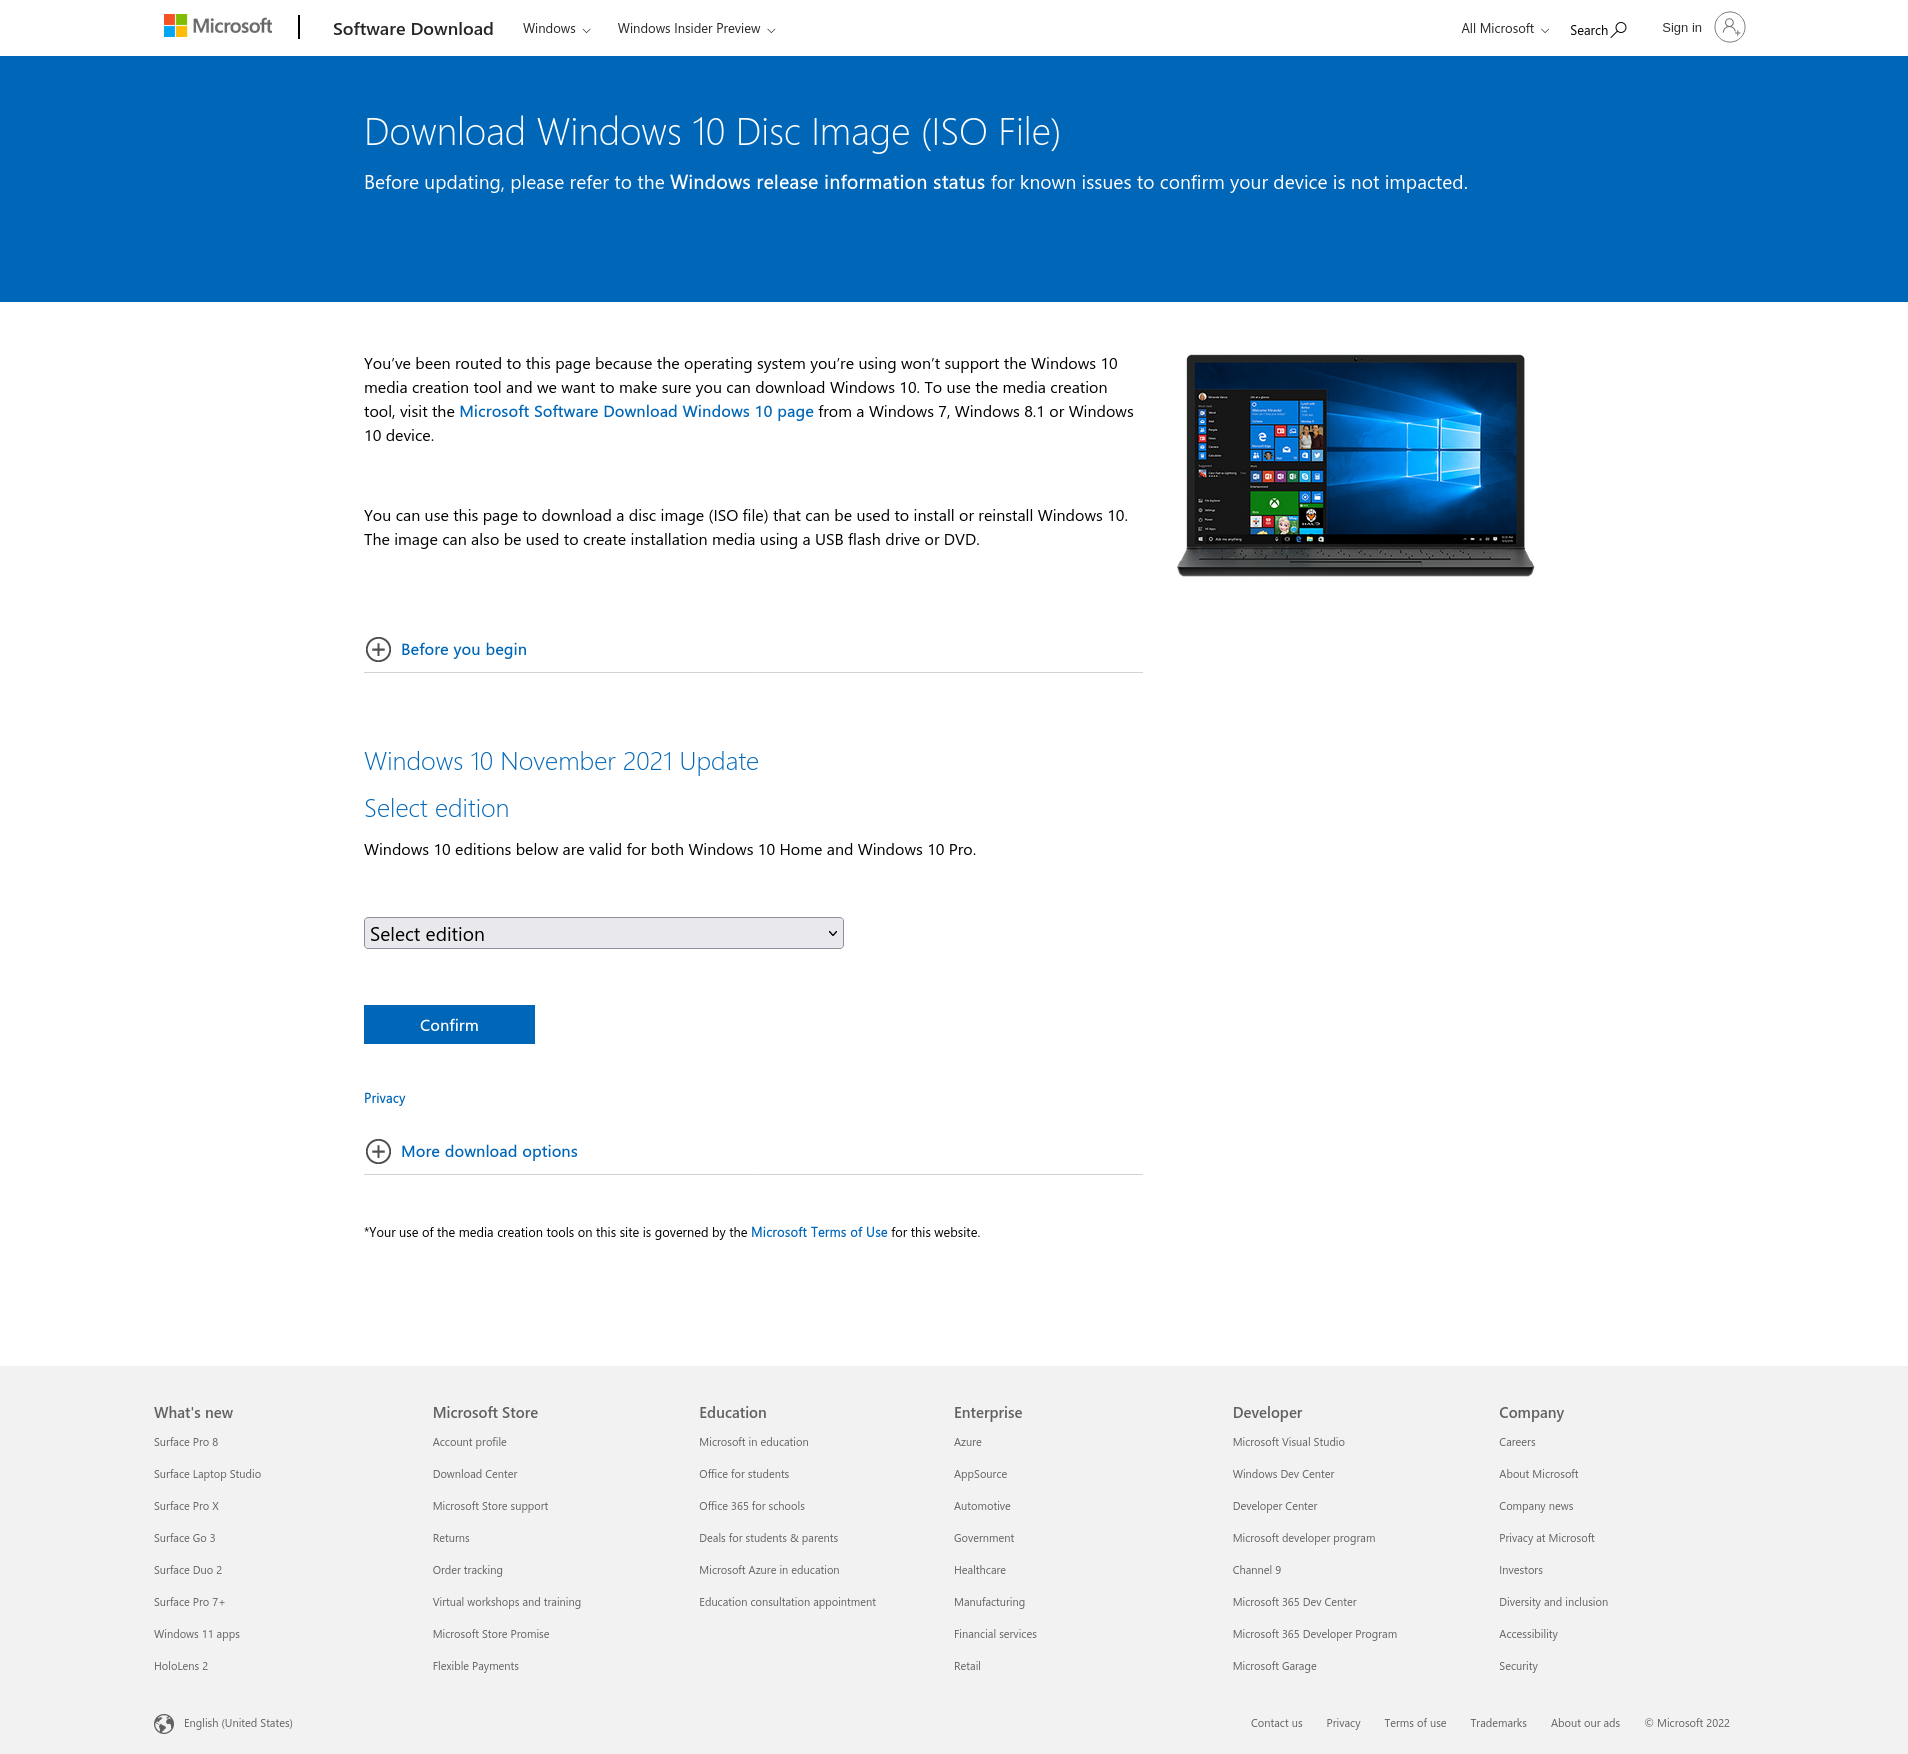
You can download Windows 10 directly from Microsoft for free using this link. If you visit the link using a Windows device, you’ll be redirected to the Windows Media Creation Tool like this:
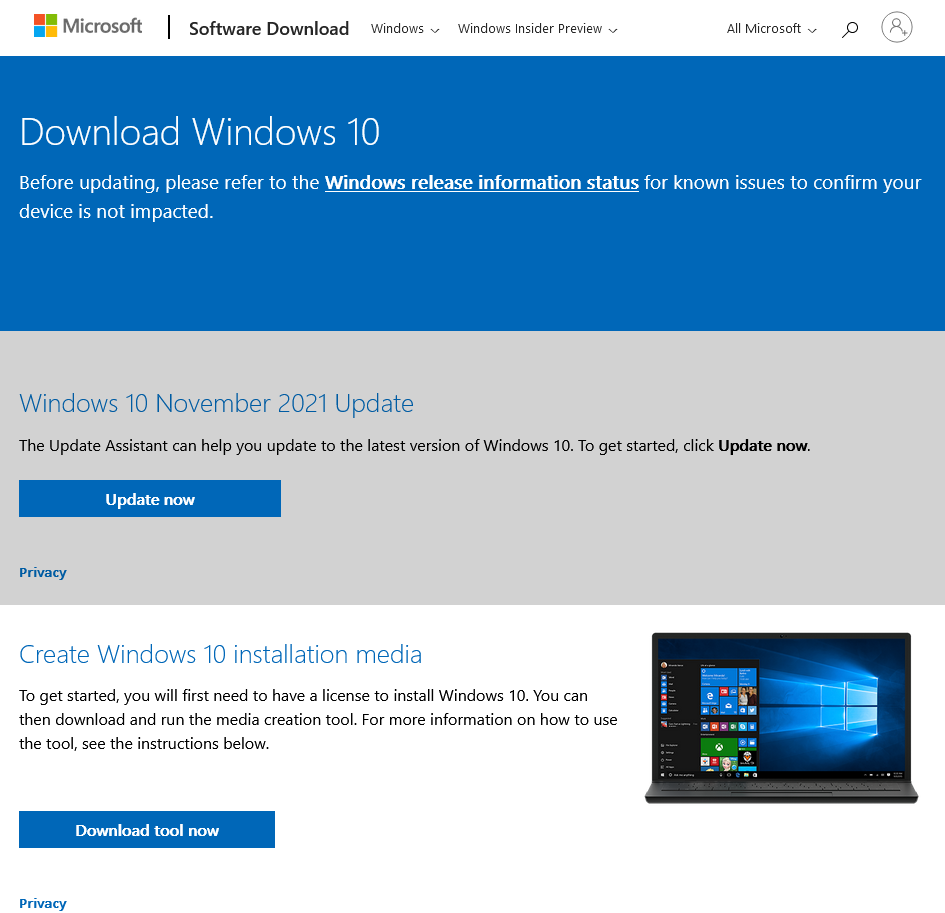
If you visit the same link from a non-Windows device, such as a Mac or a Linux device or any smartphone, you’ll land on the official ISO download page:
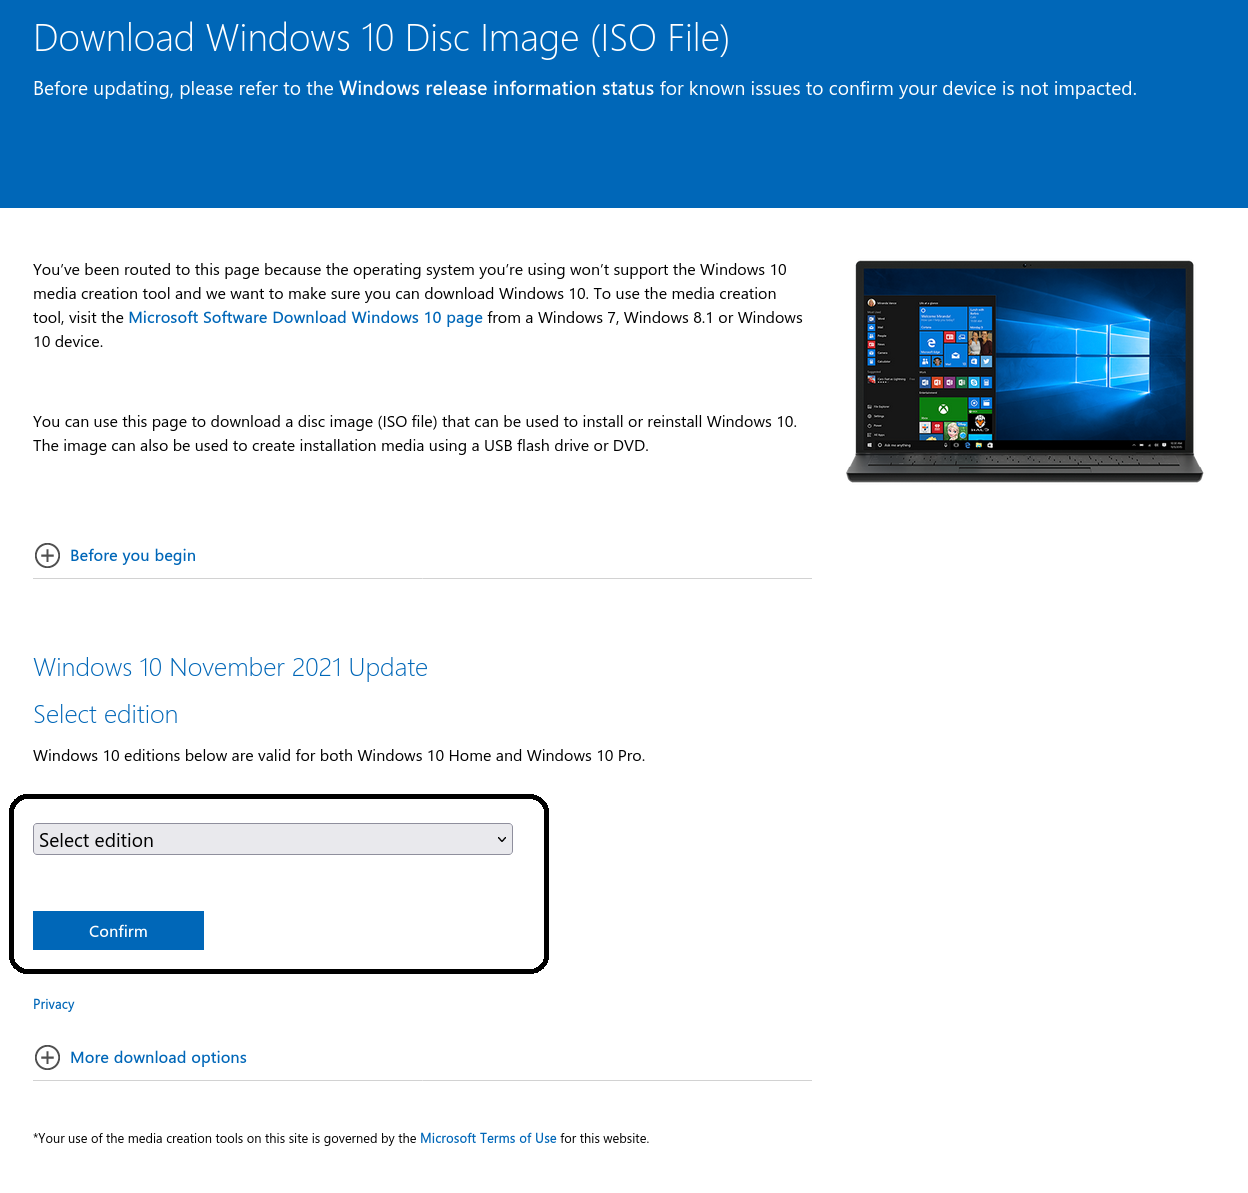
Select your desired edition from that drop-down and hit Confirm.
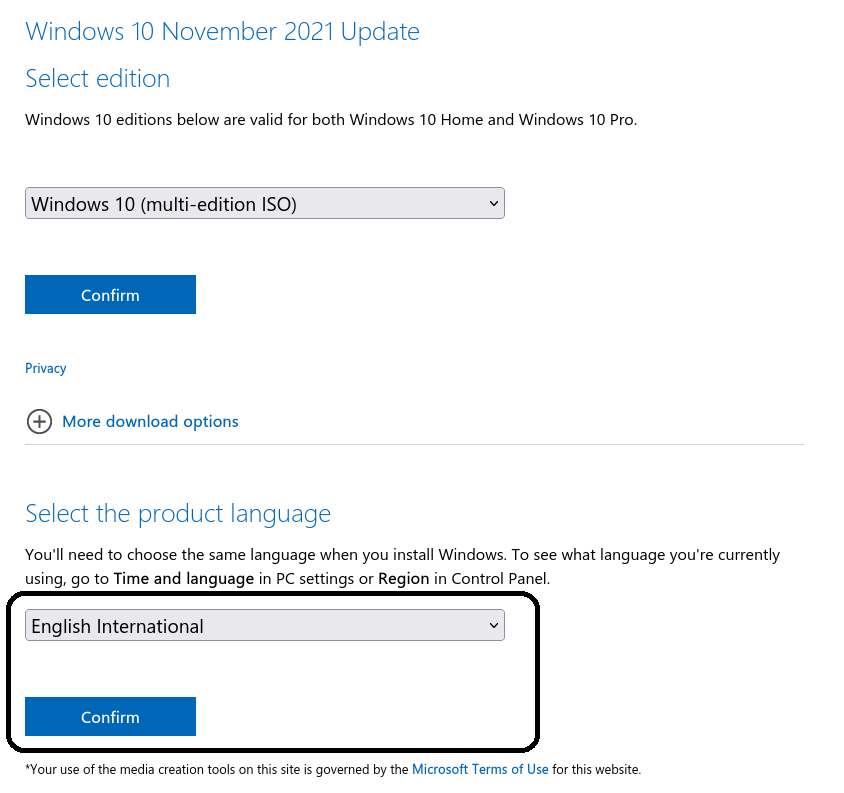
At this time, Windows 10 (multi-edition ISO) was the only one available. Once you’ve confirmed your edition, you’ll get another drop-down that lets you pick a language. Pick the one you want and hit the Confirm button.
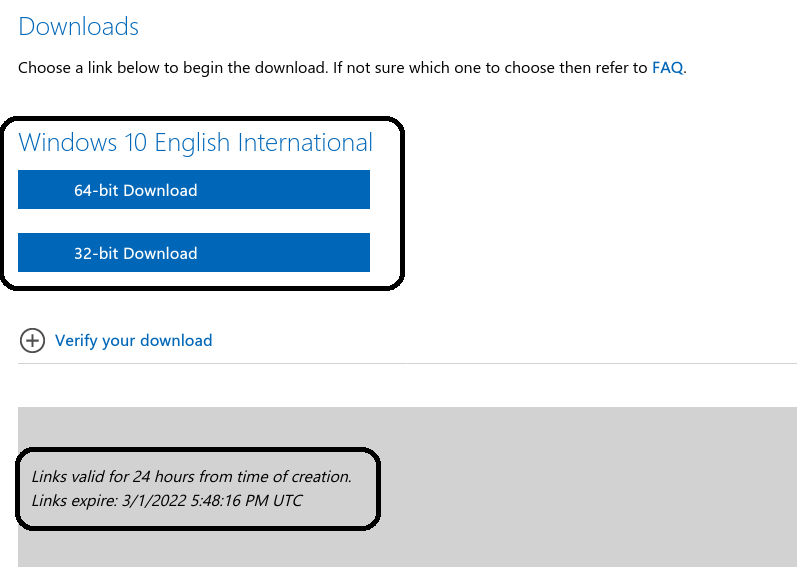
Once you’ve confirmed your language, you’ll get two download links, one for the 64-bit edition, and the other one for the 32-bit edition. Both links are valid for 24 hours and the page will also show when they expire.
If you don’t know how to decide between 64-bit and 32-bit, here’s what you should do. If you have a processor that supports 64-bit architecture and you have more than 4GB of RAM, go with the 64-bit one. 32-bit operating systems have a 4GB RAM limit.
To figure out whether your processor supports 64-bit architecture or not, head over to a website like WikiChip, and search for your processor model.
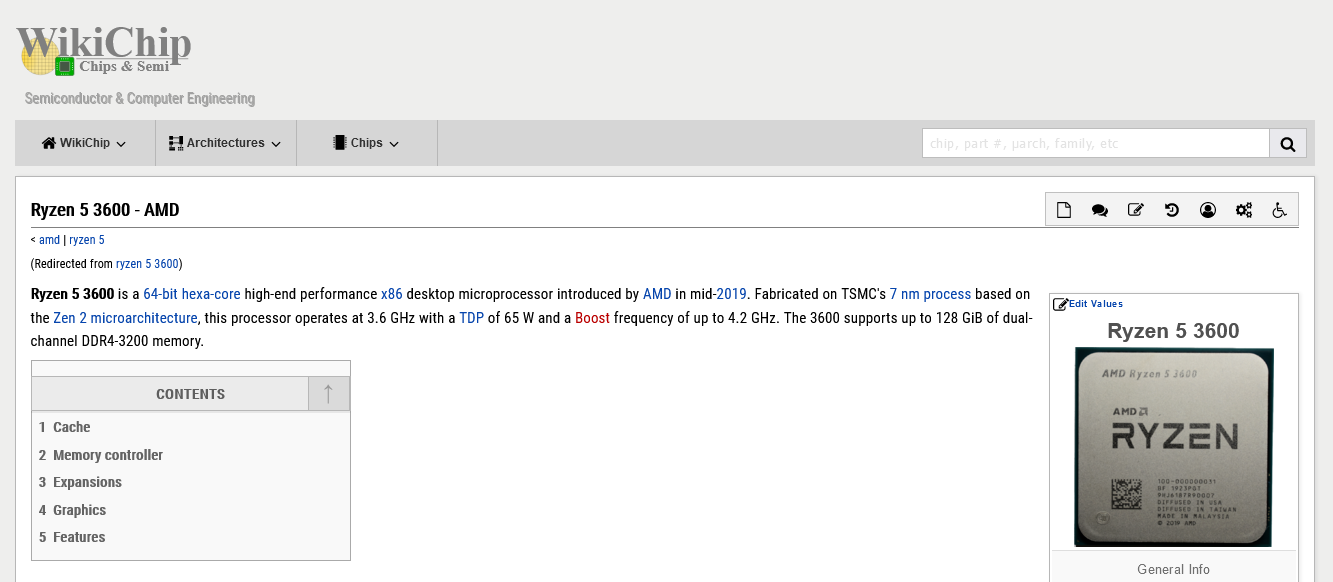
As you can see in the screenshot above, my Ryzen 5 3600 supports 64-bit architecture. I also have 16GB of RAM which is a lot more than 4GB, so I’ll go for the 64-bit edition.
Step 2: Insert your USB storage drive into your Mac
The ISO file is only about 5 gigabytes, but I recommend you use a USB drive with at least 16 gigabytes of space just in case Windows needs more space during the installation process.
I bought a 32 gigabyte USB drive at Walmart for only $3, so this shouldn’t be very expensive.
Stick your USB drive into your Mac. Then open your terminal. You can do this using MacOS Spotlight by pressing both the ⌘ and Space bar at the same time, then typing «terminal» and hitting enter.
Don’t be intimidated by the command line interface. I’m going to tell you exactly which commands to enter.
Step 3: Use the diskutil command to identify which disk your USB drive is mounted on
Open Mac Spotlight using the ⌘ + space keyboard shortcut. Then type the word «terminal» and select Terminal from the dropdown list.
Paste the following command into your terminal and hit enter:
diskutil list
You will see output like this (note — your Mac’s terminal may be black text on a white background if you haven’t customized it).
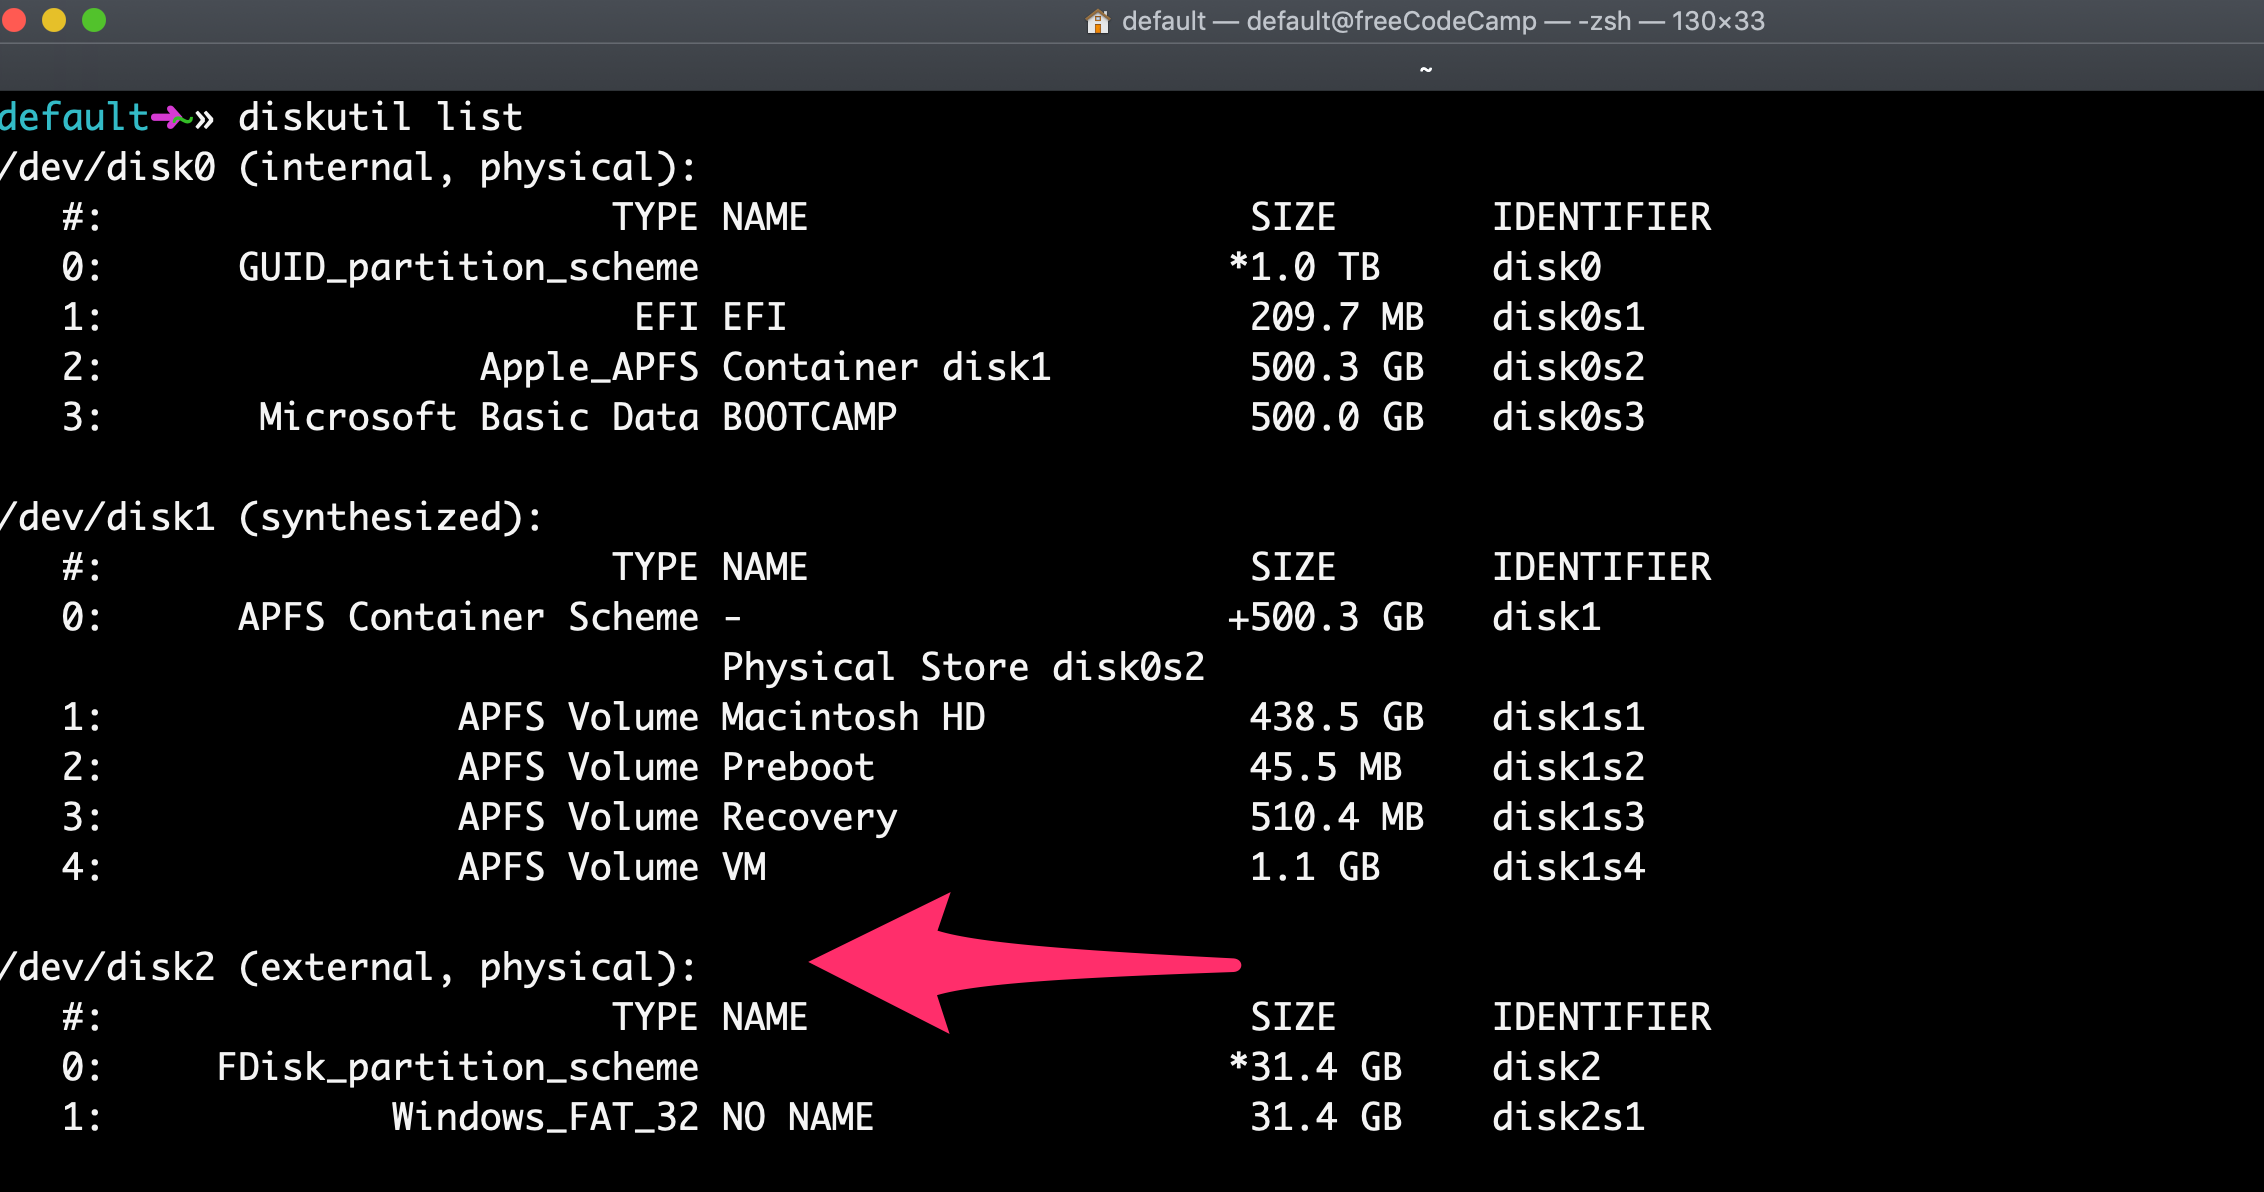
Copy the text I point to here. It will probably be something like
/dev/disk2.
Step 4: Format your USB Drive to work with Windows
Next format your USB drive to Windows FAT32 format. This is a format that Windows 10 will recognize.
Note that you should replace the disk2 with the name of the your drive from step 3 if it wasn’t disk2. (It may be disk3 or disk4).
Run this command using the correct disk number for your USB:
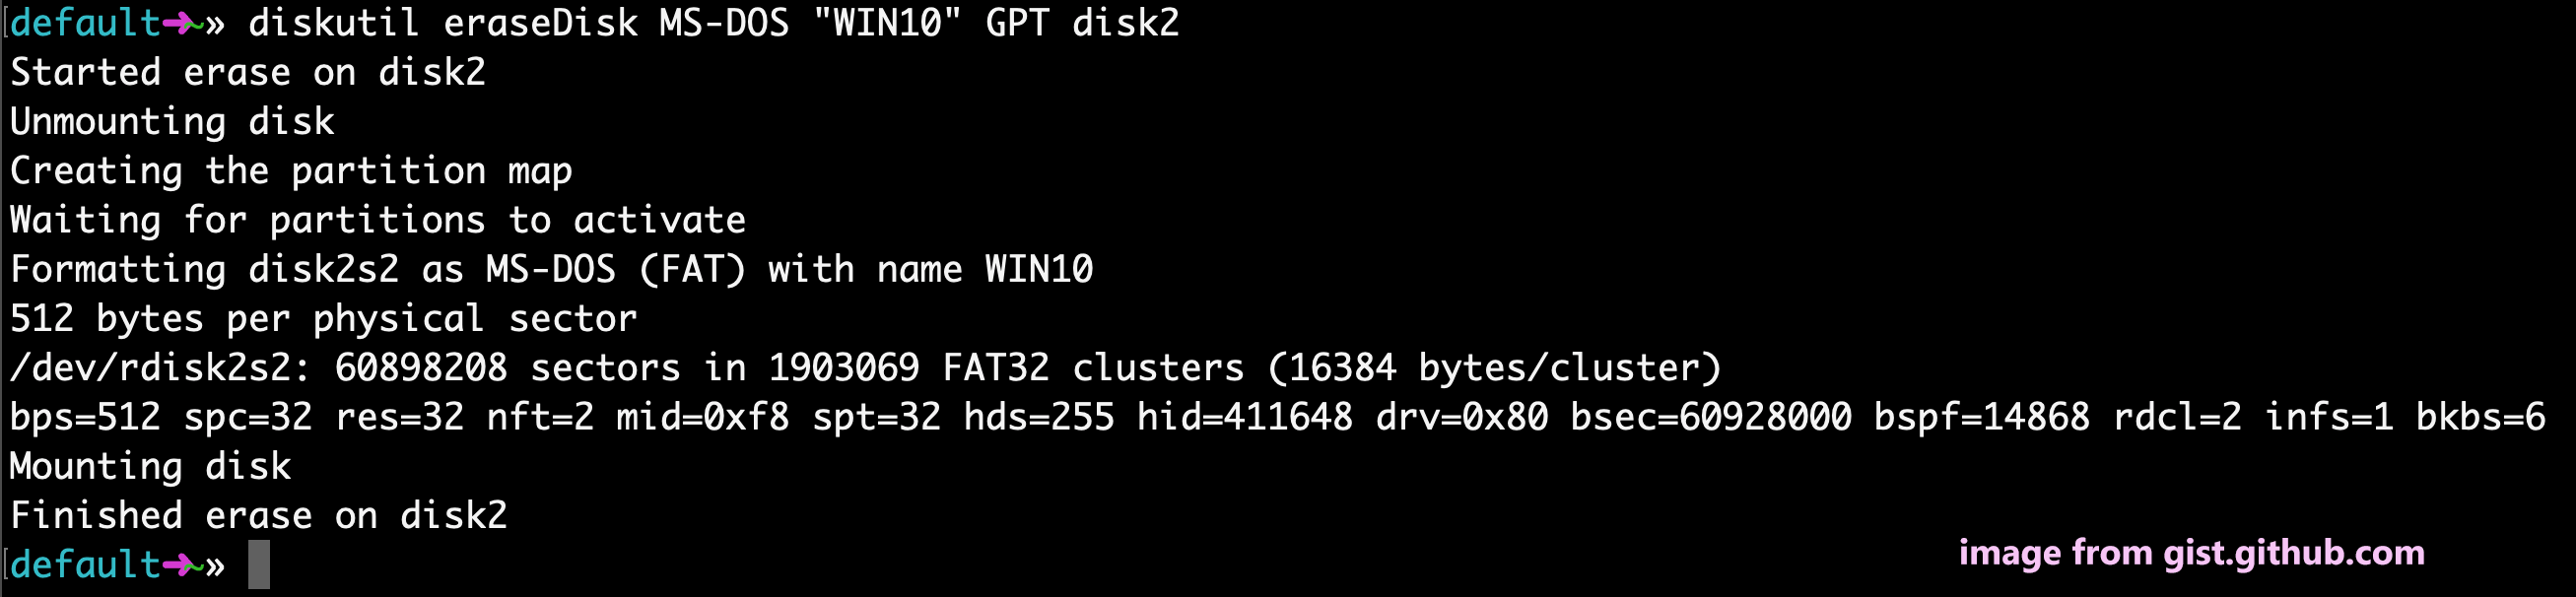
diskutil eraseDisk MS-DOS "WIN10" GPT /dev/disk2
Then you’ll see terminal output like this.
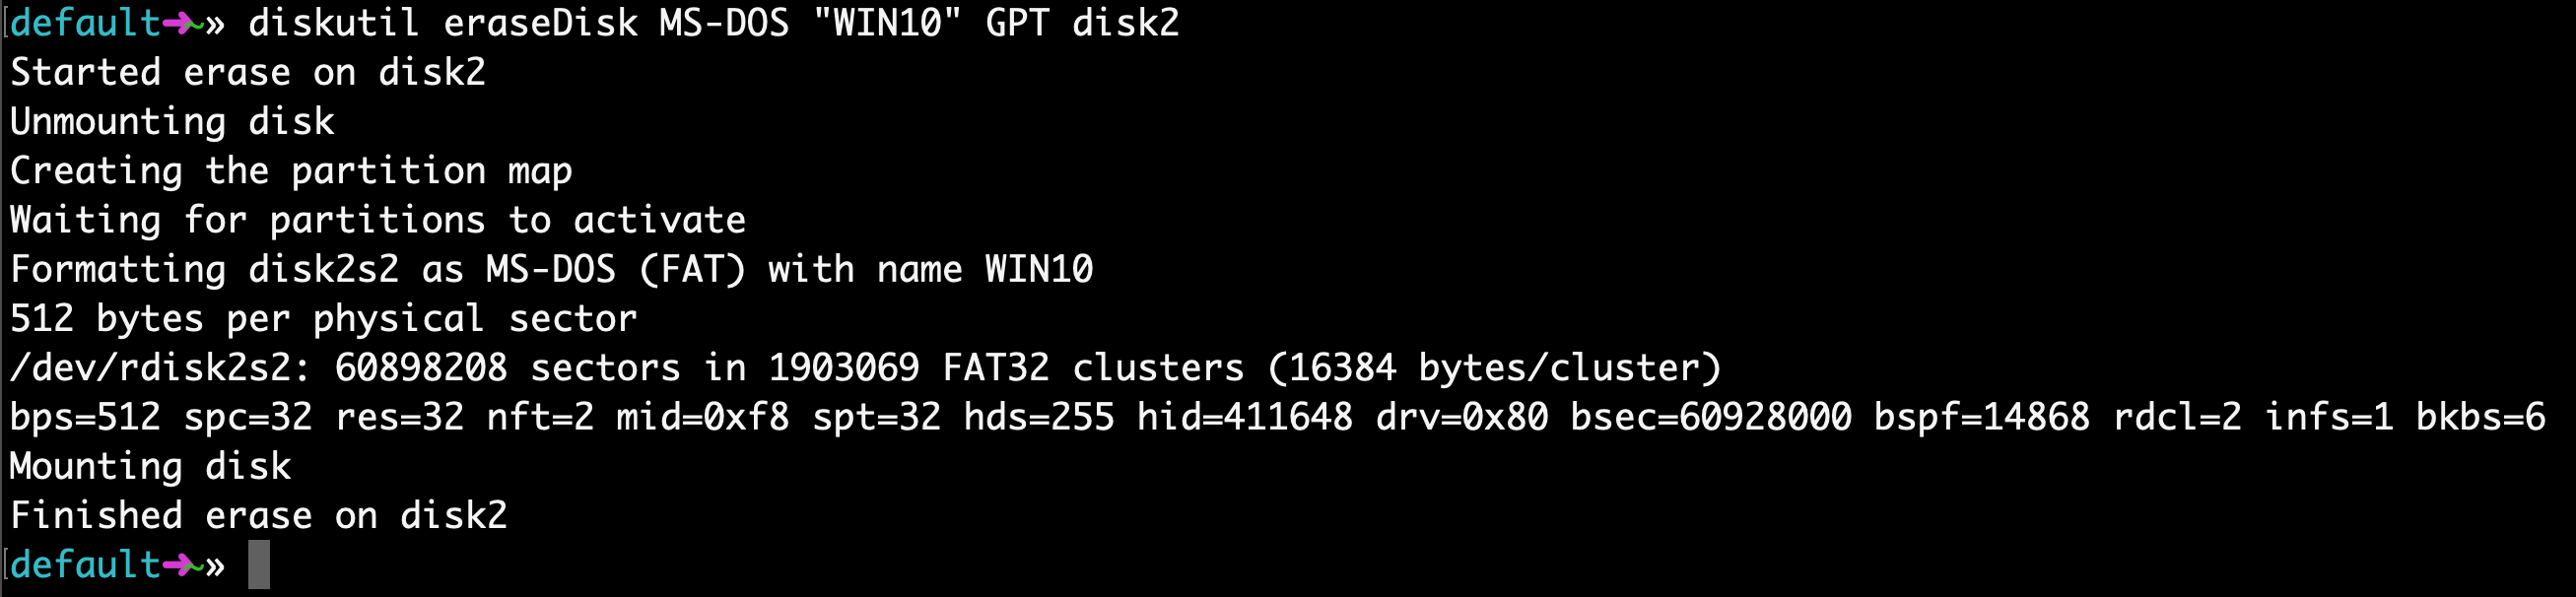
This will probably only take about 20 seconds on a newer computer, but may take longer on an older computer.
Note that for some hardware, you may instead need to run this command, which uses the MBR format for partitioning instead of GPT. Come back and try this command if step 7 fails, then redo steps 5, 6, and 7:
diskutil eraseDisk MS-DOS "WIN10" MBR /dev/disk2Step 5: Use hdiutil to mount the Windows 10 folder and prepare it for transfer.
Now we’re going to prep our downloaded ISO file so we can copy it over to our USB drive.
You will need to check where your downloaded Windows 10 ISO file is and use that. But your file is probably located in your ~/Downloads folder with a name of Win10_1903_V1_English_x64.iso.
hdiutil mount ~/Downloads/Win10_1903_V1_English_x64.iso
Step 6: Copy the Windows 10 ISO over to your USB Drive
Update April 2020: One of the files in the Windows 10 ISO – install.wim – is now too large to copy over to a FAT-32 formatted USB drive. So I’ll show you how to copy it over separately.
Thank you to @alexlubbock for coming up with this workaround.
First run this command to copy over everything but that file:
rsync -vha --exclude=sources/install.wim /Volumes/CCCOMA_X64FRE_EN-US_DV9/* /Volumes/WIN10
Then run this command to install Homebrew (if you don’t have it installed on your Mac yet):
/bin/bash -c "$(curl -fsSL https://raw.githubusercontent.com/Homebrew/install/HEAD/install.sh)"
Then use Homebrew to install a tool called wimlib with this terminal command:
brew install wimlib
Then go ahead and create the directory that you’re going to write the files into:
mkdir /Volumes/WIN10/sources
Then run this command. Note that this process may take several hours, you may see 0% progress until it finishes. Don’t abort it. It will use wimlib to split the install.wim file into 2 files less than 4 GB each (I use 3.8 GB in the following command), then copy them over to your USB:
wimlib-imagex split /Volumes/CCCOMA_X64FRE_EN-US_DV9/sources/install.wim /Volumes/WIN10/sources/install.swm 3800
Once that’s done, you can eject your USB from your Mac inside Finder. Note that Windows will automatically rejoin these files later when you’re installing.
Step 7: Put your USB into your new PC and start loading Windows
Congratulations — your computer now should boot directly from your USB drive. If it doesn’t, you may need to check your new PC’s BIOS and change the boot order to boot from your USB drive.
Windows will pop up a screen and start the installation process.
Enjoy your new PC, and your newly-installed copy of Windows.
Learn to code for free. freeCodeCamp’s open source curriculum has helped more than 40,000 people get jobs as developers. Get started
Can I create a Windows 10 installation USB on a Mac? How to make a Windows 10 bootable USB on Mac? To figure out answers to these two questions, you can go on to read this post. It is not easy as the creation on a Windows PC and MiniTool shows you a detailed guide with multiple ways to create Windows 10 bootable on Mac.
If you switch from a Windows PC to a Mac, you may find Windows and macOS are two entirely different operating systems. If you are familiar with Windows, you may want to still use this OS on the Mac. In this case, you may ask: can I install Windows 10 on my Mac for free? Of course, you can do it using a bootable Windows 10 USB flash drive. Although the Mac runs macOS, you can run Windows on it in this way.
Then, how to make a Windows 10 bootable USB on Mac? It is easy to create a bootable USB drive of Windows 10 on a PC but how about the creation on macOS? Things can become simple if you follow the methods in the following part to make bootable Windows 10 USB on Mac.
Tips:
If you are interested in Windows 11, you can also create a Windows 11 bootable USB drive to install this operating system. To know more information, read our related post — How to Create Windows 11 Installation Media on PC, Mac, or Linux.
How to Create Windows 10 Bootable USB on Mac
Download Windows 10 ISO
The following methods require an ISO image, so download a Windows 10 ISO file by following the given steps before you start creating a bootable USB drive.
Tips:
Windows 10 Media Creation Tool can only run on Windows and you should download the ISO on a Windows PC. Or, you can visit some third-party websites in a web browser to get an ISO image.
- Visit the official Microsoft website of windows 10 – https://www.microsoft.com/en-hk/software-download/windows10.
- Click Download tool now to get Windows 10 Media Creation Tool.
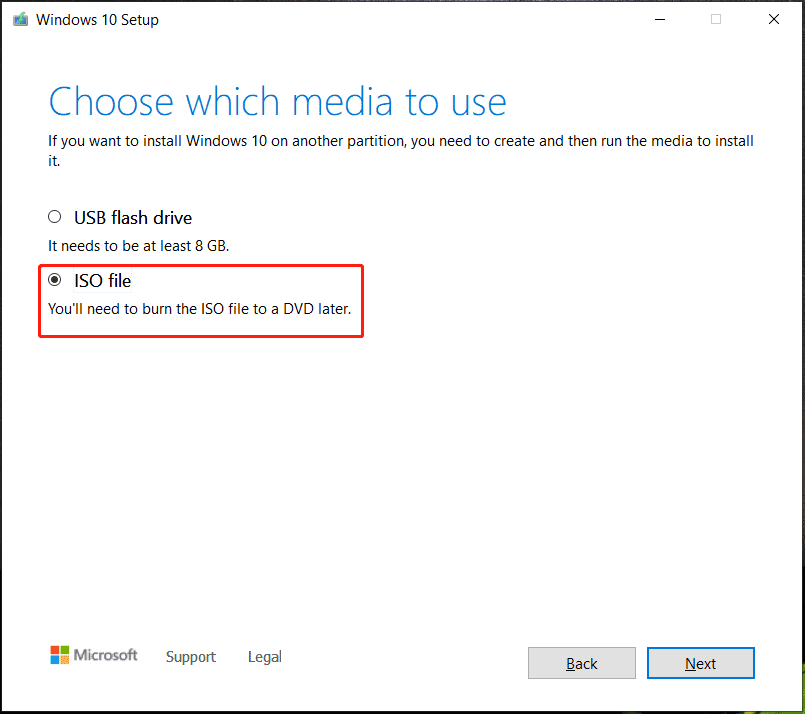
- Run this tool, accept terms, choose Create installation media (USB flash drive, DVD, or ISO file) for another PC, choose language, architecture, and edition, check the box of ISO file, and start downloading the ISO image of Windows 10.
Create Windows 10 Bootable USB on Mac with Boot Camp Assistant
As a multi-boot utility included in macOS like formerly Mac OS X/OS X, Boot Camp Assistant can be used to install Windows 10 on Intel-based Macintosh computers. Besides, this tool can help make a Windows 10 bootable USB on Mac. Note that Boot Camp Assistant isn’t supported on Apple Silicon Macs.
If you are running an Intel-based Mac with an old version, follow the steps below to start creating a bootable USB drive of Windows 10 with Boot Camp Assistant.
Step 1: Prepare a USB flash drive with at least 16GB of space and connect it to your Mac.
Step 2: Navigate to Finder > Applications > Utilities and open Boot Camp Assistant.
Step 3: Check the option of Create a Windows 10 or later install disk and click Continue. Here, you only want to make bootable Windows 10 USB on Mac, so don’t choose the option of Install Windows 10 or later version.

Step 4: Click Choose to go to find the Windows 10 ISO file you have downloaded in the popup and click Continue to go on.
Step 5: Then, Boot Camp Assistant will begin creating Windows 10 bootable USB. After that, check if your USB flash drive is renamed WININSTALL. Then, eject this USB drive from your Mac.
This method is very simple and helpful for you to create bootable USB Windows 10 on Mac. However, if you are running a Mac with an Apple Silicon M1 chip rather than an Intel-based Mac, skip this method and go to find what you should do from the following solutions.
Create Windows 10 Bootable USB on Mac via Disk Utility
How to create Windows 10 bootable USB on Mac without Boot Camp? Disk Utility is a choice for you.
It is a system utility that is designed to perform some tasks regarding disk and disk volumes on the macOS operating system. In addition, you can use Disk Utility to get a bootable Windows 10 USB drive and let’s see the instructions below:
Step 1: Connect your USB flash drive to your Mac.
Step 2: Navigate to Finder > Go > Utilities and open Disk Utility by double-clicking the icon of this tool. Alternatively, you can press Command + Spacebar, type in Disk Utility, and open it.
Step 3: Right-click on your USB drive on the left and format it to MS-DOS (FAT).

Step 4: Drag & drop the Windows 10 ISO file you have downloaded to the USB drive. Then, the writing process of the ISO file on USB starts. After finishing the process, you can get a bootable USB and use it to install Windows 10 on Mac or fix the issues with the current macOS.
Make Windows 10 Bootable USB on Mac Using UNetbootin
As a cross-platform utility that enables you to create live USB systems, UNetbootin is powerful. You can run it on Windows, Linux, and Mac OS X properly. If you need to create Windows 10 USB on Mac, it is also helpful. To use this tool, you need to download a Windows 10 ISO file from Microsoft and save it to your USB flash drive. Then, plug the drive into your Mac and start the following steps to get Windows 10 bootable USB.
Step 1: Go to Disk Utility by accessing Finder > Go > Utilities. Then, choose the USB drive from the left side and note down the disk identifier like disk5s1 that is located in the Device section on the right side.
Step 2: Download UNetbootin – search for UNetbootin in Google Chrome, click the website https://unetbootin.github.io/, and click the download button on macOS.
Step 3: Open the downloaded file to run UNetbootin. Then, check the option of Diskimage, choose ISO, and click three dots to specify the Windows 10 ISO you have downloaded.
Step 4: Choose USB Drive from the Type drop-down menu and select the USB drive’s name in Drive.

Step 5: Click OK after choosing all the parameters. After a few minutes, the USB drive will be formatted to a bootable device.
Create Bootable USB Windows 10 on Mac Using PassFab 4Winkey
In terms of the above three methods, you need to download a Windows 10 ISO first via Media Creation Tool, which takes some time. If you don’t want to download an ISO image file, you can try this way – using PassFab 4Winkey.
It is a powerful, free, and premium tool that enables you to reset, delete & unlock your Windows login password, and create a new Windows account with a USB flash drive, CD, or DVD. In addition, it allows you to make bootable Windows 10 USB on Mac.
Let’s know how to create Windows 10 bootable USB on Mac without Boot Camp using this tool by following the instructions given below.
Step 1: On your Mac, visit https://www.passfab.com/products/windows-password-recovery.html via the web browser and download PassFab 4Winkey. Use the downloaded file to install this tool on your Mac.
Step 2: After the installation, launch this utility, connect your USB drive to the machine and PassFab 4Winkey can automatically detect it.
Step 3: Choose USB Flash Drive and click the Burn button.
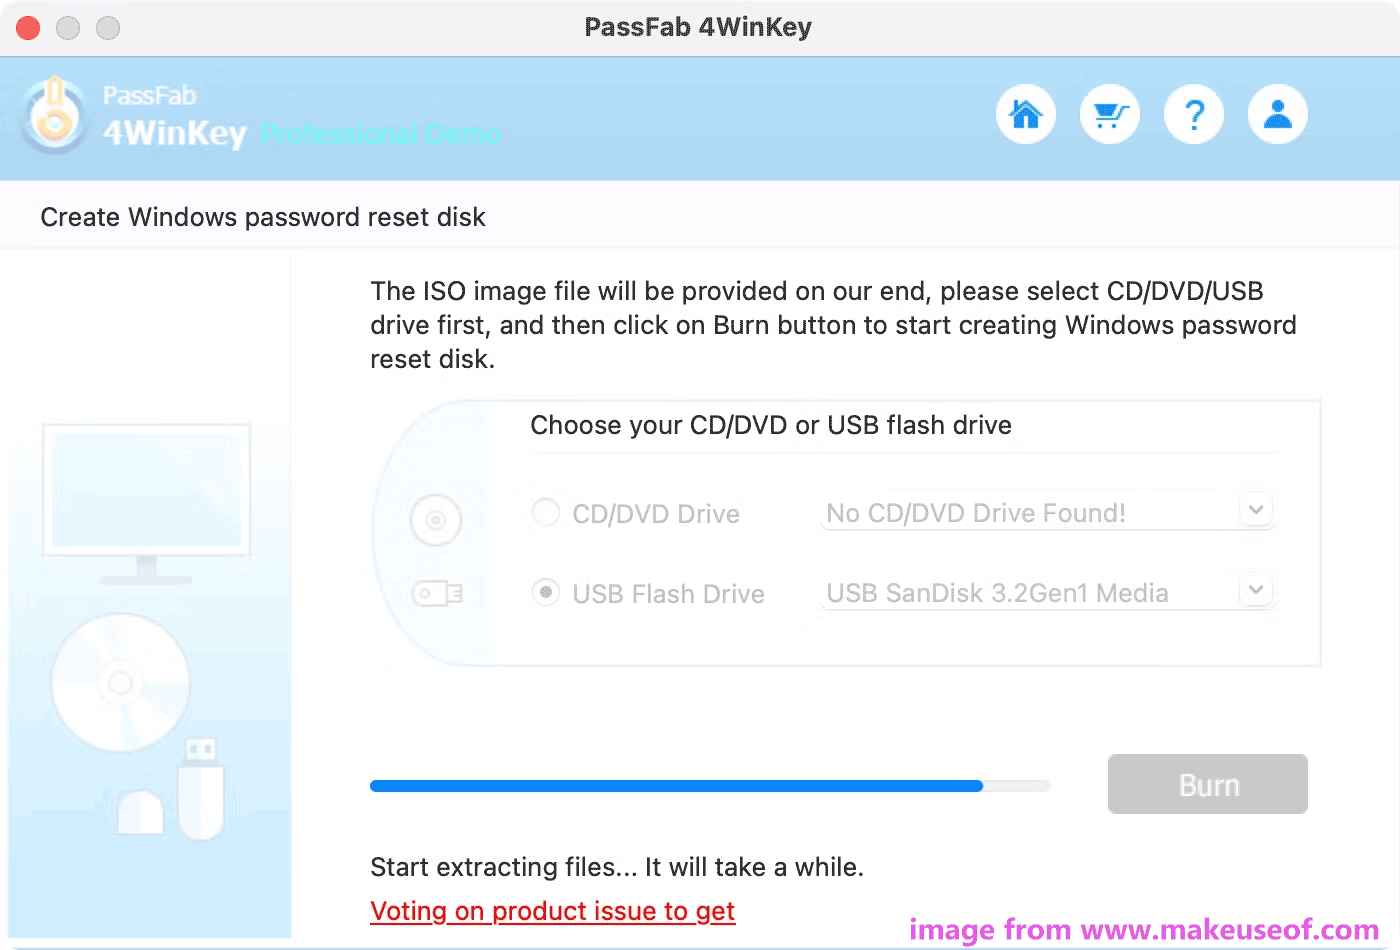
Step 4: The ISO file will be offered by this software. Just wait for the process to complete. Once it is done, you can see some instructions on what you should do next. click OK.
Create Bootable USB Windows 10 on Mac via Terminal
In addition, there is another way to help you create a bootable Windows 10 USB drive and it is using the Terminal tool that is built into macOS. This is the most complicated method out of all the methods. See how to make a Windows 10 bootable USB on Mac using Terminal by following the given steps below.
Step 1: Connect your USB flash drive to your Mac and then open the command tool by going to Finder > Applications > Utilities > Terminal. Alternatively, you can press Command + Spacebar, type into Terminal, and launch it.
Step 2: Type diskutil list into the Terminal window and press Enter. Then, you can see the list of connected drives on the Mac. Find the USB drive and note down its name like disk2.
Step 3: Copy and paste the following command, then press Enter to format the USB drive to MS-DOS (FAT).
diskutil eraseDisk MS-DOS “WIN10” GPT disk2
Step 4: Download an ISO file of Windows 10 by following the instructions in part Download Windows 10 ISO.
Step 5: Type the command – hdiutil mount ~/Downloads/Windows10.iso to the Terminal window and press Enter to mount the ISO file. ~/Downloads/Windows10.iso means the file called Windows10.iso is located in the Downloads folder. Just replace it with your own.
Step 6: Copy the ISO file to your USB drive via the command – cp -rp /Volumes/MOUNTED-ISO/* /Volumes/WINDOWS10/. Replace MOUNTED-ISO with the name of the mounted ISO. After some time, you will get a bootable USB drive of Windows 10.
Step 7: Run the command hdiutil unmount/Volumes/MOUNTED-ISO and close Terminal.
Now 5 ways to create Windows 10 bootable USB on Mac are introduced to you. Just choose one way based on your situation to get a bootable USB drive so that you can install Windows 10 on Mac. You can share them with people who also need them.
Click to Tweet
How to Install Windows 10 from USB on Mac
After you make Windows 10 bootable USB on Mac, you can take action to install Windows 10 on Mac using USB. Well then, how can you do this thing?
Step 1: Shut down your Mac and insert the bootable USB drive into it.
Step 2: Power on the machine and immediately press & hold the Option key. Then, you are allowed to choose the startup disk instead of booting to the default disk.
Step 3: Select the USB drive and press Return. Then, you can see a blue window and just follow the on-screen instructions to install Windows 10 on Mac using USB.

How to Back up Windows 10
After installing Windows 10 on your Mac via the bootable USB drive, you can start running this system. To make sure you have a smooth operating system, there are some things you should do – update Windows 10, install the latest device drivers, install some necessary software, and adjust privacy settings.
To keep Windows 10 smooth, we also recommend you to back up your Windows PC – create a system image so that you can restore the machine to a working state in case the system crashes or fails to boot. To do this task, you can use a third-party backup software called MiniTool ShadowMaker.
It is designed to back up your Windows operating system by default. Also, you can use this tool to back up your files and folders to keep data safe. Besides, disk backup, partition backup, disk clone, and file sync are also supported. Just click the download button to get MiniTool ShadowMaker and install it on the machine.
MiniTool ShadowMaker TrialClick to Download100%Clean & Safe
Step 1: Launch MiniTool ShadowMaker and click Keep Trial to continue.
Step 2: Go to the Backup page, you can see system partitions for Windows 10 to run are selected. Besides, a target folder is also selected but we recommend you to choose an external hard drive or USB drive as the storage path for the system image file.
Step 3: Click Back Up Now to execute the backup task right now.

Verdict
A guide on how to make a Windows 10 bootable USB on Mac is introduced here. If you want to make Windows 10 bootable USB on Mac and install Windows 10 on Mac using USB, just follow the given methods and steps. If you find out any efficient workarounds, don’t hesitate to tell us. Thanks a lot.