Уровень сложности
Простой
Время на прочтение
6 мин
Количество просмотров 24K
Статья о том как установить себе «macOS Monterey» в виртуальной машине на обычном PC без покупки для этой цели макбука или айМака.
По идее это просто туториал как получить у себя на обычном PC систему macOS и Xcode, но так как я тут нахожусь в состоянии «Отхабренный» я могу отправлять статьи только в «Профильные хабы». По этой статье больше бы подошло «Tutorial», но такого хаба я не нашёл и поэтому выбрал наиболее близкие хабы по теме статьи: «Настройка Linux» и «Разработка под iOS». И КДПВ тоже я выбрал идиотскую — просто сделал скриншот со своего компа где продемонстировал версию macOS и версию установленного у меня Xcode.
Итак сама статья.
Понадобилась мне macOS внезапно, то есть не macOS, а конкретно Xcode. Но Xcode, гад, существует только в версии для macOS, поэтому и macOS понадобилась.
Никаких macbook и никаких iMac у меня нет, только обычный PC. Поэтому ничтоже сумняшеся, куда деваться, полез в интернеты, читать как можно заиметь macOS не покупая компьютер от Apple. Перерыл кучу ссылок. Hackintosh (https://hackintosh.com/) отмёл сразу, у меня компу уже лет семь и он по железу уже не подойдёт для установки Хакинтоша. Решил обойтись малой кровью — в виртуалке попробовать установить macOS. Так как платные программы не особо люблю, то искал исключительно установку макоси в VirtualBox ибо он бесплатен и у меня он уже был установлен.
Только вот не сработали у меня эти рекомендации и руководства из интернета. Вернее сработали, но я смог установить в VirtualBox лишь «macOS Catalina» трёхлетней давности, а более поздние версии macOS, то есть (в порядке повышения версий от «Catalina») ни «Big Sur», ни «Monterey», ни «Ventura», ни тем более бету «Sonoma» установить не удалось.
Делать нечего, установил я что удалось установить, то есть «Catalina». А в «Catalina», блин, в «Swift SDK» не оказалось тех функций которые мне были необходимы. Они появились в более позднем «Swift SDK», в версии для «iOS 16.0», которого для «macOS Catalina» три года назад ещё не существовало, в «Catalina» была максимальная версия «Swift SDK» для «iOS 14.0» и не выше. И подумал я тогда: «А чего это я как дурак сижу с установленной в виртуальной машине «macOS Catalina», которому уже три года и до сих пор старьё такое запускаю в котором «Swift SDK» не отвечает современным традициям, а Xcode 12.4, максимальная версия для «Catalina», даже отказывается читать современные исходники от Xcode четырнадцатой и пятнадцатой версии, посылает меня далеко и надолго? Надо бы мне постараться и ВИРТУАЛЬНУЮ macOS установить посвежее чем Catalina!». Подумал я так и… Сказано — СДЕЛАНО! Решил я сгруппировать все знания которые я до этого нашёл в интернете, добавить к ним до чего додумался сам и попробовать таки установить вместо «macOS Catalina» версию посвежее.
Сначала решил попробовать вместо бесплатного VirtualBox бесплатный VMware Player, в интернете прочёл что с ним проблем почему-то меньше в отношении именно macOS. Установил его и попробовал в нём последовательно, с понижением версии macOS, начиная с текущей и ниже до Catalina, установить следующее (начал со самой старшей на нынешнее время, с «Ventura». Ибо «Sonoma» хотя и самая распоследняя версия, но она пока ещё в бете находится, так что «macOS Ventura» пока что последняя АКТУАЛЬНАЯ версия на сегодняшний день):
-
«macOS Ventura» — не вышло, трапается в kernel panic при установке.
-
«macOS Monterey» — не вышло, уходит в бесконечный цикл «Система готова к установке, нажмите «Continue», далее я нажимаю «Agree» и «Continue», после «Monterey» час устанавливается, перегружается и опять выходит точно туда же, в самое начало установки: «Система готова к установке, нажмите «Continue».
-
«macOS Big Sur» — не вышло по причине того, что он как только перешёл в режим установки то сразу же мышь у меня в нём стала нажиматься с пяти раз хорошо если на шестой, а мышиный курсор двигался такими рывками, что я даже не смог ни разу нажать «Continue» для продолжения установки — пытаюсь выбрать язык системы в самом начале инсталляции, а после не могу мышь подвести к кнопке «Continue» — прыгает по экрану, бегает туда-сюда и всё, а мне не даётся! Минут пятнадцать попробовал мышь подвигать и плюнул я на этот «Big Sur».
-
«macOS Catalina» — вот он установился вообще без проблем, как до этого у меня установился в VirtualBox. Но это у меня и в VirtualBox до этого было, так что это не интересно, я хотел чтобы версия macOS была посвежее.
После посидел ещё немного, поразмышлял, подумал, скачал с торрентов уже не Player, а полноценный VMware Workstation Pro версии 17.0.0 и установил. Да, кракнутый. Но куда же деваться? Попробовал установить в него все версии macOS про которые высказался выше. Точно такая же фигня — или трап при установке, или выходит в бесконечный цикл при установке, или мышиный курсор вообще не адеватен — ни сдвинуть его толком, ни нажать — тормозит как не пойми что и прыгает по экрану так что не поймать. А вот Catalina опять установился «на ура», без проблем вообще. НО МНЕ ЖЕ НАДО БЫЛО ВЕРСИЮ ВЫШЕ ЧЕМ CATALINA!
Полез опять в интернеты, нашёл статью что в VMware просто так macOS не пойдёт, «VMware Workstation» изначально заточен на Linux, Windows, Solaris, QNX и т.д., а мудрая фирма Apple запретила товарищам из VMware делать официальную виртуализацию macOS потому что фирма Apple хочет ЕДИНОЛИЧНО владеть всеми OS’ами и никому их не хочет давать, даже виртуализировано. Полазил по интернетам подальше, нашёл «VMware Unlocker» специально для гостевых систем от Apple чтобы «VMware Workstation» мог воспринимать macOS. Скачал. Пропатчил свой «VMware Workstation». Повторил свою эпопею по установке macOS начиная от текущей версии Ventura и понижая номер версии если установка окончилась фейлом.
-
«macOS Ventura» — опять не вышло, теперь Ventura как ранее Monterey уходит в бесконечный цикл «Система готова к установке, нажмите «Continue», я нажимаю, Ventura полтора часа устанавливается, перегружается и опять: «Система готова к установке, нажмите «Continue»
-
«macOS Monterey» — УРА! ВЫШЛО! УСТАНОВИЛСЯ! Патч от «VMware Unlocker» реально помог!
Но я решил пойти дальше, решил попробовать проапгрейдить Monterey штатным, в нём же предусмотренным способом до Ventura. Зашёл уже в свежеустановленном «macOS Monterey» в апдейты и сказал ему обновиться до Ventura. В результате он скачал образ Ventura, минут сорок после этого его устанавливал, обновлялся, пошёл на перезагрузку и БАЦ! Опять! Опять бутлуп, «Система выполнила некорректную операцию. Нажмите любую клавишу для перезагрузки или подождите несколько секунд для автоматической перезагрузки». И всё, начался бесконечный цикл таких перезагрузок.
Восстановил опять «macOS Monterey» из предварительно сделанного бекапа (ведь известно что пользователи компов деляться на три типа: первые это те кто ещё не делает резервные копии, вторые это те, кто уже делает, и третьи это те, кто восстанавливает систему из сделанных копий — вот я оказался в третьей категории, восстановил ранее сделанный бекап «macOS Monterey»). После восстановления попробовал опять средствами самого macOS зайти в апдейты, но попросил теперь обновить «macOS Monterey» не до Ventura, которая macOS 13, а до более новой версии самого Monterey — у меня он установился 12.0.1, а апгрейд предлагал его обновить до версии 12.6.9
И он, блин, прекрасно обновился до версии 12.6.9, прекрасно перезагрузился и прекрасно заработал! Без всяких кернел паников и без бутлупов!
Установил себе на него Xcode 14.2, это конечно не как на Ventura можно поставить Xcode 15, но 14.2 это всё же не 12.4 как у меня на Catalina было. Да и «Swift SDK» установился для «iOS 16.0».
И да, в VMware Workstation macOS, даже Catalina, работает чисто субъективно побыстрее чем в VirtualBox. Не знаю почему.
В общем получил я у себя полноценную более-менее последнюю версию macOS, пусть не «Ventura», а предыдущая до «Ventura» версия, но всё не «Catalina» времён динозавров и умерших давно мамонтов.
Так что просидел я с восьми утра одного дня до восьми утра следующего дня, безвылазно сидел за компом, 24 часа получается, практически не вылезая из него. Давно я такие «компьютерные марафоны» не совершал, с 90-х годов.
В процессе этого моего дневно-ночного изыскания ни одно животное не пострадало  Все произведённые операции выполнялись на моей основной системе «Fedora Linux 38», на Windows не проверял за неимением Windows, но думаю что на Windows это пройдёт без особых изменений, так же — я лично не вижу никакой разницы.
Предупреждаю что ссылки по которым я брал весь описанный выше софт я не скажу. Вернее бесплатные скажу, а те, по которым платный софт не скажу (в принципе я же названия этого софта озвучил выше, так что кому надо тот по названиям в интернете найдёт). Перечисляю ниже софт в порядке его установки, то есть софт под номером 2 должен быть установлен после софта под номером 1, а софт под номером 3 должен быть установлен соответственно после софта под номером 2.
-
VMware Workstation Pro 17.0.0 (ссылку не скажу т.к. это платная версия, ищите сами по названию)
-
VMware Unlocker, это open source, так что тут пожалуйте ссылку:
https://github.com/paolo-projects/unlocker
Он и под Windows, и под Linux. На версии VMware Workstation Pro 17.0.0 под Linux работает точно, проверено лично.
-
Образ непосредственно «macOS Monterey» версии 12.0.1 тоже ищите сами в интернете, Apple хочет за это денег поэтому ссылку не дам, но находится этот образ довольно легко.
-
И ОБЯЗАТЕЛЬНО после установки ( ПОСЛЕ УСТАНОВКИ !!! ) «macOS Monterey» в «VMware Workstation» установить «VMware Tools». Иначе не будет ни копирования через клипборд из гостевой машины в виртуальную и обратно, и разрешение в гостевой машине «macOS Monterey» будет только 1024×768 и поменять его никак. Но официально скачать с сайта VMware эти «VMware Tools» проблематично: VMware хочет чтобы вы сначала зарегистрировались, а после неделю не даёт ничего скачивать, типа «проверяет ваши данные». А через неделю вполне может дать отлуп по причине того что VMware, к примеру, не понравилась одна буква в вашей фамилии. На «VMware Tools» тоже ссылку не дам потому что это «за регистрацию» на сайте VMware и за их ПЛАТНЫЙ «VMware Workstation», а совсем не просто так, но в интернете находится где скачать эти пресловутые «VMware Tools» для гостевой системы macOS тоже элементарно, по словам «VMware Tools».
После установки macOS надо будет ПРЯМО ИЗ ЭТОЙ ВИРТУЛЬНОЙ МАШИНЫ скачать этот «VMware Tools for macOS», запустить и согласиться со всеми пунктами установки.
Ну вот в принципе. Вот я и всё сказал. Такой вот маленький tutorial получился.
Running macOS on virtual machine in Windows OS involves creating a virtualized environment within your Windows to emulate Mac. This allows you to install and run macOS as if there is a standalone system.
This approach offers several advantages, such as the ability to test macOS applications, develop software for the Mac platform, and experience the Mac ecosystem without needing to purchase a physical Mac computer.
Applications used for this purpose
There are a few popular virtualization applications that you can use to run macOS on a virtual machine within a Windows operating system. Some of these applications include:
1. Oracle VirtualBox

VirtualBox is a free and open-source virtualization software that supports running macOS as a guest operating system. It might require some additional configuration and workarounds due to Apple’s licensing restrictions, but it’s a popular choice for running macOS on Windows.
2. VMware Workstation Player

VMware offers a virtualization platform that allows you to run various operating systems, including macOS, as virtual machines on a Windows host. The VMware Workstation Player is user-friendly and provides good performance.
3. Parallels Desktop
Parallels Desktop is a commercial virtualization application specifically designed for running macOS on Mac hardware, but it can also be used to run macOS on Windows systems. It tends to offer better integration between macOS and the host system compared to other options.
4. QEMU
QEMU is a versatile emulator that can be used to run macOS on a Windows machine, but it usually requires more technical knowledge and configuration compared to other options.
5. Hackintosh
“Hackintosh” refers to the practice of installing macOS on non-Apple hardware. It involves creating a custom configuration and using bootloader tools to trick macOS into running on non-Apple systems. While this can provide a more authentic macOS experience, it can also be more challenging and may have compatibility issues.
macOS versions to run on VM
Various versions of macOS, depending on compatibility and virtualization software capabilities, can be run as VMs within Windows. This enables users to explore different iterations of the macOS environment. Here are some of the macOS versions that you can run on VM:
- macOS Sonoma
- macOS Ventura
- macOS Monterey
- macOS Big Sur
- macOS Catalina
- macOS Mojave
- macOS High Sierra
- macOS El Capitan
Run macOS on VM on Windows

To install a virtual machine (VM) on Windows, create a VM, and run macOS inside it:
Installing a Virtual Machine (VM) on Windows
1. Choose Virtualization Software
Select a virtualization application such as Oracle VirtualBox, VMware Workstation Player, or Parallels Desktop.
2. Download and Install
Download the chosen virtualization software from their official websites and follow the installation instructions.
Creating a VM and Running macOS
1. Download macOS Installer
Obtain a macOS installer (DMG or ISO file) from a trusted source. Make sure it’s compatible with the virtualization software.
2. Open Virtualization Software
Launch the virtualization application (e.g., VirtualBox).
3. Create New VM
- In VirtualBox: Click New to create a new VM. Follow the wizard and allocate resources (RAM, CPU, storage).
- In VMware: Click Create a New Virtual Machine and follow the wizard to configure settings.
- In Parallels: Click File > New and select Install Windows or another OS from a DVD or image file. Choose the macOS installer.
4. Configure VM Settings
- Assign sufficient RAM and CPU cores for optimal performance.
- Create a virtual hard disk with enough space for macOS.
5. Install macOS
- In VirtualBox: Select the created VM, click Settings, and navigate to Storage. Add the macOS installer ISO as a CD/DVD drive. Start the VM, and it should boot from the macOS installer. Follow the installation process.
- In VMware: Start the VM and boot from the macOS installer ISO. Follow the installation process.
- In Parallels: Start the VM and follow the on-screen instructions to install macOS.
6. Complete macOS Setup
Once macOS is installed, go through the initial macOS setup process, including creating a user account and configuring settings.
7. Install Tools (Optional)
Some virtualization software offers tools or extensions to enhance the integration between the host and guest systems. Install these tools if available.
You can now use macOS within the virtual machine on your Windows host.
Related:
- How to install macOS Mojave on VMware?
- How to Install macOS Monterey on VMware?
- How to Install macOS Ventura on VMWare?
- How to Install macOS High Sierra on VirtualBox?
- How to Install macOS Ventura on VirtualBox?
- How to install macOS Catalina on Virtual Box?
macOS Monterey is the latest version of Apple’s desktop operating system for Mac computers, released on October 25, 2021. It introduces new features and improvements across the system, including enhancements to FaceTime, Focus, and Universal Control. One of the most significant changes is the new Focus mode, which allows users to customize notifications and apps based on their current activity, whether it’s work, personal time, or sleep. This feature helps users stay focused and reduce distractions.
Another notable improvement is Universal Control, which enables users to control multiple Apple devices, including Macs and iPads, using a single keyboard and mouse. This feature allows for seamless transitions between devices and makes it easier to use multiple devices together. FaceTime also received a significant update, with new features such as spatial audio, grid view, and the ability to share content during video calls. Additionally, there are new features in Safari, Maps, and the Notes app, among others.
macOS Monterey also includes several under-the-hood improvements, including updates to the Safari browser engine and improved performance on Apple Silicon Macs. It also brings support for Apple’s new ProRes video codec and new accessibility features, such as the ability to control the Mac with eye movements. Overall, macOS Monterey brings several new features and improvements to the Mac, making it a worthwhile upgrade for Mac users.
Related:
- How to Install macOS Big Sur Final on VirtualBox on Windows PC?
- How to Install macOS Big Sur Final on VMware on Windows PC?
- How to Install macOS Monterey Final on VMware on Windows PC?
- How to Install macOS Ventura 13 on VMware on Windows PC?
- How to Install macOS Ventura 13 on VirtualBox on Windows PC?
macOS Monterey is compatible with the following MacBooks machines.
- iMac (Late 2015 or later)
- iMac Pro
- MacBook (Early 2016 or later)
- MacBook Air (Early 2015 or later)
- MacBook Pro (Early 2015 or later)
- Mac Mini (Late 2014 or later)
- Mac Pro (Late 2013 or later)
What is VirtualBox?
VirtualBox is a software application that allows you to run multiple virtual machines on a single physical computer. It enables you to install and run different operating systems (such as Windows, Linux, or macOS) within a virtual environment as if they were installed on separate physical machines.
Using VirtualBox, you can create and manage virtual machines with different configurations and settings, including the amount of memory and storage allocated to each machine. This makes it a useful tool for developers, IT professionals, and anyone who needs to test software applications or run multiple operating systems on a single computer. VirtualBox is free and open-source software, developed by Oracle Corporation, and is available for Windows, macOS, Linux, and Solaris operating systems.
VirtualBox provides you with the best environment to install and test multiple operating systems at the same freely on a single physical drive. So, through this guide, you will be able to learn how to install macOS Monterey Final on VirtualBox on Windows PC. The installation process of macOS Monterey might be more complicated than installing it on VMware Workstation, but it might be interesting for you.
For installing macOS Monterey on VirtualBox on Windows PC firstly you need to complete the requirements. Such as the first thing is you need to download and install the VirtualBox on your Windows PC + Its extension pack’s latest version. The next thing is to be sure that the Virtualization technology should be enabled on the BIOS of your computer. Then download the macOS Monterey ISO image file, from the below downlinks.
- Enable the virtualization technology on the BIOS of your computer.
- Download and install the latest version of VirtualBox + its extension pack on your Windows PC.
- Download the macOS Monterey ISO image file.
- Create a new virtual machine for macOS Monterey on VirtualBox on Windows PC.
- Apply the commands to configure macOS Monterey on VirtualBox.
- Perform a clean installation of macOS Monterey on VirtualBox on Windows PC.
Here is the guide on how to convert a macOS ISO image file to a vmdk file on Windows PC.
- How to Convert macOS ISO Image File to VMDK File?
Create a New Virtual Machine for macOS Monterey on VirtualBox on Windows PC
To create a new virtual machine for macOS Monterey simply open up the VirtualBox, then on the first welcome window click on the new option. There are two main methods of creation, the first one is the Expert mode, and the second one is the Guided mode. The Expert mode allows you the easiest way to create a virtual machine for macOS Monterey while you are using the ISO image file.

When this window opened click on the expert mode option.

Now type the name of the guest operating system, and specify the folder where to save it. And select the Type Mac OS X, and select the version Mac OS X (64-Bit).

Click on the hardware option, increase the size of memory, and also you can increase the processor.

Select the hard disk option, and specify the hard disk file size and location. Select the hard disk file type VHD (Virtual Hard disk), then click on finish to create the virtual machine.

Edit macOS Monterey Virtual Machine Settings for Better Performance
After that, you successfully created the virtual machine for macOS Monterey. So, therefore, for better performance, you need to edit some settings. Simply click on the Settings option to edit the settings.

When the settings window opened, from the left-handed window side select the system tab>on the motherboard category and uncheck the floppy disk.

Select the processor tab, and increase the number of processors.

Select the display tab, and increase the video memory up to 128MB.

Choose the storage tab, click on the empty disc icon, then click on the disc icon, and click on Choose a disk file.

Now go to the place where you saved the macOS Monterey ISO image file, select the file, and click open.

Select the USB tab, select the USB 3.0 Controller option, then finally click on OK to save the changes.

Apply The VirtualBox Commands With CMD
VirtualBox commands are the important factor that allows you to install the macOS operating systems on VirtualBox on Windows PC. Since the VirtualBox won’t have the ability to allow you directly to have the installation of macOS on it. Also, the important commands that are called macOS directory configuration play an important role in installing the macOS on VirtualBox on Widnows PC. Remember that if you applied the commands wrong then the insulation will remain in loop mode. Or if you don’t apply the commands you won’t be able to continue to proceed to the installation of macOS on a Windows PC.
Before editing the commands be sure that the VirtualBox is completely closed from the background.

Once the VirtualBox is closed, therefore, open up your notepad then copy and paste the below commands into the notepad window. And replace the VM Name with the name of macOS Monterey Virtual Machine.
cd "C:\Program Files\Oracle\VirtualBox\"
VBoxManage.exe modifyvm "VM Name" --cpuidset 00000001 000106e5 00100800 0098e3fd bfebfbff
VBoxManage setextradata "VM Name" "VBoxInternal/Devices/efi/0/Config/DmiSystemProduct" "iMac19,1"
VBoxManage setextradata "VM Name" "VBoxInternal/Devices/efi/0/Config/DmiSystemVersion" "1.0"
VBoxManage setextradata "VM Name" "VBoxInternal/Devices/efi/0/Config/DmiBoardProduct" "Mac-AA95B1DDAB278B95"
VBoxManage setextradata "VM Name" "VBoxInternal/Devices/smc/0/Config/DeviceKey" "ourhardworkbythesewordsguardedpleasedontsteal(c)AppleComputerInc"
VBoxManage setextradata "VM Name" "VBoxInternal/Devices/smc/0/Config/GetKeyFromRealSMC" 1

Now go to the Windows start menu, then run the command prompt with Administrator.

When the commands prompt window opened, copy the commands line by line and hit enter to apply the changes. Remember that if you entered any of the lines incorrectly then you will face the error while installing the macOS Monterey.

Perform a Clean Installation of macOS Monterey Final on VirtualBox on Windows PC
Once you have completed the pre-required files for the installation of macOS Monterey on VirtualBox on a Windows PC. Such, as installing the VirtualBox + Its extensions pack, creating a new virtual machine, editing the virtual machine settings, then applying the commands for configuration. And finally, it’s time to install macOS Monterey on VirtualBox on Windows PC. Simply, open up the VirtualBox and click on the Start option.

macOS Monterey Won’t Start: Failed to Query SMC Value From the Host (VERR_INVALID_HANDLE)
If you encountered the above error on VirtualBox then follow up on the below downlink and fix it.
- macOS Monterey Won’t Start: Failed to Query SMC Value From the Host (VERR_INVALID_HANDLE)
When the installation successfully launched on the first window select your language and click continue.

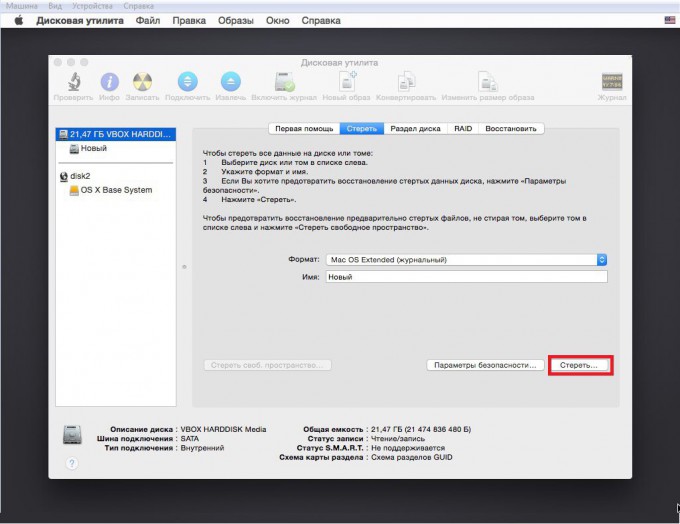
On the recovery, window selects the disk utility option and click on the continue option.

From the left-handed window, the side selects the VBOX Virtual Hard disk option, clicks on erase option, and formats the disk with the following parameters.
- Name: Optional
- Format: Mac OS X Extended (Journaled)
- Scheme: GUID Partition Map

When the disk is erased click on the done option.

After the disk is successfully erased simply close the disk utility window.

Now select install macOS Moneterey and click continue.

To set up the installation of macOS Monterey click continue.

Agree with the terms and conditions of macOS Monterey.

Select the disk that you want to install macOS Monterey, the disk that you have formatted in the disk utility window. Simply, select the disk and click continue.

And now it begins installing macOS Monterey on VirtualBox on Windows PC. So, the installation may take time, also during the installation the virtual machine will restart several times.

Complete the Basic Settings of macOS Monterey For the First Use
After the installation is successfully completed, then you have to complete the basic settings of macOS Monterey for the first use. In this case, on the first window select the country where you live and click continue.

Select your written and spoken language and click continue.

On the accessibility window simply click continue.

Select the option my computer does not connect to the internet and click continue, again on the next window click to continue to proceed.

On the Data & Privacy window simply click continue.

On the migration assistant window simply click continue.

Agree with the terms and conditions of macOS Monterey.

Create your computer account, enter your full name, account name, and password, re-type the password, and click continue.

In this step, you can customize the settings of location services and device analytics. If you don’t want to make any changes simply click continue.

On the screen-time window click on set up later.

Click on the not now option and click continue.

Choose your look for macOS Monterey on VirtualBox on Windows PC and click continue.

And finally, macOS Monterey is successfully installed on VirtualBox on Windows PC.

Conclusion
Finally, macOS Monterey is successfully installed on VirtualBox on Windows PC without any issues or errors. The only thing that remained is to enter the macOS Monterey full-screen mode on VirtualBox on Windows PC. That is pretty much easy you can do that by entering a few other small commands on the command prompt window.
For reference: my laptop is the Razer Blade 14 2022 with AMD Ryzen 9 6900HX. It supports AMD-V.
Disable “Memory integrity” under Core isolation in the Windows Security app. Restart computer. This will disable the Hyper-V hypervisor.
You can do this anytime before starting the virtual machine. This was the roadblock that prevented me from running the virtual machine.
Creating and Configuring the Virtual Machine
Writing this tutorial so that you can have an easier time.
Download VirtualBox AND the Extension Pack
- Install VirtualBox and then install the Extension Pack
MacOS 13 ISO download
Create a new Virtual machine, with the name “macOS 13”, and select file above for the ISO.
- Memory: 7840 MB
- Processors: 4
- New Virtual Hard Drive Storage: 100GB
Click Setting (cog)
- Display: 128MB (max) Video Memory
- USB: USB 3.0
Close VirtualBox
Then run these commands in an administrative command prompt
cd C:\Program Files\Oracle\VirtualBox
VBoxManage modifyvm "macOS 13" --cpuidset 00000001 000106e5 00100800 0098e3fd bfebfbff
VBoxManage setextradata "macOS 13" "VBoxInternal/Devices/efi/0/Config/DmiSystemProduct" "iMac19,3"
VBoxManage setextradata "macOS 13" "VBoxInternal/Devices/efi/0/Config/DmiSystemVersion" "1.0"
VBoxManage setextradata "macOS 13" "VBoxInternal/Devices/efi/0/Config/DmiBoardProduct" "Iloveapple"
VBoxManage setextradata "macOS 13" "VBoxInternal/Devices/smc/0/Config/DeviceKey" "ourhardworkbythesewordsguardedpleasedontsteal(c)AppleComputerInc"
VBoxManage setextradata "macOS 13" VBoxInternal2/EfiGraphicsResolution 1920x1080
VBoxManage setextradata "macOS 13" "VBoxInternal/TM/TSCMode" "RealTSCOffset"
On AMD systems,
VBoxManage modifyvm "macOS 13" --cpu-profile "Intel Core i7-6700K"
On Intel systems,
VBoxManage setextradata "macOS 13" "VBoxInternal/Devices/smc/0/Config/GetKeyFromRealSMC" 1
If you get an error,
VBoxManage setextradata "macOS 13" "VBoxInternal/Devices/smc/0/Config/GetKeyFromRealSMC" 0
Open VirtualBox and press Start for macOS 13. Wait a couple minutes.
Install Mac OS X
- Select a language and then press the right arrow icon
- Click Disk Utilty and then Continue
- On the left sidebar, click “VBOX HARDDISK Media” and then click Erase in the top right bar
- Enter “macOS HDD” as the name and click Erase, and then Done.
- Close the Disk Utility by click the red circle in the top left
- Click Install macOS 13 beta and then continue
- Click Continue, agree, and agree
- Click the HDD we just formatted and then click Continue
- The installation should take 40 minutes
Troubleshooting
A critical error has occurred while running the virtual machine
- I have a 64bit host, but can’t install 64bit guests
Mac, как и вся продукция Apple, отличается безупречным качеством исполнения. За это её чтят и любят, но есть люди, которые сомневаются в покупке данного аппарата. Безусловно, каждый может зайти в любой «реселлерский» магазин и посмотреть в живую на технику Apple, но не всем хватает на это времени. Именно для них (да и просто для любознательных) создана эта инструкция.
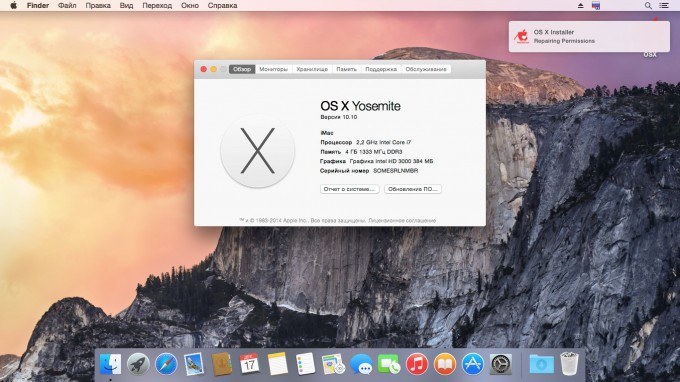
Познакомимся с операционной системой с OS X Yosemite через ваш домашний ПК посредством виртуальной машины. Не считая времени загрузки, процесс установки и настройки займет у вас не более получаса!
Внимание: исходя из политики Apple, данная операционная система не устанавливается на продукцию других компаний. Поэтому нам придется использовать сторонний образ ОС, созданный на основе оригинального. Всё, что вы делаете, вы делаете на свой страх и риск.

Лучшая виртуальная машина для нашей задачи – VirtualBox. Она достаточно мощная, имеет простой интерфейс, да и бесплатная.
Для работы данного метода убедитесь в том, что ваш процессор поддерживает технологию виртуализации (этот параметр включается в БИОСЕ).
Загрузка, установка и настройка дистрибутива
1. Загружаем дистрибутив с официального сайта. Нам нужна VirtualBox 4.3.26 for Windows hosts.

2. Во время установки программа вас оповестит о том, что ей требуется установить некоторые патчи для сети, чтобы интернет мог работать на виртуальной машине. Нажимаем “Yes” и ждём окончания установки утилиты.
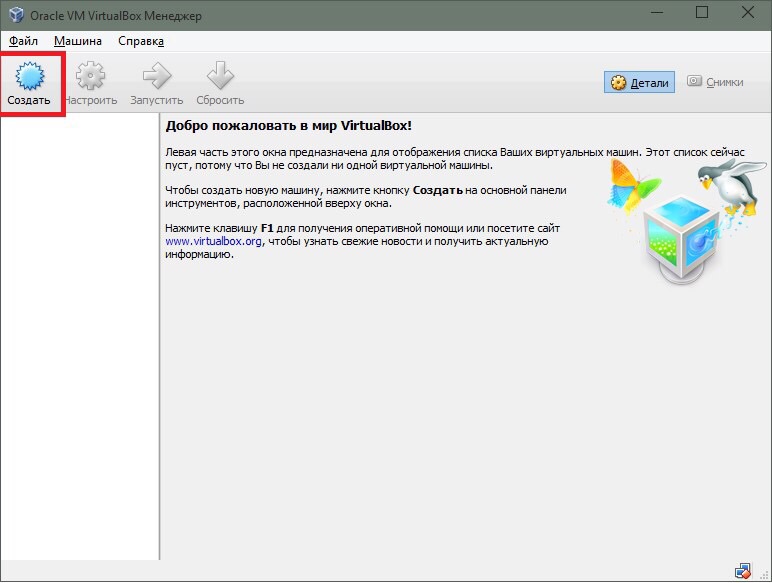
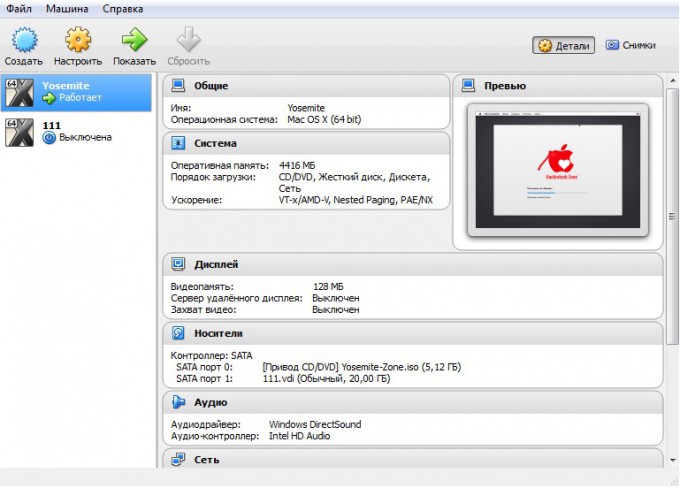
3. После установки открываем программу и мы видим окно приветствия. Нажимаем кнопку «Создать». Перед нами появляется окошко первоначальной настройки будущей операционной системы.
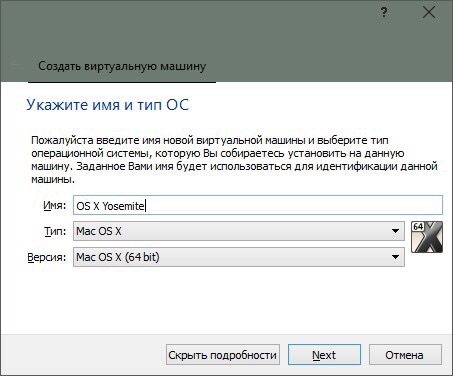
4. Называем нашу виртуальную машину и указываем тип OS X (32 bit/64 bit на выбор).
Памятка: если вам нужна будет «ось» для дальнейшего пользования и у вас 64-битный процессор, то не выставляйте настройки под 32-битную систему для 64-битных приложений. 64-битная ось медленнее запускает 32-битные приложения (OS X Yosemite работает исключительно на х64 процессорах).
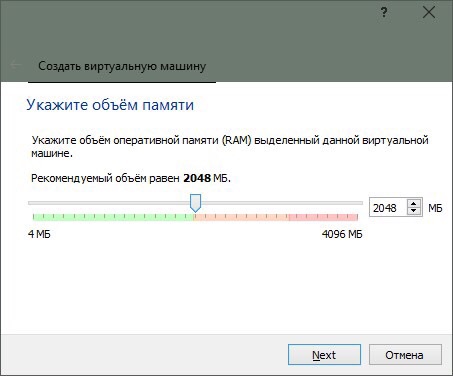
5. Указываем, сколько требуется оперативной памяти для системы. По-хорошему, ей нужно не более 4ГБ ОЗУ, но можно и больше, в зависимости от ресурсов вашего ПК. Я задал 4 ГБ.
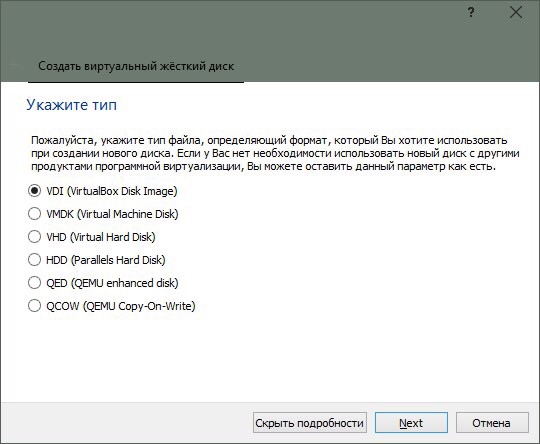
6. Нам также потребуется создать виртуальный жёсткий диск для нашей будущей машины. Именно на нём будут храниться все файлы ОС и всё то, что вы на ней будете создавать. Он берёт от физического «харда» лишь часть, размер которой вы задаёте сами. Выбираем первый пункт и идём дальше.
7. После этого заходим в раздел «Настройки->Система» и отключаем там EFI.
8. Теперь остается лишь запустить на ней OS X Yosemite. Нажимаем «Запустить» и в открывшемся диалоговом окне выбираем необходимый образ.
Памятка: для пущей верности можно задать для программы эмуляцию ноутбука от Apple. Открываем командную строку Windows (cmd.exe) и вставить:
1. cd C:\Program Files(x86)\Oracle\Virtualbox\ (стандартный путь установки)
2. VBoxManage setextradata *название_вашей_виртуальной_машины* VBoxInternal2/SmcDeviceKey “ourhardworkbythesewordsguardedpleasedontsteal(c)AppleComputerInc”
Установка и запуск OS X Yosemite
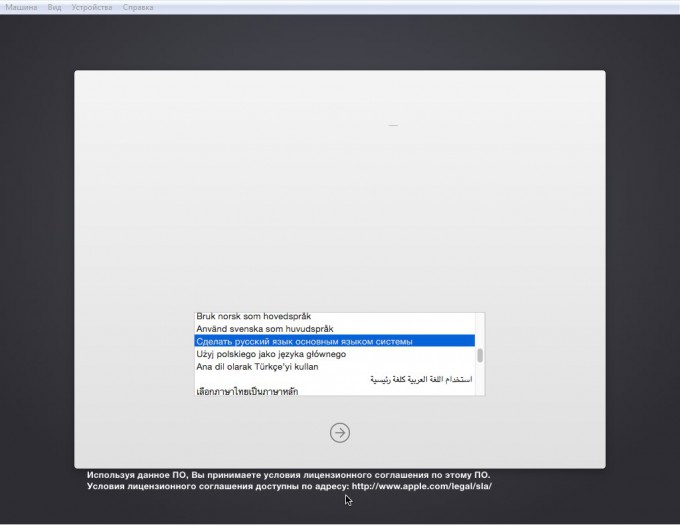
Итак, наша система загружается.
1. Выбираем русский язык и переходим к следующему шагу – настройке жёсткого диска для «операционки». Так как он создается изначально в файловой системе NTFS (которая не работает с OS X), нам придется немного «пошаманить».
2. В верхней панели заходим в «Утилиты->Дисковая утилита». В левом крае экрана выбираем наш новоиспечённый жёсткий диск, на который будет производиться установка, затем в правой части окна открываем вкладку «Стереть» и стираем диск. После этого в нём будет создан чистый раздел под ОС.
3. Переходим в верхнем «тулбаре» обратно в установщик (нажимаем на «Дисковая утилита» и выбираем «OS X Installer») указываем только что отформатированный под наши нужды «хард», жмём «Продолжить» и ожидаем окончания установки.
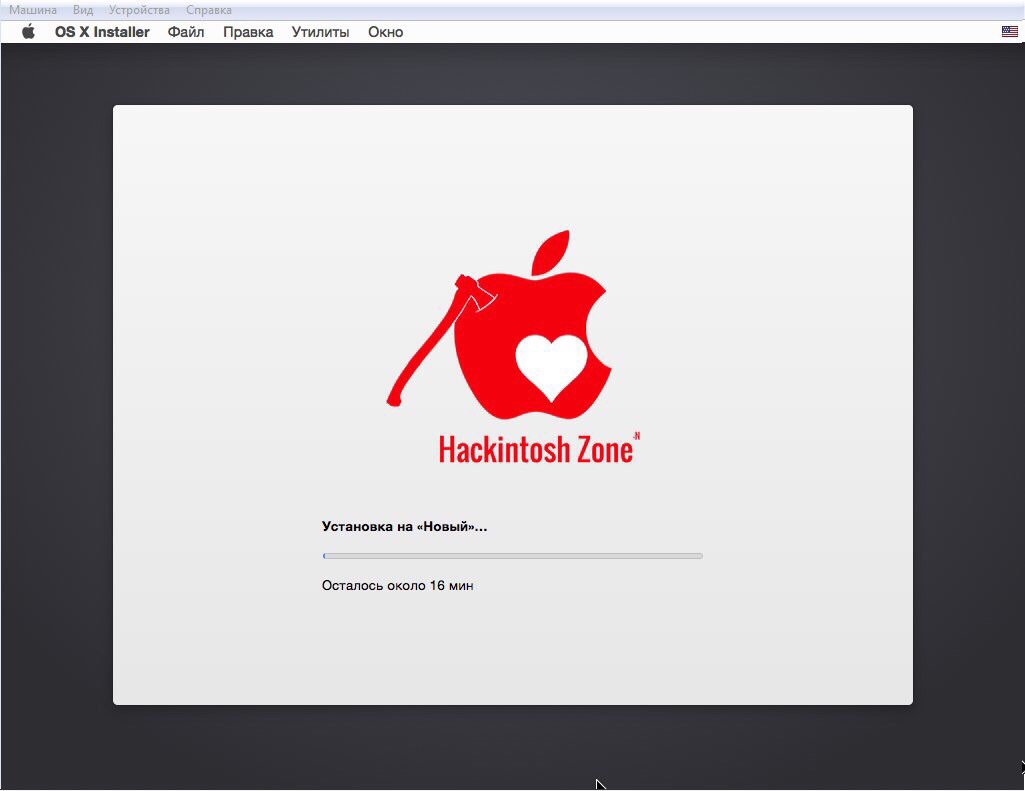
4. И вот, момент истины – OS X Yosemite готова к работе!
Пропускаем этап авторизации через iCloud, задаём логин/пароль для пользователя и, пожалуй, на этом всё.
Вот и всё! Добро пожаловать в дивный новый мир OS X. Делитесь вашим опытом работы с ОС от Apple в комментариях

 (9 голосов, общий рейтинг: 4.22 из 5)
🤓 Хочешь больше? Подпишись на наш Telegram.
![]()
iPhones.ru
Mac, как и вся продукция Apple, отличается безупречным качеством исполнения. За это её чтят и любят, но есть люди, которые сомневаются в покупке данного аппарата. Безусловно, каждый может зайти в любой «реселлерский» магазин и посмотреть в живую на технику Apple, но не всем хватает на это времени. Именно для них (да и просто для любознательных)…
- macOS,
- инструкции
![]()
Артём Баусов
@Dralker
Главный по новостям, кликбейту и опечаткам. Люблю электротехнику и занимаюсь огненной магией.
Telegram: @TemaBausov