Год выпуска: 2019
Версия: 10.14.6 [18G84]
Разработчик: Apple Inc.
Сайт разработчика: http://www.apple.com
Платформа: Intel only
Язык интерфейса: английский + русский
Таблэтка: Не требуется
ВНИМАНИЕ: для установки в самом установщике надо сначала запустить терминал (в утилитах) и написать там
date 0716100218
видео как это сделать YouTube: gGQ0ZaYKZWg
При соединении с интернетом меняет дату обратно. Надо отключать интернет на этом этапе.
Список поддерживаемых моделей:
MacBook (Early 2015 or newer)
MacBook Air (Mid 2012 or newer)
MacBook Pro (Mid 2012 or newer)
Mac mini (Late 2012 or newer)
iMac (Late 2012 or newer)
iMac Pro (2017)
Mac Pro (Late 2013, plus mid 2010 and mid 2012 models with recommended Metal-capable GPU)
Поддерживаются только процессоры с SSE4,2
Видеокарты поддерживающие Metal (Intel HD4000 и выше, nvidia kepler, AMD GCN-based).
Описание:
Mac умеет настроить на решение амбициозных задач. В macOS Mojave добавлены новые функции, вдохновлённые продвинутыми пользователями и полезные всем. Тёмный режим помогает сосредоточиться на работе. Функция «Стеки» автоматически систематизирует файлы. Делать снимки экрана разных типов стало ещё проще. Три новых встроенных приложения и ещё больше интересного в обновлённом Mac App Store. Открывайте новые возможности с каждым кликом.
Тёмный режим
Высветит главное.
Тёмный режим поможет не отвлекаться от работы. Потому что весь важный контент находится в центре внимания, а панели инструментов и меню уходят в тень. Включив Тёмный режим в разделе «Основные» Системных настроек, вы создадите красивое, минималистичное рабочее пространство, приятное глазу — во всех отношениях. Тёмный режим работает как в приложениях, встроенных в Mac, так и в созданных сторонними разработчиками.
Динамический рабочий стол
Живёт по вашему времени.
Две новых темы рабочего стола меняются в зависимости от времени суток, где бы вы ни находились.
Функция «Стеки»
Порядочная организация файлов.
Функция «Стеки» помогает поддерживать порядок на рабочем столе, автоматически сортируя файлы по группам. Файлы можно упорядочить по типу: изображения, документы, таблицы, файлы PDF и так далее. Кроме того, их можно сгруппировать по дате. А если вы используете метаданные, например названия компаний-заказчиков, функция «Стеки» разложит файлы по разным проектам. Чтобы посмотреть, какие файлы собраны в группе, проведите двумя пальцами по трекпаду или одним по поверхности мыши с поддержкой Multi-Touch. Кликните, чтобы развернуть группу и открыть нужный файл.
Новый взгляд на поиск.
Finder в macOS Mojave стал ещё более функциональным. Теперь файл можно найти по его внешнему виду. Сразу увидеть все его метаданные. И работать с ним, не открывая в приложении.
Работайте с файлом, не открывая его.
Теперь, нажав пробел, вы сможете не только просмотреть файл, но и выполнить другие действия, набор которых зависит от типа файла. Открывать файл в основном приложении для этого не нужно. Например, вы сможете внести комментарии в файл PDF, повернуть фотографию, обрезать изображение или даже аудио- и видеозапись. А когда всё будет готово, файл можно опубликовать или отправить друзьям прямо из режима «Быстрый просмотр».
Снимок экрана
Легче быстрого.
В macOS Mojave открыть инструменты для создания снимков экрана можно одним сочетанием клавиш. Просто запустите новую утилиту «Снимок экрана» или нажмите сочетание клавиш Shift-Command‑5. В удобном меню доступны новые инструменты для записи видео, а также некоторые варианты настройки. Например, вы можете установить таймер, включить отображение курсора и выбрать, где сохранять готовые снимки экрана. Сделайте снимок — его миниатюра переместится в угол экрана. Можно оставить её там, и файл автоматически сохранится в выбранной папке. А можно перетащить снимок экрана в документ или нажать на миниатюру, чтобы внести в файл комментарии и отправить его, не сохраняя на компьютере. Это не только упрощает работу, но и экономит место.
Функция «Камера Continuity»
Фото сразу на вашем Mac.
Если сделать снимок или отсканировать документ на iPhone, изображение появится на экране стоящего рядом Mac. Для этого нужно выбрать команду «Вставить фото» в меню «Файл». Вы можете сфотографировать любой предмет у себя на столе и мгновенно вставить фотографию в документ Pages. Или отсканировать чек — и выровненное изображение сразу появится в Finder в виде файла PDF. Функция «Камера Continuity» поддерживается в Finder, Почте, Сообщениях, Заметках, Pages, Keynote и Numbers. Это ещё один пример слаженной работы iPhone и Mac.
Создание загрузочной флешки Youtube
Создание флешки на форуме
ВНИМАНИЕ — СКРИНШОТЫ ИЗ ДРУГОЙ РАЗДАЧИ, НО СМЫСЛ ДЕЙСТВИЙ ПОЛНОСТЬЮ ИДЕНТИЧЕН.
Установка только на GPT
Обязательно требует настройки загрузчика
md5:b557ba5404218ae92df99cf58f5dfb75
ВНИМАНИЕ: для установки в самом установщике надо сначала запустить терминал (в утилитах) и написать там
date 0716100218
In this article, I am going to show you how to install macOS Mojave on VirtualBox on Windows. If you are interested in Apple’s new Mac operating system macOS Big Sur, you can visit our latest guide to install macOS Big Sur on VirtualBox on Windows PC. In addition, we have the VMware guide on how to install macOS Big Sur on VMware on Windows. In this guide, we will provide all the prerequisites to install macOS Mojave on VirtualBox on Windows 10 based computer.
Newer versions of macOS are out, So check the guides below to install them:
- Guide to Install macOS Catalina on VMware on Windows
- Guide to Install macOS Catalina on VirtualBox on Windows
Requirements
Before we get started, make sure to read the following requirements. Please do not skip this step because it’ll help you to successfully install macOS Mojave on VirtualBox on Windows 10 PC.
- Minimum 2 GB memory (Recommended 8GB or higher)
- Minimum 2 cores of processors (Recommended 4 cores or higher)
- Hard disk free space 20 GB (Recommended 100GB or higher)
- Your system should support Intel or AMD VT (Virtualization Technology)
- Intel/AMD VT (Virtualization Technology) Should be enabled from BIOS setup
Required: If you haven’t already then you should enable Virtualization Technology (aka Intel VT or AMD-V).
Furthermore, it’s highly recommended that you install macOS Mojave on SSD (Solid State Drive) instead of HDD (Hard Disk Drive) because you will have a much faster performance with SSD rather than HDD.
Steps to Install macOS Mojave on VirtualBox on Windows
- Download the Prerequisites
- Install VirtualBox on Windows / PC
- Install & Update VirtualBox Extension
- Create macOS Mojave a New VM & Customize
- Execute the VirtualBox Code
- Perform a Clean Installation of macOS Mojave
- Update macOS Mojave to the Latest Version (Optional)
To install macOS Mojave on VirtualBox on Windows successfully, you must download the following prerequisites. Read the step by step guide to avoid any problems. If you miss any of the steps below, then you might be unsuccessful in installing macOS Mojave on Windows.
Note: We’ll use the VMKD image for this specific guide. If you want to install macOS Mojave Using ISO file, you can visit our article “How to install macOS Mojave on VirtualBox on Windows Using ISO” Image.
Step 1: Download the Prerequisites
You have to download all the following files because they are all important to successfully install macOS Mojave on VirtualBox on a Windows-based system.
- Download macOS Mojave VMDK
- macOS Mojave 10.14.6 (18G103) Latest
- macOS Mojave 10.14.5 (18F203)
- macOS Mojave 10.14 (18A293u) Beta
- Download latest version of VirtualBox
- Download VirtualBox Code
Note: If you want to use the VMDK file multiple times, we recommend you have a copy in a different location once the download completed.
Step 2: Install VirtualBox on Windows / PC
From the “Download Prerequisites” section of this post, you should have downloaded VirtualBox and if you didn’t, download VirtualBox latest version and install it on your Windows system. If you’ve already installed VirtualBox, then you can skip this step. Other than that, follow the steps below.
- On the welcome Wizard page, click Next.
- Keep the default setting on the Custom Setup page and click Next.
- Again Click Next to accept the default options unless you want to change something.
- On the warning Network interface page, just click Yes to process with Virtualbox installation.
- Click the Install button to install VBox. Again click Yes if required.
- While installing VBox, you might see a security warning about “Oracle Corporation”. You need to click Install on this page to process with the installation. If you click Don’t install, the installation process will be terminated here and you can’t go ahead. If you see the security warning again click the Install button.
- Finally, click Finish.
Step 3: Install & Update VirtualBox Extension
This step is not 100% necessary but it’s highly recommended to do this step because macOS Mojave might not function properly on VirtualBox. For this reason, it might cause problems during the installation. Go to the Virtualbox download page. Under VirtualBox 6.1.10 Oracle VM VirtualBox Extension Pack section, click All supported platforms to download the latest version of Virtualbox Extension Pack.

Download Virtualbox Extensions
Once you’ve downloaded the Extension pack. Now, follow the steps below to update the Virtualbox extension pack.
- Open up VirtualBox, navigate to Tools>Pereferences>Extensions.
- Click on Plus (+) icon and select VirtualBox extension which you’ve downloaded at the beginning of this section. Click Install or Upgrade and then Agree to the terms and conditions. Click the OK button.
Finally, you should see something like the screenshots below.
Step 4: Create macOS Mojave a New VM & Customize
After installing VirtualBox, now you will need to create a new virtual machine on Virtualbox.
Creating a virtual machine for macOS Mojave is kind of the same as you create a virtual machine for the Windows Operating system or Linux but with some minor changes. In this post, I’ll outline those changes. Follow the steps below to create a new virtual machine for macOS Mojave using the VMDK file.
- Open up your VirtualBox application and click New.

Create a New VM
- Click Expert Mode and select the following options then click Create.
- Type a suitable Virtual Machine Name.
- Virtual Machine Location (a separate drive is recommended).
- Type (Mac OS X).
- Version (Mac OS X 64-bit).
- Memory 4 GB (recommended 8 GB or higher).
- Hard Disk: Select Use an existing virtual machine hard disk file. Click on the Folder icon to browse the macOS Mojave VMDK file.
- Click Add and select the Mojave VMDK image
- It’s time to edit the virtual machine to make it works. Select macOS Mojave VM and click on Settings. Now, bring the following changes to macOS Mojave VM.
- Under System>Motherboard, increase the Base Memory to 10248MB. However, you can use a bit lower memory if your system doesn’t have this much RAM.
- Uncheck Floppy from the Boot Order section.
- Under the Processor tab, increase the processors to 4 or higher.
- On the Display window, increase the Video Memory to 128MB.

Increase macOS Mojave Video Memory


Step 5: Execute the VirtualBox Code
Once you’ve created and customized your virtual machine, it’s time to run some codes in order to install macOS Mojave on VirtualBox. First, you should note your virtual machine name because later on, we will use it. Open the VirtualBox code which you should have downloaded from the “Download Prerequisites” section of this post. If you’ve not downloaded, doesn’t matter. Just use the following code.
Note: Before, you execute the code by command prompt. You should read the following steps.
cd "C:\Program Files\Oracle\VirtualBox\"
VBoxManage.exe modifyvm "VM Name" --cpuidset 00000001 000106e5 00100800 0098e3fd bfebfbff
VBoxManage setextradata "VM Name" "VBoxInternal/Devices/efi/0/Config/DmiSystemProduct" "iMac19,1"
VBoxManage setextradata "VM Name" "VBoxInternal/Devices/efi/0/Config/DmiSystemVersion" "1.0"
VBoxManage setextradata "VM Name" "VBoxInternal/Devices/efi/0/Config/DmiBoardProduct" "Mac-AA95B1DDAB278B95"
VBoxManage setextradata "VM Name" "VBoxInternal/Devices/smc/0/Config/DeviceKey" "ourhardworkbythesewordsguardedpleasedontsteal(c)AppleComputerInc"
VBoxManage setextradata "VM Name" "VBoxInternal/Devices/smc/0/Config/GetKeyFromRealSMC" 1- When you opened VirtualBox code via notepad or any other text editor, use the replace function of the program to Replace the “VM Name” with your virtual machine name. See the picture below to get an idea of how to do it.

Replace macOS Mojave VM Name
- Now, you’ve two choices. First, if you want to fix your macOS Mojave screen resolution in the first place. You should also execute the following code. You have to change “VM Name” with your virtual machine name and HxV with a screen resolution such as “1920×1080“. For more supported screen resolution on VirtualBox and detailed guide, visit fix macOS Catalina screen resolution on VirtualBox.
VBoxManage setextradata "VM Name" VBoxInternal2/EfiGraphicsResolution HxVImportant Note: We highly recommend to quit the VirtualBox program before executing the code. If you don’t do it, your virtual machine might not proceed to the installation step.

Exit VirtualBox
- Once you replaced the “VM Name” with your virtual machine name, then run the code one by one via command prompt (CMD). You can open the command prompt by pressing the Windows+X key in Windows 10 and select Command Prompt from the list. Or simply press Windows key and type CMD. Click Run As Administrator and click Yes.

Execute macOS Mojave VirtualBox Code
- Now, that you’ve executed the macOS Mojave VirtualBox code. Open the VirtualBox app then click the Start button to power on the VM. A black screen with a lot of white text will appear on the screen. Just wait for a few minutes and the macOS Mojave installation will start.

Installing macOS Mojave


Step 6: Perform Clean Installation of macOS Mojave
- Once you hit enter, a whole bunch of code will run on the screen, but you should not worry about it. Wait for a few minutes, and you should see the macOS Mojave installation window. Have a cup of coffee until the installation complete because it’s going to take around 15 minutes to finish.
- Once the installation part complete, your system will reboot, and after the restart, you should see macOS Mojave Welcome page.
- Select the following options. You can change most of the settings later on, so don’t worry about that for now.
-
- Select your Country and click Continue.
Welcome to macOS Mojave
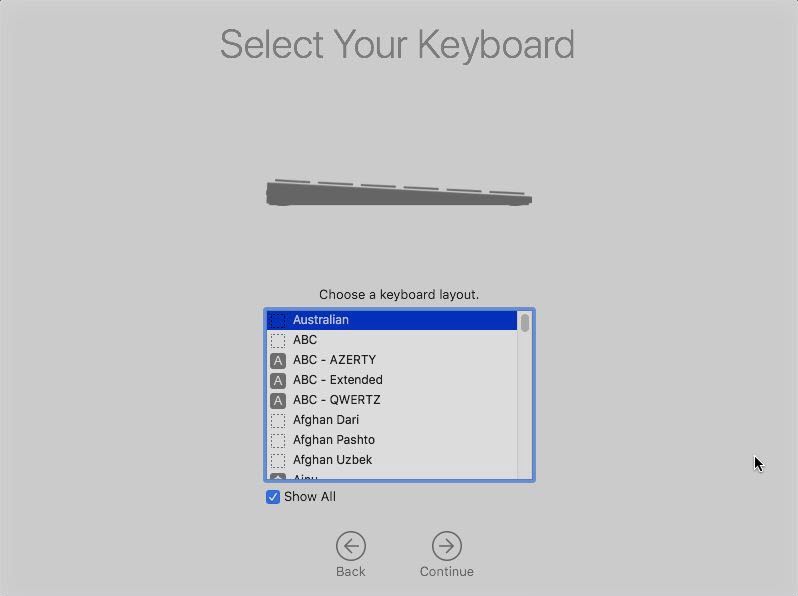
- Choose a Keyboard Layout and click Continue. If you’re not happy with default settings, you can customize the Settings.
- On the “Data & Privacy” window, click Continue.
- Select Don’t transfer any information now.
- Click on Set Up Later then Don’t Sign In. Click Skip. You can add your Apple ID later.
- Click Agree to the Terms and Conditions and click Continue.
- Fill out the Full name, Account name, Password, and Hint then click Continue.
- If you want to customize Express Set Up, you can click on Customize Settings otherwise click on Continue.
- Select an appearance theme and click Continue. You can choose between dark and light mode.
- Wait a few seconds that your macOS should be set up.
-
- Close mouse & keyboard window for now.
-
- Select your Country and click Continue.
-
- Well done 👌 you’ve installed macOS Mojave on VirtualBox Successfully.
macOS Mojave Installation Completed


Step 7: Update macOS Mojave to the Latest Version (Optional)
You should do this step if your macOS Mojave is not updated and not the latest version. So, you can update it by following the instructions below.
- Click on the Apple logo at the top-left corner of your screen. Select System Preferences from the list. Under System Preferences, click on Software Update.

Software Update
- For now, we do not upgrade to another release of macOS so we just updating our current version of macOS Mojave to the latest version of macOS Mojave. Under Another update available, click More info.

Update Available
- Check the latest update of macOS Mojave and click Install Now.

Update macOS Mojave to 10.14.6 Latest
- Click Download Install & Restart button. Now, wait for a couple of minutes so that the downloading Update complete.
- Once the Downloading Update gets complete, your VM or system will restart automatically. Just wait and relax. Be patient because it’s going to take sometimes. First, you’ll see the Installing Software update followed by another 18 minutes remaining window.

Updated macOS Mojave to the Latest version


Video Tutorial:
If you want to watch the video tutorial, you can open the URL below to see how to update your macOS to the latest version. It doesn’t matter what versions do you use. It should work for macOS Mojave, Catalina, Big Sur, and other versions of macOS.
https://www.youtube.com/watch?v=oovQHski5HsSummary
Basically, in this article, I’ve shown you the step by step pictorial guide on how to install macOS Mojave on VirtualBox on Windows computer. After reading and following this guide, you should have done the following;
- Download the Prerequisites
- Extracted macOS Mojave Image
- Installed VirtualBox on Windows / PC
- Installed & Updated VirtualBox Extension
- Created macOS Mojave a New VM & Customized
- Executed the VirtualBox Code
- Performed a Clean Installation of macOS Mojave
- Updated macOS Mojave to the Latest Version (Optional)
We are ready to keep receiving your feedback about this article, and other posts on wikigain. Your suggestions and feedbacks are highly appreciated.
Table of Contents
In this post, we’ll install macOS Mojave on VMware on Windows PC. Also, in our previous article: Install macOS Mojave on VirtualBox on Windows PC. If you are looking for an alternative to VMWare, you can check the above guide out.
Installing Mojave isn’t tricky but requires VMware Unlocker Patch Tool or macOS Unlocker for VMware. This VMware Unlocker Patch Tool for macOS Mojave will Patch VMware for making the macOS Mojave installation work. So we’ve provided the macOS VMware Patch Tool and installed it here.
Although Apple may not support manual installation, it is still feasible to use virtualization applications such as VMware. By utilizing this software, you can operate the entire system within Windows without the need to purchase an additional device or restart every time you want to run it, unlike with dual-booting. The procedure for installation is relatively simple with VMware. If you are familiar with or have prior experience using it, there is no need to be concerned. Just download the Mojave Image and VMware, install both, and you are good to go. As a result, you can generate a virtual machine (VM) and run Mojave after it has been installed. With that, you can enjoy installing and exploring Mac apps like Xcode.
- Related: How to Install Xcode on macOS Mojave on Windows
Upon installation, you will have access to essential tools, including the internet adapter, USB controller, drag & drop functionality, and more. Additionally, you may have several inquiries, which will be addressed during the installation process. This article will guide you through the steps required to install macOS Mojave on VMware on your Windows PC. The process is well-documented with clear instructions and visuals to ensure that you are not alone. Let us begin by breaking down the steps for installing macOS Mojave on VMware on your Windows PC.

Install macOS Mojave on VMware on Windows PC
Apple has a long-standing practice of restricting new software or updates to older Apple devices. This has been the case for Macs for many years, and it remains so. However, when it comes to installing on a Windows PC, there are no such restrictions. This means that regardless of whether you have an old or new PC with any version and edition of Windows, you can download and install macOS Mojave on VMware on your Windows PC.
Let’s proceed with the installation of macOS Mojave on VMware on a Windows PC.
Download Necessary Files to Install macOS Mojave on VMware
- Download macOS Mojave VMDK.
- VMware Workstation/VMware Player
- macOS VMware Unlocker Patch Tool
Now, use this guide to to install macOS Unlocker For Vmware Patch Tool
Before you start, you’ll need to look for a few settings in your computer’s BIOS. When you boot into your computer BIOS, watch out if you’ve enabled Virtualization options (VTx). If you haven’t, go ahead and enable it. You can see this video tutorial:
Watch out if the Intel VT-x hardware acceleration options are enabled from the BIOS.
Related: Download macOS Mojave ISO For VMware & VirtualBox
Step 1: Install VMware Workstation on Windows
After downloading VMware Workstation/Player, it’s time to install it. From the VMware files, click setup.exe to launch the installation wizard. Proceed with ordinary installation steps, and you’re good to go.

When you finish the installation, click Finish on the wizard to close up. When installed, don’t launch it (Otherwise the next step won’t work).

Step 2: Install VMware Unlocker Patch Tool
Normally, there is no provision for selecting macOS during installation due to the fact that VMware does not support it, and it is prohibited. This is where the macOS Unlocker, also known as the VMware Unlocker Patch Tool, comes in handy. The VMware Unlocker Patch Tool has been designed to eliminate the restriction on macOS X (Server) and patch files to enable macOS to function on VMware Workstation or Player with ease.
Download VMware Unlocker Patch Tool for macOS
- Close VMware if it’s open and run the VMware Unlocker Patch Tool.
- Navigate to the VMware Unlocker Patch Tool files and right-click on win-install and Run as administrator. It will simply run commands in the command prompt to patch relevant files in VMware.

Step 3: Create a New Virtual Machine
Now it’s time to do a little configuration.
Open VMware Workstation Player. When you see the home page, click create a new virtual machine or press Ctrl + N.

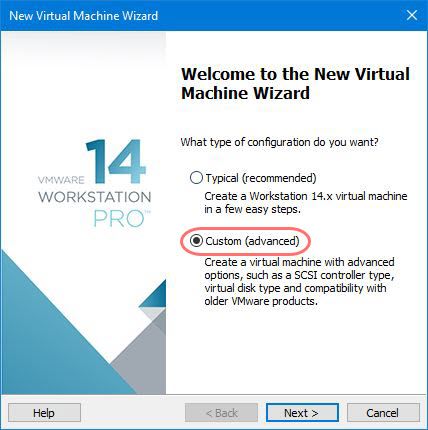
Select the Custom (advanced) option on the wizard creation and click Next.
Here you’ll see hardware compatibility and limitations for the virtual machine simply Next to it.

Now select I will install the operating system later and click Next.

For the operating system, choose Apple Mac OS X from OS selection, and for version, select the latest version (10.14) if available. If not, select the previous version (10.13). It will work too, then click Next.

Name the virtual machine whatever you would like to and specify the location where to store the virtual machine files, then Next.

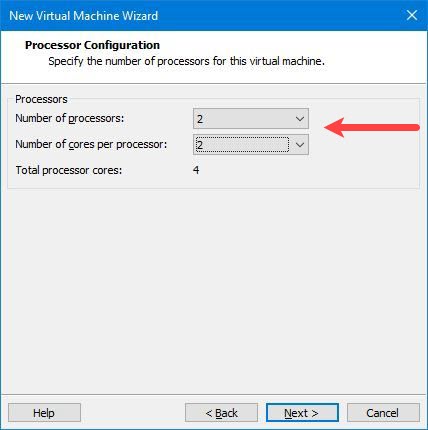
The processors are a significant part of a virtual machine, set up 50% – 75% of your system’s CPU.
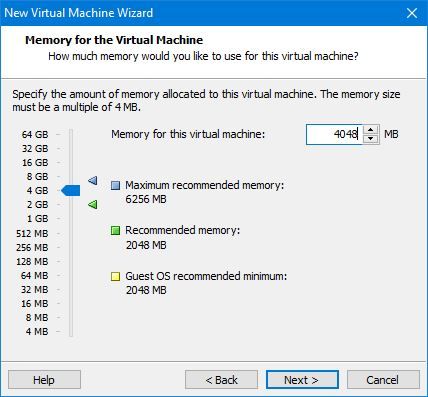
For memory, I’d like to set 4GB RAM for the virtual machine. That’s about 50% of my laptop memory. Make sure you set 50% – 65% of your system’s memory for the VM. I have 8GB of RAM in total, so I have used 4GB for the virtual machine.
By default, NAT will be selected. That’s okay, just Next.

On this page, you don’t have to make any changes, simply click Next.

Continue through the process and click Next.

In the disk selection, select Use an existing virtual hard disk and follow Next.

Next, browse the macOS Mojave Image (VMDK) that you downloaded, then click Next.

At last, you’ll have the summary of the virtual machine creation, if you wish to make changes, customize hardware to change one, and if everything seems ok, hit Finish.

Step 4: Insert VMware Code in the Virtual Machine file
When the virtual machine is configured, you must tweak this to insert code into the macOS VMX file. Now, navigate to macOS virtual machine files and open (macOS Mojave).vmx file with Notepad.

At this window, copy the code from below and paste it at the end then save it.
Smc.version = 0

Step 5: Install macOS Mojave on VMware Workstation
And you’re done with the configuration, and you’re ready to install macOS Mojave on VMware.
Navigate to the VMware Workstation and start the virtual machine with Power on this virtual machine.

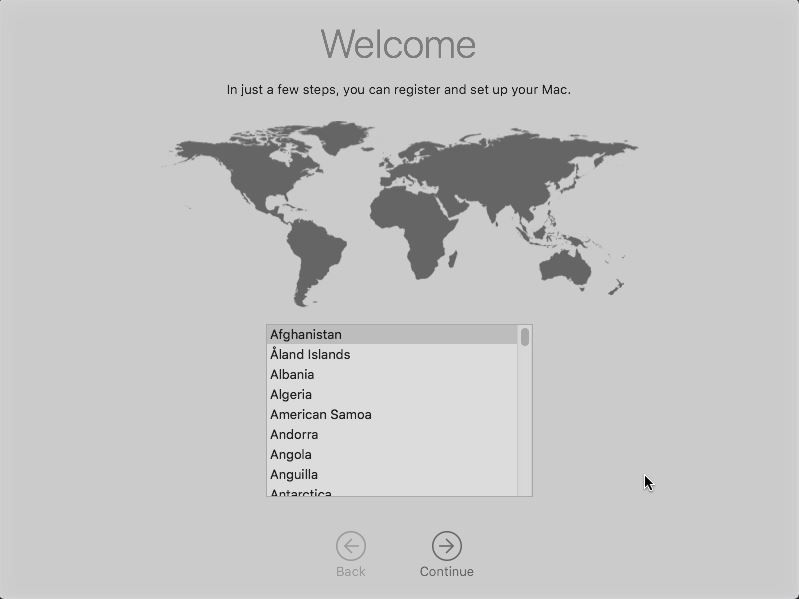
As it starts up, the Welcome screen will appear (It’ll take some time to boot, depending on your configuration). Select your location and Continue.
If you encounter some error that shows,” This virtual machine requires AVX2, but AVX is not present. This virtual machine cannot be powered on.” Here’s how to fix it in a moment: How to Fix This virtual machine requires AVX2 but AVX is not present
Next, select your keyboard. If it’s not there, click Show All to choose your keyboard from the list. When you’re done, click Continue.
Click Continue.

Yes, you have the option to transfer information from your Windows PC, but that’s not recommended since you’re not going to use this as your primary computer, don’t do that. When selected, click Continue.

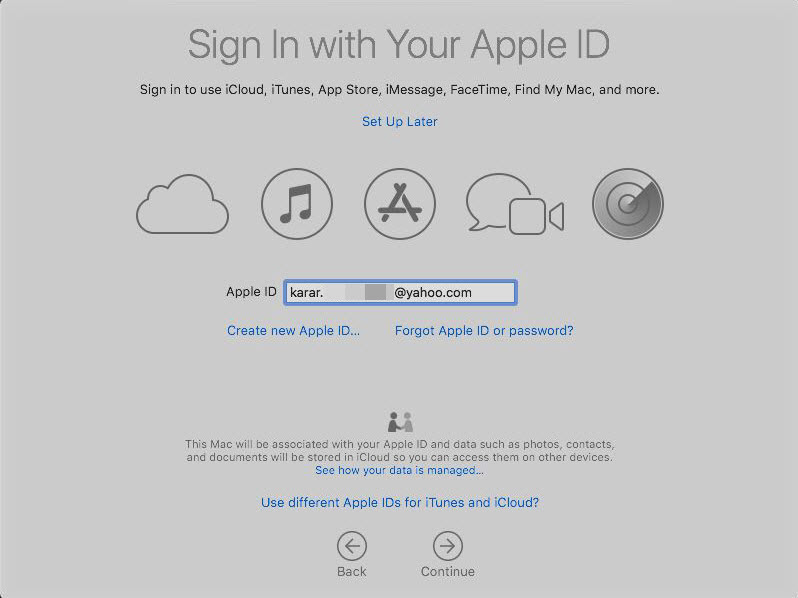
Sign in with your Apple ID if you have one. If you’re a newbie, click on the Create New Apple ID to create one. Alternatively, you can sign in later any way you want. Whatever you choose, Continue it when finished.
To make things work, the virtual machine is automatically connected to the internet as you configured.
To Agree to the Terms & Conditions, tap on Agree.

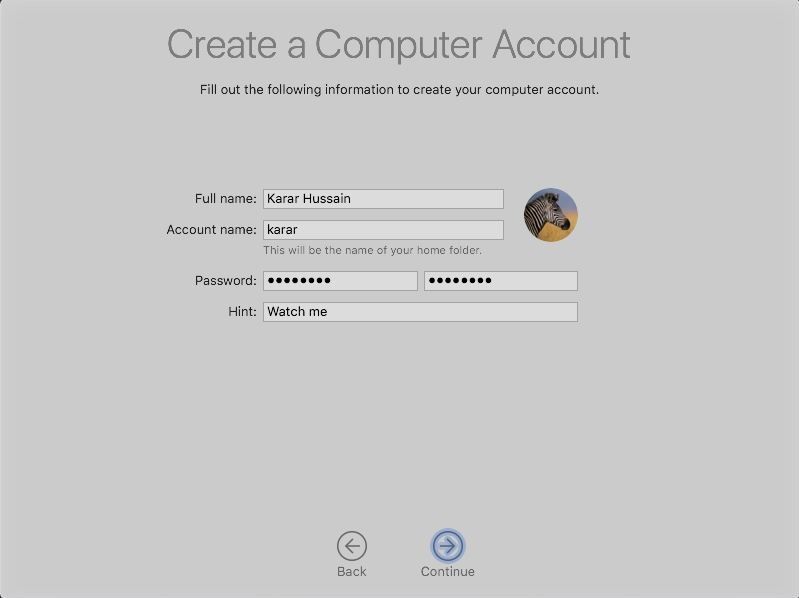
Apparently, you’ll need to create a local computer account, simply enter your details into the blanks and Continue.
The express setup will enable Maps – Location – Find my Mac and more. If you wish to customize and enable only those you want, you can do that. Just hit Customize settings to allow the services you want.

If you chose to customize settings, you’d be asked for every single service for enabling — At the first screen, you’ll be asked to enable location services, as here I don’t allow location services. Simply Continue.

Similarly, you’ll be asked for some essential services. You can easily choose to enable or disable it.
After you continue, you’ll witness the favorite part you were definitely waiting for. I guess you’d probably want to try the new look — Dark Mode. Otherwise, you could change it later. Just Continue.

Yay! Eventually, you’ve done it — You’re into macOS Mojave.
If you want, you can follow this guide: How to share folders on VirtualBox & Vmware? (Windows-MAC) Step by Step Guide

Install VMware Tools on Virtual Machine (VM)
When you’re done with the installation, you probably wanted a full screen instead of the black screen at your edges. Luckily, there’s a perfect tool for that — That will exceptionally provide extra valuable features such as full-screen resolution, sound, drag & drop, and more. The steps are here on how to do it.
Go to VM > Install VMware Tools and wait to pop up on the screen.
When you’re prompted to Install VMware tools, double-click on it.

On the Introduction page, click Continue. On the next screen, Continue to install for all users of this computer.
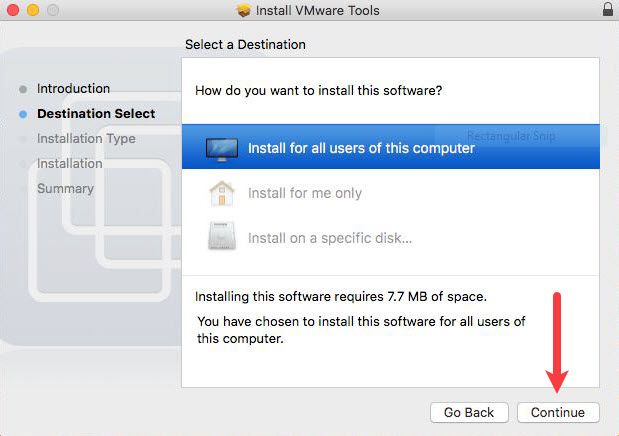
Hit Install to perform the installation on the currently available disk for all users.

In meantime, you may be asked for your account credentials; enter them correctly, and click Install.
When the installation is finished, click Restart to complete the installation.

When the macOS reboots completely, you should have perfect resolution covering the entire screen. Here is a glimpse.

If you see a System Extension Blocked error, you can fix this.

Navigate to Settings > Security & Privacy > On this page, watch out for “ System software from the developer was blocked….“ at the end and click Allow. This will let you install VMware Tools when you run.
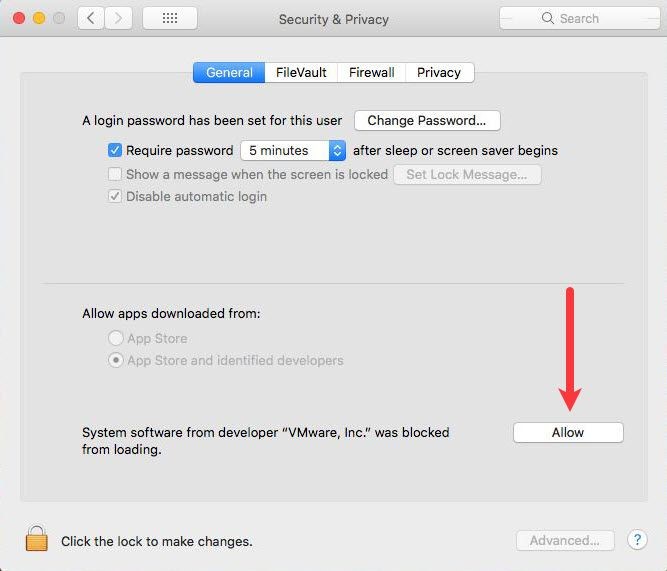
Once you allow, there won’t be any restrictions, repeat the VMware tools installation, and this time, it’ll likely work.
Finally, you’ll have macOS Mojave running perfectly on your Windows PC. Everything should work fine with sound, display, internet, and everything else.
If you want to update macOS, however, you can. Since the Mac is already enrolled in the Apple developer program, it will receive the newest updates. To update, head to Settings > Software Update > Click Update to begin downloading the update.

When the download is completed, you’ll be asked for a restart, click Restart, and the update will be installed once restarted.

And congrats! You have the latest macOS Mojave 10.14 beta three on your PC with its superb features.

Create a Snapshot of macOS Mojave (Optional)
Regarding backup in VMware, a snapshot is a tool you’d prefer. Bad times can come anytime, but you’ll be in big trouble if you aren’t ready for them. What’s a better idea than performing a backup before something happens wrong? That’s where snapshot comes in handy. Simply put, a snapshot is a useful VMware tool that creates a copy of the virtual machine files to back up and protect everything.
- Related: How to Take Snapshot of macOS Mojave on VMware
Perhaps the trick is simple if you would like to create a snapshot.
In VMware, go to VM > Snapshot > Take Snapshot.

Next, name the snapshot and add a description if you’d like to, then click Take Snapshot to begin the process.

It will create a snapshot of the virtual machine within a minute, wait!

Once the snapshot is created, you can find it in VM > Snapshot > “Snapshot Name” like I saved the snapshot by the name of New Snapshot, and for restore click on it.

By this snapshot, you’ve, just like the shield, doubled the life of your sweet macOS. This potential recovery option will be when the machine fails to boot or any other issues. Now you’re completely safe and guaranteed.

That’s pretty much all there is to it. So, you’re free to install apps or do whatever you’ve in mind. If you experience slow performance or wanted to boost, reserve 50 – 60% of your PC’s memory and CPU (Processors) for the virtual machine.
If you have problems and errors out here, you can check for solutions we’ve listed and answered.
- Fix macOS Mojave Problems on Virtual Machine
Want to create a bootable installer, here’s how to do it quickly.
- Create Bootable USB Installer for macOS Mojave
Well, that’s all about how you install macOS Mojave on VMware on your Windows PC. I hope your questions have been answered. If not, let me know in the comments.
DISCLAIMER: This guide is created for the educational purpose and shows that one can install macOS Mojave 10.14 or OSX on PC without Mac. This works for non-Apple hardware but Intel-based Windows laptops and PC. The guide explains how it’s done. The process explained is a part of ethical hacking macOS for Non-Apple Windows and Linux desktops and Laptops. If you wish to remove the content (DMCA), please reach us via contact us page.
Let’s learn how to Install macOS Mojave 10.14 on any Windows or Linux laptop or PC without Mac. This guide will help you install macOS X on PC running on the 7th and 8th Gen processors. The best thing about this macOS Mojave Installation guide is that we don’t need a MacBook for this.

Thus, if you own a Windows Laptop powered by either Kaby Lake or Coffee Lake processors, proceed with this tutorial. If you own a system with older generation processors such as skylake and below, you can still use this guide but need to replace a few files in clover to install and run macOS Mojave on a Windows 10 laptop.
Further, if you want to install macOS High Sierra 10.13.6, follow this guide on how to install macOS 10.13.6 High Sierra on a Windows PC or Laptop without using a Macbook or macOS.
NOTE: This is the simplest and the easiest How-To guide on macOS Mojave installation on the internet with all the screenshot and video guides. However, currently, these videos are offline coz. Apple Inc. raised a copyright claim on our macOS MojaveInstallation video, and we got a strike on our YouTube channel. So we had to take down all macOS installation guides.
However, we will soon upload them to other platforms such as Vimeo and on our Facebook fan page. On TechPosts, we always try to create a video guide along with the post and you will find almost all posts with a video guide. And that’s what makes us different.
How to Install macOS Mojave 10.14 on a Windows Laptop or PC
BEFORE YOU BEGIN…
Before you begin the installation, let me make myself very clear. I or TechPosts cannot be held responsible for any damage, whatsoever if anything happens to you or your system by following this guide. This is entirely for educational and learning purpose. So proceed with this guide at your own risk.
Steps to Install macOS Mojave10.14 On PC without Mac
We have prepared all the necessary files required for installation and tried making this guide more straightforward for better understanding. So all you have to is download, copy, and paste. In case you find it difficult, follow the process as shown in the embedded macOS Mojave installation video guide.
Step 1. Backup Drive and Data [Highly Important]
Backup the entire drive or all the critical data from the system before you begin installing macOS on the internal drive if you have dual storage, no problem. Just don’t touch Windows OS drive.
However, we still highly recommend you to back up the internal drive data as we will be formatting the hard drive for macOS Mojave installation. Which means any data on the drive will be permanently lost. So be careful and create a backup to be on the safer side.
Step 2. Create a macOS Mojave Installer for PC
To create a macOS installation media, you need at least 8GB USB thumb drive. However, 16GB is recommended. And make sure it’s USB 3.0 for quick installation.
- Download the macOSMojave.dmg file which is around 5.6 GB
http://getintopc.com/softwares/operating-systems/macos-mojave-v10-14-18a391-app-store-dmg-free-download/
- install TransMac app on your PC.
- Connect USB Thumb drive to your PC and then run Transmac application as administrator.
- Then right-click on the USB Thumb Drive and click Format for MacOS.

- Right-click again on the USB drive but this time select Restore from Disc Image

- Now browse the MacOSMojave.dmg file you downloaded and select it
- Click OK to proceed. Now, this can take a while depending on your system speed
- Once it’s finished, you can go to ‘File Explorer’ and then open the thumb drive partition
- Inside the partition, you will see a few files and folders- delete everything. Don’t format drive
- Download the compressedEFI folder and then extract the CLOVER and BOOT folders to the USB Thumb drives EFI partition

- Now that you have copied the EFI folder, shut down your system
- Press the power button to turn on the PC and immediately start pressing BIOS key usually F2 as the system boots.
Then change the following settings:
- Deactivate Secure Boot.
- Under virtualization, disable VTD or VT for Direct I/O.
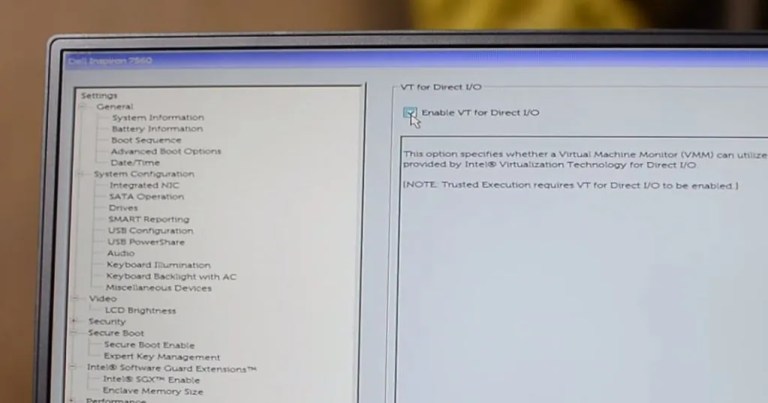


That’s it. Now save changes and reboot your system.
As system reboots, press F12 continuously to see Boot options
- From the boot options list, select your thumb drive containing macOS Mojave Installer as boot drive by using arrow keys and hitting the Enter key

- On boot, you will see this clover bootloader screen. From here, you need to select the disk that says ‘Boot macOS Install from Install macOS Mojave’.

Step 3. Installing macOS Mojave 10.14
You will see the Apple logo, and it will start loading the installation file.
Now if you get any error here, I want you to please take a screenshot, upload it to the cloud and share the URL via comments or reach out to our Facebook fan page. Please mention system properties otherwise I will not be able to help you fix any error.
If everything is good, you will see the installation window.
Proceed to the next step by pressing the forward arrow button, and agree to all terms and conditions.
- Next, open DiskUtility. Then choose the drive where you want the Mac OS to be installed
- Make sure the volume or disk is empty as this will delete all data from the disk.

- Select the disk and click Erase
- Give a name to the drive such as macOS MojaveDisk, then choose Extended(Journaled) and GUID Partition from the respective dropdowns.
- Hit erase, this will format the hard drive and make it ready for macOS Mojave Installation
- After eraser, close the Disk Utility program and select the Install macOS.
- Agree to terms, select the formatted drive and hit Install to begin the Mac OS Mojave installation on your Windows PC.

- This may take 20-30 minutes, depending on your system and storage type (USB 3.0 or HDD/SSD).
- SSD will be quicker than the traditional hard disk drives. Once the installation is finished, you will see a message that says,macOS could not be installed on your computer.
- Just ignore this message as macOS Mojave is successfully installed on your system. This is an error message. So ignore it and click on Restart.
- Again press F12 system restarts to choose USB thumb drive from the boot options
- Then in clover bootloader, select Boot from macOS Mojave Disk.

- This will boot the MacOS Mojave from the disk where we installed it. This may take a while and once it boots up. Do the initial setup like Choose Region, Timezone, Agree to terms etc.
- Then choose an account name and enter a password.
- That’s it, finally select between Light and Dark mode and your system is ready to use

So now that you have successfully installed the latest macOS Mojave 10.14 on your Kaby Lake laptop or PC, check which hardware is working and what’s not.
- To check this, click ‘Apple icon at the top left and click About System
- Click the System Info tab and check what all hardware is detected

Comment down below what’s working and what’s not so that I can help you fix what’s not working in your macOS Mojave Windows PC.
CONCLUSION
Now at this point, you should have successfully installed the macOS Mojave on PC without using Mac. This works for all Windows Laptops and PC powered by 7th and 8th Generation Kaby Lake and Coffee Lake processors.
Again, if you get any error, share with me via comment section down below. I will try to answer each and every one. But if everything works fine, share the system configuration, EFI folder (if you have modified) to help other enthusiasts.
Please stay tuned for more such guides. Subscribe to our newsletter and YouTube channel for instant updates.
Порой возникает необходимость воспользоваться операционной системой отличной от установленной на компьютере. Есть разные методы сделать это в зависимости от ситуации и одним из таких способов будет запустить нужную операционку в виртуальной машине. Процесс не сложный, однако есть некоторые нюансы и занимающий много времени.
В данном примере рассмотрим установку Mac OS Mojave 10.14.6 в VirtualBox на Windows 10. В качестве процессора будет использован AMD Ryzen 3 2200G хотя на процессорах Intel все аналогично за небольшими изменениями, о которых будет сказано дальше.
Для запуска Mac OS в виртуальной машине VirtualBox нам потребуется сама программа которую можно бесплатно скачать на официальном сайте и пакет дополнений для гостевых операционных систем (Oracle VM VirtualBox Extension Pack) который можно загрузить там же. Устанавливайте последнюю версию которая будет на сайте, а в данном случае использовалась версия VirtualBox 6.1.
Так же необходим установочный диск с macOS Mojave. Вы можете воспользоваться образом, использовавшимся в данном примере скачав Mac OS Mojave 10.14.6 здесь или тут. Части архива взаимозаменяемые, так что можно загружать откуда вам больше нравится. Хеш образа диска SHA256: E700465D24B5D81CC694013D22497DDC6BD2EE6CAAF83BDCFA3B6792796BB4B2.
Останавливаться на установке программы мы не будем, желающие могут ознакомиться с подробной инструкцией на нашем сайте. Запускаете программу и нажимаете кнопку «Создать». Затем мы переключились в «Экспертный режим» нажав соответствующую кнопку внизу появившегося окна. Вводим имя нашей машины, лучше английскими символами и указываем тип операционной системы и ее разрядность, в данном случае Mac OS X 64-bit.
Папку машины, где хранятся ее настройки можно не менять. Передвигаем ползунок оперативной памяти выделив примерно половину имеющейся, но в красную зону лучше не залезать. Отмечаем «Создать новый виртуальный жесткий диск» и нажимаем кнопку «Создать».

Теперь нужно указать папку, где будет располагаться создаваемый виртуальный жесткий диск и его размер. Имейте в виду, что потом изменить размер диска Мак не позволит, так что сразу указывайте нужный вам размер. Тип и формат хранения можно сделать как на скриншоте.

После этого виртуальная машина будет создана. Выделяем ее в левой колонке и нажимаем кнопку «Настроить» в верхней панели. Выбираем в левой колонке открывшего окна пункт «Система». Здесь нужно указать в списке порядок загрузки первым оптический диск.

На вкладке «Процессор» выбираете сколько ядер процессора выделить для работы Mac OS и предел загрузки CPU. Кроме того, здесь и на вкладке «Ускорение» есть дополнительные настройки, которыми можно «поиграться» если в процессе загрузки ОС будет возникать ошибка. Все зависит от конкретных комплектующих вашего компьютера. Порой помогает отключение Nested Paging, а в моем случае включение галочки у пункта «Включить Nested VT-x/AMD» приводило к тому, что установка заканчивалась сообщением attempting system restart mach reboot.
В разделе «Дисплей» настраивается размер видеопамяти, выделенный виртуальной машине, а также тип графического контроллера и режимы ускорения. Их можно оставить по умолчанию или подбирать в случае проблем с запуском.
Переходим к разделу настроек «Носители». Здесь уже присутствует виртуальный жесткий диск, созданный нами на начальном этапе. Нам нужно указать оптический диск, с которого будет происходить установка Mac. Для этого выбираем его, нажав на «Пусто» и затем щелкаем по синему значку диска в верхней правой части окна. В открывшемся меню нужно указать местоположение образа нашего установочного диска или привод CD-ROM если он находится в нем. В результате должно получиться как на изображении ниже.

Теперь важный момент, сохраняем выполненные настройки и обязательно закрываем программу VirtualBox. Это нужно чтобы можно было сделать некоторые настройки виртуальной машины с помощью VBoxManage. Запускаем командную строку Windows и переходим в папку с установленной программой VirtualBox. Если вы не меняли путь по умолчанию при установке, то команда будет такой, в противном случае подставьте свой путь.
cd "C:\Program Files\Oracle\VirtualBox\"
Дальше нужно выполнить последовательно следующие команды, но заменив Имя Виртуальной Машины на реальное имя, указанное вами при ее создании.
VBoxManage modifyvm "Имя Виртуальной Машины" --cpuidset 00000001 000106e5 00100800 0098e3fd bfebfbff
VBoxManage setextradata "Имя Виртуальной Машины" "VBoxInternal/Devices/efi/0/Config/DmiSystemProduct" "iMac11,3"
VBoxManage setextradata "Имя Виртуальной Машины" "VBoxInternal/Devices/efi/0/Config/DmiSystemVersion" "1.0"
VBoxManage setextradata "Имя Виртуальной Машины" "VBoxInternal/Devices/efi/0/Config/DmiBoardProduct" "Iloveapple"
VBoxManage setextradata "Имя Виртуальной Машины" "VBoxInternal/Devices/smc/0/Config/DeviceKey" "ourhardworkbythesewordsguardedpleasedontsteal(c)AppleComputerInc"
VBoxManage setextradata "Имя Виртуальной Машины" "VBoxInternal/Devices/smc/0/Config/GetKeyFromRealSMC" 1
Если у вас процессор AMD, то выполните дополнительно команду
VBoxManage modifyvm "Имя Виртуальной Машины" --cpu-profile "Intel Core i7-6700K"
Если при этом получаете сообщение об ошибке VBoxManage.exe: error: Invalid parameter '--cpu-profile', то попробуйте указать другой процессор, например:
VBoxManage modifyvm "Имя Виртуальной Машины" --cpu-profile "Intel Xeon X5482 3.20GHz"
VBoxManage modifyvm "Имя Виртуальной Машины" --cpu-profile "Intel Core i7-5600U"
VBoxManage modifyvm "Имя Виртуальной Машины" --cpu-profile "Intel Core i5-3570"
VBoxManage modifyvm "Имя Виртуальной Машины" --cpu-profile "Intel Core i7-2635QM"
Также можно сразу указать нужное разрешение экрана виртуальной машины выполнив следующую команду, где последние два числа как раз указывают ширину и высоту в пикселах. Впрочем, это всегда можно будет изменить в последствии снова выполнив эту команду с другим разрешением.
VBoxManage setextradata "Имя Виртуальной Машины" VBoxInternal2/EfiGraphicsResolution 1280x1024

На этом все подготовительные мероприятия закончены и можно переходить непосредственно к установке Mac OS Mojave в виртуальную машину. Снова запускаем VirtualBox, выбираем нашу машину и нажимаем кнопку «Запустить» в верхней панели. Откроется окно виртуальной машины VirtualBox и побегут строчки, показывающие процесс первоначальной загрузки операционной системы.

В некоторые моменты может казаться, что установка зависла, тогда можно ориентироваться на индикатор активности виртуального жесткого диска внизу окна программы. Теперь можно расслабиться и помедитировать пока не появится экран выбора языка, где указываем русский и щелкаем по стрелке вправо расположенной под ним. Прежде чем выполнять саму установку ОС необходимо инициализировать диск, поэтому на следующем шаге в окне «Утилиты MacOS» выбираем «Дисковая утилита».

В левом столбце выбираем наш виртуальный жесткий диск и нажимаем кнопку «Стереть» на верхней панели. Появится запрос на подтверждение действия, где можно задать какое-нибудь имя нашему диску и нажать снова «Стереть».

После завершения подготовки диска закрываем «Дисковая утилита» и снова попадаем в окно «Утилиты macOS», где теперь надо выбрать пункт «Установка macOS» и кликнуть «Продолжить». В следующем окне для продолжения установки будет предложено нажать соответствующую кнопку, а затем принять лицензионное соглашение. Дальше предложат выбрать диск для установки операционной системы, просто выделяем наш диск и щелкаем стрелку вправо после чего начнется установка MacOS на ваш компьютер.

В какой-то момент система без предупреждения перезагрузится и снова будет черный экран с бегущими строчками. Нам этого не надо, поскольку установка начнется опять с самого начала. Выключаем виртуальную машину закрыв окно с ней. Идем в ее настройки, выбираем наш iso образ с macOS Mojave и отключаем его от машины.

Сохраняем настройки, снова запускаем виртуальную машину VirtualBox и теперь установка продолжится непосредственно с жесткого диска. Когда первоначальная загрузка на черном фоне завершится, появится эмблема Эппл и индикатор оставшегося времени, верить которому не стоит. Это самый долгий этап установки macOS на Virtualbox по окончании которого виртуальная машина снова перезагрузится.
Если вместо продолжения установки вы видите UEFI Interactive Shell, то придется запустить ее самому. Для этого нужно последовательно выполнить команды:
fs1:
cd "macOS Install Data"
cd "Locked Files"
cd "Boot Files"
boot.efi
Фактически процесс установки завершен, осталось только выполнить первоначальные настройки и можно пользоваться. Выбираете страну из списка, затем раскладку клавиатуры, вопрос по миграции и Apple ID, если у вас нет Apple ID то пропустите соответствующий шаг нажав «Настроить позже».

Затем укажите имя вашей учетной записи и пароль. Дальше будут вопросы экспресс-настройки, которые можно оставить по умолчанию или настроить на свой вкус нажав «Настроить параметры».

После окончания всех настроек будет показан рабочий стол MacOS Mojave знаменующий окончание установки.

Хотя установка занимает много времени, последующая загрузка происходит довольно быстро. Стоит иметь в виду, что иногда по каким-то причинам в процессе загрузки может произойти ошибка хотя до этого все работало. В этом случае достаточно просто запустить загрузку заново.