Want some of the best macOS features on Windows? Check out these apps that can get the job done.
You might think the best macOS features are exclusive to macOS. For the most part that’s accurate, but the core benefit of Windows is customizability and user control. So, what if we could incorporate those macOS features into your Windows system?
Let’s have a look at some of the best macOS features that you can recreate on Windows.
How to Get macOS Features on Windows
For the most part, getting macOS features on Windows will involve downloading third-party programs and clients that attempt to recreate the macOS experience.
There are a handful of macOS programs that have been released on Windows officially by Apple, but among those programs are options such as Apple TV, and that’s not exactly a feature that defines the macOS operating system.
So be prepared to download and configure some non-official programs if you’re hoping for a macOS experience on Windows.
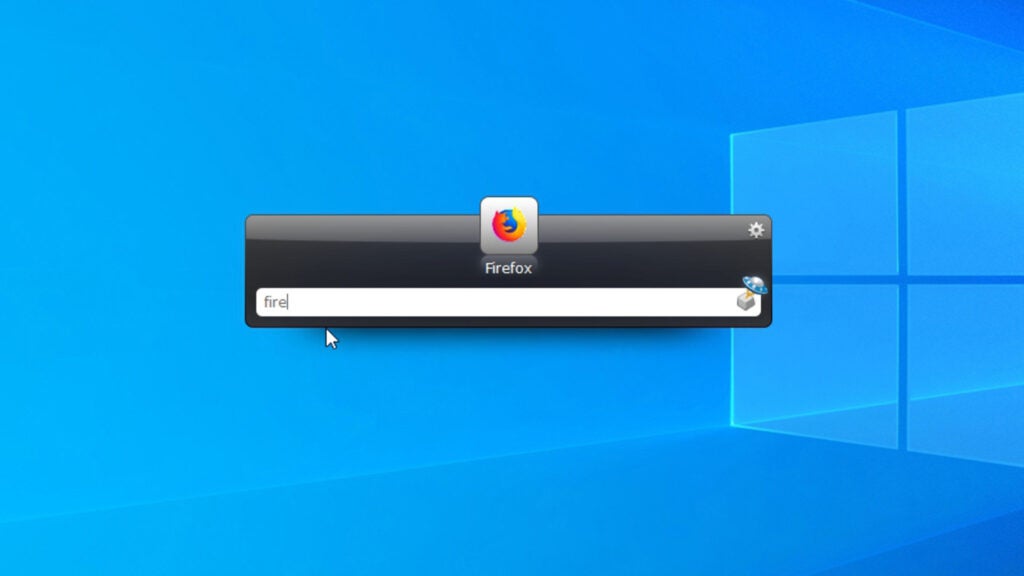
1. Get the AirDrop Experience With Feem
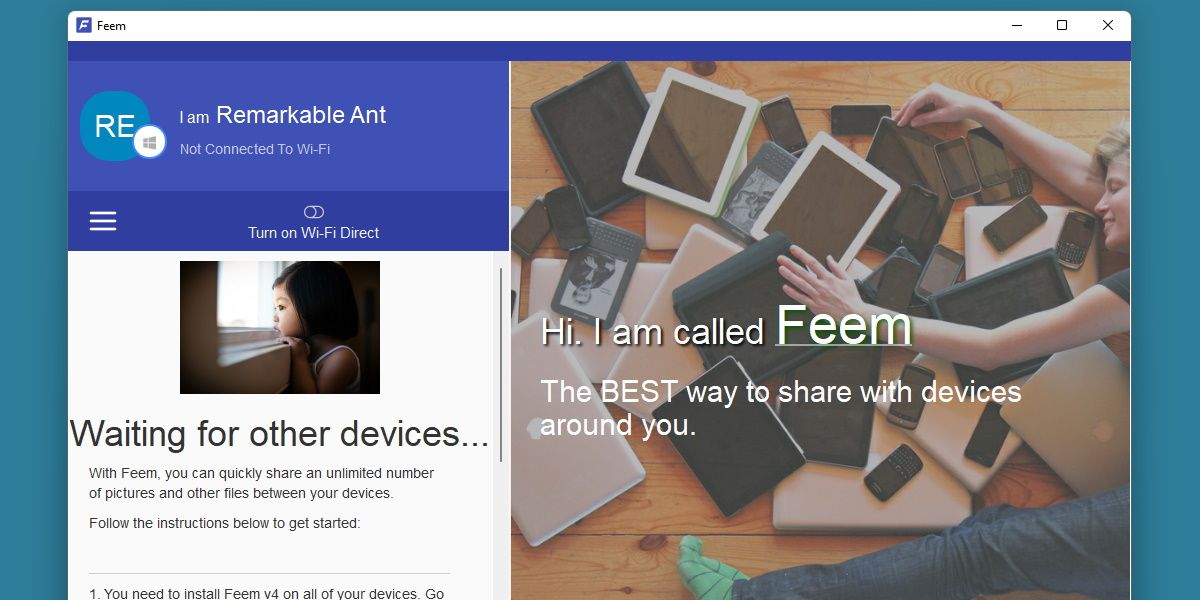
AirDrop is a macOS feature many will swear by. If you have a family of Apple devices, AirDrop makes the experience of sharing files effortless.
Windows doesn’t have a dominant range of devices like Apple does, so AirDrop is harder to recreate, though it’s not impossible.
Feem is a lightweight solution to dropping your files from one device to another. It’s intended to make it simple to transfer files from your Windows device to an Android one, however Feem is available for just about any device, including macOS.
The program is free, however signing up to an annual subscription will grant you more features, such as choosing which folder the dropped file will end up in.
Download: Feem (Free, subscription available)
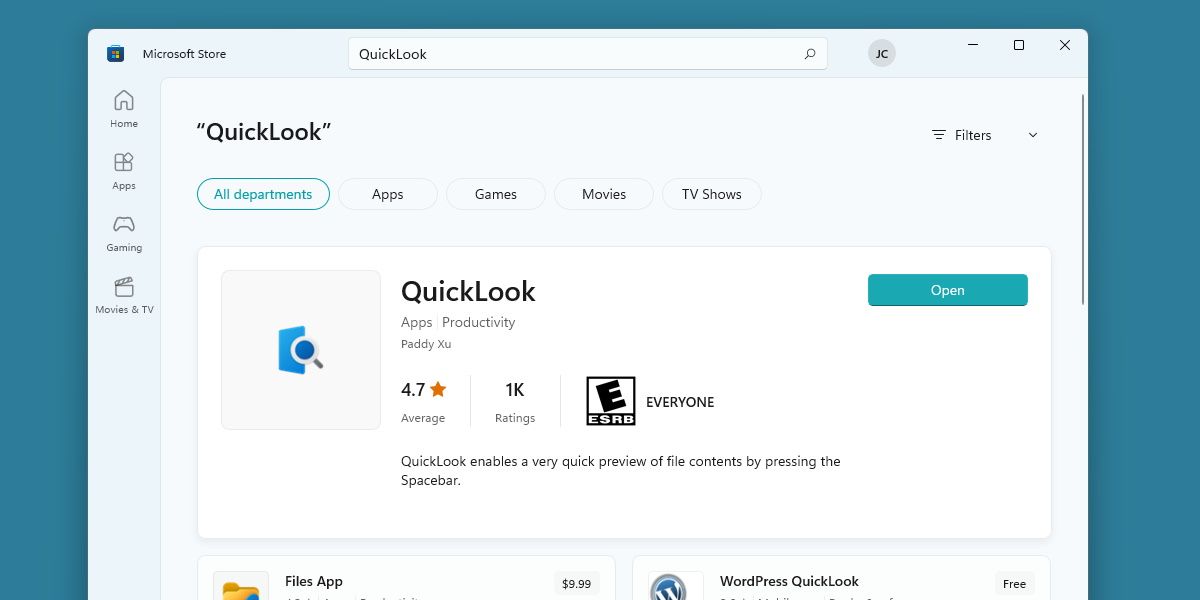
2. Get QuickLook by using QuickLook
QuickLook allows you to easily preview files with the press of the spacebar. You might expect a simple function like that would already exist in Windows, but it doesn’t.
The Windows alternative is helpfully also called QuickLook, and is available on the Microsoft Store.
There’s not much to say with this one. Once installed and launched, you’ll have that immediate previewing power that macOS offers, right on your Windows system.
Download: QuickLook (Free)
3. Spotlight’s Powerful Search With Everything
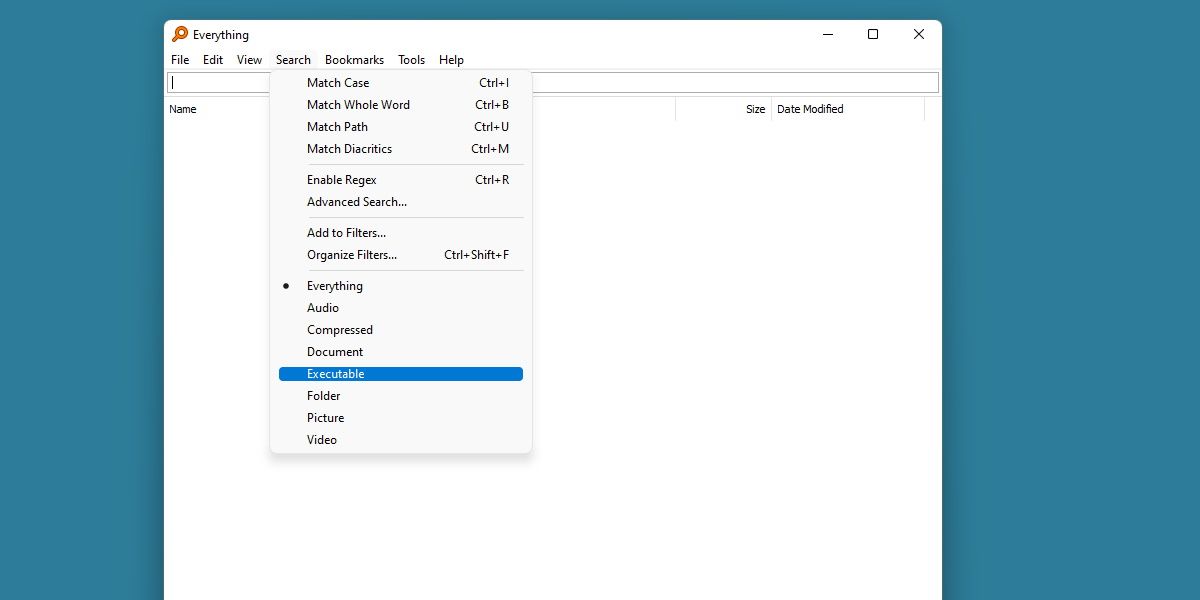
Spotlight is both an efficient and versatile tool, with near-instant results and a wide array of functions. macOS users may not even realize how different searching between the two operating systems is, with Windows’ default search often coming up short in comparisons.
Thankfully, you can at least recreate the near instant search speed on Windows, with a little program called Everything.
Everything takes advantage of quick file indexing to bring you a much faster search experience than Windows traditionally offers.
Download: Everything (Free)
4. Duet for Sidecar Functionality
Sidecar is another macOS function that takes advantage of the family of interconnected devices that Apple boasts. Windows doesn’t have an easy way to use a separate device as a second display, but you can add it in with Duet.
Duet is a premium package that allows you to connect additional PCs, tablets or even other macOS systems as an additional screen.
This means you can use a tablet as a drawing pad, or extend your desktop with whatever you have lying around, just as you would with Sidecar.
Download: DuetDisplay (Premium)
5. Universal Control on Windows With Synergy
Universal Control allows a macOS user to use a single keyboard and mouse across two different devices. This is a huge benefit to those on the Apple ecosystem, but it’s purposes might be a bit unclear on Windows.
Still, there’s an option out there for the Windows user who needs this functionality. Synergy is another premium offering, but grants the user a snappy and intuitive system for swapping input hardware between different machines.
Privacy and customizability are on the forefront of Synergy, which is important for a Windows system.
Consider grabbing Synergy if you’re in the need of quick keyboard swapping.
Download: Synergy (Premium)
Where There’s a Will, There’s a Way, Especially With Windows
macOS users rest easy knowing that their system offers a robust range of features that just work. Windows users rest slightly less easy on this assumption, but thanks to the customizability of the operating system, you can always be sure there’s a way to imitate features from other operating systems.
Next time you see something that a macOS can do that Windows cannot, ask yourself if it really has to be that way. Chances are, there’s a Windows alternative out there somewhere.
Apple’s latest iteration to its desktop operating system was announced at WWDC earlier this month. Named ‘macOS Mojave,’ the update brings with it a bevy of new features including some long-awaited things like the dark mode, and other features and cosmetic upgrades that are pretty nice. So, if you’re wondering how to get these features on a Windows 10 PC, well we’ve got your back.
Getting macOS Mojave features on Windows 10 is a relatively simple task, partly because a lot of these features are built into Windows, and partly because most of the apps you’ll need to get these features are easily available and free. So here’s how you can get each of the macOS Mojave features on Windows 10.
1. Dark Mode
The dark mode is easily the most requested feature of all time. While earlier versions of macOS featured a dark mode that was utterly useless, this time Apple has shipped a dark mode that’s worthy of the name and looks beautiful.

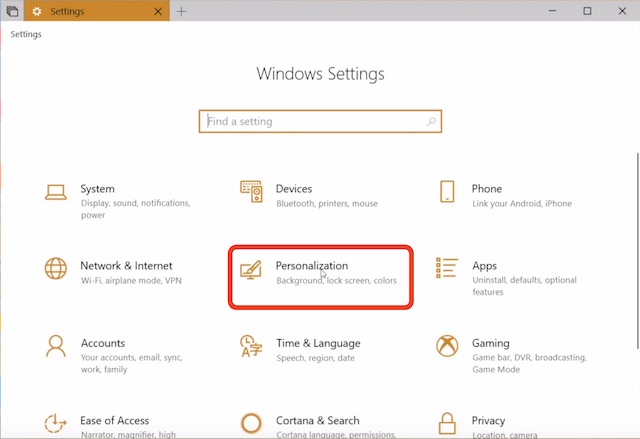
To get the dark mode on Windows, all you have to do is tweak a few settings.
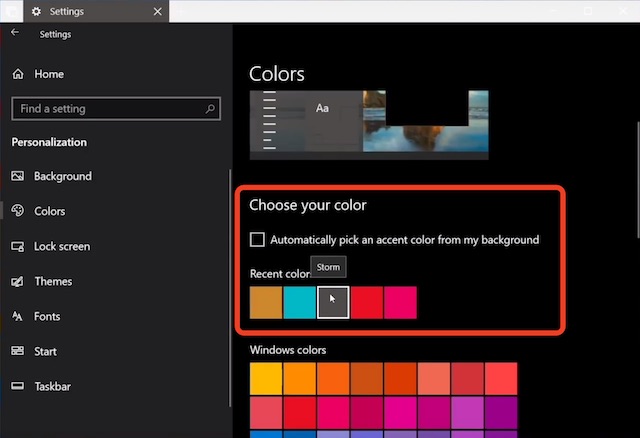
- In Settings, go to Personalization.
- Here, head over to ‘Colors.’
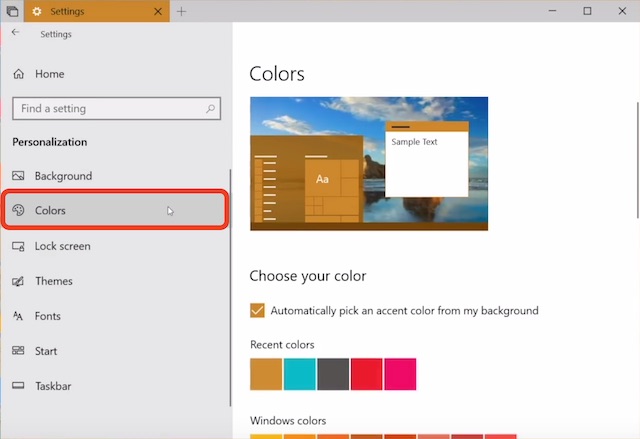
- Scroll down and change the ‘Default app mode’ to ‘Dark.’
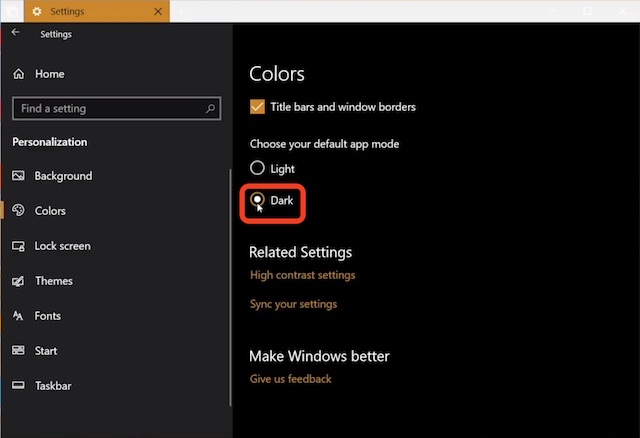
This will change all the app windows and stuff to shades of black and grey. However, things like the taskbar, and the Start Menu still remain as they were. However, if you scroll back up, you’ll find an option to pick color manually. Just select the darkest color you can find here, and the Start Menu and taskbar will both turn dark as well.
2. Dynamic Wallpaper
Yet another addition to macOS Mojave came in the form of Dynamic Wallpapers. These are basically wallpapers that change according to the time of the day. So the Mojave desert wallpaper that’s the default on macOS Mojave changes the lighting conditions of the photo from day time to afternoon to the evening and finally at night. It looks stunning.
Getting that exact feature on Windows 10 is currently not possible, but you can get something that comes pretty close.
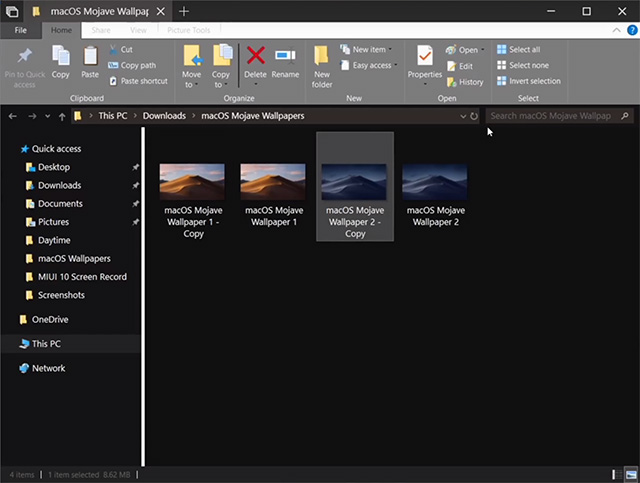
- Download the macOS Mojave wallpapers from this link.
- Make a folder and make two copies of each of the wallpapers inside the folder.
- Head over to Personalization settings, and from the ‘Background’ dropdown, choose ‘Slideshow.‘
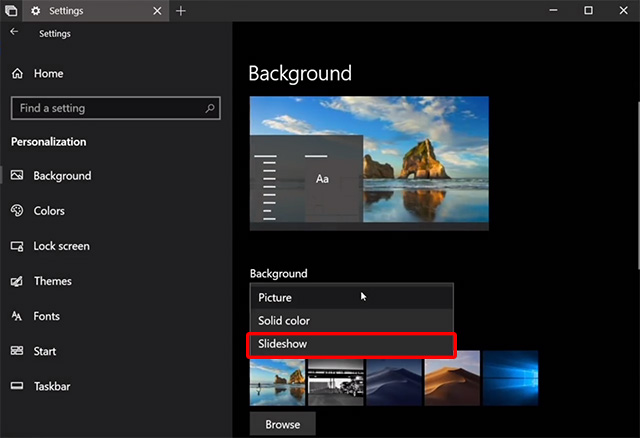
- Choose the folder you just made with the wallpapers, and set ‘change picture’ to ‘6 hours.’
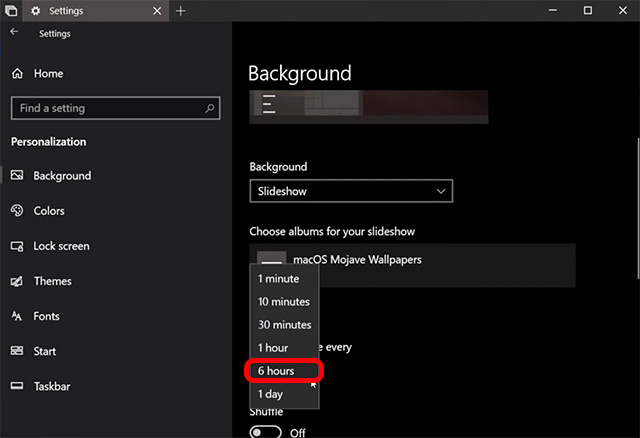
- Now, turn of shuffle, and enable ‘allow slideshow on battery power.’

What you’ve basically done is set the daytime and night-time wallpapers from macOS Mojave to automatically change every 12 hours giving off the illusion that it’s a dynamic wallpaper. Pretty neat, isn’t it?
3. Stacks
Stacks have become one of my favorite features in macOS Mojave because my desktop is almost always a cluttered mess. Stacks solve all of that. Basically, if I enable Stacks, all my files automatically get sorted into stacks on the wallpaper according to the file-type. All the images become one stack, all the documents become another stack, and all the PDFs become yet another stack. Stacks are a lot like folders, but much better. Simply click on a Stack to expand it and show all its files right there; click again to collapse.

It’s nice, and fortunately you can get a similar functionality on Windows as well.
- First you’ll have to download ‘Fences’ (30 day trial, $10)
- Install the app, and as soon as you’ve done all the set-up formalities such as creating a free account, Fences will automatically sort your desktop into neat folder-like things.

These don’t exactly look like Stacks, but they bring the same advantages of giving your desktop a look that’s much cleaner than usual. While Fences is a paid app, you get a free 30 day trial after which you’ll have to pay $10 to buy the full version.
4. Quick Look
Quick Look is an awesome feature that I love using on my Mac. It allows me to quickly peek into a file, scrub through a video, check out the contents of a PDF, and all without opening the files in dedicated apps.
To get the same functionality on Windows, all you need is a free app.
- From the Microsoft Store, download the app called ‘QuickLook.’ (Free)
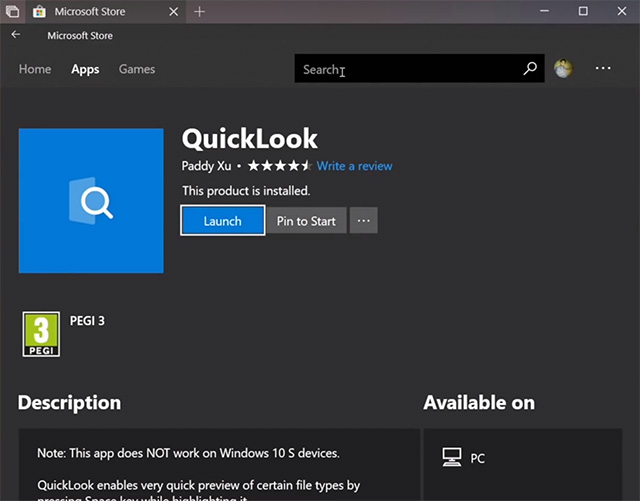
- Once you’ve done that, you’re ready to go. Simply select an image, file, or audio file, and press ‘Space’ to open it up in Quick Look.

Believe me, Quick Look is one feature that will get you addicted to using it. It’s really very useful. Plus, the Quicklook app on Microsoft Store is completely free, so there’s no harm in trying.
5. Screenshot Tool
The macOS Mojave update also brings an updated and improved screenshot tool. Where users made use of keyboard shortcuts to take screenshots on the Mac, Apple has now included a handy screenshot HUD (which comes with screen recording as well) right there. Plus, when you take a screenshot, you can click on the preview image that pops up and get handy editing shortcuts right there.
If you want a similar feature on Windows, you’ll have to use an app called Tiny Take (free). You simply have to install the app on your Windows 10 PC and that’s it. Tiny Take brings a number of handy keyboard shortcuts to take screenshots, to record the screen, and to even record a video from the webcam.
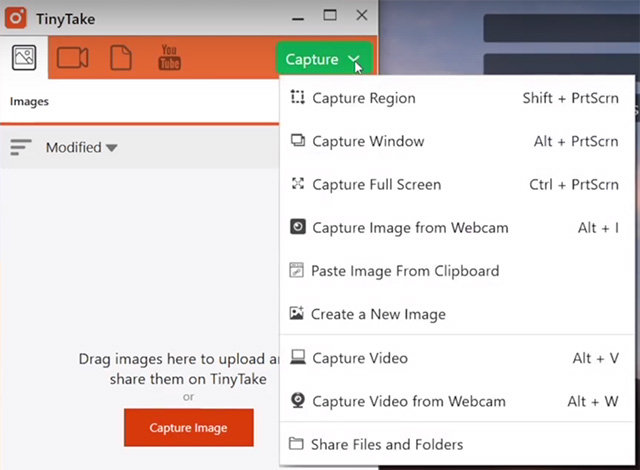
Tiny Take also does this thing where after you take a screenshot it directly takes you into a handy editing app where you can perform some basic editing including things like annotation, cropping, and more.
If, however, you don’t want to install a third-party app, the latest builds of Windows 10 also include a keyboard shortcut ‘Windows + Shift + S’ to bring up a screenshot tool with a couple of basic options that should be enough for most people.
6. Finder Features
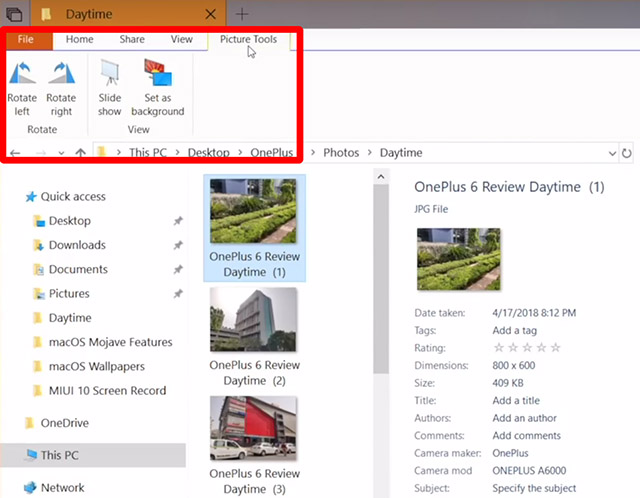
Apple also added a couple of new features to the Finder app in macOS Mojave. This included things like a new ‘Gallery View,’ the ability to see complete metadata in the sidebar, and quick actions. As it turns out, these features are sort-of there in Windows anyway.
For Gallery View, all you need to do is:
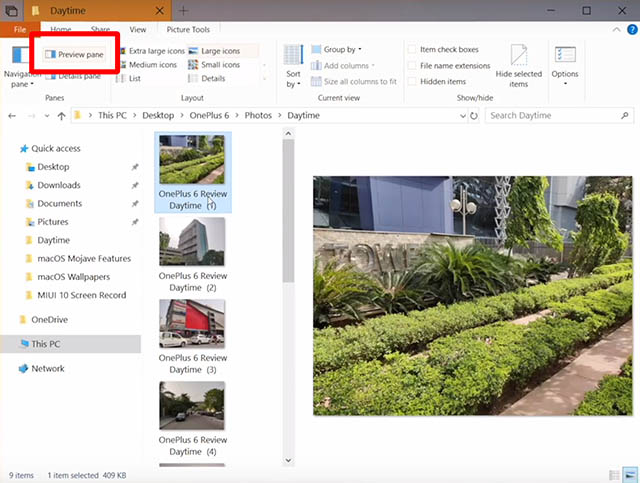
- Head over to the ‘View’ tab in Explorer.
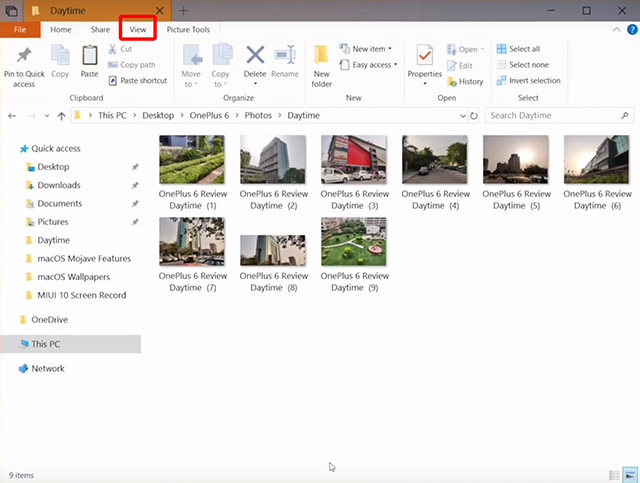
- Here, enable the ‘Preview Pane’ to get a Gallery View like view in Explorer.
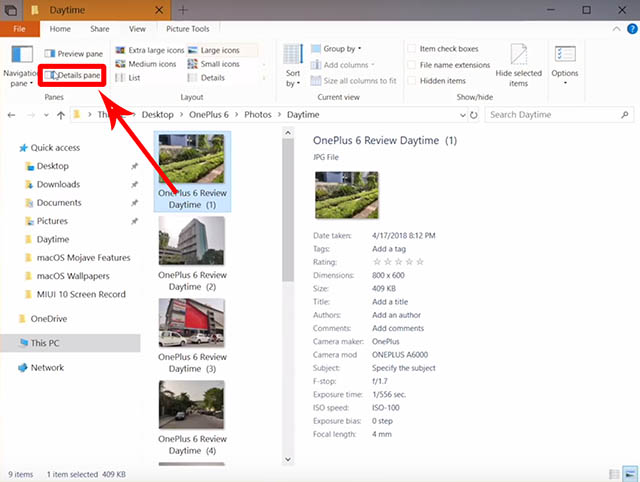
Similarly, if you want to enable the side-bar to view metadata, you can simply enable the ‘Details Pane’ from the ‘View’ options in Explorer.
The Quick Actions on macOS Mojave are a little harder to get, but Windows comes with contextual buttons as well. In a folder with images, you’ll get a ‘Picture tools’ inside Explorer with actions like rotate, set as background and more.
SEE ALSO: 10 Best New macOS Mojave Features You Should Know
Use Dark Mode, Quick Look and More on Windows 10
Well, that was basically how you can get macOS Mojave features on your Windows 10 PC. Obviously, getting all of the macOS Mojave features isn’t possible, but the features we’ve discussed in this article are some of the most sought after and talked about ones in the latest iteration of macOS. The best part about this is that you can get everything from macOS Mojave in Windows 10 using just built-in features or free apps. Stacks is the only thing you’ll need a paid app for.
So, are you going to use these macOS Mojave features on your Windows computer, and did you know about some of these features being present in Windows 10 already? Let us know in the comments down below.
Whether you’re a die-hard Windows fan or simply a Mac user required to occasionally use Windows, it’s hard to argue against the fact that Mac OS X has some killer features. Here’s how to get the best of them on Windows.
If you’re a Mac user that has to use Windows at work, needs Boot Camp for a few specific programs, or if you’re one of the few that’s actually switched from Mac to Windows (instead of the other way around), it can be hard to get used to some of Windows’ idiosyncracies. There are no shortage of ways to make Windows look like a Mac, but what about making it act like a Mac? Here are some ways to get OS X’s best features in Windows—from simple keyboard shortcuts to system-level niceties like Exposé, Spaces, and multitouch gestures.
Exposé and Spaces
Exposé and Spaces are two of the best window-managing features around, but neither of them really has a built-in equivalent in Windows 7. Previously mentioned Dexpot will give you them and a lot more. You can get an Exposé-like overview of your open windows, view and manage multiple virtual desktops, replace your Alt+Tab switcher with Dexpot’s, and even toggle things like your screensaver with the press of a button. It’s a really great app, whether you’re trying to Mac-ify your Windows desktop or not.
Just install it and right-click on its System Tray icon to tweak its many settings. The Spaces-like virtual desktops are its main feature, but you can also find the Exposé-like overview under Dexpot Components > Window Calalogue on the Controls menu. You can even set all the keyboard shortcuts to match the ones you’re used to in OS X. Sadly, Win+Right and Win+Left (which are what will correspond to Mac’s Ctrl+Right and Ctrl+Left, in this case), are already taken by Aero Snap, so you can’t use them for Spaces out of the box. You can either turn off Aero Snap if you don’t use it, or change it to something similar like Alt+Right and Alt+Left, This is something you may run into with other shortcuts, too, so just tweak them accordingly.
Quick Look
Sadly, there’s nothing quite as great as Mac’s Quick Look available for Windows, but there are a few similar features. Windows 7’s built-in Quick Look alternative is the preview pane in Windows explorer. Just open up Windows explorer and click the «show preview pane button» on the right, and you’ll get a third pane that will show thumbnails for images and play music files.
Your other option, which is more like Quick Look but still not quite as useful, is the Quick Look clone contained in previously mentioned MaComfort. It won’t let you flip through documents, and its image previews are pretty small, but it will suffice for many situations (and it plays music files well). It works exactly like on OS X: MaComfort sits in your system tray, and all you need to do to Quick Look a file is to highlight its icon and hit the spacebar.
Note that MaComfort is actually a program designed to bring Mac’s best features—like Spaces, Exposé, and Quick Look—to Windows, but I’ve found that the rest of the program isn’t very good. Dig around through it if you want to see what it offers, but I’d recommend turning most of its features off and using the ones I recommend above instead. They’re much better.
The Dock
While the Windows 7 taskbar is often lauded as better than the Dock, the Dock does have some nice features, like Stacks. If you want a more Mac-like Dock on your desktop, you’ll definitely want to try out previously mentioned RocketDock. RocketDock is pretty similar to OS X’s dock in a lot of ways: you can launch applications, view folders, or even minimize windows to it. It’s pretty configurable, too, letting you tweak it just how you want. It also has a great plugin infrastructure, which lets you add «docklets» that give you extra themes and features, like this one that mimics Stacks on OS X. It probably won’t replace your Windows taskbar completely, but it’ll give you back some of those features you miss from OS X’s Dock without bogging down your system.
Keyboard Shortcuts
If you’re used to OS X, the first thing you’ve probably noticed on Windows is that all your keyboard shortcuts have changed. If you’ve burned them into your muscle memory, it can be pretty hard to change them back again, and even if you aren’t used to the ones on OS X, many find them to be faster than Windows’ anyways, so you may want to change them. Here are a few ways to get fast, Mac-like shortcuts on Windows.
Putting Ctrl, Alt, and Command in Their Place
The biggest change from Windows to Mac is the position of the Ctrl, Alt, and Command or Windows keys. The best way to switch these is to dig into the Windows registry itself. However, that’s a little annoying, so we’ll use a portable program called SharpKeys to do it for us.
Just download the zipped version of SharpKeys and run it to configure your keyboard. If you have a Windows-based keyboard, you’ll want to map Ctrl to the Alt key, Alt to the Win key, and Win to the Ctrl key to keep things as similar to OS X as possible.
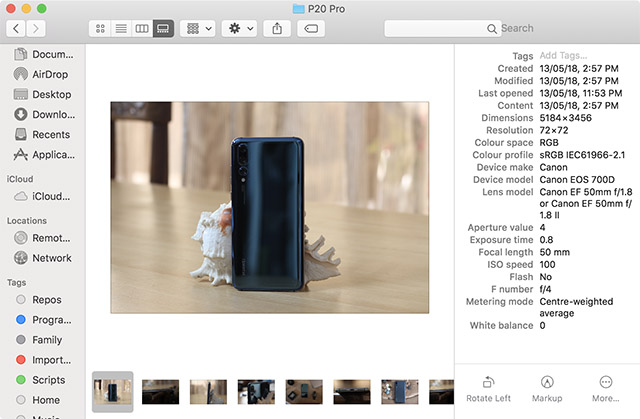
Now that you’ve remapped all these keys, the terminology for keyboard shortcuts might leave you a bit confused. For the remainder of this article, I’m going to refer to Windows shortcuts as their original keys, not their remapped version. So, Ctrl+C will still be referred to as Ctrl+C, not Alt+C, which is what it will look like if you watch your hands. Furthermore, remember that Ctrl usually does what Command does on a Mac, for the purposes of these instructions. Photo by Declan Jewell.
Changing Unfamiliar Shortcuts with AutoHotkey
Now, many of your keyboard shortcuts—like Ctrl+C for copy or Ctrl+T to open a new browser tab—should feel more like what you’re used to. However, there are others that won’t. On Windows, Alt+Tab opens the application switcher instead of Ctrl+Tab, so your muscle memory will be off. To fix this, you’ll need the ever-useful and insanely powerful AutoHotkey. We won’t go into too much detail on how to use it here, but you can really dig into the program using our original guide.
A great example is Alt+Tab, since the window switcher function is built-in to AutoHotkey. To change Windows’ Alt+Tab shortcut to Ctrl+Tab, just create a new AutoHotkey script. Once you have AutoHotkey installed, you can do this by right-clicking anywhere and going to New > AutoHotkey Script. Enter in the following text:
LCtrl & Tab::AltTab
Drag that script to your Windows Startup folder, and it will run every time your computer boots. From then on, Cmd+Tab should act like it does in OS X. For more info on how to set up AutoHotkey shortcuts, check out the AutoHotkey documentation.
Keep in mind, also, that you can customize a lot of shorcuts from within the app they correspond to. So, for example, if you’re used to Cmd+Shift+4 for taking screenshots, you can just head into the preferences of a screenshot program like Lightscreen to change the «take screenshot» shortcut to Ctrl+Shift+4.
For more ideas, check out this table of keyboard shortcuts on Wikipedia. It will show you both the Mac OS and Windows version of any given shortcut, so you can remap them to match each other. Again, remember that Command on Mac will be Control on Windows if you’ve remapped your keys as I describe above, since Windows technically has no Command key. Sadly, not every keyboard shortcut will map exactly the same way—make sure Windows isn’t already using a specific key combination for something before you go and map it.
Multitouch Gestures
Most laptops have multitouch-capable trackpads, but not all of them have the great multitouch gestures that Mac OS X has baked in. If you need to get your two-finger scrolling fix, there are a few things you can do.
If all you want is two-finger scrolling and a few tap gestures (likely the most used gesture in OS X), you can grab TwoFingerScroll, a small utility that sits in your system tray and turns on two-finger scrolling for your trackpad. It’s pretty configurable, too, so you can tweak exactly how fast and smooth you scroll. You can also assign certain actions to two- and three-finger taps, which is nice. If you want the full treatment—such as three-finger gestures and more—check out our full how-to on setting up multitouch gestures in Windows.
Unfocused Scrolling
It’s a small annoyance, but one of the biggest problems I had with Windows was that you can only scroll up and down with the scroll wheel on the window that’s in focus. In OS X, you can scroll in whatever window your cursor is hovering over, even if it isn’t the front window. A great little utility called KatMouse fixes this problem beautifully. Just install it, let it run at startup, and scrolling will work everywhere.
A *nix Command Line
One of Windows’ biggest weaknesses—especially for people who like to do a little developing—is its command prompt, and if you’re used to the Terminal on OS X, it’s even worse. If you need to do any command line work, you’ll definitely want to pick up Cygwin for Windows and learn how to use it. It will give you a much more powerful Unix-style command line, which is great for digging down into files and performing operations you can’t from the graphical interface.
You’ll never be able to get Windows working exactly like OS X, but you probably wouldn’t want to. With just a few simple tools and tweaks, you can get the best of both worlds on your Windows machine, and (for the most part) without having to re-learn any of your favorite shortcuts. Got any of your own favorite features we skipped over? Let us know how you brought them over to Windows in the comments.
More on Making Windows and Mac Play Nice
A Guide for Switching to a Mac
If you switched to a Mac from a PC, you’ve probably noticed that there are a lot of differences between the two. What follows is a round-up of everything that stuck out to me when I made the move to my first Mac. More »
The Complete Guide to Mac/Windows Interoperability
Today, Mac OS and Windows can work together in harmony on the same home network, sharing files and printers, mounting one another’s drives and using the same equipment, like wireless routers and USB drives. If you’re considering a mixed Mac/PC home or office, here’s a primer on how the two systems inter-operate (and the few instances when they don’t.) More »
Snow Transformation Pack Makes Your Windows Desktop Look Like Mac OS X
Windows: If you like the look and feel of Mac OS X but prefer to stick with Windows (whether it be for gaming, or because you just don’t like Apple), freeware Snow Transformation Pack will make Windows look like OS X. More »
Hey Guys, Today you will learn How to Get macOS Mojave Features on Windows 10 for free. Apple announced MacOS Mojave at WWDC on 4th June 2018. MacOS Mojave comes with some awesome new features like the dark mode, desktop stacks, dynamic wallpaper and a lot more. I mean it’s quite impressive so that got me wondering if you can get all of these awesome features on a Windows PC. well turns out you can Get macOS Mojave Features on Windows 10. Obviously, you can’t get all of the features from a macOS Mojave, but you can get some of the most talked features. Some of these features are already built-in on windows 10 but some of are not, where we will use Microsft store to google to get those features. So, let’s dive in to Get macOS Mojave Features on Windows 10.
Also Read:-
- Install macOS Mojave on VirtualBox on Windows 10
- Install macOS Mojave on VMware on Windows 10
Get macOS Mojave Features on Windows 10
Step 1. Enable Dark mode on Windows 10
MacOS Mojave finally brings the much-awaited dark mode and it is beautiful, it changes everything on MacOS to an awesome dark shade.
If you want to get the dark mode on windows 10, well, for your surprise Windows 10 already has a really cool dark mode. All you need is enable that and use all over.
To enable the Dark Mode on Windows 10 follow the below steps.
- First, open windows settings by holding Windows+ I
- Open Personalization.
- click on the Colors tab and scroll down and enable the dark mode on windows 10.
Once you enabled the Dark mode on windows 10, all the downloaded apps for Microsoft store are in dark mode. which includes also the built-in apps for Windows 10.
And if you want to turn on the dark mode on Microsoft Edge,
- First, Open Microsoft edge settings.
- Second, From theme option select the dark them.
Step 2. Create a dynamic Background of MacOS Mojave on Windows 10
In order to create a dynamic background just like macOS Mojave 10.14, first, you have to download the macOS Mojave Backgrounds.
Download macOS Mojave Backgrounds:- https://bit.ly/2M6ba3m
Once you downloaded and extracted the macOS Mojave Backgrounds, duplicate both backgrounds.
- Open Personalization from settings
- Change the Background from Picture to slideshow and locate the macOS Mojave Pictures.
- Set the timer for changing the background every 6 hours.
- Turn on the shuffle and allow slideshow when on battery power.
Step 3. Enable Stacks on Windows 10
Stacks is a new feature in macOS Mojave 10.14, which allows the users to make stacks of related files. For Example, if your desktop is full of files, folders, icons, videos, photos, software and others. And once you enable the stacks it will sort all the files according to the file-type and Your desktop will look so much cleaner.
If you want to enable this features in Windows 10, then we have to use a third party software called Fences. Fences is an application created and developed by Stardock company which allows us to manage our files on windows just like the mac.
But this software is not totally free, however, it gives you a 30 days trial version which you test. After 30 days you have to purchase for more use. Another which you have to know is the look, Fences can’t turn your desktop exactly like macOS Mojave, but it makes your screen similar to macOS Mojave 10.14 and in my idea even better.
Fences can be customized even more if you play around with, it has really cool features. I wish it could be available by default available on windows 10.
Step 4. Enable Quicklook in Windows 10
Quicklook is another feature on macOS Mojave which is really awesome and saves too much time. QuickLook Helps to have a look at the file without opening, all you need is take your cursor on it and it will show you the file.
As you know by default windows 10 do not have this feature, in order to use Quicklook on windows 10. Download an App from Microsoft Store called Quicklook. QuickLook is free to use but unfortunately, it won’t work on windows 10 s.
While using Quicklook on windows 10, simply select a file and press space on the keyboard, a quick look of the file will appear. This feature is really awesome in windows 10 if you use.

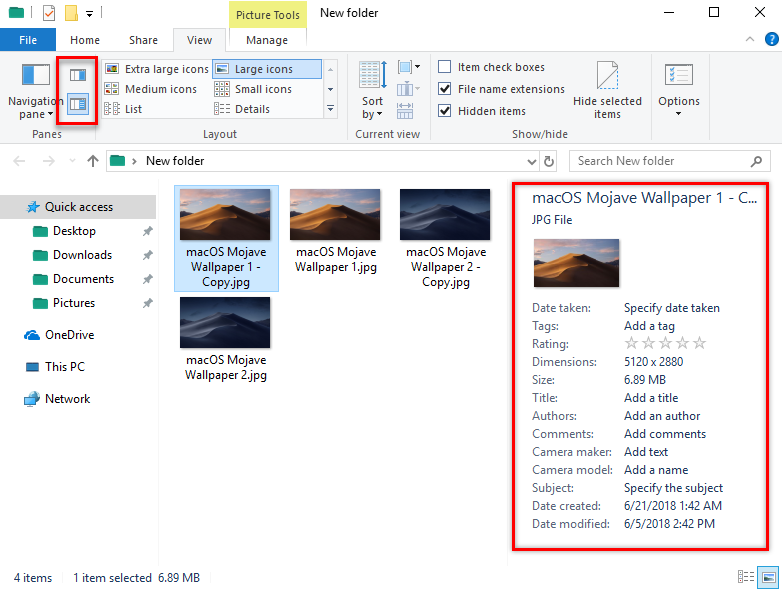
Step 5. Enable Finder Features on Windows 10
Finally, Apple brought some small updates on finder too. the Features which includes gallery view, the complete metadata in the sidebar and quick actions.
If we look at Windows 10, it already has some of the features. In order to show them.
- Open a Folder which contains some files.
- On the ribbon, select view and enable the pane view.
The preview Pane View on Windows 10, only shows the file in a large size but the detailed pane view shows the file in small view with completes details. In the screenshot, you can see the example of detailed pane view.
Windows 10 has contextual buttons which is so much easier compared to macOS Mojave. On Windows simply select manage and do whatever you want to do.
Step 6. Enable Screenshot Features of macOS Mojave on Windows 10
Screenshot Tool on macOS Mojave has been improved so much by Apple. With screenshot tool, apple users are creating keyboard shortcuts of their own. But the major update which Apple has brought on screenshot tool is screenshot hub. Screenshot hub allows creating keyboard shortcuts, record video, edit photos and videos after capturing.
If you want to use similar features of screenshot tool from macOS Mojave on Windows 10, you have to the TinyTake App. TinyTake app is a free and open source software for windows which allow creating keyboard shortcuts, record video, edit video and photos with basic tools.
Again if you are not interested in using the TinyTake app, then you have to use the Windows+ Shift+ S to take a screenshot. This keyboard shortcut is new in Windows 10 1803.
Get macOS Mojave Features on Windows 10
GetaOS Mojave Features on Windows 1
If the grass is greener on the other side, snatch up your neighbor’s lawn
By
|


No matter what computer you choose, there are always a things on other platforms that seem better than whatever you’re using. I’ve been a Windows user for years, but macOS has some great features Microsoft has yet to truly adopt. Thankfully, third-party developers have filled a few of those gaps.
Bring Quick Look-esque file previews to Windows with Seer
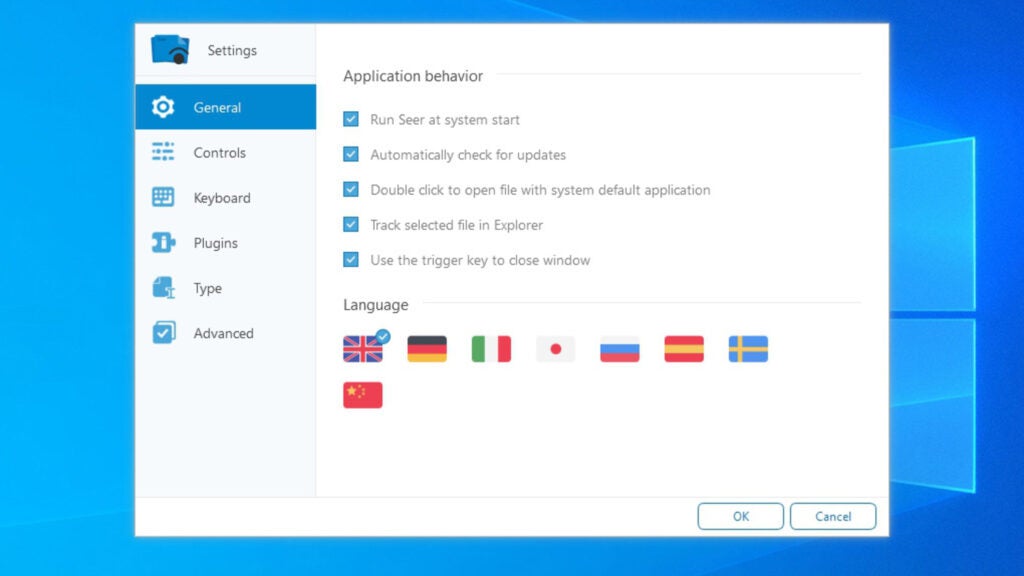
When I first switched to Windows (after many years as a Mac user), I was surprised to find Quick Look was the feature I missed the most. Being able to preview any file with a quick tap on the space bar is so fast and easy that it becomes muscle memory, and losing it feels like losing one of my fingers.
Seer is the best Quick Look clone I’ve used: it’s a small app that runs in the background and works pretty much exactly like you’d expect. Select an image, text file, PDF, or other document in Windows’ File Explorer and press the spacebar. You’ll get an immediate preview in an overlay window, so you don’t have to wait for an actual program to load. If Seer doesn’t support the file format in question, pressing spacebar will give you some of the file’s properties, which is better than nothing.
Seer costs just over $12 for the most recent version, but you can download an old version for free, without ads, and use it as long as you want. New versions mostly support more file types and add a few features here and there, but the free version works great if you only need basic functionality.
Launch apps faster, Spotlight-style, with Launchy
Apple’s Spotlight has evolved from a little search bar in the corner to a front-and-center digital multitool. Press Command+Space on your keyboard and type a few keystrokes to launch an app, look up a word, perform calculations, and more. Similar to Quick Look, once you get that shortcut in your muscle memory, it’s hard to give up—and while Windows’ Start menu has gotten more powerful over the years, it’s nowhere near as good as Spotlight.
That’s why Launchy is one of the first programs I download on any new Windows PC. It’s a free, open-source tool that opens with Alt+Space, letting you launch apps or open certain files just by typing a few letters. However, if you want to go further, Launchy has a ton of options and plugins you can use to beef it up (like a more powerful calculator, or the ability to shut down your computer). Even with plugins it doesn’t quite reach the level of Spotlight, but it’s a lot closer—and now I rarely have to take my hands off the keyboard to perform those basic tasks.
Send text messages from your PC (at least, if you use Android)

iMessage makes it extremely hard to leave the Apple ecosystem. Being able to text people over Wi-Fi, see when they’re replying, and sync up messages with your Mac is amazing. And unfortunately, there’s no true alternative for Windows if you’re an iPhone user—but Android users have a few options for texting from their PC.
The two official options from Google and Microsoft are arguably the best. Google’s PC-messaging webapp is incredibly easy: just head to messages.android.com in your computer’s web browser, scan the QR code using the Messages app on your Android phone, and boom—you can send and receive text messages from your PC. You’ll even get notifications through your browser, as long as the Messages window is open in a tab.
Windows also has built-in message syncing for Android, but it takes a bit more setup. Open the Start menu, search for “Your Phone,” and go through the wizard. You’ll be prompted to download the Your Phone Companion app for Android, link it to your Microsoft account, and give it the necessary permissions to see your messages, contacts, photos, and so on. Once you’re done, you’ll see the Your Phone app populate your messages, and photos on your PC, and you’ll get new notifications when messages come in—with the ability to respond right from the notification banner.
“AirDrop” files between machines

When Apple first announced AirDop on the Mac and iPhone, I was a bit skeptical. Did we really need another way to share files between devices? After I used it, though, I was immediately jealous. Sure, there are lots of ways to share files on Windows PCs, but few of them are as quick, easy, and reliable as AirDrop.
Microsoft did add a similar feature to Windows 10 last year, called “Nearby Sharing.” You can enable it from Settings > System > Shared Experience Settings, allowing you to share links or files between your own devices, or any device nearby. (Just remember the risks of allowing anyone to share files with you.) From there, you can share a file with another PC by right-clicking it and choosing “Share.” Simple, right?
Unfortunately, this doesn’t work with non-Windows PCs or phones. So while it’s worth having in your back pocket, I also recommend bookmarking Snapdrop—an incredibly simple webapp that works just like AirDop, but cross-platform. Just open up the webpage on both devices, and they should appear in the Snapdrop window. Then drag your file into the window to send it along—it’ll transfer over the network, without ever touching Snapdrop’s servers. Snapdrop is open source, so if you want to vet the code, you can do so on its Github page.