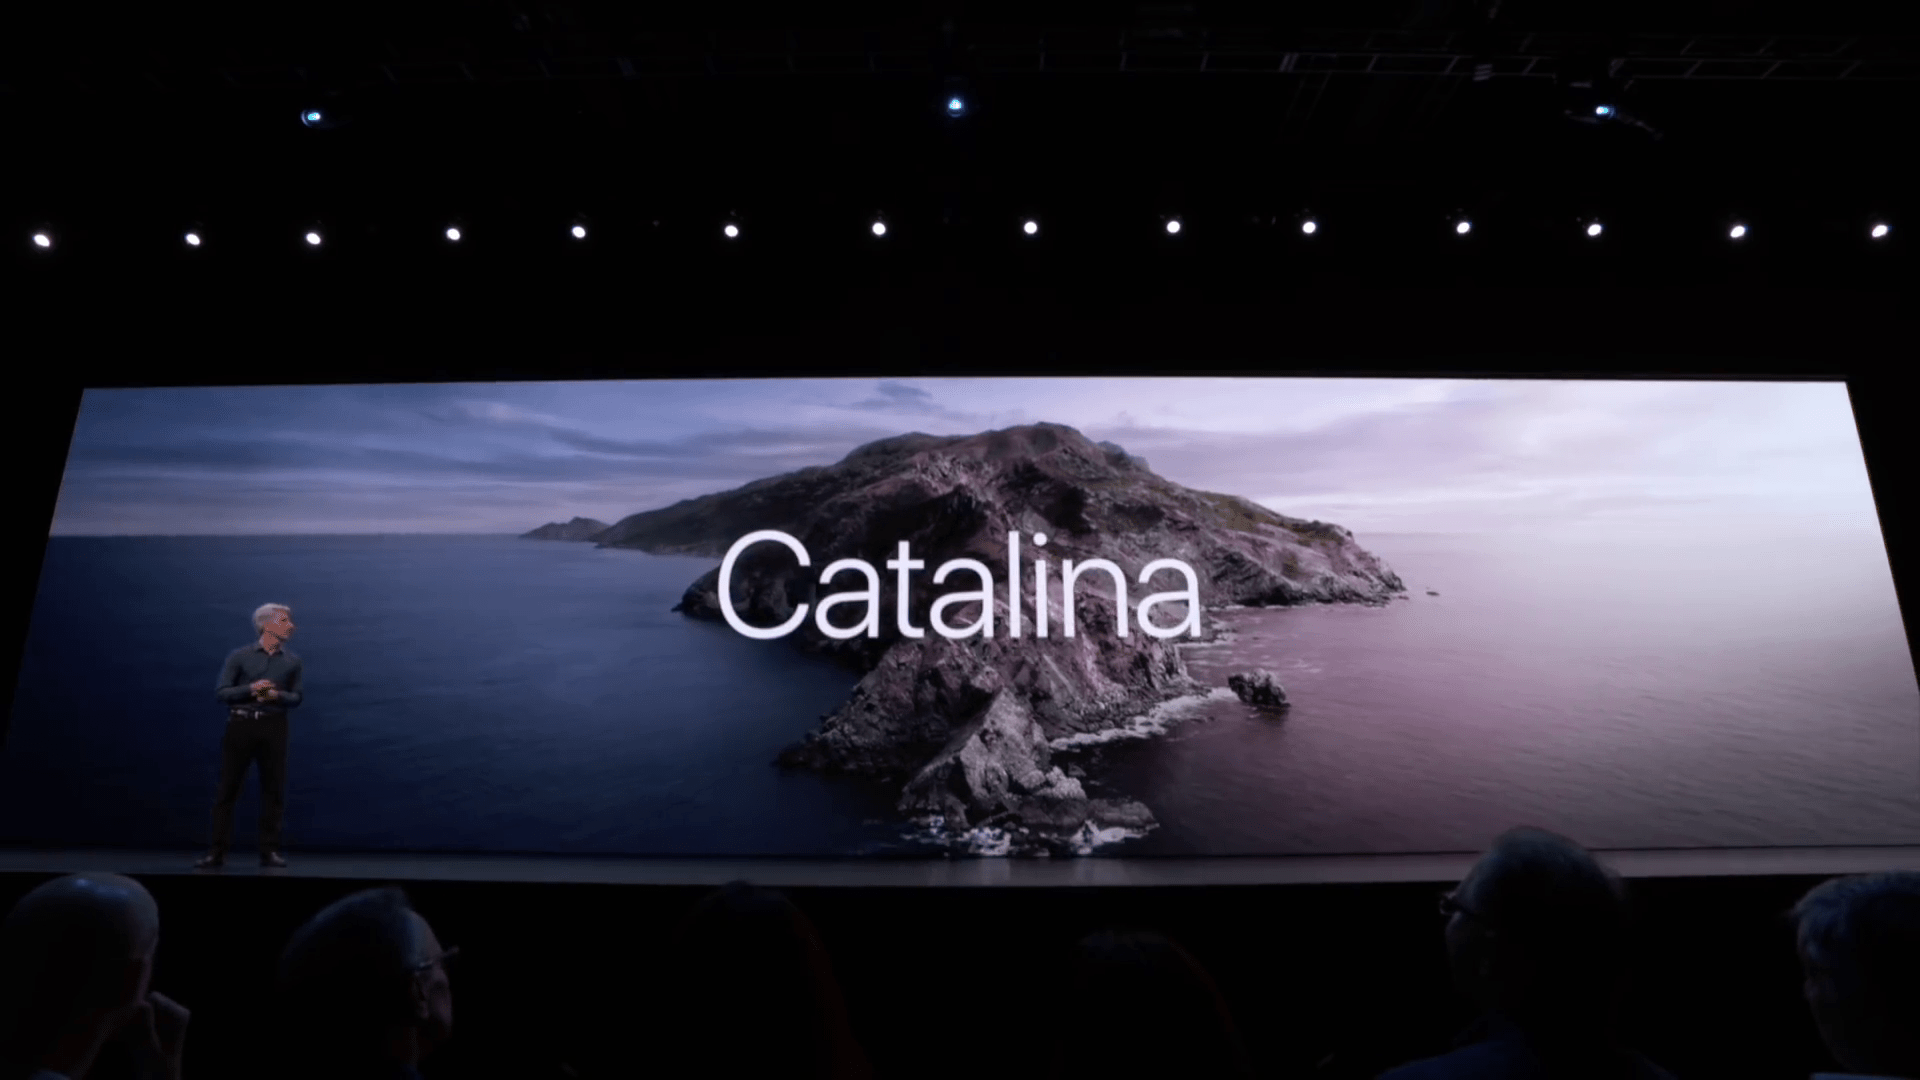
Привет! macOS Catalina – это основная версия операционной системы macOS. Они назвали это как macOS Catalina 10.15. Выпустив macOS Catalina, Apple внесла слишком много серьезных изменений. Они работали, разрабатывали и добавляли самые интересные функции в операционную систему macOS Catalina 10.15. Все операционные системы macOS выпускаются разработчиком Всемирной конференции на WWDC. А также последняя версия macOS Catalina 10.15 анонсирована на Всемирной конференции разработчиков 2019. Таким образом, каждая операционная система macOS, которую они создают. Они слишком сосредоточены на обеспечении безопасности, чтобы никто не мог их атаковать. А операционная система и полноценный ПК должны быть защищены от кибератак. Каждую операционную систему macOS, выпускающую до этого, выпускает разработчик. Так что пользователи должны правильно проверить это на виртуальной машине. Таким образом, вы узнаете, как установить macOS на VirtualBox.
- [Ultimate Guide] Установите macOS Big Sur на VirtualBox на ПК с Windows
Однако вы знаете, что существует множество платформ. Вы можете установить и протестировать любую операционную систему. Такие как VMware Workstation, VirtualBox, Hyper-V, Boot camp, новое приложение Sandbox для Windows 10 и многие другие. Например, вы можете установить Windows, Linux, macOS на Виртуальную машину. Однако установка другой операционной системы на виртуальную машину может быть очень полезной для пользователя. Предлагаю вам приобрести рабочую станцию VMware. Потому что VMware – один из лучших источников виртуализации плюс VirtualBox. Поскольку мы говорим о другом источнике Виртуальной машины. Итак, способы установки операционной системы на Виртуальную машину различаются и различаются.
Необходимые файлы для macOS Catalina
- VirtualBox: Как я уже говорил, у нас есть разные типы машин виртуализации. Таким образом, VirtualBox может быть лучшим источником для установки различных типов операционных систем в качестве гостевой операционной системы. VirtualBox – лучшая виртуализация, которая позволяет легко устанавливать на нее все операционные системы.
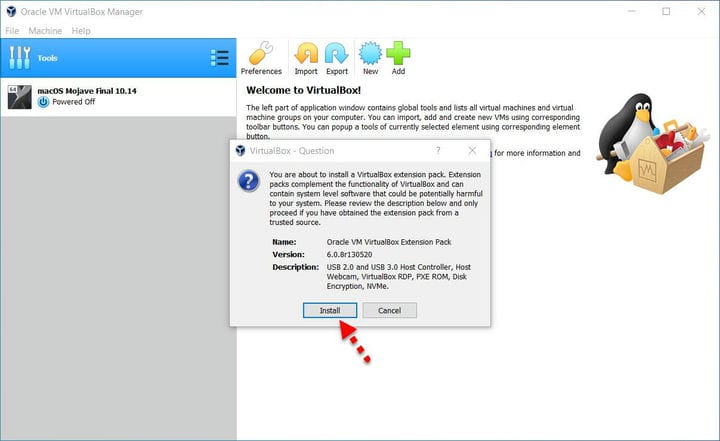
- VirtualBox Extension Pack: при установке операционных систем macOS. Таким образом, вы столкнетесь с одной из самых распространенных ошибок, при которой не работают мышь и клавиатура. В этом случае VirtualBox предоставляет вам очень простое расширение – VirtualBox Extension Pack. После этого вы установили операционную систему macOS, а также установили VirtualBox. Потому что это устранит ошибку мыши и клавиатуры на VirtualBox. Однако VirtualBox Extension Pack позволяет пользователям использовать USB 3.0 на VirtualBox. После macOS Sierra все более поздние версии macOS могут поддерживаться USB 3.0. Установите VirtualBox Extension Pack и наслаждайтесь операционной системой macOS на ПК с Windows.
- macOS Catalina 10.15 Образ виртуальной машины (файл VMDK): если вы хотите использовать macOS Catalina для виртуализации. Следовательно, вам необходимо загрузить файл VMDK, пока вы собираетесь загружать виртуальный образ. Я рекомендую вам иметь быстрое подключение к Интернету. Таким образом, файл macOS Catalina слишком велик, поэтому его можно загрузить при быстром подключении к Интернету. Как и в предыдущей статье, мы также говорили о двух разных файлах операционной системы macOS. Первый – это HFS и APFS, поэтому на VirtualBox можно установить только образ HFS. И APFS не может поддерживаться файлом APFS. Причина, о которой я упомянул, чтобы вы использовали только версию HFS. Вы можете легко обновить macOS до последней версии.
- Скачать macOS Catalina 10.15 VirtualBox и образ VMware
- Создайте файл установщика ISO для macOS Catalina 10.15.
Установить VirtualBox + установить VirtualBox Extension Pack
Теперь вы знаете полную информацию о macOS Catalina 10.15. Итак, пришло время загрузить и установить VirtualBox plus VirtualBox Extension Pack. Поэтому вы можете скачать VirtualBox с его официальной страницы. Существуют разные типы версий VirtualBox для разных операционных систем. Загрузите последнюю версию, и процесс установки прост, вы можете установить его в несколько кликов.
- Пока вы загружаете VirtualBox, дважды щелкните, чтобы открыть мастер установки.
- Трехкратное нажатие кнопки «Далее» приведет к предупреждению сети.
- Теперь выберите Да, чтобы игнорировать сетевое предупреждение.
- На этом этапе нажмите кнопку «Установить», чтобы установить файлы VirtualBox.
- По завершении установки нажмите Готово.
- Как и в приведенном выше описании, я упомянул для вас пакет расширений VirtualBox. Поэтому вы устанавливаете пакет расширений из инструментов VirtualBox в Интернете. И второй, вы можете загрузить и установить пакет расширений VirtualBox с веб-сайта VirtualBox. VirtualBox Extension Pack позволяет исправить ошибку мыши и клавиатуры. После этого вы загружаете Extension Pack, дважды щелкаете по установке и нажимаете кнопку установки.
[Ultimate Guide] Установите macOS Big Sur на VirtualBox на ПК с Windows
Установите пакет расширений VirtualBox
Создайте новую виртуальную машину для macOS Catalina 10.15
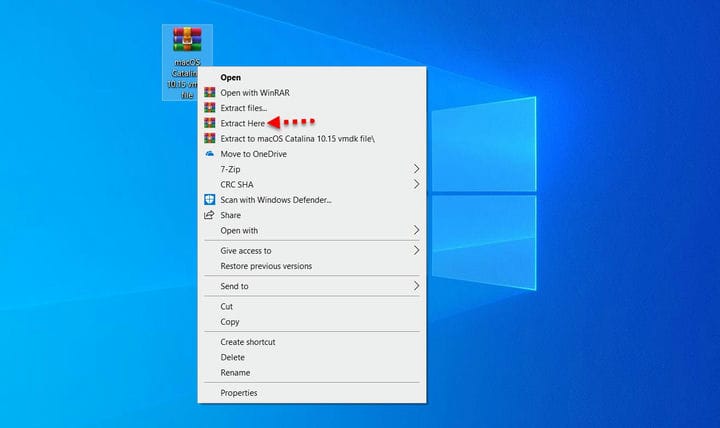
Шаг 1. После этого вы скачали образ виртуальной машины macOS Catalina. Вам необходимо распаковать файл, для этого на вашем компьютере должен быть установлен WinRaR или 7Zip. Пока вы распаковываете файл macOS Catalina 10.15, размер образа уменьшится с 8 ГБ до 6 ГБ.
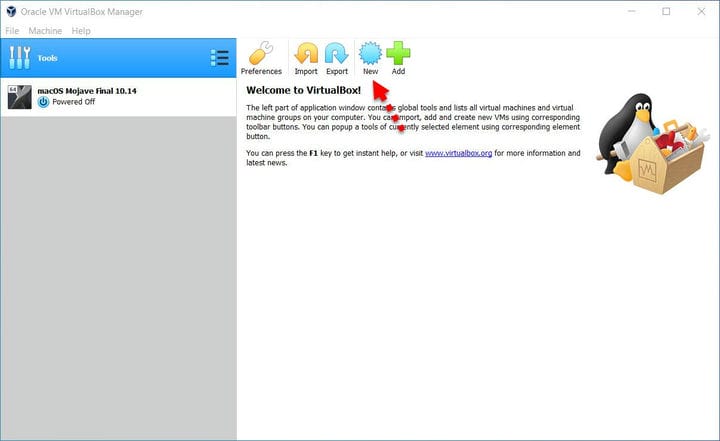
Шаг 2. Чтобы создать новую виртуальную машину для macOS Catalina 10.15, нажмите «Создать».
Шаг 3. Назовите операционную систему, выберите Mac OS X (64-разрядная версия) и нажмите «Далее».

Выберите имя для операционной системы
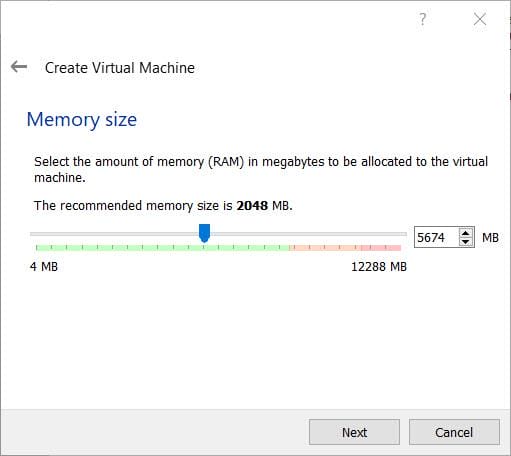
Шаг 4. Увеличьте размер памяти, рекомендуемый размер памяти – 2048 МБ.
Увеличьте объем оперативной памяти
Шаг 5. Выберите третий вариант «Использовать существующий файл виртуального жесткого диска». Щелкните «Желтую» папку и найдите файл vmdk для macOS Catalina 10.15. Когда файл выбран, нажмите «Вставить».
выберите третий вариант
Шаг по редактированию macOS Catalina 10.15 «Настройки»
Тем не менее, это сделано не для лучшей производительности. Вам необходимо настроить виртуальную машину macOS Catalina 10.15 на VirtualBox. Откройте VirtualBox и щелкните созданную виртуальную машину macOS Catalina, затем щелкните «Настройка».
Шаг 1. Выберите «Система» на вкладке, затем снимите флажок «Дискета из« Порядка загрузки »».
Система
Шаг 2. Выберите «Процессор» и увеличьте ядро процессора.
Процессор
Шаг 3. Выберите «Display» и увеличьте размер «Video Memory».
Отображать
Шаг 4. На последнем этапе настройки вам необходимо включить «USB». и включите третью опцию Контроллер USB 3.0 (XHCI).
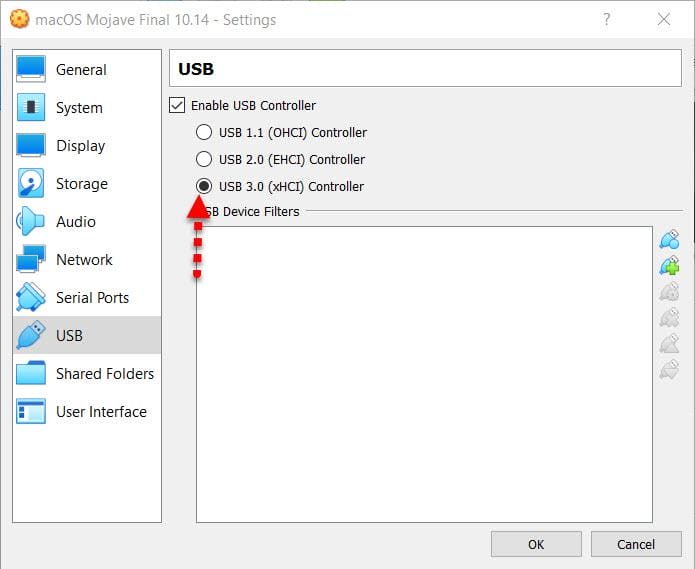
Выберите USB 3.0
Добавьте коды в командную строку, чтобы устранить ошибку macOS Catalina 10.15
Прежде чем добавлять коды в командную строку, закройте VirtualBox. После этого вы закрыли VirtualBox и запустили CMD от имени администратора. Следовательно, коды, принадлежащие VirtualBox, устранят ошибки macOS Catalina. Например, он исправит одну из самых распространенных ошибок – -Cpuidset. Этот простой код является простым продуктом компании Apple. Это позволяет пользователям при установке macOS работать на VirtualBox. Он отклонит ошибки macOS в VirtualBox.
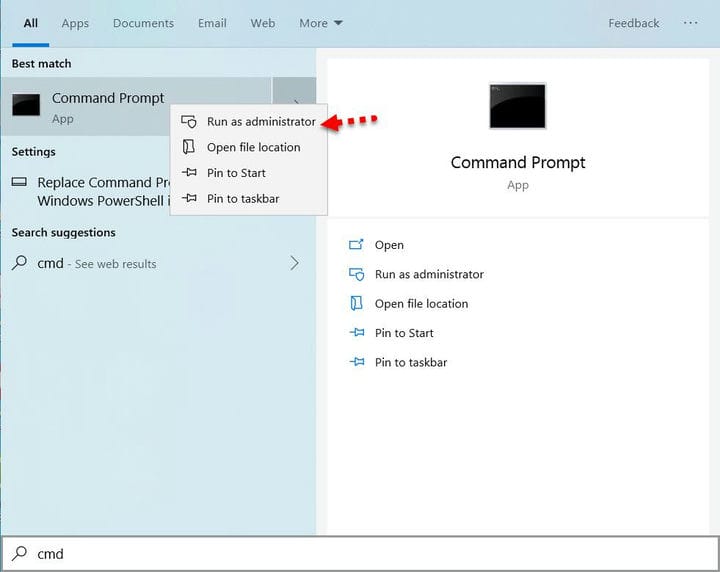
Запустите CMD от имени администратора
Теперь замените «Имя вашей виртуальной машины » на имя созданной виртуальной машины. И скопируйте и вставьте каждый код в «Командную строку», нажав «Enter». Примечание. Если вы скопировали какой-либо код неправильно, во время установки вы столкнетесь с ошибкой. Постарайтесь сосредоточиться на том, чтобы сделать лучшее.

Скопируйте и вставьте коды в CMD
Codes for VirtualBox V6.X:
cd "C:Program FilesOracleVirtualBox"
VBoxManage.exe modifyvm "Your VM Name" --cpuidset 00000001 000106e5 00100800 0098e3fd bfebfbff
VBoxManage setextradata "Your VM Name" "VBoxInternal/Devices/efi/0/Config/DmiSystemProduct" "iMac11,3"
VBoxManage setextradata "Your VM Name" "VBoxInternal/Devices/efi/0/Config/DmiSystemVersion" "1.0"
VBoxManage setextradata "Your VM Name" "VBoxInternal/Devices/efi/0/Config/DmiBoardProduct" "Iloveapple"
VBoxManage setextradata "Your VM Name" "VBoxInternal/Devices/smc/0/Config/DeviceKey" "ourhardworkbythesewordsguardedpleasedontsteal(c)AppleComputerInc"
VBoxManage setextradata "Your VM Name" "VBoxInternal/Devices/smc/0/Config/GetKeyFromRealSMC" 1
Код для VirtualBox V5.X:
cd "C:Program FilesOracleVirtualBox"
VBoxManage.exe modifyvm "Your Virtual Machine Name" --cpuidset 00000001 000106e5 00100800 0098e3fd bfebfbff
VBoxManage setextradata "Your Virtual Machine Name" "VBoxInternal/Devices/efi/0/Config/DmiSystemProduct" "iMac11,3"
VBoxManage setextradata "Your Virtual Machine Name" "VBoxInternal/Devices/efi/0/Config/DmiSystemVersion" "1.0"
VBoxManage setextradata "Your Virtual Machine Name" "VBoxInternal/Devices/efi/0/Config/DmiBoardProduct" "Iloveapple"
VBoxManage setextradata "Your Virtual Machine Name" "VBoxInternal/Devices/smc/0/Config/DeviceKey" "ourhardworkbythesewordsguardedpleasedontsteal(c)AppleComputerInc"
VBoxManage setextradata "Your Virtual Machine Name" "VBoxInternal/Devices/smc/0/Config/GetKeyFromRealSMC" 1
Установите macOS Catalina 10.15 на VirtualBox на ПК с Windows
Теперь вы полностью выполнили шаги macOS 10.15 на VirtualBox. Поэтому откройте VirtualBox и запустите установку macOS Catalina 10.15 на VirtualBox. После этого вы запустите установку, просто следуйте инструкциям, чтобы правильно установить macOS Catalina 10.15 на VirtualBox.
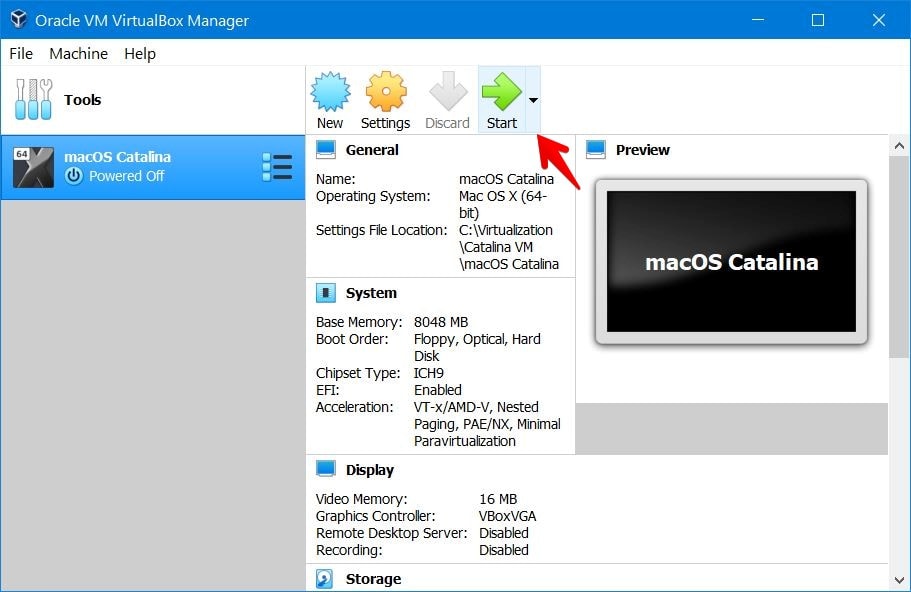
- Откройте VirtualBox, нажмите «Созданная виртуальная машина» и нажмите кнопку «Пуск».
Шаг 1. Когда вы запустите это в первом окне, выберите свой язык и страну.
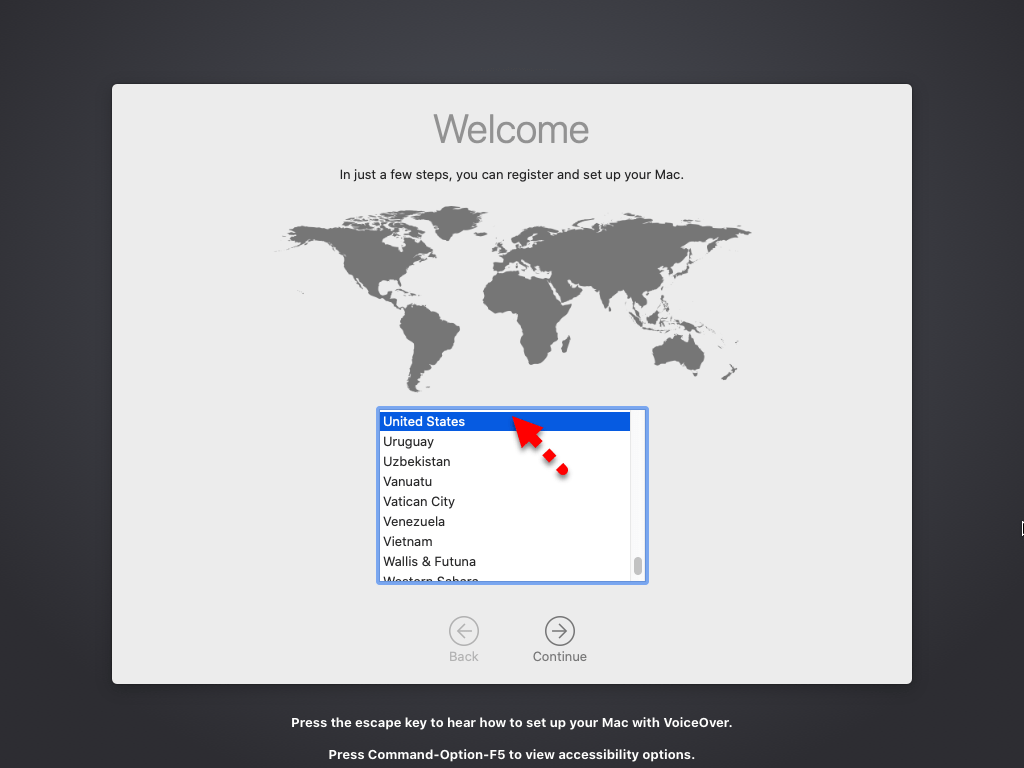
выберите свою страну
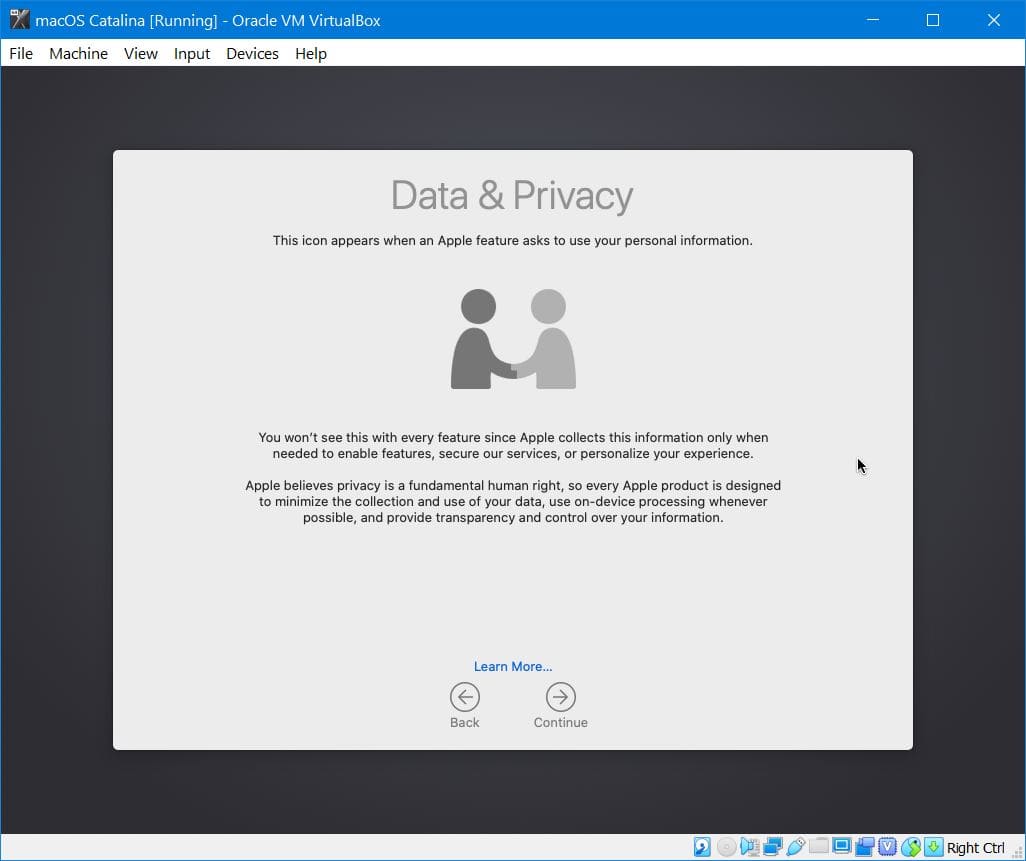
Шаг 2. Прочтите о данных и конфиденциальности и узнайте больше о macOS Catalina 10.15
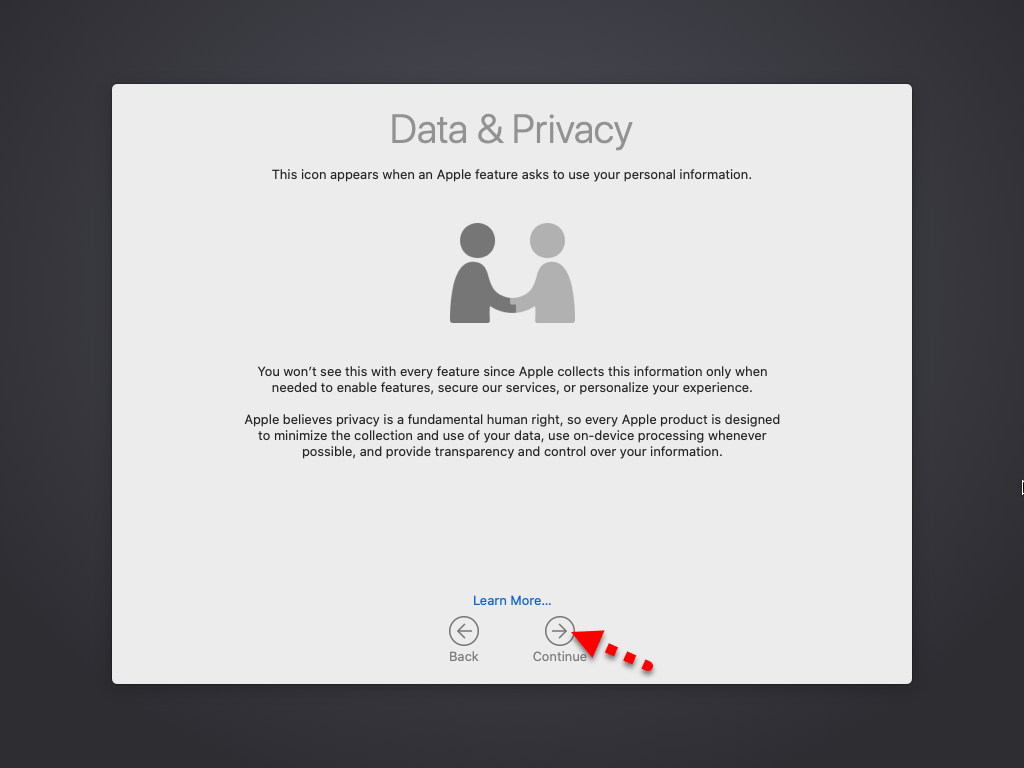
Конфиденциальность данных
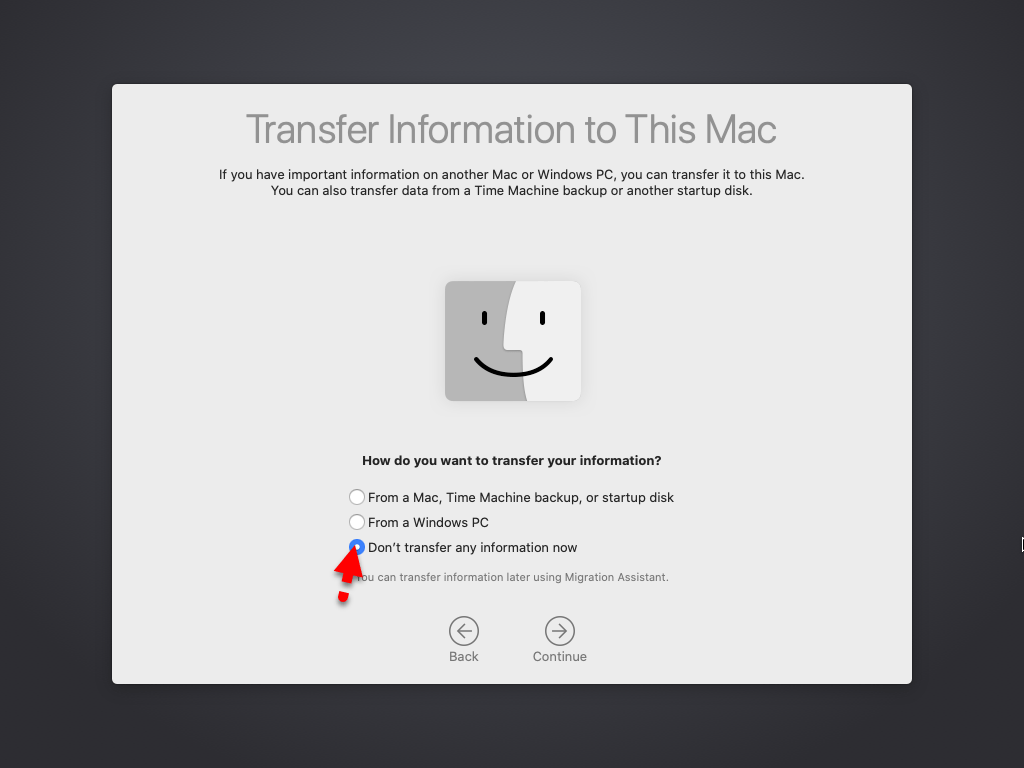
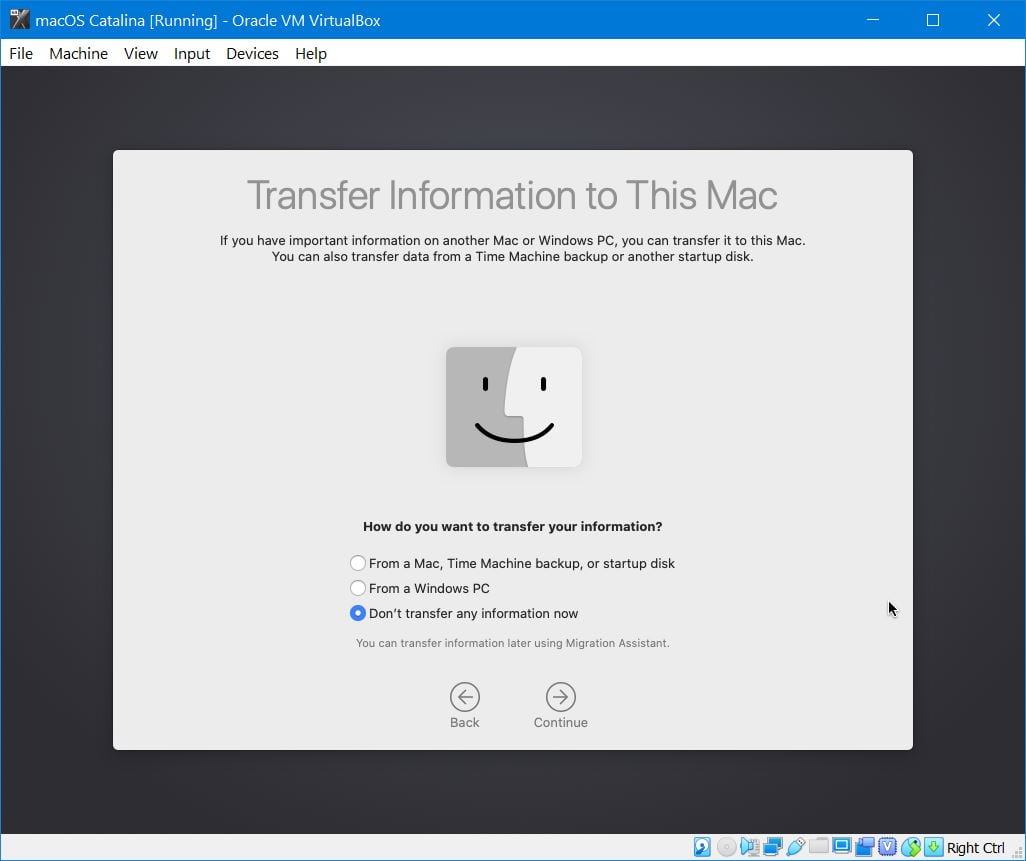
Шаг 3. Выберите «Не передавать какую-либо информацию на этот Mac» и нажмите «Продолжить».
Методы трансформации
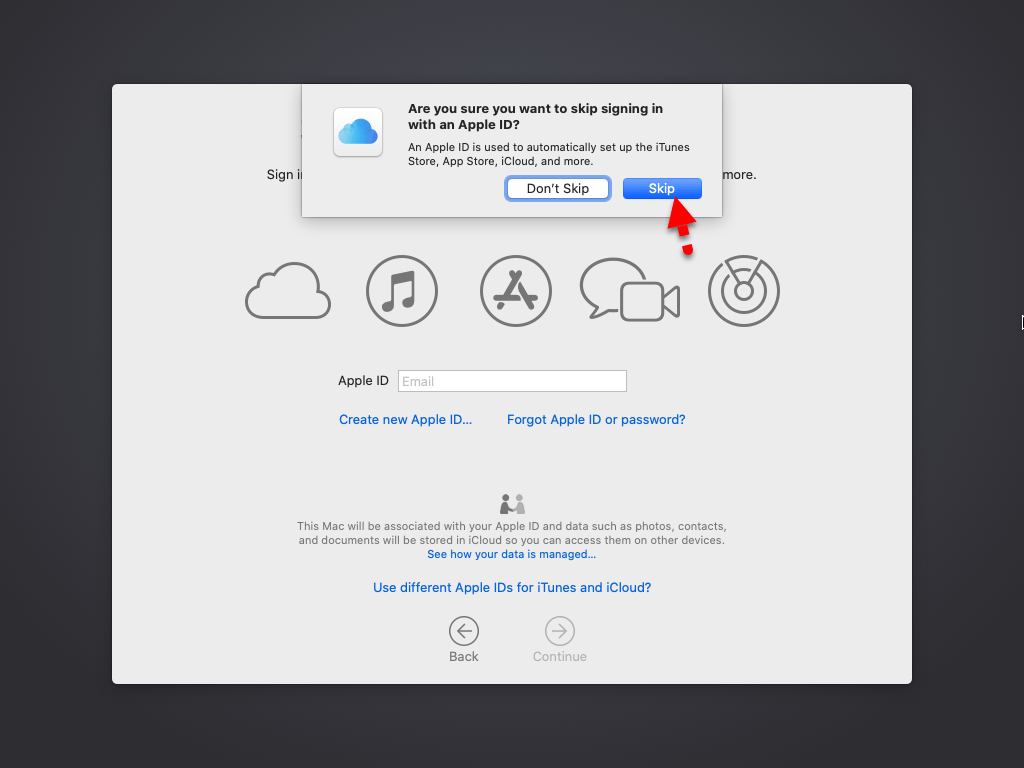
Шаг 4. Если у вас есть учетная запись Apple ID, введите ее. Затем, если вы не выберете продолжить без Apple ID.
Войти с Apple ID
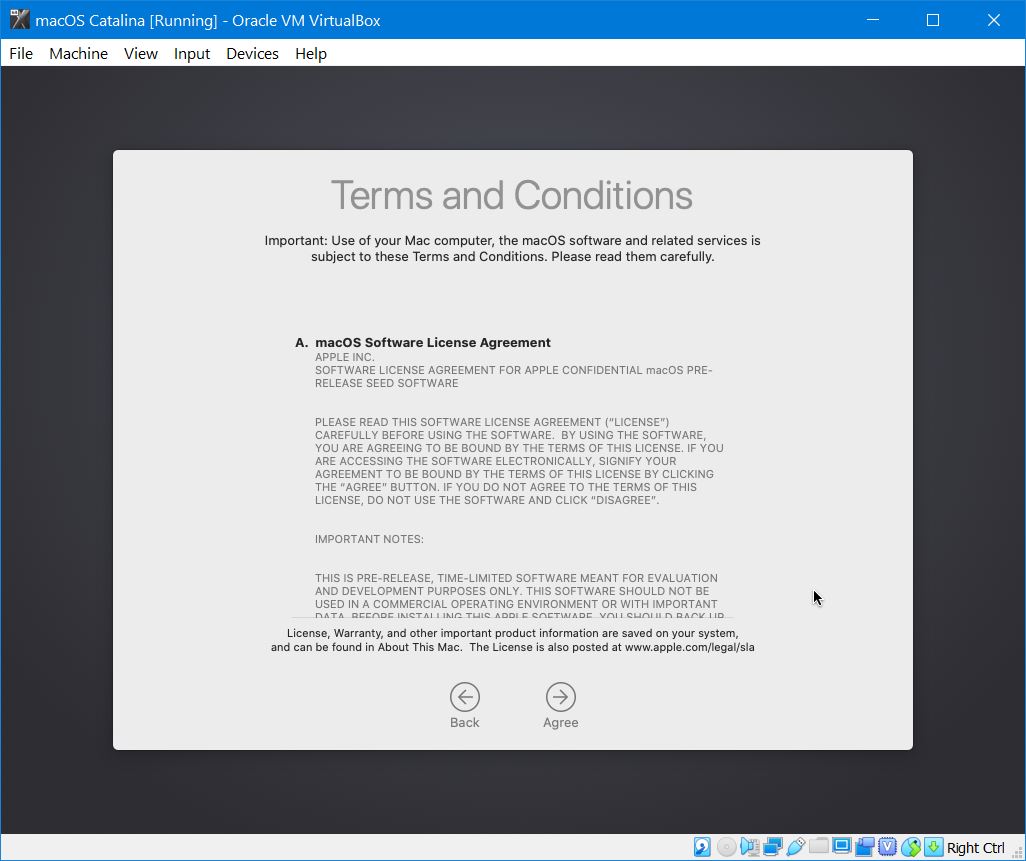
Шаг 5. Согласитесь с условиями и нажмите Продолжить.

Лицензионное соглашение
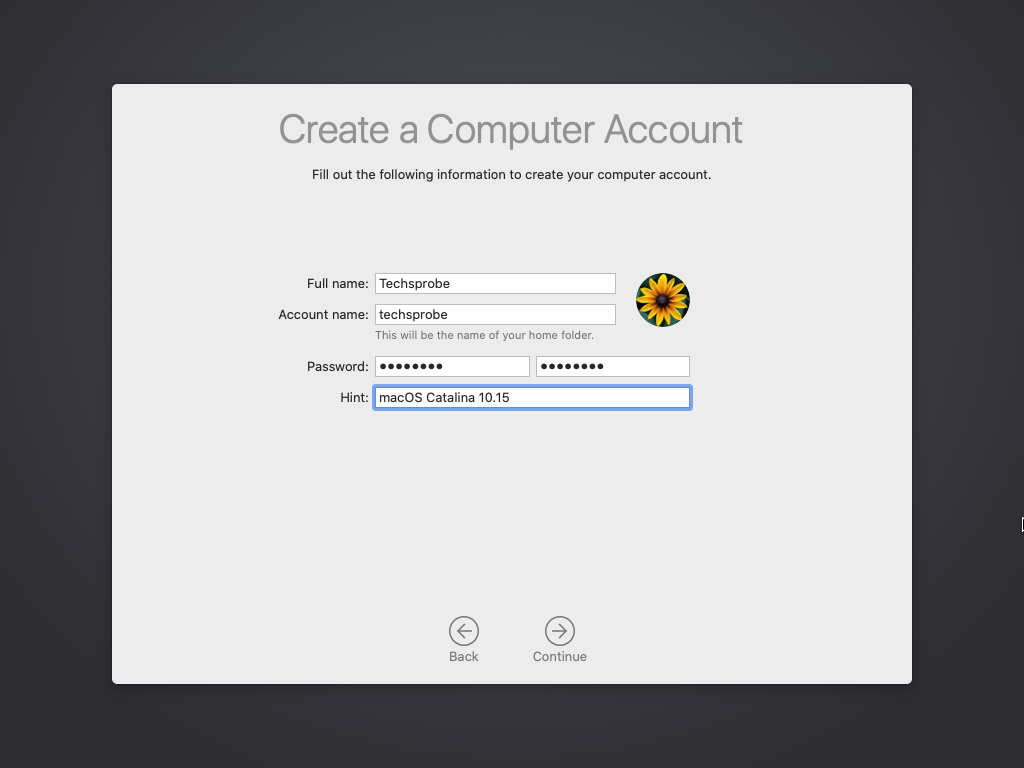
Шаг 6. Создайте учетную запись компьютера, указав полное имя, имя учетной записи, пароль и подсказку, затем нажмите «Продолжить».
Создайте учетную запись компьютера
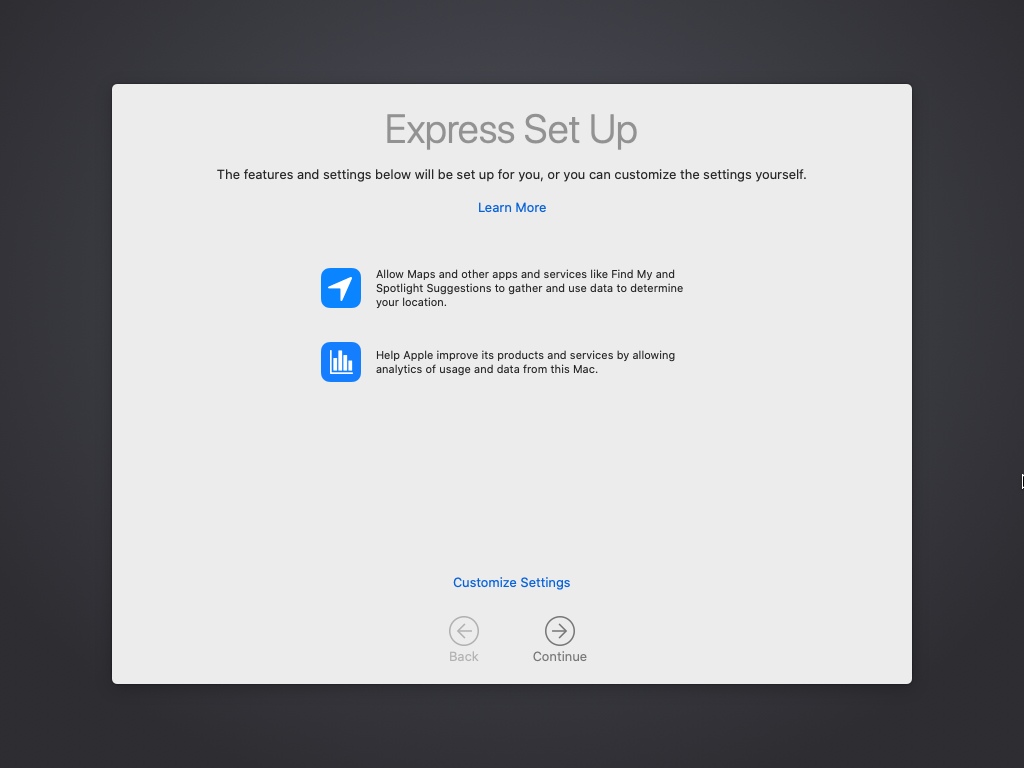
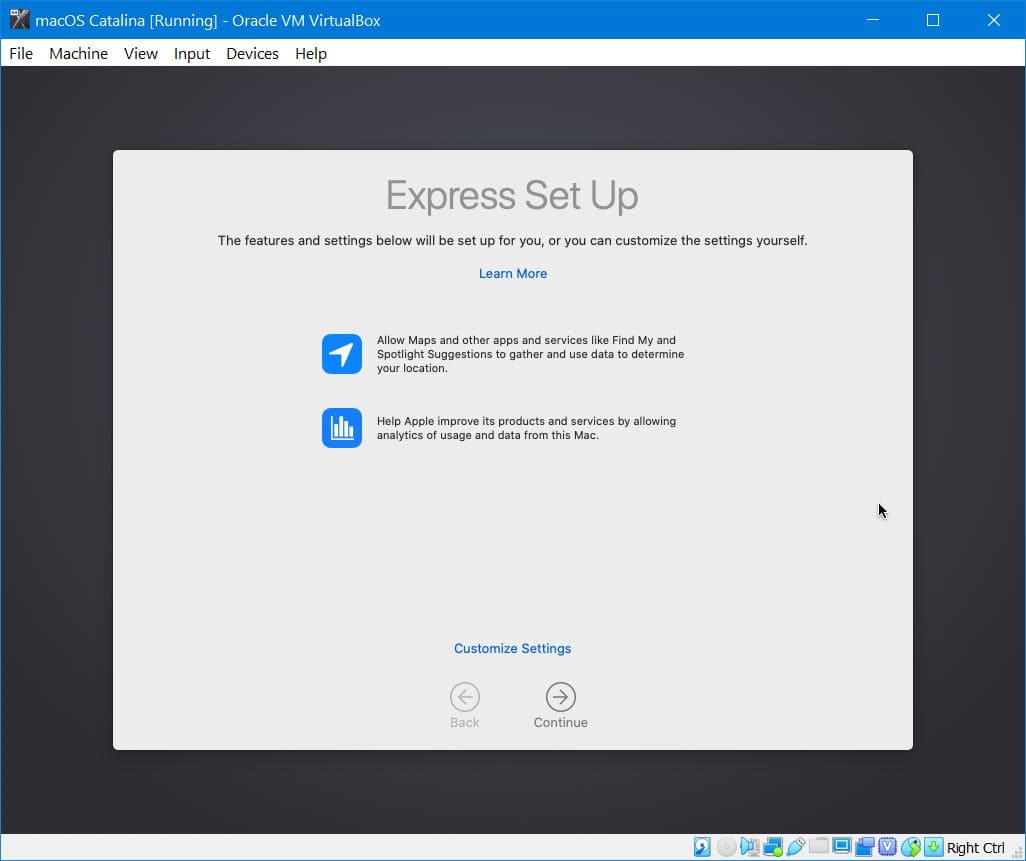
Шаг 7. Приведенные ниже функции и параметры будут настроены для вас, или вы можете настроить параметры самостоятельно и нажать «Продолжить», если вы не хотите настраивать параметры.
Экспресс установка
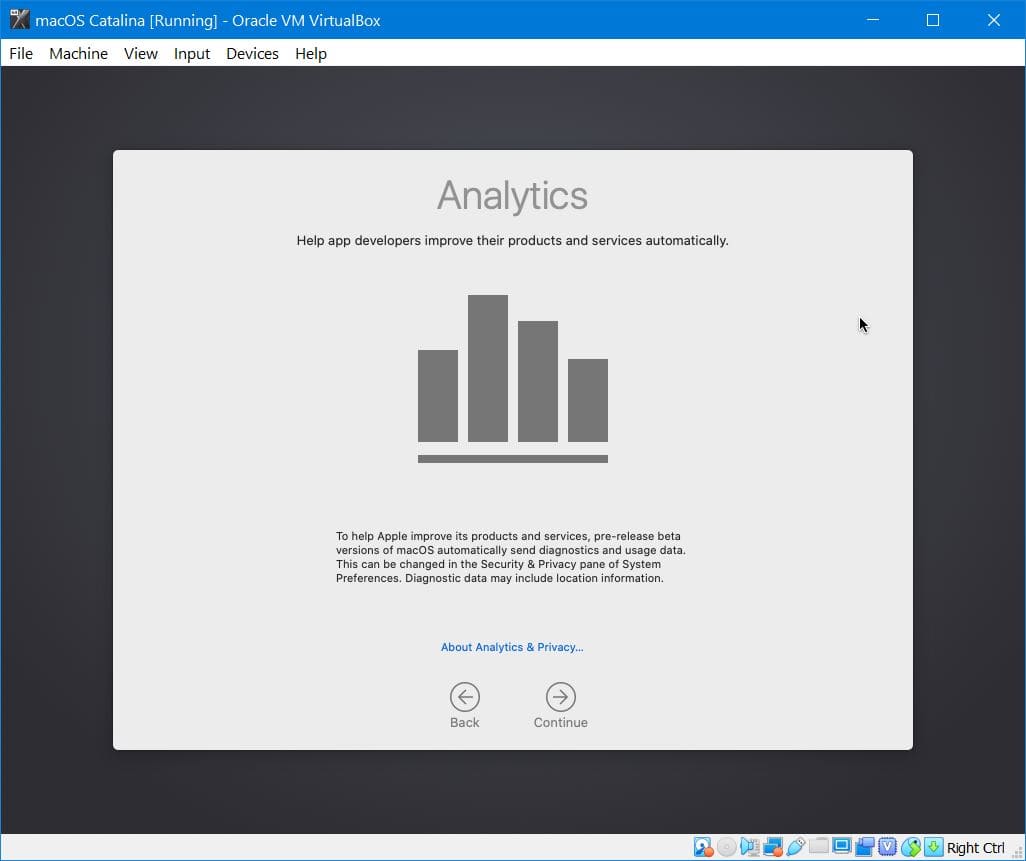
Шаг №8. Аналитика поможет macOS Catalina 10.15 автоматически отправлять диагностику и данные об использовании.

Аналитика
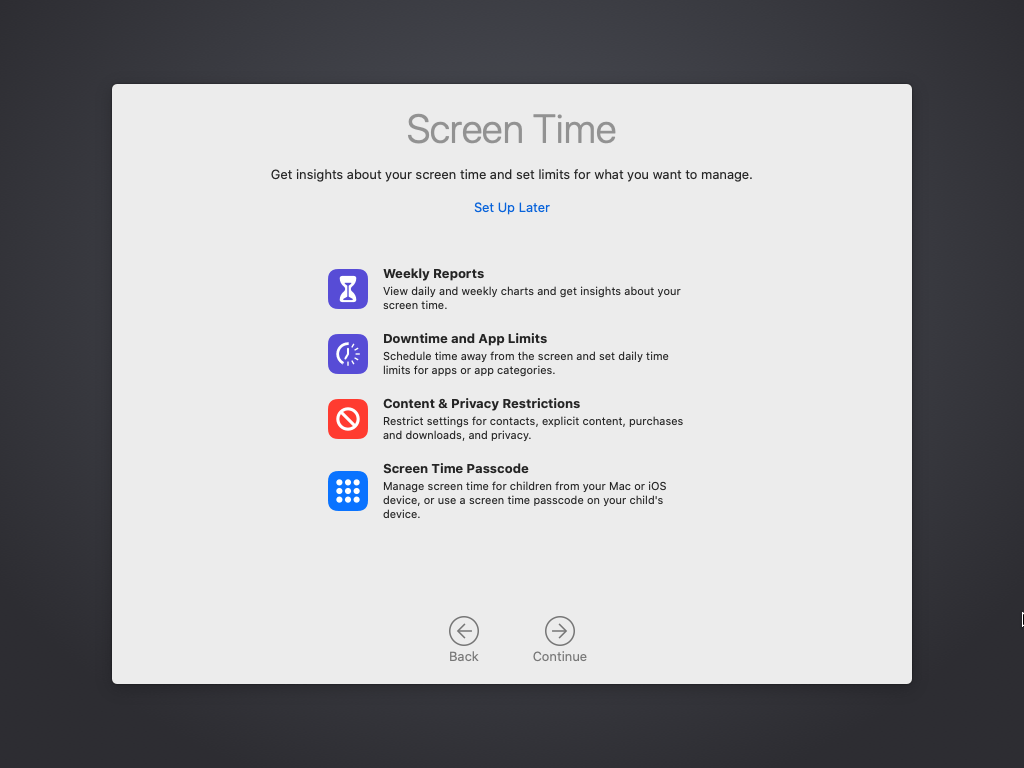
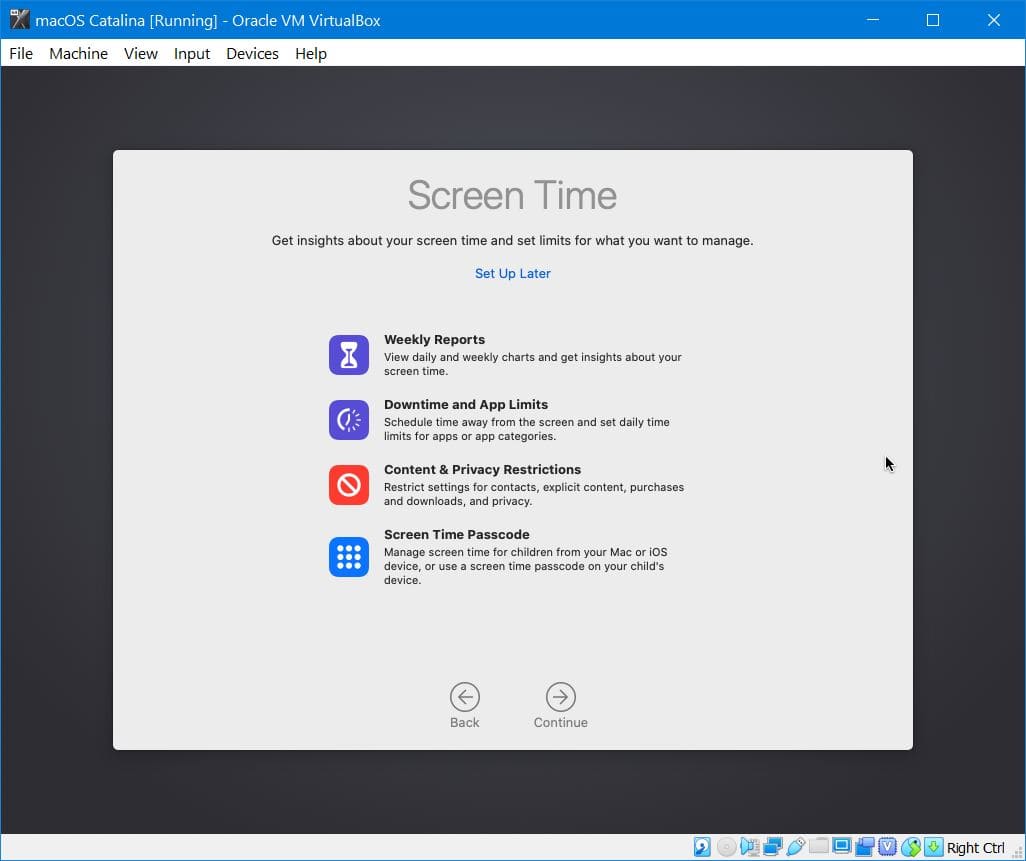
Шаг 9. Экранное время. Получите представление о времени использования экрана и ограничениях того, чем вы хотите управлять.
Экранное время
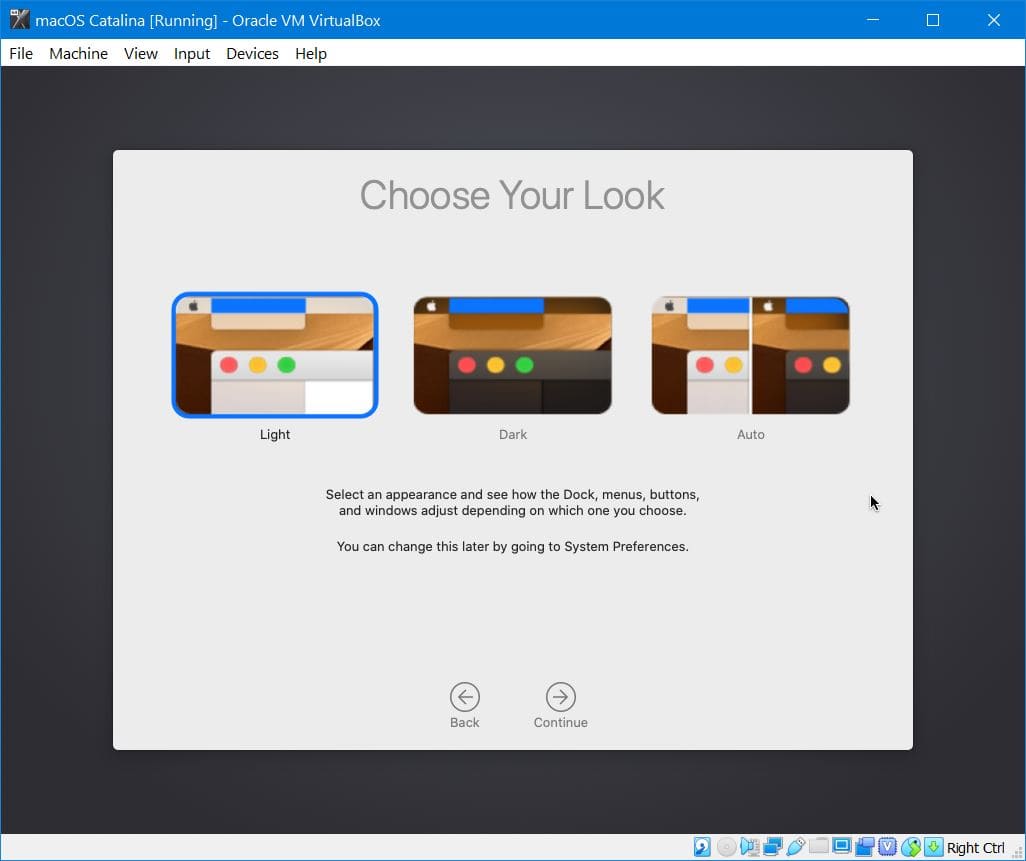
Шаг № 10. Здесь вы можете выбрать образ тремя способами. И вы можете лучше рассмотреть свой Mac.
Выбери свой образ
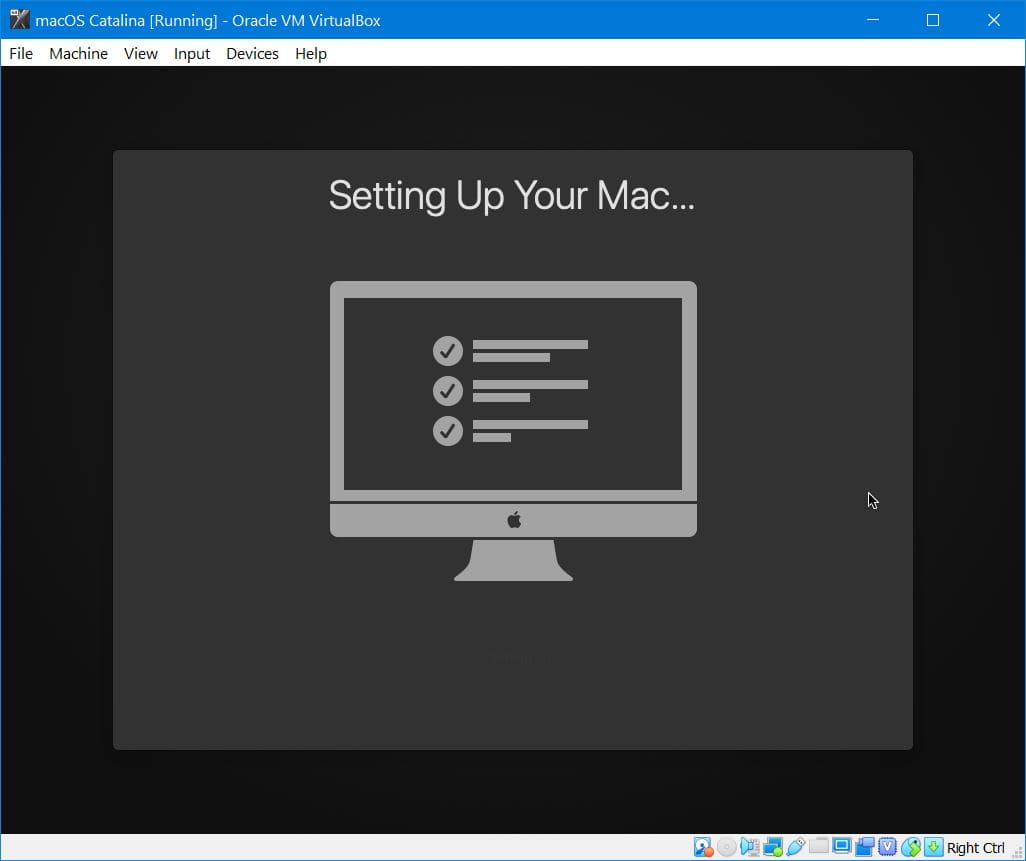
Шаг № 10. Настройка вашего Mac … Подождите, пока это не шаг.
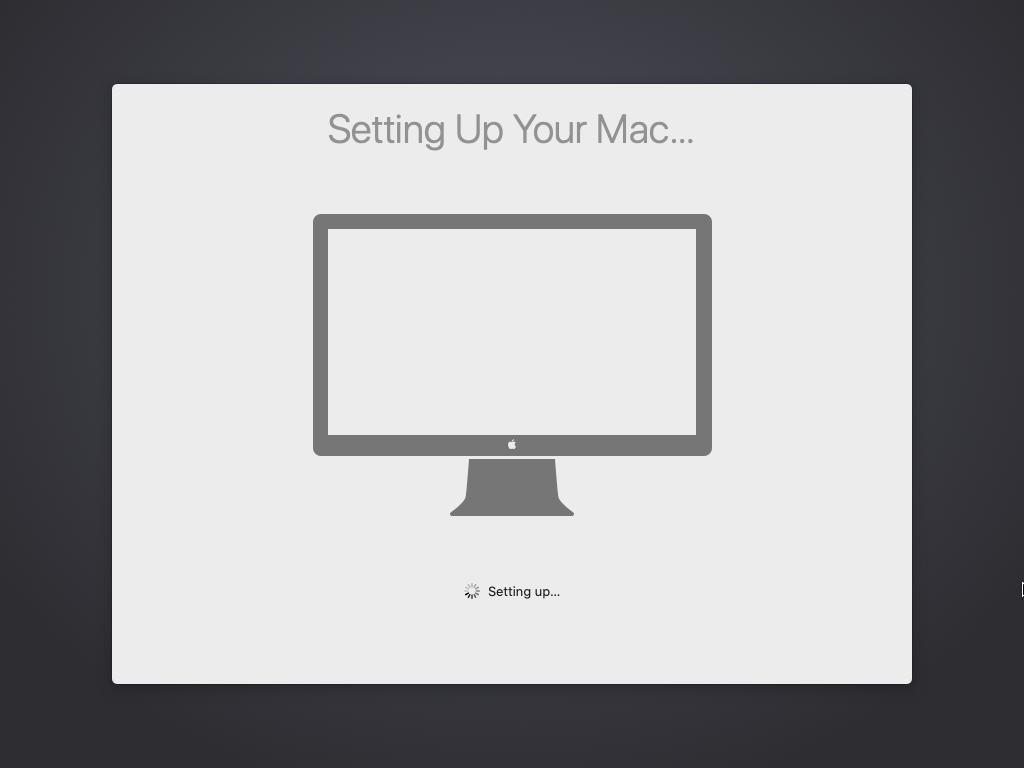
Настройка вашего Mac
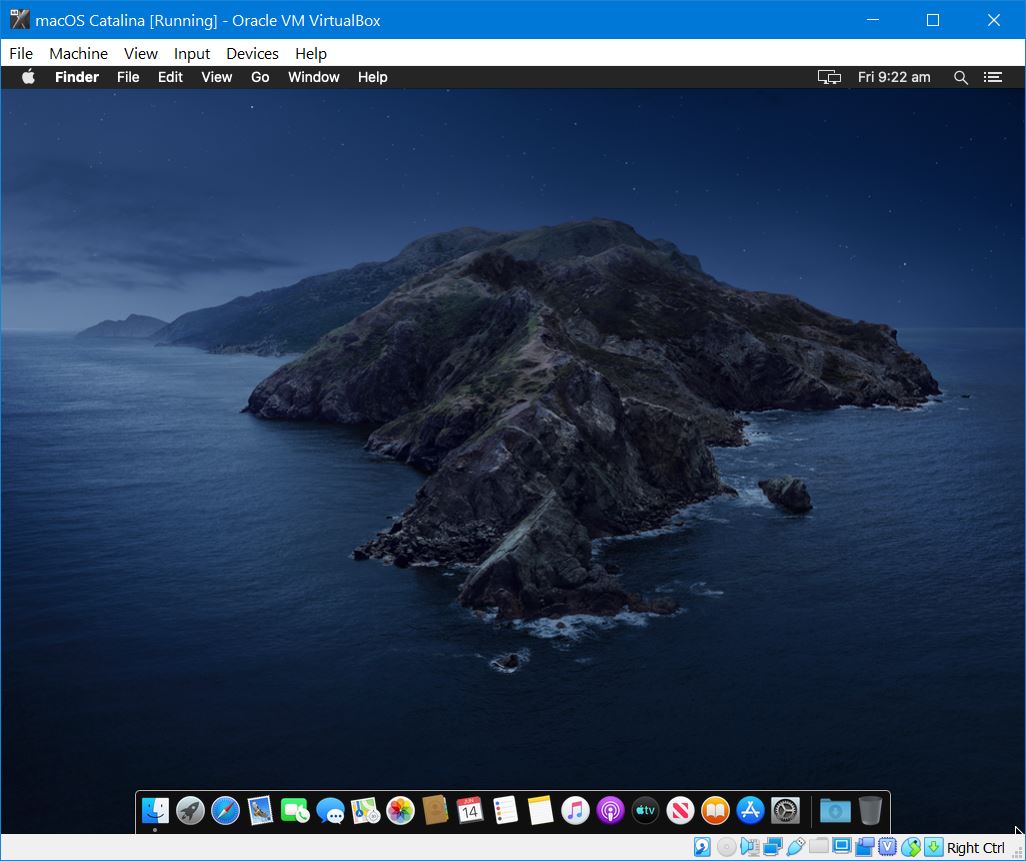
Шаг №11. Вы успешно установили macOS Catalina 10.15 на VirtualBox в Windows.
macOS Catalina в VirtualBox в Windows
Связанный:
- Как установить Guest Tool на macOS 10.15 Catalina на VirtualBox
Конечная точка
Поздравляю! вот и все о способах установки macOS Catalina 10.15 на VirtualBox. Поэтому я надеюсь, что вы кое-что поняли из этой статьи. Кроме того, если вы столкнулись с какой-либо ошибкой, не стесняйтесь и оставьте комментарий, дайте нам знать об ошибке. Поделитесь с нами своим мнением для получения дополнительной поддержки и подпишитесь на наш блог.
Установите macOS Catalina на VirtualBox на ПК с Windows – Видео
Источник записи: techsprobe.com
Установка MacOS 10.15 Catalina на Virtualbox на Linux или Windows PC
Так получается, что иногда приходится проверять тот или иной момент работы программ на операционной системе отличной от той которая установлена на Вашем компьютере. Можно поставить на компьютер вторую операционную систему, но можно обойтись и менее кардинальными методами, а именно — воспользоваться виртуальной машиной. Инструкций с установкой Windows или дистрибутивов Linux на VM VirtualBox много и там трудностей не должно быть. А вот с установкой операционной системы от Apple могут быть трудности и он них Мы поговорим дальше.
В примере используется:
- Oracle VM VirtualBox 6.1.4
- Windows hosts;
- OS X hosts;
- Linux distributions;
- Solaris hosts;
- Установленный пакет расширений VirtualBox 6.1.4 Oracle VM VirtualBox Extension Pack;
- Iso образ диска с MacOS 10.15 Catalina (pass: workite.ru) google: https://drive.google.com/file/d/1mVvt… yandex: https://yadi.sk/d/v6Fq8X3eBVMFeA;
- Файл с командами, конфигурируемые виртуальную машину — файл;
- Компьютер на который устанавливается VM VirtualBox с поддержкой USB 3.0;
Подготовка VirtualBox для установки MacOS Catalina:
Для работы Нам надо будет поставить пакет расширений VirtualBox 6.1.4 Oracle VM VirtualBox Extension Pack

- В VM VirtualBox заходим «Файл» — «Настройки» — «Плагины»;
- Проверяем, если не стоит плагин расширений как на картинке выше, то нажимаем на кнопку
 и выбираем заранее скаченный с официального сайта, пакет расширений VirtualBox 6.1.4 Oracle VM VirtualBox Extension Pack;
 и выбираем заранее скаченный с официального сайта, пакет расширений VirtualBox 6.1.4 Oracle VM VirtualBox Extension Pack;
Теперь переходим к созданию и настройки Вашей виртуальной машины:
Нажимаем Создать  (Ctrl+N)

Указываем Имя ОС (в примере: MacOSX)

Указываем объём памяти

Этап Жесткий диск выбираем Создать новый виртуальный жёсткий диск

Этап Укажите тип выбираем VDI (VirtualBox Disk Image)

Этап Укажите формат хранения выбираем Динамический виртуальный жесткий диск

Этап Укажите имя и размер файла выставляем 40,00 ГБ или больше
Переходим к настройкам нашей виртуальной машины, выбираем слева созданную машину и нажимаем 


Заходим в раздел Система, вкладка Материнская плата:
- Выставляем Основная память 4096 МБ ( минимальное можно поставить 2048 МБ ).
- В окне Порядок загрузки обязательно снимаем флаг Гибкие диски.
- В поле Дополнительные возможности оставляем галки:
- Включить I/O APIC
- Включить EFI (только специальные ОС)
- Часы в системе UTC

Так же в разделе Система, только вкладке Процессор выставляем
- Процессор(ы): значение 2, можно больше, меньше нельзя;
- Предел загрузки: ЦПУ оставляем в значении 100%;

Заходим в раздел Дисплей выбираем вкладку Экран
- Видеопамять выставляем в 128 МБ
- В поле Ускорение снимаем флаги с
- Включить 3D-ускорение
- Включить 2D-ускорение видео

Заходим в раздел Носители и производим подключение образа диска доступный для загрузки по ссылкам, на архивах стоит пароль workite.ru
- yandex

Заходим в раздел USB и включаем Контроллер USB 3.0 (xHCI) на Вашем компьютере, должна быть поддержка USB 3.0.
Все остальные настройки, оставляем по умолчанию, Сохраняем виртуальную машину и закрываем VM VirtualBox
После этого требуется выполнить конфигурацию
Перед запуском Виртуальной машины, требуется выполнить конфигурационный скрипт:
mac os 10.15 catalina
Для Windows OS:
- Открываем CMD (Win+R — CMD — нажать ОК или Пуск-Все программы-cmd.exe — выполнить );
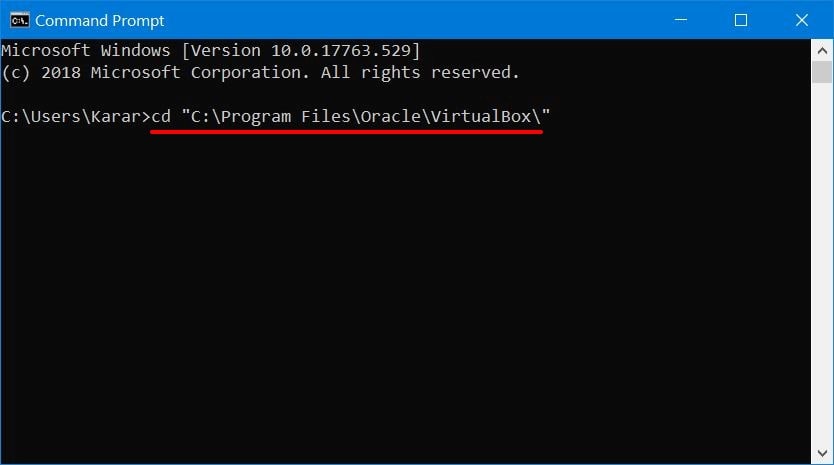
- Вводим cd «C:\Program Files\Oracle\VirtualBox\» нажимаем ввод;
- Изменяем в скрипте «Your Virtual Machine Name» на имя виртуальной машины, который Вы задали (в примере используется MacOSX )
- Выполняем в CMD команды по очереди, вставляя и нажимая ввод на клавиатуре;
- Настройка завершена;
VBoxManage modifyvm «Your Virtual Machine Name» —cpuidset 00000001 000106e5 00100800 0098e3fd bfebfbff
VBoxManage setextradata «Your Virtual Machine Name» «VBoxInternal/Devices/efi/0/Config/DmiSystemProduct» «iMac11,3»
VBoxManage setextradata «Your Virtual Machine Name» «VBoxInternal/Devices/efi/0/Config/DmiSystemVersion» «1.0»
VBoxManage setextradata «Your Virtual Machine Name» «VBoxInternal/Devices/efi/0/Config/DmiBoardProduct» «Iloveapple»
VBoxManage setextradata «Your Virtual Machine Name» «VBoxInternal/Devices/smc/0/Config/DeviceKey» «ourhardworkbythesewordsguardedpleasedontsteal(c)AppleComputerInc»
VBoxManage setextradata «Your Virtual Machine Name» «VBoxInternal/Devices/smc/0/Config/GetKeyFromRealSMC» 1
VBoxManage setextradata «Your Virtual Machine Name» VBoxInternal2/EfiHorizontalResolution 1440
VBoxManage setextradata «Your Virtual Machine Name» VBoxInternal2/EfiVerticalResolution 900
Для ОС Linux:
- Открываем Терминал;
- Копируем все команды с исправленным именем виртуальной машины в терминал и нажимаем ввод;
- Настройка завершена;
Для компьютеров на базе AMD CPU, требуется выполнить дополнительную команду:
VBoxManage modifyvm «Your Virtual Machine Name» —cpu-profile «Intel Core i7-6700K»
Выполняем установку Apple Mac OS Catalina

Выбираем Язык установки

На данном этапе, сначала заходим в Дисковые утилиты

Тут нам надо выбрать слева наш жесткий диск (проверяем по размеру, указанному справа) и выбираем кнопку Стереть

Указываем:
- Имя — любое;
- Формат — Mac OS Extended (журналируемый)
- Схема — Схема разделов GUIDж

После успешного форматирования, нажимаем Готово

Теперь переходим к Установка macOS

Нажимаем Продолжить

Принимаем лицензионное соглашение

Выбираем ранее отформатированный жесткий диск и нажимаем Установить

После длительной установки, выбираем страну, нажимаем Продолжить


Ввод Apple ID лучше пропустить, что бы не заблокировать учетную запись


Указываем учетные данные компьютера, Полное имя, учетную запись, пароль и


Снимаем галку с Доступ для разработчиков к данным о сбоях и использовании приложений


Вот собственно и все.
How to install macOS Catalina 10.15 on VirtualBox under Windows.
Small tutorial with all the sources that allowed me to install MacOS Catalina on VirtualBox under Windows.
This tutorial explains how to install macOS Catalina on a virtual machine. Customizable resolution and video memory.
Do not hesitate to open an exit in case of a problem or for any technical question.
Prerequisites
VirtualBox
- Go to this website and download VirtualBox and the Extension Pack.
- Once downloaded, install VirtualBox and the Extension Pack.
Required files
All the necessary files except VirtualBox, the Extension Pack and the macOS ISO are available by downloading the repository.
- Download the ISO of macOS Catalina 10.15 (8.3GB).
- Download the VMware Tools.iso file.
- Download the Boot.vmdk file.
Activate the Virtualization Technology
The virtualization technology is available for Intel and AMD processors under different names. For Intel, it is named VT-X and for AMD, it is named AMD-V. This technology must be enabled in order to run macOS Catalina on VirtualBox.
To activate the virtualization technology option, you need to access either the BIOS or the UEFI of your computer. In order to do this, you need to know the key·s required when booting your PC. It can be one of these keys: F1, F2, F10, F12, or DEL (may require pressing the Fn key).
How to activate Intel’s VT-X virtualization technology?
Once on your BIOS or UEFI, you need to find the Virtualization Technology, VT-X or VT option which is usually found in the Advanced options. Make sure you set this option to Enabled.
How to activate AMD’s AMD-V virtualization technology?
Once on your BIOS or UEFI, you need to find the Secure Virtual Machine Mode, AMD-V or SVM Mode option which is usually found in the Advanced options. Make sure you set this option to Enabled.
How do I know if virtualization technology is enabled on my computer?
Open the Task Manager and in the Performance tab check the Virtualization field is enabled.
Configuration of the virtual machine
-
Run VirtualBox.
-
Create a new virtual machine. Enter the name you want, select Mac OS X for the type and Mac OS X (64-bit) for the version.
-
Select the amount of RAM. The minimum is 4096MB, but for best performance, I recommend setting it to 8192MB.
-
Create a VDI virtual disk with a fixed size and a minimum of 80GB.
-
Click on your virtual machine and open the Settings options.
- In System ➜ Motherboard, set the Chipset to PIIX3.
- In System ➜ Processor, set the number of CPUs to a minimum of 2.
- In Display ➜ Screen, set the Graphics Controller to VMSVGA.
- In USB, enable the USB controller and check USB 3.0 (xHCI) Controller.
- In Storage, click on the disk button with a green
+and add the macOS Catalina ISO file. - In Storage, click on the hard disk button with a green
+and add theBoot.vmdkfile.
-
Click OK to confirm the changes.
-
Open a command prompt as administrator and type these commands:
Make sure to replace theVirtual Machinewith the name of your virtual machine.cd "C:/Program Files/Oracle/VirtualBox/" VBoxManage.exe modifyvm "Virtual Machine" --cpuidset 00000001 000106e5 00100800 0098e3fd bfebfbff VBoxManage.exe setextradata "Virtual Machine" "VBoxInternal/Devices/efi/0/Config/DmiSystemProduct" "iMac11,3" VBoxManage.exe setextradata "Virtual Machine" "VBoxInternal/Devices/efi/0/Config/DmiSystemVersion" "1.0" VBoxManage.exe setextradata "Virtual Machine" "VBoxInternal/Devices/efi/0/Config/DmiBoardProduct" "Iloveapple" VBoxManage.exe setextradata "Virtual Machine" "VBoxInternal/Devices/smc/0/Config/DeviceKey" "ourhardworkbythesewordsguardedpleasedontsteal(c)AppleComputerInc" VBoxManage.exe setextradata "Virtual Machine" VBoxInternal2/EfiGraphicsResolution 1920x1080 VBoxManage.exe modifyvm "Virtual Machine" --vram 256The values in the last two lines can be changed.
- The first is the resolution. It can be:
1280×720,1920×1080,2560×1440,2048×1080,3840×2160,5120×2880. - The second is the video memory. It can be a number between 0 and 256. The minimum is 128 and the best is 256.
- The first is the resolution. It can be:
Installation of macOS on the virtual machine
- Start the virtual machine.
- After a few lines of white text on a black background, the macOS installation screen for Catalina should appear.
- Select your language.
- Click on Disk Utility and format the
VBOX HARDDISK Media. - Close the tab and click on Install macOS.
- Continue and accept the terms of the software license agreement.
- Select the hard drive and click Install.
- Important step: during the automatic restart of the virtual machine, stop it.
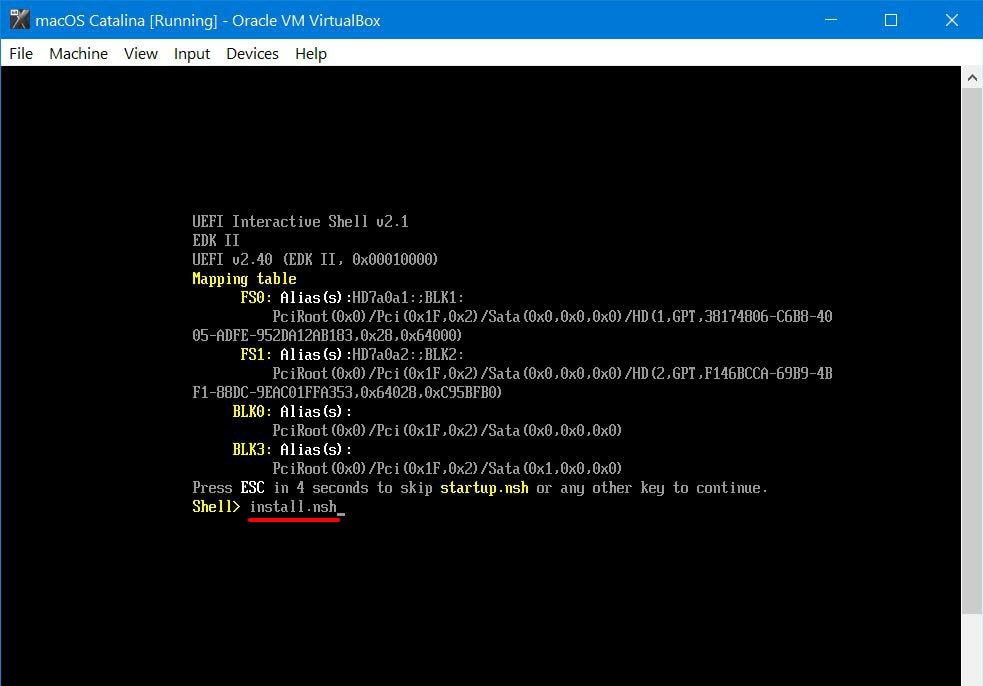
- Restart the virtual machine and press the
Esckey to open the BIOS. - Move to the Boot Manager menu with the arrow keys and select EFI Internal Shell.
- A few random yellow, gray and white texts should appear. Press
Escand it should get toShell> _. - Type
install.nshand pressEnter. - After a few moments, you will be on the macOS Catalina configuration pages.
- Follow the basic configuration steps and you will be on the macOS Catalina desktop as soon as possible.
Change resolution and video memory
-
Shut down the virtual machine.
-
Open the Settings options and in Storage, eject the macOS Catalina ISO file.
Then click on the disk button with a green+and add theVMware Tools.isofile. -
Restart the virtual machine.
-
Double-click on the VMWare Tools disk and click on Install VMWare Tools.
-
The extension should be blocked, so open the Security and Privacy section in the System Preferences and click Open anyway.
-
Once the installation is complete, restart the virtual machine. Note that the installation may need to be performed twice.
-
Open the Terminal application and type this command:
Replace the1920 1080value with the same value as the screen resolution you set earlier.sudo /Library/Application\ Support/VMware\ Tools/vmware-resolutionSet 1920 1080 -
To automate this command every time you start your system, open the Automator application.
-
Choose Application, open Utilities and add Run Shell Script.
-
Set the Shell to
/bin/bashand type this command line:
Replace the valuepasswordwith the macOS password for your virtual machine.
Replace the1920 1080value with the same value as the screen resolution you set earlier.echo "password" | sudo -S /Library/Application\ Support/VMware\ Tools/vmware-resolutionSet 1920 1080 -
Click on file and save it in Applications.
-
Open the System Preferences and click on Users & Groups.
-
In Login Items, click on the
+button and add the application.
Sources
- French website — Comment installer macOS Catalina 10.15 sur VirtualBox sur Windows?
https://www.tech2tech.fr/comment-installer-macos-catalina-10-15-sur-virtualbox-sur-windows - How to change screen resolution of macOS on VirtualBox?
https://techsviewer.com/how-to-change-screen-resolution-of-macos-on-virtualbox - How to increase the display memory to 256 MB and change the screen resolution under macOS Catalina on VirtualBox?
https://www.youtube.com/watch?v=gDwFdGUsBOo
Install macOS Catalina 10.15 on VirtualBox on Windows PC. macOS Catalina is the next operating system after macOS Mojave. The new update of macOS Catalina is accepted by macOS users due to having well and comfortable features, performance. The macOS had the super credibility in using the latest OS in every update. The upgrading to macOS Catalina is pretty easy, every Mac users can upgrade to macOS Catalina in a few clicks.
Overall the macOS Catalina is the full fill of expectations of macOS users with huge credibility. However, macOS Catalina raised the flag in WWDC Worldwide developer conference 2019 Keynote in California America, the issue was pointed out aside with release date too. So when macOS Catalina comes out with all new bunch of features that make it beautiful to update it now. Moreover, this update of macOS Catalina brought unbelievable features with high-security performance. There are features to show out by installing macOS Catalina. In this post, I’ll show how to install macOS 10.15 Catalina on VirtualBox on Windows PC.
I hope you are familiar with the macOS Catalina installation. By installing the macOS beta version on different platforms can be a great experience and also explore all the issues too. macOS Catalina is successfully installed on Mac PC without facing any kind of problem. But again you can install macOS Catalina on VMware, or VirtualBox on Windows PC. If you are satisfied with all macOS Catalina features then in few simple steps install it in VirtualBox with a new method.
Install macOS Catalina 10.15 on VirtualBox on Windows PC
When it comes to the era of Virtual machines, VirtualBox is a complete Virtualization platform that everything is existing on that. This App is creating a separate machine to install macOS Mojave, macOS Catalina or any other OS on it. The environment which you have on your actual operating system is the same on virtual machines. But the functions are different from an actual operating system. Here’s how to install macOS 10.15 Catalina on VirtualBox on Windows PC.
However, this installation process of macOS Catalina is different from the previous installation on VirtualBox. In the previous method, we use the VMDK file but here we use the macOS Catalina ISO file. Again we install it on VirtualBox whether you use macOS Catalina VMDK or macOS Catalina ISO file. Also, you can create a macOS Catalina ISO file by yourself. Or easily download the ISO file from below given link.
- Installing macOS Catalina with ISO file is much easy than using VMDK “Virtual Machine Disk File”. You need to prepare all the files and in a few clicks you can continue it up.
Here’s how to Create macOS Catalina ISO.
- How to Create macOS Catalina ISO
Install VirtualBox with Extension Pack
Now it is time to install VirtualBox plus Extension Pack. Visit the VirtualBox official site and download the setup plus Extension Pack. Extension Pack allows the user while they are getting stuck on Mouse & Keyboard, by installing Extension Pack with VirtualBox you can bypass the issue. Open the website then from the list VirtualBox platform packages click on Windows supported. And bellow that click on all supported platforms for Extension Pack.

Install VirtualBox
Create a New Virtual Machine for macOS Catalina
Step 1. The installation needs to prepare a new virtual machine. When VirtualBox installed open that then click on New for a fresh new virtual machine.

Create a new Virtual machine
Step 2. Click on Export Mode to continue into next step

Export Mode
Step 3. Now type macOS Catalina by typing the name it can obtain the “Type, Version” then specify the location. Choose the Memory size then select the option “Create a virtual hard disk file”. It is ready then click Create.

Create a virtual machine
Step 4. Choose the file size then select the option “VDI (VirtualBox Disk Image) and click Create.

Create virtual Disk
Edit Virtual Machine Settings
Step 5. These setting we are showing in this step, properly configure the settings. Indeed it will help the installation work and performance. Don’t miss any of the settings otherwise you will fail to boot into the installation. Click on the create virtual machine settings from the top menu.

Edit settings
Once the setting window opened click on the System tab, uncheck the “Floppy”. And check the box of “Enable EFI (special Oses Only).

System
Navigate to the next tab, processor tab and increase the processor up to 4. The processor will increase the speed of the Virtual machine during the installation.

Increase processor
On the Display, tab increase Video Memory up to 128MB

Increase Video Memory
Come down to Storage tab, then on Storage devices select “Empty”. And click on the Optical drive disk icon, then select “Choose/Create a virtual Optical disk”.

Storage
Now click Add button and navigate to the folder of macOS Catalina ISO file then select it and click open.

Open macOS Catalina
After inserting macOS Catalina should be like below screenshot

macOS Catalina
Here select the USB tab, then select “USB 3.0 (xHCI) Controller. After that, click OK to end the setting.

USB 3.0
Apply Virtual Machine Codes
We did it, now we are at the final step of creating a virtual machine for macOS Catalina. Here we only apply some commands for a virtual machine using the command prompt. To apply the Virtual machine codes or command firstly close the VirtualBox.

Close VirtualBox
Copy the below code into notepad or Wordpad. Which you think to replace its name with the virtual machine name easily.
Code for Virtualbox:
cd "C:\Program Files\Oracle\VirtualBox\"
VBoxManage.exe modifyvm "Your VM Name" --cpuidset 00000001 000106e5 00100800 0098e3fd bfebfbff
VBoxManage setextradata "Your VM Name" "VBoxInternal/Devices/efi/0/Config/DmiSystemProduct" "iMac11,3"
VBoxManage setextradata "Your VM Name" "VBoxInternal/Devices/efi/0/Config/DmiSystemVersion" "1.0"
VBoxManage setextradata "Your VM Name" "VBoxInternal/Devices/efi/0/Config/DmiBoardProduct" "Iloveapple"
VBoxManage setextradata "Your VM Name" "VBoxInternal/Devices/smc/0/Config/DeviceKey" "ourhardworkbythesewordsguardedpleasedontsteal(c)AppleComputerInc"
VBoxManage setextradata "Your VM Name" "VBoxInternal/Devices/smc/0/Config/GetKeyFromRealSMC" 1
Firstly, use the edit tab to replace the “Your Virtual Machine Name” with created virtual machine name “macOS Catalina” then click replace All.

Replace the Virtual Machine Name
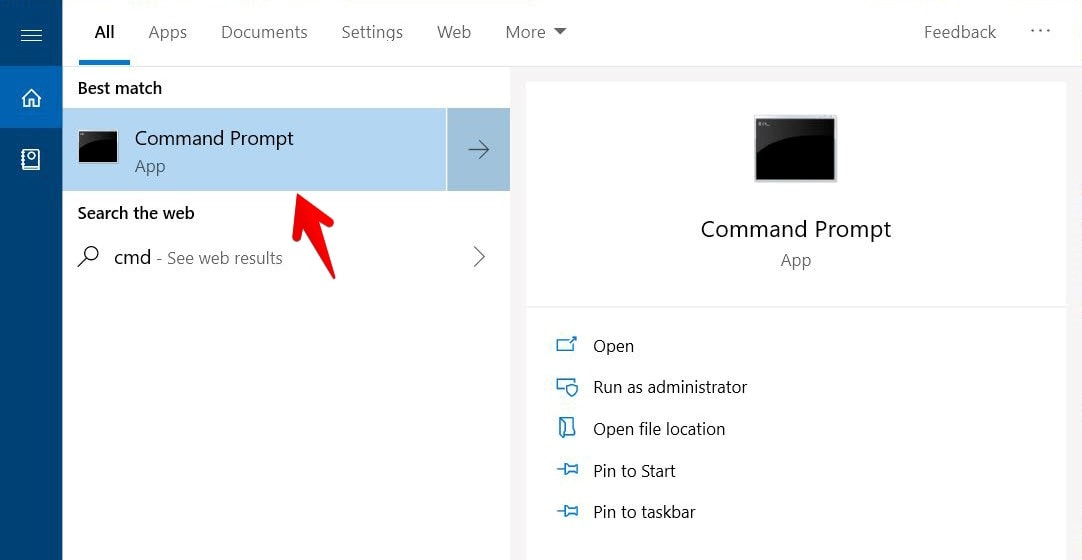
Now go ahead and hit Windows Start menu, type CMD or command prompt and press enter to open.

Command prompt
Once the command prompt launched, copy and paste each of the code and press enter.

Apple the virtual machine codes in command prompt
Install macOS Catalina on VirtualBox on Windows PC
Every process to install macOS Catalina on VirtualBox on Windows PC is completed. Open VirtualBox then select the macOS Catalina created virtual machine then click Start button.

Start
Choose your language then click continue

Choose your language
In the macOS Utility window select “Disk Utility” and click continue.

Choose Disk Utility
Select the created drive of macOS Catalina, in my installation process the Virtual machine drive name is “VBOX HARDDISK Media”. Select the drive, click “Erase” from the top menu bar under, name the hard disk. Choose the “Format” “Mac OS Extended (Journaled), Choose the “Scheme” “GUID Partition Map”, then click the Erase button.

Erase the disk
When the disk successfully erased click “Done”, and close the Disk Utility window.

Click Done
Now select “Install macOS”, and click continue

Install macOS
Agree to the terms and conditions and license agreement of macOS Catalina, by clicking the agree button for two times.

Agree to the terms and conditions of macOS Catalina
Manage or select the disk which you erased for installing macOS Catalina, then click Install.

Select the disk
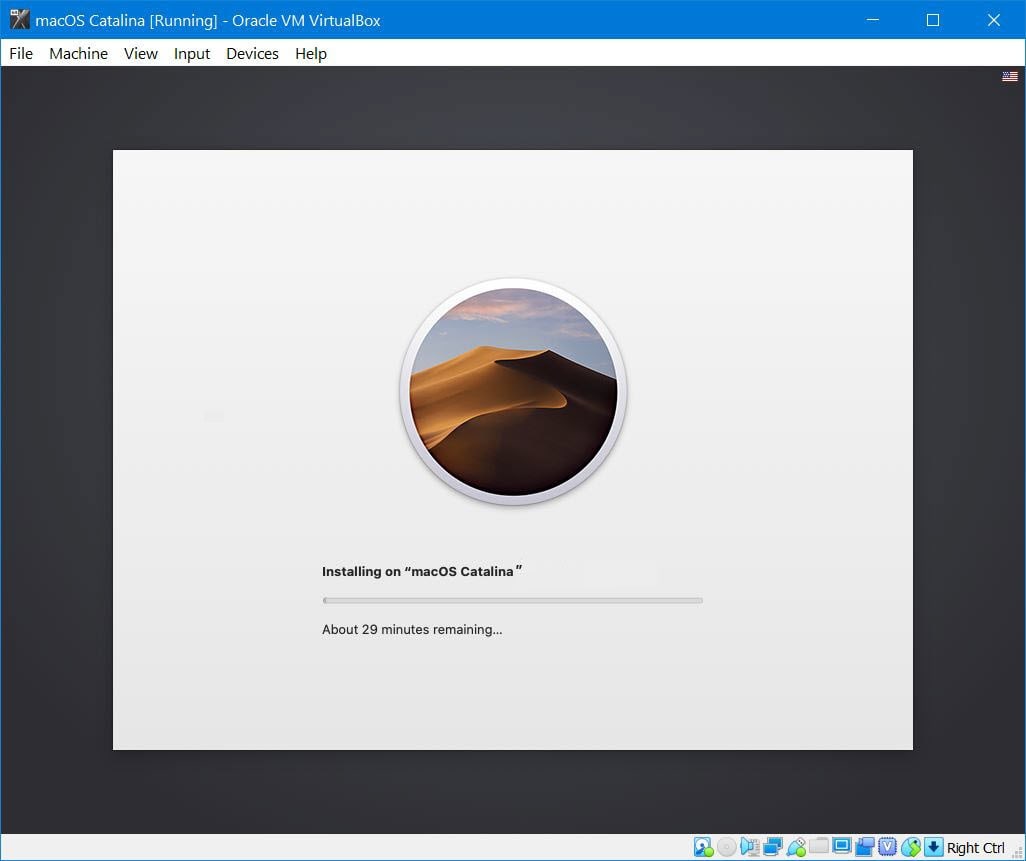
Wait to the installation process to be completed, while the installation is done the virtual machine will restart automatically.

Installing macOS Catalina
Install macOS Catalina 10.15 on VirtualBox on Windows PC
Again the virtual machine starts, wait for this step of installation also, again the installation will take some time. When the installation completed again the virtual machine will restart, and the Apple logo will appear. Then complete the rest of the installation too.

Installing
While the Apple logo screen disappeared wait for this black screen to bypass

Here, is the step to complete the installation of macOS Catalina by selecting your language.

Choose your language
- Choose your keyboard layout and click continue, again you don’t prefer the keyboard layout click on Show all.
- Select Don’t transfer any information right now and click continue.
You can add your Apple ID, or reject this step by clicking on Sign up later and Skip option.

Sign up later
Agree to terms and conditions of macOS Catalina

Agree to terms and conditions
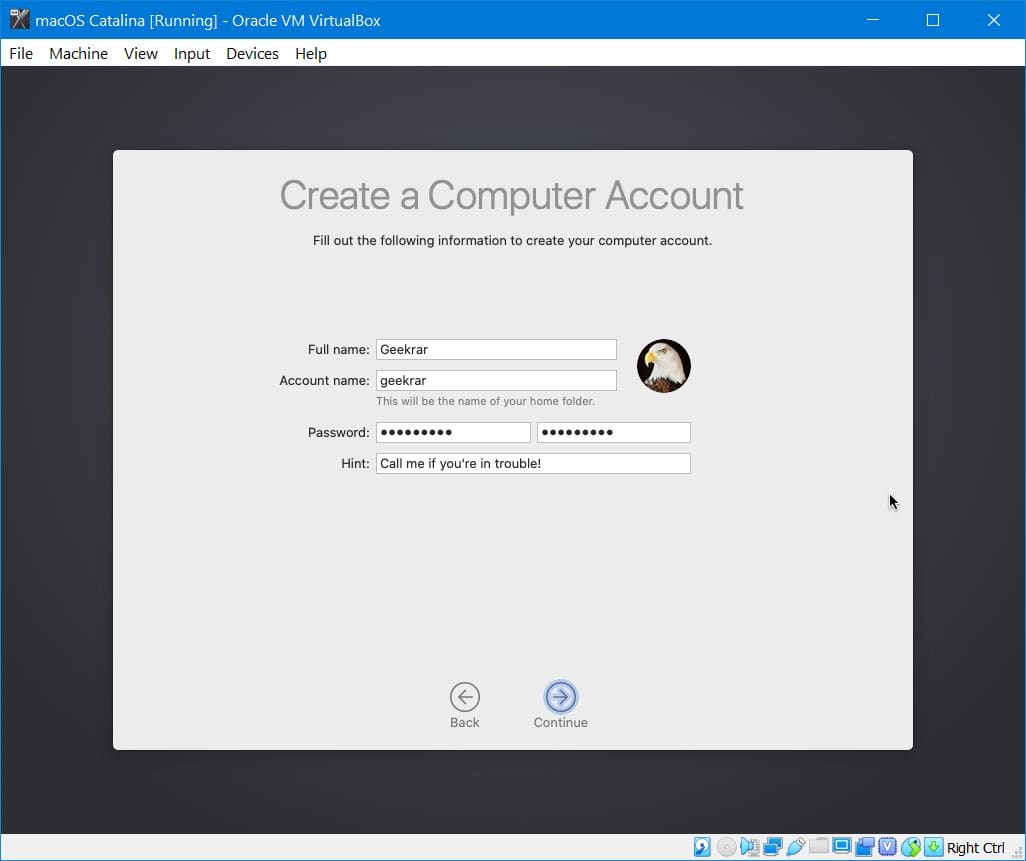
Create a computer account, by filling the full name, Account name, Password, and hint then click continue.

Create a computer account
- Click continue on express set up
- On the screen time, window click Sign up later.
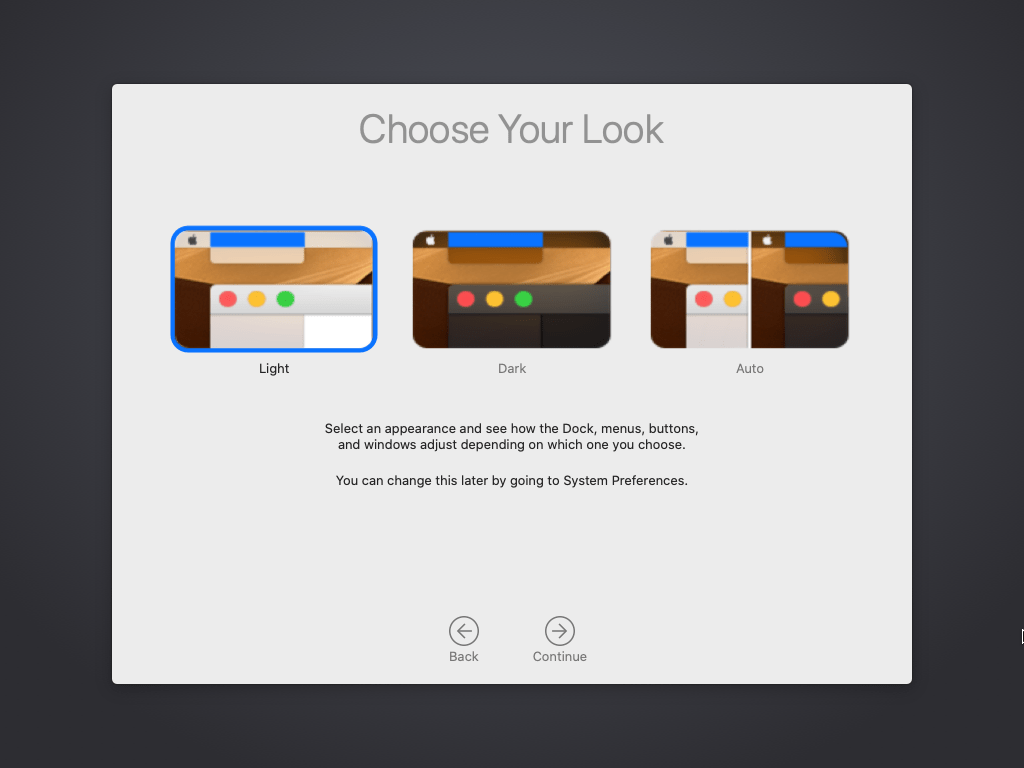
Select your theme and click continue

Choose your theme
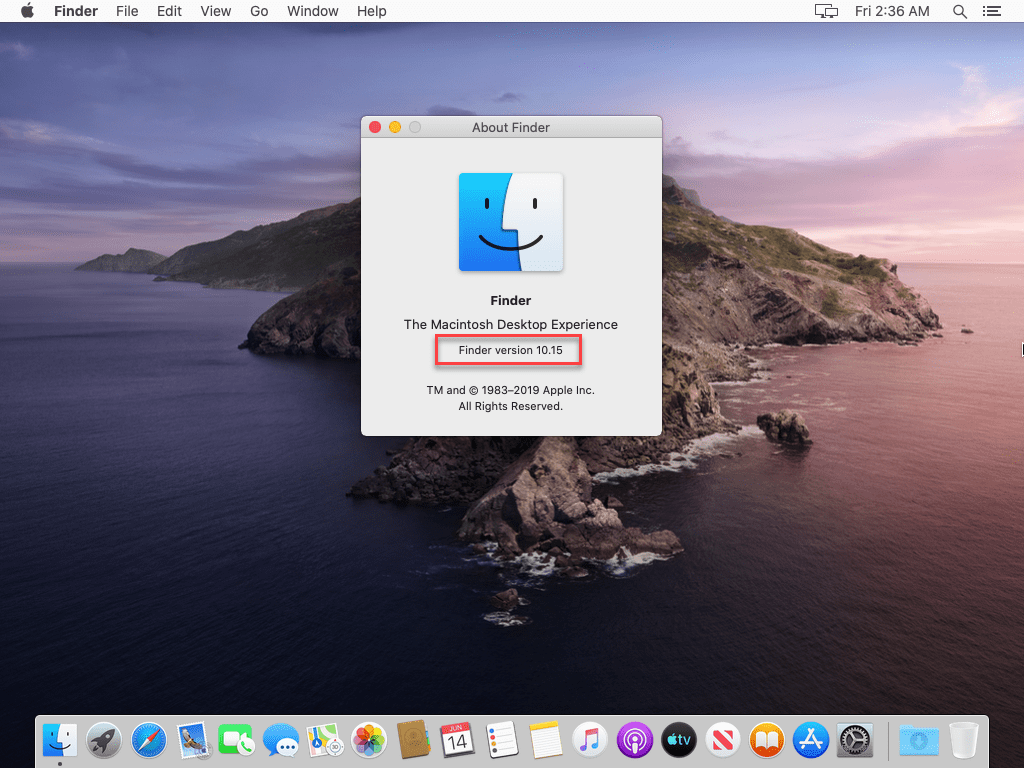
When macOS Catalina installed on VirtualBox on Windows PC. Then you will see the beautiful window of macOS Catalina. Also, we can not be touched with all functions like a real macOS Catalina on Mac. It is only a testament of an OS in a Virtual machine.

macOS Catalina on VirtualBox on Windows
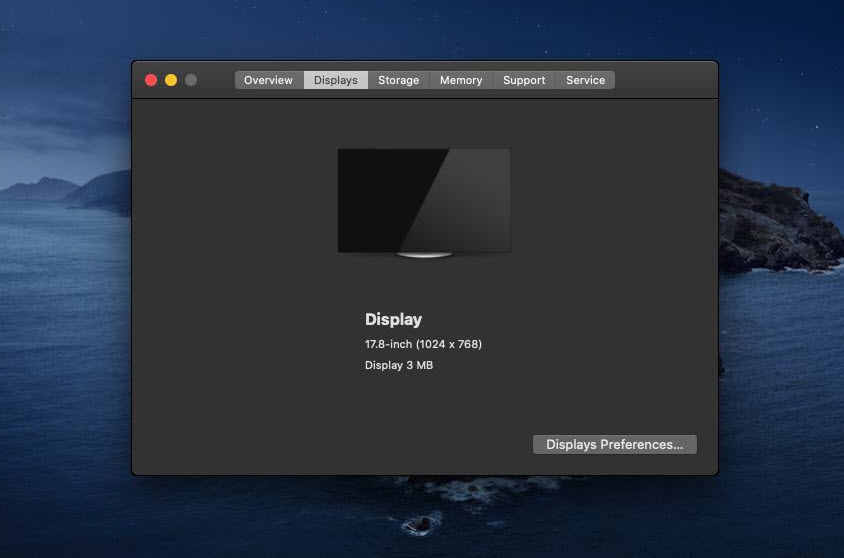
That’s the process of installing macOS Catalina on VirtualBox on Windows PC. The only thing is remaining is to fix the macOS Catalina screen resolution, I think that it is easy to fix it, need to check the below article.
- How To Use macOS Catalina full screen on VirtualBox on Windows
- How to Install Guest Tool on macOS 10.15 Catalina on VirtualBox
Bottom Line
That’s all about how to install macOS Catalina on VirtualBox on Windows PC. Using the ISO file out of the VMDK file is pretty easy. Again if you faced any issue feel free to share with us below in the comment section.
On the morning of 3rd June, Apple kicked off its 2019 annual developer conference with all the new stuff Apple has been working on for the last year will be front and center. The keynote was significantly exciting mostly for software but a little for hardware lovers. While WWDC is one of the most important and significant events with the biggest update to Mac, iPhone, iPad, Mac Pro, Apple Watch and Apple TV. In this post, we’ll install macOS Catalina on VirtualBox on Windows PC.
With all those things updated, the biggest update to macOS is the more exciting new version of macOS which is popular by macOS Catalina. With the new version of macOS – Catalina arriving on Mac’s, it’s fine to some Windows users wanting it within their computer. While Catalina works perfectly on Mac, but when it comes to installing it on Windows, it’s not the case. If you’re would like to install Catalina on a Mac, all you do is enroll in the developer program and download it. Once you’ve the installer file, you will straightly boot into and install Catalina in your Mac.
Instead, if you’re willing to install macOS Catalina on VirtualBox on Windows PC, first of all, you’ll need to download macOS Catalina VirtualBox image, (not from App Store or Apple’s developer program, they don’t work with virtual machines) which is pretty difficult to figure out. Getting a copy of the Catalina VirtualBox installer is even very tricky. If you Google, you’ll find some broken or corrupt files or download links that are completely rubbish. Even searching deep and more and more won’t help you out.
In terms of installing Catalina on Windows, there is no such question. Even Catalina is now risky to install but you have the perfect option which is a virtual machine. The virtual machines solve almost all questions and make riskiness faraway. It will completely work separate from your actual operating system without harming a single thing. If there’s some problem at some point, you’ve two solid options whether to delete the virtual machine or use the snapshot that is pretty easy. That’s the best option to try everything up without taking a risk.
Excited about Catalina, but don’t want to wait until fall? The public beta is now available to try on your Windows PC; here’s how to install macOS Catalina on VirtualBox. If you want to install macOS Catalina on VirtualBox worth of new features to play with, the Public Beta of Catalina VirtualBox image gives you access right now.
Table of Contents
Whether you would like to install macOS Mojave on VirtualBox or would like to install macOS Catalina on VirtualBox, we are with you. In this tutorial, we’ll walk you through how to install macOS Catalina on VirtualBox on your Windows PC.
- Related: Install macOS Catalina on VirtualBox on Windows PC [New Method]
What You’ll Need
This process requires some necessary tools that are very easy to get at this point. We’ve prepared the things for you that you won’t have to dig around. These images are straightforward to obtain. They are securely created, compressed, uploaded to two powerful servers. All you’ve to do is click on the images and acquire those.
- VirtualBox — This virtual machine app makes the process quite easy. With VirtualBox, it’s pretty easy to understand everything, and not only that but is easy to install and use it. There’s nothing more you’d need that VirtualBox needs to run with. All of its components are integrated into it. The nice thing is, it supports installing macOS no matter which version, unlike VMware. But still, there’s a simple trick which we need to do.
Join us on Patreon and support us for making better content.
https://bit.ly/39ZB1FR
macOS Catalina Final Version (19A602) 15 Oct 2019 (Recently Uploaded)
Download Now link 1
Download Now link 2
Download Now link 3
Finally, when you’re done, you’ll need to extract the files into a single folder.
Before we get to the important part, one last thing before we jump in: make sure the Intel VT-x is turned on for Intel users. If you’re an AMD user, you could definitely ignore this.
Done downloading things? Good. Now it turns to Install macOS Catalina on VirtualBox on Windows PC which is pretty simple.
- Related: Install macOS Catalina on VirtualBox on Windows PC [New Method]
Step One: Install VirtualBox on Windows
The first thing you need to do is start the VirtualBox installation with the setup.exe from the VirtualBox setup files.
The installation part is simple, with a few clicks you’ll end up installing it.
At the end, start the VirtualBox from the installation and click Finish.
Step Two: Set Up A New Virtual Machine
Speaking of installing Catalina, you’ll need to set up a new virtual machine in order to install macOS Catalina.
From the VirtualBox, click on New.
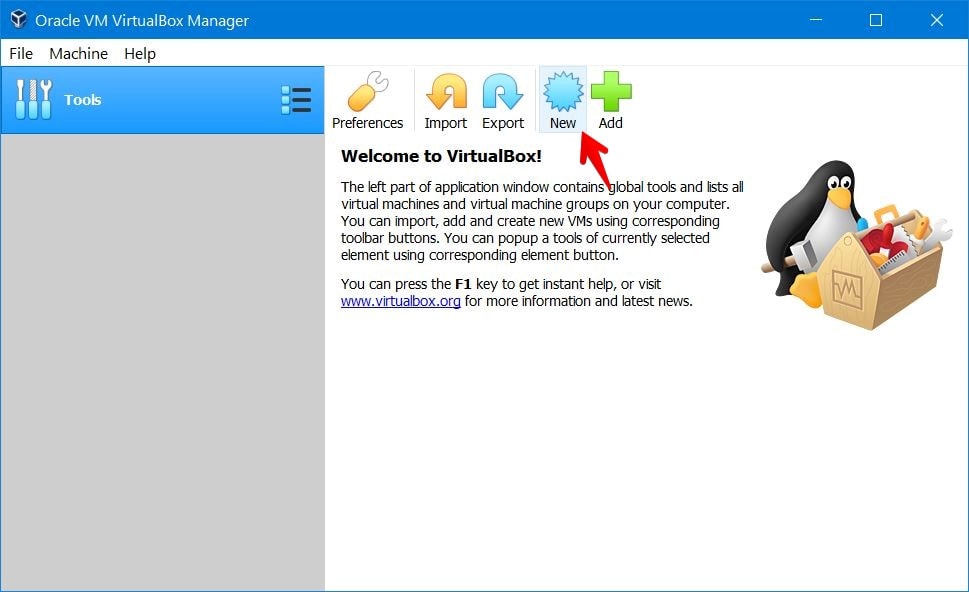
Now choose Expert Mode from the bottom.
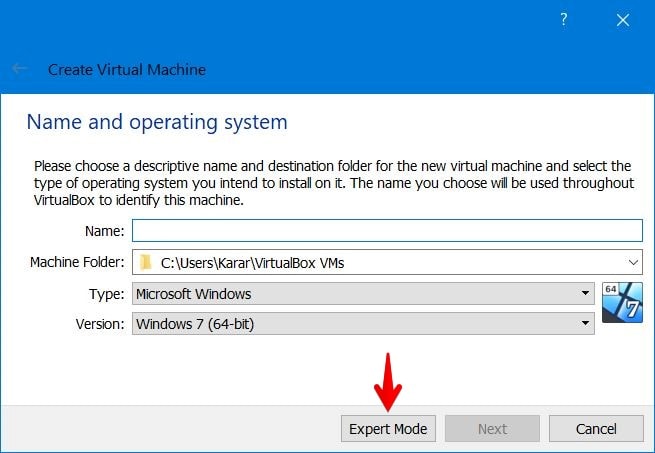
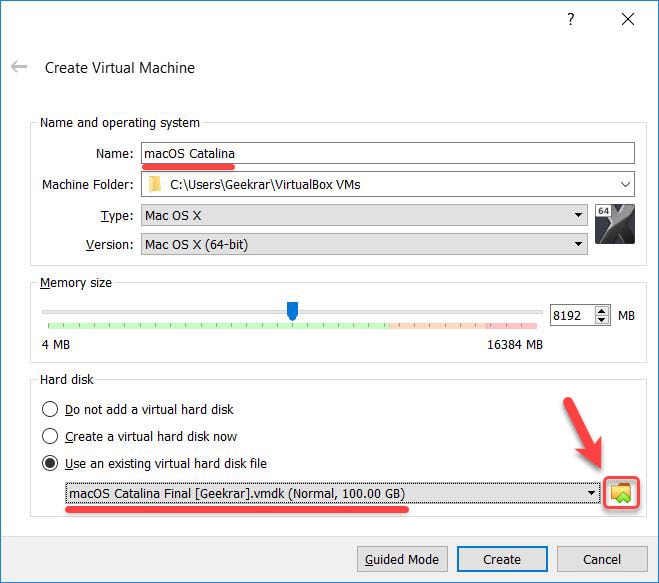
For the Name & operating system, write down the name of the virtual machine. In my case, I will write down “macOS Catalina”. Select “Mac OS X” for the Type and Mac OS X (64-bit) for the version.
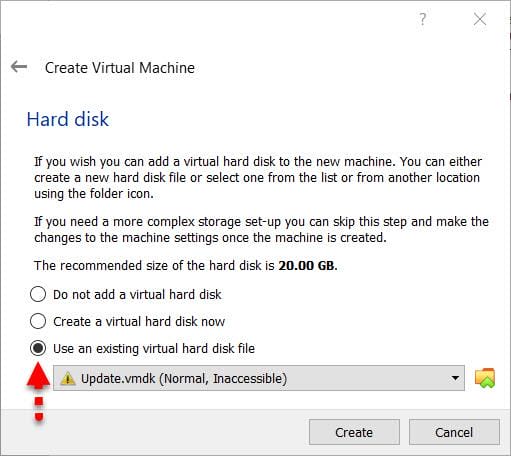
For Memory, I recommend you to go with the 50-50 rule which is to assign 50 to 60% of your computer’s memory for the virtual machine. For Hard Disk, select Use an existing virtual hard disk file and choose the macOS Catalina’s extracted VirtualBox image which is Catalina’s VMDK file. In the end, click Create. Here’s the preview of how it looks like.
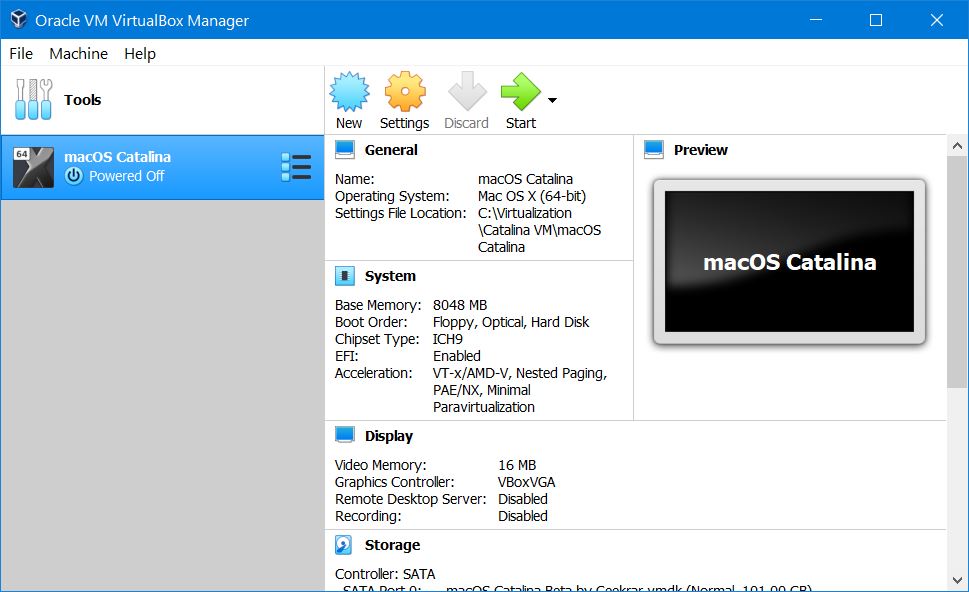
With the virtual machine created, simply close the VirtualBox (Important!). If you didn’t, you would likely end up with EFI Internal Shell. Here’s how to fix EFI Internal Shell on VirtualBox.
Done all that? Alright, here’s what else you need to do.
Step Three: Configure macOS Catalina Virtual Machine
Install macOS Catalina on VirtualBox on Windows PC will essentially work straightforward similar to a Mac, and devotes most of your Windows power and its graphics card to running Catalina. How much ever you allocate, it will get more thirsty of power. The more you allocate, the better the performance. That is what makes the experience better and better. So note this!
The virtual machine won’t work without configuring. We need to do some quick configuration from the virtual machine settings. From the top of the window, click on Settings.

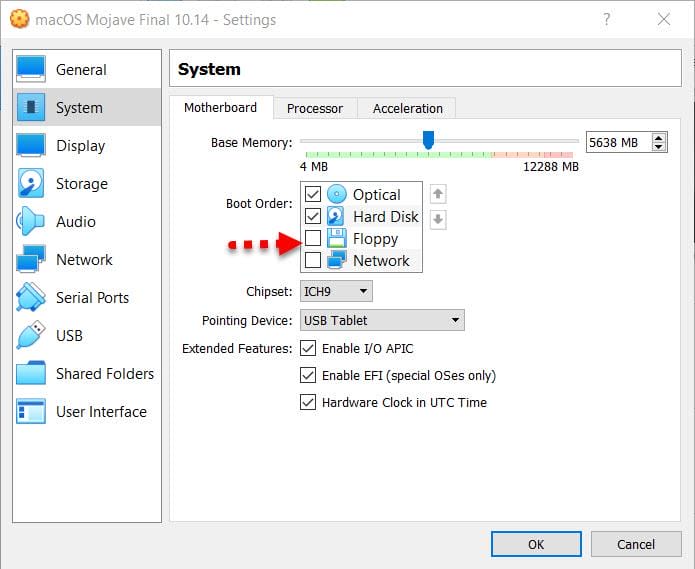
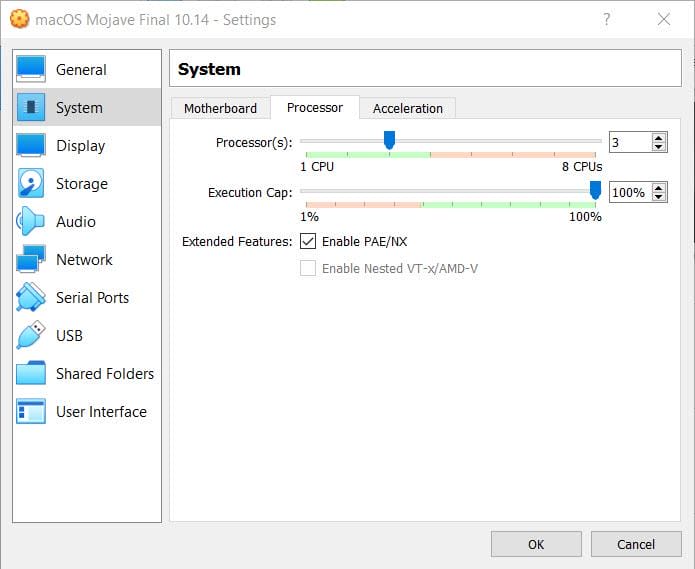
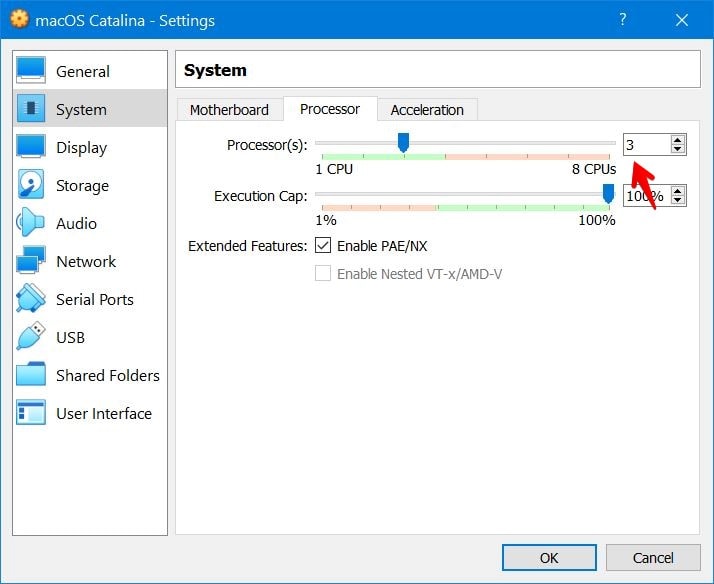
Now select the System tab and click on Processor. Increase the processor to 2 at least or more (Seriously, otherwise, the virtual machine won’t boot).
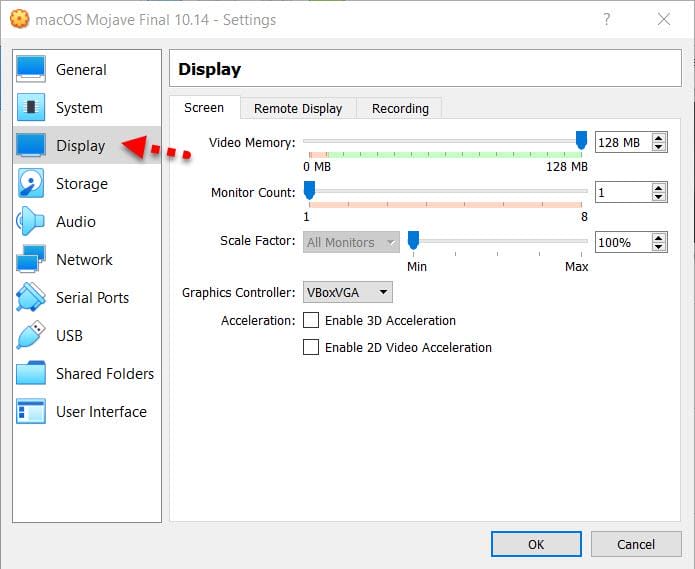
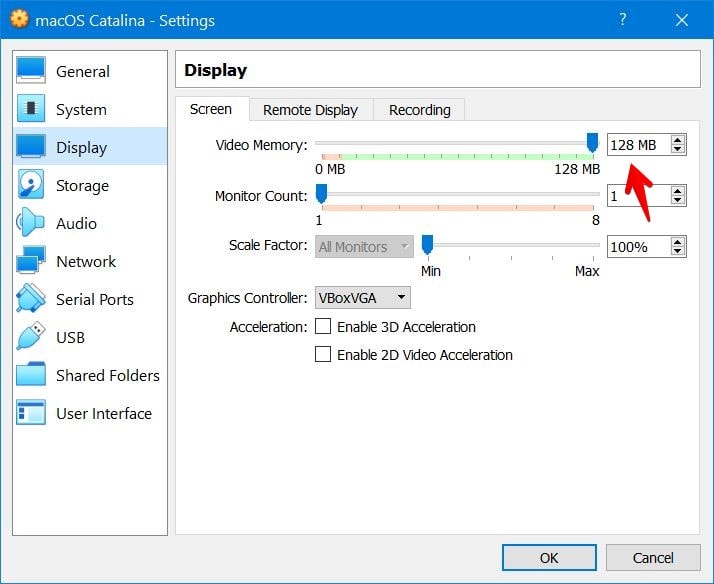
Under it, click the Display tab. Increase the video memory to the highest which is 128 MB. When you’re done, click OK.
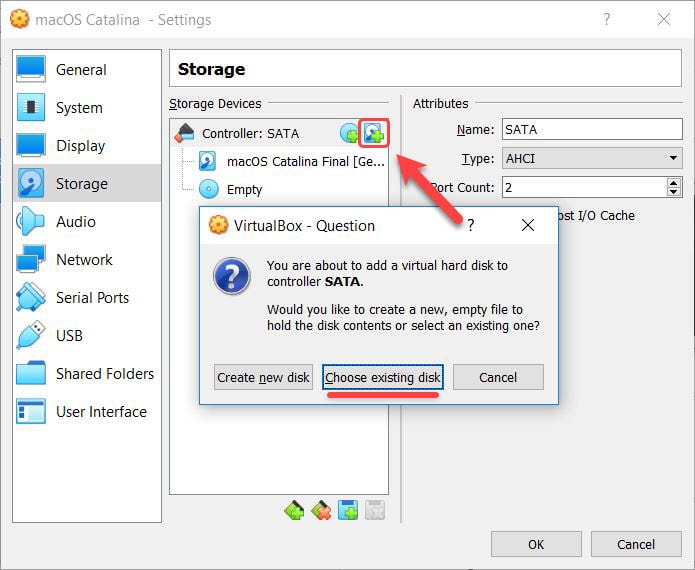
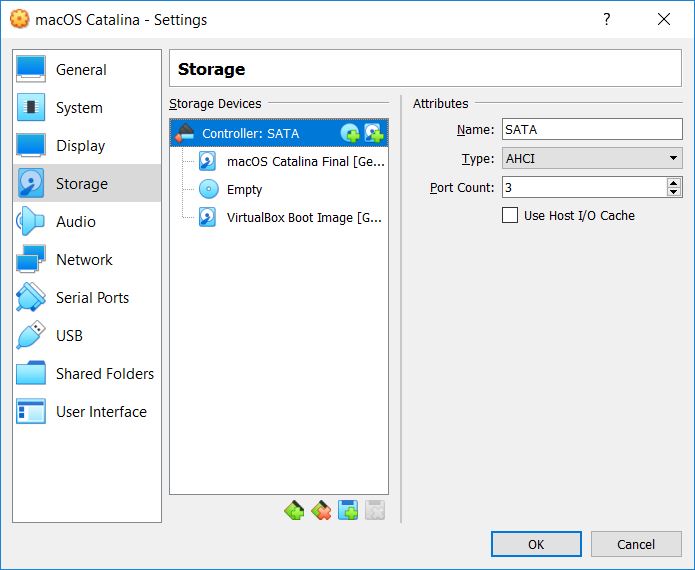
Next head to the storage tab and click on the hard disk plus icon at then choose existing disk on the pop up that appears.
Now first click on Add button and choose VirtualBox Boot Image by Geekrar.
If the top one didn’t work, here’s another one.
- Download macOS Catalina VirtualBox Boot Image
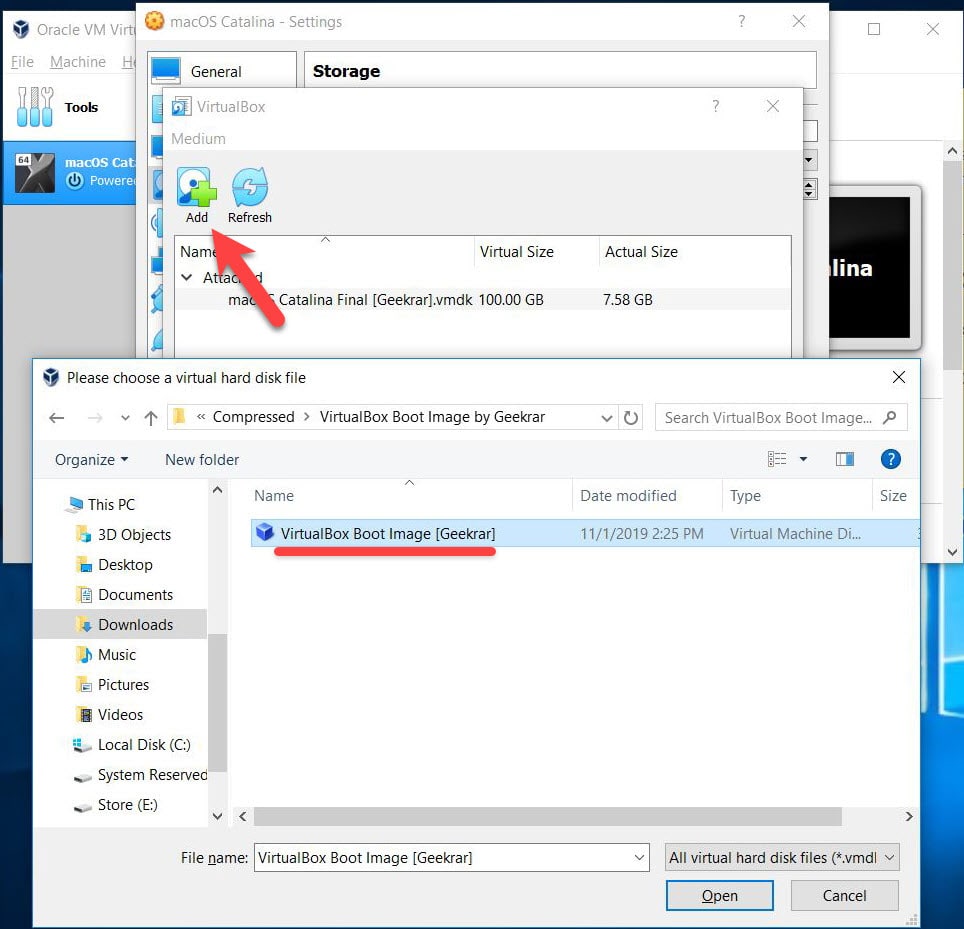
When that’s added, click choose.
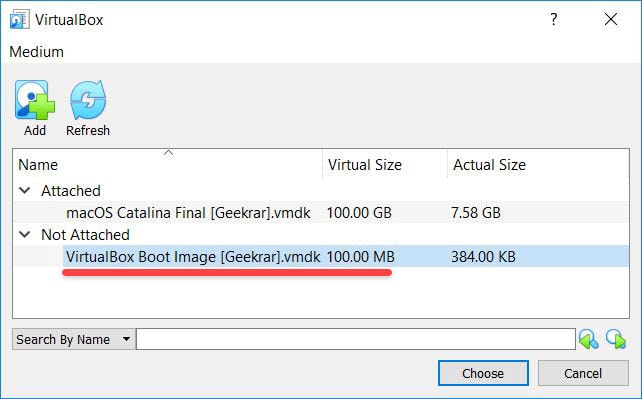
When done, click OK on the virtual machine settings.
Step Four: Install VirtualBox Extension Pack
The virtual machine is nearly finished configuration. In order to work mouse and keyboard, you’ll need to install the VirtualBox extension pack. Here’s how to do it.
- Related: How to Install VirtualBox Extension Pack
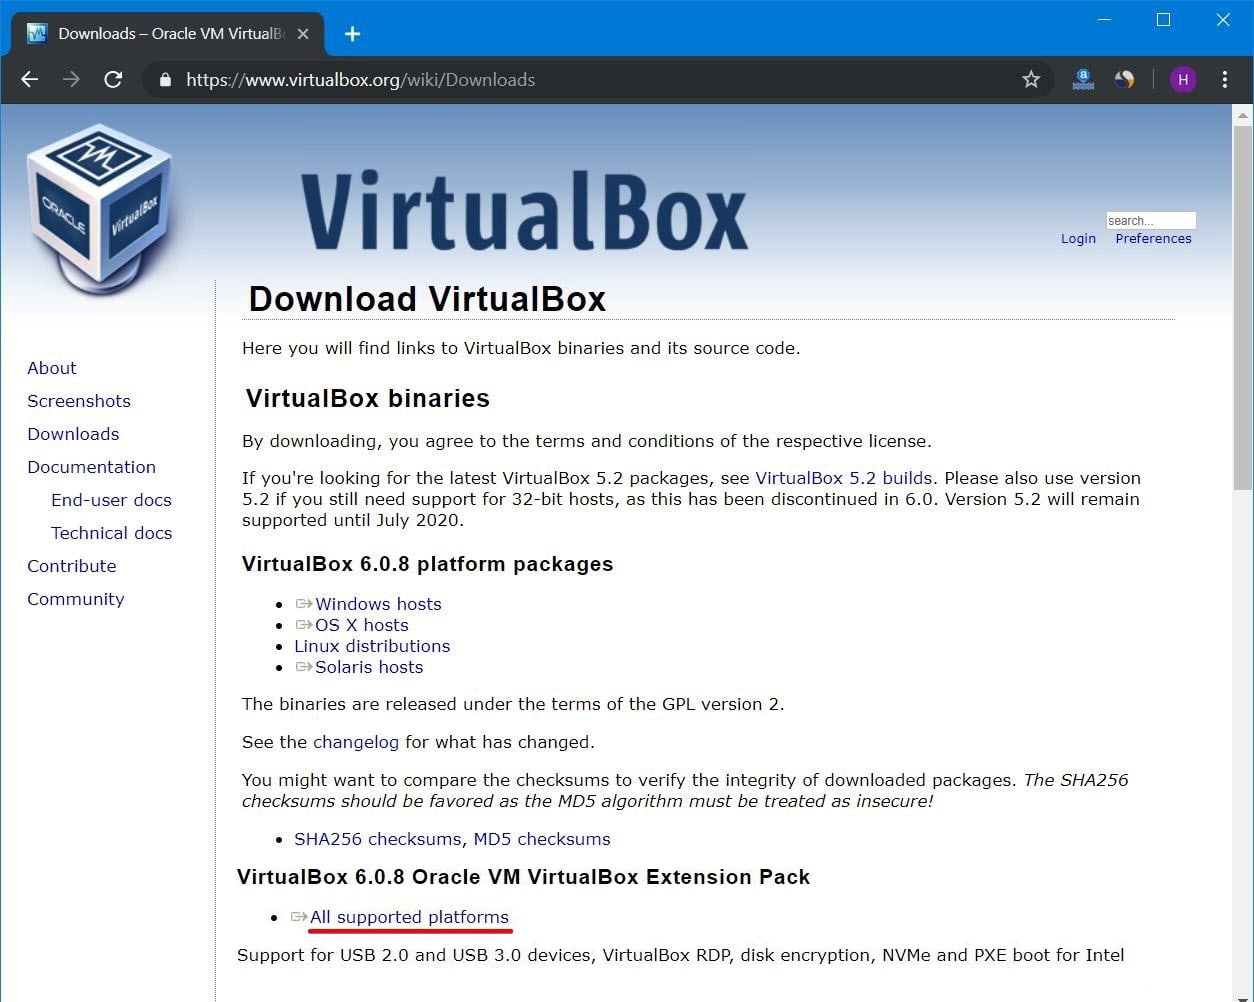
Go to the VirtualBox downloads page and scroll down for the VirtualBox extension pack. Click on the All supported forms to download it.
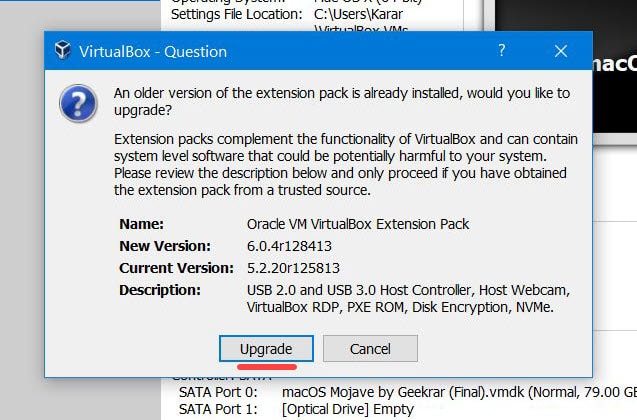
When it’s finished, open it. It will pop up the extension installing a window, click on Install. It will immediately upgrade the VirtualBox extension. If you haven’t installed yet, you need to Install VirtualBox Extension Pack.
Step Five: Apply Commands on VirtualBox
Once you’ve accomplished those, there are some commands which you need to apply in order to run macOS Catalina.
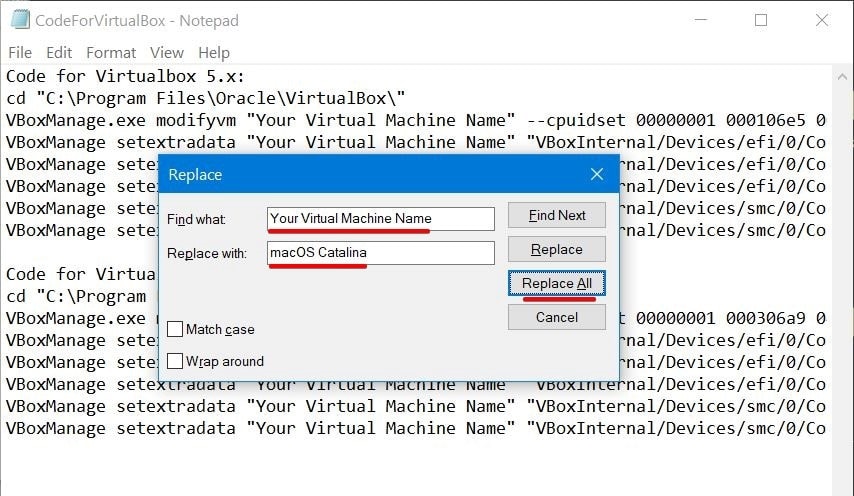
Open the commands and press Ctrl + H. When the window popped up, write “macOS Catalina” (your machine name) in front of Find What and write “Your Virtual Machine Name” in front of Replace with.
Note: If you’ve an AMD Ryzen or AMD Radeon, you need a different command. This won’t work for you. Here’s how to install macOS Catalina on VirtualBox on AMD system.
cd "C:\Program Files\Oracle\VirtualBox\"
VBoxManage.exe modifyvm "Your Virtual Machine Name" --cpuidset 00000001 000106e5 00100800 0098e3fd bfebfbff
VBoxManage setextradata "Your Virtual Machine Name" "VBoxInternal/Devices/efi/0/Config/DmiSystemProduct" "iMac11,3"
VBoxManage setextradata "Your Virtual Machine Name" "VBoxInternal/Devices/efi/0/Config/DmiSystemVersion" "1.0"
VBoxManage setextradata "Your Virtual Machine Name" "VBoxInternal/Devices/efi/0/Config/DmiBoardProduct" "Iloveapple"
VBoxManage setextradata "Your Virtual Machine Name" "VBoxInternal/Devices/smc/0/Config/DeviceKey" "ourhardworkbythesewordsguardedpleasedontsteal(c)AppleComputerInc"
VBoxManage setextradata "Your Virtual Machine Name" "VBoxInternal/Devices/smc/0/Config/GetKeyFromRealSMC" 1
Now open up Command Prompt (CMD) without administrator privileges.
First, copy and paste the first line of the commands.
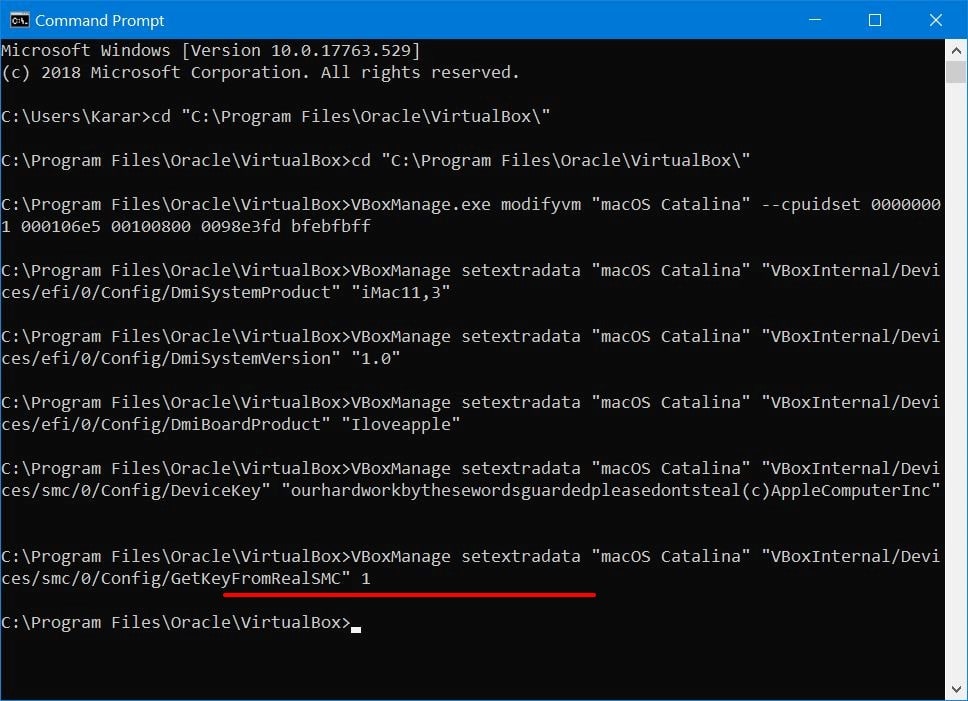
cd "C:\Program Files\Oracle\VirtualBox\"
VBoxManage.exe modifyvm "Your Virtual Machine Name" --cpuidset 00000001 000106e5 00100800 0098e3fd bfebfbff
VBoxManage setextradata "Your Virtual Machine Name" "VBoxInternal/Devices/efi/0/Config/DmiSystemProduct" "iMac11,3"
VBoxManage setextradata "Your Virtual Machine Name" "VBoxInternal/Devices/efi/0/Config/DmiSystemVersion" "1.0"
VBoxManage setextradata "Your Virtual Machine Name" "VBoxInternal/Devices/efi/0/Config/DmiBoardProduct" "Iloveapple"
VBoxManage setextradata "Your Virtual Machine Name" "VBoxInternal/Devices/smc/0/Config/DeviceKey" "ourhardworkbythesewordsguardedpleasedontsteal(c)AppleComputerInc"
VBoxManage setextradata "Your Virtual Machine Name" "VBoxInternal/Devices/smc/0/Config/GetKeyFromRealSMC" 1
Then, copy and paste all the remaining part of the commands.
Step Six: Install macOS Catalina on VirtualBox on Windows PC
The time has come to succeed with the installation war. Start Install macOS Catalina on VirtualBox on Windows PC. Now fire up VirtualBox and click Start.
Once the booting finished, press ESC to skip startup.nsh. Now type “install.nsh” and hit Enter. This will definitely take a while.
The installation will begin in a moment that will look like this.
After this, it will restart with hundreds of lines of codes appearing. Don’t worry, that’s fine. When the machine boots up, you’ll figure out the Welcome screen. There you go! Choose where you are located and click Continue.
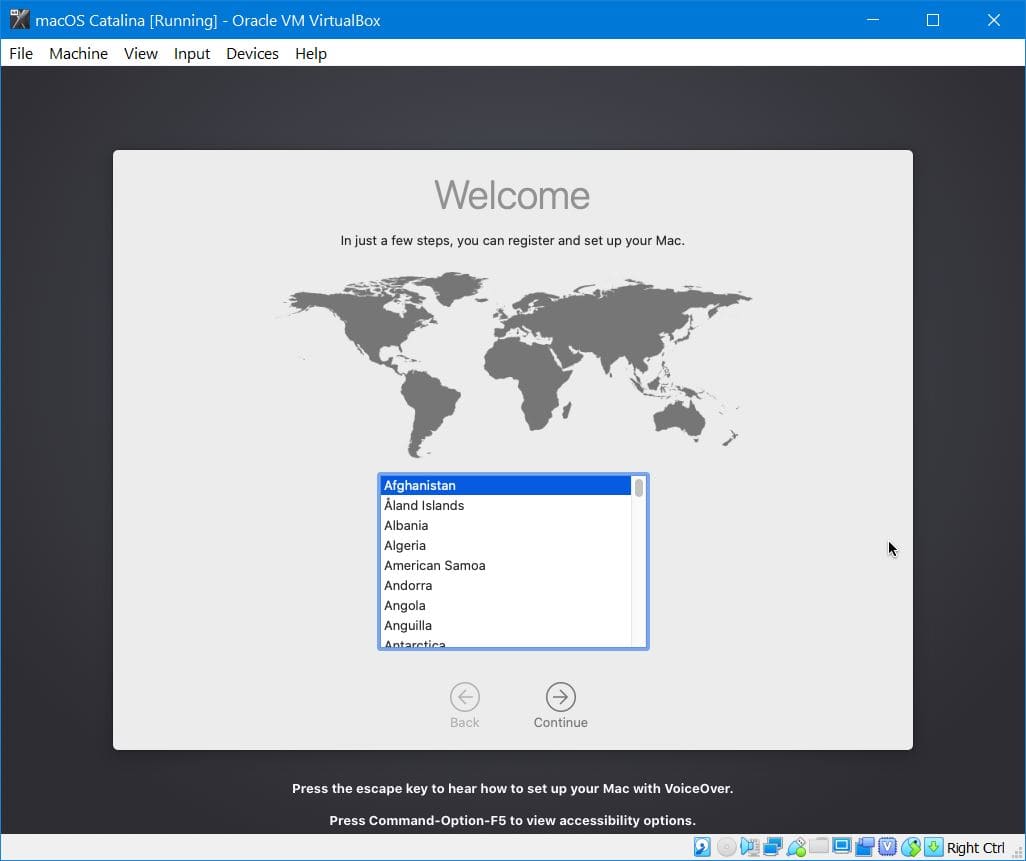
Great! From now, whenever you use an Apple feature, Apple might collect some information of you, simply Continue. There’s no risk in it.
Next, if you would like to make your information here, you’re free to go. In my case, I’ll use the Don’t transfer any information now.
The sign in option is there. If you have an Apple ID, use it to sign in there. Next, you’ll be asked for your credential, type it and click Continue.
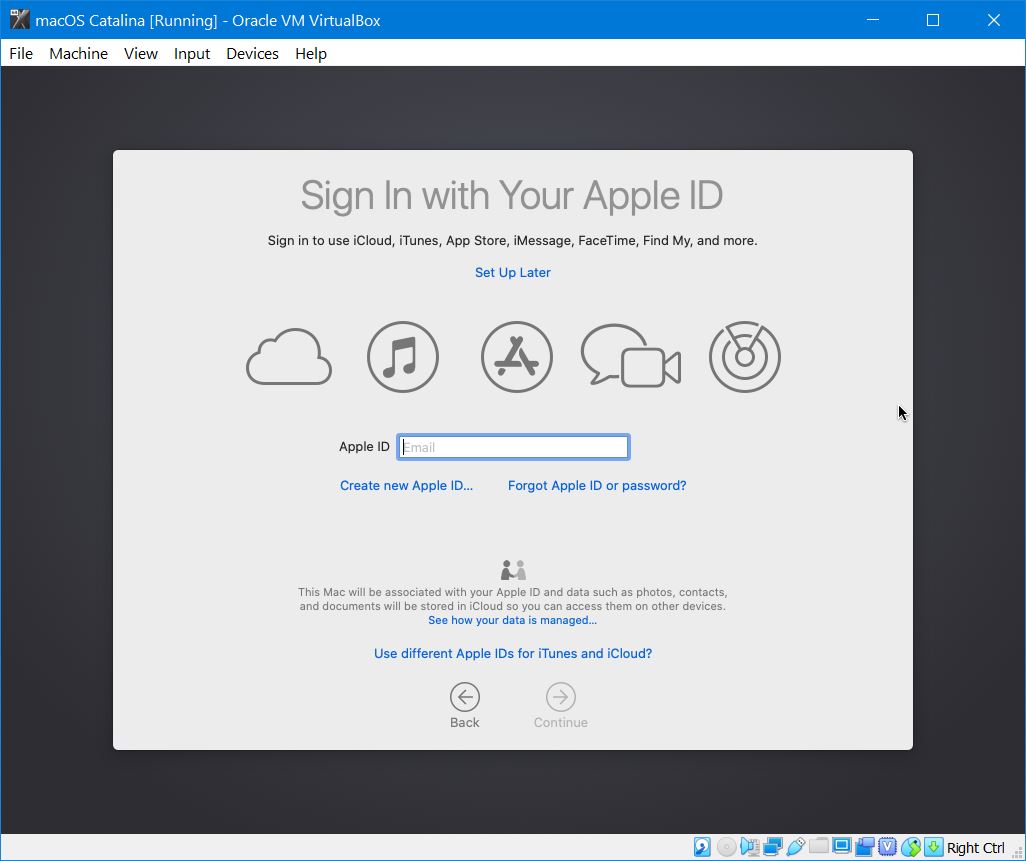
Since I’ve signed in with my Apple ID, Apple recommends using two-factor authentication.

The use of the macOS Catalina points to the terms and conditions. Click Agree and continue with the installation.
Create your account with the following details and Continue.
There are some useful features which will be set up for you, Continue with it.
Apple might receive some information about the software, Continue with it. This can be changed from the System Preferences later.
Wonderful! The new screen time feature is under your hands, Continue with it.
Select your desired interface which looks the best to you and click Continue.
Once you’ve done the settings, your Mac will begin setting up.
When it’s finished, you’ll see the newest version of macOS which is macOS Catalina. The dark mode of Catalina is super stunning. Here’s a quick look at what we expect to see.
Optional Step: Fix macOS Catalina Small Screen Resolution
With all the things done, you will likely notice a small resolution when you turn into a full screen. Here’s how to fix macOS Catalina screen resolution.
- Fix macOS Catalina Screen Resolution on VirtualBox
With the assigned resources, you should now do speed experience a speed surf of Catalina. Here’s how to speed up macOS Catalina or Mojave on Virtual Machine.
One More Step: Take A Snapshot
We recommend taking a backup of your virtual machine and when something goes wrong, you may simply switch to backup. This is really easy on VirtualBox.
- How to Take and Use Snapshots on VirtualBox

From now, you can surf, try new apps and features, develop apps on XCode and even install Windows on Catalina. Including these, there’s plenty of things you could do. While running macOS on VirtualBox mightn’t be the best, but however, it’s the most convenient and cheapest way to try and even work. It’s worth giving a try! Now that you’ve done all these, there’s nothing more you’ve to do. This isn’t probably perfect experience for trying out Catalina on an actual computer, but with virtual machine, you’ll experience nearly the most similar experience. That way, whenever a new version is dropped, you don’t need to wait for us to upload an image, instead, you can directly update your macOS to the latest version.
However, if there were some issues with slow performance, you can always speed up slow running macOS Catalina.
That’s the end line of Install macOS Catalina on VirtualBox on Windows PC. If you’ve some questions, suggestions or ideas for improvement, we are here to know.