Local user and group management (lusrmgr.msc) is a console for managing local users and groups in Windows. It is a universal console and has been used in all versions of Windows since Windows 2000 including Windows XP, Windows Vista, Windows 7, Windows 8 and now Windows 10.
The basic purpose of local user management is to assign rights to different users and groups on a computer. For example, the default roles include administrator, power user, standard user, guests, etc.
You can open local users and group management console by going to Run –> lusrmgr.msc.
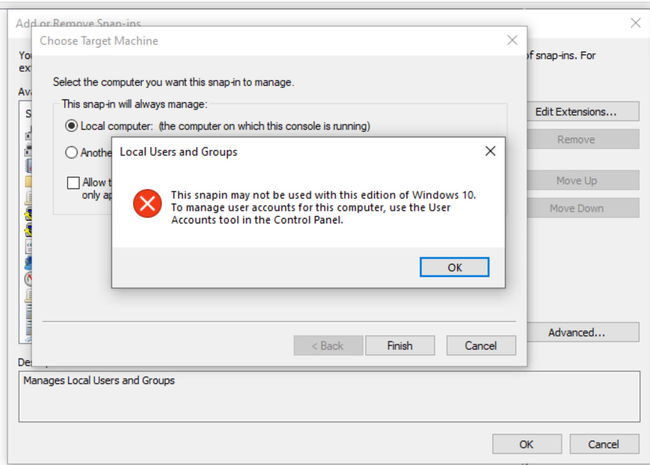
But when you run this command in Windows 10 Home edition, you will get the following message:
This snapin may not be used with this edition of Windows 10. To manage user accounts for this computer, use the User Accounts tool in the Control Panel.
The problem with the user accounts tool from the control panel is that it does not give a lot of options regarding user rights control. Lusrmgr is always easier to use and historically, administrators have used the console for user management.
In this article, we will discuss how to enable lusrmgr in Windows 10 Home and also how to manage users from the command-line.
Enable Lusrmgr in Windows 10 Home
It is not possible to use the built-in local user and group management tool in Windows 10 Home but we can use a third-party tool which is very similar to the built-in tool and it has the same functionality.
- Go to the lusrmgr download page. Download lusrmgr.exe.
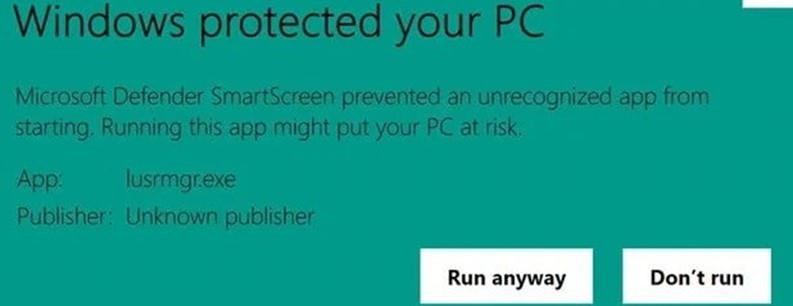
- Run the downloaded executable. Since the executable is not digitally signed, you may encounter a Microsoft Defender SmartScreen prompt. Click on More info and then on Run anyway.
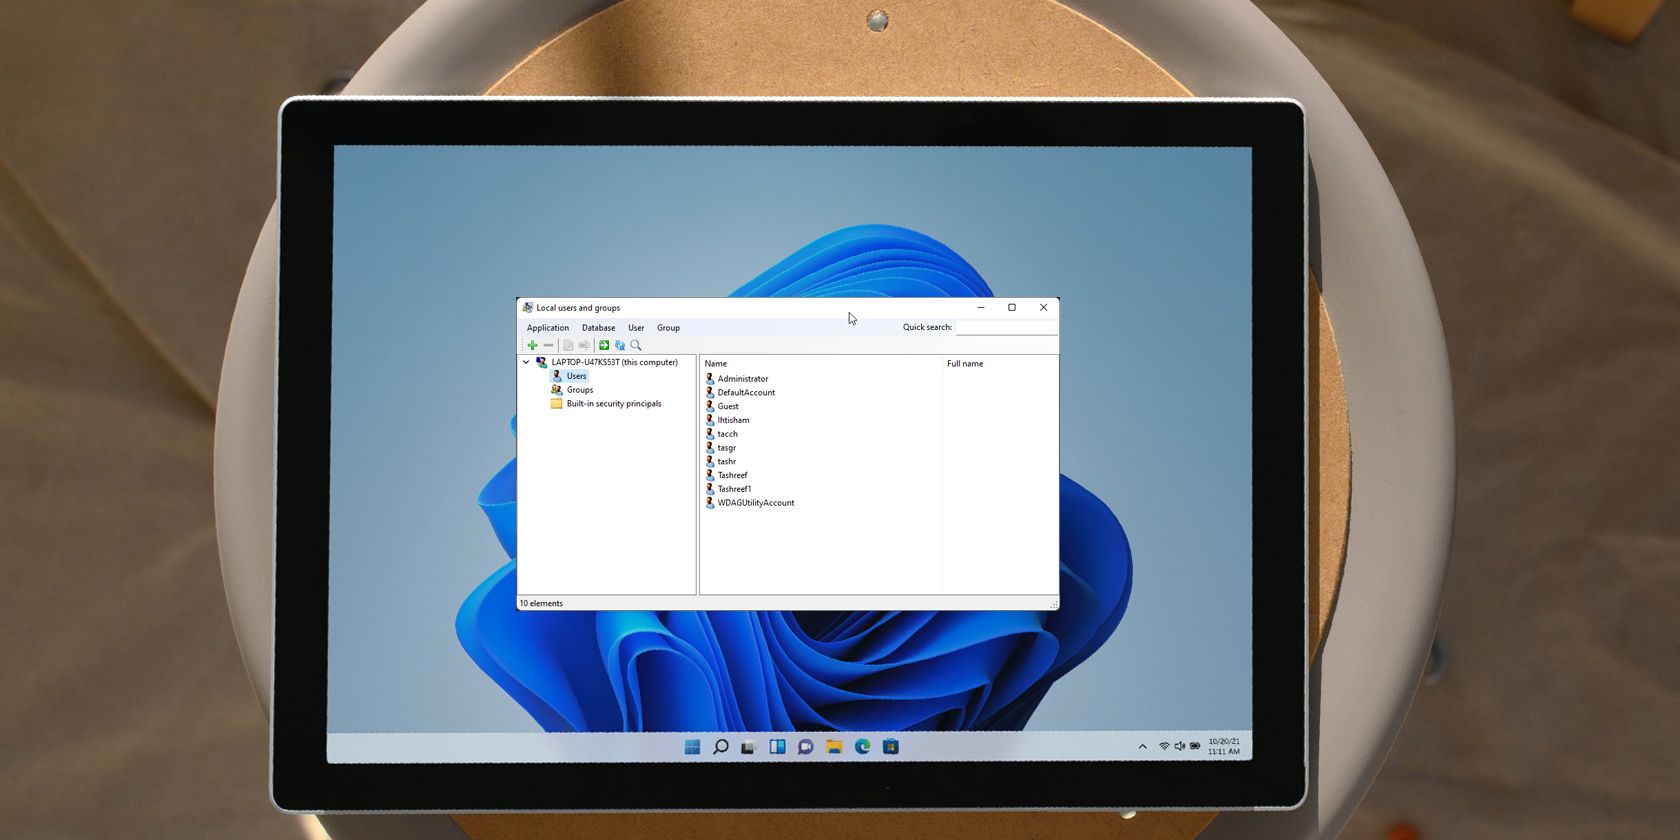
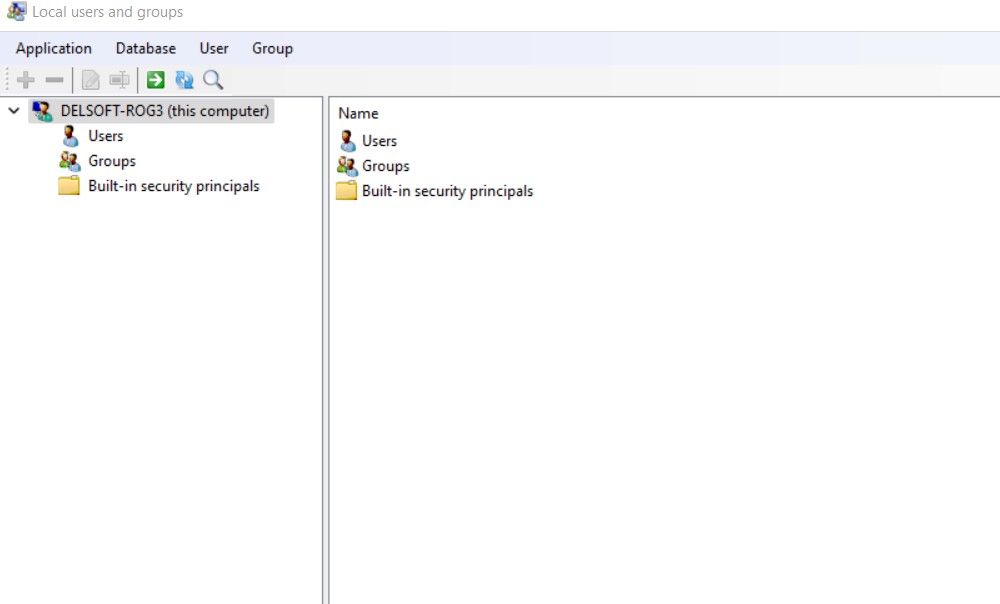
- You will get the following screen which is very similar to the built-in lusrmgr tool:
You can create new users and groups and change the existing users and groups easily using this app.
Lusrmgr is a portable app that can be run on any edition of Windows 10 including Windows 10 Home. Please note that the lusrmgr program requires administrative privileges and .NET framework 4.5 or higher to function correctly.
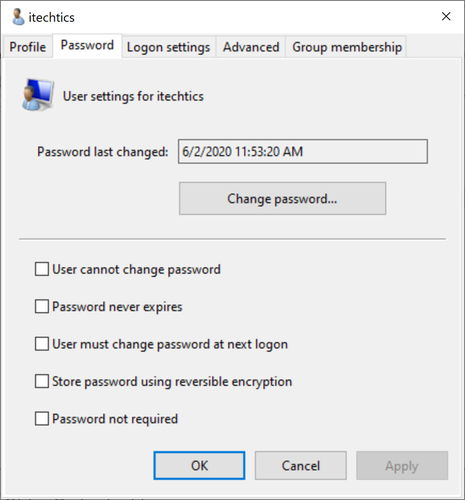
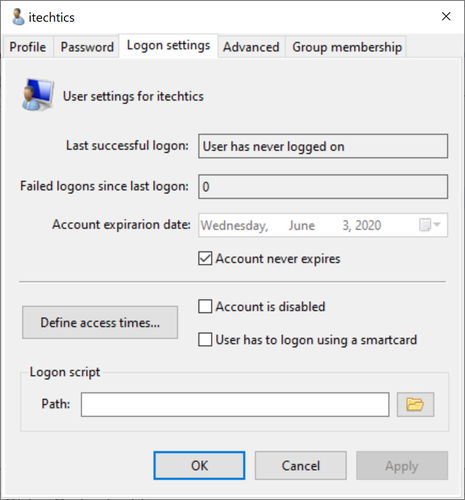
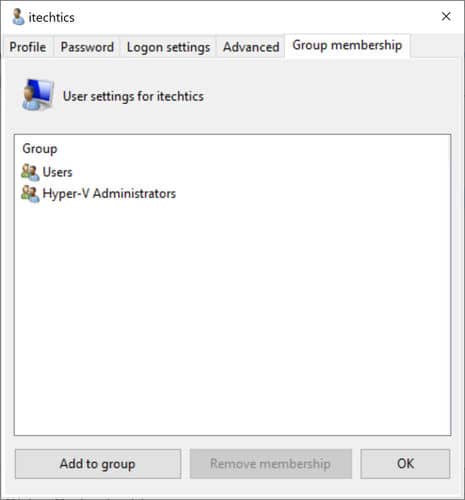
You can configure the following settings for a single user:
Password settings include changing or resetting Windows passwords, restricting password changes and password changes at the next logon, and storing passwords using reversible encryption and logins without passwords.
You can also configure the logon times of the user, account expiration and also define a logon script path and the home folder.
You can also add or remove a user from a specific group.
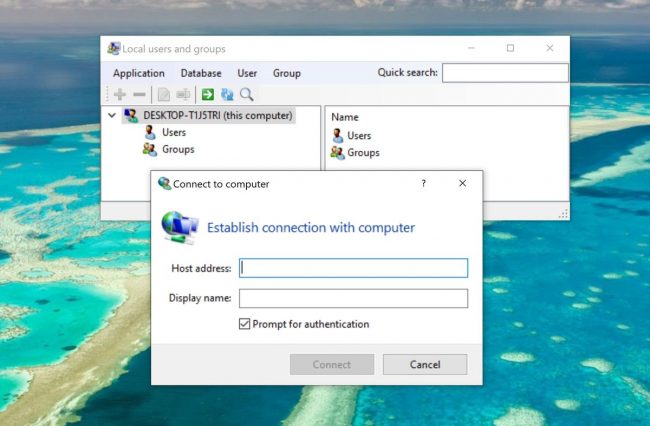
One interesting feature of lusrmgr is that it can also connect to remote computers for managing their local users and groups. To do this, go to Database –> Connect to computer or simply press Ctrl + C shortcut key.
Please note that remote computers are required to allow remote connections otherwise this utility will not be able to connect successfully.
Once you have made the changes in the user or group rights, you can easily verify if the new changes are in effect using the command-line.
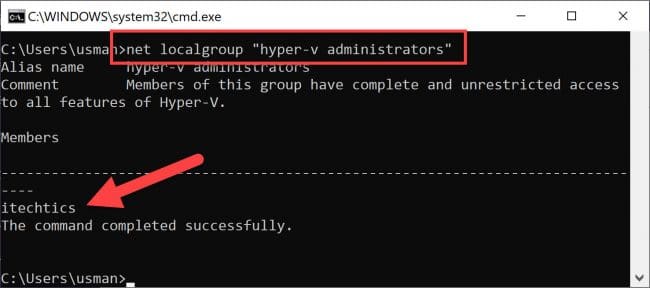
For example, I added the user itechtics in Hyper-V administrators group using lusrmgr executable discussed above. To verify if the user has been added to the group, I’ll run the following commands:
net localgroup "hyper-v administrators"
This will show a list of users in the group.
Overall, lusrmgr.exe is a nifty portable tool that fills in the gap of user management for home users without getting into a lot of complexities.
What is your experience with the tool? Please share your experience with us in the comments below.
Also check out the following articles related to Windows 10 Home:
How to enable the group policy editor in Windows 10 Home
How to enable Hyper-V in Windows 10 Home
Use the third party tool to enable lusrmgr.msc
by Taiba Hasan
A postgraduate in Computer Applications, she is an avid technical writer who loves to craft content revolving around Windows, Android, and emerging technologies like SaaS. With How-To and… read more
Updated on
- The ulsrmgr.msc command lets you access the Local Users and Groups Management interface on Windows pro, edu, and Enterprise editions.
- However, you cannot manage the local users and groups via the lusrmgr.msc command in Windows Home edition.
- A third-party tool, lusrmgr.exe, will let you access a similar console to manage the local users and groups on the Home edition of the OS.
Microsoft offers a shell application Local Users and Groups Management (lusrmgr.msc) for managing the users on local and remote computers. However, this application is not accessible in the Home edition for Windows using the lusrmgr.msc command.
If you are looking for ways to enable local user and group management to manage users and groups, this guide will explain the complete method of doing so.
What is lusrmgr.exe?
Local Users and Groups Management, just like Local Group Policy Editor, is an advanced feature and is only part of Windows Pro, Education, and Enterprise Edition of the operating system.
Hence, if you are a Windows Home Edition user, you will find Local Users and Groups missing. Subsequently, you will need a third-party program known as lusrmgr.exe to manage local users and groups via a console similar to Local Users and Groups Management.
How we test, review and rate?
We have worked for the past 6 months on building a new review system on how we produce content. Using it, we have subsequently redone most of our articles to provide actual hands-on expertise on the guides we made.
For more details you can read how we test, review, and rate at WindowsReport.
What are the system requirements for lusrmgr.exe?
The minimum system requirements to be able to install lusrmgr.exe are as follows:
- .NET Framework version 4.6 or above
- Operating system Windows Vista/Windows Server 2008 or above
How do I download lusrmgr.exe from GitHub?
- Visit the GitHub lusrmgr.exe download page.
- Scroll down the Code tab and click the Download link in the Download section to download the latest version.
- Once the download is completed, navigate to the download location of the lusrmgr.exe file in File Explorer and double-click to run the program.
- Click Yes on the User Action Control prompt to allow the application to make changes on the computer.
When the Lusrmgr application launches successfully, you will see that it resembles the Local Users and Groups Management interface that is accessible via the lusrmgr.msc command.
How do I manage local users on Windows Home edition using lusrmgr.exe?
1. Create a new user account using Lusrmgr.exe
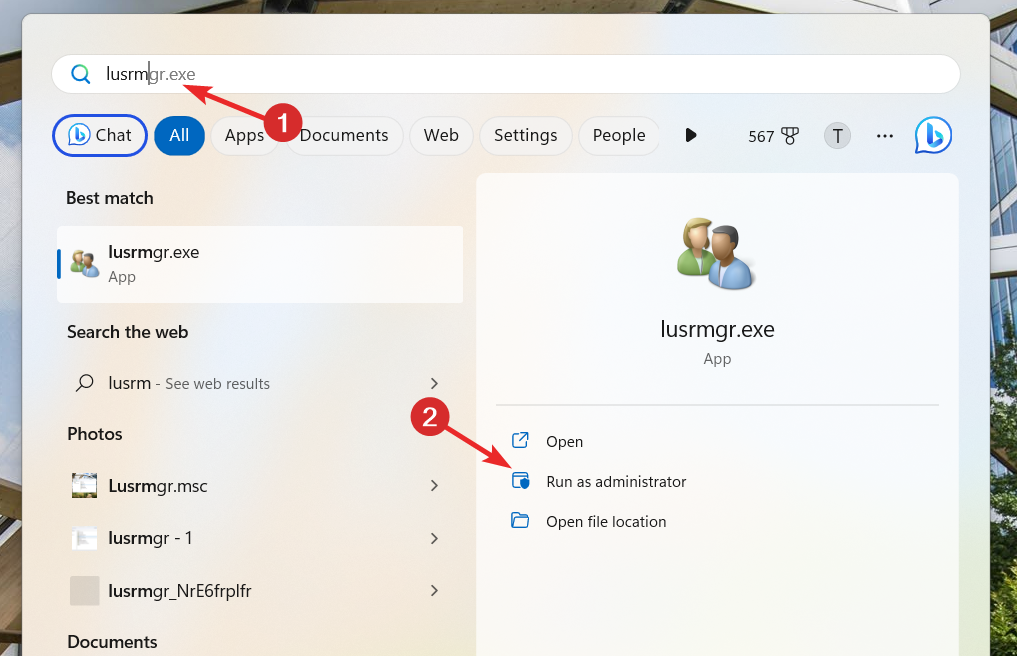
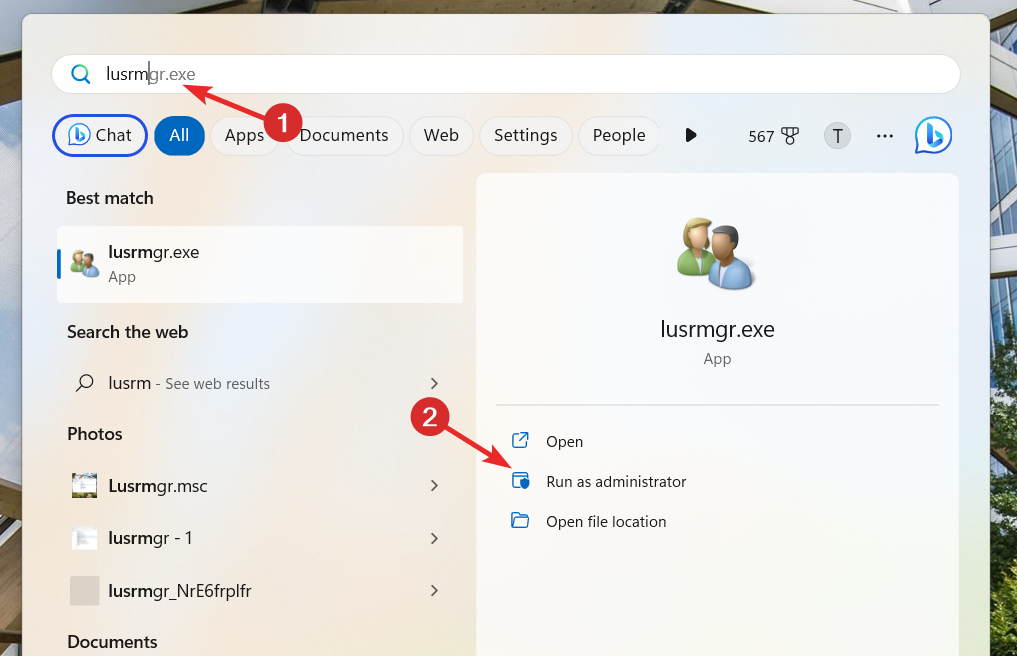
- Press the Windows key, type lusrmgr in the search bar, and click the Run as administrator option in the search results.
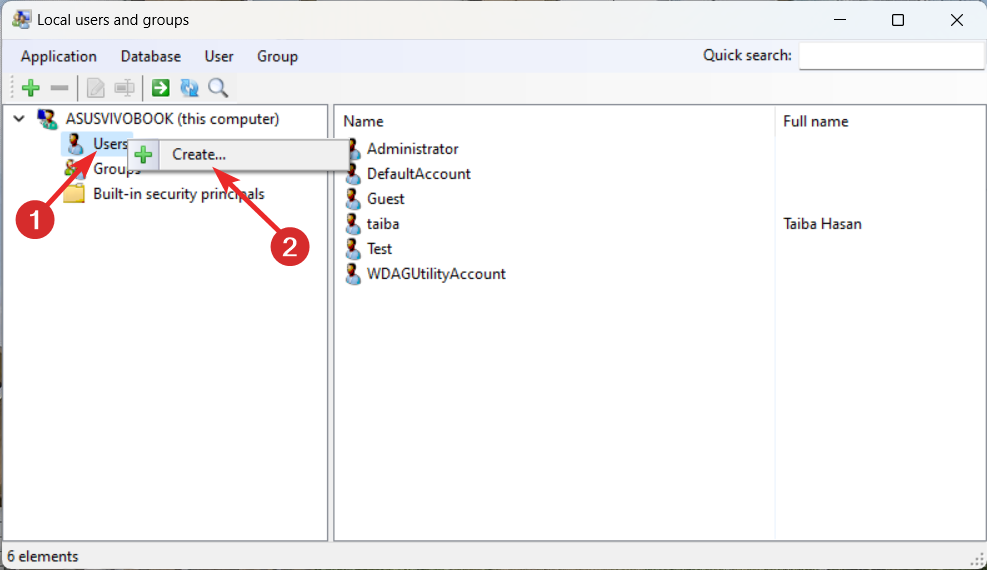
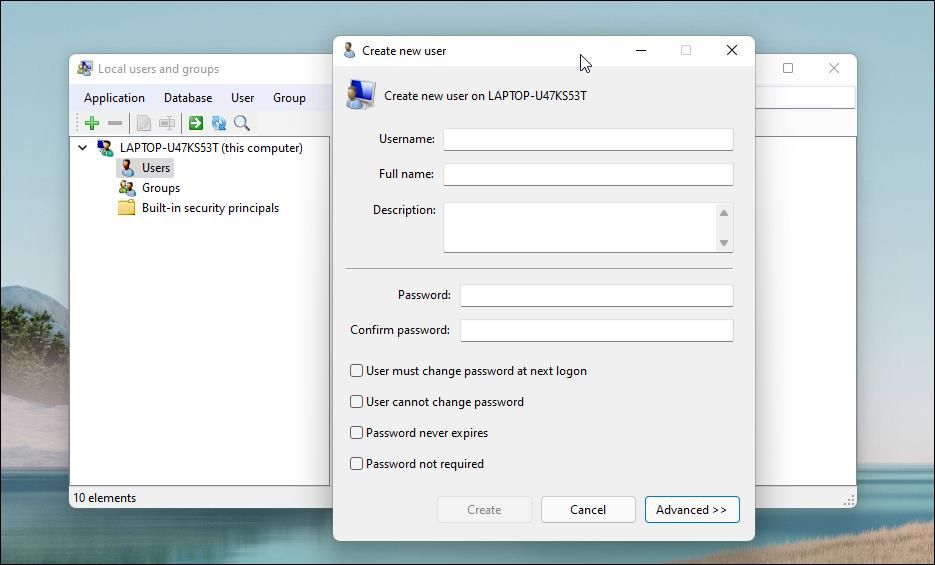
- Right-click the Users option in the left sidebar and select Create from the context menu.
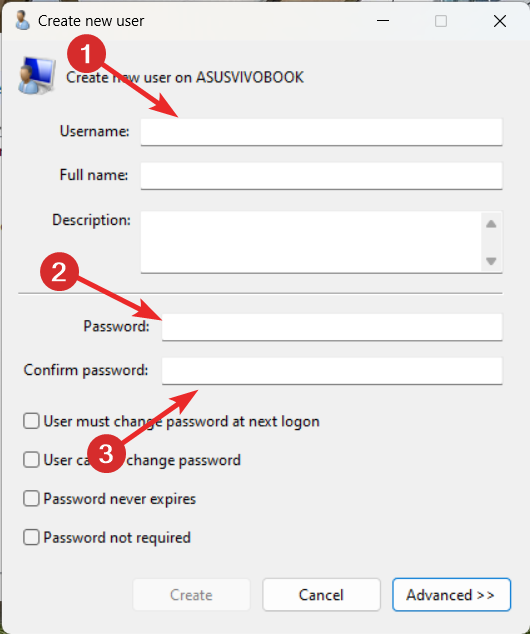
- Assign Username, set the Password, and Confirm the password in the relevant fields.
- Click the Advanced button to access the advanced settings and configure the local path, remote path, and account expiration date, if necessary.
- Press the Create button after assigning the necessary fields to create a new user account.
Creating a new user account is a straightforward process using the Lusrmgr.exe tool a replacement for lusrmgr.msc on Windows Home Edition. It’s worth noting you can configure the logon times of the user and account expiration details using this third-party workaround.
2. Manage user accounts using lusrmgr.exe
1. Change the user password
- Launch the lusrmgr.exe tool on Windows PC and select the User option from the left navigation bar.
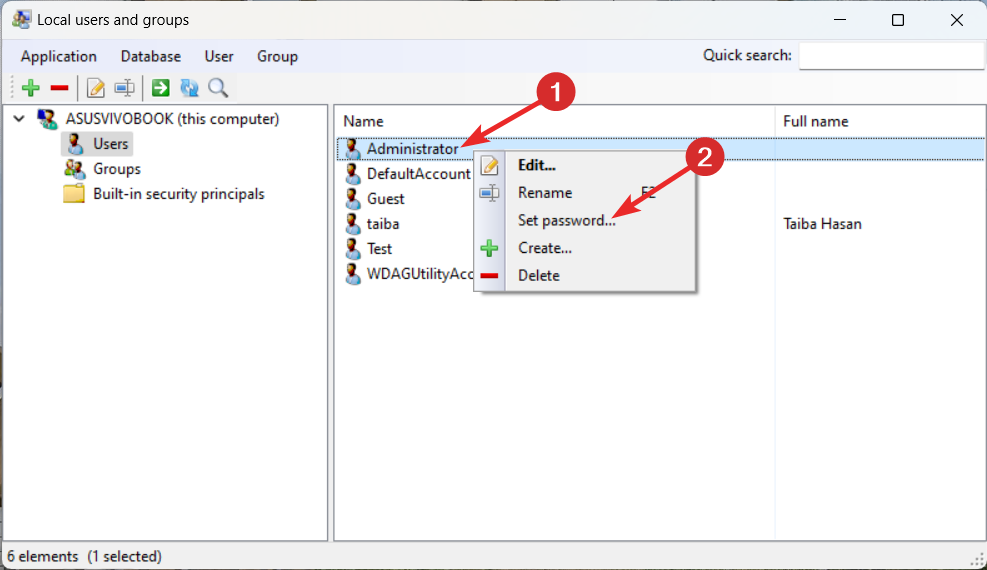
- Right-click the user name for which you want to change the password, and select Set Password.
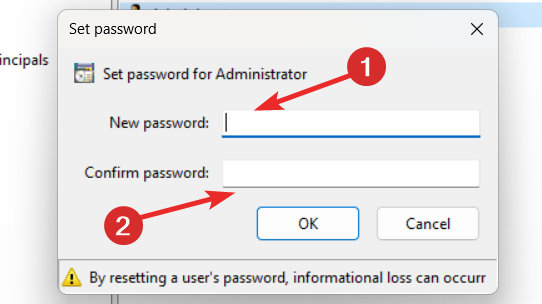
- In the popup window that opens, enter the new password twice in the New password and Confirm password fields.
- Press the OK button to save the changes.
2. Delete the user account
- Launch Lusrmgr on your Windows PC and switch to the User from the left navigation bar.
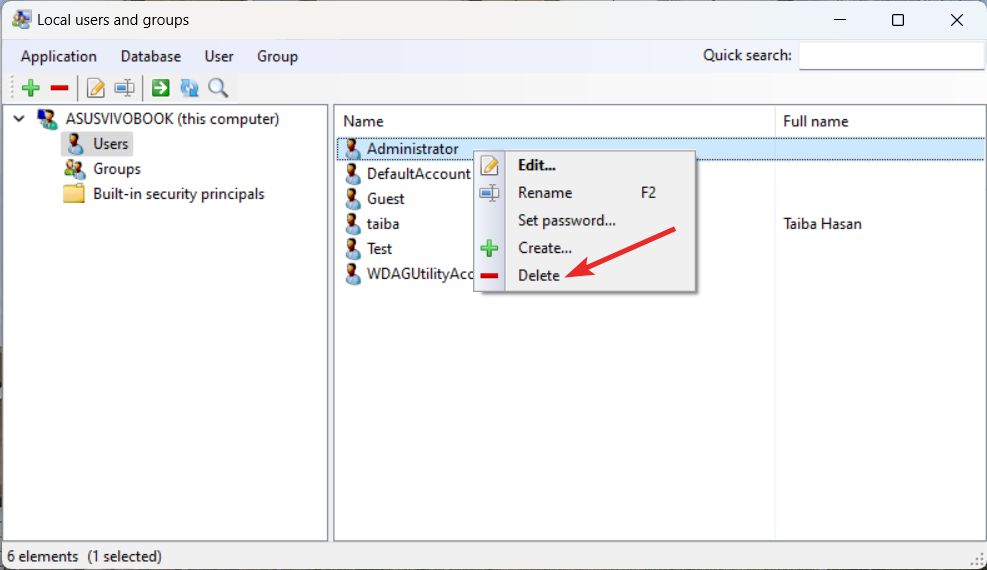
- Right-click the user account you want to delete, and select Delete from the context menu.
- Press the Delete button on the confirmation popup to permanently delete the user account.
Apart from changing the password and deleting the user account, you can also change the user settings like user name and group membership, prevent the user from changing the password, and even set the password expiration date.
How do I manage groups on Windows Home edition?
1. Create a new group using lusrmgr
- Press the Windows key, type lusrmgr in the search bar, and click Run as administrator from the results section.
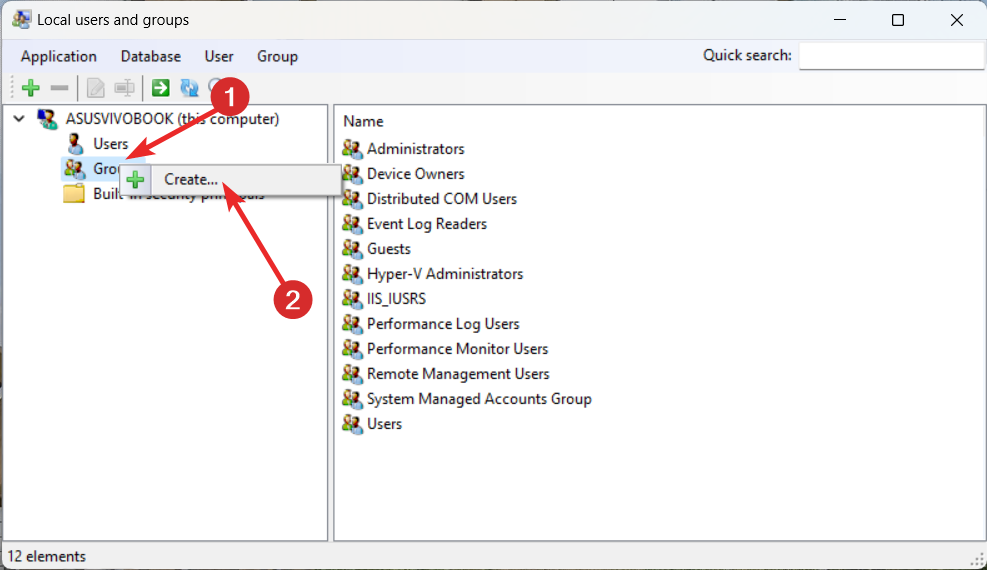
- Switch to the Groups section from the left navigation pane, right-click it, and select the Create option.
- Assign a relevant Group name in the new window that opens and click the + icon to add a user to the newly created group.
- Choose the user you need to add to the group and press the Select button.
- Finally, press the Create group button to create a new user group on your PC.
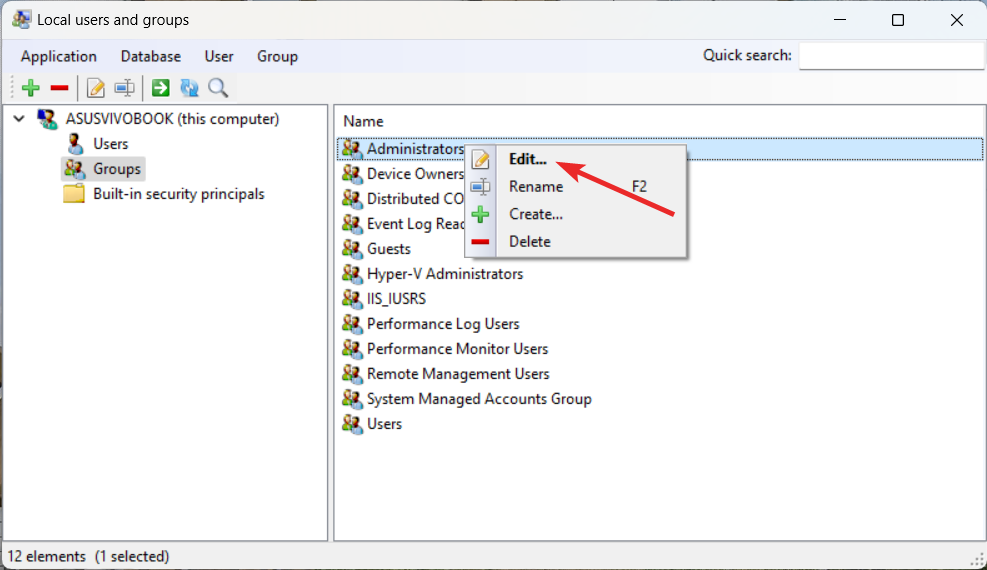
2. Add or remove a user from the group
- Launch the Lusrmgr tool on Windows PC and select the Groups option from the left navigation pane.
- In the right section of the window, right-click the group name from which you want to add or remove a user account and select the Edit option.
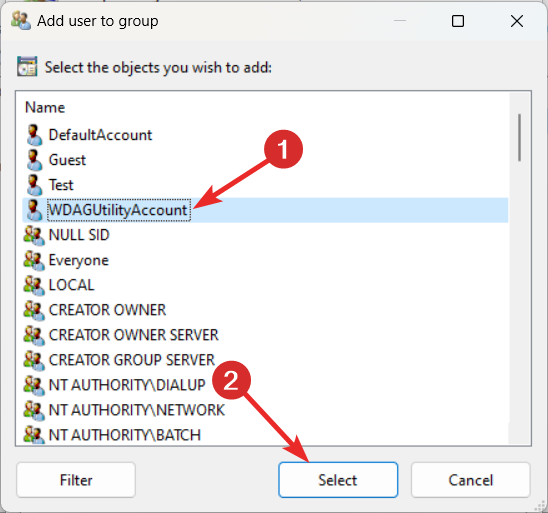
- Press the + icon located at the bottom to add a user.
- Choose the user you wish to add from the new popup that opens and press the Select button.
- You can press the Filter button and then choose one out of the two options – Show users or Show built-in security principals based on your preference.
- To delete a user from a specific group, simply select that user account and press the – icon.
That’s pretty much it! Hopefully, you now have a pretty good idea about how you can enable and use the Local User and Group Management using the lusrmgr tool on a Windows Home edition PC.
Refer to this guide in case you are curious to enable and use the group policy editor on Windows Home edition.
In case you have any queries or feedback for us, feel free to reach out in the comments section.
The windows 10 User Accounts and Settings app under the Control Panel (CP) can allow you to edit user accounts. But with the snap-in console’s Local Users and Groups management feature, you gain access to more details such as the permissions granted to groups and users on your personal computer.
Local User and Group Management (LUSRMGR.MSC) is a tool that supports managing local computer user accounts and groups. The tool can delete, add, or edit local user groups and accounts on a PC, including adding and removing users from local groups. It can also change the attributes of user accounts, such as login scripts, password policies, and home directories.
However, the LUSRMGR.MSC tool isn’t available under the “Administrative Tools” menu on most Windows 10 and 11 Home computers. In this case, you can use a third-party program to enable the tool because it’s not activated by default.
You can also run LUSRMGR.MSC file to access Local Users and Groups Management or gain access using Computer Management Windows feature. In this article, you’ll learn how to enable LUSRMGR.MSC in Windows 10 and 11 computers, including how to view and manage all local users and groups on your PC.
How to Enable LUSRMGR.MSC in Windows 10/11 Home
Local Users and Groups Management resembles the Local Group Policy Editor function and is only available in Windows 11 Edu, Pro, and Enterprise OS editions. However, the built-in LUSRMGR.MSC snap-in isn’t available on the Home edition of Windows operating system.
LUSRMGR.MSC third-party tool, including features, resembles the built-in Windows user accounts and groups management tool. The portable application can run on any Windows 10 and 11 Home editions, making it ideal for enabling the built-in tool.
Available on GitHub, LUSRMGR.MSC download is free. However, you must assign LUSRMGR.MSC administrator privileges and set the .NET framework at 4.5 or higher for the tool to function properly. Enable LUSRMGR.MSC in Windows 11 or 10 is as follows:
1) Download an executable LUSRMGR.exe file.
2) Double-click on the downloaded file to run it. If you encounter a Microsoft Defender SmartScreen prompt, click on “More Info.”
3) Click on “Run Anyway.”
4) Launch the program, and a screen similar to that of the built-in LUSRMGR tool will appear as follows:
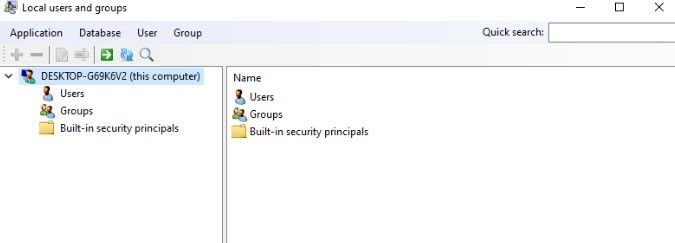
5) Create and manage user accounts and groups under the console.
How to Create a New User Account Using LUSRMGR.MSC
1) Click on the “Users” menu.
2) Select the option “Create” to create a new user.
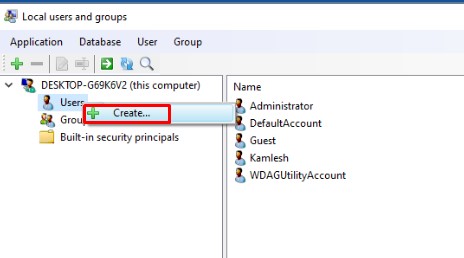
3) Enter all the correct user account details and click on the “Create” button.
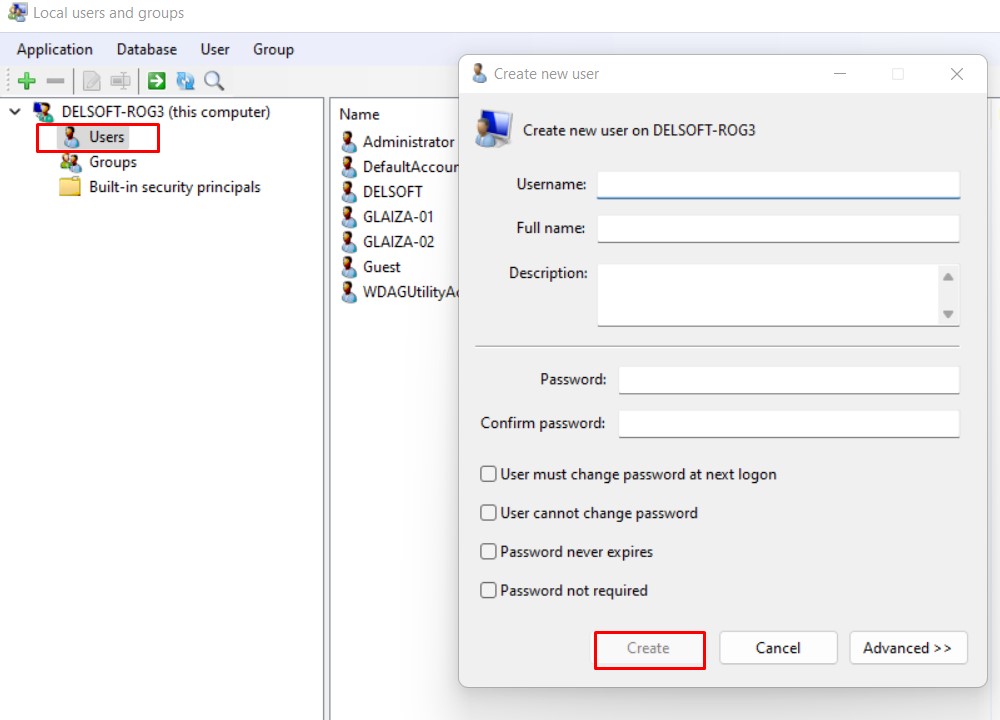
4) Configure the local path, advanced options, and profile, then click on the “Advanced” button.
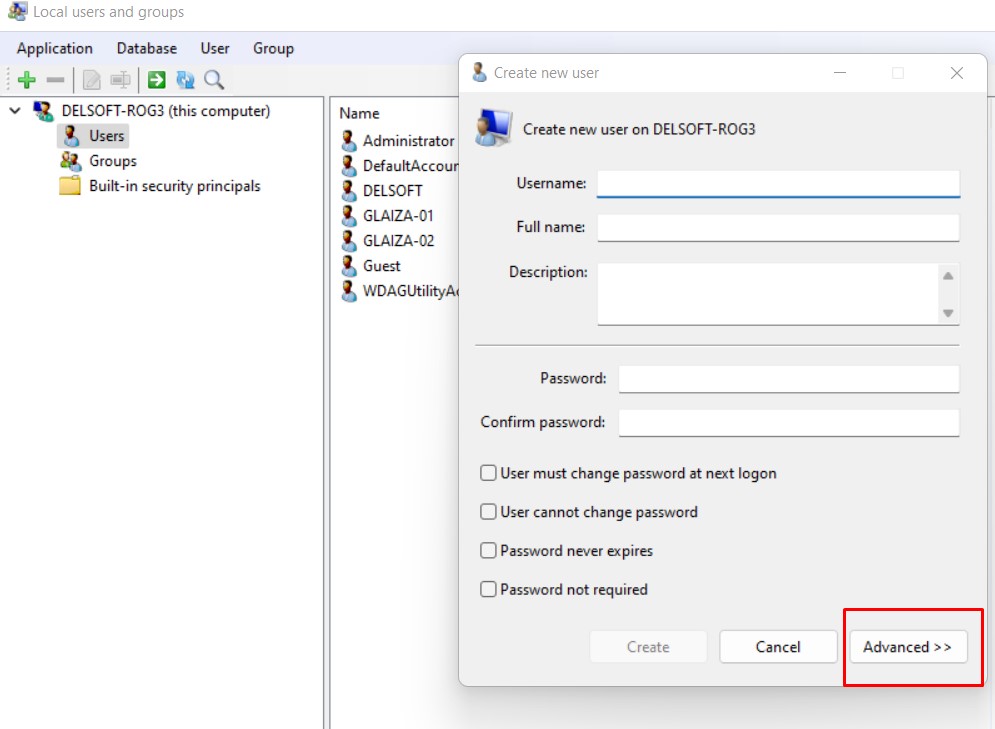
5) Click on the “Create” button to add the newly-created user account to your computer.
With the LUSRMGR tool, you can delete, edit, add, or rename an existing user account password. The tool also enables the creation of a hidden administrator account. It also allows remote connection to computers.
Other LUSRMGR.MSC Features
Apart from account management features, the LUSRMGR.MSC command line options offer other possibilities not available within the built-in utility. They include:
- Using the search function to find a particular user account. It enables system administrators to easily manage several user accounts.
- Defining individual user account access times or set blocked times for particular times and days. Right-click on an account’s username and select “Edit” to set its access time. Finally, click on the “Account” tab and select “Define access time.”
All user accounts lack a default time limit. Choose a time block for various days to define access time, if necessary.
Common LUSRMGR.MSC Errors
Some common errors linked to the local user accounts and groups include:
- Lusrmgr. Application error.
- Lusrmgr – bad image.
- Lusrmgr could not be installed.
- Lusrmgr could not be started.
- Lusrmgr could not be found.
- Lusrmgr failed to initialize properly.
- Lusrmgr could not be launched. Class not registered.
- Lusrmgr is not running.
- Lusrmgr has encountered a problem and need to close. We are sorry for the inconvenience.
- Lusrmgr is not a valid Win32 application.
- Error starting program: lusrmgr.msc
- The file lusrmgr.msc is missing or corrupt.
- Cannot find lusrmgr.msc.
- Windows failed to start – lusrmgr.msc.
- Faulting application path: lusrmgr.msc.
1. How to Fix the Common LUSRMGR.MSC Errors
Restore Your Computer to the Last Backup Image or Restore Point Prior to the Error
You can restore your Windows XP, Vista, 8, 7, 10, and 11 as follows:
1) Click on the “Start” button and type “System Restore” on the search box, then hit the “Enter” key.
2) Find “System Restore” in the search results and click on it.
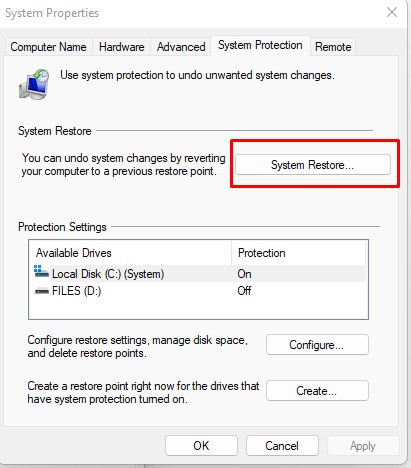
3) Enter your administrator password if prompted.
4) Follow the System Restore window prompts to select a relevant point of restoration.
5) Restore your PC to that restore point or backup image.
2. Run a Windows Update
An outdated Windows operating system is also linked to most lusrmgr.msc errors. Conduct an update as follows:
1) Click on the “Start” button and type “Update” in the search box, and hit the “Enter” key.
2) Click on “Check for Updates” on the Windows Update wizard.
3) Download available updates and click on “Install Updates.”
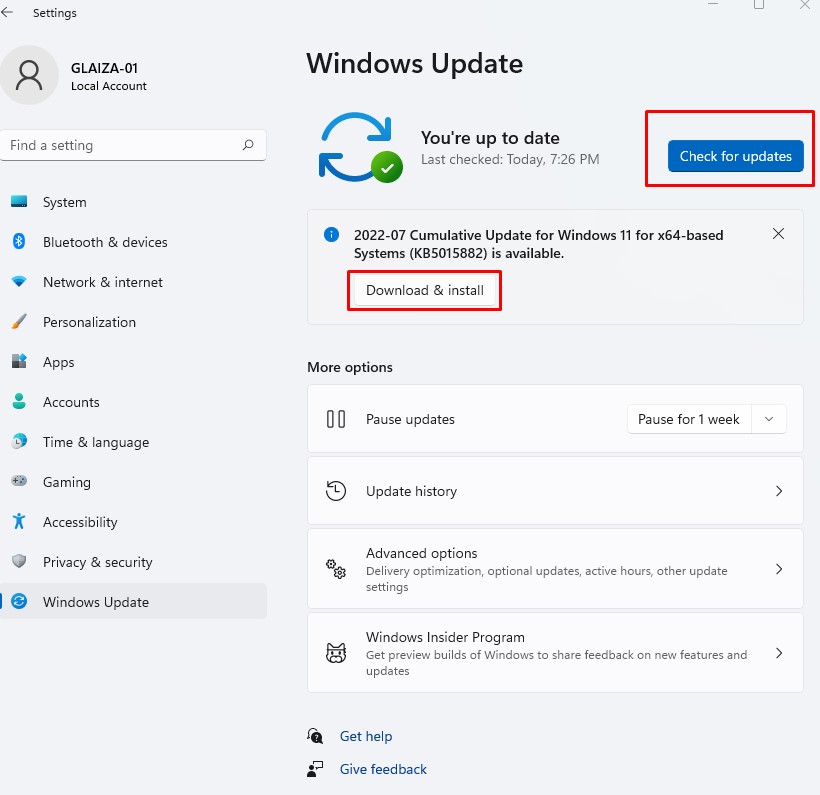
4) Restart your computer once all update downloads and installations are complete.
Conclusion
The local users and groups management tool enable easy control of local users and groups on your computer. The program allows for the addition, deletion, or modification of user accounts and groups. In addition, you can easily download the portable LUSRMGR.MSC application to enable the built-in feature on Windows 10 and 11.
Run Windows Update or restore your PC to the last restore point to fix most LUSRMGR.MSC errors, such as application error and could not be found or started. We hope that you found this helpful article and you were able to enable your local user and group management Windows feature.
На чтение 3 мин. Просмотров 34 Опубликовано
Управление локальными пользователями и группами (lusrmgr.msc) — это консоль для управления локальными пользователями и группами в Windows. Вы можете найти эту универсальную консоль во всех версиях Windows, включая Windows 2000, XP, Vista, 7, 8, 8.1, 10 и Windows 11. Она используется для назначения прав различным пользователям и группам на компьютере. Например, роли по умолчанию включают администратора, опытного пользователя, стандартного пользователя, гостей и т.д. Вы можете получить доступ к консоли управления локальными пользователями и группами, выполнив команду lusrmgr.msc.
Консоль управления локальными пользователями и группами (lusrmgr.msc) удобна и доступна в каждой версии Windows, как было сказано выше. К сожалению, эта команда не работает в Windows 11/10 Home edition, когда вы попытаетесь запустить команду lusrmgr.msc в Windows 11/10 Home Edition, вы получите следующее сообщение: — «Эта оснастка не может быть использована».
«Эта оснастка не может использоваться в данной редакции Windows 11/10. Для управления учетными записями пользователей на этом компьютере используйте инструмент «Учетные записи пользователей» в панели управления».
В этой статье мы рассмотрим, как включить lusrmgr в Windows 11/10 Home edition и управлять пользователями?
Как включить консоль управления локальными пользователями и группами (Lusrmgr.msc) в Windows 11/10 Домашняя версия?
Встроенный инструмент консоли управления локальными пользователями и группами в Windows 10 Home невозможно использовать без стороннего инструмента, который очень похож на встроенный инструмент и обладает той же функциональностью. Чтобы включить и использовать консоль управления локальными пользователями и группами (Lusrmgr.msc) в Windows 10 Home, выполните следующие шаги:-…
Шаг 1. Загрузите исполняемый файл lusrmgr с Github.
Шаг 2. Запустите загруженный файл на компьютере с Windows 11/10 Home.
Шаг 3. Появится следующий экран, который очень похож на встроенный инструмент lusrmgr:-.
Шаг 4. В консоли Локальные пользователи и группы вы можете создавать и управлять пользователями и группами. Чтобы создать пользователя, щелкните правой кнопкой мыши на Пользователи и выберите Создать в меню.
Шаг 5. Откроется окно «Создание нового пользователя». Заполните данные нового пользователя, которого вы хотите создать под Windows 11/10, и нажмите кнопку Создать.
Шаг 6. Чтобы управлять уже созданной учетной записью в Windows 11/10, выберите и щелкните правой кнопкой мыши на ней. Вы можете переименовать, установить пароль, удалить или отредактировать учетную запись.
Одна из интересных особенностей этого инструмента заключается в том, что он позволяет подключиться к удаленному компьютеру, если удаленный компьютер разрешает удаленное подключение. Чтобы получить доступ, щелкните правой кнопкой мыши на записи вашего компьютера и выберите «Подключиться к компьютеру».
Читайте также:
- Как включить функцию Windows Sandbox в Windows 10 Home Edition?
- Как включить редактор групповой политики (gpedit.msc) в Windows 11/10 Home edition?
Windows’ Home editions don’t usually come with the Local User and Group Management service, but there are ways you can add it in.
Local Users and Groups Management is a shell application to manage Windows system administrator applications. It also allows you to manage local and remote computers and access system administrator tools. However, Local Users and Groups Management is not available in the Windows Home edition of the operating system.
If you need to use Local Users and Groups Management (lusrmgr.msc) in Windows 11 Home, you will have to rely on a third-party program. Here we show you how to enable Lusrmgr.msc in Windows 11 and 10 Home running computers.
How to Enable the Local User and Group Management (Lusrmgr.msc) Console in Windows 11/10 Home Edition
Similar to Local Group Policy Editor, Local Users and Groups Management is a power user feature, so it is only available for Windows 11 Pro, Edu, and Enterprise edition of the OS.
However, while you can enable Group Policy Editor on Windows Home edition, it is not possible to enable the built-in Local Users and Groups Management snap-in for the Windows Home edition.
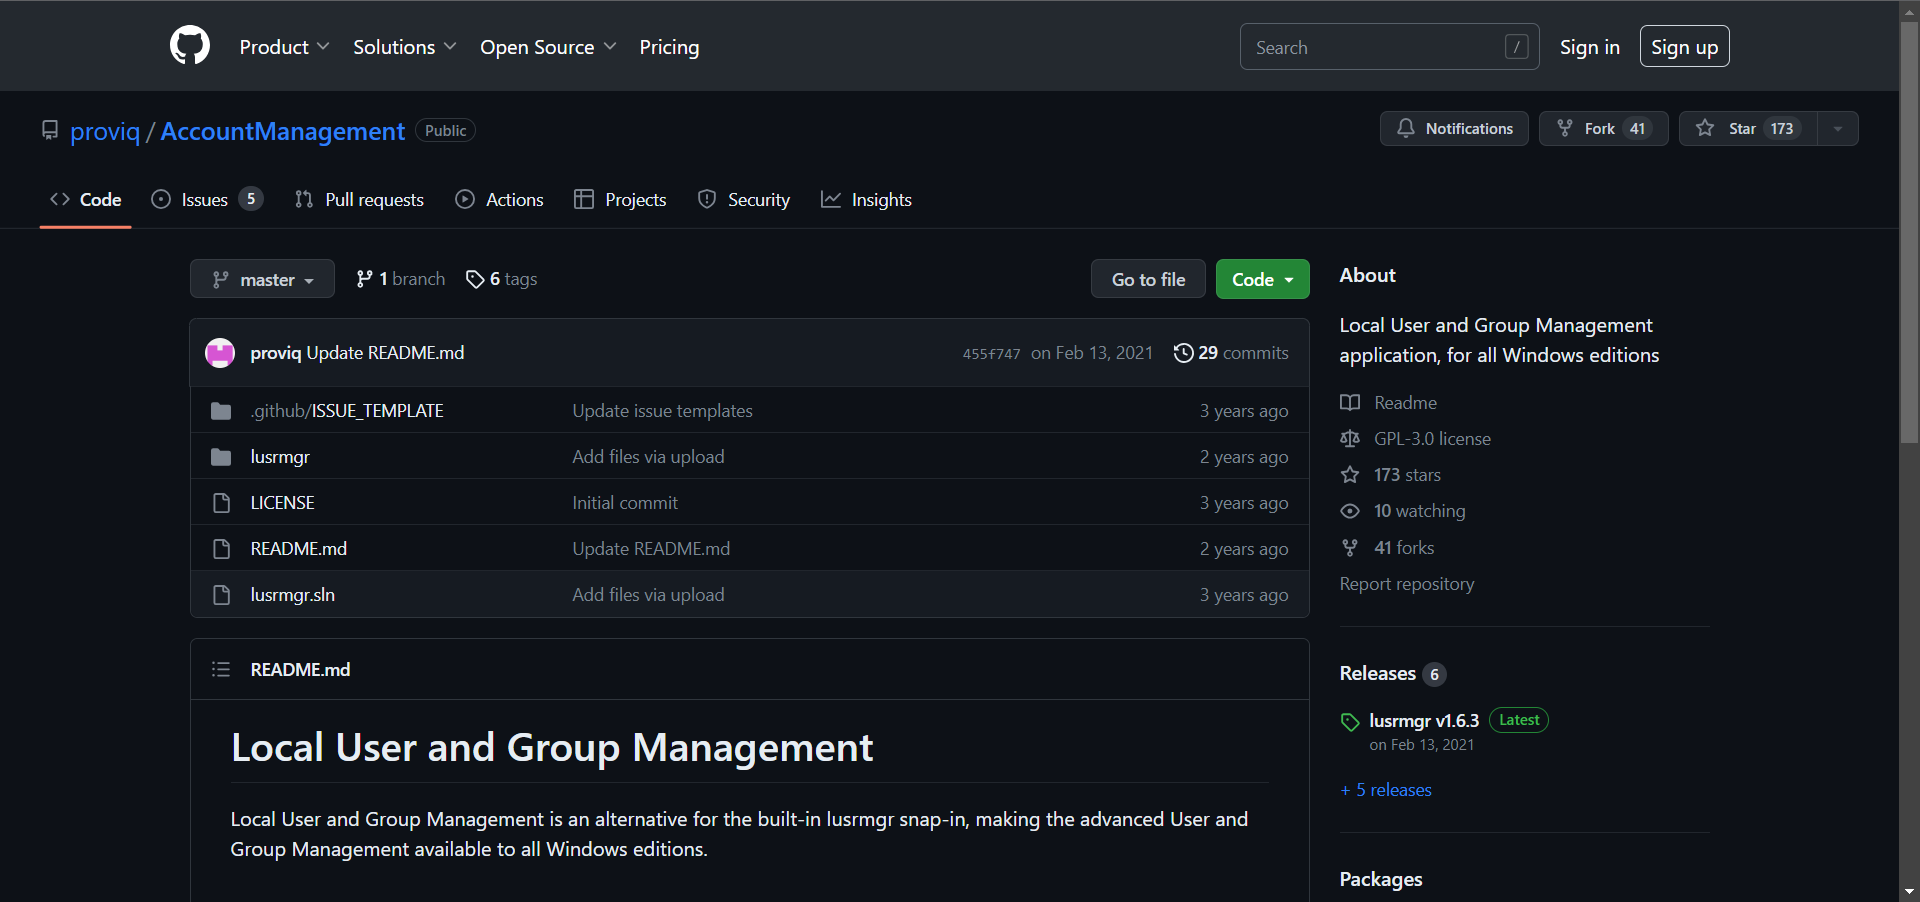
Instead, you will need to use a third-party alternative to enable lusrmgr.msc in Windows 11 Home edition. Dubbed as lusrmgr.exe, it is a third-party snap-in that comes with similar functionalities to the built-in Local Users and Groups Management console. It is a portable application, and you can download it from GitHub for free.
Follow these steps to enable Local User Group and Management Console in Windows 11 Home Edition using the lusrmgr.exe tool:
- Open the lusrmgr GitHub page. In the Code tab, click on the lusrmgr.exe file.
- Then click the Download button right corner to download the file to your PC.
- Once downloaded, double-click on the lusrmgr.exe file to run the program.
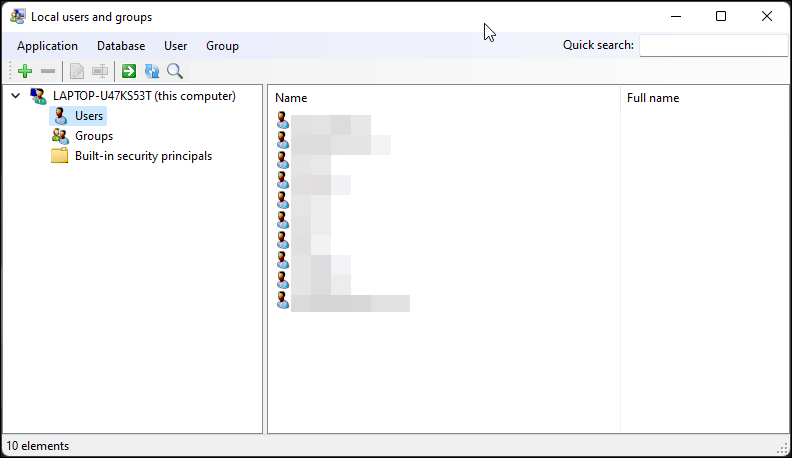
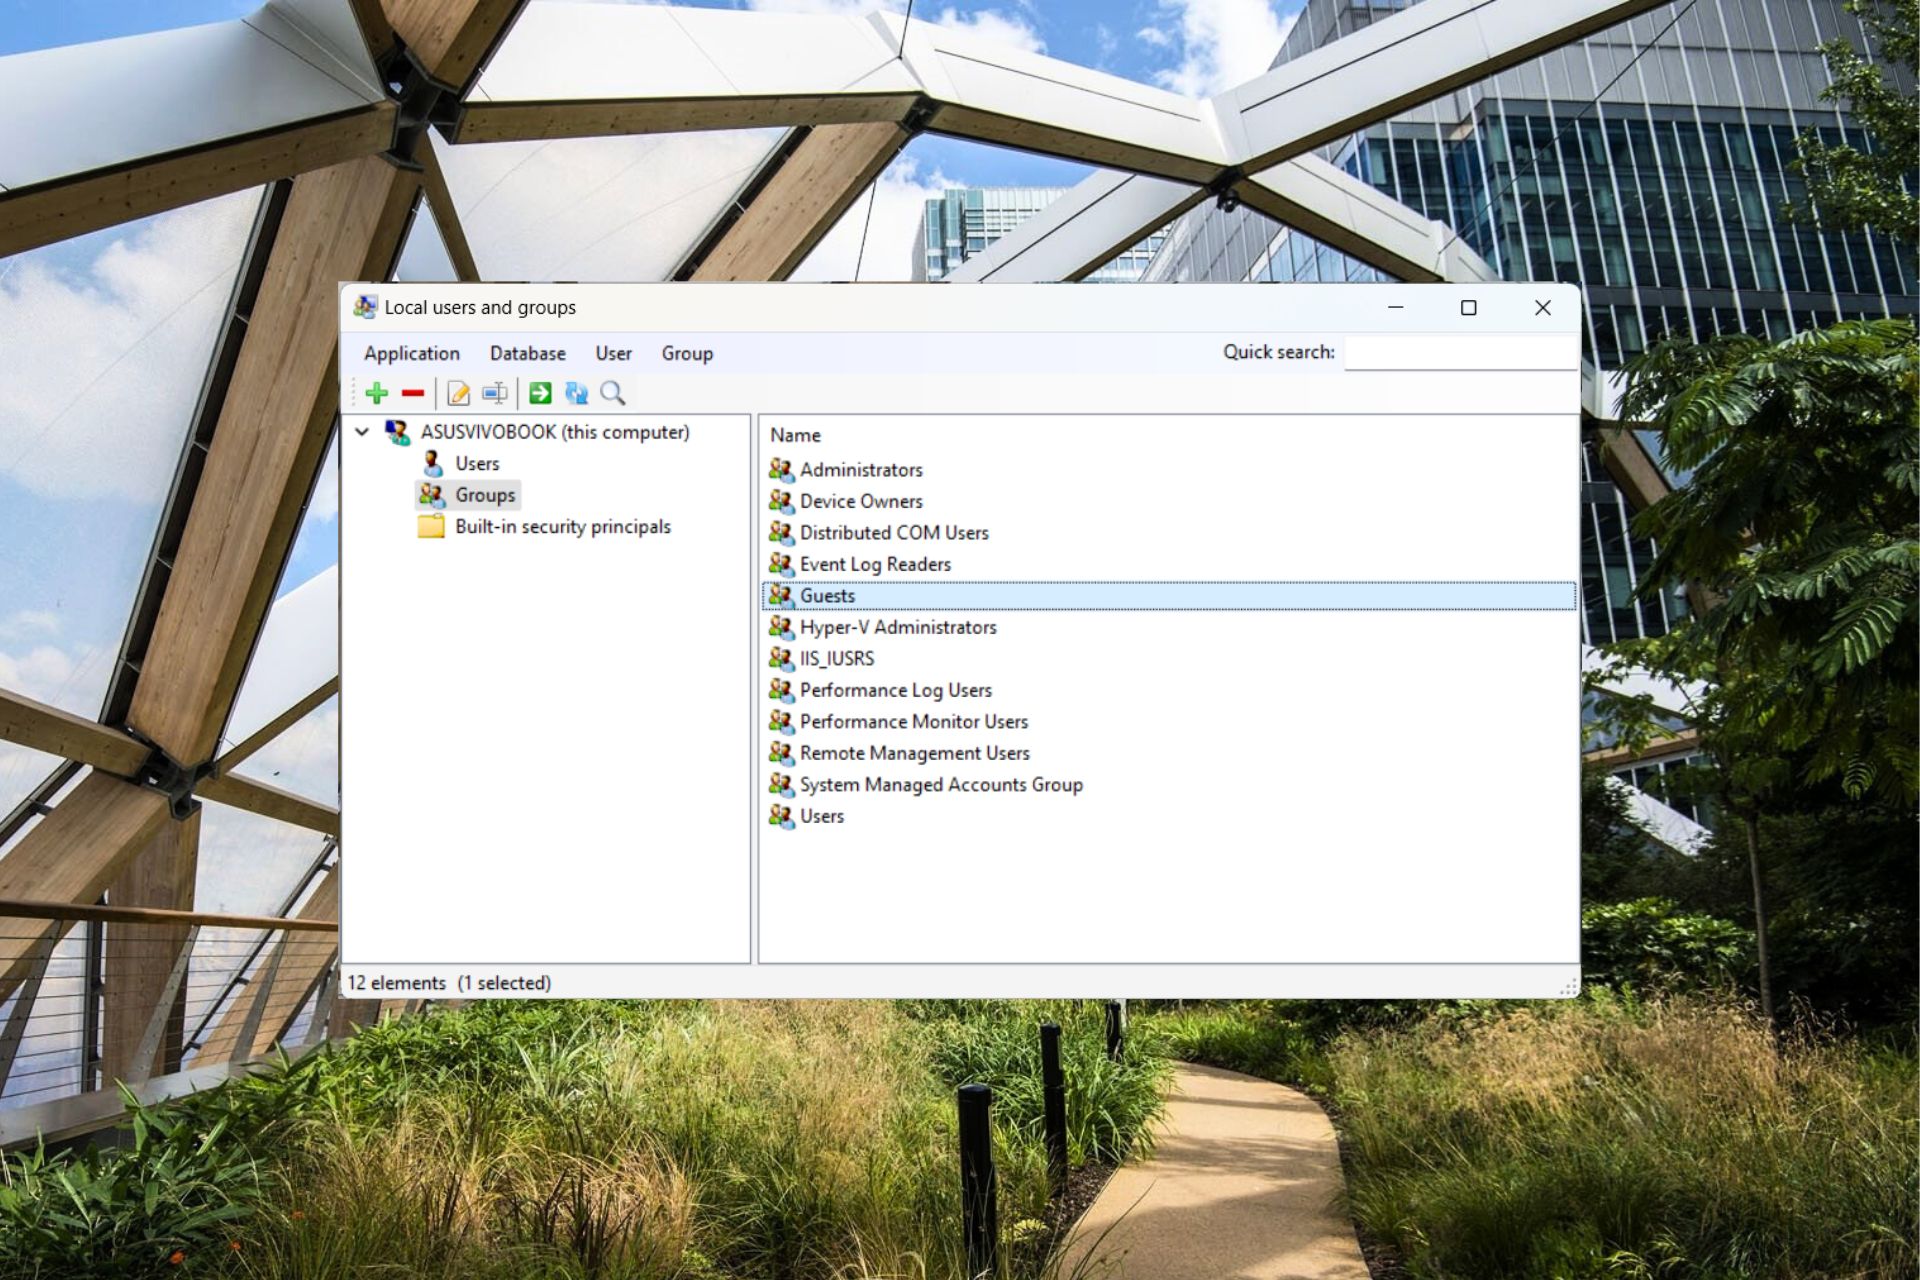
Upon launch, you will notice the lusrmgr application looks similar to the built-in Local Users and Groups Management console. However, the difference lies in the usability of the tool. Below are side-by-side images for the third-party and built-in lusrmgr tool for reference.
Create a new user account using lusrmgr:
- To create a new user, right-click on User and select Create. Then, fill in the details for the new user account.
- Click the Advanced button to configure the advanced account option, local path, and profile path.
- Click on Create to add the new user account.
Similarly, you can edit, remove, rename, or add a password to the existing user account. You can also enable the secret built-in administrator account using the Local Users and Groups Management tool.
Additional Features in Lusrmgr
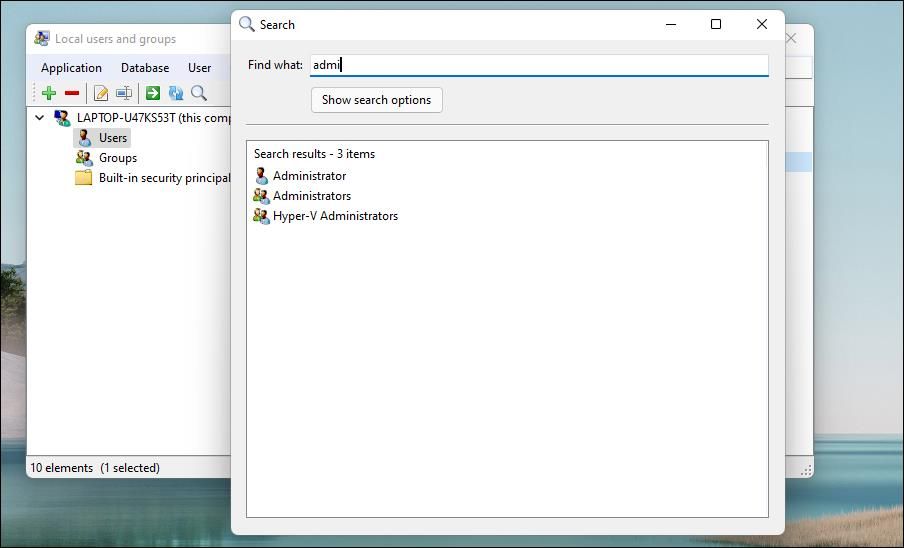
Apart from the usual account management features, Lusrmgr provides some additional functions not available in the built-in utility. For example, you can use the search function to find a specific account. Useful for system administrators who manage multiple user accounts in an organization.
Another useful feature is the ability to define access times for individual accounts. You can set a blocked time for individual accounts for specific days and hours.
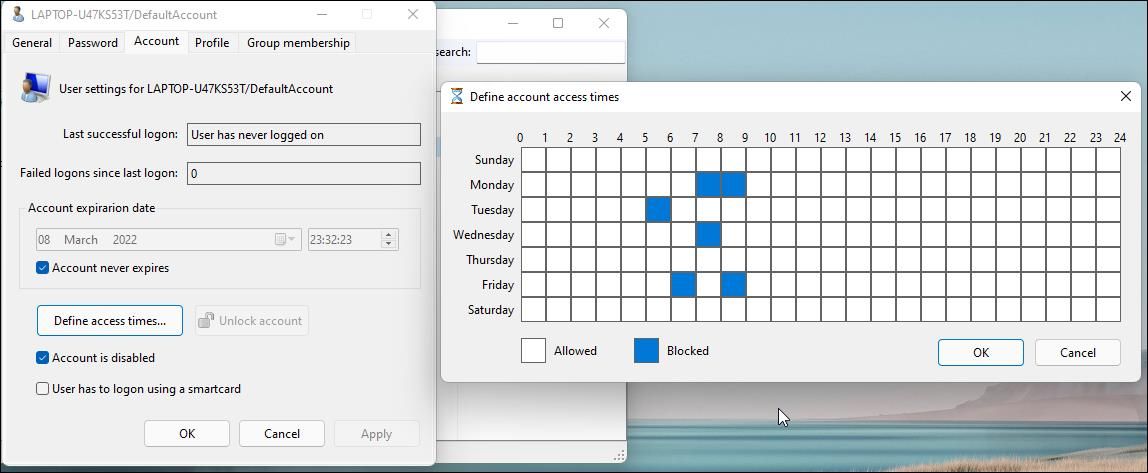
To define access time, right-click on the user name and select Edit. Next, open the Account tab and click on Define access time. By default, all the user accounts have no limit on access time. However, if you want, you can define access time by selecting a time block for different days.
Since lusrmgr is a portable app, you can’t open it with the lusrmgr.msc command like the built-in app. To launch the program, simply double-click on the executable file, and you should be able to make necessary changes to the user account or groups.
Enable Local User Group and Management Console in Windows 11 Home
Local Users and Groups Management console is a handy utility for system administrators to manage local computers as well as connect remotely to compatible systems. However, if you are running Windows 11 Home and need to use the lusrmgr.msc tool, your only option is to use the third-party application from GitHub.
