Локальный отладчик Windows Visual Studio – это мощное инструментальное средство, позволяющее разработчикам проводить отладку программного обеспечения в среде Windows. Этот отладчик предоставляет широкий спектр возможностей, которые помогают выявлять и исправлять ошибки в коде, а также анализировать работу программы на различных этапах ее выполнения.
Одной из основных возможностей локального отладчика Windows Visual Studio является возможность установки точек останова в коде программы. Точки останова позволяют приостановить выполнение программы в определенном месте и проанализировать состояние переменных, выполнение инструкций и другие параметры. Это особенно полезно при поиске и исправлении ошибок, так как позволяет увидеть, как программа работает в конкретный момент времени и что происходит с переменными и данными.
Важным преимуществом отладчика является его интеграция с средой разработки Visual Studio. Благодаря этому интеграции разработчики могут использовать другие инструменты и функции Visual Studio, такие как автодополнение кода, поиск и замена, анализ памяти и производительности, что значительно облегчает процесс отладки и повышает эффективность работы.
Локальный отладчик Windows Visual Studio предоставляет возможность работы со множеством типов приложений, включая приложения на базе .NET, C++, C#, JavaScript и другие. Благодаря этому разработчики могут отлаживать приложения различной сложности и уровня детализации, начиная от простых консольных программ до масштабных веб-приложений.
В заключение, использование локального отладчика Windows Visual Studio является неотъемлемой частью процесса разработки программного обеспечения в среде Windows. Этот инструмент предоставляет множество функций, которые помогают разработчикам выявлять и исправлять ошибки, анализировать работу программы и повышать производительность. Благодаря интеграции с средой Visual Studio, отладка программного кода становится более эффективной и удобной.
Содержание
- Локальный отладчик Windows Visual Studio
- Возможности отладки в Visual Studio
- Интерактивное отслеживание и исправление ошибок
- Отладка многопоточных приложений
- Работа с точками останова
- Анализ значений переменных и объектов
Локальный отладчик Windows Visual Studio
Основные возможности и преимущества локального отладчика Windows Visual Studio:
1. Пошаговое выполнение кода:
Отладчик Visual Studio позволяет разработчикам выполнять код по шагам, позволяя исследовать каждую его часть. Это позволяет выявить и исправить ошибки и неполадки в программе.
2. Отслеживание переменных:
С помощью отладчика можно отслеживать значения переменных во время выполнения программы. Это помогает разработчикам понять, какие именно значения принимают переменные в разных точках исполнения кода.
3. Изучение стека вызовов:
Локальный отладчик Windows Visual Studio позволяет анализировать стек вызовов программы. Это полезно для выявления проблем, связанных с порядком выполнения функций и методов.
4. Выявление и исправление ошибок:
Отладчик Visual Studio помогает разработчикам быстро находить и исправлять ошибки в коде. При возникновении исключений во время выполнения программы отладчик автоматически останавливает выполнение кода, что позволяет разработчикам диагностировать и исправить проблему.
5. Интерактивная отладка:
Отладчик позволяет в режиме реального времени взаимодействовать с программой, изменять значения переменных и устанавливать точки останова для более глубокого анализа кода. Это делает отладку более эффективной и удобной.
Использование локального отладчика Windows Visual Studio позволяет разработчикам значительно увеличить эффективность своей работы и сократить время, затрачиваемое на отладку и исправление ошибок.
Возможности отладки в Visual Studio
Вот некоторые основные возможности отладки в Visual Studio:
- Установка точек останова. Разработчики могут установить точки останова в коде программы, чтобы проверить состояние переменных и выполнение определенных участков кода.
- Пошаговое выполнение. Отладчик позволяет выполнять код пошагово, поэтапно переходя от одной строки кода к другой. Это позволяет анализировать процесс выполнения программы и выявлять возможные ошибки.
- Просмотр значений переменных. Отладчик Visual Studio позволяет просматривать значения переменных во время выполнения программы. Это полезно для контроля за состоянием переменных и идентификации проблемных значений.
- Обнаружение и исправление ошибок. Отладчик позволяет обнаружить различные типы ошибок, такие как нулевые указатели, выход за границы массива и другие. Кроме того, он предлагает инструменты для их исправления, такие как автоматическое исправление и подсказки по коду.
- Анализ вызовов функций. Отладчик позволяет анализировать последовательность вызовов функций и проверять правильность передачи аргументов и возвращаемых значений.
- Отображение стека вызовов. Отладчик Visual Studio предоставляет возможность просмотреть стек вызовов функций, что позволяет анализировать последовательность вызовов и контролировать процесс выполнения программы.
Все эти возможности позволяют разработчикам эффективно находить и исправлять ошибки в коде программы, повышая качество и надежность программного обеспечения.
Интерактивное отслеживание и исправление ошибок
Локальный отладчик Windows Visual Studio предоставляет удобную функцию интерактивного отслеживания и исправления ошибок, которая позволяет разработчикам обнаруживать и устранять проблемы в исходном коде на ранней стадии разработки.
Одной из основных возможностей отладчика является установка точек останова в коде программы. При выполнении программы отладчик останавливается на установленных точках останова, позволяя разработчику анализировать состояние программы в этой точке. Разработчик может просматривать значения переменных, выполнять дополнительные вычисления и выполнять другие действия, необходимые для проверки правильности работы кода.
В случае обнаружения ошибок разработчик может использовать интерактивное исправление ошибок. Отладчик предоставляет возможность изменять значения переменных, исправлять неправильные выражения и переходить к следующей итерации цикла выполнения программы. Это позволяет быстро и эффективно исправлять ошибки прямо во время отладки, без необходимости перезапуска программы.
Кроме того, отладчик Visual Studio предоставляет множество вспомогательных инструментов, которые помогают разработчику отслеживать и исправлять ошибки. Например, он предоставляет возможность просмотра стека вызовов, который показывает последовательность вызовов функций и методов, приведших к ошибке. Это позволяет разработчику понять, какой участок кода вызывает проблему и где нужно вносить исправления.
Интерактивное отслеживание и исправление ошибок является незаменимым инструментом для разработчиков, позволяющим значительно повысить эффективность разработки и сократить время, затрачиваемое на поиск и устранение ошибок.
Отладка многопоточных приложений
Многопоточные приложения представляют особую сложность для отладки, так как они могут содержать несколько параллельно выполняющихся потоков. Ошибки могут быть вызваны гонками данных, дедлоками, утечками памяти и другими проблемами, которые возникают в среде совместного использования ресурсов между потоками.
Visual Studio предоставляет инструменты для эффективной отладки многопоточных приложений и облегчения поиска и устранения ошибок. Одной из таких возможностей является возможность наблюдения за состоянием каждого потока в процессе выполнения приложения.
Для отладки многопоточных приложений могут быть использованы следующие инструменты Visual Studio:
- Окно «Потоки»: в этом окне можно просмотреть список всех текущих потоков приложения и их состояние. Для каждого потока можно просмотреть его текущий стек вызовов и значения локальных переменных.
- Окно «Выключение»: это окно позволяет установить точки останова в коде приложения, чтобы отслеживать выполнение определенных участков кода. При остановке выполнения программы на точке останова можно просмотреть состояние всех потоков и значения переменных в этот момент времени.
- Информационный поиск по потокам: такая функция позволяет найти конкретные потоки по их идентификаторам или другим свойствам и просмотреть информацию о них в текущем контексте выполнения программы.
- Автоматическое отслеживание потоков: в некоторых случаях Visual Studio может автоматически отслеживать создание и уничтожение потоков и автоматически устанавливать точки останова на их начало и конец. Это позволяет в реальном времени наблюдать за состоянием всех потоков и следить за выполнением кода в каждом из них.
Отладка многопоточных приложений требует некоторых навыков и опыта, но благодаря инструментам Visual Studio можно значительно упростить этот процесс и быстрее находить и исправлять ошибки.
Работа с точками останова
Visual Studio предоставляет широкие возможности по работе с точками останова. Разработчику доступны следующие действия:
Установка точки останова. В Visual Studio точка останова устанавливается путем щелчка на линии кода, где необходимо остановить выполнение программы. Выполнив эту операцию, точка останова будет активирована во время отладки, и выполнение программы приостановится в этом месте.
Активация и деактивация точек останова. Разработчик может включать и выключать точки останова по своему усмотрению. Это особенно полезно, когда необходимо временно отключить точку останова без ее удаления.
Условное выполнение точек останова. В Visual Studio можно установить условие, при котором точка останова будет активироваться. Например, разработчик может установить точку останова для переменной, значение которой больше заданного числа. Точка останова будет активирована только при выполнении этого условия.
Подсчет количества выполнений точек останова. В Visual Studio можно настроить точку останова для подсчета количества ее выполнений. Это может быть полезно, когда требуется отслеживать, сколько раз программа проходит через определенный кодовый блок.
Удаление точек останова. В случае, когда точка останова стала ненужной, ее можно удалить. Visual Studio предоставляет простой способ удалить все точки останова сразу или выбрать нужную точку останова для удаления.
Все эти возможности работы с точками останова в Visual Studio помогают разработчику более эффективно отлаживать программы, а также быстрее находить и исправлять ошибки.
Анализ значений переменных и объектов
Локальный отладчик Windows Visual Studio позволяет анализировать значения переменных и объектов для лучшего понимания работы программы и поиска возможных ошибок. Во время отладки вы можете использовать несколько инструментов для анализа значений:
| Инструмент | Описание |
|---|---|
| Окно Locals | В окне Locals отображаются локальные переменные и их текущие значения в текущем контексте выполнения программы. Вы можете просматривать значения переменных, а также изменять их во время выполнения программы. |
| Окно Watch | В окне Watch вы можете добавлять переменные, выражения и объекты, значения которых вы хотите отслеживать во время выполнения программы. Вы можете проверять значения переменных на каждой итерации цикла или при выполнении определенных условий. |
| Окно Autos | Окно Autos автоматически отображает значения переменных, которые были использованы в последних нескольких строках кода. Это помогает сосредоточиться на наиболее значимых значениях в текущем контексте выполнения. |
Анализ значений переменных и объектов позволяет вам более эффективно отлаживать свою программу, понимать, какие значения принимают переменные в различных точках выполнения, и легче находить возможные ошибки. Использование этих инструментов совместно с другими функциями отладчика поможет ускорить процесс разработки и снизить количество возможных ошибок.
One of the key features of Visual Studio Code is its great debugging support. VS Code’s built-in debugger helps accelerate your edit, compile, and debug loop.
Debugger extensions
VS Code has built-in debugging support for the Node.js runtime and can debug JavaScript, TypeScript, or any other language that gets transpiled to JavaScript.
For debugging other languages and runtimes (including PHP, Ruby, Go, C#, Python, C++, PowerShell and many others), look for Debuggers extensions in the VS Code Marketplace or select Install Additional Debuggers in the top-level Run menu.
Below are several popular extensions which include debugging support:
Tip: The extensions shown above are dynamically queried. Select an extension tile above to read the description and reviews to decide which extension is best for you.
Start debugging
The following documentation is based on the built-in Node.js debugger, but most of the concepts and features are applicable to other debuggers as well.
It is helpful to first create a sample Node.js application before reading about debugging. You can follow the Node.js walkthrough to install Node.js and create a simple «Hello World» JavaScript application (app.js). Once you have a simple application set up, this page will take you through VS Code debugging features.
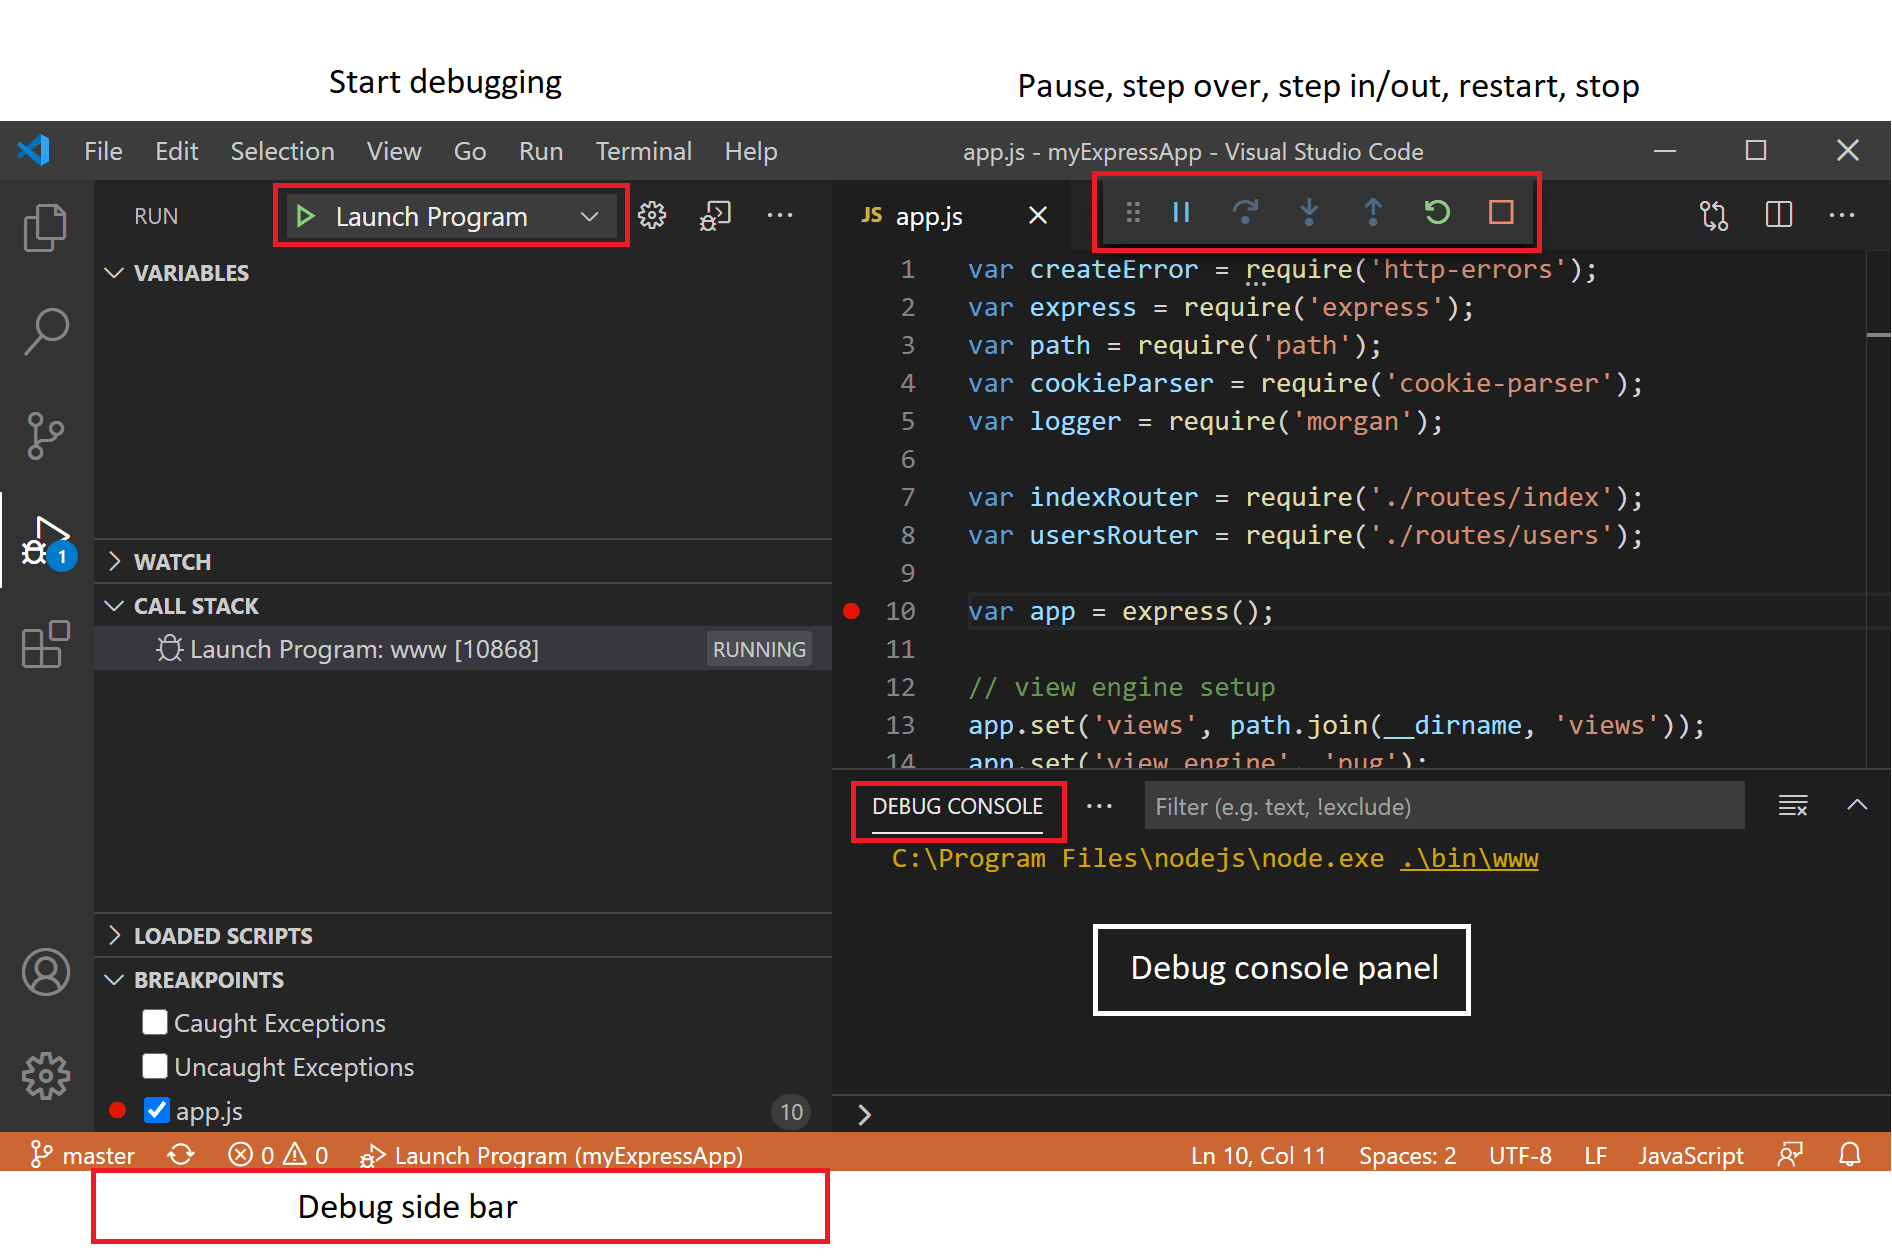
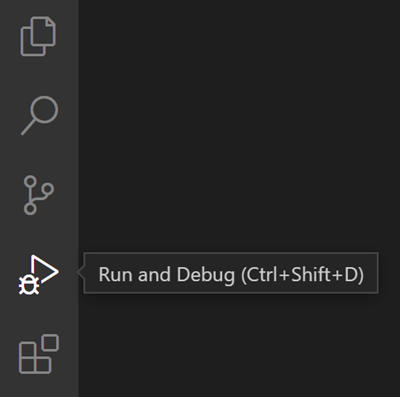
Run and Debug view
To bring up the Run and Debug view, select the Run and Debug icon in the Activity Bar on the side of VS Code. You can also use the keyboard shortcut ⇧⌘D (Windows, Linux Ctrl+Shift+D).
The Run and Debug view displays all information related to running and debugging and has a top bar with debugging commands and configuration settings.
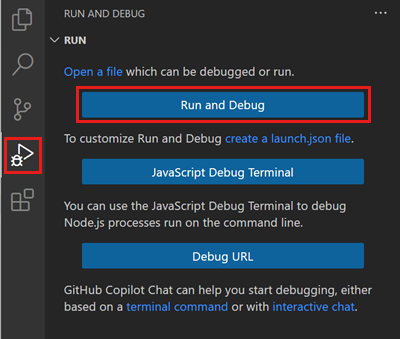
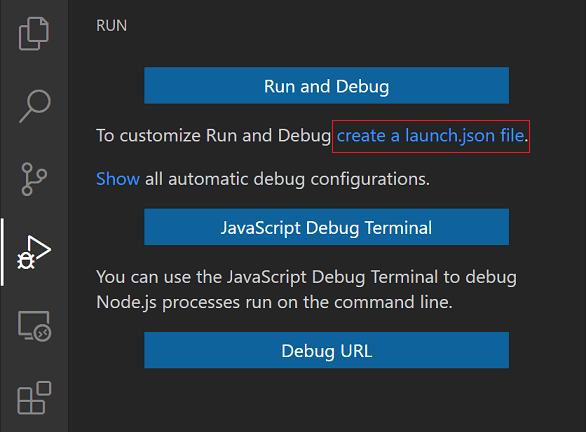
If running and debugging is not yet configured (no launch.json has been created), VS Code shows the Run start view.
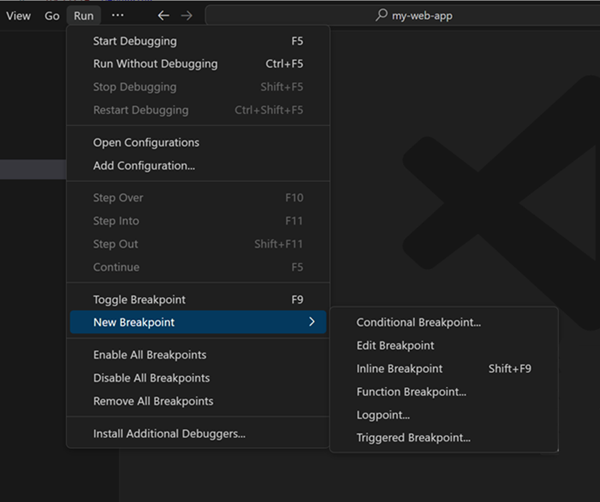
The top-level Run menu has the most common run and debug commands:
Launch configurations
To run or debug a simple app in VS Code, select Run and Debug on the Debug start view or press F5 and VS Code will try to run your currently active file.
However, for most debugging scenarios, creating a launch configuration file is beneficial because it allows you to configure and save debugging setup details. VS Code keeps debugging configuration information in a launch.json file located in a .vscode folder in your workspace (project root folder) or in your user settings or workspace settings.
To create a launch.json file, click the create a launch.json file link in the Run start view.
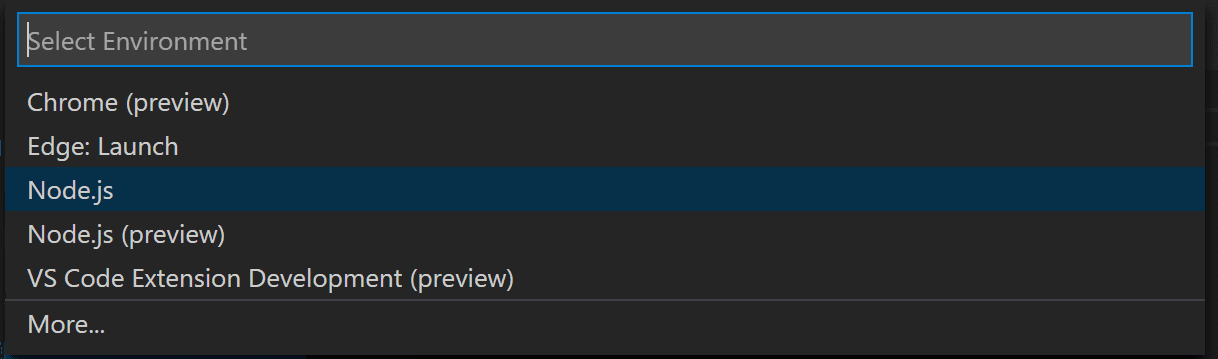
VS Code will try to automatically detect your debug environment, but if this fails, you will have to choose it manually:
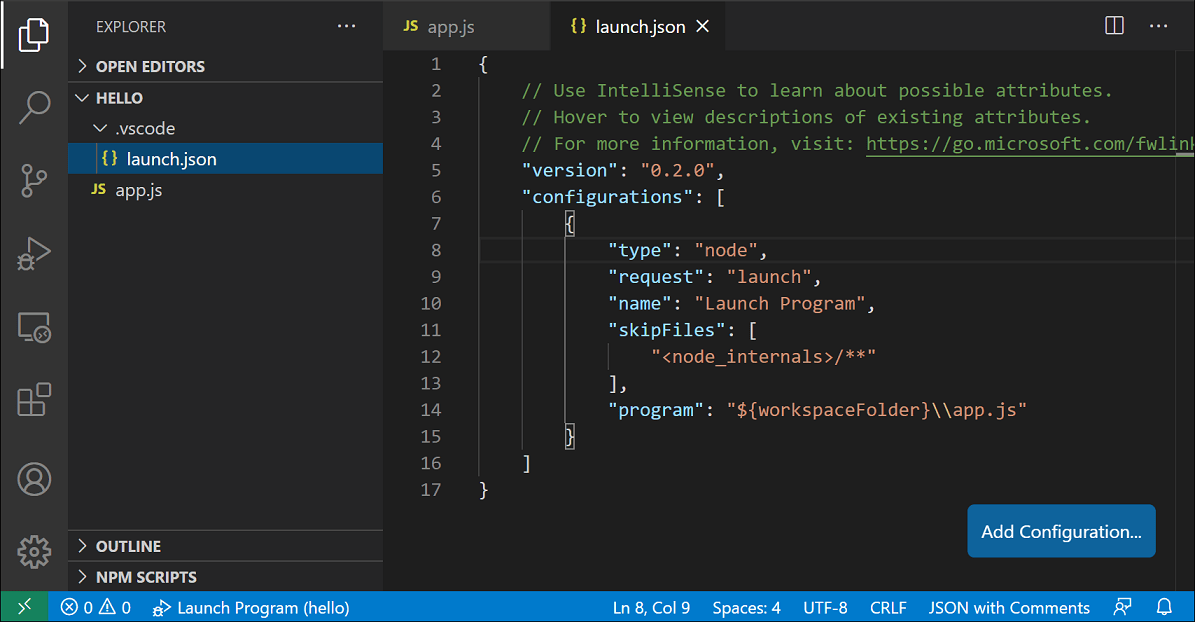
Here is the launch configuration generated for Node.js debugging:
{
  "version": "0.2.0",
  "configurations": [
    {
      "type": "node",
      "request": "launch",
      "name": "Launch Program",
      "skipFiles": ["<node_internals>/**"],
      "program": "${workspaceFolder}\app.js"
    }
  ]
}
If you go back to the File Explorer view (⇧⌘E (Windows, Linux Ctrl+Shift+E)), you’ll see that VS Code has created a .vscode folder and added the launch.json file to your workspace.
Note: You can debug a simple application even if you don’t have a folder open in VS Code, but it is not possible to manage launch configurations and set up advanced debugging. The VS Code Status Bar is purple if you do not have a folder open.
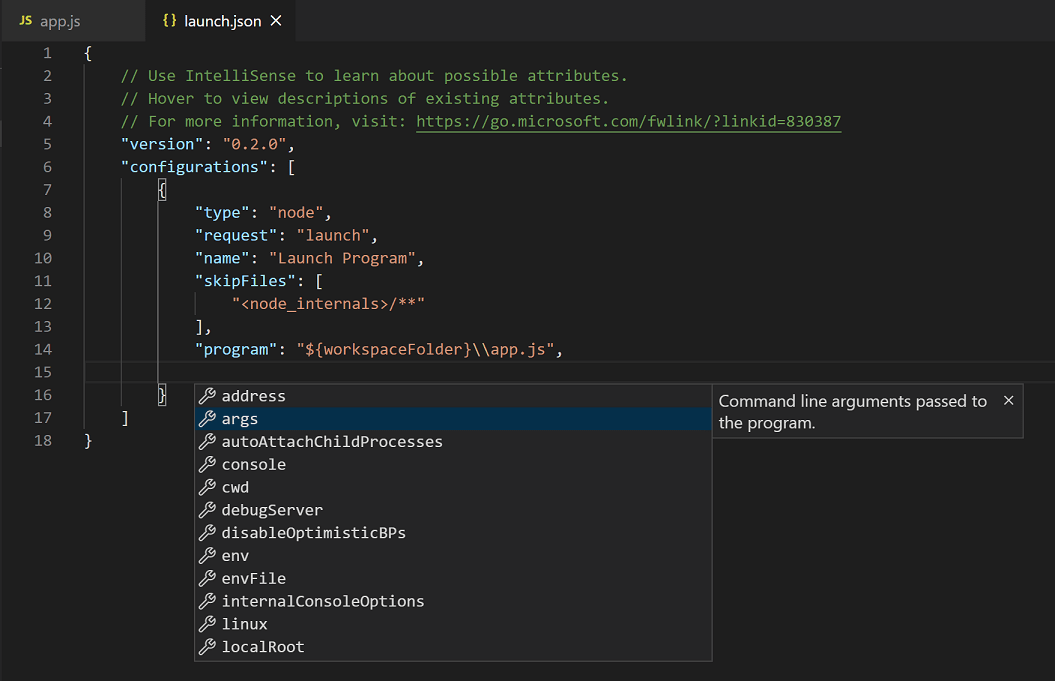
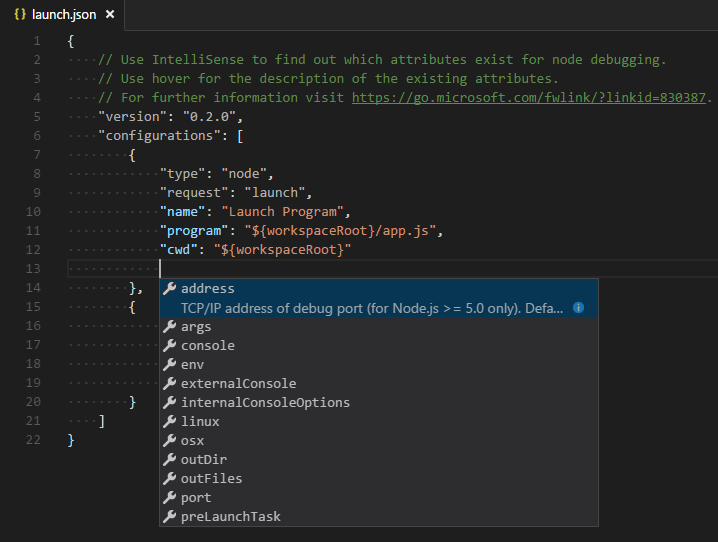
Note that the attributes available in launch configurations vary from debugger to debugger. You can use IntelliSense suggestions (⌃Space (Windows, Linux Ctrl+Space)) to find out which attributes exist for a specific debugger. Hover help is also available for all attributes.
Do not assume that an attribute that is available for one debugger automatically works for other debuggers too. If you see green squiggles in your launch configuration, hover over them to learn what the problem is and try to fix them before launching a debug session.
Review all automatically generated values and make sure that they make sense for your project and debugging environment.
Launch versus attach configurations
In VS Code, there are two core debugging modes, Launch and Attach, which handle two different workflows and segments of developers. Depending on your workflow, it can be confusing to know what type of configuration is appropriate for your project.
If you come from a browser Developer Tools background, you might not be used to «launching from your tool,» since your browser instance is already open. When you open DevTools, you are simply attaching DevTools to your open browser tab. On the other hand, if you come from a server or desktop background, it’s quite normal to have your editor launch your process for you, and your editor automatically attaches its debugger to the newly launched process.
The best way to explain the difference between launch and attach is to think of a launch configuration as a recipe for how to start your app in debug mode before VS Code attaches to it, while an attach configuration is a recipe for how to connect VS Code’s debugger to an app or process that’s already running.
VS Code debuggers typically support launching a program in debug mode or attaching to an already running program in debug mode. Depending on the request (attach or launch), different attributes are required, and VS Code’s launch.json validation and suggestions should help with that.
Add a new configuration
To add a new configuration to an existing launch.json, use one of the following techniques:
- Use IntelliSense if your cursor is located inside the configurations array.
- Press the Add Configuration button to invoke snippet IntelliSense at the start of the array.
- Choose Add Configuration option in the Run menu.
VS Code also supports compound launch configurations for starting multiple configurations at the same time; for more details, please read this section.
In order to start a debug session, first select the configuration named Launch Program using the Configuration dropdown in the Run and Debug view. Once you have your launch configuration set, start your debug session with F5.
Alternatively, you can run your configuration through the Command Palette (⇧⌘P (Windows, Linux Ctrl+Shift+P)) by filtering on Debug: Select and Start Debugging or typing 'debug ' and selecting the configuration you want to debug.
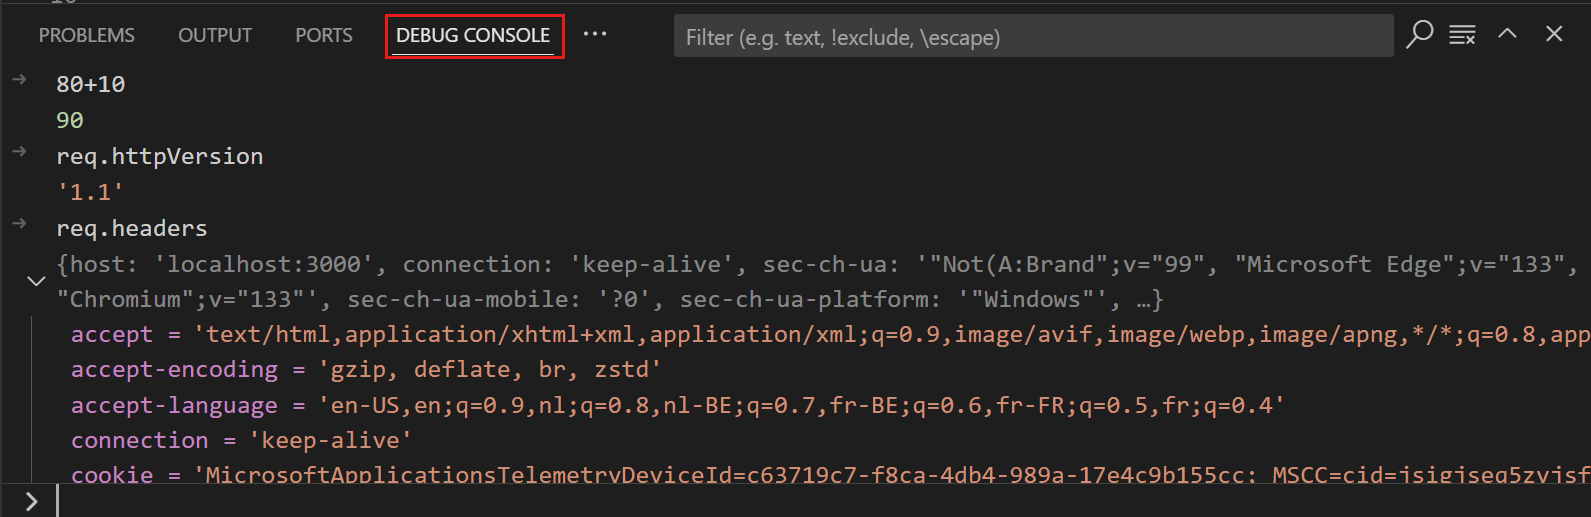
As soon as a debugging session starts, the DEBUG CONSOLE panel is displayed and shows debugging output, and the Status Bar changes color (orange for default color themes):
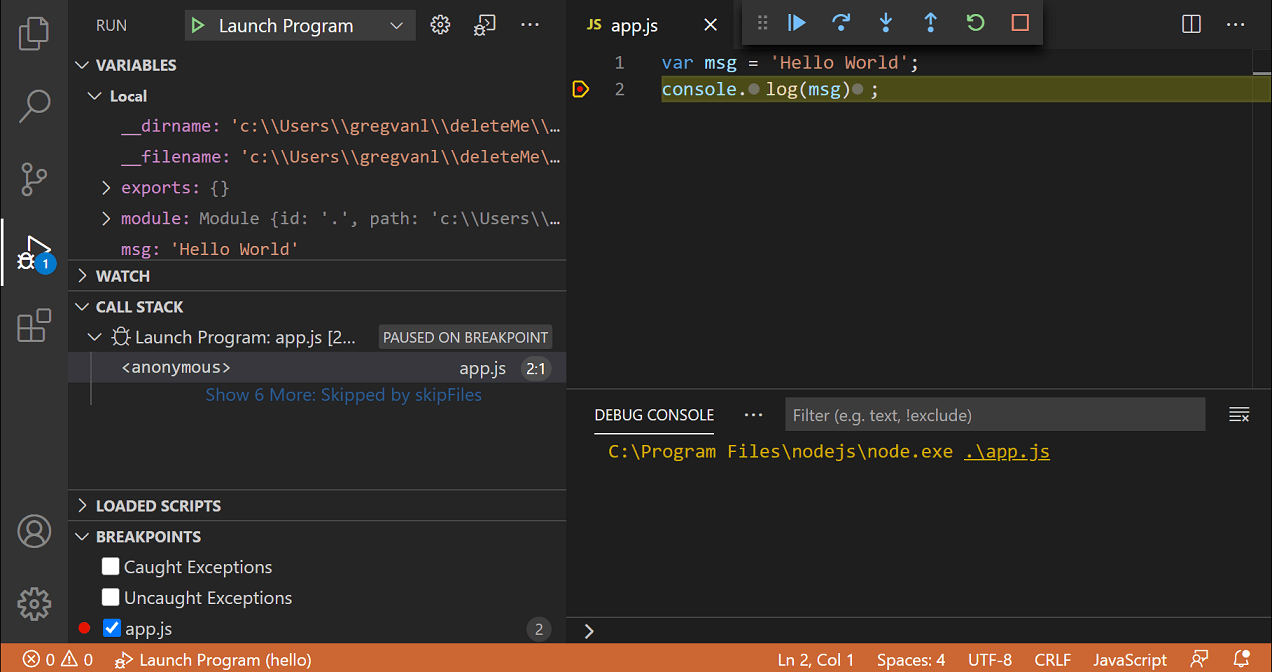
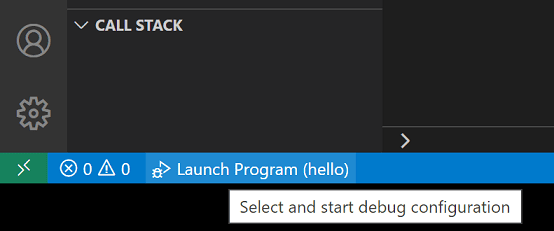
In addition, the debug status appears in the Status Bar showing the active debug configuration. By selecting the debug status, a user can change the active launch configuration and start debugging without needing to open the Run and Debug view.
Debug actions
Once a debug session starts, the Debug toolbar will appear on the top of the editor.

| Action | Explanation |
|---|---|
| Continue / Pause F5 |
Continue: Resume normal program/script execution (up to the next breakpoint). Pause: Inspect code executing at the current line and debug line-by-line. |
| Step Over F10 |
Execute the next method as a single command without inspecting or following its component steps. |
| Step Into F11 |
Enter the next method to follow its execution line-by-line. |
| Step Out ⇧F11 (Windows, Linux Shift+F11) |
When inside a method or subroutine, return to the earlier execution context by completing remaining lines of the current method as though it were a single command. |
| Restart ⇧⌘F5 (Windows, Linux Ctrl+Shift+F5) |
Terminate the current program execution and start debugging again using the current run configuration. |
| Stop ⇧F5 (Windows, Linux Shift+F5) |
Terminate the current program execution. |
Tip: Use the setting
debug.toolBarLocationto control the location of the debug toolbar. It can be the defaultfloating,dockedto the Run and Debug view, orhidden. Afloatingdebug toolbar can be dragged horizontally and also down to the editor area.
Run mode
In addition to debugging a program, VS Code supports running the program. The Debug: Run (Start Without Debugging) action is triggered with ⌃F5 (Windows, Linux Ctrl+F5) and uses the currently selected launch configuration. Many of the launch configuration attributes are supported in ‘Run’ mode. VS Code maintains a debug session while the program is running, and pressing the Stop button terminates the program.
Tip: The Run action is always available, but not all debugger extensions support ‘Run’. In this case, ‘Run’ will be the same as ‘Debug’.
Breakpoints
Breakpoints can be toggled by clicking on the editor margin or using F9 on the current line. Finer breakpoint control (enable/disable/reapply) can be done in the Run and Debug view’s BREAKPOINTS section.
- Breakpoints in the editor margin are normally shown as red filled circles.
- Disabled breakpoints have a filled gray circle.
- When a debugging session starts, breakpoints that cannot be registered with the debugger change to a gray hollow circle. The same might happen if the source is edited while a debug session without live-edit support is running.
If the debugger supports breaking on different kinds of errors or exceptions, those will also be available in the BREAKPOINTS view.
The Reapply All Breakpoints command sets all breakpoints again to their original location. This is helpful if your debug environment is «lazy» and «misplaces» breakpoints in source code that has not yet been executed.

Optionally, breakpoints can be shown in the editor’s overview ruler by enabling the setting debug.showBreakpointsInOverviewRuler:

Logpoints
A Logpoint is a variant of a breakpoint that does not «break» into the debugger but instead logs a message to the console. Logpoints are especially useful for injecting logging while debugging production servers that cannot be paused or stopped.
A Logpoint is represented by a «diamond» shaped icon. Log messages are plain text but can include expressions to be evaluated within curly braces (‘{}’).
Just like regular breakpoints, Logpoints can be enabled or disabled and can also be controlled by a condition and/or hit count.
Note: Logpoints are supported by VS Code’s built-in Node.js debugger, but can be implemented by other debug extensions. The Python and Java extensions, for example, support Logpoints.
Data inspection
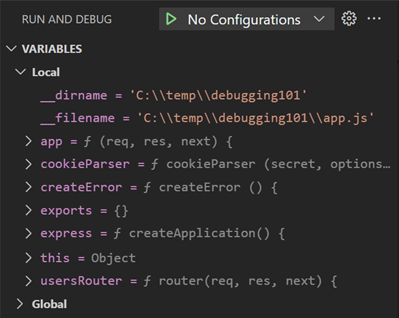
Variables can be inspected in the VARIABLES section of the Run and Debug view or by hovering over their source in the editor. Variable values and expression evaluation are relative to the selected stack frame in the CALL STACK section.
Variable values can be modified with the Set Value action from the variable’s context menu. Additionally, you can use the Copy Value action to copy the variable’s value, or Copy as Expression action to copy an expression to access the variable.
Variables and expressions can also be evaluated and watched in the Run and Debug view’s WATCH section.

Variable names and values can be filtered by typing while the focus is on the VARIABLES section.

Launch.json attributes
There are many launch.json attributes to help support different debuggers and debugging scenarios. As mentioned above, you can use IntelliSense (⌃Space (Windows, Linux Ctrl+Space)) to see the list of available attributes once you have specified a value for the type attribute.
The following attributes are mandatory for every launch configuration:
type— the type of debugger to use for this launch configuration. Every installed debug extension introduces a type:nodefor the built-in Node debugger, for example, orphpandgofor the PHP and Go extensions.request— the request type of this launch configuration. Currently,launchandattachare supported.name— the reader-friendly name to appear in the Debug launch configuration dropdown.
Here are some optional attributes available to all launch configurations:
presentation— using theorder,group, andhiddenattributes in thepresentationobject, you can sort, group, and hide configurations and compounds in the Debug configuration dropdown and in the Debug quick pick.preLaunchTask— to launch a task before the start of a debug session, set this attribute to the label of a task specified in tasks.json (in the workspace’s.vscodefolder). Or, this can be set to${defaultBuildTask}to use your default build task.postDebugTask— to launch a task at the very end of a debug session, set this attribute to the name of a task specified in tasks.json (in the workspace’s.vscodefolder).internalConsoleOptions— this attribute controls the visibility of the Debug Console panel during a debugging session.debugServer— for debug extension authors only: this attribute allows you to connect to a specified port instead of launching the debug adapter.serverReadyAction— if you want to open a URL in a web browser whenever the program under debugging outputs a specific message to the debug console or integrated terminal. For details see section Automatically open a URI when debugging a server program below.
Many debuggers support some of the following attributes:
program— executable or file to run when launching the debuggerargs— arguments passed to the program to debugenv— environment variables (the valuenullcan be used to «undefine» a variable)envFile— path to dotenv file with environment variablescwd— current working directory for finding dependencies and other filesport— port when attaching to a running processstopOnEntry— break immediately when the program launchesconsole— what kind of console to use, for example,internalConsole,integratedTerminal, orexternalTerminal
Variable substitution
VS Code makes commonly used paths and other values available as variables and supports variable substitution inside strings in launch.json. This means that you do not have to use absolute paths in debug configurations. For example, ${workspaceFolder} gives the root path of a workspace folder, ${file} the file open in the active editor, and ${env:Name} the environment variable ‘Name’. You can see a full list of predefined variables in the Variables Reference or by invoking IntelliSense inside the launch.json string attributes.
{
  "type": "node",
  "request": "launch",
  "name": "Launch Program",
  "program": "${workspaceFolder}/app.js",
  "cwd": "${workspaceFolder}",
  "args": ["${env:USERNAME}"]
}
Platform-specific properties
Launch.json supports defining values (for example, arguments to be passed to the program) that depend on the operating system where the debugger is running. To do so, put a platform-specific literal into the launch.json file and specify the corresponding properties inside that literal.
Below is an example that passes "args" to the program differently on Windows:
{
  "version": "0.2.0",
  "configurations": [
    {
      "type": "node",
      "request": "launch",
      "name": "Launch Program",
      "program": "${workspaceFolder}/node_modules/gulp/bin/gulpfile.js",
      "args": ["myFolder/path/app.js"],
      "windows": {
        "args": ["myFolder\path\app.js"]
      }
    }
  ]
}
Valid operating properties are "windows" for Windows, "linux" for Linux, and "osx" for macOS. Properties defined in an operating system specific scope override properties defined in the global scope.
Please note that the type property cannot be placed inside a platform-specific section, because type indirectly determines the platform in remote debugging scenarios, and that would result in a cyclic dependency.
In the example below, debugging the program always stops on entry except on macOS:
{
  "version": "0.2.0",
  "configurations": [
    {
      "type": "node",
      "request": "launch",
      "name": "Launch Program",
      "program": "${workspaceFolder}/node_modules/gulp/bin/gulpfile.js",
      "stopOnEntry": true,
      "osx": {
        "stopOnEntry": false
      }
    }
  ]
}
Global launch configuration
VS Code supports adding a "launch" object inside your User settings. This "launch" configuration will then be shared across your workspaces. For example:
"launch": {
    "version": "0.2.0",
    "configurations": [{
        "type": "node",
        "request": "launch",
        "name": "Launch Program",
        "program": "${file}"
    }]
}
Advanced breakpoint topics
Conditional breakpoints
A powerful VS Code debugging feature is the ability to set conditions based on expressions, hit counts, or a combination of both.
- Expression condition: The breakpoint will be hit whenever the expression evaluates to
true. - Hit count: The ‘hit count’ controls how many times a breakpoint needs to be hit before it will ‘break’ execution. Whether a ‘hit count’ is respected and the exact syntax of the expression vary among debugger extensions.
You can add a condition and/or hit count when creating a source breakpoint (with the Add Conditional Breakpoint action) or when modifying an existing one (with the Edit Condition action). In both cases, an inline text box with a dropdown menu opens where you can enter expressions:
Condition and hit count editing support is also supported for function and exception breakpoints.
You can initiate condition editing from the context menu or the new inline Edit Condition action.
An example of condition editing in the BREAKPOINTS view:

If a debugger does not support conditional breakpoints, the Add Conditional Breakpoint and Edit Condition actions will be missing.
Inline breakpoints
Inline breakpoints will only be hit when the execution reaches the column associated with the inline breakpoint. This is particularly useful when debugging minified code which contains multiple statements in a single line.
An inline breakpoint can be set using ⇧F9 (Windows, Linux Shift+F9) or through the context menu during a debug session. Inline breakpoints are shown inline in the editor.
Inline breakpoints can also have conditions. Editing multiple breakpoints on a line is possible through the context menu in the editor’s left margin.
Function breakpoints
Instead of placing breakpoints directly in source code, a debugger can support creating breakpoints by specifying a function name. This is useful in situations where source is not available but a function name is known.
A function breakpoint is created by pressing the + button in the BREAKPOINTS section header and entering the function name. Function breakpoints are shown with a red triangle in the BREAKPOINTS section.
Data breakpoints
If a debugger supports data breakpoints, they can be set from the context menu in the VARIABLES view. The Break on Value Change/Read/Access commands will add a data breakpoint that is hit when the value of the underlying variable changes/is read/is accessed. Data breakpoints are shown with a red hexagon in the BREAKPOINTS section.
Debug Console REPL
Expressions can be evaluated with the Debug Console REPL (Read-Eval-Print Loop) feature. To open the Debug Console, use the Debug Console action at the top of the Debug pane or use the View: Debug Console command (⇧⌘Y (Windows, Linux Ctrl+Shift+Y)). Expressions are evaluated after you press Enter and the Debug Console REPL shows suggestions as you type. If you need to enter multiple lines, use Shift+Enter between the lines and then send all lines for evaluation with Enter.
Debug Console input uses the mode of the active editor, which means that the Debug Console input supports syntax coloring, indentation, auto closing of quotes, and other language features.
Note: You must be in a running debug session to use the Debug Console REPL.
Redirect input/output to/from the debug target
Redirecting input/output is debugger/runtime specific, so VS Code does not have a built-in solution that works for all debuggers.
Here are two approaches you might want to consider:
-
Launch the program to debug («debug target») manually in a terminal or command prompt and redirect input/output as needed. Make sure to pass the appropriate command line options to the debug target so that a debugger can attach to it. Create and run an «attach» debug configuration that attaches to the debug target.
-
If the debugger extension you are using can run the debug target in VS Code’s Integrated Terminal (or an external terminal), you can try to pass the shell redirect syntax (for example, «<» or «>») as arguments.
Here’s an example launch.json configuration:
{
  "name": "launch program that reads a file from stdin",
  "type": "node",
  "request": "launch",
  "program": "program.js",
  "console": "integratedTerminal",
  "args": ["<", "in.txt"]
}
This approach requires that the «<» syntax is passed through the debugger extension and ends up unmodified in the Integrated Terminal.
Multi-target debugging
For complex scenarios involving more than one process (for example, a client and a server), VS Code supports multi-target debugging.
Using multi-target debugging is simple: after you’ve started a first debug session, you can just launch another session. As soon as a second session is up and running, the VS Code UI switches to multi-target mode:
Compound launch configurations
An alternative way to start multiple debug sessions is by using a compound launch configuration. A compound launch configuration lists the names of two or more launch configurations that should be launched in parallel. Optionally a preLaunchTask can be specified that is run before the individual debug sessions are started. The boolean flag stopAll controls whether manually terminating one session will stop all of the compound sessions.
{
  "version": "0.2.0",
  "configurations": [
    {
      "type": "node",
      "request": "launch",
      "name": "Server",
      "program": "${workspaceFolder}/server.js"
    },
    {
      "type": "node",
      "request": "launch",
      "name": "Client",
      "program": "${workspaceFolder}/client.js"
    }
  ],
  "compounds": [
    {
      "name": "Server/Client",
      "configurations": ["Server", "Client"],
      "preLaunchTask": "${defaultBuildTask}",
      "stopAll": true
    }
  ]
}
Compound launch configurations are displayed in the launch configuration dropdown menu.
Remote debugging
VS Code does not itself support remote debugging: this is a feature of the debug extension you are using, and you should consult the extension’s page in the Marketplace for support and details.
There is, however, one exception: the Node.js debugger included in VS Code supports remote debugging. See the Node.js Debugging topic to learn how to configure this.
Automatically open a URI when debugging a server program
Developing a web program typically requires opening a specific URL in a web browser in order to hit the server code in the debugger. VS Code has a built-in feature «serverReadyAction» to automate this task.
Here is an example of a simple Node.js Express application:
var express = require('express');
var app = express();

app.get('/', function(req, res) {
  res.send('Hello World!');
});

app.listen(3000, function() {
  console.log('Example app listening on port 3000!');
});
This application first installs a «Hello World» handler for the «/» URL and then starts to listen for HTTP connections on port 3000. The port is announced in the Debug Console, and typically, the developer would now type http://localhost:3000 into their browser application.
The serverReadyAction feature makes it possible to add a structured property serverReadyAction to any launch config and select an «action» to be performed:
{
  "type": "node",
  "request": "launch",
  "name": "Launch Program",
  "program": "${workspaceFolder}/app.js",

  "serverReadyAction": {
    "pattern": "listening on port ([0-9]+)",
    "uriFormat": "http://localhost:%s",
    "action": "openExternally"
  }
}
Here the pattern property describes the regular expression for matching the program’s output string that announces the port. The pattern for the port number is put into parenthesis so that it is available as a regular expression capture group. In this example, we are extracting only the port number, but it is also possible to extract a full URI.
The uriFormat property describes how the port number is turned into a URI. The first %s is substituted by the first capture group of the matching pattern.
The resulting URI is then opened outside of VS Code («externally») with the standard application configured for the URI’s scheme.
Trigger Debugging via Edge or Chrome
Alternatively, the action can be set to debugWithEdge or debugWithChrome. In this mode, a webRoot property can be added that is passed to the Chrome or Edge debug session.
To simplify things a bit, most properties are optional and we use the following fallback values:
- pattern:
"listening on.* (https?://\S+|[0-9]+)"which matches the commonly used messages «listening on port 3000» or «Now listening on: https://localhost:5001». - uriFormat:
"http://localhost:%s" - webRoot:
"${workspaceFolder}"
Triggering an Arbitrary Launch Config
In some cases, you may need to configure additional options for the browser debug session—or use a different debugger entirely. You can do this by setting action to startDebugging with a name property set to the name of the launch configuration to start when the pattern is matched.
The named launch configuration must be in the same file or folder as the one with the serverReadyAction.
Here the serverReadyAction feature in action:

Next steps
To learn about VS Code’s Node.js debugging support, take a look at:
- Node.js — Describes the Node.js debugger, which is included in VS Code.
- TypeScript — The Node.js debugger also supports TypeScript debugging.
To see tutorials on the basics of Node.js debugging, check out these videos:
- Intro Video — Debugging — Showcases the basics of debugging.
- Getting started with Node.js debugging — Shows how to attach a debugger to a running Node.js process.
To learn about debugging support for other programming languages via VS Code extensions:
- C++
- Python
- Java
To learn about VS Code’s task running support, go to:
- Tasks — Describes how to run tasks with Gulp, Grunt, and Jake and how to show errors and warnings.
To write your own debugger extension, visit:
- Debugger Extension — Uses a mock sample to illustrate the steps required to create a VS Code debug extension.
Common questions
What are the supported debugging scenarios?
Debugging of Node.js-based applications is supported on Linux, macOS, and Windows out of the box with VS Code. Many other scenarios are supported by VS Code extensions available in the Marketplace.
I do not see any launch configurations in the Run and Debug view dropdown. What is wrong?
The most common problem is that you did not set up launch.json or there is a syntax error in that file. Alternatively, you might need to open a folder, since no-folder debugging does not support launch configurations.
3/1/2023
One of the key features of Visual Studio Code is its great debugging support. VS Code’s built-in debugger helps accelerate your edit, compile, and debug loop.
Debugger extensions
VS Code has built-in debugging support for the Node.js runtime and can debug JavaScript, TypeScript, or any other language that gets transpiled to JavaScript.
For debugging other languages and runtimes (including PHP, Ruby, Go, C#, Python, C++, PowerShell and many others), look for Debuggers extensions in the VS Code Marketplace or select Install Additional Debuggers in the top-level Run menu.
Below are several popular extensions which include debugging support:
Tip: The extensions shown above are dynamically queried. Select an extension tile above to read the description and reviews to decide which extension is best for you.
Start debugging
The following documentation is based on the built-in Node.js debugger, but most of the concepts and features are applicable to other debuggers as well.
It is helpful to first create a sample Node.js application before reading about debugging. You can follow the Node.js walkthrough to install Node.js and create a simple «Hello World» JavaScript application (app.js). Once you have a simple application set up, this page will take you through VS Code debugging features.
Run and Debug view
To bring up the Run and Debug view, select the Run and Debug icon in the Activity Bar on the side of VS Code. You can also use the keyboard shortcut ⇧⌘D (Windows, Linux Ctrl+Shift+D).
The Run and Debug view displays all information related to running and debugging and has a top bar with debugging commands and configuration settings.
If running and debugging is not yet configured (no launch.json has been created), VS Code shows the Run start view.
The top-level Run menu has the most common run and debug commands:
Launch configurations
To run or debug a simple app in VS Code, select Run and Debug on the Debug start view or press F5 and VS Code will try to run your currently active file.
However, for most debugging scenarios, creating a launch configuration file is beneficial because it allows you to configure and save debugging setup details. VS Code keeps debugging configuration information in a launch.json file located in a .vscode folder in your workspace (project root folder) or in your user settings or workspace settings.
To create a launch.json file, click the create a launch.json file link in the Run start view.
VS Code will try to automatically detect your debug environment, but if this fails, you will have to choose it manually:
Here is the launch configuration generated for Node.js debugging:
{
  "version": "0.2.0",
  "configurations": [
    {
      "type": "node",
      "request": "launch",
      "name": "Launch Program",
      "skipFiles": ["<node_internals>/**"],
      "program": "${workspaceFolder}\app.js"
    }
  ]
}
If you go back to the File Explorer view (⇧⌘E (Windows, Linux Ctrl+Shift+E)), you’ll see that VS Code has created a .vscode folder and added the launch.json file to your workspace.
Note: You can debug a simple application even if you don’t have a folder open in VS Code, but it is not possible to manage launch configurations and set up advanced debugging. The VS Code Status Bar is purple if you do not have a folder open.
Note that the attributes available in launch configurations vary from debugger to debugger. You can use IntelliSense suggestions (⌃Space (Windows, Linux Ctrl+Space)) to find out which attributes exist for a specific debugger. Hover help is also available for all attributes.
Do not assume that an attribute that is available for one debugger automatically works for other debuggers too. If you see green squiggles in your launch configuration, hover over them to learn what the problem is and try to fix them before launching a debug session.
Review all automatically generated values and make sure that they make sense for your project and debugging environment.
Launch versus attach configurations
In VS Code, there are two core debugging modes, Launch and Attach, which handle two different workflows and segments of developers. Depending on your workflow, it can be confusing to know what type of configuration is appropriate for your project.
If you come from a browser Developer Tools background, you might not be used to «launching from your tool,» since your browser instance is already open. When you open DevTools, you are simply attaching DevTools to your open browser tab. On the other hand, if you come from a server or desktop background, it’s quite normal to have your editor launch your process for you, and your editor automatically attaches its debugger to the newly launched process.
The best way to explain the difference between launch and attach is to think of a launch configuration as a recipe for how to start your app in debug mode before VS Code attaches to it, while an attach configuration is a recipe for how to connect VS Code’s debugger to an app or process that’s already running.
VS Code debuggers typically support launching a program in debug mode or attaching to an already running program in debug mode. Depending on the request (attach or launch), different attributes are required, and VS Code’s launch.json validation and suggestions should help with that.
Add a new configuration
To add a new configuration to an existing launch.json, use one of the following techniques:
- Use IntelliSense if your cursor is located inside the configurations array.
- Press the Add Configuration button to invoke snippet IntelliSense at the start of the array.
- Choose Add Configuration option in the Run menu.
VS Code also supports compound launch configurations for starting multiple configurations at the same time; for more details, please read this section.
In order to start a debug session, first select the configuration named Launch Program using the Configuration dropdown in the Run and Debug view. Once you have your launch configuration set, start your debug session with F5.
Alternatively, you can run your configuration through the Command Palette (⇧⌘P (Windows, Linux Ctrl+Shift+P)) by filtering on Debug: Select and Start Debugging or typing 'debug ' and selecting the configuration you want to debug.
As soon as a debugging session starts, the DEBUG CONSOLE panel is displayed and shows debugging output, and the Status Bar changes color (orange for default color themes):
In addition, the debug status appears in the Status Bar showing the active debug configuration. By selecting the debug status, a user can change the active launch configuration and start debugging without needing to open the Run and Debug view.
Debug actions
Once a debug session starts, the Debug toolbar will appear on the top of the editor.
| Action | Explanation |
|---|---|
| Continue / Pause F5 |
Continue: Resume normal program/script execution (up to the next breakpoint). Pause: Inspect code executing at the current line and debug line-by-line. |
| Step Over F10 |
Execute the next method as a single command without inspecting or following its component steps. |
| Step Into F11 |
Enter the next method to follow its execution line-by-line. |
| Step Out ⇧F11 (Windows, Linux Shift+F11) |
When inside a method or subroutine, return to the earlier execution context by completing remaining lines of the current method as though it were a single command. |
| Restart ⇧⌘F5 (Windows, Linux Ctrl+Shift+F5) |
Terminate the current program execution and start debugging again using the current run configuration. |
| Stop ⇧F5 (Windows, Linux Shift+F5) |
Terminate the current program execution. |
Tip: Use the setting
debug.toolBarLocationto control the location of the debug toolbar. It can be the defaultfloating,dockedto the Run and Debug view, orhidden. Afloatingdebug toolbar can be dragged horizontally and also down to the editor area.
Run mode
In addition to debugging a program, VS Code supports running the program. The Debug: Run (Start Without Debugging) action is triggered with ⌃F5 (Windows, Linux Ctrl+F5) and uses the currently selected launch configuration. Many of the launch configuration attributes are supported in ‘Run’ mode. VS Code maintains a debug session while the program is running, and pressing the Stop button terminates the program.
Tip: The Run action is always available, but not all debugger extensions support ‘Run’. In this case, ‘Run’ will be the same as ‘Debug’.
Breakpoints
Breakpoints can be toggled by clicking on the editor margin or using F9 on the current line. Finer breakpoint control (enable/disable/reapply) can be done in the Run and Debug view’s BREAKPOINTS section.
- Breakpoints in the editor margin are normally shown as red filled circles.
- Disabled breakpoints have a filled gray circle.
- When a debugging session starts, breakpoints that cannot be registered with the debugger change to a gray hollow circle. The same might happen if the source is edited while a debug session without live-edit support is running.
If the debugger supports breaking on different kinds of errors or exceptions, those will also be available in the BREAKPOINTS view.
The Reapply All Breakpoints command sets all breakpoints again to their original location. This is helpful if your debug environment is «lazy» and «misplaces» breakpoints in source code that has not yet been executed.
Optionally, breakpoints can be shown in the editor’s overview ruler by enabling the setting debug.showBreakpointsInOverviewRuler:
Logpoints
A Logpoint is a variant of a breakpoint that does not «break» into the debugger but instead logs a message to the console. Logpoints are especially useful for injecting logging while debugging production servers that cannot be paused or stopped.
A Logpoint is represented by a «diamond» shaped icon. Log messages are plain text but can include expressions to be evaluated within curly braces (‘{}’).
Just like regular breakpoints, Logpoints can be enabled or disabled and can also be controlled by a condition and/or hit count.
Note: Logpoints are supported by VS Code’s built-in Node.js debugger, but can be implemented by other debug extensions. The Python and Java extensions, for example, support Logpoints.
Data inspection
Variables can be inspected in the VARIABLES section of the Run and Debug view or by hovering over their source in the editor. Variable values and expression evaluation are relative to the selected stack frame in the CALL STACK section.
Variable values can be modified with the Set Value action from the variable’s context menu. Additionally, you can use the Copy Value action to copy the variable’s value, or Copy as Expression action to copy an expression to access the variable.
Variables and expressions can also be evaluated and watched in the Run and Debug view’s WATCH section.
Variable names and values can be filtered by typing while the focus is on the VARIABLES section.
Launch.json attributes
There are many launch.json attributes to help support different debuggers and debugging scenarios. As mentioned above, you can use IntelliSense (⌃Space (Windows, Linux Ctrl+Space)) to see the list of available attributes once you have specified a value for the type attribute.
The following attributes are mandatory for every launch configuration:
type— the type of debugger to use for this launch configuration. Every installed debug extension introduces a type:nodefor the built-in Node debugger, for example, orphpandgofor the PHP and Go extensions.request— the request type of this launch configuration. Currently,launchandattachare supported.name— the reader-friendly name to appear in the Debug launch configuration dropdown.
Here are some optional attributes available to all launch configurations:
presentation— using theorder,group, andhiddenattributes in thepresentationobject, you can sort, group, and hide configurations and compounds in the Debug configuration dropdown and in the Debug quick pick.preLaunchTask— to launch a task before the start of a debug session, set this attribute to the label of a task specified in tasks.json (in the workspace’s.vscodefolder). Or, this can be set to${defaultBuildTask}to use your default build task.postDebugTask— to launch a task at the very end of a debug session, set this attribute to the name of a task specified in tasks.json (in the workspace’s.vscodefolder).internalConsoleOptions— this attribute controls the visibility of the Debug Console panel during a debugging session.debugServer— for debug extension authors only: this attribute allows you to connect to a specified port instead of launching the debug adapter.serverReadyAction— if you want to open a URL in a web browser whenever the program under debugging outputs a specific message to the debug console or integrated terminal. For details see section Automatically open a URI when debugging a server program below.
Many debuggers support some of the following attributes:
program— executable or file to run when launching the debuggerargs— arguments passed to the program to debugenv— environment variables (the valuenullcan be used to «undefine» a variable)envFile— path to dotenv file with environment variablescwd— current working directory for finding dependencies and other filesport— port when attaching to a running processstopOnEntry— break immediately when the program launchesconsole— what kind of console to use, for example,internalConsole,integratedTerminal, orexternalTerminal
Variable substitution
VS Code makes commonly used paths and other values available as variables and supports variable substitution inside strings in launch.json. This means that you do not have to use absolute paths in debug configurations. For example, ${workspaceFolder} gives the root path of a workspace folder, ${file} the file open in the active editor, and ${env:Name} the environment variable ‘Name’. You can see a full list of predefined variables in the Variables Reference or by invoking IntelliSense inside the launch.json string attributes.
{
  "type": "node",
  "request": "launch",
  "name": "Launch Program",
  "program": "${workspaceFolder}/app.js",
  "cwd": "${workspaceFolder}",
  "args": ["${env:USERNAME}"]
}
Platform-specific properties
Launch.json supports defining values (for example, arguments to be passed to the program) that depend on the operating system where the debugger is running. To do so, put a platform-specific literal into the launch.json file and specify the corresponding properties inside that literal.
Below is an example that passes "args" to the program differently on Windows:
{
  "version": "0.2.0",
  "configurations": [
    {
      "type": "node",
      "request": "launch",
      "name": "Launch Program",
      "program": "${workspaceFolder}/node_modules/gulp/bin/gulpfile.js",
      "args": ["myFolder/path/app.js"],
      "windows": {
        "args": ["myFolder\path\app.js"]
      }
    }
  ]
}
Valid operating properties are "windows" for Windows, "linux" for Linux, and "osx" for macOS. Properties defined in an operating system specific scope override properties defined in the global scope.
Please note that the type property cannot be placed inside a platform-specific section, because type indirectly determines the platform in remote debugging scenarios, and that would result in a cyclic dependency.
In the example below, debugging the program always stops on entry except on macOS:
{
  "version": "0.2.0",
  "configurations": [
    {
      "type": "node",
      "request": "launch",
      "name": "Launch Program",
      "program": "${workspaceFolder}/node_modules/gulp/bin/gulpfile.js",
      "stopOnEntry": true,
      "osx": {
        "stopOnEntry": false
      }
    }
  ]
}
Global launch configuration
VS Code supports adding a "launch" object inside your User settings. This "launch" configuration will then be shared across your workspaces. For example:
"launch": {
    "version": "0.2.0",
    "configurations": [{
        "type": "node",
        "request": "launch",
        "name": "Launch Program",
        "program": "${file}"
    }]
}
Advanced breakpoint topics
Conditional breakpoints
A powerful VS Code debugging feature is the ability to set conditions based on expressions, hit counts, or a combination of both.
- Expression condition: The breakpoint will be hit whenever the expression evaluates to
true. - Hit count: The ‘hit count’ controls how many times a breakpoint needs to be hit before it will ‘break’ execution. Whether a ‘hit count’ is respected and the exact syntax of the expression vary among debugger extensions.
You can add a condition and/or hit count when creating a source breakpoint (with the Add Conditional Breakpoint action) or when modifying an existing one (with the Edit Condition action). In both cases, an inline text box with a dropdown menu opens where you can enter expressions:
Condition and hit count editing support is also supported for function and exception breakpoints.
You can initiate condition editing from the context menu or the new inline Edit Condition action.
An example of condition editing in the BREAKPOINTS view:
If a debugger does not support conditional breakpoints, the Add Conditional Breakpoint and Edit Condition actions will be missing.
Inline breakpoints
Inline breakpoints will only be hit when the execution reaches the column associated with the inline breakpoint. This is particularly useful when debugging minified code which contains multiple statements in a single line.
An inline breakpoint can be set using ⇧F9 (Windows, Linux Shift+F9) or through the context menu during a debug session. Inline breakpoints are shown inline in the editor.
Inline breakpoints can also have conditions. Editing multiple breakpoints on a line is possible through the context menu in the editor’s left margin.
Function breakpoints
Instead of placing breakpoints directly in source code, a debugger can support creating breakpoints by specifying a function name. This is useful in situations where source is not available but a function name is known.
A function breakpoint is created by pressing the + button in the BREAKPOINTS section header and entering the function name. Function breakpoints are shown with a red triangle in the BREAKPOINTS section.
Data breakpoints
If a debugger supports data breakpoints, they can be set from the context menu in the VARIABLES view. The Break on Value Change/Read/Access commands will add a data breakpoint that is hit when the value of the underlying variable changes/is read/is accessed. Data breakpoints are shown with a red hexagon in the BREAKPOINTS section.
Debug Console REPL
Expressions can be evaluated with the Debug Console REPL (Read-Eval-Print Loop) feature. To open the Debug Console, use the Debug Console action at the top of the Debug pane or use the View: Debug Console command (⇧⌘Y (Windows, Linux Ctrl+Shift+Y)). Expressions are evaluated after you press Enter and the Debug Console REPL shows suggestions as you type. If you need to enter multiple lines, use Shift+Enter between the lines and then send all lines for evaluation with Enter.
Debug Console input uses the mode of the active editor, which means that the Debug Console input supports syntax coloring, indentation, auto closing of quotes, and other language features.
Note: You must be in a running debug session to use the Debug Console REPL.
Redirect input/output to/from the debug target
Redirecting input/output is debugger/runtime specific, so VS Code does not have a built-in solution that works for all debuggers.
Here are two approaches you might want to consider:
-
Launch the program to debug («debug target») manually in a terminal or command prompt and redirect input/output as needed. Make sure to pass the appropriate command line options to the debug target so that a debugger can attach to it. Create and run an «attach» debug configuration that attaches to the debug target.
-
If the debugger extension you are using can run the debug target in VS Code’s Integrated Terminal (or an external terminal), you can try to pass the shell redirect syntax (for example, «<» or «>») as arguments.
Here’s an example launch.json configuration:
{
  "name": "launch program that reads a file from stdin",
  "type": "node",
  "request": "launch",
  "program": "program.js",
  "console": "integratedTerminal",
  "args": ["<", "in.txt"]
}
This approach requires that the «<» syntax is passed through the debugger extension and ends up unmodified in the Integrated Terminal.
Multi-target debugging
For complex scenarios involving more than one process (for example, a client and a server), VS Code supports multi-target debugging.
Using multi-target debugging is simple: after you’ve started a first debug session, you can just launch another session. As soon as a second session is up and running, the VS Code UI switches to multi-target mode:
Compound launch configurations
An alternative way to start multiple debug sessions is by using a compound launch configuration. A compound launch configuration lists the names of two or more launch configurations that should be launched in parallel. Optionally a preLaunchTask can be specified that is run before the individual debug sessions are started. The boolean flag stopAll controls whether manually terminating one session will stop all of the compound sessions.
{
  "version": "0.2.0",
  "configurations": [
    {
      "type": "node",
      "request": "launch",
      "name": "Server",
      "program": "${workspaceFolder}/server.js"
    },
    {
      "type": "node",
      "request": "launch",
      "name": "Client",
      "program": "${workspaceFolder}/client.js"
    }
  ],
  "compounds": [
    {
      "name": "Server/Client",
      "configurations": ["Server", "Client"],
      "preLaunchTask": "${defaultBuildTask}",
      "stopAll": true
    }
  ]
}
Compound launch configurations are displayed in the launch configuration dropdown menu.
Remote debugging
VS Code does not itself support remote debugging: this is a feature of the debug extension you are using, and you should consult the extension’s page in the Marketplace for support and details.
There is, however, one exception: the Node.js debugger included in VS Code supports remote debugging. See the Node.js Debugging topic to learn how to configure this.
Automatically open a URI when debugging a server program
Developing a web program typically requires opening a specific URL in a web browser in order to hit the server code in the debugger. VS Code has a built-in feature «serverReadyAction» to automate this task.
Here is an example of a simple Node.js Express application:
var express = require('express');
var app = express();

app.get('/', function(req, res) {
  res.send('Hello World!');
});

app.listen(3000, function() {
  console.log('Example app listening on port 3000!');
});
This application first installs a «Hello World» handler for the «/» URL and then starts to listen for HTTP connections on port 3000. The port is announced in the Debug Console, and typically, the developer would now type http://localhost:3000 into their browser application.
The serverReadyAction feature makes it possible to add a structured property serverReadyAction to any launch config and select an «action» to be performed:
{
  "type": "node",
  "request": "launch",
  "name": "Launch Program",
  "program": "${workspaceFolder}/app.js",

  "serverReadyAction": {
    "pattern": "listening on port ([0-9]+)",
    "uriFormat": "http://localhost:%s",
    "action": "openExternally"
  }
}
Here the pattern property describes the regular expression for matching the program’s output string that announces the port. The pattern for the port number is put into parenthesis so that it is available as a regular expression capture group. In this example, we are extracting only the port number, but it is also possible to extract a full URI.
The uriFormat property describes how the port number is turned into a URI. The first %s is substituted by the first capture group of the matching pattern.
The resulting URI is then opened outside of VS Code («externally») with the standard application configured for the URI’s scheme.
Trigger Debugging via Edge or Chrome
Alternatively, the action can be set to debugWithEdge or debugWithChrome. In this mode, a webRoot property can be added that is passed to the Chrome or Edge debug session.
To simplify things a bit, most properties are optional and we use the following fallback values:
- pattern:
"listening on.* (https?://\S+|[0-9]+)"which matches the commonly used messages «listening on port 3000» or «Now listening on: https://localhost:5001». - uriFormat:
"http://localhost:%s" - webRoot:
"${workspaceFolder}"
Triggering an Arbitrary Launch Config
In some cases, you may need to configure additional options for the browser debug session—or use a different debugger entirely. You can do this by setting action to startDebugging with a name property set to the name of the launch configuration to start when the pattern is matched.
The named launch configuration must be in the same file or folder as the one with the serverReadyAction.
Here the serverReadyAction feature in action:
Next steps
To learn about VS Code’s Node.js debugging support, take a look at:
- Node.js — Describes the Node.js debugger, which is included in VS Code.
- TypeScript — The Node.js debugger also supports TypeScript debugging.
To see tutorials on the basics of Node.js debugging, check out these videos:
- Intro Video — Debugging — Showcases the basics of debugging.
- Getting started with Node.js debugging — Shows how to attach a debugger to a running Node.js process.
To learn about debugging support for other programming languages via VS Code extensions:
- C++
- Python
- Java
To learn about VS Code’s task running support, go to:
- Tasks — Describes how to run tasks with Gulp, Grunt, and Jake and how to show errors and warnings.
To write your own debugger extension, visit:
- Debugger Extension — Uses a mock sample to illustrate the steps required to create a VS Code debug extension.
Common questions
What are the supported debugging scenarios?
Debugging of Node.js-based applications is supported on Linux, macOS, and Windows out of the box with VS Code. Many other scenarios are supported by VS Code extensions available in the Marketplace.
I do not see any launch configurations in the Run and Debug view dropdown. What is wrong?
The most common problem is that you did not set up launch.json or there is a syntax error in that file. Alternatively, you might need to open a folder, since no-folder debugging does not support launch configurations.
3/1/2023
Отладка кода в Visual Studio происходит довольно просто, если сравнивать этот процесс с другими IDE. Плюс отладчик Visual Studio обладает довольно широкими возможностями и позволяет отлаживать различные технологии, а если имеющихся средств не хватает, то можно воспользоваться дополнениями.
Отладка кода — это один из самых важных процессов. Без отладки в свет не выходит ни одно нормальное приложение. Потому что, независимо от опыта разработчика, код не всегда работает так, как нужно. А иногда и вообще работает совершенно не так. Вот тут как раз и приходит на помощь отладчик, который позволит разобраться, что не так, и найти изъяны. Можно, конечно, много часов провести за самостоятельным выявлением багов, но отладчиком все-таки быстрее и проще.
В то же время отладка кода — это не волшебная палочка, которая быстренько найдет и исправит все недочеты вашего кода. Отладка — это процесс, при котором код пошагово выполняется в некой программе, например, в Visual Studio. В процессе выполнения идет поиск точек, где вы могли допустить ошибку. А вы в это время можете анализировать свой код и вносить необходимые правки для устранения «косяков».
Работа с отладчиком, даже с таким простым, как Visual Studio, требует определенных знаний и понимания, что там внутри происходит. Умение работать с отладчиком вам в любом случае пригодится, если вы хотите связать свою жизнь с разработкой ПО. В этой статье мы ознакомим вас с процессом отладки при помощи Visual Studio.
Перед стартом отладки вашего кода не лишним было бы для себя выяснить, существует ли какая-то проблема с вашим кодом? Для чего вам нужна отладка? Если есть какие-то проблемы в работе вашего ПО и вы хотите найти их, используя отладчик Visual Studio, нужно понять, в чем суть проблемы. Возможно, есть проблемы, которые отладчик не определит, например:
- орфографические ошибки или опечатки,
- неправильно подключенные API,
- неправильное размещение последних корректировок в код,
- и др.
В принципе, все ошибки возможно будет увидеть уже в процессе работы отладчика. При его работе активно мониторится все, что происходит с вашим ПО. А то, что вы можете в любой точке остановить отладку, дает вам возможность более детально рассмотреть состояние вашего приложения и в нужный момент перейти в построчное изучение кода.
Прежде чем запускать отладчик Visual Studio, не лишним будет проверить код редактором кода и визуально оценить. Нужно искать «красные» и «зеленые»линии. «Красные» линии — это ошибки. «Зеленые» — предупреждения. Это могут быть:
- ошибка компиляции;
- ошибка преобразования типа;
- код не поддерживает синтаксис;
- и др.
«Красные» волнистые линии нужно исправить — это поможет в дальнейшем уменьшить количество ошибок, найденных Visual Studio. А зеленые, если не получается исправить, то по крайней мере нужно тщательно изучить.
Как запустить отладчик Visual Studio
Чтобы запустить отладчик Visual Studio, нужно:
- Запустить саму программу Visual Studio.
- Открыть код приложения, который необходимо отладить.
- Потом при помощи нажатия клавиши «F5» запустить режим отладки. Также это можно сделать через меню, если нажать «Отладка», а потом «Начать отладку».
Начнется процесс отладки. При возникновении ошибок отладчик Visual Studio покажет вам строку их проявления и предоставит вам информацию о том, что произошло. Для более точного изучения кода вы можете расставить точки останова. Это те точки в коде, где отладчик Visual Studio остановит свою работу, а у вас появится возможность детальнее изучить:
последовательность исполнения кода;
работу памяти;
значение переменных и др.
Чтобы создать точку останова в отладчике, нужно кликнуть слева от интересующей вас строки кода или при помощи клавиши «F9».
Бывает такое, что сразу выявить ошибки не получается при помощи отладчика, но приложение все равно не работает корректно. Тогда вам тоже смогут помочь точки останова. Нужно выставить их перед выполнением проблемного кода, а потом запустить отладчик Visual Studio в построчном выполнении программы для детализированного анализа, и тогда баг проявится.
Какая информация выводится отладчиком Visual Studio
Итак, вы выставили несколько точек останова и запустили процесс отладки. На каждой точке останова Visual Studio будет останавливаться. В эти моменты вам будет доступна определенная информация. Чтобы ее просмотреть, нужно кликнуть кнопку «Debug» на панели инструментов и найти «Windows». Получите бонус от Пин ап казино 100% от первого депозита с вейджером отыгрыша x35 на 72 часа! Только на официальном сайте Pin Up лучшие игровые автоматы, рулетка и живые диллеры.
Там вам будет доступна следующая информация:
- Breakpoints. Тут собраны сведения о ваших точках останова.
- Output. Здесь выводятся служебные сообщения от самой Visual Studio.
- Watch. Здесь расположены переменные, за которыми вы наблюдаете в коде; внести их можно только вручную.
- Autos. Здесь находится список переменных, с которыми прямо сейчас проводится работа.
- Locals. Здесь выводятся все локальные переменные.
- Immediate. Здесь выводятся переменные, которые вы требуете.
- Call Stack. Здесь расположен список вызываемых функций.
- Threads. Тут выводится информация об уже стартовавших потоках вашего приложения.
- Modules. Отображаются все загруженные модули.
- Processes. Отображаются процессы модулей.
- Memory. Отображается память рассматриваемых модулей.
- Disassembly. Тут можно увидеть, как отображается ваш код на языке более высокого уровня.
- Registers. Выводится регистр значения.
В заключение
Отладка в Visual Studio дает возможность довольно быстро решить проблемы с вашим кодом. Да, без определенных знаний и понимания запустить и понять отладчик Visual Studio будет нелегко, но с опытом все станет понятнее. В разработке без отладки кода — путь в никуда, потому что стабильность работы приложения — это залог его качества. И если на самом старте разработки игнорировать этот процесс, то нет смысла идти дальше.
|
0 / 0 / 0 Регистрация: 03.04.2017 Сообщений: 3 |
|
|
1 |
|
|
03.04.2017, 19:53. Показов 7243. Ответов 8 Здравствуйте, уважаемые форумчане. У меня win 7, 64bit, и существует проблема с отладчиком в Visual Studio 2017. Каждый раз, когда я пытаюсь его использовать, мне выдает ошибку: «Отладчик установлен неправильно. Запустите программу Setup для установки или восстановления отладчика.» 0 |
|
Programming Эксперт 94731 / 64177 / 26122 Регистрация: 12.04.2006 Сообщений: 116,782 |
03.04.2017, 19:53 |
|
Ответы с готовыми решениями: Не работает отладчик Не работает отладчик у меня беда с отладчиком сначала выдавал такую вещь: Не работает отладчик Не работает отладчик 8 |
|
903 / 424 / 159 Регистрация: 02.04.2014 Сообщений: 1,206 |
|
|
04.04.2017, 13:48 |
2 |
|
А вот куда тебе студию 2017 ?? Чего в 2008 не хватает?? Или чем новее, тем круче программы получаются? (типа как у фотографов с фотоаппаратами) 2 |
|
0 / 0 / 0 Регистрация: 05.04.2017 Сообщений: 1 |
|
|
05.04.2017, 16:31 |
3 |
|
Как же бесят такие «люди». Вместо решения проблемы начинают разглагольствовать. 0 |
|
0 / 0 / 0 Регистрация: 03.04.2017 Сообщений: 3 |
|
|
05.04.2017, 23:09 [ТС] |
4 |
|
rao, Не знаю, какая версия лучше, вот и скачал последнюю — 2017. Если можешь посоветовать удобную и стабильную, то буду рад, а так «сотрясать воздух» не вижу смысла Добавлено через 2 часа 37 минут 0 |
|
903 / 424 / 159 Регистрация: 02.04.2014 Сообщений: 1,206 |
|
|
06.04.2017, 09:56 |
5 |
|
Anton121, если учиться с/с++, то может Фыр-Фыр и прав, вполне хватит VS 6.0 — маленькая, шустрая, без глюков. Правда последние Platform SDK на неё уже не ставились. Хотя с другой стороны, зачем новичку последние навороты Windows 10, если он еще только учится создавать окошки? А так меня вполне устраивает «VS 2008 Team System» и к ней еще «Visual Assist X». (его бы я в любую версию добавлял) 0 |
|
3433 / 2812 / 1249 Регистрация: 29.01.2016 Сообщений: 9,426 |
|
|
06.04.2017, 15:27 |
6 |
|
С тех пор в студии вроде бы ничего не изменилось. Поддержка С++11 изменилась, и сильно. 1 |

|
903 / 424 / 159 Регистрация: 02.04.2014 Сообщений: 1,206 |
|
|
06.04.2017, 16:46 |
7 |
|
20 лет прожили без С++11 и ничего.. .нормально. . и виндовсылинуксы писались, и прикладного софта тоже понаделали какого угодно. Да, кое-что удобное появилось (лямбда-выражения и цикл for по диапазону), но по большому счёту кому это всё надо? Какие-то «косметические» улучшения.. .Ну напишешь где-то предположим 3 строчки вместо 10, а все-равно самое трудоемкое — это отладка. 0 |
|
3433 / 2812 / 1249 Регистрация: 29.01.2016 Сообщений: 9,426 |
|
|
06.04.2017, 17:17 |
8 |
|
Да, кое-что удобное появилось (лямбда-выражения и цикл for по диапазону), Многопоточность. Но в целом, я не спорю, это так — замечания по поводу. 1 |
|
0 / 0 / 0 Регистрация: 03.04.2017 Сообщений: 3 |
|
|
08.04.2017, 13:12 [ТС] |
9 |
|
И эта страница — первая в гугле. Да, нашел эту статью. Но она относится к VS2015. Поставил VS2015, там все отлично работает. Спасибо всем за советы. 0 |
One of the key features of Visual Studio Code is its great debugging support. VS Code’s built-in debugger helps accelerate your edit, compile, and debug loop.
Debugger extensions
VS Code has built-in debugging support for the Node.js runtime and can debug JavaScript, TypeScript, or any other language that gets transpiled to JavaScript.
For debugging other languages and runtimes (including PHP, Ruby, Go, C#, Python, C++, PowerShell and many others), look for Debuggers extensions in the VS Code Marketplace or select Install Additional Debuggers in the top-level Run menu.
Below are several popular extensions which include debugging support:
Tip: The extensions shown above are dynamically queried. Select an extension tile above to read the description and reviews to decide which extension is best for you.
Start debugging
The following documentation is based on the built-in Node.js debugger, but most of the concepts and features are applicable to other debuggers as well.
It is helpful to first create a sample Node.js application before reading about debugging. You can follow the Node.js walkthrough to install Node.js and create a simple «Hello World» JavaScript application (app.js). Once you have a simple application set up, this page will take you through VS Code debugging features.
Run and Debug view
To bring up the Run and Debug view, select the Run and Debug icon in the Activity Bar on the side of VS Code. You can also use the keyboard shortcut ⇧⌘D (Windows, Linux Ctrl+Shift+D).
The Run and Debug view displays all information related to running and debugging and has a top bar with debugging commands and configuration settings.
If running and debugging is not yet configured (no launch.json has been created), VS Code shows the Run start view.
The top-level Run menu has the most common run and debug commands:
Launch configurations
To run or debug a simple app in VS Code, select Run and Debug on the Debug start view or press F5 and VS Code will try to run your currently active file.
However, for most debugging scenarios, creating a launch configuration file is beneficial because it allows you to configure and save debugging setup details. VS Code keeps debugging configuration information in a launch.json file located in a .vscode folder in your workspace (project root folder) or in your user settings or workspace settings.
To create a launch.json file, click the create a launch.json file link in the Run start view.
VS Code will try to automatically detect your debug environment, but if this fails, you will have to choose it manually:
Here is the launch configuration generated for Node.js debugging:
{
  "version": "0.2.0",
  "configurations": [
    {
      "type": "node",
      "request": "launch",
      "name": "Launch Program",
      "skipFiles": ["<node_internals>/**"],
      "program": "${workspaceFolder}\app.js"
    }
  ]
}
If you go back to the File Explorer view (⇧⌘E (Windows, Linux Ctrl+Shift+E)), you’ll see that VS Code has created a .vscode folder and added the launch.json file to your workspace.
Note: You can debug a simple application even if you don’t have a folder open in VS Code, but it is not possible to manage launch configurations and set up advanced debugging. The VS Code Status Bar is purple if you do not have a folder open.
Note that the attributes available in launch configurations vary from debugger to debugger. You can use IntelliSense suggestions (⌃Space (Windows, Linux Ctrl+Space)) to find out which attributes exist for a specific debugger. Hover help is also available for all attributes.
Do not assume that an attribute that is available for one debugger automatically works for other debuggers too. If you see green squiggles in your launch configuration, hover over them to learn what the problem is and try to fix them before launching a debug session.
Review all automatically generated values and make sure that they make sense for your project and debugging environment.
Launch versus attach configurations
In VS Code, there are two core debugging modes, Launch and Attach, which handle two different workflows and segments of developers. Depending on your workflow, it can be confusing to know what type of configuration is appropriate for your project.
If you come from a browser Developer Tools background, you might not be used to «launching from your tool,» since your browser instance is already open. When you open DevTools, you are simply attaching DevTools to your open browser tab. On the other hand, if you come from a server or desktop background, it’s quite normal to have your editor launch your process for you, and your editor automatically attaches its debugger to the newly launched process.
The best way to explain the difference between launch and attach is to think of a launch configuration as a recipe for how to start your app in debug mode before VS Code attaches to it, while an attach configuration is a recipe for how to connect VS Code’s debugger to an app or process that’s already running.
VS Code debuggers typically support launching a program in debug mode or attaching to an already running program in debug mode. Depending on the request (attach or launch), different attributes are required, and VS Code’s launch.json validation and suggestions should help with that.
Add a new configuration
To add a new configuration to an existing launch.json, use one of the following techniques:
- Use IntelliSense if your cursor is located inside the configurations array.
- Press the Add Configuration button to invoke snippet IntelliSense at the start of the array.
- Choose Add Configuration option in the Run menu.
VS Code also supports compound launch configurations for starting multiple configurations at the same time; for more details, please read this section.
In order to start a debug session, first select the configuration named Launch Program using the Configuration dropdown in the Run and Debug view. Once you have your launch configuration set, start your debug session with F5.
Alternatively, you can run your configuration through the Command Palette (⇧⌘P (Windows, Linux Ctrl+Shift+P)) by filtering on Debug: Select and Start Debugging or typing 'debug ' and selecting the configuration you want to debug.
As soon as a debugging session starts, the DEBUG CONSOLE panel is displayed and shows debugging output, and the Status Bar changes color (orange for default color themes):
In addition, the debug status appears in the Status Bar showing the active debug configuration. By selecting the debug status, a user can change the active launch configuration and start debugging without needing to open the Run and Debug view.
Debug actions
Once a debug session starts, the Debug toolbar will appear on the top of the editor.
| Action | Explanation |
|---|---|
| Continue / Pause F5 |
Continue: Resume normal program/script execution (up to the next breakpoint). Pause: Inspect code executing at the current line and debug line-by-line. |
| Step Over F10 |
Execute the next method as a single command without inspecting or following its component steps. |
| Step Into F11 |
Enter the next method to follow its execution line-by-line. |
| Step Out ⇧F11 (Windows, Linux Shift+F11) |
When inside a method or subroutine, return to the earlier execution context by completing remaining lines of the current method as though it were a single command. |
| Restart ⇧⌘F5 (Windows, Linux Ctrl+Shift+F5) |
Terminate the current program execution and start debugging again using the current run configuration. |
| Stop ⇧F5 (Windows, Linux Shift+F5) |
Terminate the current program execution. |
Tip: Use the setting
debug.toolBarLocationto control the location of the debug toolbar. It can be the defaultfloating,dockedto the Run and Debug view, orhidden. Afloatingdebug toolbar can be dragged horizontally and also down to the editor area.
Run mode
In addition to debugging a program, VS Code supports running the program. The Debug: Run (Start Without Debugging) action is triggered with ⌃F5 (Windows, Linux Ctrl+F5) and uses the currently selected launch configuration. Many of the launch configuration attributes are supported in ‘Run’ mode. VS Code maintains a debug session while the program is running, and pressing the Stop button terminates the program.
Tip: The Run action is always available, but not all debugger extensions support ‘Run’. In this case, ‘Run’ will be the same as ‘Debug’.
Breakpoints
Breakpoints can be toggled by clicking on the editor margin or using F9 on the current line. Finer breakpoint control (enable/disable/reapply) can be done in the Run and Debug view’s BREAKPOINTS section.
- Breakpoints in the editor margin are normally shown as red filled circles.
- Disabled breakpoints have a filled gray circle.
- When a debugging session starts, breakpoints that cannot be registered with the debugger change to a gray hollow circle. The same might happen if the source is edited while a debug session without live-edit support is running.
If the debugger supports breaking on different kinds of errors or exceptions, those will also be available in the BREAKPOINTS view.
The Reapply All Breakpoints command sets all breakpoints again to their original location. This is helpful if your debug environment is «lazy» and «misplaces» breakpoints in source code that has not yet been executed.
Optionally, breakpoints can be shown in the editor’s overview ruler by enabling the setting debug.showBreakpointsInOverviewRuler:
Logpoints
A Logpoint is a variant of a breakpoint that does not «break» into the debugger but instead logs a message to the console. Logpoints are especially useful for injecting logging while debugging production servers that cannot be paused or stopped.
A Logpoint is represented by a «diamond» shaped icon. Log messages are plain text but can include expressions to be evaluated within curly braces (‘{}’).
Just like regular breakpoints, Logpoints can be enabled or disabled and can also be controlled by a condition and/or hit count.
Note: Logpoints are supported by VS Code’s built-in Node.js debugger, but can be implemented by other debug extensions. The Python and Java extensions, for example, support Logpoints.
Data inspection
Variables can be inspected in the VARIABLES section of the Run and Debug view or by hovering over their source in the editor. Variable values and expression evaluation are relative to the selected stack frame in the CALL STACK section.
Variable values can be modified with the Set Value action from the variable’s context menu. Additionally, you can use the Copy Value action to copy the variable’s value, or Copy as Expression action to copy an expression to access the variable.
Variables and expressions can also be evaluated and watched in the Run and Debug view’s WATCH section.
Variable names and values can be filtered by typing while the focus is on the VARIABLES section.
Launch.json attributes
There are many launch.json attributes to help support different debuggers and debugging scenarios. As mentioned above, you can use IntelliSense (⌃Space (Windows, Linux Ctrl+Space)) to see the list of available attributes once you have specified a value for the type attribute.
The following attributes are mandatory for every launch configuration:
type— the type of debugger to use for this launch configuration. Every installed debug extension introduces a type:nodefor the built-in Node debugger, for example, orphpandgofor the PHP and Go extensions.request— the request type of this launch configuration. Currently,launchandattachare supported.name— the reader-friendly name to appear in the Debug launch configuration dropdown.
Here are some optional attributes available to all launch configurations:
presentation— using theorder,group, andhiddenattributes in thepresentationobject, you can sort, group, and hide configurations and compounds in the Debug configuration dropdown and in the Debug quick pick.preLaunchTask— to launch a task before the start of a debug session, set this attribute to the label of a task specified in tasks.json (in the workspace’s.vscodefolder). Or, this can be set to${defaultBuildTask}to use your default build task.postDebugTask— to launch a task at the very end of a debug session, set this attribute to the name of a task specified in tasks.json (in the workspace’s.vscodefolder).internalConsoleOptions— this attribute controls the visibility of the Debug Console panel during a debugging session.debugServer— for debug extension authors only: this attribute allows you to connect to a specified port instead of launching the debug adapter.serverReadyAction— if you want to open a URL in a web browser whenever the program under debugging outputs a specific message to the debug console or integrated terminal. For details see section Automatically open a URI when debugging a server program below.
Many debuggers support some of the following attributes:
program— executable or file to run when launching the debuggerargs— arguments passed to the program to debugenv— environment variables (the valuenullcan be used to «undefine» a variable)envFile— path to dotenv file with environment variablescwd— current working directory for finding dependencies and other filesport— port when attaching to a running processstopOnEntry— break immediately when the program launchesconsole— what kind of console to use, for example,internalConsole,integratedTerminal, orexternalTerminal
Variable substitution
VS Code makes commonly used paths and other values available as variables and supports variable substitution inside strings in launch.json. This means that you do not have to use absolute paths in debug configurations. For example, ${workspaceFolder} gives the root path of a workspace folder, ${file} the file open in the active editor, and ${env:Name} the environment variable ‘Name’. You can see a full list of predefined variables in the Variables Reference or by invoking IntelliSense inside the launch.json string attributes.
{
  "type": "node",
  "request": "launch",
  "name": "Launch Program",
  "program": "${workspaceFolder}/app.js",
  "cwd": "${workspaceFolder}",
  "args": ["${env:USERNAME}"]
}
Platform-specific properties
Launch.json supports defining values (for example, arguments to be passed to the program) that depend on the operating system where the debugger is running. To do so, put a platform-specific literal into the launch.json file and specify the corresponding properties inside that literal.
Below is an example that passes "args" to the program differently on Windows:
{
  "version": "0.2.0",
  "configurations": [
    {
      "type": "node",
      "request": "launch",
      "name": "Launch Program",
      "program": "${workspaceFolder}/node_modules/gulp/bin/gulpfile.js",
      "args": ["myFolder/path/app.js"],
      "windows": {
        "args": ["myFolder\path\app.js"]
      }
    }
  ]
}
Valid operating properties are "windows" for Windows, "linux" for Linux, and "osx" for macOS. Properties defined in an operating system specific scope override properties defined in the global scope.
Please note that the type property cannot be placed inside a platform-specific section, because type indirectly determines the platform in remote debugging scenarios, and that would result in a cyclic dependency.
In the example below, debugging the program always stops on entry except on macOS:
{
  "version": "0.2.0",
  "configurations": [
    {
      "type": "node",
      "request": "launch",
      "name": "Launch Program",
      "program": "${workspaceFolder}/node_modules/gulp/bin/gulpfile.js",
      "stopOnEntry": true,
      "osx": {
        "stopOnEntry": false
      }
    }
  ]
}
Global launch configuration
VS Code supports adding a "launch" object inside your User settings. This "launch" configuration will then be shared across your workspaces. For example:
"launch": {
    "version": "0.2.0",
    "configurations": [{
        "type": "node",
        "request": "launch",
        "name": "Launch Program",
        "program": "${file}"
    }]
}
Advanced breakpoint topics
Conditional breakpoints
A powerful VS Code debugging feature is the ability to set conditions based on expressions, hit counts, or a combination of both.
- Expression condition: The breakpoint will be hit whenever the expression evaluates to
true. - Hit count: The ‘hit count’ controls how many times a breakpoint needs to be hit before it will ‘break’ execution. Whether a ‘hit count’ is respected and the exact syntax of the expression vary among debugger extensions.
You can add a condition and/or hit count when creating a source breakpoint (with the Add Conditional Breakpoint action) or when modifying an existing one (with the Edit Condition action). In both cases, an inline text box with a dropdown menu opens where you can enter expressions:
Condition and hit count editing support is also supported for function and exception breakpoints.
You can initiate condition editing from the context menu or the new inline Edit Condition action.
An example of condition editing in the BREAKPOINTS view:
If a debugger does not support conditional breakpoints, the Add Conditional Breakpoint and Edit Condition actions will be missing.
Inline breakpoints
Inline breakpoints will only be hit when the execution reaches the column associated with the inline breakpoint. This is particularly useful when debugging minified code which contains multiple statements in a single line.
An inline breakpoint can be set using ⇧F9 (Windows, Linux Shift+F9) or through the context menu during a debug session. Inline breakpoints are shown inline in the editor.
Inline breakpoints can also have conditions. Editing multiple breakpoints on a line is possible through the context menu in the editor’s left margin.
Function breakpoints
Instead of placing breakpoints directly in source code, a debugger can support creating breakpoints by specifying a function name. This is useful in situations where source is not available but a function name is known.
A function breakpoint is created by pressing the + button in the BREAKPOINTS section header and entering the function name. Function breakpoints are shown with a red triangle in the BREAKPOINTS section.
Data breakpoints
If a debugger supports data breakpoints, they can be set from the context menu in the VARIABLES view. The Break on Value Change/Read/Access commands will add a data breakpoint that is hit when the value of the underlying variable changes/is read/is accessed. Data breakpoints are shown with a red hexagon in the BREAKPOINTS section.
Debug Console REPL
Expressions can be evaluated with the Debug Console REPL (Read-Eval-Print Loop) feature. To open the Debug Console, use the Debug Console action at the top of the Debug pane or use the View: Debug Console command (⇧⌘Y (Windows, Linux Ctrl+Shift+Y)). Expressions are evaluated after you press Enter and the Debug Console REPL shows suggestions as you type. If you need to enter multiple lines, use Shift+Enter between the lines and then send all lines for evaluation with Enter.
Debug Console input uses the mode of the active editor, which means that the Debug Console input supports syntax coloring, indentation, auto closing of quotes, and other language features.
Note: You must be in a running debug session to use the Debug Console REPL.
Redirect input/output to/from the debug target
Redirecting input/output is debugger/runtime specific, so VS Code does not have a built-in solution that works for all debuggers.
Here are two approaches you might want to consider:
-
Launch the program to debug («debug target») manually in a terminal or command prompt and redirect input/output as needed. Make sure to pass the appropriate command line options to the debug target so that a debugger can attach to it. Create and run an «attach» debug configuration that attaches to the debug target.
-
If the debugger extension you are using can run the debug target in VS Code’s Integrated Terminal (or an external terminal), you can try to pass the shell redirect syntax (for example, «<» or «>») as arguments.
Here’s an example launch.json configuration:
{
  "name": "launch program that reads a file from stdin",
  "type": "node",
  "request": "launch",
  "program": "program.js",
  "console": "integratedTerminal",
  "args": ["<", "in.txt"]
}
This approach requires that the «<» syntax is passed through the debugger extension and ends up unmodified in the Integrated Terminal.
Multi-target debugging
For complex scenarios involving more than one process (for example, a client and a server), VS Code supports multi-target debugging.
Using multi-target debugging is simple: after you’ve started a first debug session, you can just launch another session. As soon as a second session is up and running, the VS Code UI switches to multi-target mode:
Compound launch configurations
An alternative way to start multiple debug sessions is by using a compound launch configuration. A compound launch configuration lists the names of two or more launch configurations that should be launched in parallel. Optionally a preLaunchTask can be specified that is run before the individual debug sessions are started. The boolean flag stopAll controls whether manually terminating one session will stop all of the compound sessions.
{
  "version": "0.2.0",
  "configurations": [
    {
      "type": "node",
      "request": "launch",
      "name": "Server",
      "program": "${workspaceFolder}/server.js"
    },
    {
      "type": "node",
      "request": "launch",
      "name": "Client",
      "program": "${workspaceFolder}/client.js"
    }
  ],
  "compounds": [
    {
      "name": "Server/Client",
      "configurations": ["Server", "Client"],
      "preLaunchTask": "${defaultBuildTask}",
      "stopAll": true
    }
  ]
}
Compound launch configurations are displayed in the launch configuration dropdown menu.
Remote debugging
VS Code does not itself support remote debugging: this is a feature of the debug extension you are using, and you should consult the extension’s page in the Marketplace for support and details.
There is, however, one exception: the Node.js debugger included in VS Code supports remote debugging. See the Node.js Debugging topic to learn how to configure this.
Automatically open a URI when debugging a server program
Developing a web program typically requires opening a specific URL in a web browser in order to hit the server code in the debugger. VS Code has a built-in feature «serverReadyAction» to automate this task.
Here is an example of a simple Node.js Express application:
var express = require('express');
var app = express();

app.get('/', function(req, res) {
  res.send('Hello World!');
});

app.listen(3000, function() {
  console.log('Example app listening on port 3000!');
});
This application first installs a «Hello World» handler for the «/» URL and then starts to listen for HTTP connections on port 3000. The port is announced in the Debug Console, and typically, the developer would now type http://localhost:3000 into their browser application.
The serverReadyAction feature makes it possible to add a structured property serverReadyAction to any launch config and select an «action» to be performed:
{
  "type": "node",
  "request": "launch",
  "name": "Launch Program",
  "program": "${workspaceFolder}/app.js",

  "serverReadyAction": {
    "pattern": "listening on port ([0-9]+)",
    "uriFormat": "http://localhost:%s",
    "action": "openExternally"
  }
}
Here the pattern property describes the regular expression for matching the program’s output string that announces the port. The pattern for the port number is put into parenthesis so that it is available as a regular expression capture group. In this example, we are extracting only the port number, but it is also possible to extract a full URI.
The uriFormat property describes how the port number is turned into a URI. The first %s is substituted by the first capture group of the matching pattern.
The resulting URI is then opened outside of VS Code («externally») with the standard application configured for the URI’s scheme.
Trigger Debugging via Edge or Chrome
Alternatively, the action can be set to debugWithEdge or debugWithChrome. In this mode, a webRoot property can be added that is passed to the Chrome or Edge debug session.
To simplify things a bit, most properties are optional and we use the following fallback values:
- pattern:
"listening on.* (https?://\S+|[0-9]+)"which matches the commonly used messages «listening on port 3000» or «Now listening on: https://localhost:5001». - uriFormat:
"http://localhost:%s" - webRoot:
"${workspaceFolder}"
Triggering an Arbitrary Launch Config
In some cases, you may need to configure additional options for the browser debug session—or use a different debugger entirely. You can do this by setting action to startDebugging with a name property set to the name of the launch configuration to start when the pattern is matched.
The named launch configuration must be in the same file or folder as the one with the serverReadyAction.
Here the serverReadyAction feature in action:
Next steps
To learn about VS Code’s Node.js debugging support, take a look at:
- Node.js — Describes the Node.js debugger, which is included in VS Code.
- TypeScript — The Node.js debugger also supports TypeScript debugging.
To see tutorials on the basics of Node.js debugging, check out these videos:
- Intro Video — Debugging — Showcases the basics of debugging.
- Getting started with Node.js debugging — Shows how to attach a debugger to a running Node.js process.
To learn about debugging support for other programming languages via VS Code extensions:
- C++
- Python
- Java
To learn about VS Code’s task running support, go to:
- Tasks — Describes how to run tasks with Gulp, Grunt, and Jake and how to show errors and warnings.
To write your own debugger extension, visit:
- Debugger Extension — Uses a mock sample to illustrate the steps required to create a VS Code debug extension.
Common questions
What are the supported debugging scenarios?
Debugging of Node.js-based applications is supported on Linux, macOS, and Windows out of the box with VS Code. Many other scenarios are supported by VS Code extensions available in the Marketplace.
I do not see any launch configurations in the Run and Debug view dropdown. What is wrong?
The most common problem is that you did not set up launch.json or there is a syntax error in that file. Alternatively, you might need to open a folder, since no-folder debugging does not support launch configurations.
3/1/2023
Локальный отладчик windows visual studio
Visual Studio предоставляет прекрасные возможности отладки вне зависимости от языка, который вы используете: от C#, VB и C++ до JavaScript и Python, XAML и HTML. Возможна отладка всех поддерживаемых языков. Предлагаем ознакомиться со сведениями о том, как приступить к отладке в Visual Studio 2019.
Любая платформа или место
В локальной, удаленной и рабочей среде.
Где бы ни запускался ваш код, Visual Studio может выполнить его отладку — от запуска приложения для Windows на рабочем столе или в эмуляторе Android до подключения удаленного экземпляра Azure, устройства iOS или игровой приставки, а также любого браузера.
Вы можете выполнять отладку проблем вне сети в рабочей среде, используя такие возможности, как IntelliTrace и глубокий анализ файлов дампа. Подробнее об этих функциях см. в нашем пошаговом руководстве по использованию IntelliTrace.
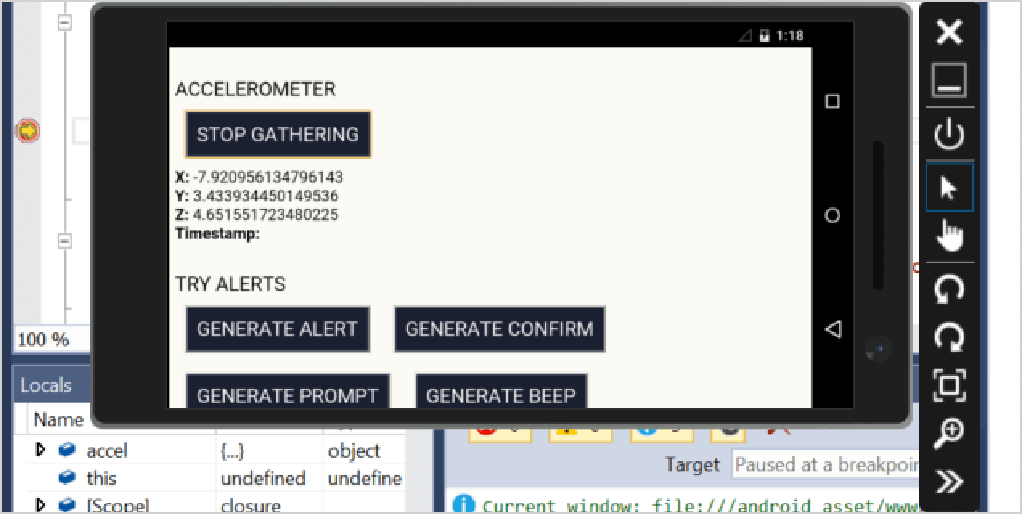
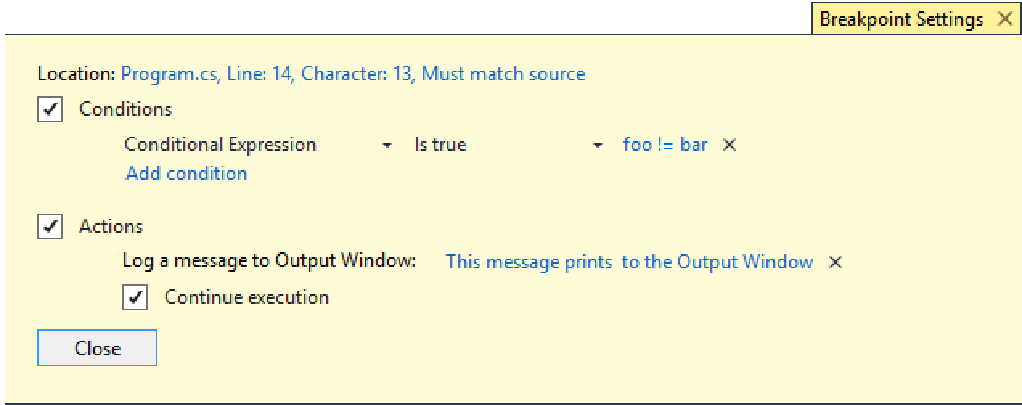
Детальный контроль
Вам решать, где именно и когда прервать выполнение и проверить состояние.
Отладчик Visual Studio позволяет контролировать выполнение, то есть вам решать, где приостановить все потоки в процессе и проверить текущее состояние. Вы можете в любой момент прервать все, выполнить шаг с обходом операторов, шаг с заходом и выходом из функций, выполнить до текущей позиции, изменить и продолжить выполнение, а также задать так понравившиеся всем точки останова.
Гибкая проверка состояния
Просматривайте значения переменных во время выполнения.
Как только вы приостановите выполнение приложения, где захотите, Visual Studio предложит множество способов проверить значения переменных для формулирования или проверки гипотезы.
Отслеживайте значение при пошаговом выполнении кода, быстро просматривайте локальные переменные и оценивайте сложные выражения — и все это не выходя из отладчика. Вы даже можете выполнить интерактивный запрос глубоко в структуру данных.
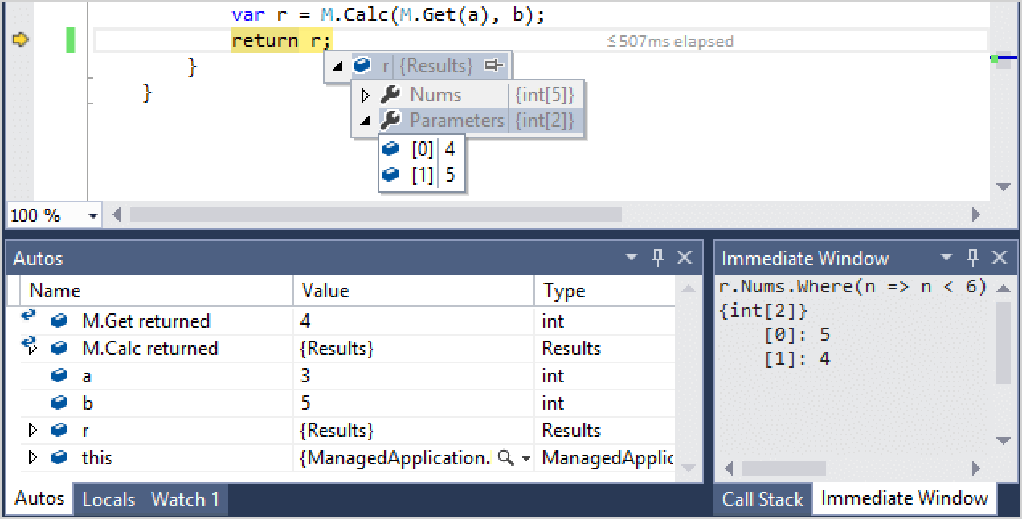
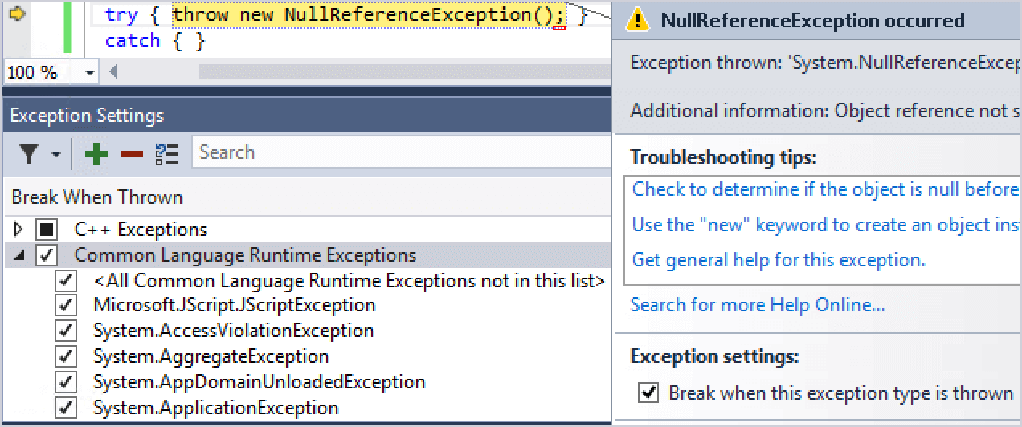
Исключения — это хорошо
Будьте предупреждены о проблемах.
Дефекты кода и неожиданные ситуации проявляют себя в виде исключений. Исключения аварийно завершат работу вашего приложения или просто превратятся в ошибки, которые трудно найти.
При отладке в Visual Studio вы можете настроить условия порождения уведомлений и даже выбрать специальные исключения, которые интересуют вас больше всего. Вы будете предупреждены, и с этого момента все просто — как-будто вы пришли в точку останова.
Простая работа с потоками
Упростите контроль и проверку сложного многопоточного кода.
Просматривайте стеки вызовов всех потоков в одном графическом представлении и оценивайте выражения в нескольких потоках, чтобы сравнить значения. Легко просматривайте информацию о потоках и задачах, помечайте их и замораживайте. Быстро переключайтесь между контекстами выполнения и используйте маркеры потоков, чтобы в любой момент времени видеть, какие строки кода выполняются потоками.
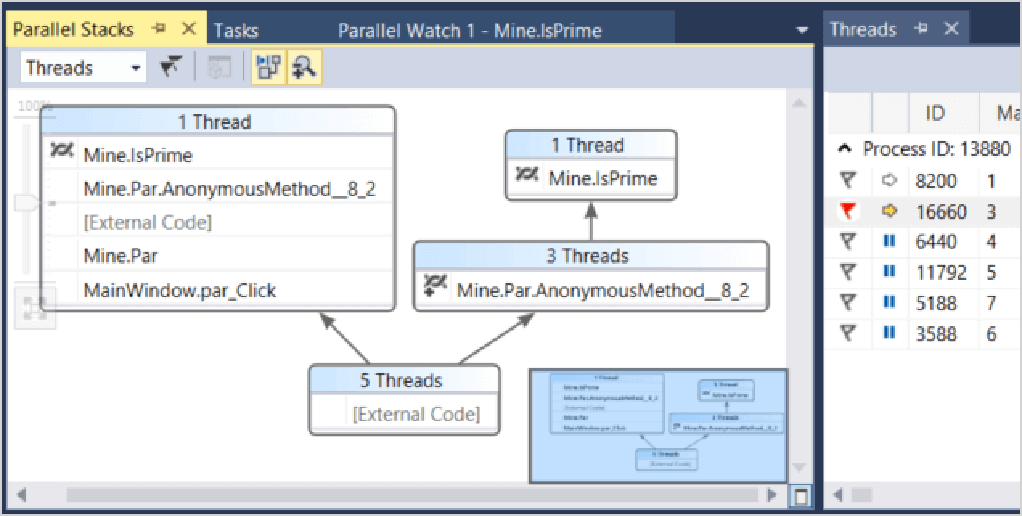
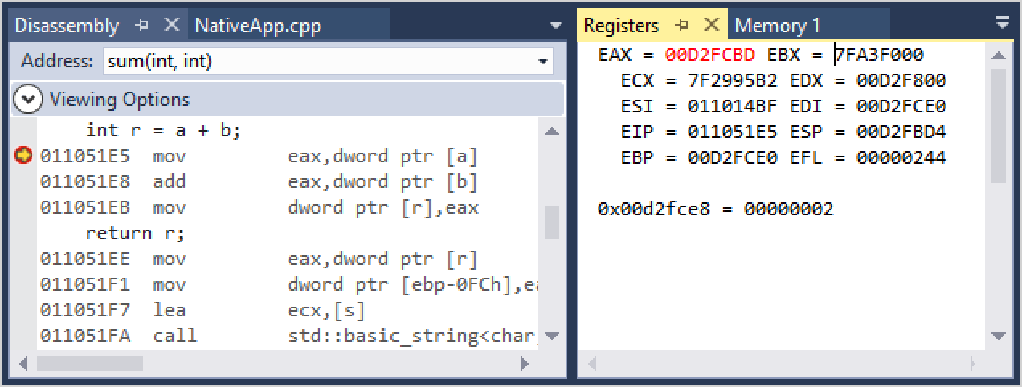
На низком уровне…
Углубляйтесь настолько, насколько этого требует код.
Иногда, особенно для кода C++ системного уровня, необходимо подобраться ближе к аппаратному уровню, чтобы диагностировать тяжело обнаружимые ошибки. Visual Studio позволяет это сделать с помощью окон «Память», «Регистры» и «Дизассемблированный код». Подробнее о поиске утечек памяти с помощью библиотеки CRT.
Предотвращение проблем производительности
Сделайте приложение быстрым и надежным.
Получайте информацию, которая поможет принимать верные решения по производительности при написании кода. Используйте встроенную функцию редактора PerfTips и инструменты диагностики, чтобы при отладке понять качества кода с точки зрения производительности и использования памяти.
Используйте комплексные инструменты профилирования без отладчика, чтобы лучше изучить производительность своего кода, включая использование ЦП, GPU и памяти, скорость отклика пользовательского интерфейса и использование сети. Ознакомьтесь с нашим руководством по средствам профилирования для новичков.

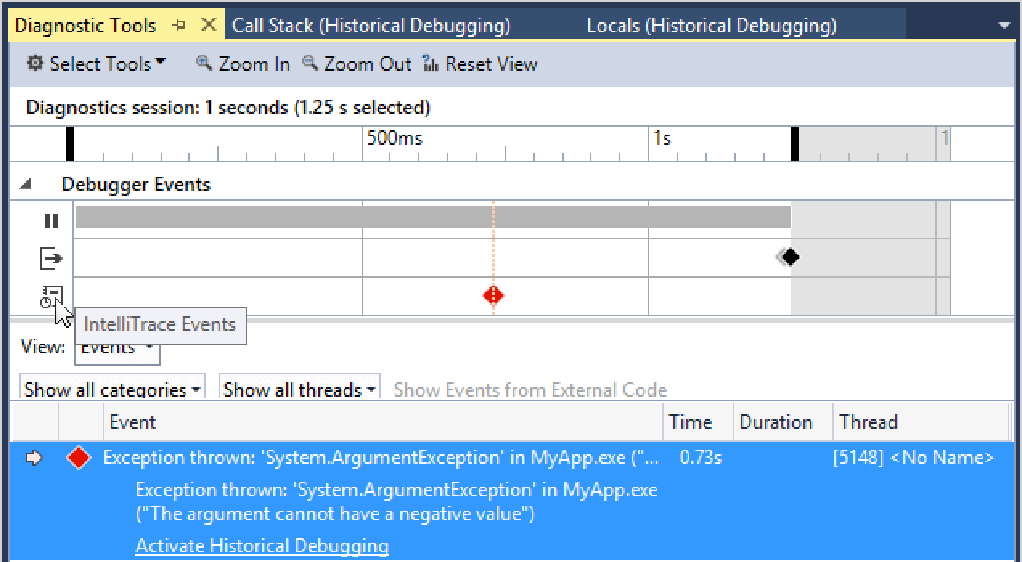
Больше никаких невоспроизводимых ошибок
Журнал выполнения кода .NET.
Изменив код .NET и нажав клавишу F5, чтобы проверить его, вы обнаружили неожиданное поведение, ошибку. Иногда на диагностику такой ошибки уходят часы — вы просматриваете исходный код в поисках связанных фрагментов кода и наугад устанавливаете точки останова.
С помощью инструментов диагностики Visual Studio и IntelliTrace вы можете просматривать журнал выполнения кода и переходить к проверяемому состоянию без каких-либо точек останова.
Простая отладка пользовательского интерфейса
XAML и HTML — это тоже код.
Вы можете настроить оформление приложения на свой вкус, пока оно выполняется. Больше не нужно полагаться на данные времени разработки, чтобы проверить макет.
Для приложений с пользовательским интерфейсом на HTML или XAML проблемы на уровне интерфейса можно выявлять, используя функции отладки кода. Кроме того, Visual Studio позволяет просматривать HTML DOM и визуализировать структуру кода XAML с помощью визуального дерева XAML прямо во время выполнения вашего приложения. Узнайте подробнее о проверке элементов XAML в процессе отладки.
Источник
Переходите по коду с помощью отладчика Visual Studio Navigate through code with the Visual Studio debugger
С помощью отладчика Visual Studio можно переходить по коду для проверки состояния приложения и просмотра последовательности выполнения. The Visual Studio debugger can help you navigate through code to inspect the state of an app and show its execution flow. Для быстрого перехода к коду, который необходимо изучить, можно использовать сочетания клавиш, команды отладки, точки останова и другие функции. You can use keyboard shortcuts, debug commands, breakpoints, and other features to quickly get to the code you want to examine. Знание команд навигации и сочетаний клавиш в отладчике ускоряет и упрощает поиск и устранение неполадок в приложениях. Familiarity with debugger navigation commands and shortcuts makes it faster and easier to find and resolve app issues. Если вы не знакомы с процессом отладки кода, перед выполнением задач в этой статье рекомендуется прочесть документ об отладке для начинающих и статью Методы и инструменты отладки. If this is the first time that you’ve tried to debug code, you may want to read Debugging for absolute beginners and Debugging techniques and tools before going through this article.
Переход в режим приостановки выполнения Get into «break mode»
В режиме приостановки выполнения выполнение приложения приостанавливается, но функции, переменные и объекты при этом остаются в памяти. In break mode, app execution is suspended while functions, variables, and objects remain in memory. Когда отладчик находится в режиме приостановки выполнения, можно переходить по коду. Once the debugger is in break mode, you can navigate through your code. Наиболее распространенные способы быстрого перехода в режим приостановки выполнения: The most common ways to get into break mode quickly is to either:
Начните пошаговое выполнение кода, нажав клавишу F10 или F11. Begin code stepping by pressing F10 or F11. Это позволит быстро найти точку входа в приложение, после чего можно продолжать использовать команды пошагового выполнения для перехода по коду. This allows you to quickly find the entry point of your app, then you can continue pressing step commands to navigate code.
Например, в редакторе кода в Visual Studio можно использовать команду Выполнить до текущей позиции, чтобы запустить приложение, присоединить отладчик и перейти в режим приостановки выполнения, а затем нажать клавишу F11 для перехода по коду. For example, from the code editor in Visual Studio, you can use the Run to Cursor command to start the app, debugger attached, and get into break mode, then F11 to navigate code.

В режиме приостановки выполнения можно переходить по коду, используя различные команды. Once in break mode, you can use a variety of commands to navigate through your code. Во время режима приостановки выполнения можно выполнять поиск ошибок и нарушений целостности данных, проверяя значения переменных. While in break mode, you can examine the values of variables to look for violations or bugs. Для некоторых типов проектов можно также вносить корректировки в приложение. For some project types, you can also make adjustments to the app while in break mode.
Большинство окон отладчика, таких как Модули и Контрольные значения, доступны только тогда, когда отладчик присоединен к приложению. Most debugger windows, like the Modules and Watch windows, are available only while the debugger is attached to your app. Некоторые возможности отладчика, такие как просмотр значений переменных в окне локальных переменных или вычисление выражений в окне контрольных значений, доступны только при приостановке отладчика (то есть в режиме приостановки выполнения). Some debugger features, such as viewing variable values in the Locals window or evaluating expressions in the Watch window, are available only while the debugger is paused (that is, in break mode).
Если во время приостановки выполнения кода не загружены исходные файлы или файлы символов (PDB), отладчик отображает страницу Исходный файл не найден или Символы не найдены, которая поможет найти и загрузить файлы. If you break into code that doesn’t have source or symbol (.pdb) files loaded, the debugger displays a Source Files Not Found or Symbols Not Found page that can help you find and load the files. См. статью Указание файлов символов (.pdb) и файлов с исходным кодом в отладчике Visual Studio. See Specify symbol (.pdb) and source files. Если вы не можете загрузить исходные файлы или файлы символов, можно выполнить отладку инструкций на языке ассемблера в окне Дизассемблирование. If you can’t load the symbol or source files, you can still debug the assembly instructions in the Disassembly window.
Пошаговое прохождение кода Step through code
С помощью команд пошагового выполнения отладчика можно проверять состояние приложения или изучать его последовательность выполнения. The debugger step commands help you inspect your app state or find out more about its execution flow.
Построчное выполнение кода Step into code line by line
Для остановки выполнения на каждом операторе во время отладки используйте команду Отладка > Шаг с заходом или нажмите клавишу F11. To stop on each statement while debugging, use Debug > Step Into, or press F11.
Отладчик осуществляет пошаговое выполнение операторов кода, а не физических строк. The debugger steps through code statements, not physical lines. Например, предложение if может быть записано в одной строке: For example, an if clause can be written on one line:
Однако при пошаговом выполнении этой строки отладчик обрабатывает условие как один шаг, а следствие — как другой. However, when you step into this line, the debugger treats the condition as one step, and the consequence as another. В предыдущем примере условие выполняется. In the preceding example, the condition is true.
При вызове вложенных функций команда Шаг с заходом позволяет попасть в самую глубокую вложенную функцию. On a nested function call, Step Into steps into the most deeply nested function. Например, если использовать Шаг с заходом на вызове Func1(Func2()) , отладчик заходит в функцию Func2 . For example, if you use Step Into on a call like Func1(Func2()) , the debugger steps into the function Func2 .
При выполнении каждой строки кода можно наводить указатель мыши на переменные, чтобы просматривать их значения, или использовать окна Локальные переменные и Контрольные значения для наблюдения за изменением значений. As you execute each line of code, you can hover over variables to see their values, or use the Locals and Watch windows to watch the values change. Кроме того, можно визуально отслеживать стек вызовов при выполнении шагов с заходом в функции. You can also visually trace the call stack while stepping into functions. (Сведения, касающиеся только Visual Studio Enterprise, см. в статье Сопоставление методов в визуализации стека вызовов при отладке.) (For Visual Studio Enterprise only, see Map methods on the call stack while debugging).
Пошаговое прохождение кода и пропуск некоторых функций Step through code and skip some functions
Во время отладки некоторые функции могут вас не интересовать или вы можете знать, что они работают, как в случае с тщательно протестированным кодом библиотеки. You may not care about a function while debugging, or you know it works, like well-tested library code. Чтобы пропустить код во время пошагового выполнения, можно использовать приведенные ниже команды. You can use the following commands to skip code while code stepping. Функции по-прежнему выполняются, но отладчик пропускает их. The functions still execute, but the debugger skips over them.
| Команда с клавиатуры Keyboard command | Команда меню «Отладка» Debug menu command | Описание Description |
|---|---|---|
| F10 F10 | Шаг с обходом Step Over | Если текущая строка содержит вызов функции, команда Шаг с обходом выполняет код, а затем останавливает выполнение в первой строке кода после возврата управления вызываемой функцией. If the current line contains a function call, Step Over runs the code, then suspends execution at the first line of code after the called function returns. |
| SHIFT+F11 Shift+F11 | Шаг с выходом Step Out | Команда Шаг с выходом возобновляет выполнение кода и приостанавливает выполнение, когда текущая функция возвращает управление. Step Out continues running code and suspends execution when the current function returns. Отладчик пропускает текущую функцию. The debugger skips through the current function. |
Выполнение до указанного места или функции Run to a specific location or function
Вам может потребоваться выполнить код непосредственно до определенного места или функции, если вы точно знаете, какой код нужно проверить или с какого места следует начать отладку. You may prefer to run directly to a specific location or function when you know exactly what code you want to inspect, or you know where you want to start debugging.
Выполнение до точки останова в коде Run to a breakpoint in code
Чтобы задать простую точку останова в коде, щелкните в левом поле напротив строки кода, в которой нужно приостановить выполнение. To set a simple breakpoint in your code, click the far left margin next to the line of code where you want to suspend execution. Можно также выбрать строку и нажать клавишу F9, выбрать команду Отладка > Переключить точку останова или щелкнуть правой кнопкой мыши и выбрать команду Точка останова > Вставить точку останова. You can also select the line and press F9, select Debug > Toggle Breakpoint, or right-click and select Breakpoint > Insert Breakpoint. Точка останова отображается как красный кружок в левом поле рядом со строкой кода. The breakpoint appears as a red dot in the left margin next to the code line. Отладчик приостанавливает выполнение непосредственно перед выполнением строки. The debugger suspends execution just before the line executes.

Точки останова в Visual Studio предоставляют широкий набор дополнительных функций, таких как условные точки останова и точки трассировки. Breakpoints in Visual Studio provide a rich set of additional functionality, such as conditional breakpoints and tracepoints. Дополнительные сведения см. в статье Использование точек останова. For details, see Using breakpoints.
Выполнение до точки останова функции Run to a function breakpoint
Можно дать отладчику команду на выполнение до тех пор, пока не будет достигнута определенная функция. You can tell the debugger to run until it reaches a specified function. Можно задать функцию по имени или выбрать ее из стека вызовов. You can specify the function by name, or you can choose it from the call stack.
Указание точки останова функции по имени To specify a function breakpoint by name
Выберите команду Отладка > Создать точку останова > Точка останова функции. Select Debug > New Breakpoint > Function Breakpoint
В диалоговом окне Новая точка останова функции введите имя функции и выберите ее язык. In the New Function Breakpoint dialog, type the name of the function and select its language.

Нажмите кнопку ОК. Select OK.
Если функция перегружается или находится в нескольких пространствах имен, нужную функцию можно выбрать в окне Точки останова. If the function is overloaded or in more than one namespace, you can choose the one you want in the Breakpoints window.

Выбор точки останова функции из стека вызовов To select a function breakpoint from the call stack
Во время отладки откройте окно Стек вызовов, выбрав пункт Отладка > Окна > Стек вызовов. While debugging, open the Call Stack window by selecting Debug > Windows > Call Stack.
В окне Стек вызовов щелкните правой кнопкой мыши имя функции и выберите команду Выполнить до текущей позиции или нажмите клавиши CTRL+F10. In the Call Stack window, right-click a function and select Run To Cursor, or press Ctrl+F10.
Сведения о визуальном отслеживании стека вызовов см. в статье Сопоставление методов в визуализации стека вызовов при отладке. To visually trace the call stack, see Map methods on the call stack while debugging.
Выполнение до расположения курсора Run to a cursor location
Чтобы выполнить код до позиции курсора, в окне исходного кода или в окне Стек вызовов выберите строку, в которой нужно прервать выполнение, щелкните ее правой кнопкой мыши и выберите команду Выполнить до текущей позиции или нажмите клавиши CTRL+F10. To run to the cursor location, in source code or the Call Stack window, select the line you want to break at, right-click and select Run To Cursor, or press Ctrl+F10. Выбор команды Выполнить до текущей позиции аналогичен заданию временной точки останова. Selecting Run To Cursor is like setting a temporary breakpoint.
Выполнение до щелкнутого Run to Click
Во время приостановки работы отладчика можно навести указатель мыши на оператор в исходном коде или в окне Дизассемблирование и щелкнуть значок с зеленой стрелкой Выполнить до этого места. While paused in the debugger, you can hover over a statement in source code or the Disassembly window, and select the Run execution to here green arrow icon. Использование команды Выполнение до щелкнутого позволяет не устанавливать временную точку останова. Using Run to Click eliminates the need to set a temporary breakpoint.

Команда Выполнение до щелкнутого доступна начиная с версии Visual Studio 2017 Visual Studio 2017 . Run to Click is available starting in Visual Studio 2017 Visual Studio 2017 .
Приостановка выполнения кода вручную Manually break into code
Чтобы приостановить выполнение в следующей доступной строке кода в выполняющемся приложении, выберите команду Отладка > Прервать все или нажмите клавиши CTRL+ALT+BREAK. To break in the next available line of code in a running app, select Debug > Break All, or press Ctrl+Alt+Break.
Перемещение указателя для изменения потока выполнения Move the pointer to change the execution flow
Когда работа отладчика приостановлена, желтая стрелка в поле исходного кода или в окне Дизассемблированный код отмечает текущее расположение оператора, который должен быть выполнен следующим. While the debugger is paused, a yellow arrowhead in the margin of the source code or Disassembly window marks the location of the next statement to be executed. Вы можете изменить оператор, который будет выполнен следующим, переместив эту стрелку. You can change the next statement to execute by moving this arrowhead. Можно пропустить часть кода или вернуться к предыдущей строке. You can skip over a portion of code, or return to a previous line. Перемещение указателя полезно при возникновении таких ситуаций, как пропуск раздела кода, содержащего известную ошибку. Moving the pointer is useful for situations such as skipping a section of code that contains a known bug.

Для изменения оператора, который будет выполнен следующим, отладчик должен находиться в режиме приостановки выполнения. To change the next statement to execute, the debugger must be in break mode. В окне исходного кода или окне Дизассемблированный код перетащите желтую стрелку в другую строку или щелкните правой кнопкой мыши строку, которую нужно выполнить следующей, и выберите команду Задать следующий оператор. In the source code or Disassembly window, drag the yellow arrowhead to a different line, or right-click the line you want to execute next and select Set Next Statement.
Счетчик программы переходит непосредственно к новому расположению, и инструкции между старой и новой точками не выполняются. The program counter jumps directly to the new location, and instructions between the old and new execution points aren’t executed. Однако при перемещении точки выполнения обратно промежуточные инструкции не отменяются. However, if you move the execution point backwards, the intervening instructions aren’t undone.
- Перемещение следующего оператора на другую функцию или область обычно приводит к повреждению стека вызова, вызывая ошибку времени выполнения или исключение. Moving the next statement to another function or scope usually results in call-stack corruption, causing a run-time error or exception. При попытке перемещения следующего оператора в другую область, отладчик открывает диалоговое окно с предупреждением и предоставляет возможность отменить операцию. If you try moving the next statement to another scope, the debugger opens a dialog box with a warning and gives you a chance to cancel the operation.
- В Visual Basic нельзя переместить следующий оператор на другую область или функцию. In Visual Basic, you cannot move the next statement to another scope or function.
- Если при использовании машинного кода C++ включены проверки времени выполнения, установка следующего оператора может вызвать исключение, когда выполнение достигнет конца метода. In native C++, if you have run-time checks enabled, setting the next statement can cause an exception to be thrown when execution reaches the end of the method.
- При включенной операции «Изменить и продолжить» команда Задать следующий оператор завершится неудачей, если вы внесете изменения, которые операция «Изменить и продолжить» не сможет немедленно применить. When Edit and Continue is enabled, Set Next Statement fails if you have made edits that Edit and Continue cannot remap immediately. Например, это может произойти, если были внесены изменения внутри блока catch. This can occur, for example, if you have edited code inside a catch block. При возникновении такой ситуации появляется сообщение об ошибке, указывающее, что операция не поддерживается. When this happens, an error message tells you that the operation is not supported.
- В управляемом коде нельзя перемещать следующий оператор в следующих случаях: In managed code, you cannot move the next statement if:
- Следующий оператор находится в методе, отличном от метода текущего оператора. The next statement is in a different method than the current statement.
- Отладка была запущена через JIT–отладку. Debugging was started by Just-In-Time debugging.
- Выполняется очистка стека вызова. A call stack unwind is in progress.
- Вызвано исключение System.StackOverflowException или System.Threading.ThreadAbortException. A System.StackOverflowException or System.Threading.ThreadAbortException exception has been thrown.
Отладка кода, не являющегося пользовательским Debug non-user code
По умолчанию отладчик пытается выполнить отладку только кода вашего приложения, так как включена функция Только мой код. By default, the debugger tries to debug only your app code by enabling a setting called Just My Code. Дополнительные сведения о том, как эта функция работает с проектами различных типов и на разных языках, а также о том, как настроить ее, см. в статье Только мой код. For more details about how this feature works for different project types and languages, and how you can customize it, see Just My Code.
Для просмотра кода платформы, кода сторонней библиотеки или системных вызовов во время отладки можно отключить функцию «Только мой код». To look at framework code, third-party library code, or system calls while debugging, you can disable Just My Code. В меню Сервис (или Отладка) выберите пункты Параметры > Отладка и снимите флажок Включить только мой код. In Tools (or Debug) > Options > Debugging, clear the Enable Just My Code check box. Когда функция «Только мой код» отключена, в окнах отладчика отображается код, не являющийся пользовательским, и отладчик может выполнять его по шагам. When Just My Code is disabled, non-user code appears in the debugger windows, and the debugger can step into the non-user code.
Режим «Только мой код» не поддерживается для проектов устройств. Just My Code is not supported for device projects.
Отладка системного кода Debug system code
Если вы загрузили отладочные символы для системного кода Майкрософт и отключили режим «Только мой код», можно производить шаг с заходом в системный вызов так же, как в любой другой вызов. If you have loaded debugging symbols for Microsoft system code, and disabled Just My Code, you can step into a system call just as you can any other call.
Чтобы загрузить символы для определенного системного компонента, выполните указанные ниже действия. To load symbols for a specific system component:
Во время отладки откройте окно Модули, выбрав пункт Отладка > Окна > Модули или нажав клавиши CTRL+ALT+U. While you’re debugging, open the Modules window by selecting Debug > Windows > Modules, or pressing Ctrl+Alt+U.
Определить, для каких модулей символы загружены, можно по значению в столбце Состояние символов в окне Модули. In the Modules window, you can tell which modules have symbols loaded in the Symbol Status column. Щелкните правой кнопкой мыши модуль, для которого требуется загрузить символы, и выберите команду Загрузить символы. Right-click the module that you want to load symbols for, and select Load Symbols.
Шаг с заходом в свойства и операторы в управляемом коде Step into properties and operators in managed code
По умолчанию отладчик обходит свойства и операторы при пошаговом выполнении в управляемом коде. The debugger steps over properties and operators in managed code by default. В большинстве случаев это делает отладку более удобной и эффективной. In most cases, this provides a better debugging experience. Чтобы включить пошаговое выполнение свойств и операторов, выберите пункт Отладка > Параметры. To enable stepping into properties or operators, choose Debug > Options. На странице Отладка > Общие снимите флажок Обход свойств и операторов (только управляемый код) . On the Debugging > General page, clear the Step over properties and operators (Managed only) check box.
Источник
Search code, repositories, users, issues, pull requests…
Provide feedback
Saved searches
Use saved searches to filter your results more quickly
Sign up
Visual Studio является одним из самых популярных интегрированных сред разработки (IDE) для платформы Windows. Часто разработчики сталкиваются с проблемой, когда локальный отладчик в Visual Studio перестает работать. Это может быть вызвано разными причинами — от ошибок в настройках IDE до проблем с операционной системой или аппаратным обеспечением. В этой статье мы рассмотрим самые распространенные причины проблем с отладчиком и предоставим решения, которые помогут вам быстро восстановить его работу.
Одной из самых распространенных причин проблем с отладчиком Visual Studio является неправильная конфигурация проекта или обновление IDE. Если вы недавно обновили Visual Studio или сделали изменения в настройках проекта, могло возникнуть несоответствие между версией инструментов отладки и версией проекта. В таких случаях, рекомендуется проверить версию отладочных инструментов и настроек проекта, а также обновить их до последней версии.
Еще одной причиной проблем с отладчиком может быть конфликт с другими программными компонентами или антивирусными программами. Некоторые антивирусные программы и системы безопасности могут блокировать работу отладчика из-за считаемой ими подозрительной активности. В таких случаях, рекомендуется временно отключить антивирус программу или добавить процесс Visual Studio в список доверенных.
Если у вас все еще есть проблемы с отладчиком Visual Studio, рекомендуется обратиться к официальной документации или к сообществу разработчиков для получения дальнейшей помощи и поддержки.
Содержание
- Причины неработоспособности локального отладчика Windows Visual Studio
- Ошибки в проекте
- Отсутствие необходимых компонентов
- Некорректные настройки отладчика
- Возможные проблемы операционной системы
Причины неработоспособности локального отладчика Windows Visual Studio
Локальный отладчик Windows Visual Studio может не работать по разным причинам. Рассмотрим некоторые наиболее распространенные проблемы:
1. Неправильная конфигурация проекта:
Отладка может не работать, если проект неправильно настроен. Проверьте настройки проекта, убедитесь, что выбран правильный тип сборки и целевая платформа.
2. Ошибки в коде:
Если в коде проекта есть ошибки, это может вызывать неработоспособность отладчика. Проверьте код на наличие синтаксических ошибок, опечаток и других проблем.
3. Конфликты с другими приложениями или программами:
Некоторые приложения и программы могут конфликтовать с отладчиком Visual Studio и мешать его работе. Попробуйте закрыть все ненужные программы и приложения перед запуском отладки.
4. Несовместимость с операционной системой или версией Visual Studio:
Отладчик Visual Studio может быть несовместим с определенной версией операционной системы или версией самой Visual Studio. Проверьте совместимость вашей системы и версии Visual Studio с требованиями отладчика.
5. Неправильные настройки отладчика:
Отладчик имеет свои собственные настройки, которые могут быть неправильно установлены. Проверьте настройки отладчика и убедитесь, что они соответствуют вашим требованиям отладки.
6. Проблемы с установкой или обновлением Visual Studio:
Если у вас возникли проблемы с установкой или обновлением Visual Studio, это может повлиять на работу отладчика. Проверьте, что у вас установлена последняя версия Visual Studio и проведите необходимые обновления.
7. Проблемы с драйверами и оборудованием:
Некоторые проблемы с драйверами или оборудованием компьютера могут вызывать неработоспособность отладчика. Проверьте драйверы и оборудование на наличие проблем и обновите их при необходимости.
8. Низкое количество оперативной памяти или высокая загрузка системы:
Если у вас мало оперативной памяти или ваша система слишком загружена, отладчик может работать медленно или неработоспособно. Попробуйте освободить память и снизить нагрузку системы перед запуском отладки.
Устранение причин неработоспособности локального отладчика может потребовать времени и терпения. Рекомендуется последовательно проверять каждую из перечисленных проблем и искать способы их решения.
Ошибки в проекте
Ошибки в проекте могут быть одной из причин, по которой локальный отладчик Windows Visual Studio не работает. Эти ошибки могут возникать из-за различных причин, таких как неправильно настроенные зависимости, несовместимые версии библиотек или проблемы с кодом.
Чтобы исправить ошибки в проекте, следует внимательно изучить сообщения об ошибках и принять необходимые меры. Ниже приведены некоторые распространенные типы ошибок, которые могут возникнуть в проекте:
Синтаксические ошибки: Это ошибки, возникающие из-за неверного синтаксиса кода. Они могут быть вызваны отсутствием или неправильным использованием скобок, точек с запятой или других символов синтаксиса. В таком случае следует внимательно проверить код и исправить синтаксические ошибки.
Ошибки времени выполнения: Ошибки времени выполнения возникают во время выполнения программы. Примерами могут быть попытка деления на ноль или обращение к несуществующему объекту. В таких случаях следует использовать отладчик для идентификации места возникновения ошибки и исправления кода.
Ошибки связанности: Эти ошибки возникают в результате проблем с зависимостями проекта. Может быть неправильная версия библиотеки или отсутствие необходимой зависимости. В таких случаях следует проверить и обновить зависимости проекта.
Потерянные файлы: Если в проекте отсутствуют необходимые файлы, могут возникать ошибки. Например, если отсутствует файл с определением класса, компилятор не сможет найти его и возникнет ошибка. В таких случаях следует добавить или восстановить недостающие файлы.
Исправление ошибок в проекте может требовать времени и тщательного анализа кода. Важно также учитывать специфические требования и особенности проекта. После исправления ошибок отладчик Visual Studio должен работать корректно, позволяя проанализировать и отладить код проекта.
Отсутствие необходимых компонентов
Если локальный отладчик Windows Visual Studio не работает, одной из причин может быть отсутствие необходимых компонентов. В Visual Studio используется множество компонентов, которые могут быть отключены или не установлены на вашем компьютере. Пропавшая или неправильно установленная компонента может вызывать проблемы с отладкой приложений.
Чтобы исправить эту проблему, следует убедиться, что все необходимые компоненты Visual Studio установлены и находятся в рабочем состоянии. В Visual Studio можно проверить наличие и состояние компонентов в меню «Инструменты» -> «Дополнительные компоненты». Обратите внимание на компоненты, связанные с отладкой, такие как «Установщик символов» и «Средства отладки Windows». Убедитесь, что они установлены и активированы.
Если компоненты отключены, попробуйте их включить и перезапустить Visual Studio. Если компоненты не установлены, вы можете добавить их в Visual Studio с помощью инструмента «Установщик Visual Studio». Для этого запустите установщик и выберите нужные компоненты для установки.
Также стоит проверить, имеется ли переходный пакет для вашей версии Windows. Переходные пакеты являются дополнительными компонентами, которые могут быть необходимы для корректной работы отладчика на определенных версиях Windows. Если переходный пакет не установлен, найдите его на официальном сайте Microsoft и установите его. После установки перезапустите компьютер и проверьте работу отладчика.
Если все необходимые компоненты установлены и активированы, но отладчик по-прежнему не работает, возможно, проблема связана с другими факторами, такими как настройки проекта или конфликты с другими приложениями. В этом случае, рекомендуется обратиться к официальной документации Visual Studio или обратиться в техническую поддержку Microsoft для получения дополнительной помощи.
Некорректные настройки отладчика
Причиной неработоспособности локального отладчика Windows Visual Studio может быть некорректная настройка самого отладчика. Возможно, вы изменили некоторые параметры или установили несовместимые плагины, что привело к его нестабильной работе.
Для исправления данной проблемы, следует проанализировать настройки отладчика и убедиться, что они соответствуют требованиям вашего проекта. Возможно, вам потребуется отключить некоторые неиспользуемые плагины или изменить параметры, которые могут негативно повлиять на работу отладчика.
Также, стоит проверить обновления для Visual Studio и установить последние версии плагинов, чтобы убедиться, что у вас установлена самая стабильная и совместимая версия отладчика.
| Проблема | Решение |
|---|---|
| Некорректные параметры отладки | Проверьте настройки проекта и убедитесь, что параметры отладки установлены правильно. |
| Несовместимые плагины | Отключите неиспользуемые плагины или попробуйте обновить их до последней версии. |
| Неактуальная версия Visual Studio | Проверьте наличие обновлений для Visual Studio и установите последнюю версию. |
Если проблема не решается после выполнения данных действий, стоит обратиться к документации Visual Studio или зарегистрироваться на форуме поддержки Visual Studio для получения информации от сообщества разработчиков или официальной поддержки.
Возможные проблемы операционной системы
При использовании локального отладчика Windows Visual Studio могут возникать различные проблемы, связанные с операционной системой. Вот несколько наиболее распространенных проблем и их возможные решения:
1. Конфликты с другими программами: некоторые программы могут заблокировать использование отладчика или влиять на его работу. Чтобы решить эту проблему, попробуйте временно отключить или закрыть другие приложения, а затем запустить отладку снова.
2. Недостаточно прав доступа: в некоторых случаях для запуска отладчика требуются административные права. Убедитесь, что вы выполняете отладку от имени пользователя с соответствующими правами доступа.
3. Несовместимость с версией операционной системы: проверьте, поддерживается ли ваша версия операционной системы отладчиком Visual Studio. Если нет, обновите операционную систему до поддерживаемой версии.
4. Поврежденная установка Visual Studio: поврежденные или неправильно установленные компоненты Visual Studio могут привести к неполадкам в работе отладчика. Попробуйте переустановить Visual Studio или восстановить его компоненты с помощью инструментов восстановления.
5. Неправильные настройки безопасности: некоторые настройки безопасности могут блокировать работу отладчика. Проверьте настройки антивирусной программы, брандмауэра и других систем безопасности, чтобы убедиться, что они не блокируют отладку.
6. Проблемы с драйверами и обновлениями: некоторые проблемы могут быть связаны с устаревшими или неправильно установленными драйверами устройств или операционной системы. Обновите драйверы и операционную систему до последней версии, чтобы исправить возможные проблемы.
7. Некорректные параметры конфигурации: неправильные настройки проекта или конфигурации отладчика могут привести к его неправильной работе. Убедитесь, что все параметры конфигурации проекта и настройки отладчика указаны правильно.
Если у вас возникли проблемы с локальным отладчиком Windows Visual Studio, рекомендуется пройти по вышеперечисленным шагам и попробовать исправить возможные проблемы операционной системы, которые могут повлиять на работу отладчика.