Table Of Contents
System Message Logging
Understanding System Message Logging
Configuring System Message Logging
System Log Message Format
Default System Message Logging Configuration
Disabling and Enabling Message Logging
Setting the Message Display Destination Device
Enabling and Disabling Time Stamps on Log Messages
Enabling and Disabling Sequence Numbers in Log Messages
Defining the Message Severity Level
Limiting Syslog Messages Sent to the History Table and to SNMP
Setting a Logging Rate Limit
Configuring UNIX Syslog Servers
Logging Messages to a UNIX Syslog Daemon
Configuring the UNIX System Logging Facility
Displaying the Logging Configuration
System Message Logging
This module describes how to configure system message logging on your wireless device in the following sections:
•![]() Understanding System Message Logging
Understanding System Message Logging
•![]() Configuring System Message Logging
Configuring System Message Logging
•![]() Displaying the Logging Configuration
Displaying the Logging Configuration

Note ![]() For complete syntax and usage information for the commands used in this chapter, refer to the Cisco IOS Configuration Fundamentals Command Reference for Release 12.4.
For complete syntax and usage information for the commands used in this chapter, refer to the Cisco IOS Configuration Fundamentals Command Reference for Release 12.4.
Understanding System Message Logging
By default, wireless devices send the output from system messages and debug privileged EXEC commands to a logging process. The logging process controls the distribution of logging messages to various destinations, such as the logging buffer, terminal lines, or a UNIX syslog server, depending on your configuration. The process also sends messages to the console.
Note ![]() The syslog format is compatible with 4.3 BSD UNIX.
The syslog format is compatible with 4.3 BSD UNIX.
When the logging process is disabled, messages are sent only to the console. The messages are sent as they are generated, so message and debug output are interspersed with prompts or output from other commands. Messages are displayed on the console after the process that generated them has finished.
You can set the severity level of the messages to control the type of messages displayed on the console and each of the destinations. You can timestamp log messages or set the syslog source address to enhance real-time debugging and management.
You can access logged system messages by using the access point command-line interface (CLI) or by saving them to a properly configured syslog server. The access point software saves syslog messages in an internal buffer. You can remotely monitor system messages by accessing the access point through Telnet or by viewing the logs on a syslog server.
Configuring System Message Logging
This section describes how to configure system message logging in the following sections:
•![]() System Log Message Format
System Log Message Format
•![]() Default System Message Logging Configuration
Default System Message Logging Configuration
•![]() Disabling and Enabling Message Logging
Disabling and Enabling Message Logging
•![]() Setting the Message Display Destination Device
Setting the Message Display Destination Device
•![]() Enabling and Disabling Time Stamps on Log Messages
Enabling and Disabling Time Stamps on Log Messages
•![]() Enabling and Disabling Sequence Numbers in Log Messages
Enabling and Disabling Sequence Numbers in Log Messages
•![]() Defining the Message Severity Level
Defining the Message Severity Level
•![]() Limiting Syslog Messages Sent to the History Table and to SNMP
Limiting Syslog Messages Sent to the History Table and to SNMP
•![]() Setting a Logging Rate Limit
Setting a Logging Rate Limit
•![]() Configuring UNIX Syslog Servers
Configuring UNIX Syslog Servers
System Log Message Format
System log messages can contain up to 80 characters and a percent sign (%), which follows the optional sequence number or timestamp information, if configured. Messages are displayed in this format:
seq no:timestamp: %facility-severity-MNEMONIC:description
The part of the message preceding the percent sign depends on the setting of the service sequence-numbers, service timestamps log datetime, service timestamps log datetime [localtime] [msec] [show-timezone], or service timestamps log uptime global configuration command.
Table 1 describes the elements of syslog messages.
|
Element |
Description |
|---|---|
|
seq no: |
Stamps log messages with a sequence number only if the service sequence-numbers global configuration command is configured. For more information, see the «Enabling and Disabling Sequence Numbers in Log Messages» section. |
|
timestamp formats: mm/dd hh:mm:ss or hh:mm:ss (short uptime) or d h (long uptime) |
Date and time of the message or event. This information appears only if the service timestamps log [datetime | log] global configuration command is configured. For more information, see the «Enabling and Disabling Time Stamps on Log Messages» section. |
|
facility |
The facility to which the message refers (for example, SNMP, SYS, and so forth). A facility can be a hardware device, a protocol, or a module of the system software. It denotes the source or the cause of the system message. |
|
severity |
Single-digit code from 0 to 7 that is the severity of the message. For a description of the severity levels, see Table 3. |
|
MNEMONIC |
Text string that uniquely describes the message. |
|
description |
Text string containing detailed information about the event being reported. |
The following example shows a partial access point system message:
00:00:46: %LINK-3-UPDOWN: Interface Port-channel1, changed state to up
00:00:47: %LINK-3-UPDOWN: Interface GigabitEthernet0/1, changed state to up
00:00:47: %LINK-3-UPDOWN: Interface GigabitEthernet0/2, changed state to up
00:00:48: %LINEPROTO-5-UPDOWN: Line protocol on Interface Vlan1, changed state to down
00:00:48: %LINEPROTO-5-UPDOWN: Line protocol on Interface GigabitEthernet0/1, changed
state to down 2
*Mar 1 18:46:11: %SYS-5-CONFIG_I: Configured from console by vty2 (10.34.195.36)
18:47:02: %SYS-5-CONFIG_I: Configured from console by vty2 (10.34.195.36)
*Mar 1 18:48:50.483 UTC: %SYS-5-CONFIG_I: Configured from console by vty2 (10.34.195.36)
Default System Message Logging Configuration
Table 2 shows the default system message logging configuration.
|
Feature |
Default Setting |
|---|---|
|
System message logging to the console |
Enabled |
|
Console severity |
Debugging (and numerically lower levels; see Table 3) |
|
Logging buffer size |
4096 bytes |
|
Logging history size |
1 message |
|
Time stamps |
Disabled |
|
Synchronous logging |
Disabled |
|
Logging server |
Disabled |
|
Syslog server IP address |
None configured |
|
Server facility |
Local7 (see Table 4) |
|
Server severity |
Informational (and numerically lower levels; see Table 3) |
Disabling and Enabling Message Logging
Message logging is enabled by default. It must be enabled to send messages to any destination other than the console. When enabled, log messages are sent to a logging process, which logs messages to designated locations asynchronously to the processes that generated the messages.
To disable message logging, follow these steps, beginning in privileged EXEC mode:
|
Command |
Purpose |
|
|---|---|---|
|
Step 1 |
configure terminal |
Enters global configuration mode. |
|
Step 2 |
no logging on |
Disables message logging. |
|
Step 3 |
end |
Returns to privileged EXEC mode. |
|
Step 4 |
show running-config |
Verifies your entries. |
Disabling the logging process can slow down the access point because a process must wait until the messages are written to the console before continuing. When the logging process is disabled, messages are displayed on the console as soon as they are produced, often appearing in the middle of command output.
The logging synchronous global configuration command also affects the display of messages to the console. When this command is enabled, messages appear only after you press Return. For more information, see the «Enabling and Disabling Time Stamps on Log Messages» section.
To reenable message logging after it has been disabled, use the logging on global configuration command.
Setting the Message Display Destination Device
If message logging is enabled, you can send messages to specific locations in addition to the console. To specify the locations that receive messages, use one or more of the following commands, beginning in privileged EXEC mode:
|
Command |
Purpose |
|
|---|---|---|
|
Step 1 |
configure terminal |
Enters global configuration mode. |
|
Step 2 |
logging buffered [size] [level] |
Logs messages to an internal buffer. The default buffer size is 4096. The range is 4096 to 2147483647 bytes. Levels include emergencies 0, alerts 1, critical 2, errors 3, warnings 4, notifications 5, informational 6, and debugging 7. Note |
|
Step 3 |
logging host |
Logs messages to a UNIX syslog server host. For host, specify the name or IP address of the host to be used as the syslog server. To build a list of syslog servers that receive logging messages, enter this command more than once. For complete syslog server configuration steps, see the «Configuring UNIX Syslog Servers» section. |
|
Step 4 |
end |
Returns to privileged EXEC mode. |
|
Step 5 |
terminal monitor |
Logs messages to a non-console terminal during the current session. Terminal parameter-setting commands are set locally and do not remain in effect after the session has ended. You must perform this step for each session to see the debugging messages. |
The logging buffered global configuration command copies logging messages to an internal buffer. The buffer is circular, so newer messages overwrite older messages after the buffer is full. To display the messages that are logged in the buffer, use the show logging command, in privileged EXEC mode. The first message displayed is the oldest message in the buffer. To clear the contents of the buffer, use the clear logging command, in privileged EXEC mode.
To disable logging to the console, use the no logging console command in global configuration mode. To disable logging to a file, use the no logging file [severity-level-number | type] command in global configuration mode.
Enabling and Disabling Time Stamps on Log Messages
By default, log messages are not time stamped.
To enable timestamping of log messages, follow these steps, beginning in privileged EXEC mode:
|
Command |
Purpose |
|
|---|---|---|
|
Step 1 |
configure terminal |
Enters global configuration mode. |
|
Step 2 |
service timestamps log uptime or service timestamps log datetime [msec] [localtime] [show-timezone] |
Enables log timestamps. The first command enables timestamps on log messages, showing the time since the system was rebooted. The second command enables timestamps on log messages. Depending on the options selected, the timestamp can include the date, time in milliseconds relative to the local time zone, and the time zone name. |
|
Step 3 |
end |
Returns to privileged EXEC mode. |
To disable timestamps for both debug and log messages, use the no service timestamps command in mode global configuration.
The following example shows part of a logging display with the service timestamps log datetime command enabled:
*Mar 1 18:46:11: %SYS-5-CONFIG_I: Configured from console by vty2 (10.34.195.36)
The follwoing example shows part of a logging display with the service timestamps log uptime command enabled:
00:00:46: %LINK-3-UPDOWN: Interface Port-channel1, changed state to up
Enabling and Disabling Sequence Numbers in Log Messages
Because there is a chance that more than one log message can have the same timestamp, you can display messages with sequence numbers so that you can unambiguously refer to a single message. By default, sequence numbers in log messages are not displayed.
To enable sequence numbers in log messages, follow these steps, beginning in privileged EXEC mode:
|
Command |
Purpose |
|
|---|---|---|
|
Step 1 |
configure terminal |
Enters global configuration mode. |
|
Step 2 |
service sequence-numbers |
Enables sequence numbers. |
|
Step 3 |
end |
Returns to privileged EXEC mode. |
To disable sequence numbers, use the no service sequence-numbers global configuration command.
The follwoing example shows part of a logging display with sequence numbers enabled:
000019: %SYS-5-CONFIG_I: Configured from console by vty2 (10.34.195.36)
Defining the Message Severity Level
You can limit messages that are displayed to the selected device by specifying the severity level of the message. Table 3 describes the severity level.
To define the message severity level, follow these steps, beginning in privileged EXEC mode:
|
Command |
Purpose |
|
|---|---|---|
|
Step 1 |
configure terminal |
Enters global configuration mode. |
|
Step 2 |
logging console level |
Limits messages logged to the console. By default, the console receives debugging messages and numerically lower levels (see Table 3). |
|
Step 3 |
logging monitor level |
Limits messages logged to the terminal lines. By default, the terminal receives debugging messages and numerically lower levels (see Table 3). |
|
Step 4 |
logging trap level |
Limits messages logged to the syslog servers. By default, syslog servers receive informational messages and numerically lower levels (see Table 3). For complete steps for configuring syslog servers, see the «Configuring UNIX Syslog Servers» section. |
|
Step 5 |
end |
Returns to privileged EXEC mode. |
Note ![]() Specifying a level causes messages at that level and numerically lower levels to be displayed at the destination.
Specifying a level causes messages at that level and numerically lower levels to be displayed at the destination.
To disable logging to the console, use the no logging console command in global configuration mode. To disable logging to a terminal other than the console, use the no logging monitor command in global configuration mode. To disable logging to syslog servers, use the no logging trap command in global configuration mode.
Table 3 describes the severity level keywords. It also lists the corresponding UNIX syslog definitions from the most severe level to the least severe level.
|
Level Keyword |
Level |
Description |
Syslog Definition |
|---|---|---|---|
|
emergencies |
0 |
System unstable |
LOG_EMERG |
|
alerts |
1 |
Immediate action needed |
LOG_ALERT |
|
critical |
2 |
Critical conditions |
LOG_CRIT |
|
errors |
3 |
Error conditions |
LOG_ERR |
|
warnings |
4 |
Warning conditions |
LOG_WARNING |
|
notifications |
5 |
Normal but significant condition |
LOG_NOTICE |
|
informational |
6 |
Informational messages only |
LOG_INFO |
|
debugging |
7 |
Debugging messages |
LOG_DEBUG |
The software generates four other categories of messages:
•![]() Error messages about software or hardware malfunctions, displayed at levels warnings through emergencies: these types of messages mean that the functionality of the access point is affected.
Error messages about software or hardware malfunctions, displayed at levels warnings through emergencies: these types of messages mean that the functionality of the access point is affected.
•![]() Output from the debug commands, displayed at the debugging level: debug commands are typically used only by the Technical Assistance Center (TAC).
Output from the debug commands, displayed at the debugging level: debug commands are typically used only by the Technical Assistance Center (TAC).
•![]() Interface up or down transitions and system restart messages, displayed at the notifications level: this message is only for information; access point functionality is not affected.
Interface up or down transitions and system restart messages, displayed at the notifications level: this message is only for information; access point functionality is not affected.
•![]() Reload requests and low-process stack messages, displayed at the informational level: this message is only for information; access point functionality is not affected.
Reload requests and low-process stack messages, displayed at the informational level: this message is only for information; access point functionality is not affected.
Note ![]() Authentication request log messages are not logged on to a syslog server. This feature is not supported on Cisco Aironet access points.
Authentication request log messages are not logged on to a syslog server. This feature is not supported on Cisco Aironet access points.
Limiting Syslog Messages Sent to the History Table and to SNMP
If you have enabled syslog message traps to be sent to an SNMP network management station by using the snmp-server enable trap command, you can change the level of messages sent and stored in the access point history table. You can also change the number of messages that are stored in the history table.
Messages are stored in the history table because SNMP traps are not guaranteed to reach their destination. By default, one message of the level warning and numerically lower levels (see Table 3) are stored in the history table even if syslog traps are not enabled.
To change the level and history table size defaults, follow these steps, beginning in privileged EXEC mode:
|
Command |
Purpose |
|
|---|---|---|
|
Step 1 |
configure terminal |
Enters global configuration mode. |
|
Step 2 |
logging history level1 |
Changes the default level of syslog messages stored in the history file and sent to the SNMP server. See Table 3 for a list of level keywords. By default, warnings, errors, critical, alerts, and emergencies messages are sent. |
|
Step 3 |
logging history size number |
Specifies the number of syslog messages that can be stored in the history table. The default is to store one message. The range is 1 to 500 messages. |
|
Step 4 |
end |
Returns to privileged EXEC mode. |
1 Table 3 lists the level keywords and severity level. For SNMP usage, the severity level values increase by 1. For example, emergencies equal 1, not 0, and critical equals 3, not 2.
When the history table is full (it contains the maximum number of message entries specified with the logging history size command in global configuration mode), the oldest message entry is deleted from the table to allow the new message entry to be stored.
To return the logging of syslog messages to the default level, use the no logging history command in global configuration mode. To return the number of messages in the history table to the default value, use the no logging history size command in global configuration mode.
Setting a Logging Rate Limit
You can set a limit on the number of messages that the access point logs per second. You can enable the limit for all messages or for messages sent to the console, and you can specify that messages of a specific severity are exempt from the limit.
To enable a logging rate limit, follow these steps, beginning in privileged EXEC mode:
|
Command |
Purpose |
|
|---|---|---|
|
Step 1 |
configure terminal |
Enters global configuration mode. |
|
Step 2 |
logging rate-limit seconds [all | console] [except severity] |
Enables a logging rate limit in seconds. • • |
|
Step 3 |
end |
Returns to privileged EXEC mode. |
To disable the rate limit, use the no logging rate-limit command in global configuration mode.
Configuring UNIX Syslog Servers
The next sections describe how to configure the 4.3 BSD UNIX server syslog daemon and define the UNIX system logging facility.
Logging Messages to a UNIX Syslog Daemon
Before you can send system log messages to a UNIX syslog server, you must configure the syslog daemon on a UNIX server. Log in as root, and perform these steps.
Note ![]() Some recent versions of UNIX syslog daemons no longer accept by default syslog packets from the network. If this is the case with your system, use the UNIX man syslogd command to determine what options must be added to or removed from the syslog command line to enable logging of remote syslog messages.
Some recent versions of UNIX syslog daemons no longer accept by default syslog packets from the network. If this is the case with your system, use the UNIX man syslogd command to determine what options must be added to or removed from the syslog command line to enable logging of remote syslog messages.
Step 1 ![]() Add a line such as the following to the file /etc/syslog.conf:
Add a line such as the following to the file /etc/syslog.conf:
local7.debug /usr/adm/logs/cisco.log
The local7 keyword specifies the logging facility to be used; see Table 4 for information on the facilities. The debug keyword specifies the syslog level; see Table 3 for information on the severity levels. The syslog daemon sends messages at this level or at a greater severity level to the file specified in the next field. The file must already exist, and the syslog daemon must have permission to write to it.
Step 2 ![]() Create the log file by entering these commands at the UNIX shell prompt:
Create the log file by entering these commands at the UNIX shell prompt:
$ touch /usr/adm/log/cisco.log
$ chmod 666 /usr/adm/log/cisco.log
Step 3 ![]() Ensure the syslog daemon reads the new changes by entering this command:
Ensure the syslog daemon reads the new changes by entering this command:
$ kill -HUP `cat /etc/syslog.pid`
For more information, see the man syslog.conf and man syslogd commands on your UNIX system.
Configuring the UNIX System Logging Facility
When sending system log messages to an external device, you can cause the access point to identify its messages as originating from any of the UNIX syslog facilities.
To configure UNIX system facility message logging, follow these steps, beginning in privileged EXEC mode:
|
Command |
Purpose |
|
|---|---|---|
|
Step 1 |
configure terminal |
Enters global configuration mode. |
|
Step 2 |
logging host |
Logs messages to a UNIX syslog server host by entering its IP address. To build a list of syslog servers that receive logging messages, enter this command more than once. |
|
Step 3 |
logging trap level |
Limits messages logged to the syslog servers. Be default, syslog servers receive informational messages and lower. See Table 3 for level keywords. |
|
Step 4 |
logging facility facility-type |
Configures the syslog facility. See Table 4 for facility-type keywords. The default is local7. |
|
Step 5 |
end |
Returns to privileged EXEC mode. |
To remove a syslog server, use the no logging host command in global configuration mode, and specify the syslog server IP address. To disable logging to syslog servers, enter the no logging trap command in global configuration mode.
Table 4 lists the 4.3 BSD UNIX system facilities that the Cisco IOS software supports. For more information about these facilities, consult the operator’s manual for your UNIX operating system.
|
Facility Type Keyword |
Description |
|---|---|
|
auth |
Authorization system |
|
cron |
Cron facility |
|
daemon |
System daemon |
|
kern |
Kernel |
|
local0-7 |
Locally defined messages |
|
lpr |
Line printer system |
|
|
Mail system |
|
news |
USENET news |
|
sys9 |
System use |
|
sys10 |
System use |
|
sys11 |
System use |
|
sys12 |
System use |
|
sys13 |
System use |
|
sys14 |
System use |
|
syslog |
System log |
|
user |
User process |
|
uucp |
UNIX-to-UNIX copy system |
Displaying the Logging Configuration
To display the current logging configuration and the contents of the log buffer, use the show logging command in privileged EXEC mode. For information about the fields in this display, refer to the Cisco IOS Configuration Fundamentals Command Reference for Release 12.2.
To display the logging history file, use the show logging history command in privileged EXEC mode.
CCDE, CCENT, Cisco Eos, Cisco HealthPresence, the Cisco logo, Cisco Lumin, Cisco Nexus, Cisco StadiumVision, Cisco TelePresence, Cisco WebEx, DCE, and Welcome to the Human Network are trademarks; Changing the Way We Work, Live, Play, and Learn and Cisco Store are service marks; and Access Registrar, Aironet, AsyncOS, Bringing the Meeting To You, Catalyst, CCDA, CCDP, CCIE, CCIP, CCNA, CCNP, CCSP, CCVP, Cisco, the Cisco Certified Internetwork Expert logo, Cisco IOS, Cisco Press, Cisco Systems, Cisco Systems Capital, the Cisco Systems logo, Cisco Unity, Collaboration Without Limitation, EtherFast, EtherSwitch, Event Center, Fast Step, Follow Me Browsing, FormShare, GigaDrive, HomeLink, Internet Quotient, IOS, iPhone, iQuick Study, IronPort, the IronPort logo, LightStream, Linksys, MediaTone, MeetingPlace, MeetingPlace Chime Sound, MGX, Networkers, Networking Academy, Network Registrar, PCNow, PIX, PowerPanels, ProConnect, ScriptShare, SenderBase, SMARTnet, Spectrum Expert, StackWise, The Fastest Way to Increase Your Internet Quotient, TransPath, WebEx, and the WebEx logo are registered trademarks of Cisco Systems, Inc. and/or its affiliates in the United States and certain other countries.
All other trademarks mentioned in this document or website are the property of their respective owners. The use of the word partner does not imply a partnership relationship between Cisco and any other company. (0812R)
Any Internet Protocol (IP) addresses used in this document are not intended to be actual addresses. Any examples, command display output, and figures included in the document are shown for illustrative purposes only. Any use of actual IP addresses in illustrative content is unintentional and coincidental.
© 2009 Cisco Systems, Inc. All rights reserved.
Уровень сложности
Простой
Время на прочтение
7 мин
Количество просмотров 6.5K
Введение
Добрый день дорогие читатели, в этой статье я хочу рассмотреть однин из основных способов логирования событий в cisco – syslog. Так же помимо него рассмотрим snmp traps, попробуем настроить «красивый» сбор логов на сервере linux. Журналирование syslog’а в cisco довольно старая и неудобная вещь, о чем пишут многие кто с ней работает. Различные недочеты и что с ними связно в этой статье рассматриваться не будут, только минимальные функции по настройке сервера и сетевых устройств.
Теория
Начнём с того, что все логирование происходит прямо у вас при настройке устройств, как пример при переходе из настройки конфигурации сетевого устройства в привилегированный режим у вас будет выведено сообщение на экран:
R1(config)#exit
R1#
May 10 22:25:56.133: %SYS-5-CONFIG_I: Configured from console by console
Этот способ называется console logging и он включен автоматом на сетевых устройствах cisco. Так же включен и buffered logging, который собирает все лог-сообщения в оперативную память, для их просмотра достаточно ввести команду “show logging”. Но не будем о простом логировании, наша главная задача рассмотреть основной способ для передачи сообщений на сторонний сервер или устройство, для этих мер подходит syslog и SNMP traps.
Syslog
При использовании syslog, необходимо понимать, что мы хотим передавать, для этого нам потребуется “Cisco Severity and Escalation Guidelines”, в котором расписан каждый уровень severity (серьезности) сообщений:
-
Alerts — Необходимо срочное вмешательство
-
Critical — Критические события
-
Errors — Сообщения об ошибках в работе маршрутизатора
-
Warning — Всевозможные предупреждения
-
Notifications — Различные важные уведомления
-
Informational — Информационные сообщения
-
Debugging — Отладочные сообщения
Для наглядности в тестовом стенде будет использоваться 7 и 5 уровень серьезности сообщений.
Так же, для удобства будем использовать протокол NTP, чтобы синхронизировать время отправки лог-сообщений между маршрутизаторами.
Во время приходящих сообщений на сервер syslog, он руководствуется специальными правилами и категориями для записи и сортировки в определенный файл. Стандартные категории syslog включают в себя: User — сообщения генерируемые процессами пользователя, Kern — сообщения генерируемые ядром, Mail — сообщения от почтовой системы, Daemon — сообщения генерируемые системными демонами, Auth — сообщения связанные с авторизацией пользователей, LPR — сообщения от системы печати, News — сообщения от сервера новостей, UUCP — зарезервировано за системой UUCP, Cron — сообщения полученные от cron.
Далее следуют так называемые “локали” или же категории (Local0 – Local7), зарезервированные для использования администратором системы.
SNMP
SNMP — используется для чтения/чтения и изменения данных с сетевых устройств, существует 4 версии: 1, 2, v2c, 3. Главное различие между версиями это безопасность. Начиная с 3 версии, snmp претерпел сильные изменения и даже его пакет выглядит иначе, чем на более ранних версиях. Подробнее можно прочитать на любой википедии.
SNMP traps — ловушка, которую устройство Cisco будет посылать на сторонний сервер SNMP сообщением для сбора событий происходящих на сетевом устройстве.
Практическая часть
Syslog

Наш тестовый стенд будет построен в GNS3 и состоять из: linux сервера, коммутатора и двух маршрутизаторов cisco. Прежде всего настроим NTP сервер для синхронизации времени между маршрутизатором и двумя коммутаторами. За отправное звено, или же за наш ntp сервер возьмем R1, укажем “stratum 1” для отправной точки синхронизации с остальными устройствами:
R1(config)#ntp master 1Далее на всех остальных устройствах укажем NTP сервер:
R2(config)#ntp server 11.10.10.1т.к алгоритм у протокола NTP не быстрый, то ждать синхронизации времени между сетевыми устройствами придется какое-то время. Для отслеживания состояния потребуется команда:
R2#show ntp associations
  address         ref clock       st   when   poll reach  delay  offset   disp
 ~11.10.10.1      .LOCL.           1     39     64     0  0.000   0.000 15937.
 * sys.peer, # selected, + candidate, - outlyer, x falseticker, ~ configured
Здесь NTP еще только синхронизируется, когда будет *~ ip address, то это будет означать полную синхронизацию между устройствами. Для отправки логов на наш сервер воспользуемся командой:
R1(config)#logging trap debugging
R1(config)#logging host 10.10.10.50 transport udp port 514
R1(config)#logging origin-id hostname
В данном случае мы перенаправляем все log сообщения на адрес нашего сервера, а также указываем порт – udp 514. Такие же команды мы введем на S1 и R2 разумеется, укажем статический маршрут в сторону нашей основной сети.
После успешного соединения с сервером сетевое устройство выведет уведомление:
*May 10 09:32:23.147: %SYS-6-LOGGINGHOST_STARTSTOP: Logging to host 10.10.10.50 port 514 started - CLI initiatedДалее переходим на наш linux сервер, в нем нам необходимо настроить сбор логов. Для успешной передачи udp, tcp пакета на linux сервере нам необходимо изменить rsyslog.conf, а именно убрать комментарии у четырех строк:
# provides UDP syslog reception
module(load="imudp")
input(type="imudp" port ="514")
# provides TCP syslog reception
module(load="imtcp")
input(type="imtcp" port ="514")
Далее нам нужно настроить файлы для логирования, предлагаю создавать для каждого сетевого устройства отдельную директорию под каждый файл:
$template dynFile, "/var/log/%HOSTNAME%/syslog.log"
*.*                                        ?dynFile
После перезапуска демона rsyslog.service у нас создаются отдельные директории с названием ip адреса сетевого устройства и файла. А именно:

На данном этапе настройка простого syslog сервера закончилась.
SNMP TRAPS
В тестовом стенде, который будет точно такой же, как и при настройке syslog, приведена в пример 3 версия snmp traps. В чем ее различие между всеми остальными?
В 3 версии добавили расширенную безопасность. Мы можем создавать учетные записи, профиля и группы, для которых можем прописать определенные правила. К этим правилам относиться режим чтения и записи на датчики, а также определение их доступности. В дальнейшем мы попробуем создать пользователя и будем передавать стандартный профиль (view), в котором есть уже какие-то доступные датчики. Так же в этой версии добавили аутентификацию пользователя и шифрования, у вас есть выбор какую из них использовать:
-
noAuthnoPriv — пароли передаются в открытом виде;
-
AuthnoPriv — проходит аутентификация, осуществляется с помощью алгоритмов криптографии;
-
AuthPriv — поддержка аутентификации и шифрования.
Как и говорилось выше, есть множество стандартных профилей, для того чтобы узнать какие из них есть и какая вам больше подходит используйте «show snmp view»
Теперь перейдем к настройке сетевых устройств, нам нужно включить сам snmp сервер и создать access-list, не забыв указать пароль, в режиме ro или rw в зависимости от ваших нужд.
R1(config)#access-list 1 permit host 10.10.10.50
R1(config)#snmp-server community cisco ro 1
R1(config)#snmp-server enable traps snmp
Стоит заметить, что snmp traps более гибок в настройке чем syslog, при включении можно указать в каком режиме эти сообщения будут подаваться:
R1(config)#snmp-server enable traps snmp authentication ?
  coldstart  Enable coldStart trap
  linkdown   Enable linkDown trap
  linkup     Enable linkUp trap
  warmstart  Enable warmStart trap
Выше была приведена настройка snmp сервера 2 версии, в дальнейшей настройки эти команды не потребуются, но для понимания работы snmp-server советую для начала поработать с v2c версией.
Следующим шагом нам нужно создать свой профиль, в который мы передаём или исключаем из него какие-то датчики. Так же создадим группу и передадим туда наш профиль:
R1(config)#snmp-server view EXAMPLE 1.3.6.1.4.1.9.2.1.56.0 included
R1(config)#snmp-server view EXAMPLE 1.3.6.1.2.1.2.2.1.8.0 included
R1(config)#snmp-server view EXAMPLE 1.3.6.1.2.1.1.3.0 included
R1(config)#snmp-server group EX v3 auth read EXAMPLE
Для тестового стенда я решил использовать стандартный профиль v1default, но никто не запрещает использовать вам свою группу, описанную выше, главное записать или исключить нужные датчики.
После создаём пользователя admin с шифрованием sha и паролем cisco123:
R1(config)#snmp-server user admin EX v3 auth sha cisco
R1(config)#snmp-server host 10.10.10.50 version 3 auth admin
Для проверки работоспособности советую воспользоваться snmpget на нашем linux сервере:
snmpget -u admin -l authNoPriv -a SHA -A cisco123 10.10.10.1 1.3.6.1.2.1.1.3.0
iso.3.6.1.2.1.1.3.0 = Timesticks: (71632) 0:11:56.32
Теперь переходим к настройке linux сервера, а именно изменим файл конфигурации snmp.conf расскоментируя одну строку “mibs :”

Далее нам нужно установить snmpd, snmptrap, snmptt. В snmpd нужно зайти в конфигурационный и изменить две строки, вместо локального подключения к демону разрешить любое подключение по 162 порту.
#agentaddress 127.0.0.1,[::1]
agentaddress udp:162, udp6:[::1]:162
Также необходима настройка и всех остальных утилит. Все они располагаются в директории «/etc/snmp/».
В snmptrapd.conf нам нужно создать пользователя и прописать traphandle:
authUser admin SHA cisco123
traphandle default snmptthandler
В snmptt.ini изменяем параметры:
mode = daemon
net_snmp_perl_enable = 1
unknown_trap_log_enable = 1
Теперь осталось только перезапустить snmpd и snmptt, чтобы применить изменения:
systemclt restart snmptrapd
systemclt restart snmptt
После отправки ловушки от сетевого устройства, наш сервер принимает пакет и записывает его в директорию /var/log/snmptt/
Для примера попробуем создать loopback 100 и выключить его:
R1(config)#int loopback 100
R1(config-if)#no shutdown
May 22 08:45:01.490: %LINK-3-UPDOWN: Interface Loopback100, changed state to up
May 22 08:45:02.489: %LINEPROTO-5-UPDOWN: Line protocol on Interface Loopback100  , changed state to up
R1(config-if)#shutdown
May 22 08:45:39.344: %LINK-5-CHANGED: Interface Loopback100, changed state to ad  ministratively down
May 22 08:45:40.344: %LINEPROTO-5-UPDOWN: Line protocol on Interface Loopback100  , changed state to down
На нашем сервере появился файл snmptt.log, в котором записаны наши действия:
Mon May 10 04:41:45 2023 .1.3.6.1.6.3.1.1.5.4 Normal "Status Events" UNKNOWN - Link up on interface
6. Admin state: Loopback100. Operational state: 24
Mon May 10 04:41:57 2023 .1.3.6.1.6.3.1.1.5.4 Normal "Status Events" UNKNOWN - Link down on interface
6. Admin state: Loopback100. Operational state: 24
На этом настройка простого snmptraps сервера окончена!
Заключение
В данной статье я постарался максимально просто рассмотреть настройку логирования на сервере и сетевых устройствах компании cisco. Из приятного и полезного оставляю читателю ссылки на более подробные настройки этих способов логирования, а так же некоторые полезные команды: syslog, snmptraps, snmptrap, snmptraps v3, NTP.
В следующей статье рассмотрим более глубокую настройку логирования aaa accounting на сетевых устройствах cisco.
Настройки логирования в роутерах iRZ
В любом сложном электронном устройстве необходима функциональность ведения журналов его работы (системных логов). Анализ записанных логов оказывает неоценимую помощь при диагностике сложных ситуаций.
В роутерах iRZ логи работы по умолчанию ведутся в буфере оперативной памяти, поэтому при перезагрузке устройства они полностью затираются. После старта устройства файлы логов и начинают записываться заново.
Эта особенность работы не позволяет диагностировать ситуации приведшие к перезагрузке устройства или его недоступности по внешним интерфейсам.
Для решения этого вопроса мы предлагаем настроить ведение системных логов на внешнюю, энергонезависимую память.
Запись логов на внутреннюю память роутера
Для данной настройки необходимо подключиться к консоли роутера через протоколы Telnet или SSH и произвести необходимые манипуляции с настройками роутера.
Для внесения изменений ведения лог-файла необходимо отредактировать файл /etc/config/system.
В базовой настройке это можно сделать с помощью текстового редактора vi. Если же вы привыкли к другому текстовому редактору, то его можно поискать в репозиториях и установить с помощью менеджера пакетов — opkg.
opkg update; opkg install nano #установка текстового редактора nano
А вот пример того выглядит файл system:
root@iRZ-Router:~# cat /etc/config/system
config system
option hostname 'iRZ-Router'
option timezone 'GMT'
option log_size '128'
option enable_telnet '1'
option telnet_port '23'
config timeserver 'ntp'
list server '0.openwrt.pool.ntp.org'
list server '1.openwrt.pool.ntp.org'
list server '2.openwrt.pool.ntp.org'
list server '3.openwrt.pool.ntp.org'
option enabled '1'
option enable_server '0'
В выводе данного файла присутствует два блока информации из которых нас интересует первый — config system.
Строка option log_size ‘128’ отвечает за размер файла (измеряется в килобайтах). Для того чтобы писать лог не в буфер оперативной памяти, а в файл, необходимо добавить строку в конце данного блока данных:
option log_file '/opt/log.txt'
В роутере есть не затираемая область памяти. Она которая монтируется в папку /opt. Мы предлагаем записывать лог-файл log.txt именно в неё.
При изменении размера файла логов следует учитывать размеры свободного пространства в данной области памяти. Количество свободной памяти можно узнать по команде:
root@iRZ-Router:~# df -h
Filesystem                Size      Used    Available   Use%     Mounted on
rootfs                   69.1M      6.9M     58.6M              11%          /
/dev/root                13.3M     13.3M         0          100%             /rom
tmpfs                    60.9M    160.0K     60.8M              0%          /tmp
/dev/ubi0_2              69.1M      6.9M     58.6M              11%             /overlay
overlayfs:/overlay       69.1M      6.9M     58.6M              11%             /
tmpfs                   512.0K         0    512.0K              0%          /dev
/dev/ubi1_0              25.3M    812.0K     23.2M               3%           /opt
Это вывод с роутера серии R4 и для других серий будет выглядеть по другому. В данном случае мы видим что в разделе памяти, смонтированной в папку /opt , свободно 23 мегабайта.
Следует учесть ещё одну особенность ведения логов на роутере: при записи логов в файл, роутер при достижении граничного размера файла, указанного в настройках, перезапишет этот файл в файл с расширением .old.
То есть если вы пишете в файл /opt/log.txt, то в этой папке появится второй файл — /opt/log.txt.old максимального размера, указанного в настройках. Таким образом эти два файла /opt/log.txt и /opt/log.txt.old будут максимум того размера, что вы укажете в настройках. Они будут циклически перезаписываться по мере накопления логов.
Итоговый файл настроек для записи логов во внутреннюю память роутера должен выглядеть приблизительно так:
config system
option hostname 'iRZ-Router'
option timezone 'GMT'
option log_size '1024'
option enable_telnet '1'
option telnet_port '23'
option log_file '/opt/log.txt'
config timeserver 'ntp'
list server '0.openwrt.pool.ntp.org'
list server '1.openwrt.pool.ntp.org'
list server '2.openwrt.pool.ntp.org'
list server '3.openwrt.pool.ntp.org'
option enabled '1'
option enable_server '0'
После внесения данных изменений необходимо сделать рестарт служб командами:
/etc/init.d/log restart /etc/init.d/system restart
Запись логов на внешние накопители
К роутерам серии R4 и R2 можно подключить внешние накопители. К роутерам серии R4 можно подключить USB flash-накопитель, а к роутерам серии R2 — microSD карту.
В случае записи логов на внешние накопители необходимо проделать все те же манипуляции с настройками что и в предыдущем пункте данного руководства с одним отличием — путь куда записывать файлы логов будет отличаться.
Чтобы понять как будет смонтирован ваш внешний накопитель необходимо подключиться к консоли роутера и выполнить команду:
mount
пример вывода команды для роутеров серии R4
root@iRZ-Router:~# mount
rootfs on / type rootfs (rw)
/dev/root on /rom type squashfs (ro,relatime)
proc on /proc type proc (rw,nosuid,nodev,noexec,noatime)
sysfs on /sys type sysfs (rw,nosuid,nodev,noexec,noatime)
tmpfs on /tmp type tmpfs (rw,nosuid,nodev,noatime)
/dev/ubi0_2 on /overlay type ubifs (rw,noatime)
overlayfs:/overlay on / type overlay (rw,noatime,lowerdir=/,upperdir=/overlay/upper,workdir=/overlay/work)
tmpfs on /dev type tmpfs (rw,nosuid,relatime,size=512k,mode=755)
devpts on /dev/pts type devpts (rw,nosuid,noexec,relatime,mode=600)
debugfs on /sys/kernel/debug type debugfs (rw,noatime)
/dev/ubi1_0 on /opt type ubifs (rw,relatime)
mountd(pid3156) on /tmp/run/mountd type autofs (rw,relatime,fd=5,pgrp=3152,timeout=60,minproto=5,maxproto=5,indirect)
**/dev/sda1 on** **/tmp/run/mountd/sda1** type vfat (rw,relatime,uid=1000,gid=1000,fmask=0022,dmask=0022,codepage=437,iocharset=iso8859-,shortname=mixed,errors=remount-ro)
пример вывода команды для роутеров серии R2
root@iRZ-Router:~# mount
rootfs on / type rootfs (rw)
/dev/root on /rom type squashfs (ro,relatime)
proc on /proc type proc (rw,nosuid,nodev,noexec,noatime)
sysfs on /sys type sysfs (rw,nosuid,nodev,noexec,noatime)
tmpfs on /tmp type tmpfs (rw,nosuid,nodev,noatime)
/dev/mtdblock6 on /overlay type jffs2 (rw,noatime)
overlayfs:/overlay on / type overlay (rw,noatime,lowerdir=/,upperdir=/overlay/upper,workdir=/overlay/work)
tmpfs on /dev type tmpfs (rw,nosuid,relatime,size=512k,mode=755)
devpts on /dev/pts type devpts (rw,nosuid,noexec,relatime,mode=600)
debugfs on /sys/kernel/debug type debugfs (rw,noatime)
/dev/mtdblock7 on /opt type jffs2 (rw,relatime)
**/dev/mmcblk0p1 on /mnt/mmcblk0p1** type vfat (rw,relatime,fmask=0000,dmask=0000,allow_utime=0022,codepage=437,iocharset=iso8859-1,shortname=mixed,errors=remount-ro)
В последней строке данных вывода будет искомый внешний накопитель и то путь монтирования.
Следовательно в пункте option log_file (см. предыдущий раздел), необходимо указать путь до файла в соответствии с теми данными, которые вы получите из вывода команды mount.
Пример для роутер серии R4:
option log_file '/tmp/run/mountd/sda1/log.txt'
Пример для роутера серии R2:
option log_file '/mnt/mmcblk0p1/log.txt'
Ведение логов на удалённый сервер
Во всех сериях роутеров есть возможность отправки логов работы на удалённый сервер по протоколу Syslog. Данная настройка находится в меню Tools => System log. Описание данного пункта есть в документации к роутерам — Руководство пользователя по настройке роутеров iRZ.
Протокол Syslog — это стандарт отправки и регистрации сообщений о происходящих в системе событиях и используется на всех операционных системах. Так как это стандарт, то серверов для данного протокола очень много для всех операционных систем.
Установить и настроить такой сервер не сложно. Достаточно почитать инструкции к выбранному серверу и указать в настройках роутера внешний IP адрес вашего сервера. В рамках этой статьи мы не хотим подробно углубляться в процесс настройки сервера сбора логов, но приведём небольшой пример.
Пример на базе opensource проекта Visual Syslog Server for Windows.
Вот домашняя страница данного проекта на русском языке: https://github.com/MaxBelkov/visualsyslog/blob/master/readme_rus.md.
С данной страницы скачиваем стабильную версию сервера в zip архиве на хост машину, которая будет собирать логи с роутера. Установка заключается в разархивировании архива и запуске исполняемого файла. Установка не вызывает никаких проблем, достаточно везде нажать кнопки далее и готово.
Далее цитата со страницы проекта:
После установки Visual Syslog Сервер для Windows сразу готов к работе: настройка не требуется. По умолчанию ожидает сообщений на портах 514 UDP и 514 TCP. Программа установки добавляет исключения брандмауэра для Visual Syslog Сервер.
Далее необходимо включить необходимую функциональность на самом роутере. Это делается в разделе Tools => System Log. Следуя документации, приведённой выше, нужно включить ведение удаленного логирования и вписать IP адрес хост машины на которой вы запустили Visual Syslog Server.
Пример приведён на рисунке ниже:
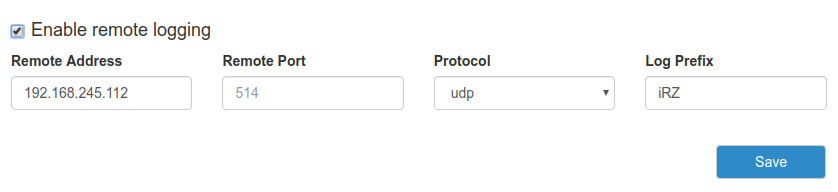
Поле Prefix необходимо для маркировки сообщений от данного роутера в Visual Syslog Server. Это сделано на для случаев когда данный сервер собирает данные с нескольких устройств и для вывода логов по каждому устройству отдельно на основе данных префиксов.
После вышеописанных шагов в окне сервера логов вы сразу увидите те сообщения которые поступят с роутера после включения функции логирования:


Диагностика неисправностей то ещё занятие. Но всякий, кто изучил данную практику, может ничего не бояться. Поиск и устранение требуют глубокие знания, но выработанный навык много стоит. Компания Mikrotik имеет большое количество инструментов диагностики сети (Troubleshooting), как для проводных, так и WiFi. В данной статье рассмотрим наиболее часто используемые для проводных сетей. Конфигурация будет использоваться самая домашняя на RouterOS 6 47.4.
Если вы хотите углубить свои знания по работе с роутерами MikroTik, то наша команда рекомендует пройти курсы которые сделаны на основе MikroTik Certified Network Associate и расширены автором на основе опыта . Подробно читайте ниже.
Содержание
- Torch
- IP Scan
- Cable Test
- Log
- Traceroute
- Ping
- ARP
- Connections
- Passthrough
- Sniffer
- Profile
- Bandwidth Test
- 89 вопросов по настройке MikroTik
Torch позволяет просматривать трафик на интерфейсах в реальном времени.

В качестве примера, я запущу с рабочей станции ping на 8.8.8.8. Скриншот ниже демонстрирует всех, кто отправляет эхо запросы на 8.8.8.8. Для удобства вывода я отключил IPv6. Так же выбрал основной бридж, т.к. мне нужно понять, кто из локальной сети отправляет и нажал Start. Статус Running в скобках, говорит о том, что идёт прослушка трафика.

Теперь давайте взглянем на какой IP адрес роутера, нам отвечает Google, поменяв местами SRC и DST, а также выберем внешний интерфейс.
Из дополнительного, вы можете просмотреть какая метка VLAN бегает внутри кадра.

Вы можете жёстко задать Src. Address. Посмотрим, куда лезет мой телефон, если я открою YouTube.

Открыть данную утилиту можно в контекстном меню любого из интерфейсов. Есть возможность использовать в консольном режиме.

IP Scan
Маленькая утилита, позволит узнать, какая подсеть/подсети или адреса видны на определённых интерфейсах.
Попробуем выяснить, что живёт на провайдером интерфейсе самого крупного оператора нашей страны.
Если вы хотите просканировать определённую подсеть, то можете ее указать в Address Range.

Как только я получил данный адрес, мой порт тут отключился. Позвонив в ТП, меня уверяли, что никаких блокировок на порту нет и т.д. и т.п. Оператор утверждала, что проблема в обрыве кабеля. Давайте проверим кабель.
Cable Test
Да, Mikrotik умеет диагностировать разрыв физической линии с помощью утилиты Cable Test, причём довольно точно. После разговора с оператором, я запустил данную утилиту. Картина интересна, по трём парам 94 метра, а по одной 98, и все они разорваны на одинаковом расстоянии от меня.

Полагаю, что оператор был не прав (оно и очевидно), т.к. мой линк снова загорелся, спустя 5 минут.
Будьте осторожны, подобные ситуации, могут быть и у вас.
Log
Логирование основных действий пишется в ОЗУ и хранится до перезагрузки устройства. Вот тут, помимо засвеченных маков, можно увидеть, что WAN интерфейс поднялся и через 40 секунд отключился основной провайдерский линк.

Вы можете детализировать отображаемую информацию через System – Logging. На примере ниже, я добавил хранение в ОЗУ всех DNS запросов. Лог сразу же стал быстро заполняться и пролистываться.
Для приостановки автопролистывания есть кнопка Freeze, она замораживает автоскролинг.

В Actions, вы можете настроить отправку логов на удалённый Syslog Server, или хранить их локально на диске.

Не сложными манипуляциями возможно сделать debug определённых служб, допустим DHCP.

Берите на вооружение, очень полезная штука.
Traceroute
Tools — Traceroute
Графическая утилита, для определения количества хопов по пути. Фишка ее в том, что она постоянно будет рисовать потери, историю и время до хопа.

Вы можете указать максимальное количество прыжков, исходящий адрес, таблицу маршрутизации, интерфейс и размер пакета.
Ping
Tools — Ping
Простенькая тулза, с дополнительными фишками по аналогии с Traceroute. Позволяет сделать пинг на L2 – ARP-Ping. Для этого нужно выбрать интерфейс. На скриншоте видно стабильное время отклика до моего ноутбука, подключённого через WiFi.

ARP
IP – ARP-List
Таблица ARP адресов доступна на просмотр соответствий. Можно создать постоянную запись соответствия IP к MAC.

Connections
Если ваш роутер, настроен на преобразование адресов, или по-русски, есть хотя бы одно правило NAT, то включается тот самый Connection Tracker. С помощью его фильтров, можно просматривать состояние соединений.
Открываем IP – Firewall – Connections, нажимаем на фильтр:
Я хочу просмотреть все соединения с 192.168.10.51
![]()
Тут можно увидеть новые, устоявшиеся и любые другие соединения. В колонке Connection Mark отображается метки пакетов – удобно диагностировать при Dual WAN.
Passthrough
Очень полезная функция, которая ничего не делает.
Допустим, вы хотите заблокировать определённый порт на входящем или проходящем трафике, но переживаете что-то поломать.
Открываем IP – Firewall и создаём правило:
Если входящий трафик с 192.168.10.51 по протоколу ICMP…

… Action – passthrough

Теперь данное правило ставим выше, предполагаемого блокируемого.
Отправляю эхо-запрос и вижу, что счётчик Bytes и Packets – тикнули. Улавливаете?

Т.е. если есть пакет, подходящий под это правило, мы ничего не делаем, ну кроме тика счётчика. Данная штука так же работает и для маркировки (Mangle). Главное двигайте его правильно.
Sniffer
Ещё одна полезная фикция в микротик находится Tools – Packet Sniffer позволяет захватывать и анализировать трафик. Доступны разные фильтры.

Сохранять дамп на диск указав максимальный его размер в File Limit. Memory Limit указывает на объем занимаемый в ОЗУ самого снифера.

Так же увидеть направление пакетов, протокол, размер в Packets. И дополнительную информацию в Connections, Hosts, Protocols.

Есть возможность передачи прослушанного трафика на удалённый сервер. Для этих целей подойдёт Wireshark на вашем ПК или ноутбуке.

Доступен так же в CLI. Можно просмотреть входящий/исходящий трафик по определённым портам, очень удобно при диагностировании блокировки L2TP/IPSEC со стороны провайдера, указав их через запятую. Стрелочки, отображают направление.

Profile
Просмотреть нагрузку на само устройство можно через Profile. У ребят, которые не закрывают DNS снаружи, колонка Usage будет в 100%. Есть возможность фильтрации по ядрам.

Bandwidth Test
Bandwidth Test Клиент-серверная утилита созданная компанией mikrotik, позволяет проверить скорость соединения между устройствами по протоколу UDP (порт 2000). Достаточно сильно нагружает процессор на больших скоростях иди маленьких ЦП. Есть инструмент для скачивания на Windows, а также общедоступные сервера в интернете. Доступен в меню Tools.

Кнопкой enable включаем инструмент. Галочка Authenticate разрешает аутентифицироваться под пользователем RouterOS (System – Users).

Так же есть встроенная версия клиента. Вы можете замерить скорость как по UDP так и по TCP. Выбрать направления (Direction), приём, передача или сразу оба. Задать логин и пароль для аутентификации на уделённой стороне.

В самом низу представлен удобный график. Можете мерить скорости внутри VPN или LAN, между мостами и офисами или промежуточных узлов.
89 вопросов по настройке MikroTik
Вы хорошо разбираетесь в Микротиках? Или впервые недавно столкнулись с этим оборудованием и не знаете, с какой стороны к нему подступиться? В обоих случаях вы найдёте для себя полезную информацию в курсе «Настройка оборудования MikroTik». 162 видеоурока, большая лабораторная работа и 89 вопросов, на каждый из которых вы будете знать ответ. Подробности и доступ к началу курса бесплатно тут.
![]()
Applies to RouterOS: v3, v4 +
Summary
RouterOS is capable of logging various system events and status information. Logs can be saved in routers memory (RAM), disk, file, sent by email or even sent to remote syslog server (RFC 3164).
Log messages
Sub-menu level: /log
All messages stored in routers local memory can be printed from /log menu. Each entry contains time and date when event occurred, topics that this message belongs to and message itself.
[admin@ZalaisKapots] /log> print
jan/02/1970 02:00:09 system,info router rebooted
sep/15 09:54:33 system,info,account user admin logged in from 10.1.101.212 via winbox
sep/15 12:33:18 system,info item added by admin
sep/15 12:34:26 system,info mangle rule added by admin
sep/15 12:34:29 system,info mangle rule moved by admin
sep/15 12:35:34 system,info mangle rule changed by admin
sep/15 12:42:14 system,info,account user admin logged in from 10.1.101.212 via telnet
sep/15 12:42:55 system,info,account user admin logged out from 10.1.101.212 via telnet
01:01:58 firewall,info input: in:ether1 out:(none), src-mac 00:21:29:6d:82:07, proto UDP,
                          10.1.101.1:520->10.1.101.255:520, len 452
If logs are printed at the same date when log entry was added, then only time will be shown. In example above you can see that second message was added on sep/15 current year (year is not added) and the last message was added today so only the time is displayed.
![]()
Note: print command accepts several parameters that allows to detect new log entries, print only necessary messages and so on. For more information about parameters refer to scripting manual
For example following command will print all log messages where one of the topics is info and will detect new log entries until Ctrl+C is pressed
[admin@ZalaisKapots] /log > print follow where topics~".info"
12:52:24 script,info hello from script
-- Ctrl-C to quit.
If print is in follow mode you can hit ‘space’ on keyboard to insert separator:
[admin@ZalaisKapots] /log > print follow where topics~".info"
12:52:24 script,info hello from script

 = = =   = = =   = = =      = = =   = = =   = = =      = = =   = = =   = = =

-- Ctrl-C to quit.
Logging configuration
Sub-menu level: /system logging
| Property | Description |
|---|---|
| action (name; Default: memory) | specifies one of the system default actions or user specified action listed in actions menu |
| prefix (string; Default: ) | prefix added at the beginning of log messages |
| topics (account, bfd, caps, ddns, dns, error, gsm, info, iscsi, l2tp, manager, ntp, packet, pppoe, radvd, rip, script, smb, sstp, system, timer, vrrp, web-proxy, async, bgp, certificate, debug, dot1x, dude, event, hotspot, interface, isdn, ldp, mme, ospf, pim, pptp, raw, route, sertcp, snmp, state, telephony, upnp, warning, wireless, backup, calc, critical, dhcp, e-mail, firewall, igmp-proxy, ipsec, kvm, lte, mpls, ovpn, ppp, radius, read, rsvp, simulator, ssh, store, tftp, ups, watchdog, write; Default: info) | log all messages that falls into specified topic or list of topics.
‘!’ character can be used before topic to exclude messages falling under this topic. For example, we want to log NTP debug info without too much details:
|
Actions
Sub-menu level: /system logging action
| Property | Description |
|---|---|
| bsd-syslog (yes|no; Default: ) | whether to use bsd-syslog as defined in RFC 3164 |
| disk-file-count (integer [1..65535]; Default: 2) | specifies number of files used to store log messages, applicable only if action=disk |
| disk-file-name (string; Default: log) | name of the file used to store log messages, applicable only if action=disk |
| disk-lines-per-file (integer [1..65535]; Default: 100) | specifies maximum size of file in lines, applicable only if action=disk |
| disk-stop-on-full (yes|no; Default: no) | whether to stop to save log messages to disk after the specified disk-lines-per-file and disk-file-count number is reached, applicable only if action=disk |
| email-start-tls (yes | no; Default: no) | Whether to use tls when sending email, applicable only if action=email |
| email-to (string; Default: ) | email address where logs are sent, applicable only if action=email |
| memory-lines (integer [1..65535]; Default: 100) | number of records in local memory buffer, applicable only if action=memory |
| memory-stop-on-full (yes|no; Default: no) | whether to stop to save log messages in local buffer after the specified memory-lines number is reached |
| name (string; Default: ) | name of an action |
| remember (yes|no; Default: ) | whether to keep log messages, which have not yet been displayed in console, applicable if action=echo |
| remote (IP/IPv6 Address[:Port]; Default: 0.0.0.0:514) | remote logging server’s IP/IPv6 address and UDP port, applicable if action=remote |
| src-address (IP address; Default: 0.0.0.0) | source address used when sending packets to remote server |
| syslog-facility (auth, authpriv, cron, daemon, ftp, kern, local0, local1, local2, local3, local4, local5, local6, local7, lpr, mail, news, ntp, syslog, user, uucp; Default: daemon) | |
| syslog-severity (alert, auto, critical, debug, emergency, error, info, notice, warning; Default: auto) | Severity level indicator defined in RFC 3164:
|
| target (disk, echo, email, memory, remote; Default: memory) | storage facility or target of log messages
|
![]()
Note: default actions can not be deleted or renamed.
Topics
Each log entry have topic which describes the origin of log message. There can be more than one topic assigned to log message. For example, OSPF debug logs have four different topics: route, ospf, debug and raw.
11:11:43 route,ospf,debug SEND: Hello Packet 10.255.255.1 -> 224.0.0.5 on lo0
11:11:43 route,ospf,debug,raw PACKET:
11:11:43 route,ospf,debug,raw     02 01 00 2C 0A FF FF 03 00 00 00 00 E7 9B 00 00
11:11:43 route,ospf,debug,raw     00 00 00 00 00 00 00 00 FF FF FF FF 00 0A 02 01
11:11:43 route,ospf,debug,raw     00 00 00 28 0A FF FF 01 00 00 00 00
List of Facility independent topics
| Topic | Description |
|---|---|
| critical | Log entries marked as critical, these log entries are printed to console each time you log in. |
| debug | Debug log entries |
| error | Error messages |
| info | Informative log entry |
| packet | Log entry that shows contents from received/sent packet |
| raw | Log entry that shows raw contents of received/sent packet |
| warning | Warning message. |
Topics used by various RouterOS facilities
| Topic | Description |
|---|---|
| account | Log messages generated by accounting facility. |
| async | Log messages generated by asynchronous devices |
| backup | Log messages generated by backup creation facility. |
| bfd | Log messages generated by Manual:Routing/BFD protocol |
| bgp | Log messages generated by Manual:Routing/BGP protocol |
| calc | Routing calculation log messages. |
| caps | CAPsMAN wireless device management |
| certificate | Security certificate |
| dns | Name server lookup related information |
| ddns | Log messages generated by Manual:Tools/Dynamic DNS tool |
| dude | Messages related to the Dude server package Manual:The_Dude tool |
| dhcp | DHCP client, server and relay log messages |
| Messages generated by Manual:Tools/email tool. | |
| event | Log message generated at routing event. For example, new route have been installed in routing table. |
| firewall | Firewall log messages generated when action=log is set in firewall rule |
| gsm | Log messages generated by GSM devices |
| hotspot | Hotspot related log entries |
| igmp-proxy | IGMP Proxy related log entries |
| ipsec | IPSec log entries |
| iscsi | |
| isdn | |
| interface | |
| kvm | Messages related to the KVM virtual machine functionality |
| l2tp | Log entries generated by Manual:Interface/L2TP client and server |
| lte | Messasges related to the LTE/4G modem configuration |
| ldp | Manual:MPLS/LDP protocol related messages |
| manager | Manual:User_Manager log messages. |
| mme | MME routing protocol messages |
| mpls | MPLS messages |
| ntp | sNTP client generated log entries |
| ospf | Manual:Routing/OSPF routing protocol messages |
| ovpn | OpenVPN tunnel messages |
| pim | Multicast PIM-SM related messages |
| ppp | ppp facility messages |
| pppoe | PPPoE server/client related messages |
| pptp | PPTP server/client related messages |
| radius | Log entries generated by RADIUS Client |
| radvd | IPv6 radv deamon log messages. |
| read | SMS tool messages |
| rip | RIP routing protocol messages |
| route | Routing facility log entries |
| rsvp | Resource Reservation Protocol generated messages. |
| script | Log entries generated from scripts |
| sertcp | Log messages related to facility responsible for «/ports remote-access» |
| simulator | |
| state | DHCP Client and routing state messages. |
| store | Log entries generated by Store facility |
| smb | Messages related to the SMB file sharing system |
| snmp | Messages related to Simple network management protocol (SNMP) configuration |
| system | Generic system messages |
| telephony | Obsolete! Previously used by the IP telephony package |
| tftp | TFTP server generated messages |
| timer | Log messages that are related to timers used in RouterOS. For example bgp keepalive logs
12:41:40 route,bgp,debug,timer KeepaliveTimer expired 12:41:40 route,bgp,debug,timer RemoteAddress=2001:470:1f09:131::1 |
| ups | Messages generated by UPS monitoring tool |
| vrrp | Messages generated VRRP |
| watchdog | Watchdog generated log entries |
| web-proxy | Log messages generated by web proxy |
| wireless | M:Interface/Wireless log entries. |
| write | SMS tool messages. |
Logging to file
To log everything to file, add new log action:
/system logging action add name=file target=disk disk-file-name=log
and then make everything log using this new action:
/system logging add action=file
You can log only errors there by issuing command:
/system logging add topics=error action=file
This will log into files log.0.txt and log.1.txt.
You can specify maximum size of file in lines by specifying disk-lines-per-file. <file>.0.txt is active file were new logs are going to be appended and once it size will reach maximum it will become <file>.1.txt, and new empty <file>.0.txt will be created.
You can log into USB flashes or into MicroSD/CF (on Routerboards) by specifying it’s directory name before file name. For example, if you have accessible usb flash as usb1 directory under /files, you should issue following command:
/system logging action add name=usb target=disk disk-file-name=usb1/log
![]()
Note: Logging entries from files will be stored back in the memory after reboot.
Examples
Webproxy logging
These two screenshots will show you how to configure the RouterOS logging facility to send Webrpoxy logs to a remote syslog server, in this example, located at 192.168.100.12. The syslog server can be any software that supports receiving syslogs, for example Kiwi syslog.
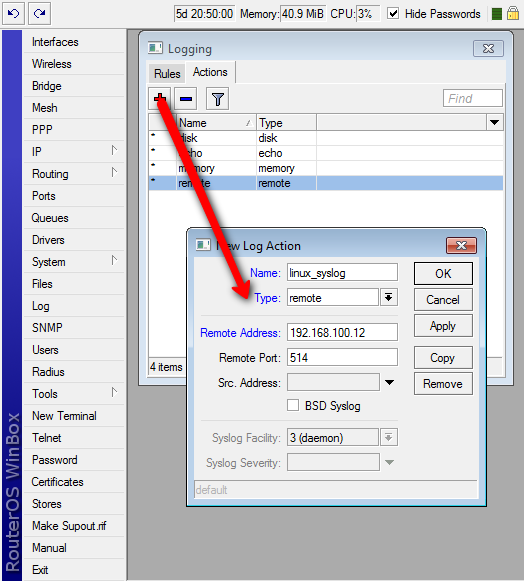
Add a new logging action, with «remote» and the IP of the remote server. Call it whatever you like
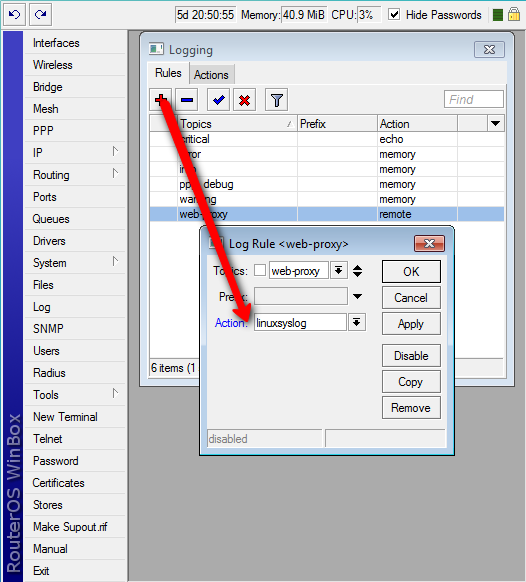
Then add a new logging rule with the topic «webproxy» and then newly created action. Note that you must have webproxy running on this router already, for this to work. To test, you can temporary change the action to «memory» and see the «log» window if the webproxy visited websites are logged. If it works, change it back to your new remote action
Note: it’s a good idea to add another topic in the same rule: !debug. This would be to ensure you don’t get any debug stuff, only the visited sites.
Rsyslog
It is possible to send all logs to a remote syslog server, one example of a syslog server is Rsyslog. Below you can find configuration example that is relevant to RouterOS:
/system logging action
set [find name=remote] remote=10.0.0.1
/system logging
add action=remote topics=info
add action=remote topics=critical
add action=remote topics=error
add action=remote topics=warning
With this configuration all logs will be present on the device and on the remote syslog server. Below you can find configuration lines that are relevant to a Rsyslog server (only lines that should be changed from the default values):
#/etc/rsyslog.conf
$ModLoad imudp
$UDPServerAddress 10.0.0.1
$UDPServerRun 514
$AllowedSender UDP, 10.0.0.0/24 127.0.0.1

$template Router1Log, "/var/log/MikroTik/router1.log"
:fromhost-ip, isequal, "10.0.0.2" -?Router1Log
& stop
For security reasons you should only allow Rsyslog to listen to a certain address, this limits the instance to a single interface. You should also specify only certain IP addresses that are allowed to send their logs to the particular syslog server.
![]()
Note: Never rely on a single security measure, you should also implement proper Firewall on the machine running Rsyslog, to limit access to the server.